

Page 1

1
Audiofier SEQUI2R EX User Manual
December 2016
The information in this manual is subject to change without notice.. The software described by this document may
not be copied to other media. All trademarks are the property of their respective owners and use of them does not
imply any affiliation with or endorsement by them.
AUDIOFIER SEQUI2R EX User Manual
Page 2

Table of Contents
Welcome to SEQUI2R EX
Audiofier EULA
SEQUI2R EX System Requirements
Tutorials on the web
Installation
Snapshot loading workaround.
Minimizing loading time
FOR WINDOWS 10 USERS ONLY
FOR THE OWNERS OF SEQUI2R 1.2
Getting started
Very important considerations before using SEQuiR
2
User Interface: SEQUI2R EX Main Page
Responsive Keyswitches layers.
Fixed Key-switches:
Variable Key Switches:
Special functions Keyswitches
Sound ranges.
Sound Menus Panel:
The menu functionality.
Up and Down Arrows.
Sound Panels:
Main Buttons page:
EQ Buttons page:
Env Buttons page:
Sub Sound Sources layer page
Sequences Selectors:
Operations Buttons:
The Key/Scale Controls Panel:
More features in the Key/Scale Controls Panel.
Save User Function
Import Key/Scale Function
User Presets Slots
Sequencer Panel:
Group Panel:
AUDIOFIER SEQUI2R EX User Manual
Page 3

Sequence Displays Panel:
Special Sequencer Functions Panel
Single group allow per step.
Stutter/ Ornament functions.
Reverse Notes per Step.
Random Notes per Step.
Portamento
Bottom Panel:
Smart Legato Phrasing Function
Randomisation Engine
User Interface: Options Page
Recording workflow
Notes only recording:
Advanced recording:
Recording maintaining Step-fx values:
Recording from position:
3
Editing
Notes pitch editing:
Manual Step Effects Values Editing:
Choke and Bend editing:
Editing by drawing:
Editing using the Browser:
Editing with Copy and Paste:
Playback
SEQUI2R EX as a rompler/synth:
SEQUI2R EX as a phrase repeater:
Playing tips:
Optional Start:
Legato playing mode:
The System Page
Start Options Matrix:
Scale Options Matrix
Troubleshooting
AUDIOFIER SEQUI2R EX User Manual
Page 4

4
AUDIOFIER SEQUI2R EX User Manual
Page 5

5
Welcome to SEQUI2R EX
Thank you for buying SEQUI2R EX!
The focus of SEQUI2R EX is to provide a new way of creating sequences, without being bound
to a arpeggiator type of workflow. SEQUI2R EX enables the user to record and perform custom
phrases, which are altered by SEQUI2R EX engine in order to follow the composition’s chords
progression. But it does not end here. As you’ll see there are many applications for SEQUI2R
EX. So please, read on, as, even though the user interface is not overly complicated and does
not comprise many different pages, a few important feature might not be apparent on the GUI at
a first glance.
Audiofier EULA
BY DOWNLOADING AND INSTALLING SEQUI2R EX YOU AGREE TO THE FOLLOWING:
SEQUI2R EX library is licensed, not sold to you. This license is personal and non-transferrable.
YOU MAY use SEQUI2R EX in your own compositions (including library music) and/or
commercial work for clients/media, without any restrictions or additional fees.
YOU MAY install SEQUI2R EX on multiple computers of yours, as long as you are using the
library and you are not sharing/giving/lending your license with others.
YOU MAY NOT make copies of this library, as a whole or in part, with the intent to re-distribute,
sell or give them away - this includes making available any of the content on a network, e.g.
through internet file sharing services or pirate sites.
YOU MAY NOT re-use or re-package any of SEQUI2R EX content in another virtual instrument
or sample library.
Installing the SEQUI2R EX library implies that you agree to the above terms and conditions. ©
2016
AUDIOFIER SEQUI2R EX User Manual
Page 6

6
SEQUI2R EX System Requirements
To install SEQUI2R EX you need at least 5GB of hard disk space (over 10GB uncompressed).
While a fast hard drive is required, a solid state drive is highly recommended in a fast computer,
due to SEQUI2R EX’s high number of samples and demanding CPU engine.
SEQUI2R EX requires the retail Native Instruments Kontakt 5.5. SEQUI2R EX will not work with
Kontakt Player. You will need an extraction utility to unpack the .rar or .zip archives (whichever
you received). This library is intended for use with MIDI controller keyboards - ideally with 76
keys. Due to the layout of SEQUI2R EX it is recommended to have a few MIDI controllers
(sliders or knobs) available, to take fully advantage of SEQUI2R EX capabilities.
MAC RECOMMENDED SYSTEM
● Mac Pro Quad-Core Intel Xeon 2.66GHz or higher
● 16GB RAM or more
● Mac OSX 10.7 or later
● SSD (Solid State Drive)
● NI Kontakt 5.5
PC RECOMMENDED SYSTEM
● Intel Core 2 Quad, or AMD Quad Core 2.66GHz or higher
● 16GB RAM or more
● 64-bit Windows/Host Sequencer
● Sound card with ASIO drivers
● SSD (Solid State Drive)
● NI Kontakt 5.5
AUDIOFIER SEQUI2R EX User Manual
Page 7

7
Tutorials on the web
Please check Audiofier YouTube channel for video tutorials. Since SEQui2R EX is the latest
version of SEQui2R family, you can learn from older videos of SEQui2R, SEQui2R 1.1,
SEQui2R 1.2. Bear in mind that since the following videos are in chronological order, you might
find some of the explained methods or functionality outdated in the earlier videos and then up to
date on later videos.
Audiofier YouTube Channel:
lhttps://www.youtube.com/channel/UC2Nk5CLZO4jlLdGtvD9Sopg
SEQui2R - In-depth Tutorial:
https://www.youtube.com/watch?v=27DonIAZjFs
SEQui2R Tutorial Bits: Getting started:
https://www.youtube.com/watch?v=lMGdbrsBZac
SEQui2R Tutorial Bits: Patch and Phrases Creation:
https://www.youtube.com/watch?v=OfooRqYyCZE
SEQui2R 1.1 Update - New Features Walkthrough:
https://www.youtube.com/watch?v=Hs7TkfP5GBU&t=2s
SEQui2R 1.2 Update - New Features Walkthrough:
https://www.youtube.com/watch?v=XaHf1UIRQfo
SEQui2R EX - Overview:
https://www.youtube.com/watch?v=zVVFsa41A4s&t=23s
AUDIOFIER SEQUI2R EX User Manual
Page 8

8
Do not copy the folder “Snapshots” but only the folder named “SEQui2R” into
the path above.
Installation
Locate your downloaded file and use a zip extraction utility to uncompress SEQui2R EX.
SEQui2R EX makes use of Kontakt’s snapshots feature. Please refer to Kontakt’s user manual
to learn how to load and save snapshots. To install SEQui2R EX factory’s snapshots, copy
SEQui2R EX folder (located inside Snaphots folder) to:
▪ On Mac OS X: Macintosh HD/Users/Your Name/Documents/Native Instruments/User Con-
tent/Kontakt/
▪ On Windows:C:\Users\Your Name\My Documents\Native Instruments\User Content\Kontakt/
Failing to do so will result in the incapacity of loading SEQui2R factory patches. While this may
be a big handicap, this library can still be used without them, but the user will have to create his
own patches/snapshots from scratch.
Snapshot loading workaround.
Note: In some PC configurations the snapshot Kontakt folder is not created when Kontakt is
installed, but only when the user creates his first snapshot. Therefore the path to the snapshots
does not work if no user snapshots has ever been created prior to SEQui2R installation. If you
do not see a Kontakt folder in the snapshots path indicated in the manual please use this
workaround:
1. Do not move SEQui2R snapshot folder in the suggested path yet.
2. Load SEQui2R in Kontakt.
3. Follow Kontakt instructions on how to save a snapshot, and save a dummy snapshot
with any name.
4. Pls check that you see it afterwards in the snapshot list.
5. Open Kontakt's hood clicking on the wrench and click on instrument options.
AUDIOFIER SEQUI2R EX User Manual
Page 9

9
6. Select the tab "Snapshots" and click on "show". Kontakt should point you directly to the
folder "it wants you to put the snapshots in".
7. Drag all the folders that you find inside SEQui2R snapshot folder: The file INIT and the
folders, Electronic, Organic, Guitars and Rhythms.
8. Now check the snapshot list again and you should see all presets snapshots.
Minimizing loading time
Some computer configurations might take long to load Sequi2r EX samples the first time its
booted. After the first boot it is recommended to do a BATCH RESAVE following these steps:
Step 1: BACK UP SEQui2R EX by copying the whole folder in a different location.
Step 2: Go to Kontakt Files menu and hit Batch Resave. Select “YES” at the dialog popup. Note
that you do not need any patches loaded in Kontakt for this to work.
Step 3: In the “Browse for Folder” popup, select SEQui2R folder.
Step 4: A dialog might pop up displaying any missing samples in that folder. At the bottom,
make sure “Allow alternate file types” is checked (this will check for both WAV and NCW), and
then use the “Browse for folder” option to select Sequi2r Samples folder, where you NCW
samples are stored.
Step 5: Load SEQUi2R EX again, and you’ll be good to go.
FOR WINDOWS 10 USERS ONLY
There might be a problem with Windows trying to scan all the samples for virus.
Please try the following, which worked for other windows users:
In your PC try to go to: SETTINGS / UPDATE & SECURITY / WINDOWS DEFENDER and look for
EXCLUSIONS in the right pane, selecting ADD EXCLUSION. Go with a "Folder Exclusion" for the directory
where your Kontakt libraries are. Copy your downloaded Sequi2r zip file in that folder and try to unzip it once
again, inside that folder.
AUDIOFIER SEQUI2R EX User Manual
Page 10
10
FOR THE OWNERS OF SEQUI2R 1.2
Apart from a few graphic differences, SEQui2R 1.2 owners should find their way around
SEQui2R EX pretty quickly.
If you have created custom snapshots or edited any factory one, you can still use them but you
need to turn off the Sub Sources Button off till it turns red. This way, no sub layers will play
accidentally. If you load a custom snapshot, created prior updating to SEQui2R EX, please save
it again with the Sub Sources Button off. All the snapshots provided in this new release are
updated so you can simply replace the old ones. But, as mentioned, if you have edited any
SEQui2R 1.2 snapshot, please, load it and save it with a different name with the Sub Sources
Button off.
AUDIOFIER SEQUI2R EX User Manual
Page 11

11
Getting started
In order to load SEQUI2R EX, navigate on Kontakt 5.5 browser and locate the folder where you
extracted SEQUI2R EX. Double click on SEQUI2R EX.nki and wait for the loading progress bar
to disappear and the GUI to be fully formed on screen.
While SEQUI2R EX seems to be constituted of only one file, up to 400 sources sounds (Factory
plus Expansion 1) can be accessed on the very same interface.
SEQUI2R EX makes use of the Kontakt’s snapshots feature. Please refer to Kontakt’s user
manual to learn how to load and save snapshots.
Very important considerations before using SEQuiR
When you load SEQUI2R EX you will be presented with the initialised patch called INIT. It will
not make any sound and all memory is purged. In order to use SEQUI2R EX, please load a
snapshot or create a patch and phrases of your own (please see below Recording and Editing
sections).
When you load any patch/snapshot, which includes Key/Scale settings, the Key/Scale Control
could be switched off, but the key and scale are already set. In order to play on any other key,
please change the Key/Scale Control to the key or scale of your liking.
If the patch/snapshot does not include Key/Scale settings, it will transpose the phrase starting
from the pressed key.
Phrases that comes within a factory patch/snapshot can be edited.
The Sound Sources that constitute a factory patch/snapshot can be changed with any of the
included Sound Source of any category (see below for more info).
AUDIOFIER SEQUI2R EX User Manual
Page 12
12
User Interface: SEQUI2R EX Main Page
Responsive Keyswitches layers.
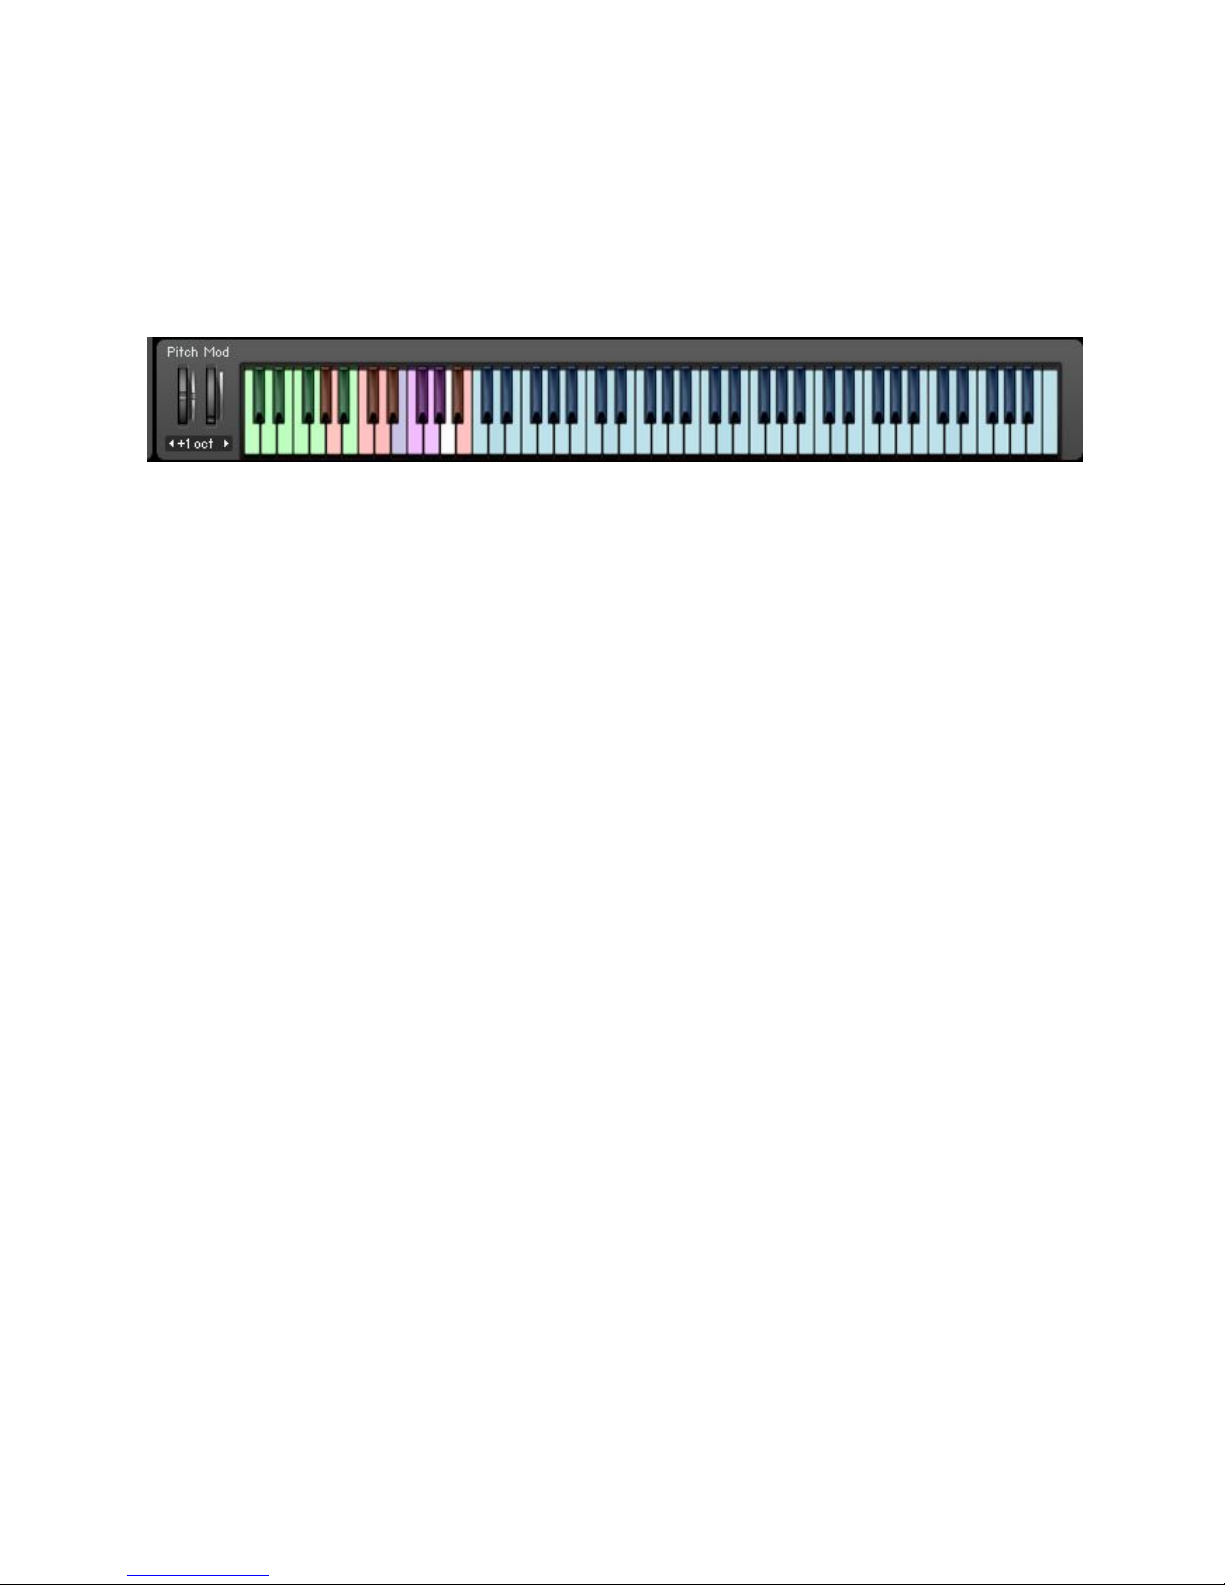
As you’ll notice, Kontakt’s graphic keyboard color layout has been changed to reflect new
features.
Fixed Key-switches:
These keys will not trigger any sound, but they will activate different functions:
● Green keys (C-1, G-1): these keys activate each of the 8 available phrases per patch.
They can be pressed both while idle or while a phrase is already playing. These keys
override the 8 Sequences Selectors and the Recall Button altogether.
● Red key (G#-1, A-1): these keys control the Optional Start function. It overrides the
legato start function. They can be pressed both while idle or while a phrase is already
playing. A-1 activates the Optional Start function, while G#-1 deactivates it.
● Green keys (A#-1, B-1): these keys control the Legato function. It overrides the Optional
Start function. They can be pressed both while idle or while a phrase is already playing.
B-1 activates the Legato function, while A#-1 deactivates it.
● Red keys (A#0, B0): these keys control the Tempo Behaviour (see below “Tempo
Behaviour Menu”).
○ A#0 doubles the speed of the ongoing phrase.
○ B0 halves the speed of the ongoing phrase.
AUDIOFIER SEQUI2R EX User Manual
Page 13
Variable Key Switches:
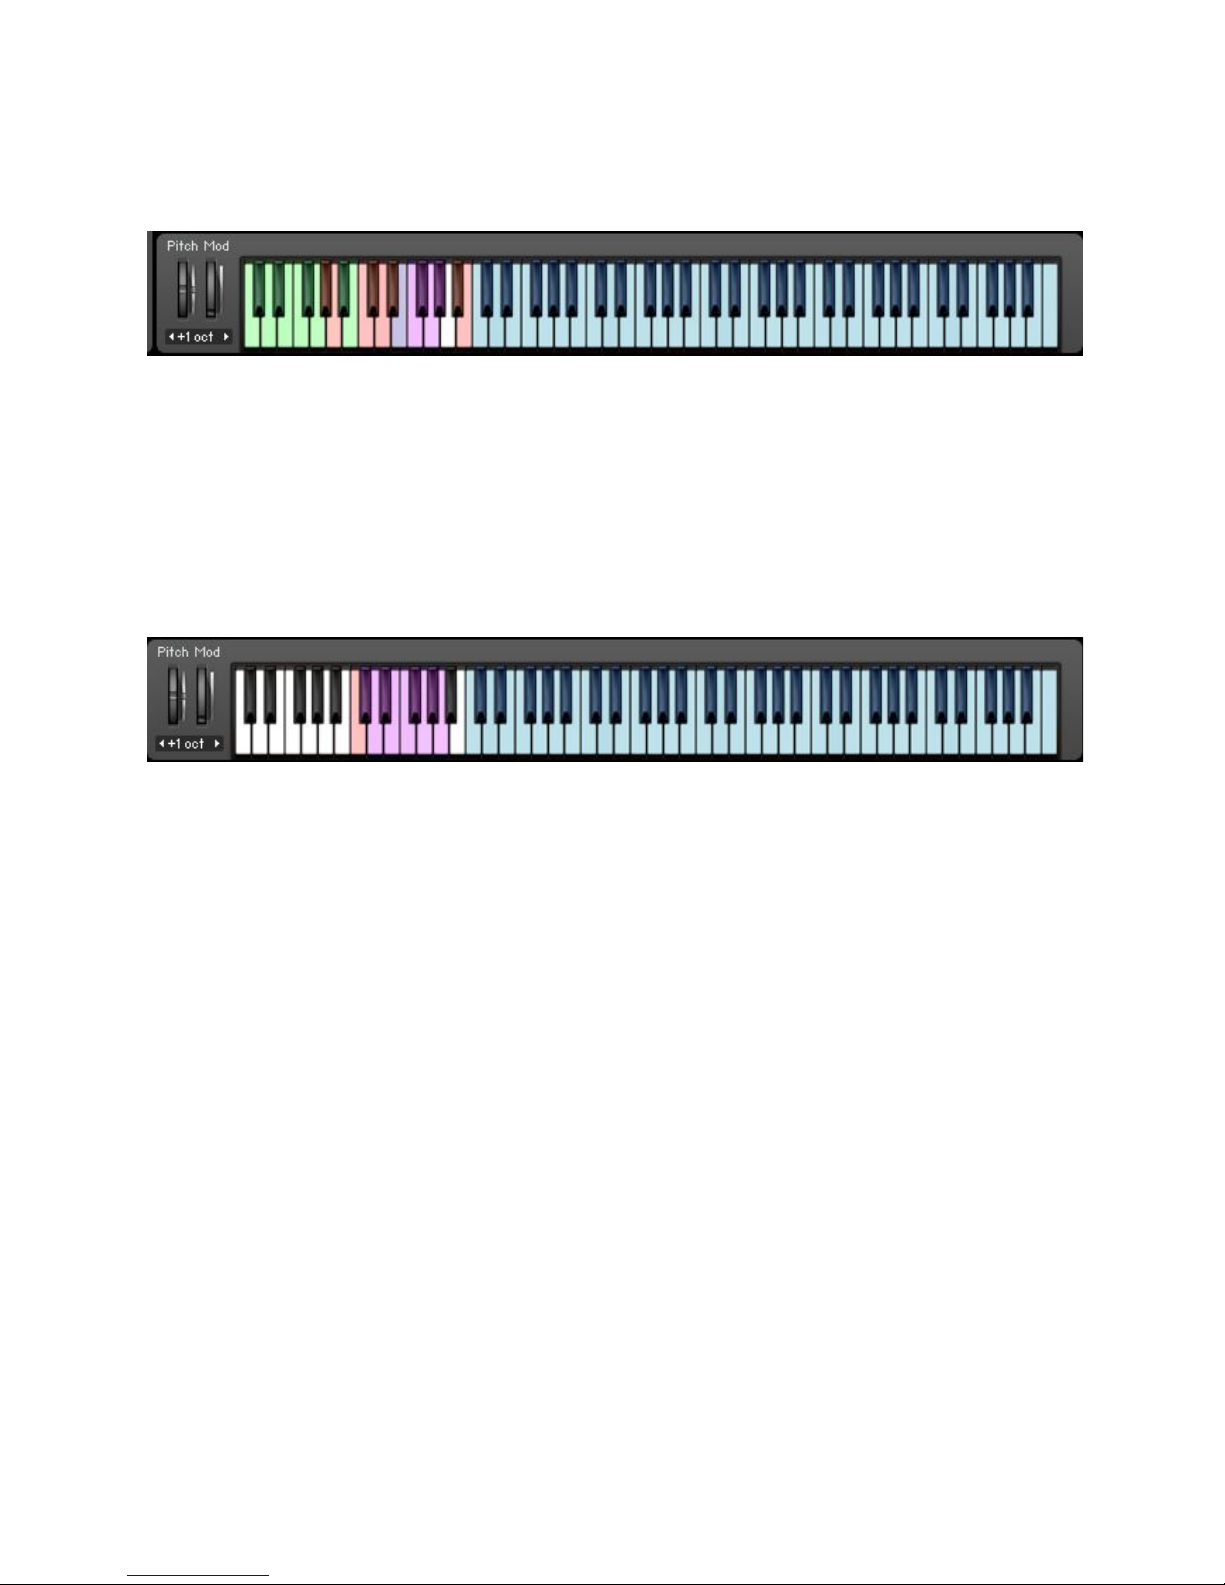
The following keys will show and be active only in Play Mode (Not in Recording Mode):
● Red keys (C0, D#0): These keys trigger the four optional starts. See System Page
Controls.
● Purple Keys (E0, G#0): E0 activates the scale selected in the Key/scale control Menu.
From F0 to G#0 they trigger the four scale variations. System Page Controls.
13
The following keys will show and be active only in Recording Mode (Not in Play Mode):
● Red key (C0): it’s the pause/rest key. To be used while recording a phrase.
● Purple keys (D0, A0): these keys select the note value while recording a phrase. They
override the Note Value Menu on the GUI. The values are from 32nd note (D0) to 2/4
(A0).
Special functions Keyswitches
The following picture can be accessed on the System page, by clicking on the menu at the
centre of the page.
AUDIOFIER SEQUI2R EX User Manual
Page 14
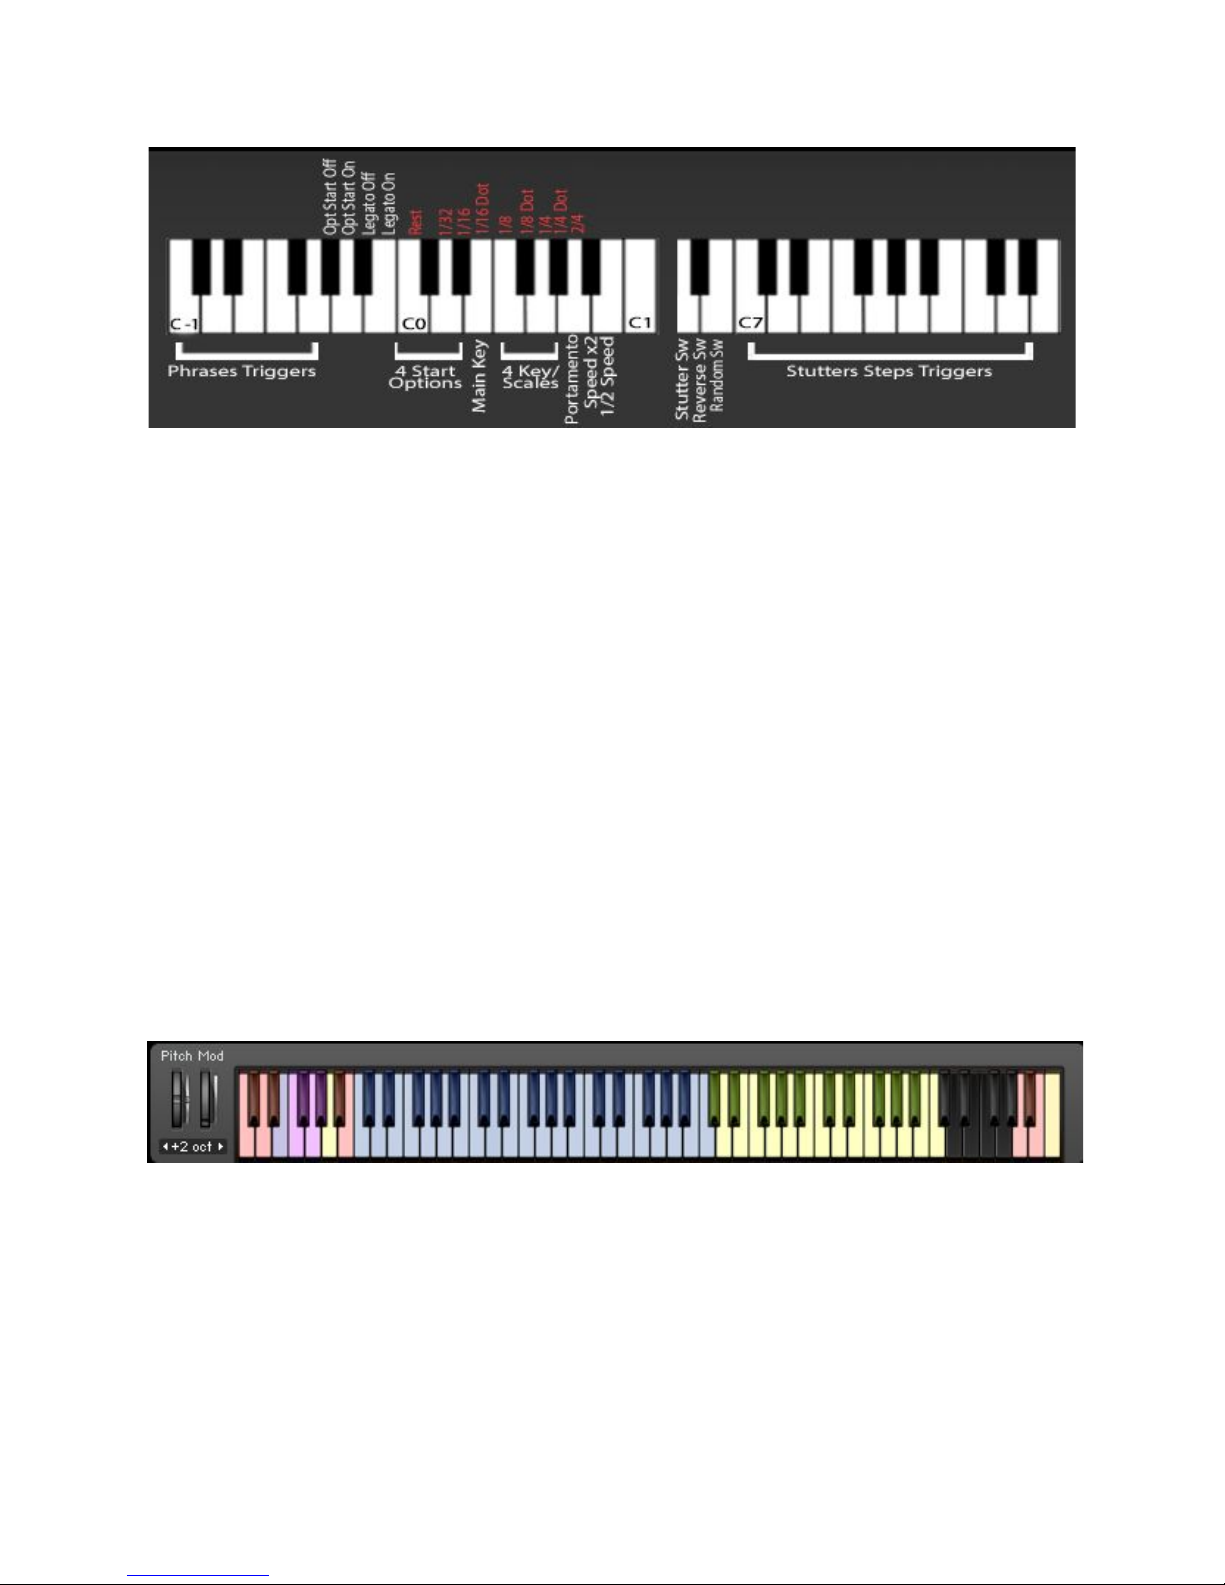
● Yellow key (A0): this key switches the main Portamento function on/off.
● Red key (A6): this key switches the main Stutter/Ornament function on/off.
● Red keys (A#6): his key switches the main Reverse function on/off.
● Red key (B6): this key switches the main Random Notes function on/off.
● Yellow Keys (C7,E8): these keys kill momentarily the Stutter/Ornament function. Each of
these 16 keys controls one of the 16 sequencer steps. As soon as the note that triggers
the playback is pressed again the Stutter/Ornament function is again active on the step
that had been previously deactivated with the correspondent keyswitch.
14
Sound ranges.
When 2 Sound Sources are loaded, the keys with mapped samples will color Blue (Group A)
and Yellow (Group B). keys with no samples will remain all black.
If group A is selected, only Sound Sources A samples (Blue) will be displayed.
If group B is selected, only Sound Sources B samples (Yellow) will be displayed.
AUDIOFIER SEQUI2R EX User Manual
Page 15
15
Sound Menus Panel:
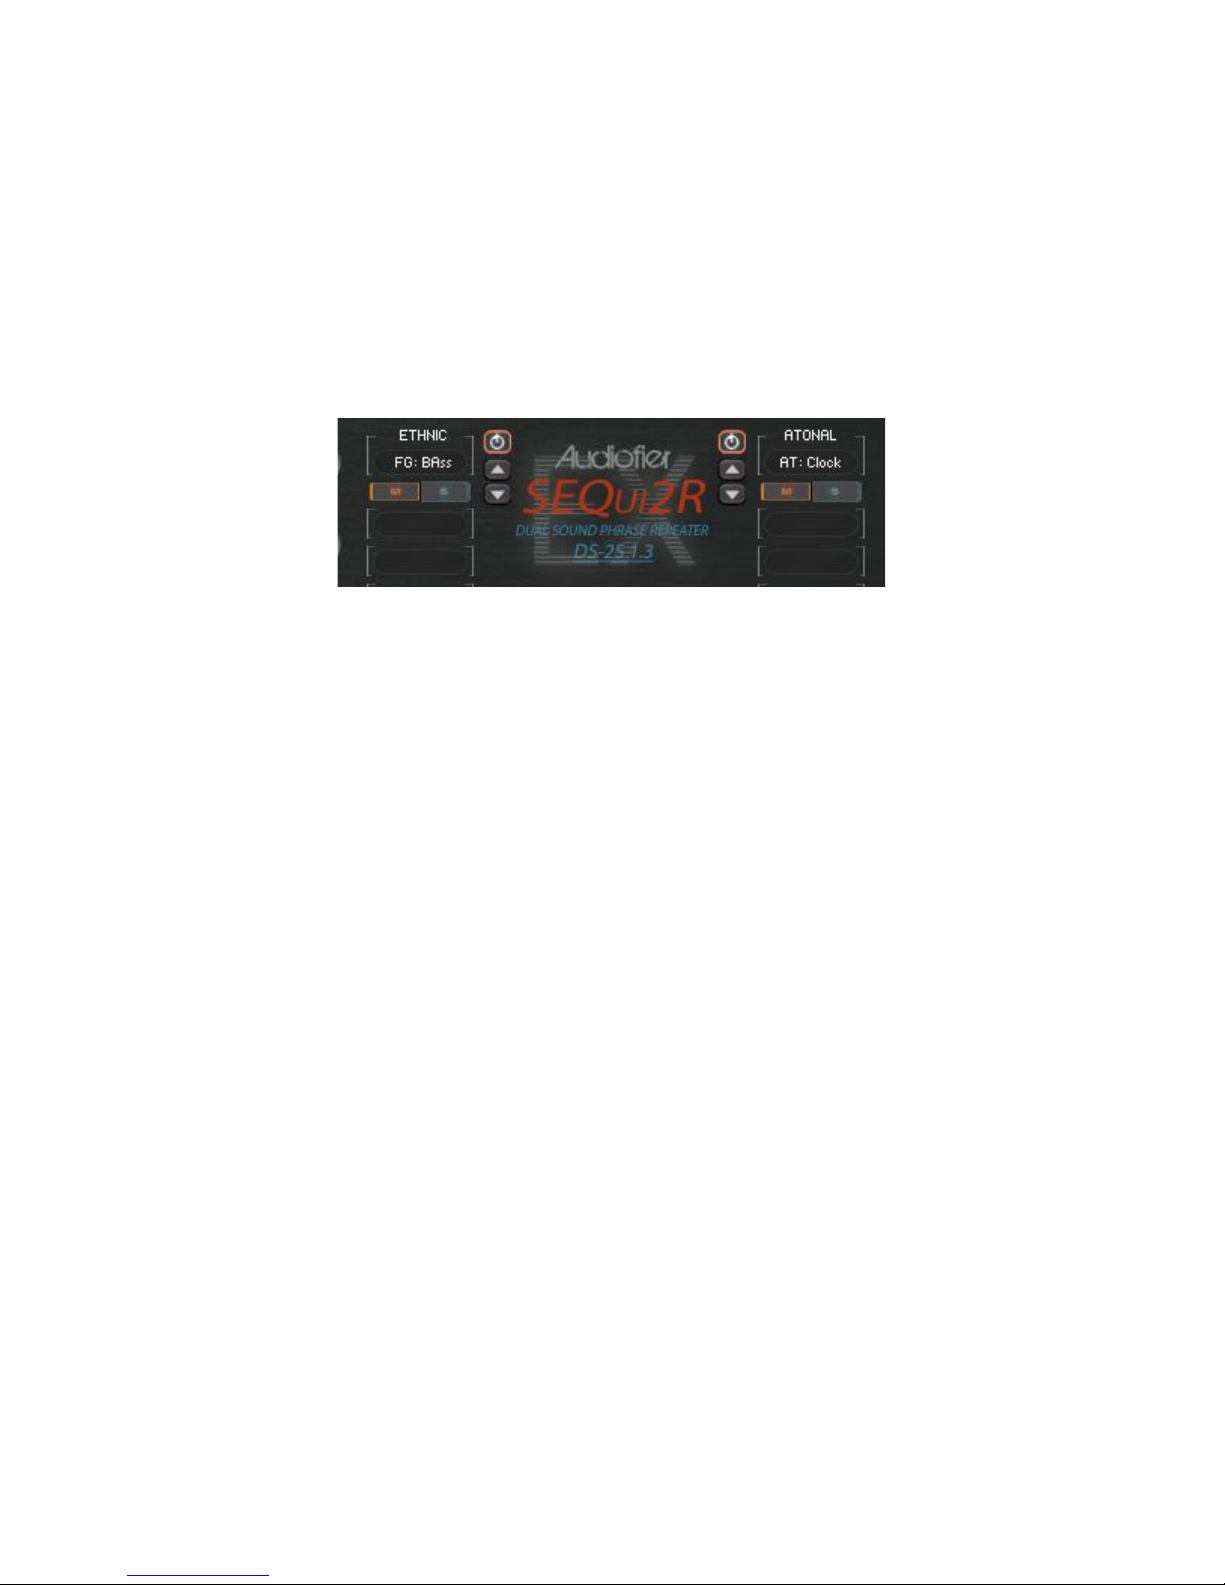
SEQUI2R EX sound patches can contain up to 2 Sound Sources in the 2 distinct Groups, A and
B. There are 660 Sound Sources available to choose from and are divided in categories
(Factory plus Expansion 1,2,3,4):
The menu functionality.
To load Sound Sources on group A or B follow this steps:
1. Select the sound Category on the Category menu (ALL CAPS title)
2. The Sound Source previously loaded becomes red (the sound is still loaded but
SEQui2R is waiting for a confirmation of the new sound to be loaded.
3. Click on the red sound name and select the desired new sound name.
The main difference between version 1.1 and 1.2 is that previously a random sound sources
was loaded as soon as the new category was chosen. Now we have only one sound change
and it is under the user’s control.
Up and Down Arrows.
They allow to scroll through the Sound Sources without the use of the menu. The Sound
categories will change automatically if the user recalls a sound before the first one or after the
last one in the sound list.
The same Sound Source cannot be loaded on both groups at the same time. As a matter of
fact, once a Sound Source is loaded in one Group, its name will disappear from the other Sound
Source’s Menu.
AUDIOFIER SEQUI2R EX User Manual
Page 16
16
When you change a Sound Source within a preset patch, you must note that the
patch might contain filters and envelopes settings which might not be optimal
for the new Sound Source. For instance, if you replaced an electronic synth with
a strings patch, the outcome might be a highly processed strings sound. It is
recommended to check the step fx statuses when changing Sound Source, to
avoid confusion.
On top of the arrows you’ll find the Purge Button. When active, the Sound Source is loaded,
otherwise the Sound Source samples are purged and the memory freed up. In “purged” mode
the menus are colored in red to signify they are inactive.
Below each Sound Source Menu are the Mute and Solo buttons, which are self explanatory.
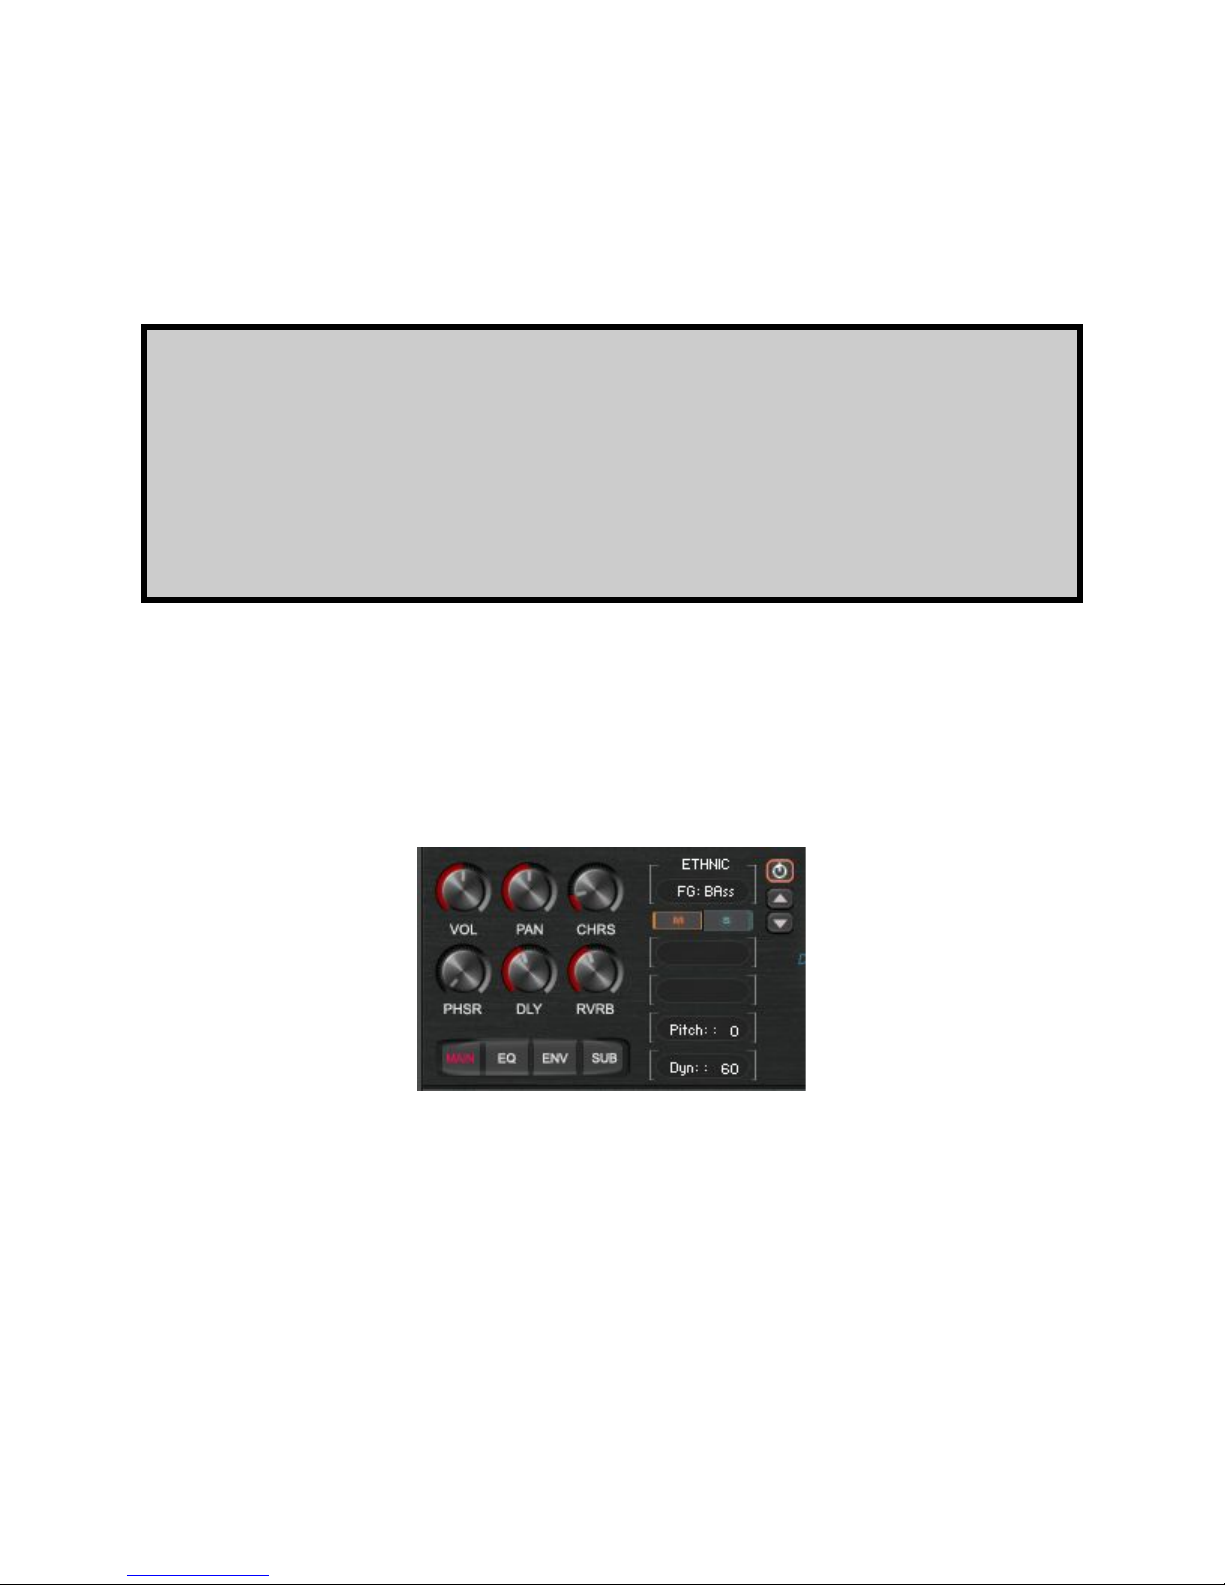
Sound Panels:
Both Group A and B have same parameters controls.
The four Page Selectors (Main, Eq, Env and Sub buttons) allow to access different
parameters and knobs:
Main Buttons page:
● VOLUME: this is the Master Volume of each group. It is totally independent from the
automatable Step Volume/gater. Control/ALT click to reset its value.
AUDIOFIER SEQUI2R EX User Manual
Page 17

● PAN: this is the Master Pan of each group. It is totally independent from the automatable
Step Panner. Control/ALT click to reset its value.
● CHORUS: this knob controls simultaneously the amount, the rate and depth of the
chorus effect. Each group has an independent chorus effect. When this knob is at zero,
the effect is bypassed.
●
● PHASER: this knob controls simultaneously the level, the rate and depth of the phaser
effect. Each group has an independent phaser effect. When this knob is at zero, the
effect is bypassed.
● DELAY: this knob controls the amount of delay effect. Once the knob is touched, the
nearby value edits will display Delay time and Feedback value. Each group has an
independent delay effect. When this knob is at zero, the effect is bypassed.
● REVERB: this knob controls the amount of reverb effect. Once the knob is touched, the
nearby value edits will display a Reverb Type Menu and Reverb Time. The Reverb
Type Menu includes a choice of Impulse responses. When one of these is selected, the
convolution reverb unit is activated. Each group has an independent convolution reverb
effect. The Reverb Type Menu includes also a Digital Reverb effect option. When this is
selected, the Reverb Knob controls the effect send of kontakt internal reverb and the
convolution effect unit is disabled. Both groups share the same main digital reverb.
When the digital reverb time is edited for one group, it will be modified the same way for
the other group as it is the same reverb effect.
17
EQ Buttons page:
This switch reveals the 6 knobs of Kontakt’s 3 bands parametric equalizer. Gain and frequency
are fully selectable from 20hz to 20000hz. Each Sound Source has a 3 bands parametric
equalizer. Control/ALT click on the Frequency Knobs to reset its value and bypass the eq.
Env Buttons page:
This one reveals a few more controls.
● CUTOFF: The Sound Source main filter cutoff control. It is overridden by the controller
chosen for filter cutoff in the options page. Each Sound Source has an independent main
filter effect
AUDIOFIER SEQUI2R EX User Manual
Page 18
● FILTER TYPE SWITCH: this is a small yellow led button that alternates the filter type. If
“on”, a Lowpass filter is chosen. Otherwise a Highpass filter will be activated instead.
● RESONANCE: The Sound Source main filter resonance control. Each group has an
independent main filter effect.
● ATTACK: the volume envelope Attack for each group.
● SUSTAIN: the volume envelope Sustain for each group.
● HOLD: the volume envelope Hold for each group.
● RELEASE: the volume envelope Release for each group.
The Pitch value edit controls the pitch for each group.
The Dyn value edit controls the velocity response of each group.
18
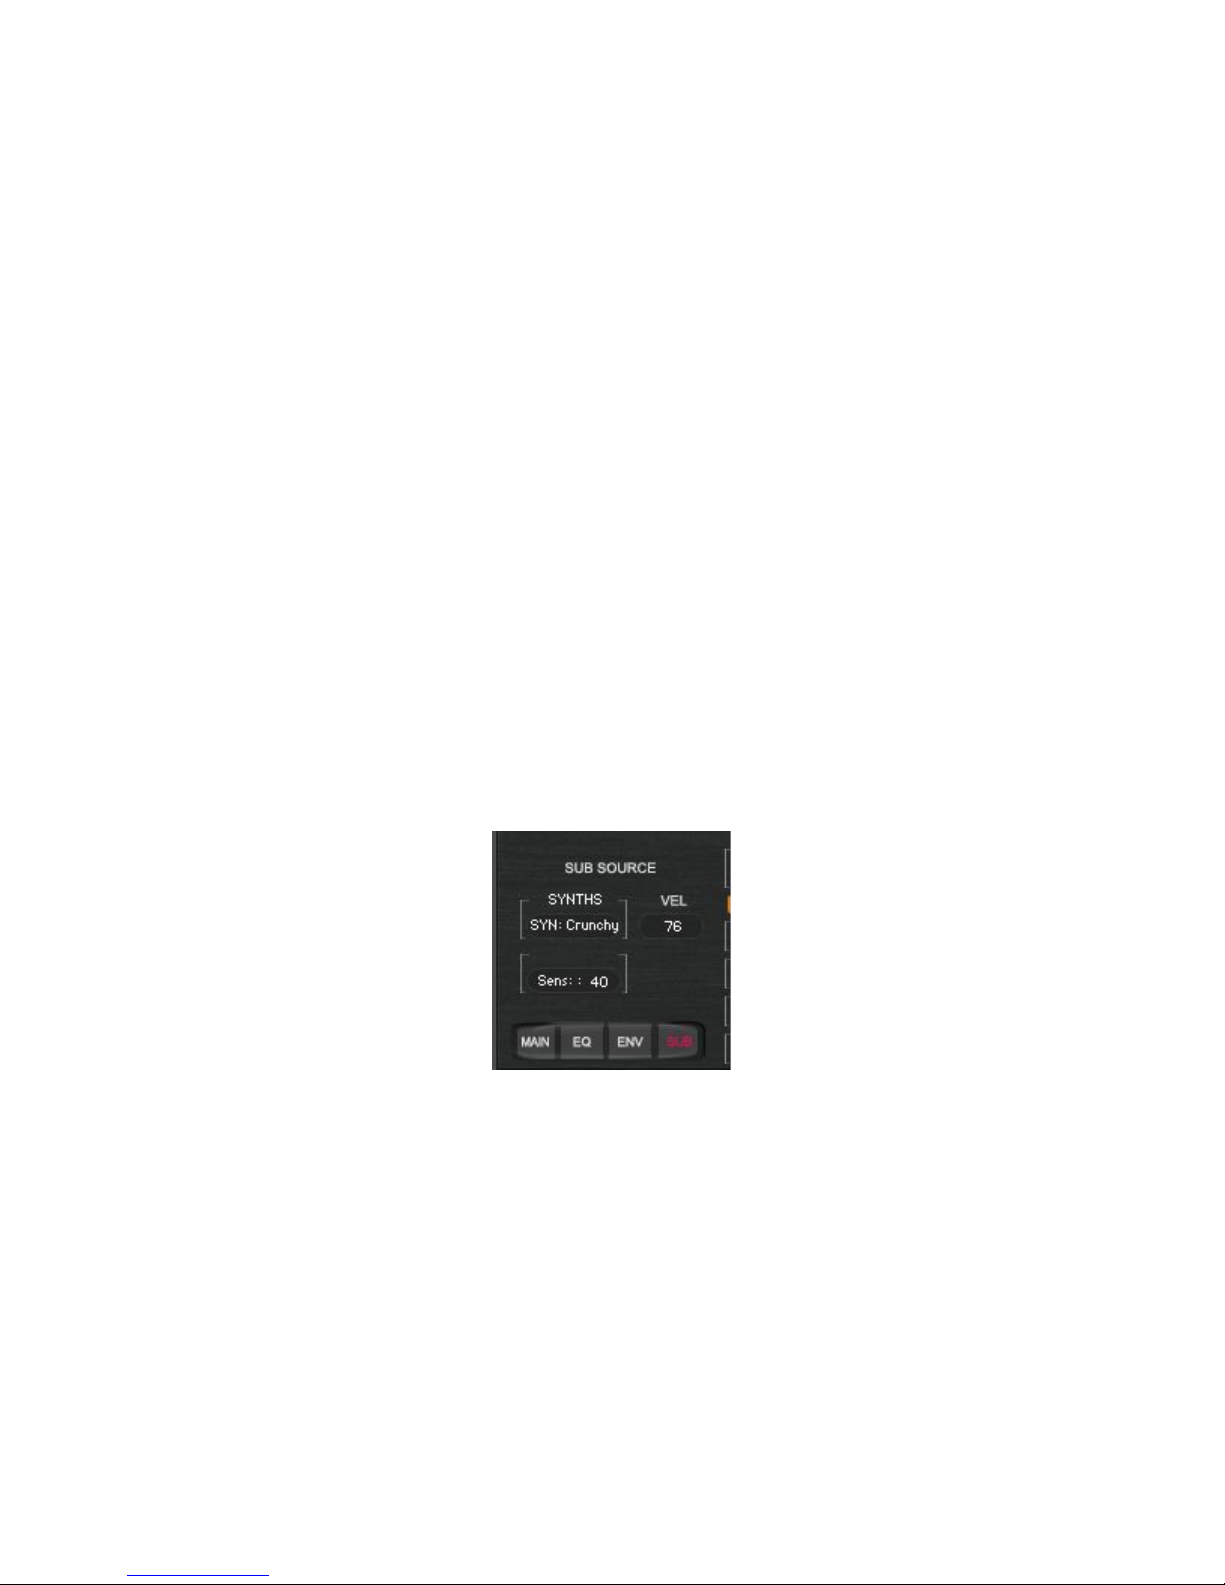
Sub Sound Sources layer page
This page reveals the sub layer function of SEQui2R EX. it is possible to load a completely
different sound source in this slot using the category and sound source menus in this page
(exactly the way we load the main sound sources sounds). But this new layer will only play
when the sequencer is on and when the velocity of the step sequencer is below the value set on
the VEL control. So if we choose 76, like in the picture,, when a note from the sequence is
below 76 of velocity, the sub layer will play, otherwise the main sound source, in this case
sound source A, will play.
The SENS control allows to change the sensibility of the Sub layer. Since Most of Sequi2r EX
sound sources are multisampled in different velocities, it is possible that the velocity sensibility
will need to be adjusted to make the most of each sound in terms of dynamics.
AUDIOFIER SEQUI2R EX User Manual
Page 19
19
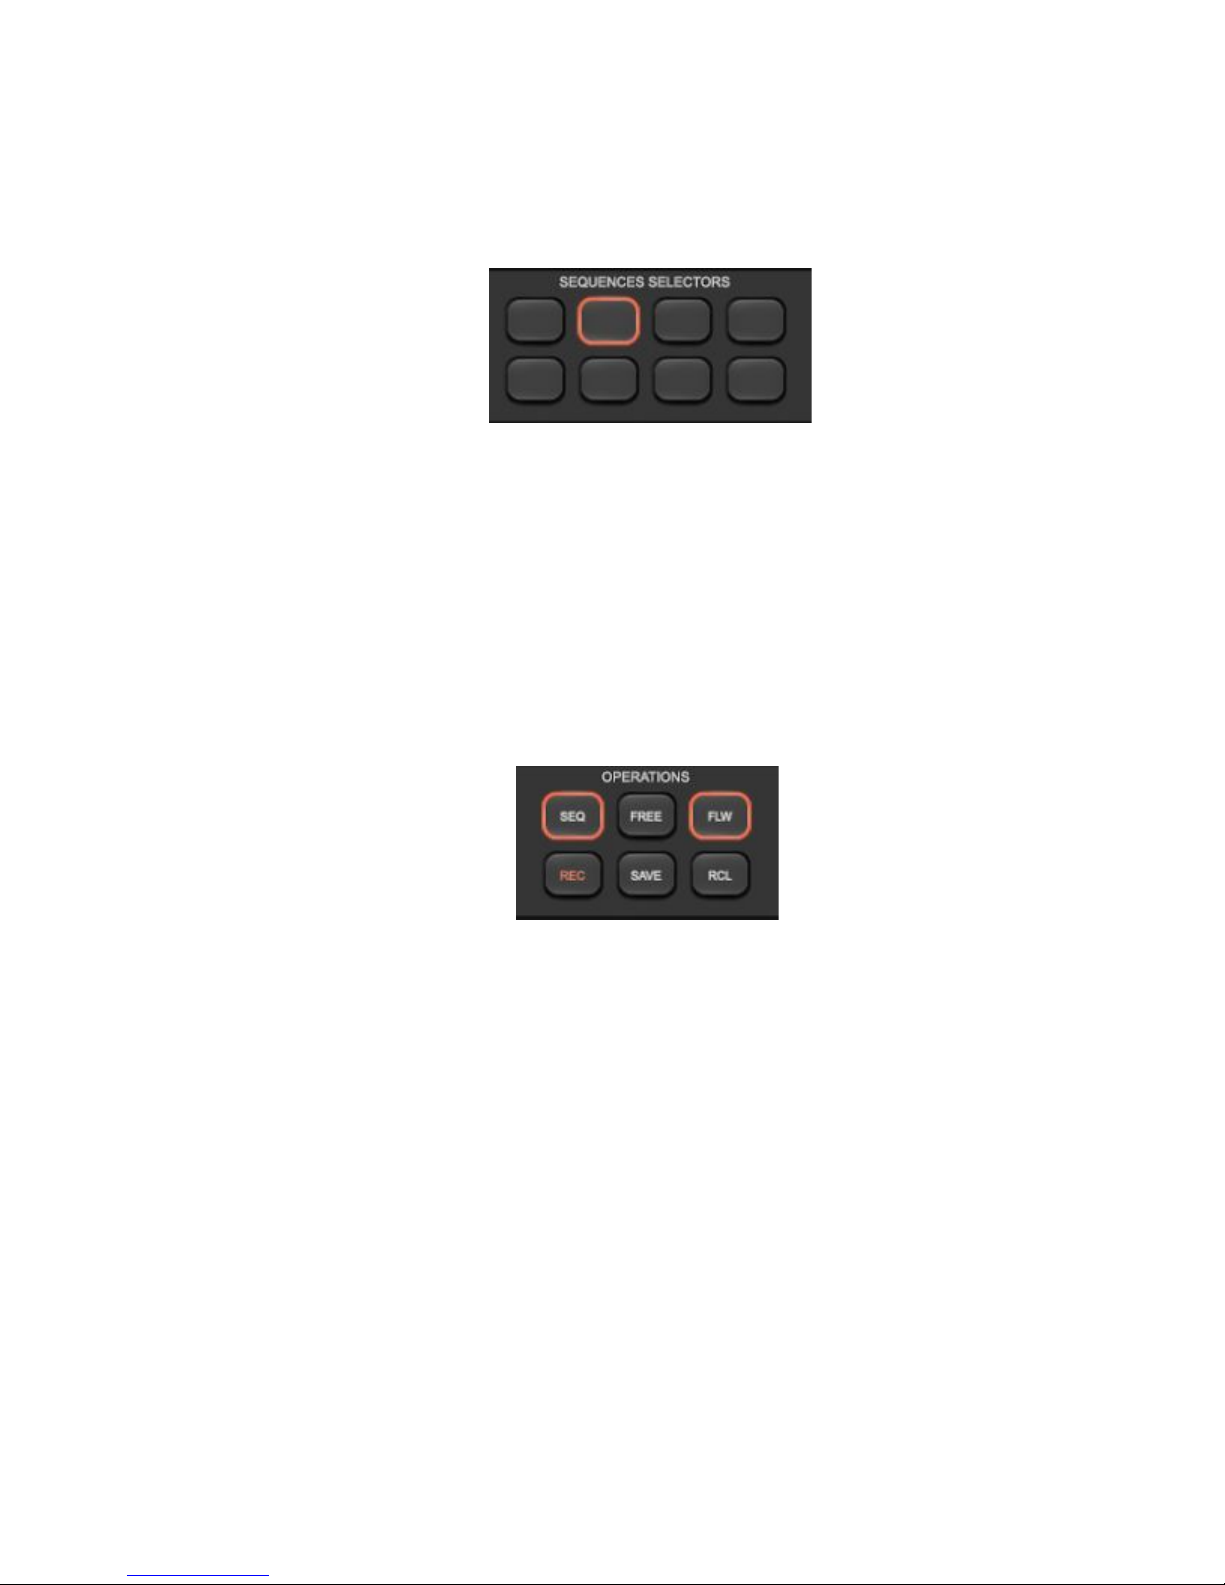
Sequences Selectors:
The Sequences Selectors are a series of 8 buttons which allow to choose what phrase to be
played (8 phrases in total). They do not recall phrases in real time, instead, after selecting the
desired button, the Recall Button must be pressed in order for the phrase to be loaded. To
recall a phrase in real time it’s opportune to use the Green Keys (C-1,G-1) as explained above.
These buttons are also to be used when saving a newly recorded phrase in conjunction with the
Operations Buttons.
Operations Buttons:
These buttons are the heart of SEQUI2R EX as they provide the means to record and playback
custom phrases.
● SEQ: this is the phrase/sequencer power switch. When on, SEQUI2R EX will act as a
phrase repeater, with playback and recording capabilities. When off, SEQUI2R EX can
be played as a normal synth, in real time.
● FREE: This button locks the sequencer to the current phrase selected for:
○ Editing purposes: as SEQUI2R EX normally reloads all stored sequence
parameters any time a key is pressed, the Free Button allows the user to edit
new parameters while playing, without them being wiped out at any newly
pressed key. This is useful when perfecting velocities or filters shapes, while
hearing the modifications in real time, as the phrase repeats. Once the desired
balance of parameters is achieved, by pressing Save, the phrase is stored.
Editing will be again possible while idle, or when the Free button is again
AUDIOFIER SEQUI2R EX User Manual
Page 20

pressed. These functions will be later referred to as Editing While Playing (EWP)
It is worth noting how SEQUI2R EX transposes a phrase. For instance let’s
assume we record a phrase starting from C4, continuing as a simple major
scale. When FLW Button is activated, SEQUI2R EX will repeat the exact same
phrase only if a C4 is played. In other words:
1. If the original starting note is played SEQUI2R EX will repeat the
exact recorded phrase, if FLW button is pressed.
2. If a different note is played, SEQUI2R EX will transpose the
recorded phrase starting with the newly played note, if FLW button
is pressed.
3. If the KEY/SCALE control is activated, SEQUI2R EX will modify the
recorded phrase according to the key/scale selected. Therefore all
the intervals in the phrase will be changed accordingly in order for
all the notes to be within the selected key/scale.
4. If FOLLOW button is not pressed, the recorded phrase will be
repeated exactly, no matter what note is played.
and Editing While Idle (EWI).
○ Recording purpose: if Free edit is active when recording a phrase, the values of
Step volume, Step pan, Cutoff, Lo-fi, Talk, Distortion will be preserved as they
were before the notes were recorded. This is useful when the user wishes to
duplicate a phrase, maintain all the step fx parameters and change all or a few
notes.
● FLW: This is the Follow button. When pressed, any recorded phrase will start from the
key pressed as SEQUI2R EX will transpose it accordingly. When depressed, SEQUI2R
EX will repeat the recorded phrase without transposing it, no matter what key is played.
In conjunction with the Key/Scale Controls, the user has the options to transpose each
phrase maintaining the original notes intervals or altering the notes intervals to keep the
phrases within a predefined scale/key.
20
● REC: This is the Record Button.
AUDIOFIER SEQUI2R EX User Manual
Page 21
○ As soon as it is pressed, the chosen phrase (in the Sequences Selectors Panel)
will be wiped out and all parameters will be reset. It is good practice to press the
desired Sequences Selector button first, then press Record. As soon as the new
phrase is recorded, the Save button will light up. This means the phrase is
recorded and saved already on the selected location.
○ If Free edit is active when recording a phrase, the values of Step volume, Step
pan, Cutoff, Lo-fi, Talk, Distortion will be preserved as they were before the notes
were recorded. This is useful when the user wishes to duplicate a phrase,
maintain all the step fx parameters and change all or a few notes.
● SAVE: This button must be used in different situations.
○ Firstly it’s recommended to press Save anytime the user has finished recording
the new phrase, even though the Save button might already be lit as a sign that
the phrase is already saved. This is because the phrase can also be recorded
partially. The user can choose to record only a few notes at the beginning of the
phrase and leave the others note steps blank. By pressing save at this stage,
SEQUI2R EX will fill in the blanks with the required number of rests.
○ Also the Save button must be used anytime an edit is performed, such as a
velocity parameter edit or a step filter parameter edit.
● RECALL: this button recalls whatever phrase (and all its parameters) is chosen with the
Sequences Selectors buttons.
21
The Key/Scale Controls Panel:
This is a very powerful tool with very few controls:
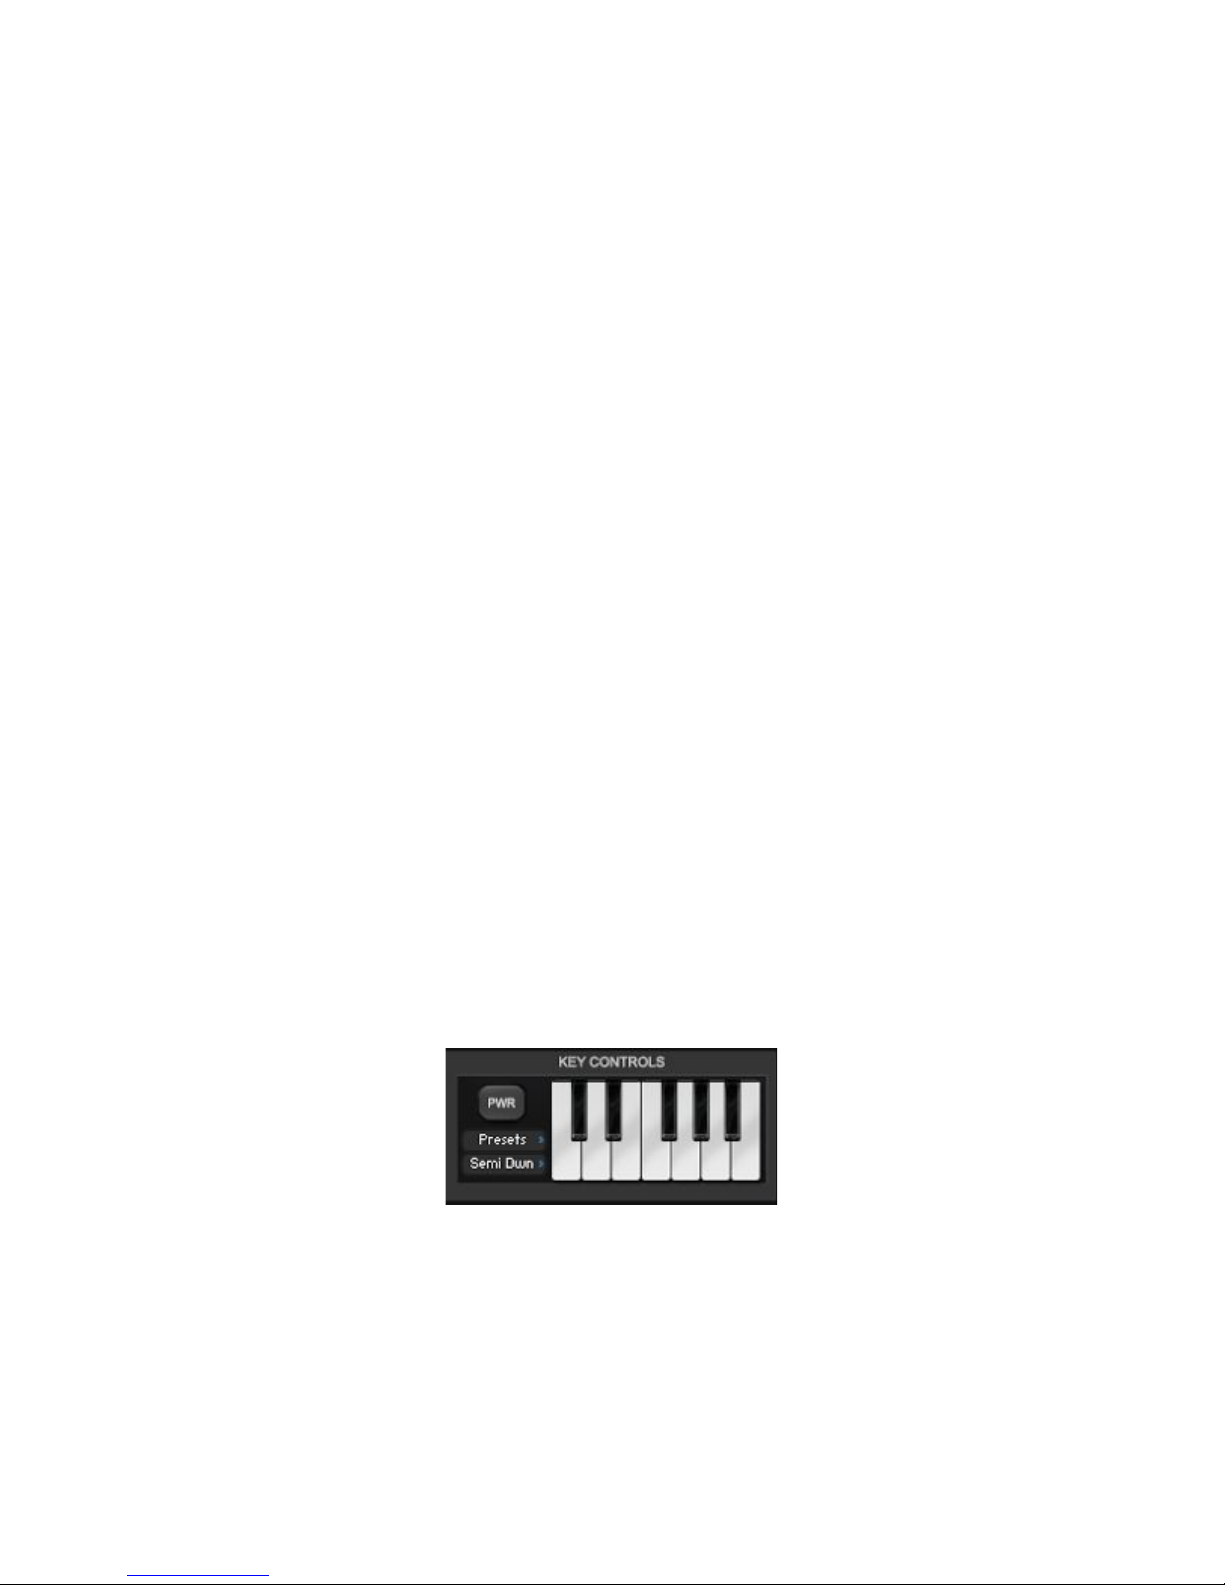
● PWR: the power switch button. It activates the key/scale function. When off, it
keeps all the scale parameters that might have been previously chosen or
created.
AUDIOFIER SEQUI2R EX User Manual
Page 22

22
You cannot recall a Key/Scale User Presets in a Snapshot/Patch in which you
have not previously saved any. It may cause a problem which can be
troubleshooted by recalling any other Key/Scale Presets.
At the moment of writing the Key/Scale User Presets is saved for all SEQUI2R
EX patches.
● PRESETS Menu: this offers a selection of scales and keys. Available scales at
the time of writing are:
○ Major/ Minor Natural
○ Harmonic Minor
○ 8 Notes Diminished (T+S)
○ 8 Notes Diminished (S+T)
○ Wholenote scale
The Presets menu also offer the option to save one User Scale preset. To do so,
after you have created the intervals you desire in the Key/Scale Controls
Keyboard (see below) just hit “Save User” in the Presets menu and the preset
will be named User. At this point it is available like all the other scales presets.
● BEHAVIOUR MENU: this menu offers three options:
○ Semitone up: while modifying the intervals in order to keep the phrase
within the chosen scale/key, SEQUI2R EX will transpose any undesired
note one semitone up. If an acceptable note is not reached, SEQUI2R EX
will transpose again, by shifting a semitone up , until a note within the
desired scale/key is reached.
○ Semitone down: while modifying the intervals in order to keep the phrase
within the chosen scale/key, SEQUI2R EX will transpose any undesired
note one semitone down. If an acceptable note is not reached, SEQUI2R
EX will transpose again, by shifting a semitone down , until a note within
the desired scale/key is reached.
○ Silent: while modifying the intervals in order to keep the phrase within the
chosen scale/key, SEQUI2R EX will skip any undesired note leaving a
gap in the phrase.
AUDIOFIER SEQUI2R EX User Manual
Page 23
23
Note that the key/scale is set for the whole patch. So the 8 recordable phrases
share the same key and scale parameters.
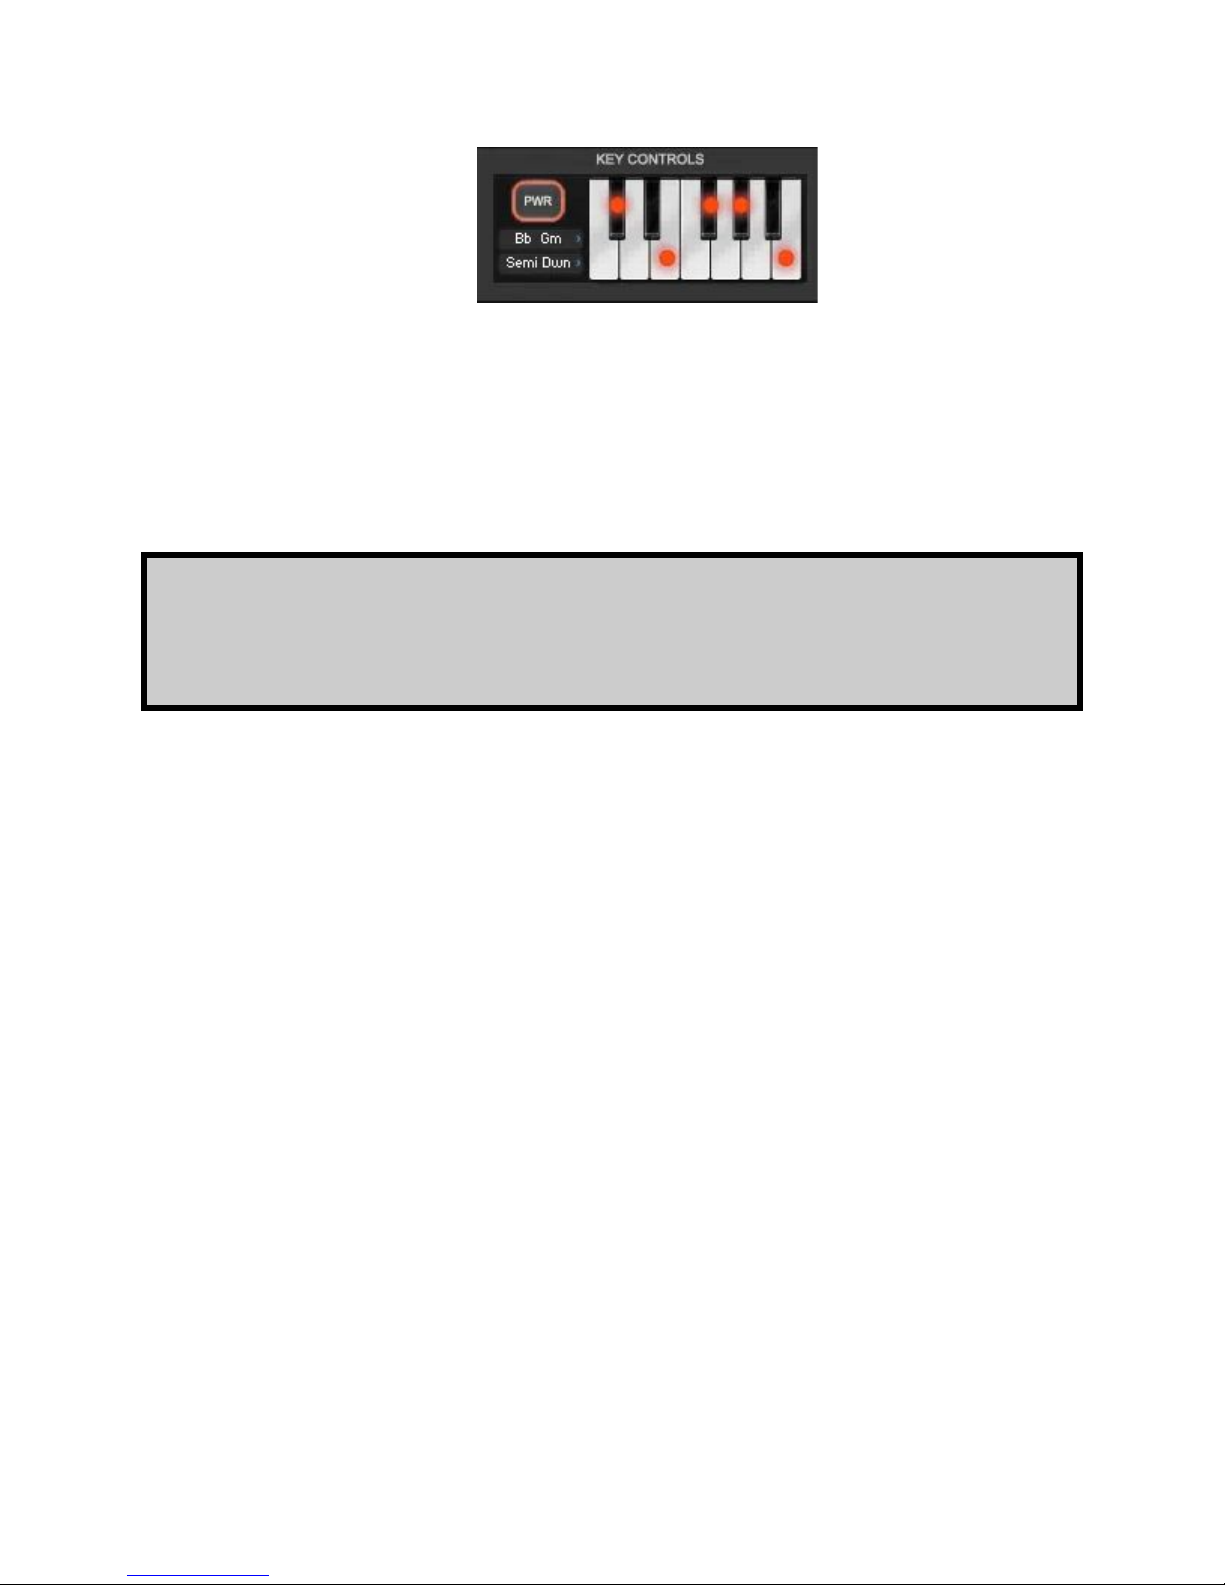
● KEYBOARD: this is an interactive series of keys. Red dots will appear on keys
which are not part of the chosen scale. The user can also generate custom
scales by clicking on each key accordingly. Keys with red dots will not be
included in the scale while obviously all keys without the red dot will be included.
It is possible to save one user preset per Snapshot/Patch. Please see above on
the Presets Menu.
More features in the Key/Scale Controls Panel.
The PRESETS Menu now includes a few more items. Apart from the original choices of
keys/scales, there are a few new features.
AUDIOFIER SEQUI2R EX User Manual
Page 24
24
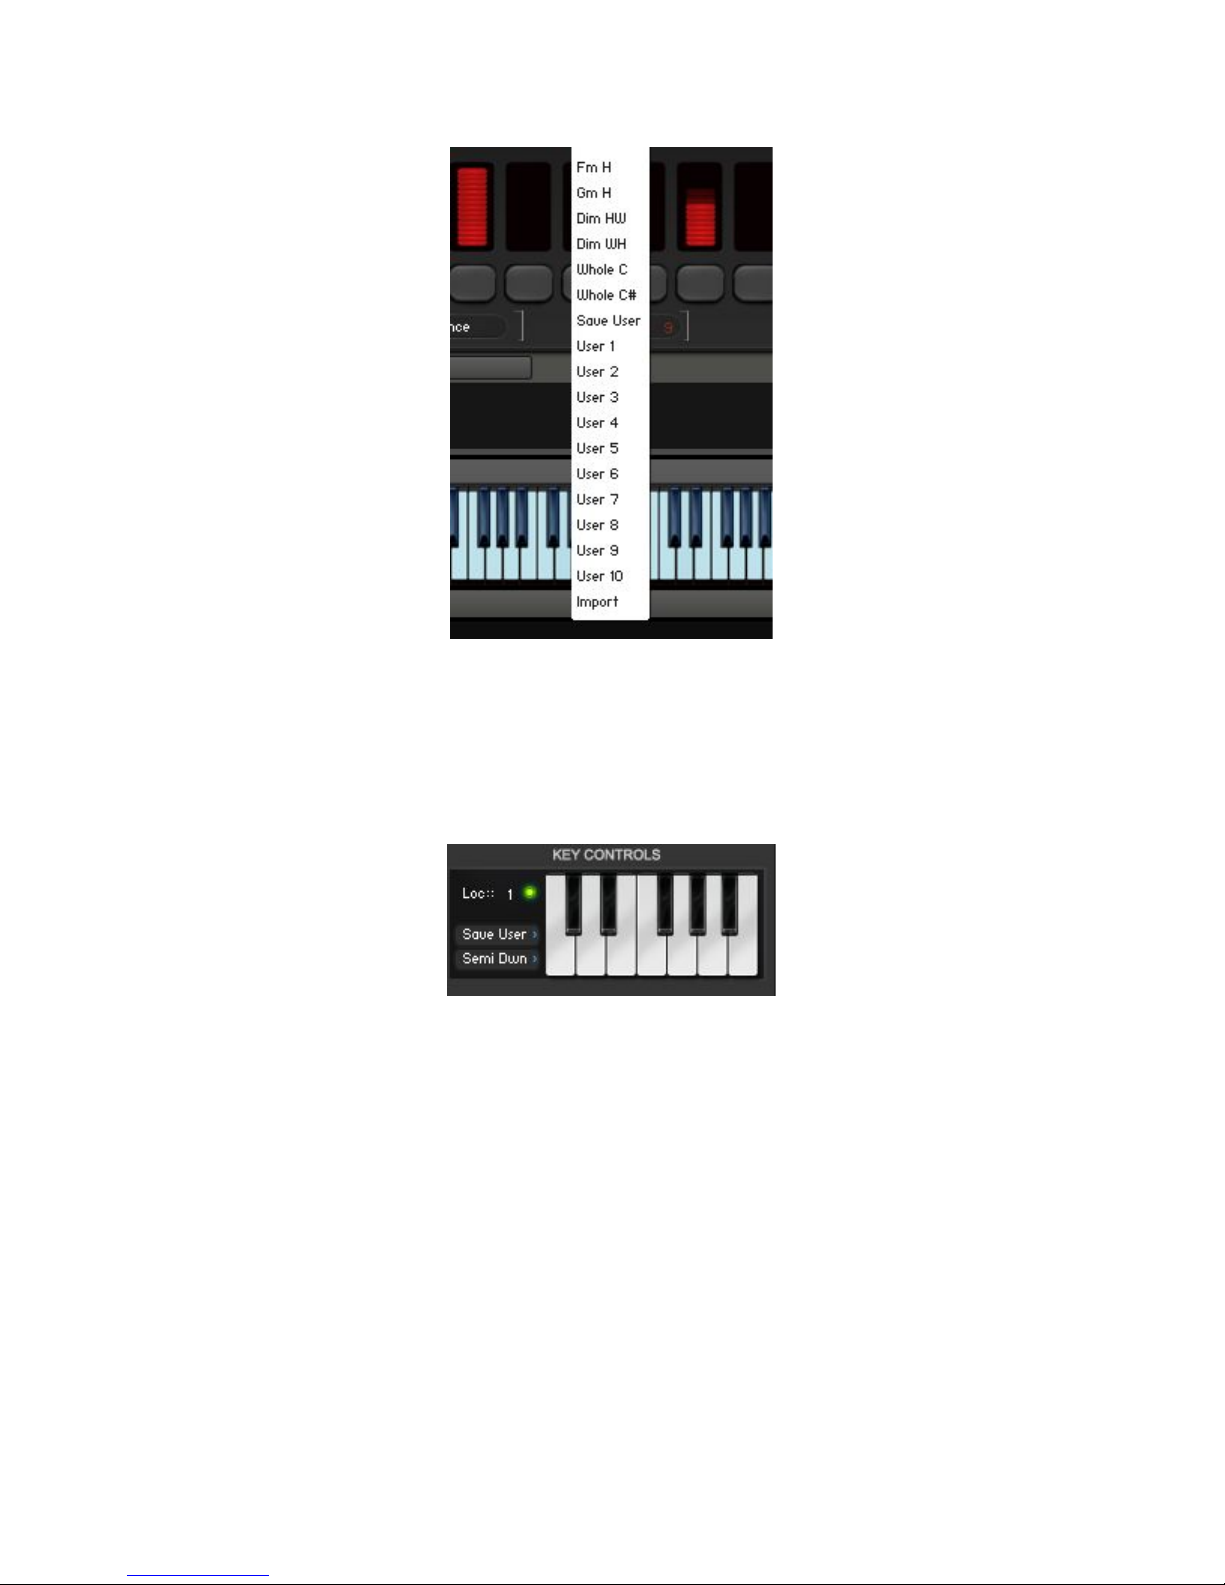
Save User Function
When this item is selected, two new items appear on the place of the Key/Scale Power switch:
○ Location Number value edit: this allows the user to select one of the ten
user locations to store the user Key/Scale preset.
○ Save led button: this small button opens a dialogue window which will ask
for a filename for the user preset to be saved. After “Save” is clicked, the
newly saved user preset will be recallable via the The PRESETS Menu,
by clicking the correspondent user preset number that was previously
selected with the Location Number value edit.
Import Key/Scale Function
AUDIOFIER SEQUI2R EX User Manual
Page 25
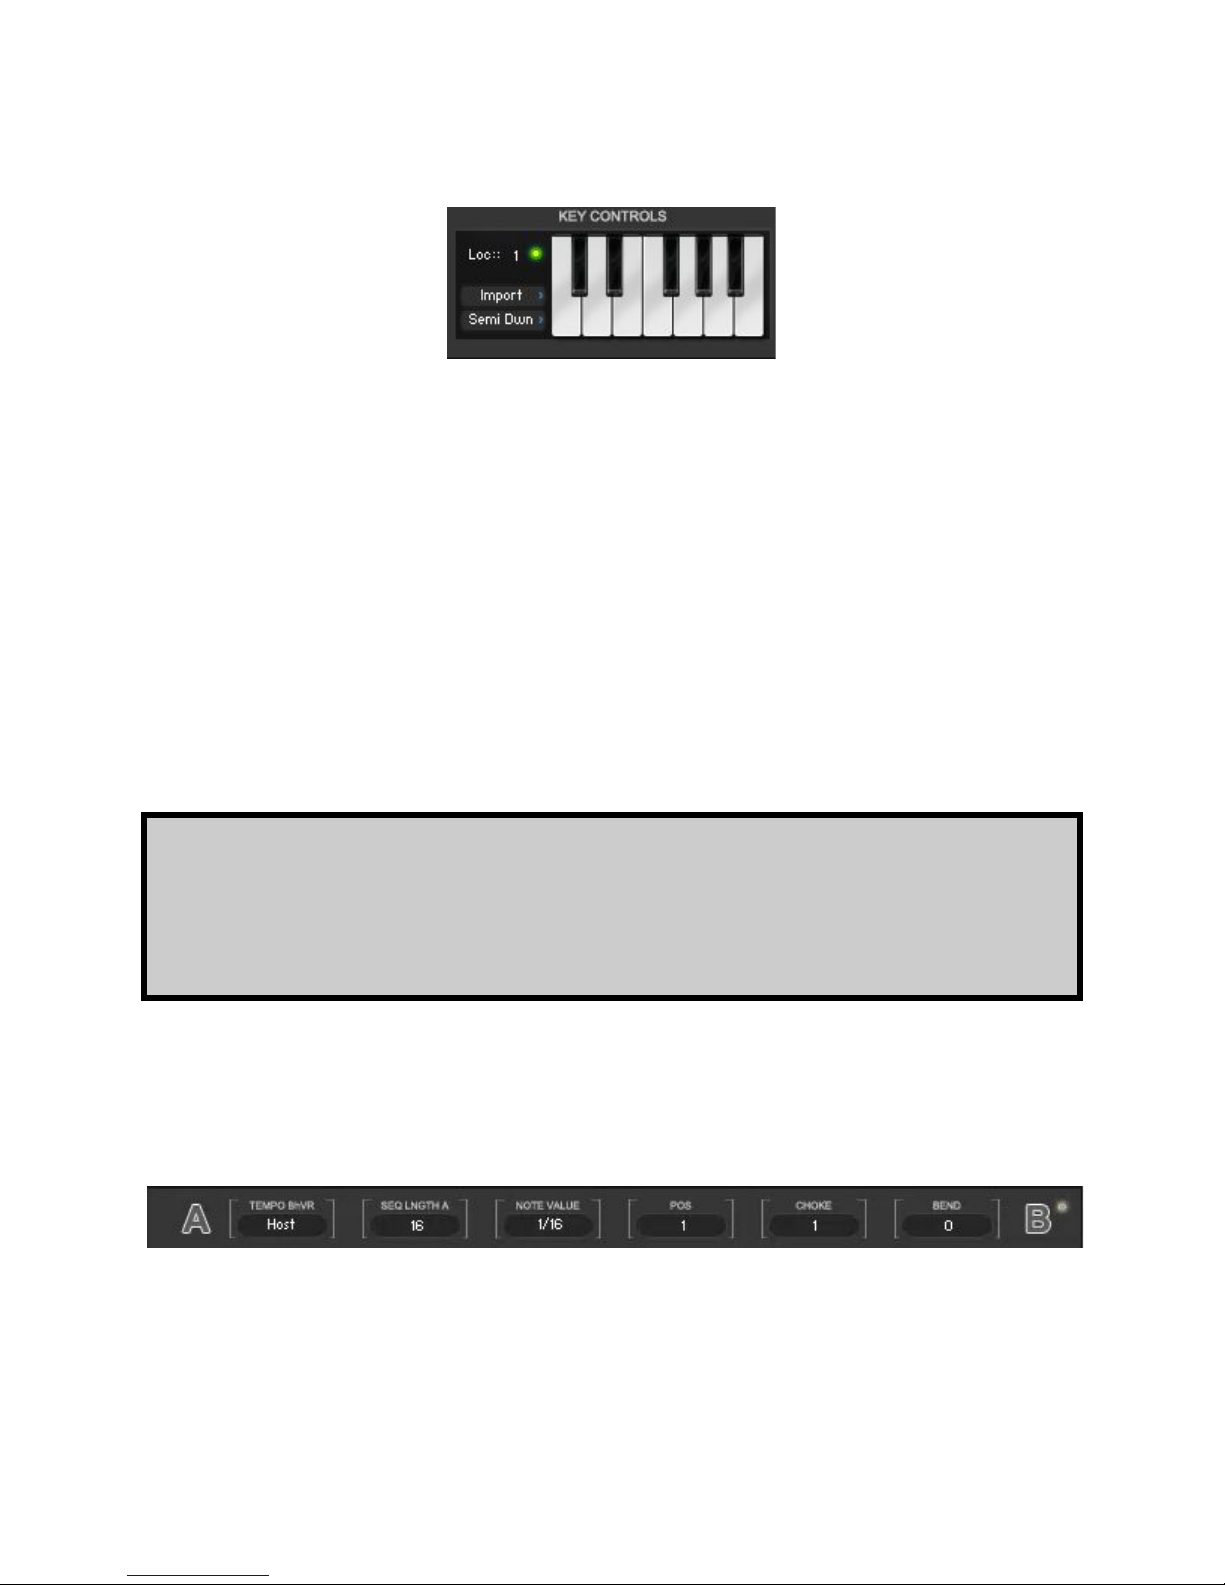
By clicking this item two new items appear on the place of the Key/Scale Power switch:
Each snapshot can include ten unique user presets as they are saved or
imported for each patch/snapshot. The user can import in one patch/snapshot
scales saved in other patch/snapshots.
○ Location Number value edit: this allows the user to select one of the ten
user locations to which import an user preset.
○ Import led button: this small button opens a dialogue window which will
show a choice of previously saved presets.. After “Open” is clicked, the
newly imported user preset will be recallable via the The PRESETS
Menu, by clicking the correspondent user preset number that was
previously selected with the Location Number value edit.
25
User Presets Slots
These will recall any user preset saved through the Save User Function.
Sequencer Panel:
This is a very important panel and needs to be understood properly in order to be able to record
custom phrases.
AUDIOFIER SEQUI2R EX User Manual
Page 26

SEQUI2R EX sequencer has 16 steps. The phrase length is dictated by the
Tempo Behaviour Menu. The default length of a phrase is half a bar and this is
because in most situations each phrase will be looped and different phrases will
be triggered in order to achieve more complicated patterns. For instance phrase
1 can serve as the beginning of a riff, while phrase 2 and 3 can be two possible
endings of the same riff. This way it is easier to create variations on the fly
without having a bigger number of longer phrases which differ of only a few
notes at the end.
It’s important to remember that the chosen Tempo Behaviour will be applied to
ALL the phrases recorded in a single patch.
The Sequencer Panel has the following controls:
● TEMPO BEHAVIOUR MENU: this very important menu gives the option to play
the recorded phrase at the
○ Host tempo: this way the recorded notes values will coincide with the host
note value. The phrase length will be of Half a bar of the host application.
○ Double tempo: this way the recorded notes values will be half the host
note value. The phrase length will be a quarter of a bar of the host
application.
○ Half tempo: this way the recorded notes values will be double the host
notes value. The phrase length will be a bar of the host application.
○ Quarter tempo: this way the recorded notes values will be four times the
host notes value. The phrase length will be half a bar of the host
application.
26
● SEQUENCE LENGTH: this value edit allows to select the number of steps/sliders
per phrase, from a minimum of 2 to a maximum of 16.
AUDIOFIER SEQUI2R EX User Manual
Page 27
27
It is possible to have different phrases with different numbers of steps/sliders.
At the time of writing, It is not possible to have simultaneously base 3 note
values (triplets) and base 2 note values (normal 8th or 16th, etc…) in one given
phrase. In fact the feel of the phrase, whether a triplet feel or a straight feel,
must be chosen at a patch level using the dedicated menu at the center of the
GUI.
The chosen feel will be applied to all the phrases within a patch/snapshot.
● NOTE VALUE MENU: here note values from 32nd to 2/4 of a bar can be chosen.
This menu is overridden by the green key switches (C-1, G-1) in recording mode.
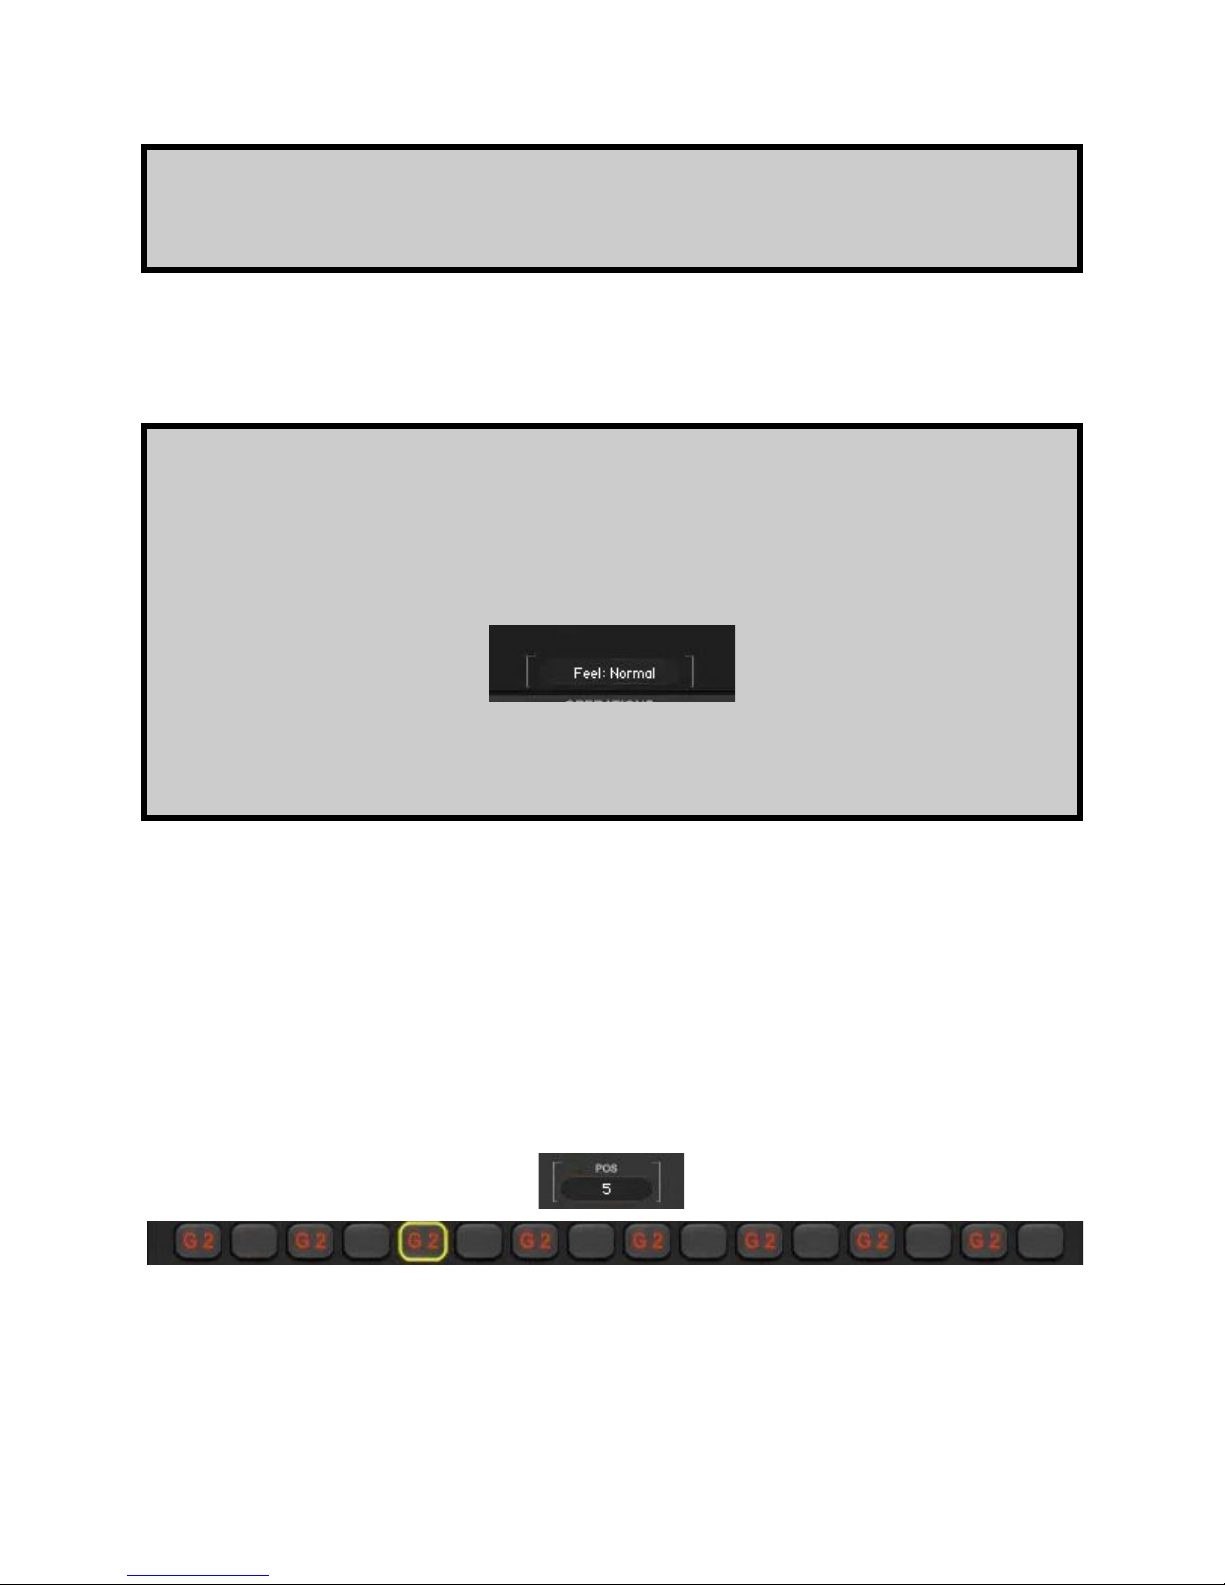
● POS value edit: this is a very handy feature that allows to edit the recorded
phrase by re-recording from a specific step/position of the phrase. At the default
value of 1, SEQUI2R EX will behave normally as explained in the Record section.
If POS value is greater than one, SEQUI2R EX will keep untouched all notes in
the phrase smaller than the displayed POS value and will await the user to record
from the specified POS value onwards. When a POS value is chosen, a yellow
border will surround the Notes Display to indicate which step is selected within
the recorded phrase (as shown below, as the fifth step is selected).
● CHOKE value edit: This value allows to choke/shorten the note up to a 20th of
the original value. This can be achieved while step recording, or as an edit, after
the actual phrase is recorded. In some cases, when the Release time of the
group is extremely high (as in a guitar sound with very long release time), there is
AUDIOFIER SEQUI2R EX User Manual
Page 28
28
It’s important to remember that each group corresponds to a Sound Source. The
first Sound source corresponds to Group A, the second to Group B. In this way
it is possible to make different edits to a phrase at a group level. For instance
having different step filters patterns for each group.
not much difference from a choked note to a not choked one. But this feature is
really great on pulsing, arpeggiated sounds, when a kind of stuttering effect is
required.
● BEND: this allows to create a bending effect to the selected note. It is depending
to the Bend Range in the Options page, in that it only controls the amount of
bend. Like a pitch bend wheel that can be touched just a little, instead to be used
to it’s full range.
Group Panel:
This Panel can be accessed by clicking either on the letter A (Group A) or the letter B (Group
B). The pressed letter will change its state from a grey color to a white color to indicate which
group is selected.
Once a group is selected, more controls are revealed. These controls are independent for each
group and can be edited while recording and/or while editing. Please check the Recording and
Editing workflows further in this manual.
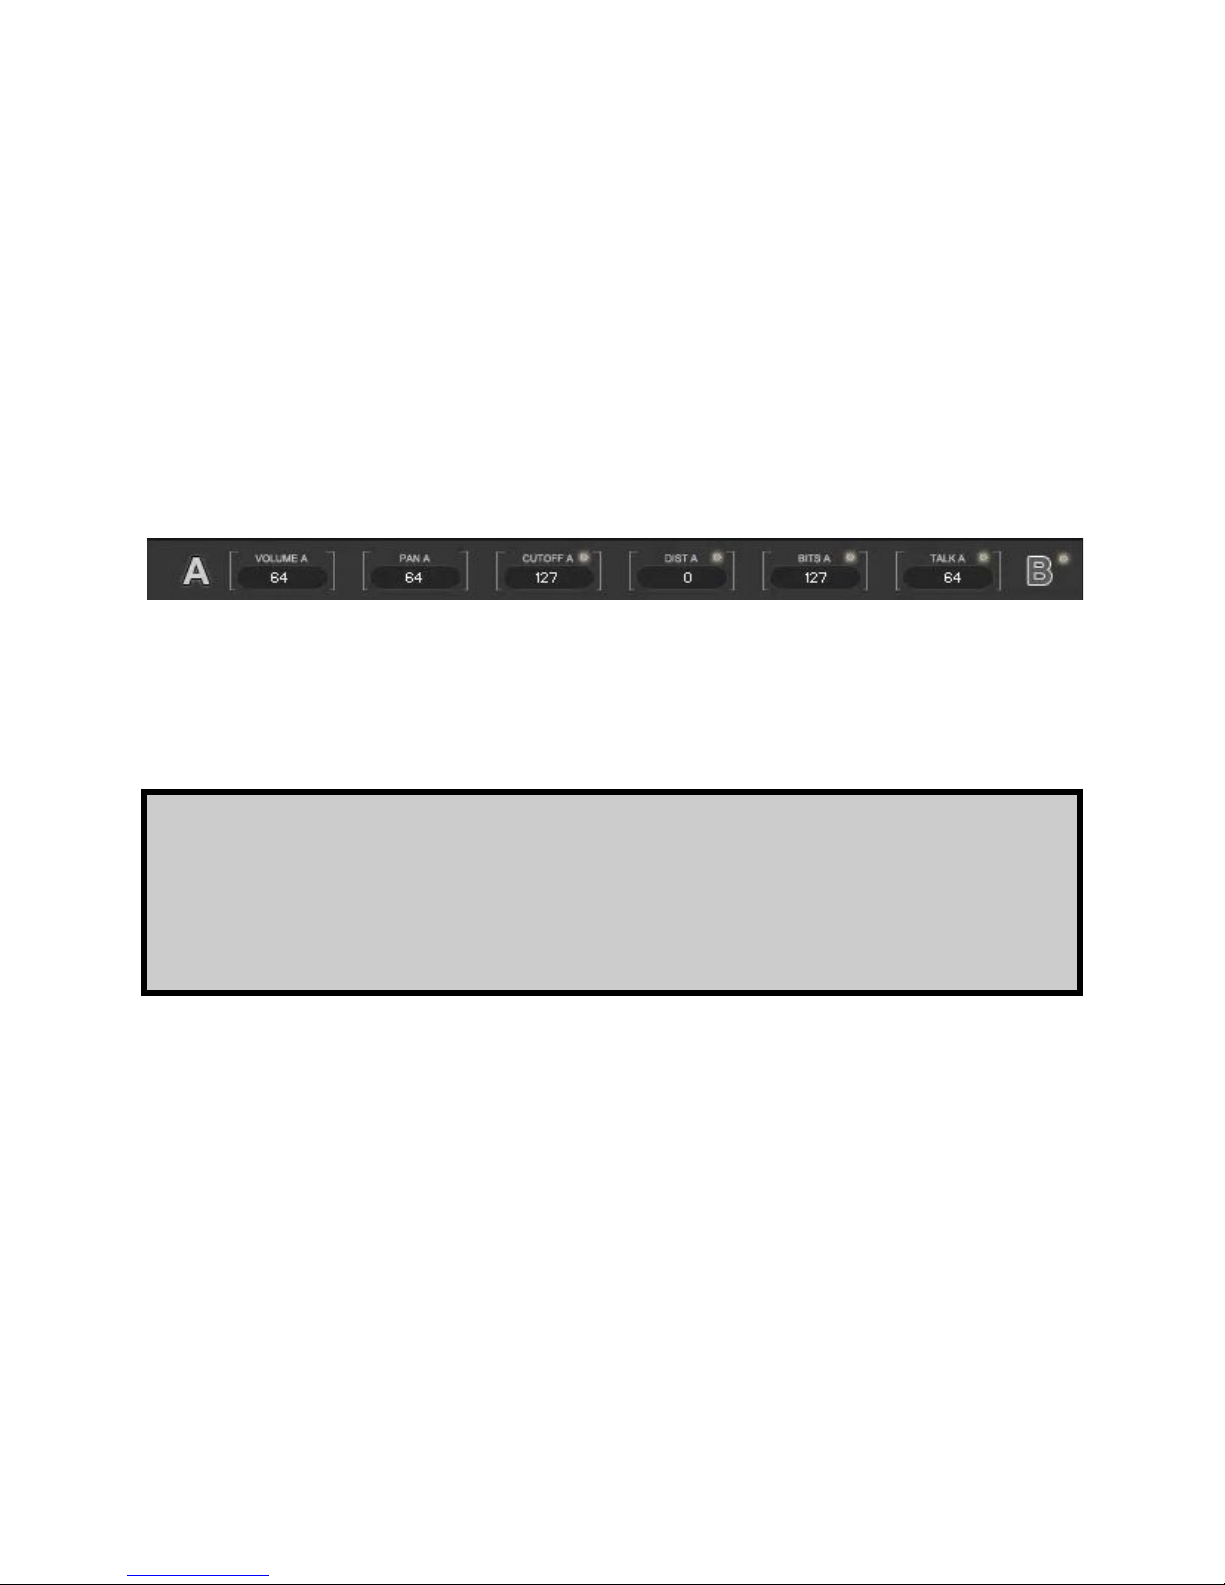
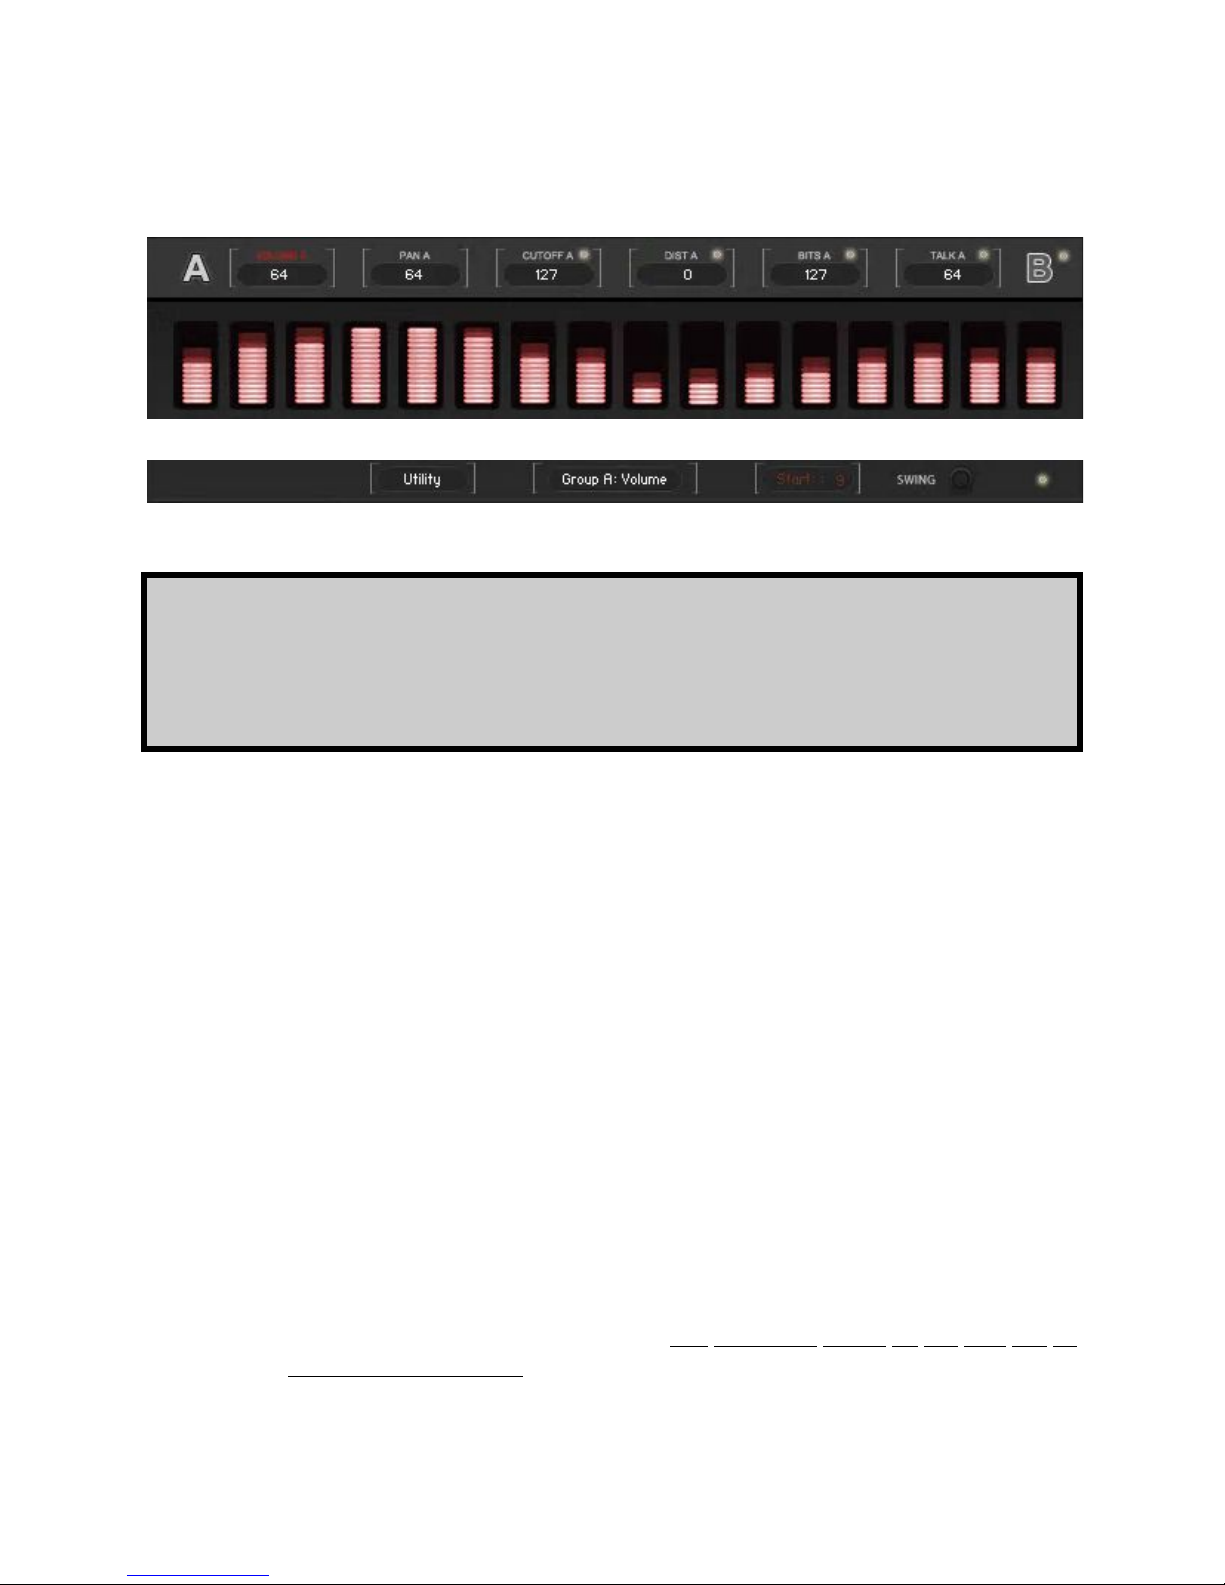
● VOLUME (A or B): This value edit allows to create changes in the group volume
step by step. It is totally independent from the Group Master Volume in the
Sound Panel. While recording, a different value can be set for each note , before
each note is played, in order to create step gater effects. By clicking on the actual
Volume title, the writing will change its color to red to indicate the Volume is
displayed step by step. In fact also the Sequence Sliders will change color and
display the Volume values step by step. Also the Indicator Label at the bottom
AUDIOFIER SEQUI2R EX User Manual
Page 29
29
When ALT/CONTROL clicking on the title of any of these value edit in the
Group/Slot Panel, their values will be reset to default. Press Save to keep the
changes.
of SEQUI2R EX’s GUI will display: Group “x” Volume. Please check the pictures
below.
● PAN (A or B) value edit: similarly to the Volume value edit, this value edit allows
to create changes in the group Pan step by step. It is recommended to keep the
Master Pan at unity if it is intended to make any panning effects to avoid conflicts.
Even though the Master Pan could act as a overall “pan adjust” while the Step
Pan dictates the panning movement . While recording, a different value can be
set for each note , before each note is played, in order to create step panner
effects. By clicking on the actual Pan title, the writing will change its color to red
to indicate the Pan is displayed step by step. In fact also the Sequence Sliders
will change color and display the Pan values step by step. Also the Indicator
Label at the bottom of SEQUI2R EX’s GUI will display: Group “x” Pan.
● CUTOFF (A or B): This value edit allows to create changes in the Filter Cutoff
step by step. It is totally independent from the Group Master Filter in the Sound
Panel. While recording, a different value can be set for each note , before each
note is played, in order to create step filter effects. By clicking on the actual Filter
title, the writing will change its color to red to indicate the Volume is displayed
step by step. in fact also the Sequence Sliders will change color and display the
Filter values step by step. Also the Indicator Label at the bottom of SEQUI2R
EX’s GUI will display: Group “x” Filter. The resonance values for this filter can be
set in the Options Page.
AUDIOFIER SEQUI2R EX User Manual
Page 30

30
● FILTER SWITCH: this is a small yellow led switch beside the cutoff title. It is the
filter power switch When off, no step filter effect will be audible, even though a
filter shape might be displayed on the visual Sequence Sliders.
● DIST (A or B): This value edit allows to create changes in the Distortion effect
step by step. It controls the gain amount of a distortion unit. While recording, a
different value can be set for each note , before each note is played, in order to
create step distortion effects. By clicking on the actual Distortion title, the writing
will change its color to red to indicate the Volume is displayed step by step. in
fact also the Sequence Sliders will change color and display the distortion gain
values step by step. Also the Indicator Label at the bottom of SEQUI2R EX’s
GUI will display: Group “x” Dist.
● DISTORTION SWITCH: this is a small yellow led switch beside the Distortion
title. It is the distortion power switch When off, no step distortion effect will be
audible, even though a distortion shape might be displayed on the visual
Sequence Sliders.
● BITS (A or B): This value edit allows to create changes in the LO-FI effect step by
step. It controls the bits reduction amount of a LO-FI unit. While recording, a
different value can be set for each note , before each note is played, in order to
create step LO-FI effects. By clicking on the actual Bits title, the writing will
change its color to red to indicate the LO-FI value is displayed step by step. In
fact also the Sequence Sliders will change color and display the LO-FI values
step by step. Also the Indicator Label at the bottom of SEQUI2R EX’s GUI will
display: Group “x” Bits.
● LO-FI SWITCH( A or B): this is a small yellow led switch beside the LO-FI title. It
is the LO-FI effect power switch When off, no step LO-FI effect will be audible,
even though a LO-FI shape might be displayed on the visual Sequence Sliders.
● TALK (A or B): This value edit allows to create changes in the Talk effect step by
step. It controls the wovel filter amount of a Talk unit. While recording, a different
value can be set for each note , before each note is played, in order to create
step Talk effects. By clicking on the actual Talk title, the writing will change its
color to red to indicate the Talk value is displayed step by step. In fact also the
Sequence Sliders will change color and display the Talk values step by step.
Also the Indicator Label at the bottom of SEQUI2R EX’s GUI will display: Group
“x” Talk.
● TALK SWITCH: this is a small yellow led switch beside the Talk title. It is the
Wovel effect power switch When off, no step Talk effect will be audible, even
though a Talk shape might be displayed on the visual Sequence Sliders.
AUDIOFIER SEQUI2R EX User Manual
Page 31
31
● COPY A TO B button: this is located at the right of the B group letter. By pressing
it, all Volume, Pan, Cutoff, Distortion, Lo-Fi and Talk values will be copied from
Sound Source A to Sound Source B. After this it is strongly recommended to click
Save, otherwise the copy will not take effect.
Sequence Displays Panel:
This Panel gives a visual representation of the recorded notes and parameters recorded in a
phrase.
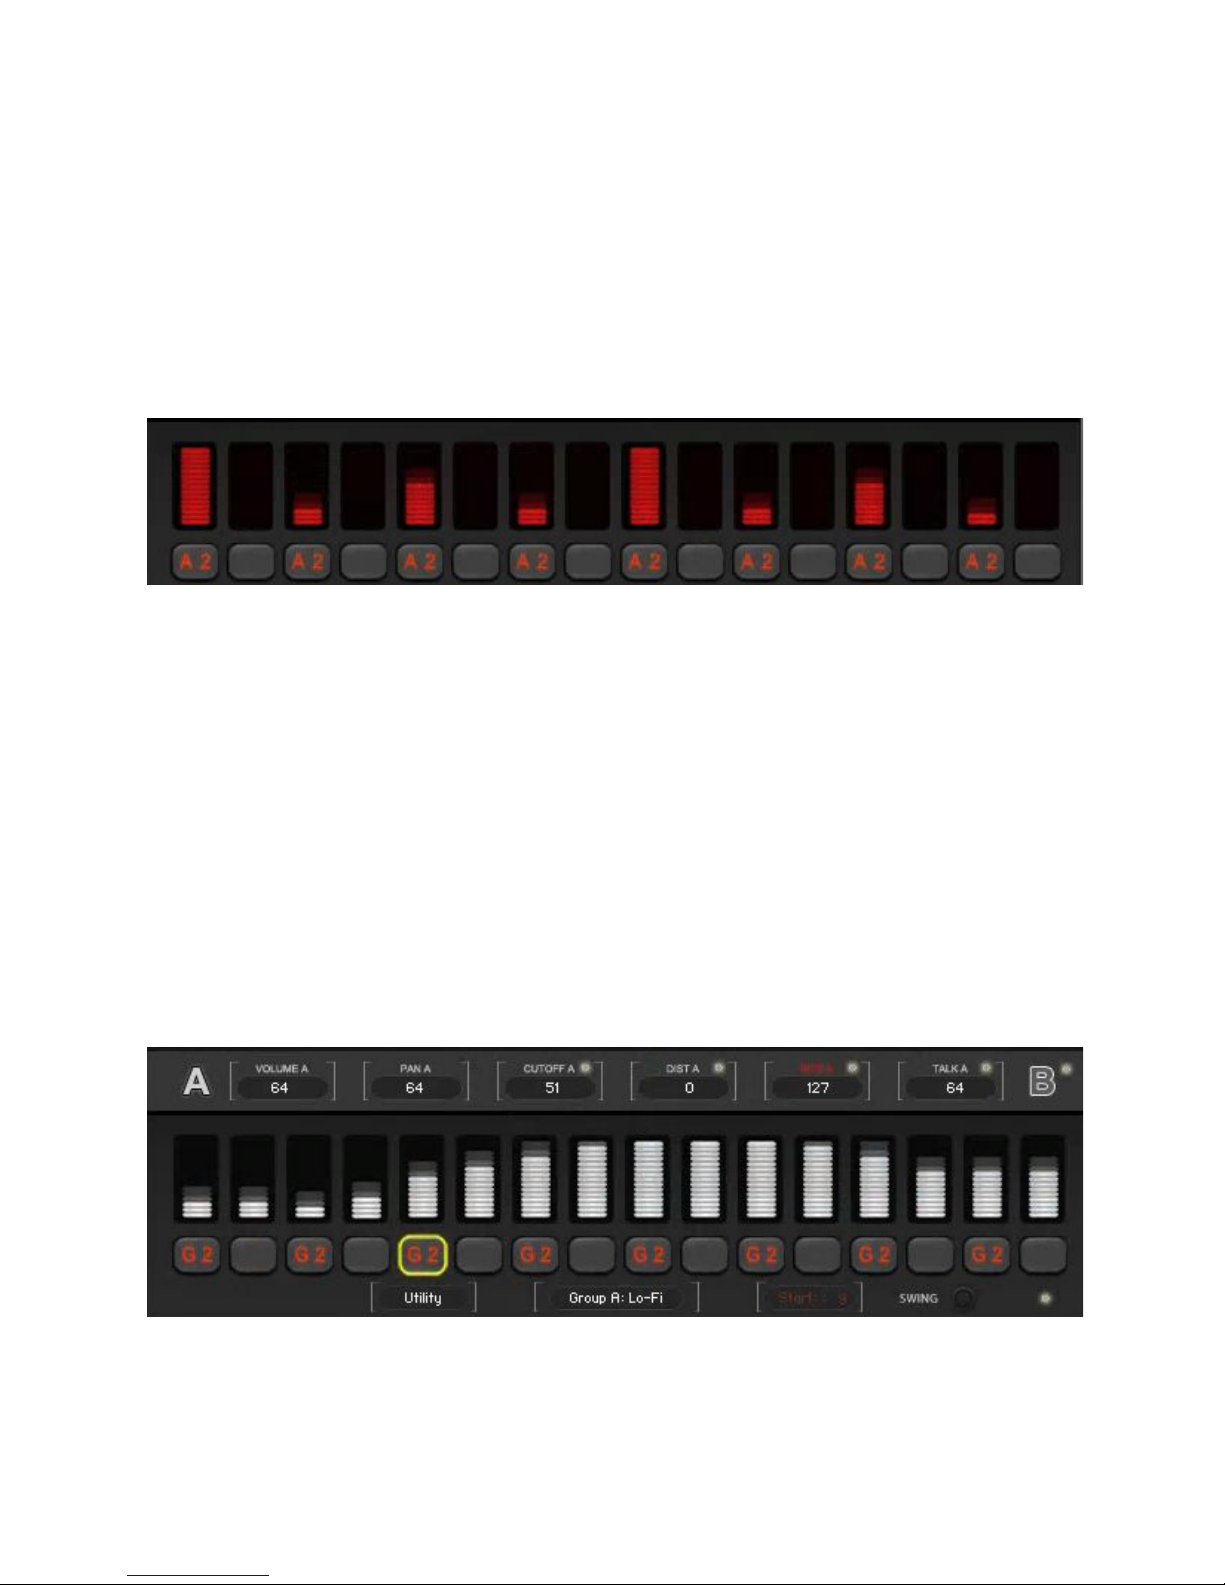
● SEQUENCE SLIDERS: these bars display by default the velocity values of each
note. In this case their color is red and the Indicator Label reads “Sequence”.
They will also change color and values to display Volume, Pan, Cutoff, Distortion,
Lo-Fi and Talk values when these are selected on the Group Panel. These
sliders can be used to edit the displayed values manually after the phrase has
been recorded. When Free button is activated, these values can be edited while
the notes are playing (EWP). Otherwise it’s better to edit when no key is pressed
and click on Save button straight away no to loose the changes (EWI). The
picture below shows the Sequence Sliders and Indicator Label states when the
Bits (Lo-Fi) effect for Group A is selected.
● NOTES DISPLAY: This is a string of 16 buttons which shows the recorded notes
names. When a different note from the original recorded phrase starting note is
AUDIOFIER SEQUI2R EX User Manual
Page 32
32
The Notes Display is affected by the Key/Scale Controls and will display the
notes name after the intervals have been changed to fit the phrase within the
chosen key/scale.
played, the Notes Display will show the resulting notes after the transposition has
taken effect. This buttons also provide the means to edit the recorded note.
Special Sequencer Functions Panel
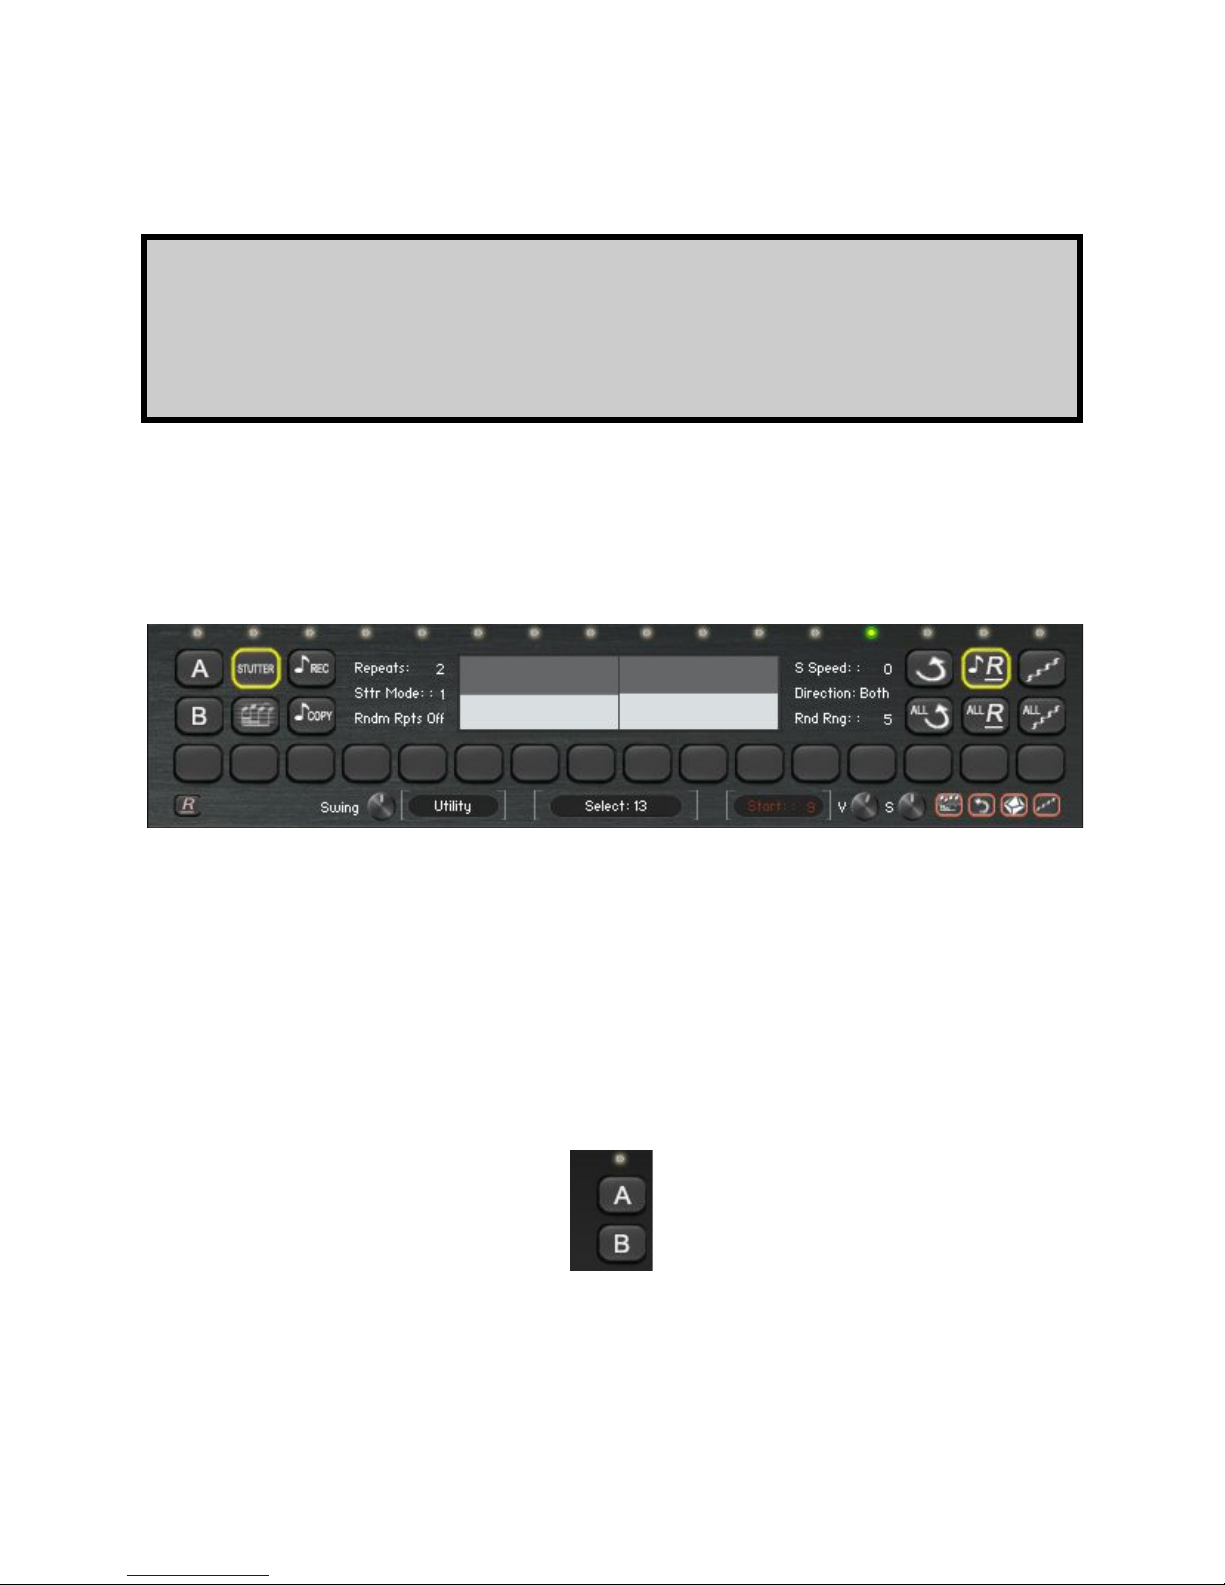
On top of each step there are 16 new led switches. By clicking on each of them we can access
SEQui2R’s New View Panel which contains new functions that are to be set for each
sequencer step.
We will explore all the new functions in this panel from left to right.
Single group allow per step.
By clicking on A or B button, it is possible to select whether Sound Source A or B is playing in
solo for the selected step. Both buttons on is equivalent to both switched off.
AUDIOFIER SEQUI2R EX User Manual
Page 33
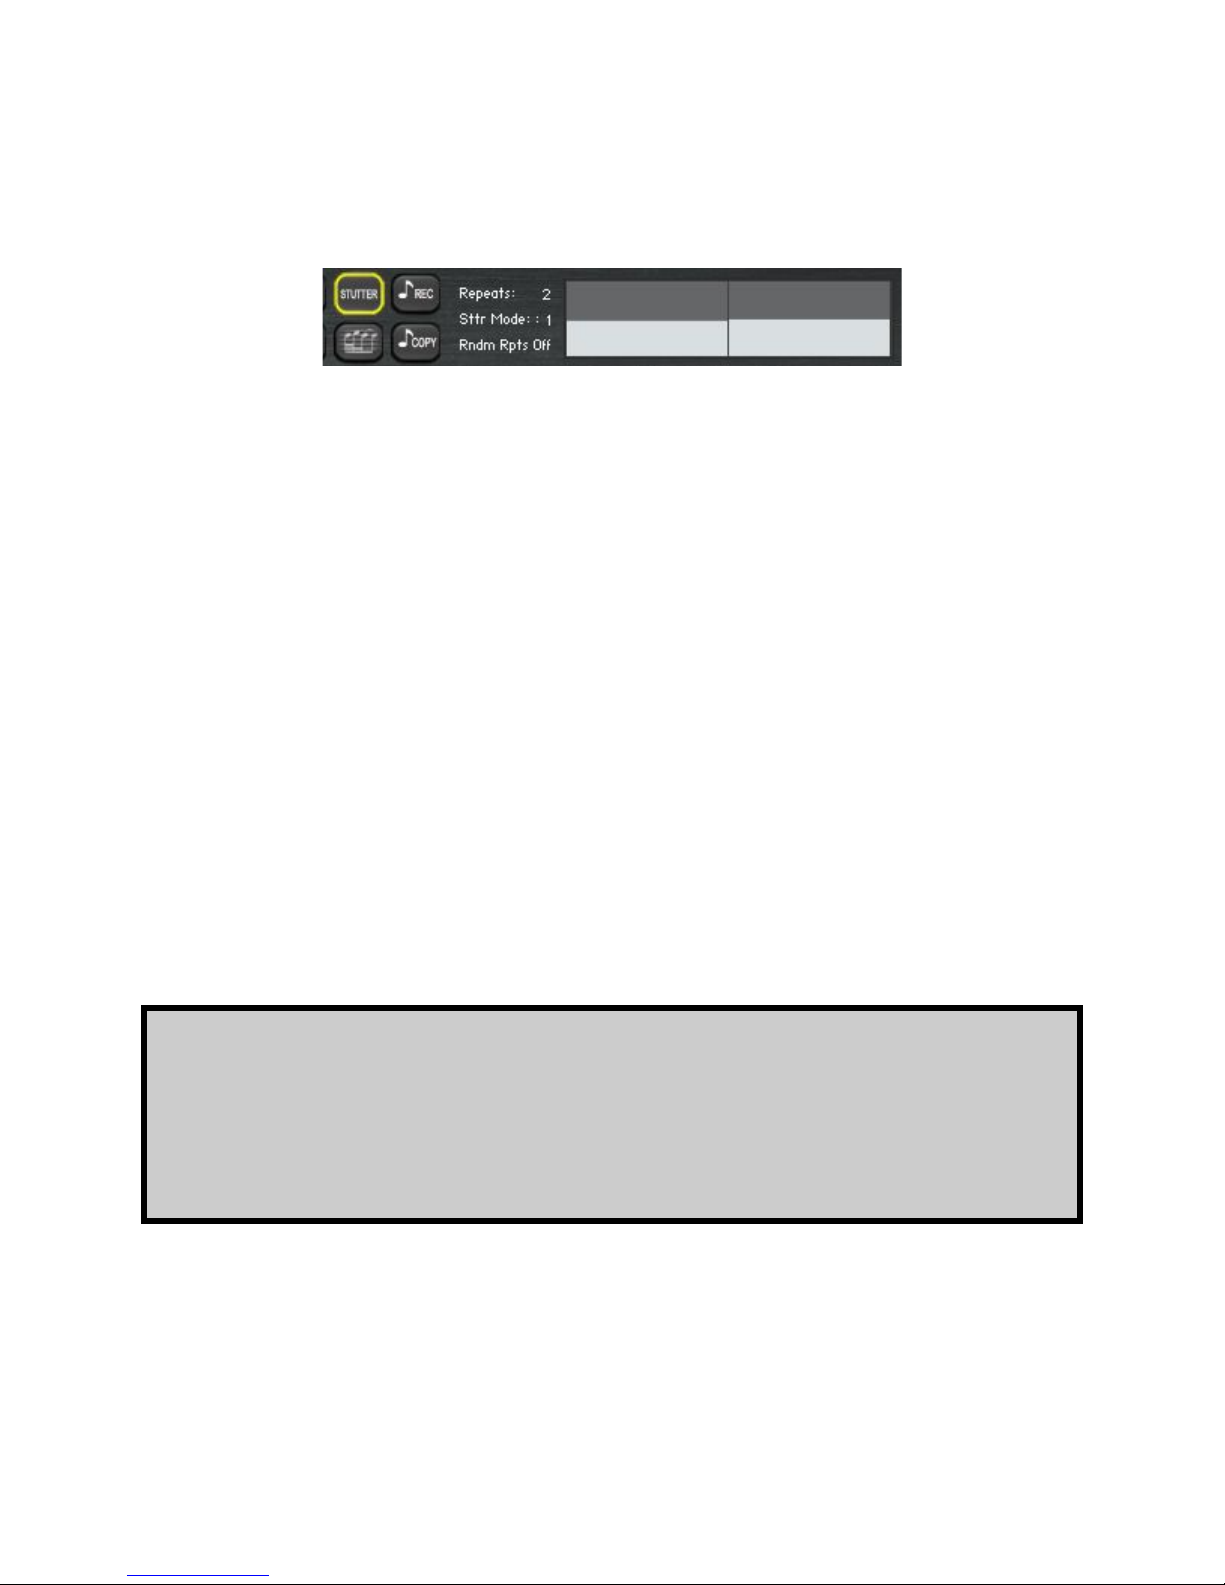
Stutter/ Ornament functions.
In random generated phrases SEQui2R can set rest notes that are not
immediately visible. For this reason at times the Mode 1 Stutter will sound like
Mode 0, because a rest note or a series of rest notes are placed immediately
after the selected step in which we want to apply a stutter effect.
● Stutter Button: activates this function on the selected step.it acts as master switch for the
Ornament function as well.
● Ornament Button: activates this function on the selected step. If off, this step will play in
stutter mode.
● Random Repeats Value Edit: sets the number of Stutter/Ornaments notes: from 1 to 8.
With this function SEQui2R is able to play triplets, quintuplets and more within a straight
16th notes pattern.
● Stutter/Ornament modes:
○ Mode 0: A buzz effect is generated on the step selected, for the length of the step
alone.
○ Mode 1: The duration of the note that starts on this step is divided by the number
of repetitions set on the Repeats Value Edit. Generally the stutter effect will
cover the length of time to the next note, unless a rest note had been recorded, in
which case the Stutter/Ornament effect will get only to the Rest note step.
33
● Velocities table: allows to set the velocity of each stutter/ornament note, overriding the
velocity set on the selected step.
● Ornament Rec: Ornament is a particular type of stutter that repeats notes played by the
user
○ Switch Master Stutter on
AUDIOFIER SEQUI2R EX User Manual
Page 34
○ Switch Stutter Button on
If more notes than the amount indicated in the Repeats Value edit are played,
SEQui2R will ignore this Stutter and it will have to be re-set again.
In random generated phrases the Stutter function might cause errors because of
the nature of the random generated length. Use editing function (User Manual
1.0) to correct any problems in random generated phrases.
○ Set the number of repetitions with the Repeats Value Edit
○ Click on Ornament Rec
○ Play as many notes as indicated with the Repeats Value Edit
○ SEQui2R will prompt you to save.
○ The phrase will play the recorded ornament on the selected step.
● Stutter/Ornament Copy (and Paste): Allows to copy and paste a Stutter/Ornament from
one step to another.
○ Click on Copy once you have selected a step with desired Stutter or Ornament.
○ Select the destination Step
○ The button now will show “Paste”
○ Click on Paste
○ Save the phrase.
● Master Stutter/Ornament switch: activates and deactivates the Stutter/Ornament function
on the fly. It is also controllable via keyswitch (See keyswitches map).
34
AUDIOFIER SEQUI2R EX User Manual
Page 35
Reverse Notes per Step.
The Master Reverse Speed Knob needs to be set for each project as it does not
adjust automatically to the song tempo.
This function allows to reverse the sound on the selected step.
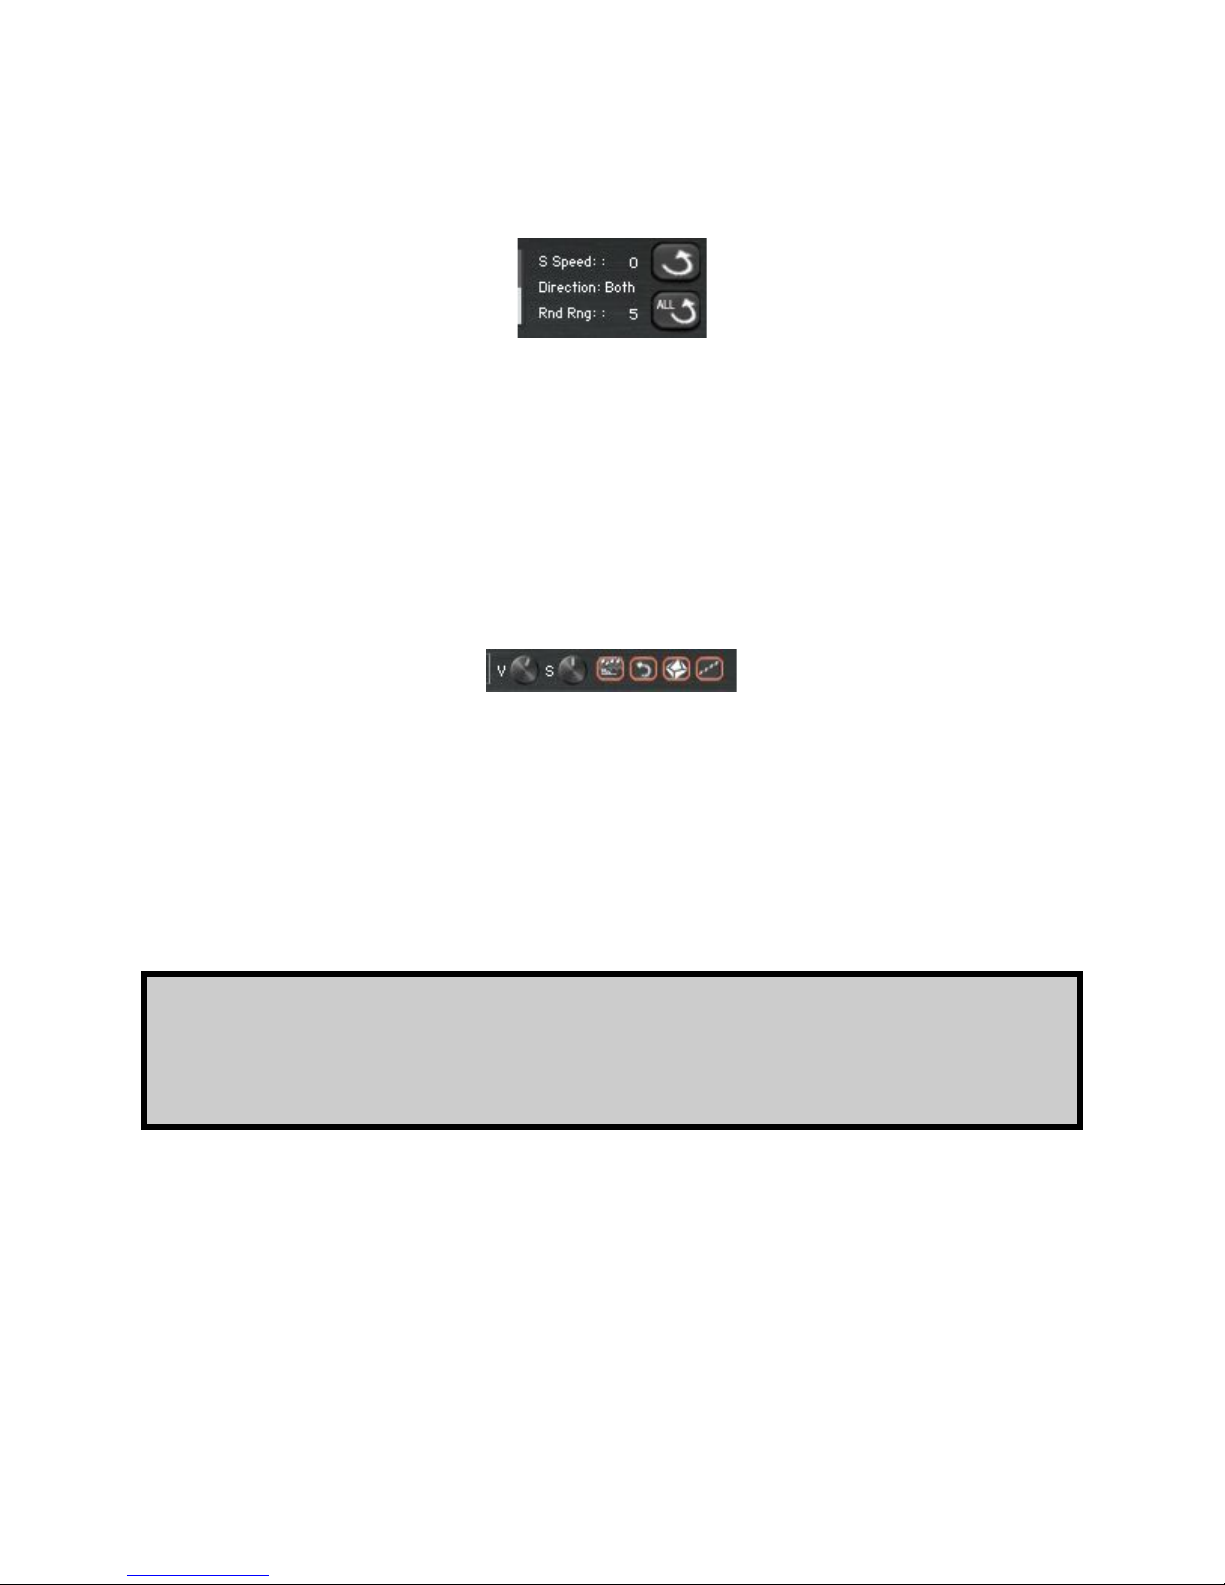
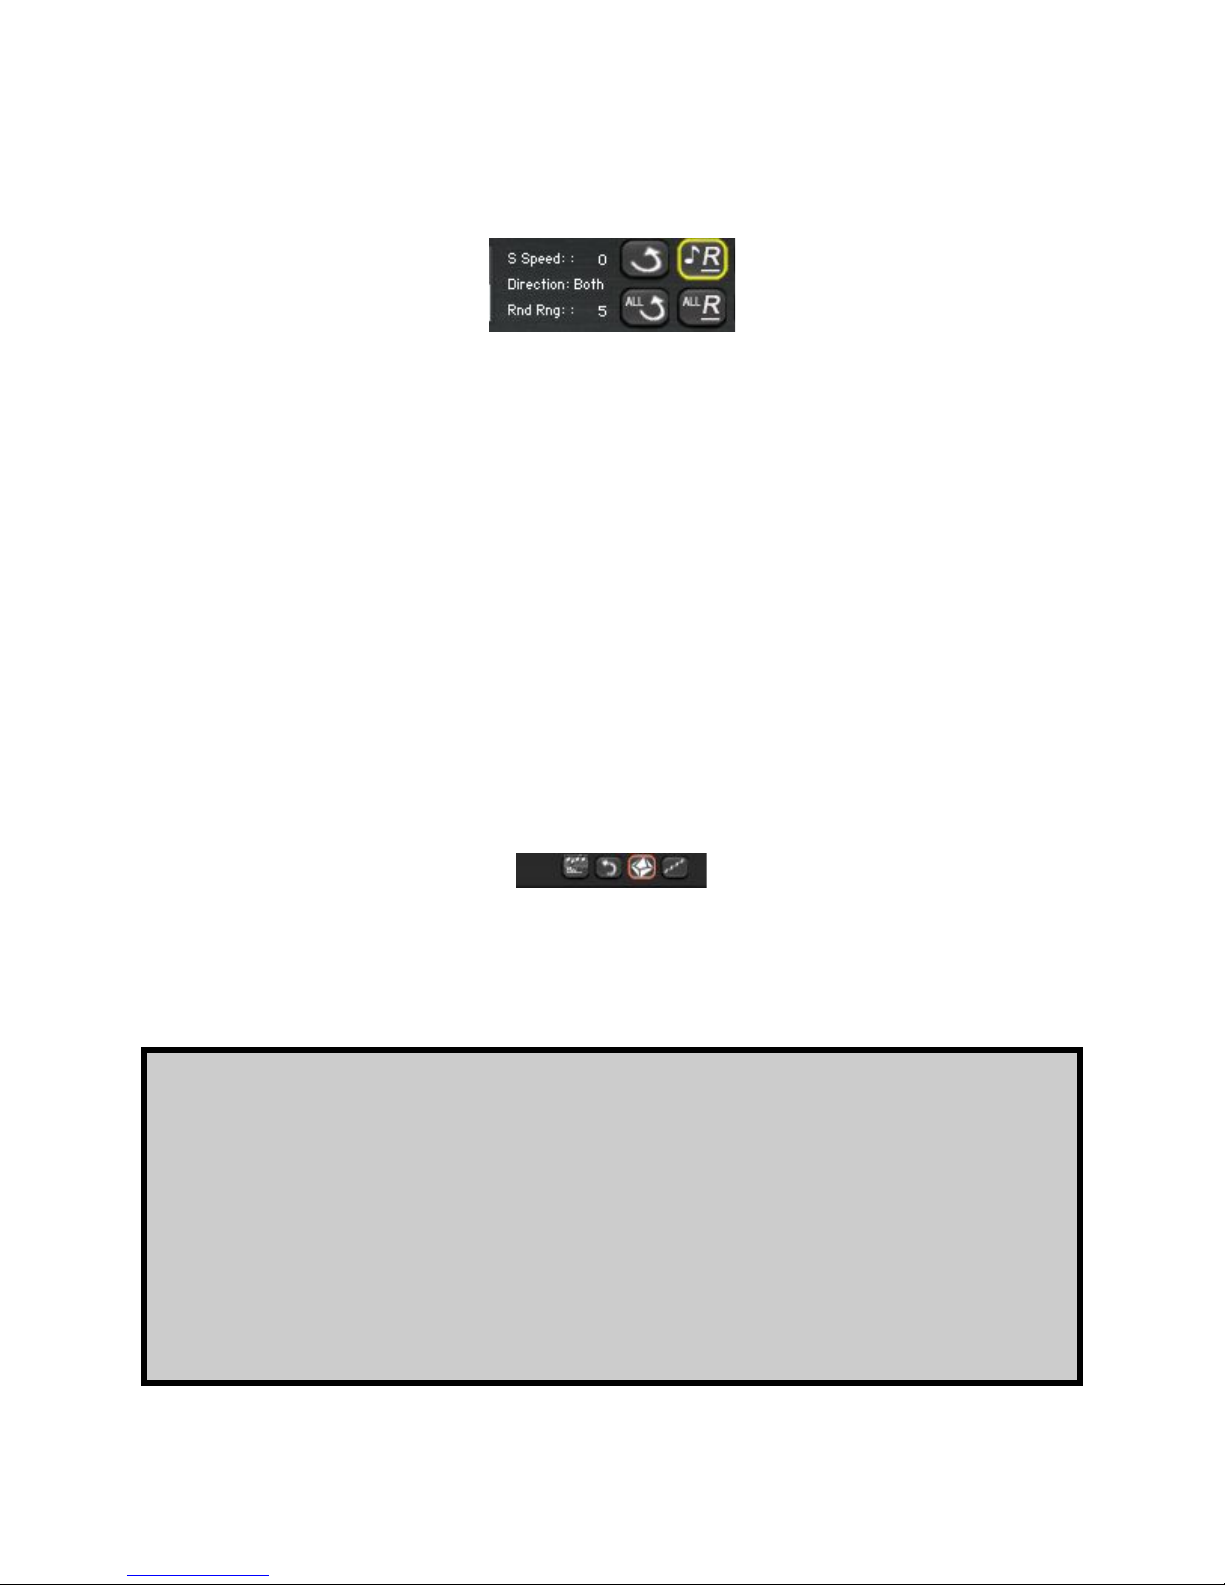
● Reverse Button: Switches the reverse function on the selected step on or off.
● Reverse All Button: Switches the reverse function on all steps at once on or off.
● Step Speed Knob: it adjust the speed of the reverse sound for the selected step. It works
in conjunction with the Master Reverse Speed Knob which needs to be set first.
35
● Reverse Volume Knob: it adjust the volume of the reverse sound. It works in conjunction
with the Main Group Volume.
● Master Reverse Speed Knob: it adjust the speed of the reverse sound at a master level.
A faster speed will produce a more prominent “sucking” effect.
● Reverse Master Switch: It controls the reverse function. It can be controlled with a
keyswitch (See keyswitches map).
AUDIOFIER SEQUI2R EX User Manual
Page 36
36
When using Midi Drag and drop function of phrases that contain Random Notes,
pls do not expect the MIDI FILE to play a random note as SEQui2R does.
Likewise, if you layer SEqui2R with another instrument playing the MIDI FILE, do
not expect SEQui2R to randomise the notes the same way they are in the MIDI
FILE.
Similarly, the MIDI FILe will not contain any Reverse Sound information for
another instrument to interpret.
Random Notes per Step.
This function allows SEQui2R to generate random notes on the selected step. This effect is best
achieved when a Key/Scale is set.
● Random Button: it switches on/off this function on the selected step.
● All Notes Random Button: Switches the random function on all steps at once on or off.
● Random Range: It sets the boundaries in semitones for the random notes to be
generated. Up to 12 Semitones below and above the selected note.
○ Both: notes both above and below the note set on the step will be generated.
○ Up: only notes above the note set on the step will be generated.
○ Down: only notes below the note set on the step will be generated.
● Master Random Switch: it switches on/off this function. It can be controlled with a
keyswitch (See keyswitches map).
AUDIOFIER SEQUI2R EX User Manual
Page 37
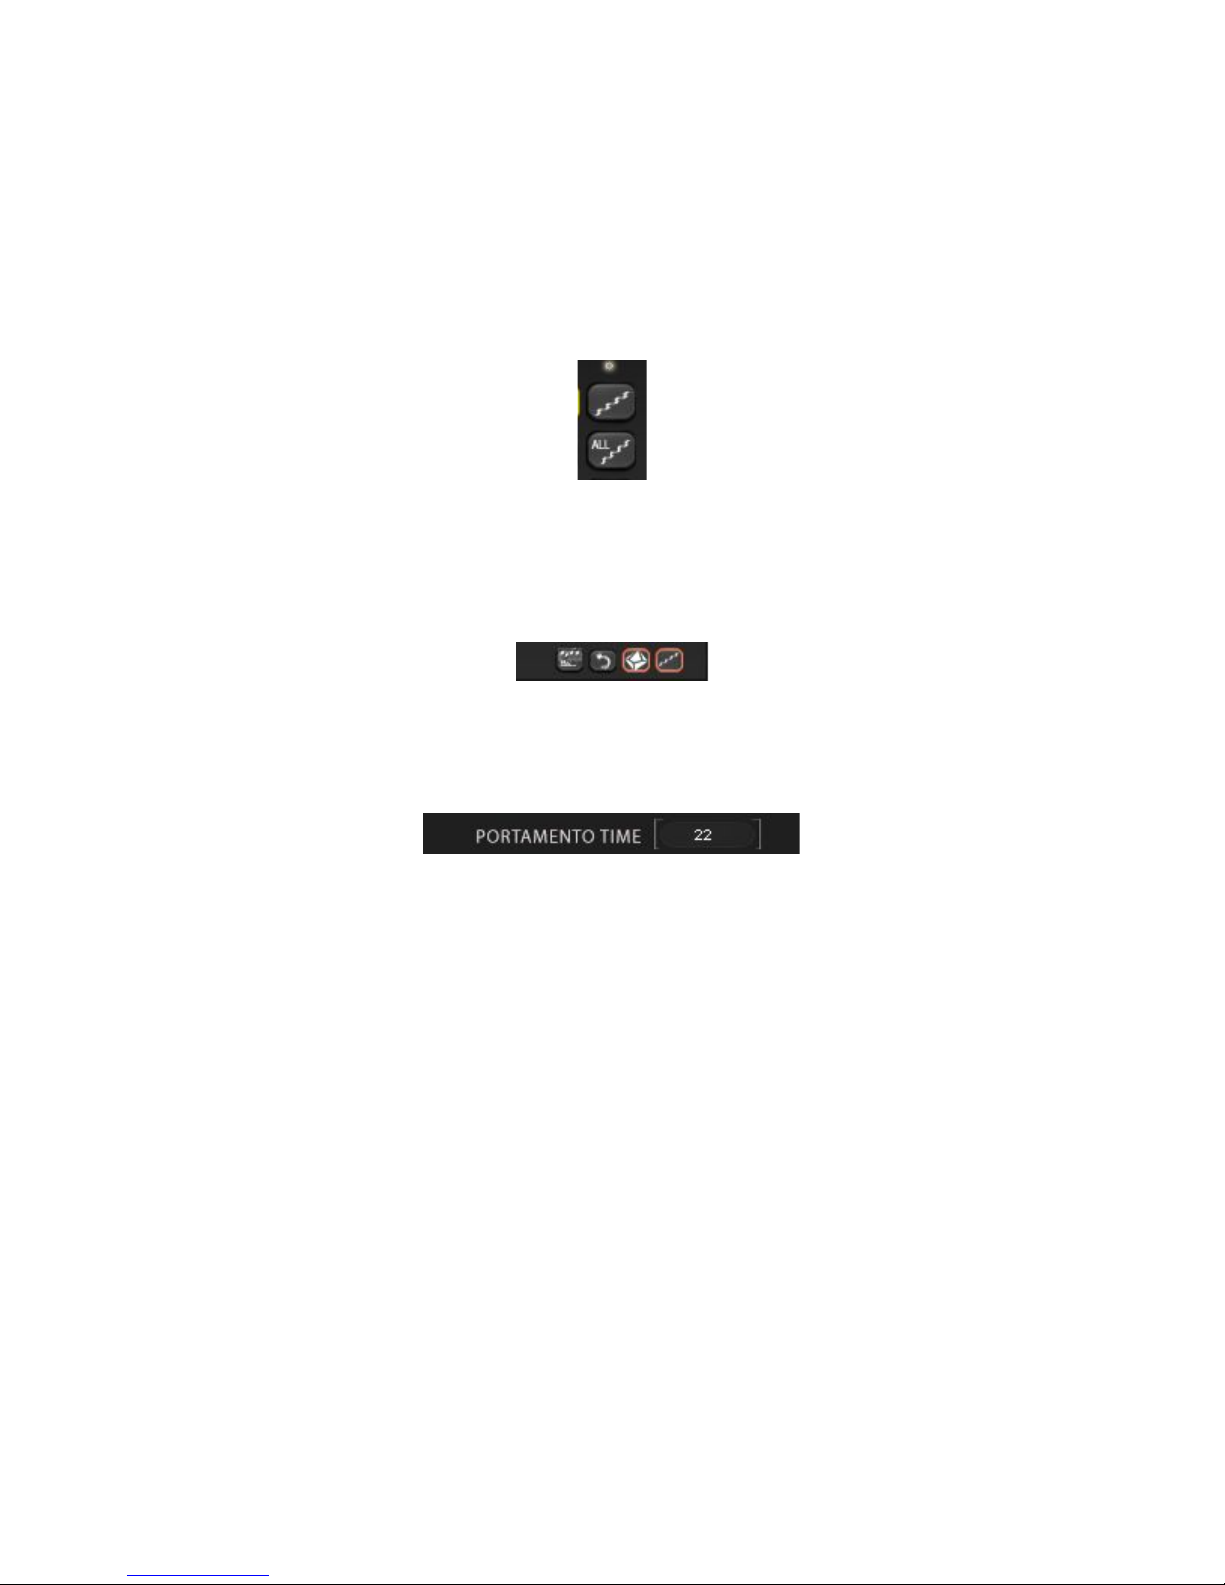
Portamento
It generates a glide/legato effect on the selected steps.
● Portamento Switch: it switches on/off this function on the selected step.
● All Steps portamento: Switches the portamento effect on all steps at once on or off.
37
● Master Portamento Switch: : it switches on/off this function. It can be controlled with a
keyswitch (See keyswitches map).
● Portamento Time: it controls the speed and amount of the glide effect. This control is
located in the Options Page.
AUDIOFIER SEQUI2R EX User Manual
Page 38
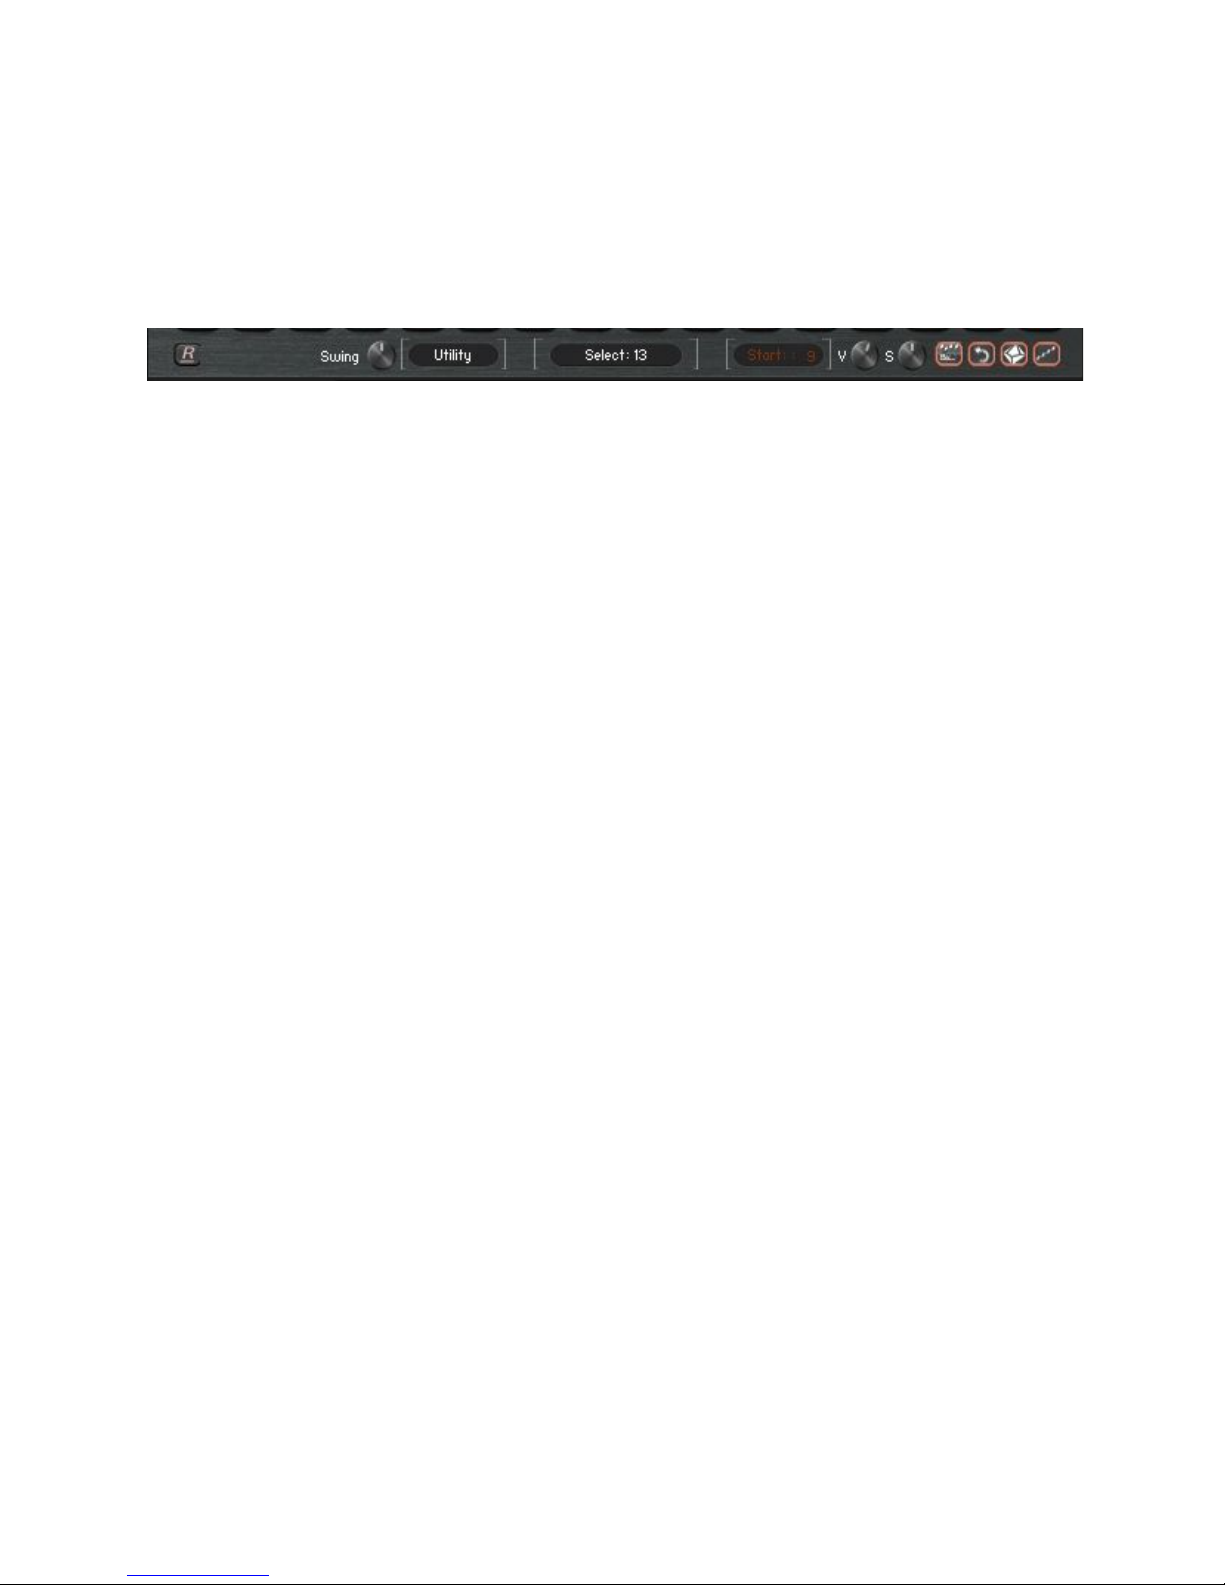
Bottom Panel:
This panel contains the following:
● UTILITY MENU: This menu offers options to facilitate editing and general phrase
parameters changes.
○ COPY: the selected values among Volume, Pan, Cutoff, Distortion, Lo-Fi
and Talk, which is visually represented by the Sequence Sliders and
Indicator Label, can be copied and pasted onto another of the same or
different kind. For instance a Step Volume pattern from Group A can be
copied onto Group B Step Pan pattern.
○ PASTE: the selected values among Volume, Pan, Cutoff, Distortion, Lo-Fi
and Talk, which is visually represented by the Sequence Sliders and
Indicator Label, can be copied and pasted onto another of the same or
different kind. For instance a Step Volume pattern from Group A can be
copied onto a Step Pan pattern. To do so, first select the desired
parameter in the Group Panel (its title needs to become red). Then in the
Utility Menu, choose Copy. Now select the destination Parameter again in
the Group Panel (its title needs to become red). Then choose Paste in the
Utility Menu and Save straight away.
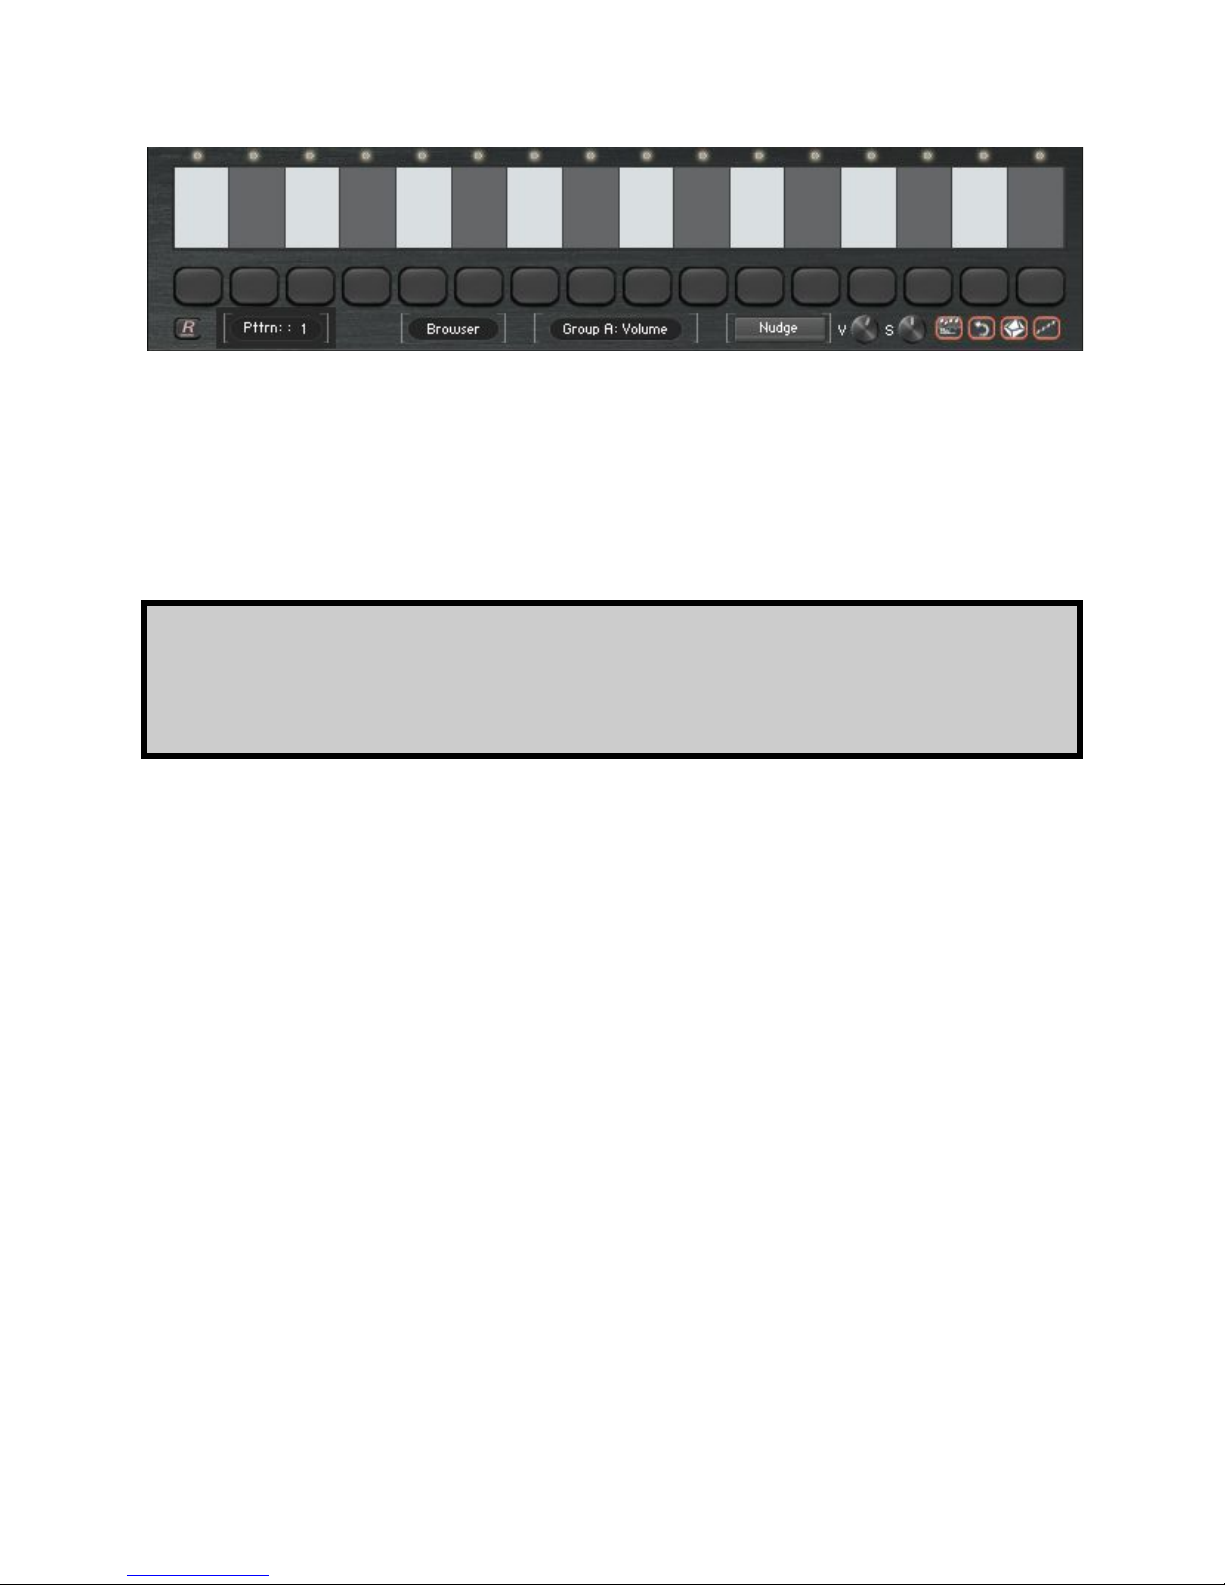
○ BROWSER: This utility reveals 10 (at the time of writing) premade
patterns which are selectable with the Pattern Select value edit which will
appear at the bottom left of the GUI when the Browser utility is chosen.
The Nudge button also will appear, at the right of the Indicator Label. By
clicking on this button, the pattern shown on the Browser will be nudged
by one step, resulting in a slightly modified version of the pattern.
38
AUDIOFIER SEQUI2R EX User Manual
Page 39
39
Please note that The Tempo Behaviour value will not be exported, therefore not
imported.
○ IMPORT: This utility allows to import a phrase with all its parameters and
effects from a folder where previously it was exported into as a .nka file.
○ EXPORT: This utility allows to export a phrase with all its parameters and
effects to a specified folder as a .nka file.
● INDICATOR; This is a label that displays what values are selected for editing.
Available values are: Sequence (Global), Volume, Pan, Cutoff, Distortion, Lo-Fi
and Talk (for each group).
● OPTIONAL START: This value edit allows to select from which step the optional
start feature will begin. When inactive, its writing is in red color. When active, it
becomes white. This function is activated/disactivated with the Purple key
switches (G#-1, A-1). It is overridden by the Green key switch (B-1) which
activates the Legato Start function. In this case the writing “Start” is replace by
“Leg on” to indicate this function is active.
● SWING: this knob controls the amount of swing of a phrase.
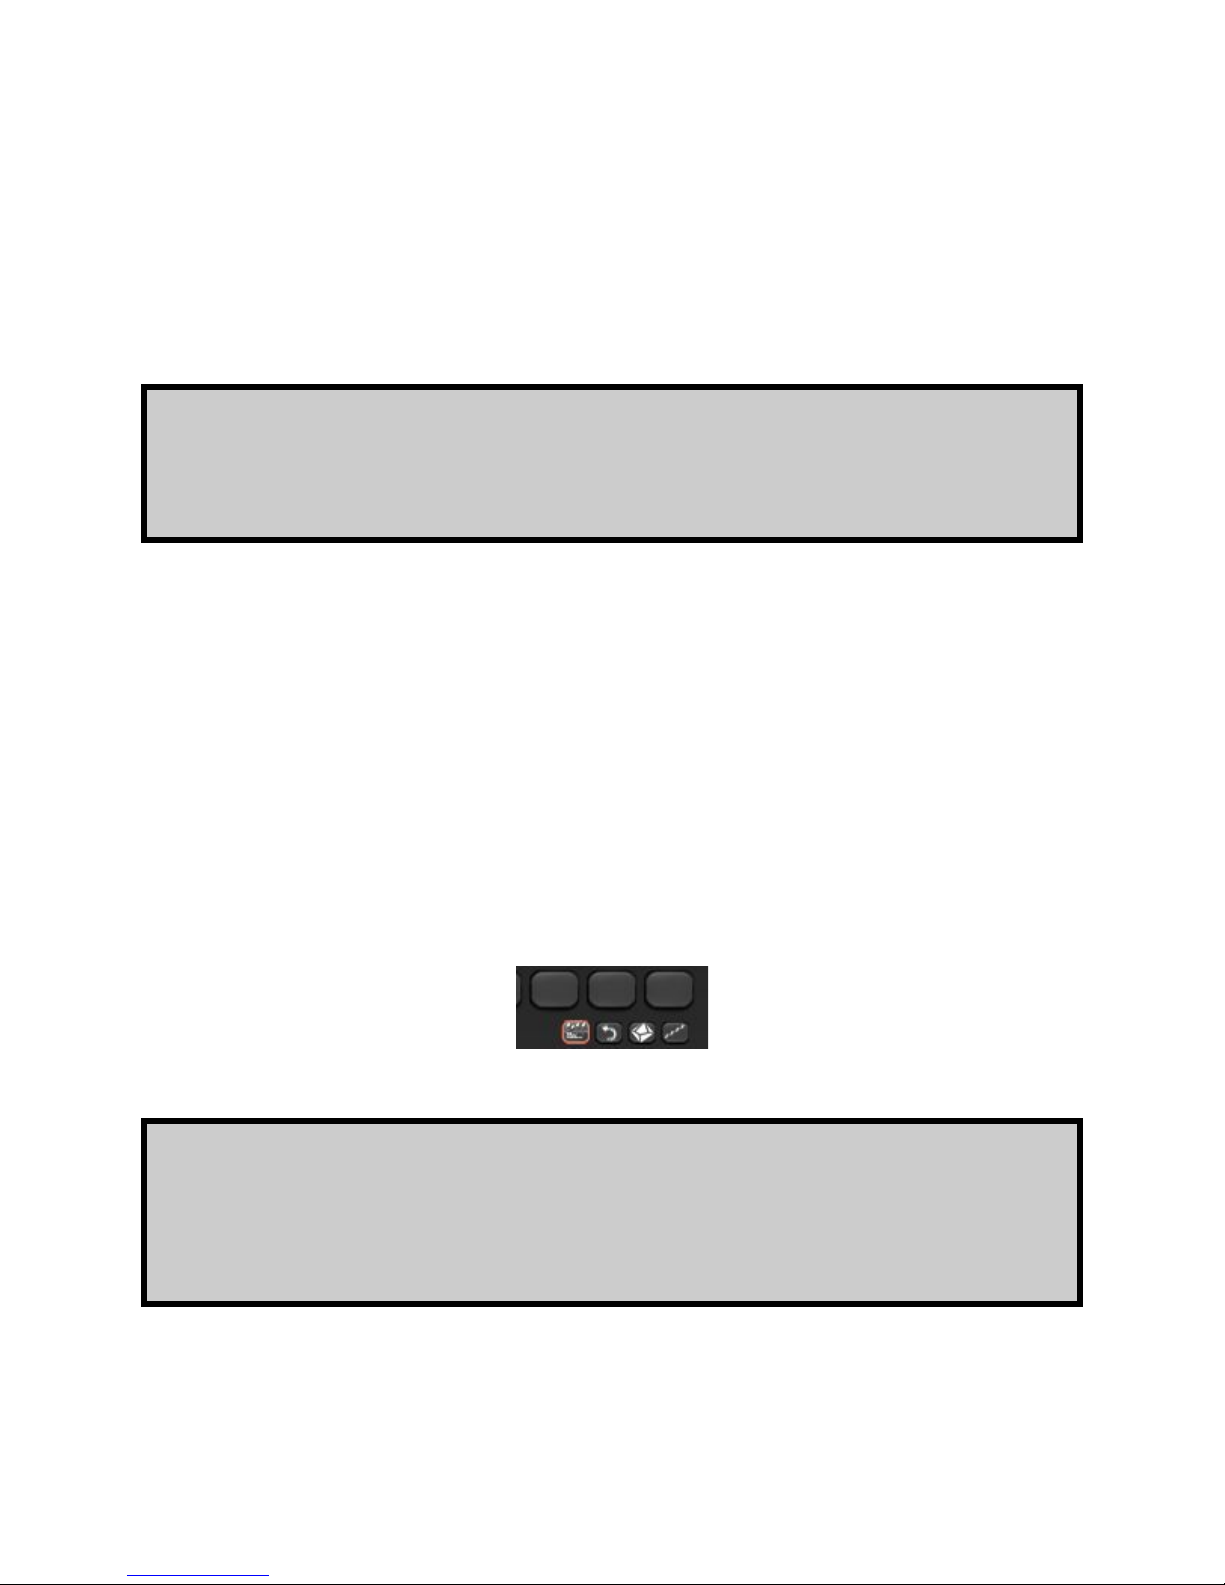
● SIMPLE PATTERN DRAWER ACTIVATOR: this small led button will lit when
clicked and the normal Kontakt style table will replace the Sequence Sliders,
allowing for a faster pattern shape drawing. It is recommended to Save as soon
as the shape is drawn.
AUDIOFIER SEQUI2R EX User Manual
Page 40
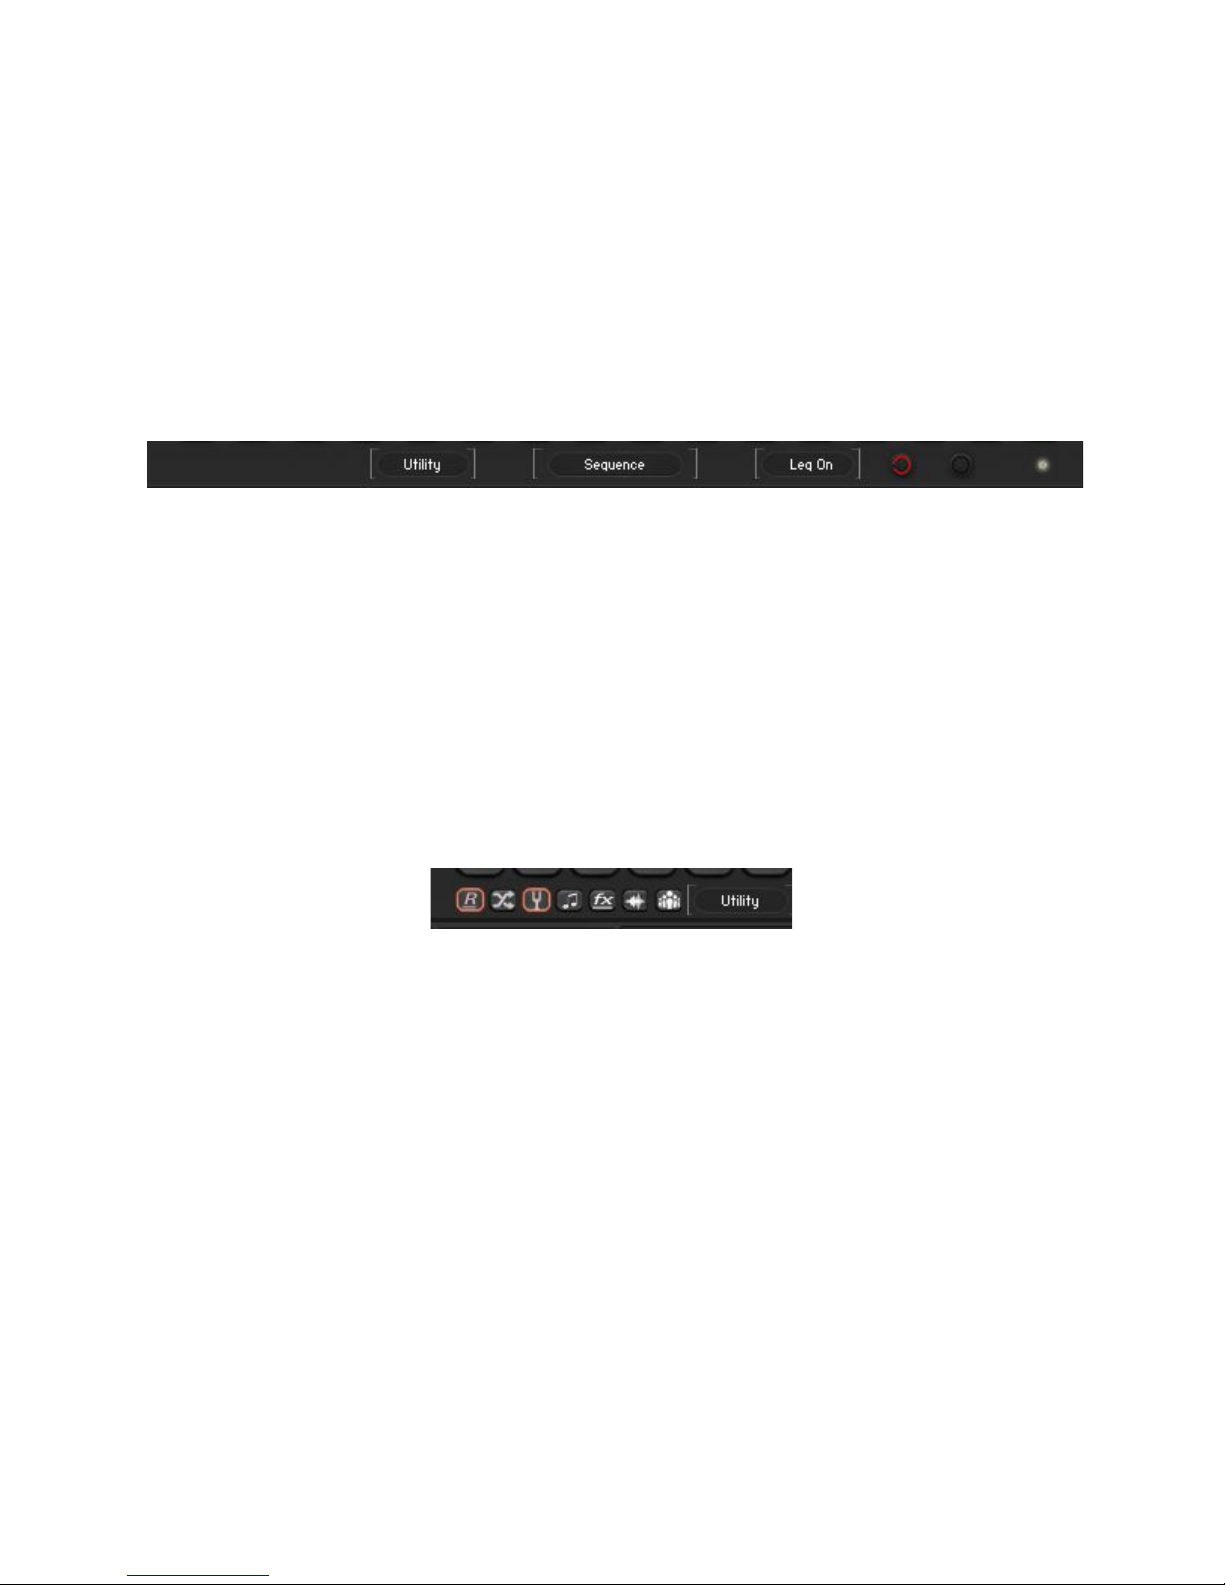
40
Smart Legato Phrasing Function
SEQui2R now recognizes when the user has left the keys for a specific length of time and starts
the following phrase from its first step. Before this was not possible and the user had to switch
the legato function off in order to start the following phrase from the first step and subsequently
“legato on” in order to activate it. Now the legato keyswitch can be set at the beginning of a
phrase and left on until desired (providing there is a sufficient gap of time between the last
legato line and the following phrase that needs to start on the first step).
● LEGATO START: With legato activated, a knob appears beside “Legato on”
label. This knob should be used with care. It sets the Time Gap SEQui2R waits
before “deciding” to start the phrase from the first step, when triggered again. In
other words once the user releases his hands from the keyboard, SEQui2R will
wait for a set time, if no keys are triggered then SEQui2R will set the first step as
the starting note.
Randomisation Engine
This engine allows to create random phrases, sounds and step effects.
● Random Access Button: Normally this is the only button displayed at startup. It reveals
and hides all others random engine controls.
● Random Button: by clicking this button, the random engine is activated.
● Random Pitches button: when this is on, a random phrase can be generated when the
random engine is activated. The steps duration is set as normal with the Note Length
Menu.
● Random Durations Button: this overrides the Note Length Menu. When on, random
durations notes can be generated when the random engine is activated.
AUDIOFIER SEQUI2R EX User Manual
Page 41

41
In random generated phrases the Stutter function might cause errors because of
the nature of the random generated length. Use editing function (User Manual
1.0) to correct any problems in random generated phrases.
● Random Step Effects: when on, random step effects (Pan, Filters, Distortion, Talk, And
Lo-FI) can be generated when the random engine is activated.
● Random Sound Sources: when on, 2 random Sound Sources are chosen among the
Sound Category set in the menus.
● Random Sound Category Button: When on, 2 random Sound Sources are chosen
among all SEQui2R’s Sound Sources.
All this function can be set at once, randomizing phrases, sounds and step effects altogether.
AUDIOFIER SEQUI2R EX User Manual
Page 42
42
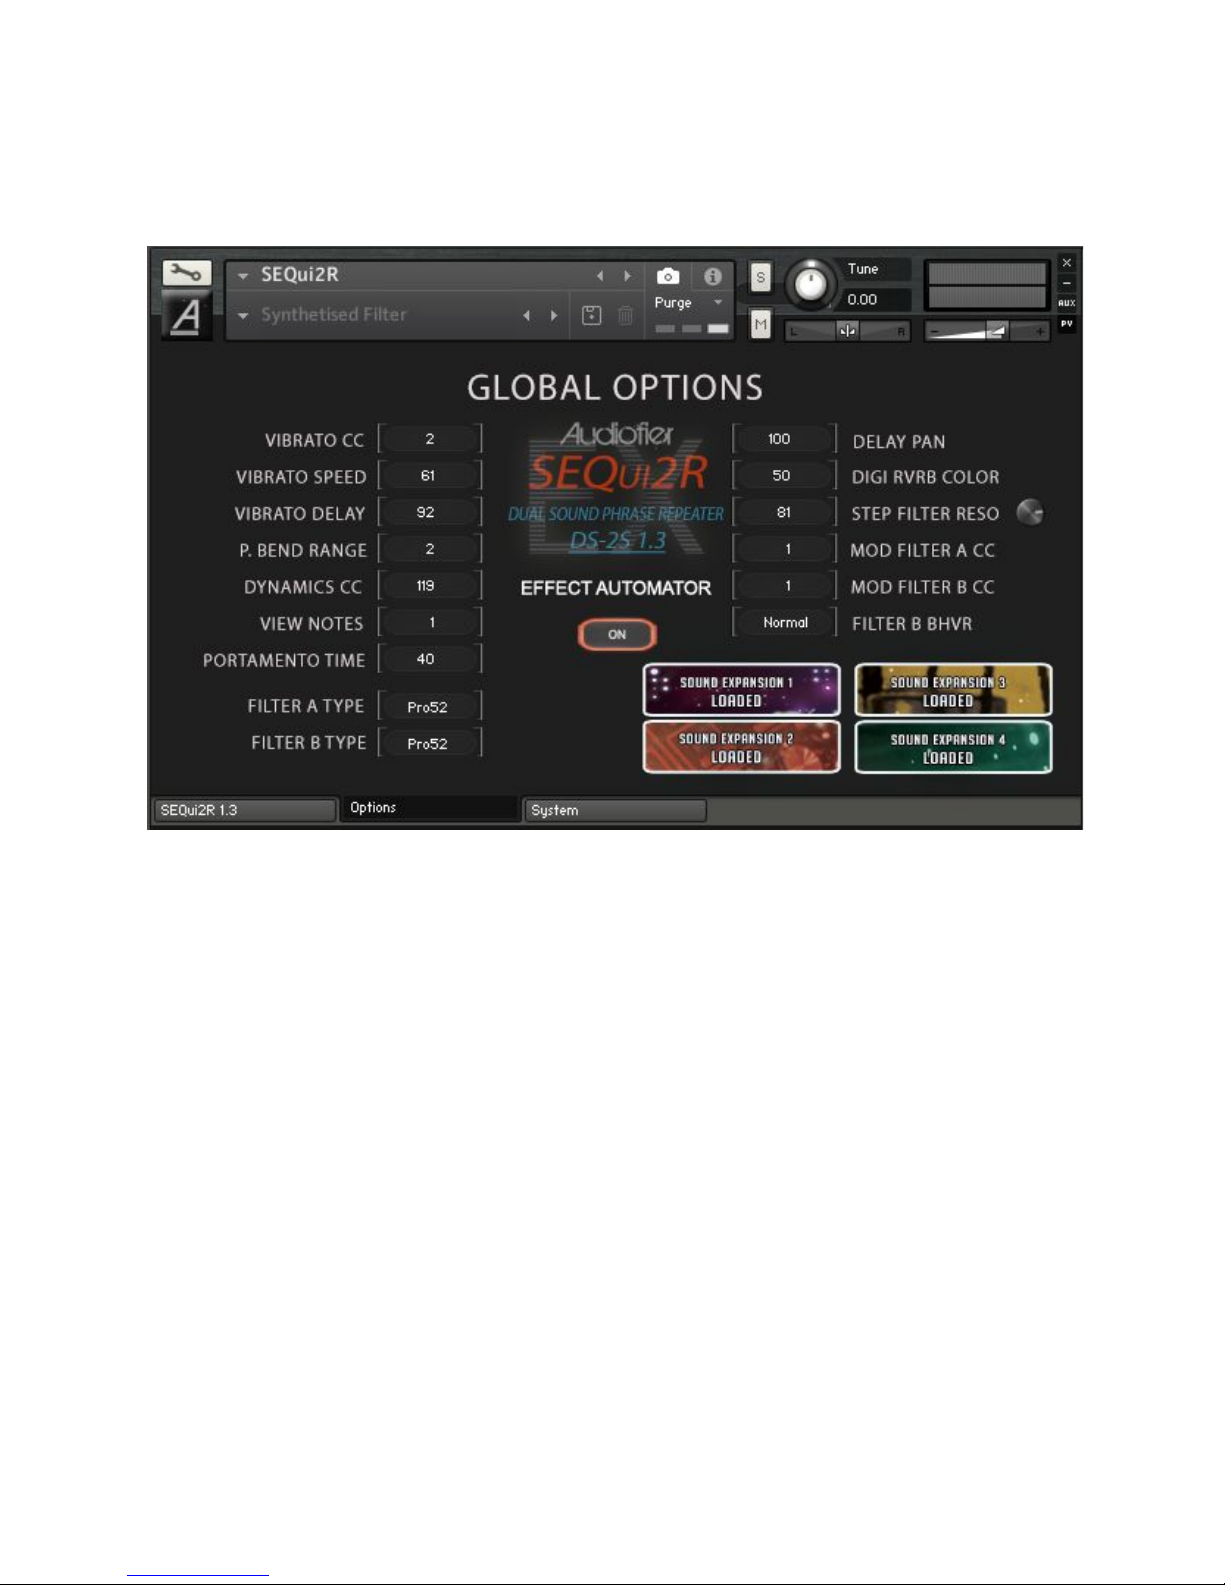
User Interface: Options Page
The Global Options page offers a few controls which are to be stored in each Patch/Snapshot.
● VIBRATO CC: this allows to select which Midi controller will control the
amount of vibrato for the whole patch.
● VIBRATO SPEED: this value edit allows to set the speed of the vibrato for
the whole patch.
● VIBRATO DELAY: this value edit allows to set the time gap before the
vibrato for the whole patch starts.
● PITCH BEND RANGE: this value edit allows to set the Pitch Bend range.
Note that the Pitch bend Amount in the Sequencer Panel will be
dependent on this value.
● DYNAMICS CC: this allows to select which Midi controller will control the
amount of Velocity reduction for dynamic control. This allows real time
dynamics (velocity) change of a pre-recorded phrase.
AUDIOFIER SEQUI2R EX User Manual
Page 43

43
● VIEW NOTES: When this value edit is set to 1, every script generated
note will be shown on the Kontakt Keyboard. On position 0, it will only
show the keys that the user presses.
● DELAY PAN: this value edit allows to set the amount of stereo effect (ping
pong) on the delay. This value is common for both Sound Sources.
● DIGITAL REVERB COLOR: this value edit allows to set the
color/dampness of Kontakt’s internal digital reverb.
● STEP FILTER RESONANCE: this value edit allows to set the resonance
value of the step filter for which the cutoff is set in the Sequencer Panel.
This value is common for both groups.
○ Step Resonance Control Knob: This is a small knob that has been
added next to the Step Filter Resonance Value edit. Now the user
can manipulate the resonance values (which are the same for
both Group A and B) when using the Step Filter. Additionally this
knob can be CC controlled.
● MOD FILTER A CC: this allows to select which Midi controller will control
the cutoff for Group A’s filter. It will override the Cutoff Knob in the main
GUI.
● MOD FILTER B CC: this allows to select which Midi controller will control
the cutoff for Group B’s filter. It will override the Cutoff Knob in the main
GUI.
● FILTER B BEHAVIOUR: this menu allows to choose whether Group B’s
main filter will behave normally or inversely in respect to Group A’s main
filter. In inverse mode, it is possible to create the effect of Sound Source
A’s filter closing when Group B’s filter opens. A kind of crossfading filter
behaviour.
● EFFECT AUTOMATOR: If activated it is possible to save different effect
bypass states for each phrase in a patch. For instance a Step Filter Cutoff
is automated in phrase 1, but totally bypassed on phrase 2. If inactive, the
bypass states will not respond and each effect will maintain its state on
every phrase.
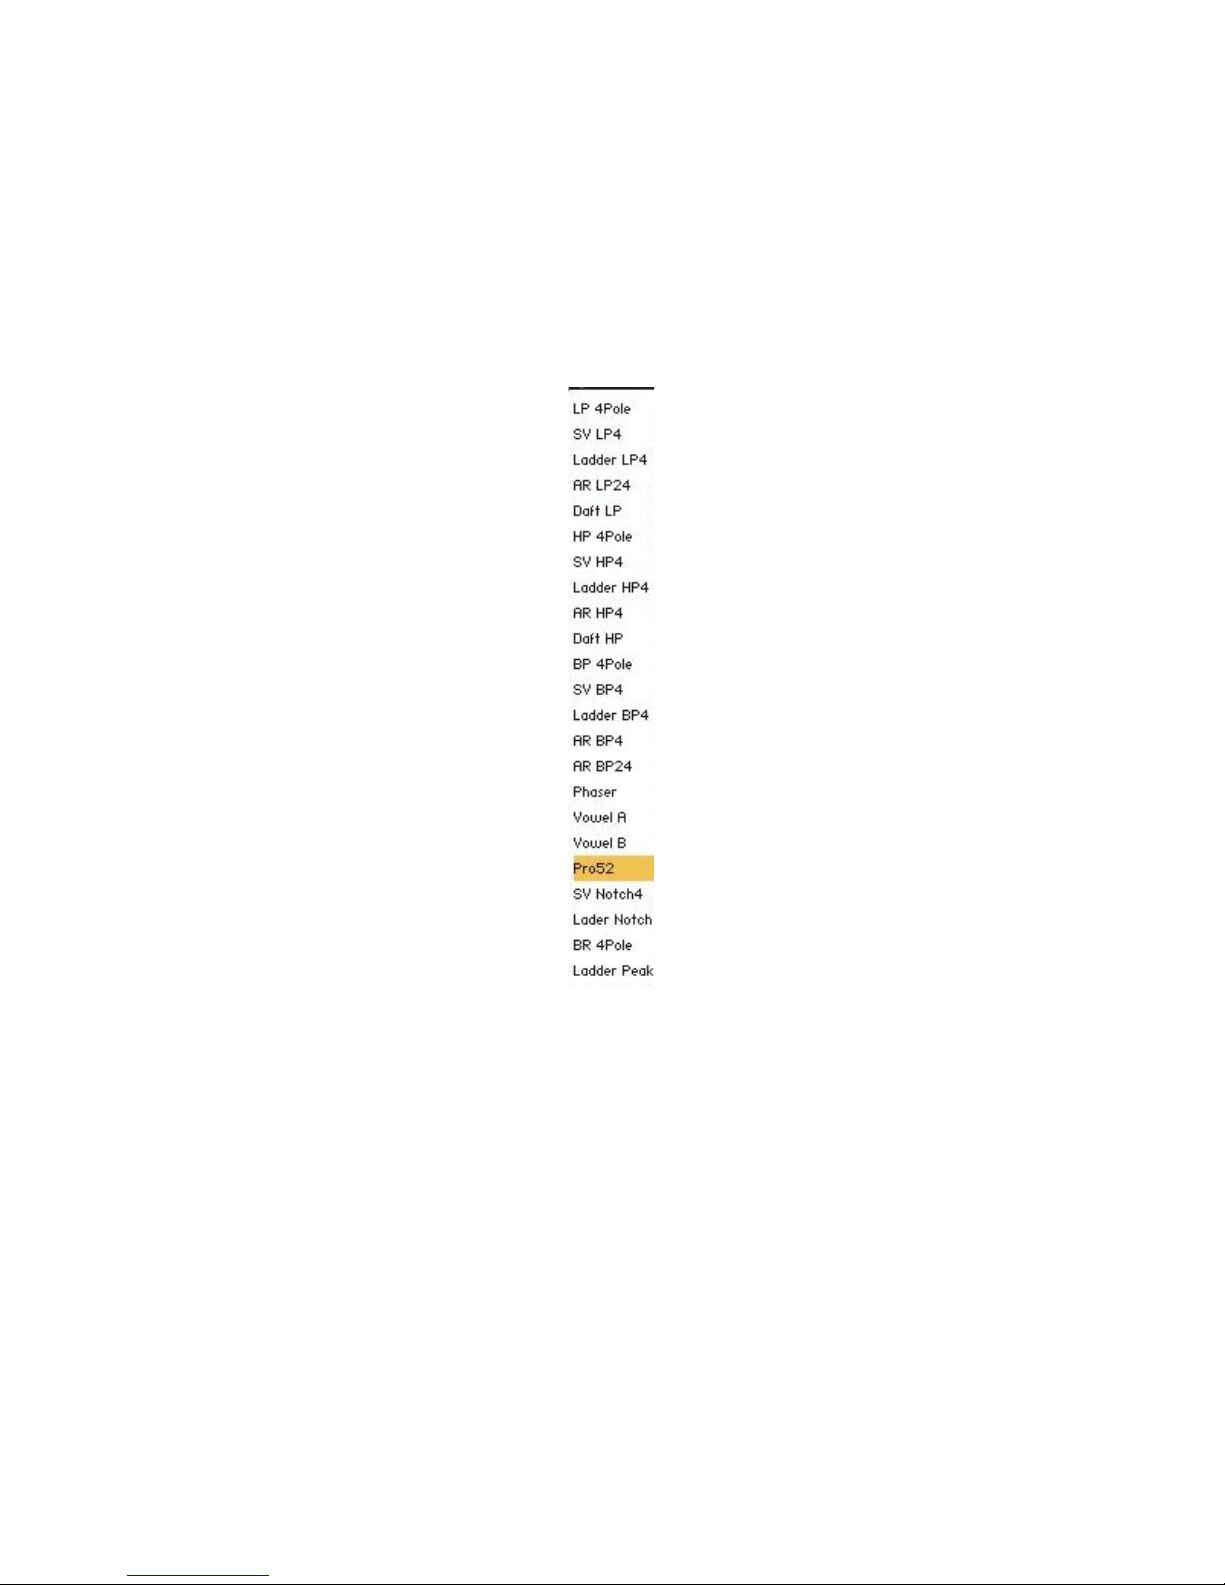
● FILTER A TYPE: this menu allows to choose the type of Step Filter (not to
be confused with the Main Group Filter which is controllable by the Cutoff
AUDIOFIER SEQUI2R EX User Manual
Page 44
44
and Resonance knobs on the Env page of the Sound Panel). Find below
a picture of all available types.
● FILTER B TYPE: this menu allows to choose the type of Step Filter (not to
be confused with the Main Group Filter which is controllable by the Cutoff
and resonance knobs on the Env page of the Sound Panel). Find below a
picture of all available types.
AUDIOFIER SEQUI2R EX User Manual
Page 45

Recording workflow
At the moment of writing, SEQUI2R EX doesn’t like phrases starting with a rest.
To work around this, start with a note at minimum velocity, 0 if possible
(otherwise you can always re-edit the velocity value to 0 later).
It is possible to record notes up to a certain step only. Then press Save to
complete the phrase. SEQUI2R EX will fill the remaining steps with rests.
Notes only recording:
In order to record a new phrase please perform the following steps:
1. Click on the Sequences Selector button correspondent to the phrase number you
desired to record onto. Its border will light up.
2. Click on REC button. It will light up.
3. Select the note value for the first note by using the Note Value Menu on the
Sequencer Panel or by using one of the Purple keys (D0, A0).
4. Play the desired note. Available note range is generally from C1 onwards. Double
check your Sound Sources playable range by clicking on letter A or B. All yellow
and/or blue keys after C1 will trigger a sound.
5. To change the note value for the following note repeat step 3, then 4. Otherwise
repeat step 4 only.
6. To insert a rest, first choose its value by using the Note Value Menu on the
Sequencer Panel or by using one of the Purple keys (D0, A0), then press the red
key (C0)
7. Repeat step 3,4,5 and/or 6 as required till the end of the phrase when the Save
button will light up. At this point, for safety, press Save and, if REC is still on,
depress REC.
8. Now play the phrase from the starting note and SEQUI2R EX will repeat it
correctly.
9. To record a new phrase start from step 1 choosing a different Sequence
Selector.
10. To edit any of the recorded notes please refer to the Editing section of this
manual.
45
AUDIOFIER SEQUI2R EX User Manual
Page 46

Choose the Feel of the phrase (Normal or Triplets) before starting the recording
process. In Triplets Feel, the notes values are to be considered as triplets. So
that a 16th note will sound as 16th triplet (or 24th).
Advanced recording:
At the moment of writing, SEQUI2R EX doesn’t like phrases starting with a rest.
To work around this, start with a note at minimum velocity, 0 if possible
(otherwise you can always re-edit the velocity value to 0 later).
This method allows to record simultaneously notes and various parameters.
1. Click on the Sequences Selector button correspondent to the phrase number you
desired to record onto. Its border will light up.
2. Click on REC button. It will light up.
3. Select the note value for the first note by using the Note Value Menu on the Sequencer
Panel or by using one of the Purple keys (D0, A0).
4. Set any of the desired value of Choke and/or Bend in the Sequencer Panel.
5. To set any value of Step Volume,Pan, Cutoff, Distortion, Lo-Fi and Talk, first click on the
letter A or B (whether you want to set the values for Group/Slot A or B)
6. Play the desired note. Available note range is generally from C1 onwards. Double check
your Sound Sources playable range by clicking on letter A or B. All yellow and/or blue
keys after C1 will trigger a sound.
7. To change the note value for the following note repeat step 3 to 6. Otherwise repeat
from step 4 only.
8. To insert a rest, first choose its value by using the Note Value Menu on the Sequencer
Panel or by using one of the Purple keys (D0, A0), then press the red key (C0)
9. Repeat step 3 to 6 and/or 7 as required till the end of the phrase when the Save button
will light up. At this point, for safety, press Save and, if REC is still on, depress REC.
10. Now play the phrase from the starting note and SEQUI2R EX will repeat it correctly.
11. To record a new phrase start from step 1 choosing a different Sequence Selector.
12. To edit any of the recorded notes or effect values please refer to the Editing section of
this manual.
46
AUDIOFIER SEQUI2R EX User Manual
Page 47

47
It is possible to record notes up to a certain step only. Then press Save to
complete the phrase. SEQUI2R EX will fill the remaining steps with rests.
Choose the Feel of the phrase (Normal or Triplets) before starting the recording
process. In Triplets Feel, the notes values are to be considered as triplets. So
that a 16th note will sound as 16th triplet (or 24th).
Recording maintaining Step-fx values:
This method allows to record notes while keeping all various parameters of Step Pan, Volume,
Cutoff etc....including choke and Bend values. it is useful when a phrase has been copied and it
is required only to re-record notes.
1. Click on the Sequences Selector button correspondent to the phrase number you
desired to record onto. Its border will light up.
2. Click on Free Edit button. It will light up.
3. Click on REC button. It will light up.
4. Select the note value for the first note by using the Note Value Menu on the
Sequencer Panel or by using one of the Purple keys (D0, A0)
5. Play the desired note. Available note range is generally from C1 onwards. Double
check your Sound Sources playable range by clicking on letter A or B. All yellow and/or
blue keys after C1 will trigger a sound.
6. To change the note value for the following note repeat step 4 to 5. Otherwise
repeat step 5 only.
7. To insert a rest, first choose its value by using the Note Value Menu on the
Sequencer Panel or by using one of the Purple keys (D0, A0), then press the red key
(C0)
8. Repeat step 4 to 6 and/or 7 as required till the end of the phrase when the Save
button will light up. At this point, for safety, press Save and, if REC is still on, depress
REC.
AUDIOFIER SEQUI2R EX User Manual
Page 48

48
At the moment of writing, SEQUI2R EX doesn’t like phrases starting with a rest.
To work around this, start with a note at minimum velocity, 0 if possible
(otherwise you can always re-edit the velocity value to 0 later).
It is possible to record notes up to a certain step only. Then press Save to
complete the phrase. SEQUI2R EX will fill the remaining steps with rests.
Choose the Feel of the phrase (Normal or Triplets) before starting the recording
process. In Triplets Feel, the notes values are to be considered as triplets. So
that a 16th note will sound as 16th triplet (or 24th).
SEQUI2R EX will replace the old notes with the new ones from the step indicated
by the POS value. If the new chosen note value differs from the previously
recorded one it might be possible that a few of the old notes will remain in the
phrase. For instance:
9. Now play the phrase from the starting note and SEQUI2R EX will repeat it
correctly maintaining all various parameters of Step Pan, Volume, Cutoff etc....including
choke and Bend values which were already in the phrase.
10. To edit any of the recorded notes or effect values please refer to the Editing
section of this manual.
Recording from position:
This feature allows to “edit” the phrase while re-recording manually from a point of the phrase
onwards.
Once a phrase is recorded:
1. Set the value of POS in the Sequencer Panel. A value greater of 1 will
cause SEQUI2R EX to record the new notes without wiping the existing
notes prior to the POS number.
2. Select the note value by using the Note Value Menu on the Sequencer
Panel or by using one of the Purple keys (D0, A0).
AUDIOFIER SEQUI2R EX User Manual
Page 49

49
● We record a phrase of only 16th notes. The Sequence Sliders will show a
pattern of velocity values which fall on every odd step while the even
steps will be empty.
● We decide to edit from step 5, but this time we record 8th notes.
● On step 5 the old note will be replaced by the new one. Step 7 will be left
untouched and step 9 will be again replaced and so forth.
This is a good method if we need to insert new notes, as SEQUI2R EX is not
wiping out the old notes, but replaces only the ones that are on the same step.
it is possible to use “Recording maintaining Step-fx values” and “Recording
from Position” in conjunction.
3. From this point onwards you can follow the normal recording process as
described above.
AUDIOFIER SEQUI2R EX User Manual
Page 50

50
If the user intends to change the starting note, then it’s useful to remember that
the phrase will play correctly if after the editing, the played key is the same as
the newly edited starting note. In other words, if the user edits a starting note C1
Editing
It’s good to note that there are 2 different ways to edit a phrase: Editing While Playing (EWP)
and Editing While Idle (EWI). These feature are true for all kind of phrase editing.
● If EWP is desired, then the Free Button must be active so that SEQUI2R EX will
not load the stored values for notes and effects anytime a loop cycle or a new
note is activated. In EWP we can press any playable key and listen to the
changes in real time. This is most desirable when checking the notes velocity,
pitch but also Step Volume patterns and so on. After the edit is performed, the
user need to press Save and Free to exit EWP to be able to change phrase
and/or listen to the synced phrase in the host application.
● EWI is preferable when we are totally sure of the edit we need to perform. Any
edit can be performed without the use of the Free function. But it’s recommended
to press Save before pressing any playable key to avoid losing the edit.
● It is also possible to make edits just by playing one note on the keyboard and
making the desired changes while the phrase is looping. Then it is required to
press Save before playing a new note on the keyboard, otherwise all the edits will
be lost as soon as the new note is played.
Notes pitch editing:
The best tool to edit the recorded notes pitches is the Note Display Panel. This is a string of 16
buttons which shows the recorded notes names. When a different note from the original
recorded phrase starting note is played, the Notes Display will show the resulting notes after the
transposition has taken effect. This buttons also provide the means to edit the recorded note.
Each button in the Notes Display is editable. By clicking/scrolling up or down, the note
name/pitch will change. this method allows only to change a wrong pitch, not the value of the
note, for which case it’s recommended the Recording from position function. Follow EWP or
EWI guidelines for saving.
AUDIOFIER SEQUI2R EX User Manual
Page 51

51
to E1, the phrase will play correctly if he/she plays the edited phrase from E1
and not the original C1. Please refer to the Editing section of this manual.
Remember to press Save in EWI before playing any new note on the keyboard.
Remember to Save in EWP before releasing the Free button.
The values of Velocity, Step Volume, Pan, Cutoff, Distortion, Lo-fi and Talk don’t
have to necessarily fall on the same steps as the notes. As a matter of fact, nice
effects can be achieved if Cutoff or Volume values are on steps where a rest is
or where a sustained note is. For instance a Volume Gater effect can be
achieved when a ¼ note is recorded and a 32th on/off Volume values pattern is
set on the note sustain.
Manual Step Effects Values Editing:
This is valid for all kind of values of Velocity, Step Volume, Pan, Cutoff, Distortion, Lo-fi and
Talk. It can be performed in EWP or EWI (Read above).
1. Select the parameter/effect to be edited.
a. For velocity values make sure that neither A nor B letter are selected. the
Indicator Label will read “Sequence”.
b. For all values of Step Volume, Pan, Cutoff, Distortion, Lo-fi and Talk,
select A or B according to the requirement, then make sure that the
desired effect title is red. The Indicator Label will show the name of the
desired effect.
2. Adjust the Sequence Sliders to achieve the desired effect.
3. Follow EWP or EWI guidelines for saving.
AUDIOFIER SEQUI2R EX User Manual
Page 52

52
Choke and Bend editing:
Possible only in EWI. To edit Choke and/or Bend amount, we need to scroll through the phrase
step using the POS value edit. Each POS value will correspond to a step on the Notes Display
lighting up. We can change the Choke or the Bend value per step this way. Of course press
Save when done.
Editing by drawing:
This type of editing involve the use of the SIMPLE PATTERN DRAWER ACTIVATOR. This
small led button will lit when clicked and the normal Kontakt style table will replace the
Sequence Sliders, allowing for a faster pattern shape drawing. Follow EWP or EWI guidelines
for saving.
1. Decide for EWP or EWI.
2. Select the parameter/effect to be edited.
3. For velocity values make sure that neither A nor B letter are selected. the
Indicator Label will read “Sequence”.
4. For all values of Step Volume, Pan, Cutoff, Distortion, Lo-fi and Talk, select A or
B according to the requirement, then make sure that the desired effect title is red.
The Indicator Label will show the name of the desired effect.
5. Click on the SIMPLE PATTERN DRAWER ACTIVATOR.
6. Use the mouse to draw any pattern on the Kontakt style table.
7. Follow EWP or EWI guidelines for saving.
Editing using the Browser:
Velocity, Step Volume, Pan, Cutoff, Distortion, Lo-fi and Talk values can be chosen among a set
of 10 pre-made patterns. It can be performed only in EWI (Read above).
1. Select the parameter/effect to be edited.
2. For velocity values make sure that neither A nor B letter are selected. the
Indicator Label will read “Sequence”.
3. For all values of Step Volume, Pan, Cutoff, Distortion, Lo-fi and Talk, select A or
B according to the requirement, then make sure that the desired effect title is red.
The Indicator Label will show the name of the desired effect.
4. Click on the Utility Menu and choose Browser. The Pattern Selector value edit
will appear.
AUDIOFIER SEQUI2R EX User Manual
Page 53

53
5. Chose among the 10 pre-made patterns by scrolling the Pattern Selector value
edit.
6. Use the Nudge button to slide the pattern by one step at a time in order to modify
it if required.
7. Follow EWI guidelines for saving.
Editing with Copy and Paste:
Velocity, Step Volume, Pan, Cutoff, Distortion, Lo-fi and Talk values can be copied and pasted
among them.
1. Select the parameter/effect to be copied.
2. For velocity values make sure that neither A nor B letter are selected. the
Indicator Label will read “Sequence”.
3. For all values of Step Volume, Pan, Cutoff, Distortion, Lo-fi and Talk, select A or
B according to the requirement, then make sure that the desired effect title is red.
The Indicator Label will show the name of the desired effect.
4. Click on the Utility Menu and choose Copy.
5. Select the parameter/effect to be copied onto.
6. Click on the Utility Menu and choose Paste.
7. Follow EWI guidelines for saving.
AUDIOFIER SEQUI2R EX User Manual
Page 54

54
Playback
SEQUI2R EX as a rompler/synth:
To play SEQUI2R EX in real time as with a normal rompler/synthetiser, SEQ button needs to be
inactive. At this point a patch can be created by loading 1 or 2 Sound Sources, modifying effects
and envelopes parameter like a normal rompler/synthetiser. But no phrase engine features will
be available. Note that any loaded snapshot which contains phrases can be just used for its
sound characteristics only, by deactivating SEQ button.
SEQUI2R EX as a phrase repeater:
To take advantage of SEQUI2R EX’s phrase repeating technology, SEQ button needs to be
active. All the factory snapshots contain phrases that can be instantly played simply by pressing
keys within the playable range (usually above C1). There are a few playing tips that the user
might find inspiring:
Playing tips:
● Phrases can be played one after the other, in sequence, from start till finish. But
also it’s interesting to change phrase by pressing different Green key-switches
(C-1, G-1) while the phrase is ongoing. This way many variations can be
achieved.
● Phrases can be played monophonically, but it’s also great to play 2 notes at a
time or more. Note that the polyphony increases considerably when more notes
are triggering notes at the same time so more CPU power is required.
● Phrases can be played at different intervals of time. For instance we can trigger a
phrase from C1 on the first beat of a bar, and without releasing the key, adding a
G1 on the second beat, to create a polyphonic arrangement. Note that the
polyphony increases considerably when more notes are triggering notes at the
same time so more CPU power is required.
● A simple one note rhythmic ostinato can become more interesting when played
as a chord.
● Mixing Legato and Optional Start playing modes (see below) makes even more
variations possible.
AUDIOFIER SEQUI2R EX User Manual
Page 55

● Using 2 Sound Sources with very different notes ranges (such as Bonus: Kicks
Although SEQUI2R EX can play polyphonically, it is not possible at the time of
writing to play 2 different phrases at the same time.
Legato mode can be quite difficult if the host latency buffer is set quite high.
Legato mode relies on the user’s precision, so that each key is pressed very
close to the correct timing to avoid SEQUI2R EX changing pitch at the wrong
time. Note that it takes a bit of practice to change key on time in legato mode
especially at high BPMs. One workaround is to play the best one can, then edit
the midi notes position in the piano roll of the host application. On a piano roll
both the note on and note off need to be quantized.
and Bonus: Hits) can give creative results (like a drum rhythm in this case) if the
phrase is recorded with the notes ranges in mind.
Optional Start:
1. Select a step number on the Optional Start value edit.
2. Play a phrase from a desired key.
3. When required press the Purple key (A-1) to activate the Optional Start function.
From this moment SEQUI2R EX will loop from the step set in the Optional Start
value edit till the end of the phrase anytime a key is pressed.
4. To exit the Optional Start mode, press the Purple key (G#-1) for the normal
playing mode, or the Green key (B-1) to activate the Legato mode.
55
Legato playing mode:
1. Play a phrase from a desired key.
2. When required press the Green key (B-1) to activate the Legato mode. From this
moment each phrase will continue till the end then loop from its start, no matter
what key is pressed and when. Each phrase will flow to the next pitch continuing
the pattern. This is great for ostinatos but also for riffs that follow different chords.
3. To exit the Legato mode, press the Green key (A#-1) for the normal playing
mode or the Purple key (A-1) to activate the Optional Start mode.
AUDIOFIER SEQUI2R EX User Manual
Page 56

56
AUDIOFIER SEQUI2R EX User Manual
Page 57
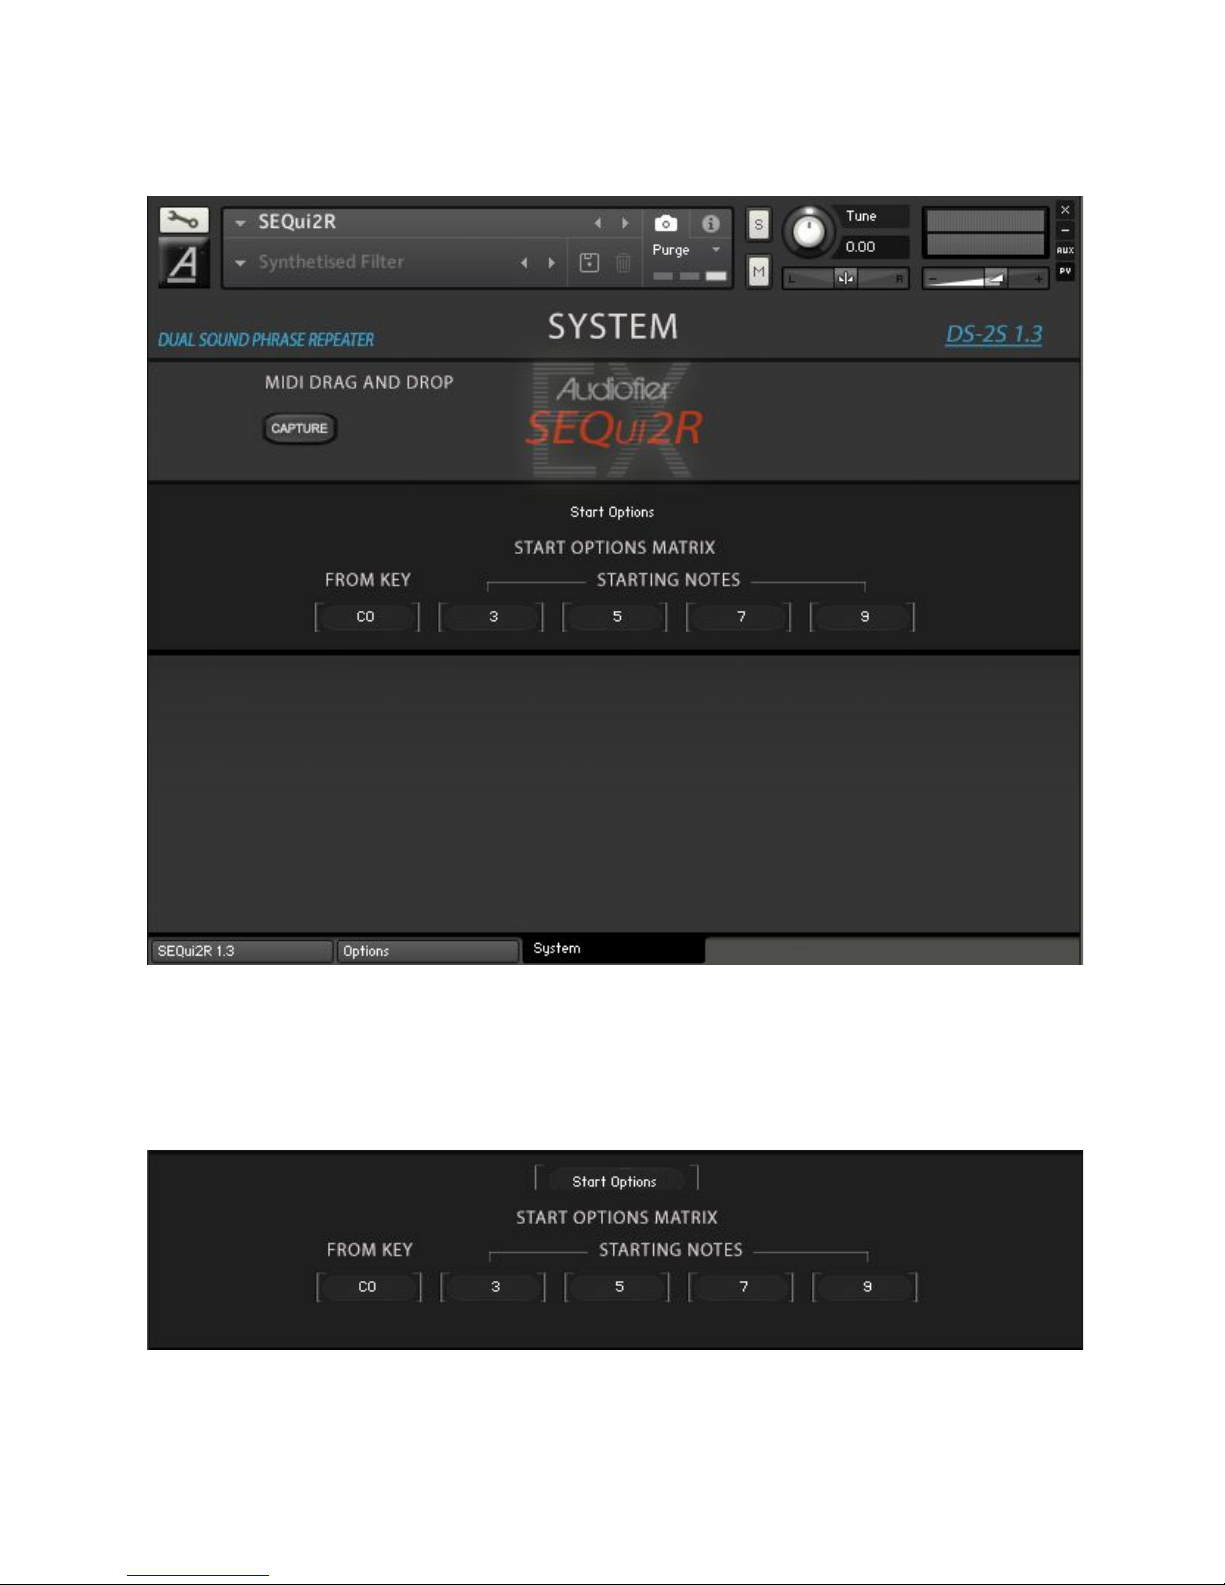
The System Page
57
This page offers exciting features:
Start Options Matrix:
AUDIOFIER SEQUI2R EX User Manual
Page 58
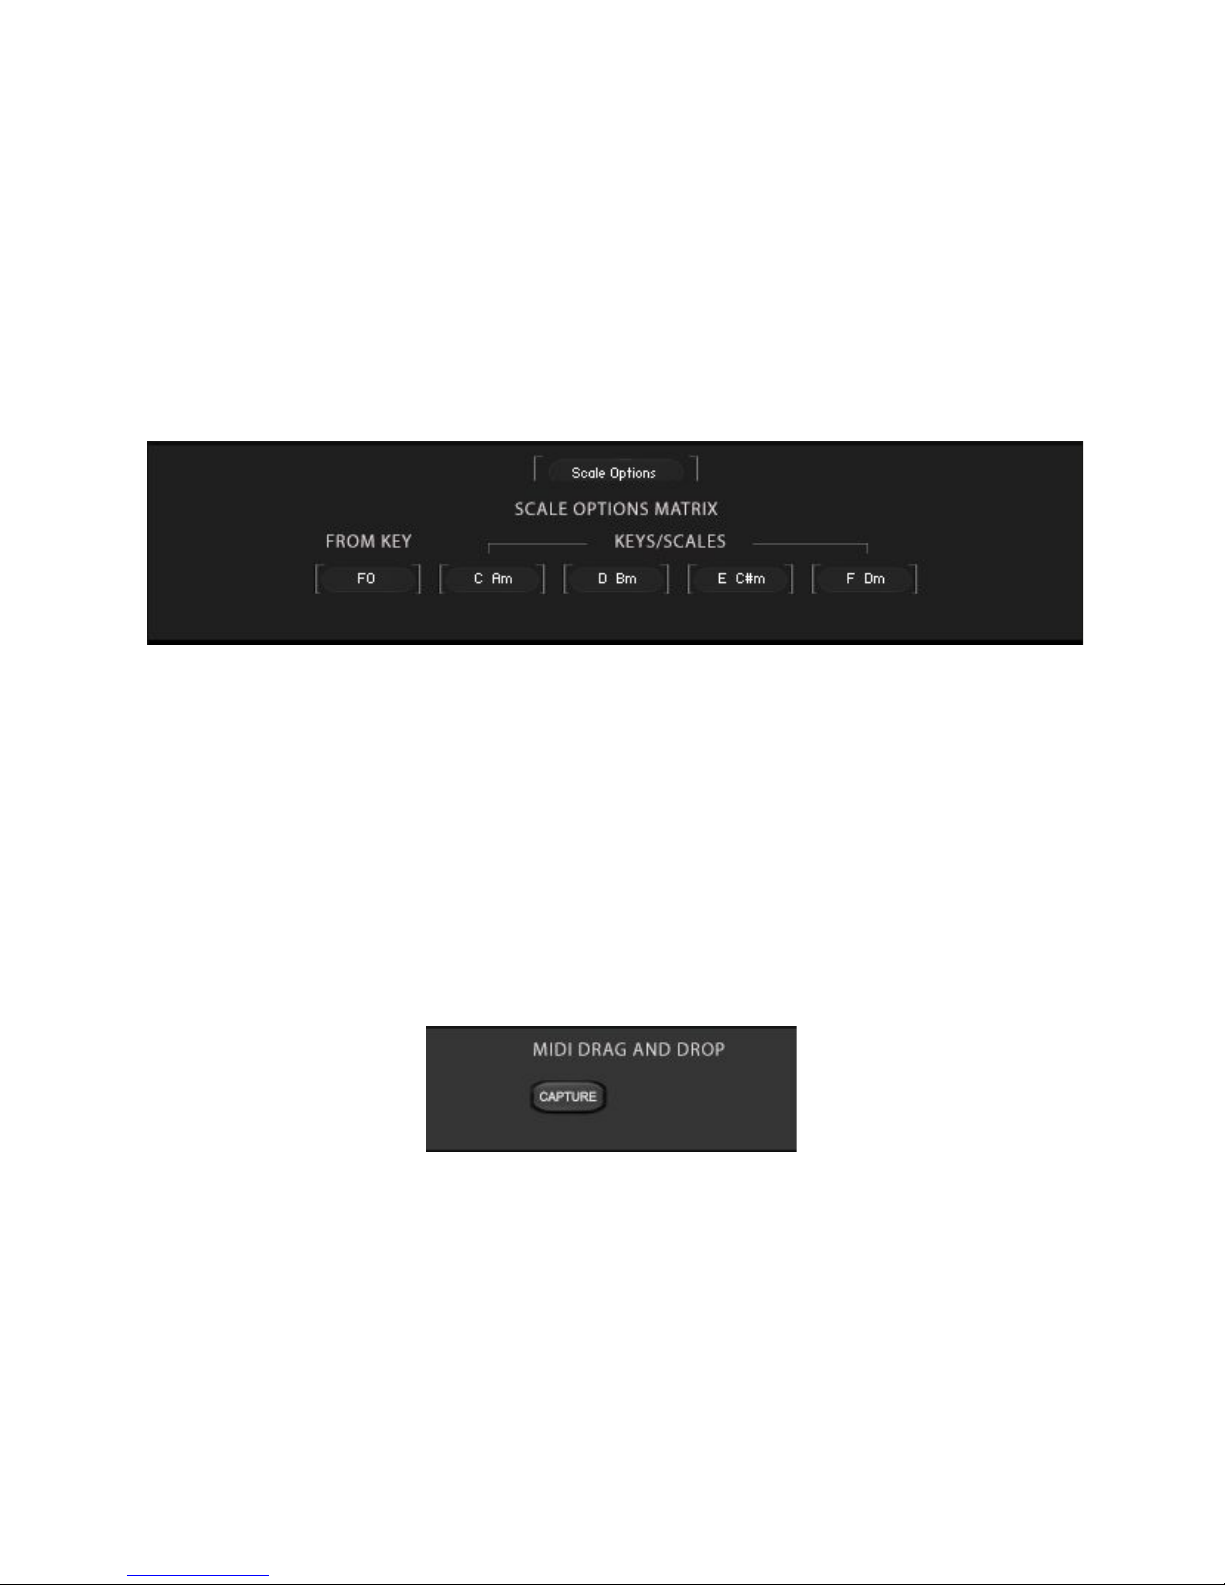
58
This matrix includes 4 slots where to set the optional starting notes. When these values are set,
the optional start can be triggered and changed via keyswitch (see above new Variable
Keyswitches).
The label “From Key” is just a reminder of the first keyswitch that triggers the first optional
starting note and it cannot be changed.
Scale Options Matrix
This matrix includes 4 menus where to set the optional four key/scales. When these values are
set, the optional start can be triggered and changed via keyswitch (see above new Variable
Keyswitches).
Midi Notes Drag & Drop
This brand new feature allows the user to drag a Midifile containing the full recorded midi
performance on the preferred DAW.
1. Record your phrases in your DAW as you would normally using SEQui2R.
2. Press the Capture button and place your DAW’s playhead just before the first keyswitch
which triggers the first phrase you played. The button will light up.
AUDIOFIER SEQUI2R EX User Manual
Page 59

3. Play the whole performance or a few bars of it.
Only midi notes will be exported. No Midi CC or Pitch Bending CC.
If SEqui2R Midi performance is happening over a Bpm change it’s
recommended to temporarily move SEQui2R’s midi region to a steady time part
of the arrangement (or just after the end of it) and the capture the performance,
as the tempo change will not be recorded and the sync will not be kept. Bpm
speed does not make any difference as long as there is no Bpm change during
SEQui2R midi capturing. The Exported Midi performance will adapt to the tempo
change once is placed again in the correct song position.
4. Press again Capture button to deactivate it.
5. A Midifile icon appears after the capturing has finished.
6. Click on the Midifile Icon and drag it on your DAW where you have prepared a midi track
or an instrument track. A new midi region will be created, containing all the midi notes
SEQui2R has generated.
59
AUDIOFIER SEQUI2R EX User Manual
Page 60

60
It’s good practice to record in the host application the green key switch that
triggers the phrase before the actual phrase starts in the arrangement, as you
would do for a key-switch that triggers an instrument articulation. Many times
one can forget to record the initial phrase key-switch and SEQUI2R EX will
trigger instead the last triggered phrase.
Troubleshooting
These minor problems have been encountered only a few times. They are not extremely
annoying or time-wasting, but it’s worth to mention they they might present themselves.
1. A graphic glitch might occur when the Step Volume B is reset by Alt-clicking.
SEQUI2R EX GUI might lose a the connection of some graphic elements and
display a Kontakt Factory Slider instead of SEQUI2R EX own designed sliders.
To troubleshoot this, just press a key to trigger a phrase and/or click on letter A
till the Sequence Sliders appear again as normal.
2. Some snapshots/patches might sound as if the reverb effect is 100% wet, or the
volume of a Sound Source is very low. To troubleshoot this, please use the
Recall button to recall any desired phrase and all will be back to normal.
3. This is not a bug/known problem per se, but a tip instead. When arranging a few
phrases on the host application, it’s better to record a rapid change of phrase by
pressing the green key-switches before the actual first midi note is recorded on
the host application. In other words, if we want to start with phrase 1 (triggered by
C-1), it’s recommended to record on the host any of the other green keys
(Csharp-1,G-1) first , then record C-1 (to recall the first phrase).
4. When working with tempo changes in a DAW, it is recommended to make the
tempo change slightly before the first beat of the new bar to allow SEQUI2R EX
to adapt to the new tempo on the first beat without losing the sync.
5. If a previous loaded patch had a particular Key/Scale active, the following patch
that has Key/Scale control inactive might be still affected by the previous
Key/Scale control. If it’s so, just switch it on and then off again.
AUDIOFIER SEQUI2R EX User Manual
Page 61

A BIG THANKS GOES TO ICE NEAL
AND GOD.
61
AUDIOFIER SEQUI2R EX User Manual
 Loading...