

Page 1
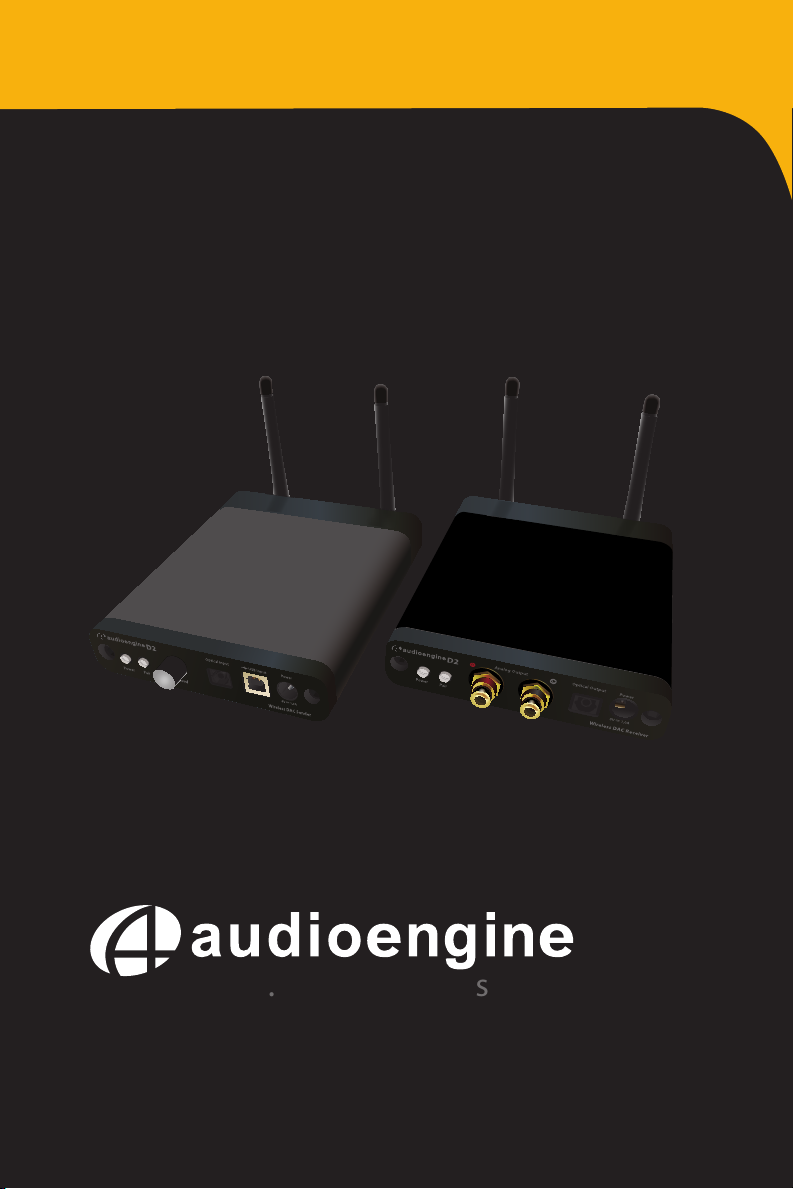
Setup Guide
D2
Premium 24-bit Wireless DAC
Page 2
Contents
Introduction
Package Contents
Cleaning
Features
Overview
Quick Setup
Pairing
Troubleshooting
Specications
Contact Us
About Audioengine
Page 3
Page 3
Page 4
Page 4
Page 4
Page 6
Page 8
Page 8
Page 9
Page 10
Page 10
D2 setup guide
1
Page 3
Basic Safety Instructions
Introduction
• Read these instructions for all components before using
this product.
• Keep these instructions for future reference.
• Heed all warnings on the product and in the owne r’s guide
Follow all instructions.
• Do not use this apparatus near water or moisture. Do not
use this product near a bathtub, washbowl, kitchen sink,
laundry tub, in a wet basement, near a swimming pool, or
anywhere els et hatwate ror moisture are present.
• Clean only with a dry cloth and as directed by the
manufacturer. Unplug this product from the wall outle
before cleaning.
• Do not block any ventilation openings. Install in
accordance with the manufacturer’s instructions. To ensure
reliable operation of the product and to protect it from
overheating, put the product in a position and location that
will not interfere with its proper ventilation. For example,
do not place the product on a bed, sofa, or similar surface
that may block the ventilation openings. Do not putit in a
built-in system, such as a bookcase or a cabinet that may
keep air from owing through it ’s ventilation openings.
• Do not install near any heat sources, such as radiators, heat
registers, st oves or other apparatus that produce heat.
• Do not defeat the safety purpose of the polarized or
grounding-type plug. A polarize d plug has two blades with
one wider than the othe r. A grounding-type plug has two
blades and a third grounding prong. The wider blade or
third prong are provided
plug does not t in your outlet, consult and electrician for
replacement of the obsolete outlet.
• Protect the power cord from being walked on or pinched,
particularly at plugs, convenience receptacles, and the
point where they exit from the apparatus.
• Only use attachments or accessories specied by the
manufacturer.
• Use only with the cart, stand, tripod, bracket or table When
a cart is used, use caution when moving the cart / apparatus
CAUTION: TO REDUCE THE RISK OF ELECTRIC SHOCK,
for your saf ety. If the provided
RISK OF ELECTRICAL SHOCK
DO NOT OPEN
DO NOT REMOVE COVER (OR BACK.)
NO USER-SERVICABLE PARTS INSIDE.
REFER SERVICING TO QUALIFIED PERSONNEL
combination to avoid injury from tip-over.
• Unplug this apparatus during lightning storms or when
unused for long periods of time to prevent damage to this
product.
• Refer all servicing to qualied service personnel.
• Servicing is required when the apparatus has been
damaged in any way such as power supply cord or plug is
damaged, liquid has been spilled or objects have fallen into
the apparatus, the apparatus has been exposed to rain or
moisture, does not operate normally, or has been dropped.
• Do not attempt to service this product yourself. Opening
or removing covers may expose you to dangerous voltages
or other hazards. Please contact the manufacturer to be
referred to an authorized service center near you.
• To prevent risk of re or electric shock, avoid over loading
wall outlets, extension cord s, or integral convenience
receptacles .
• Do not let objects or liquids
touch dangerous voltage points or shor tout par ts that
could result in a re or electrical shock.
• See product enclosure bottom for safet y related markings.
• Use Proper Power Sources. Plug the product into a proper
power source, as described in the operating instruc tions or
as marked on the product.
• Avoid power lines– Us e extreme care when installing an
outside antenna system to keep from touching power lines
or circuits, as contact with them may be fatal. Do not install
external antennas near overhead power lin es or other
electric light or power circuits, nor where an antenna can
fall into such circuits or power lines.
This device complies with part 15 of the FCC Rules. Operation
is subject to the following two conditions: This device may not
cause harmful interference and this device must accept any
interference received, including interference that may cause
undesired operatio.
RISQUE DE CHOC ÉLECTRIQUE
ATTENTION: POUR RÉDUIRE LE RISQUE DE DÉCHARGE
ÉLECTIQUE, NE RETIREZ PAS LE COUVERCLE (OU
L’ARRIÈRE.) IL NE SE TROUVE ÀL’INTÉRIEURAUCUNE
PIÉCE POUVANT ÊTRE RÉPARÉE PAR L’USAGER.
S’ADRESSER ÀUN REÉPARATEUR COMÉTENT.
enter the product as they may
NE PAS OUVRIR
Welcome to the Audioengine family and congratulations on your
purchase of the Audioengine D2 Premium 24-bit Wireless DAC!
The Audioengine team is dedicated to bringing you the highest quality
listening experience possible. The Audioengine D2 is designed with the
same attention to detail and operational simplicity as all Audioengine
products. Our goal is to get you to your music as simply as possible,
without all the “gadget tinkering” that other products require.
As with our other past eorts, we thank all our customers and resellers
for helping us create another great Audioengine product!
Package Contents
D2 Sender
• (1) D2 Sender
• (1) Power adapter
• (1) Detachable power cord, 1.5m (~5ft)
• (1) USB cable, 2ft (0.6m)
• (1) Cloth product bag
• (1) Setup Guide
• (1) Product line brochure
D2 Receiver
• (1) D2 Receiver
• (1) Power adapter
• (1) Detachable power cord, 1.5m (~5ft)
• (1) RCA audio cable, 2m (~6.5ft)
• (1) Cloth product bag
2
D2 setup guide
3
Page 4
Cleaning
Your D2 components are not water-resistant, so it’s important that they
should be kept free of moisture. You should clean only with a dry cloth
or tissue and no liquid cleaners or solvents should be used.
Features
• Wireless bit-perfect 24/96 digital-to-analog converter
• USB-to-S/PDIF converter (wireless)
• Mac or PC plug-and-play, no drivers or network setup
The D2 can process digital audio at any bit depth up to 24 bits, and
any sample rate up to 192KHz. The D2 USB input can accept a USB
audio stream from your computer or other USB source device. The D2
optical input can accept optical (PCM stereo) streams from any optical
(TOSLINK) source, such as computers, TVs, Apple TV, DVD/BluRay
players, CD players, etc.
Note: Optical sources must be set to PCM Stereo.
The D2 Receiver output can be connected to any gear with an analog
(RCA or minijack) audio input, such as powered speakers, stereo
system, etc.
• Precision re-clocking for low jitter
• USB and optical inputs
• Optical and RCA analog outputs
• Based on Burr-Brown PCM1792 DAC
Overview
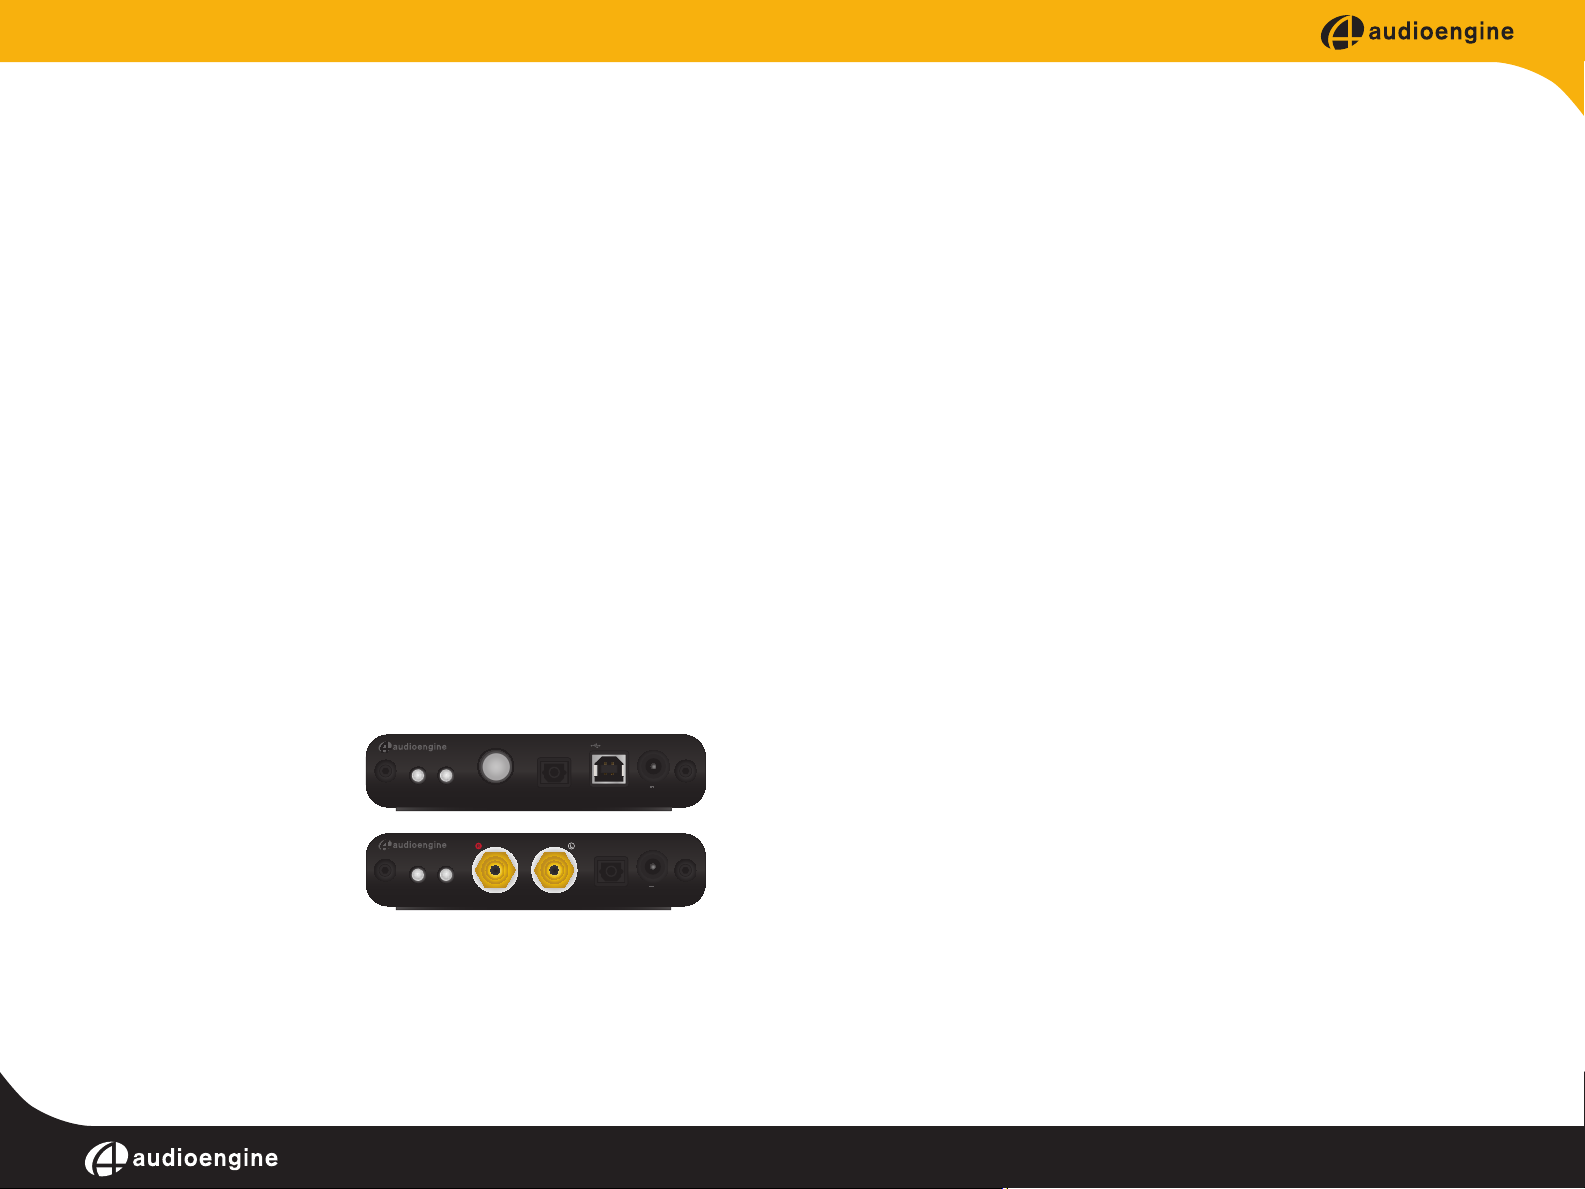
The D2 24-bit Wireless DAC
D2
Optical Input
is a simple yet powerful
wireless digital-to-analog
converter with performance
and features generally found
only in much more expensive
Power
Power
Output Level
Pair
Analog Output
D2
Pair
Right
DACs. It can accept USB or
PCM-stream optical inputs, and will automatically congure to match
the inputs you deliver, with the optical input being dominant. The
wireless operation is totally transparent, requiring no special network
setup or drivers.
USB Input
Power
6V 1.0A
Wireless DAC Sender
Power
Optical Output
6V
Left
1.0A
Wireless DAC Receiver
The D2 Receiver also includes an optical output, which can be used to
connect your own DAC or stereo receiver. Thus the D2 system can act
as a wireless USB to S/PDIF converter, as well as a wireless optical link!
Power for the D2 Sender can be provided via USB or the included
power adapter.
Note: Use only the provided Audioengine power adapter. The
Audioengine adapter is specically designed for maximum audio
performance, and the use of other adapters may damage your D2.
Note: When using the D2 with the optical output of your computer,
the USB port on the computer can provide power. The D2 will sense
that an optical input is present and give that input priority.
Internally, USB power is “double regulated” to ensure that no USB bus
power variations aect the audio.
The D2 Sender can simultaneously broadcast to (3) D2 Receiver units.
See the Pairing section for pairing additional receivers.
4
D2 setup guide
5
Page 5
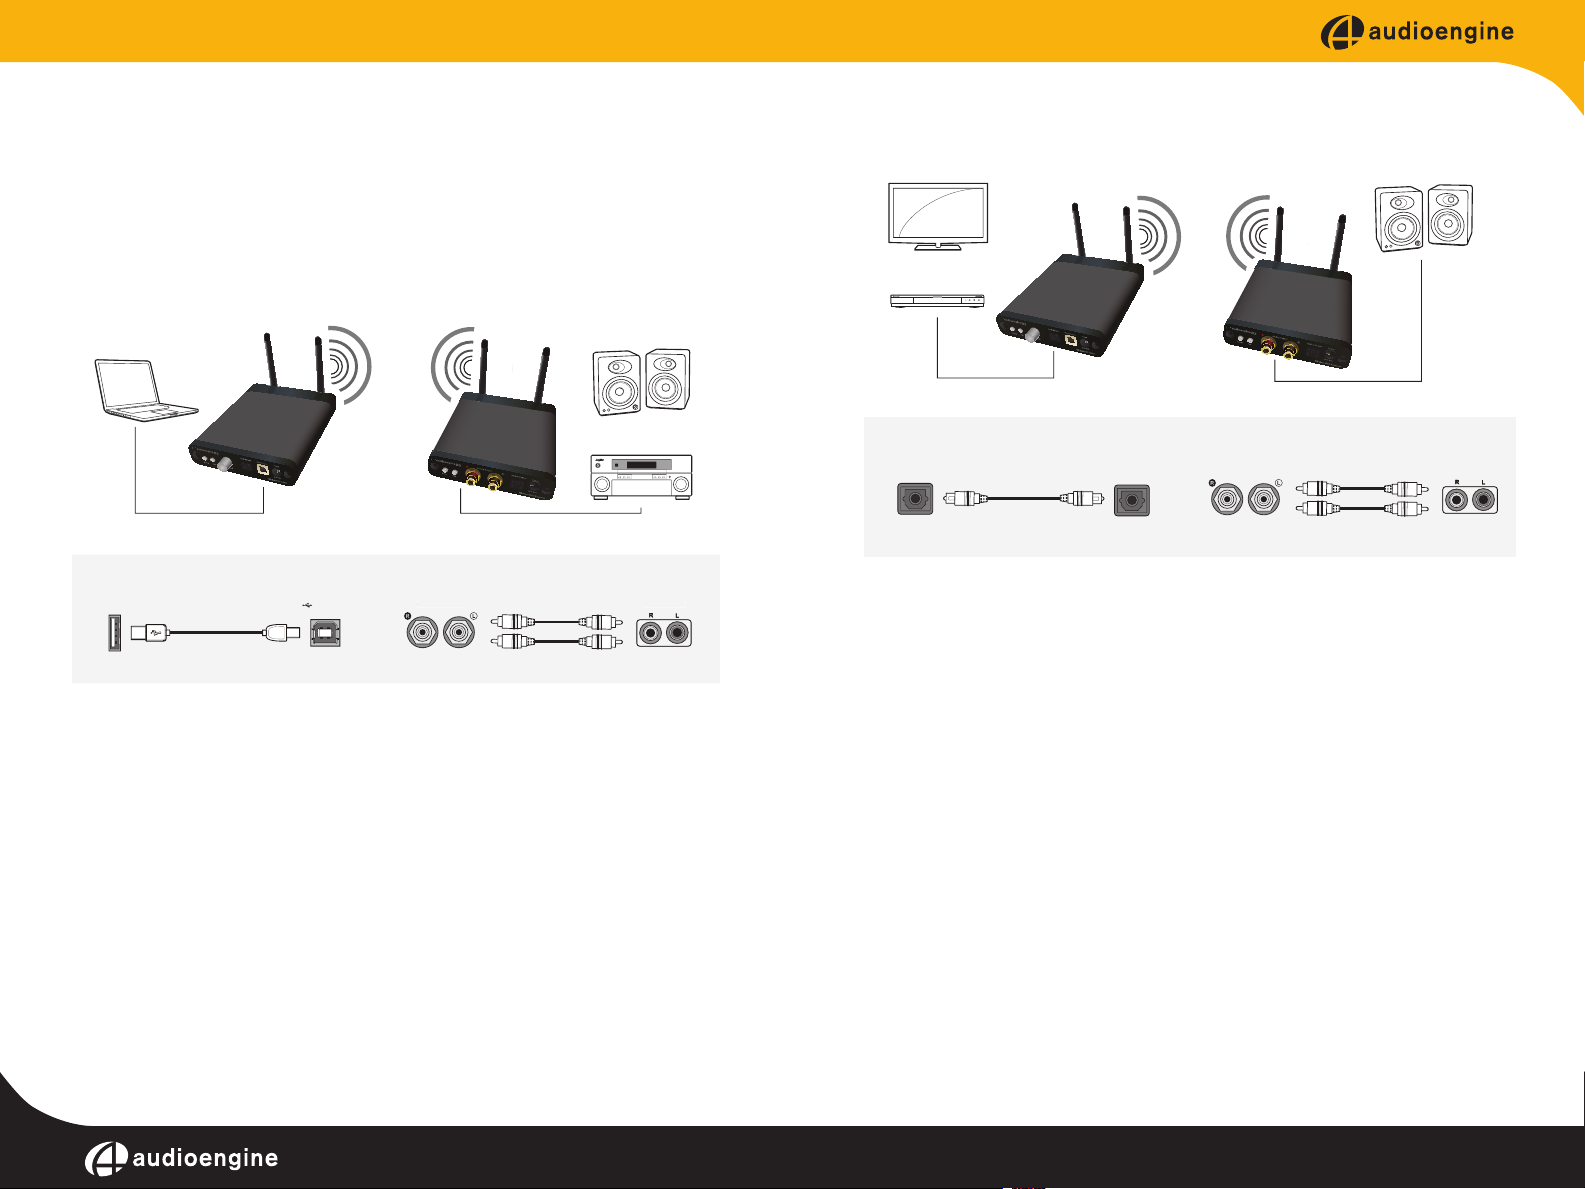
Quick Setup
Analog Output
Analog Input
Optical Source
The following diagrams show the most common congurations for D2
Setup.
Note: For maximum range, ensure that both antennae are upright.
USB from your computer
Computer
➊ ➋
USB Audio Input Analog Audio Output
➊
�
Computer
D2 Sender D2 Receiver
➋
USB Input
D2 Sender
Analog Output Analog Input
D2 Receiver
Audioengine D2 - Cong A
A5+ Powered Speakers
OR
AV Receiver
A5+ or AV Receiver
TV
OR
Blu-Ray/DVD/CD Player
➊
Optical Audio Input
➊
Optical Output Optical Input
TV/Blu-Ray/DVD
D2 Sender
D2 Sender
D2 Receiver
Analog Audio Output
➋
Analog Output Analog Input
D2 Receiver
Audioengine D2 - Cong B
A5+ Powered Speakers
➋
A5+ or AV Receiver
Step 1 -- Connect an optical output of your computer, TV, Blu-Ray, DVD,
etc. to the optical input of the D2 Sender.
Step 2 -- Connect the D2 power adapter to the D2 Sender, and to an AC
power source.
6
Step 1 -- Connect the D2 Sender to your computer USB port.
For PC, the D2 should be recognized automatically.
For Mac, under System Preferences/Sound, select “Audioengine D2”
Step 2 –- Connect the analog output of your D2 Receiver to any audio
input of your active speakers, stereo, etc.
Step 3 -- Connect the D2 power adapter to the D2 Receiver, and to an
AC power source.
D2 setup guide
Note: Verify that your source is set to PCM Stereo.
Step 3 –- Connect the analog output of your D2 Receiver to any audio
input of your active speakers, stereo, etc.
Step 4 -- Connect the D2 power adapter to the D2 Receiver, and to an
AC power source.
For advanced setup and other tips visit: audioengineusa.com
7
Page 6

Pairing
• Only one channel plays through my D2.
Pairing is the function by which two devices become acquainted. Once
a Sender and Receiver(s) are paired, they will remember one another.
Note: D2 Senders and Receivers packaged together are paired out
of the box, so if you’re only using one Sender/Receiver set, no further
conguration is needed.
To pair an additional Receiver or to re-pair a Sender/Receiver set, press
the Pair button on the Receiver (the Pair LED will blink), then press the
Pair button on the Sender. Both Sender and Receiver pair lights should
now be solid, indicating that they are paired.
Troubleshooting
• I have connected my D2 Sender and Receiver as shown, but there is
no music output.
1. Check to see that the Power and Pair lights are lit and solid. If
not, try another USB port on your computer.
2. If the Pair light is blinking re-pair the Sender and Receiver as
discussed in the Pairing section.
3. Verify that “Audioengine D2” is selected as your output device
under Control Panel (PC) or System Preferences/Audio (Mac).
1. Check the RCA cables between your D2 and your sound system.
2. Check your audio player to ensure that the balance is centered.
Break-In Period
Your DAC will sound great out of the box and will get better over time.
However, give it 40 to 50 hours break-in time before doing any critical
listening.
Specications
Electrical
Full Scale Output 2.0V RMS
Frequency Response 10 Hz - 30 kHz, +/- 0.5db
S/N Ratio (DC to 20 kHz) >115 dB
THD+N (1 kHz FS 96 kS/s) <0.0015%
Interface
Input Data Rate up to 192KS/s
Input Bit Depth up to 24 bits
USB type 1.1 or above
4. Try another USB cable.
5. Verify that the proper input source is selected on your audio
system.
• I have connected my D2 to my TV/DVD/BluRay, but there is no sound
output.
1. Verify that the D2 Sender and Receiver are both connected to a
power adapter and that the power lights are lit.
2. Be sure that your source digital audio is set to “PCM Stereo”.
8
D2 setup guide
Wireless Range (typical) >100 ft
Power Requirements
Sender 270ma
Receiver 300ma
For additional specications and product information go to:
audioengineusa.com
9
Page 7
Contact Us
Information for Users on Disposal of Old
If you have any questions or feel you may need service, contact the
reseller where you purchased your product or feel free to email us
directly at: [email protected] or call toll-free in the United
States: (877) 853-4447
About Audioengine
Audioengine designs and builds innovative audio products with all
your music in mind. Great sound, simple but elegant designs, highquality materials, and truly useful features are what Audioengine
is about. We sincerely hope you get as much enjoyment from our
products as we’ve had creating them! For information about our other
products go to:
www.audioengineusa.com
Equipment [European Union]
This symbol indicates that the electrical and electronic
equipment should not be disposed as general household
waste at its end-of-life. Instead, the product should be
Attention:
This symbol is
only valid in the
European Union.
could otherwise be caused by inappropriate waste handling of this
product. For more information about collection point and recycling
of this product, please contact your your household waste disposal
service or the shop where you purchased the product. Penalties may
be applicable for incorrect disposal of this waste, in accordance with
national legislation.
handed over to the applicable collection point for the
recycling in accordance with your national legislation.
By disposing of this product correctly, you will help
to conserve the environment and human health that
[Other Countries outside the European Union]
If you wish to dispose of this product, please do so in accordance with
applicable national legislation or other rules in your country for the
treatment of old electrical and electronic equipment.
10
D2 setup guide
11
Page 8
Audioengine, Ltd.
www.audioengineusa.com
© 2011 Audioengine Corp. All Rights Reserved.
Copyright Notice
Audioengine and Audioengine D2 are trademarks of Audioengine Ltd.
 Loading...