

Page 1
Contents
Safety Instructions Page 1
Introduction Page 2
Features Page 2
What’s in the Box Page 3
Unpacking Page 3
Setup and Operation Page 6-10
Troubleshooting Page 11
Specications Page 13
Contact Us Page 14
Warranty Information Page 15
Basic Safety Instructions
•
Read these instructions for all components before using this
product.
Keep these instructions for future reference.
•
•
Heed all warnings on the product and in the owner's guide.
•
Follow all instructions.
Do not use this apparatus near water or moisture. Do not use
•
this product near a bathtub, washbowl, kitchen sink, laundry
tub, in a wet basement, near a swimming pool, or anywhere
else that water or moisture are present.
•
Clean only with a dry cloth and as directed by the
manufacturer. Unplug this product from the wall outlet
before cleaning.
Do not block any ventilation openings. Install in accordance
•
with the manufacturer's instructions. To ensure reliable
operation of the product and to protect it from overheating,
put the product in a position and location that will not
interfere with its proper ventilation. For example, do not
place the product on a bed, sofa, or similar surface that may
block the ventilation openings. Do not put it in a built-in
system, such as a bookcase or a cabinet that may keep air
• Do not install near any heat sources, such as radiators, heat
registers, stoves or other apparatus that produce heat.
•
Do not defeat the safety purpose of the polarized or
grounding-type plug. A polarized plug has two blades with
one wider than the other. A grounding-type plug has two
blades and a third grounding prong. The wider blade or third
prong are provided for your safety. If the provided plug does
the obsolete outlet.
• Protect the power cord from being walked on or pinched,
particularly at plugs, convenience receptacles, and the point
where they exit from the apparatus.
•
manufacturer.
•
Use only with the cart, stand, tripod, bracket or table
When a cart is used, use caution when moving the cart/
apparatus combination to avoid injury from tip-over.
• Unplug this apparatus during lightning storms or when
unused for long periods of time to prevent damage to this
product.
•
•
Servicing is required when the apparatus has been damaged
in any way such as power supply cord or plug is damaged,
liquid has been spilled or objects have fallen into the
apparatus, the apparatus has been exposed to rain or
moisture, does not operate normally, or has been dropped.
Do not attempt to service this product yourself. Opening or
removing covers may expose you to dangerous voltages or
other hazards. Please contact the manufacturer to be referred
to an authorized service center near you.
•
wall outlets, extension cords, or integral convenience
receptacles .
•
Do not let objects or liquids enter the product as they may
touch dangerous voltage points or short out parts that could
•
See product enclosure bottom for safety related markings.
• Use Proper Power Sources. Plug the product into a proper
power source, as described in the operating instructions or as
marked on the product.
• Avoid power lines– Use extreme care when installing an
outside antenna system to keep from touching power lines or
circuits, as contact with them may be fatal. Do not install
external antennas near overhead power lines or other electric
light or power circuits, nor where an antenna can fall into
such circuits or power lines.
This device complies with part 15 of the FCC Rules.
Operation is subject to the following two conditions: This device
may not cause harmful interference and this device must accept
any interference received, including interference that may cause
undesired operation.
audioengine HD6 setup guide
CAUTION
RISK OF ELECTRICAL SHOCK
DO NOT OPEN
CAUTION: TO REDUCE THE RISK OF ELECTRIC SHOCK,
DO NOT REMOVE COVER (OR BACK.)
NO USER-SERVICABLE PARTS INSIDE.
REFER SERVICING TO QUALIFIED PERSONNEL
Changes or modifications not expressly approved by the party responsible for compliance could void your authority to operate the equipment.
ATTENTION: POUR RÉDUIRE LE RISQUE DE DÉCHARGE
ÉLECTIQUE, NE RETIREZ PAS LE COUVERCLE (OU
L’ARRIÈRE.) IL NE SE TROUVE ÀL’INTÉRIEURAUCUNE
PIÉCE POUVANT ÊTRE RÉPARÉE PAR L’USAGER.
S’ADRESSER ÀUN REÉPARATEUR COMÉTENT.
audioengine HD6 setup guide
AVIS
RISQUE DE CHOC ÉLECTRIQUE
NE PAS OUVRIR
1
Page 2
Introduction
What’s in the Box
Welcome to the Audioengine family and congratulations on your
purchase of the Audioengine HD6 Premium Powered Speakers!
The Audioengine team is dedicated to bringing you the highest-quality
listening experience possible and the Audioengine HD6 speakers were
designed with the same attention to detail and operational simplicity
as all other Audioengine products. As with our other past eorts we
thank our customers, distributors and resellers for the inspiration to
create another great Audioengine product.
Features
• Built-in power ampliers
• RCA, minijack, optical, and Bluetooth(r) inputs
• APTx audio
• Remote control
• Front panel volume control
• Variable preamp audio output
• Gold-plated connectors
• Full-size 5-way speaker binding posts
• Custom Kevlar woofers and silk tweeters
• Hand-built MDF wood cabinets
• Magnetically-shielded
• Cables included
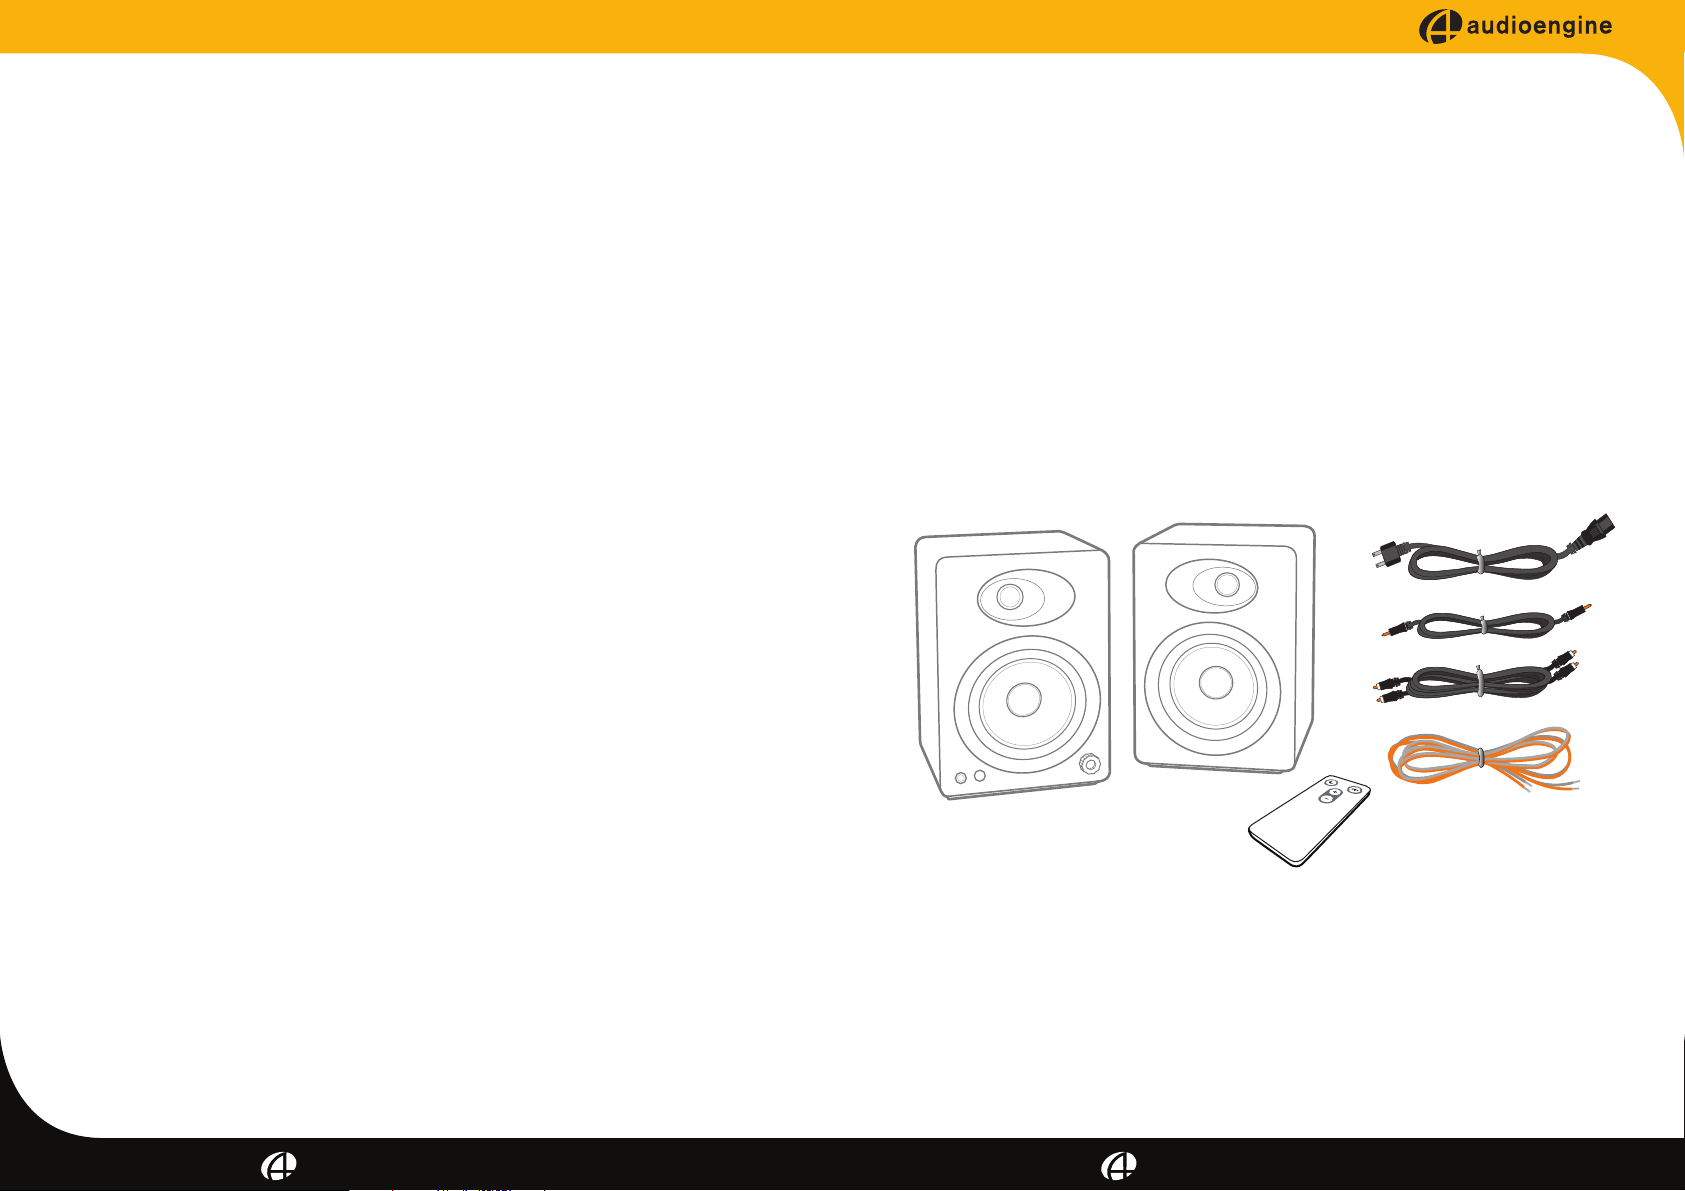
(1) HD6 powered (left) speaker
(1) HD6 passive (right) speaker
(1) Remote control
(1) Speaker wire (16AWG), 3.75 meters (~12.3ft)
(1) Detachable AC power cord
(1) 3.5mm mini-jack to mini-jack audio cable, 2 meters (~6.5ft)
(1) RCA to RCA audio cable, 2 meters (~6.5ft)
(2) Cloth speaker bag
(1) Cloth cable bag
(1) Setup guide
(1) Product line brochure
Works With
• Any computer (Mac or PC)
• iPod, iPhone, and iPad (all iDevices)
• Audioengine wireless audio adapters
• Any device supporting Bluetooth Audio output
• Any product with mini-jack or RCA audio outputs
2 3
audioengine HD6 setup guide audioengine HD6 setup guide
Unpacking
Your Audioengine HD6 speakers were carefully tested and inspected
before packaging and shipping. After unpacking please check for any
damage. It is rare that any damage occurs during shipping, but if this
does happen contact the shipping company immediately. We also
recommend that you keep the original carton and packing material.
Page 3
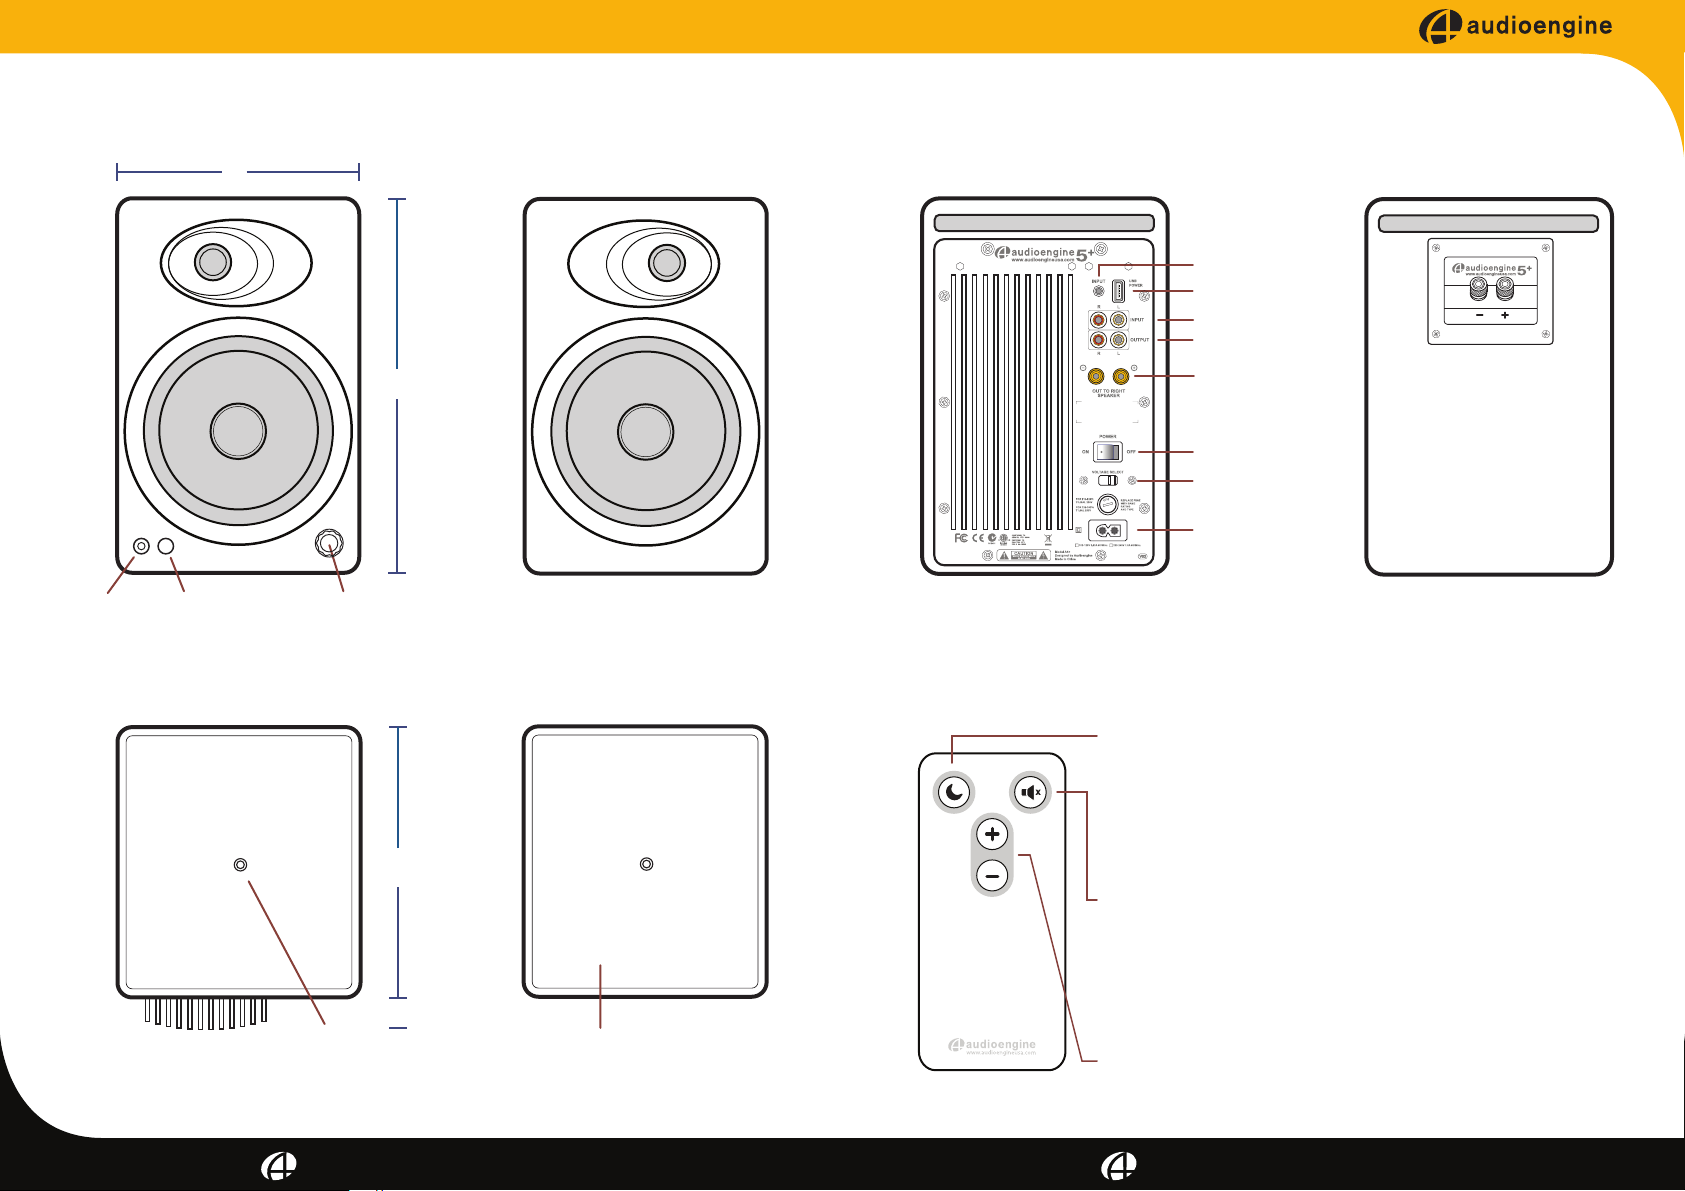
HD6 Front Left (Active/Powered) HD6 Front Right
7”
10.75”
(Passive)
HD6 Back Left HD6 Back Right
Audio Input 1
USB Power
Audio Input 2
Variable Output
Output to
Passive Speaker
Power On/O
115
Voltage Select
AC Power Inlet
Power
Indicator
Remote
Receiver
Volume
Control
HD6 Bottom Left HD6 Bottom Right
Remote Control
Sleep
This button puts HD6 into a power-saving Sleep Mode, shown
by the front panel power indicator as a slow pulse. To exit
Sleep press the Sleep button again.
Note that you can also put the HD6 into and out of Sleep
7.75”
Mode by pressing the front panel volume knob.
Mute
Press the Mute button to silence the HD6. The front panel
indicator will blink showing that the speaker is muted. Press
Mute again to unmute the volume.
Note that you can also bring the HD6 out of mute by pressing
Volume (+) or (-) or turn the front panel volume knob.
Volume
¼”-20
threaded insert
0.75”
High-density
foam isolation pad
Press Volume (+) or (-) to adjust the HD6 volume level.
4 5
audioengine HD6 setup guide audioengine HD6 setup guide
Page 4
Setup and Operation
Step 2 - Connecting the Speaker Wire
Step 1 - Speaker Placement
Although your Audioengine HD6 speakers are very forgiving with
regards to placement, it’s true that proper speaker placement can
have an impact on sound quality. There seem to be dierent theories
on correct speaker placement but rooms and tastes are dierent so it’s
dicult to recommend a perfect setup. We do suggest you feel free to
experiment to see what works for you.
As a general rule of thumb for the best soundstage and imaging, the
speakers should be equidistant from side walls and a dierent distance
from rear walls. Tweeters should be at about eye-level in your most
frequent listening location and for the best bass response we recommend at least 6 inches of clearance between the rear of the speakers
and the wall behind them.
Here are a few more suggestions, assuming you have some exibility
regarding where you place your speakers. No need for concern if your
situation and listening environment dictate the speakers’ position.
• Both speakers should be equidistant from your primary listening
position.
• Placing the speakers at least 6 feet (1.8m) apart usually provides the
best imaging.
• Try to keep the speakers near the front edge of shelves or cabinets.
• Allow at least 6 inches of clearance between the rear of the speakers
and the wall or surface behind them.
• If you need to turn the speakers on their sides, position the tweeters
toward the outside.
• If used on a desktop for computer speakers, it’s best if they are
placed on a solid surface
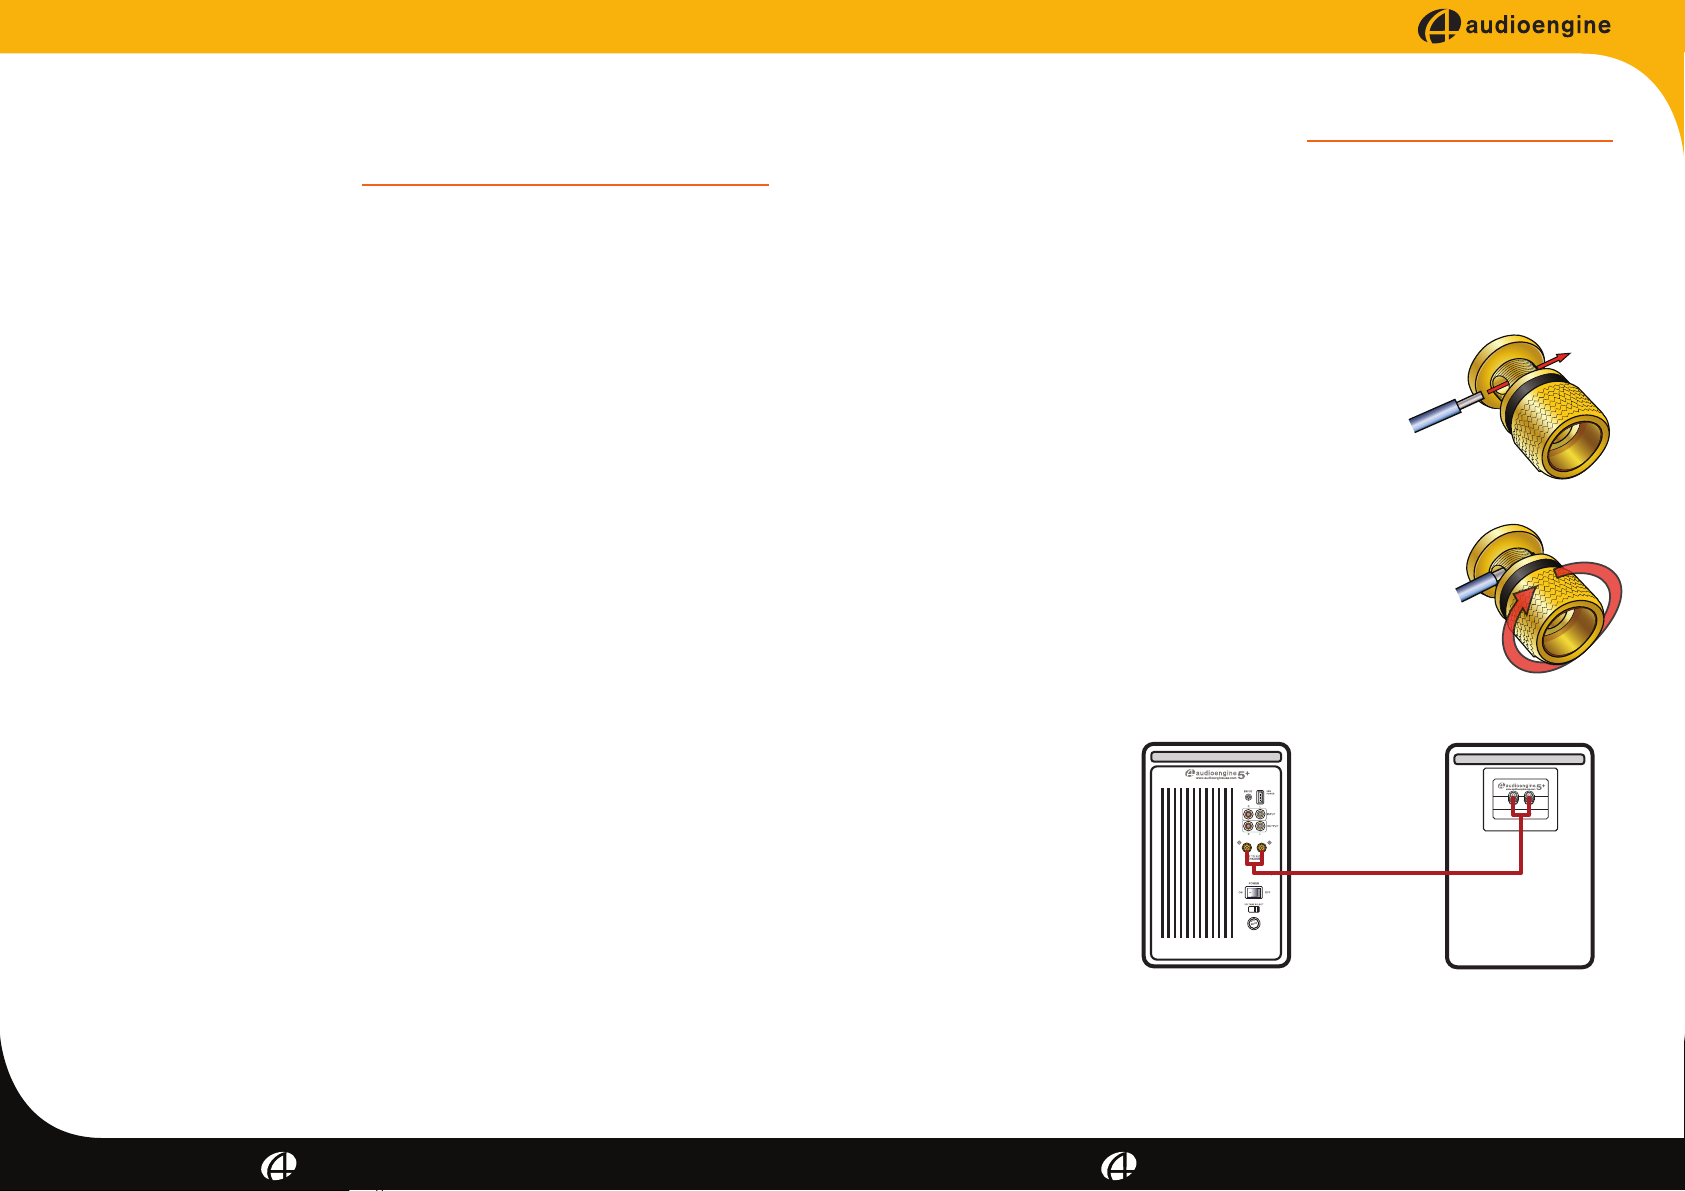
The Audioengine HD6 speakers have ampliers built into the left cabinet and the included speaker wire is used to connect both speakers to
each other. The HD6 uses high quality, ve-way gold plated binding
posts that will accept heavy gauge bare wire, banana plugs, spade
lugs, or pin terminators.
1) Use your thumb and nger to unscrew the
binding post connectors on the back of each
speaker.
2) Insert each speaker wire into the holes on the
side of binding post connectors, making sure to
connect the positive (+) terminal on the left
speaker to the positive (+) terminal on the right
speaker.
3) Retighten the binding posts with your ngers.
4) Verify that only the exposed portion of the
speaker wire is secured rmly in each connector.
5) Make sure that none of the speaker wire strands
have come in contact with an adjoining terminal.
115
Note:
A5+ Back Left
A5+ Back Right
As the Audioengine HD6 speaker system includes built-in power
ampliers, do not connect the speaker terminals to the speaker
outputs of a stereo receiver or amplier.
6 7
audioengine HD6 setup guide audioengine HD6 setup guide
Page 5
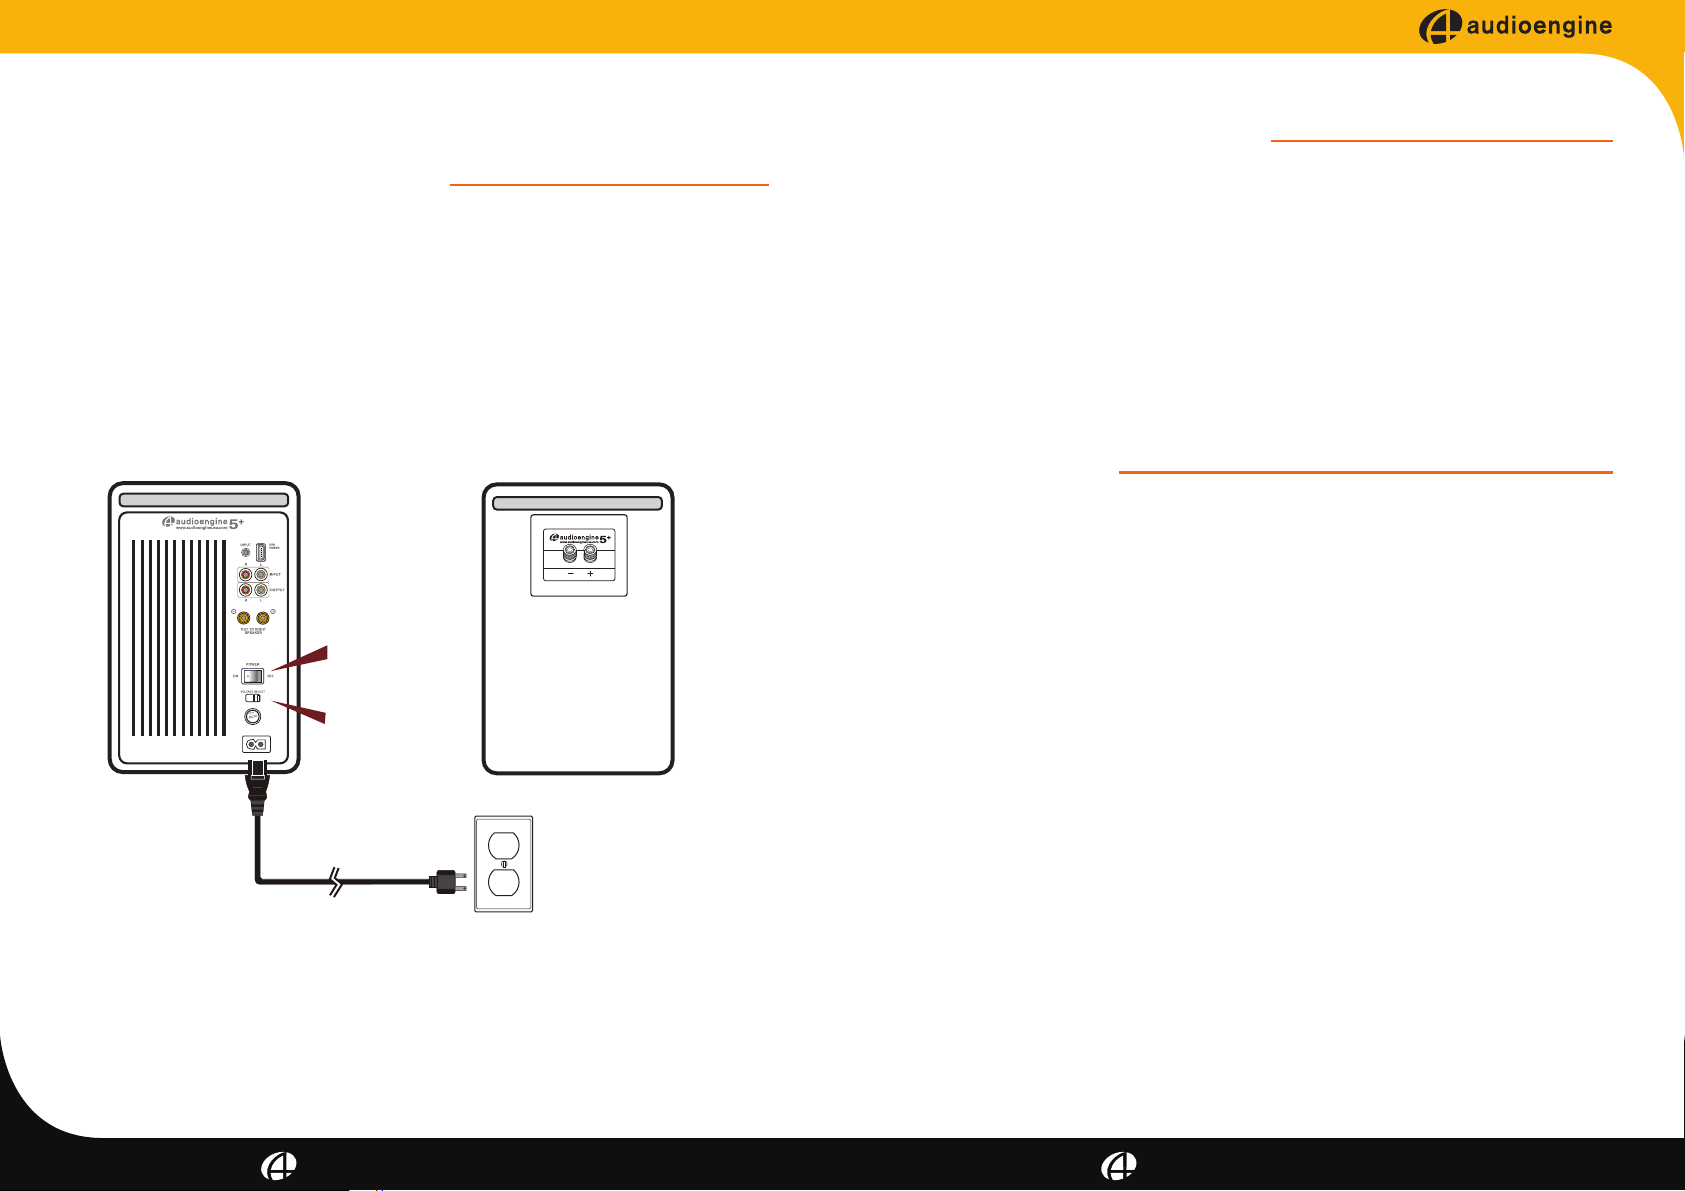
Setup and Operation (cont’d)
Step 4 – Connecting Audio Cables
Step 3 – Connecting the Power Cord
1. Verify that the power switch on the left speaker rear panel is in the
OFF position.
2. Conrm that the rear panel voltage selector switch is set to the
proper voltage for your area.
3. Connect the power cord into the left speaker and the other end
into an AC power outlet.
HD6 Back Left
115
OFF
HD6 Back Right
Using the appropriate audio cable (3.5” mini-jack and/or RCA cable),
connect your audio source (computer, iPod, etc.) to the HD6 audio
inputs. One of each cable type is included.
Note:
Both audio inputs on the HD6 are active so two audio sources may be
connected to the speakers at the same time without the need for an
input switch.
Step 5 – Operation
1. Move the HD6 rear panel power switch to the ON position. The left
speaker front panel power indicator should ash a few times then
go solid.
2. Turn on your audio input source and adjust the volume to the
desired listening level.
3. Adjust the HD6 speaker volume level with the volume knob on the
front panel or with the included remote control.
Break-in Period
Your speakers will sound great out of the box and will get better over
Note:
We recommend using a high-quality surge suppressor and/or AC line
lter on all electronics equipment.
8 9
audioengine HD6 setup guide audioengine HD6 setup guide
time. No need to do anything else but listen to them, but give them at
least 30 to 50 hours break-in time before doing any critical listening.
Cleaning
We don’t recommend using any solvents or cleaners on Audioengine
cabinets or speakers. Just wipe down with a soft, dry cloth.
Page 6
Other Features
Troubleshooting
Variable Output
The HD6 includes a variable preamp audio output so you can connect a subwoofer, other Audioengine powered speakers, or an
Audioengine wireless adapter to daisy-chain music to other systems
around the house. This output is variable (adjustable) so the volume
level can be controlled from the A5+ front panel or remote control.
USB Power
The USB port allows you to power and charge your iDevice (iPod,
iPhone, iPad, etc.), Audioengine wireless adapters, or any USBpowered product through the USB connector on the rear panel.
Note that this is for power only, not USB audio or data transfer
Stand Mounting
Threaded 1/4"-20 brass inserts are included on the bottom of each
speaker cabinet to provide the ability to attach the speakers to freestanding oor stands. These inserts, however, are not designed to
support the full weight of the speakers and therefore should not be
used with single-point wall or ceiling mounts
Important Safety Note: It is the customer’s responsibility to check
with the stand manufacturer to determine whether that specic
stand is capable of handling the weight and proportions of these
speakers in a safe and stable manner. The customer is also responsible for proper selection of mounting hardware not included with
the speaker and for proper assembly. Audioengine disclaims any
liability for the selection of suitable oor stands and/or correct hardware between the selected stand and these speakers.
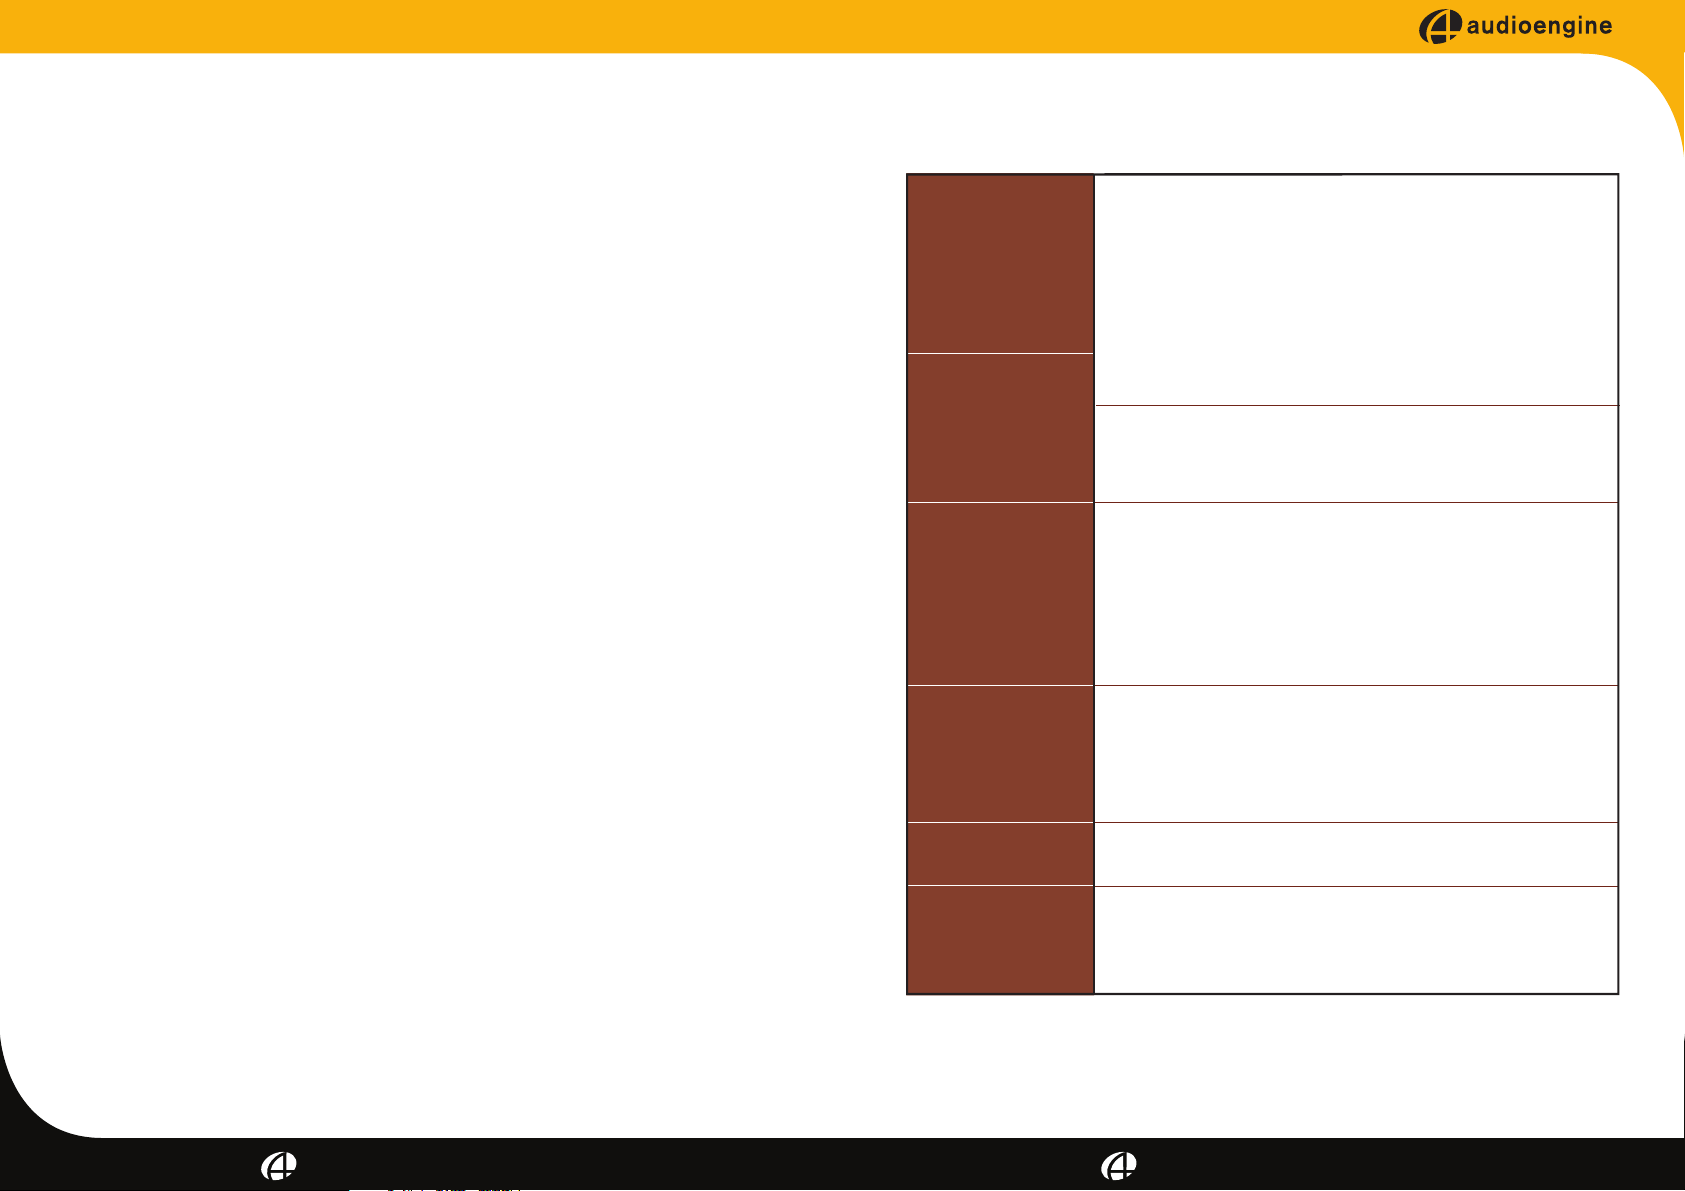
Front panel power
indicator is not
illuminated
Front panel indicator
light is on solid, but
no sound
Sound through one
speaker only
Lack of bass or
poor imaging
If sound is distorted
Remote is not working
or remote range is
reduced
•Verify that the AC power cord is rmly connected to the HD6 rear panel and to an
AC power outlet.
• Check that the AC power outlet is supplying power.
• Verify that the rear panel power switch is in the ON position.
• Be sure the rear panel voltage selector matches the operating voltage in your area.
• Check the fuse in the rear panel. If the fuse needs to be replaced it is important to
replace with same fuse type and value.
•Verify that the HD6 and your source components are all powered on and the
volume levels are not set to minimum.
• Be sure the HD6 is not in MUTE or SLEEP mode (front panel indicator light
ashing)
• Check cables to and from your audio sources to make sure they are working and
rmly connected at both ends.
•Check speaker wire connections from the left (powered) speaker to the right
(passive) speaker. Conrm by removing the speaker wire from on each speaker
and reconnecting.
• Check that the cables from your audio sources to the HD6 are properly connected.
Conrm by unplugging the audio cables and reconnecting.
• If using a computer, verify that the audio output balance setting is centered.
•Check speaker wire polarity by verifying that the wires are going to same
terminals on both speakers.
• Make sure the speakers are not too close to a wall or other obstruction, which
could limit bass output.
• Check the EQ or sound settings on your audio source.
•Decrease the volume level of the audio input source and increase the volume
of the speakers.
•Make sure nothing is blocking the remote receiver, which is in the left speaker.
• Check the remote battery to be sure it is installed correctly.
• Replace the battery (see back of remote control for battery type and
replacement instructions)
For a complete list of product features and specications, go to:
www.audioengineusa.com
10 11
audioengine HD6 setup guide audioengine HD6 setup guide
Page 7
Hum
Adding a new component could bring out hum or buzz that may not
have existed before. Your rst assumption may be that something
may be wrong with your new gear but this is generally caused by a
“ground-loop” in your system. Consider these tips for possible solutions:
• First try moving all components to the same electrical circuit or AC
power outlet.
• If the hum or buzz is still present, power o all gear and remove the
mini-jack and/or RCA audio cables to and from the HD6.
• Turn the HD6 back on and check for hum. If the noise is still audible
try plugging the HD6 AC power cord into a dierent AC outlet.
• If the hum goes away while the audio cables are still disconnected,
the noise is likely coming from another component in your system.
Connect each component back one at a time and the one that causes
the system to hum is likely the culprit.
• A common ground-loop source is from cable TV or satellite cables. If
the hum or buzz persists after trying the previous tips, disconnect
the coaxial cable from your cable box, TV, or DVR and if the hum goes
away the cable is the cause. In this case you can get a ground-loop
isolator from your local electronics store. These are inexpensive and
easy to connect inline with your video cable.
• Sometimes something as simple as a portable heater or dehumidier
will add noise into your wall wiring that could be picked up by your
audio gear. A dimmer switch on a halogen lamp, a wireless internet
router, or cordless phone near the amplier, for example, could also
all be culprits.
• The best overall solutions are to use an AC line lter, plug the unit
into a dierent AC circuit, or in the case of noise introduced by a
wireless router, for example, move it further away from your audio
gear.
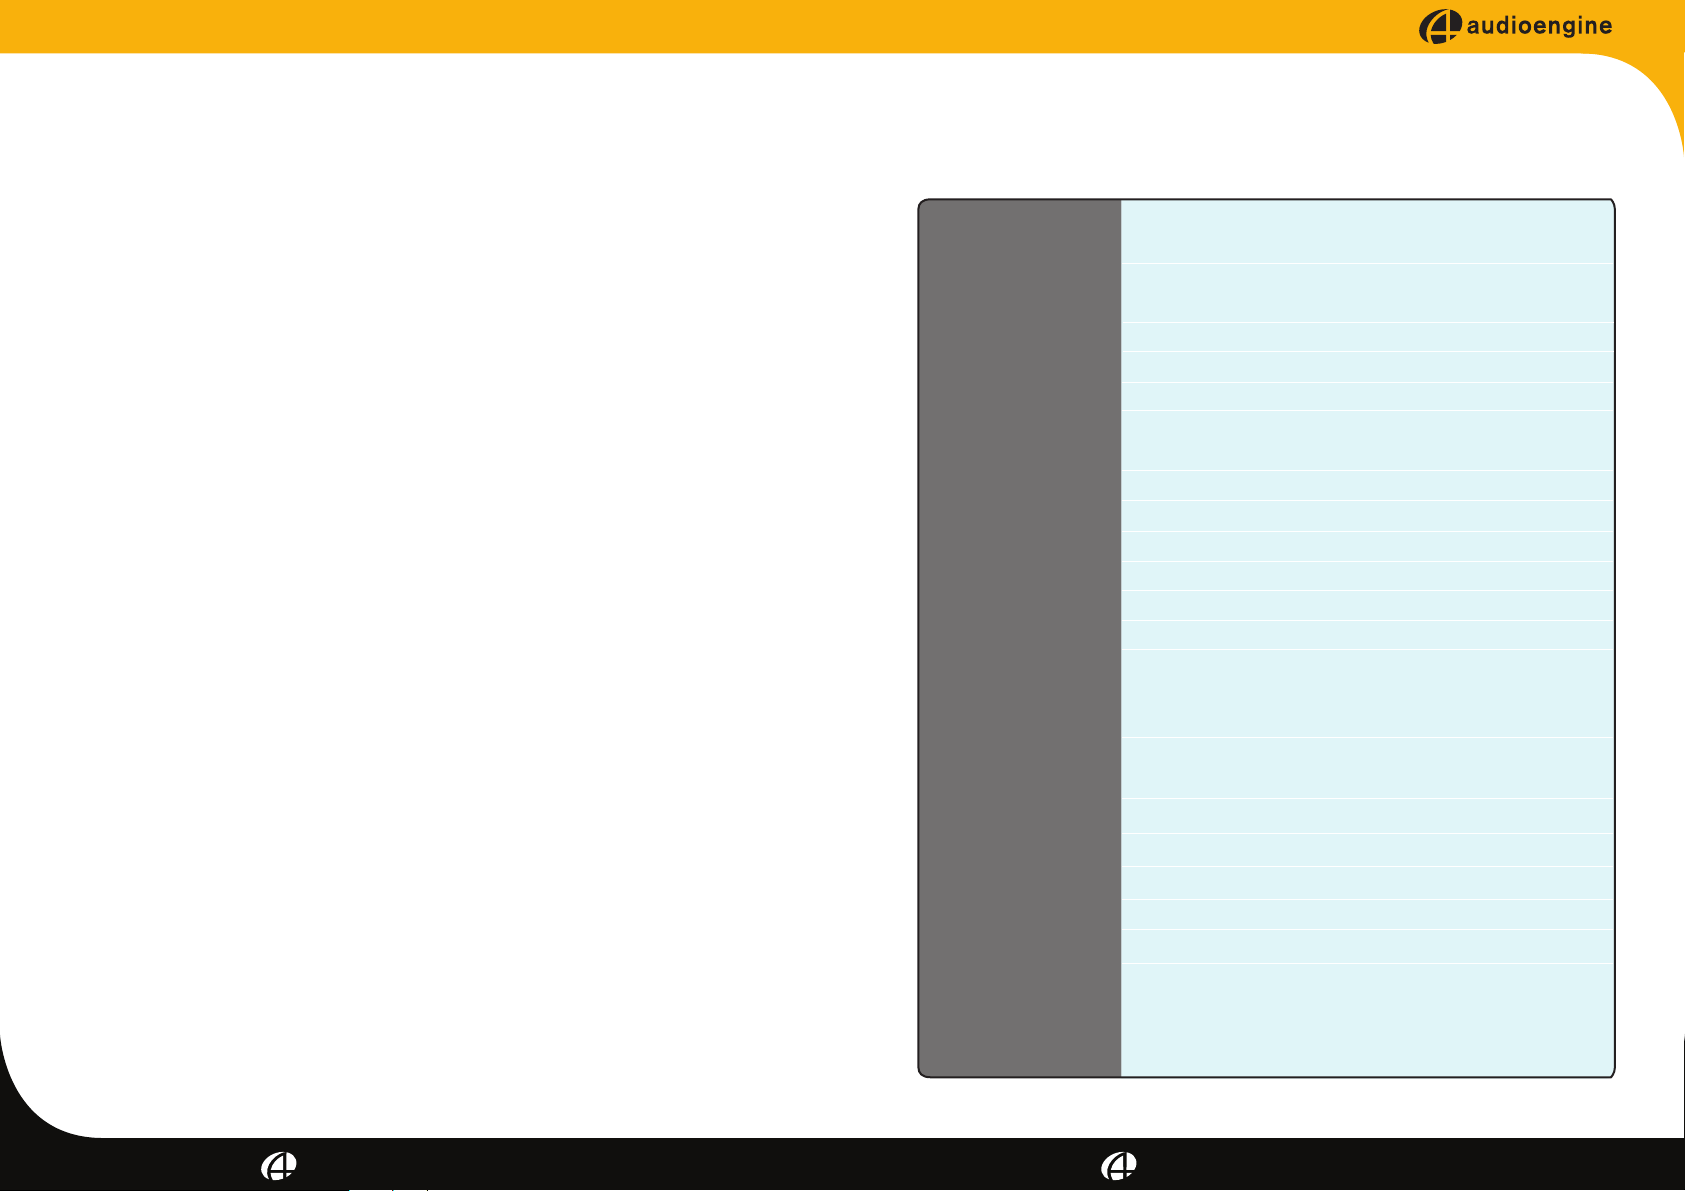
Audioengine HD6 Premium Powered Speakers
General Specications
Type:
Power output:
Amplier type:
Drivers:
Inputs:
Outputs:
Voltages:
Signal-to-noise:
THD:
Crosstalk:
Frequency response:
Input impedance:
Protection:
Power Consumption
Idle, Mute, Sleep:
Dimensions (HWD):
Weight (Left):
Weight (Right):
Shipping weight:
Shipping box dims:
Environmental
Requirements:
2.0 powered (active) speaker system
150W peak power total
(50W RMS, 75W peak per channel), AES
Dual Class AB monolithic
5" Kevlar woofers, 20mm silk dome tweeters
3.5mm stereo mini-jack, RCA L/R
RCA L/R audio (full-range, adjustable)
USB Type A (power/charge)
115/240V, 50/60Hz manually-switchable
>95dB (typical A-weighted)
<0.05% at all power settings
<50db
50Hz-22kHz ±1.5dB
10K ohms unbalanced
Output current limiting, thermal over-temperature,
power on/o transient protection, replaceable
external main fuse
10W • 6W • 4W
10.75” (27 cm) x 7” (18 cm) x 7.75” (20 cm) each
15.4 lbs (7 kg)
9.6 lbs (4.4 kg)
31 lbs (14 kg)
11.5” (W) x 14.5” (H) x 21.75” (L)
• Operating temperature: 32° to 88°F (0° to 31°C)
Non-operating temperature: -4° to 113°F (-20° to 45°C)
•
• Relative humidity: 5% to 95% non-condensing
12 13
audioengine HD6 setup guide audioengine HD6 setup guide
Page 8

Contact Us
If you have any questions or feel you may need service, contact the
reseller where you purchased your product or feel free to email us
directly at: [email protected] or call toll-free in the
United States: (877) 853-4447
About Audioengine
Audioengine designs and builds innovative audio products with all your
music in mind. Great sound, simple but elegant designs, high-quality
materials, and truly useful features are what Audioengine is about. We
sincerely hope you get as much enjoyment from our products as we've
had creating them! For information about our other products go to:
www.audioengineusa.com
Information for Users on Disposal of Old Equipment
[European Union]
This symbol indicates that the electrical and electronic equipment should not be disposed as general household waste at its
end-of-life. Instead, the product should be handed over to the
applicable collection point for the recycling in accordance with
Attention:
This symbol is
only valid in the
European Union.
this pr
this product, please contact your your household waste disposal service or
the shop where you purchased the product. Penalties may be applicable
for incorrect disposal of this waste, in accordance with national legislation.
[Other Countries outside the European Union]
If you wish to dispose of this product, please do so in accordance with
applicable national legislation or other rules in your country for the treatment of old electrical and electronic equipment.
your national legislation. By disposing of this product correctly,
you will help to conserve the environment and human health that
could otherwise be caused by inappropriate waste handling of
oduct. For more information about collection point and recycling of
Warranty
Period
All Audioengine products have a 3-year Limited Warranty on parts and labor from date of
purchase. Your warranty is automatic so there is no need to register. This Limited Warranty
applies only to Audioengine products purchased in the contiguous United States. For Limited
Warranty coverage elsewhere please contact your Audioengine dealer, reseller, or distribu
What is covered
All defective parts or faulty workmanship.
What is not covered
The Audioengine Limited Warranty does not cover damage caused by accident, misuse, abuse,
neglect, excessive moisture, lightning, power surges, other acts of nature, unauthorized product
modication or repairs, or failure to follow the instructions outlined in this Setup Guide.
What we will do
We will repair or replace any defective parts, at our option, within a reasonable amount of time
and free of charge any time during the warranty period. After service, we will ship the product
to an address in the contiguous United States at our expense by the shipping method of our
choice.
What we ask from you
You will be responsible for shipping or transportation charges directly to Audioengine or
authorized dealer. We recommend you keep the original shipping materials, as it is impor-
to an
that
tant
gine cannot be
so please pack well and insure your shipment.
How to obtain Audioengine Warranty serviceIf you have any questions about your warranty
coverage or you think you may need service, email the Audioengine Authorized Service Center
at: [email protected] or call toll-free in the United States: (877) 853-4447. We will do
everything we can to answer your questions and resolve any issues as quickly as possible.
Exclusive Remedy
This Limited Warranty is fully transferable provided that the current owner furnishes the original
proof of purchase and that the serial number on the product is in
AUDIOENGINE SHALL NOT EXCEED THE ACTUAL PURCHASE PRICE PAID BY YOU FOR THE PRODUCT. IN NO EVENT SHALL AUDIOENGINE BE LIABLE FOR SPECIAL, INCIDENTAL, CONSEQUENTIAL
OR INDIRECT DAMAGES.
Product Returns and Refunds
Your satisfaction is guaranteed! Should you have a problem or are not satised with any Audioengine product, send us an email at: [email protected] or call toll-free in the United
States: (877) 853-4447.
you package the product so that it will not be damaged during shipping. Audioen-
responsible for any damages incurred during shipping due to poor packing,
tact. THE MAXIMUM LIABILITY OF
tor.
14 15
audioengine HD6 setup guide audioengine HD6 setup guide
Page 9
Setup Guide
Audioengine, Ltd.
www.audioengineusa.com
© 2015 Audioengine Corp. All Rights Reserved.
Copyright Notice
Audioengine and Audioengine HD6 are trademarks of Audioengine Ltd.
HD6
Premium Powered Bookshelf Speakers
 Loading...