

Page 1

SPEAKER SYSTEMS
QX6.2AT / QX6.2BT
Page 2
CAUTION
Never use the Tweeters without the supplied In-Line Crossovers.
Please ensure the correct polarity (+ or -) for all connections.
Never connect loudspeakers directly with the vehicle’s chassis or power supply.
WIRING AND CONNECTIONS
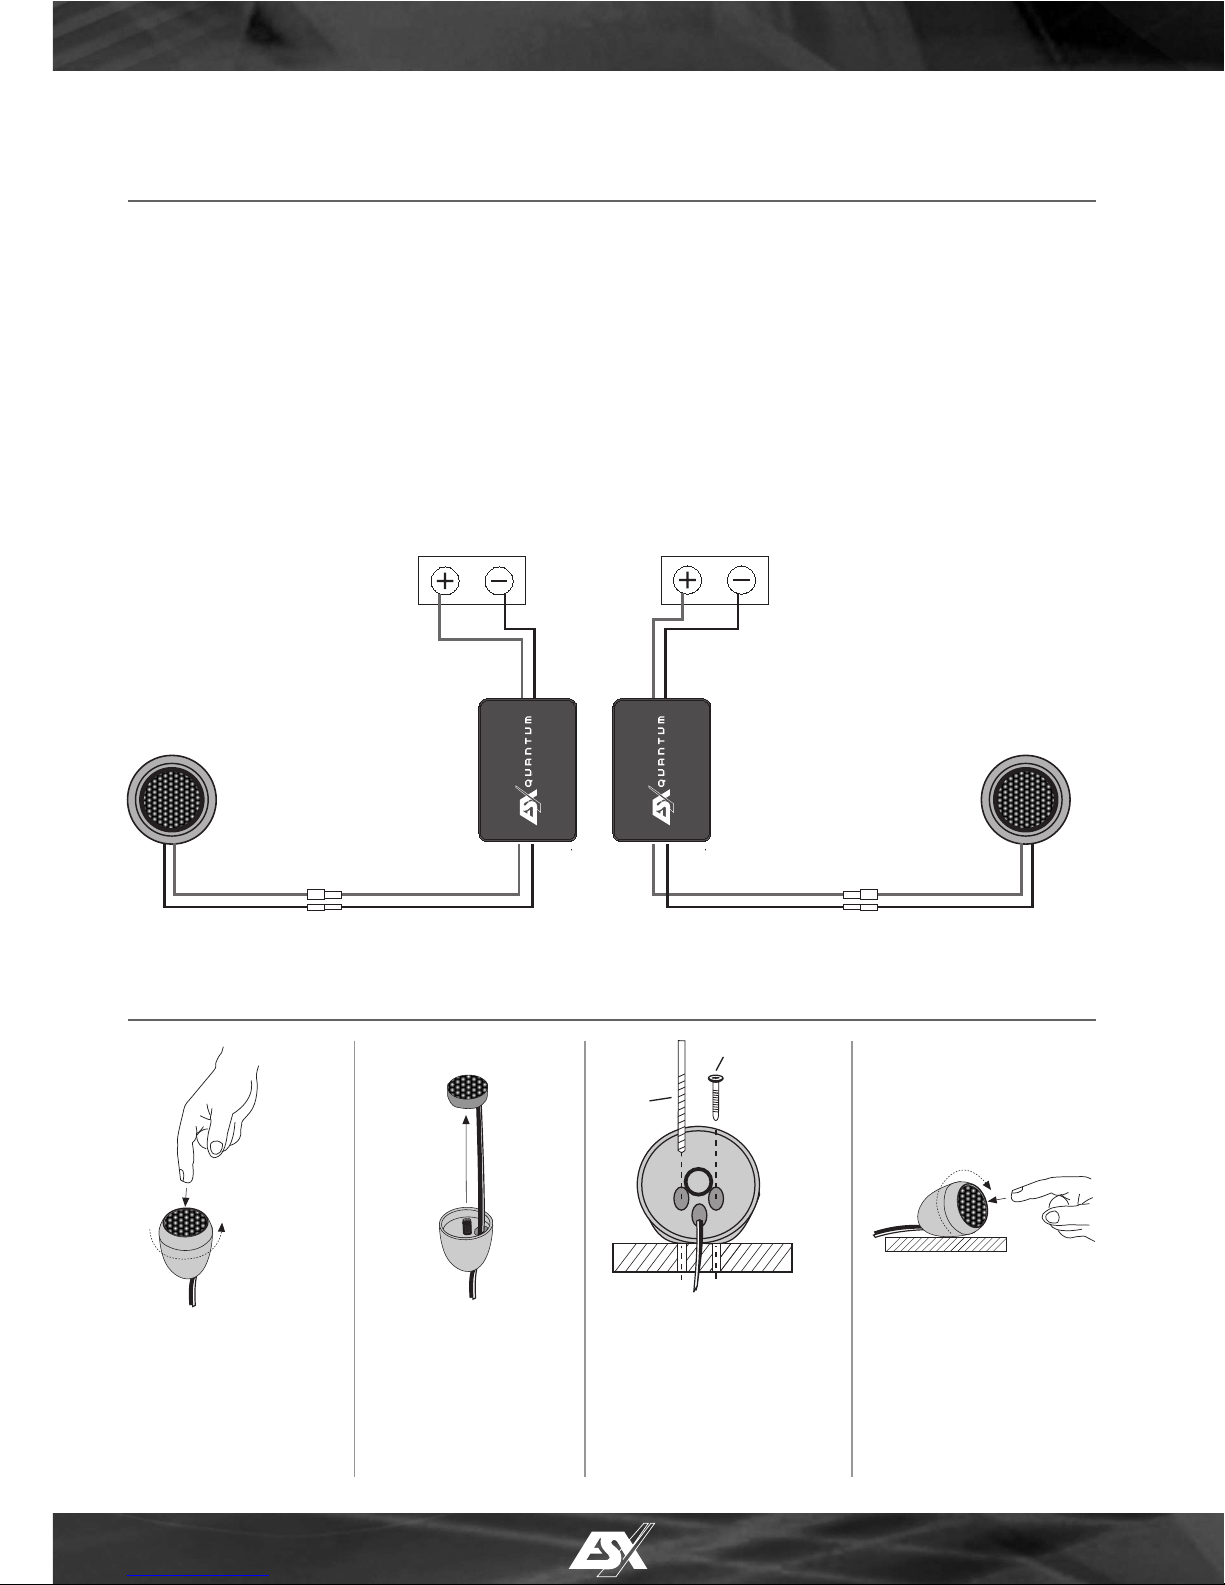
TWEETER CONNECTION:
• Connect the Plus-Wire of the Tweeter with the Plus-Wire (Tweeter) of the Tweeter Crossover.
• Connect the Minus-Wire of the Tweeter with the Minus-Wire (Tweeter) of the Tweeter Crossover.
• Connect the red marked Plus-Wire from the Tweeter Crossover with Plus-Terminal of the amplifier.
• Connect the Minus-Wire from the Tweeter Crossover with Minus-Terminal of the amplifier.
• Repeat the same procedure for the other channel components.
ACHTUNG
Benutzen Sie den Hochtöner niemals ohne die mitgelieferte Frequenzweiche.
Bitte achten Sie auf die richtige Polarität (+ oder -) bei allen Verbindungen.
Schließen Sie keine Lautsprecher an die Fahrzeugkarosserie bzw. Batterie an.
ANSCHLUSS DER HOCHTÖNER:
• Verbinden Sie das Plus-Kabel des Hochtöners mit dem Plus-Kabel (Tweeter) der Hochton-Weiche.
• Verbinden Sie das Minus-Kabel des Hochtöners mit dem Minus-Kabel (Tweeter) der HT-Weiche.
• Verbinden Sie das Plus-Kabel (rot) der Hochtonweiche mit dem Plus-Anschluss des Verstärkers.
• Verbinden Sie das Minus-Kabel der Hochtonweiche mit dem Minus-Anschluss des Verstärkers.
• Wiederholen Sie die Prozedur nochmals für die Komponenten des anderen Kanals.
AMPLIFIER
SPEAKER OUTPUT L
SPEAKER OUTPUT R
TWEETER
L
TWEETER
R
TWEETER CROSSOVER L TWEETER CROSSOVER R
PLUS
MINUS
PLUS
MINUS
PLUS
MINUS
PLUS
MINUS
TWEETER MOUNT
1.
VERKABELUNG UND ANSCHLÜSSE
• Push slightly on
the meshgrill and
release holding ring
counter clockwise
2.
• Pullout the tweeter
until the half of the
cable length
3.
• Hold housing at the
mounting location
• Drill two mounting
holes into the dashboard area
• Fix the housing with
the two screws
Drill
Self-tapping
Screw
4.
• Pull back the tweeter
inside the housing
• Set on the holding ring
• Push slightly on
the meshgrill and
screw the holding ring
clockwise
HOCHTÖNER-EINBAU
1.
• Drücken Sie leicht
auf das Gitter und
drehen Sie den
Haltering gegen den
Uhrzeigersinn auf
Page 3

ACHTUNG
Benutzen Sie den Hochtöner niemals ohne die mitgelieferte Frequenzweiche.
Bitte achten Sie auf die richtige Polarität (+ oder -) bei allen Verbindungen.
Schließen Sie keine Lautsprecher an die Fahrzeugkarosserie bzw. Batterie an.
ANSCHLUSS DER HOCHTÖNER:
• Verbinden Sie das Plus-Kabel des Hochtöners mit dem Plus-Kabel (Tweeter) der Hochton-Weiche.
• Verbinden Sie das Minus-Kabel des Hochtöners mit dem Minus-Kabel (Tweeter) der HT-Weiche.
• Verbinden Sie das Plus-Kabel (rot) der Hochtonweiche mit dem Plus-Anschluss des Verstärkers.
• Verbinden Sie das Minus-Kabel der Hochtonweiche mit dem Minus-Anschluss des Verstärkers.
• Wiederholen Sie die Prozedur nochmals für die Komponenten des anderen Kanals.
VERKABELUNG UND ANSCHLÜSSE
VERSTÄRKER
LAUTSPRECHERAUSGANG L
LAUTSPRECHERAUSGANG R
HOCHTÖNER
L
HOCHTÖNER
R
HOCHTON-FREQUENZWEICHE L HOCHTON-FREQUENZWEICHE R
PLUS
MINUS
PLUS
MINUS
PLUS
MINUS
PLUS
MINUS
HOCHTÖNER-EINBAU
1.
• Drücken Sie leicht
auf das Gitter und
drehen Sie den
Haltering gegen den
Uhrzeigersinn auf
2.
• Ziehen Sie denn
Hochtöner aus
dem Gehäuse
bis zur Hälfte der
Kabellänge
3.
• Halten Sie das Gehäuse
an den Einbauort
• Bohren Sie zwei Löcher
in das Armaturenbrett
• Befestigen Sie das
Gehäuse mit den zwei
beiliegenden Schrauben
Bohrer
SchneidSchraube
4.
• Ziehen Sie den Hochtöner ins Gehäuse
• Haltering aufsetzen
• Drücken Sie leicht
auf das Gitter und
schrauben Sie den
Haltering wieder an
Page 4

INSTALLATION
The first step of installing a speaker system is thorough planning. Choose a suitable location for your speaker components
carefully. Follow these suggestions to ensure proper imaging and maximum performance:
1. Choose a location that offers the least amount of obstruction between the components and your ears.
2. Try to mount the speakers on the same plane. That is, they should be at the same height and directly across from
each other. Do not mount one speaker higher, lower, further forward or further back from the opposite speaker.
3. Always check behind the chosen mounting locations to ensure that there is proper clearance for the back of the
speakers and avoid obstructions such as window tracks, wire harnesses, gas tank etc.
4. Maximum performance is achieved when the speaker is securely mounted to a door panel or rear speaker deck. There
should be no gaps between the speaker basket and the mounting surface.
EINBAUANLEITUNG
Der erste Schritt bei der Installation des Lautsprecher Systems sollte die sorgfältige Planung sein. Wählen Sie eine
geeignete Stelle für den Einbau der einzelnen Komponenten sorgfältig aus. Folgen Sie einfach diesen Vorschlägen um
das bestmögliche Resultat zu erreichen.
1. Wählen Sie eine Position für die einzelnen Komponenten, bei der das Signal am besten ohne Hindernisse im
Fahrgastraum verteilt wird. Beachten Sie dabei die Position der Fahrersitze, Nackenstützen und anderer Aufbauten im
Innenraum des Autos.
2. Montieren Sie die Lautsprecher auf der linken bzw. rechten Seite in der selben Anordnung. Vermeiden Sie wenn
möglich, dass ein Lautsprecher höher, tiefer, weiter weg oder näher wie der dazu gegenüber liegende Lautsprecher
montiert wird.
3. Überprüfen Sie vor dem Bohren von Montagelöchern für die Lautsprecher immer, was sich hinter der gewählten
Montagefläche befindet. Bitte beschädigen Sie auf keinen Fall Fensterhebevorrichtungen, Kabelbäume, den Benzintank
oder andere Fahrzeugteile.
4. Sie erreichen das beste Klangresultat, wenn die Lautsprecher fachgerecht in einem Türpanel oder einer Heckablage
fest montiert werden. Lücken oder lose Stellen zwischen Lautsprecherkorb und Montageoberfläche sollten abgedämmt
bzw. geschlossen werden.
Audio Design GmbH
Am Breilingsweg 3 · D-76709 Kronau / Germany
Fon +49(0)7253 - 9465-0 · Fax +49(0)7253 - 946510
www.audiodesign.de
DISTRIBUTION:
 Loading...