

Page 1

ProDAB-1 Plus & ProDAB-2 Dual
User Guide
Audio & Design
Rev 3.4
Firmware 1.72/1.74
Page 2

ProDAB User Guide
Audio & Design
2
Table of Contents
1. Initial Configuration ........................................................................................................................................... 3
1.1 Getting Started .......................................................................................................................................... 3
1.2 OLED DAB Display screens ........................................................................................................................ 5
1.3 Other OLED display ICONs ......................................................................................................................... 5
2. Network set-up .................................................................................................................................................. 6
2.1 Login details for MP3 upload: ................................................................................................................... 7
3. DAB Scan ............................................................................................................................................................ 8
4. Manual DAB Tune .............................................................................................................................................. 9
5. System Menu ................................................................................................................................................... 10
6. Change Over ..................................................................................................................................................... 13
7. MP3 menu ........................................................................................................................................................ 16
8. Engineering menu ............................................................................................................................................ 17
8.1 GPIO Outputs .......................................................................................................................................... 20
8.2 GPIO Output options available ................................................................................................................ 20
8.3 GPIO Output Pin out ................................................................................................................................ 20
8.4 GPIO Inputs ............................................................................................................................................. 21
8.5 GPIO Inputs options available ................................................................................................................. 21
8.6 GPIO Input Pin out................................................................................................................................... 21
9. Signal Quality troubleshooting......................................................................................................................... 22
9.1 OLED Technical Information Screens ............................................................................................................. 22
9.2 How ProDAB Tunes to a DAB signal ............................................................................................................... 23
9.3 DAB scan ......................................................................................................................................................... 24
10. AES67 Support ............................................................................................................................................. 25
11. System Block Diagrams ................................................................................................................................ 28
12. Rear Panel .................................................................................................................................................... 29
11.1 Inputs ........................................................................................................................................................... 29
11.2 Outputs ........................................................................................................................................................ 29
11.3 Common Grounds ....................................................................................................................................... 29
11.4 +5V Current Limited supply ......................................................................................................................... 29
13. Firmware Upgrade ....................................................................................................................................... 31
14. Web Interface .............................................................................................................................................. 32
13.1 Default Username & Password ............................................................................................................... 32
15. Spectrum Analyser Utility (Front Panel Menu) ............................................................................................ 48
WARRANTY: ..................................................................................................................................................... 51
Audio & Design
51 Paddick Drive, Lower Earley, Reading
Berkshire, RG6 4HF. UK Tel: +44 118 324 0046 Info: sales@adrl.co.uk Web:www.adrl.co.uk
Copyright © Audio & Design Reading Ltd 2018 Rev 3.4 (Firmware 1.72/1.74)
Page 3

ProDAB User Guide
Audio & Design
3
1. Initial Configuration
1.1 Getting Started
ProDAB takes approximately 35 seconds to boot up, during this time
the power LED will flash.
Press to select:
DAB/DAB+
MP3
Web (Internet Radio)
FM
When the OLED display is not in screen saver mode (Pressing any of
the “Nav” keys will bring the unit out of screen saver)
DAB Mode: display the available DAB services OK, will select
the currently displayed service.
MP3 Mode: display the MP3 files available OK, will play the
currently displayed file.
Web Mode: display available web links OK, will select the
currently displayed link.
FM Mode: tune FM receiver in 100KHz steps OK, will tune to
the currently displayed frequency.
Unlocked
To Unlock front panel press and hold Unlock button until padlock
symbol changes to Unlocked. This button will also jump out of
Screen Saver or Main Menu to service display.
When displaying currently selected service, station or track press
to change displayed information.
Locked
When ProDAB is shipped from the factory it will require a “DAB Scan” to find your local
multiplexers. You will see a message “No Stream Selected – Press OK for Menu” Press the OK
button then select DAB Scan use the button to select the type of scan you require and
to start scanning. ProDAB will then select the first service alphabetically that it finds. Press
to view all other found services & OK to select.
Page 4
ProDAB User Guide
Audio & Design
4
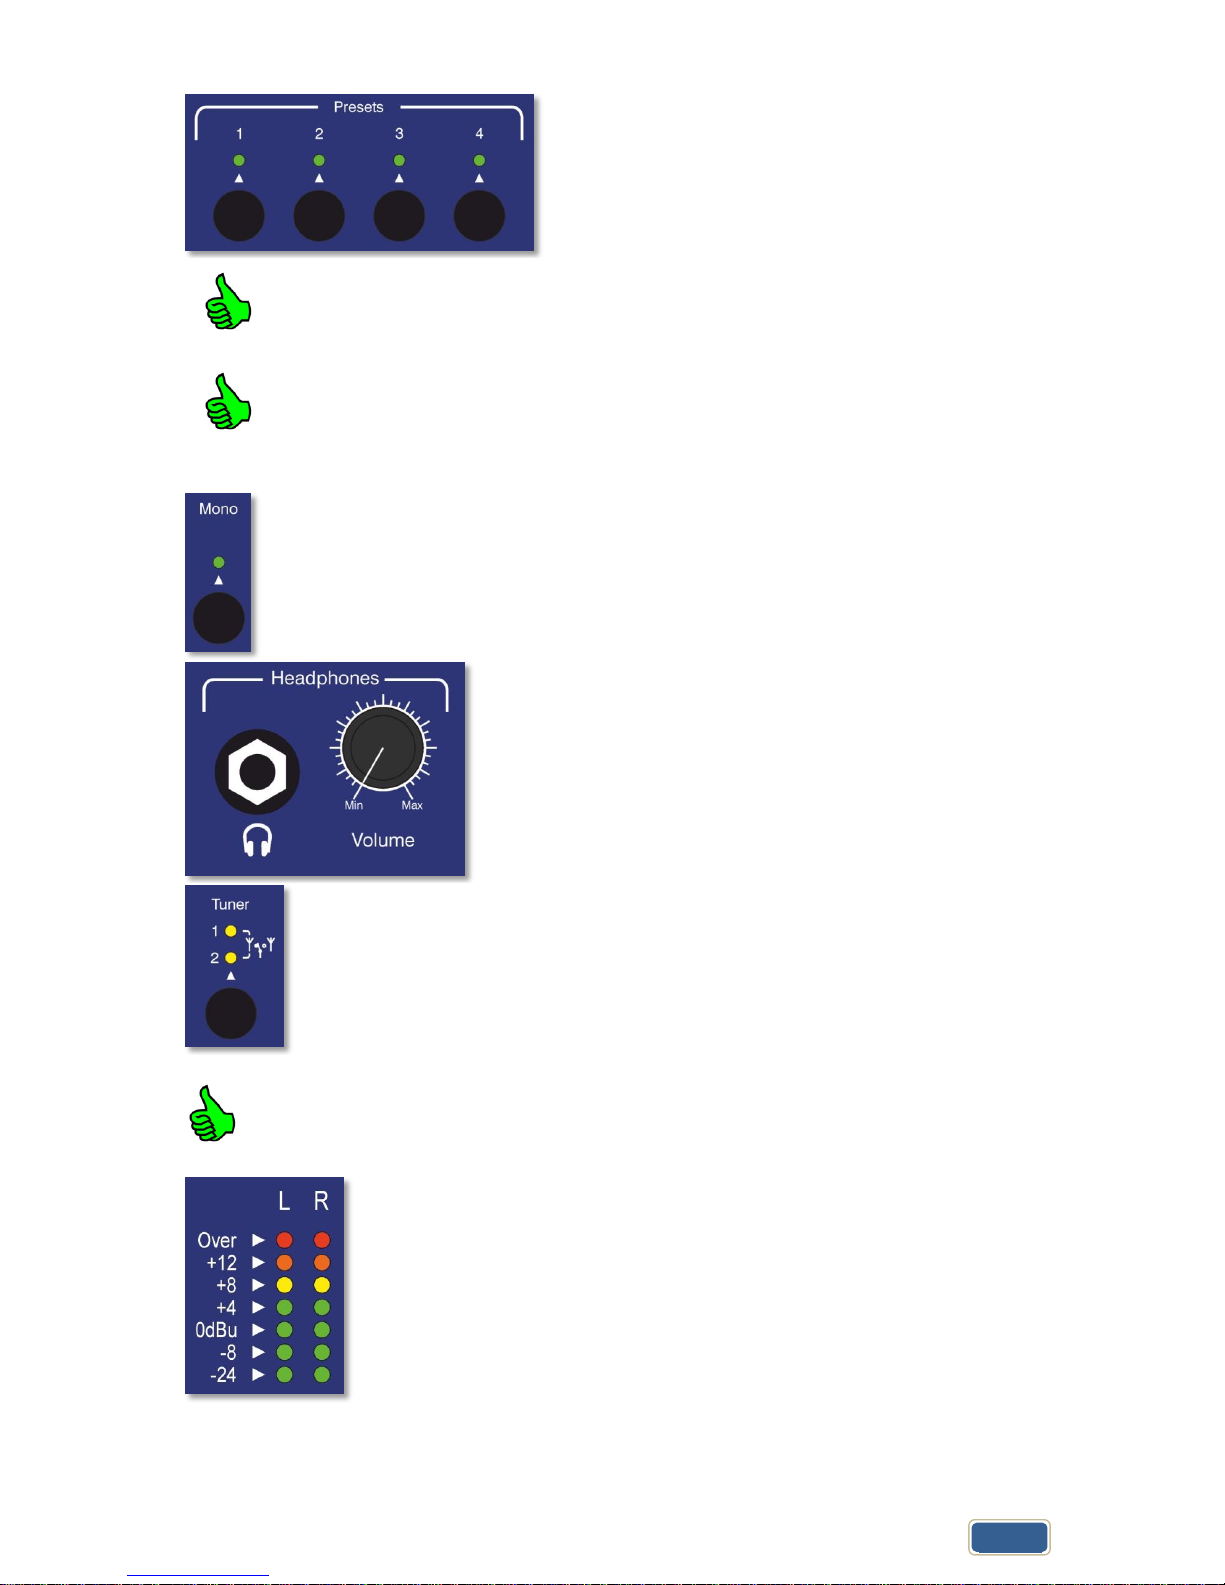
Press and hold Preset button to save currently
selected service, station, MP3 track or Web link.
Pressing whilst the preset directory is shown will cycle through the available
presets, including those not available by direct access buttons – i.e. Presets 5 to
15
Presets also store mode, so can be used as a quick way to switch between DAB,
FM, MP3 & Web.
Mono/Stereo selection will change the audio output in all
modes, including IP stream output.
The headphone output is suitable to drive headphones with
a minimum impedance of 16Ω
Tuner selection button selects which output is currently
being monitored by the headphone output and controlled
by the front panel buttons
Press and hold Tuner button to change unit mode between Diversity or
Independent modes
LED Meters - Over = 1dB below fsd.
0dBu = -18dB below fsd.
Page 5

ProDAB User Guide
Audio & Design
5
1.2 OLED DAB Display screens
Press Info button to cycle through available display
screens
Basic screen with Service Name, program information,
bit rate & mode
Information about selected MUX, audio algorithm, CID &
SID, allocated Consumers Units
Technical information for both tuners
Oscilloscope display to help with setting change over
parameters
See Change Over section for more details
1.3 Other OLED display ICONs
Change Over
Disabled
Change Over
Enabled
Change Over
Active
Change Over
Mode Changing
Streaming port
5000 active
LAN
Connected
LAN
Disconnected
LAN & Streaming
Connected
LAN & Streaming
Web Radio
Mode
AES67 or
Multicast active
Page 6

ProDAB-2 Dual User Guide
Audio & Design
6
2. Network set-up
Press OK then select SYSTEM with then . Set IP
address mask & default gateway.
Select NETWORK MENU with or then
Choose between Static & DHCP using keys
If Static press to edit IP address/net mask. Then use
to select & to change items then OK to save
Note: net mask of 255.255.255.0 is shown as /24 i.e. 24
bits
To edit use to select & to change items then OK
to save
To edit use to select & to change items then OK
to save
Note: The embedded web server can be accessed via the
set IP address port 80.
Page 7

ProDAB User Guide
Audio & Design
7
To save STATIC settings
Or if DHCP has been selected to save
Then to reboot unit
Units are shipped with the network set to STATIC:
IP address - 192.168.0.7
Net Mask – 255.255.255.0
Default Gateway – 192.168.0.254
DNS – 8.8.8.8 (Google)
To upload MP3 files use a SFTP client such as Filezilla, but, note that we use non-standard port
for SSH & SFTP of 43222 See MP3 Menu section below on how to upload files using a USB
stick.
2.1 Login details for MP3 upload:
Username - mp3
Password - 2033740
Filezilla download - https://filezilla-project.org/
When displaying menus pressing or takes you to the next or previous menu
item. OK is for selecting/accepting the desired action or parameter.
Will take you into sub-menu or editing function.
Page 8
ProDAB-2 Dual User Guide
Audio & Design
8
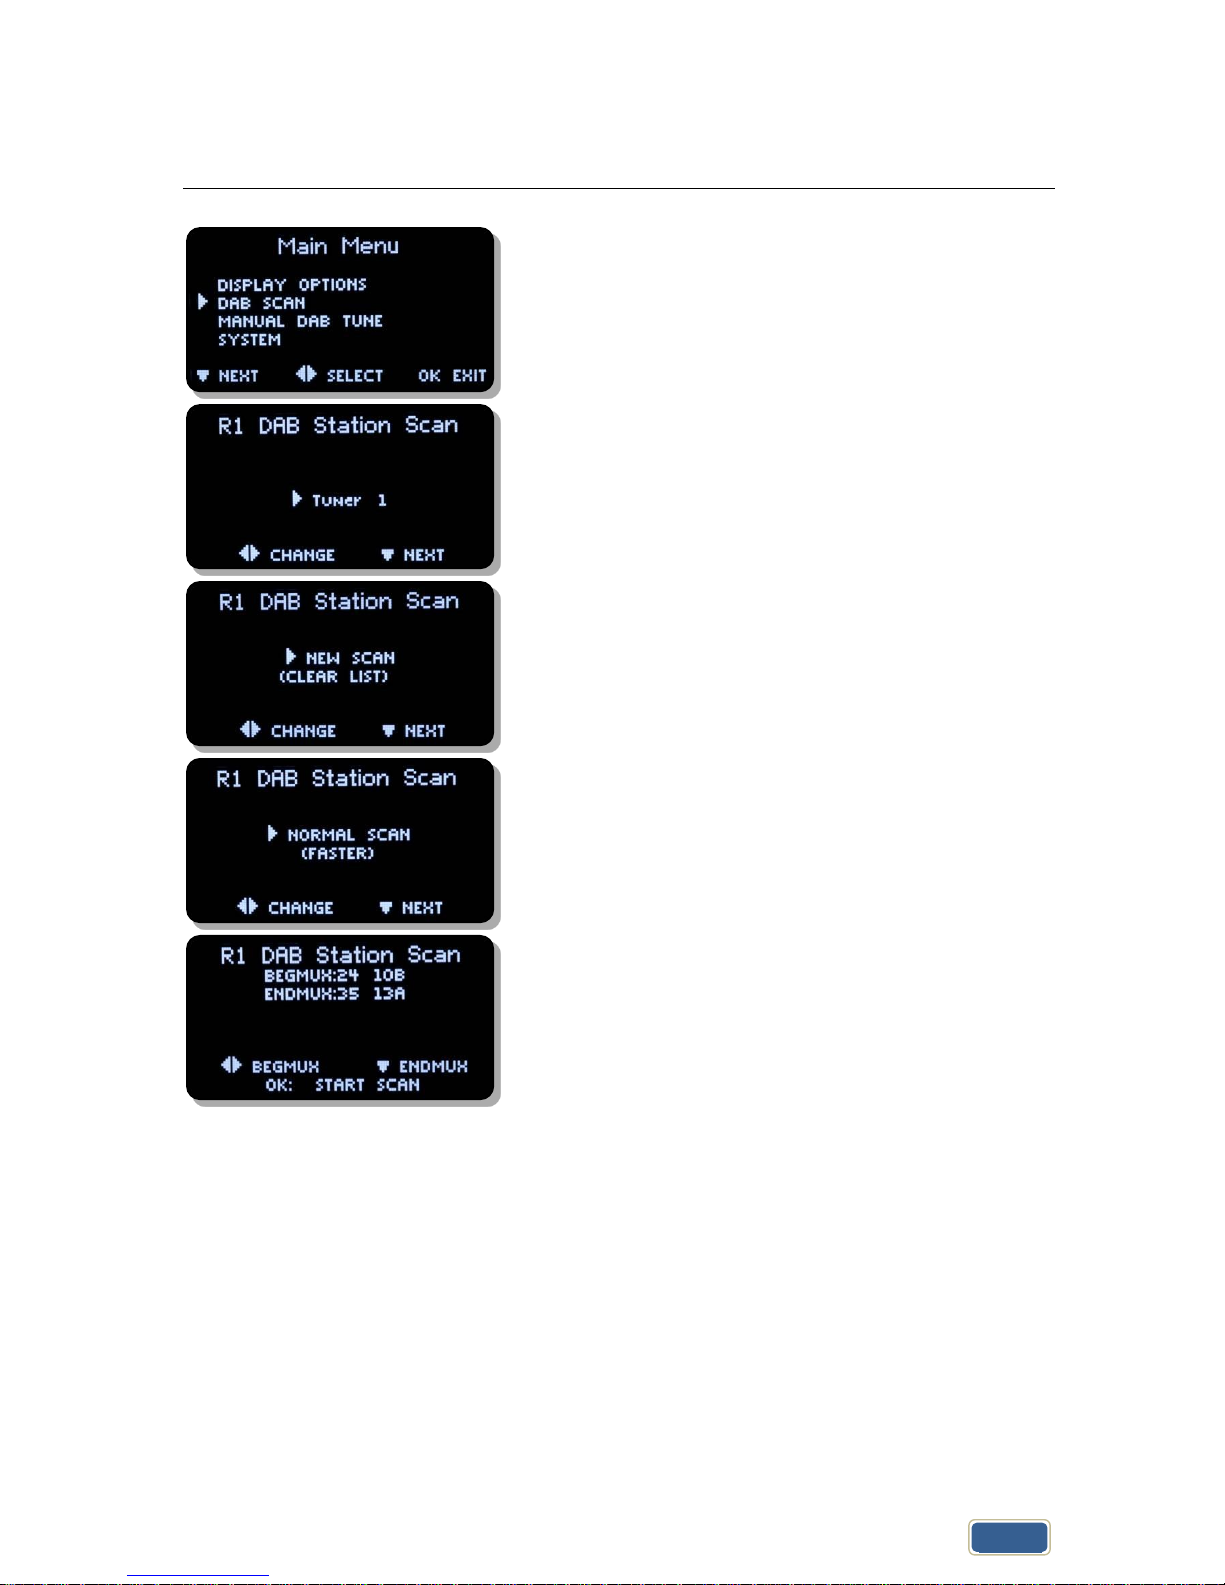
3. DAB Scan
Press OK then select DAB Scan with then
Choose between Tuner 1 & 2 using keys Then to
go to next menu option
Choose between NEW SCAN which will clear current
station list or RE-SCAN to append to current list using
Then to go to next menu option
NORMAL SCAN or SLOW SCAN
Press OK to start Scan or to change scan starting
MUX or to change scan ending MUX.
Page 9
ProDAB-2 Dual User Guide
Audio & Design
9
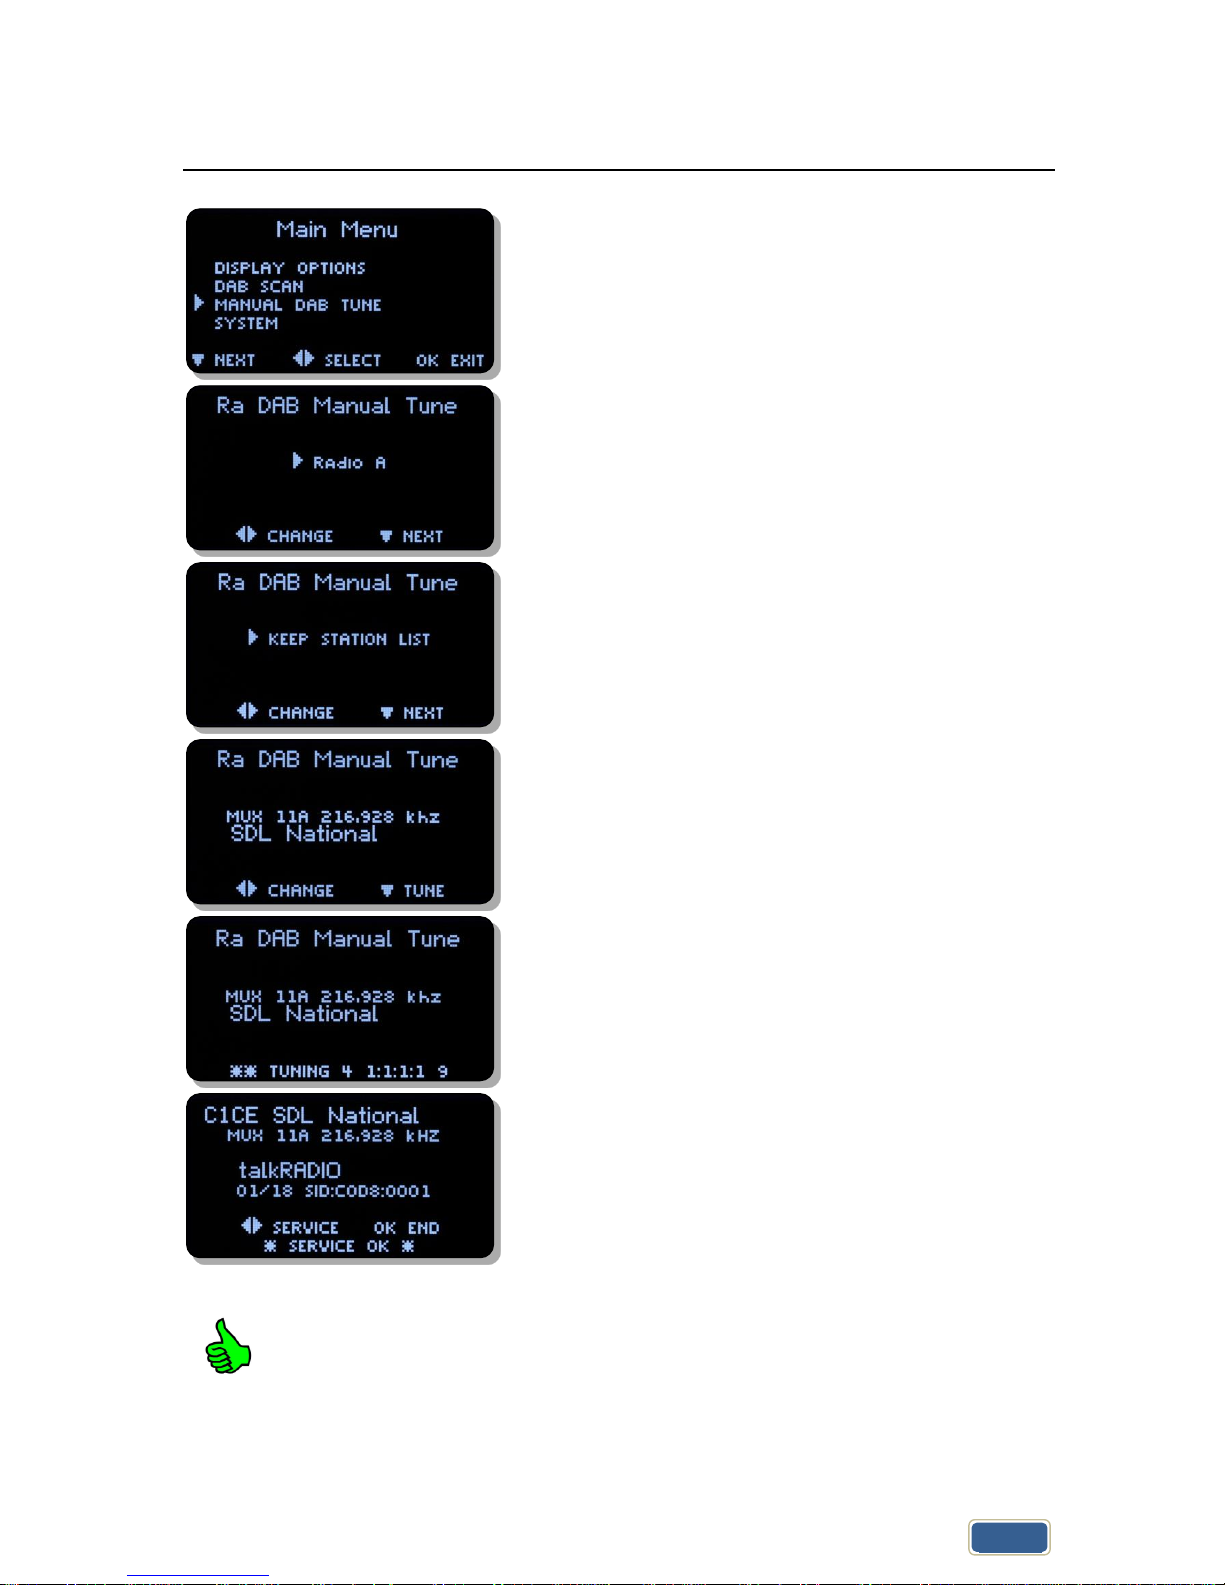
4. Manual DAB Tune
Press OK then select Manual DAB Tune with then
Choose between Radio section A or B using keys
Then to go to next menu option
Choose between KEEP STATION LIST or CLEAR LIST FIRST
which will clear current station list Then to go to
next menu option
Select MUX with and to tune to selected MUX
The unit will attempt to tune to selected MUX.
1:1:1:1 are discovery flags for:
Acquired : Ensemble : Service List : Service Audio
Select service with and OK to jump out of menu
If the unit has been used in a different location then it’s recommended that you
CLEAR LIST FIRST.
This will ensure that there are no conflicts with previously tuned services SID & CID
Page 10
ProDAB-2 Dual User Guide
Audio & Design
10
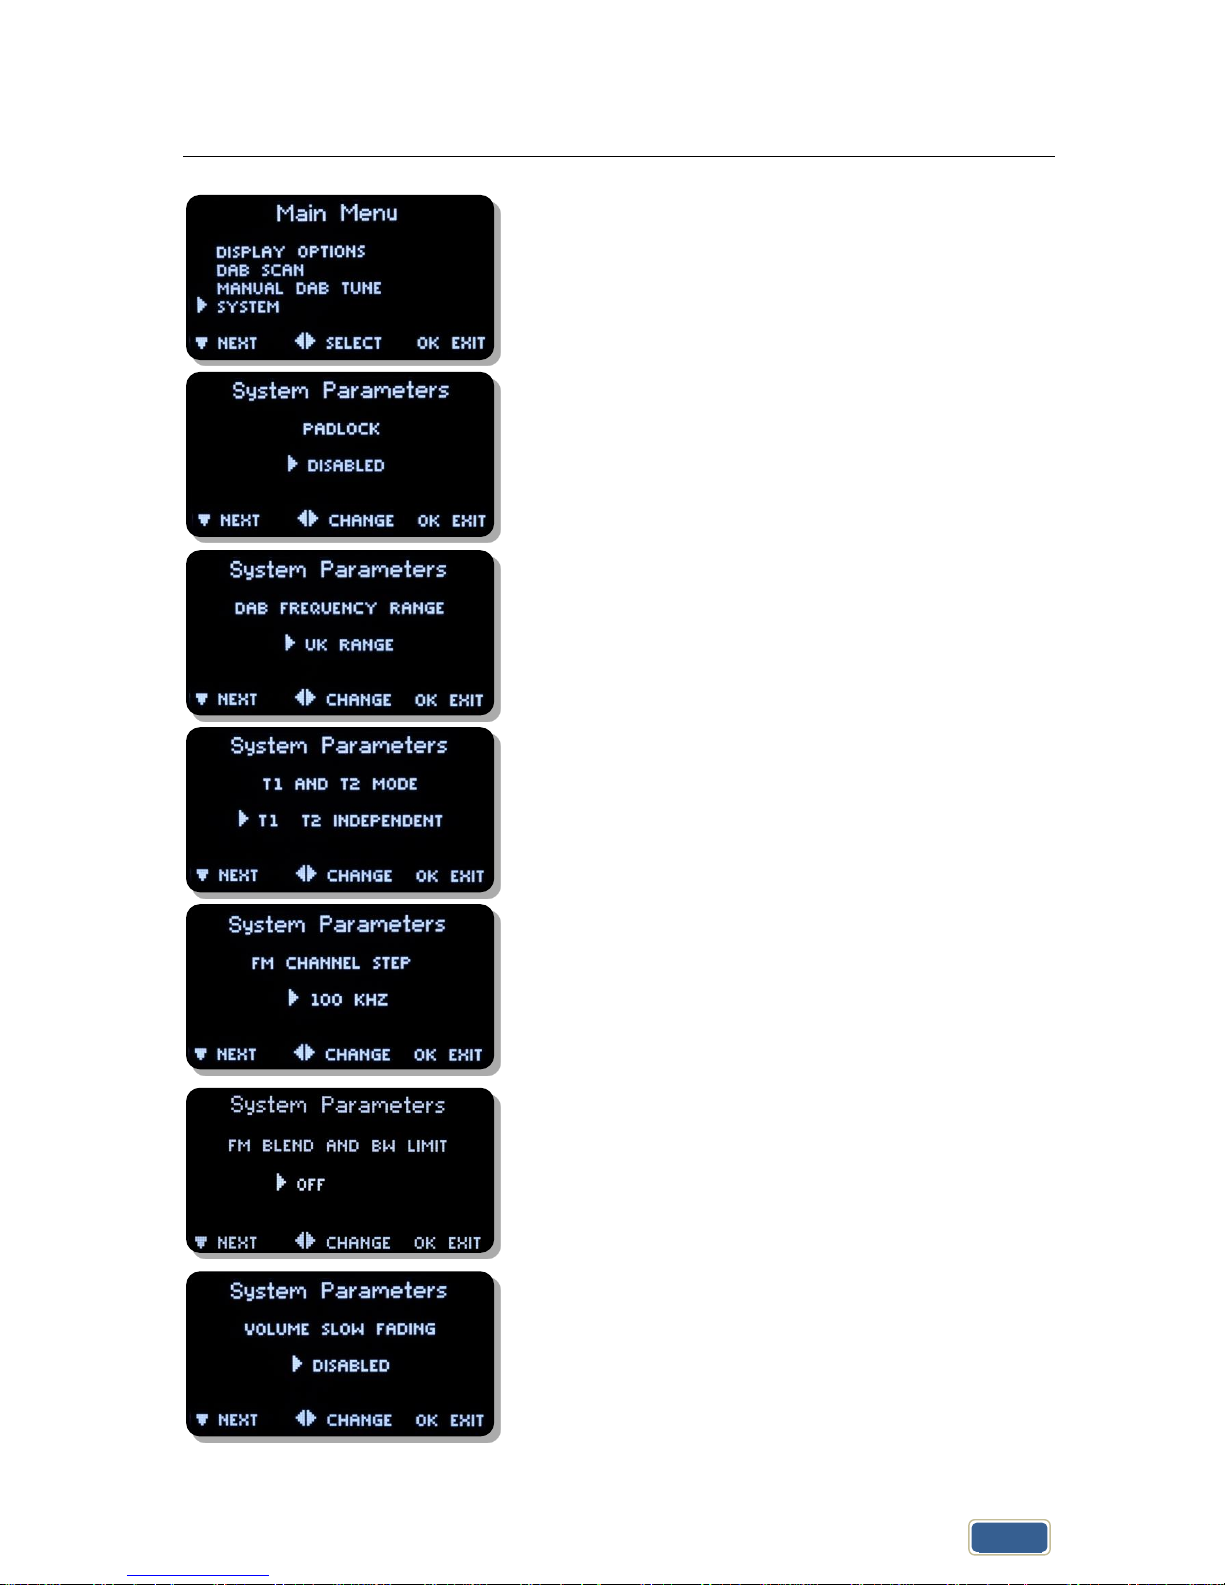
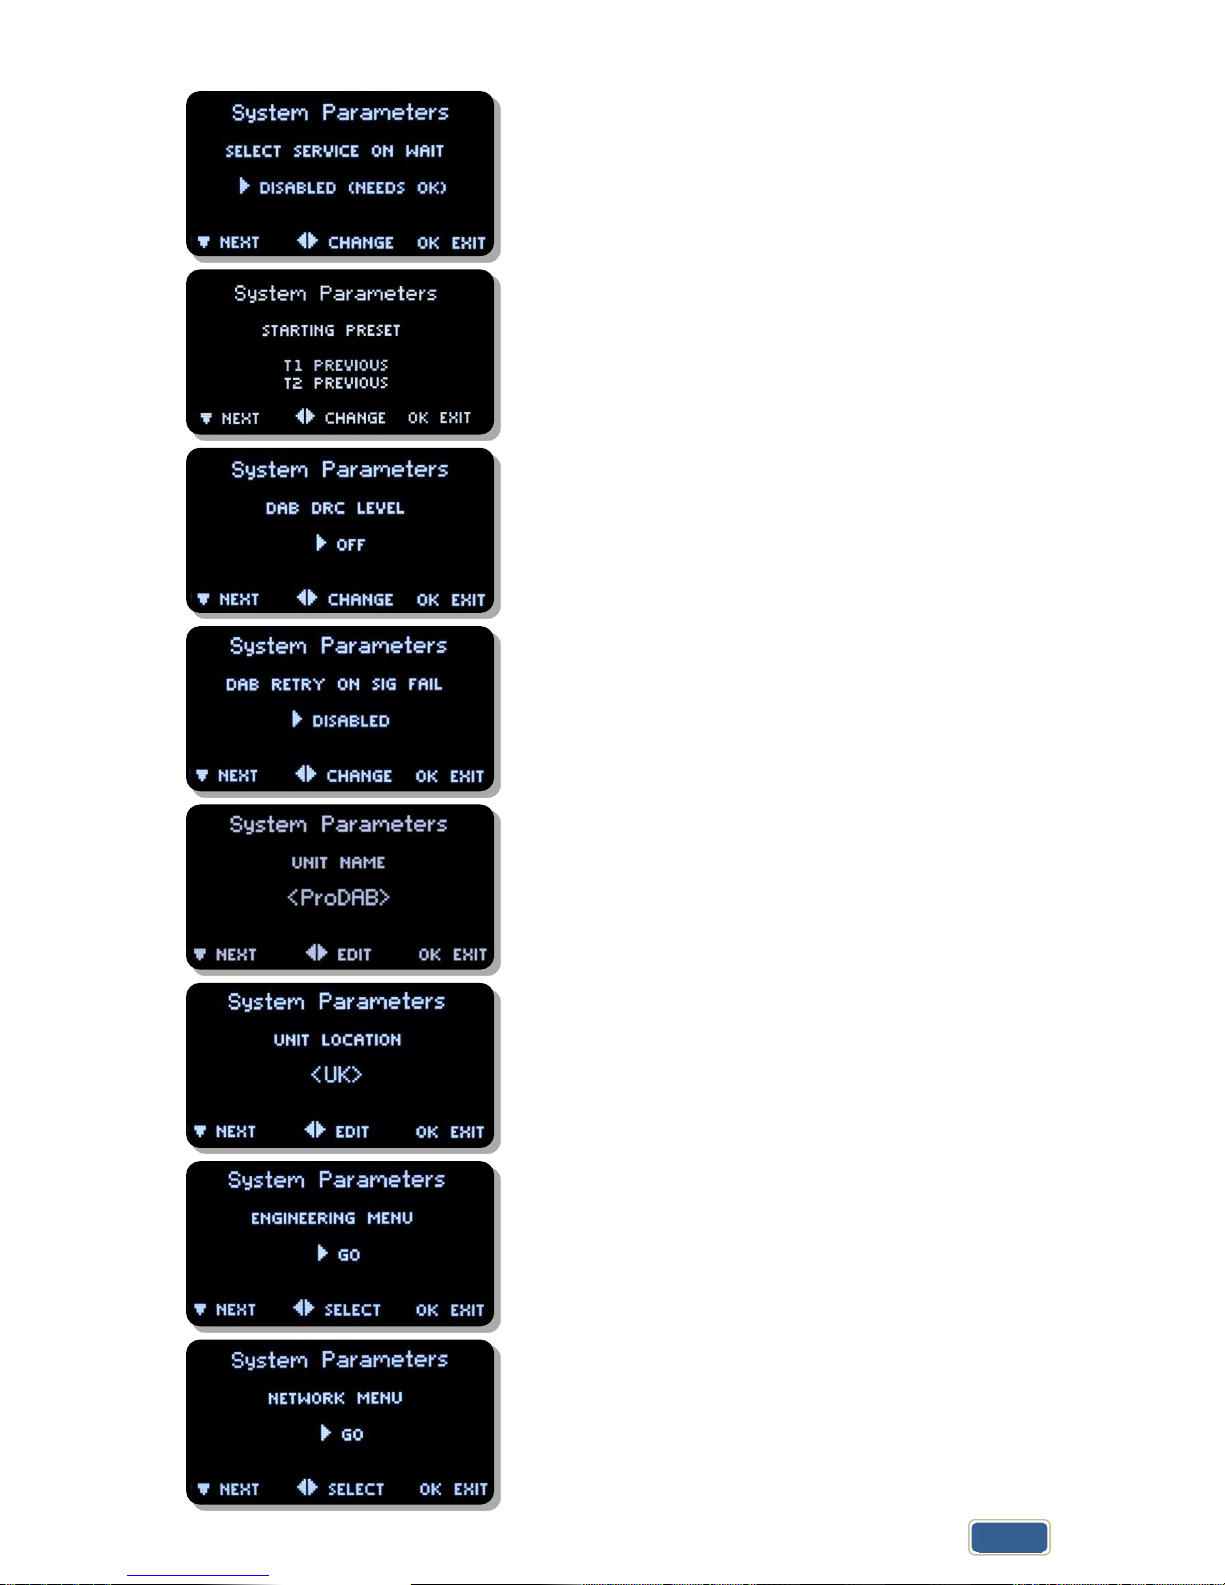
5. System Menu
Then to go to next menu option
to access, option time before unit will automatically
lockout front panel keys. Press and hold Unlock/Clr key to
unlock.
to access sub-menu, this sets the MUX range for DAB
Scan options:
UK Range 10B to 13A
EU Range 05A to 13F
to access sub-menu, this sets Tuner 1 & 2 as fully
independent or diversity mode.
to access sub-menu
options:
100KHZ
50KHZ
to access sub-menu
options:
OFF
AUTO BLEND – Audio will automatically be mixed to
Mono as RSSI decreases.
to access sub-menu
options:
DISABLED
ENABLED
Page 11
ProDAB User Guide
Audio & Design
11
to access sub-menu
options:
DISABLED
ENABLED
to access sub-menu
options:
NONE (Disabled) Unit will return to previous setting when
powered up
Select Preset which should be used on power up.
to access sub-menu
to access sub-menu
to edit
to edit
to access Engineering sub-menu
to access Network sub-menu, see Network setup
section on previous pages
Page 12
ProDAB User Guide
Audio & Design
12
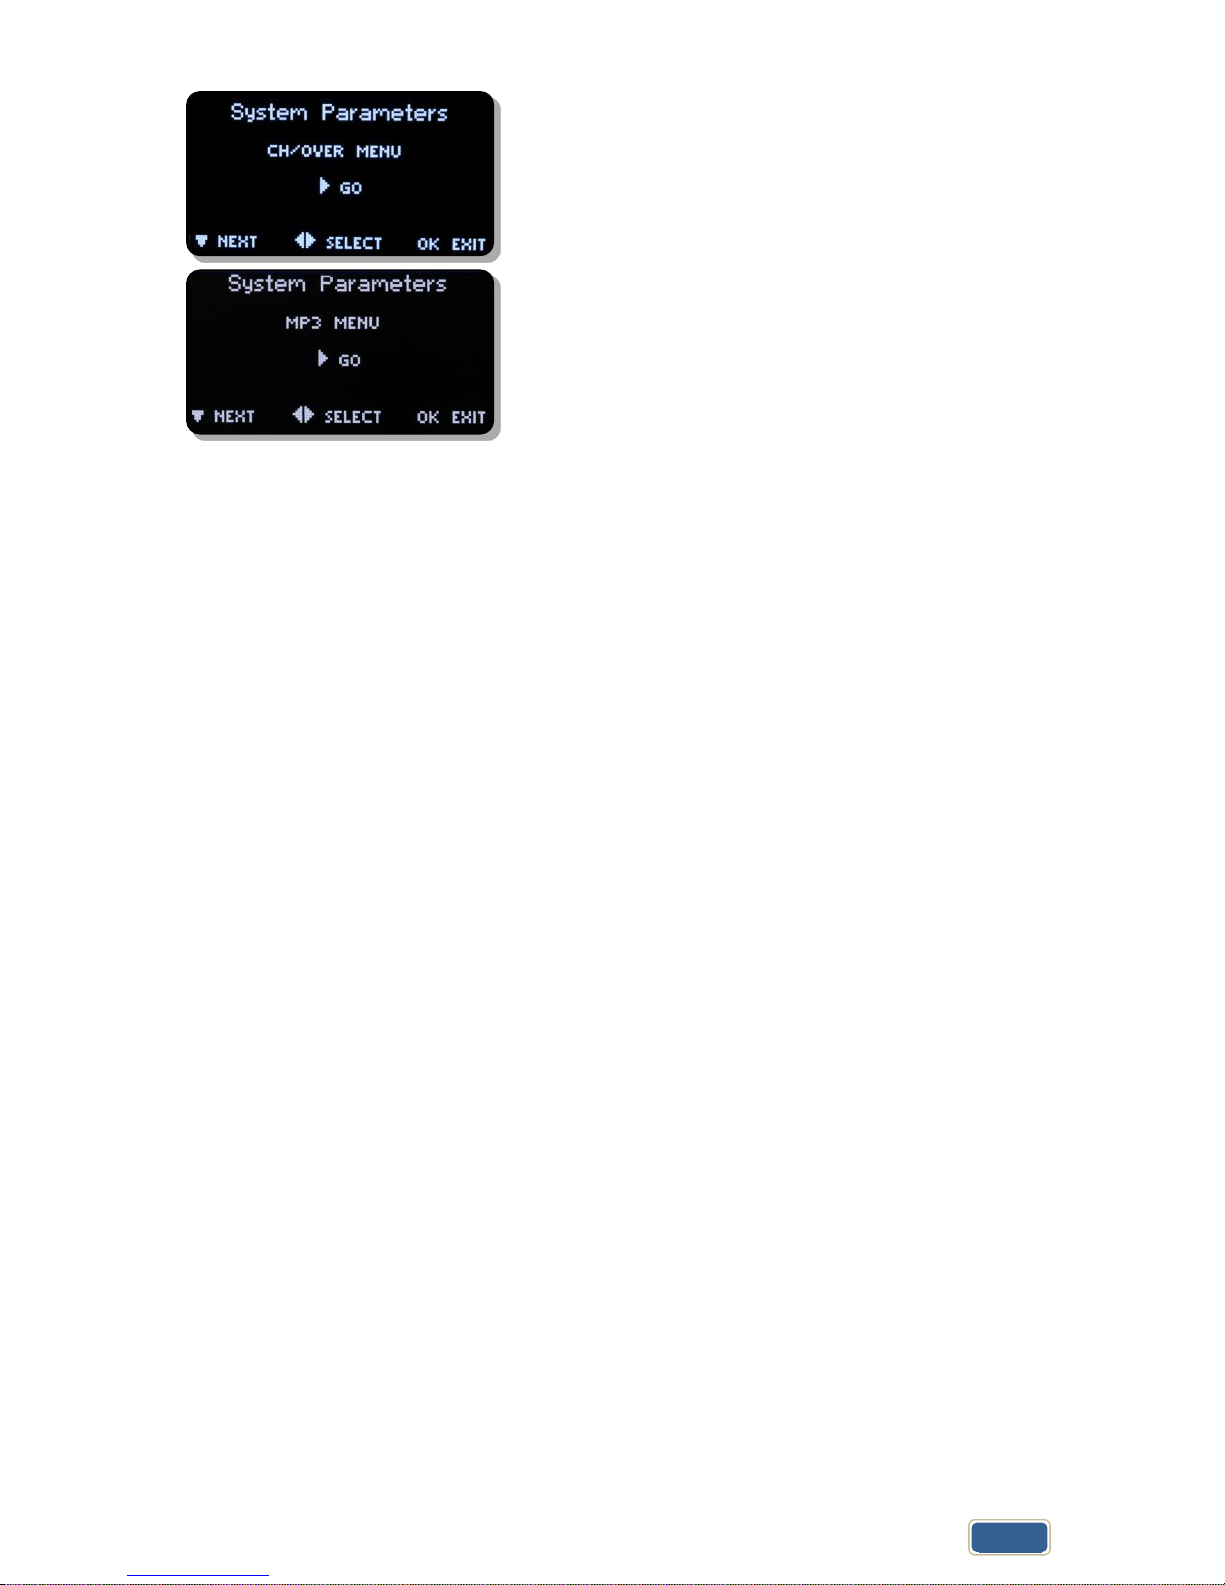
to access sub-menu
to access sub-menu, manage copy/delete stored MP3
files
Page 13
ProDAB-2 Dual User Guide
Audio & Design
13
6. Change Over
ProDAB can automatically play out a stored MP3 or switch to Internet radio when audio
silence is detected or when RF signal level drops below a set threshold. From version 160/160
Change Over is implemented as a separate software module that is “hard coded” to use
Preset 1 as the main program selected and Preset 2 as the “fail over” preset. Once “Armed”
front panel controls are locked out. To disable Change Over mode, press and hold the
Unlock/Clr front panel button. On ProDAB Dual only Tuner 1 can be set to Change Over mode,
Tuner 2 still functions but cannot be changed. Also, from version 160/160 Change Over can be
“Armed” and parameters changed via the web GUI.
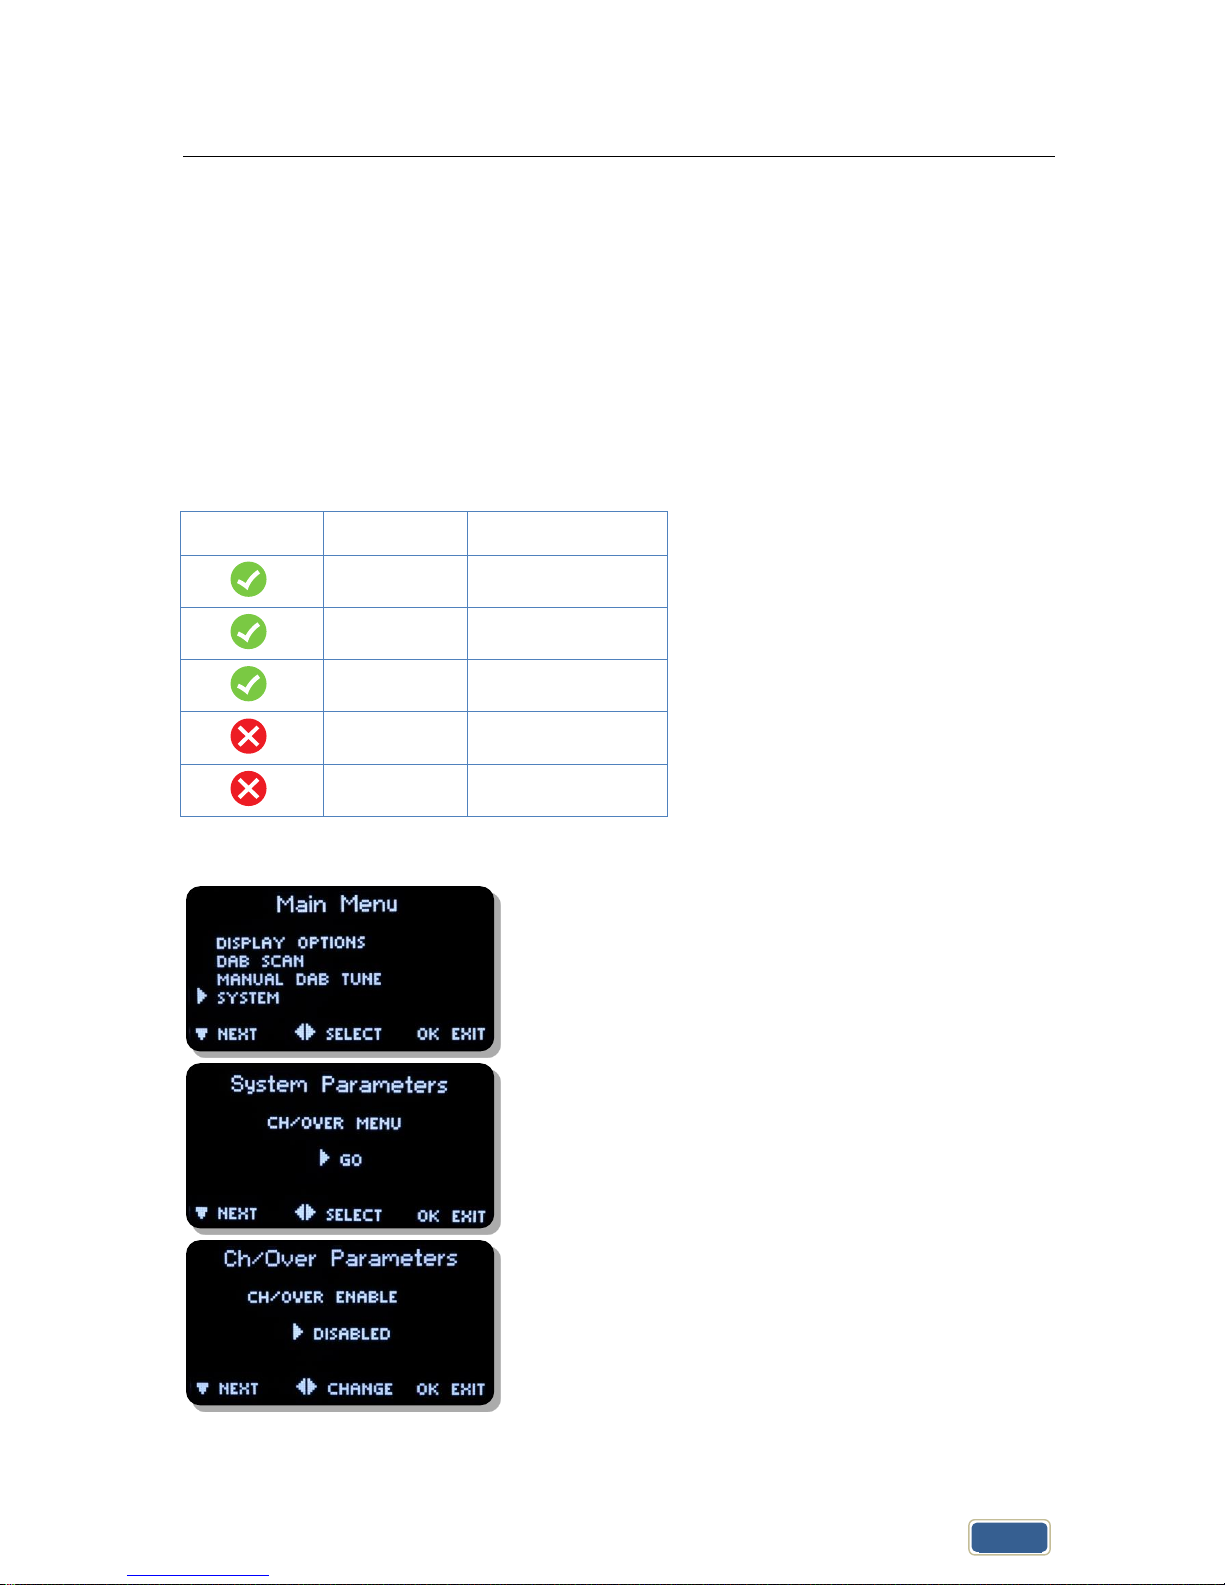
Change Over modes
Preset 1
Preset 2
DAB
MP3 or Web
FM
MP3 or Web
Web
MP3 or DAB or FM
FM
DAB
DAB
FM
Press OK then select SYSTEM with then
Then select CH/MENU with then
Change over options are: Disabled, ON AF THRESHOLD
(Audio level) or ON RSSI THRESHOLD (Received Signal
Strength)
Page 14
ProDAB User Guide
Audio & Design
14
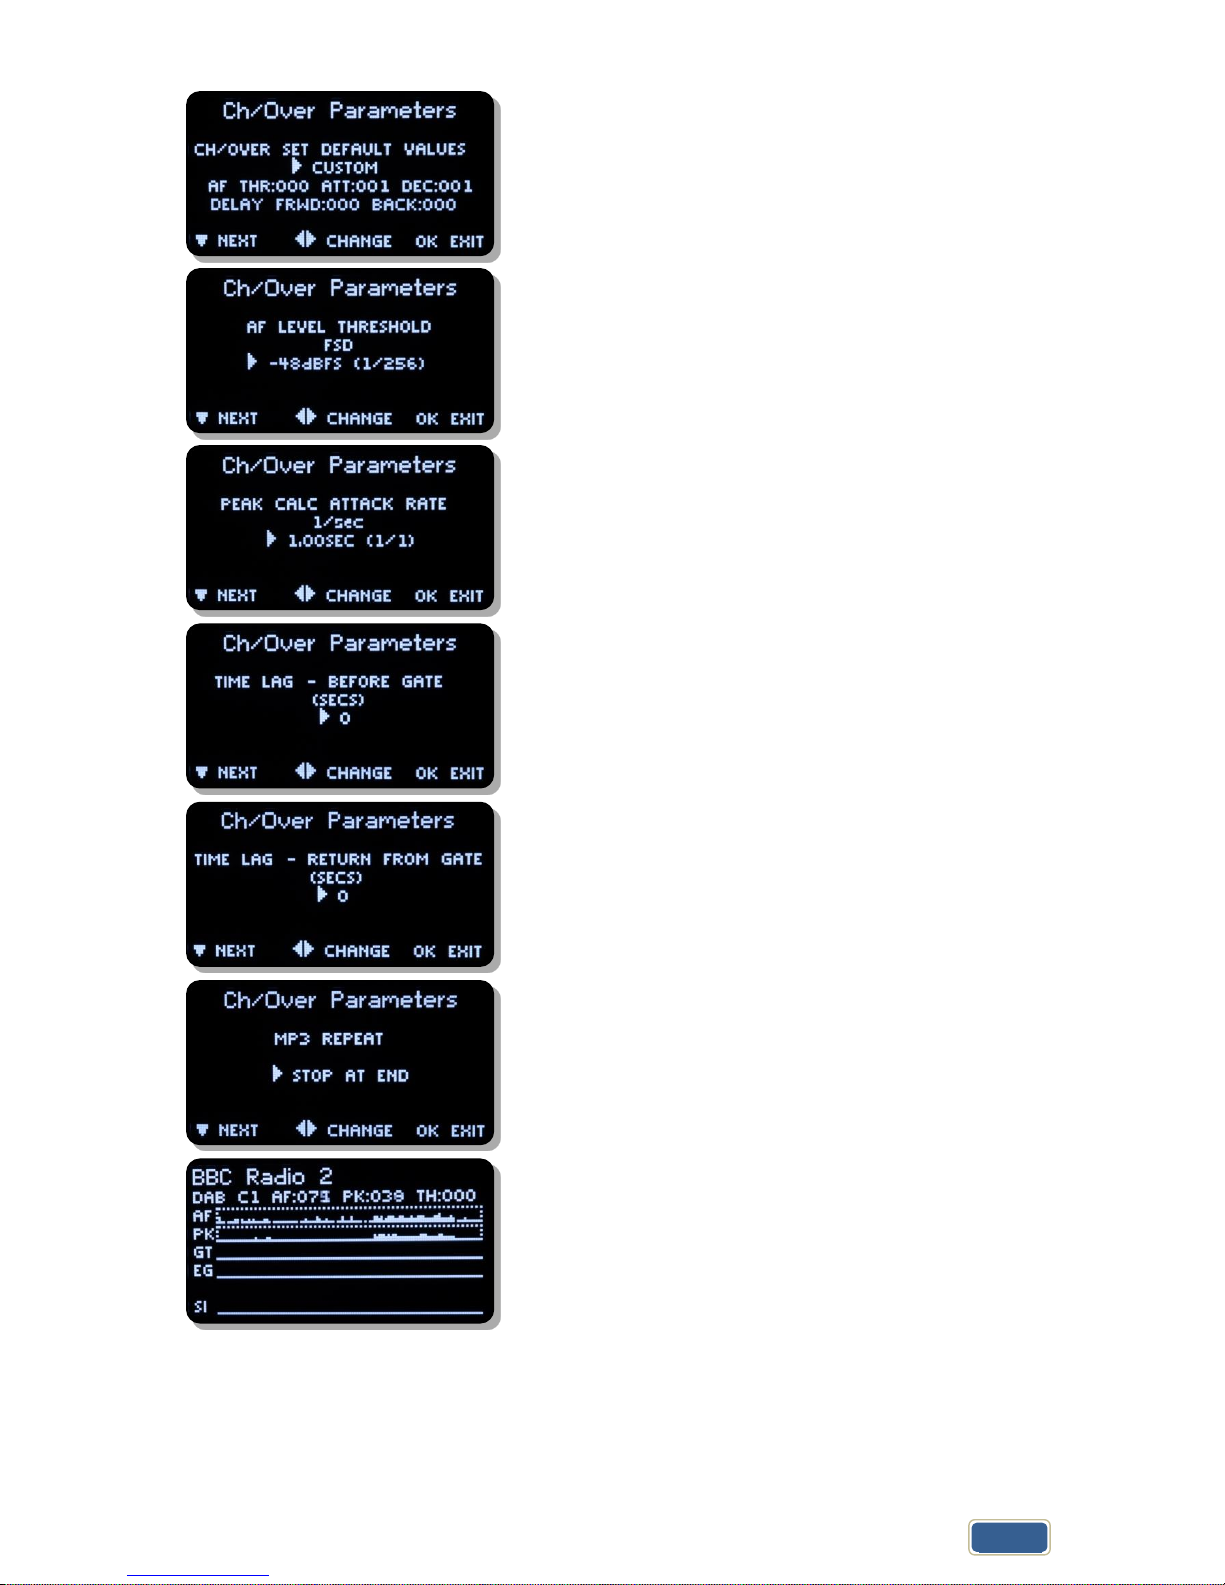
Change over parameters can be optimized for audio
threshold/rf RSSI along with delay, attack and decay
times. Other options – SMOOTH MUSIC, POP MUSIC,
SPEECH, CLASSIC MUSIC & RSSI LEVEL
Change Over, Disabled or detection on audio silence or
low RSSI
MP3 Repeat options:
STOP AT END – Play once then stop
REPEAT SAME – Play single selected MP3 then repeat.
NEXT IN LIST – Play all MP3 once, then stop
Oscilloscope display, see notes below for how to use this
tool.
Page 15

ProDAB User Guide
Audio & Design
15
AF is the instant L+R (mixed) volume level for the selected source (i.e channel 1 as "C1") This is
shown as a number (0..255) and also as a time plot.
PK is the peak value of the above, and modified by the attack and decay constants settable by
the change over menu, "pk" is shown as a number (0..255) and as a time plot.
GT is the raw gate logic level generated by the value PK threshold by constant value TH which
is also settable from the changeover menu and displayed as a number (0..255)
EG Is the extended (smoothed) gate version of GT by adding extra lead and lag times to avoid
glitches.
Lead and lag are settable from the changeover menu. The EG gate is the one that defines the
changeover state.
The general procedure is to set the GT threshold, attack and decay so that it more or less
follows the audio, then adjust the lead and lag times for EG so that short glitches are
minimised or removed.
SI is the silence gate for the same source, (obtained by a different calculation) and shown here
for comparison.
Page 16
ProDAB-2 Dual User Guide
Audio & Design
16
7. MP3 menu
ProDAB can store internally up to 12GB of MP3 files. To upload MP3 files to the unit, copy
your files to the root of a USB stick formatted as FAT32 and insert in to any of the USB sockets
on the rear of the unit.
File names for MP3 files MUST NOT contain spaces.
If you are in MP3 mode whilst uploading files, then you need to change mode and
back to MP3 in order to update the file list.
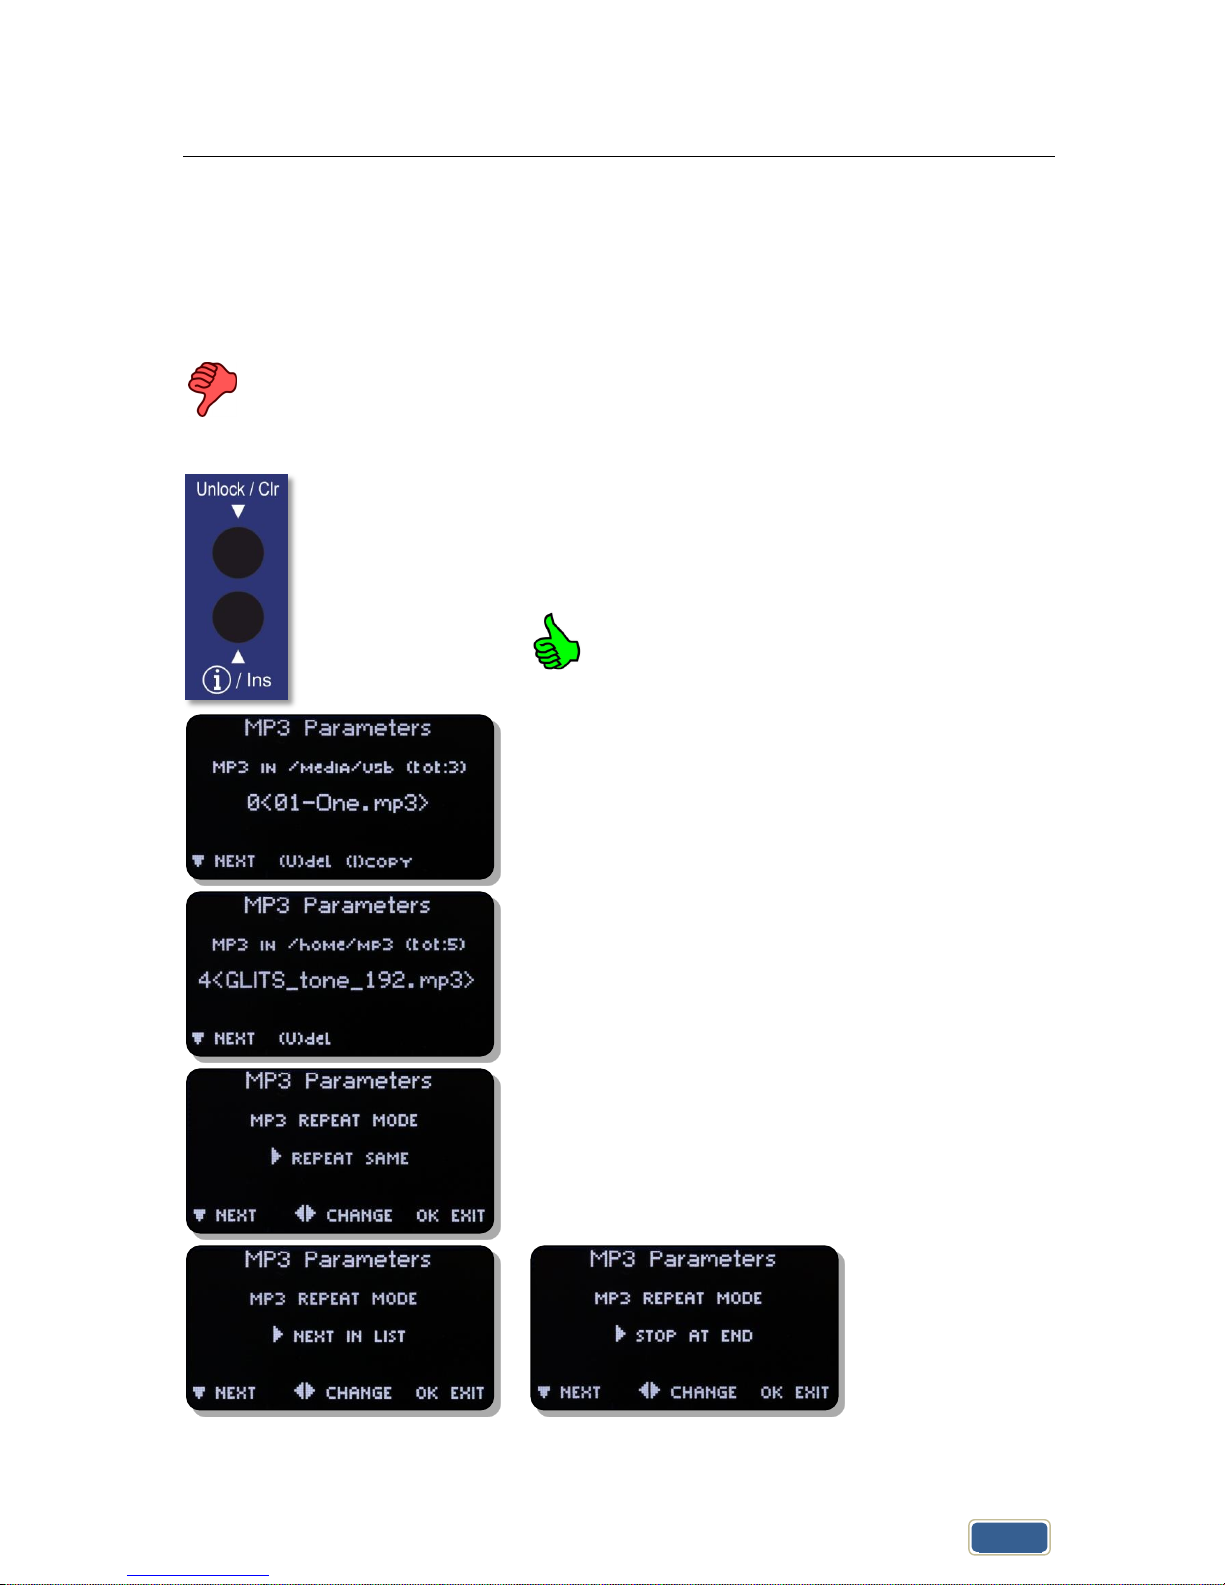
Delete files
With MP3 file operations press info/Ins key to upload
files and Unlock/Clr key to delete files
Upload files
MP3 file can be selected on your local PC and
uploaded via the web interface.
First option in MP3 menu allows you to copy or Delete
files on the USB stick. Choose file using keys press
Ins key to upload to ProDAB or Unlock key to delete.
key takes you to next menu
MP3 files on the ProDAB are stored in /home/mp3 this
menu allows you select () and delete stored files.
MP3 playback options press to change: Repeat
current track
Page 17

ProDAB-2 Dual User Guide
Audio & Design
17
8. Engineering menu
key takes you to next menu level
key takes you to next menu level
key takes you to next menu level
key takes you to next menu
key takes you to next menu level
key takes you to next menu
key takes you to next menu level
key takes you to next menu
Set AES 3 parameters such as sampling frequency.
Press to edit, then to change
key takes you to next menu
Press to edit, then to change
key takes you to next menu
Page 18

ProDAB User Guide
Audio & Design
18
Warning key will reboot system
Full or partial spectrum scan of FM band
key takes you to menu options
key takes you to next menu
Full or partial spectrum scan of DAB MUX/Services
key takes you to next menu option
key takes you to next menu
Application software and FPGA versions
key takes you to next menu
DAB (and FM, select FM mode first) chipset firmware
versions
DAB - 6.04
FM - 4.0C
key takes you to next menu
Select source for Icecast compatible IP stream output.
Either follows the selected “Tuner” (Front panel or web
GUI), or fixed to the output of Tuner 1
key takes you to next menu option
key takes you to next menu
Allows additional calibration of DAB RSSI level
Press to edit, then to change
key takes you to next menu
Page 19

ProDAB User Guide
Audio & Design
19
Allows additional calibration of FM RSSI level
Default map settings for GPIO Outputs. & to
change
(compatible with ProDAB-1)
Default map settings for GPIO Inputs. & to
change
(compatible with ProDAB-1)
Page 20

ProDAB User Guide
Audio & Design
20
8.1 GPIO Outputs
Default GPIO Output mapping and pin out
GPO-0 (pin 23) Low = In changeover to MP3, Tuner 1
GPO-1 (pin 22) Low = RDS TA Traffic Flag active, Tuner 1
GPO-2 (pin 21) Low = Mono, Tuner 1
GPO-3 (pin 20) Low = Audio silence detect, Tuner 1
GPO-4 (pin 19) Low = RSSI below threshold, Tuner 1
GPO-5 (pin 10) Low = Audio silence detect, Tuner 2
GPO-6 (pin 9) Low= Network Fail
8.2 GPIO Output options available
OLED Display
Changeover
Changeover Active
Power detect wav
Output toggles at 1.5Hz
Power detect ‘1’
Output pulled low whilst unit is operational
Power detect ‘0’
Output high whilst unit is operational
Stream Active
Streaming output has active connection/s
Ra AF Silence
Silence detected on Tuner 1 (internal)
CPU AF Silence
Silence detected on Streaming Output (internal)
SNR Low Ra
Signal to Noise low on Tuner 1
Diversity
Unit in Diversity mode
Mono Flag on DACb
Output 2 set to mono (DAB, FM, MP3 or Web)
Network Fail
No network connection
Silence on DACb
Silence detected on Output 2 (internal)
RSS Low Ra
Received Signal Strength Low Tuner 1
Silence on DACa
Silence detected on Output 1 (internal)
Mono Flag on DACa
Output 1 set to mono (DAB, FM, MP3 or Web)
FM TA Flag
FM TA Flag active Tuner 1
Default GPIO allocation version 1.72/1.74 firmware onwards
8.3 GPIO Output Pin out:
GPO-0 (pin 23) Low = In changeover to MP3, Tuner 1
GPO-1 (pin 22) Low = RDS TA Traffic Flag active, Tuner 1
GPO-2 (pin 21) Low = Mono, Tuner 1
GPO-3 (pin 20) Low = Audio silence detect, Tuner 1
GPO-4 (pin 19) Low = RSSI below threshold, Tuner 1
GPO-5 (pin 10) Low = Audio silence detect, Tuner 2
GPO-6 (pin 9) Low = Network Fail
GPO-7 (pin 8) Low = Not Defined
Common Grounds: pins 2, 3, 4, 11, 12 & 13
+5V Current Limited: pins 24 & 25
Page 21

ProDAB User Guide
Audio & Design
21
8.4 GPIO Inputs
& to change
8.5 GPIO Inputs options available
Option
Activate (Closing contact to GND)
Release (Open)
0
No action
No action
1
Preset 1 Tuner 1
No Action
2
Preset 2 Tuner 1
No Action
3
Preset 3 Tuner 1
No Action
4
Preset 4 Tuner 1
No Action
5
Preset 1 Tuner 2
No Action
6
Preset 2 Tuner 2
No Action
7
Preset 3 Tuner 2
No Action
8
Preset 4 Tuner 2
No Action
9
Preset 2 Tuner 1
Return to Preset 1 Tuner 1
10
Preset 3 Tuner 1
Return to Preset 1 Tuner 1
11
Preset 4 Tuner 1
Return to Preset 1 Tuner 1
12
Preset 1 Tuner 1
Return to Silence
13
Preset 2 Tuner 1
Return to Silence
14
Preset 3 Tuner 1
Return to Silence
15
Preset 4 Tuner 1
Return to Silence
Default GPIO allocation version 1.30 firmware onwards
8.6 GPIO Input Pin out:
GPIO-0 (pin 18) Gnd to select preset 1, Tuner 1
GPIO-1 (pin 17) Gnd to select preset 2, Tuner 1
GPIO-2 (pin 16) Gnd to select preset 3, Tuner 1
GPIO-3 (pin 15) Gnd to select preset 4, Tuner 1
GPIO-4 (pin 14) Gnd to select preset 1, Tuner 2
GPIO-5 (pin 1) Gnd to select preset 2, Tuner 2
Common Grounds: pins 2, 3, 4, 11, 12 & 13
+5V Current Limited: pins 24 & 25
Page 22

ProDAB-2 Dual User Guide
Audio & Design
22
9. Signal Quality troubleshooting
9.1 OLED Technical Information Screens
Press to cycle through screens
Page 23

ProDAB User Guide
Audio & Design
23
9.2 How ProDAB Tunes to a DAB signal
When tuned to a new RF DAB channel (as shown by the RF flag), ProDAB will first attempt to
obtain low level data sync with the received digital stream. The AQ (acquisition) flag will be set
when this is stable. At this point, a rough measure of signal level is also recorded (RSSI level).
ProDAB will then attempt to obtain ensemble information (EN flag), and then wait for, and
download, the service list (SL flag), which contains the list of services with their SID and CID
numbers. Finally, ProDAB will lock onto the desired audio service (SV flag) and audio enabled.
If no multiplexer is present, or the signal too low or bad, the AQ flag will not be set, even
though RSS may show some positive value (background noise or other carriers) With a good
clean DAB signal (i.e. RSS greater than 30), the AQ flag should be set within 2-3 seconds. The
Ensemble flag (EN) should follow within a second or so, and the Service list (SL) after a few
more seconds. If the "wanted" SID/CID services are not present in the service list, the audio
will not be enabled. Note that ProDAB will accept a CID value of FFFF as a wildcard, and will
lock to the first SID, whatever its CID value present in the service list.
The above tuning status flags are shown on the LDC display in the fourth information display
page in real time form (second line from top). (enter (I) four times) This can be used to show
how ProDAB is tuning and how long it is taking to sync to the various data blocks.
The seventh line of the second information display page (enter (I) once) shows the current
RSSI, SNR (Signal to noise ratio) CNR (carrier to noise ratio) and the accumulated number of
block errors to date. Observing the latter over a short period (e.g. a minute) can give a good
indication on how good the received stream is.
The flags are also shown when in DAB manual tune mode (bottom row) the message format
being:
("nn" and "mm" are count up timers)
** TUNING nn RF:AQ:RS:EN:SL mm **
To help visualise the number of DAB multiplexers in the band, a "quick DAB scan" function is
available under the engineering menu (/SYSTEM/ENGINEERING/QUICK DAB SCAN) This shows
a continuous scan of the relevant band together with their RSSI and SNR levels. This can be
left running continuously to visualise a snapshot of all multiplexers present.
Note: See page 9 for more information about how to manually DAB tune.
Page 24

ProDAB User Guide
Audio & Design
24
9.3 DAB scan
key takes you to next menu level
Press to change
Options:
Radio A
Radio B
key takes you to next menu
Press to change
Options:
RESCAN ( Keep Station List)
NEW SCAN (Clear List
key takes you to next menu
Press to change
Options:
THOROUGH SCAN ( Takes Longer)
NORMAL SCAN (Faster)
key takes you to next menu
Press OK to start scan
The unit will scan all DAB MUX frequencies and display
any MUXes it finds along with RSSI & SNR. This will run
continuously until stopped by pressing the OK button
Page 25

ProDAB User Guide
Audio & Design
25
10. AES67 Support
From firmware version 171/170 ProDAB supports basic AES67 connectivity with audio
algorithms for G.711 & PCM 24bit as well as multicast streaming output.
Select Main Menu | SYSTEM | Engineering Menu |
AES67 Menu
This is the Public IP address, set this if you are using
NAT or Public IP address is different from LAN IP
Address
To edit IP address use to select & to change
items then OK to save.
Press Next Menu
To edit Port use to select & to change items
then OK to save. Note traditional SIP port is 5060
Press Next Menu
Leave as 000.000.000.000 if you wish SIP to negotiate
Remote IP address otherwise, to edit IP address use
to select & to change items then OK to save.
Press Next Menu
Leave as 00000 if you wish SIP to negotiate Remote
Port address otherwise, to edit Port use to select
& to change items then OK to save.
Press Next Menu
With Timeout set to zero, ProDAB will continuously
send UDP audio packets until it receives a “BYE”
command via SIP.
To change Timeout use to select & to change
items then OK to save.
Press Next Menu
Page 26

ProDAB User Guide
Audio & Design
26
By default ProDAB will answer any calls made to
SIP:xxx@ProDAB.IP.Address. Calling
SIP:255@ProDAB.IP.Address will access built-in 1kHz
tone generator.
To edit number use to select & to change
items then OK to save.
Press Next Menu
ProDAB supports G.711 & PCM24bit (48,000 kHz
Stereo) audio modes. To edit mode use to select &
to change items then OK to save.
Press Next Menu
ProDAB can determine the IP address of units trying to
connect using the following methods:
From UDP source address (default)
From Contact Field
From fixed IP/port – set in earlier menus.
Multicast
When Multicast is selected ProDAB will immediately
start sending Multicast packets.
Typical values for Axia X-node using multicast
IP Address 239.192.x.x
Port 5004
Multicast Address of unit
Page 27

ProDAB User Guide
Audio & Design
27
Multicast Port
Not needed for multicast
To set ProDAB for multicast transmit:
Go to AES67 menu
Enter multicast address under "rem audio ip addr e.g. 239.192.006.001
Enter multicast port under "rem audio port" e.g. 5004
Enter multicast protocol (96) under "audio protocol"
Enter "000" under "audio timeout" (unless time limited multicast is wanted)
Select multicast under "rem audio address"
This will start multicast immediately on the given port
To turn off multicast (from AES67 menu):
Select other than multicast under "rem audio address"
To select MULTICAST reception on an Axia xNode:
Log into the axia web interface
Select "destinations"
Under line # enter "239.192.6.1:5004" then apply
xNode will start receiving immediately, note the displayed entry may change
Note: Axia xNode supports multicast addresses by default in the range 239.192.x.x
To select UNICAST reception on the xNode:
Log into the xNode web interface
Select "destinations"
Under line # enter "sip:1@239.192.6.1:5004" then apply
Page 28

ProDAB-2 Dual User Guide
Audio & Design
28
11. System Block Diagrams
DAB/FM
Tuner
1
DAB/FM
Tuner
2
MP3
Player
Internet
Web
Radio
Output 1
Output 2
Analogue
OP 1
L&R
AES
OP 1
AES
OP 2
Analogue
OP 2
L&R
Streaming
Output
Signal Processing
ProDAB-2 Dual
Independent Mode
DAB/FM
Tuner
1
DAB/FM
Tuner
2
MP3
Player
Internet
Web
Radio
Output 1
Output 2
Analogue
OP 1
L&R
AES
OP 1
AES
OP 2
Analogue
OP 2
L&R
Streaming
Output
Signal Processing
ProDAB-2 Dual
Diversity Mode
Page 29

ProDAB-2 Dual User Guide
Audio & Design
29
12. Rear Panel
Analogue balanced audio outputs, gain adjustable from 0dBU to
+20dBU.
Pin 1 = GND
Pin 2 = + output
Pin 3 = - output
AES3 digital output, sampling rate adjustable via menu to
48Kbps or 96Kbps
Pin 1 = GND
Pin 2 = + output
Pin 3 = - output
Antenna input for DAB & FM
F-Type female connector fitted to unit.
Default GPIO allocation version 1.30 firmware onwards
11.1 Inputs:
GPIO-0 (pin 18) Gnd to select preset 1, Tuner 1
GPIO-1 (pin 17) Gnd to select preset 2, Tuner 1
GPIO-2 (pin 16) Gnd to select preset 3, Tuner 1
GPIO-3 (pin 15) Gnd to select preset 4, Tuner 1
GPIO-4 (pin 14) Gnd to select preset 1, Tuner 2
GPIO-5 (pin 1) Gnd to select preset 2, Tuner 2
11.2 Outputs:
GPO-0 (pin 23) Low = In changeover to MP3, Tuner 1
GPO-1 (pin 22) Low = RDS TA Traffic Flag active, Tuner 1
GPO-2 (pin 21) Low = Mono, Tuner 1
GPO-3 (pin 20) Low = Audio silence detect, Tuner 1
GPO-4 (pin 19) Low = RSSI below threshold, Tuner 1
GPO-5 (pin 10) Low = Audio silence detect, Tuner 2
GPO-6 (pin 9) Low = Network Fail
GPO-7 (pin 8) Low = Not Defined
11.3 Common Grounds: pins 2, 3, 4, 11, 12 & 13
11.4 +5V Current Limited supply: pins 24 & 25
Page 30

ProDAB User Guide
Audio & Design
30
RS232 I/O – ProDAB Production units allows access to operating
system console at 115k baud.
Pin 2 = Tx data
Pin 3 = Rx data
Pin 5 = GND
RJ45 LAN connector 10/100 auto negotiation MDX
USB Can be used for additional MP3 storage.
IEC Mains inlet – Fuse T3.15A 90/240VAC
Provision for IEC retaining clip and M4 Earth tag
Page 31

ProDAB-2 Dual User Guide
Audio & Design
31
13. Firmware Upgrade
Firmware upgrades will be supplied as a package of files in ZIP format.
This can either applied directly from the web GUI (Version xxx onwards) by browsing to the
ZIP file or by unzipping files to the root of a USB flash drive formatted FAT32
Root of USB flash drive should look like above.
Insert the flash drive into one of the USB sockets on the rear on the unit.
After a few minutes the ProDAB will re-start using the new firmware.
From version 160/160 there is new DAB front-end firmware available (version 6.0.4) please
contact sales@adrl.co.uk if you wish to apply this upgrade.
Page 32

ProDAB-2 Dual User Guide
Audio & Design
32
14. Web Interface
Using a web browser navigate to the IP address of the ProDAB (default 192.168.0.7)
13.1 Default Username & Password:
Sign in as:
Username – admin
Password – 1234
Note that the web interface has been tested with the following browsers: Firefox,
Chrome & Internet Explorer version 10 onwards
System information & User Information is only
available when you sign In as Admin. Users can only
be added or changed when you sign in as Admin.
Page 33

ProDAB User Guide
Audio & Design
33
Info Bar ICONs
Click here to play audio for currently selected
tuner. Note: that when option “STREAMER
SOURCE” is set to “Tuner 1 Only” in Engineering
menu you can only listen to Tuner 1.
Click here to turn off audio monitor stream.
Change Over mode disabled
Change Over “Armed” Set to AF Threshold mode,
Preset 1 currently selected
Change Over “Active” Set to AF Threshold mode,
Preset 2 currently selected
This is the user you are currently signed in as.
Click here to access or download an “embedded”
copy of the User Guide as a PDF.
Click here to Sign Out.
Page 34

ProDAB User Guide
Audio & Design
34
In order to control a Tuner using the web
interface, it has to be selected in the
individual Tuner Info page.
Select here
Page 35

ProDAB User Guide
Audio & Design
35
The Summary screen shows information about both tuners on Dual units and Tuner 1 on
ProDAB-1 Plus.
Page 36

ProDAB User Guide
Audio & Design
36
DAB Mode Info
MP3 Mode Info
FM Mode Info
Web Radio Mode Info
RSSI (Received Signal Strength Indicator) and
SNR (Signal to Noise Ratio) for DAB reception.
Note: Black bar on RSSI gauge is the threshold
for change over set in the Change Over menu.
Real time audio level indicators. LED meter 0dBu audio output is factory set to
18dB below FSD (Full Scale Digits)
Page 37

ProDAB User Guide
Audio & Design
37
Select for more detailed
information to be displayed.
Current mode selected. Note:
only one tuner at a time can be
set to Web or MP3 mode.
Click here to take control of a
tuner.
Black markers indicate set
threshold for change over for
either RSSI or Audio level (silence)
set in Change Over menu.
Page 38

ProDAB User Guide
Audio & Design
38
Real time history display of Audio level and RSSI
Service list for MUX that tuner is currently tuned to.
The table columns can be sorted by clicking in the heading cell of each column.
Using “Change Mux” button you can select a specific MUX from the dispalyed table. ProDAB
will attempt to turn to the selected MUX and if it is available will then display the Service List.
Note that Services will then also be added to the Station list.
Page 39

ProDAB User Guide
Audio & Design
39
Stored Stations list obtained by DAB SCAN or added via “Change MUX” button.
Click here to set or recall presets.
Presets can be any combination of DAB, FM,
MP3 or Web. Up to 12 presets can be
defined.
Click the Number to recall a preset.
Page 40

ProDAB User Guide
Audio & Design
40
Preset Details
Preset Edit Screen
System information is only available
when you sign In as Admin.
Page 41

ProDAB User Guide
Audio & Design
41
GPIO Options available
Page 42

ProDAB User Guide
Audio & Design
42
Page 43

ProDAB User Guide
Audio & Design
43
Press “Upgrade” then browse to upgrade
file, the “Install” – The upgrade process
takes about 3 minutes and you will need
to refresh the browse page.
Note: System configuration files and USB
upload script are downloaded as a single
zip file.
To restore, either unzip all files to the root
of a blank USB stick formatted FAT32 or
Upload via the “Restore” button using the
web application.
Page 44

ProDAB User Guide
Audio & Design
44
Page 45

ProDAB User Guide
Audio & Design
45
Change Over Armed
Change Over Active
Page 46

ProDAB User Guide
Audio & Design
46
DAB Band Scan, Select Start & End Frequency either by MUX or frequency. Scan setting have
been optimised for the ProDAB but can be changed if needed.
Page 47

ProDAB User Guide
Audio & Design
47
Page 48

ProDAB User Guide
Audio & Design
48
15. Spectrum Analyser Utility (Front Panel Menu)
The ProDAB has a built-in simple spectrum analyser, which can be accessed as detailed below.
All scans are run using the FM mode of the chip set (DAB mode only “looks” for multiplexers).
Typical setting as below:
Note: That when in this mode the current tuner is dedicated to this function.
Press OK then select SYSTEM with then
Use to navigate to ENGINEERING
MENU then
Use to navigate to FM SCAN MENU
then
Select Tuner with then to go to next
option
Select either DAB or FM band with
then to go to next option
Page 49

ProDAB User Guide
Audio & Design
49
to go to next option, or change with
to go to next option, or change with
to go to next option, or change with
Set frequency step, either 50kHz or 100kHz
with then to go to next option
Set settling delay (time system waits after
frequency has been set) with then
to go to next option
Set display “gain” in order to optimize
display with then to go to next
option
Test type:
FM Scan (also covers DAB frequency band)
DAB Scan for Muxes
Set with then to go to next option
Page 50

ProDAB User Guide
Audio & Design
50
To continuously run scan, Unlock/Clr to
stop
Example “zooming” in to a specific MUX
Mux 12A very low level between 11D & 12B
11D – RSSI = 42dBuV
12A – RSSI = 22dBuV
12B – RSSI = 41dBuV
Page 51

ProDAB User Guide
Audio & Design
51
Audio & Design Reading Ltd. Hereby confirm that the ProDAB-2 conforms to the
requirements of EN50081-1 & EN60950 provided it is used as described in this manual and
in the sections below:
To comply with the EMC Directive EN50081-1 (generic), it is recommended that all-digital
input and output cabling be of Belden type 1696A or its exact equivalent. All input/output
connectors must be of good quality and be constructed with RF protected covers. All
interconnections via cables must carry a full earth shield, which should be connected to the RF
shielded covers at all times. Input/output cables must be terminated to comply with the
AES/EBU and IEC958 digital audio standards protocol.
This unit is wired so that a technical earth is connected to the chassis via the mains input
socket. It is recommended that this connection be made to the mains earth system at all
times to minimise the effects of radiated and conducted RF emissions.
Low Voltage Directive EN60950:
There are no serviceable parts within the unit. All repair work must be referred to a qualified
electronic engineer or returned to the factory. In the case where the unit contains plug in
modules, always switch off the unit before removing or replacing any module.
Audio & Design Reading Ltd does not accept responsibility for non-compliance if the above
criteria are not met in full.
WARRANTY:
All Audio & Design products are of the highest quality and designed to give long, trouble free
service. Nevertheless they are fully guaranteed for one year from the date of
purchase. Provided any faulty equipment is returned, post paid, to Audio & Design or its
established Agent by the original purchaser during the relevant period we will repair, or at our
opinion replace, entirely free of charge all breakdowns due to faulty workmanship or
materials. In keeping with normal practice, breakdowns due to fair wear and tear, misuse,
neglect or faulty adjustment by the user, are outside the scope of this warranty.
Warning: Warranty repairs are subject to serial number checking. We reserve the right not to
service any equipment whose serial number has in any way, been defaced or altered.
WEEE Directive: The end user must excise due care when disposing of this product at the time
it is deemed as waste material.
Page 52

ProDAB User Guide
Audio & Design
52
RoHS: The current status of Audio & Design products can be obtained from
www.adrl.co.uk/Rohs.htm
Audio & Design Reading Ltd practices lead-free manufacturing processes. Lead free solder is
used on the surface-mount PCB manufacturing processes and for hand soldering. Printed
circuit boards used are immersion tin plated, and as such use no lead.
The manufacturing processes include the assembly of purchased components from various
sources. Our products are offered as RoHS compliant, or lead free, only after sufficient
evidence is received from the component manufacturers that their components are RoHS
compliant. Audio & Design Reading Ltd relies solely on the distributor, or manufacturer of the
components for identification of RoHS compliance. Whilst every effort is made to ensure
compliance, Audio & Design Reading Ltd makes no warranty, or certification, or declaration of
compliance concerning said components.
Audio & Design Reading Ltd defines “Lead Free” as pertaining to any product, which has been
manufactured by Audio & Design Reading Ltd using components which have been declared by
the manufacturers as “Lead Free”. All statements by Audio & Design Reading Ltd of RoHS
compliance are based on component manufacturer documentation
Page 53

ProDAB-2 Dual User Guide
Audio & Design
53
Audio & Design
51 Paddick Drive
Lower Earley
Reading
Berkshire RG6 4HF
UK
Tel.: +44 118 324 0046
Info: sales@adrl.co.uk
Web:www.adrl.co.uk
Copyright © Audio & Design Reading Ltd 2018 Rev 3.3 (Firmware 1.72/1.74)
 Loading...