

Page 1

How to
Hook Up and
Enjoy Your
tm
Series IIITen
tm
Series III
®
making good stereo sound better
®
®
Page 2
Congratulations on having the good taste to buy one of the world’s
finest octave equalizers for your home stereo.
Now you can improve the performance of your speakers, adjust the sound of
CD's, make killer car tapes and even improve the sound of video soundtracks.
MAKING FRIENDS WITH YOUR NEW TEN Series III
The TEN is a fairly complex, high performance add-on with lots of buttons,
knobs and sockets including some not found on any other equalizer, so face the
blackboard and we’ll run you through each control, hole and protuberance on
the TEN.
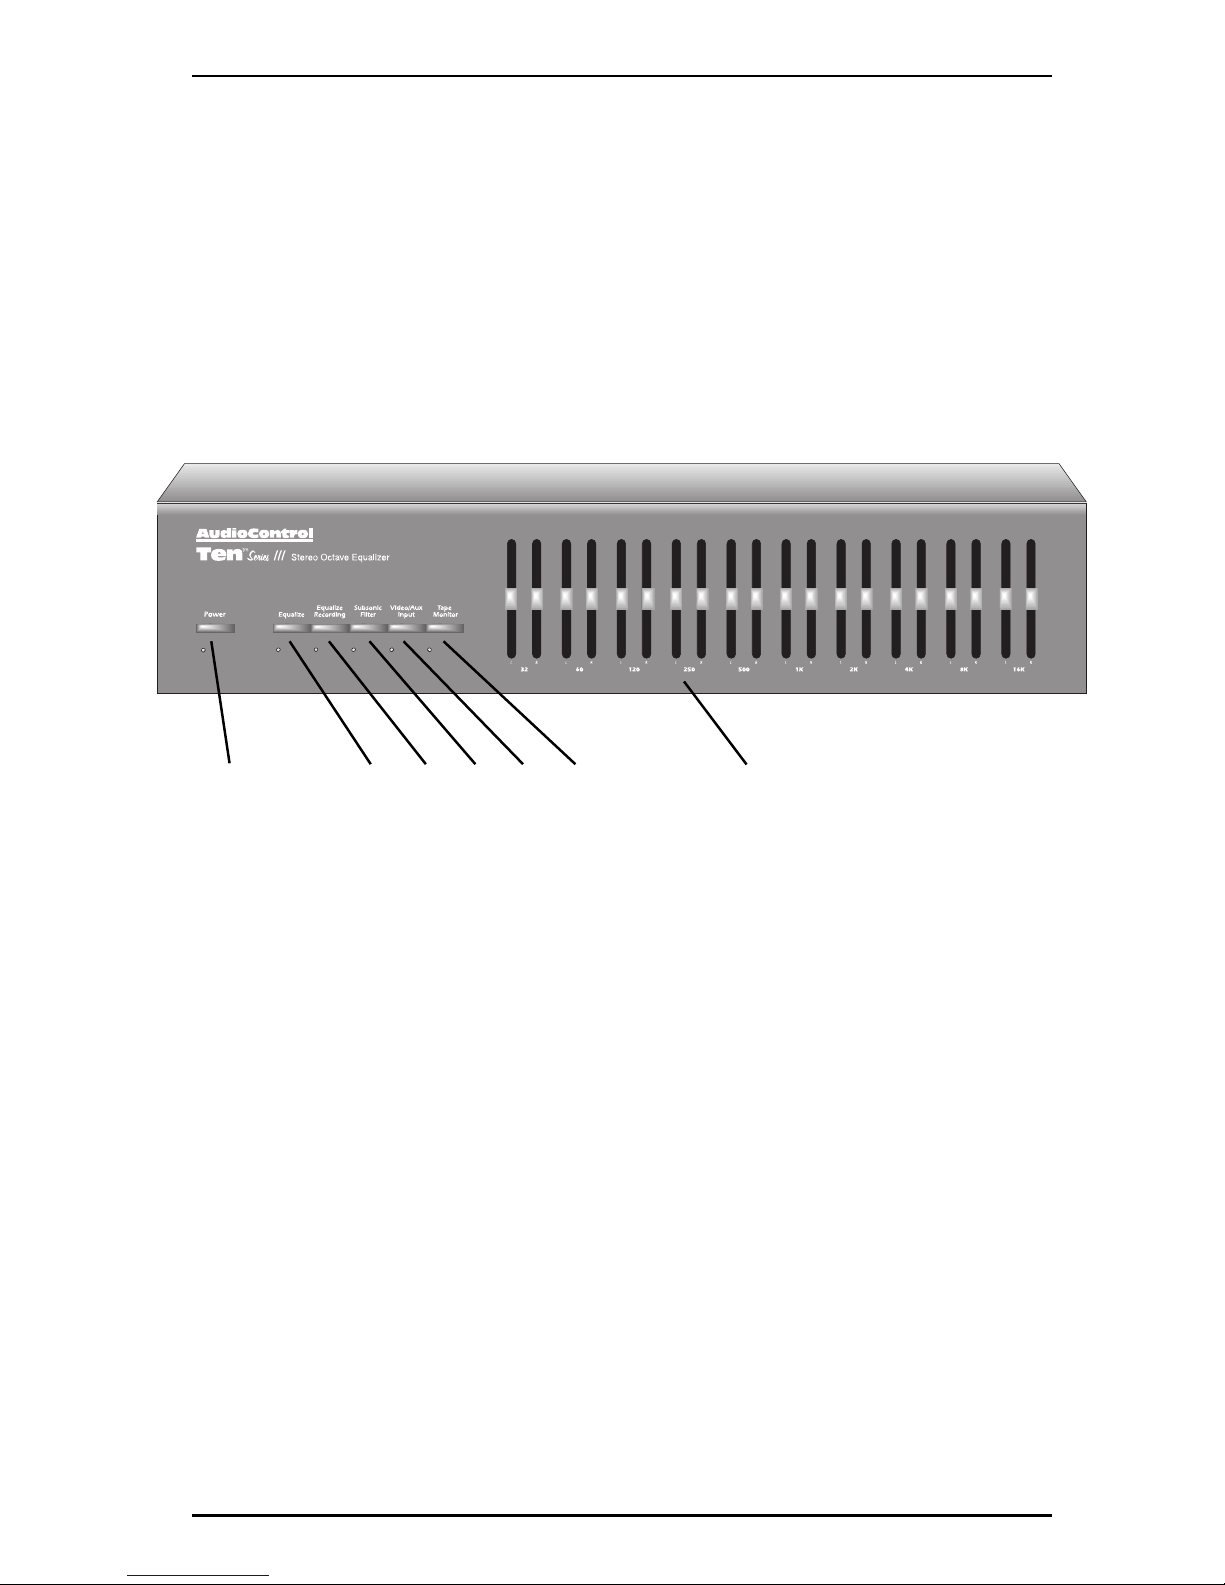
1
¶ POWER SWITCH
Self explanatory. It allows the TEN to nourish its circuits from the vast
dynamos and generators of your local monopolistic power company. Don’t
worry about using a splitter socket if you’re short of outlets: The TEN draws less
current than a clock radio and will pose no overload hazard when added to
your current tangle of plugs.
· EQ SWITCH
Think of this as a comparison switch. IN, you’re hearing the effect of the
TEN. OUT, you’re hearing things as they were before the TEN was installed.
When you use the TEN to change the tone of your music or beef up speaker
range, just pop the EQ switch in and out to make frequency comparisons.
¸ EQUALIZE RECORDING
This switch determines whether you’re equalizing your program source (CD,
FM etc.) onto tape or not. In the OUT position, your program source is simply
being equalized and played through your speakers. The IN setting transfers all
the
equalization to your tape deck. Just about all cassette recordings can benefit by
equalization which we’ll cover further on. Note that the LED under the
EQUALIZE RECORDING button blinks on the IN position to warn you in case
you DON’T want to equalize a recording.
¶ · ¸ ¹ º » ¼
Page 3

2
¹ SUBSONIC FILTER
Subsonics are inaudible ultra-low frequency oscillations caused by feedback, floor vibration, studio noise and other nefarious enemies of your
speakers. They manifest themselves in a visible flopping of speaker woofer
cones. Distorting and destructive, subsonics are chopped off below 20Hz by
this special filter circuit. Don’t confuse it with the lousy “Low Cut” filter on
your receiver or integrated which also robs audible low bass. The SUBSONIC
filter on the TEN should be left IN at all times with no audible loss of bass and
a whole lot of positive speaker protection.
º VIDEO/AUXILIARY
Both this button and the TAPE MON button next door allow you to play
different inputs into the equalizer and then into your receiver or preamp for
listening. When you press VIDEO/AUX IN, the TEN will be equalizing input
from a television, disc player, VCR or any other line level source.
» TAPE MONITOR
This is a “loop” just like the one controlled by the Tape Monitor on your
receiver. When pushed in, the TEN is receiving signals from the tape decks.
Note that if the deck is not playing and the TAPE MON button is pushed in,
deafening silence will occur.
Since the TAPE MON is a loop which goes out of the TEN through a tape
deck or other device and back in, it is where you’d plug any other soundenhancing devices such as surround sound, noise reducers, expanders, etc. If
such a device is installed, pushing the TAPE MON button IN will activate this
device. See the hook-up details if this is getting hazy. If you don’t own any
other outboard add-ons, don’t worry about it further.
¼ Next we come to the EQ SLIDERS that make up the equalization
portion of the TEN. The sound spectrum - from the lowest to highest - is
divided up into ten EQUAL ranges, called octaves. Don’t worry about the fact
that the frequency numbers don’t jump up in orderly tenths but instead
approximately double. Just think of them as ten equal bands of sound. Each
has its purposes and contributes different experiences to your enjoyment of
music. While reading this section, note the chart of instruments which will
help you understand the relationships of instruments to frequency bands.
Page 4
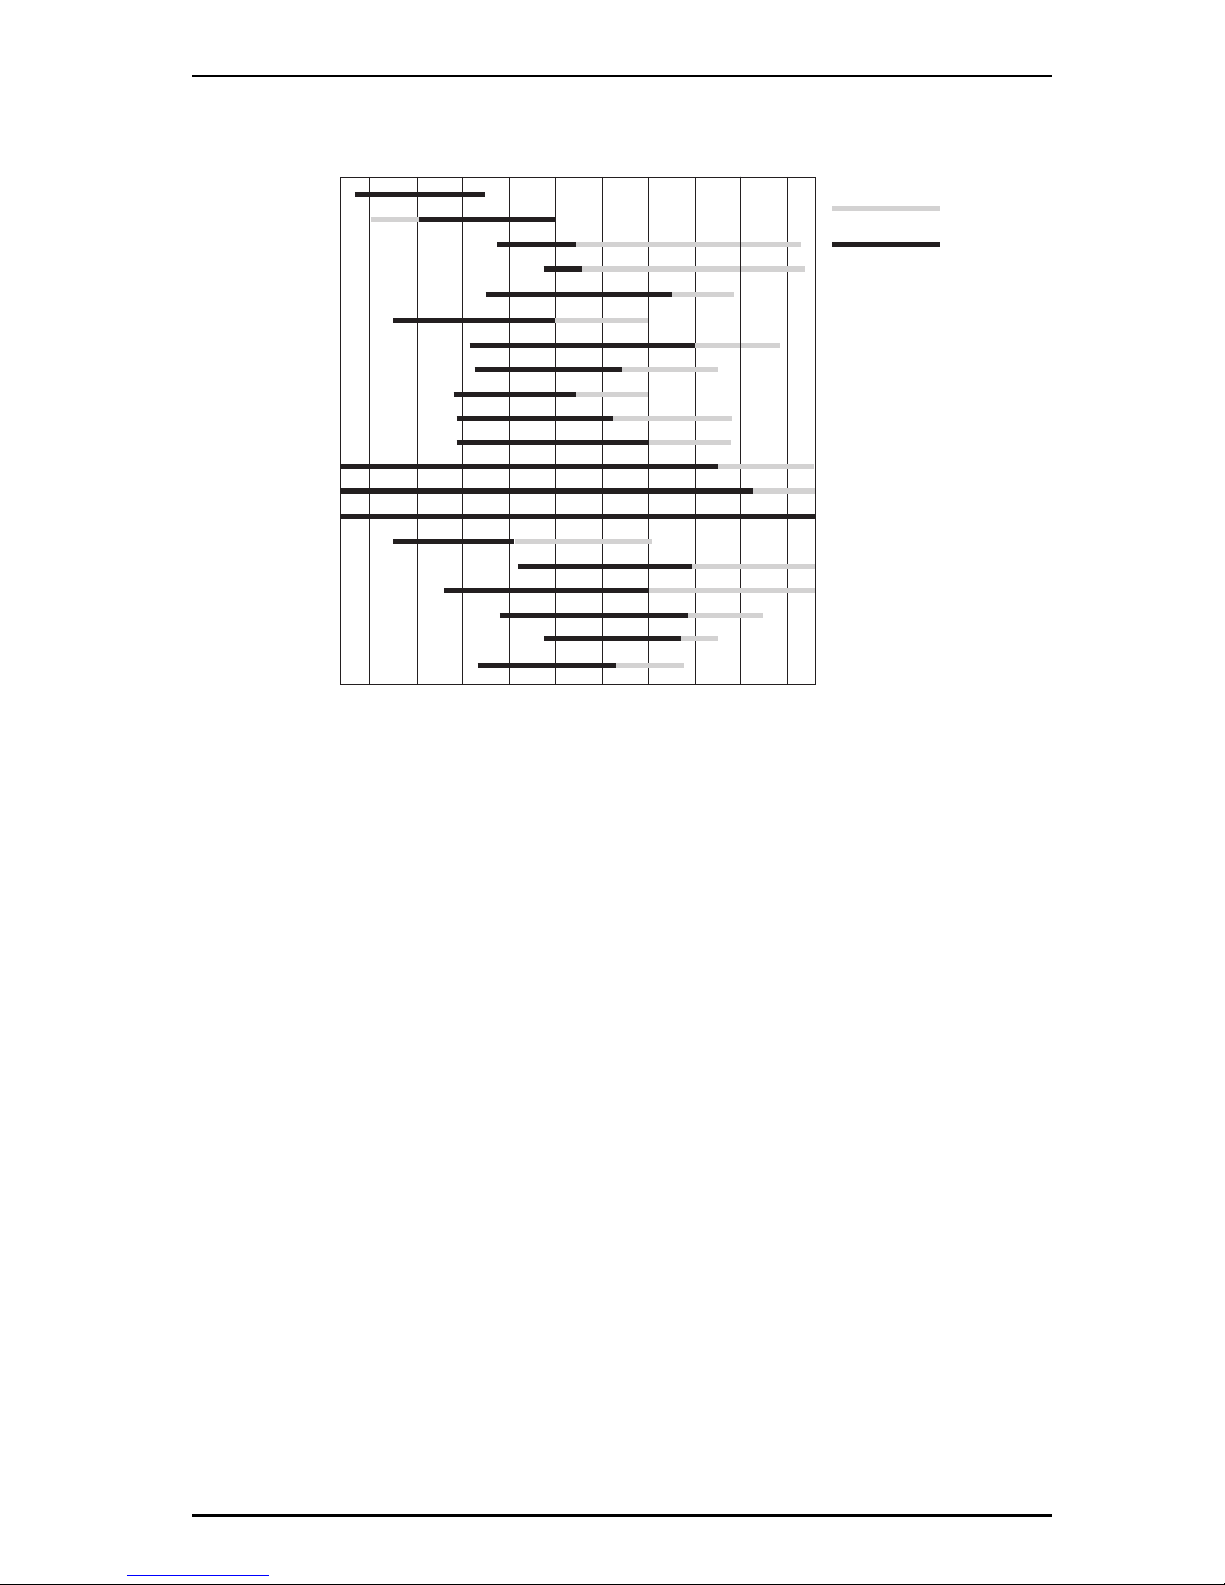
3
Harmonic or Overtone
Fundamental Note
31.5 63 125 250 500 1000 2000 4000 8000 16,000
Kick Drum
Tom Drum
Snare Drum
Cymbals
Chimes
Bass Guitar
Lead Guitar
Female Vocal
Male Vocal
Blues Harp
Saxophone
Organ
Piano
Synthesizer
String Bass
Violin
Cello
Clarinet
Flute
Trumpet
MUSICAL INSTRUMENTS vs. EQUALIZER BANDS
31.5 Hz, 63 Hz, 125 Hz, 250 Hz:
THE SLIDERS THAT SHOOK THE WORLD!
The four bottom sliders on your TEN roughly correspond to the bass
control on your amp or receiver - or rather we should say that your receiver’s
bass tone control is what’s rough.
31.5 Hz. Truly a piece of the rock. This lowest of lows is what you’ve
always wanted more of. It’s the frequency that you feel as well as hear. The
frequency that kicks you live at concerts.
Unfortunately, the whole signal chain conspires to remove it. Even $1000
microphones are not flat that low; studio recorders roll off in this area. It’s
hard to master and pretty near impossible for most speaker woofers to
reproduce.
So, even if you run the 31.5Hz slider up to +15Hz, your speakers will
probably be 5dB or more down at this gutrocking frequency.
Lay it on thick, if you have the amp power to handle it.
63Hz. Here’s the bass you were after when you used to turn on the
loudness or bass tone control. It’s the deep, tight,strong bass that makes rock
solid. It’s also where most speaker systems start giving out, as you probably
saw when you response-analyzed your speakers and room. But, if it didn’t
take a lot to flatten the response of your system, feel free to add some more.
Most studio producers and engineers actually cut down on this frequency
to compensate for teeny radios and bubblegummers’ cheap compact stereos,
so adding some 63Hz is not “gonna be no sin,” as B.B. King put it.
It’s the slider that makes the bass drums and floor toms “bigger” and
broadens bass guitar parts. And, even does surprising things to operatic basso
voices. (Forget it on Neil Young’s, though.)
125Hz. This is the bass that jukeboxes and cheap stereos specialize in. It
Page 5

4
has a boom quality that can get very tiresome to the ears after a while.
That’s not to knock it. Push the 125Hz slider to MINUS 5dB and you’ll find
a lot of what you might have thought was bass will be gone.
You see, if 31.5Hz and 63Hz were the flour and eggs of a cake, the 125Hz
band is the vanilla extract and sugar - the flavoring of bass. Boosting it too
high is like guzzling straight extract and sugar syrup. Use 125Hz sparingly, as a
seasoning, the way producers do.
Maybe +3 to pump up a vocal or a bass guitar part. A bit more if you’re a
drum freak. Also good for acoustic bass, virtually all symphonic music and
your Aunt Tillie’s goiter.
250Hz. This is on the upper fringes of bass. Fiddle with it and you’ll see it
has relatively little to do with bass guitar or kick drum. It does have a lot to
do with voices and lead guitar solos, though. Without it they lack body. Add
250Hz to “flesh out” thin vocals or older records with narrower dynamic
ranges.
BRINGING THEM FORWARD AND MOVING THEM
BACK:500, 1000, 2000, 4000.
These sliders control the core of music. Melody instruments, vocals,
midrange percussion - almost everything we associate with music. With care,
you can substantially change the sound of most melody instruments as well
as vocals. Each cut and album will be different, so experiment.
In our experience the 1000 slider does most for all-around human voice
presence. 500 is great for male voices and jazz tenor saxes. Some solo piano
benefits by a little boost here, too.
In practice, folks seem to cut down the 2000 and 4000 as much as they
boost them. There seems to be plenty of these frequencies in most contemporary pop cuts. The question is, is there too much? Particularly at high sound
pressure levels. Try it for yourself.
GETTING VERY HIGH: 8000 and 16000.
Oddly enough, neither of these frequencies is as ear-piercing as you might
think. What you thought was tinny treble is really lower down at 2000 and
4000. Up at 2000 you’ll be surprised how few instruments are actually
affected. The tips of womens’ vocals, snare drums, some synthesizer and
higher brass and woodwinds. But you can use more of it than you might first
suppose by its classification as “treble.”
As for the 16Hz, well, it’s the icing on that audio cake we were describing
earlier. The crisp sizzling of cymbals, the high harmonic overtones that bring
music to life...they’re all here.
Unfortunately, this is also a frequency which involves (dare we bring it
up?) your age. From young adolescence on we start to lose the high end of our
hearing. It’s the ultimate finito frequency roll-off and there’s little that can be
done about it. Not that we’re saying you are getting deaf when you reach 30.
But you can hear less 16K than you could ten years ago. That’s all.
Boosting this band 3-5dB can “flatten” your hearing curve again and bring
a lot out. Just don’t get vain and leave it at 0dB.
Page 6

»¶ · ¸ ¹ º
5
THE TEN’S NETHER PARTS.
In the back-end of the TEN are the corresponding socket connections for
the buttons out front.
¶ The MAIN OUT runs back to your receiver. Everything that goes into
the TEN (FM, records, tape, TV. etc.)...all return to your amp or receiver through
these two RCA-type sockets.
· TAPE OUT is the outbound segment of the tape loop we confused you
with before. Signals outbound from the TEN are routed to your tape deck or
to any other add-ons through this outlet.
¸ TAPE IN returns all signals from the tape deck or assorted black boxes.
¹ VIDEO/AUX IN lets you connect VCR’s, stereo televisions or disc players.
Their signal will be equalized when you push the corresponding button.
º MAIN IN accepts all signals from those sound sources which are hooked
to or part of your receiver: FM and records.
» The POWER cord. If this isn’t self explanatory, we'll give up and get out
of the manual writing business.
If you’re still with us after all that, a few pieces of sage advice.
A. Save your Owner’s Manual and box. You may get more toys to hook up
with the Ten later. And need to review instructions. The box is important for
warranty repair work (perish the thought) and for moving.
B. SAVE YOUR SALES SLIP OR RECEIPT. The whole foundation of our
warranty system based on proof of purchase. Very necessary. Also great for
insurance purposes if you find your whole system gone someday.
C. Provide your speakers with enough power. Low bass boost sounds super
but makes severe demands on wimpy 20-40 watt receivers. If you like Led
Zeppelin at shock volume through big speakers, get the power to match or the
TEN may just kick the speakers off the brink into clipping.
D. Be willing to experiment. Every modern recording has been equalized
at least half a dozen times before you get it. There is no such thing as “flat”.
Let your ears be the judge.
MAKING YOUR SPEAKERS SPEAK MORE CLEARLY
Where your speakers are and how they are set, can affect their sound long
before you begin to adjust them with your new TEN. Boosting highs or lows
by correcting the positioning of your speakers is a lot easier on your electronics than forcing them to pump out more or less of a frequency.
If you’re getting too much bass, get your speakers out of the corners of the
room and up off the floor. Raising a speaker even 12", or moving it three feet
out of a corner, lowers bass.
There are a number of stands you can buy as accessories which do this
fairly well. Some are unobtrusive frameworks; some are glitzy plex and
chrome numbers. All of them help eliminate a doubling of bass by prevent-
Page 7

ing the bass wave from “bouncing” off the floor and arriving a little bit late at your
ear. Also many new speakers are tilted slightly or place their woofer fairly high in
the enclosures to get around this.
If your speakers sound “bonky”, like a juke box, try getting them off the
ground this way. Just a trial wherein you prop your speakers up on some beer
bottles will give you an idea of the effect.
More likely, you’re not getting enough bass. Even though you bought your
TEN to rectify that situation, first start trying corner and floor snuggling. This is
the best way to boost bass because it does not require more amplifier power. You
can always add even more chest-stomp’n bass later.
WHY SPEAKERS HAVE SPEECH IMPEDIMENTS
The improvement of your speaker’s performance is one of the best uses for the
TEN. That’s not a slur on those Zonkophone 8000, pride-and-joy speakers you
bought last year, just an observation that no-one’s invented the perfect loudspeaker
yet.
First, many speaker elements...the woofers, tweeters, and midranges...aren’t as good
as they could be to start with. They may have peaks within their frequencies at the
same sound level, or they may not be able to reproduce their whole assigned total
tonal range as well as they could.
The enclosure, too, can be less than optimal. Its composition, volume, inside
damping materials and actual proportions all add to or subtract from a speaker’s
performance.
What we’re saying is that most speakers can stand a little improvement. Even the
best of them. And that inexpensive speakers can stand a LOT of equalization.
Because, in the signal chain from microphone to speakers, the speaker is the
weakest link. Distortion that averages less than 1% in the mike and amp can be as
much as 30% in a speaker system. It’s just a lot easier to design distortion-free, wide
frequency range electronics than it is electro-mechanical speakers with magnets and
cardboard cones and wire and surfaces that have to flex back and forth.
Lesso
basso
reduce-o
Mondo
basso
profundo
At least three feet away from
corners cuts bass addition.
Corners act as hor ns to increase bass.
6
Page 8

STARTING POINTS
The following diagrams are starting points for adjusting your speakers’
performance, based on years of experience helping customers make hi-fi’s
sound better.
7
HOOKING UP THE TEN AND A RECEIVER
1. Locate the four sockets marked TAPE on the back of your receiver, preamp or integrated amplifier. Two will be marked IN or PLAY, and two will be
marked OUT or RECORD.
2. Run a set of connection cords from the receiver’s TAPE OUT to the TEN’s
MAIN IN.
3. Run a set of cords from the receiver TAPE IN to the TEN’s MAIN OUT
sockets. Got that? IN to Out and OUT to IN.
4. Optionally, if you have a VCR, disc player or TV with audio out, connect
the video device to the TEN’s VIDEO AUX sockets.
Note: If your receiver doesn’t have a tape monitor loop system, call us at
(206) 775-8461 and we’ll explain how to handle things.
receiver/
integrated
tape
in
tape
out
tape
out
tape
in
video
in
main
out
L
R
L
R
L
R
main
in
L
R
Page 9

HOOKING UP THE TEN WITH A TAPE DECK AND
RECEIVER
1. Locate the four sockets marked Tape on the back of your receiver, preamp or integrated amplifier. Two will be marked IN or PLAY and two will say
OUT or RECORD.
2. Run a set of connection cords from the receiver’s TAPE OUT to the
TEN’s MAIN IN.
3. Run a set of connection cords from the receiver’s TAPE IN to the TEN’s
MAIN OUT sockets. Got that? IN to OUT and OUT to IN.
4. Optionally, if you have a VCR, disc player or TV with audio out, connect
the video device to the TEN’s VIDEO AUX sockets.
5. Run a set of patchcords from the TEN’s TAPE OUT to the tape deck’s IN
sockets.
6. Now run a set of cords from the TEN’s TAPE IN to the tape deck’s TAPE
OUT. Again, it’s IN to OUT and OUT to IN. And Left to Left, Right to Right.
8
Page 10

HOOKING UP A “BLACK BOX”, CASSETTE DECK & THE
TEN
“Black boxes” include other equalizers, expanders, Bose active equalizers,
noise reduction units, etc. Also called outboard signal processing devices.
1. Locate the four sockets marked TAPE on the back of your receiver, preamp or integrated amplifier. Two will be marked IN or PLAY, and two will be
marked OUT or RECORD.
2. Run a set of connection cords from the receiver’s TAPE OUT to the
TEN’s MAIN IN.
3. Run a set of cords from the receiver TAPE IN to the TEN’s MAIN OUT
sockets. Got that? IN to OUT and OUT to IN.
4. Optionally, if you have a VCR, disc player or TV with audio out, connect
the video device to the TEN’s VIDEO AUX sockets.
5. Run a set of patchcords from the TEN’s TAPE OUT to the additional
unit’s IN sockets.
6. Run a set of patchcords from the TEN’s TAPE IN to the black box’s OUT
sockets.
7 Now locate another set of sockets on the black box titled TAPE OUT and
TAPE IN. Run a set of patchcords from the black box’s TAPE OUT sockets to
your cassette deck’s IN sockets.
8. Now run a set of patchcords from the black box’s TAPE IN sockets to
your cassette deck’s OUT sockets.
9. Enjoy.
With this set-up, input
from your tape deck is
controlled by the “black
box’s” tape monitor circuit.
Leave the TEN’s TAPE
MONITOR and the receiver’s
TAPE MONITOR circuit IN at
all times if you want both the
TEN and the additional addon to be operating at all
times.
Music signals go from the
receiver to the TEN, out of
the TEN into the black box,
out of the black box into
cassette deck for recording if
you wish, back into the black
box from the tape deck, out
of the black box into the
TEN and finally from the
TEN into the receiver again.
So you can hear the whole
mess. It’s like links of a chain:
If you have more than one
add-on, they simply go
between the TEN and the
tape deck. Remember that
not turning one of the “links”
on, or not pushing its tape
monitor button, will break
the chain.
Page 11

The Warranty.
People are scared of warranties. Lots of fine print. Lots of non-cooperation.
Months of waiting around. Well, don’t be scared of this warranty. It’s designed to
make you rave about us to your friends. It’s a warranty that looks out for you and
helps you resist the temptation to have your friend “who’s good with electronics” try
to repair your AudioControl TEN. So, go ahead and read through your warranty; then
enjoy your equalizer for a few days before sending in the warranty and any comments.
“Conditional” doesn’t mean anything ominous. The federal Trade Commission
tells all manufacturers to use the term to indicate certain conditions you have to
meet before they’ll honor the warranty. If you honor these conditions, we will
warrant all materials and workmanship on your TEN for Five Years from the date
you bought it, and will fix or replace it during that time.
Here are the conditions that make this warranty conditional:
1. You have to fill out the warranty card and send it to us within 15 days after you
have purchased your TEN.
2. You must keep your sales slip or receipt so you have proof of when, and from
whom, you bought your equalizer. We’re not the only company to require this, so it
is a good habit to get into with any hi-fi purchase.
3. Your TEN has to have been originally purchased from an authorized AudioControl dealer. You do have to be the original owner to take advantage of the fiveyear warranty, but the date of purchase is still important so be sure to get the sales
slip from the original owner.
4. You can’t let anybody who isn’t (a) an authorized AudioControl service center;
(b) the AudioControl factory; or (c) someone authorized in writing by us, work on
your AudioControl TEN. If anyone other than (a), (b), (c) messes with it, that voids
the warranty.
5. The warranty is also NOT in effect if the serial number has been altered or
removed, or if the AudioControl TEN is used improperly. Now, that sounds like a big
loophole, but here’s all we mean by it. Unwarranted abuse is (a) physical damage
(our consumer products are not meant to prop up bookcases or get hauled around in
tool cases, etc. This is a HOME hi-fi unit, not a bash-it-about utility equalizer, so if
you crunch it, we can’t be responsible); (b) improper connection, patch the phono
jacks into a line socket or hook it to the speaker terminals on your power amp and
we aren’t responsible...high input signals could fry the innards; (c) sadistic things you
shouldn’t do to any electronics, such as get them wet, too hot, dirty, etc.
Assuming you conform to numbers 1 - 5, and it isn’t all that hard, we get the
option of deciding whether to fix your old unit or give you a new one. (See “What to
do if you need service.”)
LEGALESE SECTION
This is the only warranty given by AudioControl. This warranty gives you
specific legal rights, and you may also have rights which vary from state to state.
Promises of how well your TEN will work are not implied by this warranty. Other
than what we’ve covered in this warranty, we have no obligation, express or implied.
Also, we will not be obligated for direct or indirect consequential damage to your
system caused by hooking up the AudioControl TEN.
Failure to send in the properly completed warranty card negates any service
claims.
Page 12

©1996 AudioControl, all rights reserved. P/N 9130080
making good music sound better
®
Electronic Engineering & Manufacturing, Inc.
22410 70th Avenue West
Mountlake Terrace, WA 98043
425-775-8461 Fax 425-778-3166
®
Block Diagram
Specifications.
Distortion: .005% THD.
Signal-to-noise: 120dB.
Bandwidth: 3-100,000Hz±1dB
Subsonic Filter: 18dB/octave from 20Hz, Tchebychev configuration.
Input Impedance: 100,000 ohms (to fit any current electronics).
Output Impedance : 150 ohms.
Country of origin: U.S.A.
WHAT TO DO IF YOU NEED SERVICE
First, contact AudioControl. In writing, at: 22410 70th Ave West, Mountlake
Terrace, Washington 98043 (Attention: Service Dept.). Or phone us at : (206) 775-8461.
We’ll help you make arrangements to have the unit sent back to the factory for
service. That means recommending shipping methods and working with you to see
if it really IS broken.
In either case, proof of purchase MUST be included with the unit (that sales slip
or receipt we’ve been harping about). And send a brief note telling us what’s wrong
with the unit. (You’d be surprised how many folks forget this.)
The normal service time at the factory is less than ONE day! The rest is shipping
time.
You’re responsible for freight or postage when sending your unit to the factory.
Actually, we recommend UPS (United Parcel Service) emphatically over the Pony
Express Postal Service. UPS is more reliable and faster, too.
We’ll pay return freight, and practice what we preach about using UPS on the
return.
 Loading...