

AudioControl Rialto 400 Installation Manual
High Power Audiophile Amplier and DAC
Perfect for Streaming Audio Systems
Installation Manual
2
Installation Manual
Important Safety Instructions
1. Read these instructions.
2. Keep these instructions.
3. Heed all warnings.
4. Follow all instructions.
5. Do not use this apparatus near water.
6. Clean only with a dry cloth.
7. Do not block any ventilation openings. Install in accordance with the
manufacturer’s instructions.
8. Do not install near any heat sources such as radiators, stoves or any other
apparatus (including ampliers) that produce heat.
9. Protect the power cord from being walked on or pinched particularly at
plugs, convenience receptacles, and the point where they exit from the
apparatus.
10. Only use attachments/accessories specied by the manufacturer.
11. Do not ‘Hot Plug’. When changing inputs or outputs, switch the Rialto 400
o before making changes. Once changes have been made, then switch
the Rialto 400 back on.
12. Unplug this product during lightning storms or when unused for long
periods of time which we hope will be rarely!
13. Refer all servicing to qualied service personnel. Servicing is required
when the apparatus has been damaged in any way, such as power-supply cord or plug is damaged, liquid has been spilled or objects have
fallen into the apparatus, the apparatus has been exposed to rain or
moisture, does not operate normally, or has been dropped.
14. This apparatus shall not be exposed to dripping or splashing, and no
object lled with liquids, such as vases or glasses, shall be placed on the
apparatus.
15. Exposure to high sound pressure levels may lead to permanent hearing
loss. Take every precaution to protect your hearing.
16. The remote control comes with a non-rechargable Lithium battery installed. Take every precaution when handling and installing new Lithium
batteries, and follow all local and state guidelines for safe disposal of old
batteries. Keep all batteries away from children.
The lightning ash with arrowhead symbol within an equilateral
triangle is intended to alert the user to the presence of uninsulated
“dangerous voltage” within the product’s enclosure, that may be of
sucient magnitude to constitute a risk of electric shock to persons.
The exclamation point within an equilateral triangle is intended to
alert the user of the presence of important operating and maintenance (servicing) instructions in the literature accompanying the
appliance.
Caution: to reduce the risk of electric shock, do
not disassemble the apparatus. There are no
user-serviceable parts inside. Refer servicing to
qualied personnel.
Recycling notice: If the time comes and this apparatus has fullled
its destiny, do not throw it out into the trash. It has to be carefully
recycled for the good of mankind, by a facility specially equipped
for the safe recycling of electronic apparatii. Please contact your
local or state recycling leaders for assistance in locating a suitable
nearby recycling facility. Or, contact us and we might be able to
repair it for you.
3
Table of Contents
©2018 AudioControl Inc All rights reserved.
Important Safety Instructions ....................................2
Chapter 1: Introduction ...........................................4
Introduction ...................................................4
Ready to Rumble! - A Quick Look at the Rialto 400 ...............5
Chapter 2: Quick Start Guide .....................................6
Quick View .....................................................6
Quick Start .....................................................7
Chapter 3: Hookup Diagrams .....................................8
Typical Three-Source Setup .....................................8
2.1 Speaker Setup and 4.1 Parallel Speaker Setup ................9
Using the Speaker-Level Inputs ................................10
Stereo and Mono Passive Subwoofer Speaker Setup ............11
Chapter 4: Installation ...........................................12
Installation ....................................................12
Speaker Connections ..........................................13
Chapter 5: Features ..............................................14
Front Panel Features ...........................................14
Rear Panel Features ............................................15
Voice-Enabled Device Example ................................19
Additional Features and Support ...............................20
Chapter 6: Adjustments. . . . . . . . . . . . . . . . . . . . . . . . . . . . . . . . . . . . . . . . . .21
Adjusting the AccuBASS® ......................................21
Chapter 7: Troubleshooting .....................................22
Troubleshooting ..............................................22
Chapter 8: Specications ........................................23
Specications .................................................23
Chapter 9: Service ...............................................24
Service ........................................................24
Chapter 10: Please Remain Calm .................................25
The Warranty ..................................................25
Legalese Section ..............................................26

4
Installation Manual
Thank you and congratulations for purchasing your AudioControl
Rialto 400. This installation manual is your guide to installing and
using the Rialto 400 Amplier and DAC, including information on its
more advanced features. The table of contents will help you navigate
to the area of the manual you are looking for. It is a good idea to read
the whole manual in order to acclimatize yourself with the full workings and features of the Rialto 400, and to keep the technical writer’s
Mom happy!
Established in Seattle four decades ago, we have always been
dedicated to designing, engineering and building world-class audio
products from the ground up. In the process, we’ve earned a reputation worldwide for operating at the highest levels of reliability and
performance with a mission of ‘Making Good Sound Great’.
We trust that you will get many years of satisfying and trouble-free operation from your Rialto 400. If you require more information about this or any of our AudioControl products, please
visit our website at www.audiocontrol.com or contact us at
sound.great@audiocontrol.com. In addition, do not hesitate to talk to
our dealers worldwide, or contact us directly at our Seattle base in the
misty rainforests of the Pacic Northwest, USA. The days can be rainy
and cold but there is always a warm welcome and a hot cup of coee
available all year round.
Contents
• Rialto 400
• AC Power Cord
• Optical Cable
• RCA to 1/8” adapter
• 4 stick-on feet
• 4-pin speaker connector (attached to unit)
• This installation manual
• A shipping box full of fresh air from the wooded slopes of
Mountlake Terrace, WA
Introduction
Chapter 1: Introduction

5
Ready to Rumble! - A Quick Look at the Rialto 400
The Rialto 400 has been updated to combine its legendary high-powered, audiophile performance and features, with an input stage
devoted to voice-enabled devices, such as Amazon’s Echo® or Google
Home®. This allows super-fast, accurate signal-sense switching when
you expect it, while going about your daily activities.
For example, if you are listening to music (from the digital input
source) or watching TV (from the analog input source) but you need
to add something to your shopping list. Have your voice-enabled
device connected to the rear panel 3.5 mm jack (which is always
prioritized). Ask your question, and the Rialto 400 will auto-magically
switch to the voice-enabled device to answer your question or
conrm your addition to the list. Then it immediately switches back to
your music, just as smooth as (insert your favorite analogy here).
The Rialto 400 is in its own class of compact, high-powered ampliers,
with a built-in audiophile-grade DAC designed specically to provide
greater performance and higher sound quality for all analog and
digital systems, including streaming audio components like Sonos®
home entertainment.
The Rialto 400’s powerful amplier delivers 100 Watts of power
per channel into 8 Ohms and 200 Watts per channel into 4 Ohms.
Additionally, the Rialto 400 can be bridged to perform as a 400 Watt
mono-block amplier.
Chapter 1: Introduction
The state of the art Rialto 400 features a built-in high-performance
Wolfson® DAC (digital to analog converter) that dramatically improves
audio quality and performance.
Digital and analog audio-systems can now reach their full potential
across the whole house whether the speakers are free-standing, inwall, in-ceiling, invisible, desktop, gaming, in the garden shed etc.
Equipped with AudioControl’s unique patented AccuBASS® circuitry,
the Rialto 400 also rejuvenates the bass response lost in most digital
compression schemes. This results in a richer and fuller audio performance with better bass and mid-bass response.
The net eect is that you will enjoy a more complete listening experience and hear music with a richness and vibrancy much closer to the
way the artist intended their music to be enjoyed.
6
Installation Manual
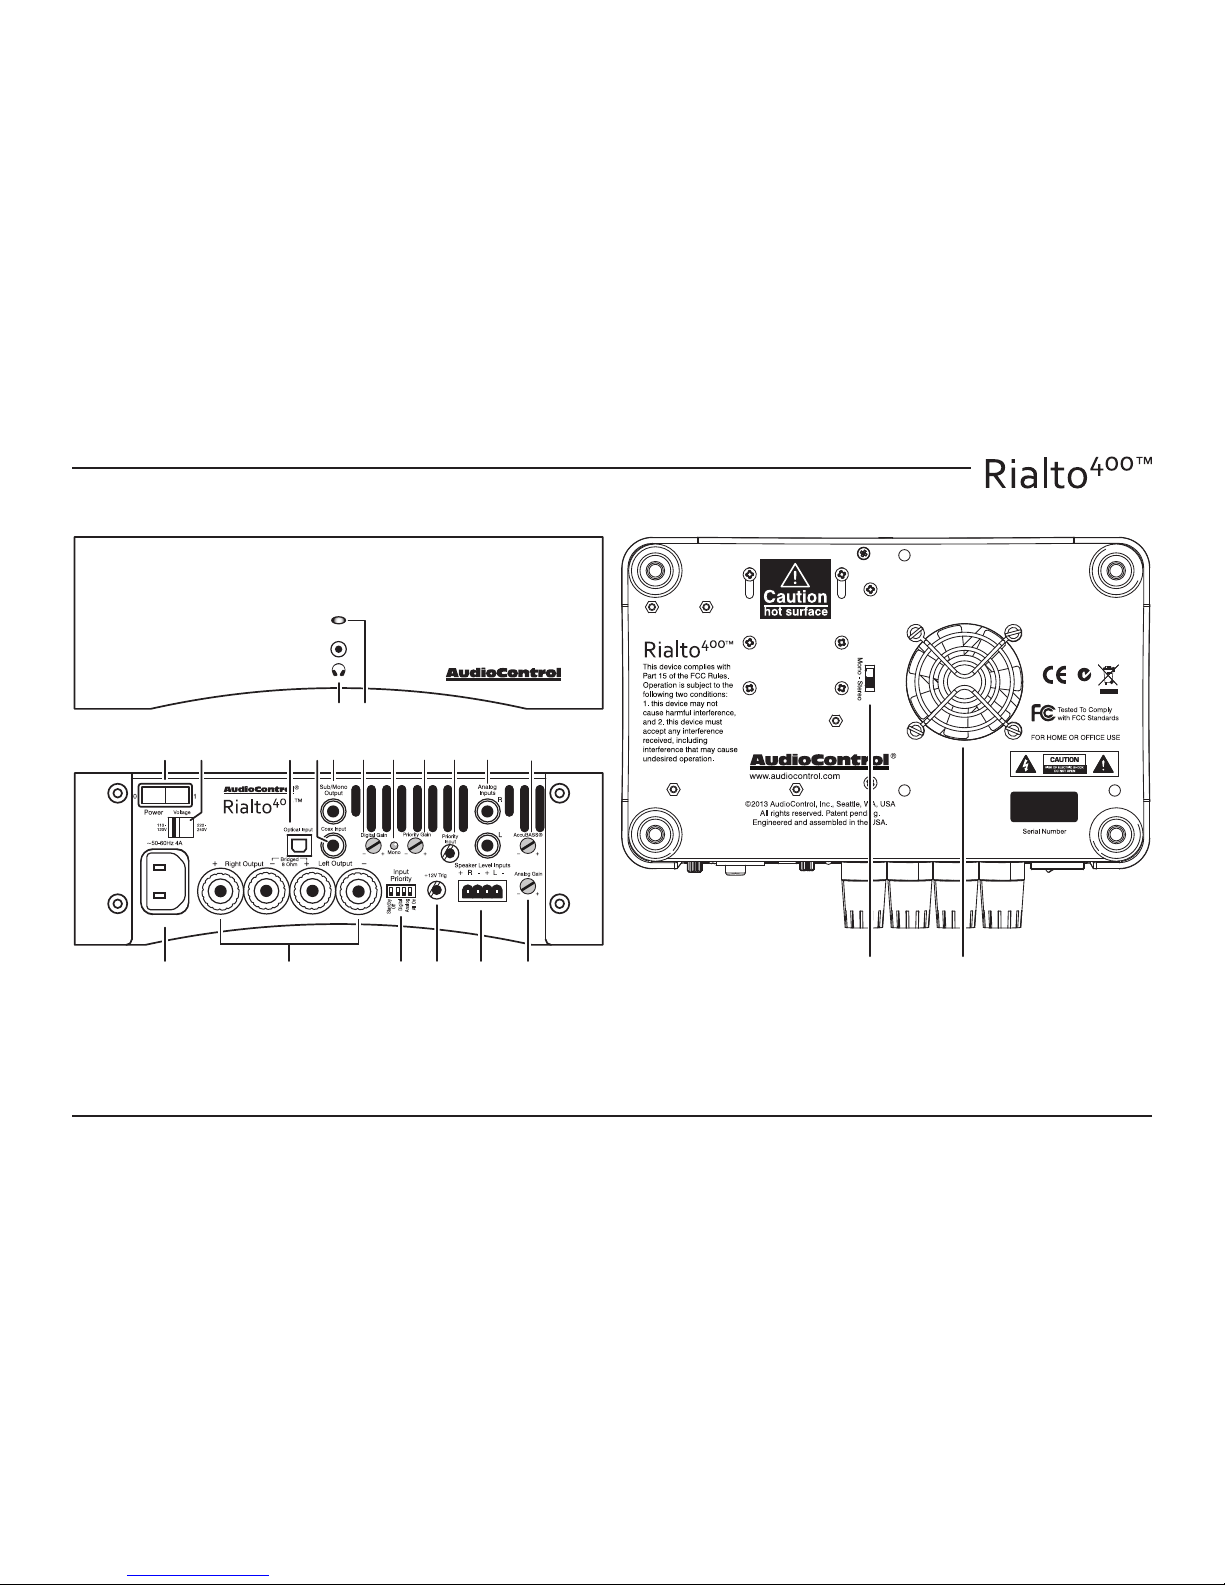
Quick View
Chapter 2: Quick Start Guide
1. Headphone Output
2. Power LED
3. Power On/O Switch
4. AC Voltage Selector
5. AC Input
6. Speaker Outputs
7. Control Switches
8. +12V Trigger Output
9. Speaker Level Inputs
10. Analog Gain
1 2
3 4 1211 13 14 17 18
19
15 16
5
109876
20 21
11. Optical Digital Input
12. Coaxial Digital Input
13. Sub/Mono Output
14. Digital G ain
15. Mono LED
16. Priority Gain
17. Priority Input
18. Analog Input L/R
19. AccuBASS® Level
20. Mono Switch
21. Cooling Fan
7
Quick Start
It takes just a few steps to get your AudioControl Rialto 400 up and running. The steps below are explained in more
detail throughout this manual. This example shows a typical single-source digital setup and a voice-enabled device.
(The numbers in the illustration correspond to the numbers in the procedure steps.)
Chapter 2: Quick Start Guide
1. Connect one source component (for example
a digital music player, SONOS™ CONNECT,
television, receiver, CD player, Xbox, etc.) to the
digital input of the Rialto 400.
2. Connect a voice-enabled device to the 3.5 mm
Priority Input. (For best results, the device’s
volume level should be set to 50% or more.)
3. Connect a pair of your favorite speakers to the
Rialto 400, ensuring that the polarity matches.
4. After all connections have been made, turn on
power to all devices, with the Rialto 400 last.
5. Before playing your music, turn down the Rialto
400 gain controls. Then play your music and
increase the gain for the desired volume level.
6. Adjust the AccuBASS® control to the desired
amount of bass response to add bass and richness back to your music.
7. Pour sonic goodness into your room, and enjoy
“Making Good Sound Great!”
4
1
5
3
2
7 7
+
+ +
+
6
8
Installation Manual
Chapter 3: Hookup Diagrams
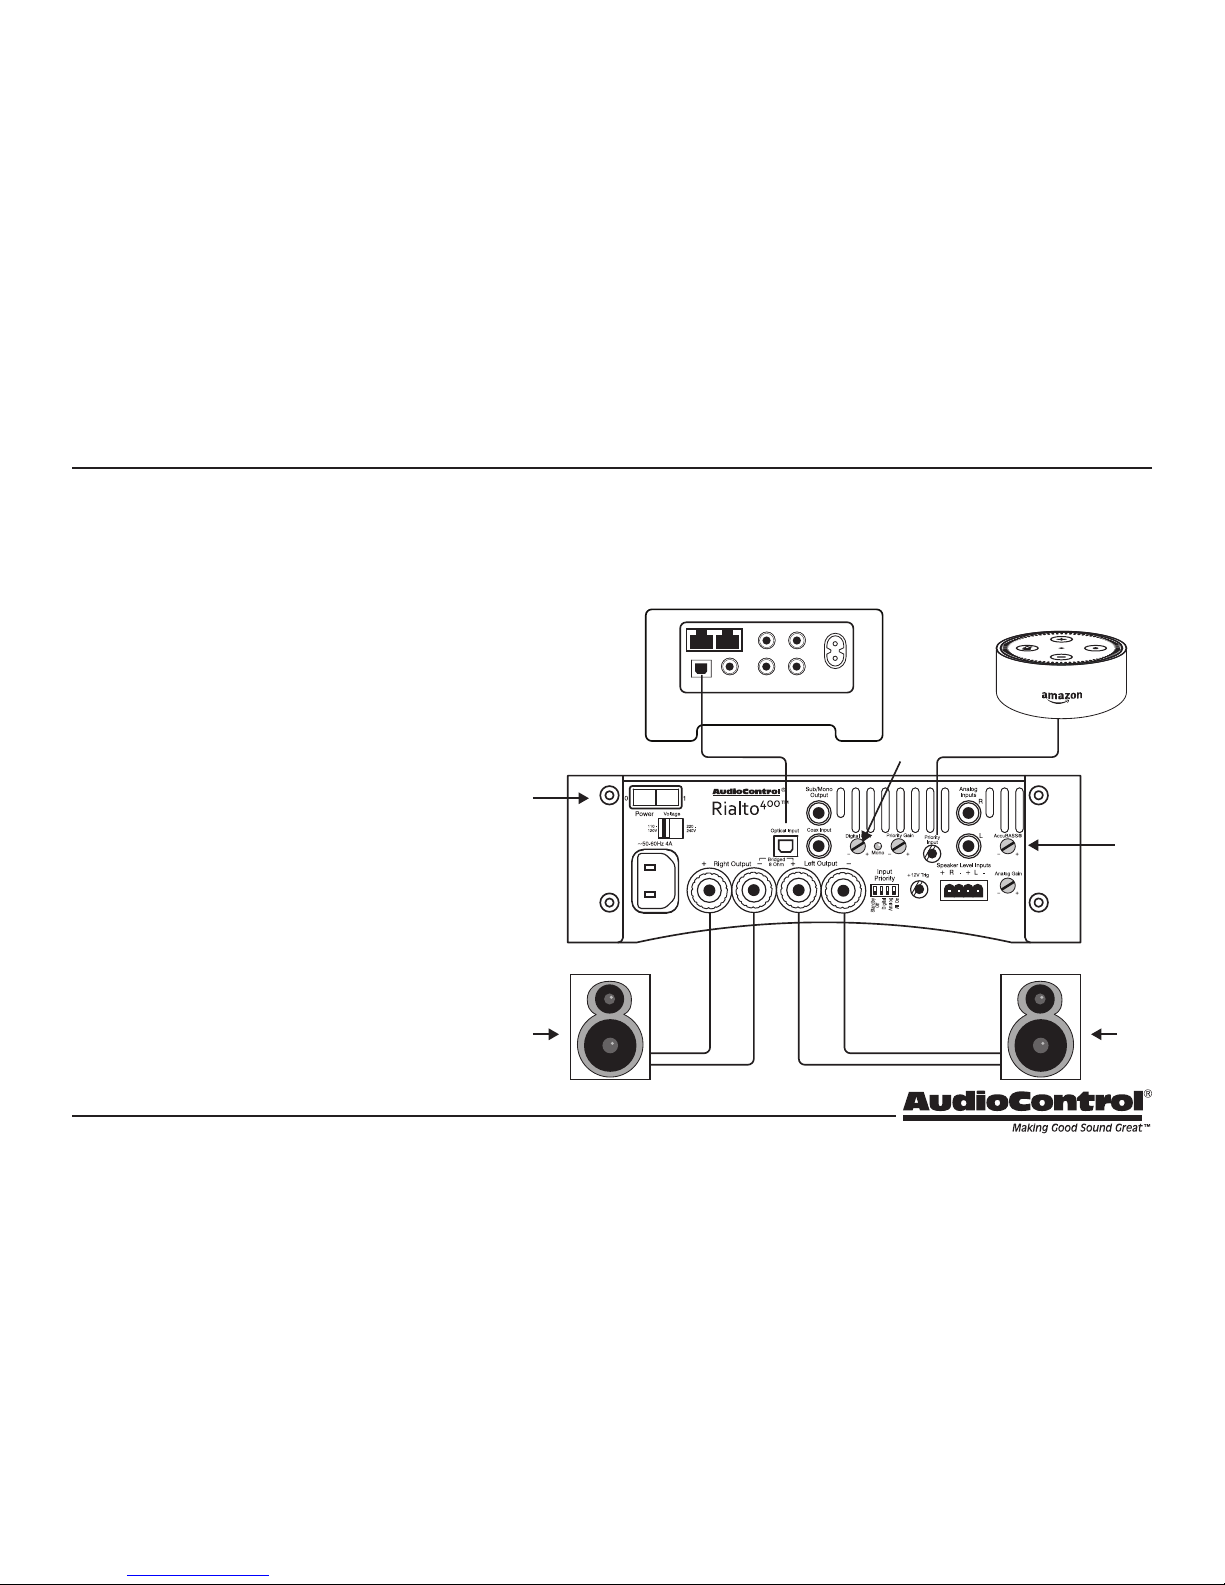
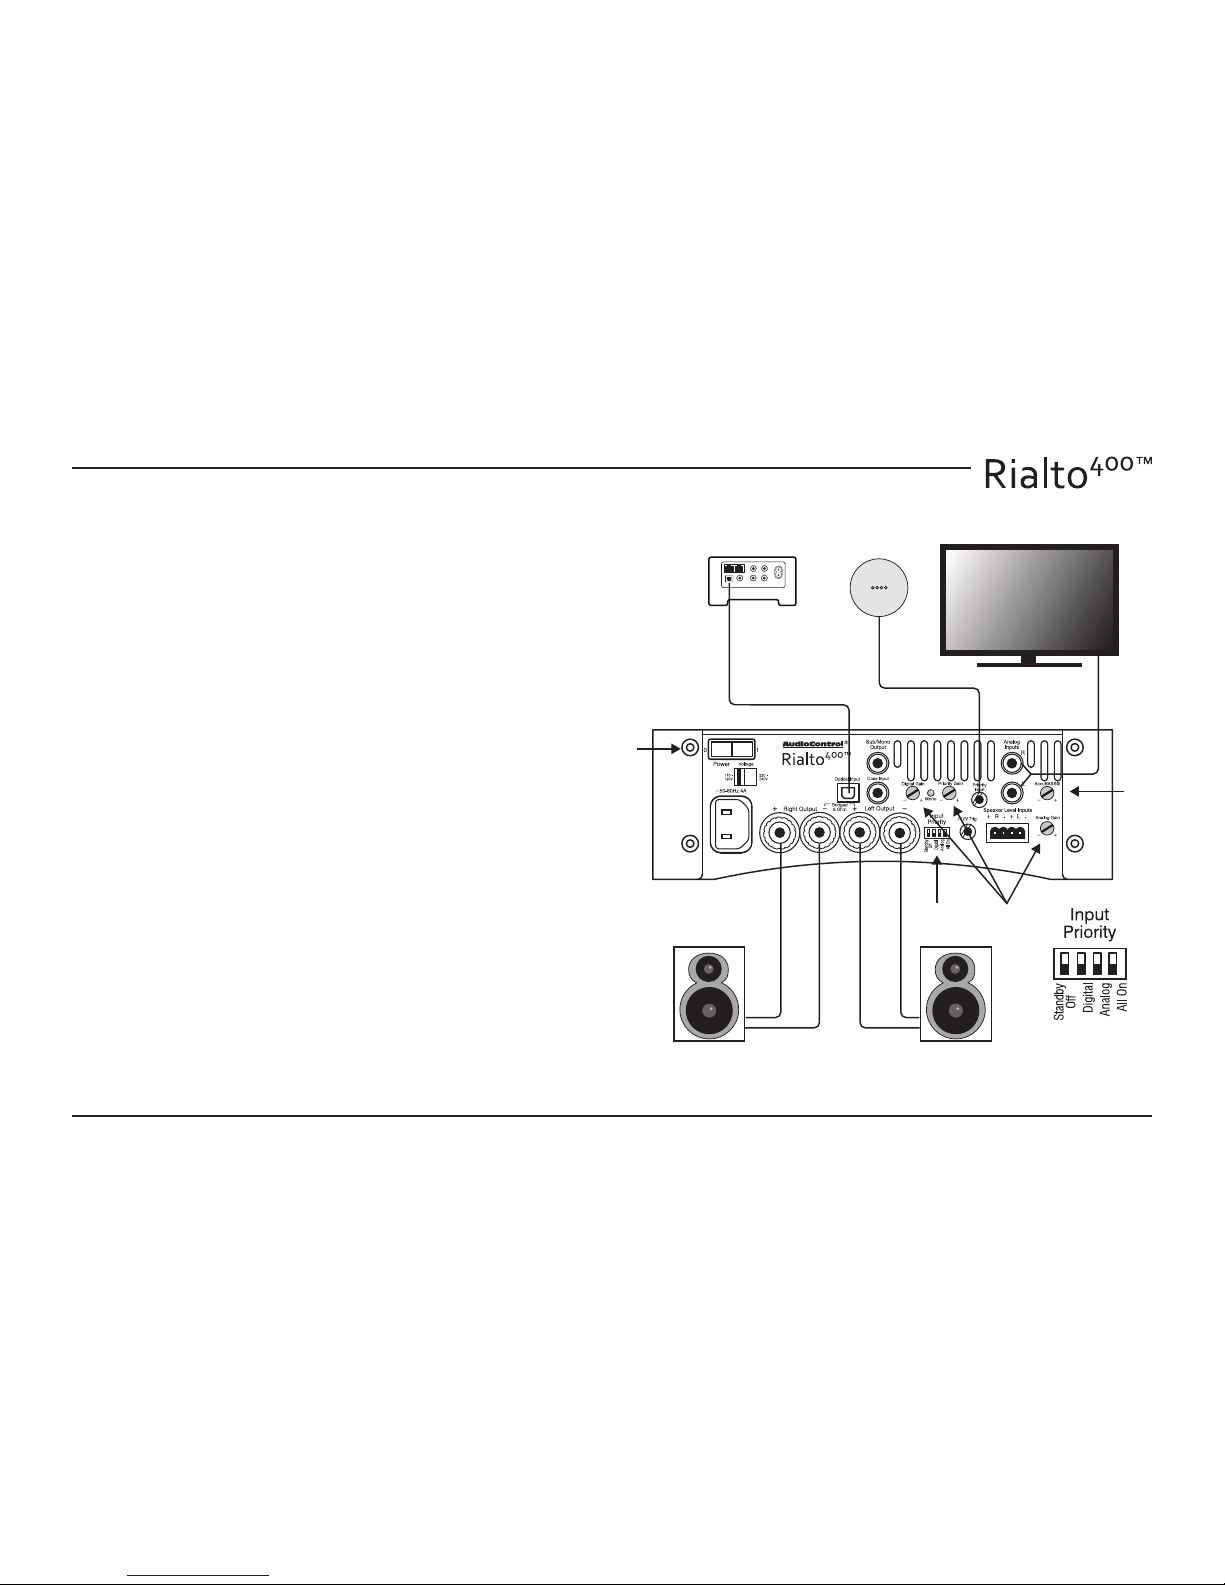
Typical Three-Source Setup
The Rialto 400 allows multiple sources to be connected to the various
L/R analog inputs, the digital input (coax or optical) and the priority
3.5 mm input.
1. Connect a digital source to the Rialto 400 using the digital input
(coaxial or optical).
2. Connect an analog source to the Rialto 400 using the right (R)
and left (L) analog input RCA jacks.
3. Connect a voice-enabled device such as a Google Home® to the
3.5 mm Priority Input. (For best results, the device’s volume level
should be set to 50% or more.)
4. Connect a pair of your favorite speakers to the Rialto 400, ensuring that the polarity matches.
5. Set the priority switches to Analog, Digital, or All, depending on
your preference.
6. After all connections have been made, turn on power to all
devices, with the Rialto 400 last.
7. Before playing your music, turn down the Rialto 400 gain controls. Then play your music and increase the gains for the desired
volume level.
8. Adjust the AccuBASS® control to the desired amount of bass
response to add bass and richness back to your music.
9. Enjoy “Making Good Sound Great!”
6
2
1
3
4
+
+
75
8
9
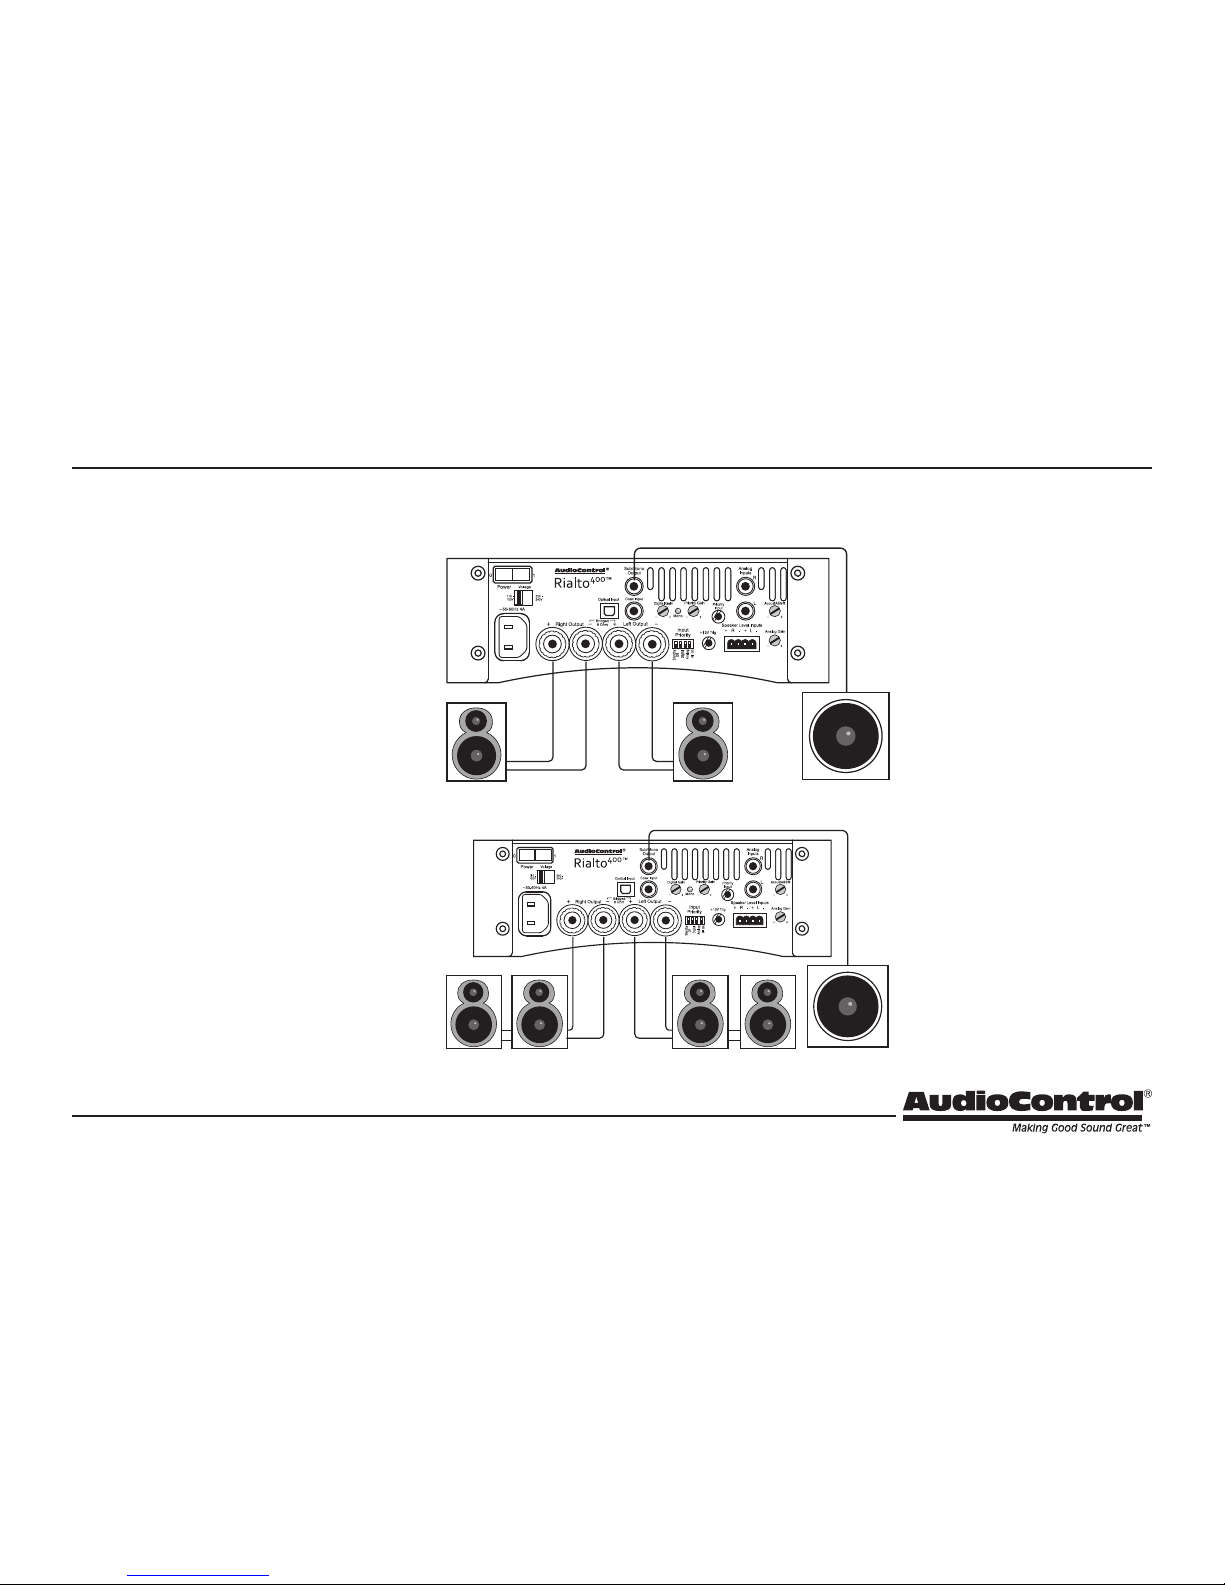
Chapter 3: Hookup Diagrams
4 or 8 Ohms 4 or 8 Ohms Powered Subwoofer
+
+
2.1 Speaker Setup and 4.1 Parallel Speaker Setup
8 Ohms8 Ohms 8 Ohms 8 Ohms Powered Subwoofer
+
++
+
The Rialto 400 has been designed to equalize
and improve the performance of all speaker
set-ups. The power of the amplier combined
with the audio performance and quality of
AudioControl’s Wolfson-engineered, digital to
analog converter (DAC) results in a dramatic
improvement in the performance of all speaker set-ups throughout the house.
Shown on the right are just two of the many
types of speaker congurations that the Rialto
400 can work with. The 4.1 speaker set-up
takes advantage of the Rialto 400 amplier’s
stability at 4 Ohms powering four speakers.
In addition, the Rialto 400 can be used as an
incredible Mono amplier with power ratings
up to 400 Watts (see page 11).
In both systems shown, the mono subwoofer
output sends the line-level audio to a powered subwoofer.
2.1 Speaker
Set-up
The standard set-up for a 2.1
speaker system with two 4 or
8 Ohm speakers plus a powered subwoofer.
4.1 Speaker
Set Up
The standard set-up where
four 8 Ohm speakers are connected in parallel to form a 4
Ohm load per channel. (The
minimum speaker impedance for this conguration is
8 Ohms.)
 Loading...