

Page 1
FEATURES
• Edge enhanced steel frame for added structural strength
• Black anodized voice coil former for superior heat dissipation
• Linear double roll surround for precision cone movement
• Complex FEA designed high eciency motor
• Rigid poly mica coated cone for optimized sound reproduction
• Rear dampened hybrid silk dome tweeter for extended frequency response
• High quality mounting hardware included
• Umbrella not included
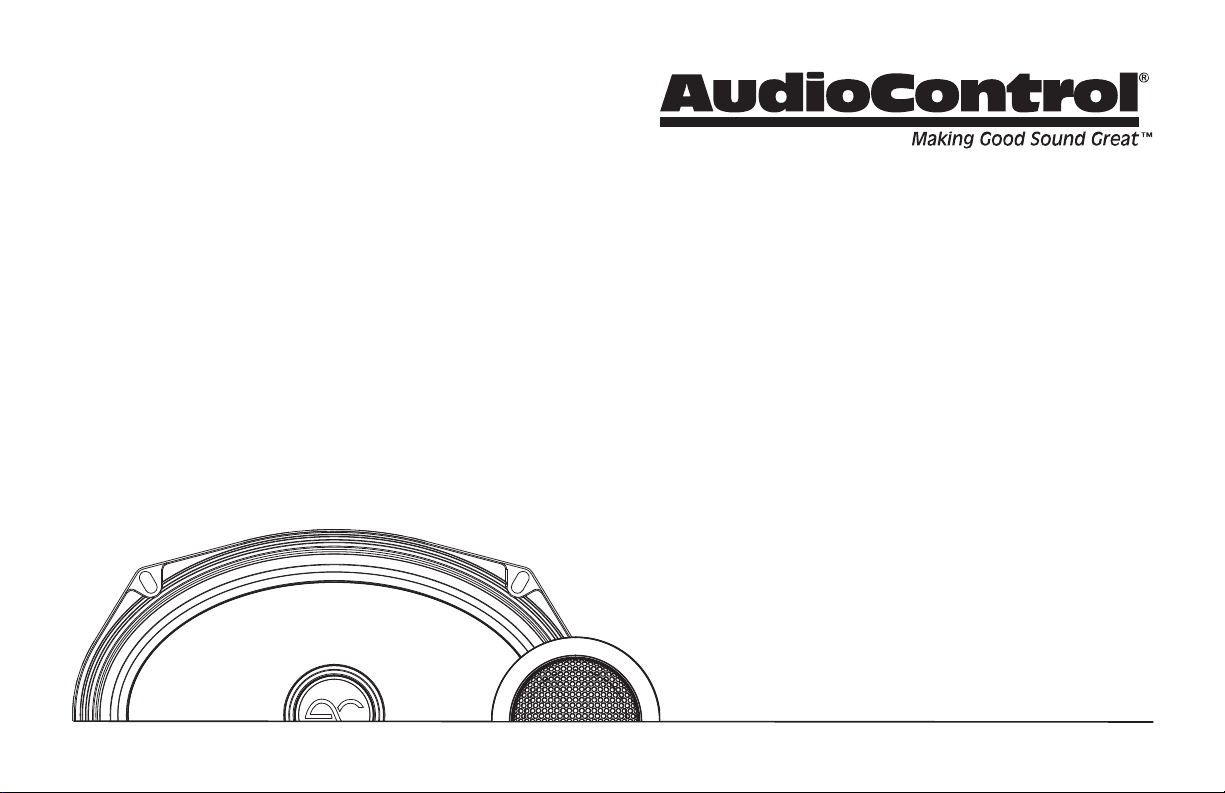
PNW-69CS2
HIGH-FIDELITY COMPONENT SPEAKERS
User Guide
Page 2
Important Safety Instructions
2
PNW-69CS2
1. Read these instructions.
2. Keep these instructions.
3. Heed all warnings.
4. Follow all instructions.
5. Do not submerge this apparatus in water.
6. Clean only with a dry cloth.
7. WARNING: The speakers must be properly secured in the vehicle.
Improper installation may lead to permanent injury or death. Installation
of the speakers must be done with great care by qualied personnel, to
prevent damage to fuel lines, power and other electrical wiring, hydraulic
brake lines, and other systems, that might compromise vehicle safety.
8. Use speaker wire of sucient size to ensure adequate current to the speaker. For PNW Series Speakers, this means 14-18 gauge speaker wire.
9. Refer all servicing to qualied service personnel. Servicing is required
when the apparatus has been damaged in any way, such as the power
input terminals are damaged, objects have fallen into the apparatus,
does not operate normally, or has been dropped.
10. Not tested for use in Bigfoot's Cave.
11. Exposure to high sound pressure levels may lead to permanent hearing
loss. Take every precaution to protect your hearing.
The exclamation point within an equilateral triangle is intended to alert the
user of the presence of important operating and maintenance
(servicing) instructions in the literature accompanying the
appliance.
Recycling notice: If the time comes and this apparatus has fullled its destiny,
do not throw it out into the trash. It has to be carefully recycled
for the good of mankind, by a facility specially equipped for the
safe recycling of electronic apparatii. Please contact your local or
state recycling leaders for assistance in locating a suitable nearby
recycling facility. Or, contact us and we might be able to repair it
for you.
User Guide
Page 3
Speaker Talk
Right on! You got yourself some shiny new AudioControl speakers. After
you are done admiring the quality workmanship and attention to detail,
you need to get these bad-boys installed. If you did not attend auto-shop
in school or are having trouble plugging in power tools, your best bet is to
seek out a qualied AudioControl dealer. They have the skills, experience,
and specialized tools to get your vehicle sounding like a live concert and they
usually smell alright too.
Crossover
The second-order Linkwitz-Riley lter is a type of crossover network that has
several benets compared to other types of crossover networks.
Firstly, the second-order Linkwitz-Riley lter has a steep slope of -12dB per
octave, which ensures that there is a sharp cuto between the frequencies
that are directed to the woofer and the tweeter. This steep slope helps to
minimize overlap between the frequencies, resulting in better sound quality
and improved power handling capability of the speakers.
Secondly, the second-order Linkwitz-Riley lter maintains a at frequency
response in the crossover region, which ensures that there are no peaks or
dips in the frequency response that can result in uneven sound quality.
Lastly, the second-order Linkwitz-Riley lter has a phase response that is
linear across the crossover region. This means that the phase shift between
the woofer and tweeter is constant, resulting in improved imaging and
soundstage.
Overall, the benets of the second-order Linkwitz-Riley lter include a
steep slope, at frequency response, and linear phase response, resulting in
improved sound quality, better power handling, and improved imaging and
soundstage compared to other types of crossover networks.
3
Page 4
Specications
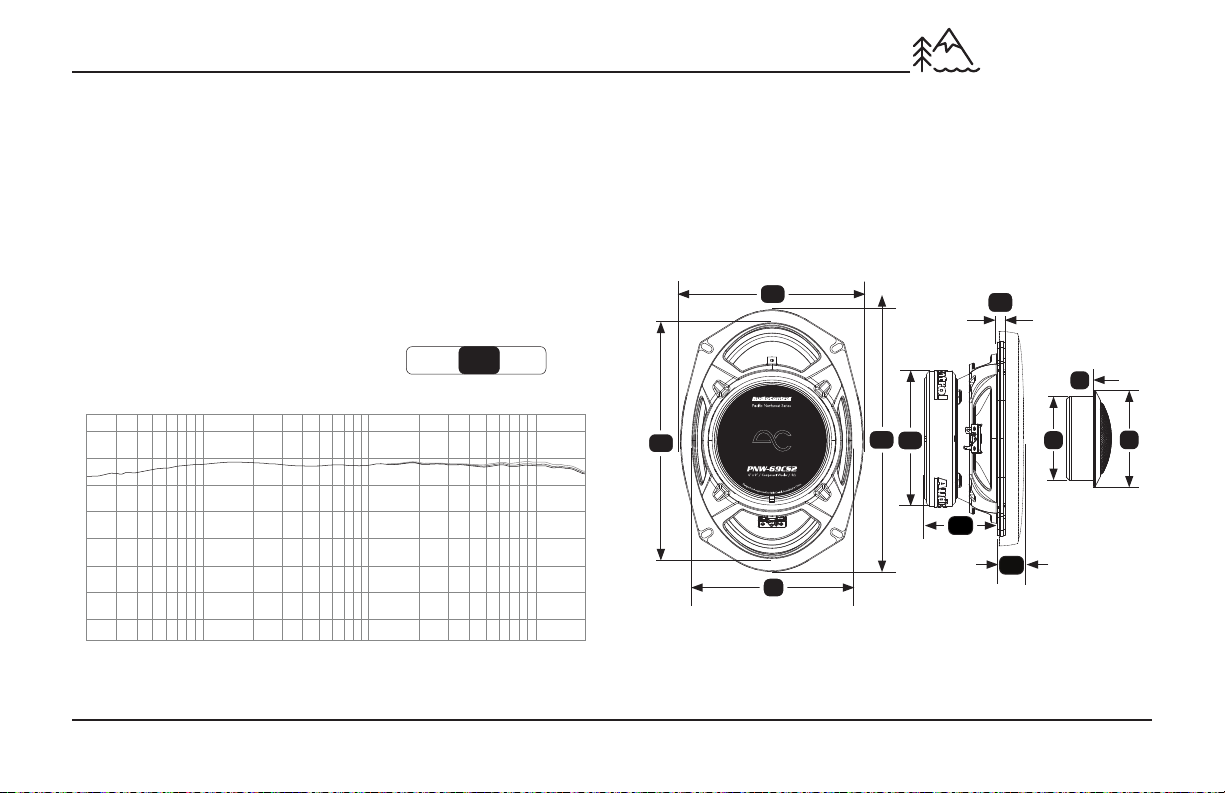
SPL
20 30 40 50 60 70 80 90 100 200 300 400 500 600 700 900 1K 2K 3K 4K 5K 6K 7K 8K 9K 10K 20kHZ
Crossover Type ...........................................................2nd order Linkwitz-Riley
DC Resistance (Re) ...............................................................................2.6 ohms
Filter Type ...............................................................................................HP / LP
System Frequency Response ...................................................... 50-20K Hz
XO Frequency .............................................................................3.5kHz HP / LP
Slope (Octave) .........................................................................................-12 dB
Tweeter Voice Coil Diameter ................................................................... 25 mm
Midrange Voice Coil Diameter ................................................................ 35 mm
MIN IDEAL MAX
Continuous Power Handling (watts RMS)
75 100 125
PNW-69CS2
Dimensions
Overall Diameter (w/o Grille) (A)(a ) ..................... 6 x 9 in / 167 x 235 mm
Overall Diameter (w Grille) (A)(a ) ............... 7.2 x 10.43 in / 183 x 265 mm
Cut Out Diameter (B)(b) ...........................5.74 x 8.34 in / 146 x 212 mm
Mounting Depth (C)................................................... 2.95 in / 75 mm
Height (w/o Grille) (D) .................................................. .0.24 in / 6.3 mm
Height (w/ Grille) (E) ..................................................... .0.98 in / 25 mm
Motor Diameter (w/ Cover) (F) .........................................4.6 in / 117 mm
A
D
I
4
150
100
50
0
-50
-100
-150
-200
a
b
F
H
C
E
B
Dimensions for Tweeter
Overall Diameter (G) .......................................................... 2.13 in / 54 mm
Cut Out Diameter (H) .........................................................1.85 in / 47 mm
Mounting Depth (I) ........................................................0.63 in / 16 mm
User Guide
G
Page 5
System Talk
In an audio system, a crossover network is used to split the incoming audio
signal into dierent frequency ranges and send each range to the appropriate
speaker or driver. The two main types of crossover networks are passive and
active crossovers.
Passive Crossover:
A passive crossover is a simple electronic circuit that uses passive components
such as resistors, capacitors, and inductors to split the audio signal into
dierent frequency ranges. Passive crossovers are typically used in passive
speaker systems where the amplier is separate from the speaker. The passive
crossover is placed between the amplier and the speaker and splits the
signal into high, mid, and low-frequency ranges.
Passive crossovers have some advantages, including simplicity and low
cost. They also don't require any additional power source since they work
with the signal from the amplier. However, passive crossovers have some
disadvantages such as signal loss, distortion, and ineciency.
Active Crossover:
An active crossover, on the other hand, is an electronic circuit that uses active
components such as transistors and op-amps to split the audio signal into
dierent frequency ranges. Active crossovers are typically used in active
speaker systems where the amplier is built into the speaker. The active
crossover is placed between the preamplier and the power amplier and
splits the signal into high, mid, and low frequencies. Active crossovers have
some advantages over passive crossovers, including a better signal-tonoise ratio, less distortion, and greater exibility in adjusting the crossover
frequency and slope.
However, an active crossover requires a separate power source and is generally
more expensive and complex than a passive crossover. In summary, both
passive and active crossovers are used to split the audio signal into dierent
frequency ranges, but they use dierent electronic circuits and have dierent
advantages and disadvantages. The choice between the two types of
crossovers depends on the specic requirements of the audio system and the
preferences of the user.
If your amplier has a built-in active crossover such as the ever-so-excellent LC
or D series ampliers from AudioControl,(examples on the following pages)
it is generally recommended to use the crossover network on the amplier
for optimum eciency and performance. This is because the active crossover
circuitry built into the amplier is designed specically to work with that
amplier, so it is likely to provide better overall performance than a separate
passive crossover.
Using the built-in active crossover also eliminates the need for additional
equipment, such as an external crossover or a separate power source, which
can help simplify your setup and reduce the clutter of your audio system.
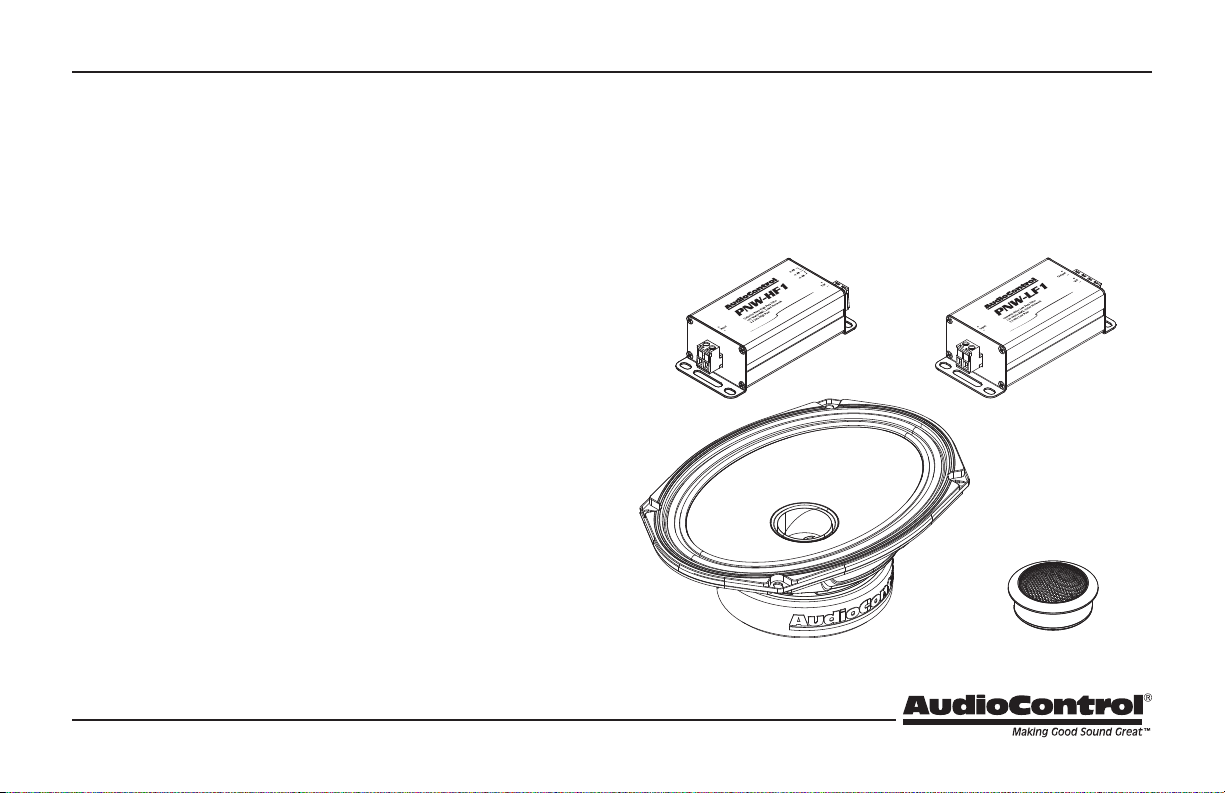
it's important to note that not all ampliers have a built-in active crossover,
thus PNW-HF1 and PNW-LF1 are provided in the PNW component system.
Additionally, you should ensure that the built-in active crossover you are
planning to use has the necessary features and adjustments to meet your
specic needs and preferences.
5
Page 6
System Examples
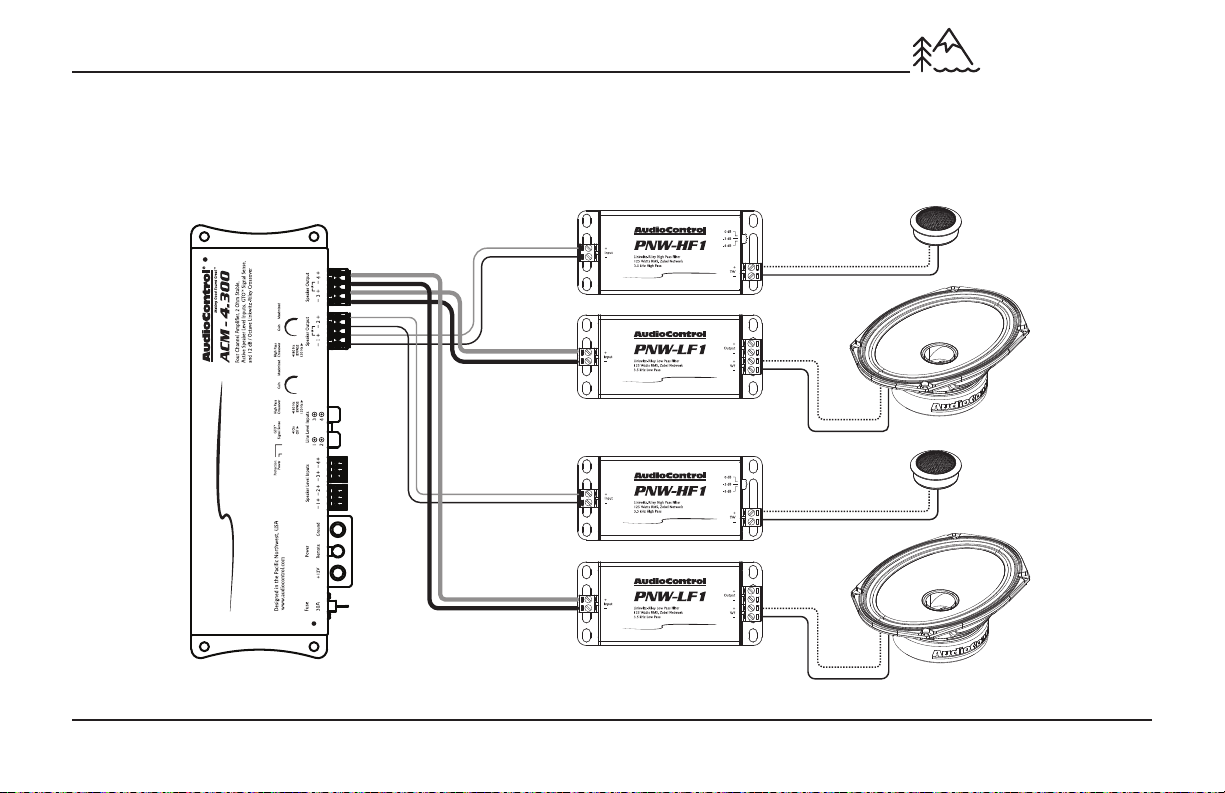
Passive Crossover 4 Channel Amp
In this example, we are connecting the PNW crossovers to a ACM 4.300. Each crossover has its own dedicated connection.
For example:
Channels 1 and 2 are connected to the PNW-HF1 positive and negative terminals.
Channel 3 and 4 are connected to the PNW-LF1 positive and negative terminals.
6
PNW-69CS2
User Guide
Page 7
System Examples Continued
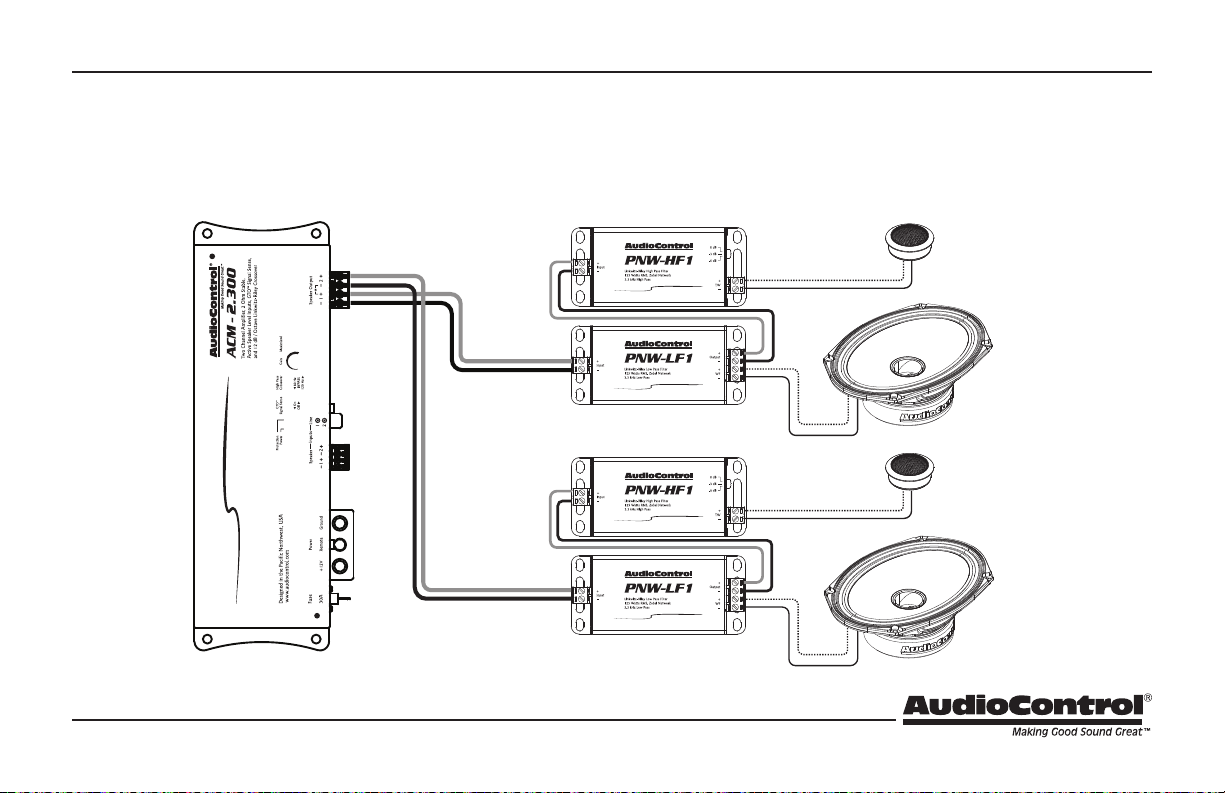
Passive Crossover 2 Channel Amp
In this example, we are connecting the PNW-LF1 crossovers to a ACM-2.300. PNW-LF1 output is connected to the PNW-HF1 input.
For example:
Channels 1 and 2 are connected to the positive and negative of the PNW-LF1 terminals.
The output of the PNW-LF1 is connected to the input of the PNW-HF1.
7
Page 8
System Examples Continued
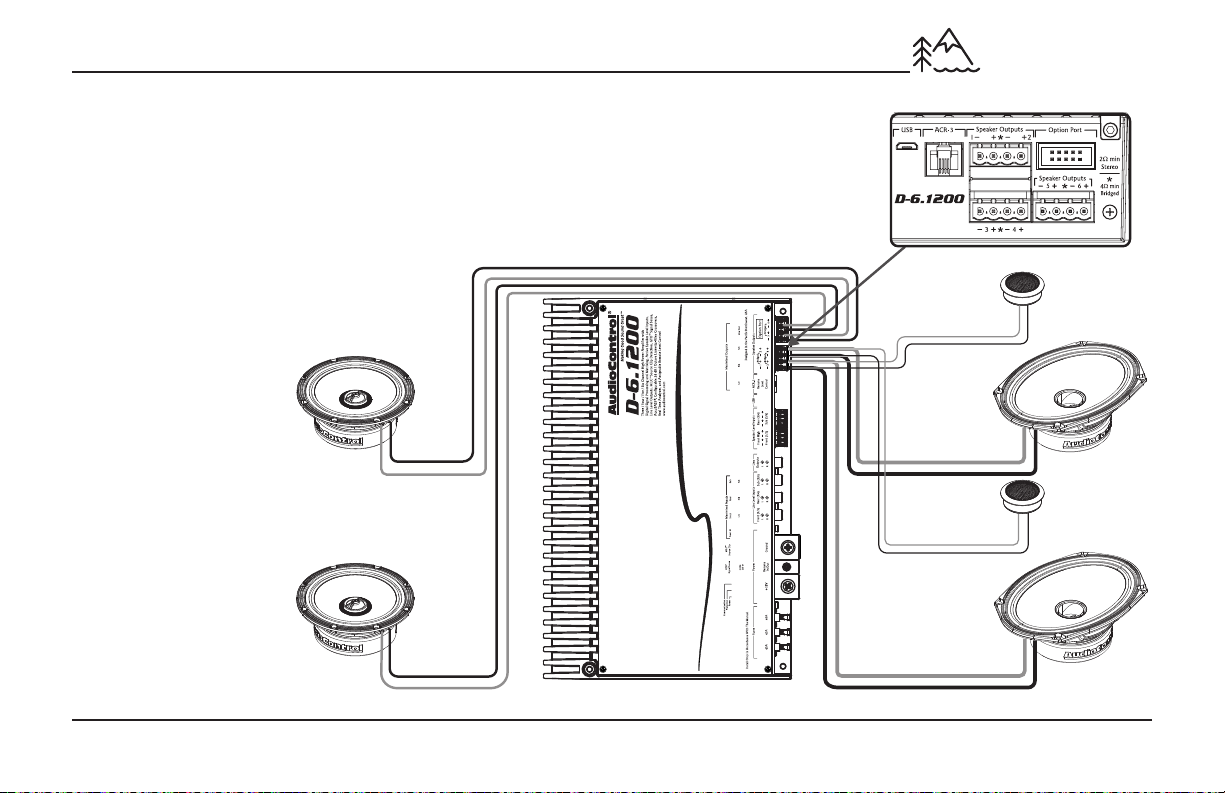
Active System 6 Channel Amp
In this example, we are connecting the Speakers directly to the Amp using a D-6.1200's internal crossovers.
The PNW-HF1 and PNW-LF1 will not be used.
For example:
CH1: front left tweeter
(playing 3.5k-20kHz)
CH3: front left midrange
(playing 80Hz-3.5kHz)
CH5: rear left coaxial
(playing 80Hz-20kHz)
* Rear coaxial speakers not incuded, for reference only
CH2: front right tweeter
(playing 3.5k-20kHz)
CH4: front right midrange
(playing 80Hz-3.5kHz)
CH6: rear right coaxial
(playing 80Hz-20kHz)
8
PNW-69CS2
User Guide
Page 9
Simple installation instructions
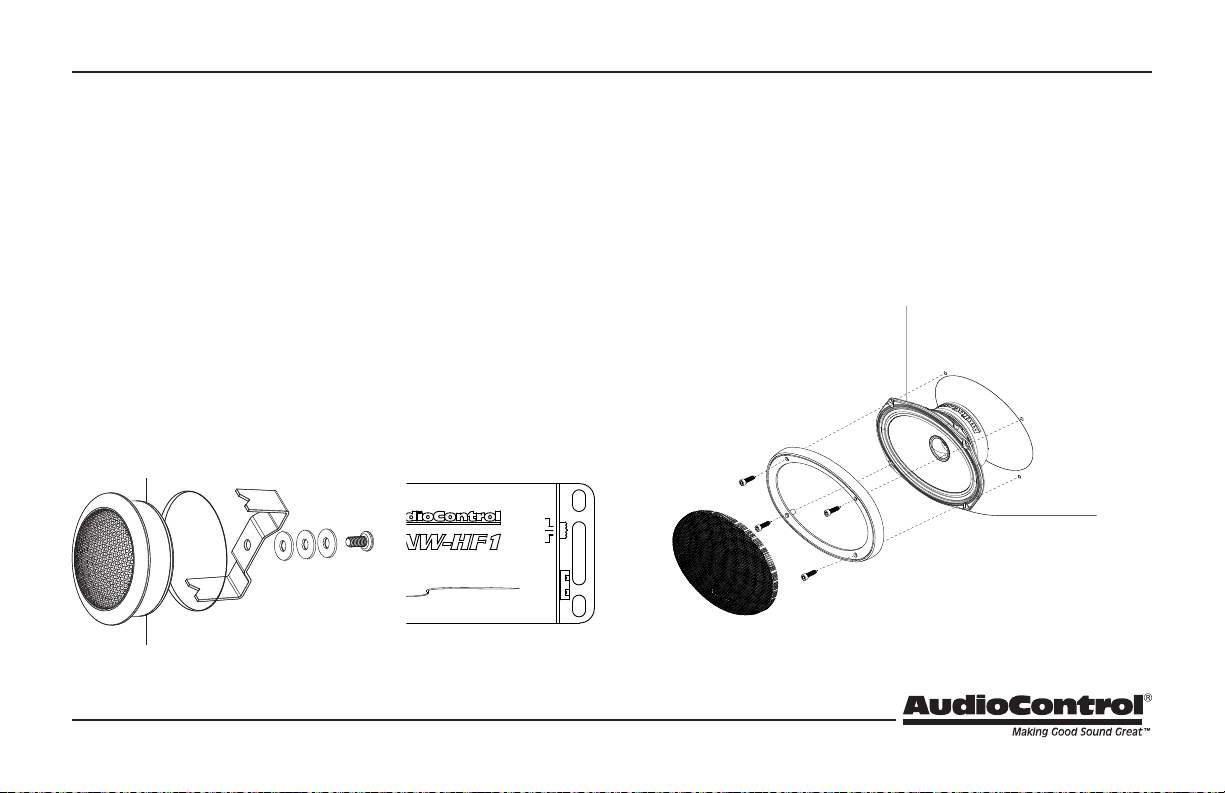
Tweeter Installation Midrange Installation
Wow! Look how far we have come, you made it to page 9! For those brave
enough to tackle the installation on their own, proceed to the next steps.
For those feeling out of their comfort zone, don't be threatened, help is
available. Our suggestion is that you seek out a qualied AudioControl dealer.
They have the skill set and experience to get your new PNW-65CS2 installed
properly.
First, determine where the tweeters will be mounted. Next, make sure the
area has a at surface for the tweeter to mount. Check the mounting depth
of the desired location (use page 4 for tweeter mounting diminsions.) If the
tweeter will be mounted in a door, roll the windows up / down and lock /
unlock the doors making sure there are no obstructions the tweeter will hit.
Using the cut out template, mark the center location for the tweeter to be
mounted. Drill the hole with a standard 1 7/8 inch (47mm) hole saw.
Once your mounting hole has been established, place the tweeter into the
hole. Position the U-Bracket on the back side of the panel and the tweeter.
With the supplied screw place the washers over the screw and mount the
screw to the tweeter.
0 dB
-3 dB
-6 dB
Panel thickness will
determine how many
washers are used
• Large speaker terminal = positive (+).
• Small speaker terminal = negative (-).
Tweeter Level Adjustment
0 dB = No Attenuation
-3 dB = Mild Attenuation
-6 dB = Moderate Attenuation
+
TW
-
First, determine where the speaker will be mounted. Next, make sure the
area has a at surface for the speaker to mount. Check the mounting depth
of the desired location (use page 4 for midrange mounting diminsions.) If
the speaker will be mounted in a door, roll the windows up / down and lock /
unlock the doors making sure there are no obstructions the speaker will hit.
Using the cut out template, mark the location for the speaker to be mounted.
With the tool of your choice cut out the marked hole. After the speaker has
been wired, place the speaker into the hole. Use supplied mounting hardware
to keep speaker in place.
For some applications
speaker grill will not be
• Large speaker terminal = positive (+).
• Small speaker terminal = negative (-).
used
9
Page 10

Peace of Mind
The Warranty
10
PNW-69CS2
In just the same way as being covered in honey and thrown into a dark pit
full of hungry woodchucks, people are scared of warranties. Lots of ne print.
Months of waiting around. Well, fear no more. This warranty is designed to
make you rave about AudioControl. It’s a warranty that looks out for you and
your client, plus helps you resist the temptation to have your friend Sparky,
who’s “good with electronics,” try to repair your AudioControl product. So go
ahead, read this warranty, then register the information at www.audiocontrol.
com/product-registration and include your comments.
Our warranty has conditional conditions! “Conditional” doesn’t mean
anything ominous. The Federal Trade Commission tells all manufacturers to
use the term to indicate that certain conditions have to be met before they’ll
honor the warranty. If you meet all of these conditions, AudioControl will,
at its discretion, repair or replace any AudioControl speaker products that
exhibit defects in materials and/or workmanship for one (1) year from the
date you bought it. We will repair or replace it, at our option, during that
time.
Here are the conditional conditions:
1. You must fully register your purchase within 15 days of the purchase date
by going to the AudioControl product registration page at:
www.audiocontrol.com/product-registration
Failure to register your product will negate the warranty.
2. You need to hold on to your sales receipt! All warranty service requires
original sales receipt documentation. The warranty only applies to
the original purchaser from an authorized AudioControl dealer. Note:
Products purchased from unauthorized dealers are not covered under
warranty.
3. The AudioControl speaker products must have originally been purchased
from an authorized AudioControl dealer. If an authorized AudioControl
dealer installs your AudioControl product, the warranty is extended to
two (2) years.
4. Our warranty covers AudioControl products that have been installed
according to the instructions in this manual.
5. You cannot let anyone who isn’t: (A) the AudioControl factory; or
(B) someone authorized in writing by AudioControl, service your
AudioControl product. If anyone other than (A), or (B) messes with your
AudioControl product, the warranty is void.
6. The warranty is void if the serial number is altered, defaced or removed,
or if your product has been used improperly. Now that may sound like a
big loophole, but here is what we mean by this: Unwarranted abuse is:
(A) physical damage (don’t use your product to pound in fence posts);
(B) improper connections (120 volts into the speaker terminals can fry
the poor thing). This is the best product we know how to build, but for
example, if you mount it to the front bumper of your car, drop it over
Niagara Falls, or use it for anchoring your boat, something will go wrong.
Assuming you conform to 1 through 6, and it really isn’t all that hard to do,
we get the option of xing your product, or replacing it with a new one, at our
discretion.
In the event that your product is out of warranty or not covered under our
warranty, you may request to have any damage repaired at our normal “Out of
Warranty” repair cost.
User Guide
Page 11
And Now a Word from our Legal Department
Legalese
The warranty above is the only warranty issued by AudioControl. This
warranty gives you specic legal rights, and you may also have rights that
vary from state to state.
Promises of how well your AudioControl product will work are not implied by
this warranty. Other than what we’ve said we’ll do in this warranty, we have
no obligation, express or implied. We make no warranty of merchantability or
tness for any particular purpose. Also neither we nor anyone else who has
been involved in the development or manufacture of the unit will have any
liability of any incidental, consequential, special or punitive damages,
including but not limited to any lost prots or damage to other parts of your
system by hooking up to the unit (whether the claim is one for breach of
warranty, negligence of other tort, or any other kind of claim). Some states do
not allow limitations of consequential damages.
For more information about this ne product, and for additional details of the limited
warranty and repair services, please visit www.audiocontrol.com
For technical questions, please visit www.audiocontrol.com/knowledge-base/
AudioControl, Inc.
22410 70th Avenue West
Mountlake Terrace, WA 98043 USA
Phone: 425-775-8461
email: [email protected]
©2023 AudioControl. All rights reserved.
As technology advances, AudioControl reserves the right to continuously change our
specications, like our Pacic Northwest weather, although we are working on changing
that as well.
11
Page 12
The End ( Thanks for hang'n in there)
PNW-69CS2
User Guide PN 913-188-0 Rev B
 Loading...