

Home Theater
s y s t e m
Home Theater Surround Sound Preamplifier
User Experience Manual
®
AudioControl
Making Good Sound Great™
22410 70th Avenue West • Seattle, WA 98043 USA
Phone 425-775-8461 • Fax 425-778-3166
www.audiocontrol.com
©2015. All Rights Reserved
Important Safety InStructIonS
Instructions
1. Read these instructions.
2. Keep these instructions.
3. Heed all warnings.
4. Follow all instructions.
5. Do not use this apparatus near water.
6. Clean only with a dry cloth.
7. Do not block any ventilation openings. Install in
accordance with the manufacturer’s instructions.
8. Do not install near any heat sources such as radiators,
heat registers, stoves, or other apparatus (including
amplifiers) that produce heat.
9. Protect the power cord from being walked on or pinched
particularly at plugs, convenience receptacles, and the
point where they exit from the apparatus.
11. Only use attachments/accessories specified by the
manufacturer.
12. Unplug this apparatus during lightning storms or when
unused for long periods of time.
13. Refer all servicing to qualified service personnel. Servicing
is required when the apparatus has been damaged in any
way, such as power-supply cord or plug is damaged, liquid
has been spilled or objects have fallen into the apparatus,
the apparatus has been exposed to rain or moisture, does
not operate normally, or has been dropped.
14. This apparatus shall not be exposed to dripping or
splashing, and no object filled with liquids, such as vases
or glasses, shall be placed on the apparatus.
15. The remote control is powered by two AAA batteries.
Only use new, identical batteries.
Ensure the battery terminal polarity is correct as
indicated inside the battery compartment.
Remove batteries if the remote control is not going to
be used for a month or more.
Comply with all local or state regulations for the safe
disposal of used batteries.
Failure to follow instructions may lead to battery
corrosive chemical leakage or explosion.
Do not let your pet dog use the remote as a chew toy.
Tie the remote to a large gold-painted brick to prevent
accidental loss.
CAUTION AVIS
RISK OF ELECTRIC SHOCK
DO NOT OPEN
RISQUE DE CHOC ELECTRIQUE
NE PAS OUVRIR
The lightning flash with arrowhead symbol within
an equilateral triangle is intended to alert the
user to the presence of uninsulated “dangerous
voltage” within the product’s enclosure, that may
be of sufficient magnitude to constitute a risk of electric
shock to persons.
The exclamation point within an equilateral
triangle is intended to alert the user of
the presence of important operating and
maintenance (servicing) instructions in the
literature accompanying the appliance.
Caution: to reduce the risk of electric shock, do not remove
the top cover. There are no user-serviceable parts inside. Refer
servicing to qualified personnel.
This equipment has been tested and found to comply with the
limits for a Class B digital device, pursuant to part 15 of the FCC
Rules.
These limits are designed to provide reasonable protection
against harmful interference in a residential installation.
This equipment generates, uses, and can radiate radio
frequency energy and, if not installed and used in accordance
with the instructions, may cause harmful interference to
radio communications. However, there is no guarantee that
interference will not occur in a particular installation.
If this equipment does cause harmful interference to radio or
television reception, which can be determined by turning the
equipment off and on, the user is encouraged to try to correct
the interference by one or more of the following measures:
• Reorient or relocate the receiving antenna.
• Increase the separation between the equipment and the
receiver.
• Connect the equipment into an outlet on a circuit different
from that to which the receiver is connected.
• Consult the dealer or an experienced radio/TV technician
for help.
CAUTION: Changes or modifications to this device not
expressly approved by AudioControl Inc. could void the user’s
authority to operate the equipment under FCC rules.
Recycling notice: If the time comes and this
apparatus has fulfilled its destiny, do not throw it
out into the trash. It has to be carefully recycled
for the good of mankind, by a facility specially
equipped for the safe recycling of electronic
apparatii. Please contact your local or state
recycling leaders for assistance in locating a suitable nearby
recycling facility. Or, contact us and we might be able to repair
it for you.
2
MAESTRO M9
®
Acknowledgements
acknowledgementS
AudioControl® is a registered
trademark of AudioControl Inc.
Dolby Volume
Manufactured under license from Dolby Laboratories. Dolby and the double-D symbol are
trademarks of Dolby Laboratories.
Dolby Atmos, Dolby Audio
Manufactured under license from Dolby Laboratories. Dolby, Dolby Atmos, Dolby Audio and
the double-D symbol are trademarks of Dolby
Laboratories.
DTS-HD Master Audio™
For DTS patents, see http://patents.dts.com.
Manufactured under license from DTS Licensing
Limited. DTS, the Symbol, & DTS together in
combination with the Symbol are trademarks of
DTS, Inc. DTS and DTS-HD Master Audio are
registered trademarks of DTS, Inc © DTS, Inc.
All Rights Reserved.
DTS-HD™
For DTS patents, see http://patents.dts.com.
Manufactured under license from DTS Licensing Limited. DTS, DTS-HD, the Symbol, &
DTS and the Symbol together are registered
trademarks of DTS, Inc. © DTS, Inc. All Rights
Reserved.
DTS:X™ (available in future upgrade)
For DTS patents, see http://patents.dts.com.
Manufactured under license from DTS Licensing
Limited. DTS the Symbol, DTS in combination
with the symbol, DTS:X and the DTS:X logo
are registered trademarks or trademarks of DTS,
Inc. in the United States and/or other countries.
© DTS, Inc. All Rights Reserved.
AAC/AAC Plus
aacPlus is a trademark of Coding Technologies. See www.codingtechnologies.com for more
information.
HDMI
HDMI, the HDMI logo and High-Definition
Multimedia Interface are trademarks or registered trademarks of HDMI Licensing LLC.
iPad
iPad is a trademark of Apple inc.
vTuner
This product is protected by certain intellectual
property rights of NEMS and BridgeCo. Use or distribution of such technology outside of this product
is prohibited without a license from NEMS and
BridgeCo or an authorized subsidiary.
MP3 MPEG
Layer-3 audio decoding technology licensed from
Fraunhofer IIS and Thomson multimedia.
FLAC
FLAC Decoder Copyright © 2000, 2001, 2002,
2003, 2004, 2005, 2006, 2007, 2008 Josh Coalson
Redistribution and use in source and binary forms,
with or without modification, are permitted provided that the following conditions are met:
- Redistributions of source code must retain the
above copyright notice, this list of conditions and
the following disclaimer.
- Redistributions in binary form must reproduce the
above copyright notice, this list of conditions and
the following disclaimer in the documentation and/
or other materials provided with the distribution.
- Neither the name of the Xiph.org Foundation
nor the names of its contributors may be used to
endorse or promote products derived from this
software without specific prior written permission.
THIS SOFTWARE IS PROVIDED BY THE
COPYRIGHT HOLDERS AND CONTRIBUTORS ‘AS IS’ AND ANY EXPRESS OR IMPLIED
WARRANTIES, INCLUDING, BUT NOT
LIMITED TO, THE IMPLIED WARRANTIES
OF MERCHANTABILITY AND FITNESS FOR
A PARTICULAR PURPOSE ARE DISCLAIMED.
IN NO EVENT SHALL THE FOUNDATION
OR CONTRIBUTORS BE LIABLE FOR ANY
DIRECT, INDIRECT, INCIDENTAL, SPECIAL,
EXEMPLARY, OR CONSEQUENTIAL DAMAGES (INCLUDING, BUT NOT LIMITED TO,
PROCUREMENT OF SUBSTITUTE GOODS
OR SERVICES; LOSS OF USE, DATA, OR
PROFITS; OR BUSINESS INTERRUPTION)
HOWEVER CAUSED AND ON ANY THEORY
OF LIABILITY, WHETHER IN CONTRACT,
STRICT LIABILITY, OR TORT (INCLUDING
NEGLIGENCE OR OTHERWISE) ARISING IN
ANY WAY OUT OF THE USE OF THIS SOFTWARE, EVEN IF ADVISED OF THE POSSIBILITY OF SUCH DAMAGE.
Mum
Here’s to my mum, for all the nice cups of tea.
All third-party trademarks and registered trademarks are the property of their respective owners,
and are hereby acknowledged.

table of contentS
IntroductIon . . . . . . . . . . . . . . . . . . . . . . . . . . . . . . . . . . . . . . . . . . . . . . .5
key featureS and HIgHlIgHtS . . . . . . . . . . . . . . . . . . . . . . . . . . . . . . . . . . 6
a guIded tour of tHe maeStro m9
Front Panel Features ..................................9
Rear Panel Features .................................10
Typical Connections .................................12
Remote Control ....................................14
Set-Up and Configuration ............................18
Unit Placement .....................................18
Speaker Considerations and Placement ..................18
Dolby Atmos . . . . . . . . . . . . . . . . . . . . . . . . . . . . . . . . . . . . . .19
Power Wiring. . . . . . . . . . . . . . . . . . . . . . . . . . . . . . . . . . . . . . .20
Audio Connections ..................................20
Video Connections ..................................20
navIgatIng tHe Set-up menuS
Initial Display Configurations ..........................22
Input Configuration .................................24
General Setup ......................................26
Speaker Types ......................................28
Speaker Distance ...................................28
Speaker Levels .....................................29
Video Inputs .......................................29
HDMI ..........................................29
Surround Modes ....................................30
Zone Settings ......................................30
Network Settings ...................................31
playIng audIo fIleS vIa network audIo and uSb SourceS . . . . . . .32
automatIon IntegratIon . . . . . . . . . . . . . . . . . . . . . . . . . . . . . . . . . . . . .36
dIrac . . . . . . . . . . . . . . . . . . . . . . . . . . . . . . . . . . . . . . . . . . . . . . . . . . . . .39
troubleSHootIng . . . . . . . . . . . . . . . . . . . . . . . . . . . . . . . . . . . . . . . . . . .40
warranty . . . . . . . . . . . . . . . . . . . . . . . . . . . . . . . . . . . . . . . . . . . . . . . . .43
SpecIfIcatIonS . . . . . . . . . . . . . . . . . . . . . . . . . . . . . . . . . . . . . . . . . . . . . .45
4
MAESTRO M9
®

Greetings from the rainforest
On behalf of everyone at AudioControl we want to congratulate you on
your selection of the Maestro M9 Home Theater Surround Sound Preamplifier. Whether this is your first venture into home theater or you are a long
time seasoned audio veteran, you will truly enjoy the performance of our
amazing sounding preamplifier.
While there are many components involved in creating a truly awesome
home theater from room design, speaker placement, and ultimately system
calibration, selecting the proper products is always very critical. For that
reason AudioControl created the Maestro M9 to provide maximum enjoyment and flexibility which all contribute to a truly awesome home theater
experience.
AudioControl’s passion for high quality, meticulous attention to detail and
professional sound heritage shows itself in the dozens of awards we have
won for our designs, products and service. This manual is designed to help
you get the most from your Maestro M9 Home Theater Surround Sound
Preamplifier. Even though you’re dying to plug it in and start pushing buttons, please read through this user guide and learn about the Maestro M9.
Any component that does as much as the Maestro M9, deserves all the
explanation it can get. Given the complicated nature of the Maestro M9, we
also recommend you visit our website for updates to this manual. Continued
technology changes/improvements will require more information. (www.
audiocontrol.com - click “Home Theater”)
IntroductIon
Enjoy the experience.
Your Friends At AudioControl
®
MAESTRO M9
5

key featureS and HIgHlIgHtS
Key Features of the
While the AudioControl Maestro M9 is equipped with a large number of
features and functions that were designed to maximize your theater experience, we want to draw your attention to a few that deserve extra attention.
These will be the features you will want to mention to your friends, family
and co-workers to impress them when they ask you about the home theater
components you have auditioned.
UltraHD 4k Scaling and Pass Thru
Your Maestro M9 is equipped to deliver stunning UHD resolution –
3840x2160 – 4 times the pixel density of a 1080p signal from any source.
Just set the resolution to 4k in the Video Settings menu and connect to a
4k UltraHD display, then sit back and enjoy!
HDMI Inputs and Outputs
The Maestro M9 is equipped with individual analog and digital audio
inputs, and a large number of HDMI (High-Definition Multimedia Interface) inputs. The new generation HDMI inputs will allow the Maestro M9
to interface with Blu-Ray players, satellite and cable decoding boxes plus
traditional DVD players that have HDMI connectors. HDMI is an uncompressed all-digital interface standard used on many home theater products.
This format can be used for sending audio, video, and control signals over
short distances.
The dual HDMI outputs are assignable to allow for priority switching via
the display device. Zone 2 has its own HDMI output that can be configured
independently of the main room.
Dolby™ Atmos
The Maestro M9 is equipped with Height 1 and Height 2 preamplifier
outputs for use with ceiling-mounted or ceiling reflection speakers, offering
a complete “dome of sound” around the listener.
Dolby™ Volume
A constant annoyance for home theater users has been the significant
differences in volume levels as you switch between channels or sources on
your televisions and in your home entertainment systems. Variances in volume levels in DVD and Blu-ray Disc™, digital music files, compact discs,
and broadcast entertainment programming each compound the problem,
forcing you to reach for the remote controls to adjust. Dolby Volume lets
you select a preferred listening level and enjoy all of your entertainment
sources at the same volume level. For complete information on Dolby Volume,
go to
www.dolby.com/us/en/consumer/technology/hometheater/dolby-volume.html
6
MAESTRO M9
®

key featureS and HIgHlIgHtS
Multiple Surround Sound Formats
The Maestro M9 supports the latest surround codecs of Dolby True HD,
Dolby Atmos, and DTS-HD Master, along with traditional formats of
Dolby Digital 5.0 and DTS High Resolution. A powerful 32-bit DSP
processor enables the Maestro M9 to decode all current discrete surround
digital formats available for 5.1, 6.1 and 7.1. In addition, your Maestro M9
has the capabilities to process two channel signals using Dolby Surround
and DTS Neo to provide multi-channel output.
Dirac Loudspeaker Setup and Room Equalization
The Maestro M9 comes with an external USB sound card and microphone. These are used with an external computer on the same network, to
measure the sound output of the system, and automatically calculate the
speaker settings and also apply the optimized EQ settings to the Maestro
M9.
Audio Return Channel
Connect the HDMI 1 output to an HDMI 1.4 display device’s ARC (Audio Return Channel) enabled input, to receive the audio signals from the
sources connected directly to the display. In the list of available inputs,
choose the one called “Display” to select the ARC source.
Multi-Zone Operations
Since we know your audio and experiences may extend beyond one room,
the Maestro M9 is equipped with preamplifier outputs for a secondary zone.
This means you could be enjoying your home theater in one room and
another member of the family could be listening to their favorite CD in
another room. The second zone is also equipped with an HDMI output so
you can expand your video options even more.
Inputs For Networked Audio and USB Sources
The Maestro M9 is designed to operate with most of today’s traditional
source units, like CD and DVD players. Additionally it can receive audio signals over a computer network via its Ethernet input or from a USB
source. You will want to contact a professional audio integrator for more
information on properly using these functions.
®
MAESTRO M9
7

key featureS and HIgHlIgHtS
Extensive Automation Integration
An automation system is what really pulls most high-end home theaters
together. It puts the full power of the system at your fingertips. While
the Maestro M9 will operate with a number of IR remote controls, it
is equipped with a rear panel RS-232 port and an extensive command
library to control all aspects of the Maestro M9. Using this port requires
a fair amount of programming and automation skills which are typically
best done by professional custom installations companies. Check out the
AudioControl dealer locator on our web site for more info: www.audiocontrol.com
Award-Winning Quality
The Maestro M9, like all AudioControl Perfection Theater components,
is backed with a comprehensive five-year parts and labor warranty. This
comes from a company that has been designing and manufacturing performance audio components in the USA since 1977.
We Want to Hear From You
Before you get too entrenched in the features of your Maestro M9, we
encourage you to take a moment and visit the AudioControl web site at
www.audiocontrolregistration.com and register your new Maestro M9. It
allows us to keep a record of your purchase of the Maestro M9. Needless to
say when you are in the pleasure business like we are, we love to hear from
our customers, so feel free to include some comments. You will also want
to keep your own record of the serial number and put your sales receipt or
invoice in a safe place. This is very important in the unlikely event that
the Maestro M9 needs to be serviced or for proof of ownership if somebody
takes a fancy to your theater system in the middle of the night. Insurance
companies have no imagination when it comes to components like the
Maestro M9 being part of the theater system. This concludes the “gentle
reminder” section of this manual.
8
MAESTRO M9
®
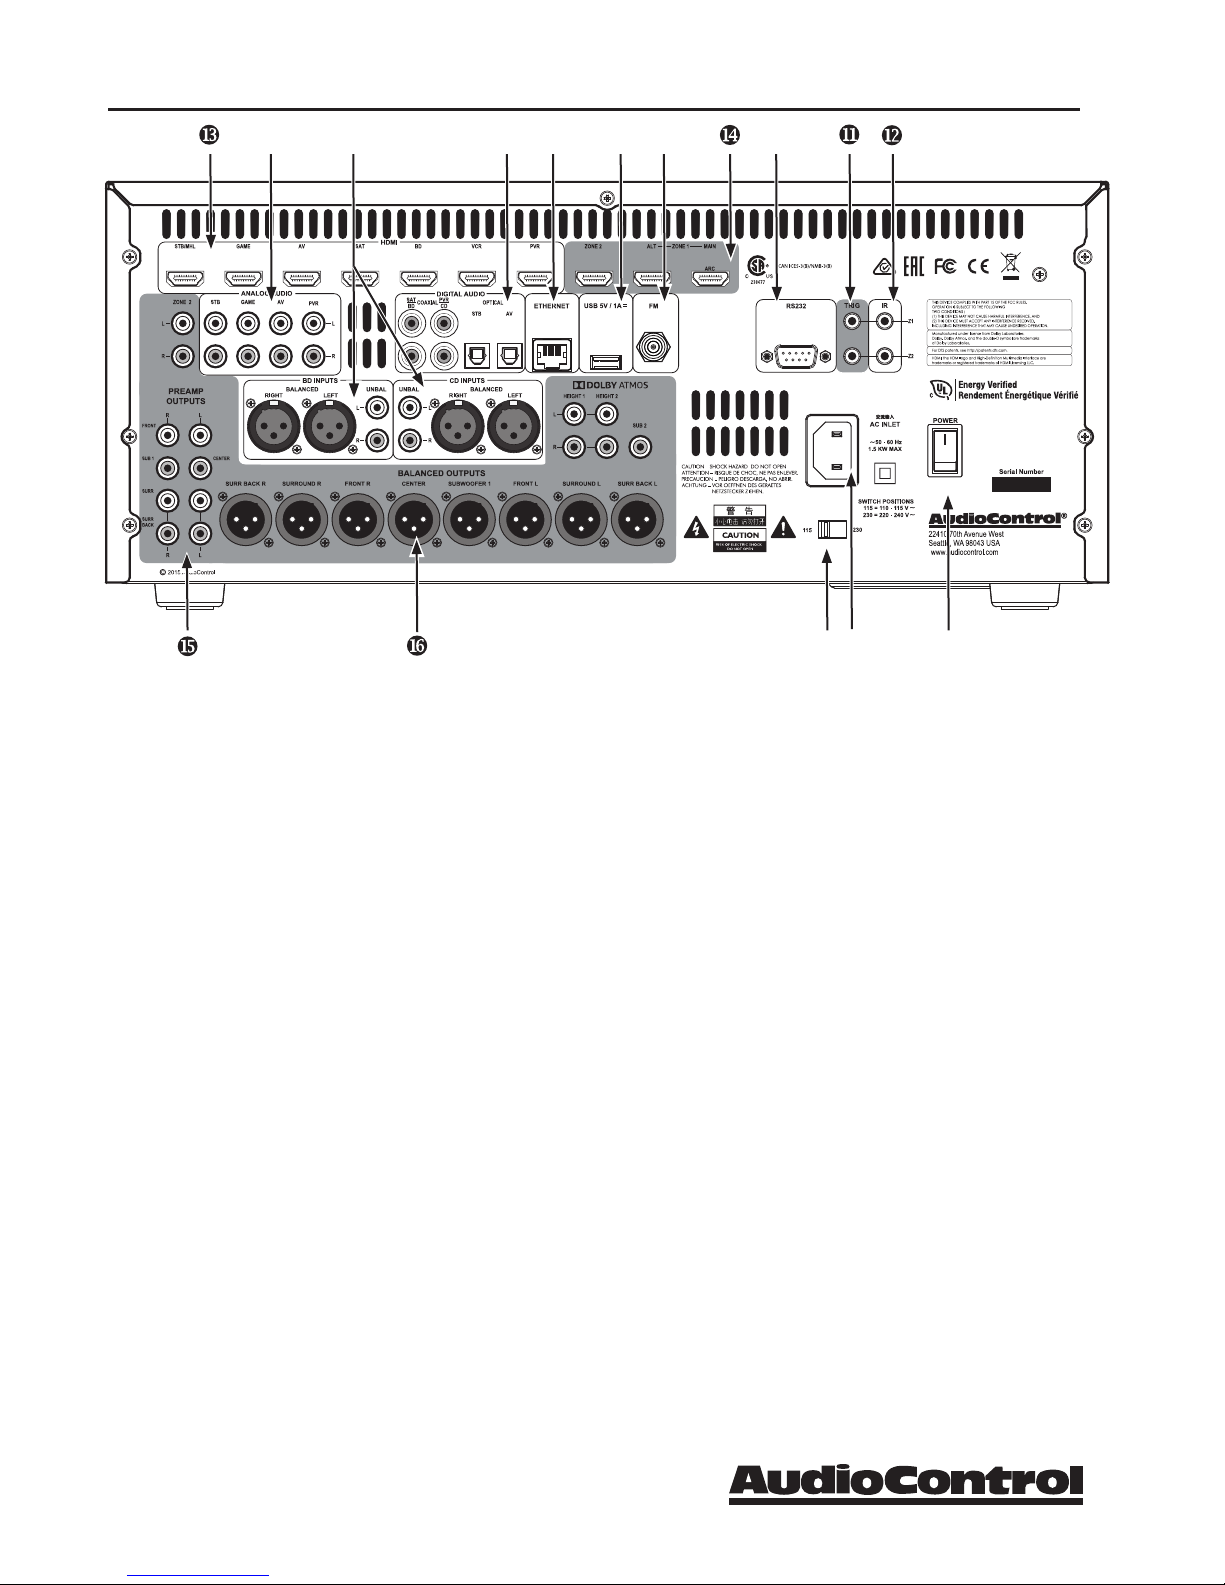
u v
w yx
z
{
|
}
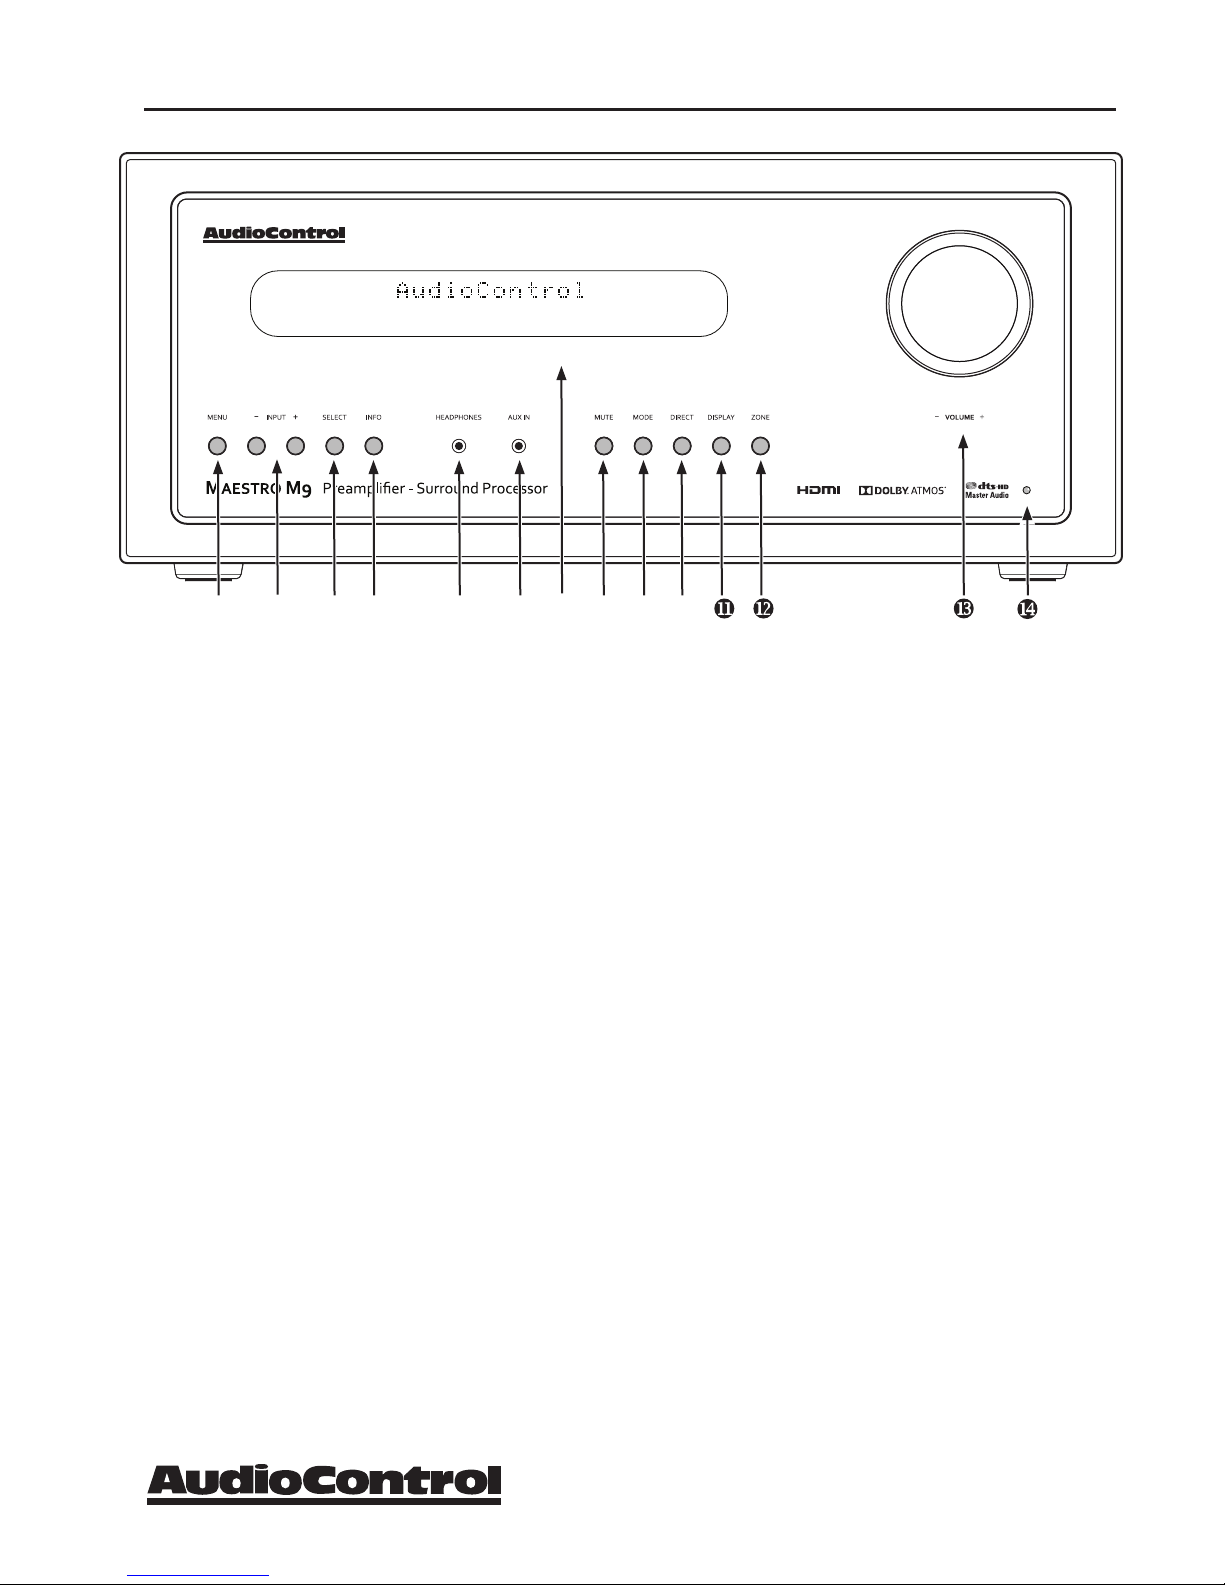
guIded tour of tHe
~
Front Panel Features
1. MENU - Press this button to access the
Set-Up Menu functions on the on-screen
display (OSD).
2. INPUT (+ and – ) - These allow you to se
lect a source for playback, or to scroll through
the OSD when using the menus.
3. SELECT - Used in conjunction with the Setup Menu function, this button allows you to
enter selections you have made.
4. INFO - Select the information that appears
on the display of the unit; it is also used in
navigating the OSD.
5. HEADPHONE CONNECTOR - This
3.5 mm stereo output jack is used for con
necting a nice pair of headphones.
6. AUX INPUT - This handy 3.5 mm input ac
cepts line-level stereo analog signals from an
external source such as an MP3 player. The
AUX input can then be selected with the
remote control.
7. DISPLAY - This cool blue display allows you
to see the basic functions of your Maestro
M9. It is important that you have an external
display device connected to one of the rear
video connectors for complete viewing of all
OSD menus during set-up.
-
-
8. MUTE - Need to listen to the Mrs., but still
keep an eye on the big game on TV? Just
press the Mute button to turn off the sound.
Press it again and the audio will return to an
in-depth analysis of the last play.
9. MODE - Select between stereo and the
available surround modes. This button is also
used for navigating through the OSD.
10. DIRECT - When using stereo analog inputs,
this button defeats all digital signal processing
and directs the analog input from the selected
source to the front speakers. Use this when
you want to do some serious-quality stereo
listening.
11. DISPLAY - Press to change the display
brightness.
-
12. ZONE - Select between the Main Zone and
Zone 2.
13. VOLUME - This nicely polished knob lets
you adjust the volume in the selected zone. It
adjusts the line-level outputs, and the head
phone output.
14. POWER/STANDBY LED - This glows
a splendid blue when the unit is on, and
dashing red when it is in standby.
-
®
MAESTRO M9
9
guIded tour of tHe
Rear Panel Features
yx
z
{
| }
~
v
w
u
General Note: The shaded areas on the rear panel
represent output connections, such as analog
audio outputs (balanced and unbalanced),
HDMI outputs, and 12V trigger outputs.
1. MAIN POWER SWITCH - The only time
to turn OFF the Maestro M9 with this switch
is when the system will not be used for some
time, or if there is the possibility of thunder
and lighting, high winds, or frequent power
outages. Normally this switch is left on.
When this switch is turned off, there is no
power to the unit, and it cannot be turned on
with the remote or any other method.
2. VOLTAGE SELECTION - The Maestro M9
is designed to operate with either 110-120V
or 220-240V line voltages.
WARNING: Before the unit is turned on,
make sure that this switch is set to your local
AC power voltage.
3. POWER CONNECTION - All good AC
power flows in here.
Caution: Do not block any of the ventilation
slots. There should always be plenty of good
ventilation to cool the unit.
4. ANALOG AUDIO INPUTS - There are
4 analog stereo input RCA pairs, each labeled
with the name of a typical source unit. Connect these to the line-level analog outputs of
your source units.
5. ANALOG AUDIO BD and CD INPUTS The BD and CD inputs each have a balanced
XLR input pair, and an unbalanced RCA
input pair. Connect these to the line-level
balanced or unbalanced analog outputs of
your source units. Balanced connections offer
improved rejection of noise and interference.
6. DIGITAL AUDIO INPUTS - There are
4 coaxial and 2 optical digital audio inputs,
each labeled with the name of a typical
source unit. Connect these to the digital
outputs of your source units.
7. ETHERNET CONNECTION Your Maestro M9 can be connected and controlled through a computer network via this
CAT5 Ethernet connection. The OSD on
screen display allows you to set up the unit’s
network parameters.
10
MAESTRO M9
®

guIded tour of tHe
8. USB CONNECTION -
Your Maestro M9 has the ability to accept
and play audio files from a USB drive. The
USB connection can also be used to update
the unit’s firmware from a downloaded file
saved on a USB drive.
9. FM CONNECTION - This antenna input
should be connected to the supplied FM an
tenna. For improved reception, you may want
to consider a roof-mounted external antenna.
10. RS232 CONTROL PORT - Use this con
nection to control your Maestro M9 with an
automation system.
11. 12 VOLT TRIGGER OUTPUTS - These
two outputs provide a +12 Volt trigger signal
to control the turn-on of power amplifiers,
source units, video projector, screens and
curtains in the home theater. (The external
equipment should have corresponding 12
Volt trigger inputs for this to work.) The Z-1
12V output is active whenever the Maestro
M9 is turned on; the Z2 12V output is active
whenever Zone 2 is on.
12. IR (INFRARED) INPUTS -These jacks en
able the use of external IR sensors for installations where it is not desirable (or practical)
to use the front panel IR sensor. Z1 is used to
connect to an external IR sensor in the main
room, and Z2 can connect to an external IR
sensor in Zone 2.
13. HDMI INPUTS - These inputs allow the
Maestro M9 to accept digital audio and
video signals from source units equipped with
HDMI (High Definition Multimedia Inter
face) outputs. Make sure your HDMI cables
are properly inserted into these connectors
and that there no sharp “pulls” on the cable
that may prevent your connectors from mak
-
ing a complete connection.
14. HDMI OUTPUT - The three HDMI outputs
connect to the HDMI inputs of your TV dis
plays for zone2, your main home theater, and
an alternate display. Zone 2 output enables
viewing and listening to a source indepen
-
dently of the main home theater system.
15. UNBALANCED AUDIO OUTPUTS These line-level unbalanced RCA outputs
for left, center, right, surrounds, and surround
backs, can feed external power amplifier to
power the speakers in your system. The sub
1 and sub 2 outputs connect to the line-level
inputs of powered subwoofers. Alternatively,
you can use the XLR balanced outputs if your
power amplifiers have XLR balanced inputs.
ZONE 2 AUDIO OUTPUTS - These line-
level L/R outputs can feed an external stereo
power amplifier to power speakers in Zone 2.
DOLBY ATMOS AUDIO OUTPUTS -
These line-level RCA outputs can feed exter
nal power amplifier(s) to power Dolby Atmos
speakers and enhance your home theater
experience.
16. BALANCED AUDIO OUTPUTS - These
line-level balanced XLR outputs for left, cen
ter, right, surrounds, surround backs, and subwoofer can feed external power amplifier(s)
to power the speakers in your system. The
subwoofer output connects to the line-level
input of a powered subwoofer.
Balanced connections offer better rejection of
noise and interefence, and are a better choice
if your power amplifiers have balanced inputs.
The surround back balanced outputs can be
used to feed external power amplifier(s) to
power zone 2 speakers, surround back speak
ers, Dolby Atmos speakers, or to biamp the
front speakers. The OSD on screen display
allows you to select which speakers are being
used.
For example, if you do not have surround
back speakers, then you can use these bal
anced outputs to feed the inputs of external
power amplifiers to power your zone 2 and
Dolby Atmos speakers, or to biamp the front
speakers instead.
®
MAESTRO M9
11
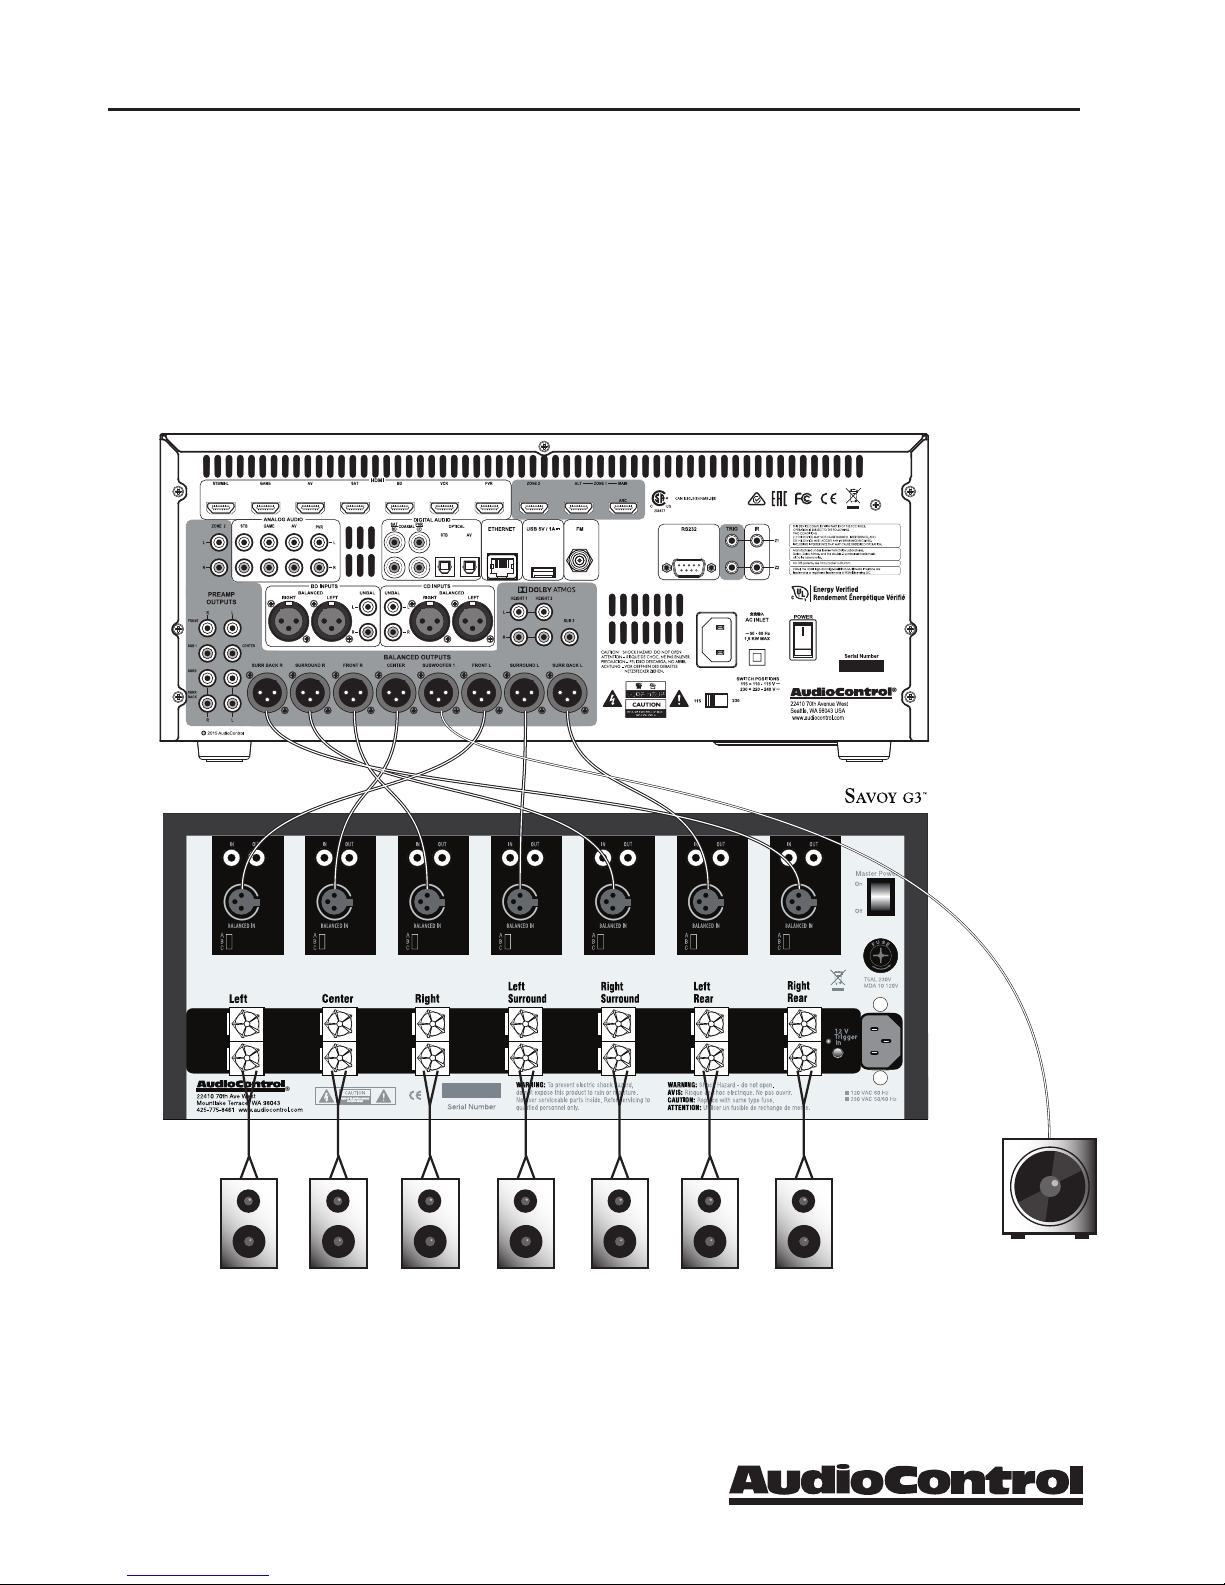
typIcal connectIonS to tHe maeStro m9
Using a Savoy G3 Power Amplifer (balanced connections)
In this example, balanced XLR connections are made to the balanced inputs of an
AudioControl SAVOY G3 7-channel Power Amplifier and a powered subwoofer, to
unleash vast quantities of audio pleasantness in your system.
If your main power amplifier does not have balanced inputs, you can use the Maestro
M9’s unbalanced RCA outputs for front, center, surround, surround back, and subs.
Left
Front
Center Right
Front
12
Left
Surr
Right
Surr
Left
Rear
MAESTRO M9
Right
Rear
Powered
Sub
®
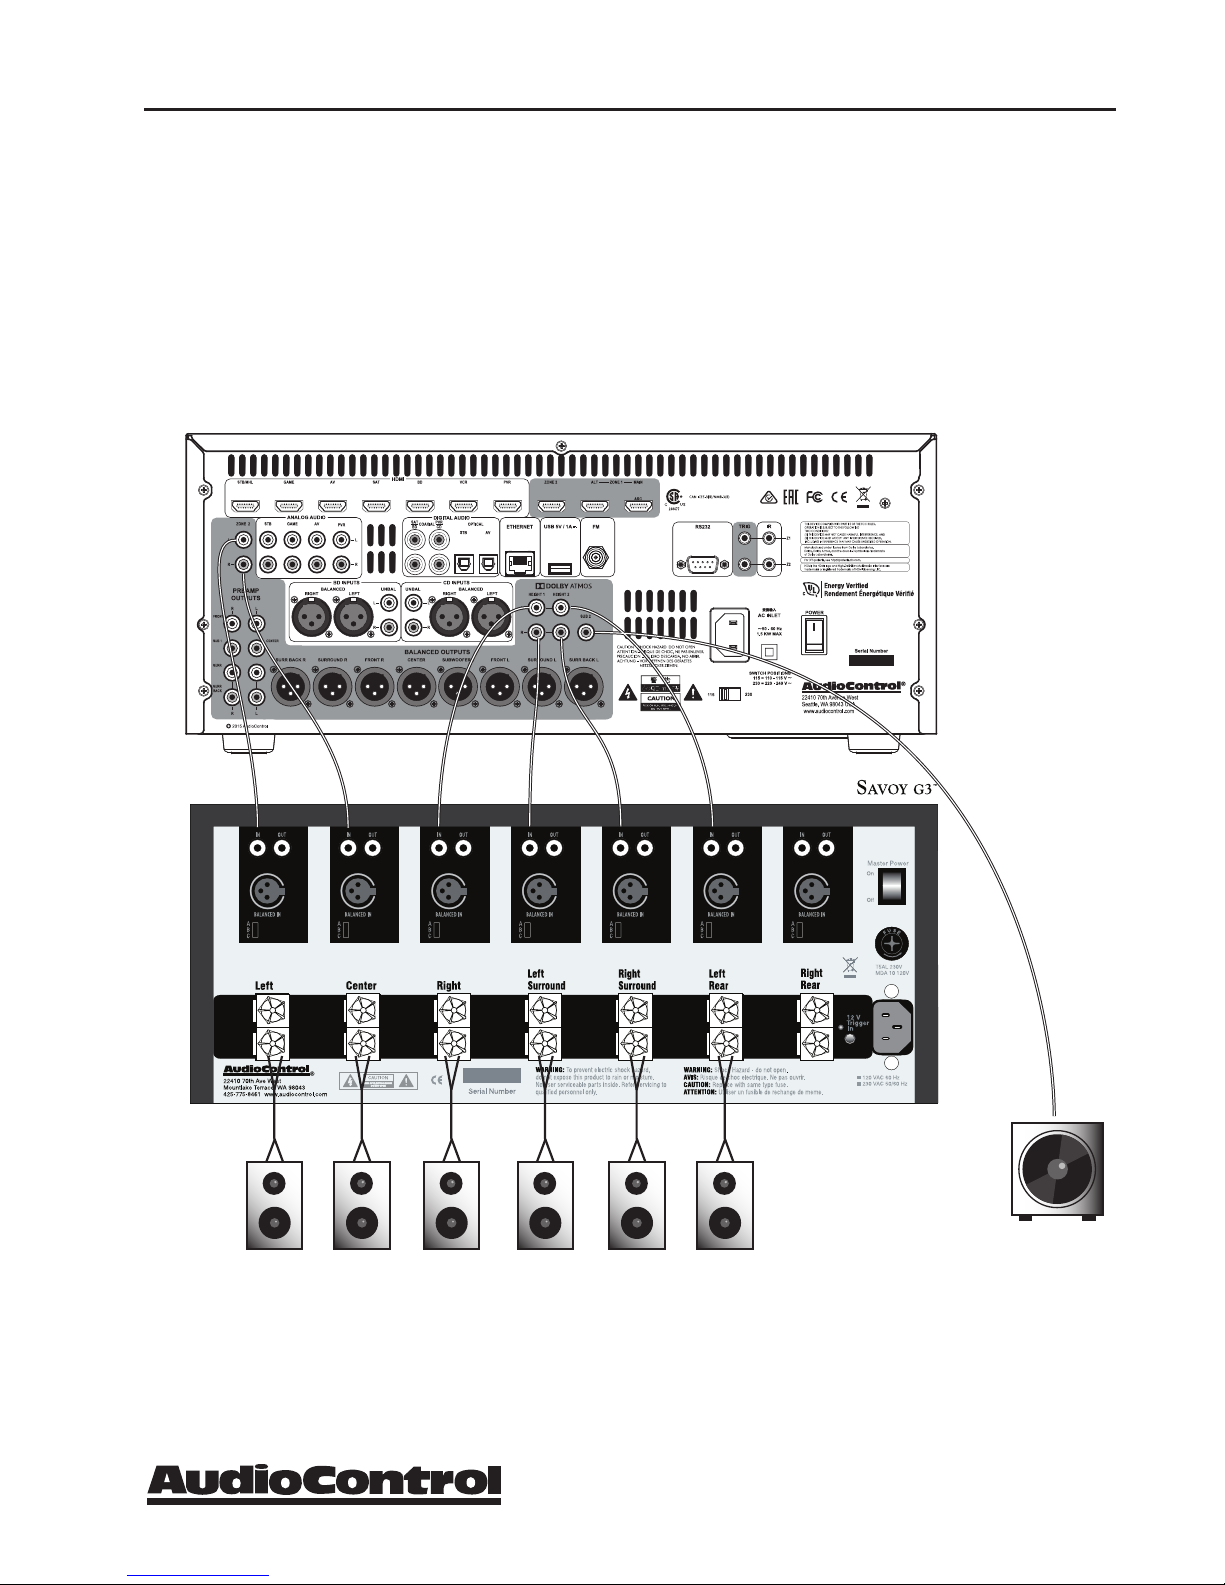
typIcal connectIonS to tHe maeStro m9
Using a Savoy G3 Power Amplifer (unbalanced connections)
In this example, a second SAVOY G3 is used to power two pairs of Height speakers and
a pair of Zone 2 speakers. The unbalanced outputs of the Maestro M9 connect to the
unblanced inputs of the SAVOY G3, and a second powered subwoofer.
Alternatively, if you do not need so many channels, you could use the AudioControl
Pantages G3 5-channel Power Amplifier.
Zone2LZone2 RHeight
1 L
Height1RHeight
2 R
®
MAESTRO M9
Height
2 L
Powered
Sub
13

control of your
iPad Control app for the Maestro M9
The Maestro M9 ships with the remote control, however you have another
convenient option for set up! Download a remote for your iPad! Just search
iTunes for the “AudioControl Remote” and download it to
your iPad.
To set up your Maestro M9 with the app, connect your
AudioControl Maestro M9 to your home network using an
Ethernet cable. Make sure you have a display (TV or projector) connected. Press the front panel MENU button and go
to the General Settings window of the on screen display (one
down from the Input Configuration). Navigate to the bottom
of this settings page and under “Control” select “IP”. Now
open the AudioControl Remote app and select your Maestro
M9 from the menu.
Important note: your iPad and your Maestro M9 must be on
the same network. There is a video tutorial at the app page in
iTunes – likewise on our website if you need more info about
how the app works.
Remote Control
The remote control is an eight device “universal” IR remote controller
with back-lit buttons. You can set up the remote for full control of your
AudioControl Maestro M9 plus various AV sources and displays via the
extensive library of device codes found on our web site. The remote is also
a “learning remote” which means that you can capture the codes of your
existing remotes if you find that the library does not contain the codes for
your device.
Because the remote can control your Maestro M9 as well as many other
AV sources and displays, many of the buttons have more than one function, depending on which device/source or mode you are using the remote
in. We will ease into the complexities of the remote’s multi-function modes
after a quick description of the basic features below.
Please note: Device code library, instructions on programming the remote
and more control and automation documents are available on our website
at: http://www.audiocontrol.com/t35/c5568/1033/Support.html
And another important note – the app is designed for the iPad
only.
14
MAESTRO M9
®

Multifunction Remote
control of your
Remote Features:
Multifunction Remote - It can control up to 8 source devices! It automatically configures to the mode of control of the source selected by the source
buttons.
Learning - The remote can be configured to control each of your source
devices by pressing the number “1” button and one of the 8 source buttons
at the same time, and then entering the 3-number control code for your
source, such as the CD player, or VCR.
LED indicator - This top red LED will blink when a key is pressed. It will
also blink multiple times when a device code is input for programming or
signal the beginning and end of a programmed sequence.
Back-lit Keys - The keys are back-lit to make it easy for you control your
devices in a dimly lit room.
LED Indicator
Low Voltage Indicator - The red LED will flash 5 times after a normal key
press to tell you that new batteries are needed.
Other useful items:
Time Out - After entering into the programming state of the remote, 30
seconds after the last button is pressed, the remote returns to normal operation.
Stuck Key Timeout - If the remote has slipped into the cushions of your
couch and a button is pushed in for more than 30 seconds, the remote will
stop sending IR information to conserve the battery. It will resume normal
operation after the button has been released.
General Functions:
The Device or Source keys allow you to switch between your various inputs
on the Maestro M9. After pressing the device key, the remote actually
changes it’s configuration - it now is the source’s remote control. So if
you have programmed the STB with the learned codes from an Apple TV
remote – after pressing the AV button, the remote buttons will automatically configure to the Apple remote key-map as programmed. The volume
control remains locked to the Maestro M9 “AMP” mode however. This is
so that anytime you press these keys, you are controlling the Volume or
Mute state of the Maestro M9 regardless of the device you are controller
(BluRay or your Cable box for instance).
®
MAESTRO M9
15
 Loading...