

Page 1

Bass Restoration Processor
Owner’s Enjoyment Manual
Greetings from the rainforest dwellers of the Pacic Northwest. We would like to
congratulate you on your purchase of The Epicenter Plus from AudioControl. As the
name suggests this processor is based on AudioControl’s legendary bass restoration
circuitry, appropriately named The Epicenter. Whether this is your rst AudioControl
product, or you are already a rm believer, the bass restoration enhancements of The
Epicenter Plus will leave you breathless. Extra octaves of deep, body shivering bass
can dramatically increase the enjoyment of your performance autosound system.
The Epicenter Plus is for audio enthusiasts who want to use their factory-installed
source units so it is equipped with AudioControl’s high-impedance, speaker-level
inputs. Additionally, an auxiliary input allows users of factory-installed radios and
portable audio players (like iPods™) to also appreciate the performance of its bass
restoration circuitry.
We are sure that by now the thought of adding The Epicenter Plus to your performance autosound system is probably making you salivate. However, we strongly
encourage you to take a few minutes to sit back, grab a beverage of your choice
and read through this manual. Although many autosound enthusiasts feel reading
an “owner’s manual” is only for novices, this particular manual may save you some
phone calls during the installation process. It also contains lots of useful facts and
information (and besides, we spent a lot of time writing it)!!
Key Features Of The Epicenter Plus
Here are a few key features that you will nd in The Epicenter Plus:
• Bass Restoration Circuitry
• Speaker-Level Inputs for Integration with Factory Audio Systems
• Auxiliary Input for iPod’s, MP3 players or Satellite radio tuners
• GTO™ Signal Sensing Inputs for Automatic Turn-on
• Bass Maximization Circuitry
• 12 volt trigger output
• Dash mount control
• PFM Subsonic Filter
• Balanced Pre-amp inputs
What all this means is more bass and better bass from your performance audio
system. Enjoy the ride…
®
22410 70th Avenue West • Mountlake Terrace, WA 98043 USA
Phone 425-775-8461 • Fax 425-778-3166 • www.audiocontrol.com
Page 2

Features and Highlights
Bass Restoration Circuitry
The Epicenter Plus contains AudioControl’s bass restoration circuit that recreates and injects low frequency information back into the signal path. What that
means in everyday terms is that The Epicenter Plus will give dramatically more
bass impact in your music regardless of whether your choice of format is compact discs, MP3, AAC, WAV, AIFF, AU, FKAC, TTA,WMA or good ol’ tapes.
For more on this unique process, see page 8.
Auxiliary Input
Since many car audio enthusiasts are multi-tasking listeners who want to use
secondary sources like iPods, MP3 players, and satellite radios, The Epicenter
Plus provides an auxiliary audio input for these devices. If you use this function, you will need to use a source that has its own volume control. The Auxiliary input is easily activated by tapping the dash control knob. You will be happy
to know that The Epicenter Plus has a cool blue LED indicator that will light
when the Auxiliary input is activated.
Speaker-Level Inputs
If you are like many people who enjoy the look and features of your factoryinstalled source unit but feel your system is lacking in power and bass, we have
good news. The Epicenter Plus has high-impedance speaker-level inputs that allow it to accept amplied signals from all known factory-installed systems (even
Bose) and output a high-quality pre-amp signal via standard RCA connectors.
This will allow you to add better-quality aftermarket ampliers, processors and
speakers while keeping the convenience features of your factory-installed source
unit. Unlike inexpensive speaker-level and line-output converters, The Epicenter
Plus offers the highest sound quality and can handle the full signal strength of a
400-watt per channel amplier.
GTO™ Signal-Sensing Inputs
Most factory-installed source units lack the features that make it easy to
upgrade with really good-sounding, performance aftermarket products. One
of those key features is a 12-volt trigger that will “turn-on” devices like The
Epicenter Plus and your external ampliers. Therefore, we have equipped the
speaker level inputs of The Epicenter Plus with our unique GTO™ (Great Turn
On) signal-sensing inputs. Once the GTO inputs of The Epicenter Plus detects a
signal, it powers up. When the signal goes away, The Epicenter
Plus will automatically turn off. Optionally, The Epicenter Plus is
also equipped with a standard 12-volt trigger (Remote In) that will
allow you to turn on The Epicenter Plus in the traditional man-
ner when you are using the pre-amp inputs.
page 2
Page 3

12-Volt Output Trigger
Since you will be using an external amplier(s) and processor in your system,
you will need the ability to “trigger” or turn-on these devices (a romantic dinner
won’t quite work here). The Epicenter Plus has a high-current 12-volt output
(labeled “Remote Out”) that will provide a trigger to these remote devices, when
The Epicenter Plus is powered up. Please note that this output is not to be used
as the main power for these devices.
Dash Mount Control For Source Selection and Bass Restoration
The Epicenter Plus is designed to be mounted anywhere in the vehicle, with
the exception of the radiator or front bumper. It comes with a dash-mountable
control that allows you to enjoy the bass-restoration effects of The Epicenter
Plus without having to leave the driver’s seat. Additionally, by just tapping the
switch, you can select between the main inputs (Pre-amp/speaker level) and the
auxiliary input. The LED turns cool blue when the auxiliary input is engaged.
PFM Subsonic Filter
This unique feature is legendary with many AudioControl fanatics for its
ability to ne tune the bass response of any system. Why waste power on nasty
subsonic information when your Programmable Frequency Match (PFM) lter
can help you clean things up?
Bass Maximization Circuitry
The Epicenter Plus circuitry has the ability to produce large amounts of deep,
mind shattering bass without damaging your speakers. The Bass Maximization
circuit allows The Epicenter Plus to maximize the bass output of any autosound
audio system while restraining destructive bursts. If your are a speaker, this is a
good thing.
Five Year Warranty
The most important feature of all. Every AudioControl product is selessly designed and manufactured by the occupants
of our rainforest factory. We take every effort to
ensure that you will have many years of enjoyment out of The Epicenter Plus. To further
ensure the performance of your new toy, we
highly recommend that you allow your authorized AudioControl dealer to perform the installation. Not only do they have
all the right knowledge and tools, but in the unlikely chance The Epicenter
Plus should fail, we back it with a limited ve year parts and labor warranty.
Should you choose to install it yourself, we will still give you a one year parts
and labor warranty. To activate your warranty, you need to FILL OUT AND
SEND IN YOUR WARRANTY CARD!
We also recommend that you save your invoice or sales slip as proof of
installation and ownership. Not only is it necessary for warranty purposes, but
should The Epicenter Plus turn up missing some day while you are out watching
submarine races, you will nd insurance companies very unforgiving.
page 3
Page 4

Quick Install Information
Integration With A Factory Installed Audio System
We interrupt your reading of this manual to provide the impatient people with
“Quick Install” information and guidelines. No matter how much more of this
manual you read, denitely look at the system drawings on page 10. Not only
will they help with system design, but if you look at them backwards you may
nd a hidden message (NOT!).
As you have probably gured out by now, The Epicenter Plus needs to be
installed in the signal path between a source and an external amplier(s). If your
factory installed audio system has an amplier, then use the speaker wires after
the factory amplier to feed a signal into The Epicenter Plus.
The Epicenter Plus also works the best when it receives a full range signal. If
you feel your bass response is somewhat lackluster, then the frequency response
of the signal you are feeding The Epicenter Plus may be too low. Try nding a
full range signal or use an AudioControl LC6i to sum the signals together.
Once this is done, you just need to hook up power, ground, trigger, run the
wire to the dash remote and tada!!! Instant bass. If you need to know more,
then read on. Heck if you don’t think you need to know more, you should still
read on, because you can never know too much.
Figure 1: Basic Installation Of The Epicenter Plus
We now return you to your normal owner’s manual…
page 4
Page 5

A GUIDED TOUR OF The Epicenter Plus
The Outside
1. Auxiliary Input: This RCA connection can accept any two-channel audio
signal that comes from secondary source devices like an iPod, MP3 player, or
Satellite radio. To activate this input, you need to tap the dash control and The
Epicenter Plus will switch between the main inputs and this auxiliary input. The
LED indicator above the “Aux Input” will identify when this input is being used.
2. Speaker-level Inputs: If you would like to use The Epicenter Plus with a
factory-installed source you will be happy to know that it is equipped with AudioControl’s high impedance speaker-level inputs. These inputs should get their
signals from the full-range speaker-level outputs of your factory-installed source
unit or amplier. If your source unit has front, rear, and subwoofer speaker-level
outputs, then you may need to use an AudioControl LC6i, LC7 or LC8 to sum
these signals together.
3. Audio Pre-Amp Inputs: The pre-amp inputs of The Epicenter Plus use a
balanced input circuit to help minimize induced noise. They are also designed
to handle very high signal voltages up to 15 volts!! When these inputs are
activated, the “Main Inputs” LED will be Red. When using these inputs you will
want to provide The Epicenter Plus with a full range signal.
➎
➊
Figure 2: The Epicenter Plus top cover
➋
➌ ➍
➏ ➐ ➑ ➒
page 5
Page 6

4. Pre-Amp Outputs: These RCA connectors should be connected to the
next component after The Epicenter Plus, such as a crossover, equalizer, or
amplier.
5. Restoration Level Control/Source Selector: This knob allows you to increase or decrease the bass restoration of The Epicenter Plus. Additionally, tapping the knob will toggle between sources. You can mount the knob anywhere
you want, although somewhere in the front of the vehicle is preferable.
6. Remote Out: Outputs 12 volts when the The Epicenter Plus is powered up
so you can turn on external devices like signal processors and external ampliers
or relays if necessary. Do not use for system power!!
7. Remote In: Allows The Epicenter Plus to be turned on remotely with a 12volt signal.
8. +12 Volt: Connect to a good source of power (the battery comes to mind).
9. Ground: Connect to a good, veried chassis ground (once again, the bat-
tery comes to mind.) Warning: Factory ground wires typically already have
multiple devices connected to them and are not recommended.
The Inside
RCA Input Grounding: Depending upon the wiring topology of your audio
system, some components may look for an “audio” ground through the RCA
connectors or speaker wires. In this case your system may encounter engine
noise whine. For most systems you can leave this jumper set in the UNBALANCED position. In the event you need additional noise rejection you can
change the jumpers to the BALANCED position.
Ground Isolation Jumpers: Occasionally alternator whine may appear in a
system because the source unit and amplier use different grounding. To help in
this situation, we have provided alternative grounding connections. Make sure
your system is turned OFF before you move these jumpers.
Bass Maximization Circuit: Not all systems are designed the same. Some
systems are designed strictly for SPL (sound pressure level) while others are
a little more passive. The Bass Maximization circuit can either increase or
decrease the mix signal voltage of the bass restoration circuit. Depending upon
your system, you may opt to change these jumpers to a higher or lower setting to
maximize your bass output and protect your speakers. In most systems the factory setting will suit you ne. We recommend you try the factory setting rst.
PFM Subsonic Filter: The Epicenter Plus utilizes a PFM (Programmable
Frequency Match) lter which will help with speaker control and amplier
power management. To change the PFM frequency, you need to remove the top
of the chassis and change the modules. Your local AudioControl dealer generally carries an assortment of these replacement modules. This is discussed in
detail on page 10. Once again, we recommend you try the factory setting rst.
page 6
Page 7
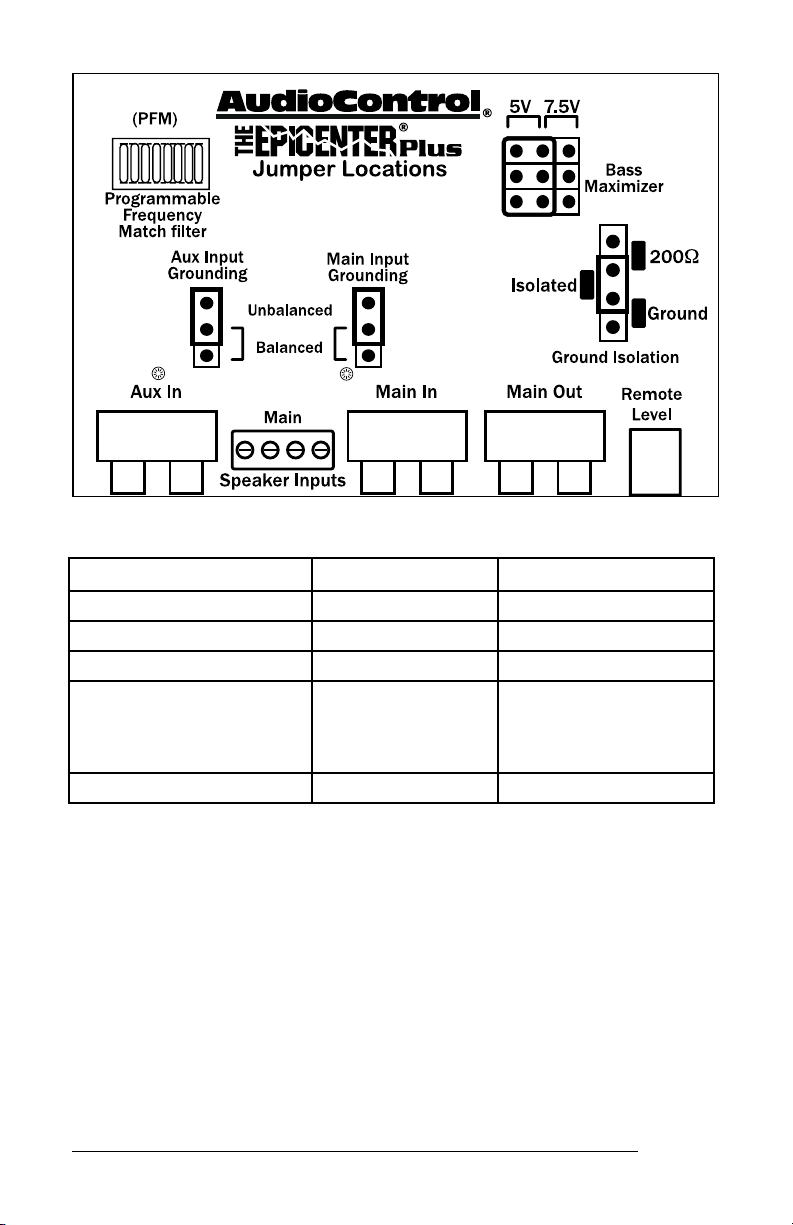
Figure 3: Inside view of The Epicenter Plus
Factory Setting Shipped Options
Bass Maximization Voltage 5 volts 5 or 7.5 volts
Input Circuit Unbalanced Balanced
Ground Isolation Isolated 200 ohm or Ground
PFM Subsonic Filter 33Hz 20Hz, 25Hz, 30Hz,
35Hz, 40Hz, 45Hz
Optional PFM modules are
sold separately.
Choice of beverage Micro-brew Latté
Note: These congurations can be changed by moving jumpers, or changing
modules.
page 7
Page 8
The Magic Of The Epicenter Bass Restoration Technology
You may ask yourself, “Why would I need to restore bass? Where did it go?
Who took it and more importantly, “How do I get it back?”. The truth is that
when music is recorded in a studio, low frequency information can be “mixed”
down or ltered out. It’s not that recording engineers are out to get you; in fact
they are looking out for your best interests and are concerned that many speaker
systems cannot handle “truly” low bass information.
Portable Audio Owners Rejoice!
If you use a portable audio player like an iPod or other MP3 player then
you will really love the Bass Restoration characteristics of The Epicenter Plus.
When you download songs and rip or “compress” them, you may notice that
your bass sounds rather thin, even on tiny ear buds. That’s because when you
are removing “bits” and ripping songs into smaller les, the bass response ends
up suffering.
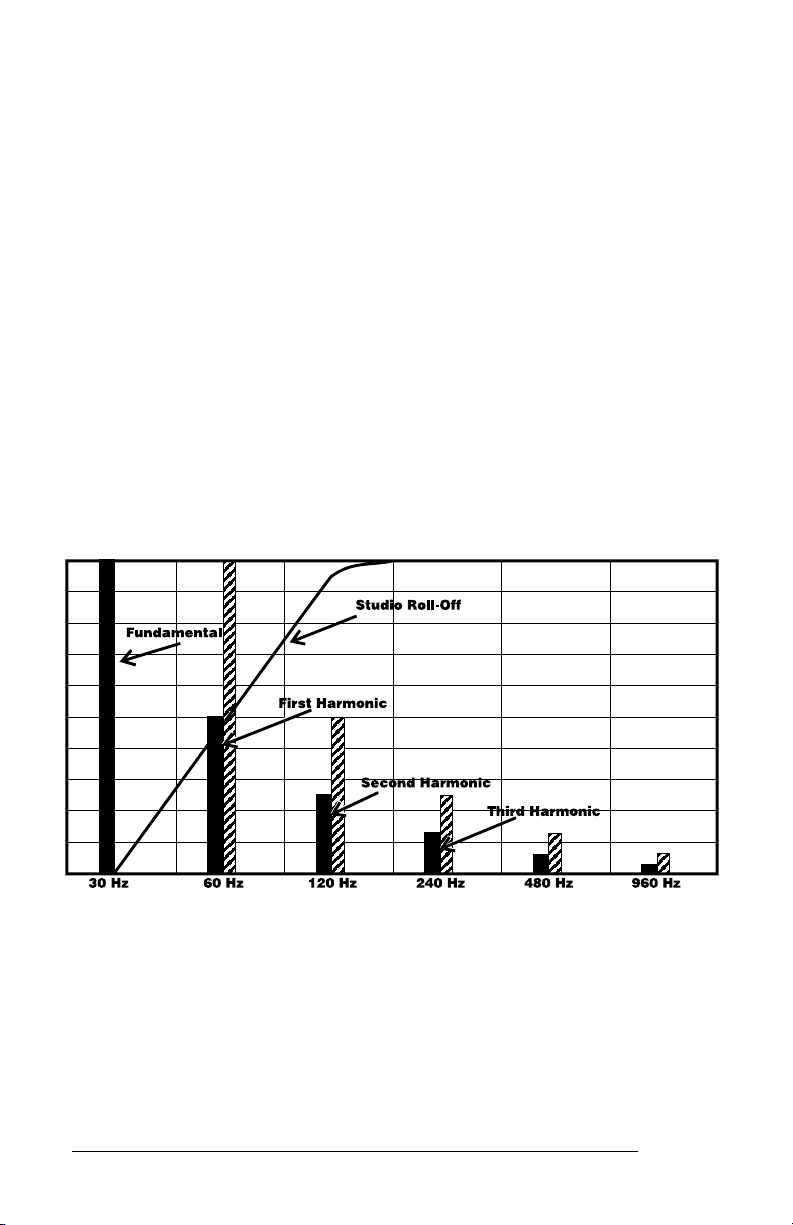
The unique bass restoration circuit inside The Epicenter Plus looks at the low
frequency harmonics that are in upper frequencies and uses them to recreate the
lower bass notes that have been rolled off or removed. We could tell you more
but what really matters is that The Epicenter Plus technology gives you deep,
body shuddering, heart-stopping bass.
Figure 4: Bass Restoration Process
Installing The Epicenter Plus
Up to this point everything you have read has served to educate you on the
operations of The Epicenter Plus. We are sure that you are chomping at the bit
to install The Epicenter Plus so we recommend you read the following sections
very carefully.
page 8
Page 9

Placement & Mounting of The Epicenter Plus
The Epicenter Plus can be physically installed in numerous locations like
behind your dashboard, under a seat, or even in the trunk. Since you will be
connecting to pre-amp outputs or speaker wires from the source unit or its
amplier(s), you should select a location that is convenient for wiring. Once
you have selected a permanent mounting location, position the unit and mark
the appropriate mounting holes with a felt-tip pin or scratch awl. Before doing
anything else, make sure you are not about to drill a hole in a gas tank or pierce
any existing wiring. Nothing ruins your day more than an expensive repair bill.
Drill a few small pilot holes and secure the chassis of the The Epicenter Plus
with self-tapping screws. If it is possible, for maximum ground isolation you
should try and avoid mounting The Epicenter Plus to metal.
The Epicenter Plus Power Wiring
WARNING: Failure to disconnect the negative terminal of your battery prior
to the installation of The Epicenter Plus can result in a warm tingly feeling.
(+12V) Positive Connection: Insert a 12 to 18 gauge wire into the connec-
tor labeled “+12” on the nifty connector of The Epicenter Plus. Connect it to a
good constant source of 12 volts (we suggest the battery), fused at 2 amps.
Ground Connection: Use the same gauge wire or larger as you did for the
positive connector and run it from the “Ground” connector on your The Epicenter Plus to the negative terminal of the battery, a ground bus, or a veried ground
location. The factory head unit ground is not a good ground!
Remote In: As we previously mentioned, The Epicenter Plus is equipped with
AudioControl GTO™ signal sensing which allows it to turn on when it detects
a signal at the Main speaker-level inputs so you may not need to use the “Remote In” feature. If you do, connect a 22 to 18 gauge wire from the source unit’s
remote turn-on or other trigger to the Remote connector on The Epicenter Plus.
Remote Out: If you are going to use the The Epicenter Plus to turn on any
external signal processors or ampliers, connect an 18 to 22 gauge wire from the
Remote Out on the The Epicenter Plus to the remote turn-on of the processors
or ampliers. Depending upon how many other components you are turning
on, you may need to connect this wire to a relay and route 12 volts from another
source.
Once the electrical connections are complete, you will want to reconnect the
negative terminal to your battery, however continue to act positively.
The Epicenter Plus Audio Wiring
The Epicenter Plus should be installed in the signal path after your factory
source unit or amplier but denitely before your aftermarket ampliers and/or
any signal processors. You may already have guessed there are numerous ways
to congure The Epicenter Plus in your audio system so we recommend you
spend a little quality time planning out your system and even sketching it out on
paper. There are some examples on the next pages.
page 9
Page 10
System Diagrams
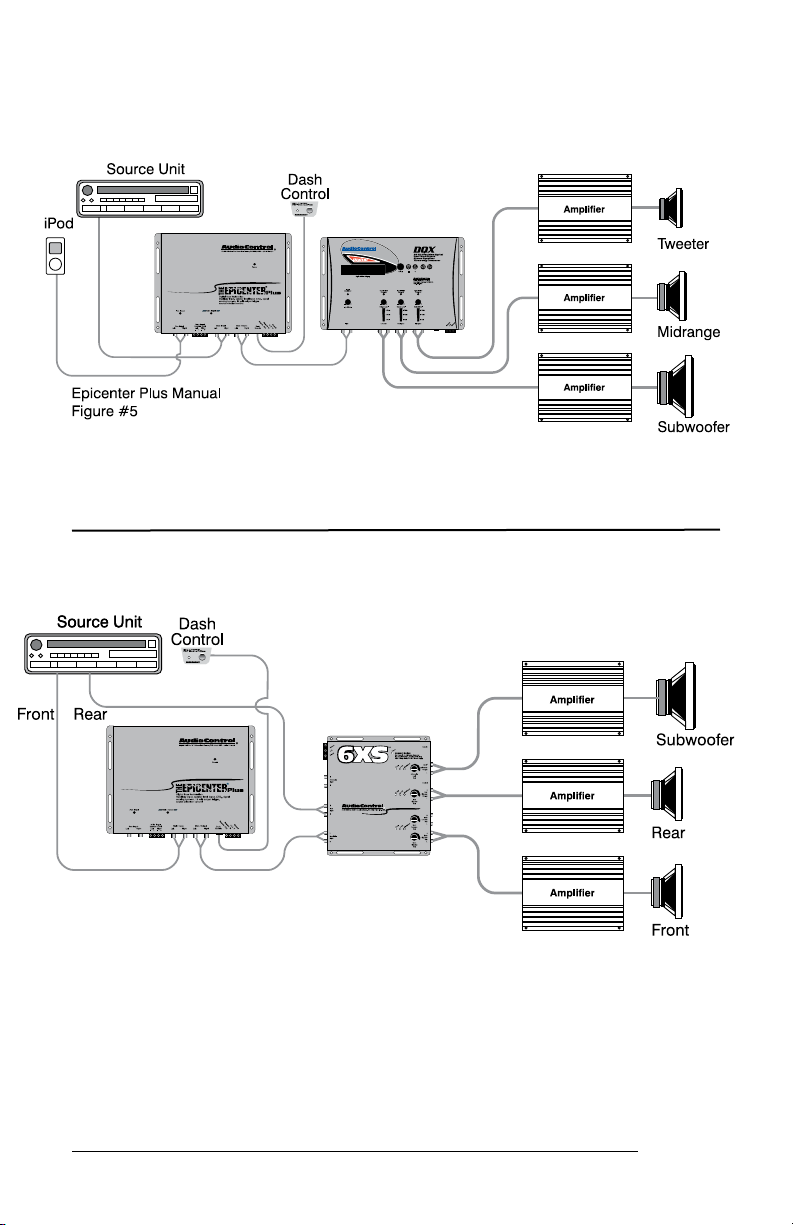
Figure 5: Two channel system with equalizer and crossover
Figure 6: Four channel system with crossover
page 10
Page 11
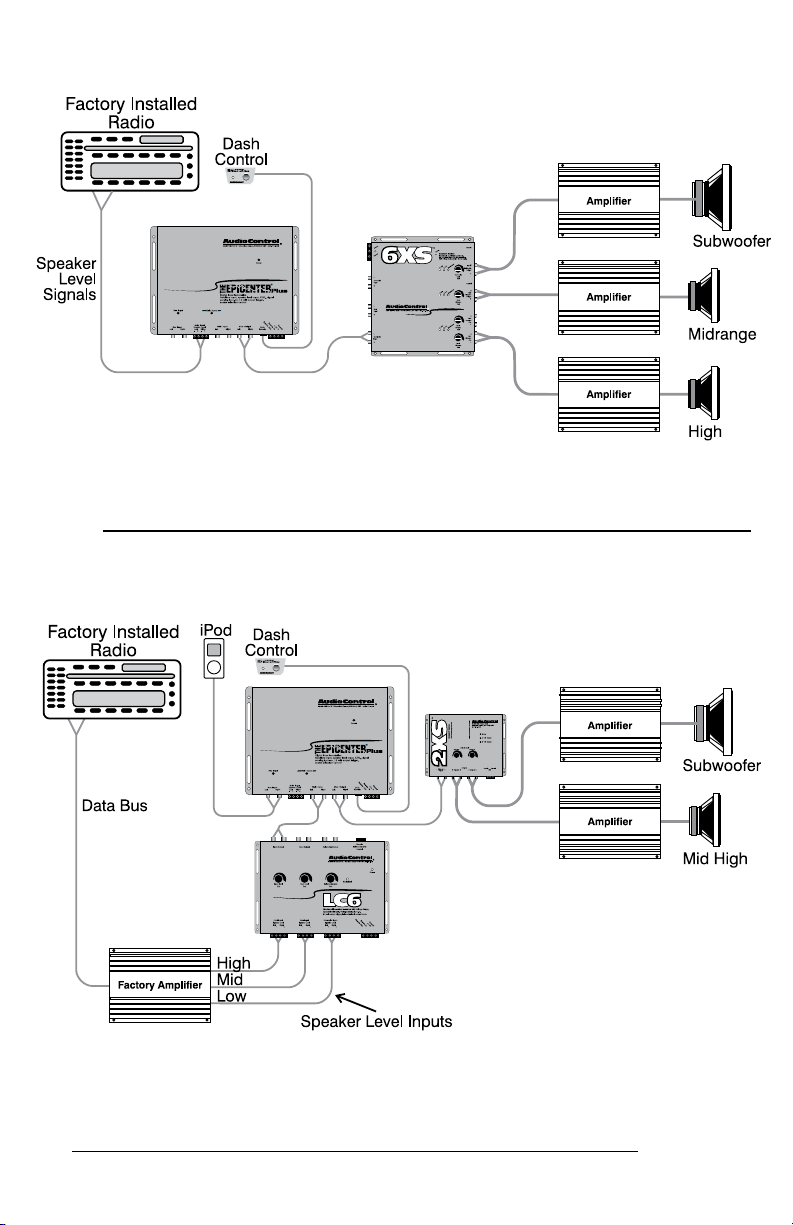
Figure 7: Interfacing with a factory installed radio plus a 6XS crossover
Figure 8: Interfacing with a factory installed radio/amplier using an
AudioControl L6i for signal summing
page 11
Page 12

Using The Speaker-Level Inputs
The Epicenter Plus is designed to accept an amplied, speaker-level signal
from a factory source unit or amplier. You will want to refer to a factory
service manual or wiring-harness schematic to determine which wires are the
speaker wires for your system. If you are unsure which wires are the speaker
wires, it is recommended you look at the color of the speaker wire connected to
the speakers and follow them back to the factory source or amplier. Connect
the speaker wires to the Speaker-Level Inputs on The Epicenter Plus. Make sure
to get your “pluses” and “minuses” connected properly.
Auxiliary Input
Many car audio enthusiasts have a number of sources of music above and
beyond their factory-installed source unit. Believe it or not, downloading music
from the Internet onto an iPod or an MP3 player is getting more and more
popular. By last count there were only 100,000,000 plus users! To help users
interface with any secondary stereo source, The Epicenter Plus is equipped with
an auxiliary two-channel input. To activate this input, you simply need to tap the
dash control knob and The Epicenter Plus will switch between the main inputs
and this auxiliary input. The bright LED indicators on The Epicenter Plus will
identify which source unit is being used.
control will turn bright blue when the auxiliary source is selected. You will still
need to use the volume control on your source unit when you switch between your
iPod and the main radio inputs, so the volume level won’t blow your ears off.
Additionally the light on your dash
Dash Control For Source Selection & Restoration Level
Placement And Mounting
The dash control may be mounted under the dash using its own
bracket or through a custom hole in the dash. It should be within
reach of the driver and in a spot where the LED is plainly visible.
Dash Bracket Installation
The dash control mounts with two
screws, which attach to the underside of
the dashboard. Slide under the dash and
place the dash
control in its mounting position.
Mark the two mounting holes,
drill pilot holes, and secure
with two screws.
Custom Installation
For that custom, nished look, the dash control can be ush mounted directly
on the dashboard (or anywhere else). We have provided an extra label to help
make this happen. Referencing Figure 8, disassemble the dash control from the
mounting bracket. Start by pushing the LED from its holder followed by removing the circuit board and rotary control from the bracket. Drill a 9/32 hole in the
dashboard for the control along with a 1/8 hole for the lock tab and a 13/64 hole
Figure 8: Dash Control Assembly
page 12
Page 13

for the LED holder. Reassemble the dash control components on the dashboard
and apply the new label over the openings.
Setting The Bass Maximization Control
The Epicenter Plus is the most powerful bass processor in the history of
autosound. Able to leap tall buildings with a single bound and all that kind of
stuff. With that in mind we have equipped The Epicenter Plus with two different
Bass Maximization selections. If you should need to change the settings, please
use the chart below for guidance. A word of advice: listen to the factory setting
before changing your Bass Maximization settings.
Recommended Settings
Setting Amplier Input Voltage Minimum Speaker Size
5 Volt 5 volts or less 10”
7.5 Volt 7.5 volts or less 12”
PFM Subsonic Filter
Many car audio systems truly push the limits of their subwoofer...without
really knowing it. Tuned enclosures affect the roll-off of many speakers, yet
lots of source material forces the speakers to play lower than expected. The net
result is wasted amplier power and damaged speakers. The AudioControl PFM
(Programmable Frequency Match or Pure F#@&% Magic) lter is a programmable subsonic lter. It allows you to let the speaker play only as low as it
should be playing. Because every system is different, we allow you to change
the PFM roll-off frequency to whatever you choose.
On most systems, the factory installed module (33Hz) is ne. If you know
the tuning frequency of your speaker enclosure (porting frequency or 3dB down
point), you might try setting your PFM module to that frequency. If you want to
protect your speaker system even more, you might even try a higher frequency.
Often a higher frequency actually sounds louder and cleaner.
TROUBLESHOOTING
No Power
Check the “Power” light on the chassis of The Epicenter Plus. If the “Power”
light is on, you will want to check to make sure that the cable connecting the
dash remote to the chassis is not pinched or disconnected. If the “Power” light
is off, check to make sure that the power wire and remote turn on wires are connected or a fuse has not blown.
No Bass Restoration
When your system is playing and yet you don’t hear any difference in the
sound, try turning the knob clockwise. If you still don’t hear any affect, then
you need to make sure that you have The Epicenter Plus in the right part of the
signal chain. It must be installed BEFORE any crossovers in the system for
best, thundering performance.
Note: If you are using a source unit with a built in crossover or processor,
you must run a full range output to The Epicenter Plus’ inputs. If you are not us-
ing the GTO™ circuit, make sure you have the 12 volt trigger connected.
page 13
Page 14

No Sound
Check the source selection LED’s on The Epicenter Plus chassis and/or the
dash control. If you have the auxiliary input selected but you are not using and a
secondary source you will get no sound. Tap the dash control to change inputs.
Sounds Distorted
Should your system sound distorted or your speakers are moving way too
much, you should decrease the amount of bass restoration by turning the dash
control knob counter-clockwise. You should also raise the PFM frequency or
lower the setting on your Bass Maximization control.
Still Distorted
If you still have distortion, you should power down The Epicenter Plus,
remove the cover and change the Bass Maximization setting to a lower position
(i.e. 5 volts).
IF YOU LIKE The Epicenter Plus, YOU’LL LOVE . . .
The DQX six-channel equalizer/crossover, is the perfect trunk mount digital
processor for those of you
who want to improve the
sound and detail of your vehicle. Less than ideal factory
speaker locations can make
even the best speaker systems cry out for help. The
equalization controls on the
DQX provide you with an
ideal amount of tone control
to tame even the most challenging acoustical situations.
The DQX offers 30 bands of precise equalization control for each channel plus a
3-way crossover with breath takingly steep 24dB-per-octave slopes. If performance is important to you, then you will appreciate the DQX. In addition, our
optional DDC Digital Dash Control allows
you to control all of the functions of your
AudioControl digital processor from the
convenience of your driver’s seat including
accessing the eight non-volatile memories.
page 14
Page 15

And now a word from our legal department….
THE WARRANTY
People are scared of warranties. Lots of ne print, months of waiting around. Well
fear no more, this warranty is designed to make you rave about us to your friends. It’s a
warranty that looks out for you and helps you resist the temptation to have your friend,
“...who’s good with electronics”, try to repair your AudioControl product. So go ahead,
read this warranty, then take a few days to enjoy The Epicenter Plus before sending in the
warranty card and comments.
“Conditional” doesn’t mean anything ominous. The Federal Trade Commission tells
all manufacturers to use the term to indicate that certain conditions have to be met before
they’ll honor the warranty. If you meet all of the conditions, we will warrant all materials
and workmanship on The Epicenter Plus for one year from the date you bought it (ve
years if it is installed by an authorized United States AudioControl dealer). We will x or
replace it, at our option, during that time.
Here are the conditional conditions:
1. You have to ll out the warranty card and send it to us within 15 days after purchas-
ing The Epicenter Plus.
2. You must keep your sales receipt for proof of purchase showing when and from
whom the unit was bought. We’re not the only ones who require this, so it’s a good habit
to be in with any major purchase.
3. The Epicenter Plus must have originally been purchased from an authorized AudioControl dealer. You do not have to be the original owner, but you do need a copy of the
original sales slip.
4. You cannot let anybody who isn’t: (A) the AudioControl factory; (B) somebody authorized in writing by AudioControl to service The Epicenter Plus. If anyone other than
(A) or (B) messes with The Epicenter Plus, that voids your warranty.
5. The warranty is also void if the serial number is altered or removed, or if The Epicenter Plus has been used improperly. Now that sounds like a big loophole, but here is
all we mean by it.
Unwarranted abuse is: (A) physical damage (don’t use The Epicenter Plus for a car
jack stand); (B) improper connections (120 volts into the power jack can fry the poor
thing); (C) sadistic things. This is the best mobile product we know how to build, but if
you mount it to the front bumper of your car, something will go wrong.
6. If an authorized United States AudioControl dealer installs The Epicenter Plus, the
warranty is ve years otherwise the warranty is one year.
Assuming you conform to 1 through 6, and it really isn’t all that hard to do, we get the
option of xing your old unit or replacing it with a new one.
LEGALESE SECTION
This is the only warranty given by AudioControl. This warranty gives you specic
legal rights that vary from state to state. Promises of how well The Epicenter Plus will
perform are not implied by this warranty. Other than what we have covered in this warranty, we have no obligation, express or implied. Also, we will not be obligated for direct
or indirect consequential damage to your system caused by hooking up The Epicenter
Plus.
Failure to send in a properly completed warranty card negates any service claims.
page 15
Page 16

Specifications
All specications are measured at 14.4 VDC (standard automotive voltage). As technology
advances, AudioControl reserves the right to continuously change our specications, like our
weather.
Maximum pre-amp input level .................................................................9.5 Vrms
Maximum speaker-level input ................................................. 400 watts @ 4ohm
Maximum output level .............................................................................9.5 Vrms
Frequency response ............................................................... 10Hz-22kHz;+/-1dB
Total harmonic distortion ........................................................................... 0.003%
Signal to Noise ratio .................................................................................. - 130dB
Balanced input noise rejection ....................................................................> 60dB
Input Impedance .....................................................................................20 Kohms
Output Impedance .................................................................................. 150 Ohms
Power supply .......................................................................High headroom PWM
Power draw .................................................................................................285mA
Recommended fuse rating ..........................................................................2 Amps
Maximum remote trigger output current ......................................................1 Amp
Size ................................................................................8” W x 6.25” D x 1.15” H
Weight ..........................................................................................................3.5 lbs
Country of origin ......................................................................................... U.S.A.
©2008, AudioControl, a division of Electronic Engineering and Manufacturing, Inc. All rights
reserved.
AudioControl, The Epicenter, The Epicenter Plus, Making Good Sound Better, 6XS, DQT, DQX,
DQS, DQXS, DDC, and EQL are all trademarks of Electronic Engineering and Manufacturing, Inc.
iPod is a registered trademark of Apple Inc.
This literature was conceived, designed, and written on a bleak, windy, dreary rain-drenched day
at our home in the Pacic Northwest Rainforest. The wheat beer was cold and so was the weather.
No endangered species were harmed during the writing of this manual. Hybrid cars are parked in our
lot.
®
making good sound better
®
®
22410 70th Avenue West
Mountlake Terrace, WA 98043 USA
Phone 425-775-8461 • Fax 425-778-3166
www.audiocontrol.com
Rev311
P/N 9130920
 Loading...