

AudioControl Epicenter 600, Epicenter 1200 Installation Manual
HIGH-POWER SUBWOOFER AMPLIFIERS
Installation Manual
AND

2
Installation Manual
Important Safety Instructions
1. Read these instructions.
2. Keep these instructions.
3. Heed all warnings.
4. Follow all instructions.
5. Do not use this apparatus near water.
6. Clean only with a dry cloth.
7. Do not block any ventilation openings. Install in accordance with the
manufacturer’s instructions.
8. Do not install near any heat sources such as muers, silencers, exhaust
pipes, or other apparatus (including ampliers) that produce heat.
9. WARNING: Improper installation may lead to permanent injury or death.
Installation of the apparatus must be done with great care by qualied
personnel, to prevent damage to fuel lines, power and other electrical
wiring, hydraulic brake lines, and other systems, that might compromise
vehicle safety.
10. Provide +12V and Ground wiring of sucient size to ensure adequate
current to the amplier. For the Epicenter 600 / 1200 this means 4 gauge
wire or lower.
11. Use rubber grommets to protect wiring whenever passing wires through
metal openings or bulkheads.
12. Only use attachments/accessories specied by the manufacturer.
13. Refer all servicing to qualied service personnel. Servicing is required
when the apparatus has been damaged in any way, such as the power input terminals are damaged, liquid has been spilled or objects have fallen
into the apparatus, the apparatus has been exposed to rain or moisture,
does not operate normally, or has been dropped.
14. This apparatus shall not be exposed to dripping or splashing, and no
object lled with liquids, shall be placed on the apparatus.
15. Fuses shall be replaced only with the correct type and fuse value, and
only when the apparatus is powered o.
16. Exposure to high sound pressure levels may lead to permanent hearing
loss. Take every precaution to protect your hearing.
The lightning ash with arrowhead symbol within an equilateral
triangle is intended to alert the user to the presence of uninsulated
“dangerous voltage” within the product’s enclosure, that may be of
sucient magnitude to constitute a risk of electric shock to persons.
The exclamation point within an equilateral triangle is intended to
alert the user of the presence of important operating and maintenance (servicing) instructions in the literature accompanying the
appliance.
Caution: to reduce the risk of electric shock, do
not disassemble the apparatus, other than to
remove the top panel to access the controls.
There are no user-serviceable parts inside. Refer
servicing to qualied personnel.
Recycling notice: If the time comes and this apparatus has fullled
its destiny, do not throw it out into the trash. It has to be carefully
recycled for the good of mankind, by a facility specially equipped
for the safe recycling of electronic apparatii. Please contact your
local or state recycling leaders for assistance in locating a suitable
nearby recycling facility. Or, contact us and we might be able to
repair it for you.

3
Table of Contents
©2015 AudioControl Inc All rights reserved.
Important Safety Instructions ....................................2
Chapter 1: Introduction ...........................................4
Introduction ...................................................4
Congratulations! ...............................................4
Features. . . . . . . . . . . . . . . . . . . . . . . . . . . . . . . . . . . . . . . . . . . . . . . . . . . . . . . .5
Complimentary bullet points ...................................6
Chapter 2: Quick Start Guide .....................................7
Quick View .....................................................7
Quick Start .....................................................8
Chapter 3: Hookup Diagrams .....................................9
Power Connections .............................................9
System #1 .....................................................10
System #2: ....................................................11
System #3: ....................................................12
Chapter 4: Installation ...........................................13
Installation ....................................................13
ACR-3 Dash Control Installation ................................15
Top Lid Removal and Installation ...............................16
Speaker Connections ..........................................17
Speaker and Wiring Impedance ................................17
Chapter 5: Features ..............................................18
Connection Panel Features ....................................18
Control Panel Features .........................................20
Chapter 6: Adjusting The System ................................24
Adjusting the System ..........................................24
Chapter 7: Troubleshooting .....................................25
Troubleshooting ..............................................25
Chapter 8: Specications ........................................27
Specications .................................................27
Block Diagram .................................................28
Dimensions ...................................................29
Chapter 9: Service ...............................................31
Service ........................................................31
Chapter 10: Please Remain Calm .................................32
The Warranty ..................................................32
Legalese Section ..............................................33
Chapter 11: Complementary Doodle Pages ......................34
Favorite Settings ..............................................34

4
Installation Manual
Simply the most advanced subwoofer ampliers in car audio today!
The Epicenter® 600 and 1200 ampliers incorporate our patented
bass restoration processor to deliver earth-shaking power to your
subwoofer system. Carefully applied signal processing at just the right
spot, enhances the listening experience and maximizes your bass
quality. In a real-world listening environment, we invite you to compare this amplier to any other amplier in the same power category,
at any price, and you will quickly learn that the Epicenter ampliers
will always have more bass! It’s time to hear what you have been
missing.
More than that
The Epicenter amplier is not a cold heartless box for increasing
the loudness of bass frequencies in your system. It restores the bass
frequencies to how they were meant to be. It is a bass-frequency
re-enactor. Your favorite music will come alive and breath, and live
again, and you will hear its presence like you haven’t heard it before.
That’s how good it is.
AudioControl’s engineering department designed these ampliers
from the ground up. They feature a black brushed aluminum nish,
with black powder-coated cast alloy heat sinks and bottom panel in
one single piece. A black-brushed aluminum cover is also provided to
protect the controls from the prying hands of carnival clown folk who
have wronged you.
Congratulations!
You are now installing a component which will dramatically improve
the performance of any low-frequency car audio system, especially
those requiring lots and lots of low-frequency earth-shattering, teacup rattling, denture crumbling performance, in a car.
The Epicenter ampliers provide high levels of power, pristine sound
quality, exible inputs, plus a number of installation-friendly features
that makes them the perfect product for performance oriented audio systems. The ampliers are American-designed “set and forget”
components which will provide a lifetime of trouble-free service for
your Earth-surface roving vehicle, and orbital, interplanetary, and
interstellar transportation systems.
The Epicenter ampliers are designed by AudioControl, the only electronics company in the world that specializes in ampliers, equalizers,
signal processors and audio analyzers. Our passion for high quality,
meticulous attention to detail, and pro sound heritage shows itself
in the dozens of awards we have won for our designs, products, and
service.
Now, as when we began, our greatest satisfaction is our reputation for
sonic excellence and reliability among people just like you throughout the world.
This manual is designed to help you get the best out of this amplier.
So, even though you’re dying to see it in action, please take a few
minutes to slog through our not-so-weighty prose and learn how to
get the most from your Epicenter amplier.
Introduction
Chapter 1: Introduction

5
Features
Here are some of the features that make the Epicenter 600 and 1200
ampliers very unique and unlike any other ampliers:
• Superior Sound Quality
Pristine sonics happens rst in all AudioControl designs and
is not compromised by any other feature. (You often get the
feeling that sound quality is an afterthought with products from
other companies.)
• High Power Levels
The high-eciency Class D monoblock subwoofer amplier is a
high-current design, capable of driving subwoofer loads down to
1 Ohm impedance.
The output power of the Epicenter 600 is 600 Watts into 1 Ohm,
and the Epicenter 1200 is 1200 Watts into 1 Ohm.
• Unparalleled Energy Eciency
Whether from the point of view of reducing current draw, or
from the viewpoint of less heat in the trunk, the Epicenter 600
and 1200 subwoofer ampliers have no equal. They are VERY
energy ecient during operation.
• The Epicenter Bass Restoration
The Epicenter Sweep and Epicenter Width controls allow you to
restore any low frequencies that may be aected by the vehicle
acoustics, speaker and enclosure design and location, and the
performance recording process.
• MILC™ Maximum Input Level Control
The Epicenter amplier analyses the incoming audio signals and
detects any signal clipping. This gives you the chance to optimize
the audio signal levels going in to the Epicenter amplier.
• ACR-3 Wired Remote
This dash-mounted remote allows easy adjustment of the output
level, and the level of the Epicenter bass restoration.
• Self Resetting Protection Features
Protection features are extensive and include thermal, short circuit, clipping, under voltage, over voltage, and DC oset among
others. If the fault is removed, the unit may reset. The protection
LED ashes with various codes that indicate the fault detected.
• Pacic Northwest Heritage
The engineers who designed this amplier are native
Northwesterners, steeped and learned in the long and impressive audio engineering history of Washington State, and all able
to reach their catch limit during razor-clam digging season. We
are very proud of that fact. What is more important is the care we
craft in at every step, and the extensive knowledge we have in all
aspects of the product. Plus, we back this up with a conditional
ve year warranty.
Chapter 1: Introduction

6
Installation Manual
• Class D Monoblock Subwoofer Amplier
• High Current Design - 1 Ohm Stable
• 600 Watts @ 1 Ohm (The Epicenter 600 Amplier)
• 1200 Watts @ 1 Ohm (The Epicenter 1200 Amplier)
• The Epicenter Digital Bass Restoration
• MILC™ Maximum Input Level Control (Patent Pending)
• 24 dB/Octave Linkwitz-Riley Alignment Crossover
• GTO Signal Sense
• PFM Subsonic Filter
• Line-Level RCA Inputs and Active Speaker-Level Inputs
• Solid One-Piece Aluminum Chassis
• Wired ACR-3 Remote Control for Subwoofer Level and the Epicenter Processor
• Expansion Bus
• Adds a weird blue glow of mystery to your trunk/boot installation
• Kind to Kittens™
• Calculus-enriched
Complimentary bullet points
Chapter 1: Introduction
7
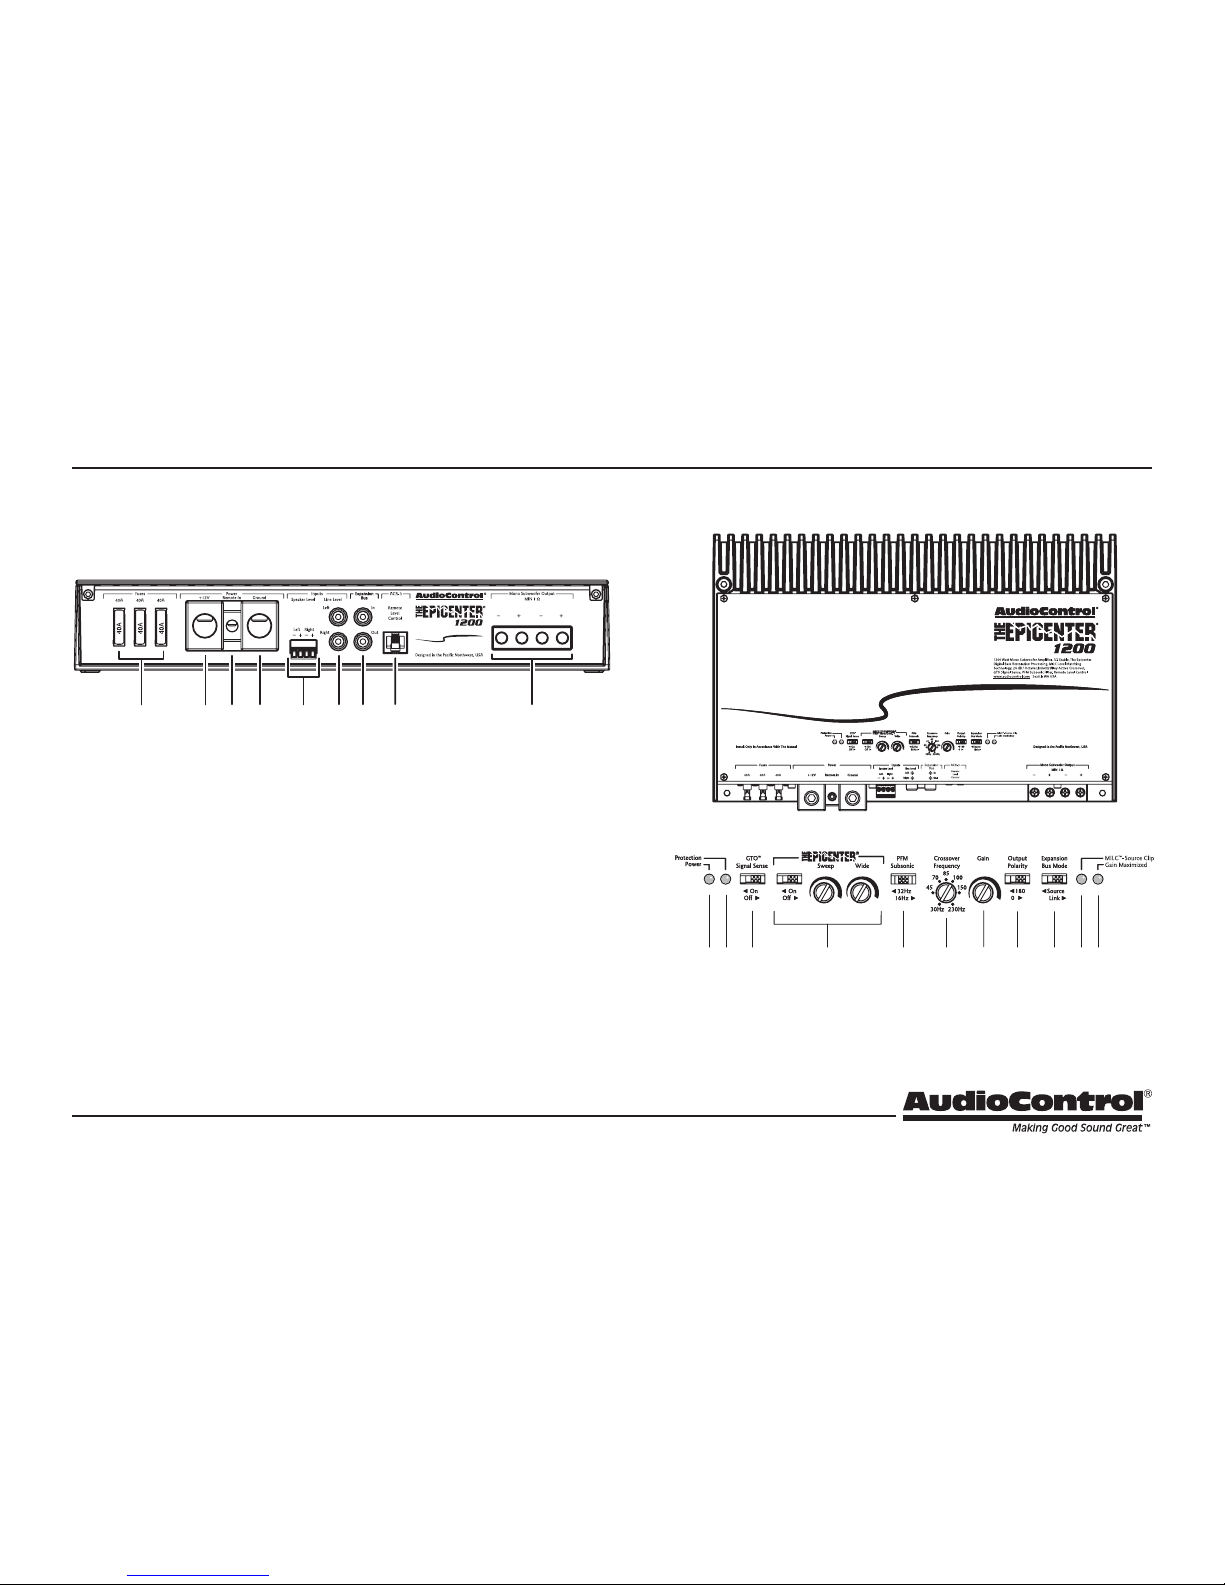
10. Power LED
11. Protection LED
12. GTO Signal Sense
13. Epicenter Controls:
On/O, Sweep, Wide
14. PFM Subsonic 16Hz/32Hz
15. Crossover Frequency
16. Gain Control
17. Polarity
18. Expansion Bus Mode
19. MILC™ Source Clip LED
20. Gain Maximized LED
1. Fuses 40A
2. Power Input Terminal +12V
3. Remote Power Input Terminal
4. Power Input Terminal Ground
5. Speaker-Level Inputs
6. RCA Analog Line-Level Inputs
7. Expansion Bus In and Out
8. Remote Control Connector
9. Speaker-Level Outputs
1 2 3 4 5 6 7
8
9
10 11 12 13 14 15
16
19 2017 18
Controls (top panel removed)
Quick View
Front Panel
Chapter 2: Quick Start Guide
Note: The Epicenter 1200 is shown. The Epicenter 600 has the same
controls and features, except for two fuses, and dierent power terminals and speaker-level output terminals.

8
Installation Manual
Quick Start
1. It only takes a few steps to get your Epicenter amplier up and
running in a ash! The steps below are explained in more detail
throughout this manual.
2. Undo the +12V and Ground connections to the car battery
before making any connections to the amplier.
3. When making connections, designate red RCA plugs as right,
and designate white, black, or grey plugs as left. This is a good
idea for all signal connections made in your audio system. The
key is consistency. Stick with the same color coding and you’ll
reduce possible problems.
4. Use quality interconnect cables. We know from experience that
really cheap cables can cause a multitude of problems. They
tend to break inside or corrode, causing a loss of signal or hum.
They also have poor shielding.
5. Connect the +12V input terminal of the unit to the +12V terminal of the vehicle battery.
6. Connect the Ground terminal of the unit to the chassis of the
vehicle.
7. Connect the remote power terminal of the unit to the remote
turn-on switch of your source unit. Alternatively, you can skip
this connection and use the GTO Signal sensing which is explained later in this manual.
8. Connect your audio inputs to the unit – either speaker-level or
line-level RCA… not both.
9. Run the ACR-3 remote to the front of the vehicle to adjust the
bass level and the Epicenter eect on the y.
10. Connect your subwoofer (1 Ohm minimum load).
11. When all connections are made, reconnect the vehicle battery.
12. Adjust your input source gain using the Patent Pending MILC.
This will indicate if the incoming audio signals are clipping.
13. Set the Epicenter’s crossover to the frequency recommended by
the subwoofer manufacturer.
14. Adjust the Epicenter sweep and wide controls for maximum bass
restoration. The ACR-3 adjusts the level of this eect, and the
overall output level.
15. Enjoy the drive!
Chapter 2: Quick Start Guide
9
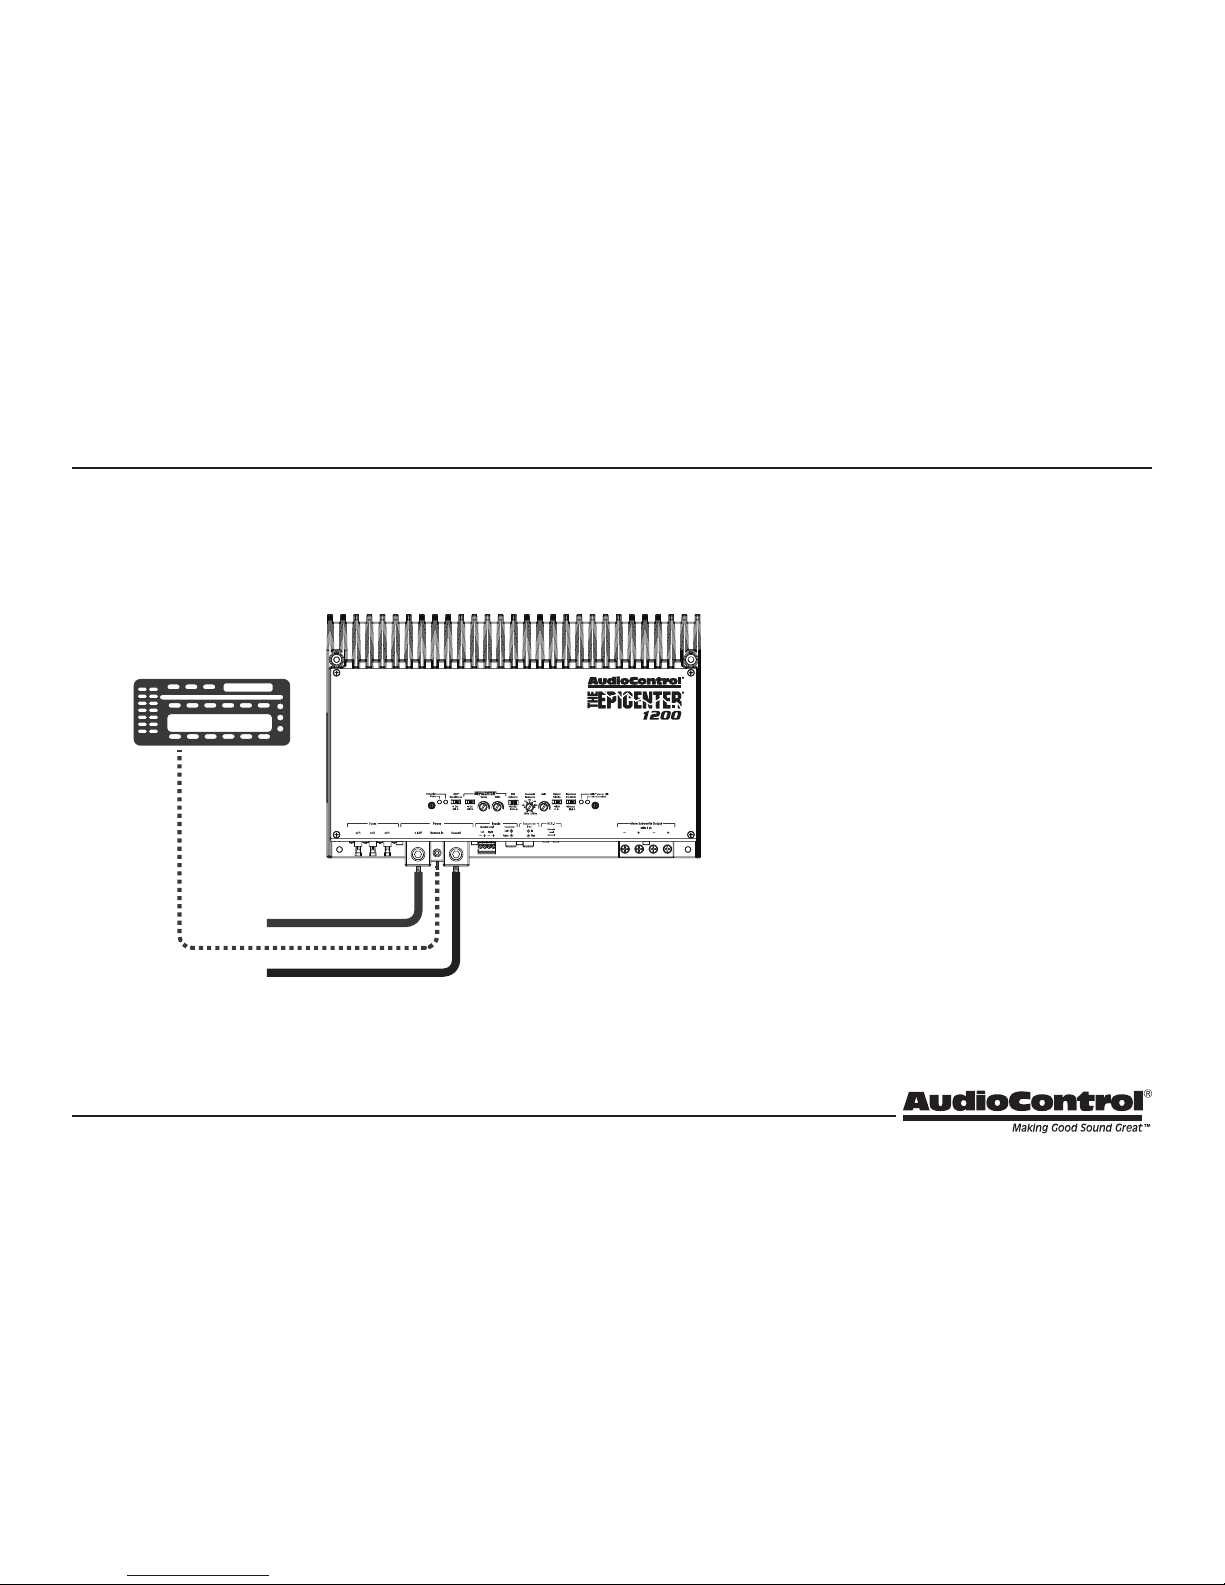
Power Connections
Ground
Head Unit
Remote Amplifier
+12V Trigger
+12V
In this example, the head unit has a +12V trigger
output that is connected to the Epicenter’s remote
input terminal. When the head unit is turned on, it
will turn on the Epicenter amplier.
Alternatively, the GTO signal sense feature can be
used to gently turn on the Epicenter amplier when
an audio input signal is detected. (And the connection to the Epicenter’s remote input terminal is not
required.)
Chapter 3: Hookup Diagrams
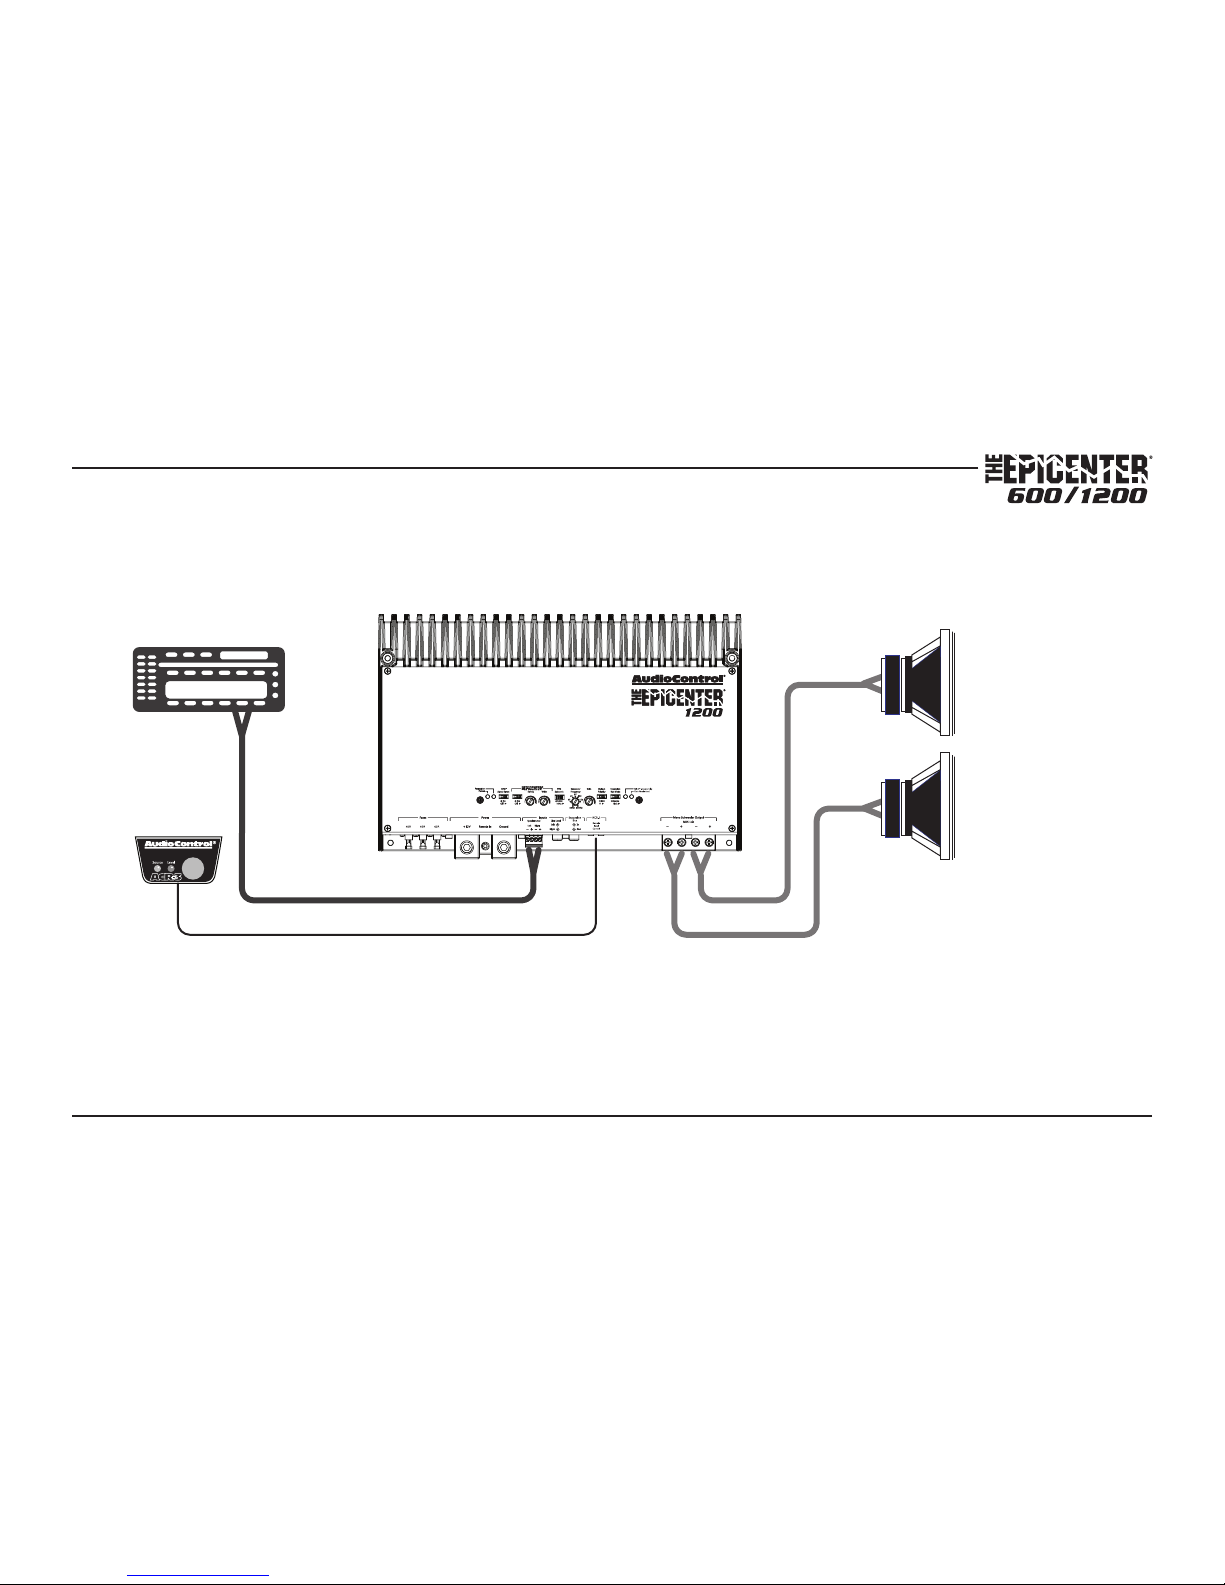
10
Installation Manual
Factory
Radio
Speaker-level
output
+
+
ACR-3
Subwoofers
System #1: Adding Subwoofers to a Factory Radio
Chapter 3: Hookup Diagrams
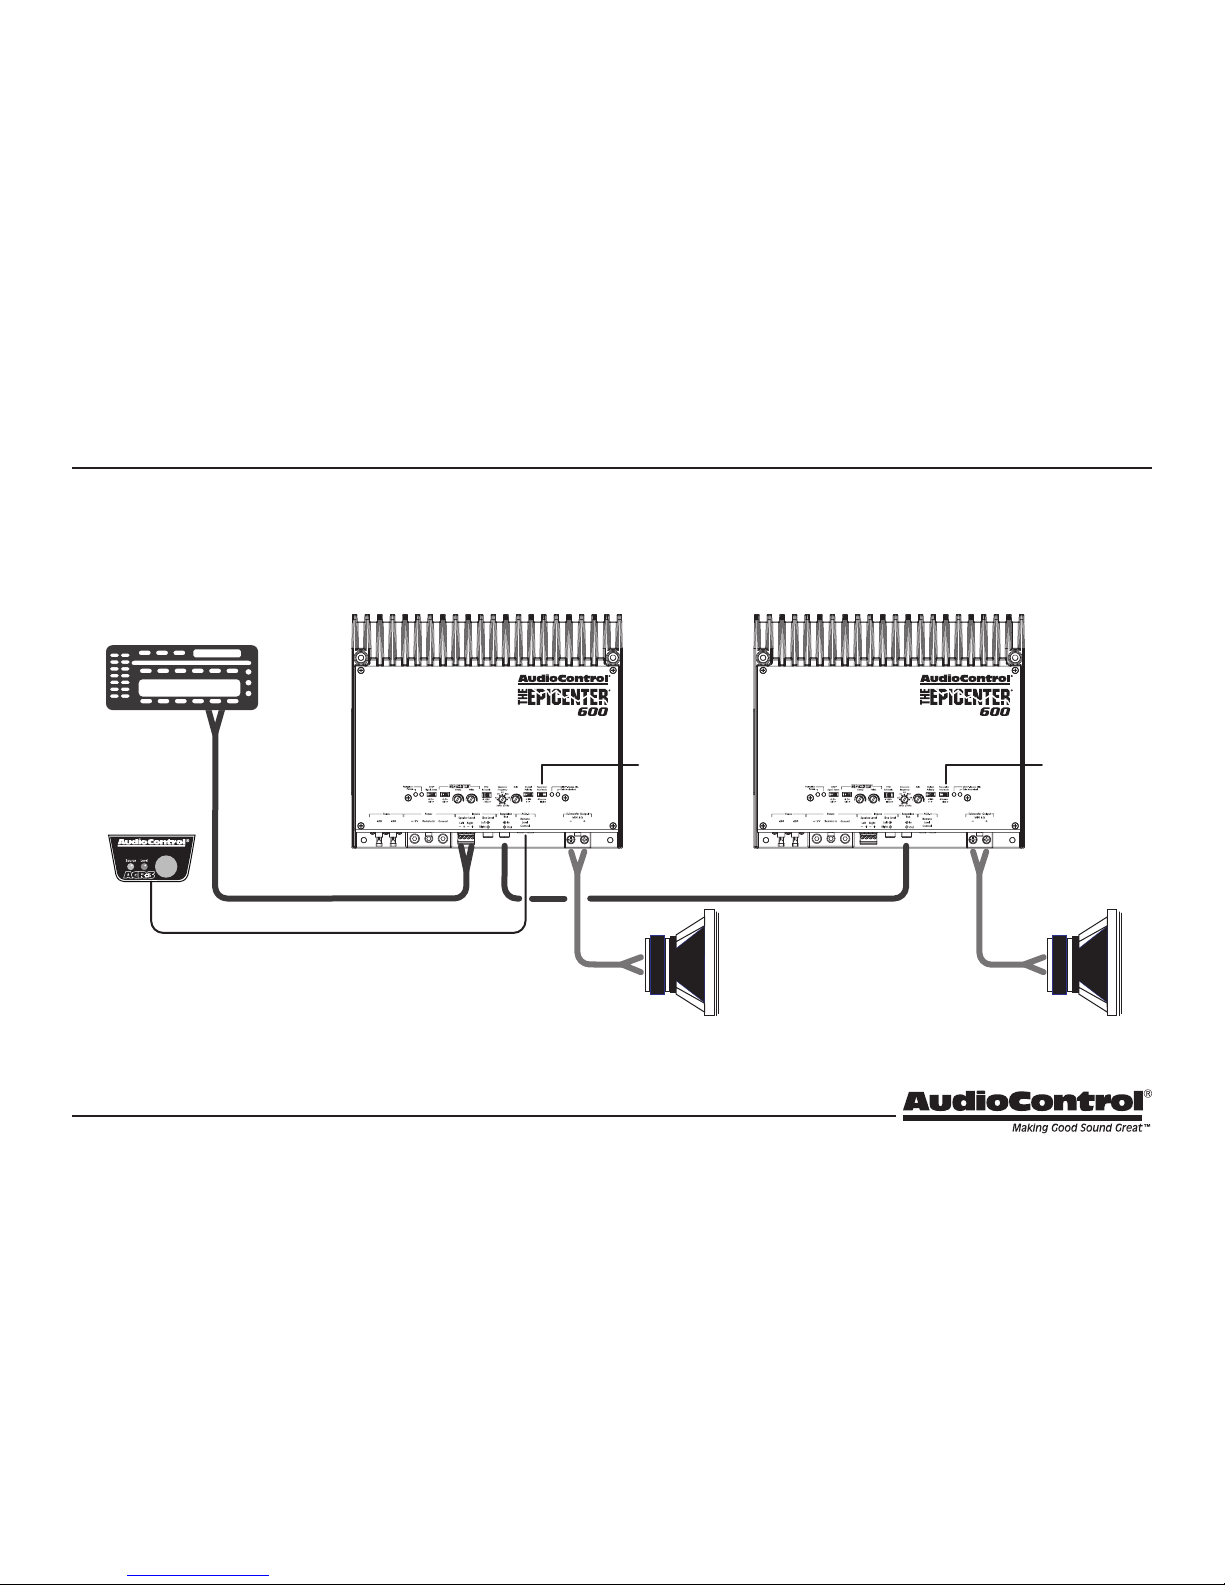
11
Left
Subwoofer
Right
Subwoofer
Factory
Radio
ACR-3
Master
Expansion Bus
Mode: Source
Expansion Bus
Mode: Link
+ +
Speaker-level
output
InOut
System #2: Using the Expansion Bus to run multiple Ampliers, linked to one
Master set of Controls
Chapter 3: Hookup Diagrams
 Loading...