

Page 1
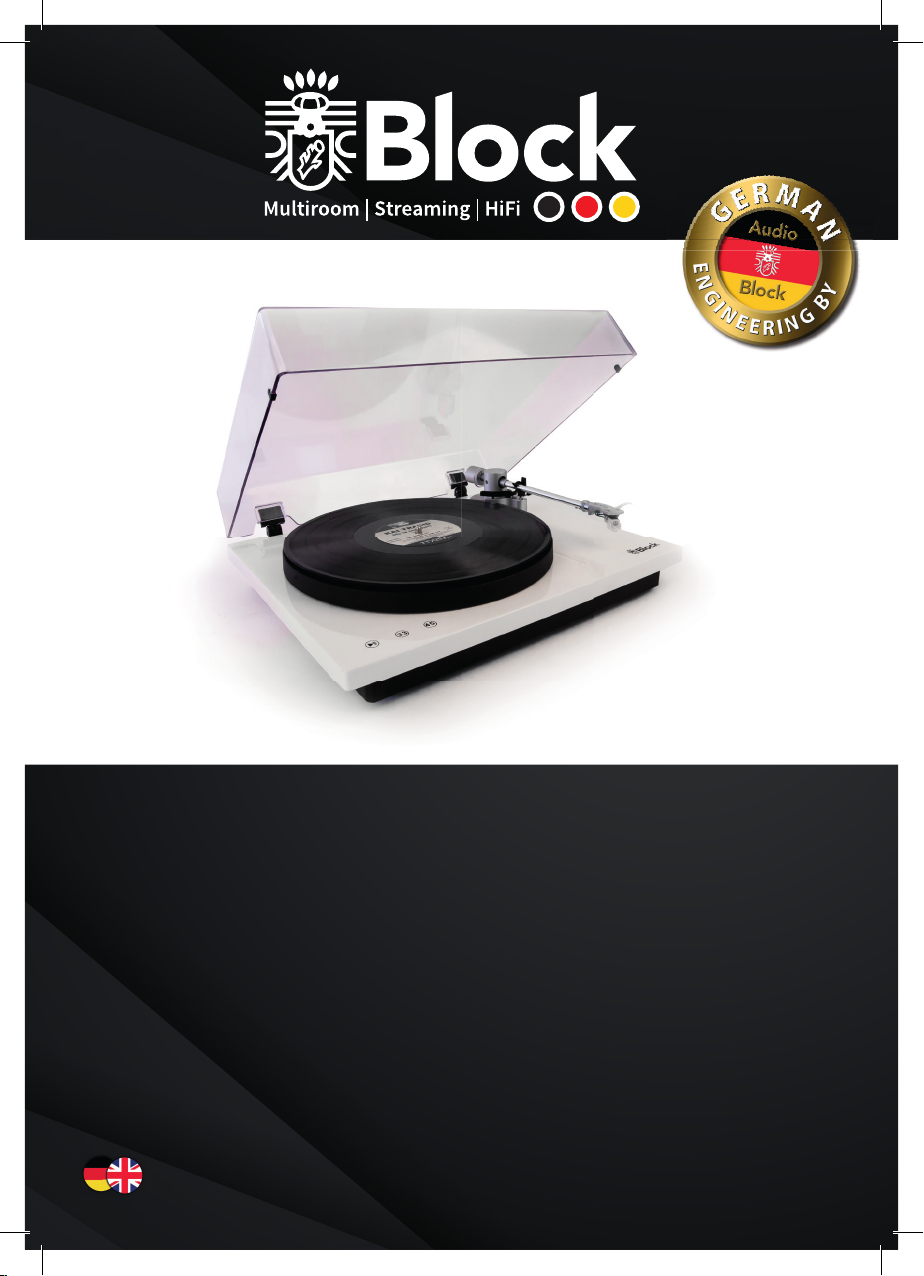
Bedienungsanleitung | Manual
PS-10
Page 2

Sehr geehrter Kunde!
Danke, dass Sie sich für dieses hochwer tige
Gerät entschieden haben. Diese Bedienungsanleitung soll Ihnen eine Übersicht darüber
geben, wie Sie Ihr Gerät bedienen können. Sie
erhalten Sicherheitsinformationen und werden darüber informiert, wie Sie ihr Gerät am
besten reinigen. Die Sicherheits- und Bedienungsinformationen sind einzuhalten, damit
das Produkt langfristig und sicher funktioniert.
Bitte nehmen Sie sich einige Minuten Zeit, um
die Bedienungsanleitung sorgfältig durchzulesen. Bewahren Sie diese Bedienungsanleitung gut auf, damit Sie bei einem Weiterverkauf mitgegeben werden kann. Bedingt durch
So wareupdates oder technische Weiterentwicklungen bei Drittherstellern (z. B. Apps), können Teile
dieser Bedienungsanleitung aktualisiert werden.
Bitte besuchen Sie von Zeit zu Zeit unsere Webseite
„www.audioblock.com“, um zu prüfen, ob es neuere
Bedienungsanleitungen zum Download gibt. Vergleichen Sie hierzu die Standangabe auf der letzten Seite mit der Angabe im Internet. Wenn Sie noch weitere
Fragen zu Ihrem Gerät haben, nehmen Sie bitte Kontakt zu einem autorisierten Fachhändler oder zu unserem Service auf. Im Falle eines Defektes, der durch
Fehlbedienung, Missbrauch oder Nichtbeachten
der Bedienungsanleitung au ritt, bitten wir um Verständnis, dass die Garantie für dieses Gerät erlischt.
Ebenfalls kann keine Ha ung für Folgeschäden übernommen werden. Dieses Produkt ist CE zertifiziert
und erfüllt alle Richtlinien und Anforderungen der
Europäischen Union. EMV und ROHS Dokumentationen liegen vor.
2
Page 3

Inhaltsverzeichnis
Sicherheitshinweise ................................................................................................................................................................... 04
Technische Daten ....................................................................................................................................................................... 06
Aufbau des Gerätes .................................................................................................................................................................... 09
Anschlüsse ...................................................................................................................................................................................10
Wichtige Tipps ............................................................................................................................................................................. 11
Contents
Safety instructions ..................................................................................................................................................................... 14
Technical details ......................................................................................................................................................................... 16
Structure of the device .............................................................................................................................................................. 18
Connections & Settings ............................................................................................................................................................. 21
Valuable tips.................................................................................................................................................................................22
Troubleshooting..........................................................................................................................................................................23
3
Page 4
Sicherer Gebrauch
Elektrogeräte gehören nicht in Kinderhand! Lassen Sie Kinder niemals unbeaufsichtigt elektrische Geräte
benutzen. Halten Sie auch die Verpackungsfolien von Kindern fern. Es besteht Erstickungsgefahr.
Sicheres Aufstellen
▶ Verwenden Sie das Gerät ausschließlich in trockenen Räumen.
▶ Wenn Sie das Gerät von einer kalten in eine warme Umgebung bringen, kann sich im Inneren des Gerätes
Feuchtigkeit nieder schlagen. Warten Si e in diesem Fall etwa zwe i bis drei Stunden, bevo r Sie es in Betrieb ne hmen.
▶ Stellen Sie das Gerät auf eine feste und ebene Oberfläche.
▶ Stellen Sie das Gerät mit mindestens 10 cm Abstand zur Wand auf.
▶ Vermeiden Sie die Nähe von Wärmequellen, wie z. B. Heizkörpern, oder Geräten mit starken Magnetfel-
dern, wie z. B. Lautsprechern.
▶ Stellen Sie keine oenen Brandquellen, wie z. B. brennende Kerzen, auf das Gerät.
▶ Stellen Sie das Gerät nicht auf empfindliche Oberflächen.
Sicheres Anschließen
▶ Schließen Sie das Gerät nur an eine gut erreichbare und fachgerecht installier te Steckdose mit 230 V ~ 50 Hz an.
▶ Der Netzstecker muss frei zugänglich sein, damit Sie das Gerät im Notfall einfach und schnell vom
Stromnet z trennen können.
▶ Verlegen Sie das Netzkabel so, dass niemand darüber stolpern oder darauf treten kann.
▶ Verwenden Sie keine Verlängerungskabel. Knicken oder quetschen Sie das Netzkabel nicht.
▶ Ziehen Sie das Netzkabel stets am Stecker aus der Steckdose.
Sicherer Gebrauch
▶ Ziehen Sie den Netzstec ker aus der Steckdose, wenn Sie das Ge rät längere Zeit nicht benutzen o der wenn sich ein Gewitter nähert.
▶ Das Netzkabel dar f während des Betriebs nicht um das Gerät gewickelt sein oder heiße Oberflächen berühren.
▶ Lassen Sie keine Feuchtigkeit in das Gehäuse gelangen.
▶ Fassen Sie das Gerät, das Netzkab el und den Netzstecker nie mit nassen Händen an. Es besteht die Gefahr eines elektrischen
Schlags. Sollten Fremdkörper oder Flüssigkeit in das Gerät gelangen, ziehen Sie sofort den Netzstecker aus der Steckdose.
Lass en Sie das Gerät von qualif iziertem Fachper sonal überpr üfen, bevor Sie es wi eder in Betrieb n ehmen. Andern falls besteht
die Gefahr eines elektrischen Schlags.
▶ Benutzen Sie das Gerät nie, wenn es beschädigt ist, oder Sie Schäden am Netzkabel oder Stecker feststellen. Ziehen Sie bei
Beschädigungen des Geräts sofort den Stecker aus der Steckdose.
▶ Önen Sie nie das Gerät . Wenden Sie sich im Störungsfall an unse r Service-Center o der eine andere geeignete Fachwerk statt.
Halten Sie das Gerät fern von Hitzequellen!
Sorgen Sie für genügend Luzirkulation bei
dem Einbau in einem Rack!
4
Behandeln Sie das Stromkabel
stets mit Vorsicht!
Halten Sie das Gerät fern
von Feuchtigkeit!
Achten Sie darauf, dass keine
Gegenstände in das Gerät fallen!
Page 5
Sicherheitshinweise
Achtung: Um d ie Gefahr eines Stro mschlages zu verme iden, darf an dies em Gerät keine Verän derung vorgenom men werden! Das Önen des Gerätes, sowie Veränderungen am Gerät, dür fen nur durch autorisierte Personen
vorgenommen werden.
Wichtige Sicherheitshinweise:
▶ Bitte lesen Sie vor der ersten Inbetriebnahme diese Bedienungsanleitung sorgfältig durch.
Dieses Gerät ist nur für den Gebrauch in geschlossenen Räumen.
▶ Dieses Gerät darf nur an einer dafür vorgesehenen Steckdose angeschlossen werden.
▶ Dieses Gerät darf keiner Feuchtigkeit ausgesetzt werden.
▶ Stellen Sie sicher, dass das Gerät frei steht.
▶ Stellen Sie sicher, dass das Gerät nicht in der Nähe einer Wärmequelle steht.
▶ Achten Sie darauf, dass das Anschlusskabel nicht beschädigt ist oder wird.
Informationen zur Entsorgung des Altgerätes:
Ihr Produkt ist aus qualitativ hochwertigen und wieder verwertbaren Materialien gebaut. Mit diesem Zeichen
erfüllt das Produkt die EU-Norm 2002/96/EC. Bitte entsorgen Sie Ihr Gerät nicht im Hausmüll sondern an entsprechender Wertstosammlung. Sie sind verpflichtet elektronische Geräte, Zubehör und Verpackung in speziell dafür vorgesehenen und durch Schilder gekennzeichnete Stellen abzugeben. Für nähere Informationen, wo
Sie diese dafür vorgesehenen Stellen finden, wenden Sie sich bit te an Ihre Müllabfuhr. Bitte halten auch Sie sich
an diese Verordnung, um unseren Kindern eine bessere Umwelt zu erhalten.
Das Gerät entspricht der EU-Norm (73/23/EEC)und erfüllt die elektromagnetische Kompatibilität
(89/336/EEC).
Das Blitz-Symbol soll den Benutzer vor nicht isolierten gefährlichen Spannungen im Gerätegehäuse warnen.
Diese Spannung könnte groß genug sein, um Pers onen durch einen elek trischen Schlag zu verlet zen. Das Ausrufezeiche n soll den Benutzer darauf aufm erksam machen , dass die Beschreib ung, die mit dem Gerät a usgeliefert
wird, wichtige Bedienungs- und Wartungshinweise enthält.
Nehmen Sie das Gerät vom Netz,
wenn es lange Zeit nicht genutzt
wird!
Achten Sie darauf, dass keine
Sprays oder Chemie an Ihr Gerät
kommt!
Achten Sie darauf, dass Ihr Gerät
nicht abgedeckt wird!
Achten Sie darauf, dass das Gerät
nur von autorisierten Personen
geönet wird!
5
Page 6

Technische Daten
Elektronische Geschwindigkeit: 33/45 RPM
Gleichlaufschwankung: ± 0,1 %
Fremdspannungsabstand: 60 db
Leistungsaufnahme: 8 Watt
Externes Netzteil Eingang: AC 110–240 V an at50–60 Hz
Externes Netzteil Ausgang: DC 9 V | 1 A
Abmessung B | H | T: 430 x 130 x 370 mm
Gewicht: 6,7 kg
System: Audio Technica AT-3800
Lieferumfang & Zubehör
• Grundchassis mit vormontiertem Tonarm
• Plattenteller
• Filzmatte
• Netzteil
• Gegengewicht für den Tonarm
• Antriebsriemen
• NF Anschlusskabel
• Staubschutzhaube
• USB Anschlusskabel
• Soware CD
• Bedienungsanleitung
Software CD
Zur Aufnahme von Ihrer Schallplatte, instalieren Sie die beigelegte Soware CD.
Legen Sie die CD in Ihr Laufwerk und folgen den Instalations Hinweisen auf Ihrem Bildschirm.
6
Page 7
Wichtiger Hinweis:
Während Sie das Gerät zusammen bauen, können kleine Teile verloren gehen. Um dies zu vermeiden, legen Sie die Zubehörteile an sicheren Orten ab!
Bevor Sie mit dem Aufbau des Gerätes beginnen, vergewissern Sie sich bitte, ob alle oben aufgeführten Teile vorhanden sind. Die Liste finden Sie auf der gegenüberliegenden Seite.
Möglicherweise benötigen Sie beim Aufbau noch eine zusätzliche Wasserwaage und eine Tonarmwaage. Beide sind nicht im Lieferumfang enthalten.
7
Page 8
8
Page 9

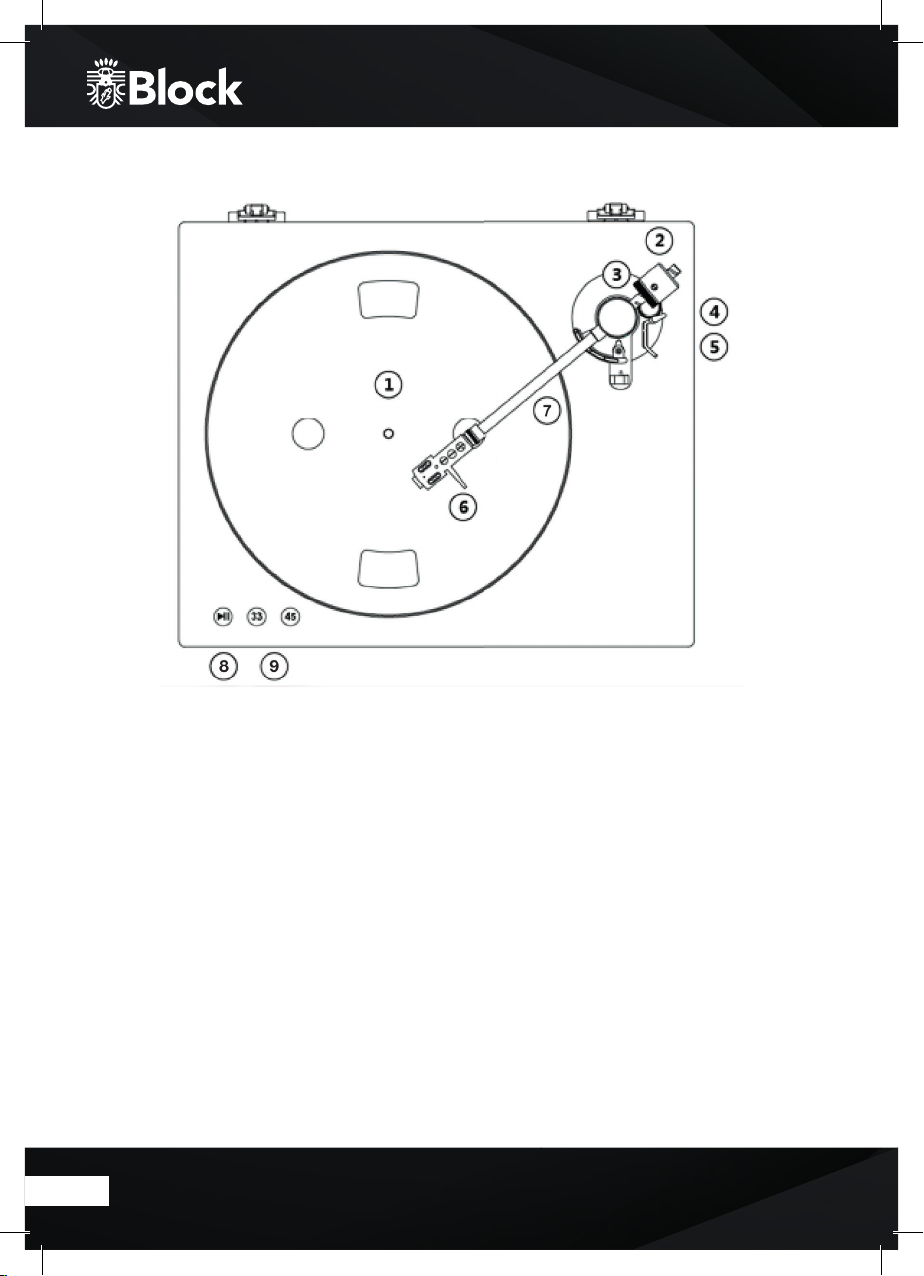
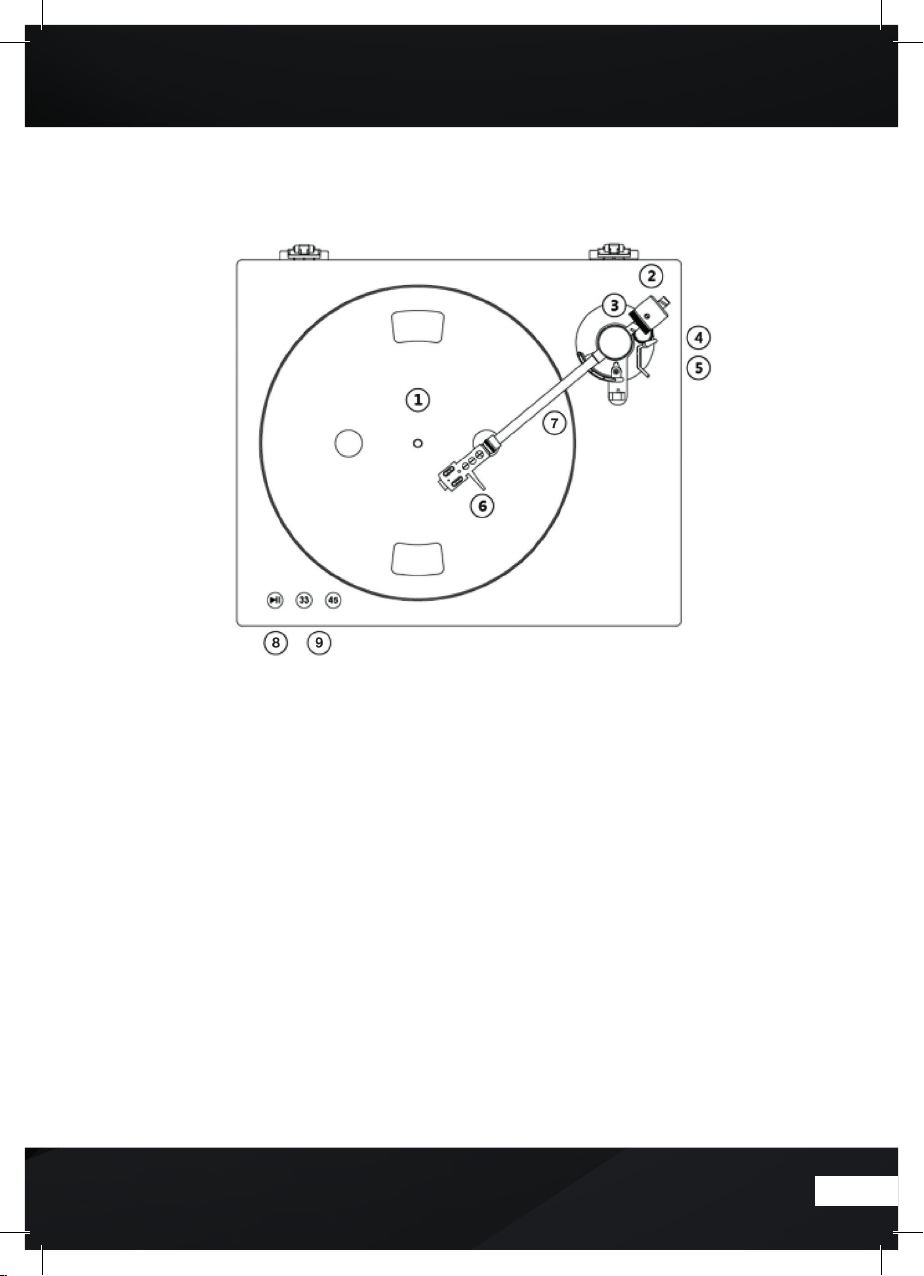
Aufbau des Gerätes
Stellen Sie sicher, dass der Plattenspieler gerade auf dem gewünschten Platz steht! Nut zen Sie dafür
einen geraden Untergrund.
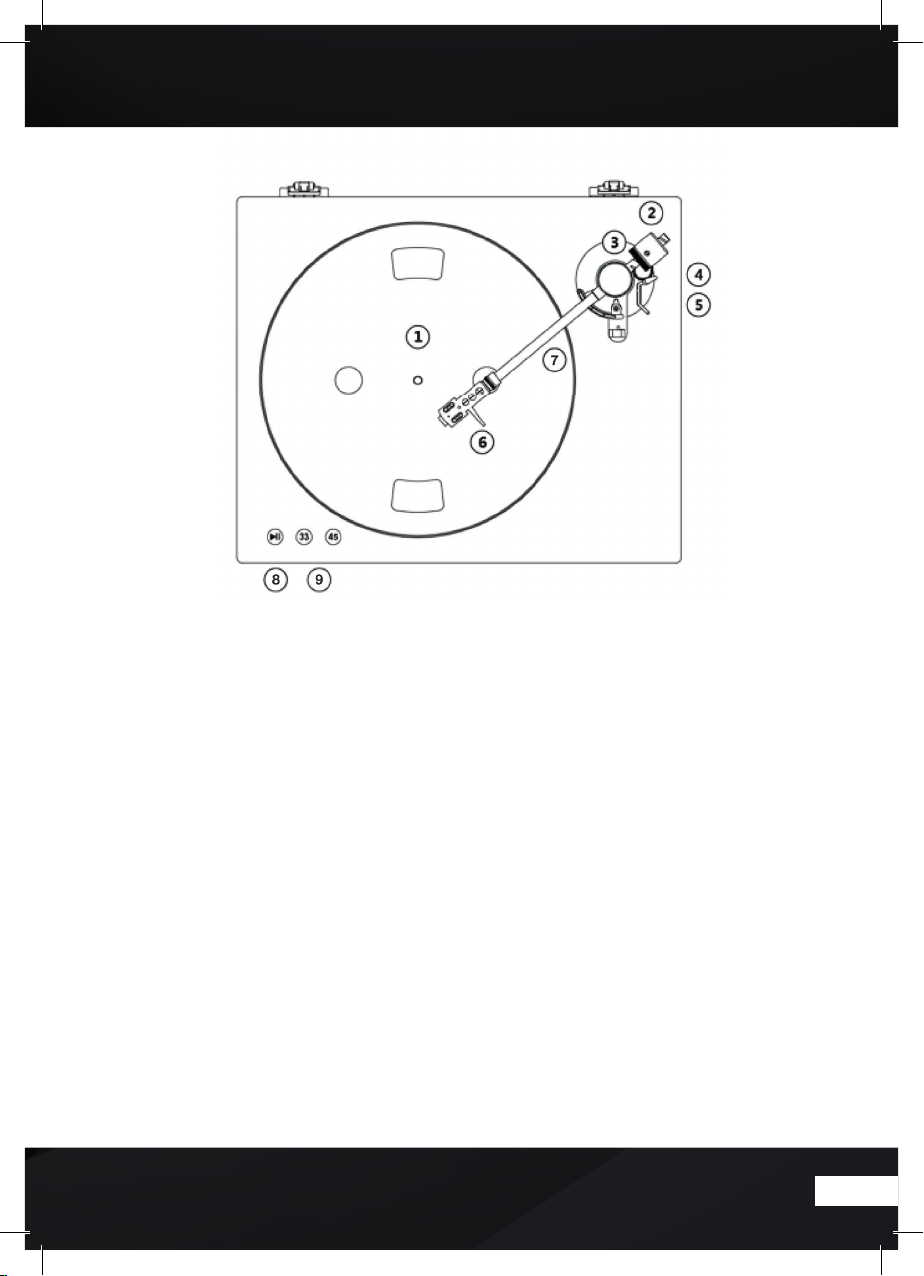
1. Plattenteller mit Filzmatte
Nehmen Sie die Filzmatte auf dem Plattenteller ab, um durch die Önungen im Plattenteller
den innenliegenden Antriebsriemen auf die Antriebswelle des Motors aufzulegen.
2. Gegengewicht
Bewegen Sie den Tonarm zum Plattenteller und stellen Sie durch Drehen des Gegengewichts
den Arm auf Schwebung ein.
3. Auflageeinstellung
Bewegen Sie nun den Arm wieder auf die Tonarmstütze. Halten Sie das Gegengewicht fest und
drehen nur die Skala so, dass die „0“ oben steht. Für das vormontierte Abtastsystem stellen
Sie durch Drehen des Gegengewichts einen Wert von 20 ein. Dieser Wert entspricht einer
Auflagekra von ca. 2,0 g. Zur Kontrolle benutzen Sie bitte eine Tonarmwaage (nicht im Zubehör).
4. Antiskating Einstellung
Durch drehen des Einstellrades ist eine genaue Einstellung der Antiskatingkra möglich. Bei
dem vormontierten Abtastsystem stellen Sie die Einstellung auf „2“.
5. Tonarmli
Hebt oder senkt den Tonarm.
6. Abtastsystem
vormontiertes Abtastsystem. Bei Wechsel des Sytems, beachten Sie folgende Anschlussfarben:
Weiß(+L) - linker Kanal +
Blau (-L) - linker Kanal Rot (+R) - rechter Kanal +
Grün (-R) - rechter Kanal -
7. Tonarm
Manueller Tonarm
8. Start | Pause Taste
Berühren Sie leicht die abgebildete Play/Pause Taste um eine Wiedergabe/Pause zu starten.
9. Umdrehungsgeschwindigkeit
Schalten Sie die Geschwindigkeit durch leichtes Berühren der Taste „33“ oder „45“ um.
9
Page 10
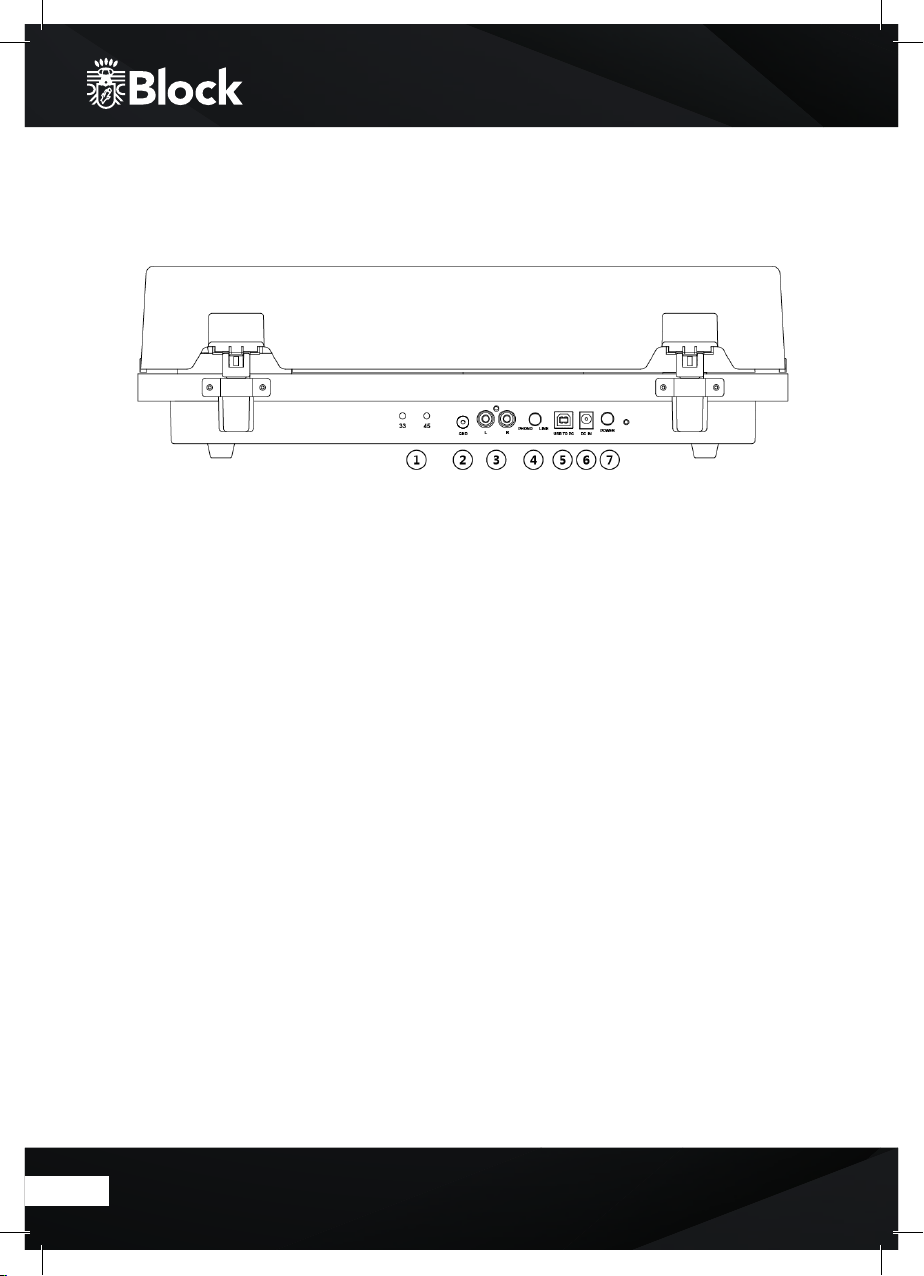
Anschlüsse & Einstellungen
1. Geschwindigkeitseinstellungen
Die Geschwindigkeit ( 33 | 45 ) ist werkseitig voreingestellt. Im Bedarfsfall können über die
Einstellregler Korrekturen vorgenommen werden.
2. Masseanschluss
Verbinden Sie das Massekabel des mitgelieferten Cinchkabels mit der Gerätemasse.
3. Analogausgang
Ausgang links / rechts zum Anschluss des mitgelieferten Cinchkabels.
Rot = rechter Kanal | Weiß = linker Kanal
4. Phono/Line Anschluss
Der Plattenspieler verfügt über einen eingebauten Phono Vorverstärker. Schalten Sie durch
Betätigen der Taste zwischen „Phono“ und „Line“ um.
5. USB Anschluss
er Ton Ihrer Schallplatte, wird digital gewandelt mit einer maximalen Auflösung von
D
48 KHz/16bit. Mit dem USB Kabel kann der Plattenspieler mit Ihrem Computer verbunden werden.
6. Spannungsanschluss
Schließen Sie das Netzteil hier an.
7. Ein/Aus Schalter
Schalten Sie Ihren Plattenspieler „ein“ und „aus“
10
Page 11

Wichtige Tipps
Wenn Sie den Plattenspieler auf einen resonanzfreien Untergrund stellen (Entkopplungsmatten
oder Holzplatten), verhindert das Störungen.
Wartung und Pflege
Ihr Plattenspieler benötigt nur wenig Wartung und Pflege. Benutzen Sie einen weichen Lappen zum
Säubern. Wir empfehlen Ihnen, die Nadel vor dem Reinigen des Plattenspielers zu sichern. Sie vermeiden dadurch Beschädigungen der Nadel. Entfernen Sie bitte immer das Netzteil, bevor Sie Ihr
Gerät warten oder pflegen.
Service
Wenn Sie mit Ihrem Gerät ein Problem haben, welches Sie nicht selber beheben können, wenden
Sie sich bitte an Ihren autorisierten Block Fachhändler. Wenn Ihnen auch dort nicht weitergeholfen
werden kann, wenden Sie sich bitte an den Hersteller direkt! Garantiereparaturen können nur dann
erfolgreich durchgeführt werden, wenn das Gerät in einer ordentlichen Verpackung verschickt wird.
Bewahren Sie hierfür ihre originale Verpackung auf. Verschicken Sie niemals den Plattenspieler ohne
sich zu vergewissern, dass das Gerät auseinander gebaut und korrekt verpackt ist.
GArantie
Der Hersteller übernimmt keine Verantwortung für Schäden, die aus Missachtung der Bedienungsanleitung und / oder aus dem Nichtver wenden der originalen Verpackung hervorgehen. Auch durch
das Verändern oder durch das Modifizieren des Gerätes erlischt der Garantieanspruch.
Der Hersteller behält sich das Recht vor, technische Änderungen ohne vorherige Ankündigungen
durchzuführen.
11
Page 12

Problembehebung
Block Produkte werden unter einem hohen Qualitätsstandard produziert. Erst nach einer strengen
Endkontrolle verlassen unsere Geräte das Werk. Eventuell auretende Fehler sind nicht automatisch
Materialfehler oder technischen Ursprungs, sondern können auch von äußeren Gegebenheiten oder
anderen Umständen kommen. Die folgende Liste soll Ihnen helfen, Probleme zu beheben.
1. Der Plattenteller dreht sich nicht, obwohl der Motor eingeschaltet ist.
Das Gerät ist nicht mit dem Netzkabel verbunden.
Kein Strom auf der Steckdose.
Der Riemen ist nicht gespannt oder abgelaufen.
2. Kein Signal auf einem oder auf beiden Kanälen.
Verbindungskabel und Anschluss an dem Verstärker prüfen.
Der Verstärker ist nicht eingeschaltet oder steht auf ”MUTE”.
Der Verstärker ist nicht an den Lautsprechern angeschlossen.
3. Starkes Rauschen / Brummen auf dem Phono-Eingang:
Das Erdungskabel vom Plattenspieler zum Verstärker ist nicht angeschlossen.
4. Verzerrter oder unbeständiger Klang aus einem oder beiden Kanälen.
Der Eingangswahlschalter am Verstärker ist nicht richtig eingestellt – bitte MM auswählen.
Die Nadel ist beschädigt.
Falsches Auflagegewicht, der Riemen ist ausgeleiert oder dreckig.
12
Page 13

Dear Costumer,
Thank you for choosing to purchase this high
quality device.This manual shall give you an
overview of how to operate your device. You
will receive safety information and you will be
informed about how to clean your equipment
best. The safety and operating information
must be strictly followed in order to ensure the
long-term and safe functioning of the product.
Please, take some time to peruse the manual
carefully. The operating instructions should
be retained in a safe place for future reference,
to be given with a resale. Due to software updates or technical developments with third
manufactures (e.g. Apps), parts of this manual
can be updated. Please visit our website „www.
audioblock.com“ to check whether there are
up-to-date operating instructions for downloa-
ding. For this purpose, compare the status on
the cover page with the information on the Internet. If you have any fur ther questions regarding your device, please contact an authorized
specialist supplier or our service centre. In
case of a defect resulting from improper operation, misuse or non-obser vance of the operating instructions, please be aware that the
guarantee for this defect will be invalidated.
Besides, no liability can be accepted for consequential damages. This product is EMC certified and meets all the directives and requirements of the European Union. CE and RoHS
documentation are provided.
13
Page 14
Safety instructions
Do not let electrical appliances in children‘s hands! Never let children unattended to use electrical devices
Also keep the packaging foils far away from children. There is a danger of shocking and suocation.
Safe positioning
▶ Use the device exclusively in dry rooms
▶ If you bring the device from a cold into warm surroundings, it could be humid inside the equipment. In this
case, wait about two to tree hours before running it.
▶ Place the device on a firm and horizontal plane surface.
▶ Place the device with at least 10 cm of distance to the wall.
▶ Do not cover existing ventilation openings.
▶ Avoid the proximity of heat sources, such as radiators, or devices with strong magnetic fields, such as loudspeakers.
▶ Do not place open sources of fire, such as burning candles, on the device.
▶ Do not place the device on sensitive surfaces.
Secure connection
▶ Connect the device only to an easily accessible and suitable installed socket. With 230 V ~ 50 Hz.
▶ The net plug mu st be of easy acces s so that the device c an be easily and quickly d isconnect fro m the power
supply, in case of emergency.
▶ Locate the power cable so that nobody can trip over it or step on it.
▶ Do not use extension cables. Do not bend or squeeze the net cable.
▶ Always pull the mains cable from the socket.
Safe use
▶ Disconnect the power plug from the power socket and remove the aerial cable from the device if you do
not use the unit for a long time or when a thunderstorm is approaching.
▶ The net cable shall not be wrapped around the device during operation nor in touch to hot surfaces. Avoid
humidity to enter the housing.
▶ Never touch the device, the net cable or the net plug with wet hands. There is a risk of electric shock.
Should an item or liquid get into the housing, immediately disconnect the device from the power supply
and have it checked.
▶ Have your equipment inspected by qualified personnel before restarting it. Otherwise there is the anger of electric shock.
▶ Never use the device if it is damaged, or if there is any damage to the net cable or to the plugs. In case the
appliance is damaged, immediately pull the plug from the socket.
▶ Never open the device. In case of fault, please contact our service centre or any other specialized shop.
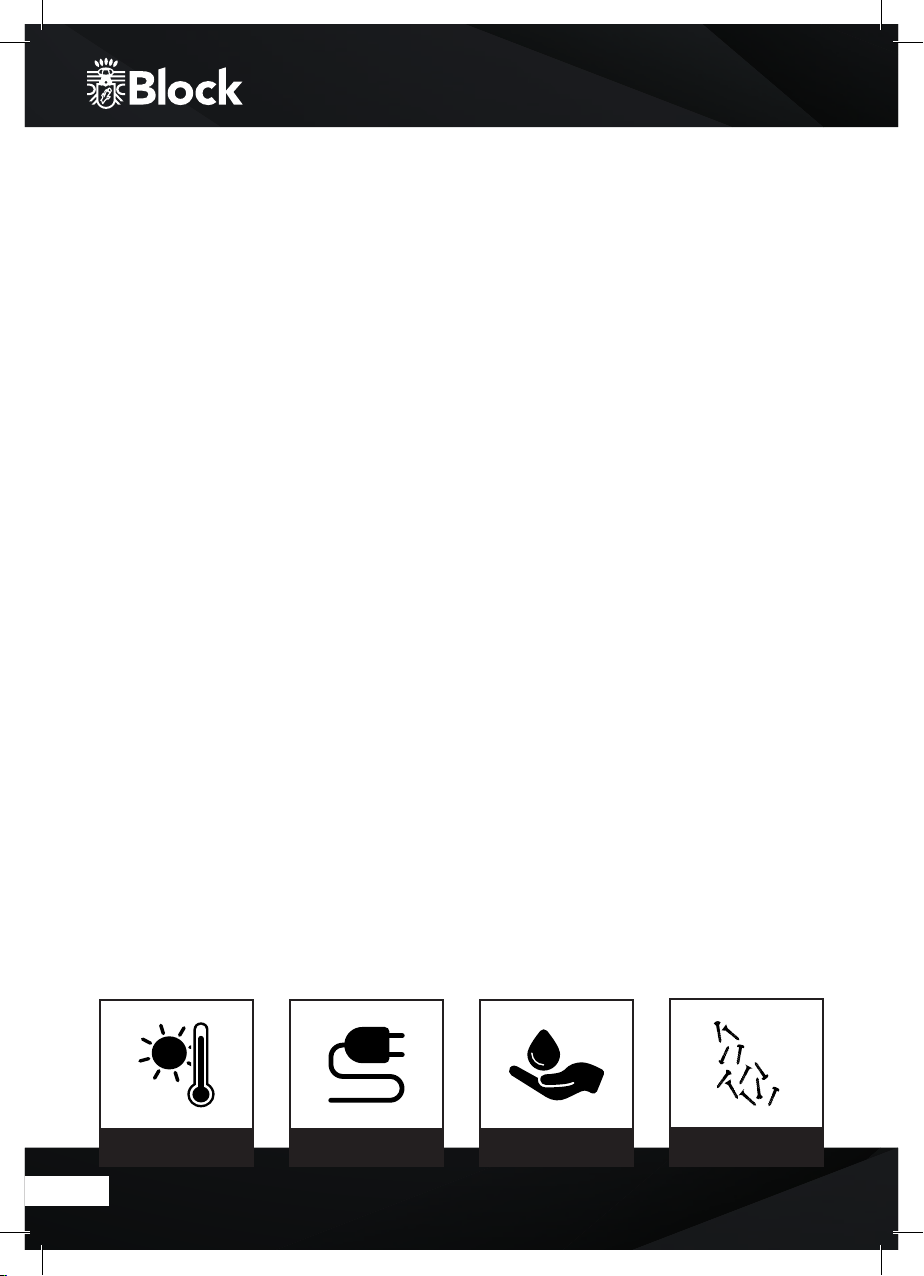
Keep the device away from heat sources!
Ensure suicient air circulation when
installing in a rack!
14
Handle the power cable
always with caution!
Keep the device away
of moisture!
Achten Sie darauf, dass keine
Be careful that none
Gegenstände in das Gerät fallen!
Objects fall into the device!
Page 15
Safety instructions
Caution: to avoid the risk of electric shock, do not modif y this device! The opening of the device as well as changes in the appliance may be carried out only by authorized personnel. Important security instructions:
▶ Before using the device for the first time, please read the operating instructions thoroughly.
▶ This device is to be used indoors only.
▶ This device may be connected only to a socket intended for it.
▶ This device is not to be exposed to humidity.
▶ Make sure the appliance does not stand to close to other objects
▶ Make sure the appliance does not stand near a heat source
▶ Make sure that the connection cable is not damaged or is going to be damaged
Information on disposal of the old equipment:
Your product is made of high quality and recyclable materials. With this symbol, the product fulfils the
EU Directive 2002/96 / EC. Please do not dispose of your appliance in the domestic waste but in a suitable
separate collection of materials. Electronic devices, accessories and packaging shall be handled to special
places intended and marke d by signs for its purpose. For more information, where you find these places, please
contac t your local garbage disp osal service. Please, kee p to this regulation in orde r to give a better env ironment
to our children.
The equipment complies with the EU norm (73/23/EEC). and fulfils the electromagnetic
compatibility (89/336/EEC).
The flash icon shall warn the user of not isolated hazardous voltages in the device’s housing. This voltage could
be strong enough to injure people through an electrical shock. The exclamation mark shall draw the attention
of the user to the fact that the manual, delivered together with the device, contains important operating and
maintenance instructions.
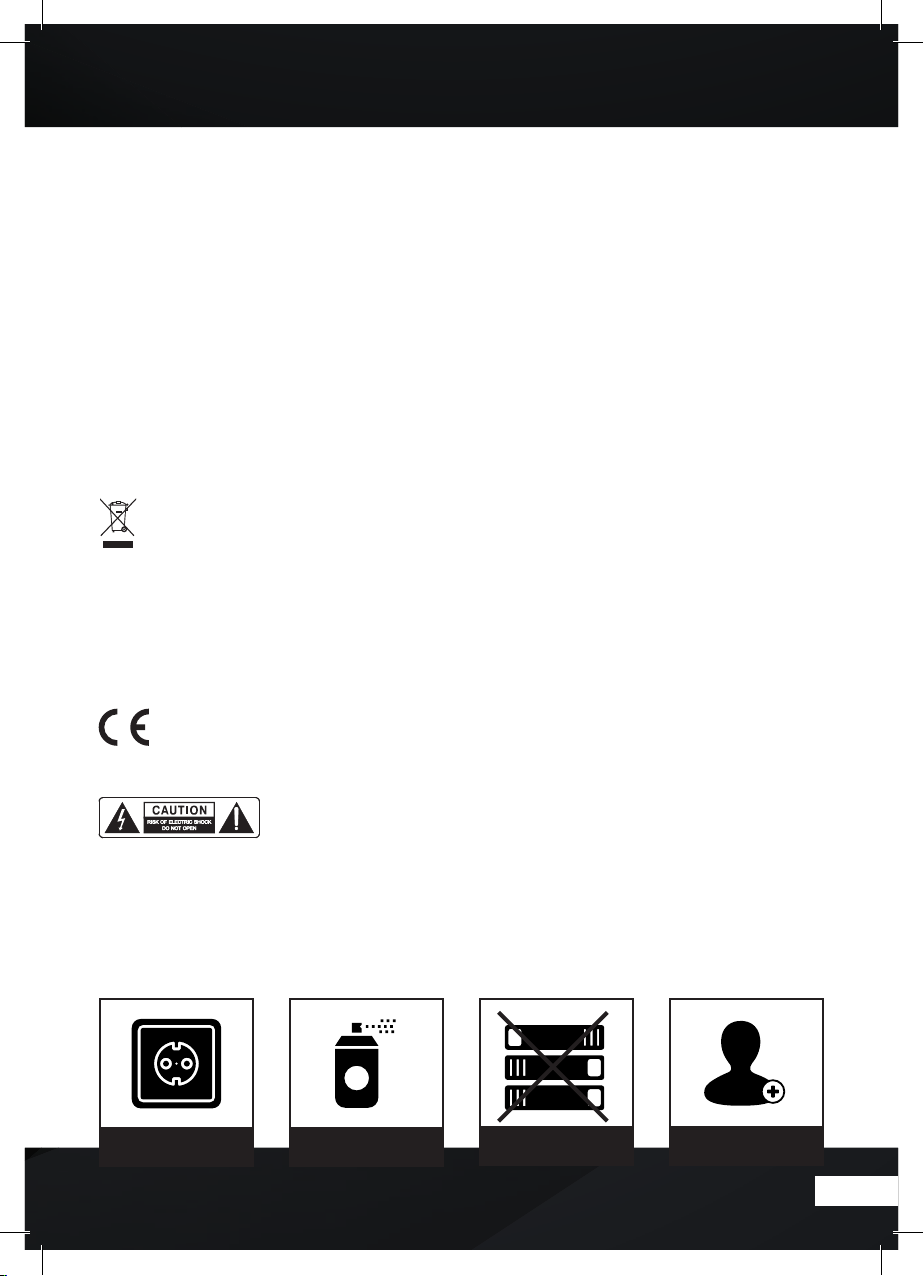
Remove the device from the power
if it is not used for a long time!
Make sure that no sprays or chemi-
cals get to your device!
Make sure that your device is not
covered!
Make sure that the device is only
opened by authorized persons!
15
Page 16

Technical details
Electronic speed: 33/45 RPM
Speed fluctuation: ± 0,1 %
External voltage ratio: 60 db
Power consumption 9 Watt
External power supply input: AC 110–240 V at50–60 Hz
External power supply output: DC 9V / 1A
Dimensions W | H | T: 430 x 130 x 370 mm
Weight: 6,7 kg
System: Audio Technica AT-3800
Package contents
• Basic chassis with preassembled tone arm
• Turntable
• Felt mat
• Power supply
• Counterweight for the tone arm
• Transmission belt
• LF connection cable
• USB cable
• Soware CD
• Manual
Software CD
To record your vinyl record, install the enclosed Soware CD.
Insert the CD into your CD drive and follow the instalation instructions on your screen.
16
Page 17
Important NOTE:
While putting the equipment together, small parts can be lost. To avoid this, place building blocks
in safe locations! Before you start setting the device up, please make sure that all parts listed above
are available. The list can be found on the opposite page.
You may also need an additional spirit level and a tone arm scale during setup. Both are not included
in the scope of delivery.
17
Page 18
18
Page 19

Structure of the device
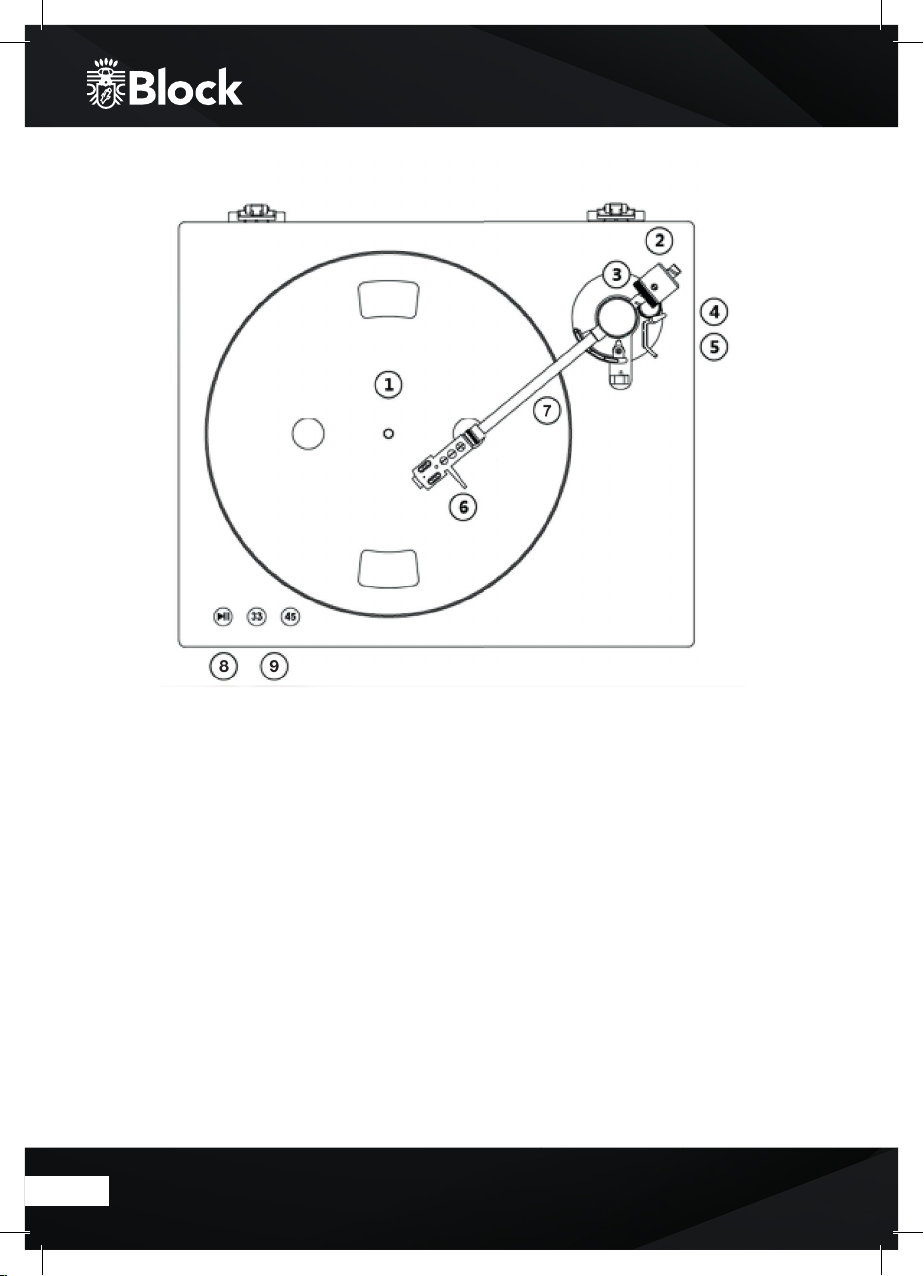
1. Turntable platter
The platter is equipped with a slip mat. This makes it easier to manipulate the record for
scratch performance. Place vinyl records centered on the turntable platter.
2. Counterweight
Adjustment creates the proper downward pressure of the stylus to the record. Attach now by
sliding the counterweight onto the rear of the tone arm.
3. Stylus pressure adjustment scale
Adjust stylus cartridge’s pressure alignment.
4. Antiskating knob
This applies inward force to the tone arm so it doesn’t skip outward across the record due to
the centrifugal force of the record spinning.
5. Ton ear m li
Control the up and down action of the tonearm.
6. Headshell
Install cartridge here. During installation, attach the stylus protector to guard the stylus tip
from damage.
Attach wires as follows:
White (L+) Le channel +
Blue (L-) Le channel –
Red (R+) Right channel +
Green (R-) Right channel –
7. Tonearm
This is a fully manual tonearm, to start playback, gently place the stylus on the record using
head shell finger support or use the tonearm lier.
8. Play | Pause Button
Press this button to start playback or to resume playback aer a pause.
9. 33/45 rotation speed setting button
Press these buttons to select the platter’s rotation according to your speed indicated on the
record for 33, 45 revolutions per minute.
19
Page 20
20
Page 21

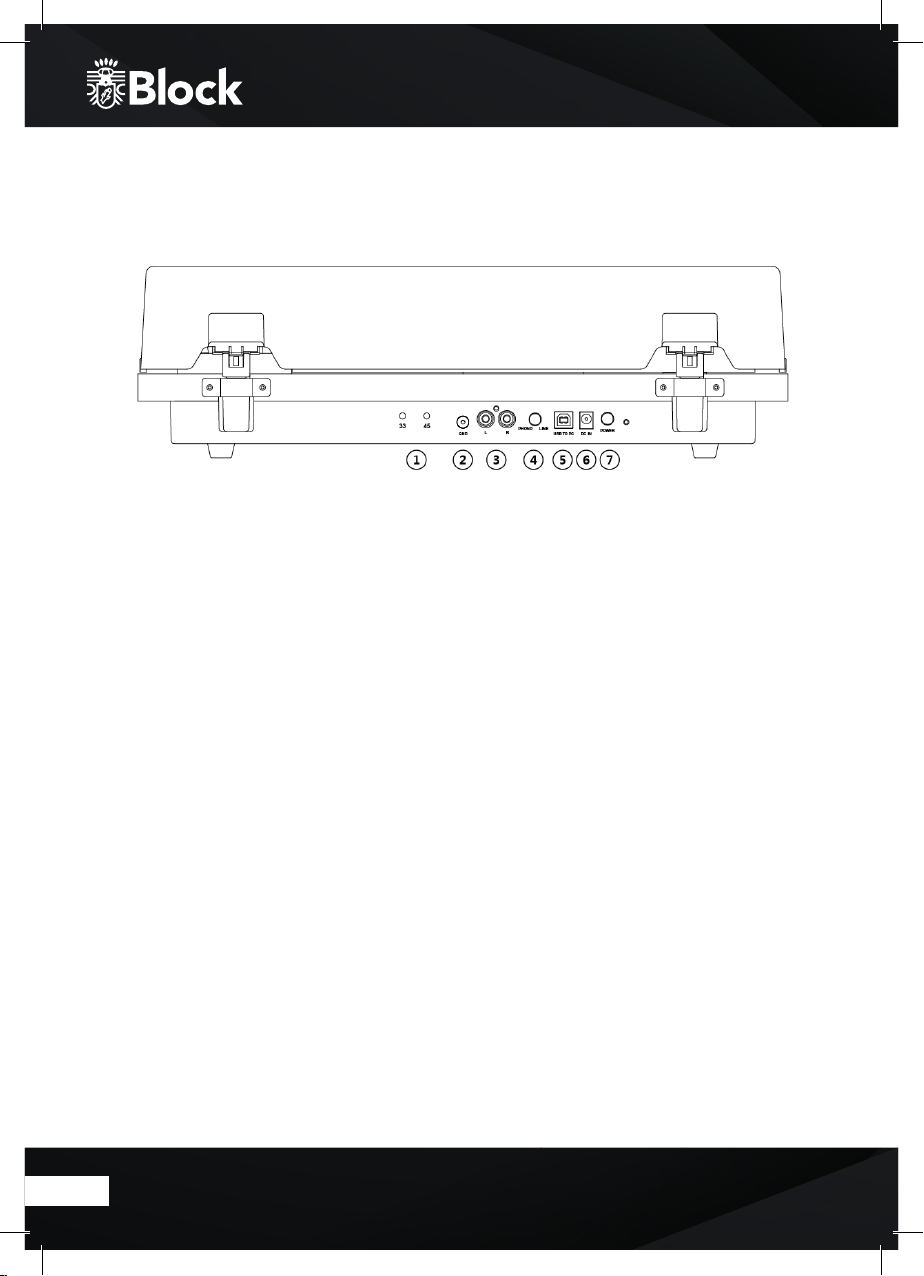
Connections & Settings
1. Adjustments
The turntable has already been adjusted at works. However if you need to adjust the rotation
speed, use these controls.
2. Ground terminal
Use the grounding wire of the included Audio cable to connect this connector to the grounding
terminal of the amplifier.
3. Analog output
OUTPUT L and R are used for connecting the turntable to the RCA analog input on your ampli
fier. Cable compatible with these sockets are of the type RCA, they are traditionally
identified by a color code RED to the RIGHT channel and WHITE for the LEFT channel.
4. Phono/Line
The turntable has a built-in PHONO preamplifier that is disengaged if you have an external
preamplifier. If you want to use the signals amplified by the internal amplifier of the turntable,
move the switch to Line. If you want to use an external PHONO preamplifier, move the switch to Phono.
5. USB port
The sound of your vinyl record is converted to digital with a maximum resolution of
48KHz / 16bits. Use the USB cable that came with the device to connect the turntable to your
computer. A CD with Audacity recording soware is also provided.
6. DC IN
Plug the power adaptor here.
7. Power ON/OFF
Use to turn the turntable on and o.
21
Page 22

Valuable tips
If you place the record player on a resonance -free background (decoupling mats or wooden panels),
this will prevent interferences.
Maintenance and care
Your turntable requires little maintenance and care. Use a so cloth to clean. We recommend securing the needle before cleaning the turntable. This will avoid damaging the needle.
If you do not use your turntable for a long time, we recommend that you remove the strap so it will
not wear out.
Please always remove the power supply before servicing or maintaining your device.
Service
If you have a problem with your device that you cannot solve yourself, please contact your authorized Block dealer. If you can not be helped there either, please contact the manufacturer directly!
Warranty repairs can only be cared out successfully if the equipment is shipped in a proper package.
Keep your original packaging for this. Never ship the turntable without making sure that the unit is
disassembled and properly packaged. Please disassemble the following parts and pack them separately: turntables, feet, weight and pickups. Secure the tone arm with the transport lock!
Guarantee
The manufacturer does not assume any responsibility for damage resulting from disregard of the
operating instructions and / or from the non-use of the original packaging. Changing or modifying the device also invalidates the warranty. The manufacturer reserves the right to make technical
changes without prior notice.
02.2019
22
Page 23

Troubleshooting
Block products are produced under a high quality standard. Only aer a strict final inspection, our
devices leave the factory. Any errors that may occur are not automatically material defects or of
technical origin, but can also come from external conditions or other circumstances. The following
list is intended to help you troubleshoot problems:
1. The turntable does not rotate even though the engine is on.
The device is not connected to the power cord.
No power on the socket.
The belt drive is not stretched or has expired.
2. No signal on one or both channels.
Check connection cable and connection to the amplifier. The amplifier is not switched on or is set on
„MUTE“. The amplifier is not connected to the speakers.
3. Strong noise on the phono input:
The grounding cable from the turntable to the amplifier is not connected.
4. Distorted or unstable sound from one or both channels.
The input selector switch on the amplifier is not set correctly - MM / MC.
The needle is damaged.
23
Page 24
Audioblock GmbH
Auf der Striepe 3a | 27798 Hude
Tel.: +49 (0) 44 84 - 920 090 10 | E-Mail: [email protected]
www.audioblock.com
 Loading...