

Page 1
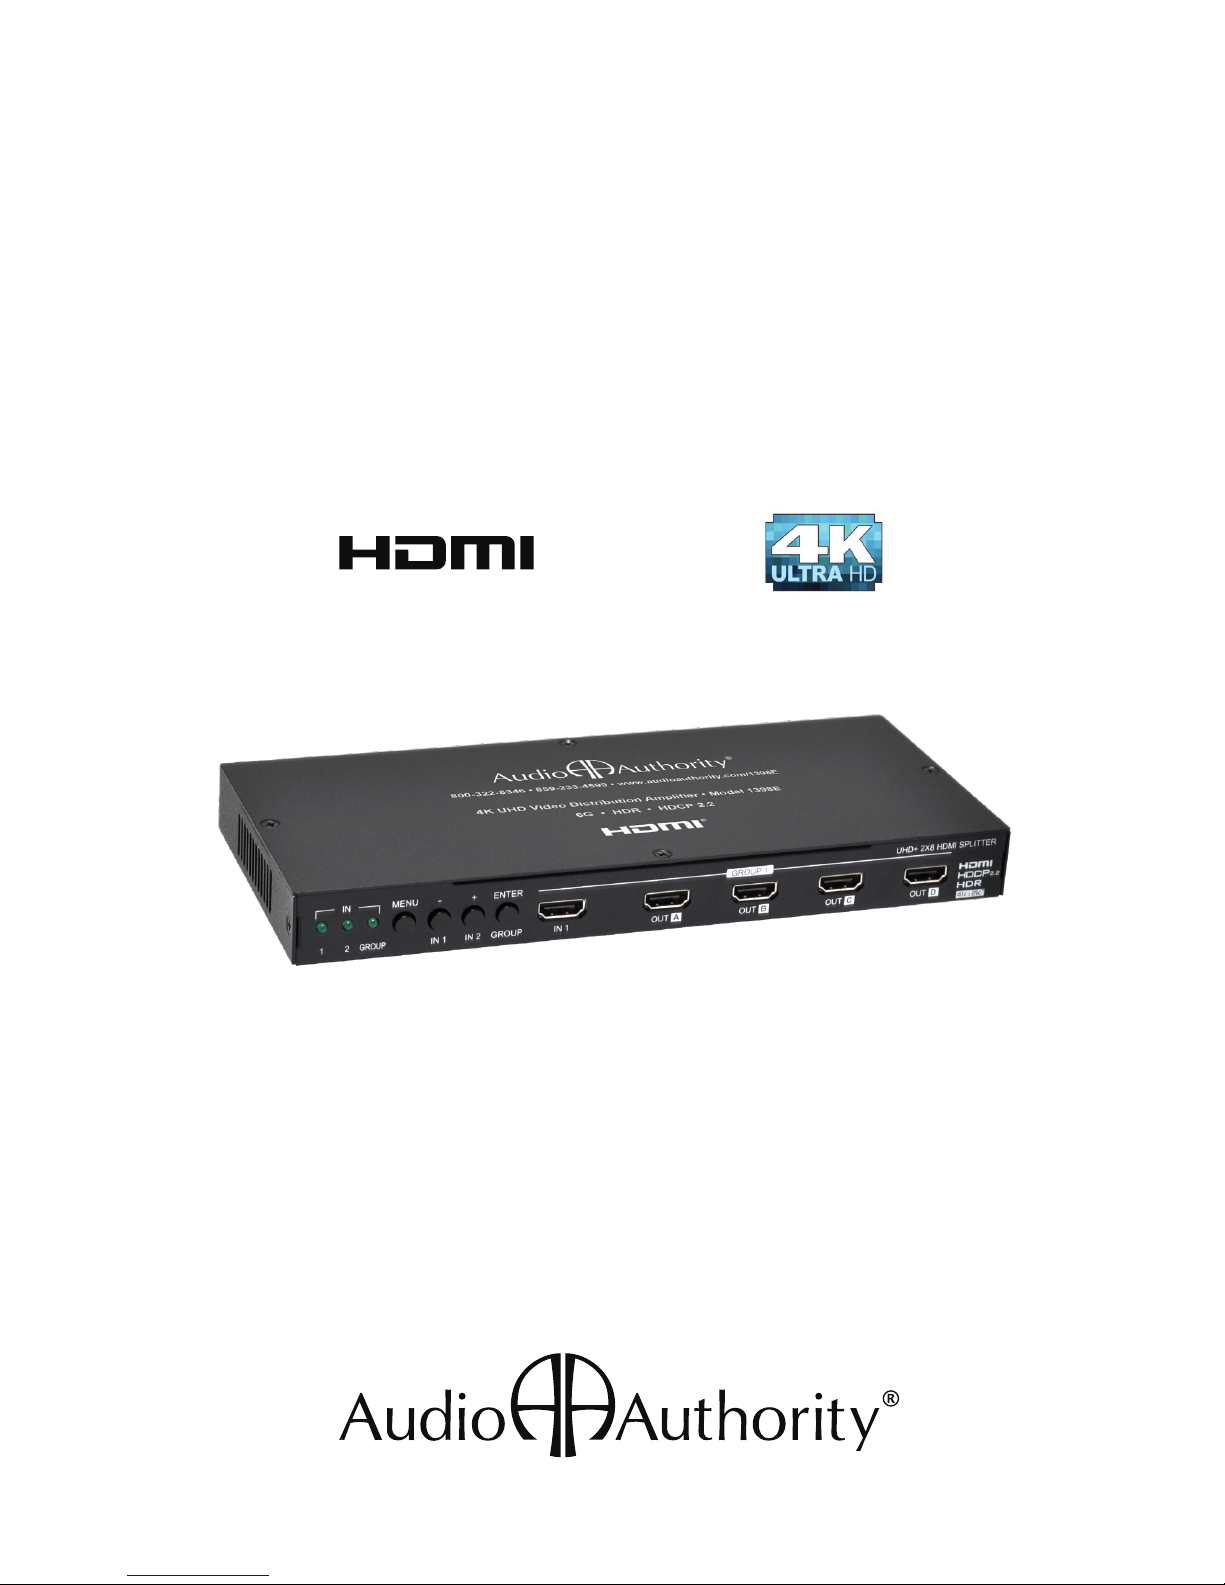
User Manual
4K UHD
Video Distribution Amplier
®
Model 1398E
Page 2

2
Page 3

3
Table Of Contents
Introduction . . . . . . . . . . . . . . . . . . . . . . . . . . . . . . . 4
Checking Package Contents . . . . . . . . . . . . . . . . . . . . . . 4
Getting the Best Results . . . . . . . . . . . . . . . . . . . . . . . . 5
Planning a Distribution System . . . . . . . . . . . . . . . . . . . . . 6
Installation . . . . . . . . . . . . . . . . . . . . . . . . . . . . . . . 7
On Sceen Display . . . . . . . . . . . . . . . . . . . . . . . . . . . 9
RS-232 . . . . . . . . . . . . . . . . . . . . . . . . . . . . . . . . 15
Serial Commands . . . . . . . . . . . . . . . . . . . . . . . . . . . 15
Operation . . . . . . . . . . . . . . . . . . . . . . . . . . . . . . . 19
Specications . . . . . . . . . . . . . . . . . . . . . . . . . . . . . 20
Troubleshooting . . . . . . . . . . . . . . . . . . . . . . . . . . . . 20
Limited Warranty . . . . . . . . . . . . . . . . . . . . . . . . . . . .21
Regulatory Compliance . . . . . . . . . . . . . . . . . . . . . . . . 22
Contact Information . . . . . . . . . . . . . . . . . . . . . . . . . . 22
4K UHD
Video Distribution Amplier
®
Model 1398E
Page 4

4
Introduction
Thanks for purchasing a 4K distribution amplier from Audio Authority®. The
1398E with resolution tracking are designed to distribute 4K video signals to
multiple displays in a retail environment. The latest chipsets allow 4K video
signals to be scaled automatically to match each display’s optimal resolution
and video format. With this capability it is no longer necessary to divide TVs
on display into separate distribution systems, according to their resolution.
Link multiple distribution ampliers to create a hub-and-spoke layout for large
distribution systems.
Features
● Two HDMI inputs, eight HDMI outputs
● Port-by-port EDID management 4K to 1080p down-scaling and color space
conversion (4:4:4 to 4:2:0), independent HDCP management engine for each
output ensures stable performance
● Special “Group Mode” allows the 1398E to function as two independent 1×4
splitters in a single device
● Supports 4K resolutions up to 3840x2160@23/24/25/29/30/50/59/60Hz
and 4096x2160@23/24/25/29/30/50/59/60Hz
● HDCP 2.2 compliant
● Clock Speed: 300MHz~600MHz
● Video bandwidth: 18Gbps
● Support for eight internal EDIDs, eight external EDIDs copied from connected
devices, and two user provided EDIDs
● Supports CEC “active source” commands to periodically reset the input
selection on CEC-compatible connected displays
● Controllable via front-panel buttons, with OSD, and RS-232
● Supports all bitstream audio formats such as LPCM 7.1 Dolby Digital and DTS
● Mini-USB rmware update for expanding compatibility
Checking Package Contents
Before attempting to use this device, please check the packaging and make
certain the following items are contained in the shipping carton:
● Distribution amplier
● 5VDC power adapter
● User manual
Page 5
5
Getting the Best Results
Many factors inuence the quality and reliability of HDMI signal distribution
installations. The following are the main factors to consider, and basic precautions
that will ensure the best possible performance.
● Port-by-Port EDID management - 4K to 1080p down-scaling and color space
conversion (4:4:4 to 4:2:0), independent HDCP management engine for each
output ensures stable performance so make sure port 1 is connected to a TV
with the highest resolution capability. Enable HDR on the high resolution outputs
using the OSD or RS-232.
● Source resolution and video/sound quality - Sources, such as satellite
receivers or cable boxes can output at low resolutions or deliver compressed
video material that may yield poor results. Consider the source when planning
and troubleshooting your system.
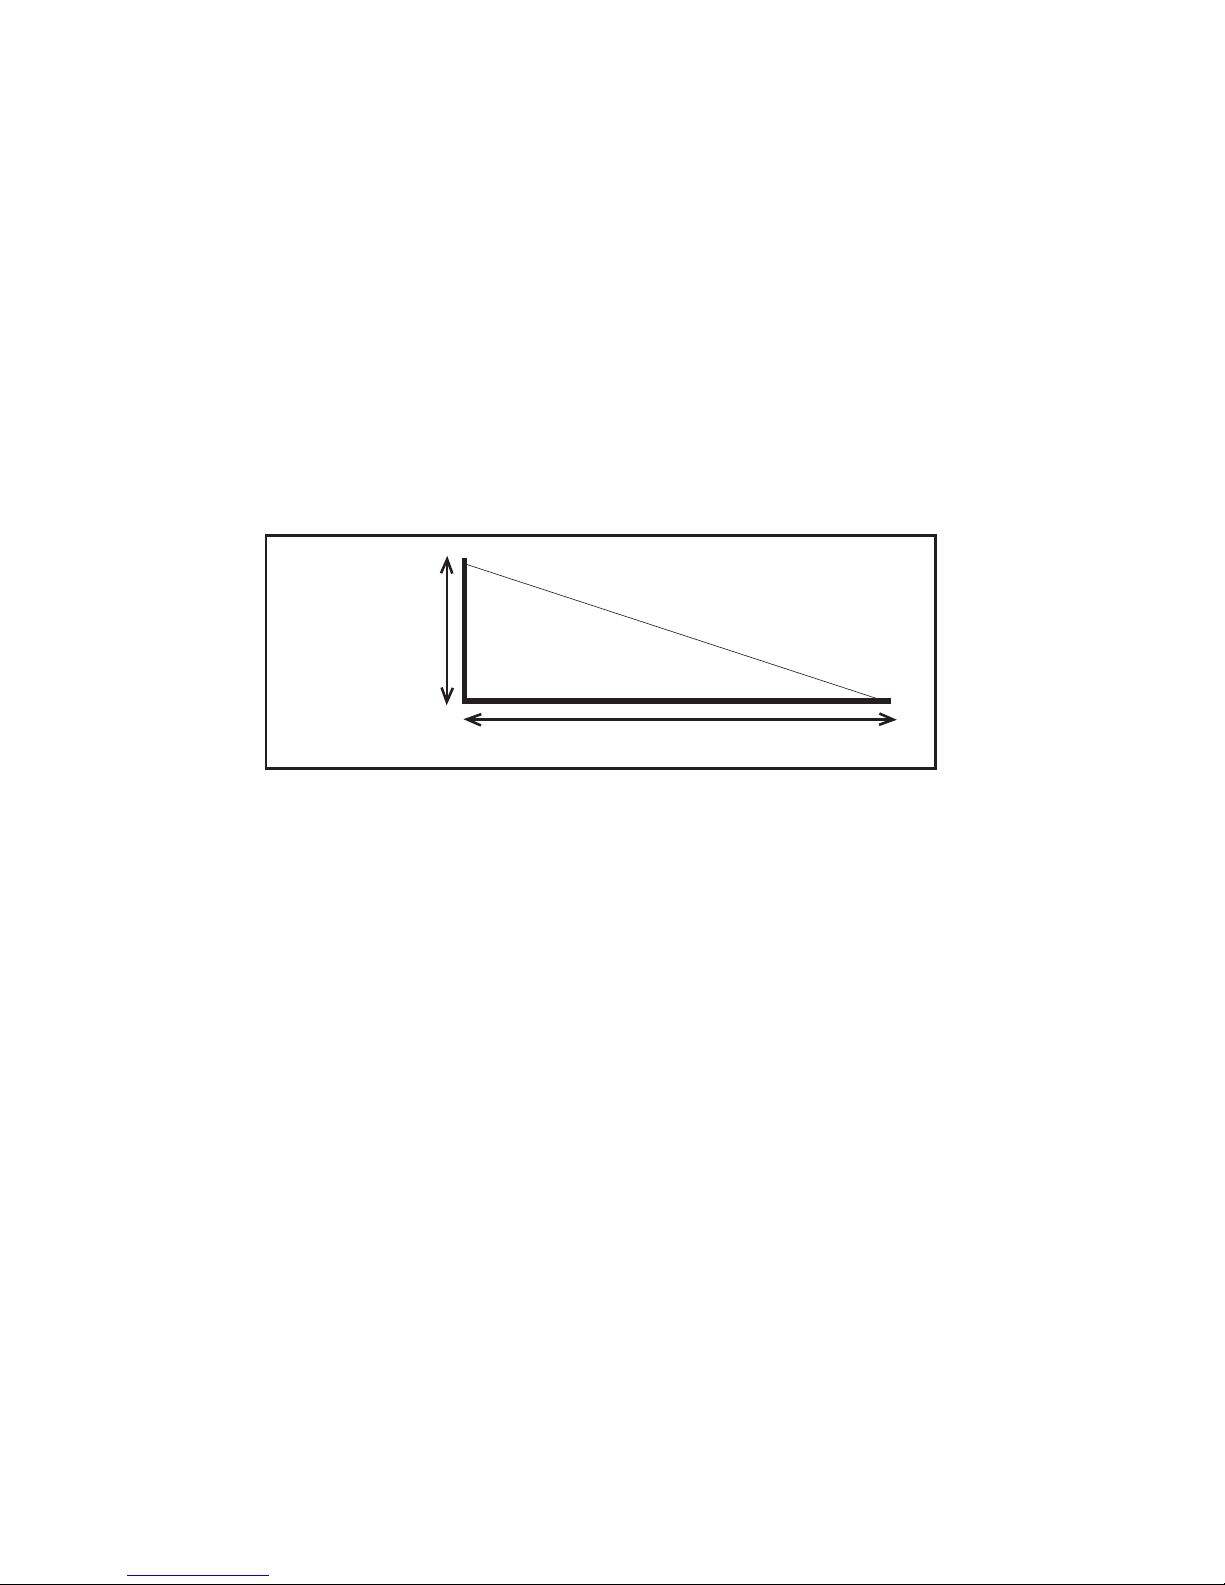
● Distance between the DA source and the displays - Use the shortest
cables possible, but premium certied high speed cables and advanced
HDMI extenders may be necessary for the longest runs.
● Connection cables - HDMI cable design and quality are extremely important
in long cable runs where capacitance can severely degrade performance. Use
premium certied high speed cables designed to handle 4K resolutions and 3D;
low quality cables are susceptible to interference. Always use good strain relief
methods to prevent cables from becoming loose over time.
● Interference from nearby electrical devices - RF emission can have an
adverse effect on signal quality. For example, older computer monitors often
emit very high electromagnetic elds that can interfere with the performance of
nearby video equipment.
Higher
Lower
Shorter Distance Longer Distance
Resolution
Refresh Rate
Bit Depth
Page 6
6
● Each display should be tested with the source(s) being used to ensure basic
compatibility before connecting them to a distribution amp and/or switcher.
Not all HDMI components and displays are compatible with every feature
and format.
● Since HDMI connectors can sometimes become loose, mount the switcher
or distribution amplier to a at surface and add strain relief tie-downs a few
inches away from every HDMI cable connector.
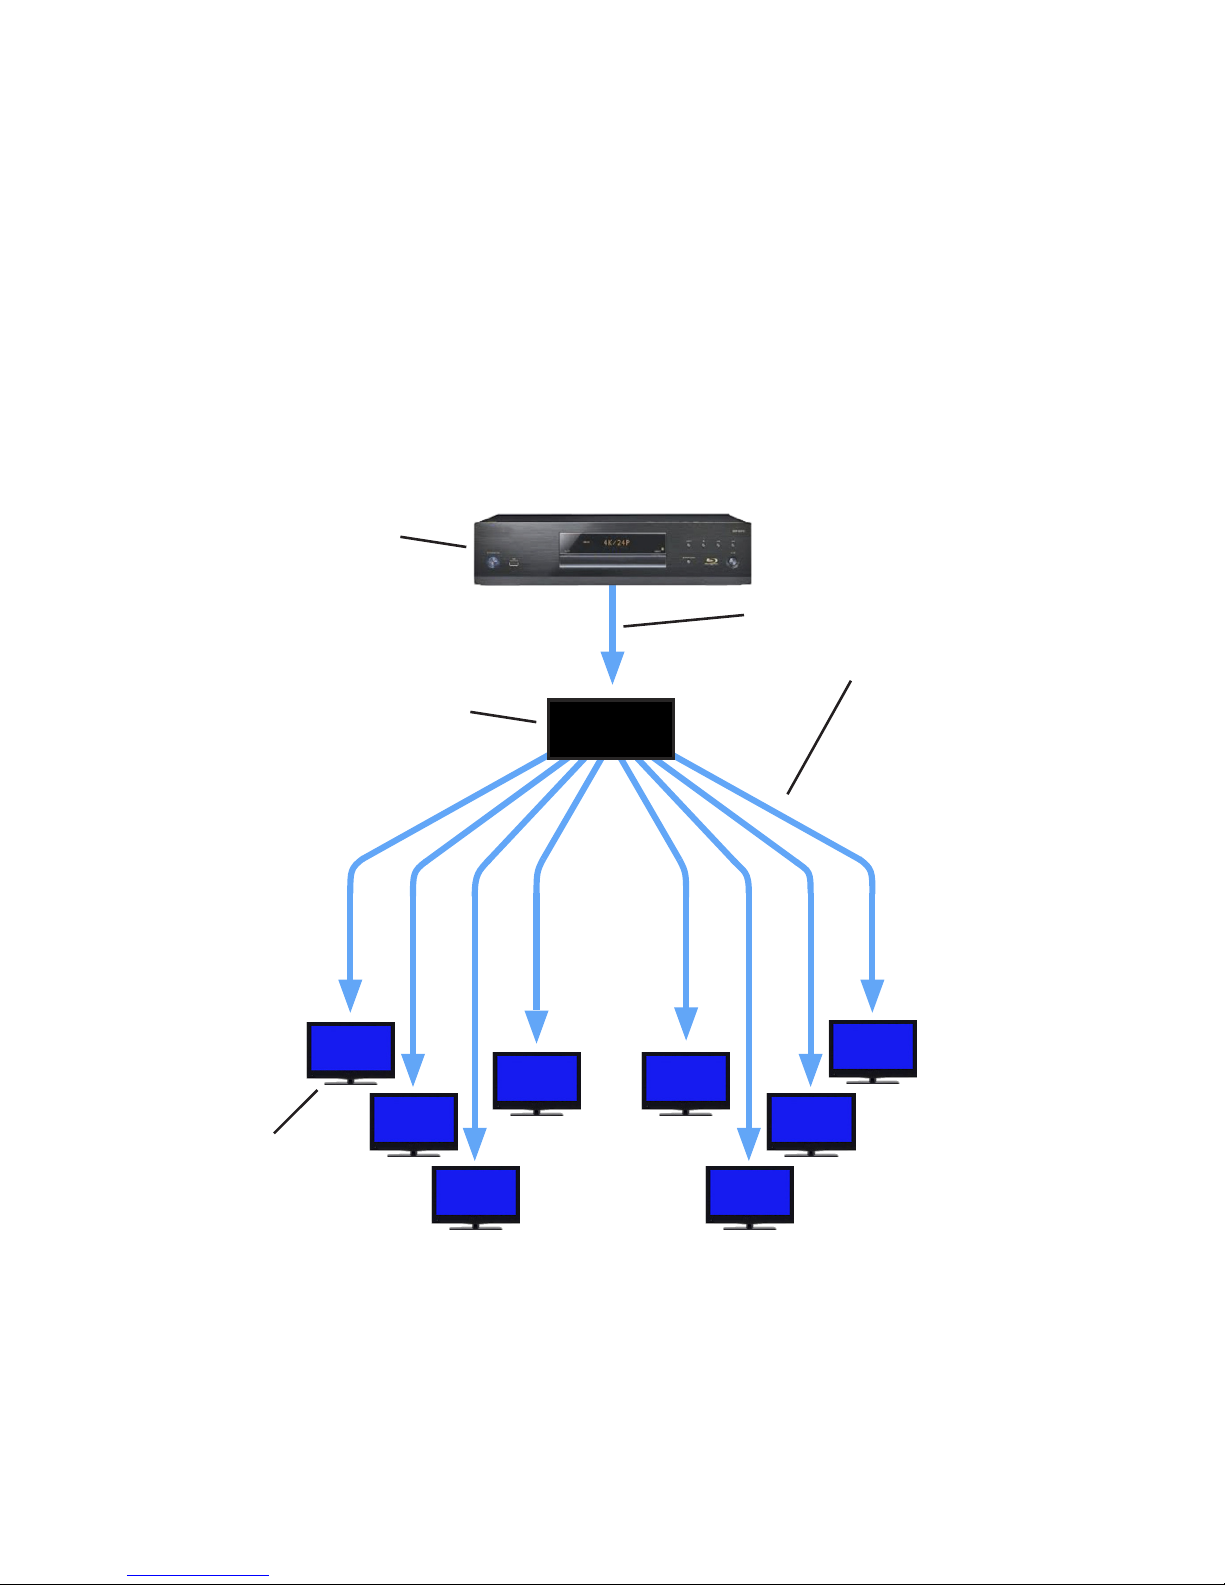
1398E
4K
4K
4K 4K
4K
1080p
1080p
1080p
EIGHT MIXED RESOLUTION TVS ON DISPLAY
4K PLAYER
1398E
PREMIUM CERTIFIED
HIGH SPEED HDMI
CABLES
OUTPUT 1
4K TV WITH
HDR
Page 7
7
Installation
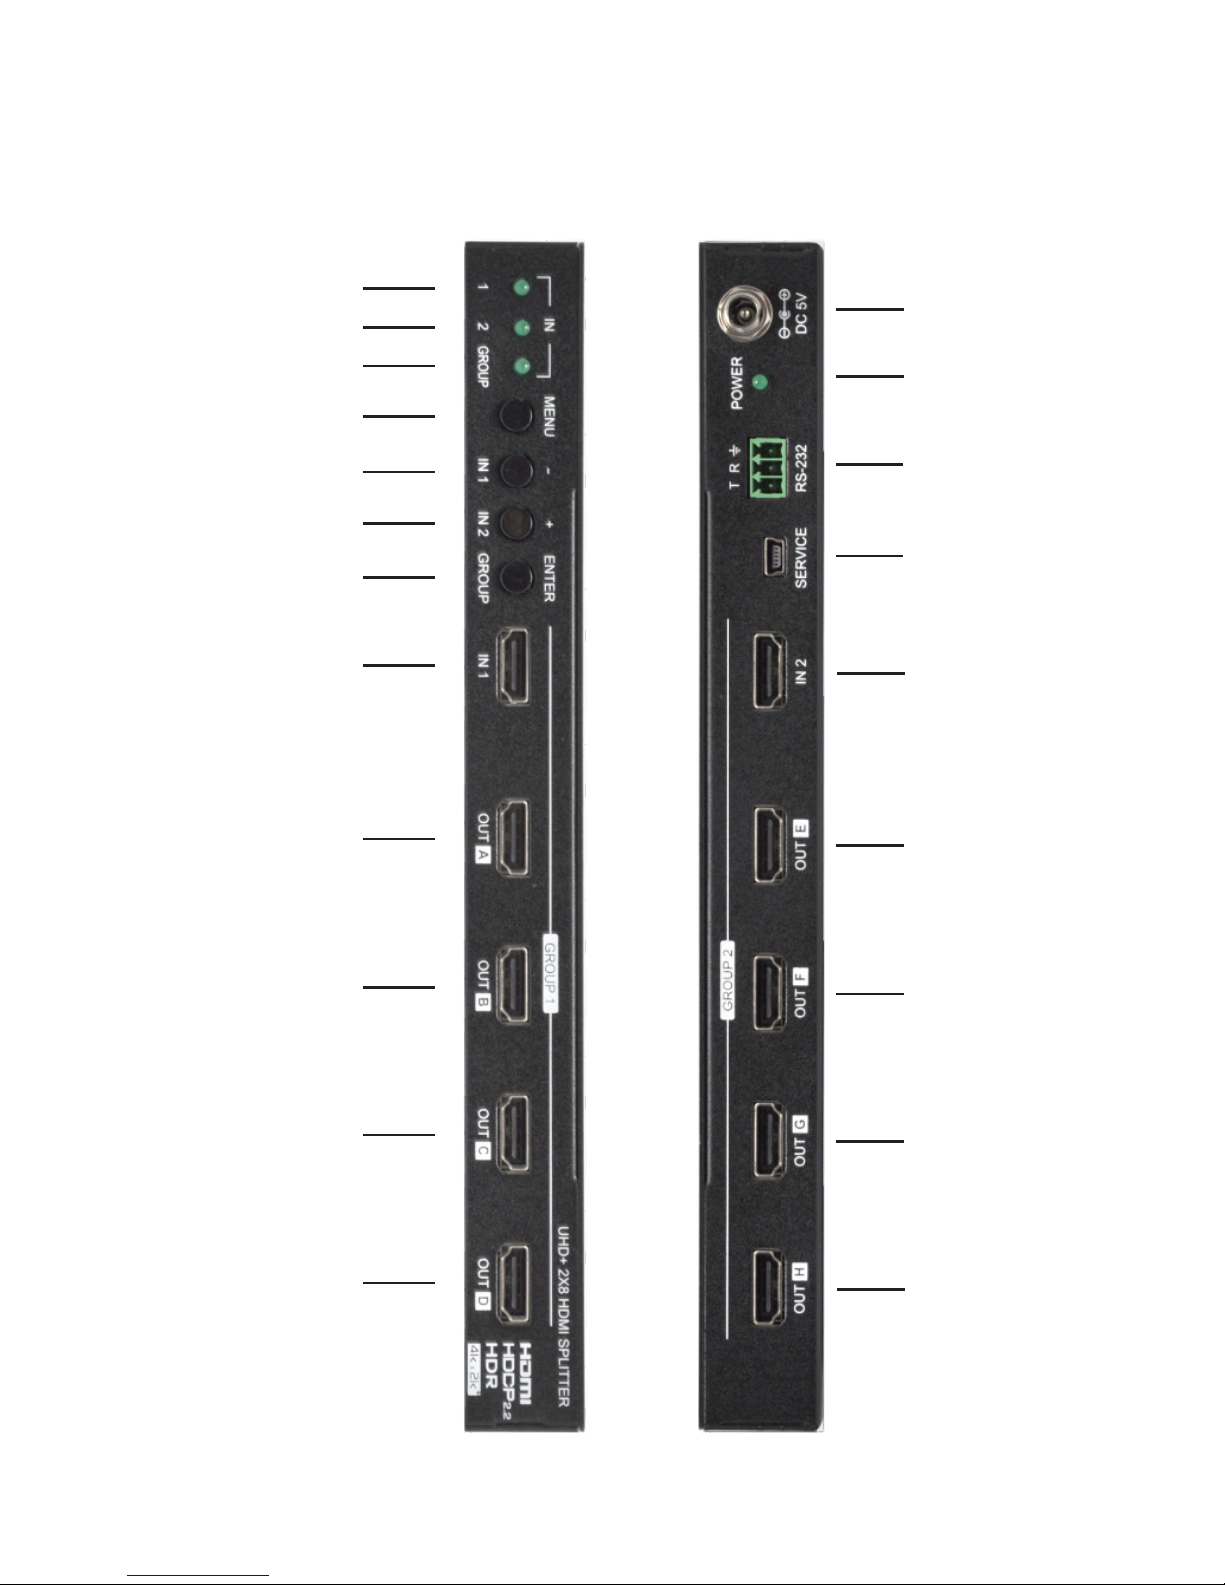
Study the picture below and become familiar with the controls, signal inputs,
outputs, RS-232, and power input.
OUTPUT C
OUTPUT B
OUTPUT A
INPUT 1
OUTPUT E
OUTPUT F
OUTPUT G
OUTPUT H
OUTPUT D
GROUP LED
INPUT 2
INPUT 1 LED
INPUT 1 / – SWITCH
INPUT 2 / + SWITCH
GROUP / ENTER
SWITCH
INPUT 2 LED
MENU
FIRMWARE
UPDATE
PORT
POWER
POWER LED
RS-232
FRONT PANEL REAR PANEL
Page 8
8
Wiring the System
● Switch off all devices, including monitors.
● Connect a premium certied high speed cable from the HDMI source to the
input(s) of the 1398E. Cable lengths should be kept as short as possible.
● Connect the outputs of the 1398E to displays or other devices.
● Make certain that the HDMI cables are securely plugged into the source and
display devices as well as the 1398E. Always use premium certied high speed
cables, and the shortest length possible, for best results.
● Connect the power adapter to the AC source and then to the 1398E.
● The 1398E begins to function as soon as the AC adapter is connected to the
1398E and AC power. There is no power switch.
● Turn on the HDMI source and HDMI destination devices and observe the source
signal on the inputs of all of the destination devices.
Note: Proper operation of HDMI distribution ampliers depends on the use
of premium certied high speed HDMI cables with low loss, high bandwidth
signal handling capabilities.
Switch Settings
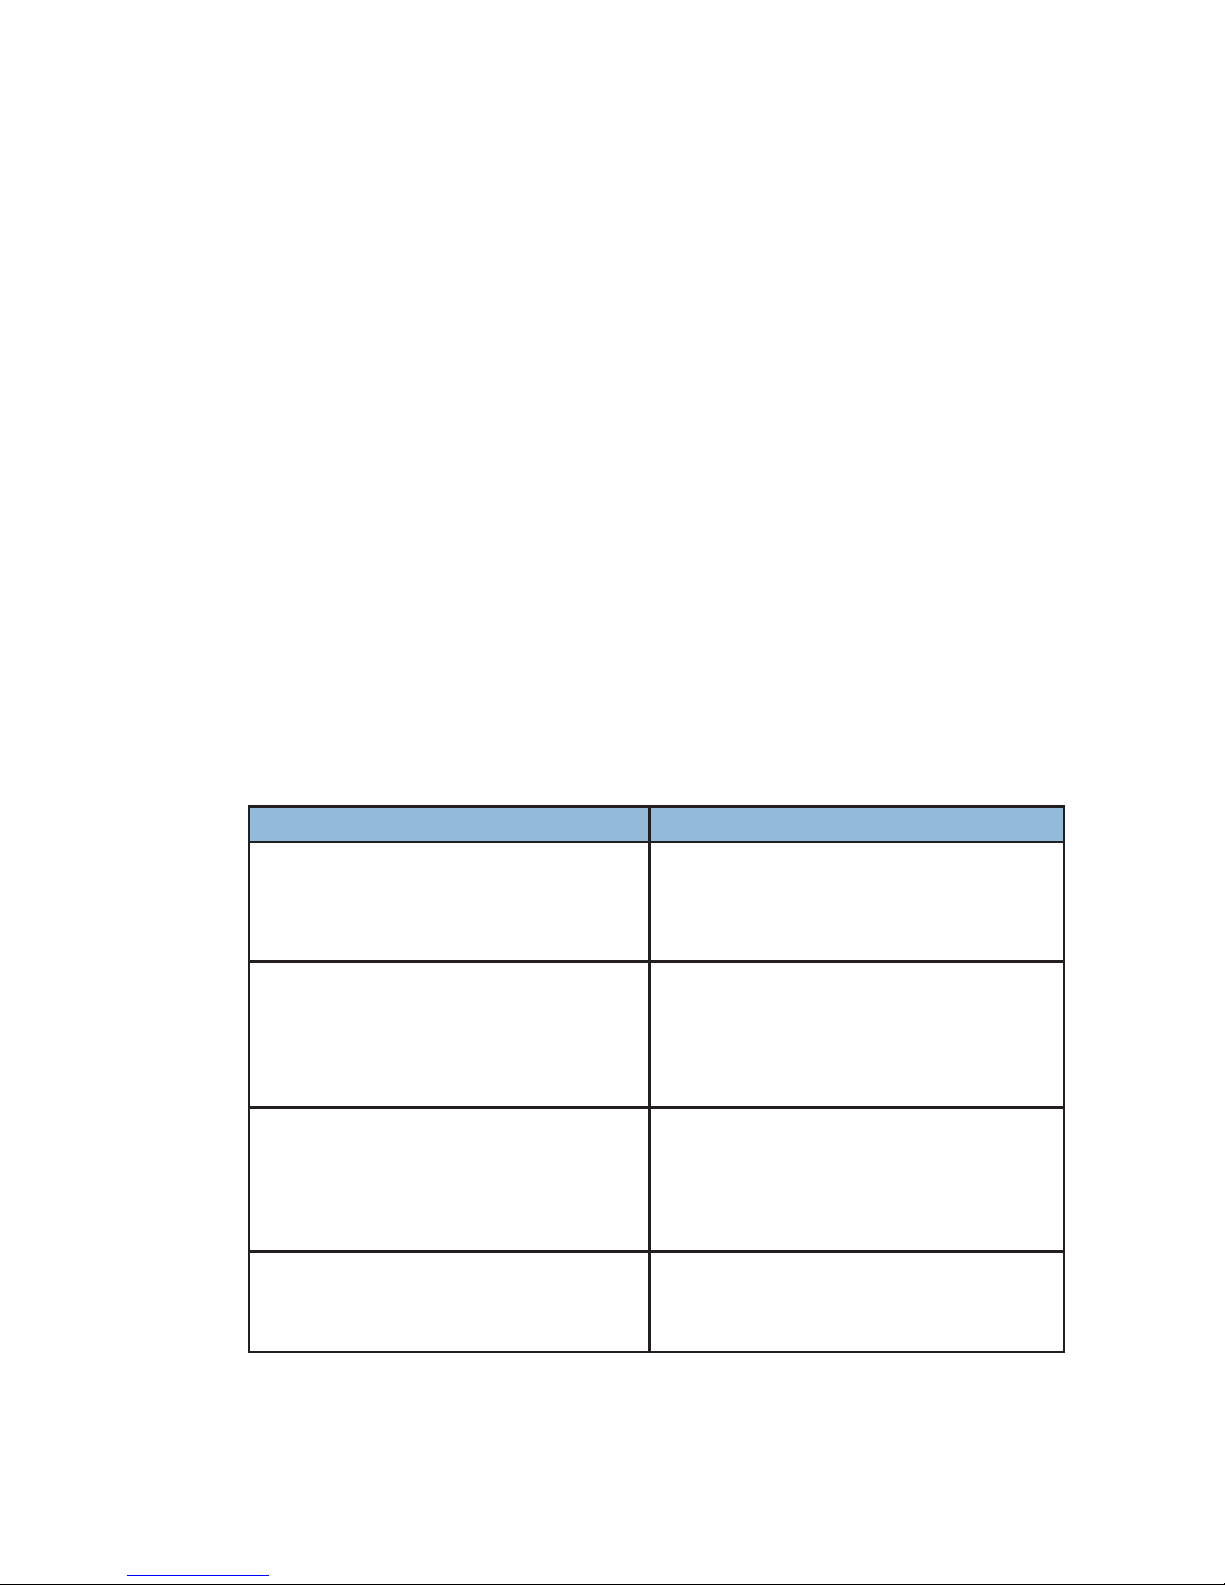
The 1398E can be controlled by using the front panel switches or when viewed
from the On Screen Display (OSD).
OSD FRONT PANEL
*MENU: Press to enter the On Screen
Display (OSD) menu, or to back out
from menu items.
Note: Press and hold the “MENU” button
for 3 seconds while connecting the
power adapter to reset all settings to
the factory defaults.
–: Press to move down or adjust
selections within the OSD menus.
Note: Pressing “MENU” and “−” together
will force Input 1 to use the internal
“FHD, 2CH” EDID.
INPUT 1: Press this button to switch to
Input 1.
+: Press to move up or adjust selections
within OSD menus.
Note: Pressing “MENU” and “+” together
will force Input 2 to use the internal
“FHD, 2CH” EDID.
INPUT 2: Press this button to switch to
Input 2.
*ENTER: Press to conrm a selection
within the OSD or to go deeper into a
menu item.
GROUP: Press this button to toggle Group
Mode on and off.
*Note: Press and hold the “MENU” and “ENTER” buttons together for 3 seconds
to lock or unlock the front panel.
Page 9
9
On Screen Display Main Menu
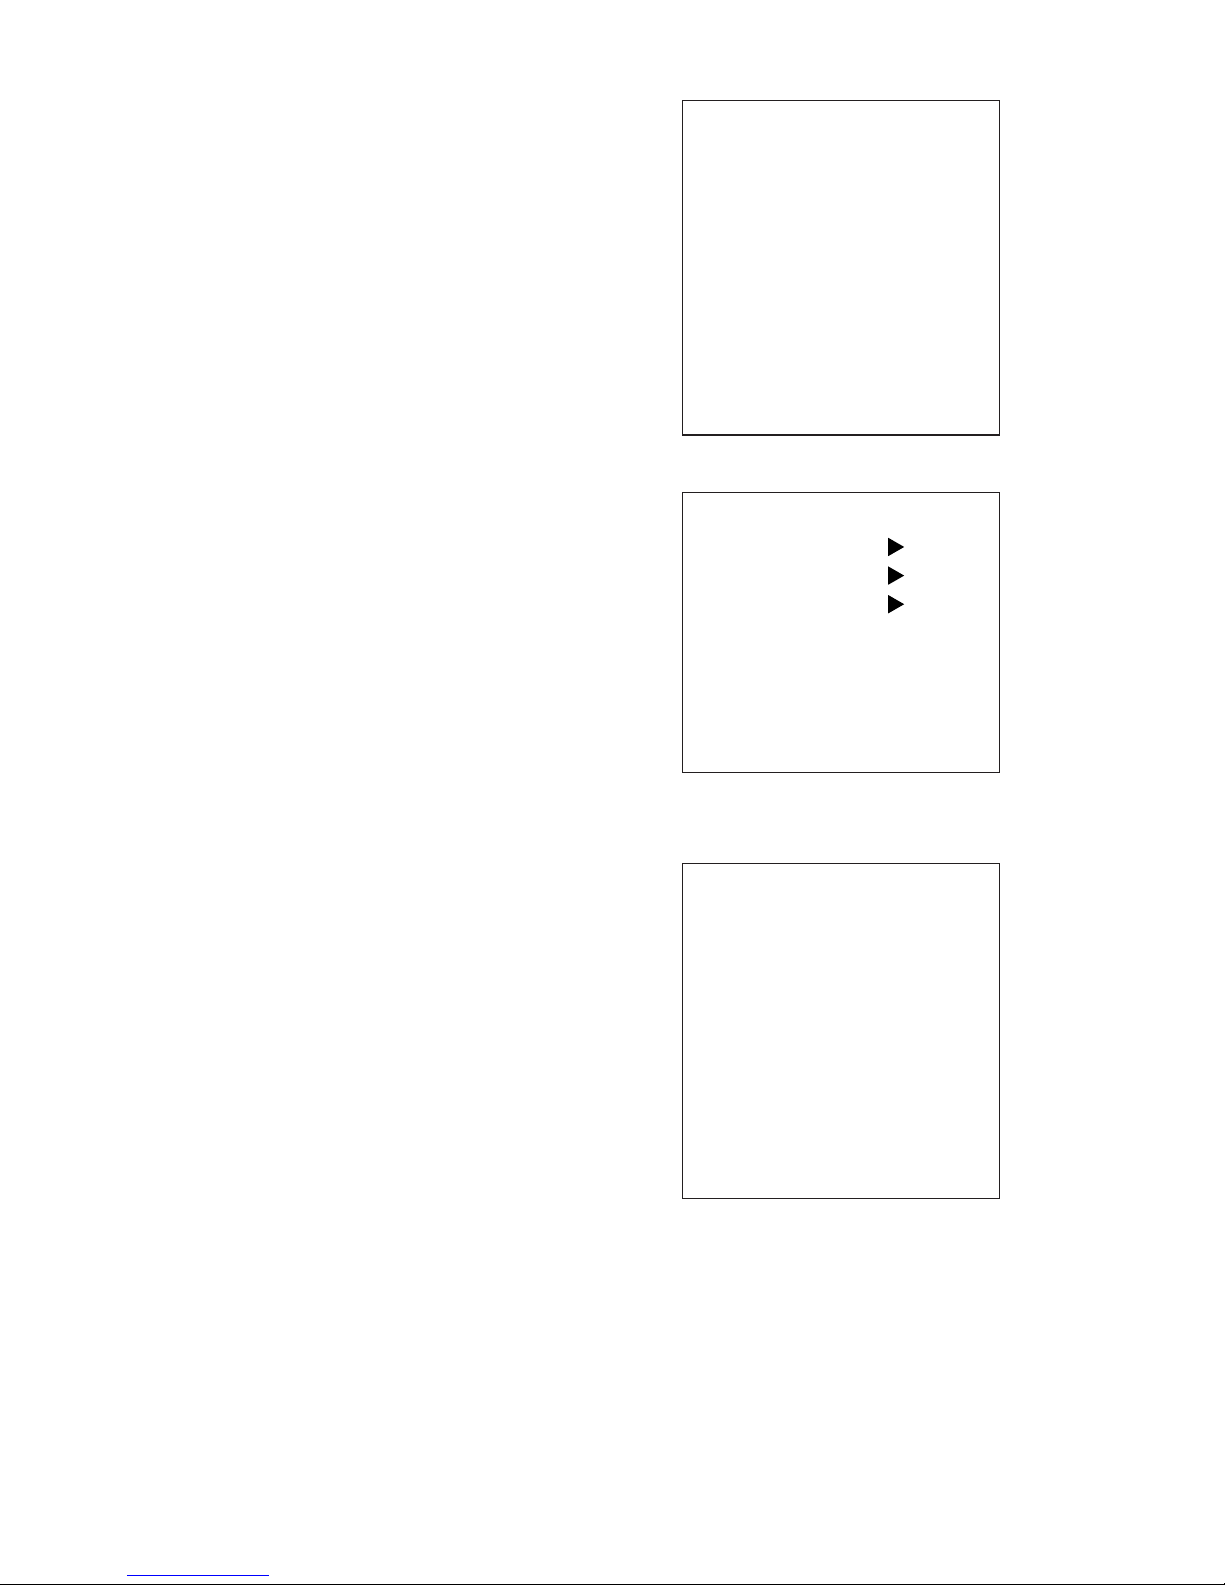
All primary functions of the 1398E can be
controlled by using the On Screen Display
(OSD), which is activated by pressing the Menu
button on the front panel. Use the + (PLUS), −
(MINUS), and ENTER buttons to navigate the
OSD menu. Press the Menu button to back out
from any menu item, and press it again to close
the menu.
Note: All screen display setting examples
shown are the default setting.
Input Switch
● Switch to: Select the input to display when
Group Mode is disabled.
Note: Selecting an Input when Group
Mode is turned on will disable Group Mode.
● Auto Switch: Enable or disable the auto
switch function.
Note: Auto Switch works when Group Mode
is disabled.
● Group Mode: Enable or disable Group Mode.
Input Information
● Input 1 and Input 2: Current input’s vendor
name based on the source’s info-frame data.
Note: Some devices may not provide this
information.
● Name: The current input’s product name
based on the source’s info-frame data.
Note: Some devices may not provide this
information.
● Fmt: The video format of the current input.
● Reso: The resolution and framerate of the
current input.
● Freq: The signal frequency of the current input.
● Depth: The color bit-depth of the current input.
● Color: The color space of the current input.
● HDCP: The HDCP status of the current input.
● Audio: The audio format of the current input.
● HDR: The HDR status of the current input.
Input Switch
Input Information
Output 4k Converter
Output Information
EDID Control
HDCP Control
CEC Control
Remote Control
OSD Setting
System Setting
Return
Main Menu
Switch to Input 1
Auto Switch OFF
Group Mode OFF
Input Switch
In 1 OPPO
Name UDP-203
Fmt HDMI
Reso 3840x2160p@59Hz
Freq 445.04MHz
Depth 12bit
Color YUV420
HDCP HDCP22 Active
Audio LPCM 2Ch
HDR No
Return
Input Information
:
:
:
:
:
:
:
:
:
:
Page 10
10
Output 4K Converter
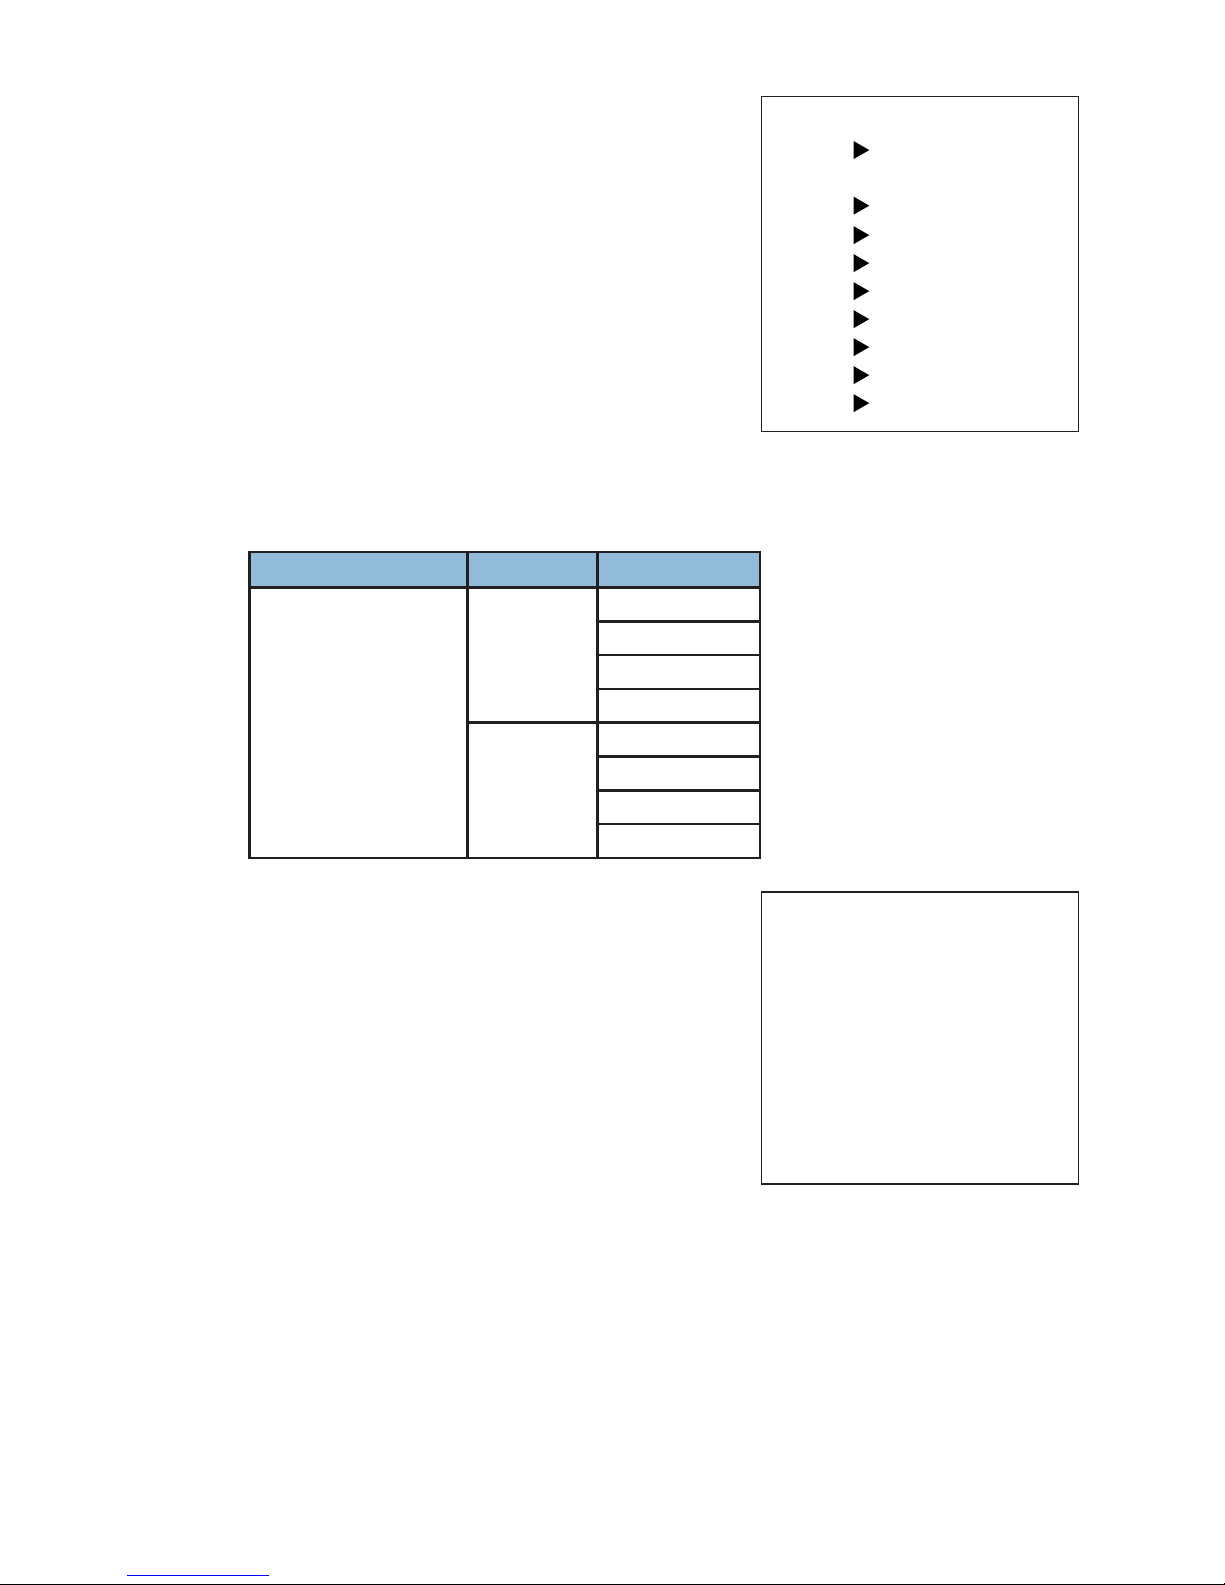
● All: Set the 4K conversion mode for all of the
outputs. Setting this to bypass will disable the
4K conversion function.
Note: Making changes to this setting will
overwrite the individual output’s settings.
● Out A-H: Set the 4K conversion mode to use for
each of the outputs individually.
Note: 4K conversion is only available with 4K
sources. Due to a chipset limitation, 4K sources
using the 4:2:2 color space may display with
incorrect colors when scaled to 1080p. If this occurs, partitioning the 1398E into
two 1x4 switchers may provide a solution in this case.
MAIN MENU LEVEL 2 LEVEL 3
Output 4K Converter All Bypass
YUV420
1080p
AUTO
Out A-H Bypass
YUV420
1080p
AUTO
Output Information
● Provides the connection status, resolution
and framerate for each output.
Note: See page 19 for a chart of supported
DVI and HDMI resolutions
EDID Control
● Input 1: Assign the selected EDID to Input 1*.
● Input 2: Assign the selected EDID to Input 2*.
*Note: Changing the EDID may result in the source changing resolutions and
blanking of the output for a couple seconds.
● Vndr: Provides the vendor name from the EDID used with the current Input.
● Name: Provides the monitor name from the EDID used with the current Input.
OutA 3840x2160p@59
OutB 3840x2160p@59
OutC 3840x2160p@59
OutD 3840x2160p@59
OutE 3840x2160p@59
OutF 3840x2160p@59
OutG 3840x2160p@59
OutH 3840x2160p@59
Output Information
:
:
:
:
:
:
:
:
All Auto
OutA Auto
OutB Auto
OutC Auto
OutD Auto
OutE Auto
OutF Auto
OutG Auto
OutH Auto
Return
Output 4k Converter
Page 11
11
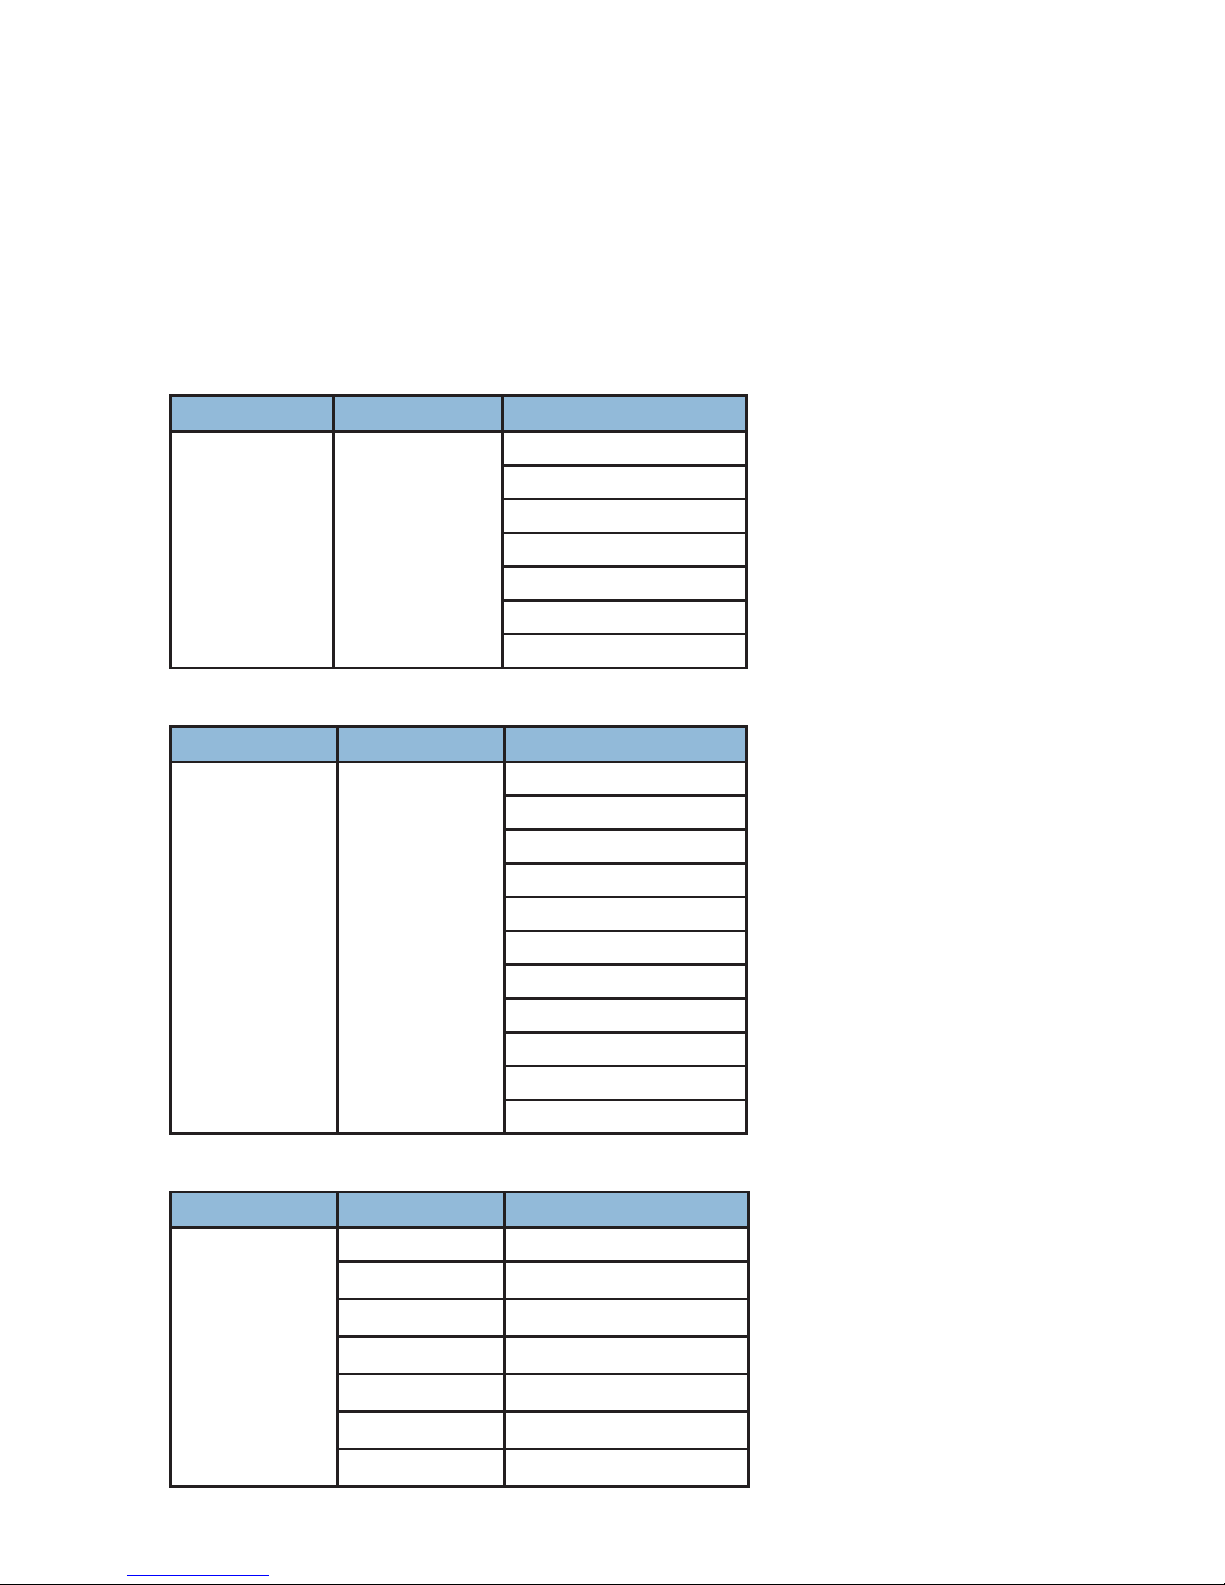
● Reso: The maximum supported resolution from the EDID used with the
current Input.
● Freq: The maximum supported frequency from the EDID used with the
current Input.
● Depth: The maximum supported bit-depth from the EDID used with the
current Input.
● YCbCr: The color space supported by the EDID used with the current Input.
● HDR: Displays if HDR is supported by the EDID used with the current Input.
MAIN MENU LEVEL 2 LEVEL 3
EDID Control Input 1 or Input 2 INT FHD 2CH
Int FHD MCH
Int UHD 2CH
Int UHD MCH
Int UHD+ 2CH
Int UHD+ MCH
Int HDR 2CH
MAIN MENU LEVEL 2 LEVEL 3
EDID Control Input 1 or Input 2 Int HDR MCH
User 1
User 2
Copy Out A
Copy Out B
Copy Out C
Copy Out D
Copy Out E
Copy Out F
Copy Out G
Copy Out H
MAIN MENU LEVEL 2 LEVEL 3
EDID Control Vndr Detailed EDID Information
Name
Reso
Freq
Depth
YCbCr
HDR
Page 12
12
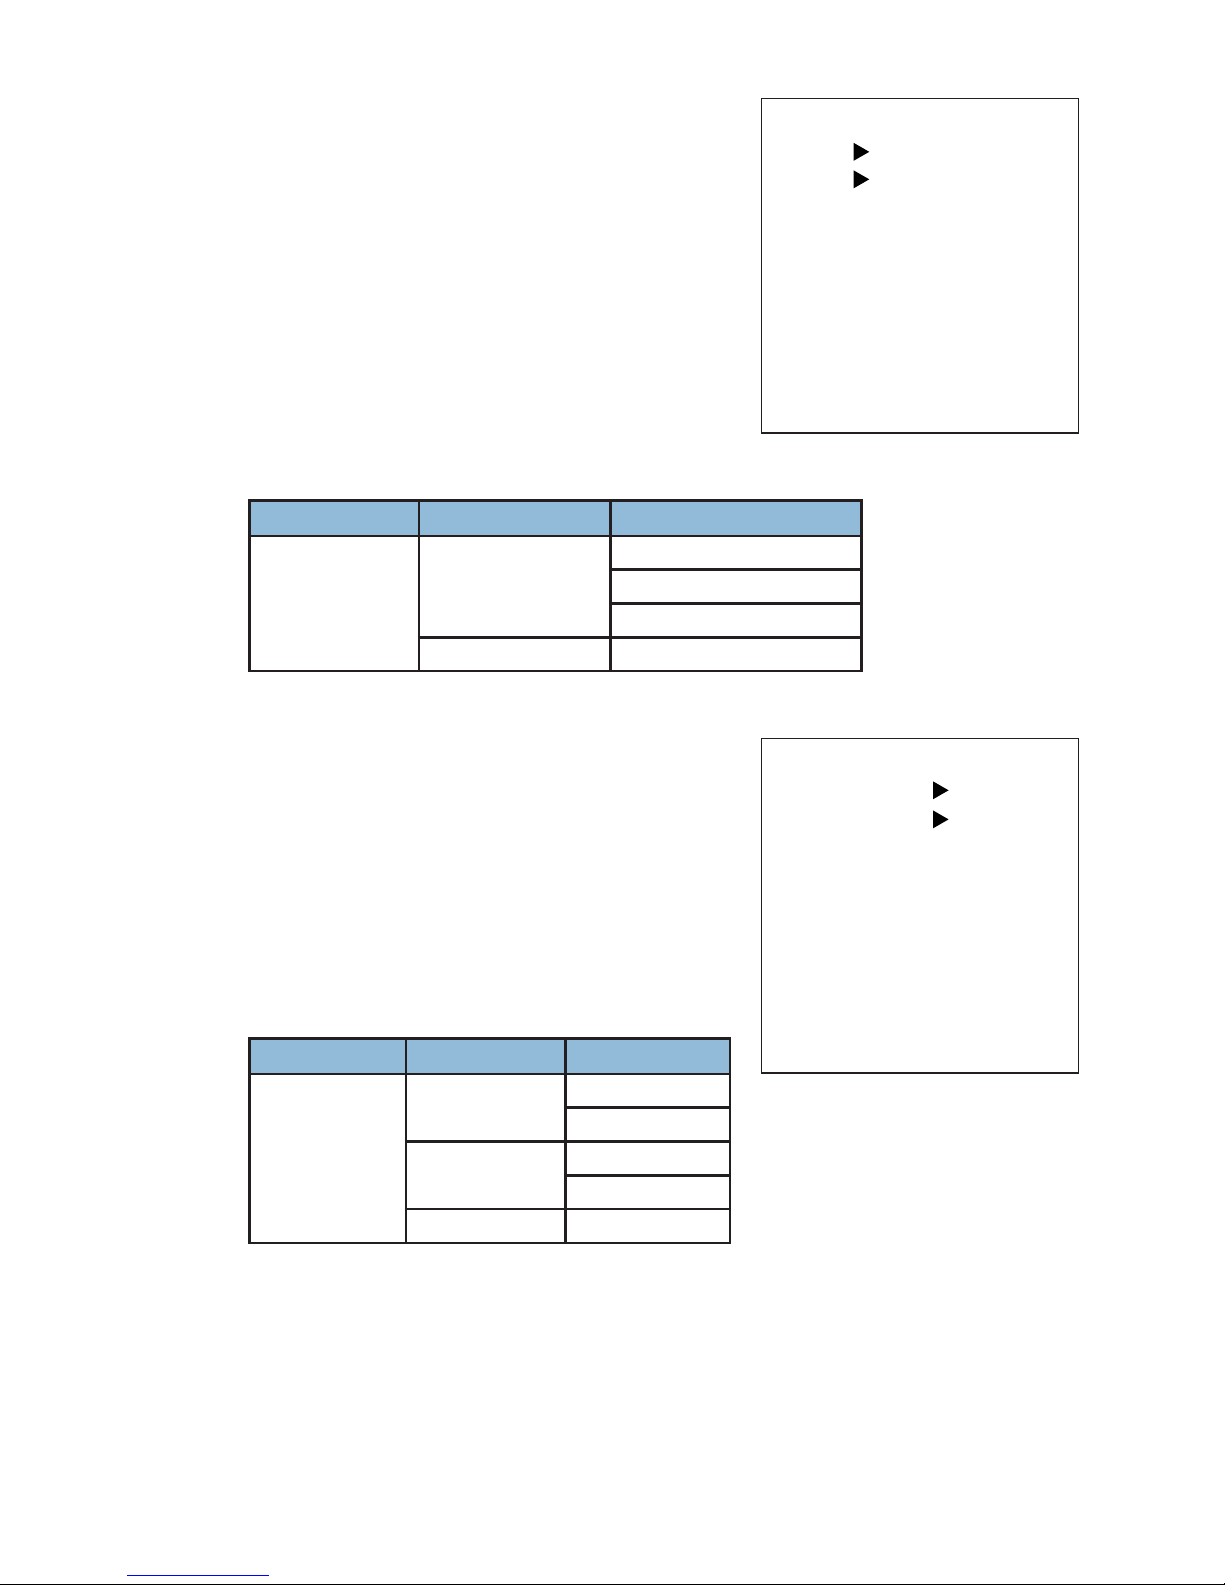
HDCP Control
● Input 1: Set the HDCP mode for Input 1.
● Input 2: Set the HDCP mode for Input 2.
● Out A-H: Show the current HDCP status of each
Output (A-H).
MAIN MENU LEVEL 2 LEVEL 3
EDID Control Input 1 or Input 2 Apple Mode
Refer Source
REFER SINK
Out A-H HDCP Status Information
CEC Control
● Auto Active: Enable or disable sending the CEC
“active source” command to connected displays
every 10 minutes*.
● Auto Standby: Enable or disable sending the
CEC “standby” command to connected displays,
if there has been no live input source detected
for more than 10 minutes*.
● Out A-H: Display the CEC address of each
connected display.
MAIN MENU LEVEL 2 LEVEL 3
CEC Control Auto Active On
OFF
Auto Standby On
OFF
Out A-H CEC Address
*Note: The connected display must support
CEC “active source” command.
OutA HDCP22 Active
OutB HDCP22 Active
OutC HDCP22 Active
OutD HDCP22 Active
OutE HDCP22 Active
OutF HDCP22 Active
OutG HDCP22 Active
OutH HDCP22 Active
In1 Refer Sink
In2 Refer Sink
Return
HDCP Control
:
:
:
:
:
:
:
:
OutA Address 3000
OutB Address 1000
OutC Address 1000
OutD Address 1000
OutE Address 1000
OutF Address 1000
OutG Address 2000
OutH Address 2000
Auto Active O
Auto Standby O
Return
CEC Control
:
:
:
:
:
:
:
:
Page 13
13
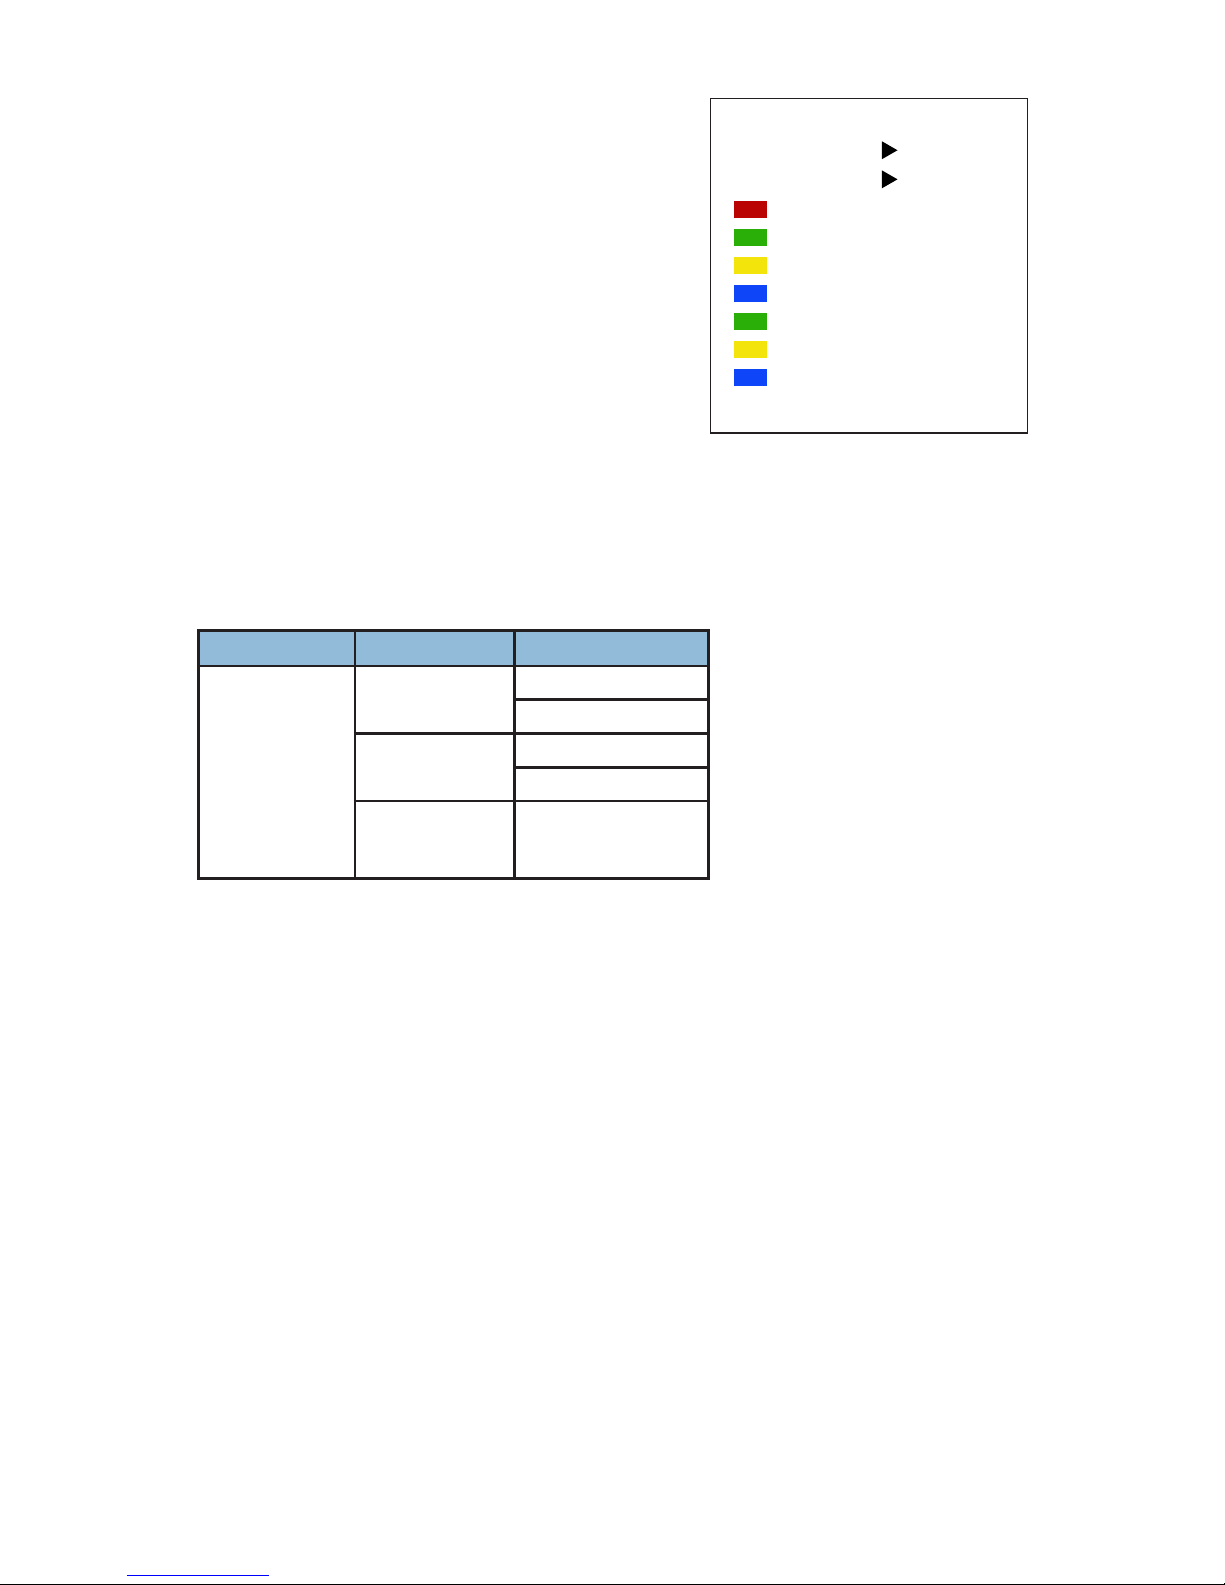
Remote Control
● Link With: Choose the display to accept CEC
remote control commands from the 1398E or
disable the functionality. The selected display’s
remote control can be used to navigate the
1398’s OSD menu using the remote’s red,
green, yellow and blue buttons by assigning
them to the functions of the 1398E’s front panel
MENU, MINUS, PLUS, and ENTER buttons.
Note: Requires a compatible remote control and
display.
● Hot Key: Enables or disables support for the
additional front panel hot key functionality that is used when not in the OSD
(INPUT 1, INPUT 2, and GROUP).
● Button and Hot Key Assignment: Lists how each of the colored buttons on the
TV’s remote will be assigned if the Remote Control function is enabled.
MAIN MENU LEVEL 2 LEVEL 3
Remote Control Link with Off
Out A-H [OUT A]
Hot Key On
OFF
Button and
Hot Key
Assignment
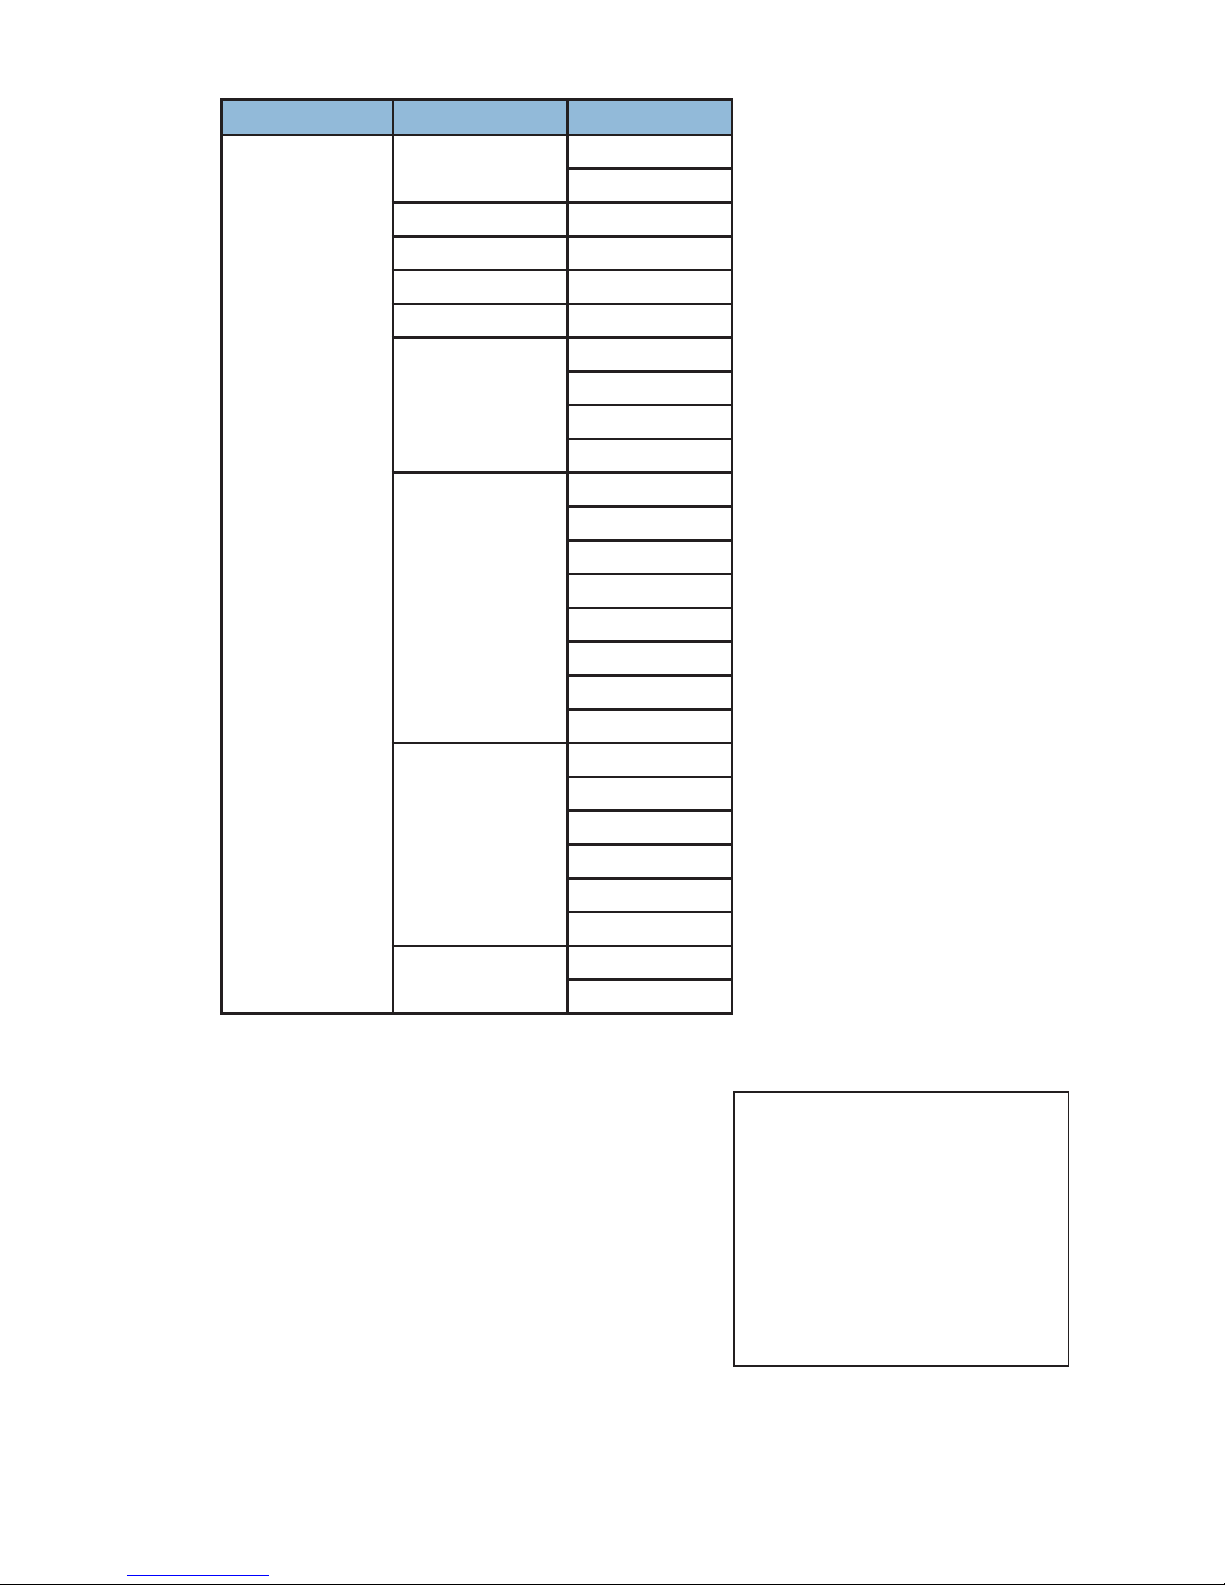
OSD Settings
● Timeout: Set the OSD menu timeout in seconds or disable the timeout.
● Horizontal: Set the OSD menu’s horizontal position.
● Vertical: Set the OSD menu’s vertical position.
● Transparency: Set the OSD menu’s transparency level.
● Contrast: Set the OSD menu contrast mode.
● Panel Color: Set the OSD menu’s panel color.
● Font Color: Set the OSD menu’s font color.
● Free Run: Set the Free Run color to display when no source is detected.
Selecting “Color” will show a color bar pattern. Selecting “No” will disable the
Free Run function.
● Default: Reset the OSD conguration settings to their factory defaults.
Button Menu
Button Minus (–)
Button Plus (+)
Button Enter
Button Input 1
Button Input 2
Button Group
Link With Out A
Hot Key O
Return
Remote Control
:
:
:
:
:
:
:
Page 14
14
MAIN MENU LEVEL 2 LEVEL 3
OSD Setting Timeout Never
1-60 [30]
Horizontal 0-100 [2]
Vertical 0-100 [3]
Transparency 0-7 [3]
Contrast 0-1 [0]
Panel Color Red
Green
Blue
GRAY
Font Color Black
White
Red
Green
BLUE
Yellow
Cyan
Magenta
Free Run No
Red
Green
BLUE
Black
Color
Default NO
Yes
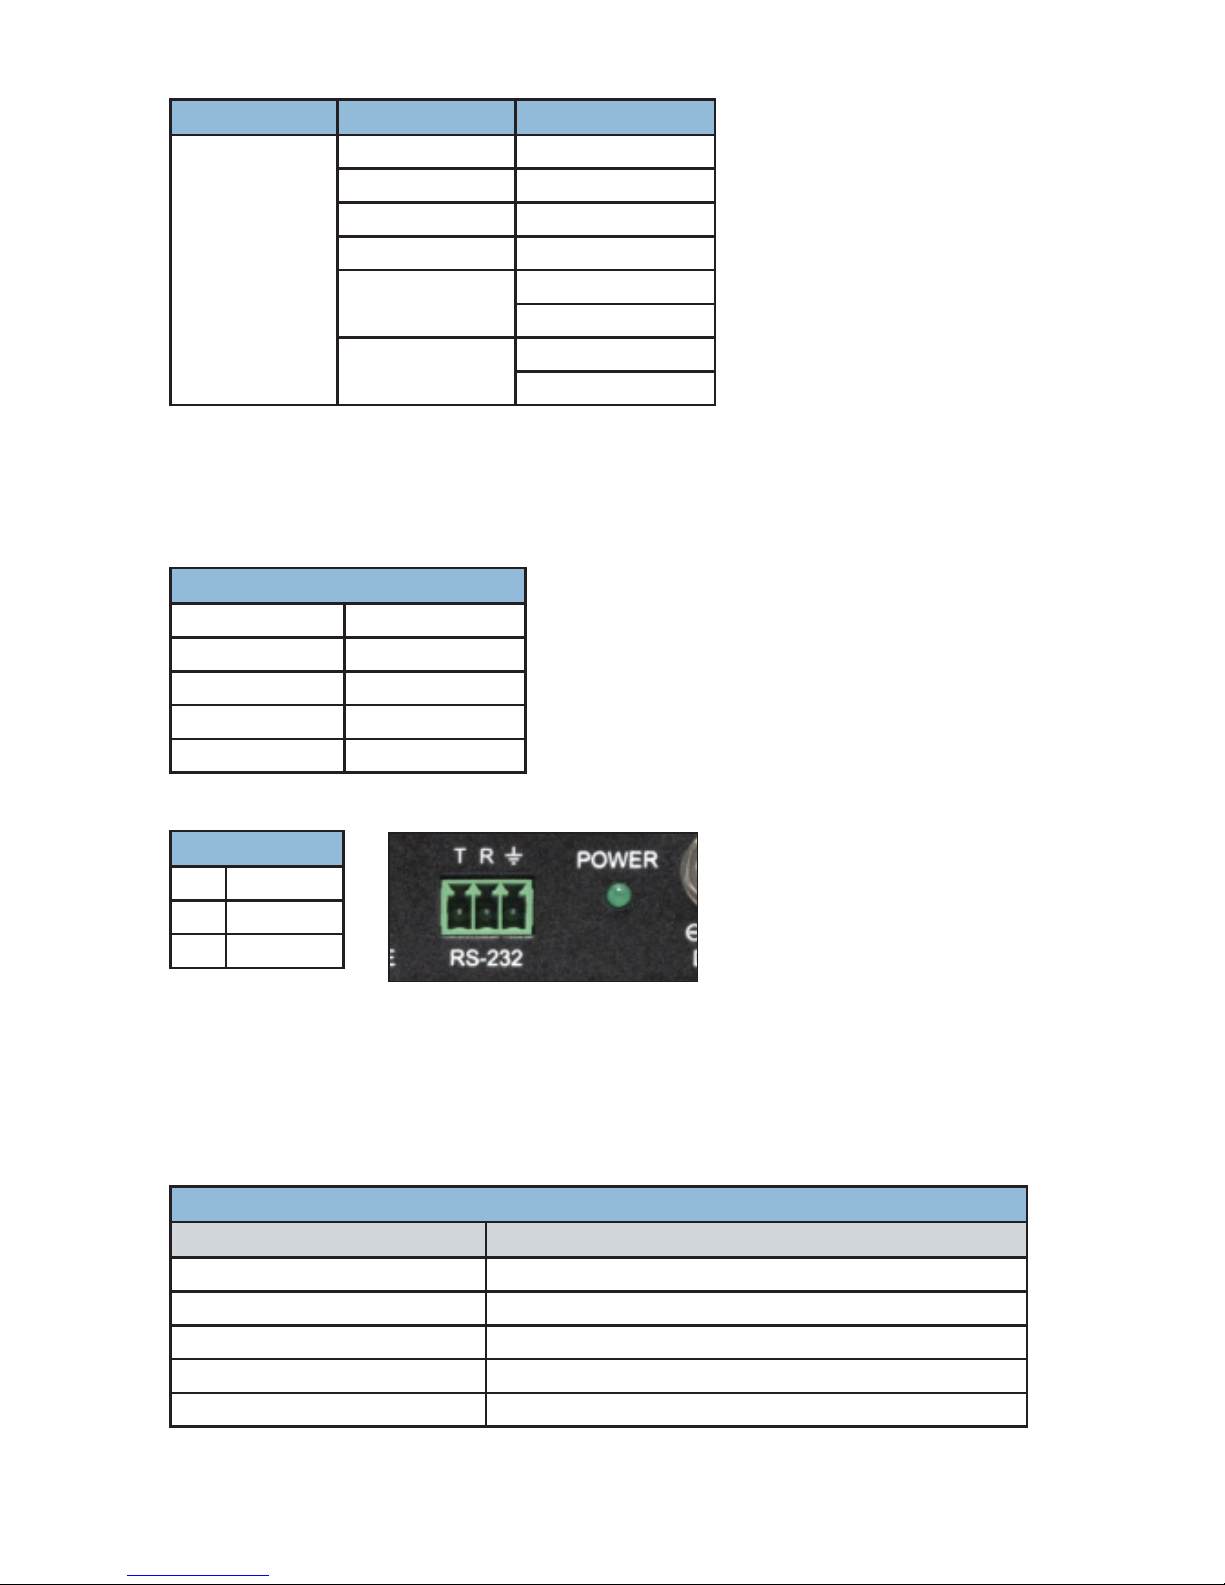
System Settings
● VID: Display the 1398E’s Vendor ID.
● PID: Display the 1398E’s Product ID.
● SN: Display the 1398E’s Serial Number.
● FW Ver: Display the 1398E’s current
rmware version.
● Factory Reset: Reset the 1398E’s
conguration to factory default.
● Software Control: Enable or disable RS-232
support for the EDID Management Software.
Note: Enabling this function will disable normal RS-232 control of the 1398E.
VID 5000
PID 6002
SN 000000000
FW Ver v2.13
Factory Reset
Software Control
System Setting
:
:
:
:
Page 15
15
MAIN MENU LEVEL 2 LEVEL 3
System Settings VID Vendor ID
PID Product ID
SN Serial number
FW Ver Firmware version
Factory Reset NO
Yes
Software Control OFF
ON
RS-232 Port
Connect an RS-232 cable to the 3-pin terminal block (see pinout below).
RS-232
Baud Rate 19200
Data Bits 8
Parity Bit None
Stop Bits 1
Flow Control None
PIN
1 TX
2 RX
3 GND
Serial Commands
The RS-232 ports pass-thru communications to other serial devices at 19200 Baud
rate. Serial command examples are shown in the following tables; commands
should be appended with a carriage return <CR>.
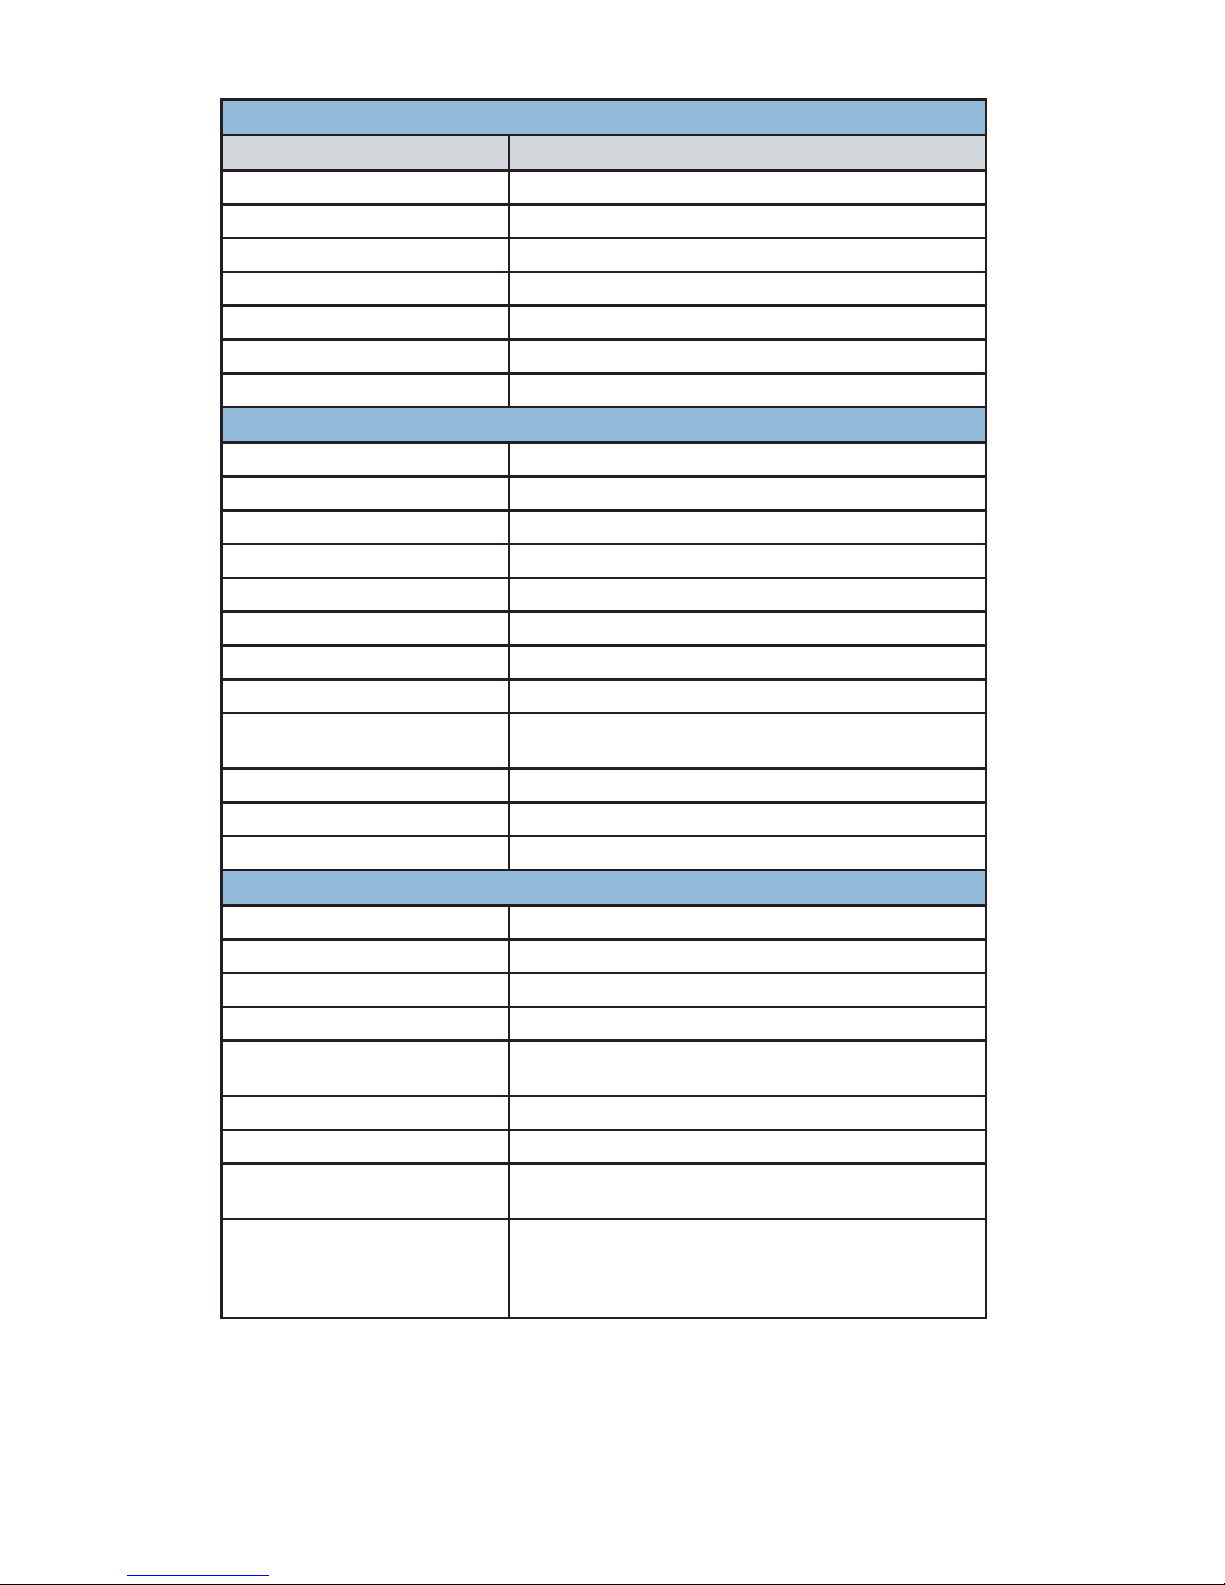
SYSTEM COMMANDS
EXAMPLE RESULT
[?] Display system command list
[HELP] Display system command list
[HELP GET KEYLOCK] Display details about specic command
[GET MODEL NAME] Display model name
[GET FW VER] Display rmware version
Page 16
16
SYSTEM COMMANDS Cont.
EXAMPLE RESULT
[SET SYSTEM REBOOT] Reboot the 1398E
[GET DESCRIPTION] Display the 1398Es current description/name
[SET DESCRIPTION #] Set the 1398Es name/description
[SET KEYLOCK #] # = ON/OFF; lock/unlock front display keys
[GET KEYLOCK] Display keylock status
[SET OSD DEFAULT] Factory default OSD conguration
[SET FACTORY DEFAULT] Factory default the 1398E
INPUT COMMANDS
[GET IN PORT NUMBER] Display the number of inputs supported
[GET IN TYPE LIST] List video format supported by each input
[GET IN # FORMAT] # = 1/2; display inputs video format
[GET IN # COLOR SPACE] # = 1/2; display inputs color space
[GET IN # COLOR DEPTH] # = 1/2; display inputs color depth
[GET IN # TIMING] # = 1/2; display inputs resolution and timing
[GET IN # HDCP MODE] # = 1/2; display inputs HDCP mode
[GET IN # HDCP STATUS] # = 1/2; display inputs HDCP status
[SET IN # HDCP MODE #] # = 0/1/2; set input HDCP mode to #:
(0 = Apple mode, 1 = Source, 2 = Sink)
[GET IN # EDID] # = 1/2; display inputs current EDID
[GET IN # EDID DATA] # = 1/2; display the raw hex data for input
[GET IN # EDID INFORMATION] # = 1/2; display the EDID assigned
OUTPUT COMMANDS
[GET OUT PORT NUMBER] Display the number of outputs supported
[GET OUT TYPE LIST] List video format supported by each output
[SET OUT ROUTE #] # = 1/2; route input to all outputs
[GET OUT ROUTE] Display the current video routing source
[SET OUT AUTO SWITCH #] # = ON/OFF; enable or disable automatic input source
switching
[GET OUT GROUP MODE] Display current group mode setting
[SET OUT GROUP MODE #] # = ON/OFF; enable or disable group mode
[GET OUT # CONVERT] # = A-H; display the 4K source conversion mode used
by the output
[SET OUT # CONVERT #] # = A-H; set the 4K source conversion mode used by the
output #:
(0 = Bypass, 1 = YUV 4:2:0, 2 = 1080p,
3 = Auto Conversion)
Note: 4K conversion is only available with 4K sources.
Page 17
17
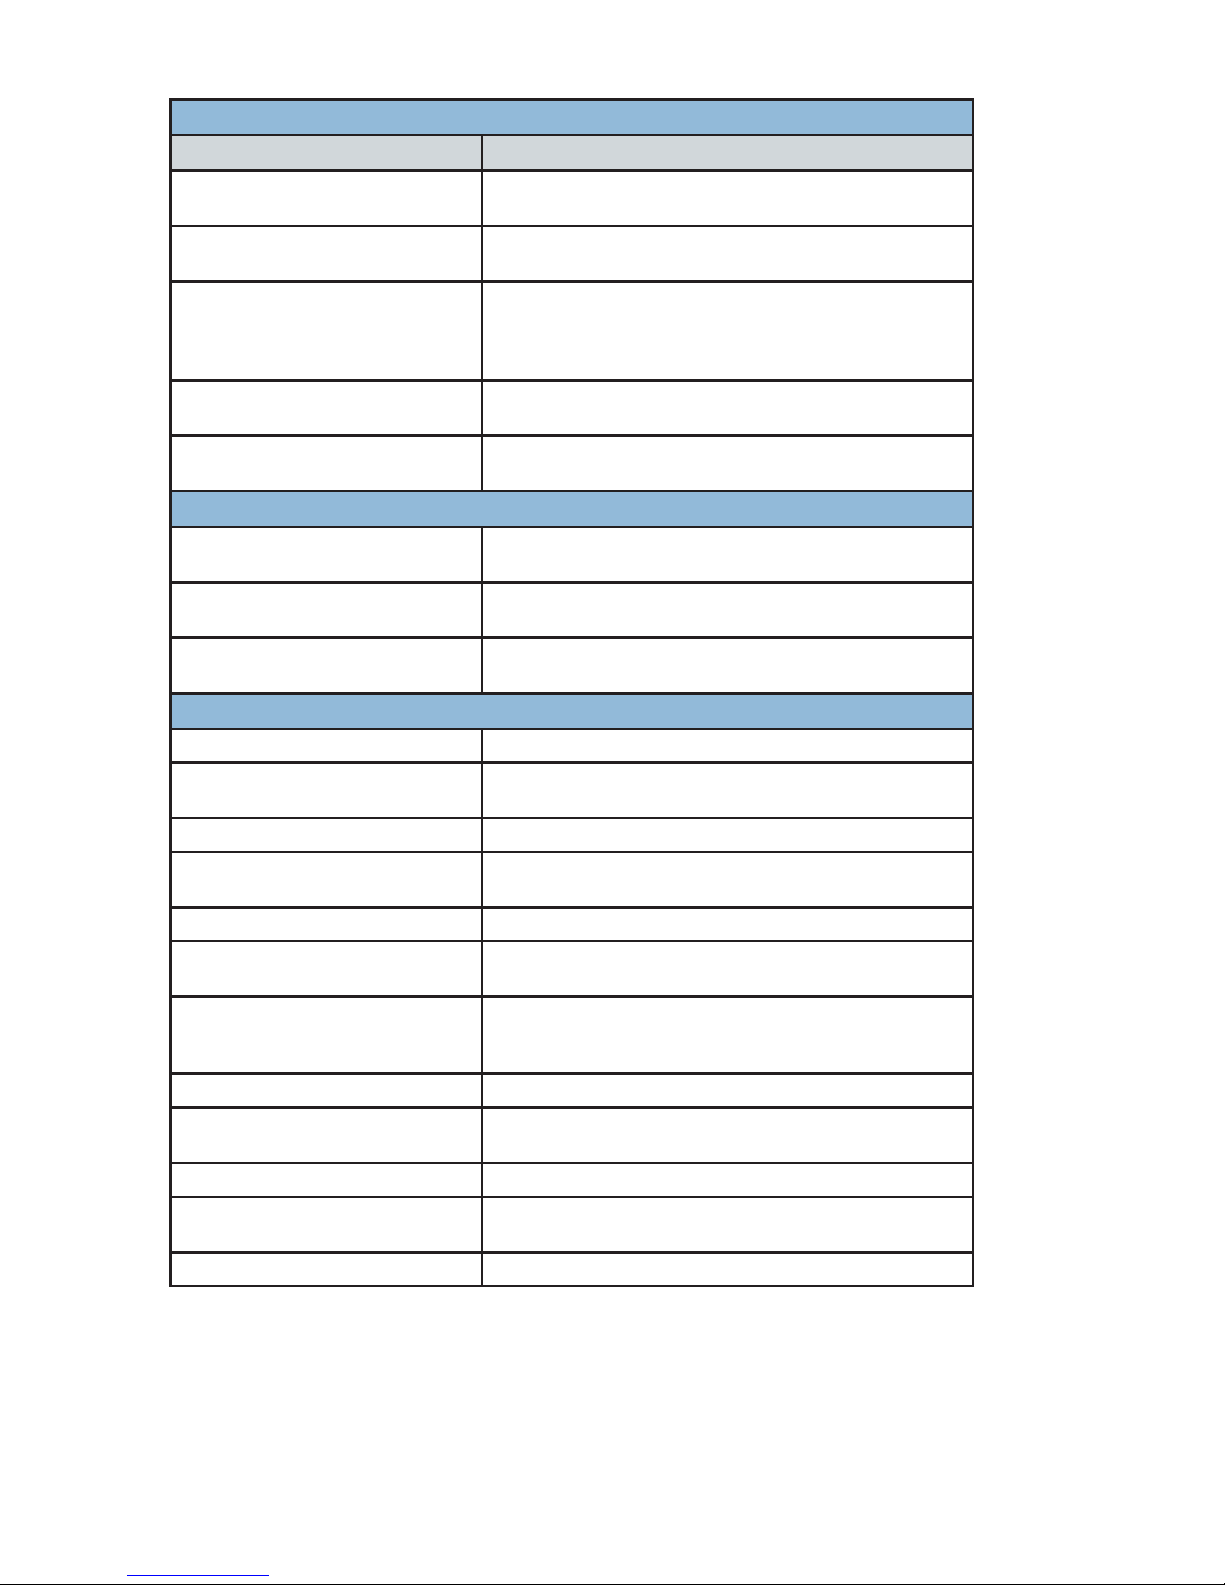
OUTPUT COMMANDS Cont.
EXAMPLE RESULT
[GET OUT # HPD] # = A-H; display the the current hot-plug status of the
output
[GET OUT # RSENSE] # = A-H; display the current receiver sense status of the
output
[GET OUT # HDCP STATUS] # = A-H; display the current HDCP status of the output:
0 = No HDCP, 1 = HDCP 1.4 Active,
2 = HDCP 2.2 Active, 3 = HDCP 1.4 Retrying,
4 = HDCP 2.2 Retrying
[GET OUT # EDID DATA] # = A-H; display the raw hex data of the EDID read from
the output
[GET OUT # EDID INFORMATION] # = A-H; display the description of the EDID read from
Output
EDID USER COMMANDS
[GET USER EDID NUMBER] Display the number of User EDIDs supported by the
1398E
[SET USER # EDID DATA #] # = 1/2; Update the contents of user EDID with new (# =
raw hex data)
[GET USER # EDID DATA] # = 1/2; display the description of the EDID stored in user
EDID
OSD COMMANDS
[GET OSD TIMEOUT #] Display the current OSD timeout value
[SET OSD TIMEOUT #] (# =) : 0 = no timeout, 1 - 60 = timeout in seconds; Set the
OSD timeout value
[GET OSD HORIZONTAL] Display the OSD menu’s horizontal position
[SET OSD HORIZONTAL #] # = 0 - 100 = horizontal position;
Set the OSD menu’s horizontal position
[GET OSD VERTICAL] Display the OSD menu’s vertical position
[SET OSD VERTICAL #] # = 0 - 100 = vertical position;
Set the OSD menu’s vertical position
[SET OSD TRANSPARENCY #] (# =) 0 = Fully Opaque, 1 - 6 = Levels of Transparency, 7 =
Fully Transparent;
Set the OSD menu’s transparency level
[GET OSD CONTRAST] Display the OSD menu’s contrast level
[SET OSD CONTRAST #] # = 0/1; Set the OSD menu’s contrast level
(0 = high, 1 = low)
[GET OSD PANEL COLOR] Display the OSD menu’s background color
[SET OSD PANEL COLOR #] (# =) 1 Red, 2 Green, 3 Blue, 4 Gray;
Set the OSD menu’s background color
[GET OSD FONT COLOR] Display the OSD menu’s current font color
Page 18
18
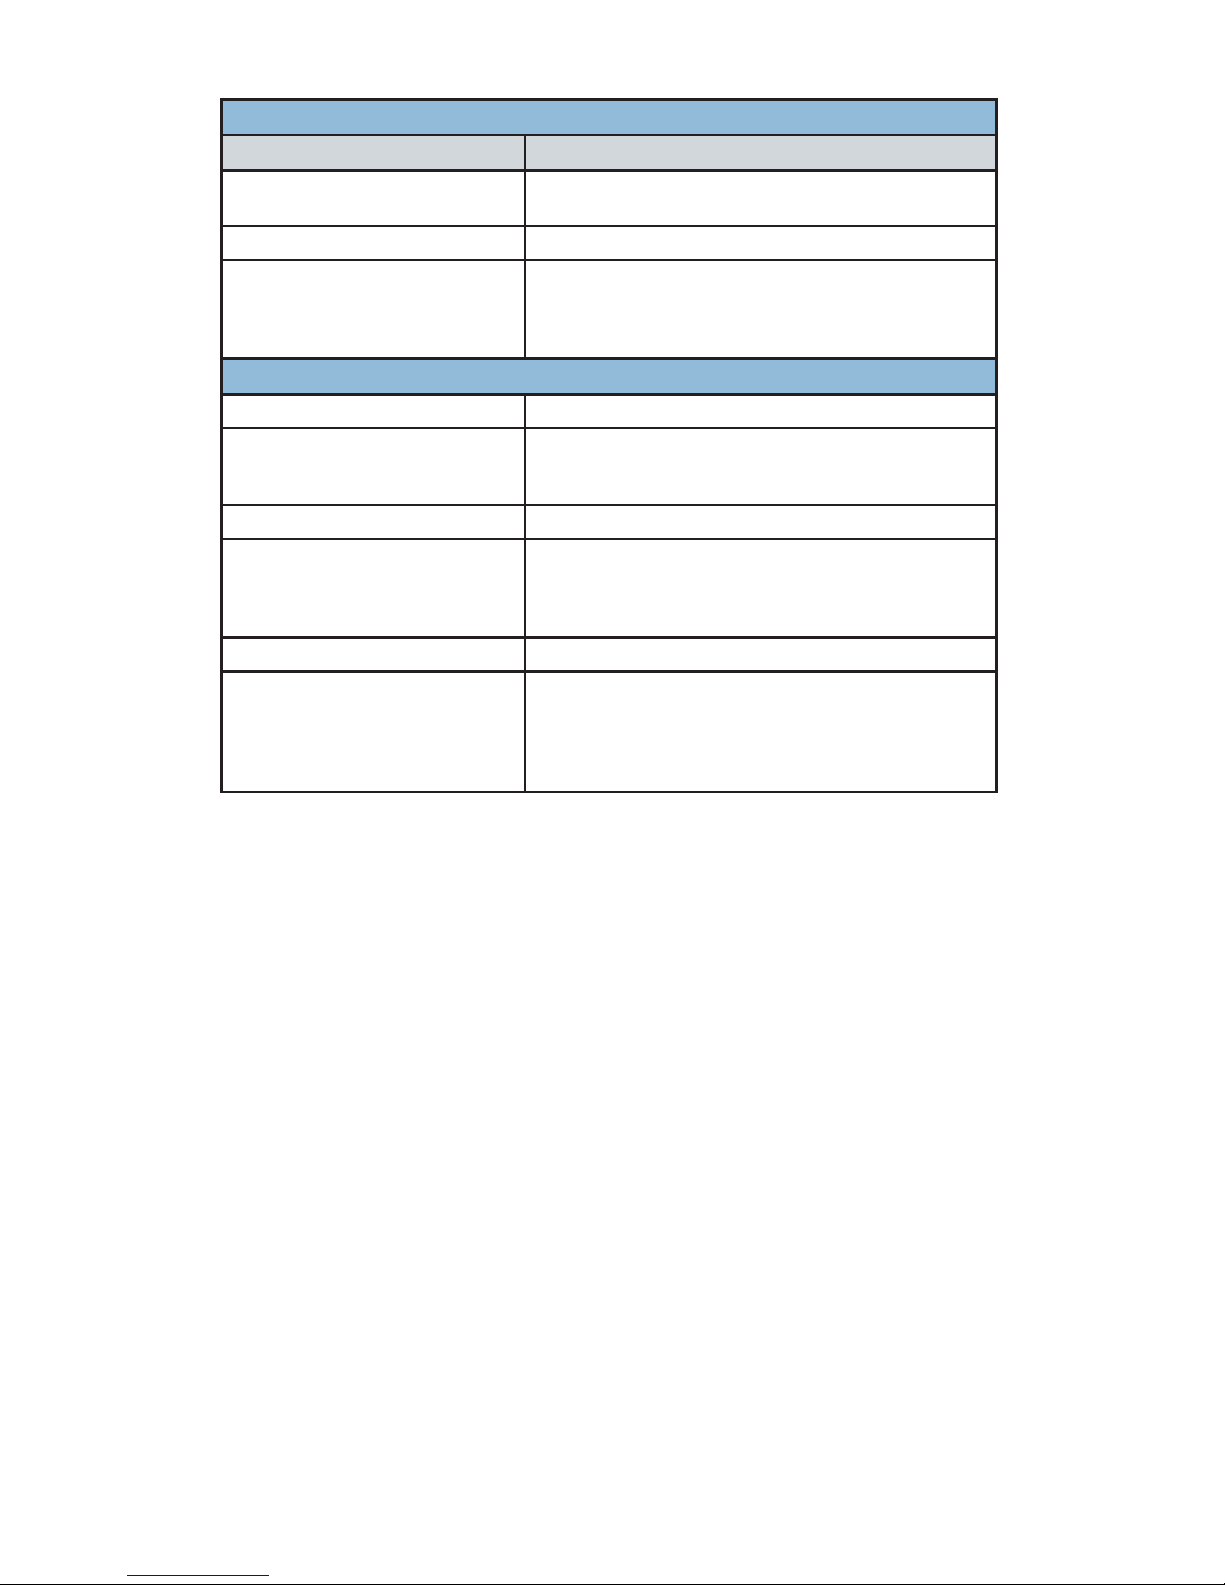
OSD COMMANDS Cont.
EXAMPLE RESULT
[SET OSD FONT COLOR #] (# =) 1 Black, 2 White, 3 Red, 4 Green;
set the OSD menu’s font color
[GET OSD FREERUN COLOR] Display the Free Run color setting
[SET OSD FREERUN COLOR #] (# =) 0 Free Run Disabled, 1 Red, 2 Green, 3 Blue, 4
Black, 5 Color Bars;
set the Free Run mode and the color used when the
input signal is lost and Free Run is active
CEC COMMANDS
[GET CEC AUTO ACTIVE] Display the CEC Active Source setting
[SET CEC AUTO ACTIVE #] # = ON/OFF; Enable (ON) or disable (OFF) sending the
CEC “active source” command to connected displays
every 10 minutes
[GET CEC AUTO STANDBY] Display the CEC Auto Standby setting
[SET CEC AUTO STANDBY #] # = ON/OFF; Enable (ON) or disable (OFF) sending the
CEC “standby” command to connected displays if there
has been no live input source detected for more than
10 minutes
[GET CEC REMOTE LINK] Display the CEC Remote Link setting
[SET CEC REMOTE LINK #] # =: OFF disable feature, A - H enabled output port;
select the display/output to accept CEC remote
control commands from to control the 1398E, or disable
the feature
Note: Requires a compatible remote control and display.
Note: Serial commands are not case-sensitive and will not be executed unless
followed by a carriage return.
Page 19
19
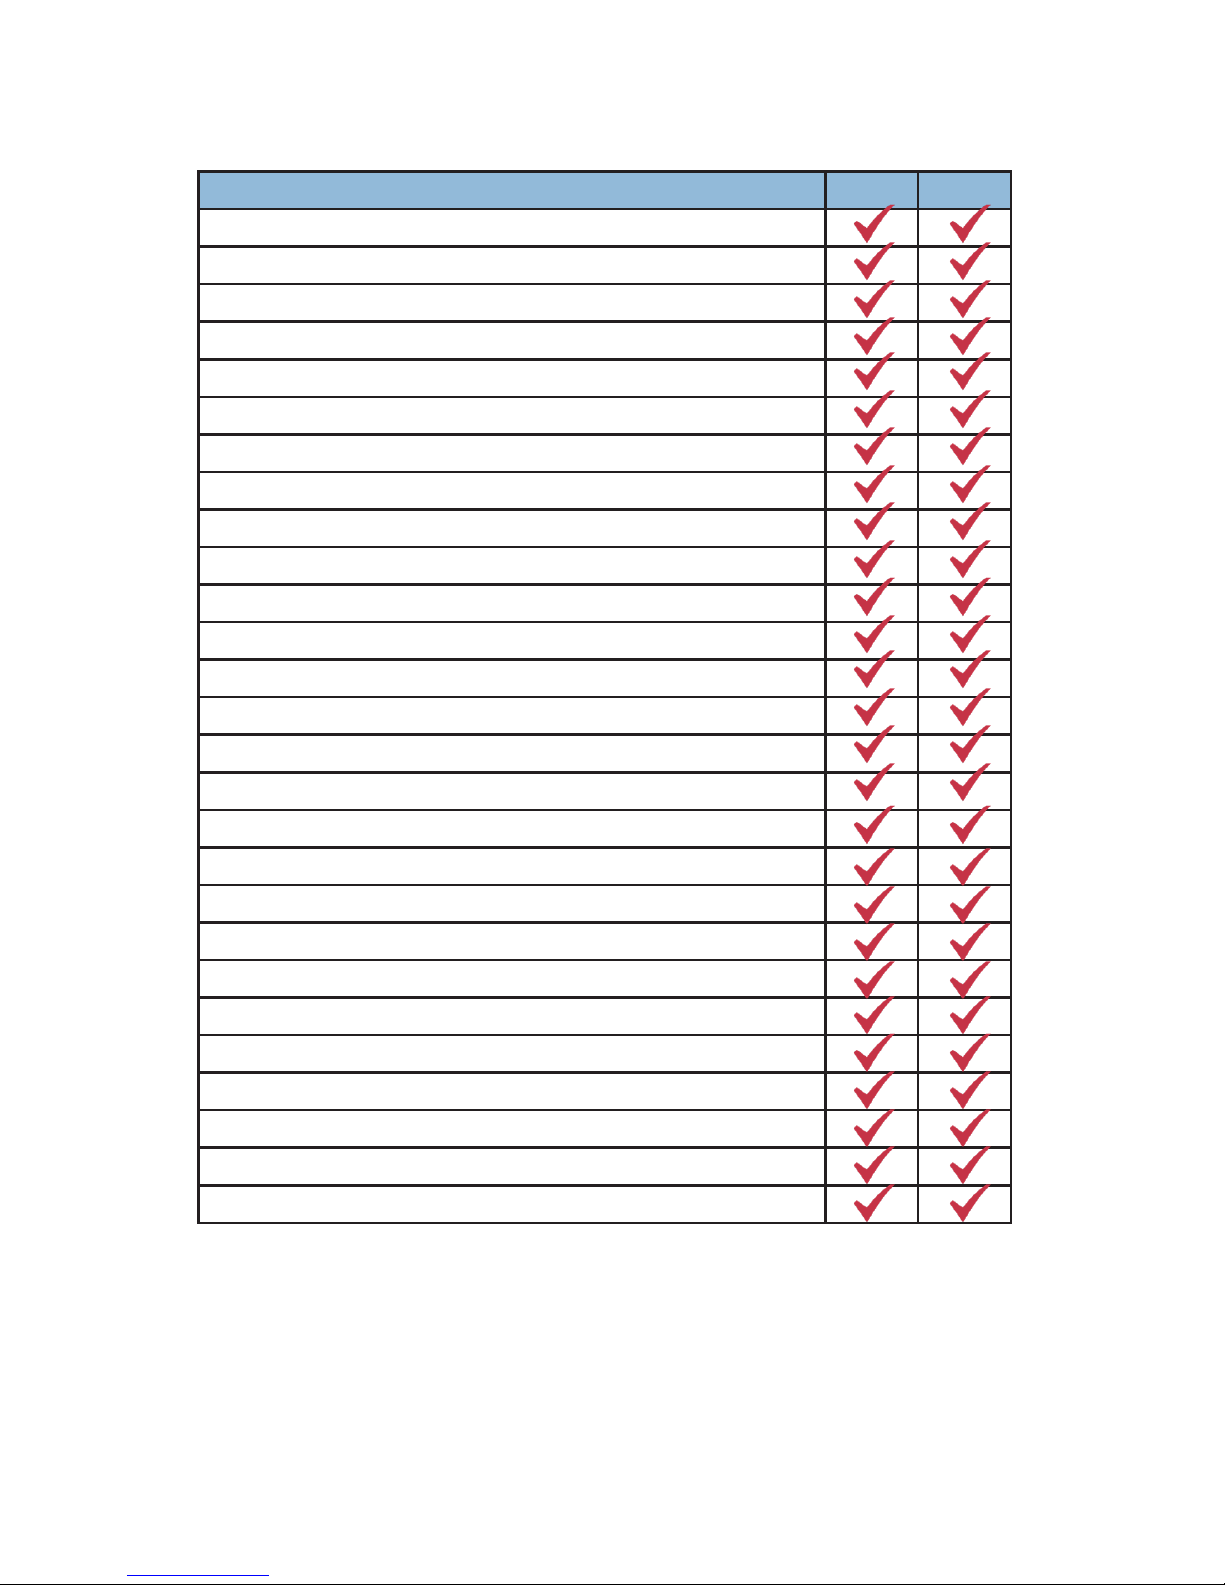
Supported Resolutions
DVI and HDMI Resolutions Input Output
640×480@60/72/75/85
720×400@85
800×600@56/60/72/75/85
1024×768@60/70/75/85
1152×864@75
1280×720@60
1280×768@60/75/85
1280×800@60
1280×960@60
1280×1024@60
1360×768@60
1366×768@60
1400×1050@60
1440×900@60
1600×900@60
1600×1200@60
1680×1050@60
1920×1080@60
1920×1200@60
1920×1440@60
2560×1600@60
1440×576i@50
1440×[email protected]/60
720×[email protected]/60
720×576p@50
1280×720p@50/59.94/60
1920×1080i@50/59.94/60
Firmware Updates
Contact Audio Authority Technical Support at 800-322-8346 for information
regarding rmware updates.
Page 20
20
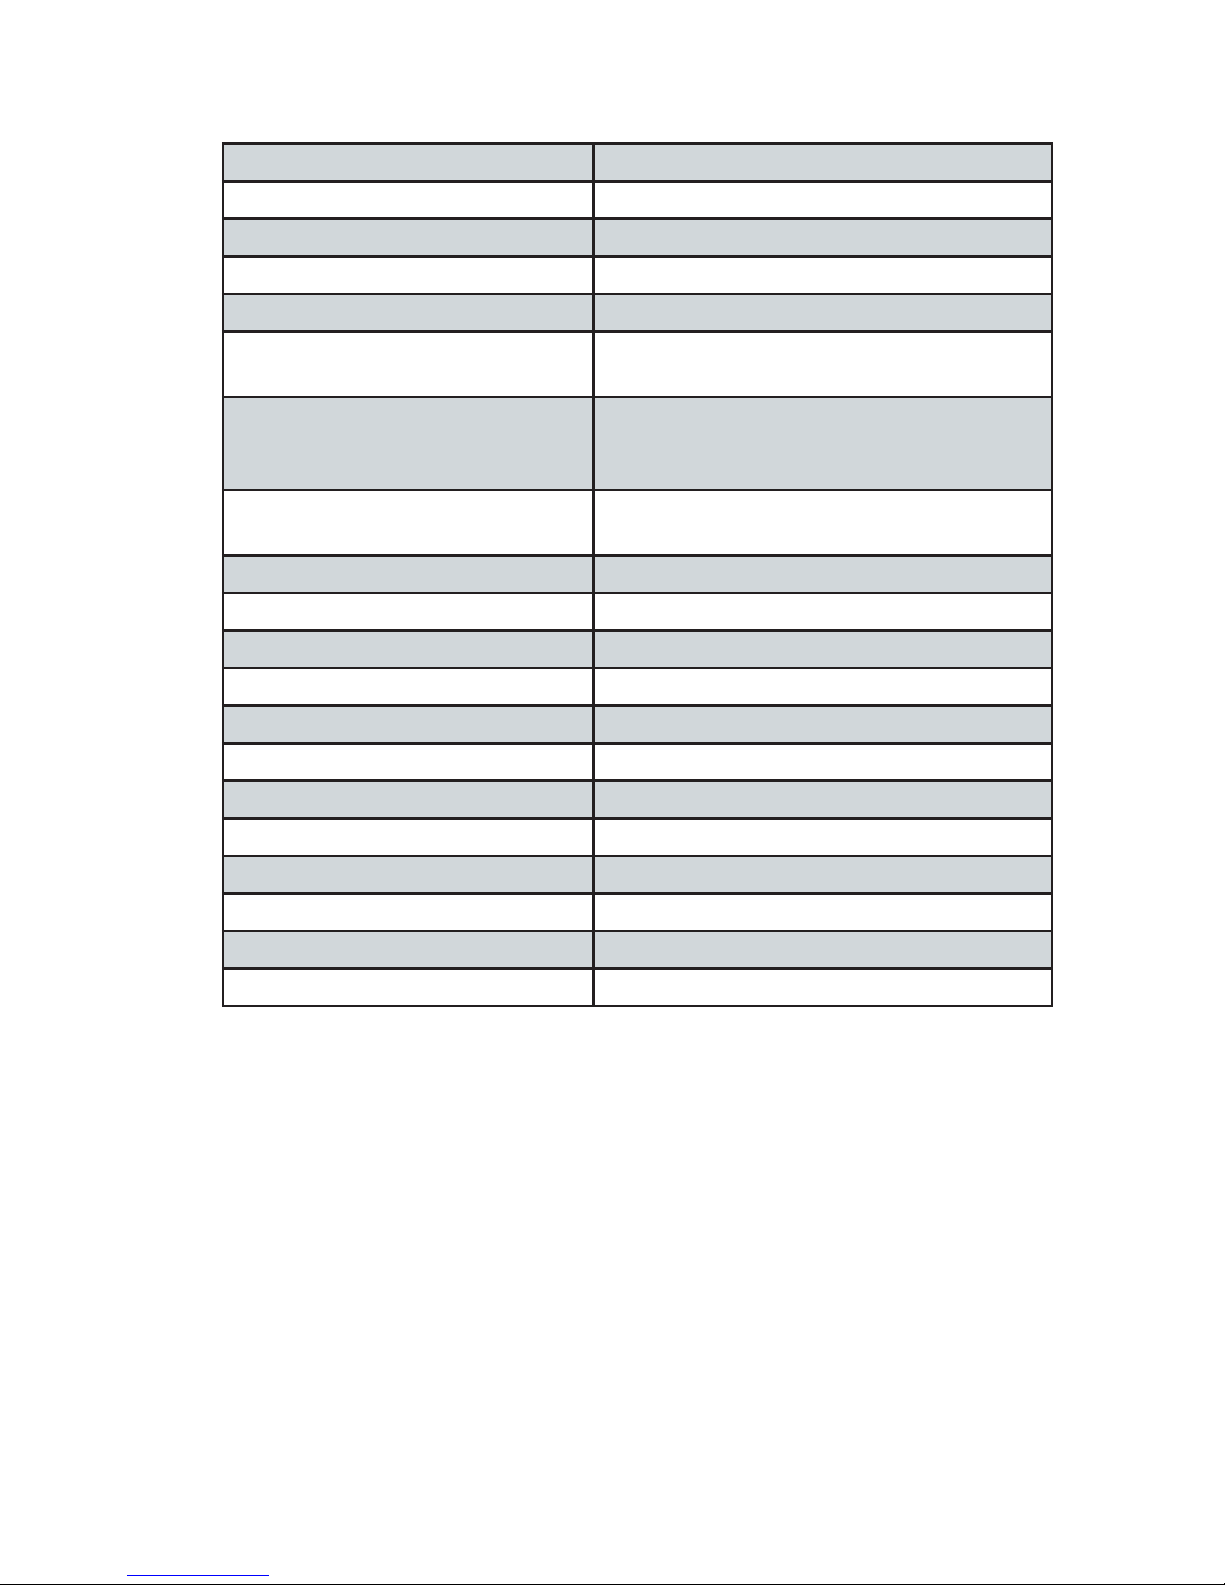
Specications
Model 1398E 2x8 Distribution Amplier* (Splitter)
HDMI Features HDMI with HDR, 3D
DVI Compliance DVI 1.0
HDCP Compliance HDCP 2.2
Video Bandwidth Single-link 600MHz (18Gbps)
Maximum Video Resolution
and Formats
480i~1080p@24/50/60
4K2K@24/25/30/50/60
Audio Support DTS-HD Master Audio, Dolby TrueHD,
Dolby Atmos, Dolby Digital, DTS, DVDAudio, LPCM, SACD, MPCM
ESD Protection Human body model — ±8kV (air-gap dis-
charge) & ±4kV (contact discharge)
Firmware Update via Mini-USB port
Input/Output 1398E 1x HDMI/8x HDMI / (2)* 1x HDMI/4x HDMI
HDMI Connector Type A (19-pin female)
Control Switch EDID mode selection
Dimensions (L x W x H) 240 x 103 x 25mm
Weight 690 g
Power Supply 5V DC 3A
Power Consumption 9.5 watts (max)
Regulatory Approvals US/EU standards, CE, FCC/UL certied
Operation Temperature 0~40°C (32~104°F)
Storage Temperature -20~60°C (-4~140°F)
Relative Humidity 20~90% RH (no condensation)
Troubleshooting
● For 4K resolution, use premium certied high speed HDMI cables and a
high speed HDMI Extender (if needed) that supports 4K. Make certain that
the input cable is as short as possible. HDMI cable design and quality are
extremely important in long cable runs where capacitance can severely impact
performance.
● Make certain that the distribution amplier’s power LED is illuminated and
not ickering on and off. Intermittent operation generally means a problem with
the DC power adapter or low AC voltage being supplied to the DC adapter’s
input.
● Due to a chipset limitation, 4K sources using the 4:2:2 color space may display
with incorrect colors when scaled to 1080p. If this occurs, partitioning the 1398E
into two 1x4 switchers may provide a solution in this case.
Page 21

21
● If some displays are not receiving video signal, or lose signal, check to see if
they are on the wrong input.
● If you still experience problems using the distribution amplier, troubleshoot by
rst attaching the source device directly to each of the destination devices in turn
using the same cables you are using with the expanded system. This is a way
of determining if the problem is due to bad cables or a problem with the other
devices. If you are unable to obtain a signal using this simplied path, suspect
the cables, the source device or the destination device.
If a problem still persists after trying the above suggestions, contact the
Audio Authority Technical Service department via email:
[email protected], or call 800-322-8346 or 859-233-4599.
Limited Warranty
If this Audio Authority® product fails due to defects in materials or workmanship
within one year from the date of the original sale to the end-user, Audio Authority
will replace or repair the defective product at no cost. Freight charges for the
replacement unit will be paid by Audio Authority (Ground service only). A copy of
the invoice showing the item number and date of purchase (proof-of-purchase)
must be submitted with the defective unit to constitute a valid in-warranty claim.
Units that fail after the warranty period has expired may be returned to the factory
for repair at a nominal charge, if not damaged beyond the point of repair. All freight
charges for out-of-warranty returns for repair are the responsibility of the customer.
Units returned for repair must have a Return Authorization Number assigned by
the factory.
This is a limited warranty and is not applicable for products which, in our opinion,
have been damaged, altered, abused, misused, or improperly installed. Audio
Authority makes no other warranties either expressed or implied, including
limitation warranties as to merchantability or tness for a particular purpose.
Additionally, there are no allowances or credits available for service work or
installation performed in the eld by the end user.
Warranty Service Procedures
If you suspect a product defect, contact Audio Authority’s Technical Service
Department at 800-322-8346 or 859-233-4599 for assistance in verifying the
problem. If a defect or potential defect is suspected, a replacement unit will be
shipped immediately on a defect-exchange basis and a Return Authorization
Number will be issued for the return of the defective product. Replacement units
are sent out at the Manufacturer’s Suggested Retail Price which is charged to the
Customer’s Credit Card at the time of shipment. Once we receive the defective
unit back at the factory, it will be evaluated under the conditions of this warranty
and if found to be in-warranty, a full credit will be issued to the Customer’s Credit
Card. Return freight charges for the defective unit are the customer’s responsibility.
Please contact our Technical Service Department for complete details concerning
all in and out of warranty service matters.
Page 22

22
Regulatory Compliance
Model 1398E distribution ampliers have been tested for compliance with
appropriate FCC and CE rules and regulations and are also RoHS compliant.
The power adaptor has been tested for compliance with UL, CE and CSA rules
and regulations and is also RoHS compliant.
Audio Authority and the Double-A Symbol are registered trademarks of Audio
Authority Corp. Copyright July, 2018, all rights reserved. All third party trademarks
and copyrights are recognized.
HDMI®, the HDMI logo and High-Denition Multimedia Interface are trademarks or
registered trademarks of HDMI Licensing LLC.
HDCP (High-bandwidth Digital Content Protection) is licensed by Digital Content
Protection, LLC.
Dolby® is a registered trademark of Dolby Laboratories, Incorporated.
Warnings
Please read all instructions before attempting to unpack or install or operate this
equipment, and before connecting the power supply. Please keep the following in
mind as you unpack and install this equipment:
● Always follow basic safety precautions to reduce the risk of re, electrical shock
and injury to persons
● To prevent re or shock hazard, do not expose the unit to rain, moisture or install
this product near water
● Never spill liquid of any kind on or into this product
● Never push an object of any kind into this product through module openings or
empty slots, as you may damage parts
● Do not attach the power supply cabling to building surfaces
● Do not allow anything to rest on the power cabling or allow it to be abused by
persons walking on it
● To protect the equipment from overheating, do not block the slots and openings
in the module housing that provide ventilation
Page 23

Page 24

E-174
Rev. 20180815
2048 Mercer Road, Lexington, KY 40511-1071 USA
800-322-8346 • 859-233-4599 • Fax: 859-233-4510
[email protected] • www.audioauthority.com
 Loading...