

Page 1
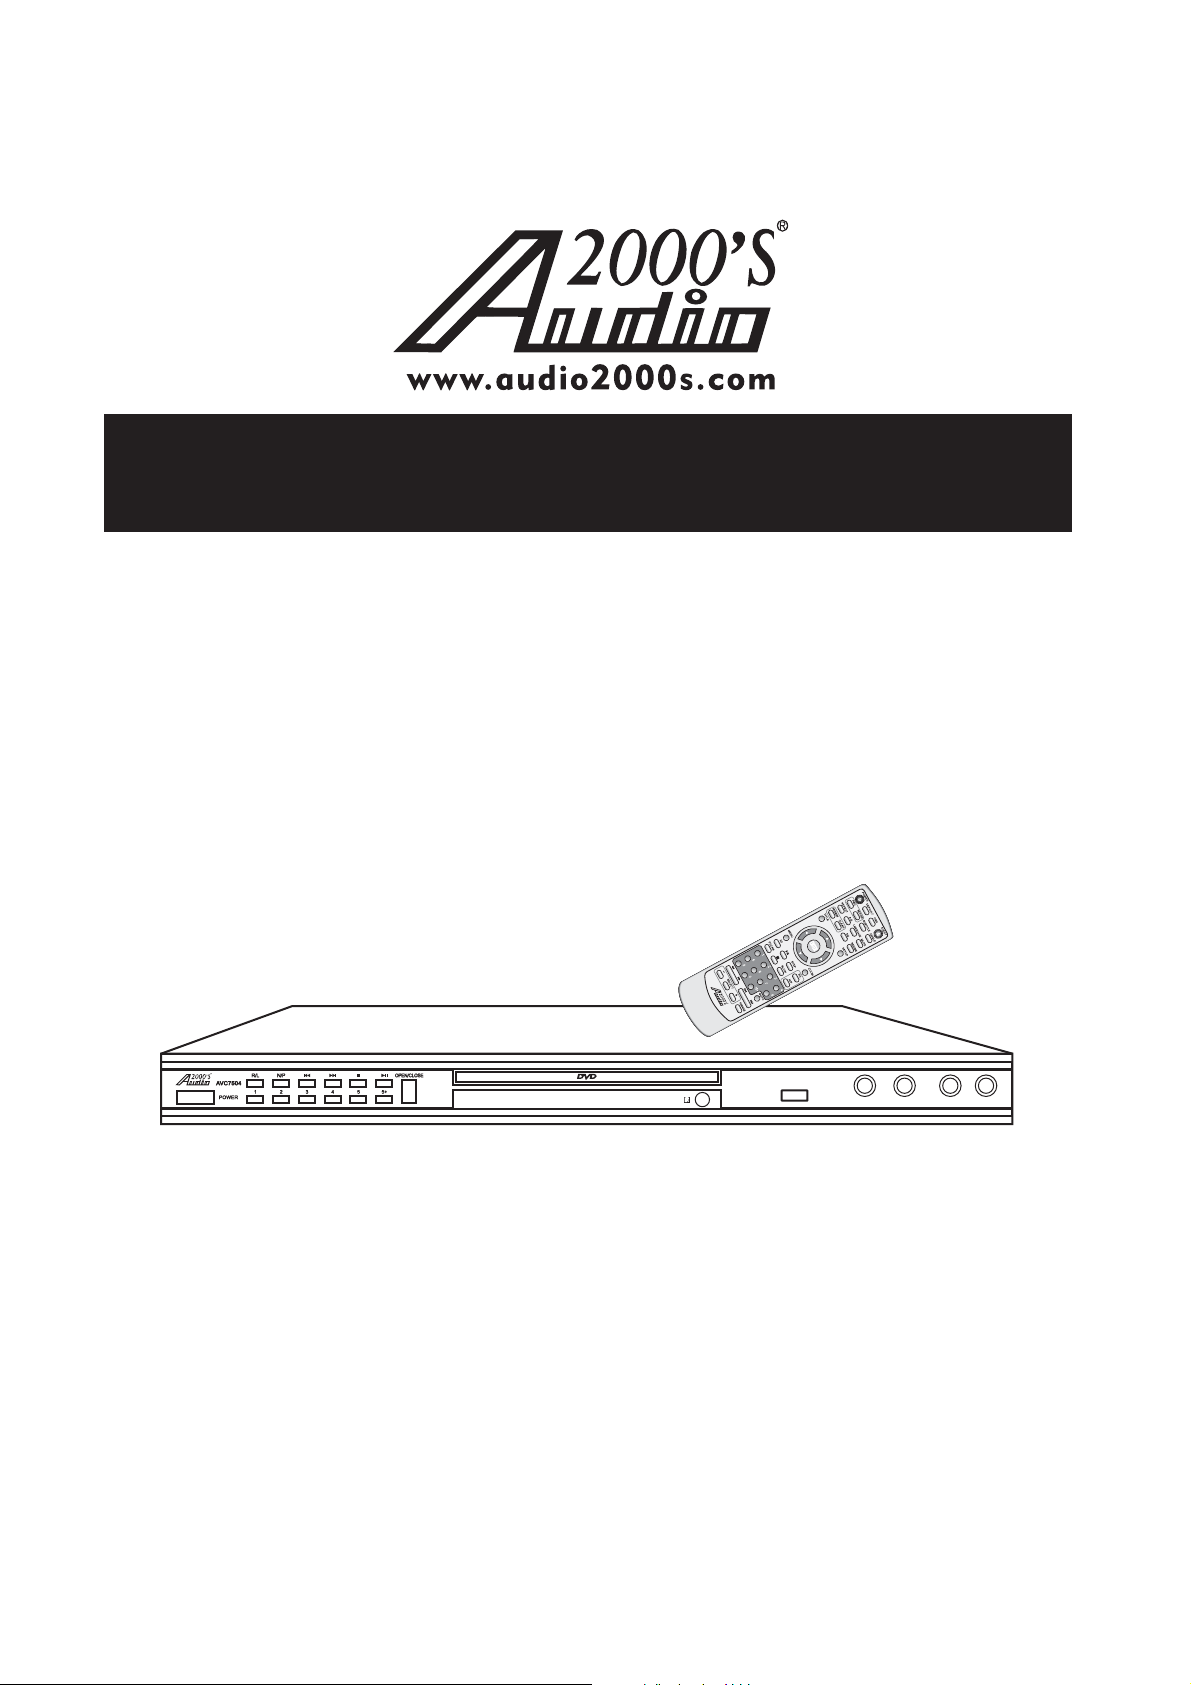
DVD/CDG/VCD/CD Karaoke Player
with Microphone Inputs & Digital Echo/Key-Control Functions
AVC7504
OWNER’S MANUAL
ACC7504-1
USB
Thank you for purchasing the AVC7504 DVD/CDG/VCD/CD karaoke
Audio2000'S
®
ECHOMICVOLMICVOLMIC1 MIC2
player! For the best results and the utmost satisfaction from your new unit, please
read this manual thoroughly, and retain it for future reference.
Page 2
CONTENTS
FEATURES AND ACCESSORIES
............................1
SAFETY INSTRUCTIONS..................................2-3
REMOTE CONTROL SETUP AND OPERATIONS
.....4
CONFIGURATIONS.........................................5-8
FRONT PANEL
●
REAR PANEL
●
REMOTE CONTROL
●
.................................................5
....................................................6
.......................................7-8
OPERATIONS (Disc Mode) 9-12.............................
SYSTEM SETUP............................................ -1
13 6
SPECIFICATIONS.............................................1
TROUBLE SHOOTING.......................................1
ADDITIONAL INFORMATION............................1
SERVICE INFORMATION...................................
20
7
8
9
Page 3
Features and Accessories
Features:
Compatible with DVD /VCD/ JPEG/CD-R/CD-RW/
Kodak Picture CD/CD
Hi-Fi sound quality, 96KHz/24bits digital to analog converter
/CDG MPEG4/
.
.
USB/microphone Inputs.
Progressive can (Y, Pb, Pr) utput
Built-in Dolby digital AC-3 , PCM decoder
DVD 5.1 audio-video outputs
Digital audio coaxial/optical outputs
VGA/component video composite video outputs
4:3/16:9 picture conversion
Parental lock settings
NTSC/PAL compatible
Professional karaoke functions
so
.
()
.
.
/S-video/
.
.
.
.
.
.
Full function infrared remote control
Accessories:
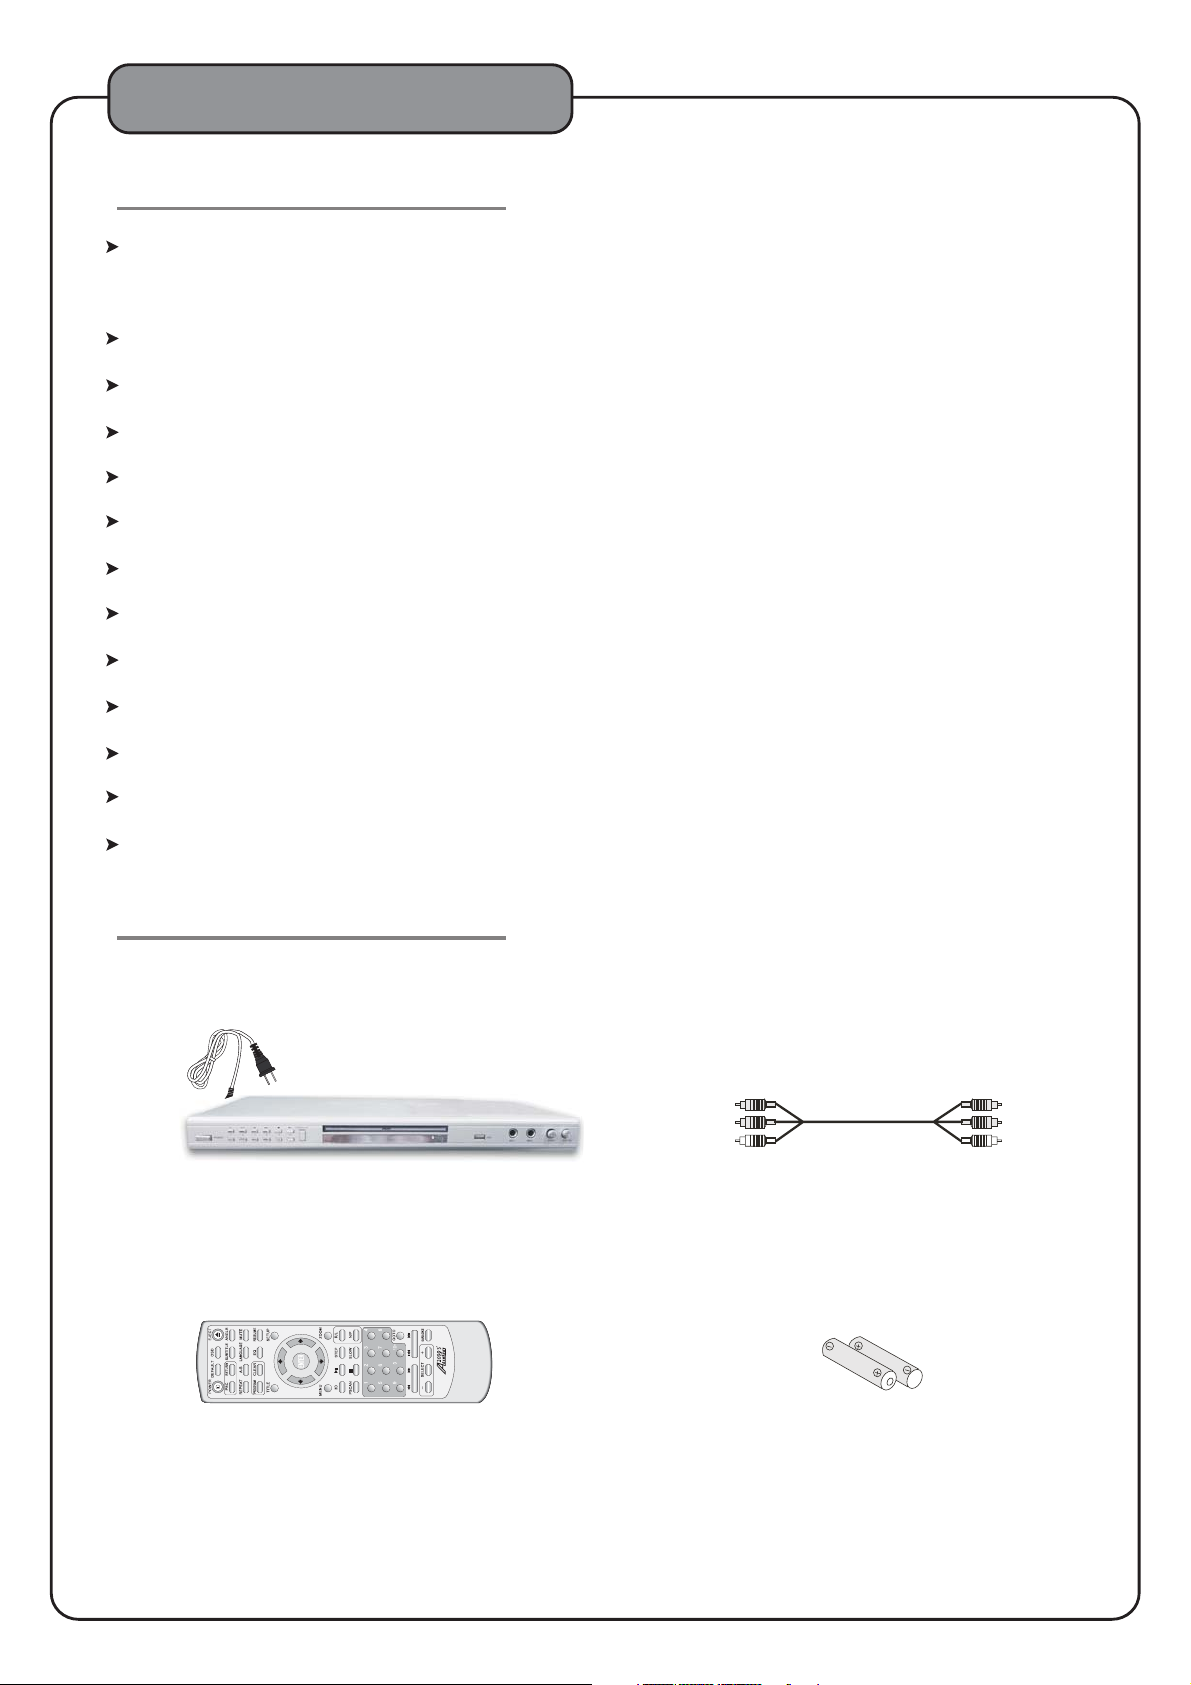
AVC7504 Unit(1)
ACC7504-1
.
A/V RCA cable(1)
Remote control(1)
AAA Batteries(2)
1
Page 4
Safety instructions
WARNING
* TO PREVENT FIRE OR SHOCK HAZARD. DO NOT EXPOSE THIS APPLIANCE TO RAINOR MOISTURE.
* THIS APPLIANCE SHALL NOT BE EXPOSED TO DRIPPING OR SPLASHING WATER AND THAT NO
OBJECT FILLED WITH LIQUIDS SUCH AS VASES SHALL BE PLACED ON APPARATUS.
IMPORTANT SAFETY INSTRUCTIONS
1) Read these instructions.
2) Keep these instructions.
3) Heed all warnings.
4) Follow all instructions.
5) Do not use this apparatus near water.
6) Clean only with dry cloth.
7) Do not block any ventilation openings. Install in accordance with the manufacturer's instructions.
8) Do not install near any heat sources such as radiators, heat registers, stoves, or other apparatus
(including amplifiers) that produce heat.
9) Do not defeat the safety purpose of the polarized or grounding-type plug. A polarized plug has two
blades with one wider than the other. A grounding type plug has two blades and a third grounding
prong. The wide blade or the third prong are provided for your safety. If the provided plug does not
fit into your outlet, consult an electrician for replacement of the obsolete outlet.
10) Protect the power cord from being walked on or pinched particularly at plugs, convenience
receptacles, and the point where they exit from the apparatus.
11) Only use attachments/accessories specified by the manufacturer.
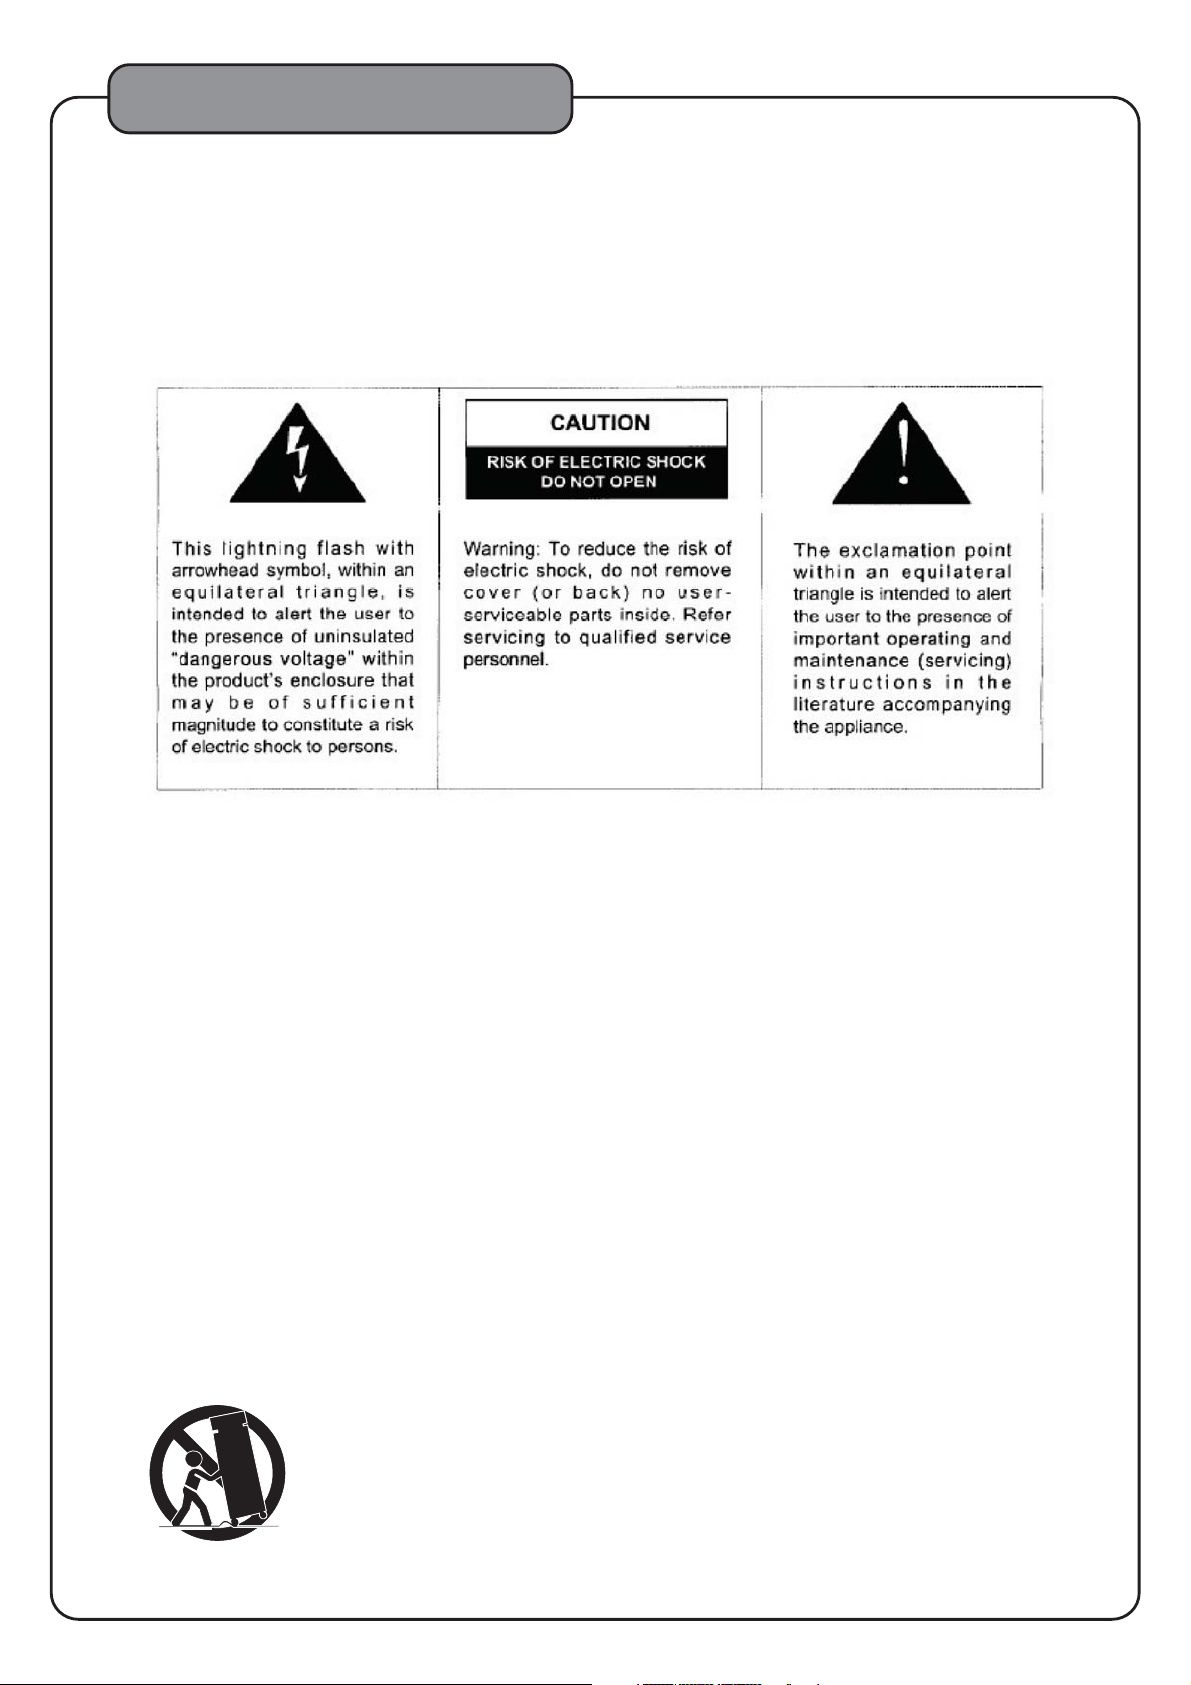
12) Use only with the cart, stand, tripod, bracket, or table specified by the manufacturer, or sold with the
apparatus. When a cart is used, use caution when moving the cart/apparatus combination to avoid
injury from tip-over.
S3125A
2
Page 5
Safety instructions
13 ) Unplug this apparatus during lightning storms or when unused for long periods of time.
14 ) Refer all servicing to qualified service personnel. Servicing is required when the apparatus has been
damaged in any way, such as power-supply cord or plug is damaged, liquid has been spilled or objects
have fallen into the apparatus, the apparatus has been exposed to rain or moisture, does not operate
normally, or has been dropped.
15) Grounding or Polarization This product may be equipped with a polarized alternating current line plug
(a plug having one blade wider than the other). This plug will fit into the power outlet only one way.
This is a safety feature. If you are unable to insert the plug fully into the outlet, try reversing the plug.
If the plug should still fail to fit, contact your electrician to replace your obsolete outlet. Do not defeat
the safety purpose of the polarized plug.
16) Ventilation Slots and openings in the cabinet are provided for ventilation and to ensure reliable
operation of the product and to protect it from overheating, and these openings must not be blocked
or covered. The openings should never be blocked by placing the product on a bed, sofa, rug, or other
similar surface. This product should not be placed in a built-in installation such as a bookcase or rack
unless proper ventilation is provided or the manufacturer's instructions have been adhered to.
17) The MAINS plug or an appliance coupler is used as the disconnect device, the disconnect device shall
remain readily operable.
Class 1 Laser Product
CAUTION: USE OF ANY CONTROLS, ADJUSTMENTS, OR PROCEDURES OTHER THAN
THOSE SPECIFIED HEREIN MAY RESULT IN HAZARDOUS RADIATION EXPOSURE.
PRODUCT COMPLIES WITH DHHS RULE 21 CFR SUBCHAPTER J IN EFFECT AT DATE
OF MANUFACTURE.
CAUTION: INVISIBLE LASER RADIATION WHEN OPEN. DO NOT STARE INTO BEAM.
Class II equipment symbol
This symbol indicates that the unit has
a double insulation system
3
Page 6
Remote Control
Setup and Operations
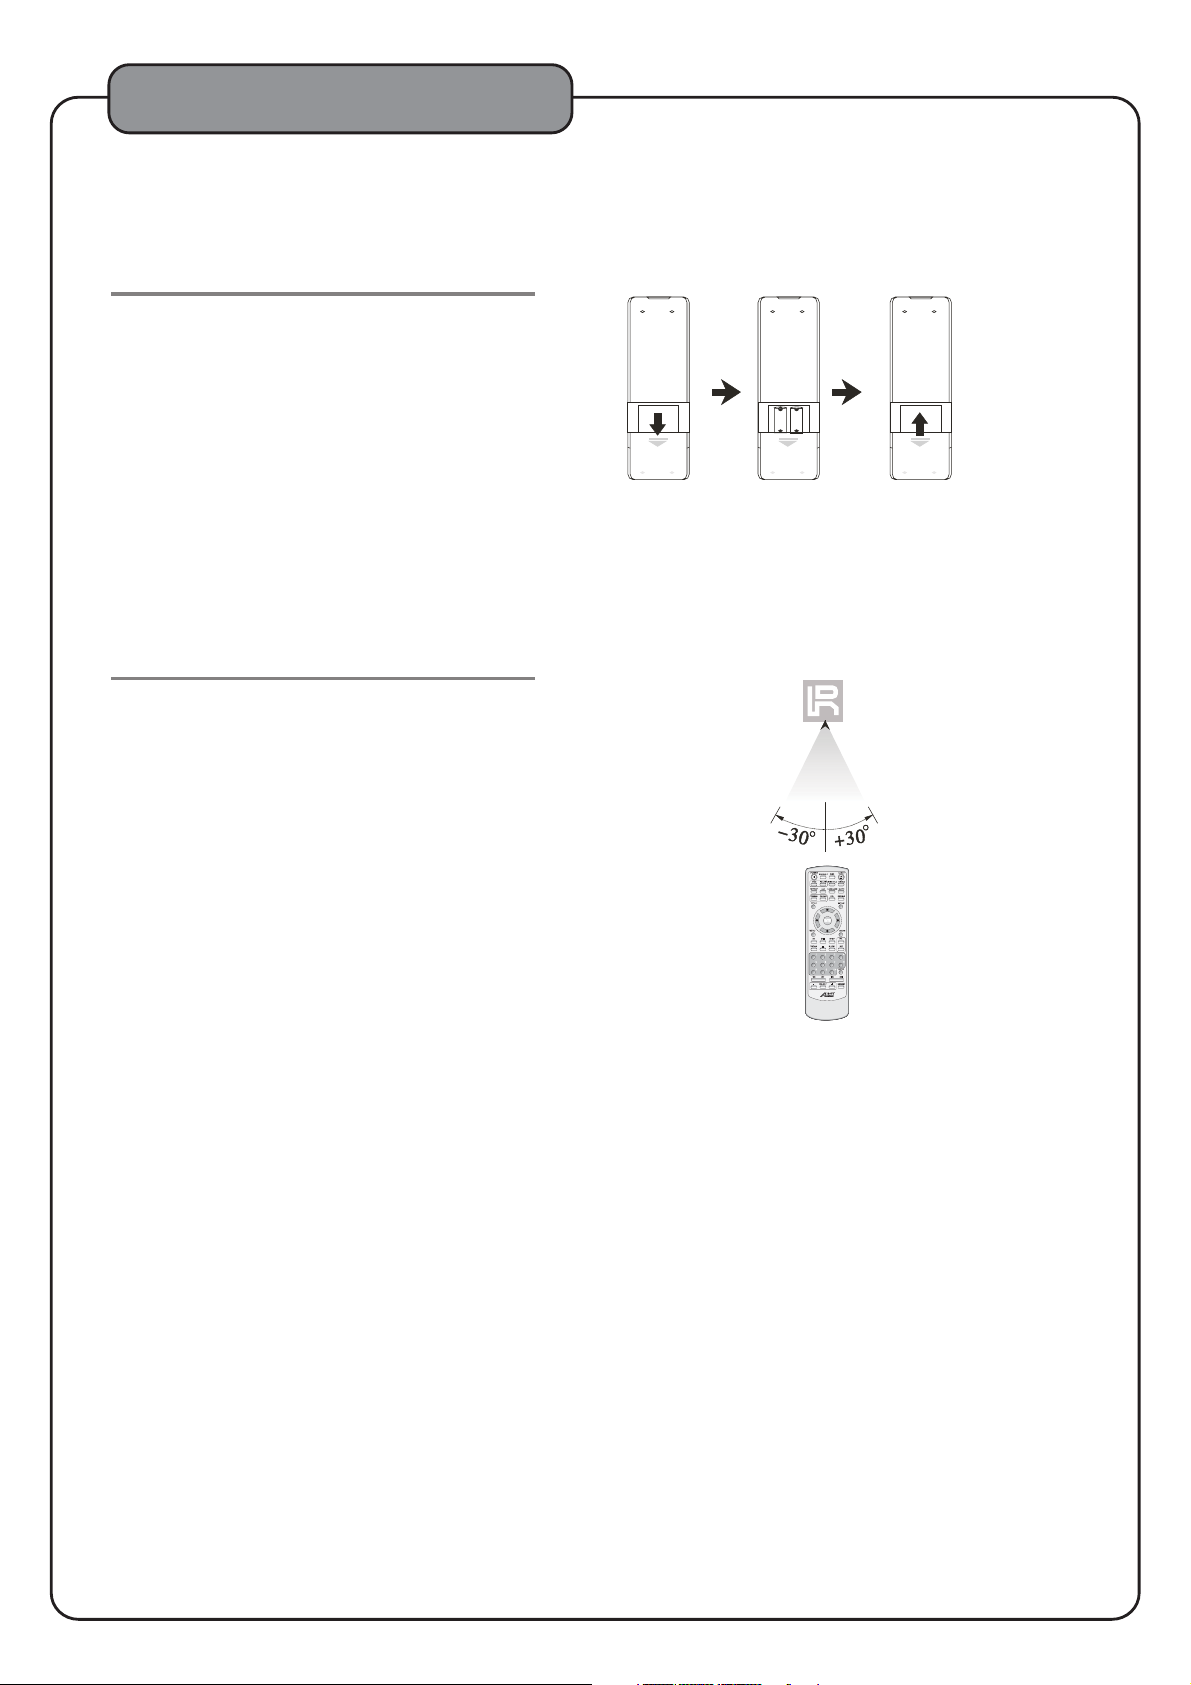
Remote Control Setup:
1.Open the battery compartment cover.
2 Insert the AAA batteries.
.
3.Close the battery compartment cover.
Remote Control Operations:
12 3
1.Point the remote control directly to the remote sensor on the
front panel of the AVC7504, within the effective angles of
+/- 30 degrees as shown.
2.The effective distance between the remote control and the
remote sensor is 18 feet.
3.Do not expose the remote sensor to any heat source to
prevent any malfunction.
* point remote control directly to the remote sensor
within 18ft
ACC7504-1
4
Page 7
Configurations
FRONT PANEL:
45678
123
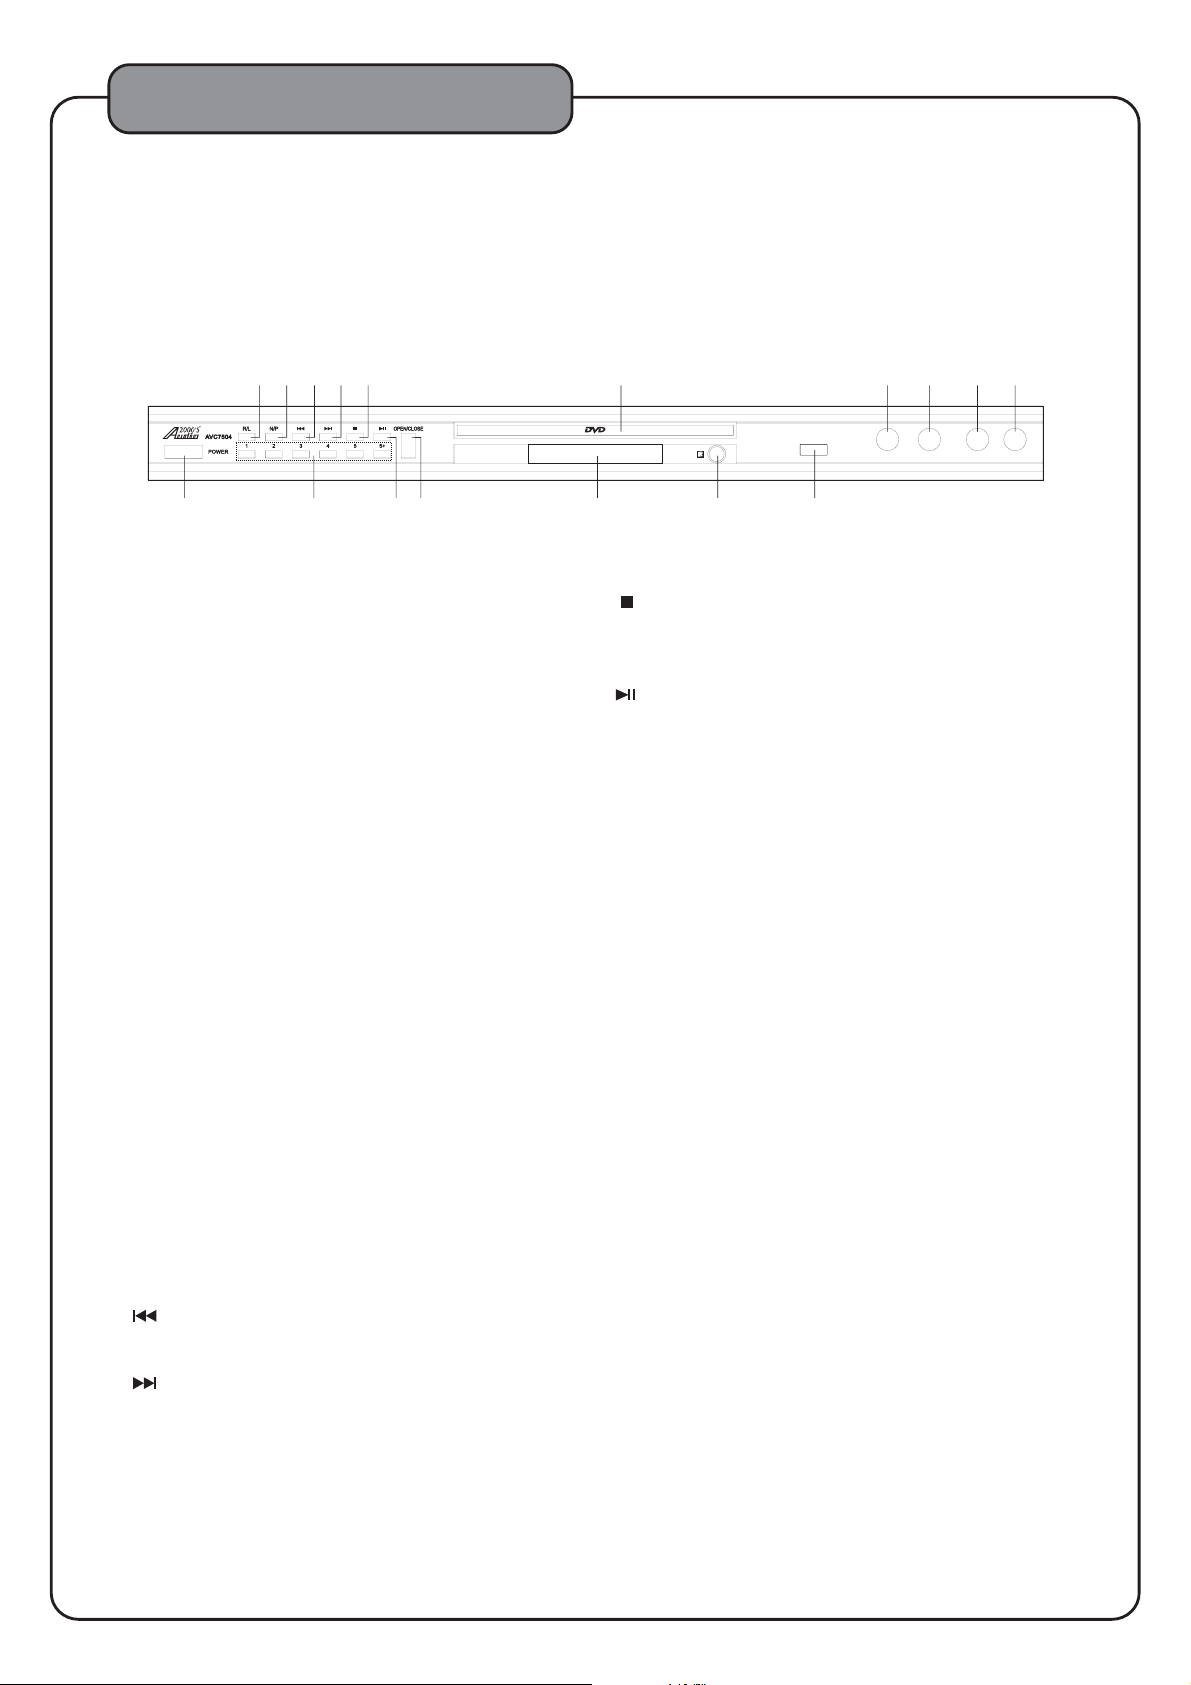
1.POWER-Thisbuttonisusedtoturnthe
AVC7504 “ON” or “OFF”.
2. Direct Track Access - These buttons allow for
Direct Track selection. For tracks 5 and up,
press the 5+ buttons. For example, to go
directly to track 7, you would press 5+ and
2, and to track number 19, press 5+ three
times and then 4.
3.OPEN/CLOSE-Thisbuttonisusedtoopen
or close the DISC TRAY.
4. R/L - This button will cycle between four
audio playback modes: Stereo, Mono Left,
Mono Right, and Mix-Mono. In the
Stereo mode, the audio playback is standard
R/L audio. In the Mono Left mode, the right
channel is removed and replaced with a
duplicate left channel. In the Mono Right
mode, the left channel is removed and
replaced with a duplicate right channel. In
the Mix-Mono mode, the left channel and the
right channel are combined to both the right
and left channels.
5. N/P - through six
This button will cycle
TV system NTSC, PAL, MULTI, NTSC
(P-SCAN), PAL (P-SCAN), and MULTI (P-SCAN).
modes:
911
10
USB
17
8. -PressthisbuttononcetoPausethedisc
playback. Press this button again to stop the
disc playback.
9. - Press this button once to pause the disc playback.
Press this button again to initiate the disc playback.
10. DISC TRAY
11. REMOTE CONTROL SENSOR
12. USB - This is a USB input. the USB input will be
accessed only when there is no disc present in
thedisc trayandthedisctrayisclosed.
13.MIC1-Thisismicrophone1input.
14. MIC2 - 2
15.
ECHO-ThisisaEchoVolumecontrolknob.Turnthis
knob clockwise to increase the echo volume or turn
this knob counter-clockwise to decrease the echo
volume.
16.
MIC VOL - This is a microphone volume control knob
forboththeMIC1andMIC2inputs.Turnthisknob
clockwise to increase the microphone volume or turn
this knob counter-clockwise to decrease the
microphone volume.
This is microphone input.
12
13 14 15 16
ECHO MICVOLMICVOLMIC1 MIC2
6. -Thisbuttonisusedtogobacktothe
Previous track.
7. - This button is used to go to the Next track.
17. LED Display
5
Page 8
Configurations
REAR PANEL:
17
19 21
18
20 22 23
24 25
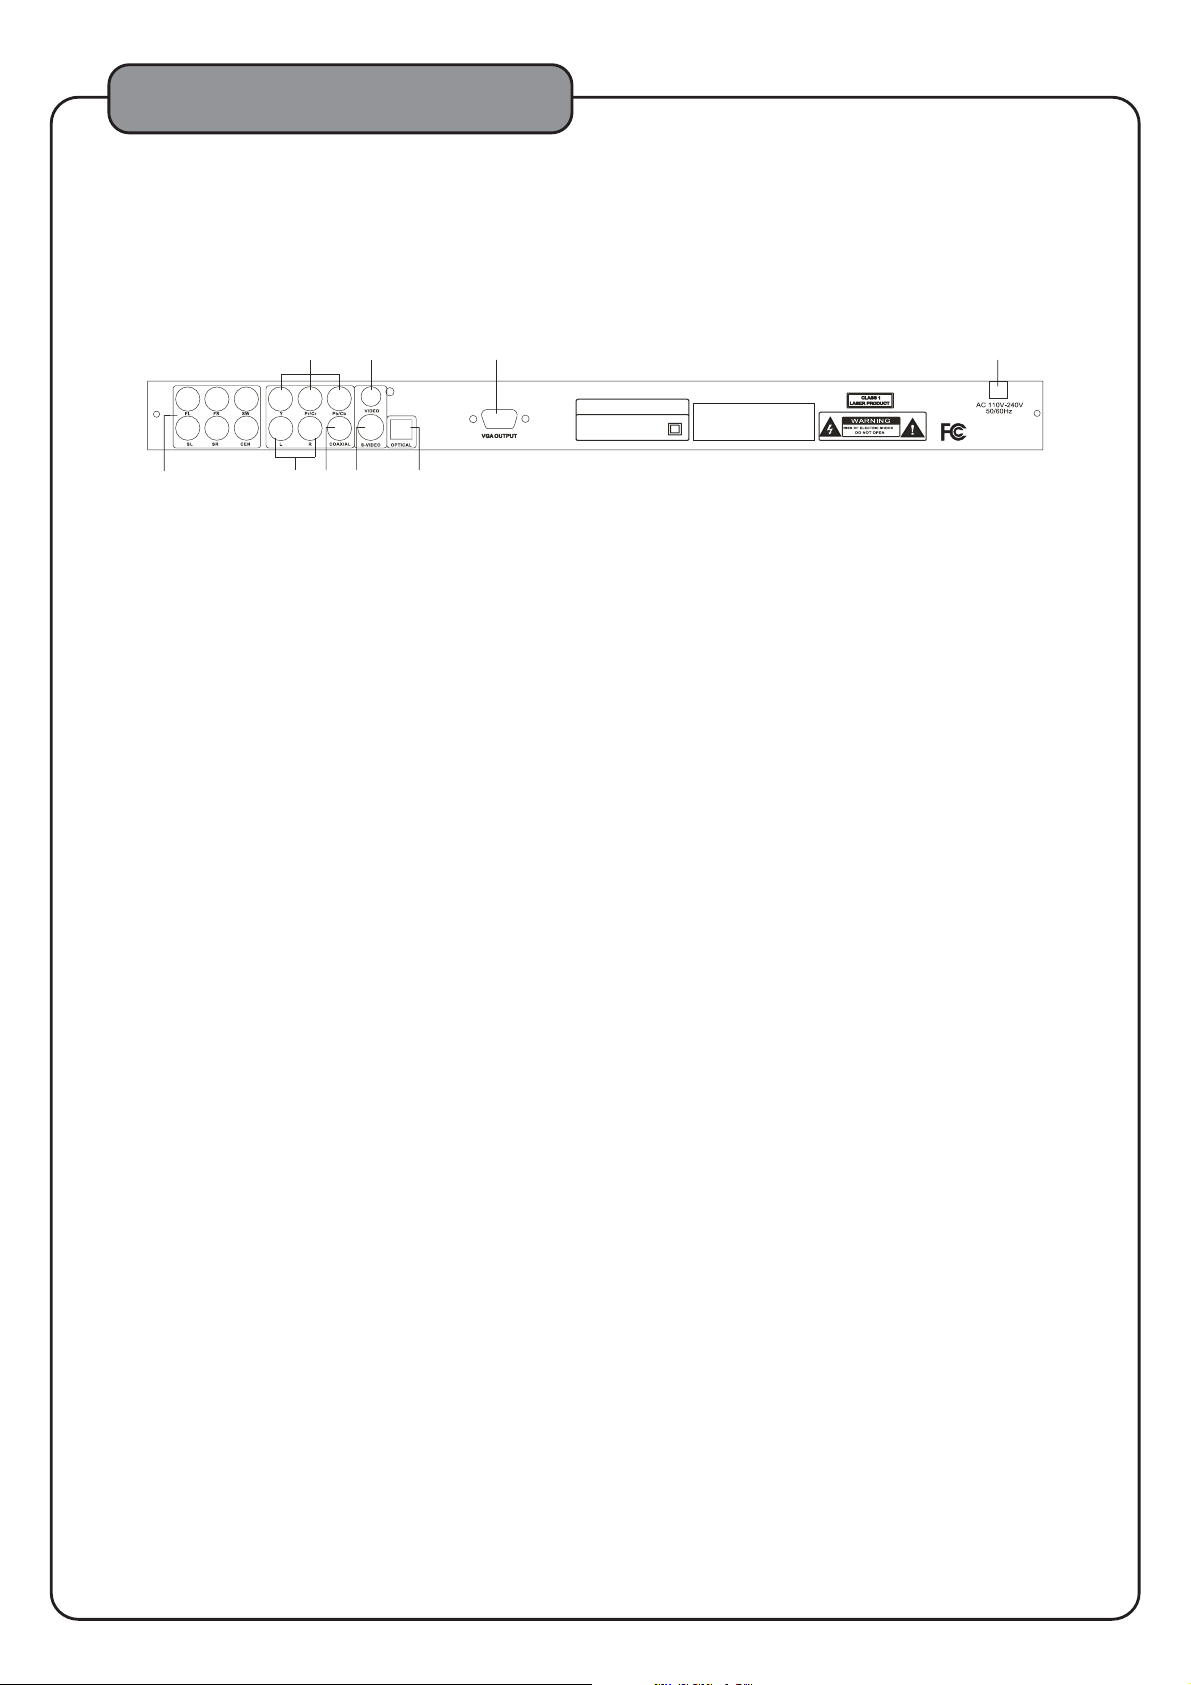
17. 5.1 Channel Audio Outputs - These output
jacks are for connecting to the 5.1 channel
ready amplifiers/receivers. The labels on each
jack indicate which speaker in the surround
sound system the specified output is sent to:
FL-frontleft,FR-frontright,SL-surround
left, SR - surround right, SW - subwoofer,
CEN - center.
18.LandR-Thesearethemainaudiooutputs
which are internally connected to the front left
(FL) and the front right (FR) outputs respectively.
19. Component Video Outputs - These component
video outputs deliver various color signals
(Pr/Cr and Pb/Cb) and luminabce signal (Y)
separately for reproducing high color fidelity.
The component outputs may differ depending
upon the TV set or monitor, such as Pr/Pb/Y,
Cr/Cb/Y, or R-Y/B-Y/Y.
DVD/CDGPLAYERDVD / CDG PLAYER
Model: AVC7504Model: AVC7504
Consumed Power:20WConsumed Power:20W
S/N:
22. S-VIDEO - This S-Video jack is connected to a
display device through an S-video cable. The
S-video provides better color separation and
resolution by separating the color and picture
signals.
23. OPTICAL - This is a digital output connecting this
output to another device through an optical cable.
When this output is not used, keep the protective
cover on to protect it from dust and foreign
material.
24. VGA - For direct connection to an HDTV/Video
monitor through a VGA cable.
25. AC Input -This AC input is connected to a wall
AC outlet through the main power cord.
20. COAXIAL - This is a digital output to be
connected to another device through a coaxial
cable.
21. VIDEO - This is a composite video output jack,
to be connected to a display
device through an RCA cable.
6
Page 9
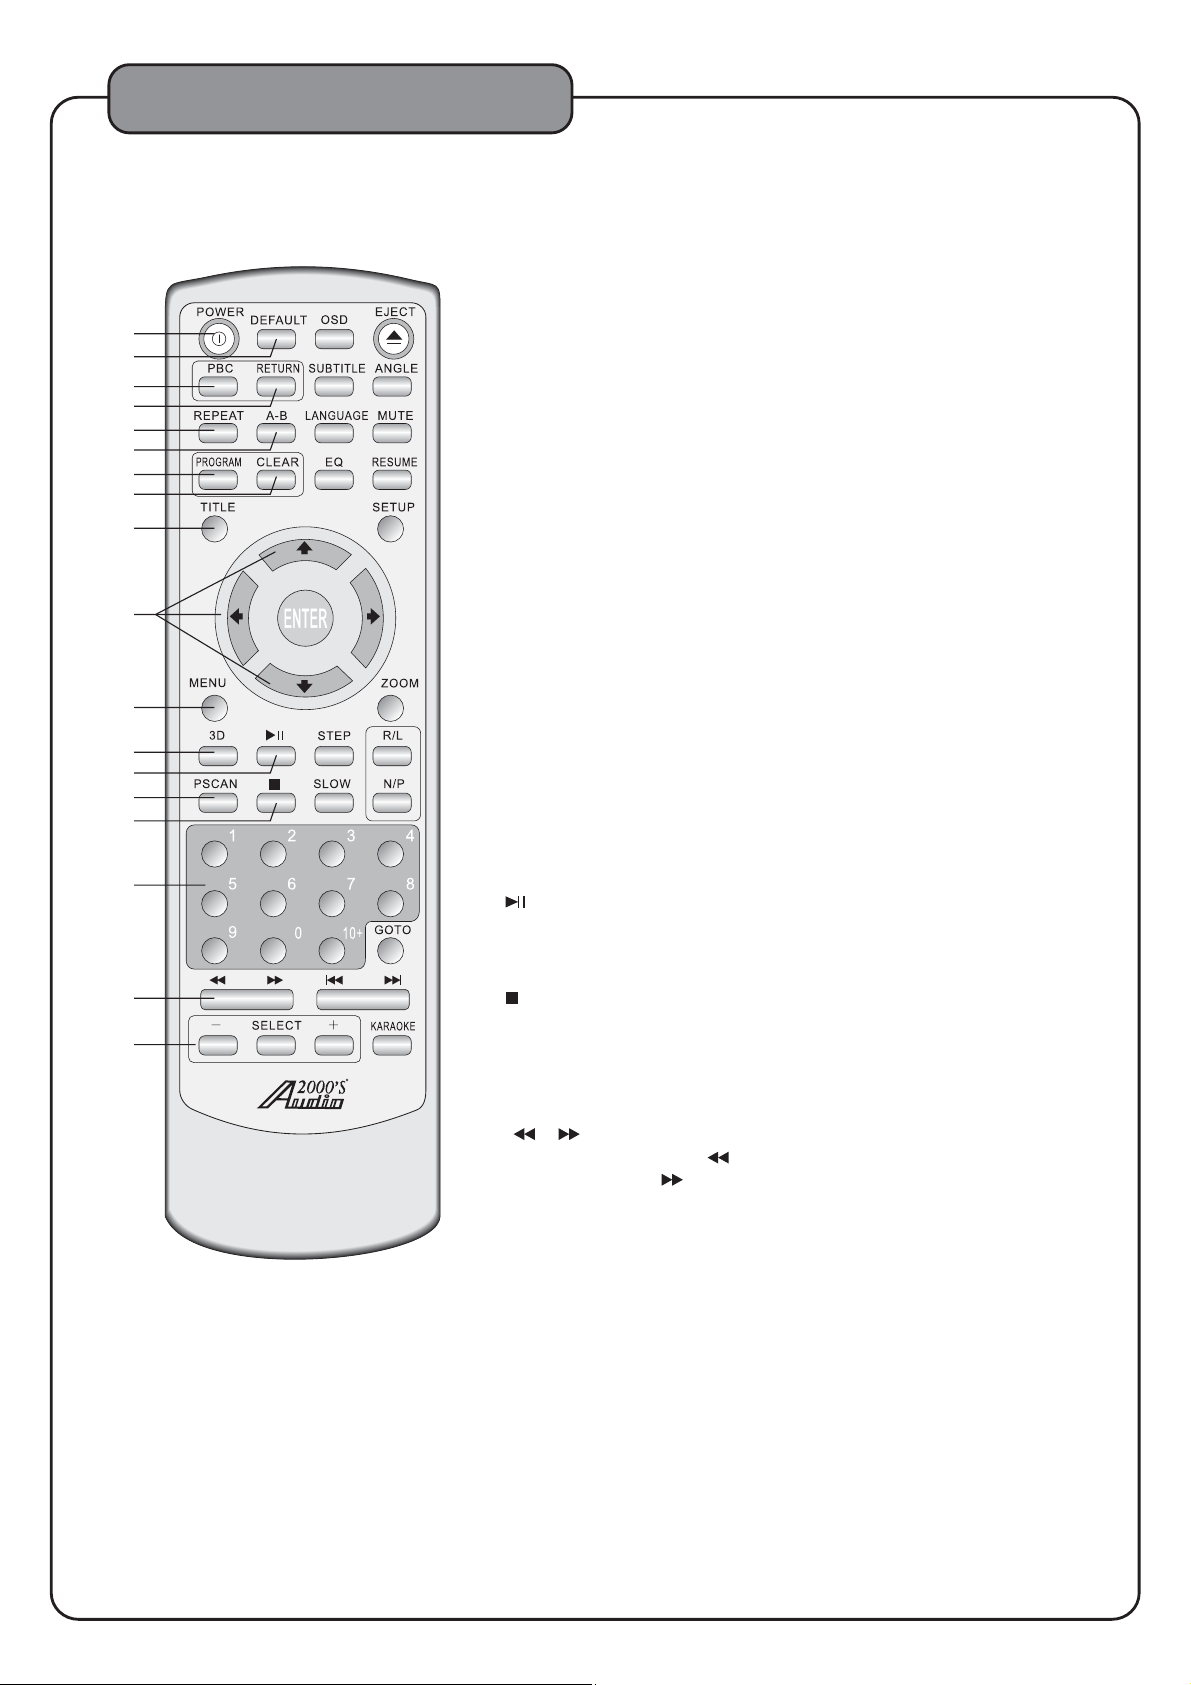
Configurations
REMOTE CONTROL:
1
2
3
4
5
6
7
8
9
10
11
12
13
14
15
16
17
18
ACC7504-1
1. POWER - This button is used to turn the AVC7504 unit “ON”
or place the unit at the “Standby” mode.
2. DEFAULT - Press this button to reset the unit to the factory
settings.
3. PBC - The PBC (Play Back Control)button toggles the PBC
mode ON/OFF. When in PBC mode, the tracks or scenes can
be accesed directly by using the Number Key Pad. The PBC
can be applied to the disc with 2.0 MPEG 1 coding only.
4. RETURN - Press this button to leave the PBC mode.
5. REPEAT -
Repeat options vary from type of disc so see the Operations
section of this manual for detailed instructions on using the
repeat function for every kind of disc.
6. A-B -
for continuous looping. See the Operations section in this
manual for detailed instructions on using the A-B loop feature.
7. PROGRAM - Opens the program menu. The
can program the playback order of up to 20 tracks
on a disc. See the Operations section of this manual for
detailed instructions on programming a custom track order.
8. CLEAR - Clears any numbers typed into a menu before
a selection has been made.
9. TITLE - Accesses the title screen on a DVD.
10.DIRECTIONAL - (<^>v)-Thesebuttonsallowyou
to navigate through the DVD menu screens, Setup Pages, and
Mp3 menus.
11.MENU - Accesses the main menu on a DVD and other
discs with main menus.
12.3D - This button cycles through the following sound effects: Off,
Concert, Living, Hall, Bathroom, Cave, Arena, and Church.
13.
This button cycles through the available repeat options.
Allows you to set a section on a disc
AVC7504
Press this button once to pause the disc playback.
Press this button again to initiate the disc playback.
14.PSCAN - This button toggles between the different variants of
component video, YUV (US), S- Video and VGA.
15. -
16.Number/Preset buttons - Use these buttons to jump
17. - Scans through a track when
18.+, , SELECT - The Select button toggles between "VOL" and "KEY".
Press this button once to Pause the disc playback. Press this
button again to stop the disc playback.
directly to a track in Disc mode. See the Disc and Tuner
Operations sections of this manual for detailed instructions
on using the Number/Preset buttons.
in DISC mode: B-Scan ( ) scans backwards through the current
track and F-Scan ( ) scans forwards through the current track.
Pressing the B-Scan or F-Scan button once will change the scan
speed to "2X". If the B-Scan or F-Scan button is pressed multiple
times, the scan speed will be changed to "2X", "4X", "8X", "16X", or
"32X". When the scan speed is at "32X", press the same B-Scan or
F-Scan button again will reset the scan speed to the normal speed
(1X).
-
When "VOL" is selected, press the "+" button to increase or press the
“ " button to decrease the AVC7504 audio output level (0-20).
-
When"KEY" is selected, press the "+" button to increase or press the
" " button to decrease the level of key control (+/ 8). Pressing the
--
"+"or “ " button directly (without selecting the function by pressing
-
the "SELECT" button) will have the AVC7504 audio output level
adjusted. These buttons will not be reset by pressing the "Default"
button.
7
Page 10
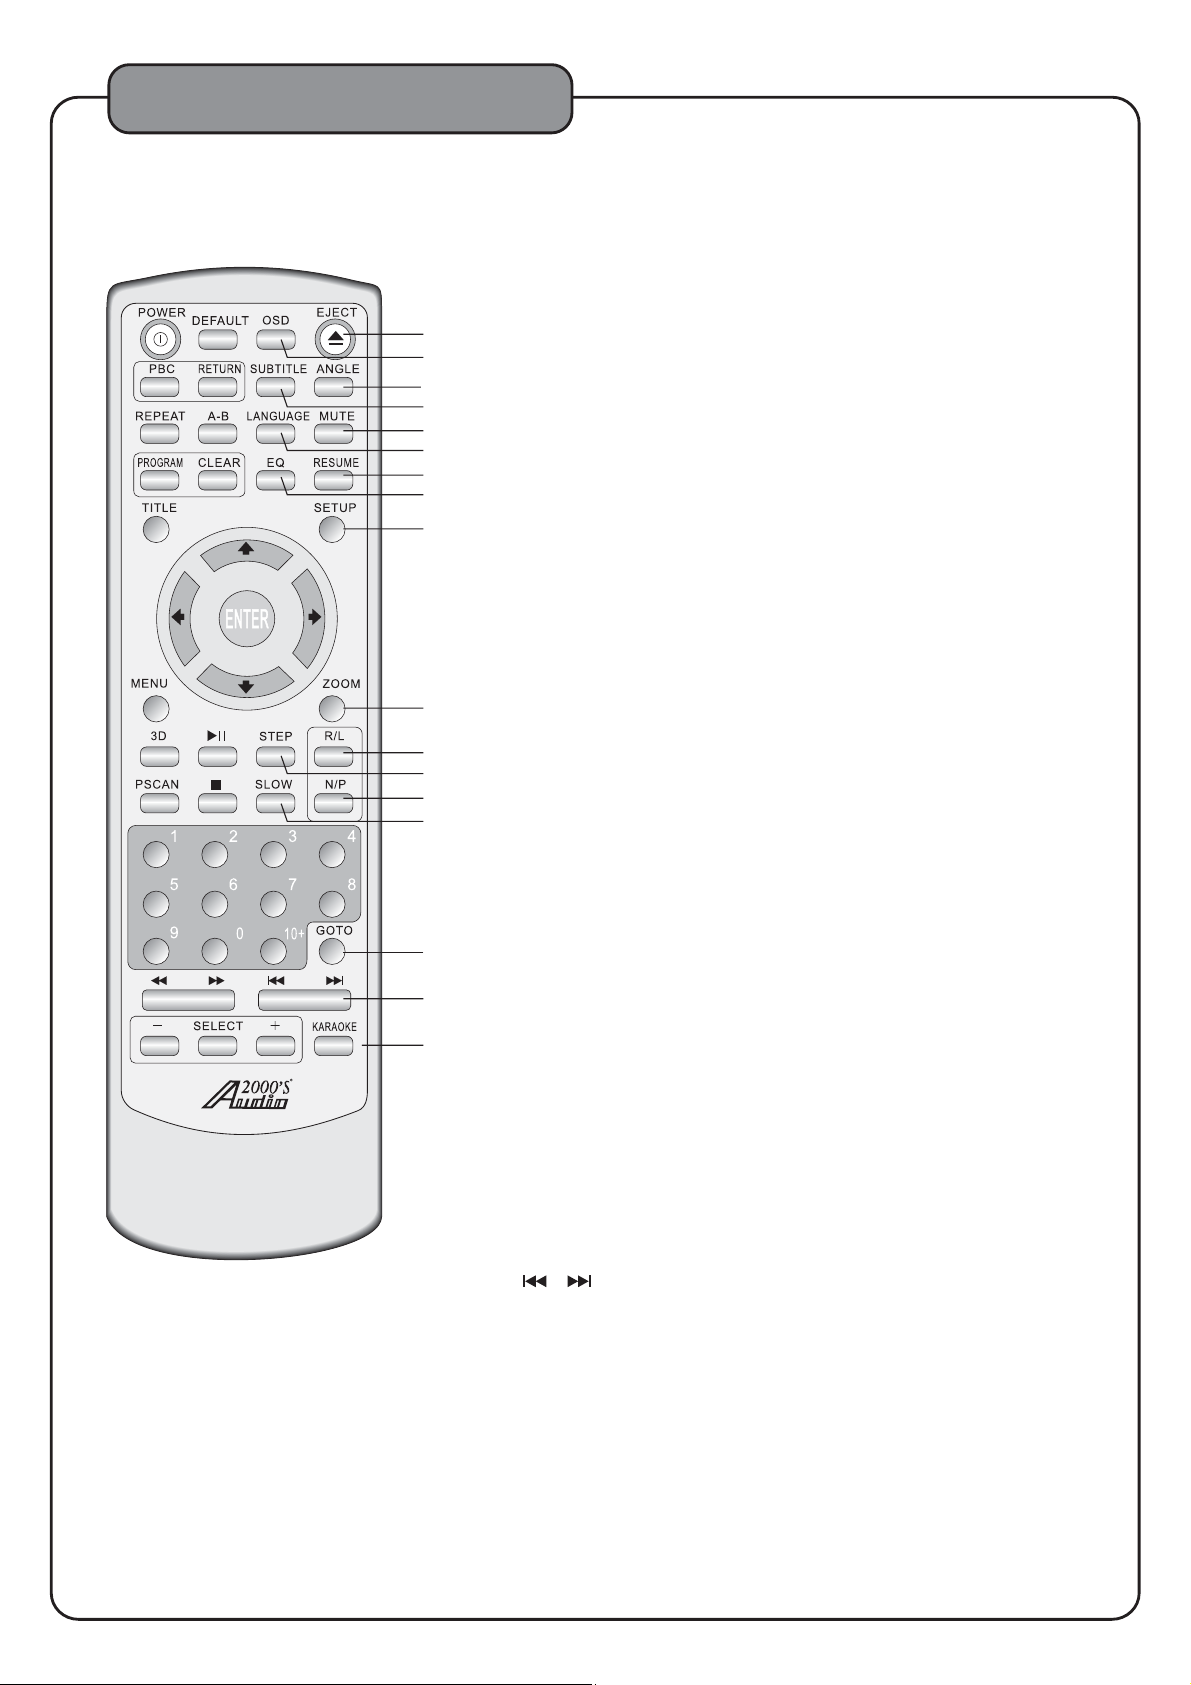
Configurations
REMOTE CONTROL:
ACC7504-1
19.EJECT-Thisbuttonisusedtoopen
or close the DISC TRAY as indicated in numeral 10.
20.
OSD - Cycles through the different On Screen Display
options.
21. ANGLE - Cycles through the available viewing
19
20
21
22
23
24
25
26
27
28
29
30
31
32
33
34
35
angles on DVDs with multiple viewing angles available.
22. SUBTITLE - Cycles through the available subtitle
languages on a DVD with subtitles available.
23.
MUTE - Mutes the sound from disc, ipod and AV input
channels.
24. LANGUAGE - This button swithches between the LANGUAGES
in a DVD that contains multiple LANGUAGES.
RESUME - Resumes playback from exact stop where
25.
a disc has been stopped in standby mode.
26. EQ - Press this button to show the audio frequency spectrum.
Press this button again to remove the spectrum.
27. SETUP - Use this button to access the AVC7504’s setup
page on the video screen. You can navigate between the
General Setup Page, Audio Setup Page, Video Setup Page,
preference page and the Password Setup page using the
DIRECTIONAL buttons (< ^ > v) on your remote. Select
options and make changes using the ENTER button on the
remote.
28.ZOOM - Allows you to zoom in 2X, 3X and 4X and
zoom out 1/2X, 1/3X and 1/4X on the video during disc playback.
R/L - This button will cycle between four audio playback modes:
29.
Stereo, Mono Left, Mono Right, and Mix-Mono. In the Stereo mode,
the audio playback is standard R/L audio. In the Mono Left mode,
the right channel is removed and replaced with a duplicate left
channel. In the Mono Right mode, the left channel is removed and
replaced with a duplicate right channel. In the Mix-Mono mode,
the left channel and the right channel are combined to both the
right and left channels.
30.
STEP - Allows you to view a disc step-by-step, one
frame at a time. See the Operations section in this manual
for detailed instructions on using the Step feature.
N/P - This button will cycle through six TV system modes: NTSC,
31.
PAL, MULTI, NTSC (P-SCAN), PAL (P-SCAN), and MULTI (P-SCAN).
32. SLOW - Cycles through the different slow motion
options while in DISC mode.
33.GOTO - This button cycles through "Disc Go To: __:__", "Track
Go To:__:__", and "Select Track:__ /__".When the "Disc Go To:__:__"
is displayed, press four digits to go to the selected disc playback
location. When the "Track Go To:__:__" is displayed, press two
digits to go to the selected track playback location. When the "
Select Tract:__/__" is displayed, press four digits to go to the
selected track.
34. - Skip tracks when in DISC mode:
prev jumps to the previous track and Next skips ahead to
the next track.
35. KARAOKE -This button toggles the microphone input "ON" and "
OFF". This function will not be reset by pressing the "Default"
button.
8
Page 11
Operations (Disc Mode)
Operations (Disc Mode)
Loading a disc
1.
Press the OPEN/CLOSE button on the remote control or the EJECT button on the front panel of
the to open the disc tray
AVC7504
2.
Insertadisc
3.
Press the OPEN/CLOSE button on the remote control or the EJECT button on the front panel of
the to close the disc tray
AVC7504
Playing a disc
1.
Loadadisc
2.
PressPLAYontheremotecontroloronthefrontpanel
Stopping a disc
Press the STOP button on the remote control or front panel once to enter pause mode
1.
Press the STOP button again to completely stop the disc
2.
Pausing a disc
Press the PAUSE button on the remote control or front panel
1.
Skipping tracks/chapters
Use the PREV and NEXT buttons on the remote control or front panel to skip tracks/chapters
1.
Press the PREV button to skip to the previous track/chapter
2.
Press the NEXT button to skip to the next track/chapter
3.
Searching through a track/chapter
Use the B.SCAN and F.SCAN buttons on the remote control or front panel to search through tracks/chapters
1.
Press the B.SCAN button to search forwards through the current track/chapter
2.
Press the F.SCAN button to search backwards through the current track/chapter
3.
Note:It will not work while playing CDG format disc
Subtitles
Some DVDs have subtitles available and some also include multiple languages. If you are using a DVD with
subtitles available, simply press the SUBTITLE button on the remote control to cycle through the available
subtitles
Viewing multiple angles
Some DVDs have multiple viewing angles available. Press the ANGLE button on the remote control to
change the viewing angle and cycle through the available angles.
Slow-motion playback using the SLOW button
Use the SLOW button on the remote control to cycle between 4 slow-forward modes :
SLOW 1/2 - Forwards at 1/2 the actual time
●
SLOW 1/4 - Forwards at 1/4 the actual time
●
SLOW 1/8 - Forwards at 1/8 the actual time
●
SLOW 1/16 - Forwards at 1/16 the actual time
●
.
9
Page 12
Operations(Disc Mode)
Viewing one frame at a time using the STEP button
Press the STEP button on the remote control to enter Step mode
1.
Every time the STEP button is pressed, when in Step mode, the movie will advance one frame
2.
3.
Press the PLAY button on the remote control or front panel to exit Step mode and return to normal playback
Selecting repeat options
Press the REPEAT button on the remote control to cycle through the available repeat modes:
Track - Repeats the current track
1.
Chapter - Repeats the current chapter on a DVD
2.
Title - Repeats the current title on a DVD
3.
All - Repeats the entire disc once it has played through
4.
Repeat off- Repeats the entire off
5.
Creating a loop using the A-B button
The A-B feature allows you to loop a certain part of a disc.
While the disc is playing:
Press the A-B button once at the desired starting point for the loop
1.
Press it again at the desired ending point for the loop
2.
Press it a third time to end the loop and return to normal playback
3.
Note:
It will not work while playing CDG format disc
Canceling vocals using the L/R button
Multiplex CDG discs are designed to have vocals on one side and music on the other. The L/R button
allows you to play only one of these sides and cancel out the other in order to have music-only or
vocals-only.Press the L/R button to cycle through the available settings:
Mono Left - Left channel only (no vocals)
●
Mono Right - Right channel only (no music)
●
Mix-Mono - Virtual stereo
●
Stereo - Left and Right in true stereo
●
Note: This feature is only for use with specifically Multiplex formatted CDG discs.
Zooming in and out
The V lets you zoom in and out on the video screen.
A C7504
Press the ZOOM button on the remote control to cycle through the available zoom settings.
Zoom in
2X - Zooms in 2X the original size
●
3X - Zooms in 3X the original size
●
4X - Zooms in 4X the original size
●
Zoom out
1/2X - Zooms out at 1/2X the original size
●
1/3X - Zooms out at 1/3X the original size
●
1/4X - Zooms out at 1/4X the original size
●
Note:when you try to play MPG and JPG file(include the MPG and JPG file on DISC,USB,SD):
Press the ZOOM button on the remote control to enter ZOOM mode;
1.
Use the F.SCAN and B.SCAN button to control zoom n and zoom out function;
2.
Jumping to specific time on a disc
Press the TIME button on the remote control to cycle through the available jump-to options:
CD/CDG disc
Disc Go To (CD/CDG only) - Jump to a specific time on the current disc
●
Track Go To (CD/CDG only) - Jump to a specific time on the current track
●
Select Track (CD/CDG only) - Jump directly to a specific track
●
Note:
It will not work while playing CDG format disc
Example:
Jumping to 1:35 in the current track
1.PresstheTIMEbuttonuntil“TRACKGOTO--|--”appears on the TV screen
2.Press0,1,3,5
3.Playback will begin at 1:35 on the current track
i
DVD disc
Note: Not all discs have multiple titles. A title refers to the different sections including the movie,
special features,etc.
Title / Chapter (DVD only) - Select the title and then jump to a chapter within that title
●
Title / Time (DVD only) - Select a title and then jump to a specific time within that title
●
Chapter / Time (DVD only) - Select a chapter and then jump to a specific time within that chapter
●
10
Page 13
Operations(Disc Mode)
Example:
Selecting a Title and Chapter
Jumping to title 2 and chapter 2
1.
Press the TIME button until TITLE “__ / __ CHAPTER __ / __ “ appears on the top of the TV screen
2.
Press 2 on the number pad to select Title 2. Now chapter will be highlighted
3.
Press 2 on the number pad to select Chapter 2
4.
Playback will begin at that on Title 2 and Chapter 2
Viewing and setting the On Screen Display (OSD)
Press the OSD button on the remote control to cycle through the available OSD viewing options.
CD/CDG discs
Single Remain - The time remaining on the current track
●
Single Elapsed - The time elapsed on the current track
●
Total Remain - The time remaining on the entire disc
●
Total Elapsed - The time elapsed on the entire disc
●
Display Off - Turns the OSD off
●
DVD discs
Title Remain - The time remaining on the current title
●
Title Elapsed - The time elapsed on the current title
●
Chapter Remain - The time remaining on current chapter
●
Chapter Elapsed - The time elapsed on the entire chapter
●
Turning on the last memory function:
1.
Press SETUP on the remote control. The General Setup page will show.
2.
Use the down arrow button on the remote control to scroll down to Last Memory
3.
If Last Memory is set to off, press enter when Last Memory is highlighted and press up so that On is
highlighted
4.
Press ENTER on the remote control to confirm the selection
5.
Press SETUP again on the remote control to close the Setup menu
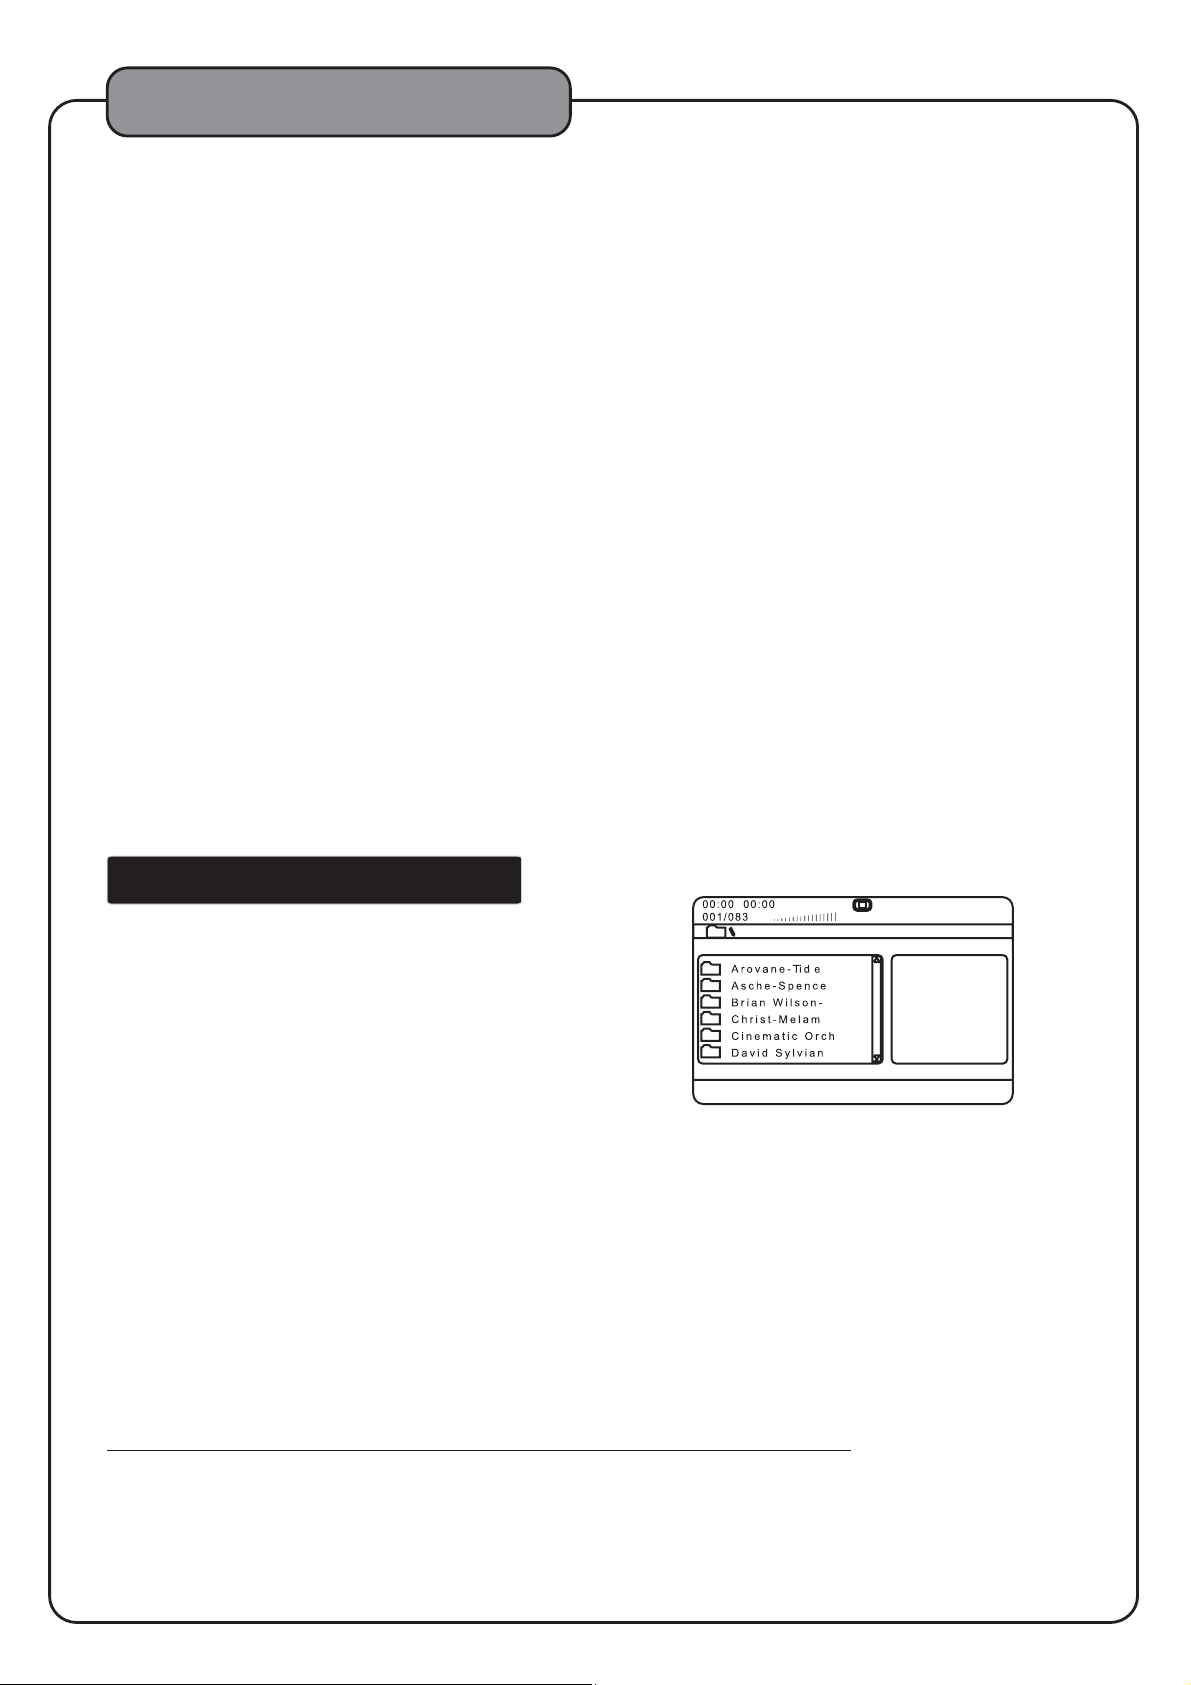
Operations ( AVI / DivX)Mp3 and
When playing and DivX files, the V
connected to a TV in order to see and navigate through the
file menu. Use the arrow buttons on the remote control to
navigate through the file menu and the ENTER button to
select a file to play.
To play a file
Use the arrow buttons on the remote control to scroll to the
1.
desired file
Press ENTER on the remote control to begin playing the file
2.
The file will begin playing
3.
or
Use the number buttons on the remote control and enter the file number
1.
Press ENTER
2.
The file will begin playing
3.
Direct track access:
When playing AVI/DivX files,to skip to the desired track directly using the number buttons,on the
remote contro.l
see the following operations section for detailed instruction:
1.
For example:to go directly to track 142 of /AVI/DivX:you would press 1 and 4 and 2,then press
ENTER button on remote control for playing your desired track.
2.
For example:to go directly to track 36 of AVI/DivX,you would press 0 and 3 and 6, then press
ENTER button on remote control for playing your desired track.
Note:The desired track you selected must be less than the total tracks on the AVI/DivX;
MP3 or
A C7504
must be
Mp3
Mp3
11
Page 14
USB Operations (Disc Mode)
Repeat options
There are six repeat options when playing Divx Files. Use the REPEAT button on the
remote control to cycle through these repeat options:
Random - Plays songs randomly from the entire disc
●
Single - Playback stops after a single track finishes playing
●
Repeat One - Repeats the current song continuously
●
Repeat Folder - Repeats the entire folder after it has played through
●
Folder - Playback stops after all of the songs in the current folder have played
●
Shuffle - Plays songs randomly within the current folder
●
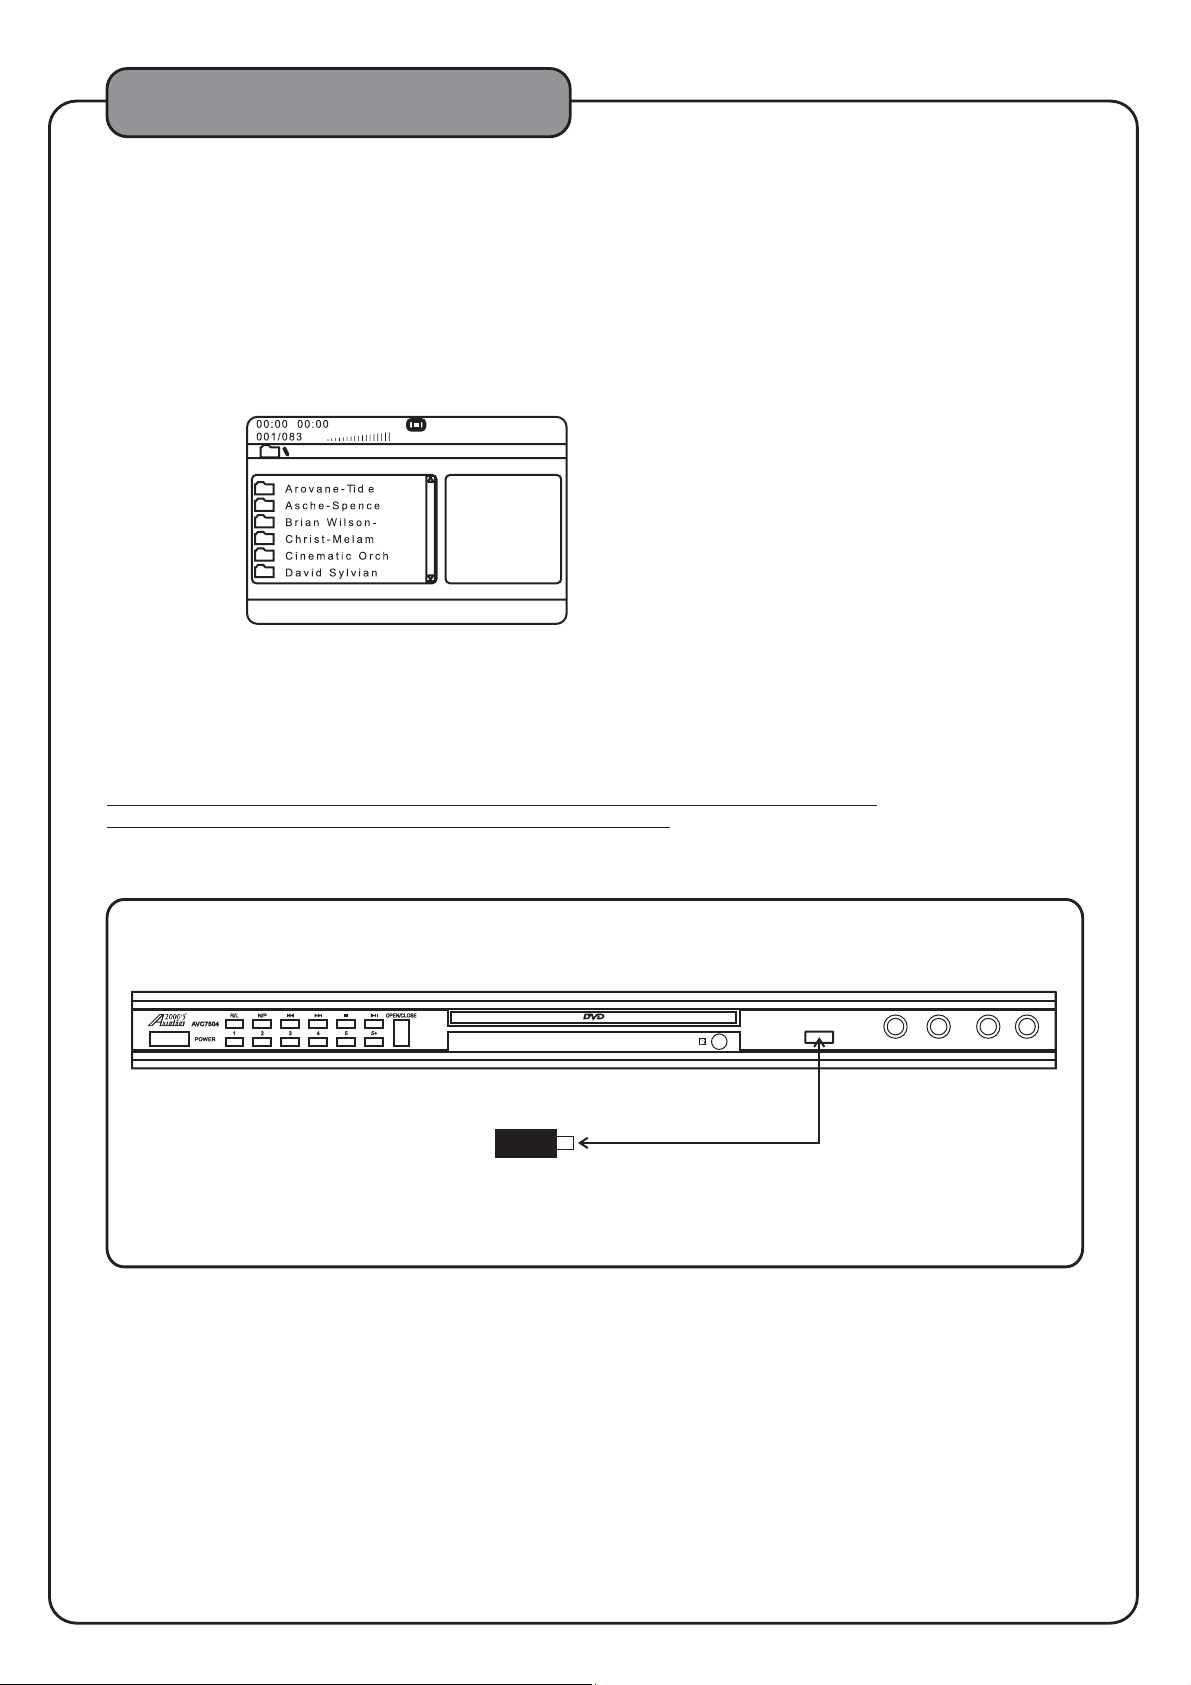
USB operations (Disc Mode)
Insert USB to the USB jacks,then begin to load the media sources from USB.
1.Using the USB Input
PlugaUSBthumbdriveintotheUSBInput.
●
Use the directional buttons to select videos, music, or images. Press the Enter button to play a
●
selected video, music, or image.
Note:The unit will play your VCD, WMA, AVI, MP4, DAT, MPG and JPG files. The different
file types must be separated into folders for the unit to read them.
USB
USB
ECHOMICV OLMICVOLMIC1 MIC2
12
Page 15
System Setup
Setting your Preferences
<
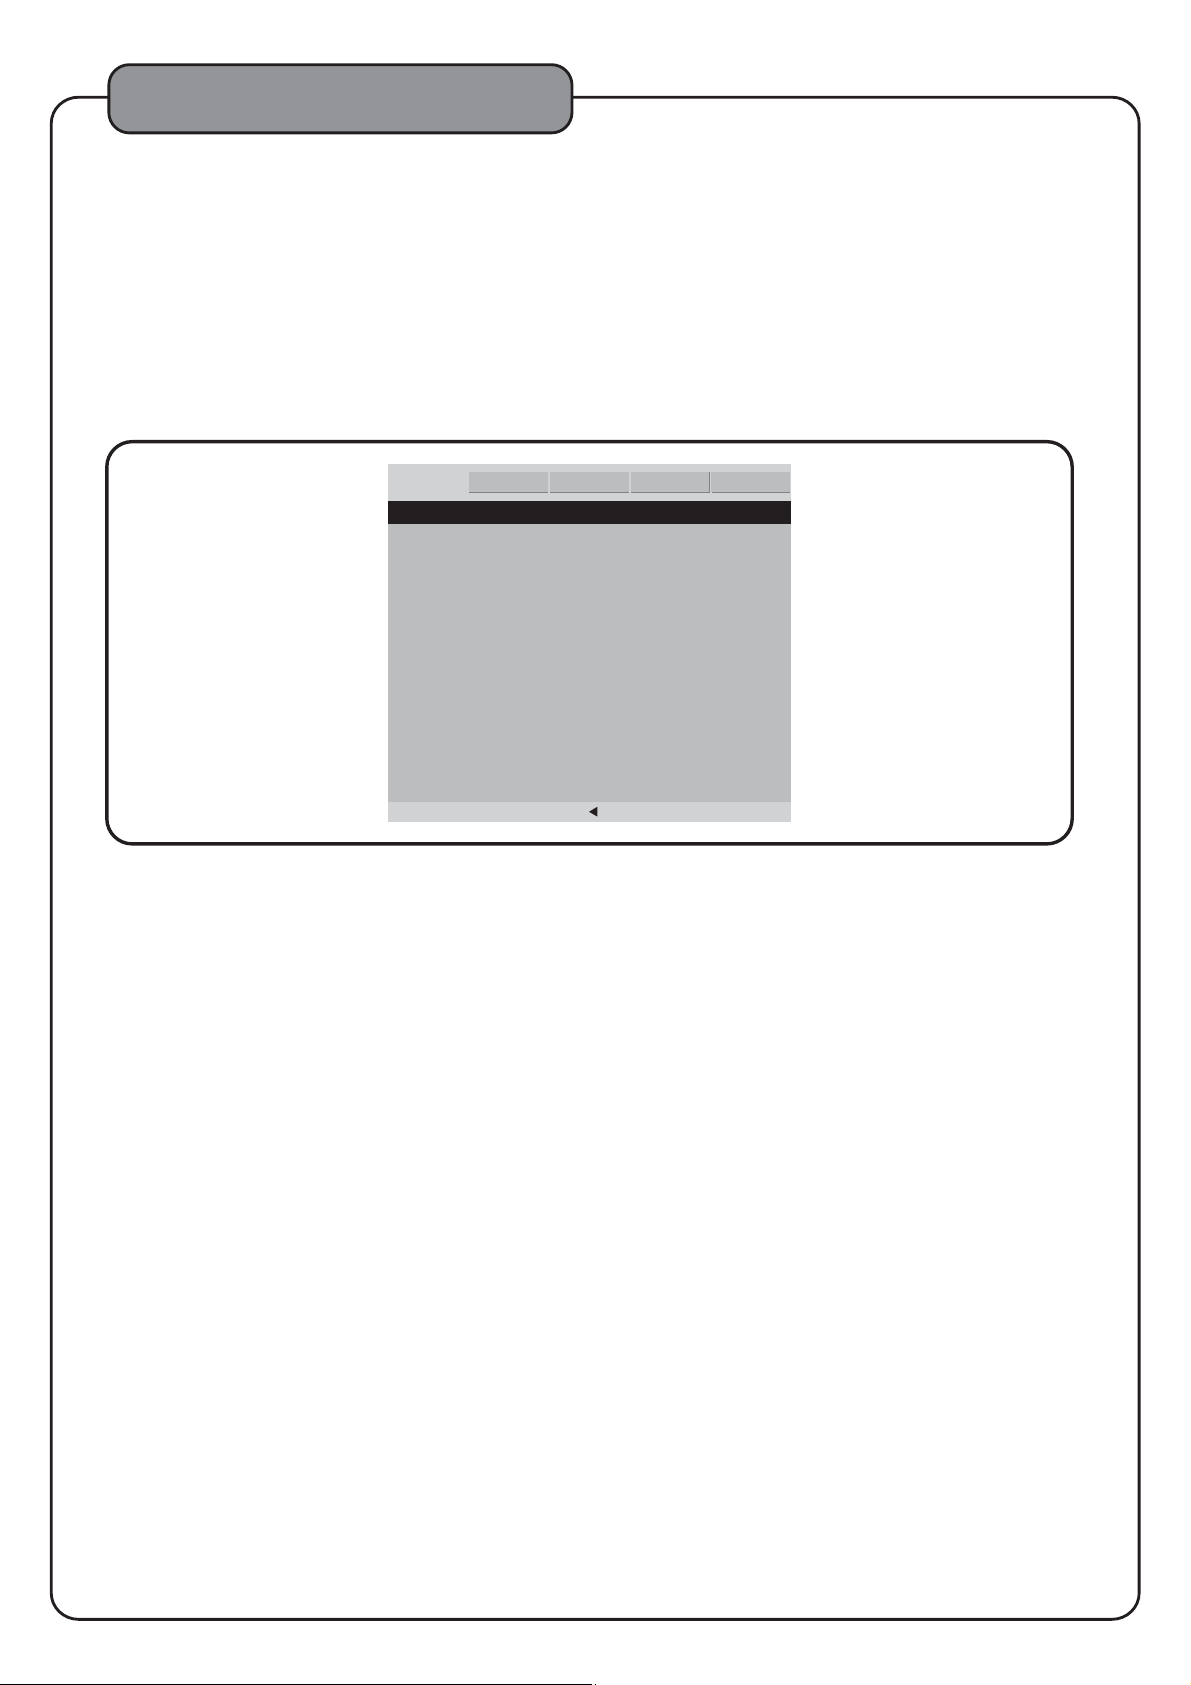
Activate the setup menu screen by pressing the SETUP button on the Remote. Use the DIRECTIONAL{ }
buttons to navigate within this menu to the desired subdirectory and press ENTER. The icon file tabs at the
top of the screen indicate which menu page your are in . The menu pages are the General Setup Page, Audio
Setup Page, Dolby Setup Page, Video Setup Page, and Preference Page.
General setup page:
<
<
<
GENERAL
GENERAL
- - General setup page - -
Audio
Tv Display * * Normal/PsPs
Angle Mark * on * on
Osd Lang * Eng
Captions * Off * on
Screen Saver * on * on
Last Memory * Off * on
Press the direction key" "return to setup menu
DOLBY
Video
Normal/Lb
Wide
Off
English*
Off
Off
Off
PREFERENCE
1.Tv Display
Select between three TV display modes.
Normal/PS: When the player is connected to a normal TV, and a wide picture is shown on the full screen.
Normal/LB: When the Player is connected to a normal TV, and a wide picture is shown at the top of the
screen with black strip at both the top and bottom of the screen.
Wide: When the player is connected to a wide screen TV, a wide picture is shown on the full screen.
2.Angle Mark
ON: The screen will show angle mark (if angle option is available).
OFF: The screen will not display the angle mark.
3.Osd Lang
Select the Language of the text on the on screen Display.
English: Selects English as the language
(Chinese characters): Selects Chinese as the language.
4.Captions
In this menu you can choose between having Closed Captioning turned ON or OFF.
5.Screen Saver
In this menu you can choose between having the Screen Saver turned ON or OFF. When in ON mode the
Screen Saver will turn on after the AVC 7504 has been idle for 10 minutes.
6.Last Memory
When ON is chosen, the Will retain the last position of playback in its memory. This feature is
AVC 7504
cancelled when the power is turned off. When OFF is chosen, the last position of playback will not be retained.
13
Page 16
System Setup
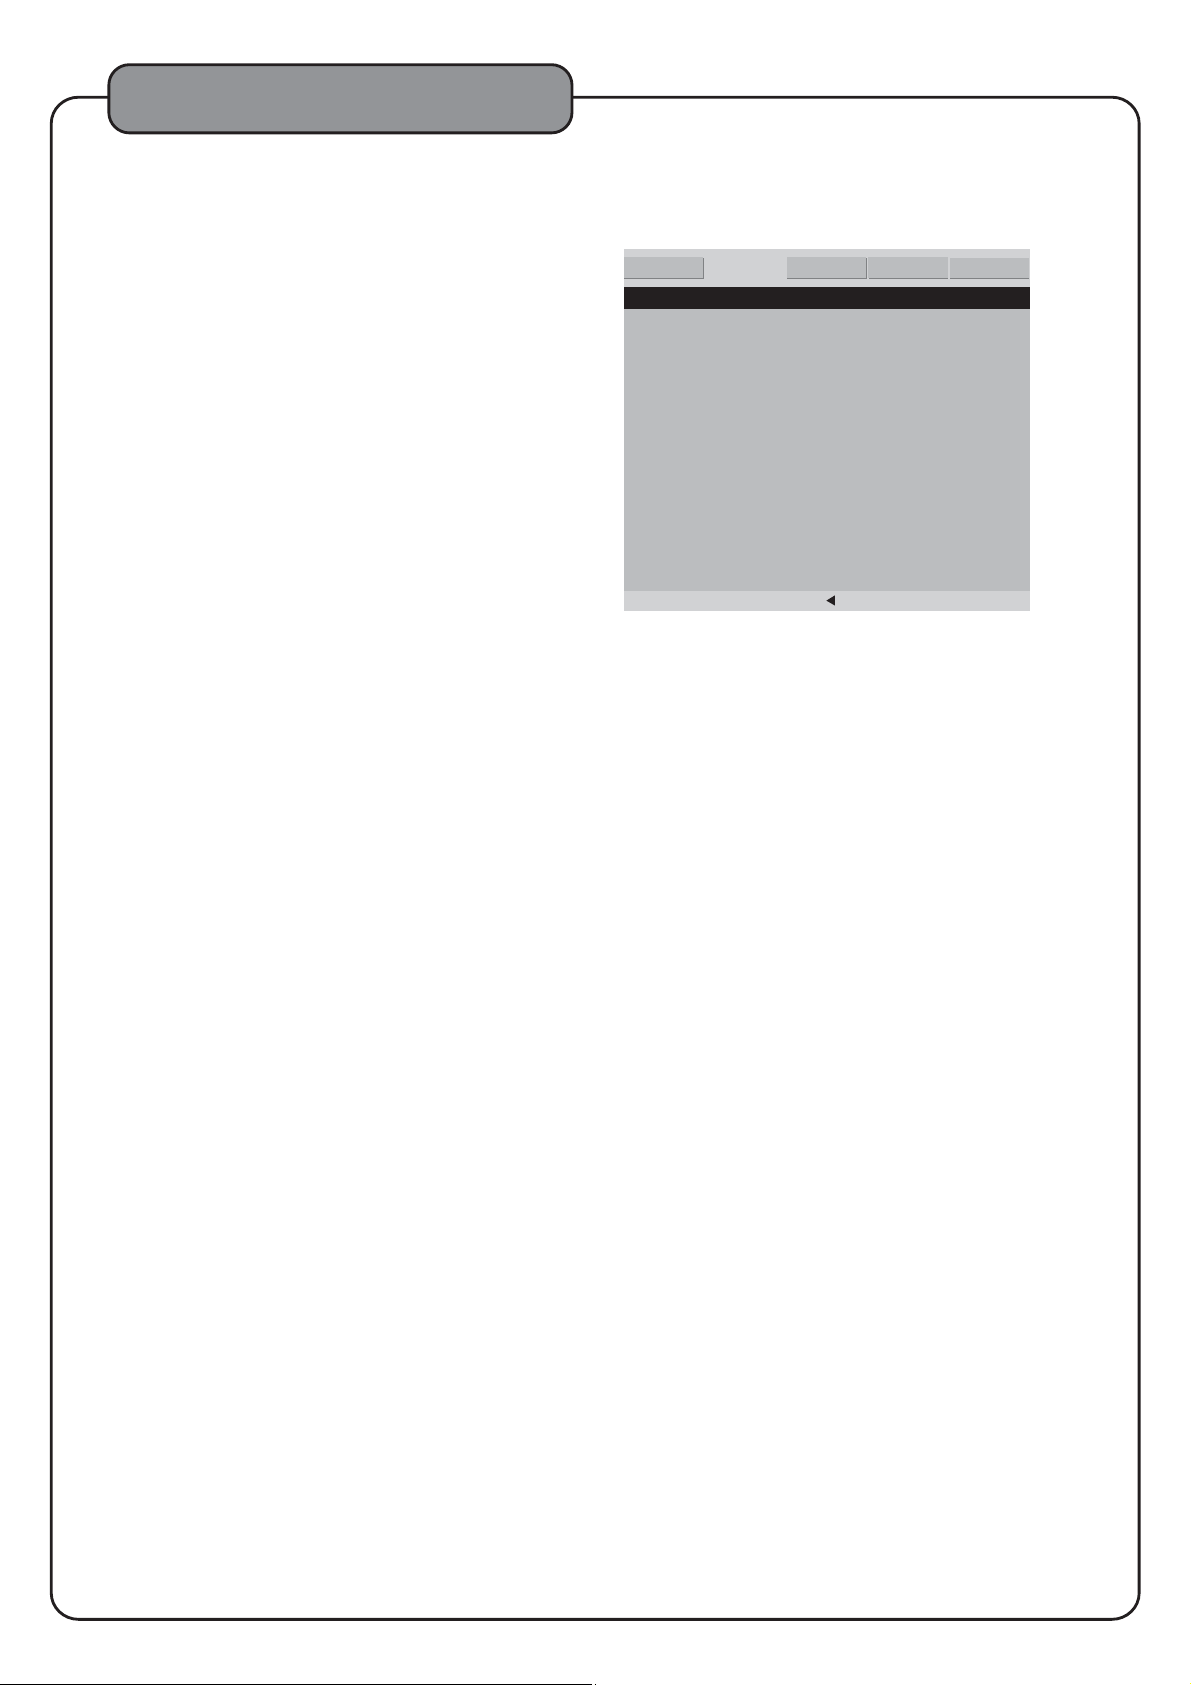
Audio setup page
1. Speaker Setup
Opens up the Speaker Setup page
1.1 Downmix
LT/RT - Sound output is divided with the Left
?
coming
out of the Left speaker and the Right coming
?
out of the Right speaker.
STEREO - Sound output is in Stereo Mode.
?
V SURR - Virtual Surround Sound
?
5.1CH-For5.1Channelsurroundsound
?
1.2 Front Speaker
Set this based on the size of your front speaker
1.3 Center Speaker
ON: If you have a center speaker
?
OFF: If you do not have a center speaker
?
1.4 Rear Speaker
ON: If you have a rear speaker(s)
?
OFF: If you do not have a rear speaker(s)
?
1.5 Subwoofer
ON:Ifyouhaveasubwoofer
?
OFF:Ifyoudonothaveasubwoofer
?
.
2
Spdif Setup
2.1 SPDIF Output:
SPDIR OFF: turn off the optical and coaxial output,only analog output.If in manual mode,you can
choose different output mode according to different disc.
2.2 CD,Dolby Digital,DTS,MPEG:
When SPDIF output is manual,setup SPDIF output according to CD,Dolby digital,DTS,MPEG discs.
If no optical output on these four modes,set up SPDIF output to "SPDIF OFF".
2.3 LPCM Output:
Set up different mode from 48KHz to 96KHz according with different audio signal source.
Note:some amplifiers cannot support 96KHz signal, and may lead to abnormal sound from optical or
coaxial digital output.
2.4 Dynamic:
If watching dynamic scope large movie programmer at night,select this mode to reduce the volume,
meantime keep the little minutia EQ high level,thus it can avoid troubling neighbors without detracting
volume quality.
3. Karaoke Setup
3.1 Mic setup
●
ON: T
urns on Microphone
●
O:
FF Microphone is off
3.2 Karaoke score
●
1
●
2
●
3
●
O:
FF Karaoke score is off
4. Equalizer
4.1 EQ Type
Choose the EQ type that is most similar to the kind of music you are playing
4.2 Bass boost
●
ON: Boosts the bass frequency
●
OFF:Bassboostisoff
4.3 Super Bass
●
ON: Turns on Super Bass, enhancing the
bass quality
●
OFF: Super Bass is off
4.4 Treble Boost
●
ON: Boosts the treble frequency
●
OFF: Treble boost is off
GENERAL
GENERAL
--Audio setup page--
Speaker Setup
Spdif Setup
Karaoke Setup
Equalizer
3d Processing
Hdcd 1X Off
Audio
Audio
Press the direction key" " to return to setup menu
DOLBY
*
Video
1X
*
2X
PREFERENCE
14
Page 17
System Setup
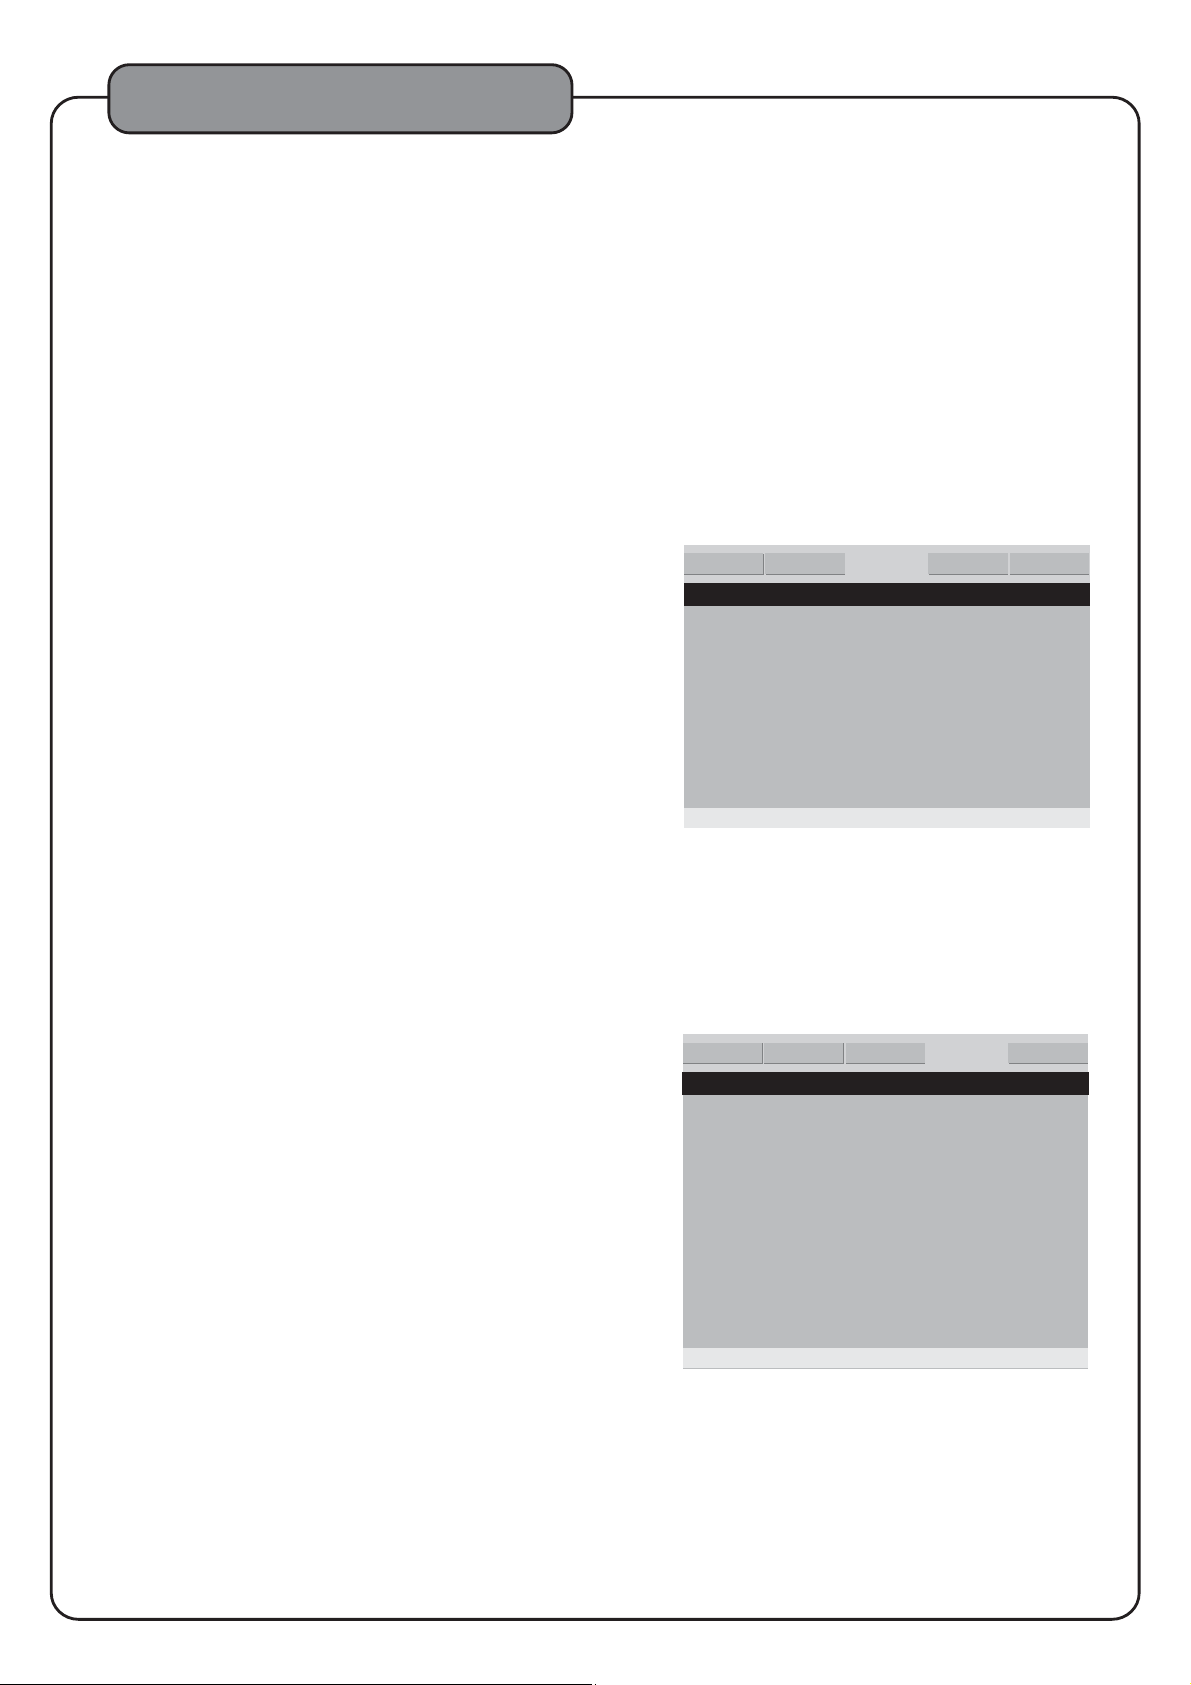
5 . 3D Processing
5.1 PRO LOGIC II page:
Select to open the PRO LOGIC II options.
PRO LOGIC II: Turn PRO LOGIC II surround sound on and off. When it is turned on, more options are available
●
MODE: Select the PRO LOGIC II mode that best fits how you are using the Sonic Station
●
●
Panorama: Turns Panorama effect on or off
Dimension Size: Select the PRO LOGIC II dimension size
●
Center Width: Select the PRO LOGIC II center width
●
6. Hdcd(High Definition Compatible Digital)
For use with an HDCD formatted audio disc. You can choose between two sampling frequencies of
digital fil-ter:44.1k, or OFF. The higher the audio frequencies are, the clearer the audio quality will be.
NOTE: Will only work with HDCD formatted discs.
Dolby Digital Setup
1. Dual Mono
Select STEREO for the player to output audio from both Left
and right Right Channels, L-MONO to output audio from
theLeftchannelonly,R-MONOtooutputaudiofromthe
Rightchannelonly,andMIX-MONOtooutputtheaverage
audio signal from the Left and Right channels.
NOTE: Use this setting when playing Dolby AC-3 encoded
2-channel discs.
2. Dynamic
When Dynamic range is set to FULL, softer music will
automatically increase and louder music will automatically
decrease. When the slider is at the OFF position, the function
will be disabled.
NOTE: This function is for use with Dolby Digital encoded discs.
Video Setup Page
1. Component
Select the digital video output
If using the S-Video output
?
If using the Component output and connected to a High-
?
Definition Y/Cb/Cr TV
?
If using the Component output and connected to a
Progressive scan Y/Pb/Pr TV
2. TV Mode
Accessible when Y/Cb/Cr is selected in the
COMPONENT option. Select P-Scan for progressive scan or
Interlace, depending on your TV. Consult your HD-TV's
instruction manual to find the correct setting.
3. Sharpness
Adjust the sharpness of the picture.
4. Brightness
Adjust the brightness of the picture.
5. Contrast
Adjust the contrast of the picture.
GENERAL
- - Dolby Digital Setup - -
Dual Mono Stereo
Dynamic
GENERAL
GENERAL
- - video Setup Page - -
Component S -Video
Tv Mode
Sharpness Low High
Brightness oo
Contrast oo
Audio
*
L-Mono
R-Mono
Mix-Mono
Audio
*
DOLBY
DOLBY
*
S-Video
Yuv
Rgb
Vga
*
*
*
Medium
*
Low
Video
Video
Video
PREFERENCE
PREFERENCE
15
Page 18
System Setup
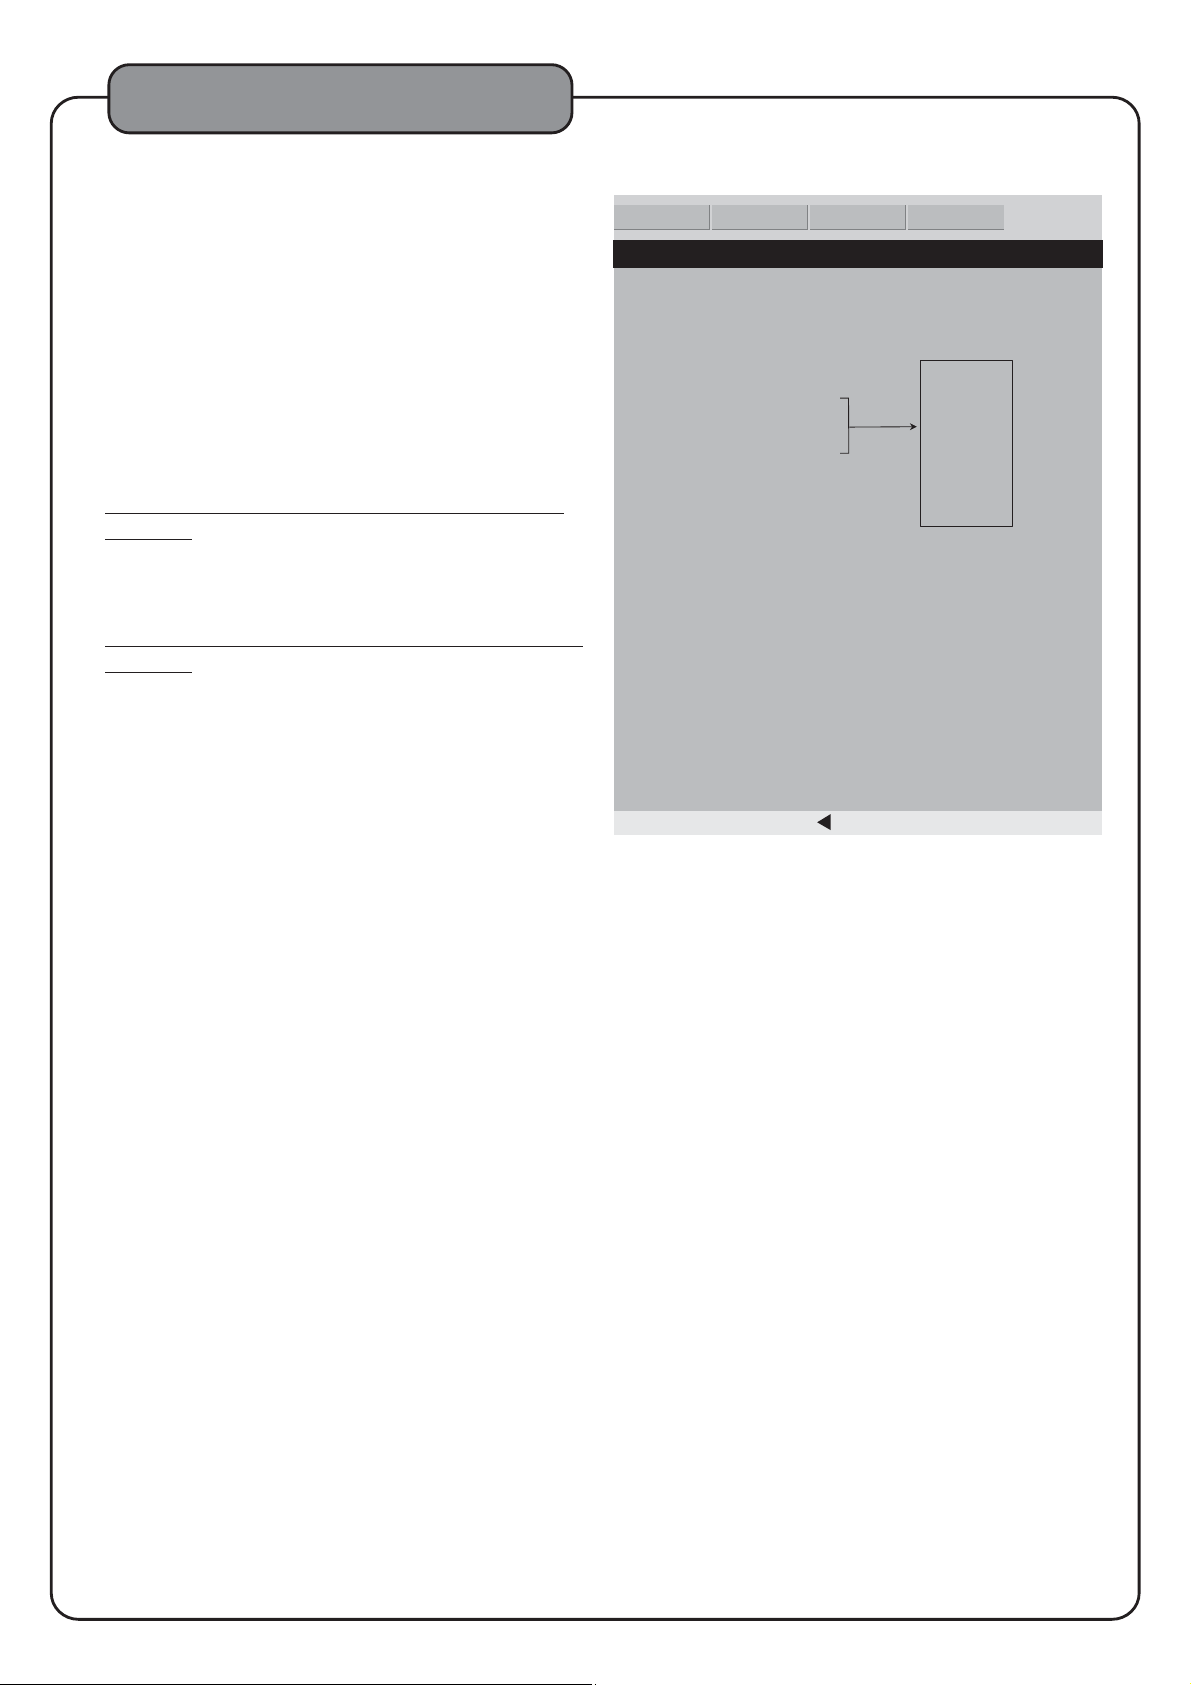
1.Tv Type
Set the video output to match your TV's system format:
●
PalTV-Europe,Asia
●
Multi - Automatically detects the TV's format
●
Ntsc TV - North America
2.Audio
Select the audio caption language for DVDs with
multiple caption languages available.
3.Subtitle
Select the subtitle language for DVDs with multiple
subtitle languages available.
NOTE: not all DVDs have multiple subtitle languages
available.
4.Disc Menu
Select the disc menu language for discs with multiple
disc menu languages available.
NOTE: not all discs have multiple disc menu languages
available.
5.Parental
Set the parental safety settings.
6.
Password
The factory preset password is 0000.
a
.Password Mode
Turns password mode on and off.
b
.Password change
To change the password.
●
Enter the current password.
●
Enter your new password.
●
Enter the new password again to confirm.
●
The new password is set.
7.Default
Restores all the system settings back to the original
factory settings.
GENERAL
GENERAL
Audio
DOLBY
Video
Video
- - preference page - -
Tv Type * Ntsc Pal Tv
Multi
*
Ntsc Tv
English
Audio * Eng
Subtitle Eng
Disc Menu Eng
Parental 1 Kid Saf
Password Change
Default Reset
*
*
Press direction " "to return to setup menu
French
Spanish
Chinese
Japanese
Korean
Russian
Thai
2G
3Pg
4Pg 13
5Pgr
6R
7Nc 17
8 Adult
*
*
*
PREFERENCE
PREFERENCE
16
Page 19
Specifications
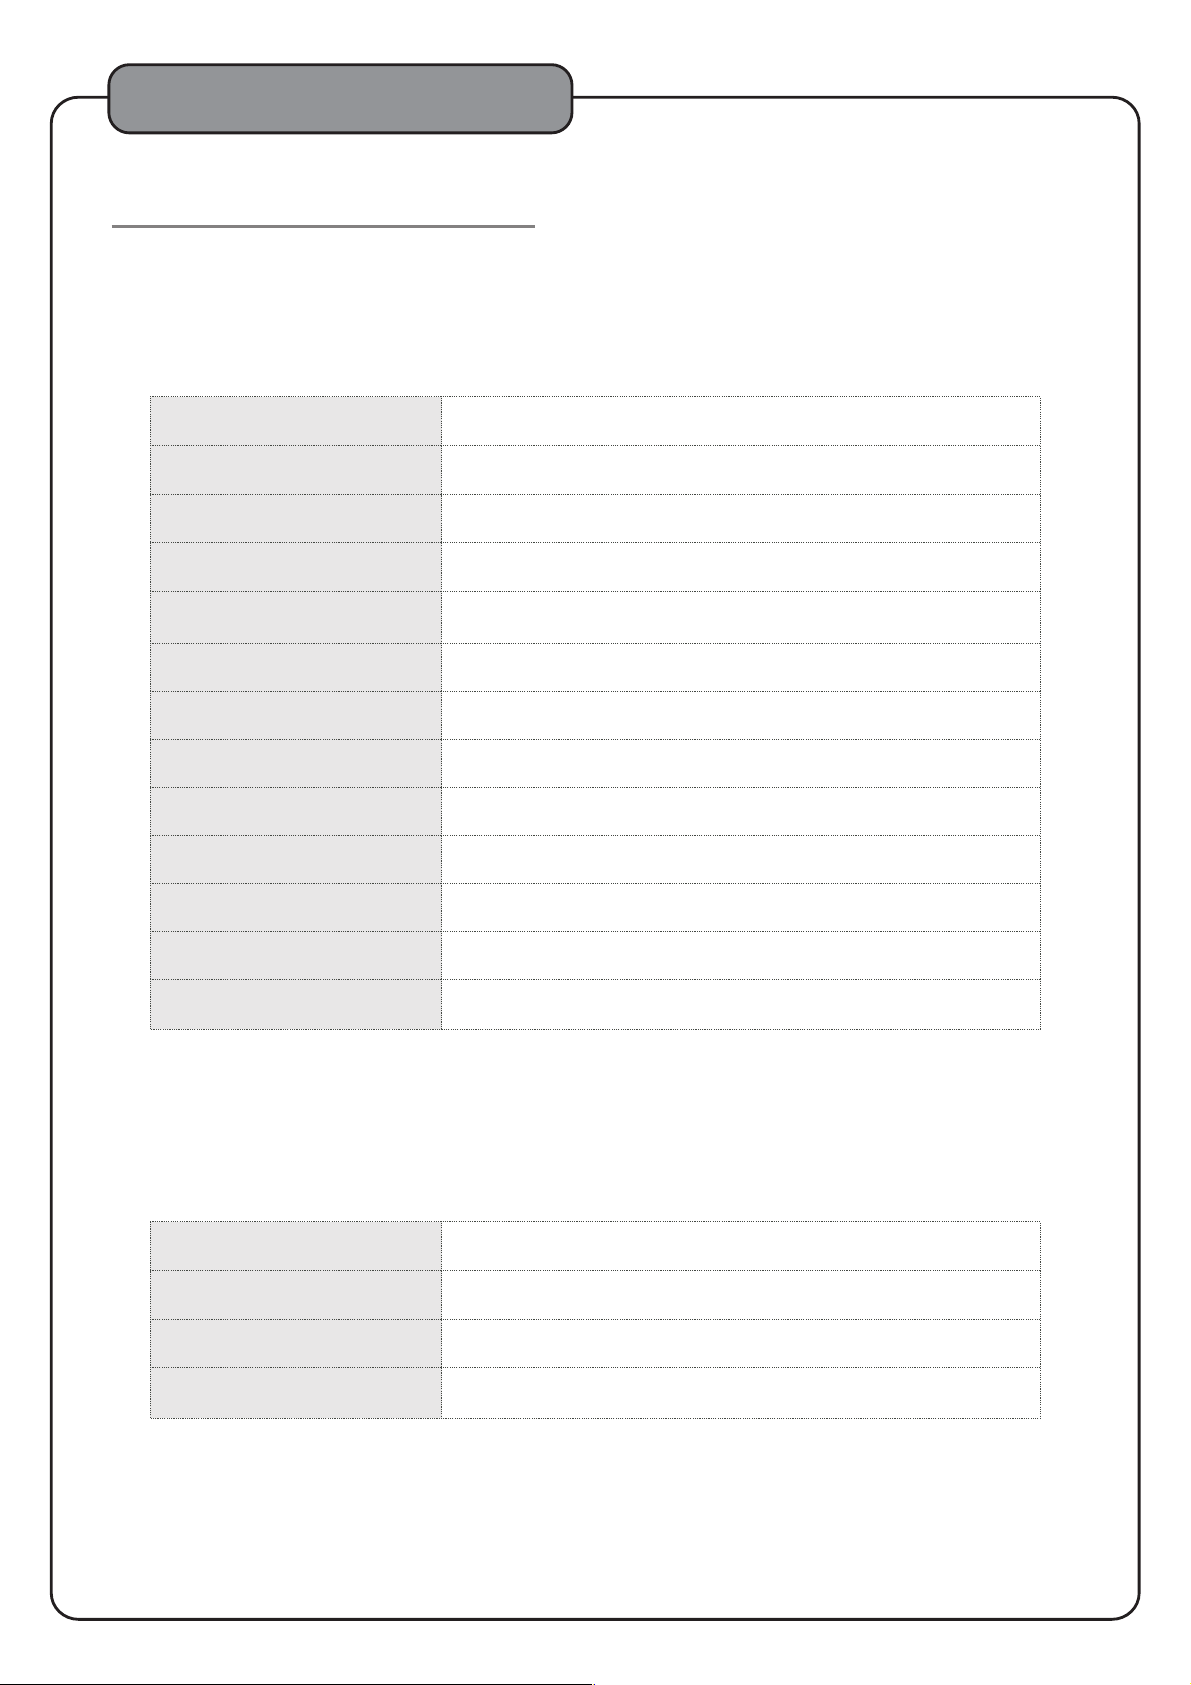
DVD PLAYER/OUTPUT:
DVD Player
Power Supply
Power Consumption
Weight
Dimension
Video System
Optical read-out system
Audio Frequency Response
S/N Ratio
Audio Dynamic Range
Rotating Ratio
~90-240V AC 50/60Hz
25W
3.1Kg
430x50x250mm(W/H/D)
NTSC/PAL
Semiconductor AIGaAs Weam, wave length:650nm,780nm
DVD andio:Fs 48KHz PCM 4 Hz~22Hz
Fs 96KHz PCM 4Hz~44KHz
Audio CD Fs 44.1Hz 4Hz~20KHz
≥90dB
≥90dB
Within measurable range
Operation Condition
Output
Video Output
S-Video Output
Audio Output(Analog Audio)
Temperature 0~40: Operation status:horizotion
1.0V(P-P),75
(Y)1.0V(P-P),75
(C)0.286 V(P-P),75
2.0V(rms)
Ω
Ω
Ω
17
Page 20
Troubleshooting
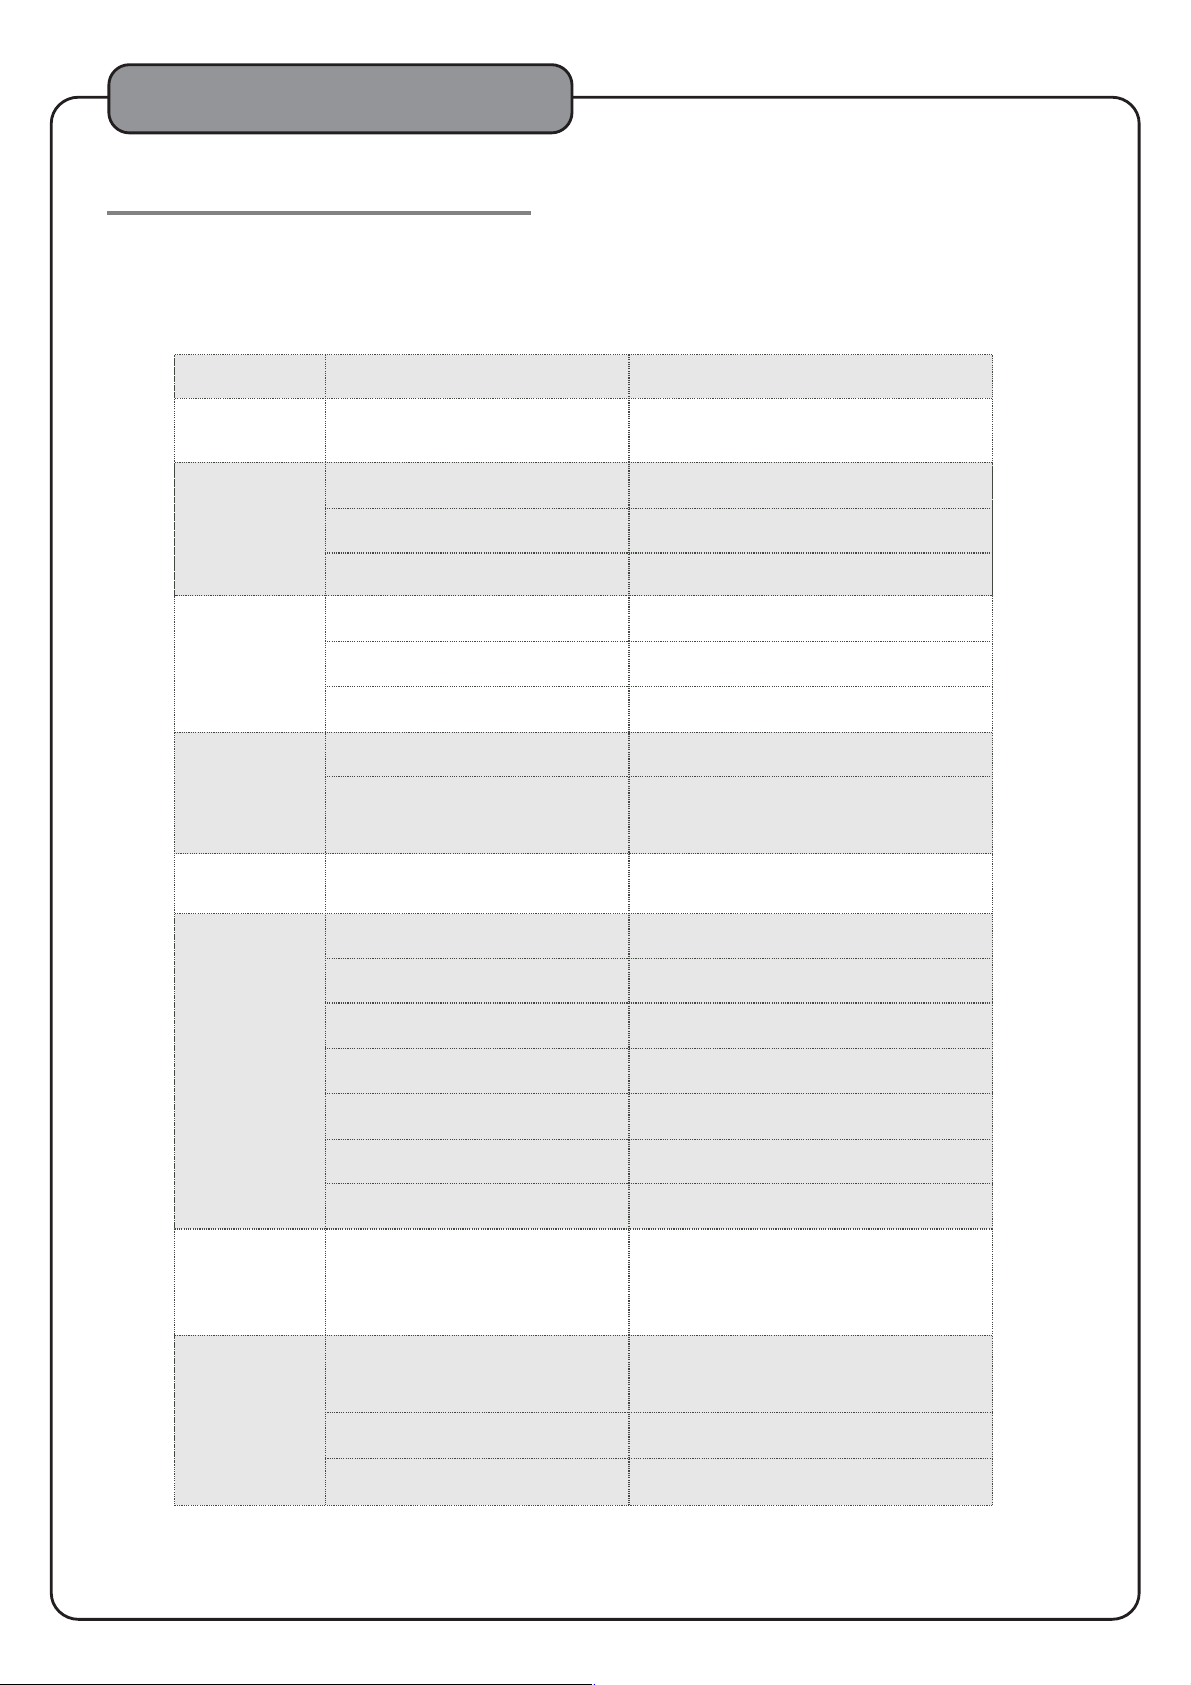
SYMPTOM AND SOLUTION:
When having problem with the unit, please check this list for a possible solution before
asking for service.
Symptom
No Power
No picture
No sound
Distorted Picture
Luminancc unsleady
or piclure with noise
Cause(s)
The power cord is not connected to the
wall outlet.
The TV's setting is not set up correctly.
The video cable is not connected or is not
connected securely.
Solution(s)
Securely connect the power cord to the wall outlet.
Set up TV in correct mode.
Connect the video cable securely.
Defective video cable. Replace the video cable.
The audio cable is not connected or is not
connected securely.
The connected audio system is not turned on.
The audio output settng is not correct.
Disc is dirty.
In fastforward or fastbackward mode.
Circuitry influence.
Disc is not in the tray.
Connect the audio cable securely.
Turn the connected audio system on.
Set it in corrcct mode.
Clean the disc or try another one.
Video distortion may appear in the fastforward or
fastbackward mode.
Connect the AVC7504 to the TV directly.
Place disc in.
Unable to play
Key no function
Remote control
does not work
The disc loaded in can not play
The disc is loaded upside down
Disc is not loaded correctly.
Disc is dirty.
TV screen has menu.
Parental lock function.
Power wave or other abnormal
phenomeno(such as static)disturbs
the normal condition.
The remote control is not pointed at the
remote sensor directly.
The remote control is too far away from the
AVC7504 remote sensor.
Bad batteries.
Place readable disc in(check the disc type).
Replace the disc with the label side up.
Load the disc correctly.
Clean the disc.
Press Setup turning off the menu.
Unlock it or change the rating.
Switch on/off power or unplug/replug the power cord.
Point the remote control at the remote sensor directly.
Operate the remote control within 18 ft from the AVC7504
remote sensor.
Replace the batteries and insert in correct polarities
18
Page 21
Additional Information
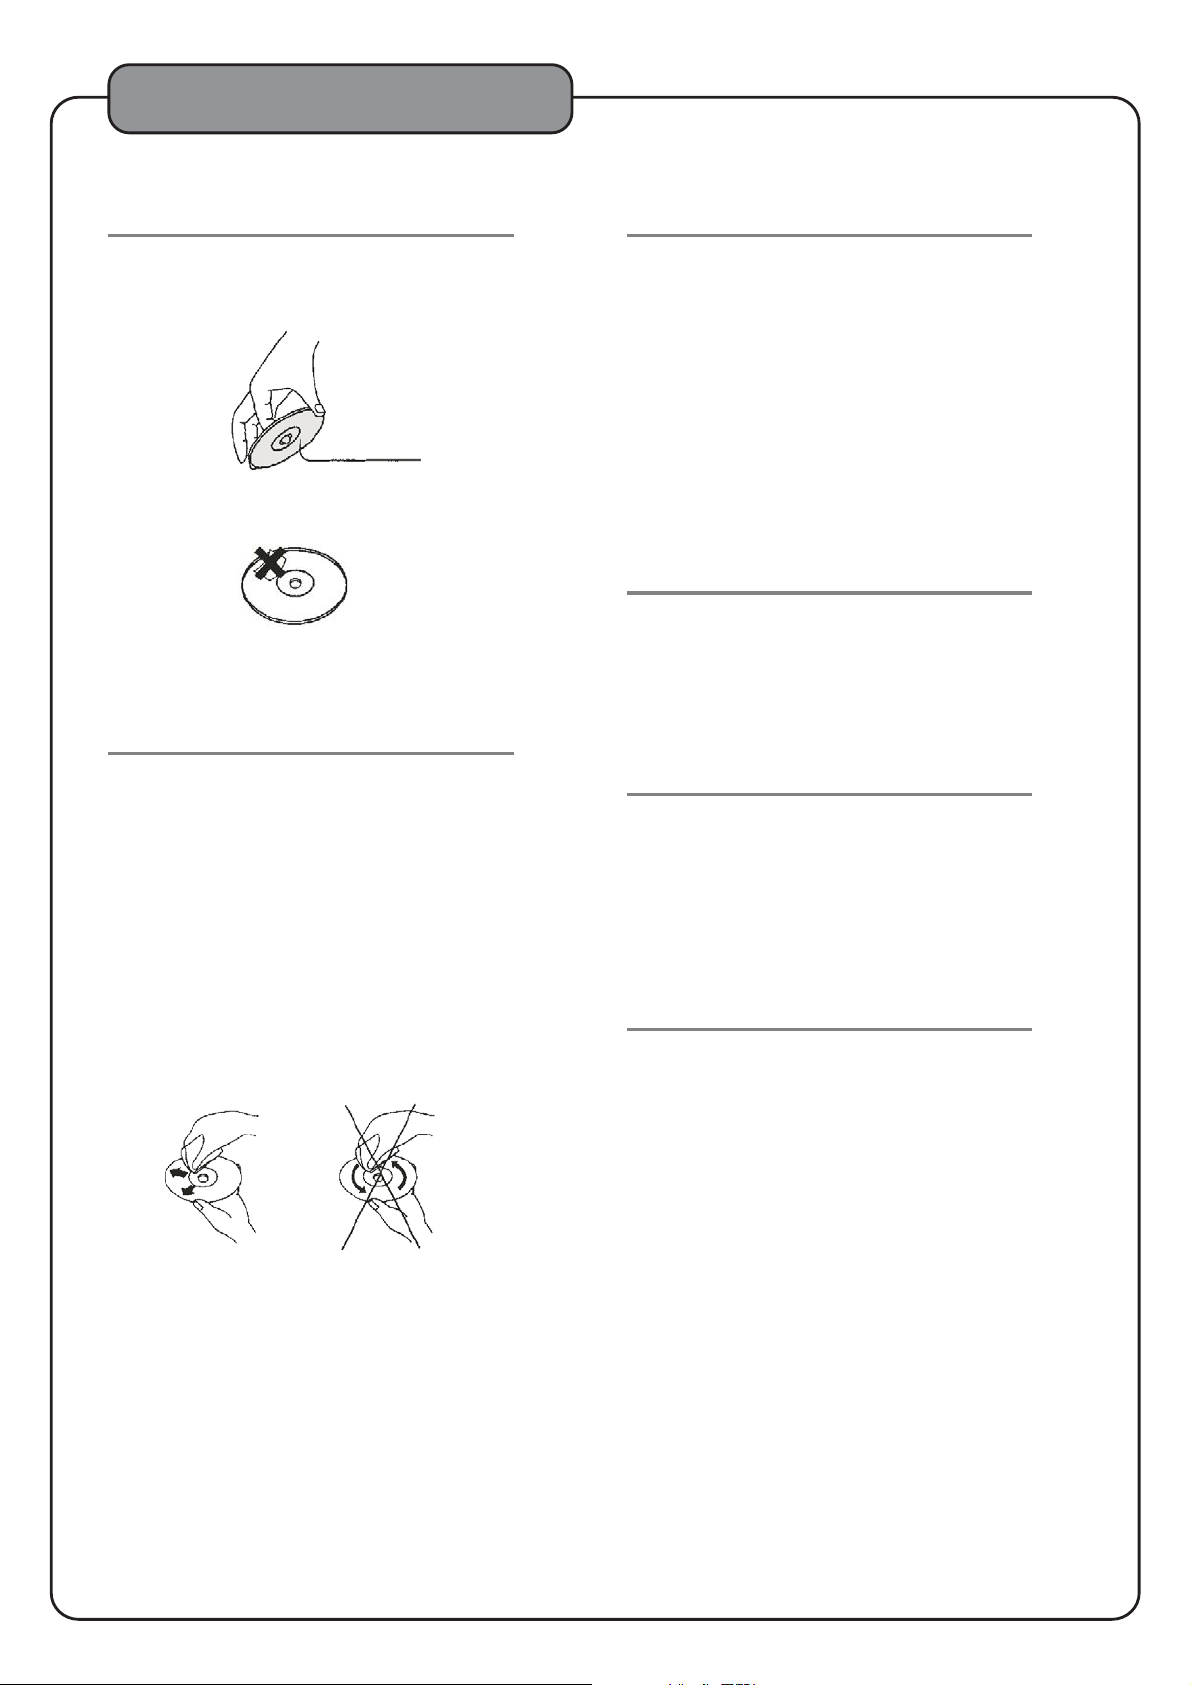
Care of disc:
Do not touch the signal surface.
Do not add labels or adhesive tapes on the
discs.
Cleaning of disc:
Storage of disc:
Do not keep the disc in the direct sunlight,
near the heat source, in the dusty places or
moisture(kitchen,bathroom).Keep the disc
vertically in the disc storage case.Heavy
objects on the disc case will canuse
deformation to the disc.
Copyringht Attention:
Copy,broadcast,play or rent the disc is
forbidden without legal permission.
TV System:
Finger prints or stains on the surface of the
disc
will directly affect signal recording and result
in a poorer picture quality.Therefore,please
use a soft cloth and wipe in a readiatimg manner
from the centre to the outer rims when
cleaning the disc.
If the surface of your disc is very dirty, clean
the disc with a moist cloth.Finally use a dry
soft cloth to remove all the water stains.
Please connect the unit to the TV compatible
with
pal/ntsc.
About this manual:
This manual explains the basic specifications
of this unit.Some DVD disc may have special
requirement and the unit may not play such
discs.Please refer to the disc instruction.
Never use electrostatic prevention products
as well as solutions which contain benzene,
thinner or any other vaporizing substances,
as they may damage the disc surface.
19
Page 22
Service Information
SHIPPING DAMAGE
If the shipping carton is found to be damaged, notify the delivery company immediately. Save the damaged
carton as evidence for the delivery company to inspect. It is the responsibility of the consignee to file a claim
with the delivery company for any damaged that occurs during shipping. In the case that the shipping carton
is in good condition but the unit is damaged or defective, call at 805-523-2759.
Audio2000'S
®
FACTORY SERVICE
If the equipment needs factory service, call at 805-523-2759 for a Return Authorization
Audio2000'S
®
number (RA number) and the address of the authorized service representatives. Insure and ship the product,
prepaid, in its original carton along with proof of purchase in the form of a bill of sale or receipted invoice to
the above address. Please clearly write the RA number on the shipping carton. Also enclose a note describing
the problem along with any other helpful information such as where and how the unit was used.
LIMITED WARRANTY
H&F Technologies, Incorporated (H&F) hereby warrants that products will be free from defects
Audio2000'S
®
in material and workmanship for a period of 1 (one) year from date of purchase. At its option, H&F will repair
or replace the defective product and promptly return it to you.
The Limited Warranty will not cover any item that has been, in H&F's estimation, subject to alteration, misuse,
neglect, accident or improper installation. In addition, any service not performed by H&F or an authorized
service center will terminate terms of this warranty. Normal wear and tear of this product will not be covered
by this or any implied warranty.
No liability will be accepted for damages/loss directly caused from the use of this product. H&F's liability shall
be limited to the repair/replacement of this product if found to be defective.
©2008H&FTechnologies, Incorporated (website: )
www.audio2000s.com
20
 Loading...