

Page 1
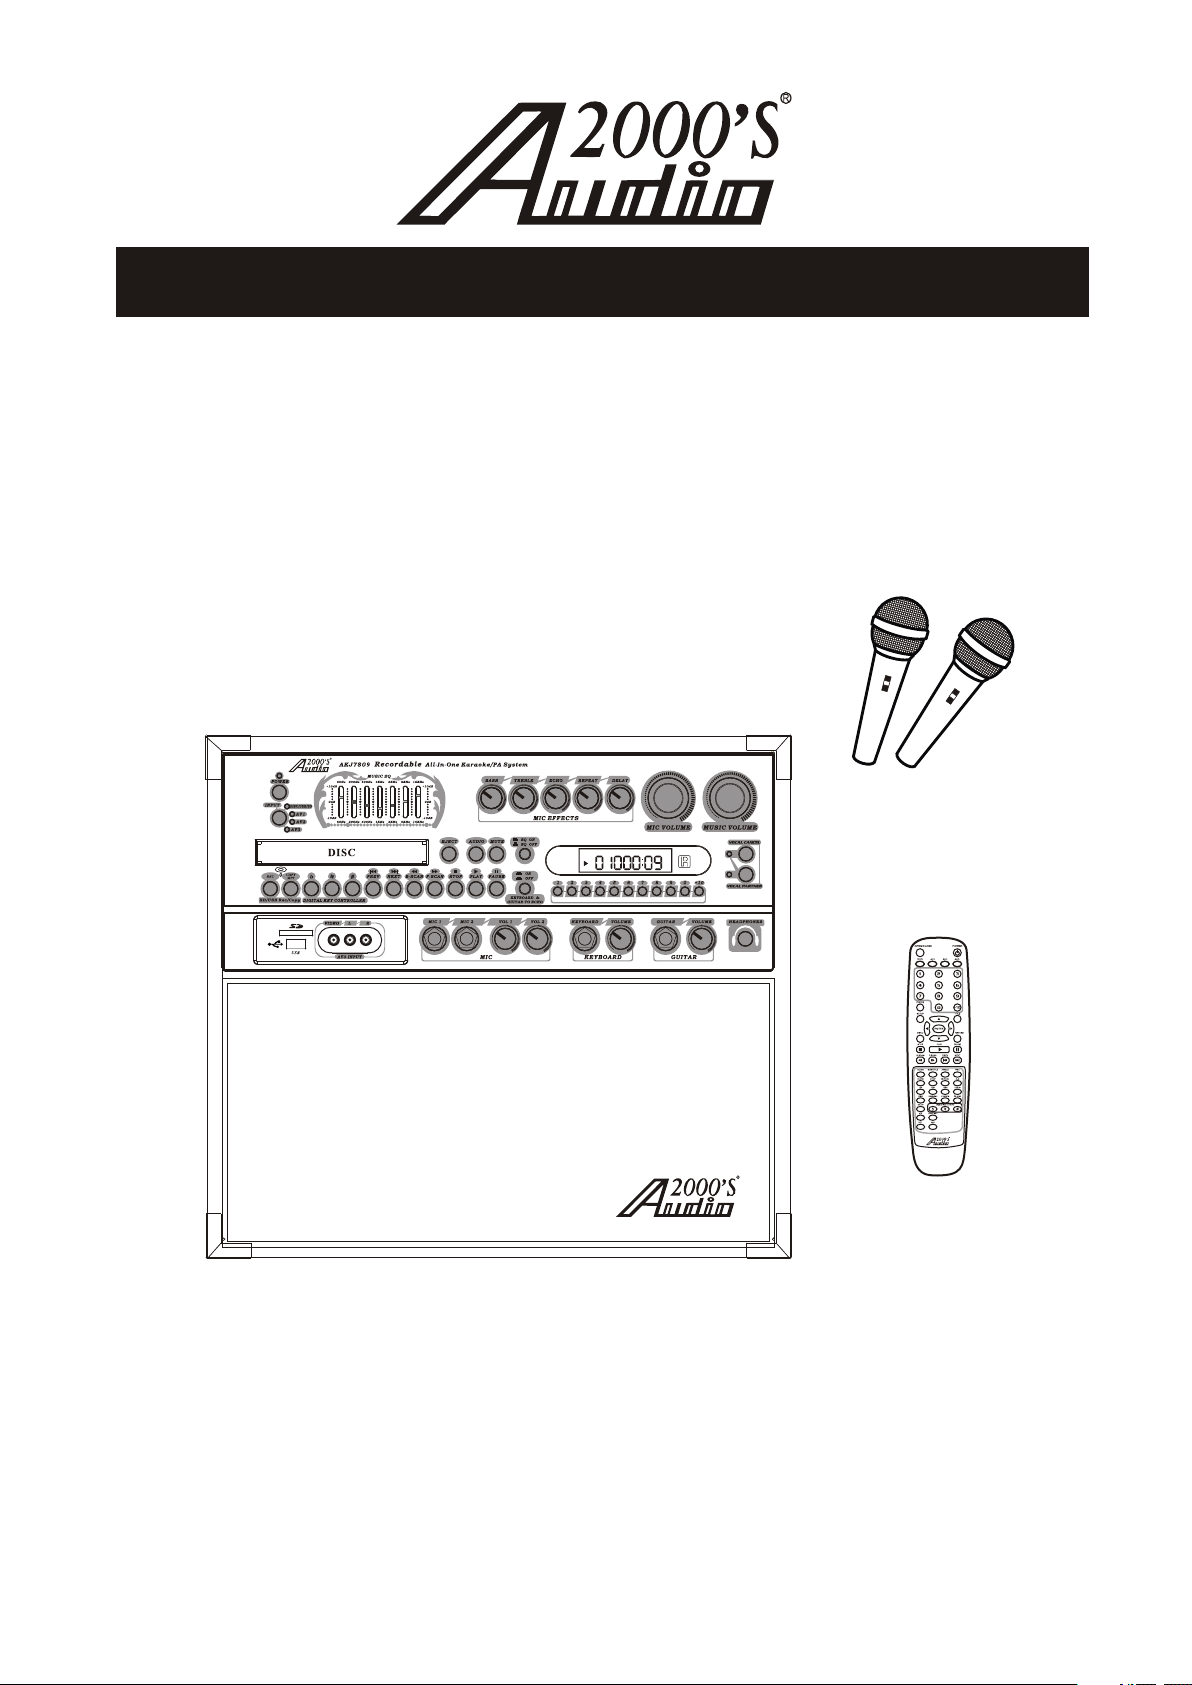
RECORDABLE ALL-IN-ONE KARAOKE/PA SYSTEM
AKJ7809
OWNER’S MANUAL
VCD
L R
ACC 7809- 01
Thank you for purchasing the Audio2000'S AKJ7809
all-in-one karaoke/PA system
! For the best results and the utmost
®
recordable
satisfaction from your new unit, please read this manual thoroughly,
and retain it for future reference.
Page 2

Table of Contents
Safet y ..... ........... ........... ........... ........... ........... ........... ........... ........... ......
Featu res .. ........... ........... ........... ........... ........... ........... ........... ........... ........... ........... .
Speci fica tions ....... ........... ........... ........... ........... ........... ........... ........... ........... ..........
Packa ge con tents...... ........... ........... ........... ........... ........... ........... ........... ........... ......
Basic Conne ctions
● ..... ........... ........... ........... ........... ........... ........... ........... ...
●Connectin g to a TV / video moni tor wi th a RCA input ..... ........... ........... ........... ..........
●Connectin g to an audio mixer o r TV wi th RCA audio input s ........... ........... ........... .....
DVD Out put Co nnections:
●Connectin g to a Dolby Pro logi c amplifier.. .... ....... .... ....... .... ....... .... ....... .... ....... ....
●Connectin g to a TV with compo nent v ideo....... ........... ........... ........... ........... ........... .
●Connectin g to a DTS receiver /decoder.... .... ....... .... ....... .... ....... .... ....... .... ....... .... .....
Gener al :
● ..... ........... ........... ........... ........... ........... ........... ........... ..........
● ..... ........... ........... ........... ........... ........... ........... ........... ...
● ..... ........... ........... ........... ........... ........... ..
Gener al Ope rations:
●Turning t he ΑΚ 9 On, Off and to S tandby ...... ........... ........... ........... ........... .......
●Input c hann els ......... ........... ........... ........... ........... ........... ........... ........... ........... ...
●Adjusting t he master Music v olume ....... ........... ........... ........... ........... ........... .........
●Adjusting t he master Micro phone volume .. .... ....... ........... ........... ........... ........... ......
●Adjusting t he master MUSIC E Q ........... ........... ........... ........... ........... ........... ..........
●Changing th e video mode (PAL / NTS C) .......... ........... ........... ........... ........... ...........
Opera tion s (Disc Mode):
●Loading a dis c ........... ........... ........... ........... ........... ........... ........... ........... ........... ..
●Playing a dis c ........... ........... ........... ........... ........... ........... ........... ........... ........... ...
● ..... ........... ........... ........... ........... ........... ........... ........... ........... ......
● ..... ........... ........... ........... ........... ........... ........... ........... ........... .......
●Skipping tr acks/chapte rs .......... ........... ........... ........... ........... ........... ........... ........
●Searching t hrough a track/ chapter ..... ........... ........... ........... ........... ........... ...........
●Subti tles . ........... ........... ........... ........... ........... ........... ........... ........... ........... .........
●Viewing mu ltiple angles ..... ....... .... ....... .... ....... .... ....... .... ....... .... ....... .... ....... .... ......
● ..... ........... ........... ........... ........... ......
●Viewing on e frame at a time usi ng the S TEP button ... ........... ........... ........... ........... .
●Selecting r epeat options . ........... ........... ........... ........... ........... ........... ........... .......
●Creating a lo op using the A-B but ton ......... ........... ........... ........... ........... ........... ....
●Canceling v ocals using the L /R button ..... ........... ........... ........... ........... ........... .......
●Zoomi ng in an d out ......... ........... ........... ........... ........... ........... ........... ........... ........
●Jumpi ng to sp ecific time on a di sc .......... ........... ........... ........... ........... ........... .......
●Viewing an d setting the On Sc reen D isplay (OSD) .. ........... ........... ........... ........... ....
● last me mory f unction.... ........... ........... ........... ........... ........... ...........
PROG (P rogr am) Operation s
● ..... .... ....... .... ....... .... ....... .... ....... .... ....... ........... ..........
● .
instr ucti ons
:
Connectin g to the AC outlet
Conne ctio ns
AV input conn ections
Headphone s connections
Micro phon e/instrumen t input connect ions
J780
Stopp ing a di sc
Pausing a dis c
Slow-moti on playback usi ng the SLOW butto n
Turning o n the
:
CD, CDG and VCD P layback
DVD Playbac k ..... .... ....... .... ....... .... ....... .... ....... .... ....... ........... ........... ........... .......
7-8
10
10
11
11
11
11
12
12
12
12
12
12
12
12
12
12
12
13
13
13
13
13
13
14
14
14
15
1
3
4
4
5
5
6
8
9
9
Page 3

Table of Contents
Op e r ations ( M P3 and AVI/Di v X):
●To play a file .... ........... ........... ........... ........... ........... ........... ........... ........... ........... ..
●Direct trac k access ...... ........... ........... ........... ........... ........... ........... ........... ........... .
●Repeat opti ons ......... ........... ........... ........... ........... ........... ........... ........... ........... ..
USB and S D card o perations (di sc mode)
●Using the USB i nput ........ ........... ........... ........... ........... ........... ........... ........... ........
●Using the SD ca rd slot ....... ........... ........... ........... ........... ........... ........... ........... .......
USB and SD C ard RE C / COPY O pera tions
REC (Record ) Operations. ........... ........... ........... ........... ........... ........... ........... ........
●
COPY Opera tions (from CD or C DG to US B or SD Card).... ........... ........... ........... ......
●
COPY Opera tions (from MP3 t o USB or SD Card)...... ........... ........... ........... ........... ..
●
Micro phon e Operations :
●Turning o n the Mi crophones ... ........... ........... ........... ........... ........... ........... ........... ..
●Adjusting t he master Micro phone volume .. .... ....... .... ....... .... ....... .... ....... .... ....... .... ..
●Adjusting t he individual M icrophone volume co ntrols ...... ........... ........... ........... .......
●Adjusting t he Microphone t one ......... ........... ........... ........... ........... ........... ........... ...
●Using digit al Echo ....... ........... ........... ........... ........... ........... ........... ........... ........... .
●Adjusting t he KEYBOARD vol ume ......... ........... ........... ........... ........... ........... .........
●Adjusting t he GUITAR volum e ........... ........... ........... ........... ........... ........... ........... ..
Descripti ons and Functio ns:
●Front P anel . ........... ........... ........... ........... ........... ........... ........... ........... ........... ......
●Rear Panel .. ........... ........... ........... ........... ........... ........... ........... ........... ........... .....
●Remote Cont rol ......... ........... ........... ........... ........... ........... ........... ........... ........... ...
DVD System Se tup Menu:
●Syste m Setu p ........... ........... ........... ........... ........... ........... ........... ........... ........... ...
●Language Se tup.. ....... ........... ........... ........... ........... ........... ........... ........... ........... .
●Αudio Setup ........ .... ........... ........... ........... ........... ........... ........... ........... ........... .....
●Video Setu p....... .... ........... ........... ........... ........... ........... ........... ........... ........... ......
●Speaker Set up .......... ........... ........... ........... ........... ........... ........... ........... ........... ...
●Digital Set up .......... ........... ........... ........... ........... ........... ........... ........... ........... .....
Troubl esho oting ....... ....... .... ....... .... ....... .... ....... .... ....... .... ....... .... ....... .... ....... .... ....
..... ........... ........... ........... ........... ........... ........... ........... ........... ..Service Inf ormation
15
15
15
16
16
16
17
17
18
18
18
18
19
19
19
20
23
25
28
29
29
29
30
30
31
32
Page 4
Safety instructions
WARNING
* TO PREVENT FIRE OR SHOC K HAZARD. DO NOT EXPOSE THIS APPLIANCE TO RA IN OR MOISTURE.
*THIS APPLIANCE SHALL NOT B E EXPOSED TO DRIPPING OR SPLASHI NG WATER AND THAT NO
OBJECT FILLED WITH LIQUI DS SUC H AS VASES SHALL BE PLACED ON APPA RATUS.
IMPORTANT SAFETY INSTRUCTIONS
1) Read these instructions.
2) Keep these instructions.
3) Heed all warnings.
4) Follow all instruct ions.
5) Do not use this apparatus near wa ter.
6) Clean only with dry cloth.
7) Do not block any ventilation op enings. Install in accordance with the manufa cturer's instructions.
8) Do not install near any heat sour ces such as radiators, heat registers, stoves , or other apparatus
(including amplifiers) tha t produce heat.
9) Do not defeat the safety purpos e of the polarized or grounding-type plug. A polarized plug has two
blades with one wider than t he other. A groun ding type plug has two blades and a third grounding
prong. The wide blade or th e third prong are provided for your safety. If the provided plug does not
fit into your outlet, cons ult an e lectrician for replacement of the obsolete ou tlet.
10) Protect the power co rd from being walked on or pinched particularly a t plugs, convenience
receptacles, and the poi nt where they exit from the apparatus.
11) Only use attachments/acc esso ries specified by the manufacturer.
12) Use only with the cart, stand, t ripod, bracket, or table specified by the manuf acturer, or sol d with the
apparatus. When a cart is used, us e caution when moving the cart/apparatus comb ination to avoid
injury from tip-over.
S31 25A
1
Page 5
Safety instructions
13 ) Unplug this apparatus durin g lightning storms or when unused for long period s of time.
14 ) Refer all servicing to q uali fied service personnel. Servicing is requir ed when the apparatus has been
damaged in any way, such as power-supply cord or pl ug is da maged, liquid has been spilled or objects
have fallen into the appar atus , the apparatus has been exposed to rain or moi stur e, does not operate
normally, or has been dropped.
15) Grounding or Pola riza tion This product may be equipped with a polarize d alternating current line plug
(a plug having one blade wid er than the other). This plug will fit into the power o utlet only one way.
This is a safety feature. If you are u nable to insert the plug fully into the outlet, try r eversing the plug.
If the plug should still fail to fit , contact your electrician to replace your obso lete outlet. Do not defeat
the safety purpose of the po lari zed plug.
16) Ventilation Slo ts and o penings in the cabinet are provided for ven tila tion and to ensure reliable
operation of the product a nd to protect it from overheating, and these ope nings must not be blocked
or covered. The openings s hould never be blocked by placing the product on a be d, sofa, rug, or other
similar surface. This produc t should not be placed in a built-in installation such a s a bookcase or rack
unless proper ventilation is p rovided or the manufacturer's instruction s have been adhered to.
17) The MAINS plug or an appli ance c oupler is used as the disconnect device, the disc onnect device shall
remain readily operabl e.
Class 1 Laser Product
CAUTION: USE OF ANY CONTROLS, ADJUSTMENTS, OR PROCEDURES OTHER THAN
THOSE SPECIFIED HEREIN MAY RESULT IN HAZARDOUS RADIATION EXPOSURE.
PRODUCT COMPLIES WITH DHHS RULE 21 CFR SUBCHAPTER J IN EFFECT AT DATE
OF MANUFACTURE.
CAUTION: INVISIBLE L ASER RADIATION WHEN OPEN. DO NOT STARE INTO BEAM.
Class II equipment symbol
This symbol indicates that the unit has
a double insulation system
2
Page 6

Features
Features
1. The "REC" button at the fro nt pan el provides the capacity to record the mixe d musi c and microphone sound
to the USB or the SD card.
2. The "COPY" button at the fr ont pa nel copies music files to the USB or the SD card.
3. The built-in USB and SD card rea ders p lay VCD, WMA, AVI, MP4, DAT, MPG, and JPG f iles i n USB
and SD card.
4. A multi-format player w ith th e direct track access supports DVD, CDG, DVD-R, DVD-RW, VCD, MP4,
DIVX, Photo-CD, CD, CD -R, and CD -RW formats.
5. All-in-one design deli vers 1 00W of power through a 4-speaker cabin et.
6. ¼-inch guitar and keybo ard in puts with individual volume controls.
7. Digital echo with repea t and de lay controls for vocal enhancement.
8. Digital key control (Th is fea ture is not applicable to the AUX inputs-AV1, AV2, and AV3).
9. Vocal cancel a nd voc al partner modes for canceling vocals fro m mult iple xed media.
10. 7-band equalizer.
11. Three RCA audio-video i nput s (AV1, AV2, and AV3).
12. Two microphone inputs (MIC1 an d MIC2 ) with individual volume controls (two un bala nced ¼-inch
microphone input s at the f ront p anel and two balanced microphone in puts a t the rear panel).
13. Two RCA audio-video outputs, on e ster eo ¼-inch audio pre - out, and DVD 5.1 aud io-vi deo outputs.
14. Three effect inserts ( GUITAR, KEYBOARD, and MIC).
15. One ¼-inch stereo head phon e output.
16. Remote Contro l.
17. 115V / 230V and NTSC -PAL compatible for world wide u se.
3
Page 7
Specifications and Package
contents
Specifications
● AC input voltage
● Audio output power
● AV1 Audio input sen siti vity
● Video input sensitivit y
● Microphone input sensi tivi ty
● Keyboard/Guitar inp ut sen sitivity
● Video output level
● Audio output level
● S/N Ratio
● Dimension
● Weight
. . . . . . . . . . . . . . . . . . . . . . . . . . . . . . . . . . . . . . .
. . . . . . . . . . . . . . . . . . . . . . . . . . . . . . . .
. . . . . . . . . . . . . . . . . . . . . . . . . . . . .
. . . . . . . . . . . . . . . . . . . . . . . .
. . . . . . . . . . . . . . . . . . . . . . . . . . . .
. . . . . . . . . . . . . . . . . . . . . . .
. . . . . . . . . . . . . . . . . . .
. . . . . . . . . . . . . . . . . . . . . . . . . . . . . .
. . . . . . . . . . . . . . . . . . . . . . . . . . . . . .
. . . . . . . . . . . . . . . . . . . . . . . . . . . . . . . . . . . . .
. . . . . . . . . . . . . . . . . . . . . . . . . . . . . . . . . . . .
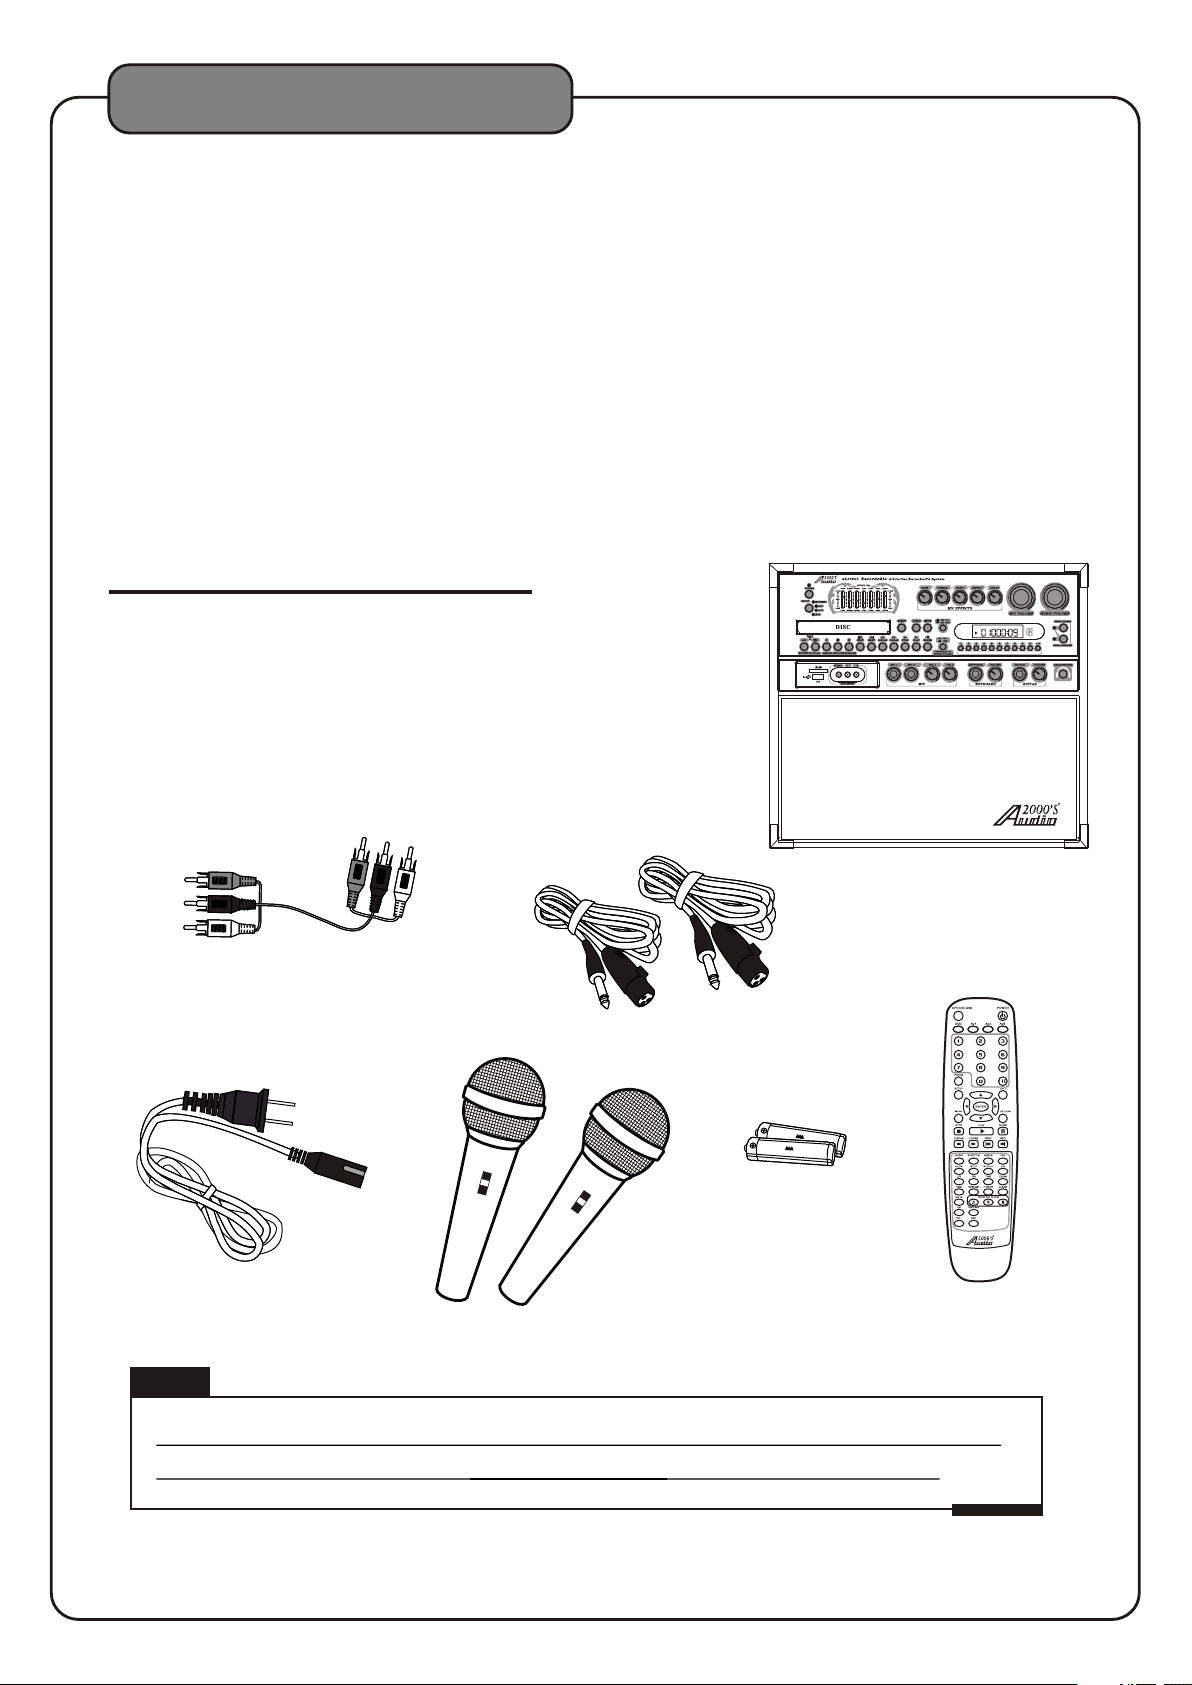
Package Contents
Items Quantit ies
AKJ7809 Unit ( 1)
A/V RCA Ca ble (1)
Microphones (2)
Microphone Cables (2)
Remote Control (1)
AC Power Cord ( 1)
AAA Batteries (2)
AC 115V 60Hz/AC 23 0V 50H z
100 W (peak to peak)
500 mV
1 V (peak to peak)
8 mV
8 mV
1 V (peak to peak)
1000 mV
90 dB
18.3" x 12.8" x 16.5" (L x W x H )
35.4 lbs
L R
VCD
ΑΚ 9 U (1)J780 nit
A/V RCA Cable (1)
Microphone Cables (2)
AAA Batteries (2)
AC Power Cord (1)
Microphones (2) Remote Control (1)
Note
If you find that any of the items mentioned above are missing from
the box, please contact AUDIO2 000’S before proceeding.
®
ACC 7809 -01
4
Page 8
Basic Connections
Since the AKJ7809 co ntai ns bui lt- in power amplifiers, speakers, DVD/C DG/C D play er, USB pla yer, and SD
card player, the AKJ7809 can be used as a s elf- c ontained sound system. However, the AKJ7809 contains
various audio video outp uts to a llow the AKJ7809 to be connected to multipl e TV set s, external sound
systems, and/or multip le sou nd effect devices. The following content demo nstr ates the procedures for
connecting the AKJ7809 t o the AC outlet and other audio video device s.
Connecting t o the AC o utle t
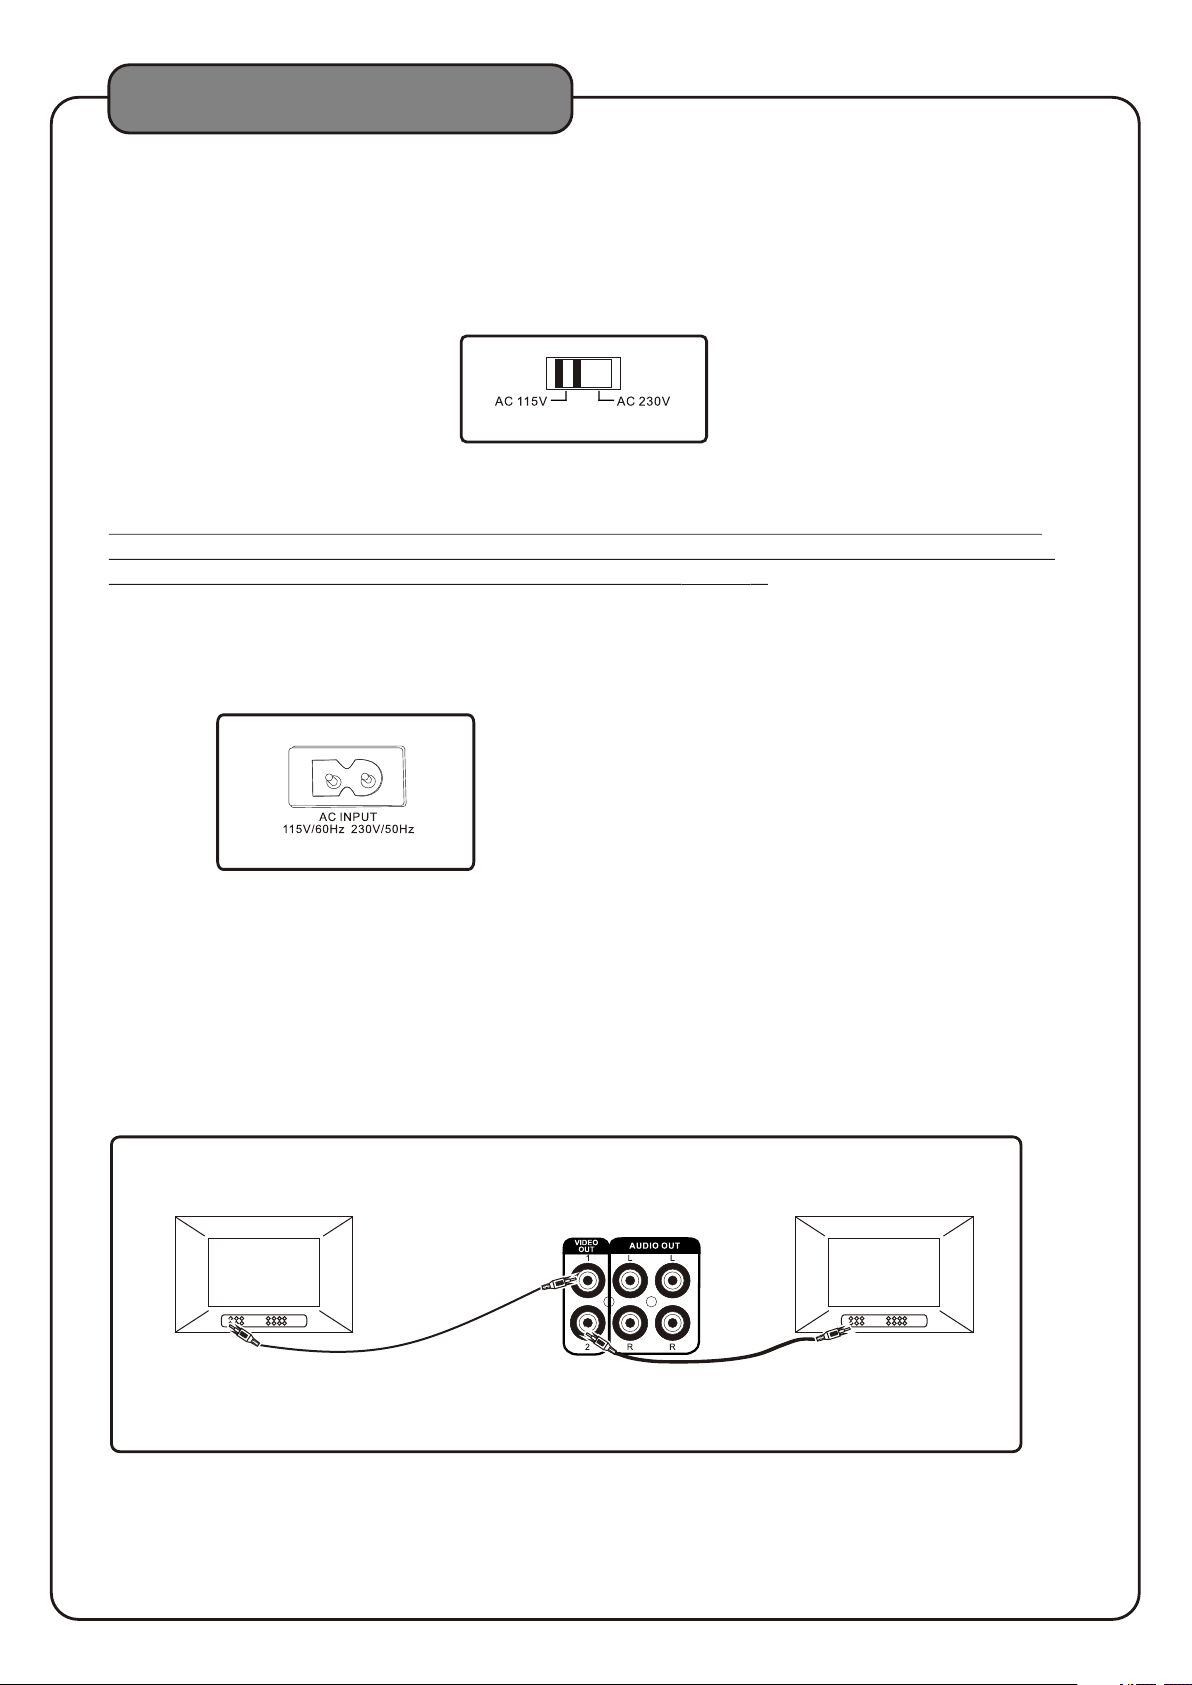
To power the 9
What you will need
●AC power cord (included )
●Surge-protector (recommen ded) or a power outlet
Note: Before turning on the powe r make sure the red voltage selector [Fig. A] under the AC input is set to the
proper voltage. It should be set t o 115V for North America and 230V for most Euro pean countries. Make sure
you know the proper voltage for yo ur region before turning on the 9.
1.Connect the AC end of the p ower cord into the
AC input on the rear panel of t he 9
2.Connect the other end to a s urge - protector
or available power outlet
AKJ780
115
VOLTA GE SELECTOR
[Fig. A]
AKJ780
AKJ780
Connecting t o a TV / vid eo mon itor with a RCA input
What you will need
●1 RCA-style video cable (included)
●TV / video monitor with a RCA video in put
1.Connect one end of the RCA vi deo ca ble to the yellow Video Out on the rear pan el of th e .
AKJ7809
2.The has two RCA-type VIDEO OUTPUT jacks f or con necting to TVs or monitor devices.
Both VIDEO OUTPUTS can be co nnec ted simultaneously.
3.Connect the other end of th e RCA vi deo cable to the Video Input on a TV / video mo nito r
AKJ7809
TVTV
5
Page 9
Basic Connections
Connecting t o an aud io mix er or TV with RCA audio inp uts
What you will need
●using 1 RCA L/R (red & white) st ereo R CA cable (included)
●using two XLR-type audio cables(not include d)
using two ¼ inch audio cable s (not i ncluded).
●
using three ¼ inch stereo au dio ca bles (not included).
●
using one audio amplifie r with X LR audio inputs.
●
using one audio amplifie r with ¼ i nch audio inputs.
●
●using 1 audio mixer or TV with R CA aud io inputs
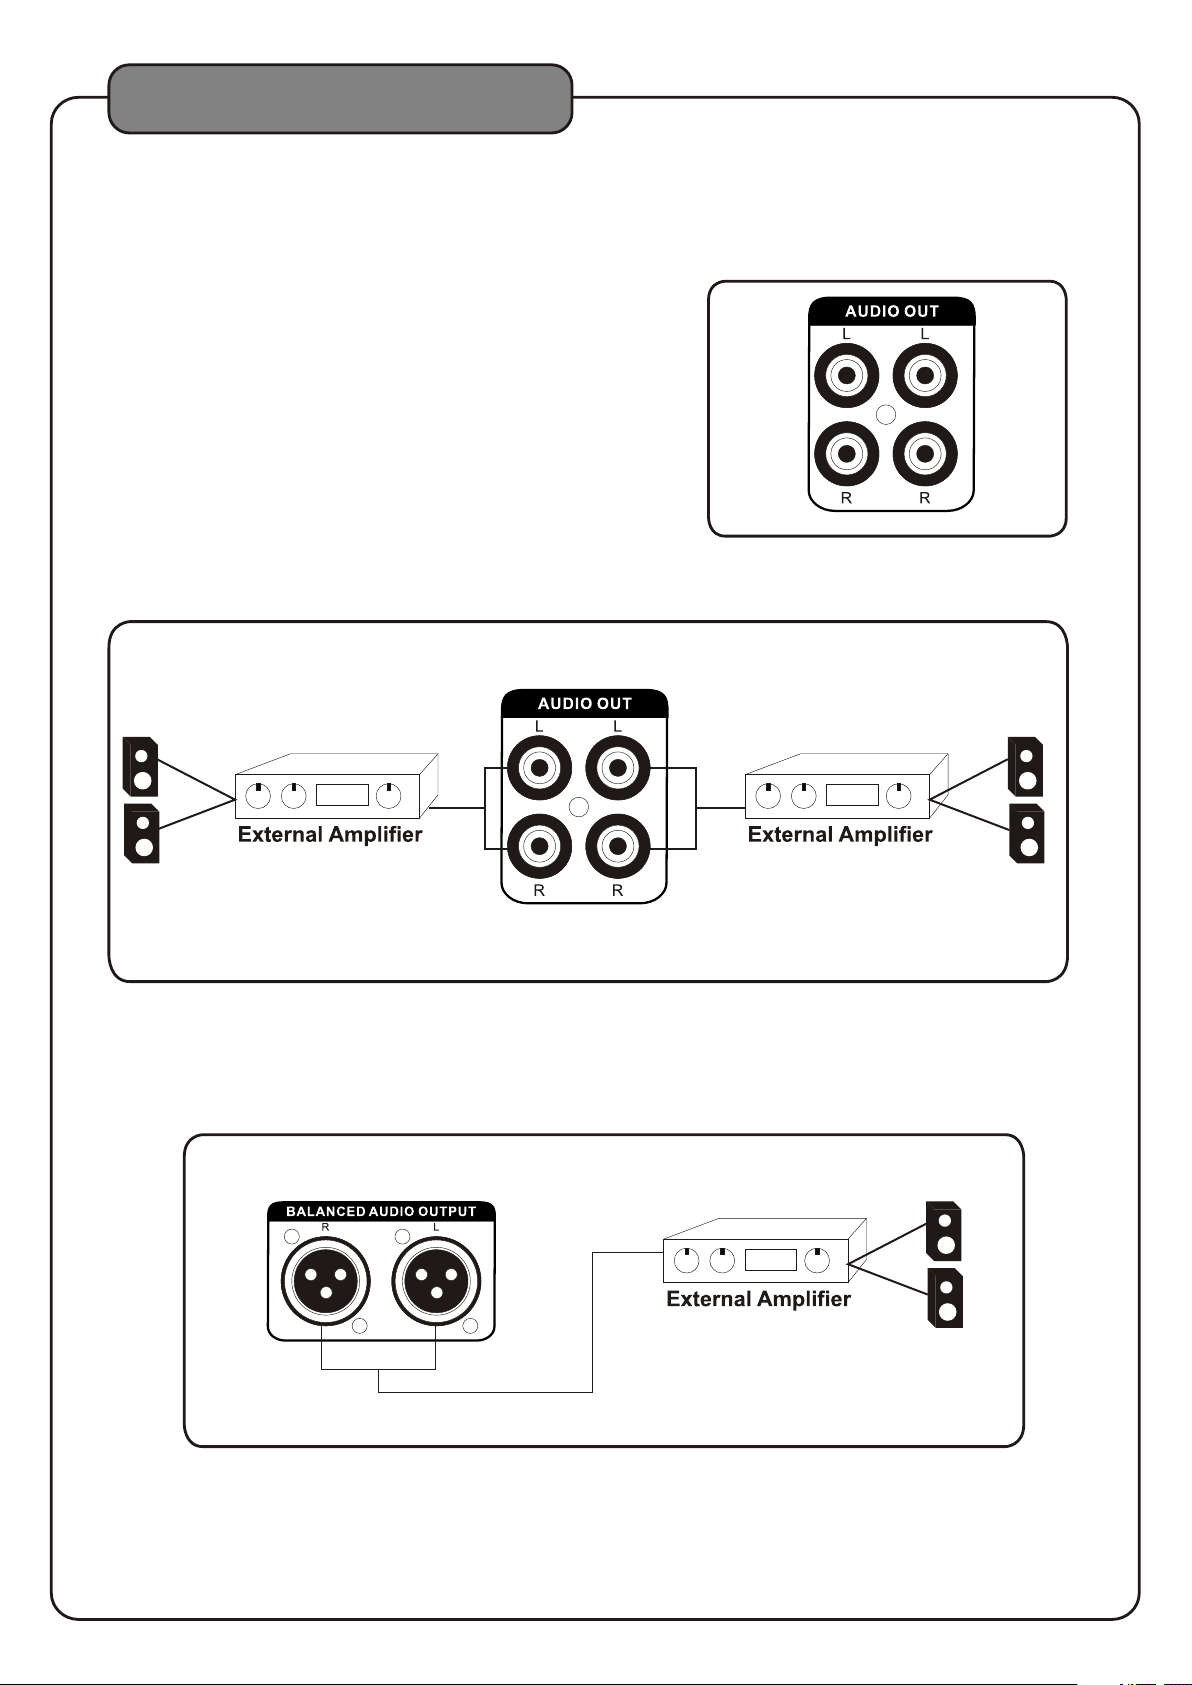
1.AUDI O OUTP UT 1 & 2 CON NECT IONS:
●Connect one end of the L/R (re d & whit e) RCA cable to the red
and white audio outputs la bele d
AUDIO OUTPUT 1 & 2 on the r ear pa nel of the .
●Connect the other end of the L /R (re d & white) RCA cable to
the audio input on an au dio mi xer or TV.
AKJ7809
2.BAL A NCED AUDIO OUTPUT CONNECTI ONS:
●Connect one end of the XLR cab les to t he left and right BALANCED AUDIO OUT PUT ja cks on the AKJ7809.
● .Connect one end of the XLR cab les to t he left and right AUDIO/LINE/AU X INPU T jacks on the external device
6
Page 10
Basic Connections
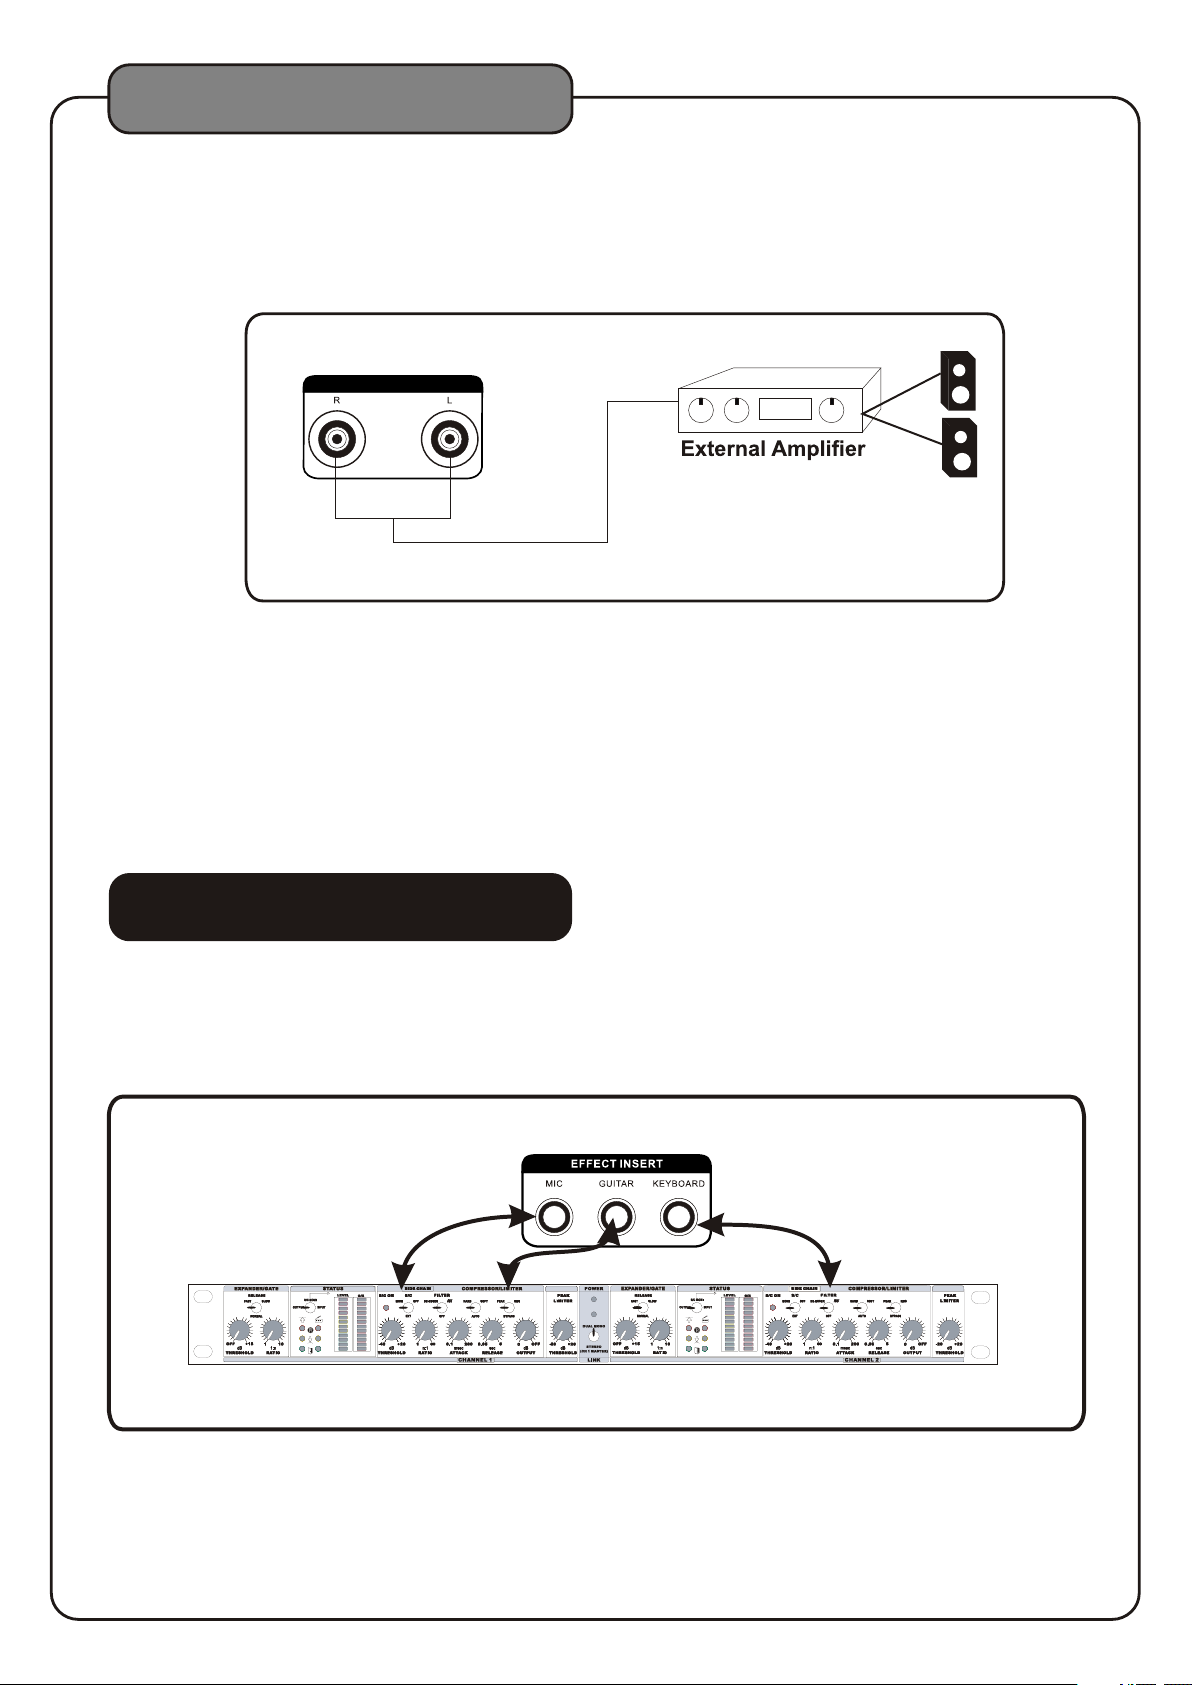
3.¼ INCH PRE-OUT C ONNE CTIO NS:
Connect one end of the ¼ inch au dio ca bles to the left and right PRE- OUT jacks on the AKJ7 809.
●
Connect one end of the ¼ inch au dio ca bles to the left and right AUDIO/LIN E/AUX INPUT jacks on
●
the external device.
PR E- OU T
4. :CONNECTING E FFEC TS USI NG THE E FFECT INSERT
Connect one end of the ¼ inch st ereo a udio cables to the GUITAR EFFEC T, KEYBOARD EFFECT, or
1.
MIC EFFECT inserts o n the re ar pan el of the AKJ7809.
Connect the other end of the ¼ i nch st ereo audio cables to the sound effect devic e.
2.
3.By using the built-in EFFECT I NSERT you can add external effects to vocals and /or gu itar or keyboard or
microphone without com prom ising the quality of the original signal.
DVD Output Connections
The effect insert is a break p oint i n the input channel signal path, It allows th e sign al to be taken out from this
AKJ7809
AKJ7809
phone jack and back to the throug h RING o f the phone jack.
, through an external equi pmen t such as a Limiter,Compressor,Equalizer, Effector,and then back to the
,the input jack can be used wi th phone jack,the signal wi ll be se nd out through TIP of the
AKJ7809
¼ inch ¼ inch
¼ inch
7
Page 11
DVD Output Connections
DVD OUTPUT CON NECT IONS
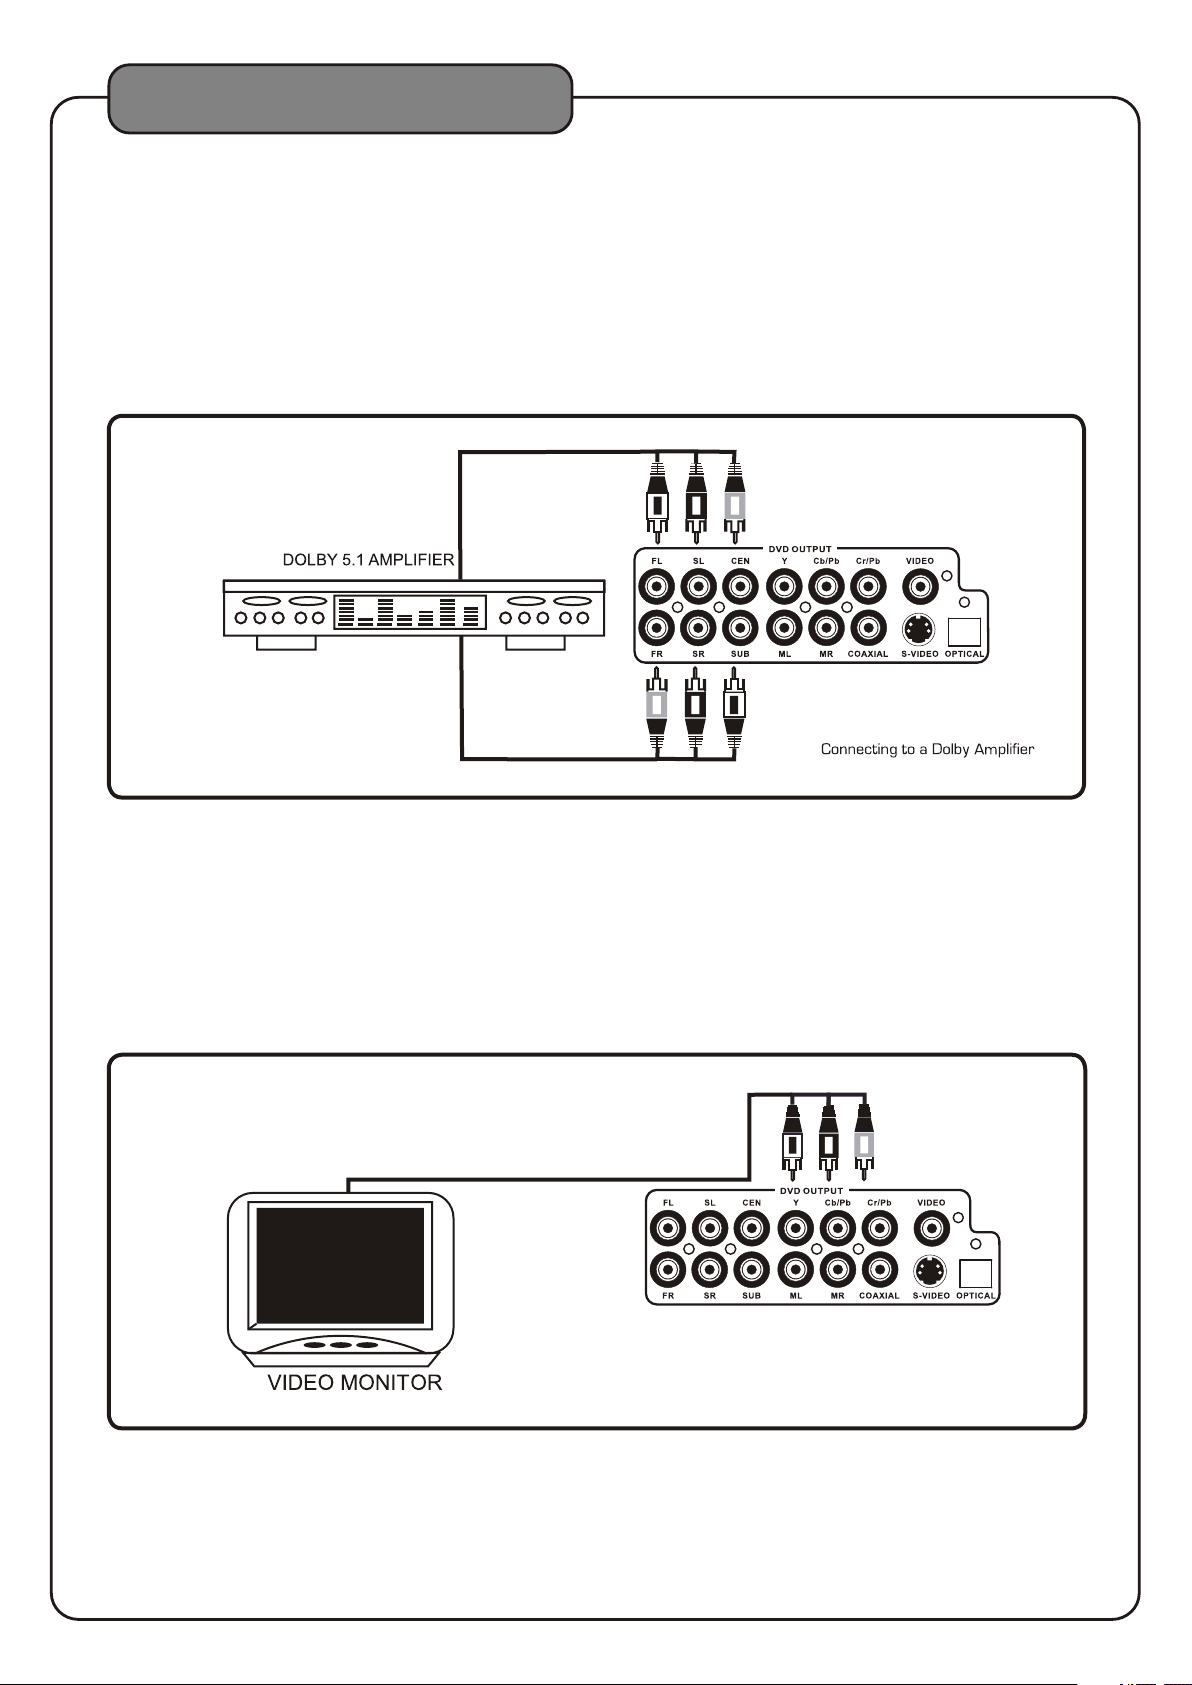
1.Conn ecti ng to a Do lby Pro logic amplifie r
AKJ7809
The allows DVD audio out put fo r 5.1 or 7.1 configurations.
With a 5.1 amplifie r, you will n eed si x RCA pa tch cables. Connect the plug from one side of e ach ca ble to the
ML , CEN, SL, MR, SW and SR outputs on the . Connect the plug from the other side of ea ch cab le to
the corresponding ML, CEN, SL , MR, SW an d SR inp uts on your 5.1 amplifier.
A 7.1 Pro Log ic con figuration requires 2 additional RCA ca bles t o be connected from the FL and FR outputs of
AKJ7809
the to your 7.1 Amplifier.
AKJ7809
2.Conn ecti ng to a TV w ith co mponent video
Using 3 appropriate comp onen t video cables (usually color coded red, bl ue and g reen), connect a set of plugs
to the COMPONENT VID EO OUT j acks ( Y-U/Pb -V /Pr) on the and plug the other set of plugs to the
COMPONENT VIDEO IN j acks ( Y-U/Pb -V /Pr) on your television. On some TVs, the compo nent v ideo input jacks
may be labeled diff- erent ly (i. e. Pr/Pb/Y or Cr/Cb/Y or R-Y/B-Y/Y etc.). You will need to press the MODE button
on the remote contro l to tog gle between YUV for Component Video, and S-Video. You ca n only u se the MODE
button when there is no disc i nser ted in the disc tray.
AKJ7809
8
Page 12
DVD Output Connections
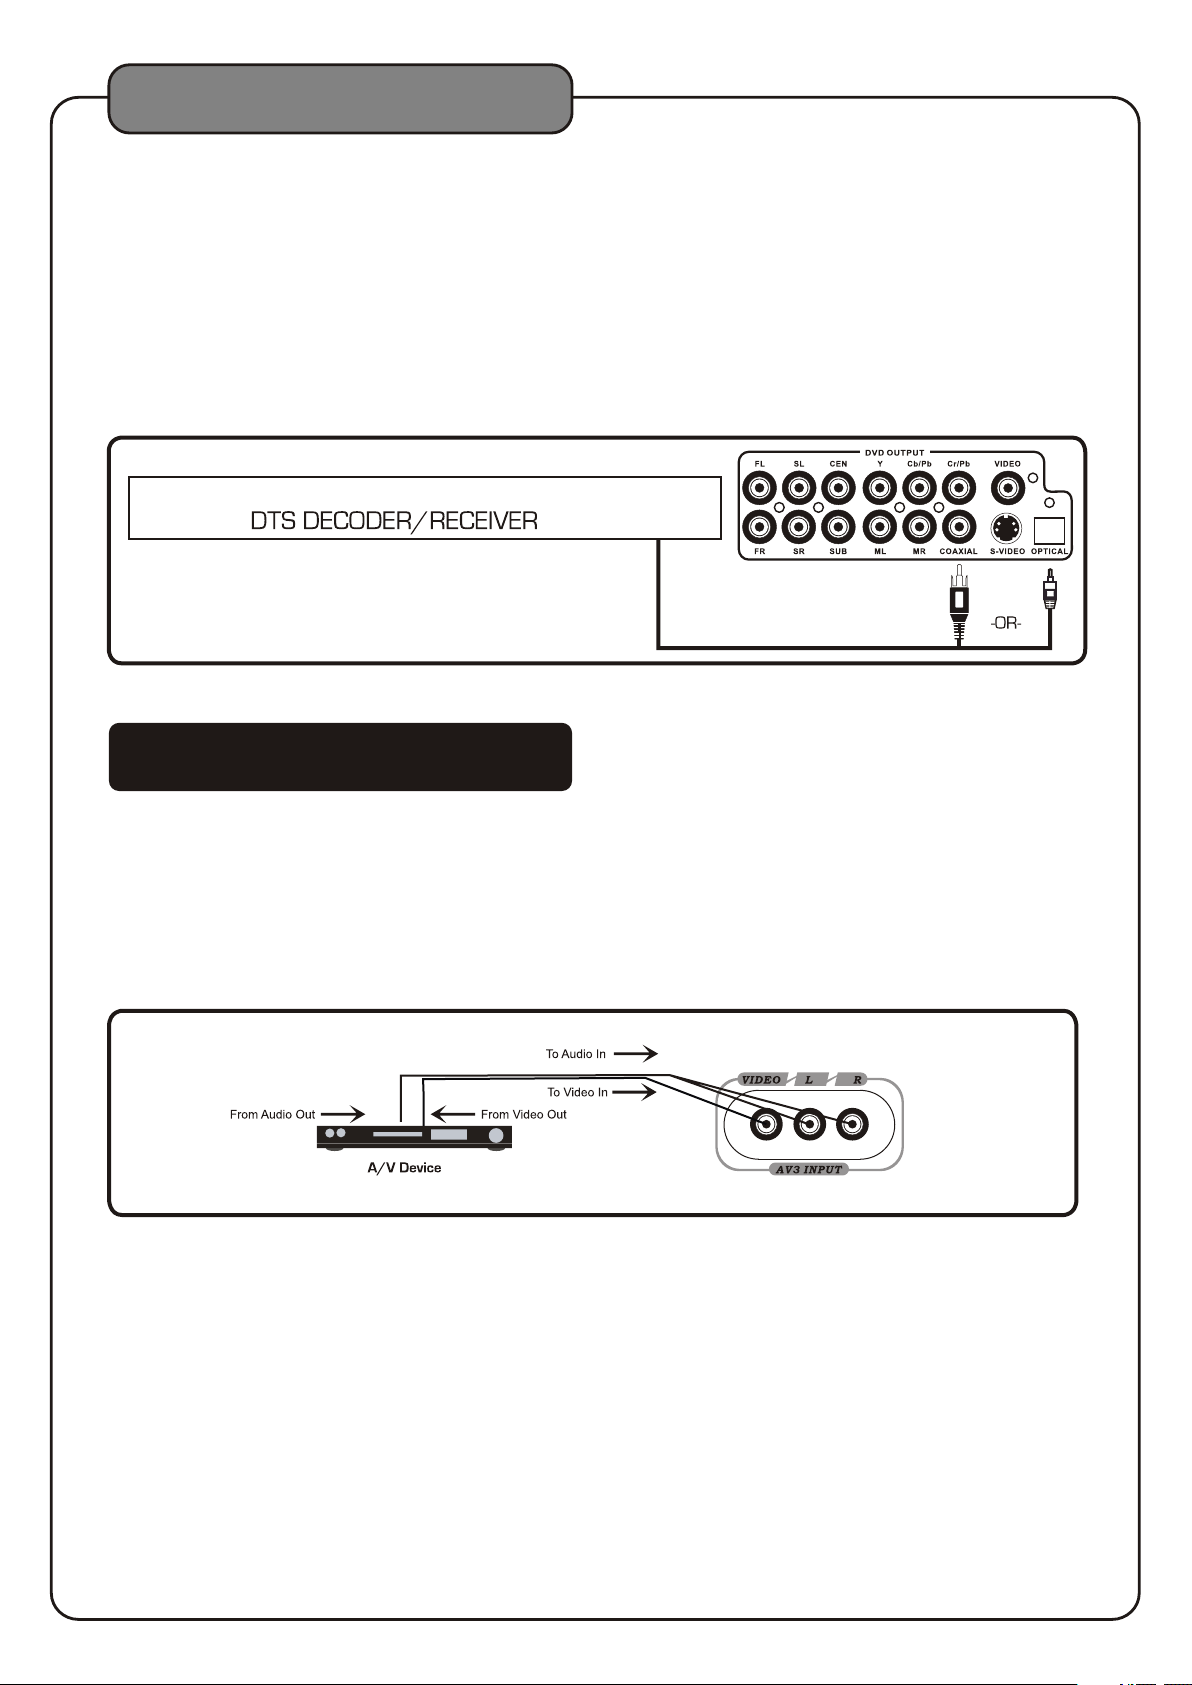
3.Conn ecti ng to a DT S rece iver/decoder
Using either a RCA- ended COAX IAL ca ble suited for digital audio use or an OPTICA L cabl e, connect one
end to the appropriate jac k on the (COAXIAL or OPTICAL) and the other end to th e appr opriate jack
(COAXIAL or OPTIC AL). I f you have both coaxial and optical inputs on y our DT S decoder/receiver, it is
recommended to use an opti cal co nnection as those cables eliminate the po ssib ility of EMI (electromagnetic
interference). If your D TS dec oder/receiver has 5.1 or 7.1 channel RCA in puts , you can use the 5.1 or 7.1
channel output jacks on th e .
AKJ7809
AKJ7809
General Connections
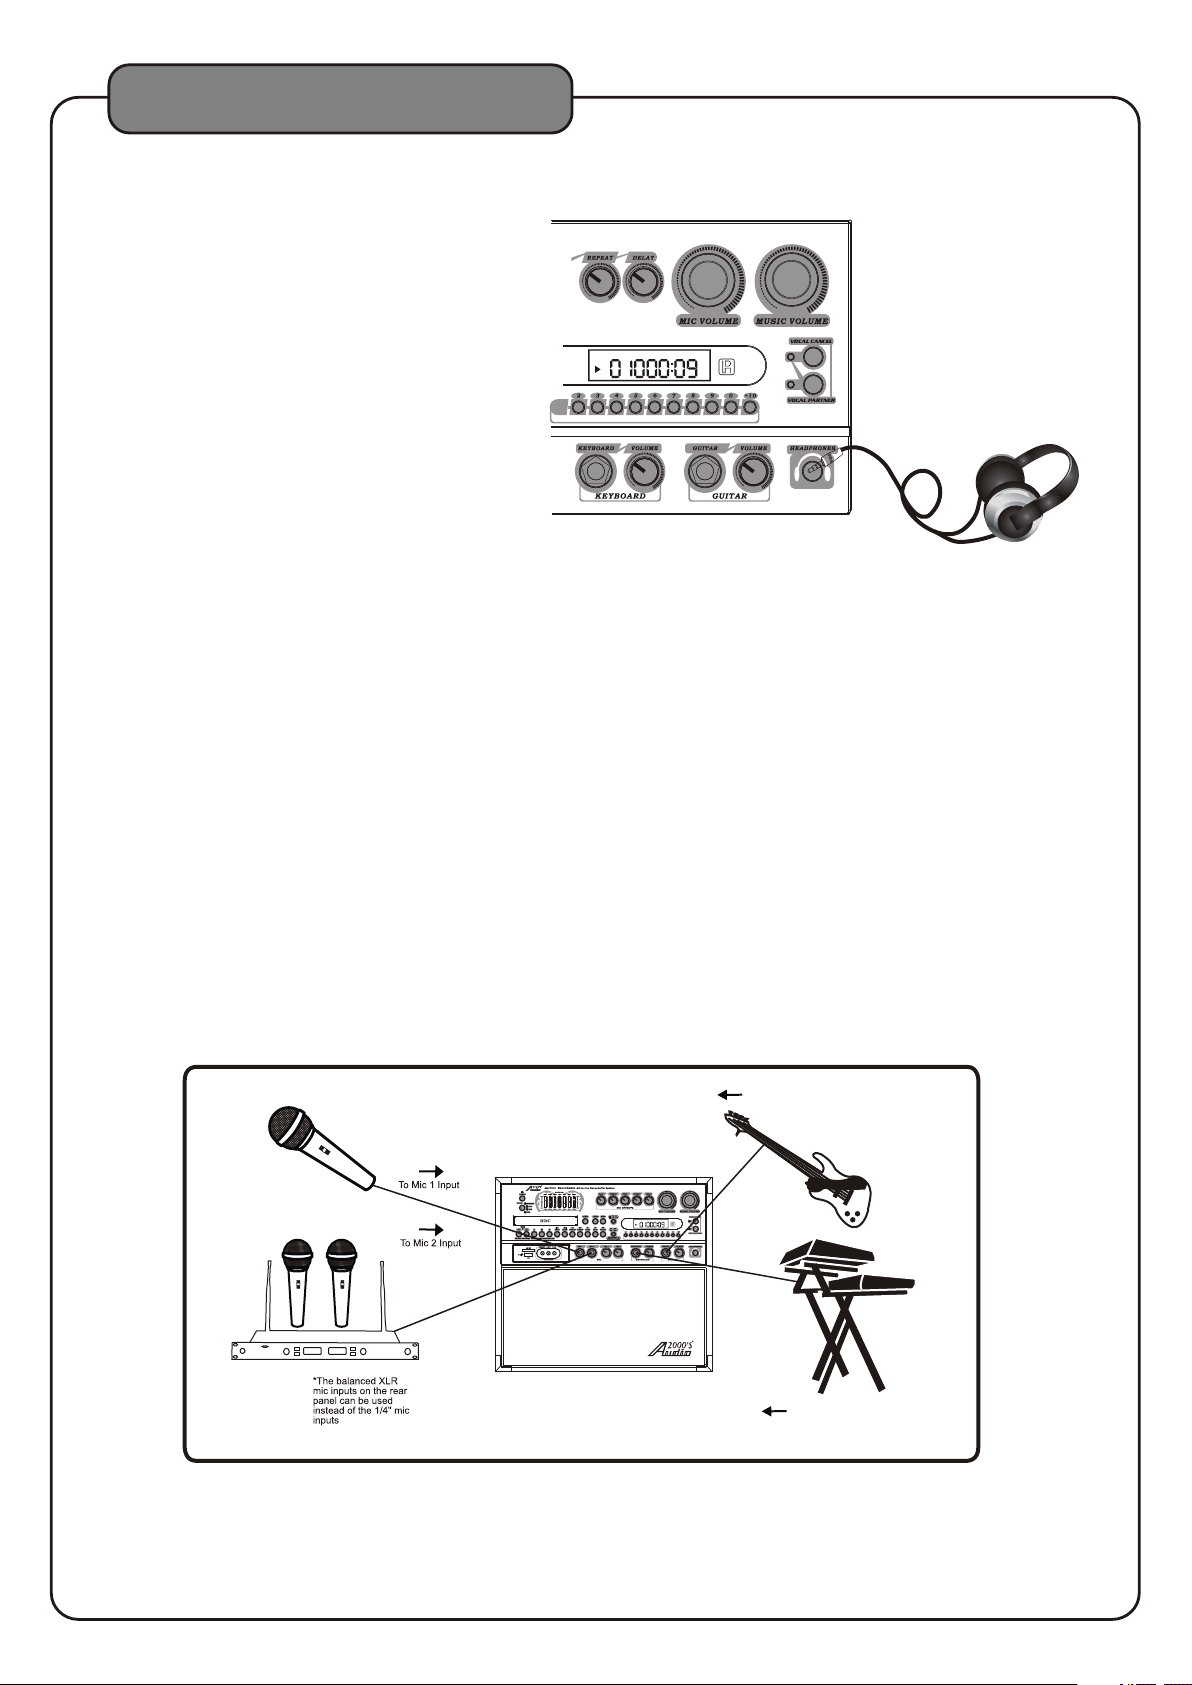
AV input connections
What you will need
●3 RCA-style A/V cable (included)
●2 A/V output Device
1.Connect one end of the 3 RCA-styl e A/V ca ble to the A/V VIDEO/L/R input labeled AV1 /AV 2/AV3 on the front
panel of the .
2.Connect the other end of th e 3 RCA- styl e A/V cable to the A/V VIDEO/L/R output on an A/V o utpu t Devi ce.
AKJ7809
9
Page 13
General Connections
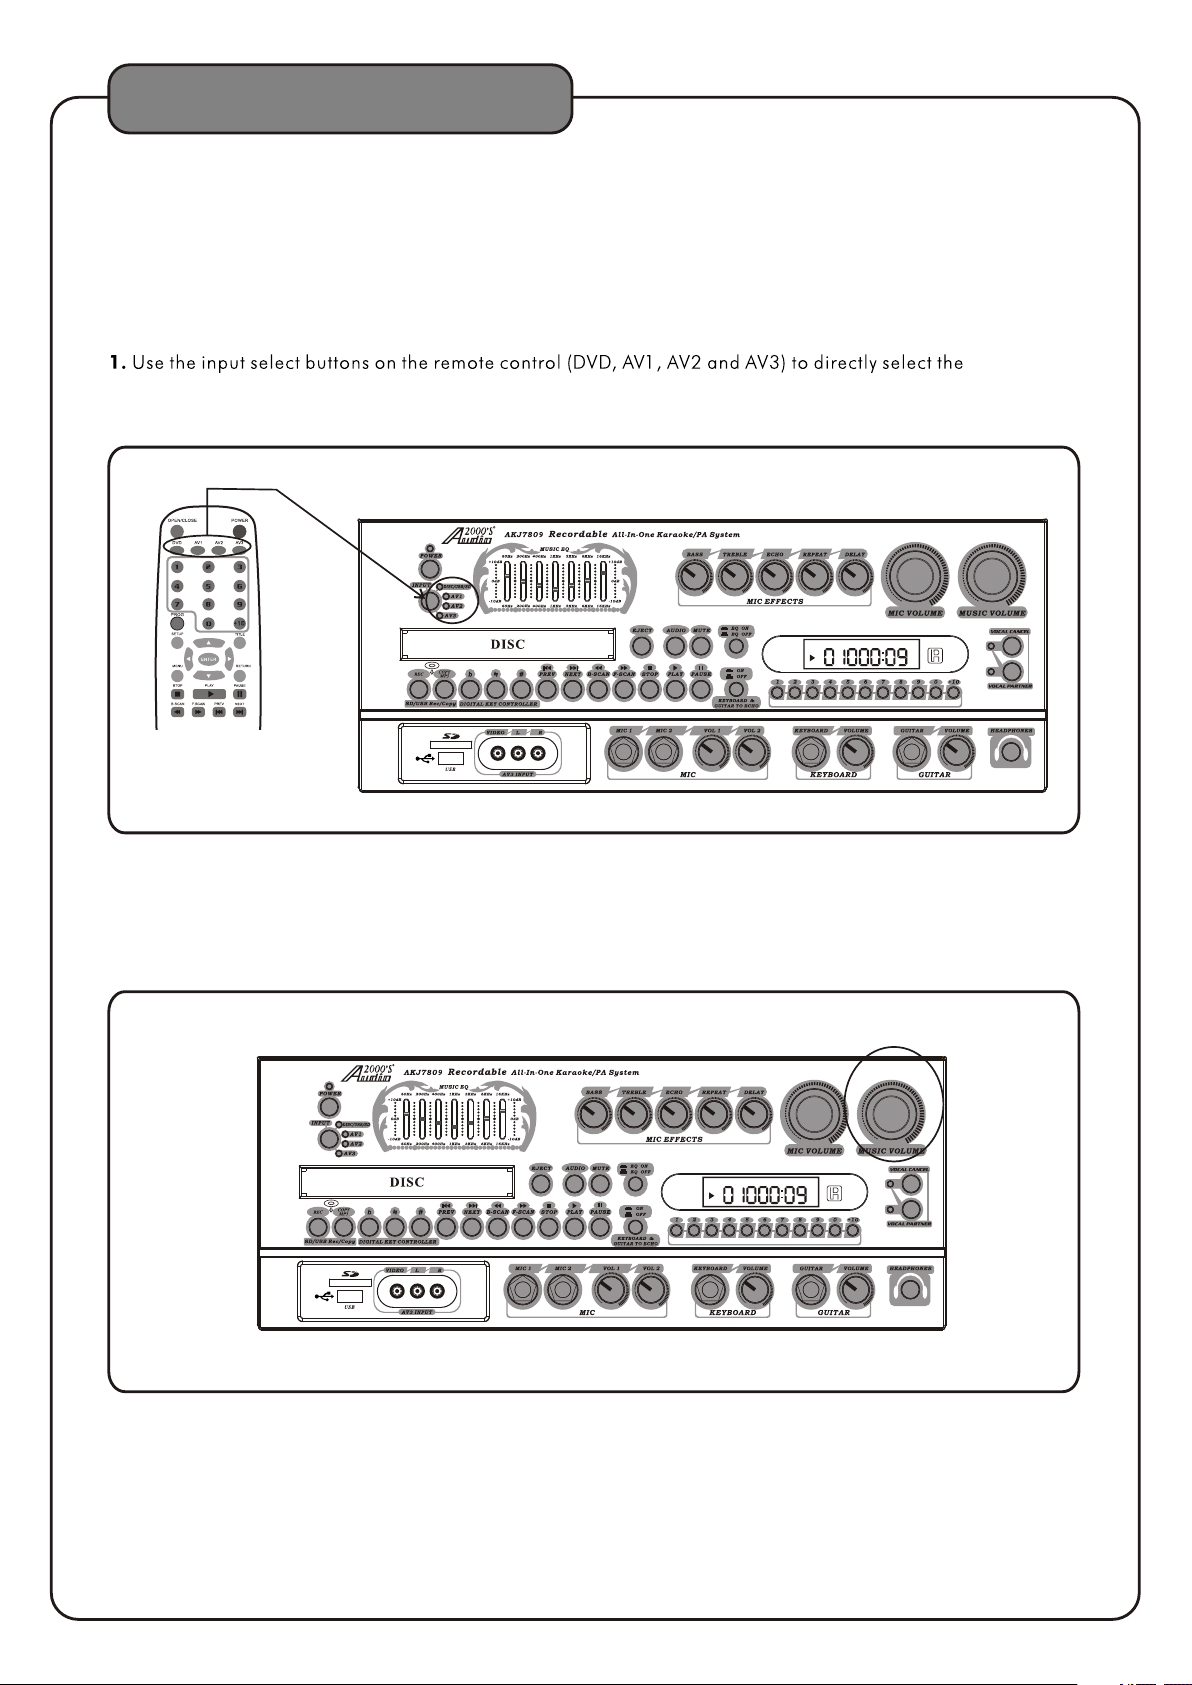
Headph ones c onne ctio ns
What you will need
●
Headphones with a ¼ inch con nect or at the
other end of the cable ( not in clud ed).
1.Connect the connector o f the he adphones
to the ¼ inch HEADPHON ES out put on
VCD
the front panel of the A KJ78 09.
Microphone /ins trum ent input connections
After completing your main sys tem connections, it is time to get your microphon es and instruments connected
and ready for performing. Bef ore you get started with your connections we reco mmend that you take the
following tips into consider ation:
●When connecting instrument s, refrain from using low quality or worn cables as t hey ca n cause significant
noise and loud pops, posing a thre at to the system's speakers.
●Use caution when connecting a ch ain of multiple effects pedals, as the output vol tage m ay change and
possibly overload the 9 inp ut cha nnel.AKJ780
The 9 has one guitar (¼ ), one keyboard (¼ ) and two microphone (¼ /XLR) inputs.AKJ780 inch inch inch
1.To connect MICROPHONES via ¼ mic cables, connect the XLR-end of the cable into the MI CROPHONE inch
until it locks into place and conn ect the ¼ plug into ei ther the MIC 1 or 2 jack on the 9.inch AKJ780
2.To connect MICROPHONES via XLR mic cabl es, attach the XLR “female ” end of the cable into the
“male” three prong jack lo cate d at the base of your handheld MICROPHONE until it lo cks into place.
Then connect the XLR “male” jack a t the other end of the cable into either of the BAL ANCED MIC 1 or 2
inputs on the 9 rear panel. It sh ould be obvious which sides of your XLR cable are mal e and AKJ780
female as there is only one possib le connection.
3.To connect a GUITAR, connect a ¼ instrument cable fro m the GUITAR's ¼ output to the
¼
inch
GUITAR input.
inch inch
4.To connect a KEYBOARD, connect a ¼ instrument cable from the KEYB OARD's ¼ output to the inch inch
9 ¼ KEY BOARD input.AKJ780 inch
L R
AKJ7809
10
To GUITAR
L R
VCD
To KEYBOA RD
Page 14
General Operations
Turning the AKJ 7809 O n, Off a nd to Standby
Press the power bu tton o n the AKJ780 to turn the unit on or off.
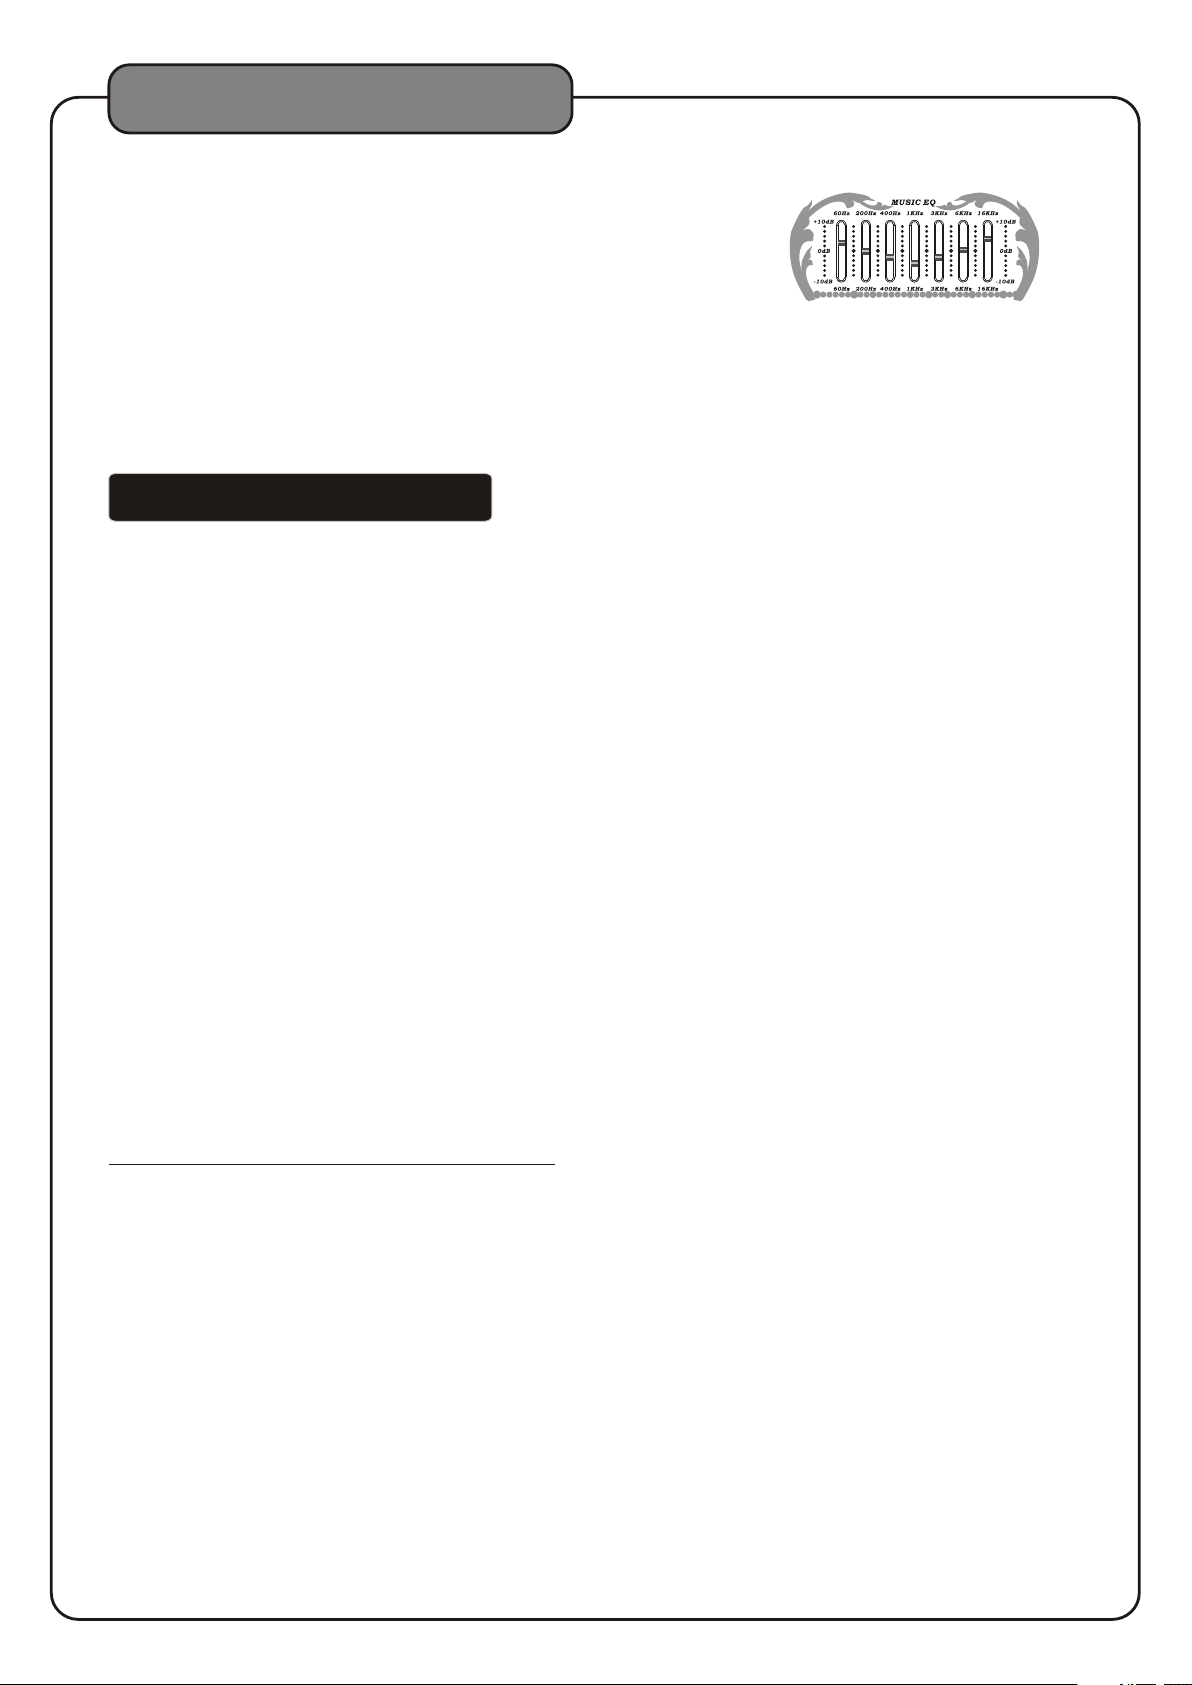
Input Ch anne ls
AKJ780
The 9 has 4 available input cha nnel s:
●Disc/USB/SD: Turns on the 9’s disc player fo r play ing DVD, CD, CDG, an d othe r discs.
AKJ780
●AV1/AV2/AV3 :For playing a device that is connected t o the AV1/AV2/AV3 RCA audio/video in puts
on the front and rear pa nels.
Selecting an I nput c hann el
desired input channel or u se the S ELECT button on the front panel to cycle thro ugh th e input channels
2. Once the desired input ch anne l is selected, playback can begin
9
VCD
L R
Adjusti ng the m aste r Musi c volume
The master Music Volu me for t he disc player, and AV input channels can be adjusted u sing e ithe r
the front panel control or t he rem ote control.
●Front Pa nel:Tur n the MUSIC VOLUME control clockw ise to r aise the volume and counter-clockwis e
to lower the volume.
VCD
L R
Adjusti ng the m aste r Micr ophone volume
The master Microphone Vol ume can be adjusted using either the front pa nel co ntrol or the remote control
●Front Pa nel:Tur n the MIC VOLUME control clockwis e to rai se the volume and counter-clockwise to
lower the volume
11
Page 15
General Operations
Adjusti ng the m aste r MUSI C EQ
The master MUSIC EQ for the disc pla yer, AV1/AV2/AV3
input channels can be adjusted u sing the front panel control
Front Pa nel
Turn the MUSIC EQ control slider up to ra ise th e EQ for
10dB and down to lower the EQ fo r 10dB.
Changi ng the v ideo m ode (PAL / NTSC )
Use the P/N button on the remo te con trol to switch between the regional PA L and NTSC video modes.
Operations (Disc Mode)
Access DISC mode by either p ress ing DVD on the remote control or by pressing t he DIS C/USB/SD
button on the front panel un til th e display screen says disc.
Loadin g a disc
1.Press the OPEN/ CLOSE button on the remote control or the E JECT b utto n on the front panel of
AKJ780
the 9 to open the disc tray
2.Insert a disc
3.Press the OPEN/ CLOSE button on the remote control or the E JECT b utto n on the front panel of
AKJ780
the 9 to close the disc tra y
Playin g a disc
1.Load a disc
2.Press PLAY o n the re mote control or on the front panel
Stoppi ng a dis c
1.Press the STOP but ton on the remote control or front panel once t o ente r pause mode
2.Press the STOP but ton again to completely stop the disc
Pau sing a d isc
1.Press the PAUS E button on the remote control or front panel
DISC/USB/SD/
Skippi ng tra cks/ chap ters
1. Use the PREV and NEXT buttons on th e remote control or front panel to skip track s/ch apters
2. Press the PREV button t o skip to the previous track/chapter
3. Press the NEXT button t o skip to the next track/chapter
Search ing th roug h a track/chapter
1. Use the B.SCAN and F.SCAN b uttons on the remote control or front panel to sear ch through tracks/chapters
2. Press the B.SCAN button to search backward s through the current track/chapter
3. Press the F.SCAN button to search forwards thro ugh th e current track/chapter
Note:It will not work whil e play ing CDG format disc
Subtit les
Some DVDs have subtitles avai lable and some also include multiple languages. If yo u are using a DVD with
subtitles available, simpl y pres s the SUBTITLE button on the remote control t o cycle through the available
subtitles
Viewin g mult iple a ngles
Some DVDs have multiple viewi ng angles available. Press the ANGLE button o n the remote control to
change the viewing angle and cyc le through the available angles.
Slow-motion pl ayba ck usi ng the SLOW button
Use the SLOW button on the r emote control to cycle between 4 slow -forward mo des :
●SLOW 1/2 - Forwa rds at 1 /2 the actual time
●SLOW 1/4 - Forwa rds at 1 /4 the actual time
●SLOW 1/8 - Forwa rds at 1 /8 the actual time
●SLOW 1/16 - Forw ards at 1/16 the actual time .
12
Page 16
Operations(Disc Mode)
Viewin g one fr ame at a t ime us ing the STEP button
1.Press the STEP button o n the remote control to enter Step mode
2.Every time the STEP button is pre ssed, when in Step mode, the movie will advance one f rame
3.Press the PLAY but ton on the remote control or front panel to exi t Step m ode and return to normal playback
Selecting re peat o ptio ns
Press the REPEAT bu tton on the remote control to cycle through t he ava ilable repeat modes:
1.Track - Repeats the current track
2.Chapter - Repeat s the cu rren t chapter on a DVD
3.Title - Repeats the current title on a DVD
4.All - Repeats the en tire d isc once it has played through
5.Repeat off- Turns off Repeat.
Creati ng a loo p usin g the A-B but ton
The A-B feature allows you to loop a cert ain part of a disc.
While the disc is playing:
1.Press the A-B button once at t he desired starting point for the loop
2.Press it again at the des ired ending point for the loop
3.Press it a third time to en d the loop and return to normal playback
Note:It will not work whil e play ing CDG format disc
Cancel ing vo cals u sing t he L/R button
Multiplex CDG discs are design ed to have vocals on one side and music on the other. The L/R button
allows you to play only one of these s ides and cancel out the other in order to have music- o nly or
vocals - only.Press the L/R button to cycle through th e available settings:
●Mono Left - Left channel o nly (no vocals)
●Mono Right - Right channel only (n o music)
●Mix-Mono - V irtual stereo
●Stereo - Left and Right in tr ue stereo
Note: This feature is only for use w ith specifically Multiplex formatted CDG discs.
Zoomin g in and o ut
AKJ780
The 9 lets you zoom in and out on the v ideo screen.
Press the ZOOM button on t he remote control to cycle through the availabl e zoom settings.
Zoom in
●2X - Zooms in 2X the original si ze
●3X - Zooms in 3X the original si ze
●4X - Zooms in 4X the original si ze
Note:when you try to play MP G and JP G file(include the MPG and JPG file on DISC,U SB,SD):
1. Press the ZOOM bu tton o n the remote control to enter ZOOM mode;
2. Use the F.SCAN and B. SCAN b utton to control zoom in and zoom out functio n;
Jumpin g to spe cifi c time o n a disc
Press the TIME button on t he remote control to cycle through the availabl e jump-to options:
CD/CDG disc
●Disc Go To (CD/CDG only) - Jump to a specific time on th e current disc
●Track Go To (CD/CDG only) - Jump to a specific time on the curren t track
●Select Track (CD/CDG only) - Jump directly to a spe cific track
Note:It will not work whil e play ing CDG format disc
Exampl e:
Jumping to 1:35 in the current tra ck
1.Press the TIME button u ntil “TRACK GO TO - - | - -” appears on the TV scree n
2.Press 0, 1, 3, 5
3.Playback will begin at 1:35 on the current track
DVD disc
Note: Not all discs have multipl e titles. A title refers to the different section s including the movie,
special features,etc.
●Titl e / Chapter (DVD only) - Select the title and th en jump to a chapter within that title
●Titl e / Time (DVD only ) - Select a title and then jump to a specific time withi n that title
●Chapter / Time (DVD only) - Select a chapter and the n jump to a specific time within that chapter
13
Page 17
Operations(Disc Mode)
Exampl e:
Selecting a Title and Chapter
Jumping to title 2 and chapter 2
1.Press the TIME button u ntil TITLE “__ / __ CHAPTER __ / __ “ appears on the top of the T V screen
2.Press 2 on the number pad t o select Title 1. N ow chapter will be highlighted
3.Press 2 on the number pad t o select Chapter 2
4.Playback will begin at that on Title 2 and Chapter 2
Viewin g and se ttin g the On Screen Display (OS D)
Press the OSD button on th e remote control to cycle through the available O SD vie wing options.
CD/CDG d iscs
●Single Remain - The time re main ing on the current track
●Single Elapsed - The time elapse d on the current track
●Total Remain - The time remaining on the en tire disc
●Total Elapsed - The time elapsed on the enti re disc
●Display Off - Turns the OSD off
DVD discs
●Titl e Remain - The time remaining on the current t itle
●Titl e Elapsed - The time elapsed on the current tit le
●Chapter Remain - The time r emai ning on current chapter
●Chapter Elapsed - The time elaps ed on the entire chapter
Turning on the la st mem ory fun ction:
1.Press SETUP on the remo te control. The General Setup page will show.
2.Use the down arrow button on the re mote control to scroll down to Last Memory
3.If Last Memory is set to off, press enter when Last Memory is highli ghte d and press up so that On is
highlighted
4.Press ENTER on the remo te control to confirm the selection
5.Press SETUP again on th e remote control to close the Setup menu
PROG (Program) Operations
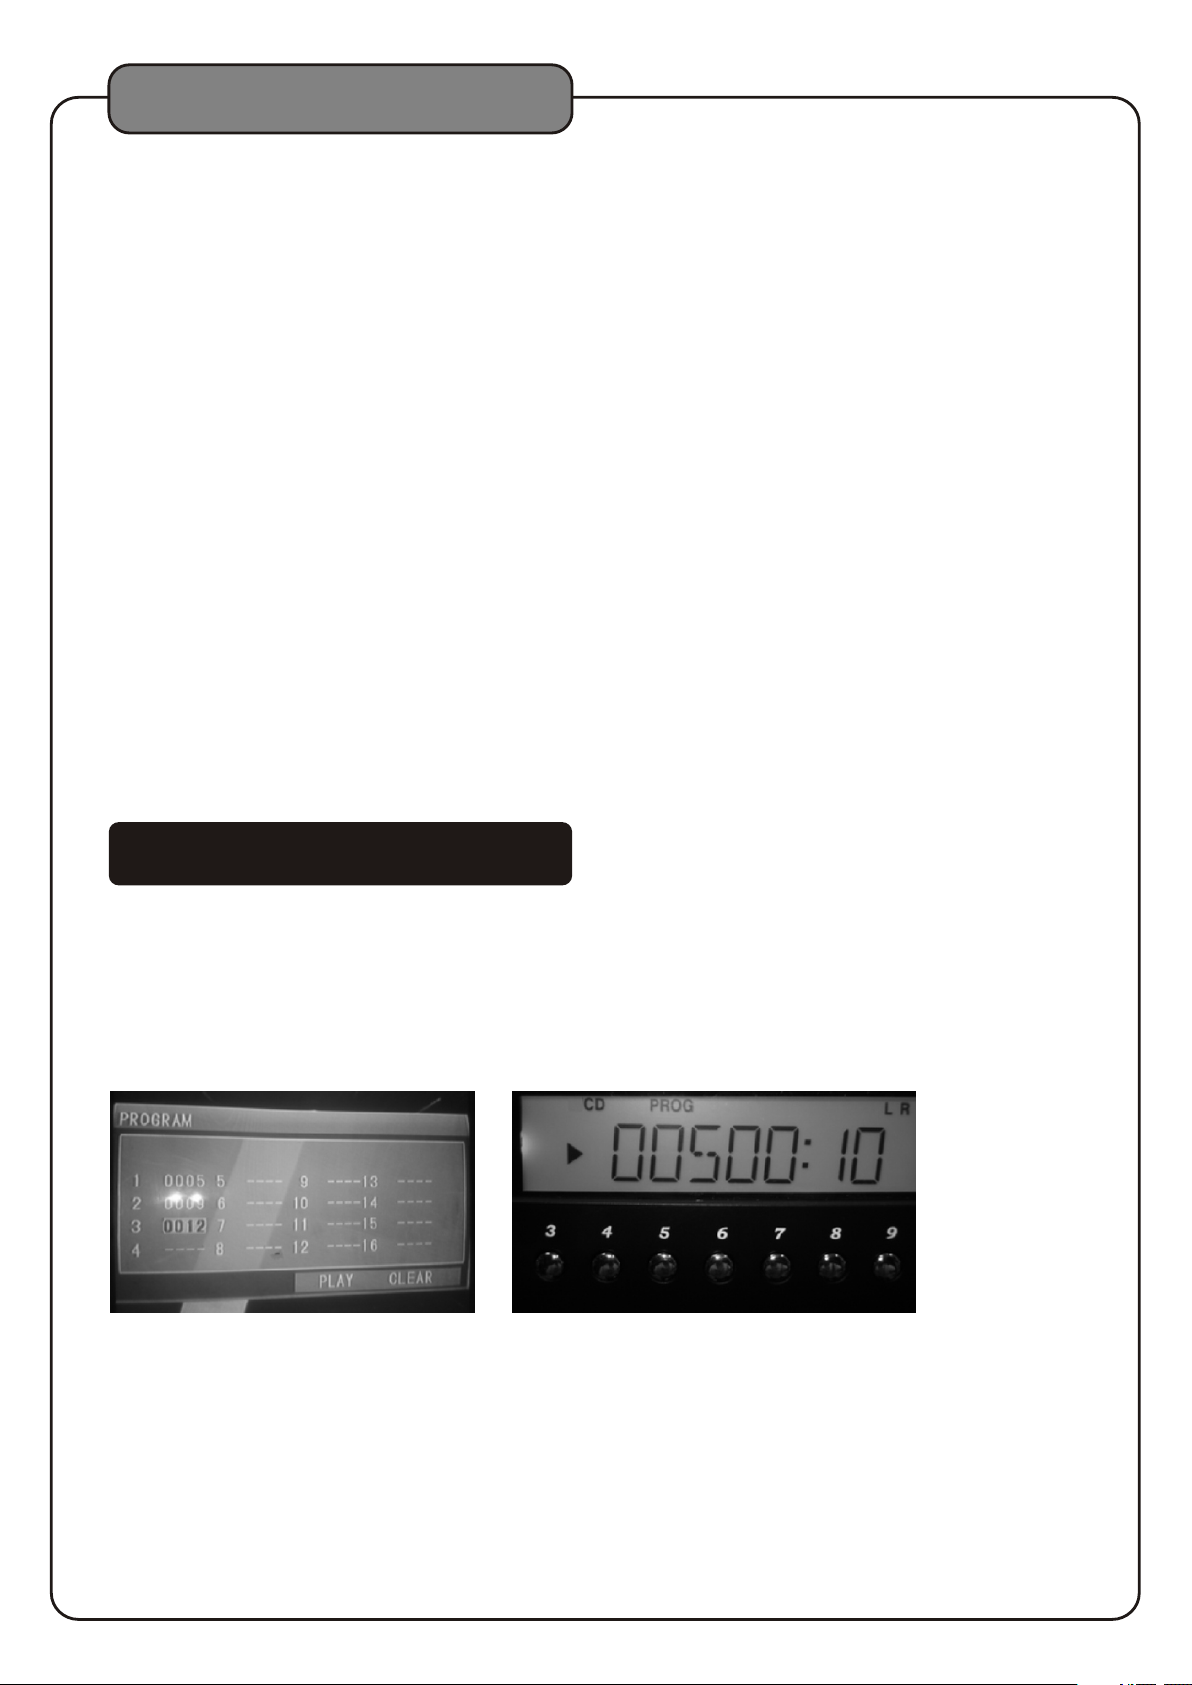
1. CD, CDG a nd VCD P layb ack:
●
Insert a CD, CD- G, or V CD in th e disc tray and press the PROG button to enter th e prog ram mo de. The TV
monitor display will sho w the pr ogram menu as in Photo J. In the p rogram menu, the track numbers of the
songs on a disc can be ent ered t o the program menu in a desired order, up to 20 tracks. The same tra ck on
a disc can be entered multip le tim es. Use the directional buttons (< > ^ ^) to go to th e track location in
the program menu to ma ke any c orre ction or delete the track from the prog ram me nu by pressing the
CLEAR button.
PHOTO( L) PHOTO( J)
● Upon completing the prog ram me nu setup, use the directional buttons (< > ^ ^) t o go to th e PLAY indicator
in the program menu an d pres s the EN TER button to start the playback acco rdin g to the t rack order set up in
the program menu. Th e PROG i ndic ator on the display panel will be on (as sh own in P hoto K) when the
programmed playback is i n prog ress. Press the PLAY button on t he rem ote control twice to stop the
programmed playback.
14
Page 18
Operations(Disc Mode)
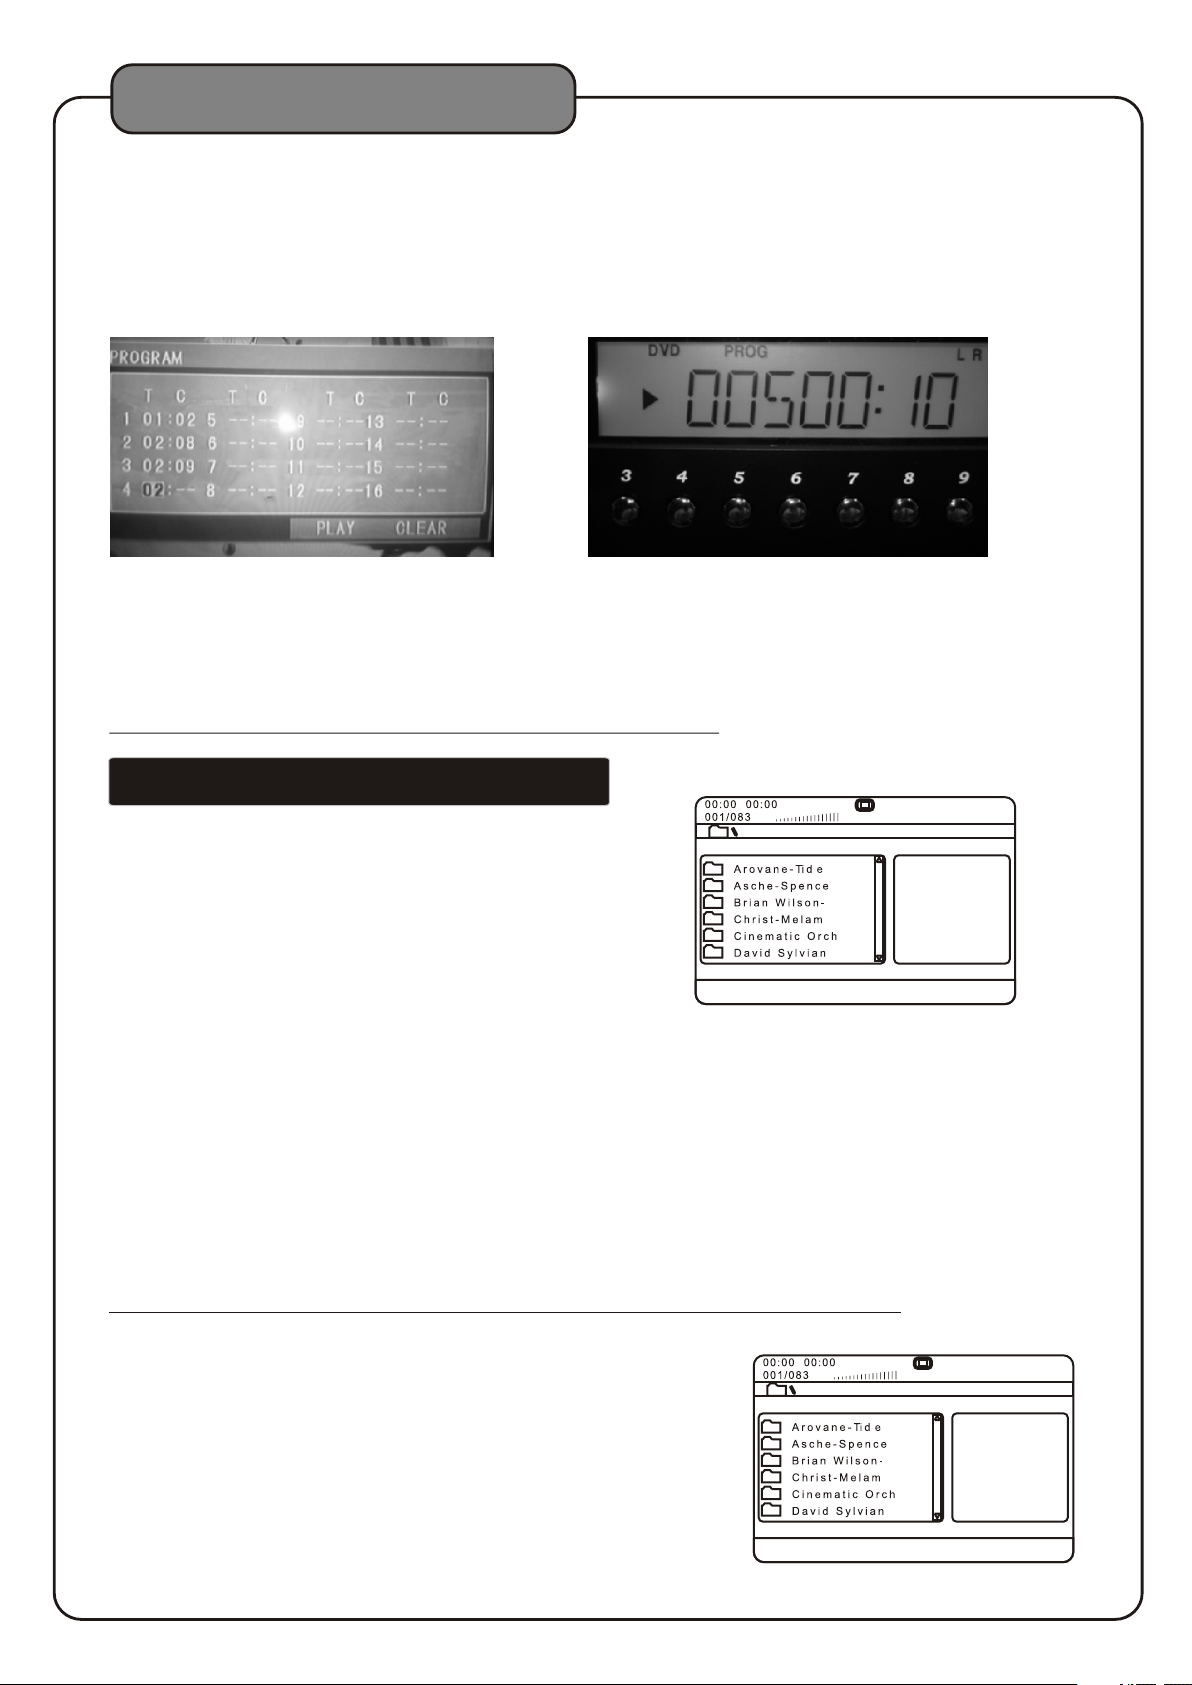
2. DVD Pla ybac k
●
Insert a DVD in the disc tray a nd pre ss the PROG button to enter the program mode. T he TV monitor display
will show the program menu a s in Pho to L. In the program menu, enter the title n umbe r under the column “T”
and enter the chapter numb er und er the column “C”. Up to 2 0 songs on a DVD can be entered to the program
menu in a desired order. The same song on a DVD ca n be entered multiple times. Use the direct iona l buttons
(< > ^ ^) to go to the song loca tion i n the program menu to make any correction or de lete t he song from the
program menu by pressing t he CLE AR button.
PHOTO( K) PHOTO( M)
●Upon completing the prog ram me nu setup, use the directional buttons (< > ^ ^) t o go to th e PLAY indicator
in the program menu and pres s the EN TER button to start the playback accordin g to the s ong order set up in
the program menu. Th e PROG i ndic ator on the display panel will be on (as sh own in P hoto M) when the
programmed playback is i n prog ress. Press the PLAY button on t he rem ote control twice to stop the
programmed playback.
NOTE: The PROG operation s are no t applicable to MP3 or MP4 discs.
Operations (MP3 and AVI / DivX)
When playing MP3 and DivX files, t he 9 must be
connected to a TV in order to se e and na vigate through the
file menu. Use the arrow buttons o n the remote control to
navigate through the file menu a nd the ENTER button to
select a file to play.
To play a file
1.Use the arrow buttons on the remo te control to scroll to the
desired file
2.Press ENTER on the remo te control to begin playing the file
3.The file will begin playing
or
1.Use the number buttons on the rem ote control and enter the file number
2.Press ENTER
3.The file will begin playing
Direct t rack a cces s:
When playing MP3 or AVI/D ivX fi les,to skip to the desired track directly u sing t he number buttons,
see the following operat ions s ection for detailed instruction:
1.For example:t o go dir ectly to track 142 of MP3/AVI/DivX:yo u woul d press 1 and 4 and 2,then press
ENTER button on remo te con trol for playing your desired track.
2.For example:t o go dir ectly to track 36 of MP3/AVI/DivX,you wou ld pre ss 0 and 3 and 6, then press
ENTER button on remo te con trol for playing your desired track.
Note:The desired track y ou sel ected must be less than the total tracks on the M P3/AVI/DivX;
Repea t opti ons
There are six repeat options whe n playing Divx Files. Use the REPEAT
button on the remote control to cy cle through these repeat options:
●Random - Plays songs randomly f rom the entire disc
●Single - Playback stops after a si ngle track finishes playing
●Repeat One - Repeats the c urrent song continuously
●Repeat Folder - Repe ats the entire folder after it has played through
●Folder - Playback stop s afte r all of the songs in the current folder
have played
●Shuffle - Plays songs randomly w ithin the current folder
AKJ780
15
Page 19
USB and SD Card Operations
(Disc Mode)
USB and SD C AR D oper atio ns (Disc Mode)
Use the DISC select button o n the fr ont panel or DVD select button on the remote c ontr ol to directly select the desired
DISC MODE,do not put DISC int o the tr ay,when the grap hic di spla y on the front panel displays”NO DISC ”, then
insert USB and SD CARD to the US B and SD C ARD jacks,then begin to load the media sour ces fr om USB or SD CARD.
1.Using t he USB i nput
●Plug a USB thumb drive into th e USB In put.
● Use the directional b utto ns to select videos, music, or images. Pr ess th e Enter button to play a
selected video, mu sic, o r image.
Note:The unit will play yo ur VCD, W MA, AVI, MP4, DAT, MPG and JP G files. The different file types must be
separated into folders f or the u nit to read them.
2.Using t he SD ca rd slo t
●Plug an SD card into the S D memo ry car d slot.
●Use the directional butt ons to s elect videos, music, or images. Press t he Ent er button to play a
selected video, mu sic, o r image.
Note: The unit will play you r VCD, WM A, AVI, MP4, DAT, MPG a nd JPG files. The different
file types must be separat ed int o folders for the unit to read them.
USB and SD Card REC / COPY Operations
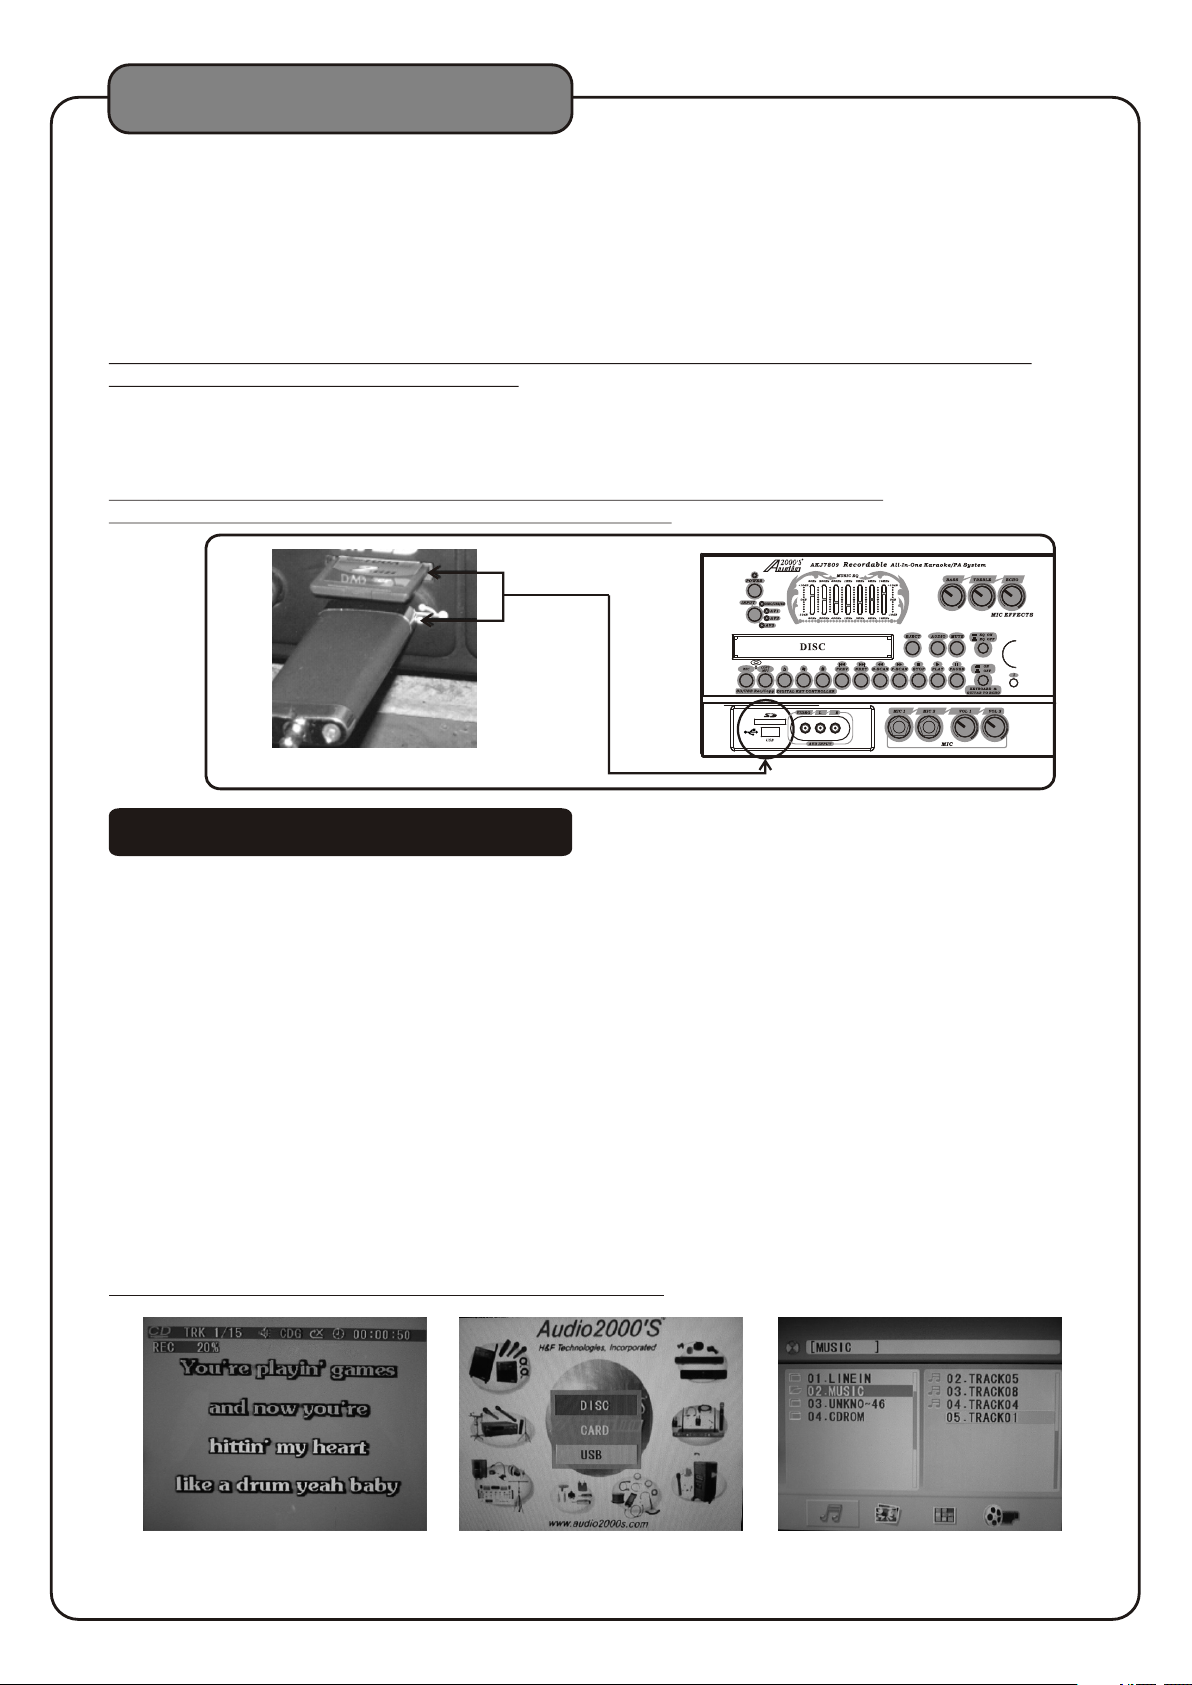
1. REC (Recor d) Ope rations:
●
With a compact disk ( in CD, CD G, MP3, MP4, DIVX , o r VCD fo rmat) in the disc tray, in sert a U SB device or an
SD card and press this REC but ton to s tart recording. Right before the r ecor ding process, the AKJ7809 will
search for the “MUSIC ” folder. A “MUSIC ” f olde r will be created if it does not exist in the USB dev ice or S D
card. During the recordi ng pro cess, the microphone input will be automa tica lly mixed with the back ground
music from the compact dis c and be r ecorded to the USB device or SD card in the M P3 for mat. In the meantime,
the percentage (0- 100% ) of the recorded portion of a song will be displ ayed o n the TV or monitor screen as
shown in Photo A.
●
The recorded content wil l be rec orded and numbered consecutively in the “ MUSI C ” folder. Each recorded
content is named with the tr ack nu mber on the disk as shown in Photo C. If a repe ated t rack n umber is used, the
track number will be follo wed by a n alphabet. For example, if track 5 o n one di sk is recorded, the recorded
content will be named “TRACK5”. When another track 5 on another disk is r ecor ded, it will be named
“TRACK5A”. Next recorded t rack 5 o n another disk will be named “TRACK5B”.
● After the recording is com plet ed, press the DVD button on the remote contr ol to enter the display as shown in Photo
B. Select USB or CARD (SD Card) and press the ENT ER but ton on the remote control to enter the pl ayba ck mod e.
● In the playback mode, use th e dire ctional buttons (< > ^ ^) to go to the “MUSIC ” folder and press the E NTER
button to open the “MU SIC” folder as shown in Phot o C. Go to t he desired recorded song to start playbac k.
(The order of the reco rded s ongs i n the “MUSIC” fo lder i s based on the times that the songs were record ed.)
NOTE: This recor ding f unct ion does NOT support any DVD disc .
PHOTO( A) PHOTO( B) PHOTO( C)
16
Page 20
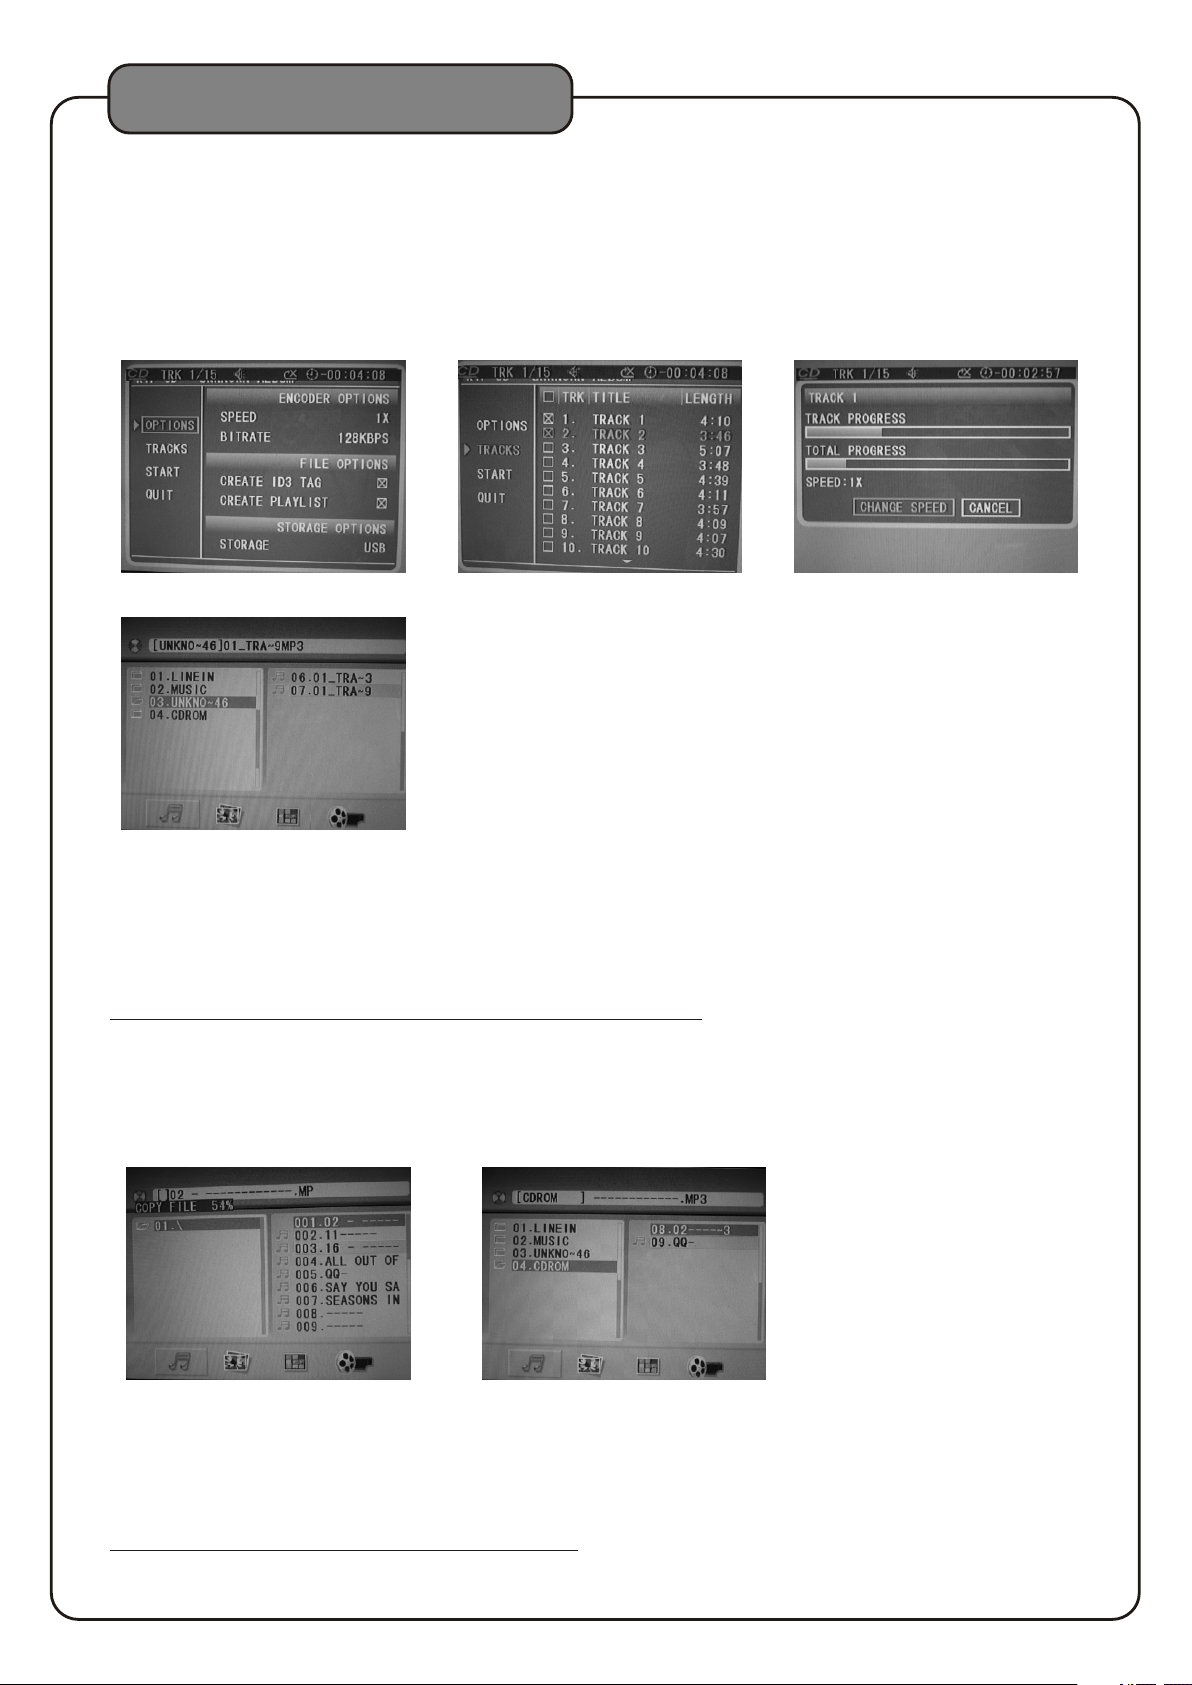
USB and SD Card REC Operartions
2. COPY Operat ions ( from C D or CDG to USB or SD Card):
●
With a CD or CDG in the dis c tray, insert a USB device or an SD c ard an d press this COPY button to enter the
downloading mode.At th e down loading mode, the TV/monitor display is a s show n in Photo D.
●
Use the directional butt ons (< > ^ ^ ) to go to “TRACKS” and press the ENTER but ton to o pen the display as
shown in Photo E . After s elec ting the desired track number in Photo E, move t he cur sor to START and press the
ENTER button to star t down loading as shown in Photo F. Right before the downloading process, th e AKJ7 809
will search for the “UNKNO” folder. A “UNKNO” folder will be created if it does no t exis t in the USB device or
SD card. The song in the C D or CDG w ill be c onverted to MP3 and downloaded to the “ UNKN O” folder.
PHOTO( D) PHOTO( E) PHOTO( F)
PHOTO( G)
●
After the MP3 downloadin g is com pleted, press the DVD button on the re mote c ontrol to enter the display as
shown in Photo B. Select USB or CARD (SD Card) an d pres s the ENTER button on the remote contro l to ent er the
playback mode. In th e play back m ode, use the directional buttons (< > ^ ^ ) to go to t he “UNKNO” folder
and press the ENTER button t o open the “UNKNO” folder as shown in Photo G. Go to the desired so ng to st art
playback. (The ord er of th e downloaded songs in the “UNKNO” folder i s base d on the times that the songs
were downloaded. )
NOTE: This downl oadi ng fun ction supports only CD and CDG discs.
3. COPY Operat ions ( from M P3 to USB or SD Card):
With a MP3 disc in the di sc tra y, insert a USB device or an S D card a nd press this COPY button to start the copyin g.
●
During the copying proce ss, th e percentage (0-100%) of the copied p orti on of the file will be displayed on the TV
or monitor screen as s hown i n Photo H. Right before the copying proces s, the A KJ7809 will search for the
“CDROM” folder. A “CDROM” folder wi ll be cr eated if it does not exist in the USB device or SD ca rd. Th e file in
the Mp3 disc will be cop ied to t he “CDROM” folder.
Photo( H)
● After the MP3 copying is com plet ed, press the DVD button on the remote c ontr ol to enter the display as shown in
Photo( I)
Photo B. Select USB or CARD (SD Card) and press t he ENT ER button on the remote control to ente r the pl ayba ck
mode. In the playbac k mode , use the directional buttons (< > ^ ^) to go to the “C DROM ” folder and press the
ENTER button to open t he “CD ROM” folder as shown in Photo I. Go to the desire d file t o start playback.
(The order of the copi ed fil es in th e “CDROM” folder is based on the times that the f iles w ere copied.)
NOTE: This copyi ng fun ctio n supports only MP3 discs.
17
Page 21
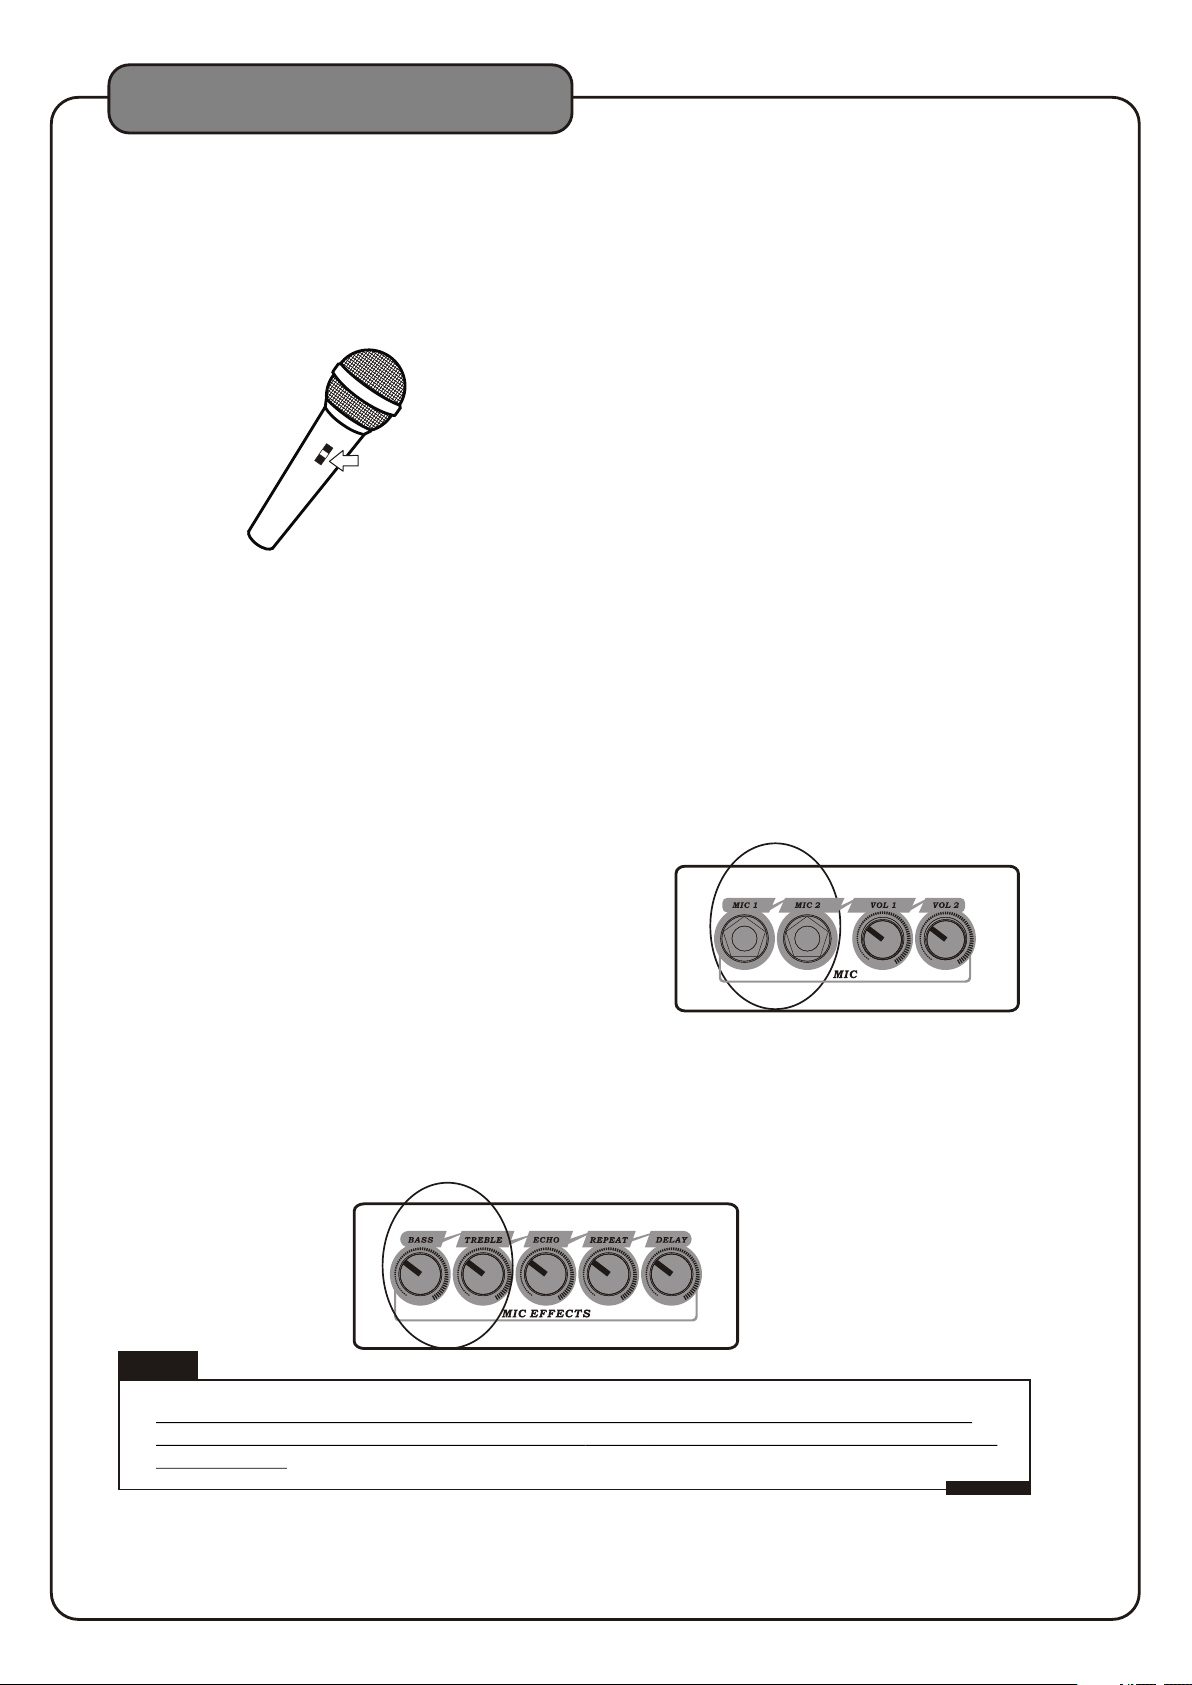
Microphone Operations
Turning on the Mi crop hone s
Each ADM1064B micr opho ne has a n On/Off switch.
1.Flip the microphone's O n/Of f switch UP to turn the microphone ON.
2.Flip the microphone's O n/Of f switch DOWN to turn the microphone OFF.
On/Off switch
Adjusti ng the m aste r Micr ophone volume
The master Microphone Vol ume can be adjusted using
either the front panel control o r the remote control
Front Pa nel
Turn the MIC VOLUME control clockwise t o raise the
volume and counter-cl ockw ise to lower the volume
Adjusti ng the i ndiv idua l Microphone volume con trol s
1.Each microphone channel has i ts own volume control
located on the front panel o f the 9. Each one
can be adjusted separately, providing a great sounding
vocal mix.
2.Turn the MIC 1 VOL and/or MIC 2 VOL cont rol clockwise
to raise the volume and counter-clockwise to lower
the volume.
Adjusti ng the M icro phon e tone
AKJ780
The 9 has microphone tone con trols on the front panel,
allowing you to create clearer a nd more professional vocals.
●MIC TREBLE- Try increasing the TREBLE tone i f the sound is too bassy or muddy and decreasing it
if it is too hi-pitched or if th ere is a lot of feedback.
●MIC BASS - Try increasing the BASS if the sound i s not deep enough and decreasing it if the
sound is too muddy or muffled.
AKJ780
Note
Note: There is no correct tone set ting. There are many factors that affect t he ton e including the
singer's own vocal tone, the roo m, etc. Adjust the TREBLE and BASS controls u ntil you are pleased
with the sound.
18
Page 22
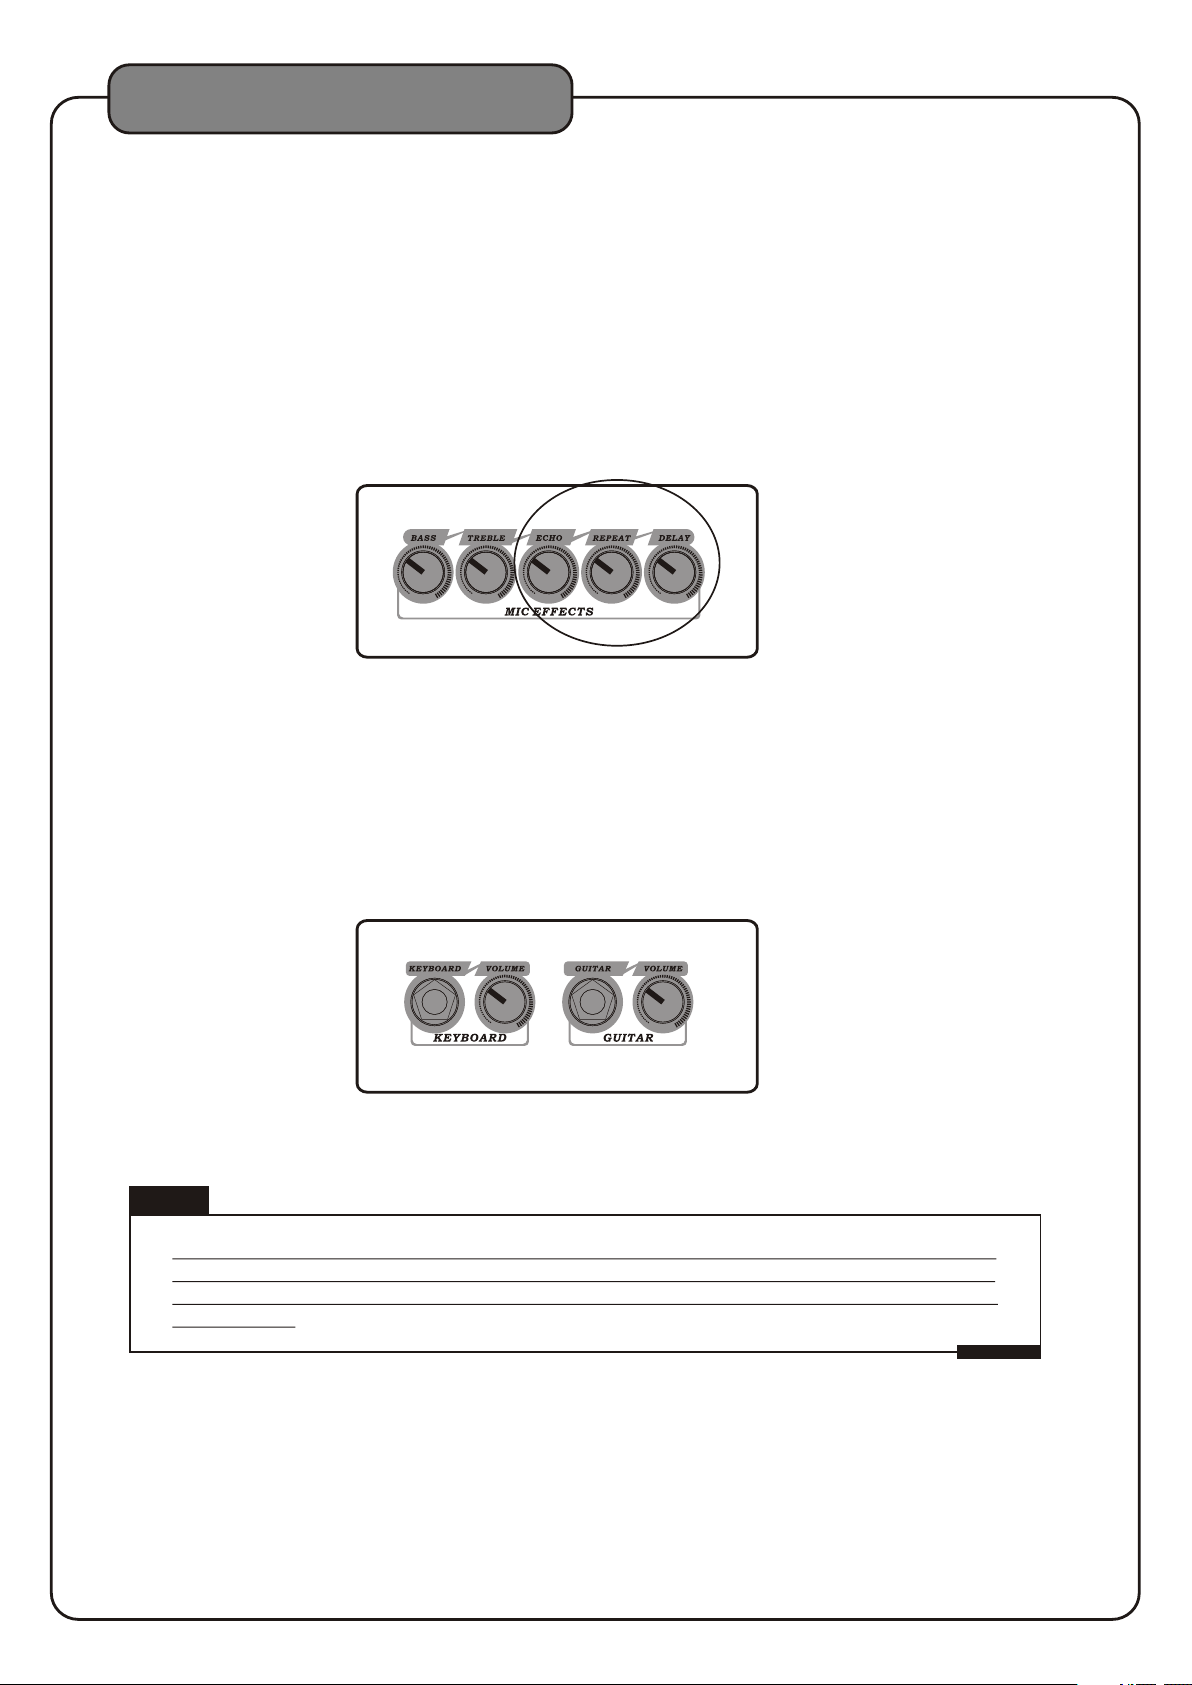
Microphone Operations
Using di gita l Echo
Digital Echo gives vocals a more p rofessional, studio -produced sound and is a gr eat way to make any singer
sound like a seasoned professi onal. There are three controls, located on the fr ont panel, for adjusting the
Echo effect:
●ECHO - This controls the amount of E cho effect that will be heard. Turn clockwise to increase th e amount
of echo and counter-clo ckwise to decrease it. Turn the ECHO control fully counter-clockwise to turn the
echo effect off.
●REPEAT- Use th is control to adjust the REPEAT setting of the E CHO effect. As REPEAT adjusts the total
number of echo intervals prior t o fade-out, the more REPEAT that is applie d, the more ECHO intervals will
occur prior to fade-out. Turn control clock wise to INCREASE and counter-clockwi se to DECREASE level.
●DELAY - This control ad just s the amount of time between each echo repeat. Turn clockwis e to make the
time shorter and counter-clockwise to make the time longer
Adjusti ng the K EYBO ARD vo lume
1.The master KEYBOARD Volume can be adjusted using the front panel con trol
2.Turn the KEYBOARD VOLUME cont rol clockwise to raise the volume and counter- clockwise to lower the
volume
Adjusti ng the G UITAR volume
1.The master GUITAR Vo lume can be adjusted using the front panel co ntro l
2.Turn the GUITAR VOLUME con trol clockwise to raise the volume and counter-clockwise to lower the
volume
Note
NOTE: KEYBOAR D & GUITAR TO ECHO ON/OFF button - Thi s butt on is used to turn on or turn
off the connection betwe en the Keyboard / guitar inputs and the digtal ECH O circ uitry. Depress
this button to activate th e digi tal ECHO. Release this button to the UP positi on to di sconnect the
digital ECHO.
19
Page 23
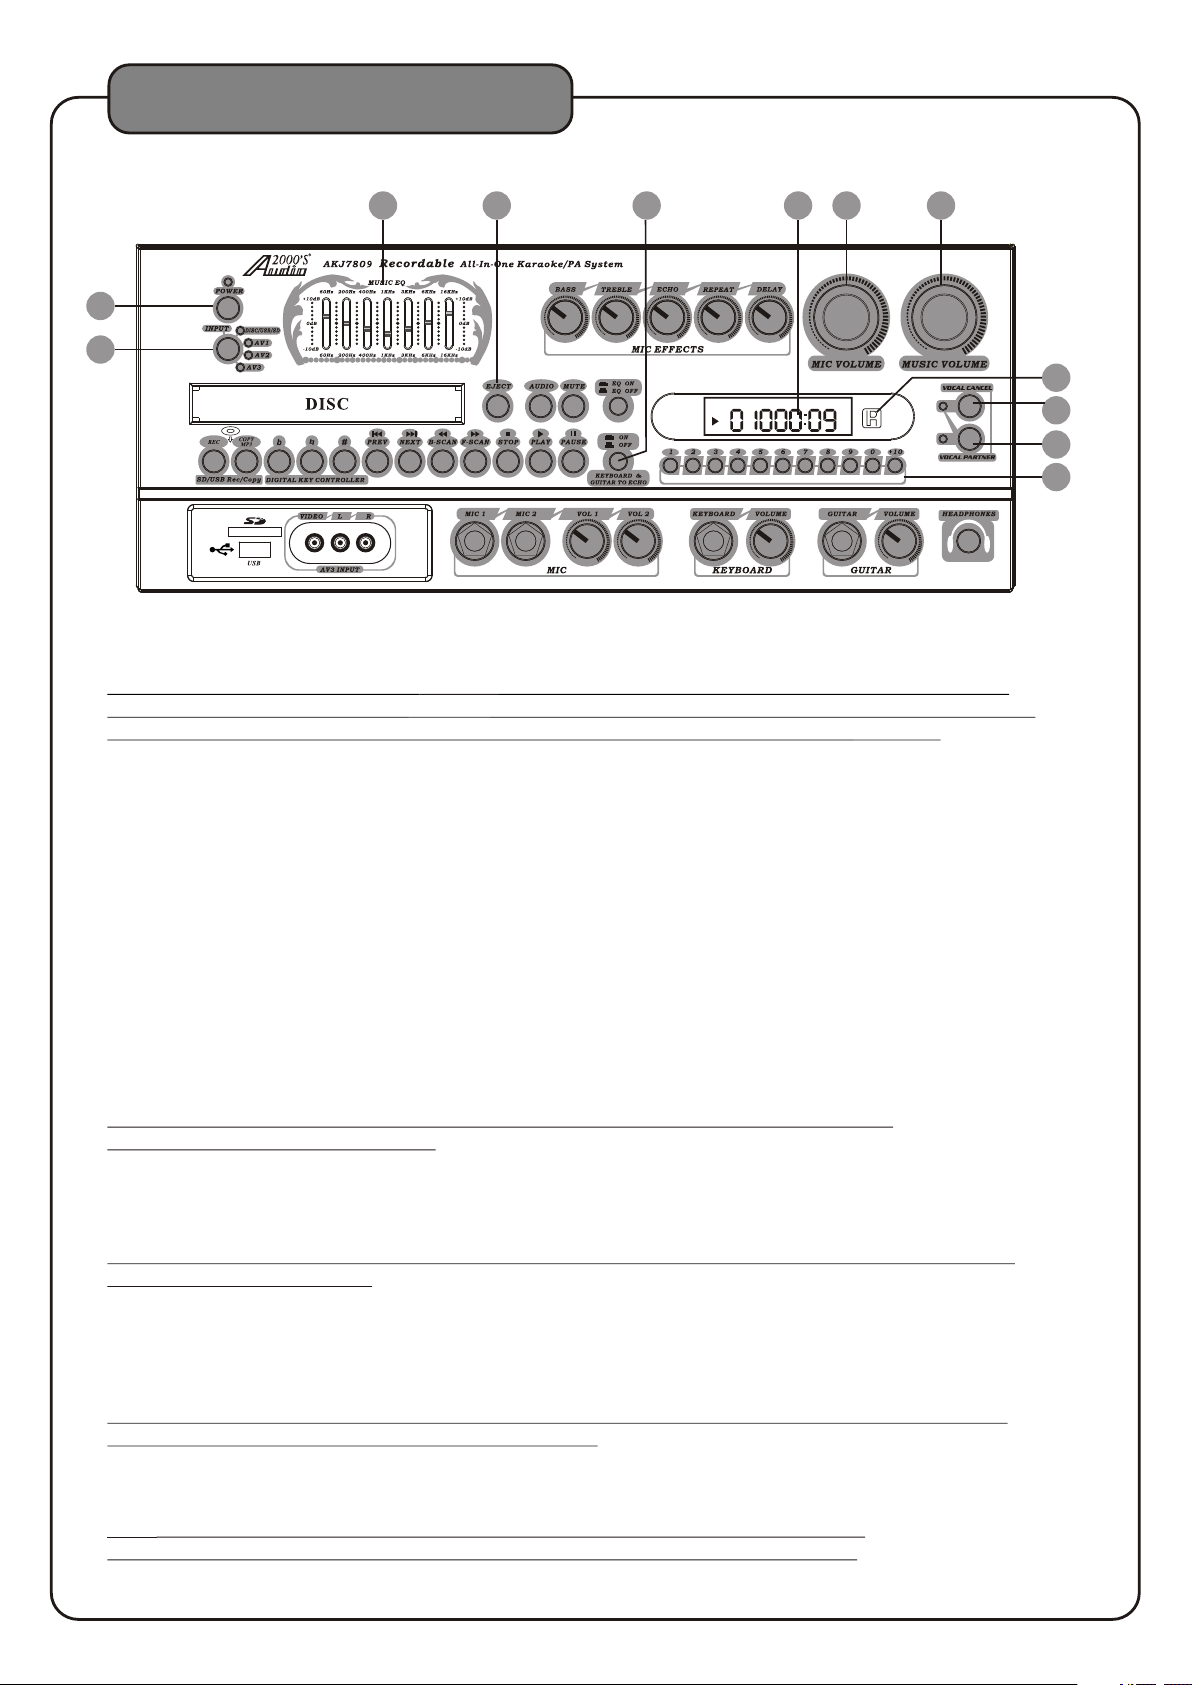
Descriptions and Functions
Front panel
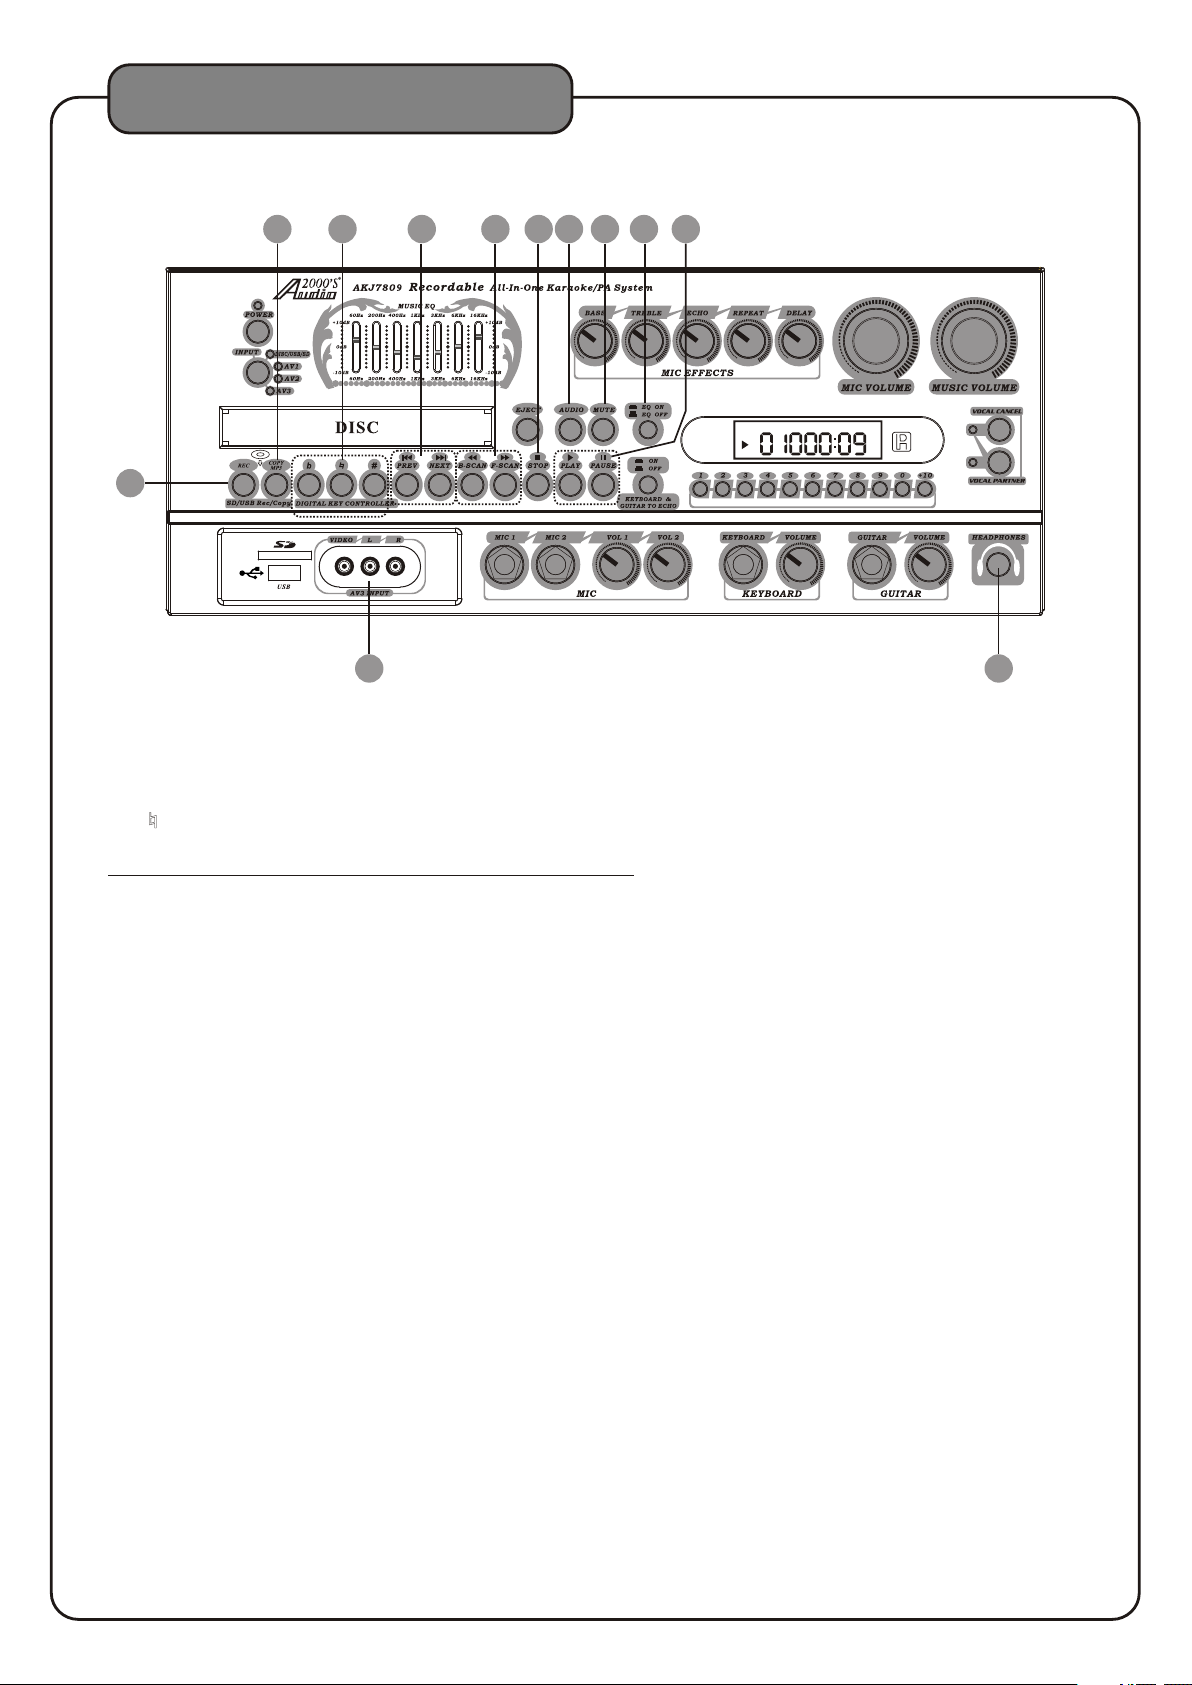
3
4
5
2
1
VCD
1.INPUT - This button t oggl es thr ough all the INPUT channels (Disc/USB/S D, AV 1/ 2/3) for available
INPUT SOURCES.
2.POWER/STANDBY - This button is used to turn the 'ON'/ 'OFF'o r plac e it in STANDBY mode.
Note: When in STANDBY mode, the is not completely powered down and st ill co ntains residual
power. This button will not turn the on if the M AIN PO WER switch on the rear panel is switched off.
To completely turn the power off, use th e MAIN POWER switch on the rear panel of th e
.MUSIC EQ -This GRAP HIC EQ i s used to BOOST and/or CUT particular frequ enci es from SOURCE
3
MUSIC output. Each slide f ader p rocesses a particular frequency range i ndic ated b y the number above it.
Frequencies from 30 Hz - 120Hz constitute the very low to low range . Frequencies from 120Hz to 1KHz
are the mid-range and freq uenc ies from 1KHz to 16KHz make up the high to very hig h rang e. To adju st,
slide the fader up to boost th e freq uency presence or down to cut the frequency.
4.EJECT button - This butto n is use d to OPEN/CLOSE the DISC tray.
5.
KEYBOARD & GUI TAR TO E CHO ON/OFF button-This button i s used to turn on or t urn off the conn ection
between th e Keyboa rd / guitar inpu ts and the digital ECHO circuitry. Depress t his button to ac tivate the
digital EC HO. Rel ease this butt on to the UP posit ion to disconn ect the digita l ECHO.
6.GRAPH IC DIS PL AY - This pa nel displays all graphical information rega rdin g system operations,
settings and performan ce.
7.MIC VOLUME contr ol - Thi s control increases/decreases the MIC VOLUME level. Turn c lockwise to
increase MIC VOLUME an d counter-clockwise to decreas e the MI C VOLUME.
8.MUSIC VOLU ME con trol - T his control increases/decreases the MUSIC VOLUME level. Turn clockwise
to increase MUSIC VOLU ME and counter- clockwise to decr ease t he MUSIC VOLUME .
9.REMOT E SENS OR - Thi s sens or rec eives infrared signals transmitted by t he REM OTE CONTROL transmitter.
Note: Obstacles locate d betw een the remote control and remote sensor sh ould b e avoided
as they can prevent signal r ecog nition
10.
VOC AL C ANCEL button- This feat ure is u sed to r emove the lead vocal sound track signal on a mu ltip lex
format CDG, VCD, or DVD disc. In order for this f eatu re to work, the disc must be multiplex format ted.
Press this butto n once t o remove the lead vocal singer sound track si gnal . Press this button again and the
lead vocal sound tra ck sig nal wi ll be added back into the music.
Note: This feature does no t work w ith a standard or non-multiplex format di sc. Th is feature is designed to
work with multiplex disc s only.
11.
VOC AL PART NER button-This feature is used to r emov e the lead vocal sound track signal only when t he
microphone signa l is pre sent ( while you are singing to the microphone). W hen the microphone signal is
not present (after you sto p sing ing to the microphone), the lead voca l soun d trac k signal will be added back
to the music. In order f or thi s feature to work, the disc must be multiplex f orma tted . Press this button once to
activate VOCAL PARTNER. Press this button again to d eact ivate VOCAL PARTNER.
Note: Like the VOCA L CANC EL, this feature does not work with a standard o r non- multiplex format disc.
This feature is designed t o work w ith multiplex discs only.
12.
DIRECT T RACK A CCES S butt ons-These buttons are used for DIRECT TRACK selection. Use the +10 button
for all the tracks hig her th an 10. For example, press +10 and 6 to go d irec tly to track 16, and press +10,
+10, and 3 to go directl y to tra ck 23.
Note: When playing AVI/ DivX f iles, to skip to the desired track directly u sing t he number
buttons, refer to the Dire ct tra ck access for AVI/DivX operations sect ion of t his manual;
AKJ7809
AKJ7809
AKJ7809
7
6
L R
AKJ7809.
8
9
10
11
12
20
Page 24
Descriptions and Functions
Front panel
14 15 16
18 19
17 22
20
21
VCD
L R
13
24
13.REC bu tton - Please refe r to pag e 16 for the details.
14.MP3 C OPY button - Pleas e refe r to page 17 for the details.
15.DIGI TAL KE Y CONT ROL buttons - These buttons direct the DIGI TAL KEY CONTROLLER to either raise,
lower or reset the musical k ey of au dio from the disc player.
●# - Raises the musical key a ha lf-st ep each time it is pressed.
● - Resets the musical key to i ts ori ginal key.
●b - Lowers the musical key a ha lf-st ep each time it is pressed.
NOTE:Key cont roll er will not work on playing AV1/AV2 /AV 3.
16.Pre v and Ne xt but tons - S kip tracks when in DISC mode .jumps to the prev ious t rack and skips
ahead to the next trac k.
17.B -Sca n and F-Scan buttons - Scans through a tr ack wh en in DISC mode.B-Sca n scan s backwards
through the current trac k and F-Scan scans forwards throu gh the c urrent track.
18.Stop button - Stops disc p layb ack in standby mode when pressed once and com plet ely stops
disc playback when press ed twi ce.
19.Audio b utto n - Cycle thro ugh ca ption languages on a disc with multiple cap tion l anguages available.
20.Mute b utto n - Mutes the so und fr om Disc/USB/SD,AV1 ,AV2and AV 3 inpu t channels.
21.EQ ON/OFF switch - This sw itch i s used to turn the 7-band Graphic Equalizer O N and OF F. Press the
EQ switch in to activa te the e qual izer. In th e out position, the equalizer is bypassed.
22.PL AY/PAUSE button - Plays a disc that is stopped or paus ed .
23.HEA DPHO NES ja ck- Th is jac k is used to connect HEADPHONES equip ped wi th a 1/4inch plug.
24.AV3 INPUT jacks - These jacks are for con nect ing AUDIO/VIDEO OUTPUT from an externa l AV
SOURCE . Connect RCA-style AV c able s from these jacks to the AV OUTPUT jacks on you r exte rnal AV device.
23
21
Page 25
Descriptions and Functions
Front panel
27 29
28 30 31
VCD
26 25
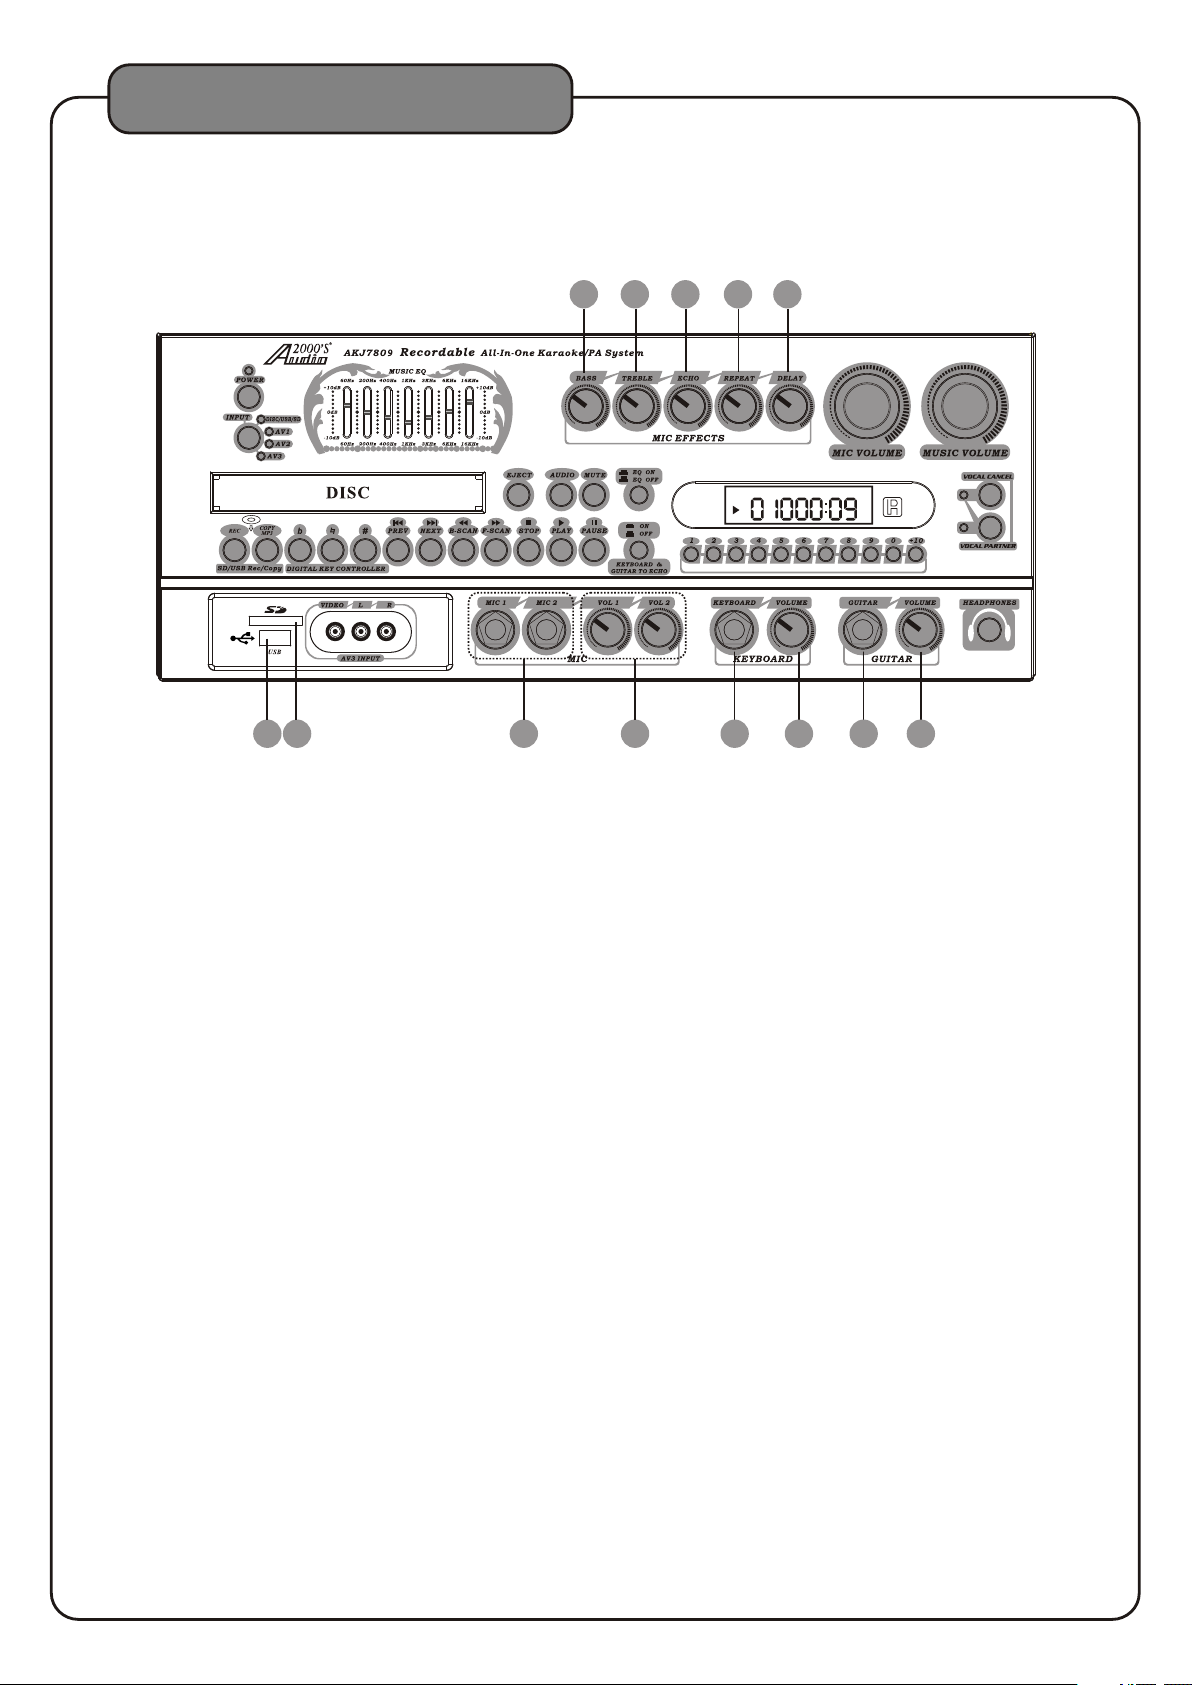
25. SD Memory Car d - Slot T he SD Me mory Card Slot accepts SD memory card forma ts. Me dia stored
on a loaded memory car d can be p layed.
26.USB I nput - Use the USB Inp ut to connect a USB Thumb Drive to the unit. Medi a stor ed on the USB
Thumb Drive can be played.
27. MIC BA SS - This contro l incr eases/decreases the amount of LOW fre quen cy response applied to the
MASTER VOLUME ou tput .
28.MIC TR EBLE - This c ontr ol increases/decreases the amount of HI frequ ency r esponse applied to the
MASTER VOLUME ou tput .
29.MIC ECHO - This control ad just s the level of ECHO applied to the MIC channels . Turn cont rol cl ockwise
to INCREASE and coun ter-clockwise to DECREASE the level of ECHO.
30.MIC RE PEAT - Use thi s control to adjust the REPEAT setting o f the EC HO effect. As REPEAT adjusts
the total number of ec ho int erva ls prior to fade-out, the more REPEAT that i s applied, the more ECHO
intervals will occur pri or to fa de-out. Tur n control clockwise to INCREASE and count er- clockwise to
DECREASE level.
31.MIC DEL AY - Use this contr ol to ad just the DELAY setting of the ECHO e ffec t. As DE LAY adjusts the
total begin-to-end l engt h of each echo interval, the more DELAY th at is ap plied, the longer each ECHO
interval will take to comp lete . Tur n cont rol clockwise to INCREASE and counter- clockwise to
DECREASE level.
32. MIC INPUTS 1 , 2 - Thes e inpu ts are for connecting MICROPHONES with a ¼ in ch (6. 3mm) plug.
33.MIC 1 / 2 VOLUM E - Thes e cont rols adjust the VOLUME levels of MI C chan nels
individually.Tur n controls clockwise to INCREASE and coun ter-clockwise to DECREASE.
34.KEYB OARD I NPUT - T his in put is used to connect a KEYBOARD device via a ¼ i nch in strument cable.
35.KEYB OARD V OLU ME - Thi s control is used to set the VOLUME lev el for a K EYBOARD connected to the
KEYBOARD INPUT JACK.
36.GUITAR INP UT - This input is used to connect a GUITAR v ia a ¼ inc h instrument cable.
37.GUITAR VOLUME - This control is used to set the VOLUME l evel f or a GUITAR connected to the
GUITAR INPUT.
34
L R
373332 35 36
22
Page 26
Descriptions and Functions
Rear panel
2
1
230
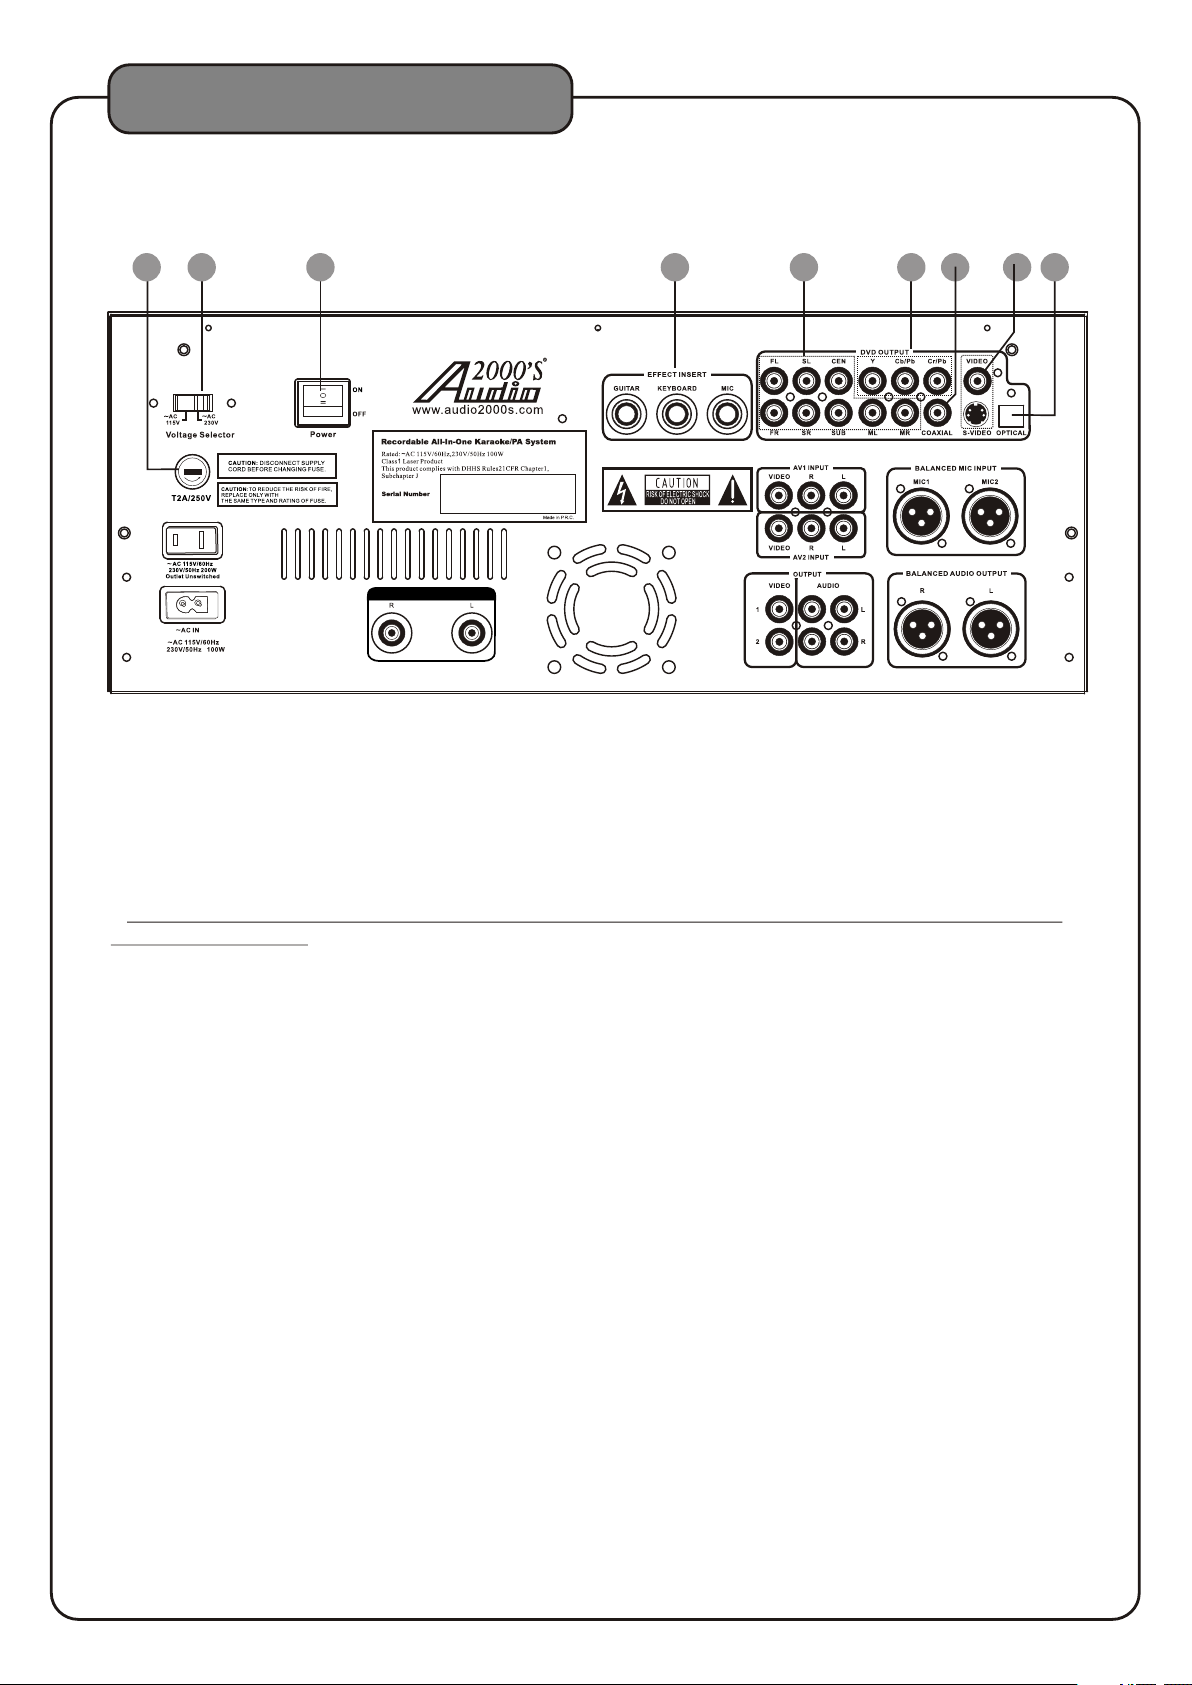
1.FUSE TERMIN AL - Thi s term inal h ouses the AKJ7809 main system FUSE.
2.VOLTAGE SEL ECTOR - This selector toggles between 110 -120V and 220-240V power settings. Plea se
make sure this toggle is set t o the co rrect position, matching the receivin g AC outlet's power supply before
plugging it in and operati ng it. N ot doing so may cause severe damage to th e unit a nd voi d your product warranty.
3.MAIN POWER switch- Thi s swit ch can be set to ON or OFF position as follow s:
●ON - to turn on the AKJ780 9 powe r.
●OFF - to turn off the AKJ7 809 po wer.
Note: The red POWER /STANDBY button on the front panel will not tu rn the A KJ7809 on if the MAIN POWER
switch is switched OFF.
4.EFFECTS INS ERT jacks - Th e effe cts inserts allows you to add external effe cts to t he audio signal without
compromising the origi nal si gnal. Use the MIC IN/OUT when adding effect s to the v ocal signal ,use the
KEYBOARD IN/OUT w hen ad ding effects to the Music and use the GUITAR IN /OUT when adding effects
to the music.
5. 5.1 CHA NNEL AUDI O OUTP UT jacks-These jacks are used for con nect ing to 5.1 channel ready
receivers/amplifie rs. Th e label on each jack specifies which speake r in the s urro und sound system the
output signal from the lab eled j ack is sent to: FL-front left, FR-front right, SL- s urro und le ft, SR-sur roun d
right, CEN-center, SW-subwoofer. The ML jack is the sam e as the F L jack and is used as the main left output
in a stereo system. The MR jac k is the s ame as the FR jack and is used as the main right outp ut in a st ereo system.
6.COMPONENT V IDEO O UTPU T - These jacks output VIDEO to a TV monitor via CO MPON ENT VIDEO cables.
COMPONENT VIDEO output s the di fferent color signals (U/Pb and V/Pr) a nd lum inance signal (Y) separately
for high-fidelity in rep rodu cing colors. The description of the compo nent v ideo output connectors may differ
depending on the TV set or mon itor i .e. Pr/Pb/Y or Cr/Cb/Y or R-Y/B-Y/Y. Com pone nt video cables only transmit
the video signal, separa te cab les are needed for audio signals. Please re fer to t he operating instructions of the
TV set or monitor for de tail s.
7.COAXIA L OUTP UT - Thi s digi tal output is for connecting devices with a C OAX IAL cable.
8.VIDEO (RCA) and S -VIDE O OUT ja cks - These jacks output video to a display device (T V, TFT, etc.). The
VIDEO jack outputs video u sing a n RCA video cable. The S -VIDEO jack uses an S-VIDEO cable. S-VI DEO
provides better color se para tion and better resolution by separatin g the co lor and picture signals of a
composite-video signa l.
9.OPTIC AL O UTPU T - This d igital out is for connecting devices with a n OPTI CAL cable. Please make sure to
remove the protective co ver fr om this jack prior to connecting an OPTICAL c able . When not using this input,
keep the protective cove r on to pr otect it from dust and foreign material.
3
PRE -OUT
4
5
7 86
9
23
Page 27
Descriptions and Functions
Rear panel
230
PRE -OUT
10
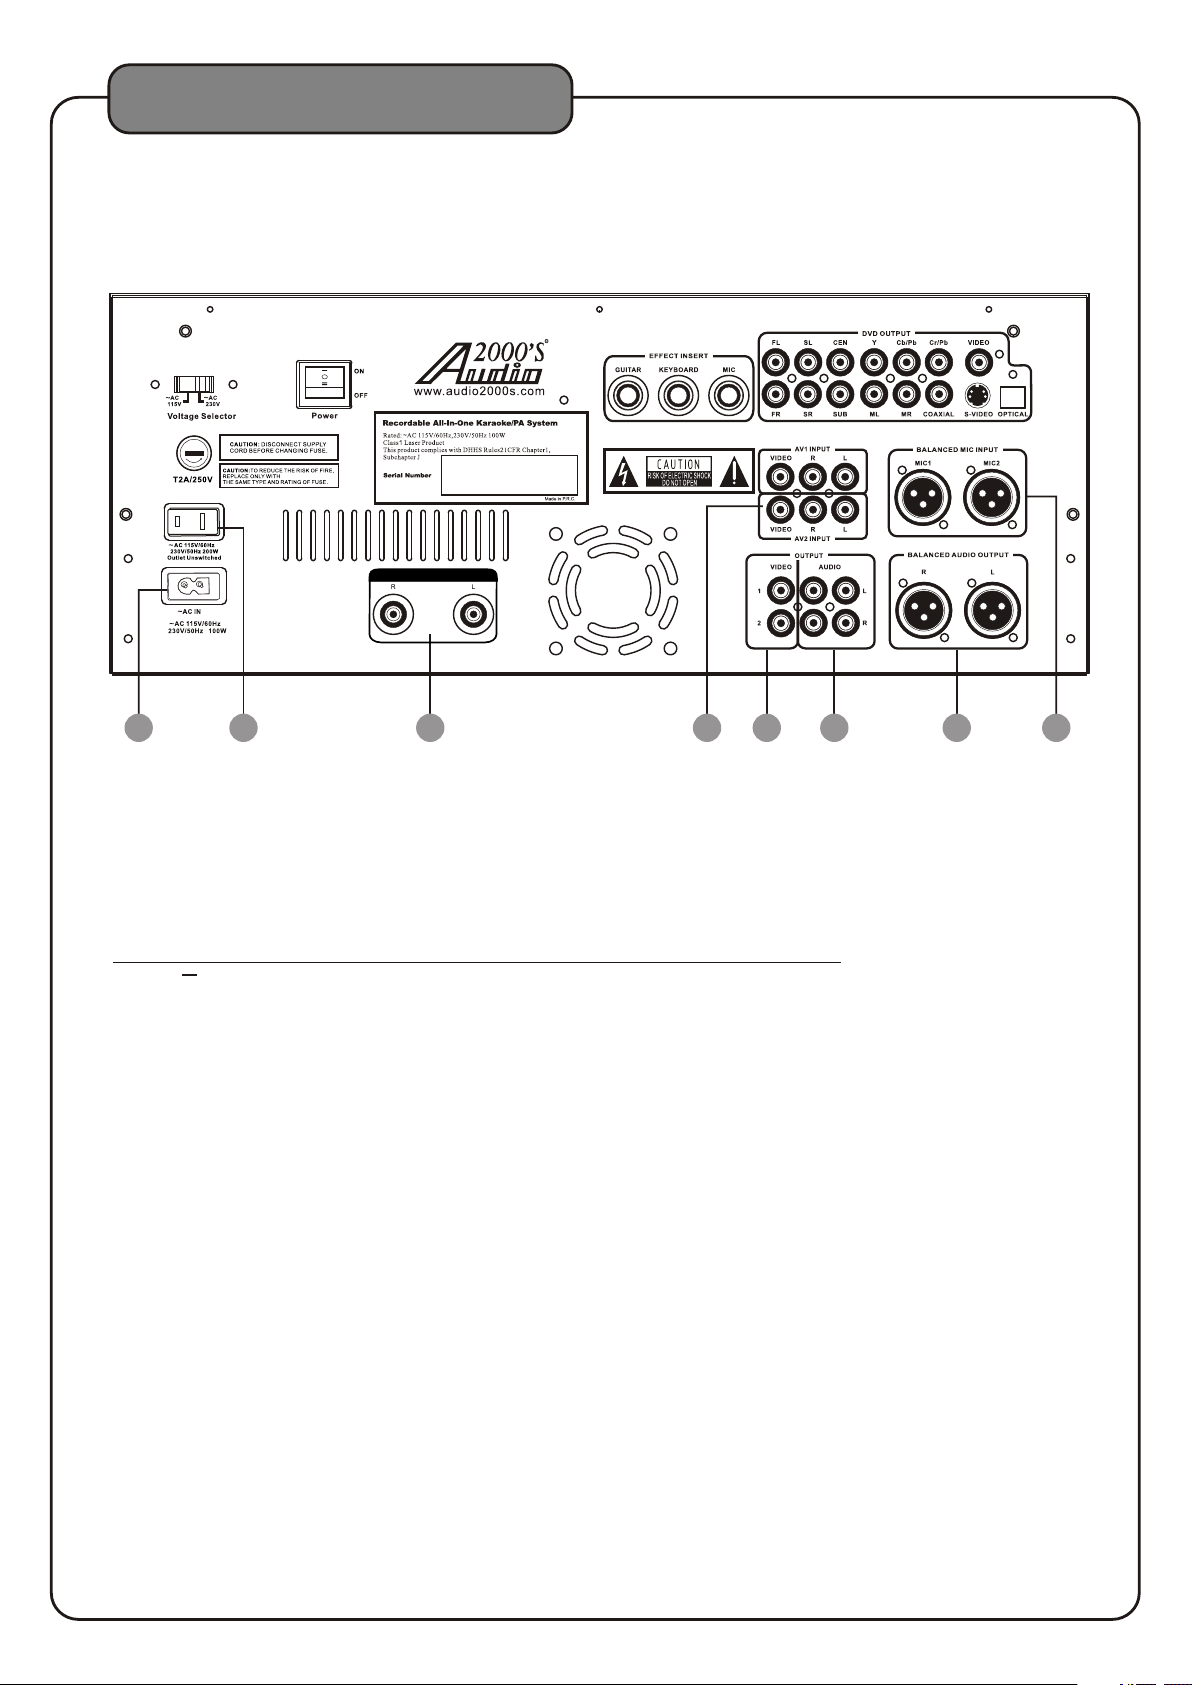
10.AC~I N TERM INAL - C onne ct AC MAIN POWER CORD from the wall outlet to th is ter minal.
AC POWER outlet - This outle t prov ides AC POWER to an external device.
11.
Note: Do not connect any dev ice wi th a power consumption level higher than 20 0W.
PRE OUT jacks-Connect one en d of ¼-i nch cables to the left and right PRE- OUT jacks on th e AKJ7 80 .
12. 9
Connect one end of the ¼-inc h cabl es to the left and right AUDIO/LINE/ AUX I NPUT jacks on the
external device.
13.AV 1 / 2 INPUT jacks - These jacks are for conn ecti ng AUDIO/VIDEO OUTPUT from external AV
SOURCES. Connec t RCA-styl e AV ca bles (R, W, Y) fro m thes e jacks to the AV OUTPUT jacks
on your external AV d evic es.
14.VIDE O OUT 1- 2 JACK S (RCA) - Th ese jacks are for connecting the 9's VIDEO OUT PUT to T V
or DISPLAY devi ces. C onnect RCA-type patch cables from these jacks to the V IDEO I NPUT jacks
on the connecting TV o r disp lay de vices.
15.AUD IO OUT 1 -2 JAC KS (RCA) - These jacks are for connecting the 9 AUD IO OUT PUT to an amplifier,
recording or mixing devi ces. C onnect paired RCA-type patch cables from the se jac ks to th e appropriate
INPUT jacks on external au dio de vices.
16.BAL ANCE D AUDIO OUTPUT jacks - These XLR j acks a re for c onnecting MASTER output to an
external device with bal ance d cables.
17.BAL ANCE D MIC 1-2 INPUT (XLR) - These jacks are for c onne cting microphones via BALANCED
XLR-type microphone cables.
11
12
13
14
AKJ780
AKJ780
15 16
17
24
Page 28
Descriptions and Functions
Remote control
1
3
6
7
9
11
13
16
18
19
AC C 78 09 -0 1
2
4
5
10
8
12
15
14
17
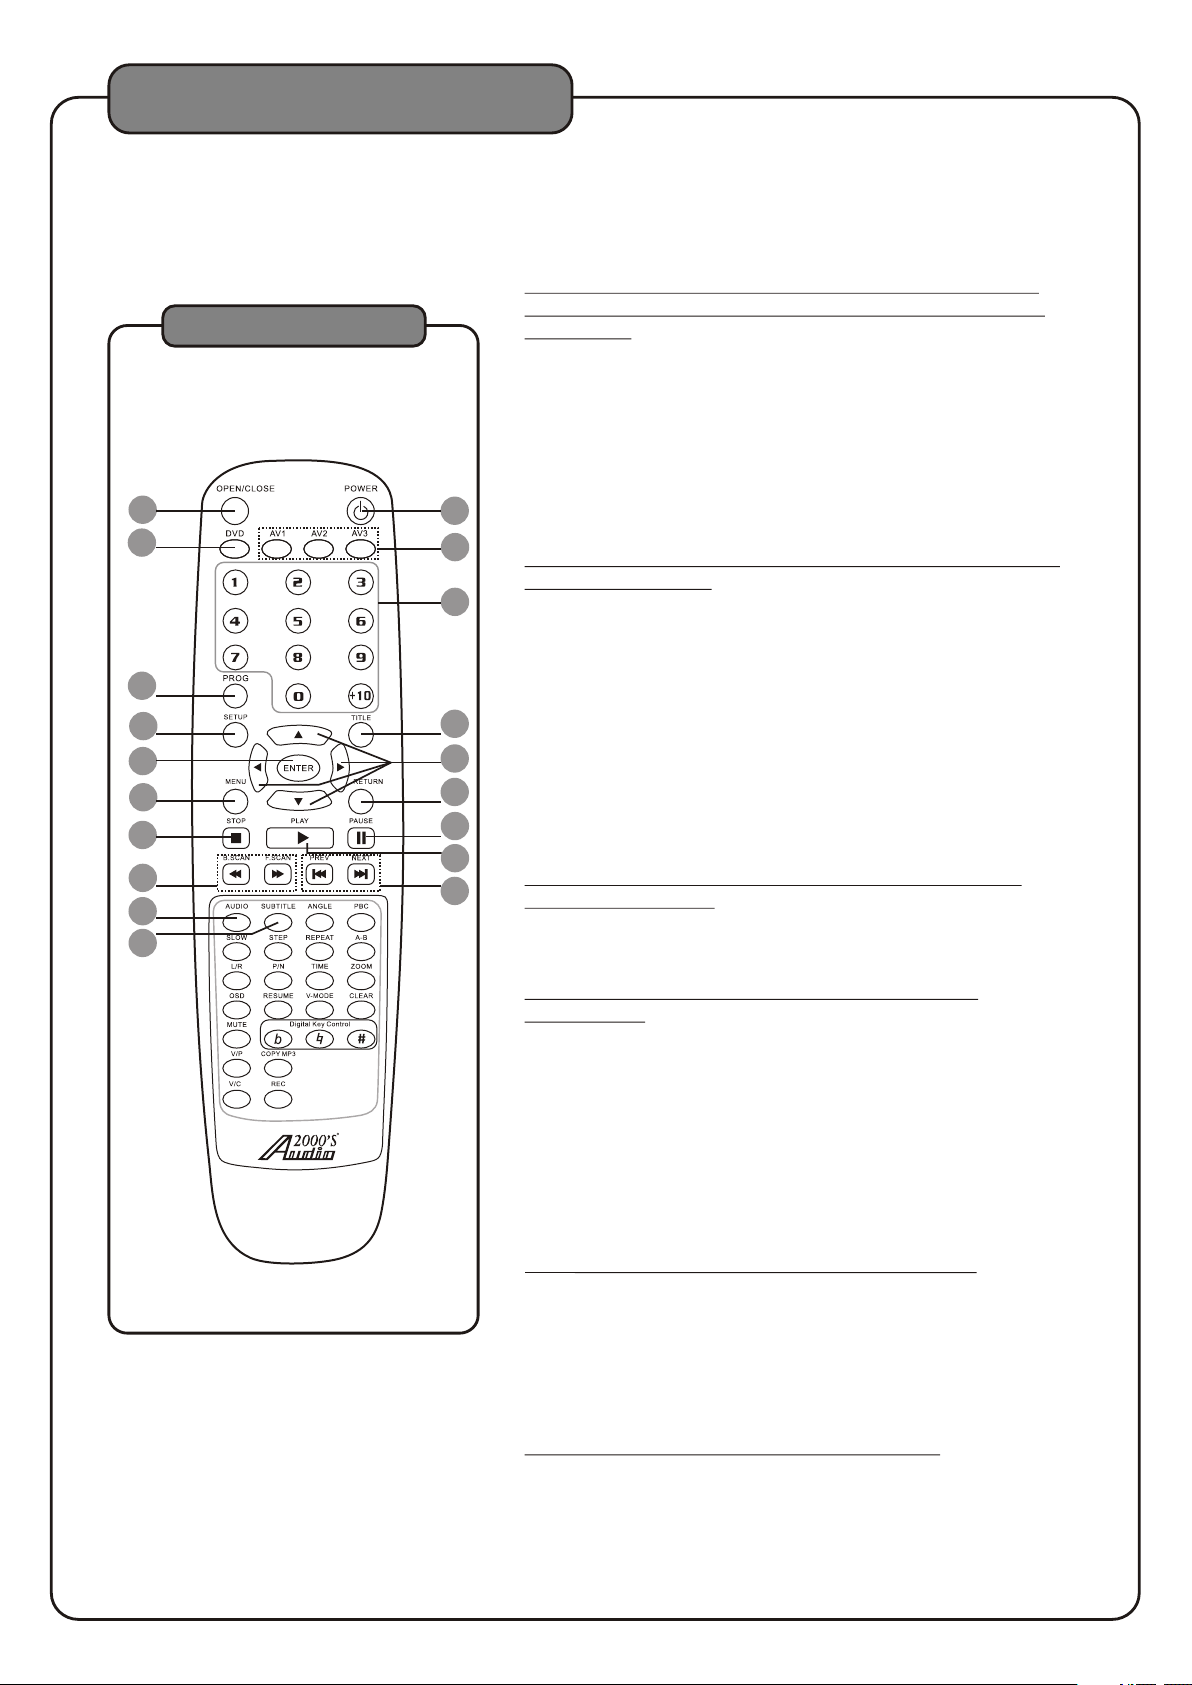
1.OPEN/CLO SE button - Th is but ton is used to OPEN/CLOSE
the DISC tray.
2.Po wer button - Turns the AKJ780 9 on or to Standby
mode. To turn the AKJ7809 comp lete ly off, use the power button
on the front panel.
Note: The main power must be o n in ord er to use this power
button. Turn on the main power with the p ower b utton on the
front panel.
3.DVD button- This button s elec ts the DVD/USB/SD player
as the input to be used.
4.AV1/AV2/AV3 button - This b utto n selects the AV1/AV2/AV3 as
the input to be used.
5.Number/Prese t butt ons - Use these buttons to jump
directly to a track in Disc mo de. Se e the Disc and Tune r
Operations sections of t his ma nual for detailed instructions
on using the Number/Pr eset b uttons.
6.PROG button - Please refe r to pag e 14 for the details.
NOTE: The AKJ780 9 must b e in DISC mode in order to access
the PROGRAM menu.
7.SETU P button - Use t his bu tton t o access the AKJ7809’s setup
page on the video screen. You can navigate between the
General Setup Page, A udio S etup Page, Video Setup Page ,
preference page and the Password Setup page using the
DIRECTIONAL buttons (< ^ > v ) on your remote. Select
options and make changes u sing t he ENTER button on the remote.
8.DIREC TION AL buttons - ( < ^ > v) - These buttons allow you
to navigate through the DVD men u screens, Setup Pages, and
Mp3 menus.
9.ENTER button- Th is but ton is u sed to make selections in
DVD menus and the OSD when an e ntry i s highlighted.
10.Titl e button - Acc esse s the title screen on a DVD.
Note: For use on DV Ds wit h title screens. Some DVDs may
not have a title screen.
11.Menu button - Acce sses t he mai n menu on a DVD and other
discs with main menus.
12.Ret urn button - A cces ses the main menu on a VCD 2.0 disc.
Note: PBC must be turned on an d the VC D must be a
VCD 2.0 disc.
13. Stop button - Stop s disc p layb ack in standby mode when
pressed once and complet ely st ops disc playback
when pressed twice.
14. Play button - Play s a disc t hat is stopped or paused. See
the Operations section i n this m anual for detailed
instructions on auto-sca nnin g.
15.Pause b utton - Pause a disc that is playing.
16.B-Sc an and F-Scan buttons - Scans through a t rack w hen
in DISC mode: B-Scan scans backwards through the curr ent
track and F- Scan scans forwards through the current track
Note:It will not work whil e play ing CDG format disc.
17.Pr ev and N ext bu tton s - Skip tracks when in DISC mode:
prev jumps to the previous t rack a nd Next skips ahead to
the next track.
18.Audio button - Cycl e thro ugh ca ption languages on a disc
with multiple caption la ngua ges available.
19.Subt itle butto n - Cycl es through the available subtitle
languages on a DVD with sub titl es available.
Note: Not all DVDs wi ll hav e subt itles available.
25
Page 29
Descriptions and Functions
Remote control
22
23
24
27
28
31
32
35
37
39
38
40
AC C 78 09 -0 1
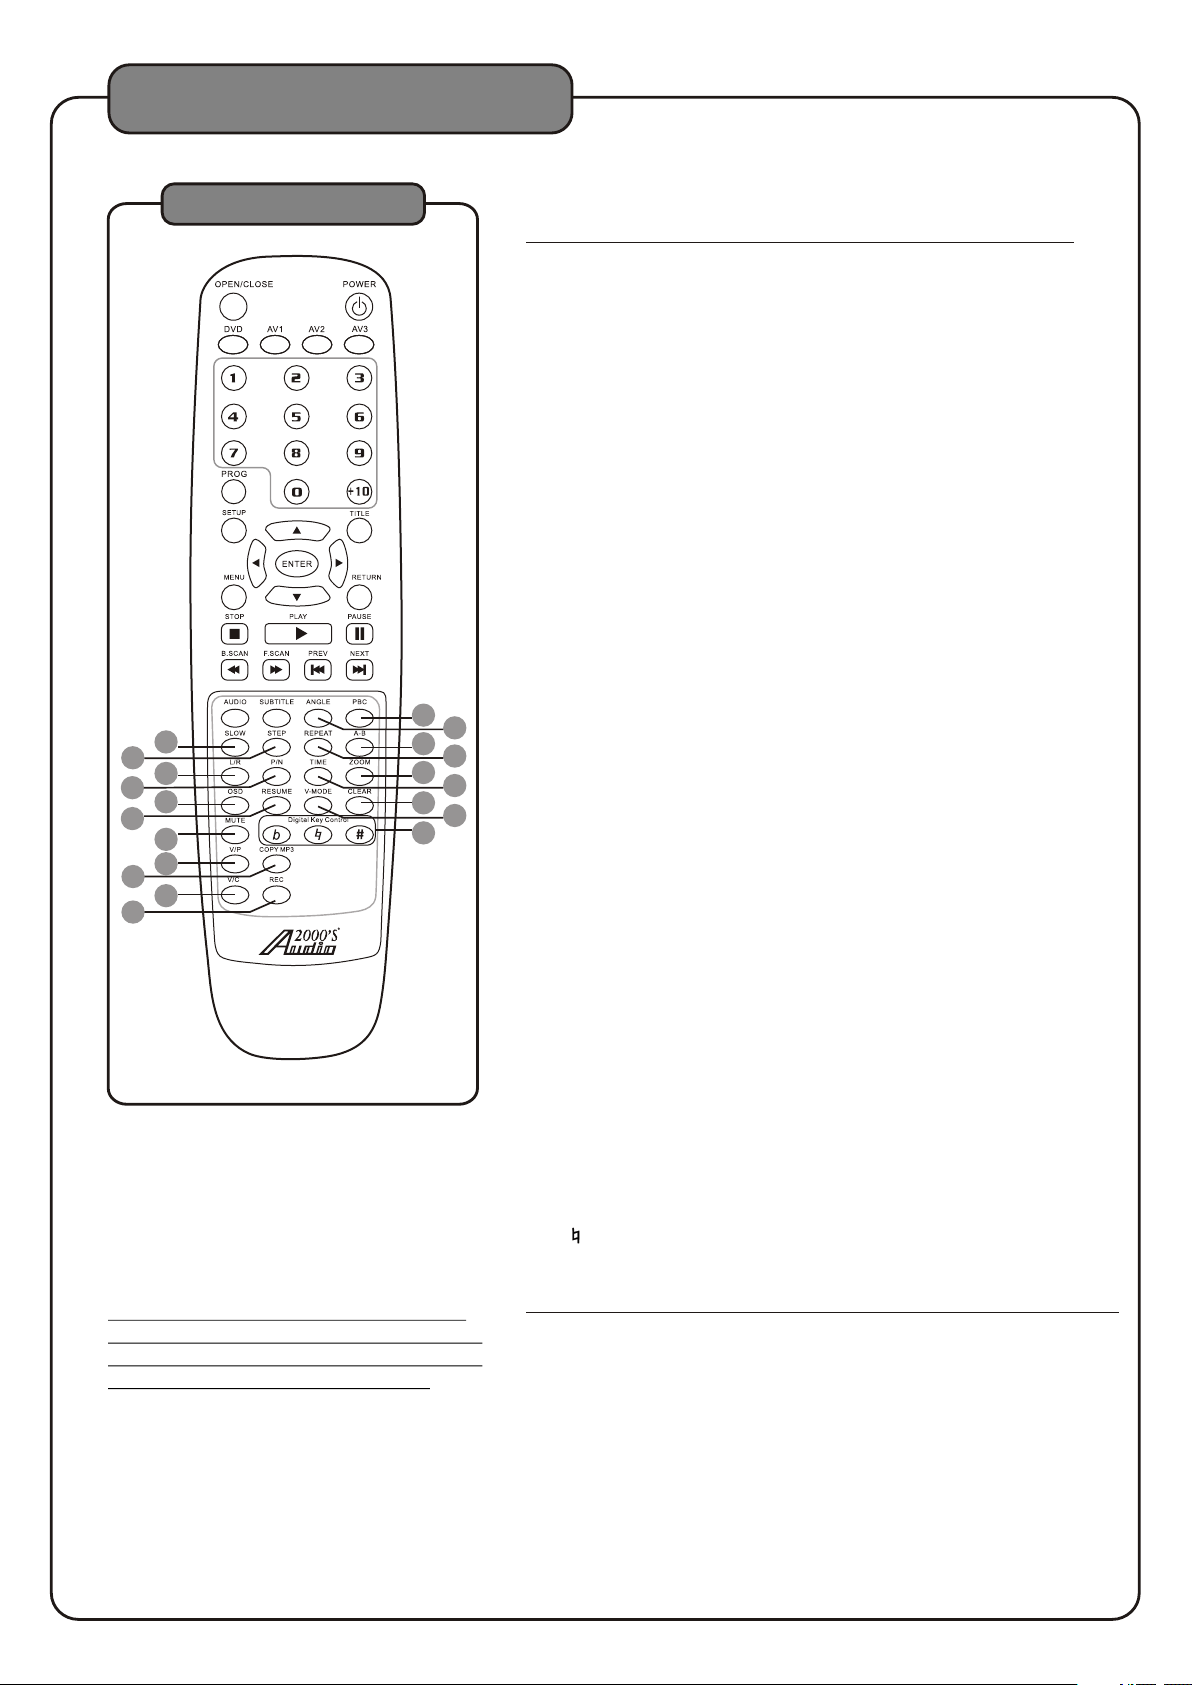
38.V/C (Voca l Canc el) bu tton - In order
for this feature to wo rk pro perl y, the
disc must be multiplex for matt ed.
Press the VOCAL C ANCE L button once
to remove the lead voc al lay er. Pre ss a
second time, and the l ead vo cal layer
will be reestablished.
Note: If you try to utilize th is fea ture while
a standard or non-multip lex di sc is playing,
it will not work as this featu re is de signed to
work with multiplex form at dis cs only.
39.COPY MP3 button - Pl ease r efer t o
page 17 for the detail s.
40.REC button - Please refe r to pag e 16
for the details.
26
30
34
36
21
25
29
33
21.Angl e button - Cyc les th rough the available viewing
angles on DVDs with multi ple vi ewing angles available.
Note: Not all DVDs wi ll hav e mult iple viewing angles available.
22.PBC button - Turns on Playback Con trol ( PBC). For use
with VCD 2.0 discs, PBC allo ws you t o navigate more
conveniently through V CD 2.0 d iscs.
23.Slow button - Cycl es thr ough t he different slow motion
options while in DISC mode . See th e Operations section in
this manual for detailed i nstr uctions on using slow motion.
24.Step button - Allo ws you t o view a disc step-by-step, one
frame at a time. See the Opera tion s section in this manual
for detailed instructi ons on u sing the Step feature.
25.Rep eat button - C ycle s through the available repeat options.
Repeat options vary fro m type o f disc so see the Operations
section of this manual for d etai led instructions on using the
repeat function for ever y kind o f disc.
26.A-B (loop) button - Allows yo u to set a s ection on a disc
for continuous looping. See t he Operations section in this
manual for detailed inst ruct ions on using the A-B loop feature.
27.L/R button - Cycles thro ugh th e different multiplex CDG
output modes for canceli ng the v ocals: MONO -LEFT,MONO-
RIGHT, MIX-MONO and STEREO. See the Operations se ctio n
in this manual for detaile d inst ructions on canceling vocals on
multiplex CDG discs.
28. P/N button - Switches be twee n PAL and NTSC video modes.
29.Time button - Acce sses t he Time menu whic h allo ws you
to jump directly to a specif ic tim e on a disc. See the Operations
section in this manual for d etai led instructions on jumping to a
specific time on a disc.
30.Zoom button - Allo ws you t o zoom in 2X, 3X and 4X and
zoom out 1/2X, 1/3X and 1/4X on t he vid eo during disc playback.
31.OSD button - Cycles thro ugh th e different On Screen Display
options. See the Operati ons se ction in this manual for detailed
instructions on select ing OS D options.
32.Res ume button - Resu mes playback from exact spot where
a disc has been stopped in sta ndby m ode.
33.V-MODE - This button toggles betw een th e different variants of
component video, Y UV (US ), and S- Video.
34.Clea r button - Cle ars an y numbers typed into a menu before
a selection has been made.
35.Mute button - Mutes the so und fr om disc, ipod and AV input
channels.
36.DIG ITAL K EY CON TROL - These buttons direct the DIGITAL
KEY CONTROLLER
# - Raises the musical key a quarte r-step each time this button
is pressed.
- Resets the musical k ey to it 's original key.
b - Lowers the musical key a qu arte r-step each time this button
is pressed.
Note:This feature is not a ppli cable to the AUX inputs, AV1/AV2 /Av3 .
37.V/P (Voca l Partner) button - To activate VOCAL PARTNER,
press button once. To remove VOCA L PARTNER, press a second
time.NOTE: If yo u try to u tilize this feature while a standard or
non-multiplex disc is pl ayin g, it will not work as this feature is
designed to work on mu ltip lex fo rmat discs only.
26
Page 30
Descriptions and Functions
Remote control
Using th e remo te con trol
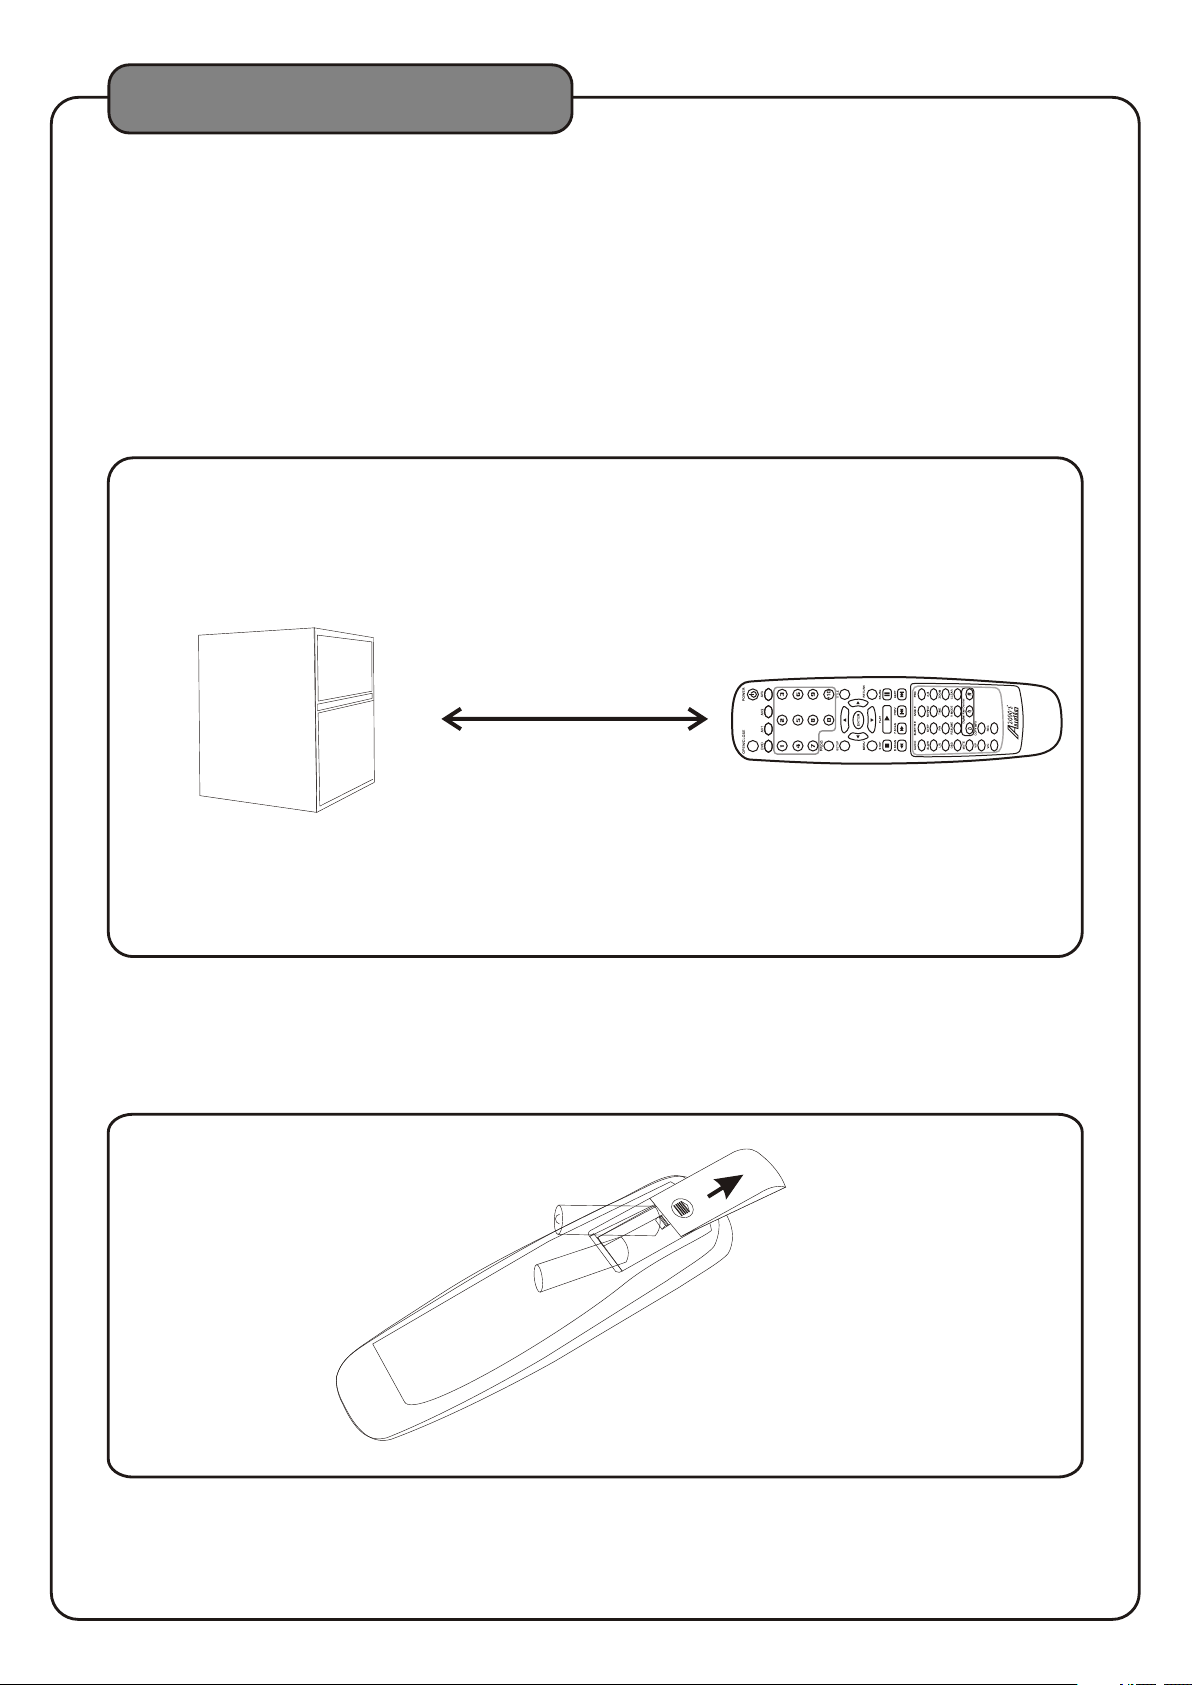
When operating the remot e cont rol, point the top of the remote contro l towa rd
the 's remo te sensor on the front panel and ensure that th ere is a c lear line of sight between the
AKJ7809
remote control and void of obst acle s in order to prevent signal deflection.
When to re plac e the ba tter ies
The maximum operationa l dist ance between the remote control and the sen sor is a pproximately 25 feet.
If the remote only operate s at sho rter distances, it is time to replace the bat teri es.
AKJ7809
Approximately 25 feet
Instal ling t he bat teries
To install the batteries, first re move t he bat tery compartment lid from the back of the rem ote co ntrol.
Insert two AAA batteries , ensu ring that the polarities are aligned corr ectl y.
ACC 780 9-01
27
Page 31
DVD System Setup Menu
SYSTEM SETUP MENU
To access the System Setup Menu, press the S ETUP b utton
on the remote control. The m enu wi ll appear on the TV
screen.Use the arrow but tons o n the remote control to
navigate through the men u and us e the ENTER button to
make selections.
1. TV SYST EM
Set the video output to your T V's sy stem format:
● NTSC North America
● PAL Europe, Asi a
● PAL60 This form at ena bles a PAL TV/Monitor to play the NT SC vid eo.
● AUTO Automat ical ly detects the TV's format.
2. SCREEN SAVER
The DVD screen saver can be t oggled ON or toggled OFF to suit your prefere nce fo r display during extended
periods of player inacti vity w hen power remains on. Use the Directional b utto ns (< > ^ ^) to make your selection.
3. VIDEO
Refer to your TV manual to de term ine which type of video it supports. You ca n choose between
INTERLACE -YUV, P-SCA N YPBP R or S-VIDE O.
4. TV TYPE
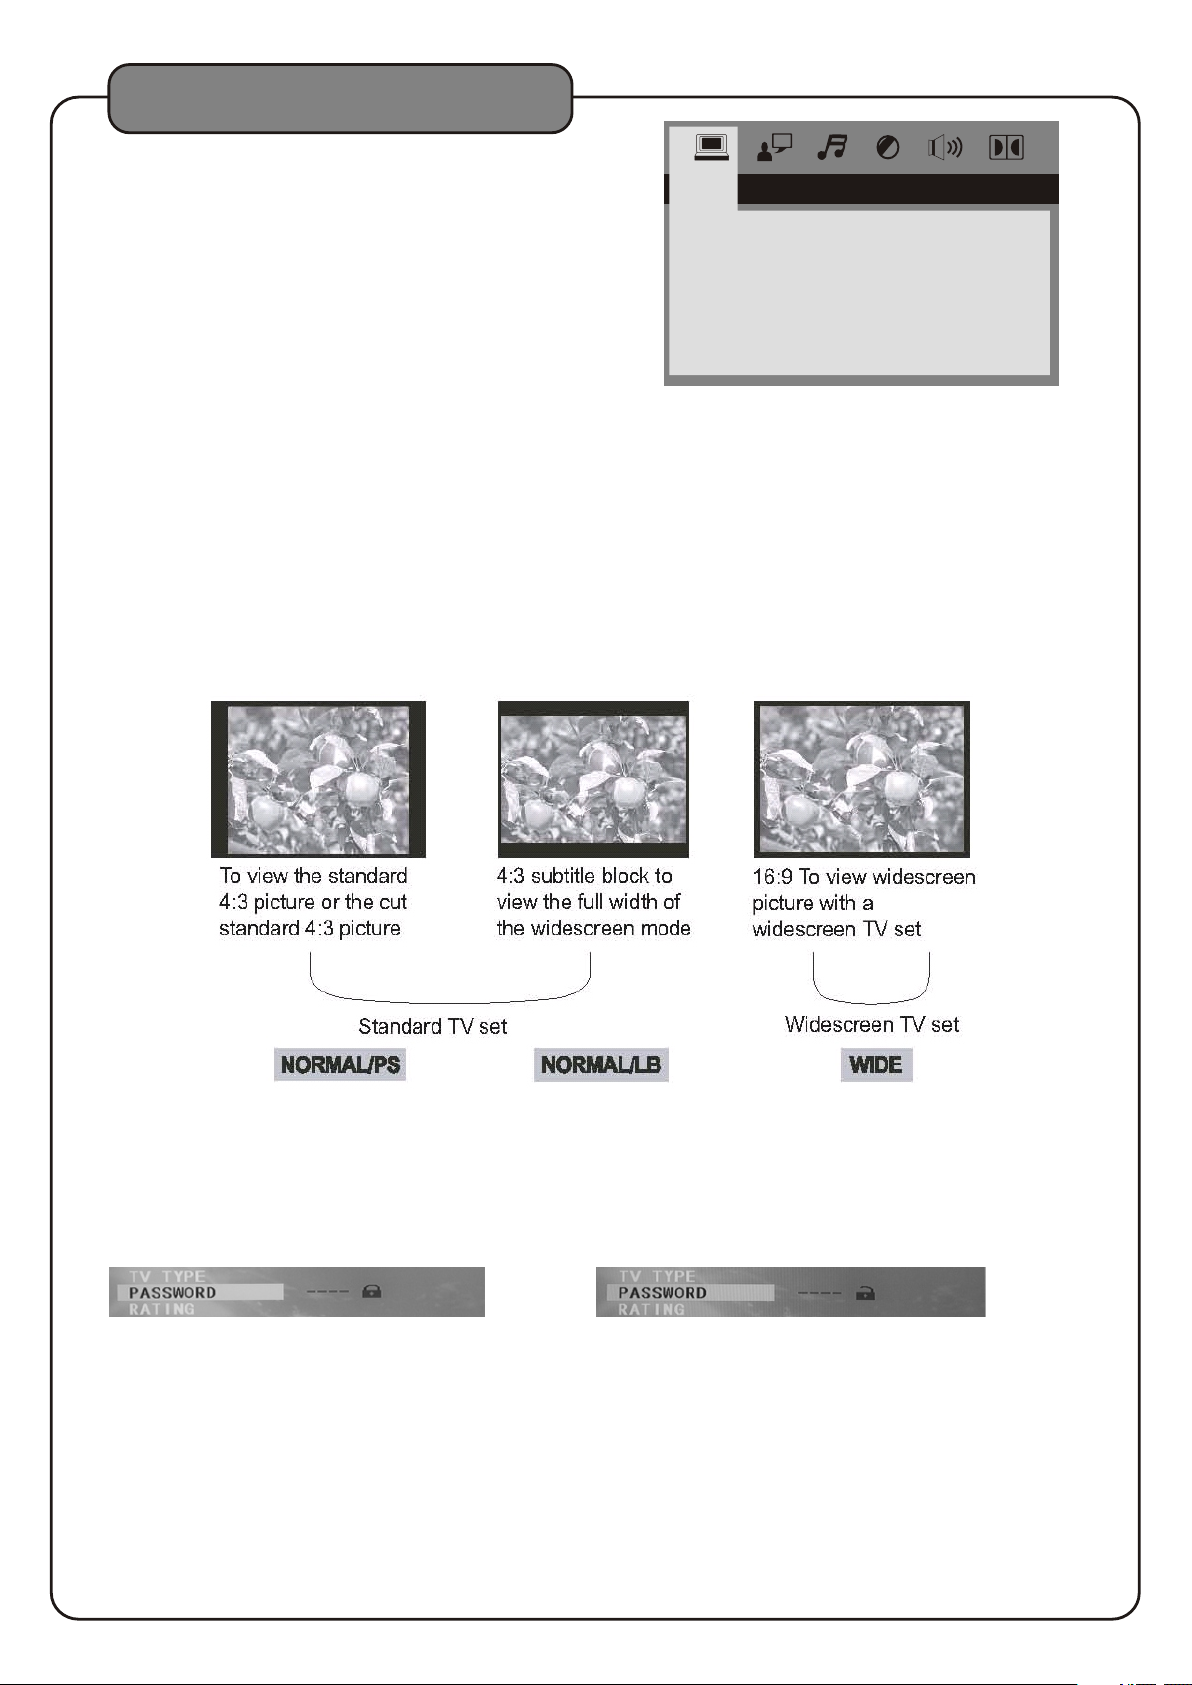
This menu actually refers to TV di spla y mode. Choose between 4:3PS for Panor amic Screen, 4:3LB for
Letterbox, or 16: 9 base d on your viewing preference.
SYST EM SE TUP
TV SYS TE M
SCRE EN S AVER
VIDE O
TV TYP E
PASS WORD
RATI NG
NEXT PAGE
5. PA S SWOR D
When the PASSWO RD men u is sel ected, the displayed lock icon is closed (l ocke d) as shown in Fig (1). The preset
password to lock or un lock R ATING settings is 0000. If you are a paren t and wa nt to limit the types of DVD's to be
viewed with the AKJ7 809, t ype this password using the NUMBER keys on th e remo te, and then press ENTER to
unlock the RATI NG set ting. Once you unlock the RATIN G sett ing, the lock icon will be opened (unlocke d) as
shown in Fig (2).
Fig(1) Fig(2)
With the RATIN G sett ing unlocked, enter the RATING menu an d sele ct the desired parental safety setting, then
come back to the PA SSWO RD men u to enter a desired 4- digit password to l ock th e selected parental safety setting.
A locked icon as in Fi g (1) wi ll display to indicate the locking status .
6. RATIN G
Set the parental safety se ttin gs. There are eight (8) parental safety set ting s as dis played on the TV / monitor.
28
Page 32
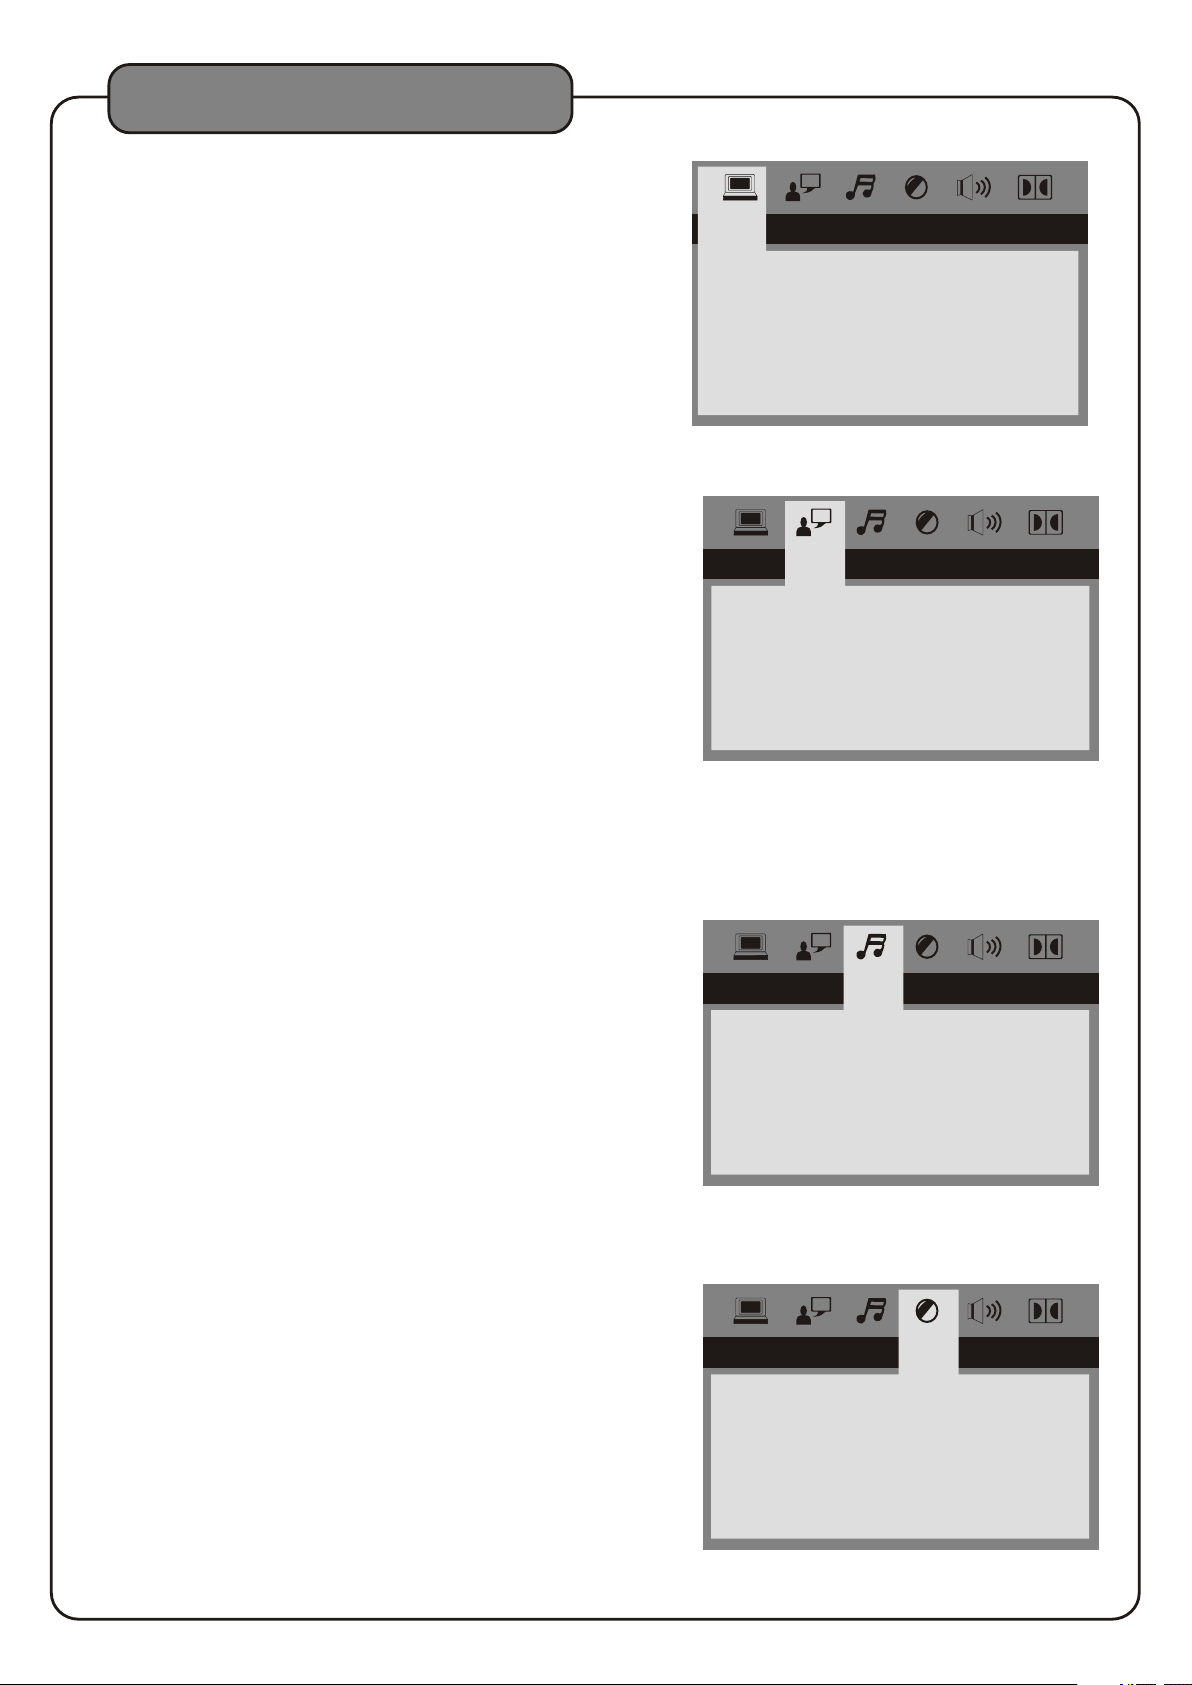
DVD System Setup Menu
7. NEXT PAGE
7.1 DEFAULT
Select this mode if you choo se to re turn a ll system
preferences to the D EFAULT settings.
7.2. RES UME
ON:R ESUM E the last spot played on a disc and
returns to it when the A KJ78 09 is turned back on
from the Standby mod e.
OFF:RESUME is off.
7.3. PRE V PAGE
L ANGUAGE SETUP
This menu is used to set up the la ngua ge preferences for the
functions described as f ollo ws. Use the Directional buttons
(< > ^ ^) on the remote cont rol to n avigate through the
menu and use the ENTER butto n to mak e selections.
1. OSD (On Scree n Disp lay) L anguage
The available OSD langua ges in clude English, Spanish,
French, Germa n, Portuguese, and Chinese.
2. AUDI O L ANGUAGE
This feature is dependen t upon t he options included with each
individual disc. Choos e from t he list provided by the disc.
3. SUBTI TLE L ANGUAGE
This feature is dependen t upon t he options included with each
individual disc. Choos e from t he list provided by the disc.
4. MENU L ANGUAGE
This feature is dependen t upon t he options included with each
individual disc. Choos e from t he list provided by the disc.
SYST EM SE TUP
DEFAU LT
RESU ME
PREV PAGE
OSD LA NG UA GE
AUDI O LA NG
SUBT IT LE L AN G
MENU L AN G
RESTORE
LANG UAG E SET UP
ENGL IS H
CHIN ES E
GERM AN
SPAN ISH
FREN CH
PORT UG UE SE
AUDIO SETUP
1. AUDI O OUT
The AKJ7809 allows u ser to u se the standard analog audio
outputs and the digital ou tput s imultaneously by using the RCA
L/R outputs and the coaxia l outp ut. When the AKJ7809 is
connected to an exte rnal s ound s ystem with digital inputs,
select settings as follo ws:
(a) SPDIF/OFF This setti ng com pletely disables the digital
audio output.
(b) SPDIF/RAW Thi s sett ing se lects the Dolby 5.1 digital
audio output. (opt ical - coaxial)
(c) SPDIF/PCM This setti ng sel ects the stereo digital audio
output (2 channels )
2. KEY CONTROL
This feature functions e xact ly the same as the KEY CONTROL
buttons on the remote cont rol, b ut with a virtual vertical fader
instead of a left-right displ ay. Use the Directional butt ons
(< > ^ ^) on the remote cont rol to t he fader bar and raise
(# or sharp) or lower (b o r flat ) the output of the disc in
quarter- step in crem ents.
VIDEO SETUP
Use the Directional butt ons (< > ^ ^ ) to raise or lower the
vertical fader bars to set u p the fo llowing video preference
settings.
1. BRIGH TNES S - Adju st the b rightness of the display.
2. CONTR A ST - Adjust the c ontr ast of t he display.
3. HUE - Adjust the hue of t he dis play.
4. SATUR ATION - Adjust the saturation of the displa y.
AUDI O OU T
KEY
VIDE O SET UP
BR I GHT NE SS
CONT RA ST
HUE
SATU RATIO N
AUDI O SET UP
SPDI F/ OF F
SPDI F/ RAW
SPDI F/ PC M
29
Page 33
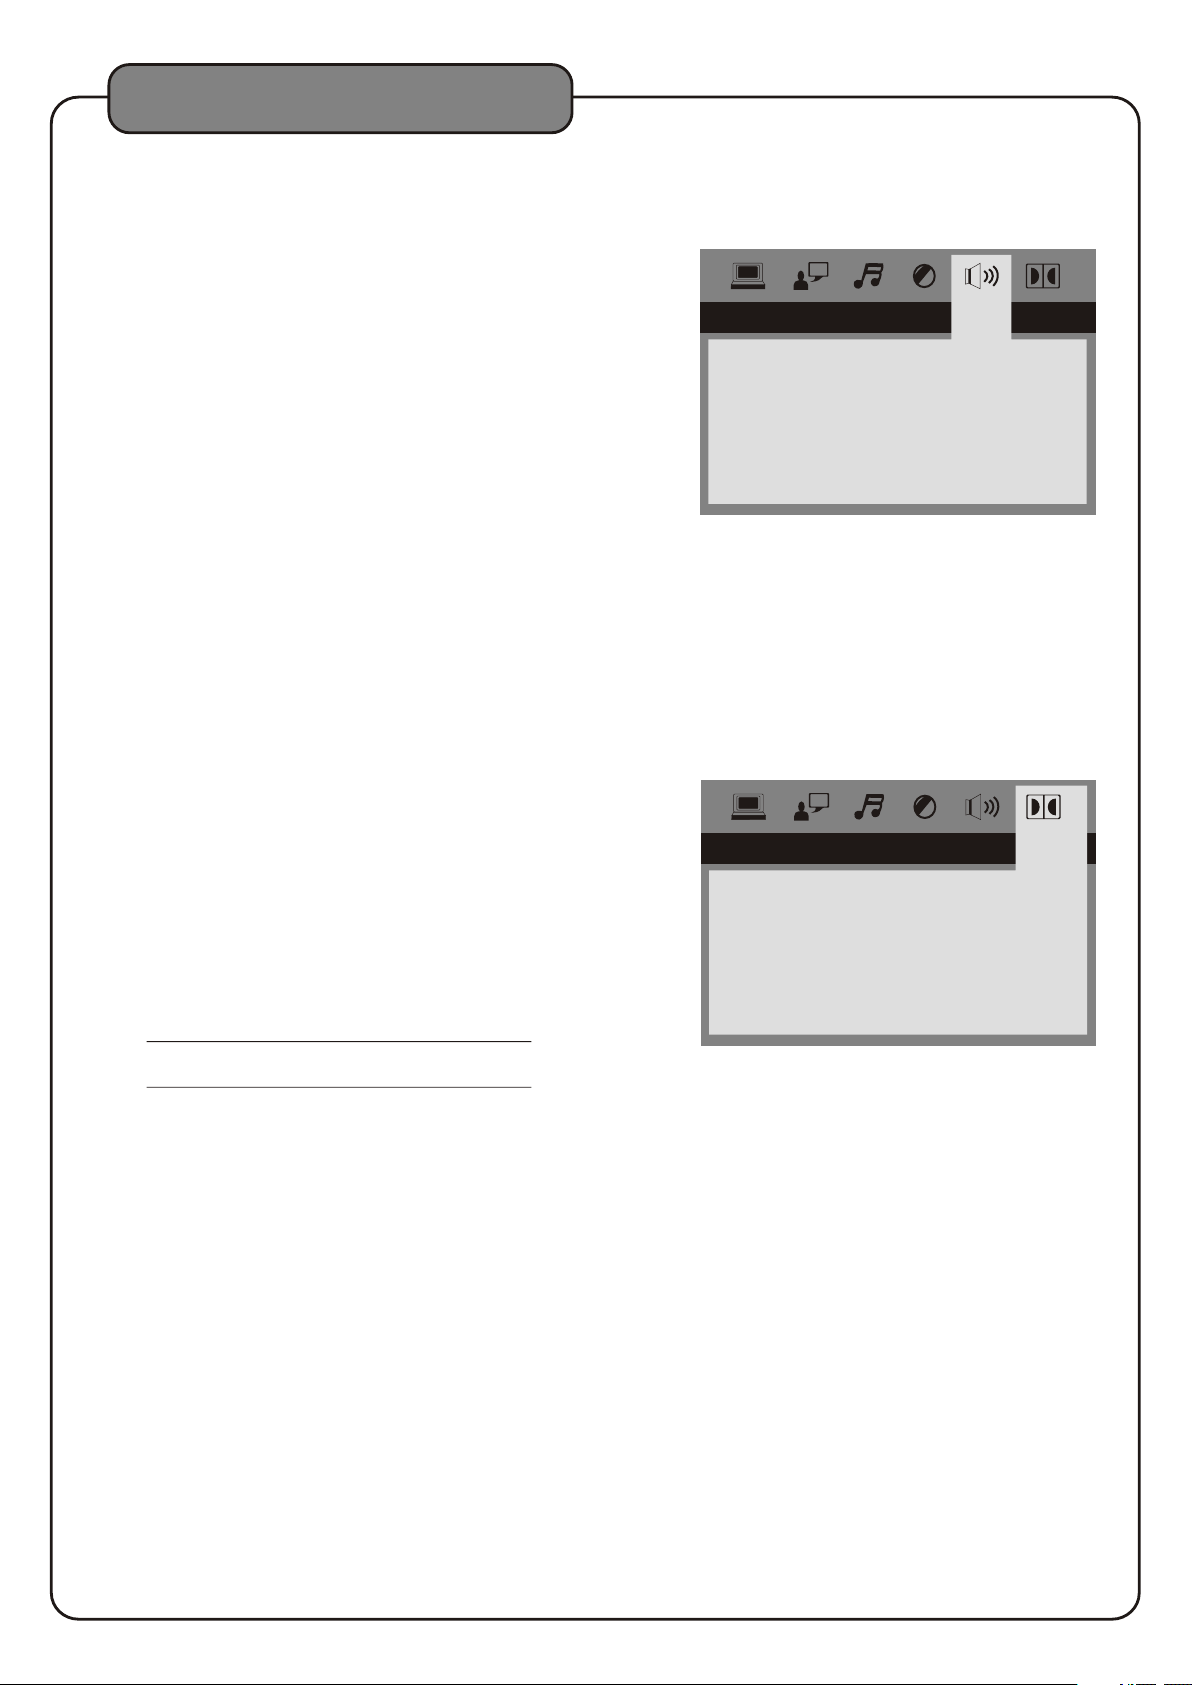
DVD System Setup Menu
SPEAKER SETUP
1. DOWNMIX
LT/RT The left chann el and t he right channel sound outputs
are mixed first and th en the m ixed sound output is redirected
to the left speaker an d the ri ght speaker simultaneously.
STEREO - Sound output is in St ereo M ode.
V SURR - Virtual Surround Sound.
5.1 CH - For 5.1 Chann el sur roun d sound.
2. SUBWOOFER
ON: If y ou have a subwoofer.
OFF: If you do not have a subwoofer.
3. CENTER DEL AY
4. REAR DE L AY
5. FRONT
Set this based on the size of yo ur fro nt speaker.
LARGE
SMALL
SPEA KER S ETU P
DOWN MI X
SUBW OO FE R
CENT ER D EL AY
REAR D EL AY
FRON T
LT/R T
STER EO
VSS
5.1C H
DIGITAL SETUP
1. OP MODE
LINE OUT - This settin g comp ress es the output signal and
lowers the vol ume fo r use in a quieter
environmen t, suc h as at night time.
RF REMOD - This settin g incr ease s volume for regular usage.
2. DYN AMIC R ANGE
When the OP CODE is set to L INE OU T, use this setting to
select the ratio of signal c ompr ession. Select FULL for the
lowest maximum signal an d OFF fo r the highest maximum
signal.
3. DUAL M ONO
STEREO - This setting play s the di sc audio in the stereo mode.
MONO L - This setting plays only th e left a udio channel.
NOTE: Fo r use on ly on Multiplex CDG discs.
MONO R - This setting plays on ly the r ight audio channel.
NOTE: Fo r use on ly on Multiplex CDG discs.
MIX MONO - This setting play s the di sc audio in the mixed
audio mode in which the left audio chann el
and the right audio channel are mixed fi rst
and then redirected to the left channe l and
the right channel simultaneously.
OP MO DE
DYNA MI C RA NG E
DUAL MONO
DIGI TAL SETU P
LINE O UT
RF REM OD
30
Page 34

Troubleshooting
Troubleshoo ting
1.There i s no pow er
●Make sure the power cord is firmly c onnected to the back of the 9 and to the power outle t
●If using a power strip/surge-pr otector, make s ure that it is plugged in and switched on
●Make sure the Power but ton on the front panel is pushed in to the on position
2.Ther e is no so und
●Make sure everything is connec ted firmly and properly
●Make sure all of your components a re turned on
●Make sure the 9 is set to the right i nput
●Make sure the proper volume cont rols are turned up high enough
3.No pict ure
●Make sure everything is connec ted firmly and properly
●Make sure there are no defective c ables
●Make sure all of your components a re turned on
●Make sure the 9 is set to the right i nput
●Make sure the TV or monitor is w orki ng correctly
4.The dis c does n ot pla y
●Make sure the disc is inserted cor rectly (label-side up)
●Make sure the disc is clean and not sc ratched
●If using a CD/DVD R/RW, try using a different brand as some bra nds might not be compatible
●Clean the CD lens using a CD lens clea ner
5.Remo te con trol d oes no t work
●Make sure the batteries are inse rted, inserted correctly, and not out of power
●Point the remote cont rol directly at the remote sensor on the machine
●Move closer to the machine
6.The pic ture i s uncl ear
●Make sure the disc is not dirty or dam aged
●Make sure that the TV TYPE (P/N butt on on the remote) is set correctly:
NTSC: In North America, Jap an and many other Asian countries
PAL : In Europe
●Try restarting the 9
7.The Mus ic fro m an MP3 p laye r or CD sounds hollow or very re verb y
●Make sure the surround sound qua lity, using the SURROUND but ton on the remote control or front
panel, is set to MUSIC
AKJ780
AKJ780
AKJ780
AKJ780
31
Page 35

Service Information
SHIPPING DAM AGE
If the shipping carton is fo und to b e damaged, notify the delivery company im medi ately. Save the damage d
carton as evidence for the d eliv ery company to inspect. It is the responsib ilit y of the shipper to file a claim
with the delivery compan y for an y damage that occurs during shipping. In t he cas e that the shipping carton
is in good condition but the u nit is d amaged or defective, call A udi o 2000 'S at 805-523-27 59.
®
FACTO RY SE RVIC E
If the equipment needs fac tory s ervice, call A udio 2 000 ' S at 805-523-2759 for a Retur n Auth orization
number (RA number) and the a ddre ss of the authorized service representative s. Ins ure and ship the product,
prepaid, in its original c arto n along with proof of purchase in the form of a bil l of sal e or receipted invoice to
the above address. Pleas e clea rly write the RA number on the shipping carto n. Als o enclose a note describing
the problem along with any o ther h elpful information such as where and how th e unit w as used.
LIMITED WARRANTY
H&F Technologies, Incorporat ed (H& F) hereby warrants that A u d io2 0 00'S products will be free fro m defe cts
in material and workmans hip fo r a period of 1 (one) year from date of purchase. A t its option, H&F will repair
or replace the defective p rodu ct and promptly return it to you.
The Limited Warrant y will n ot cover any item that has been, in H&F's e stim atio n, subject to alteration, misuse,
neglect, accident or imp rope r installation. In addition, any servic e not pe rformed by H&F or an authorized
service center will term inat e terms of this warranty. Norm al wear and tear of this product will not be cove red
by this or any implied warra nty.
No liability will be accep ted fo r damages/loss directly caused from the u se of th is pro duct. H&F's liability shall
be limited to the repair/r epla cement of this product if found to be defecti ve.
© 2009 H & F Technologies, Incorpora ted (website: www. aud i o200 0 s.c o m)
®
®
32
 Loading...