

Page 1
User guide for TX1010 digital transmitter
V1.4
Page 2
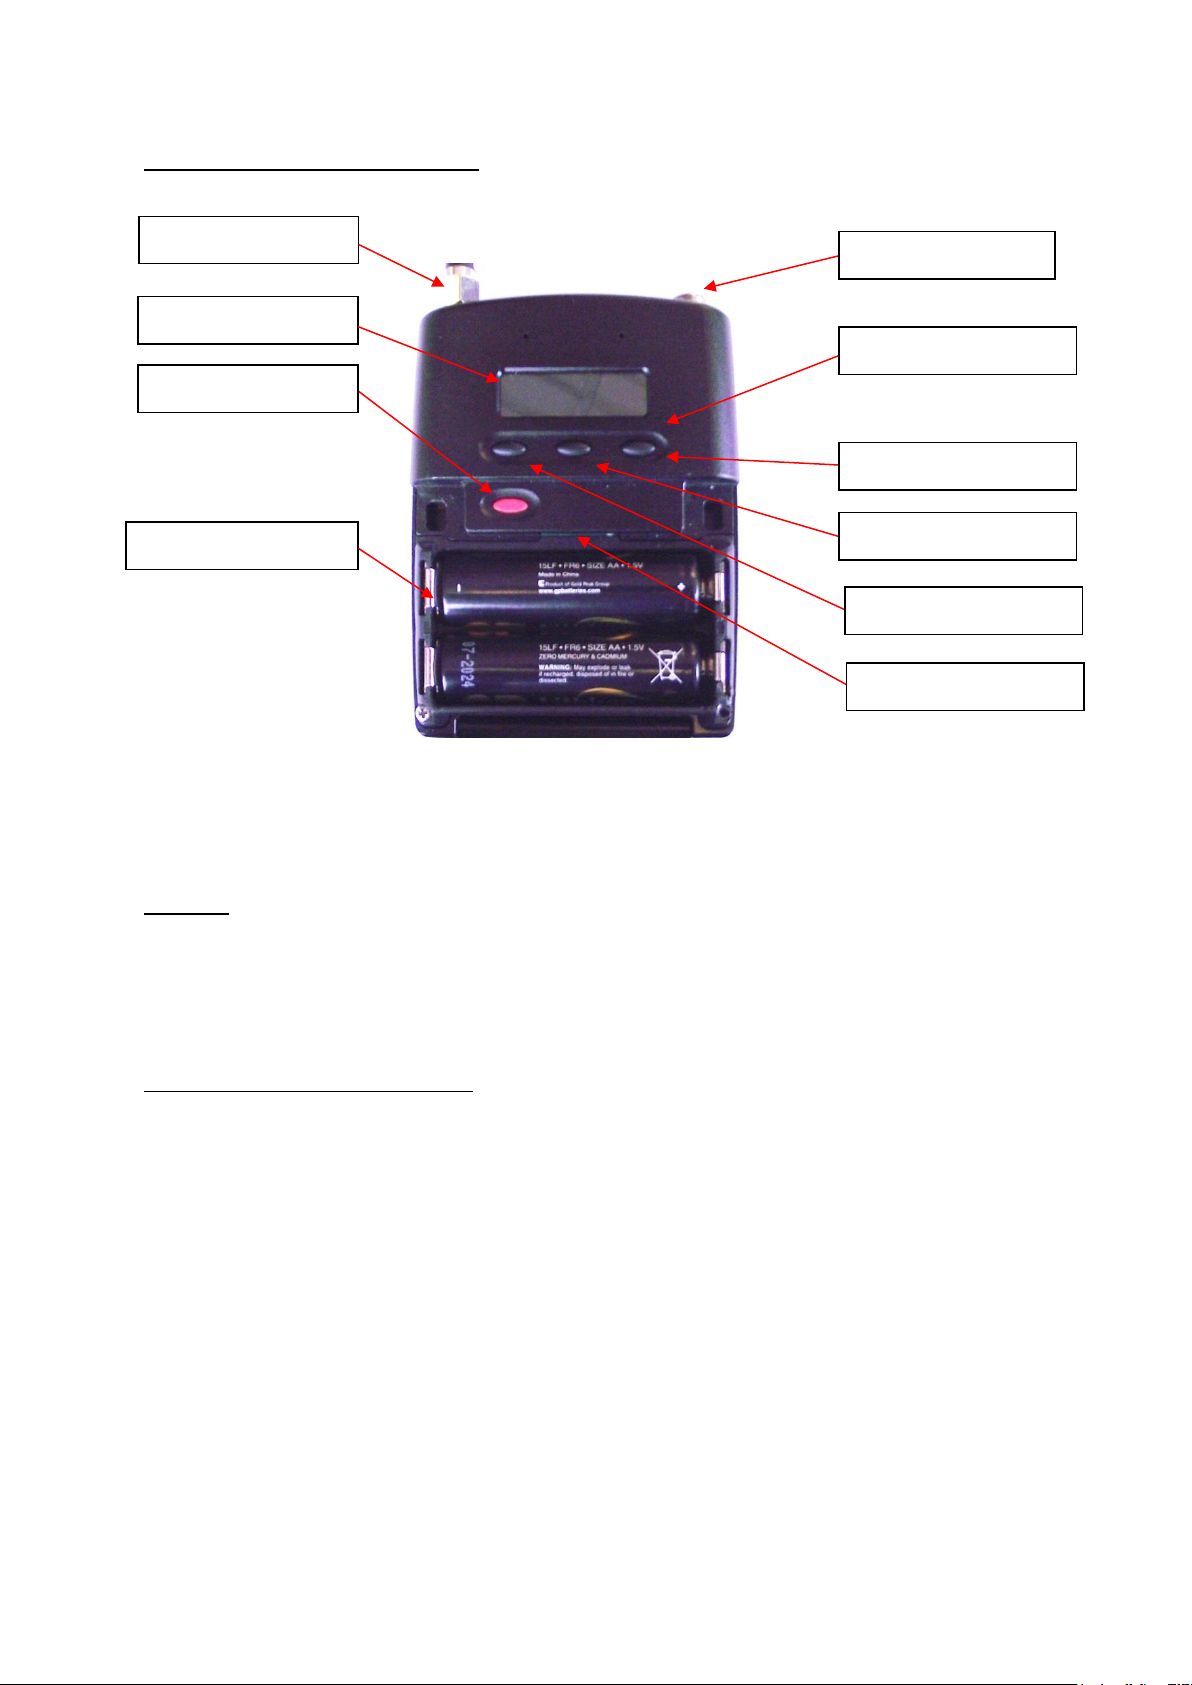
Controls, display and connections
Navigation buttons
Antenna socket
Microphone input
OLED display
On/Off button
Battery compartment
Left scroll button
Menu/Select button
Right scroll button
Micro SD card slot
Fig.1 TX1010 transmitter with open battery compartment
Antenna
The TX1010 transmitter is supplied with a detachable whip antenna. Attach this to the
antenna socket.
Installing and removing batteries
To open battery compartment, press the two catches on both sides simultaneously and
open lid (see Fig.1).
Insert 2 x AA batteries
Momentarily press the red On/Off button to turn transmitter on. The blue LED will light.
To close battery compartment, gently push down the flap until you hear a click. The
transmitter is now ready to use.
All of the parameters of the TX1010 transmitter are set up using Audio Ltd’s easy access
menu system as listed below.
V1.4
Page 3

Frequency
After accessing the main menu, use the right button to scroll to the
Frequency option. Once the frequency option is highlighted, press
the menu/enter button to enter the frequency menu to view the
TV, sub-channel, or Tune selections.
Frequency
selection
Use the left button to highlight the TV Channel to make the select
the TV channel and then select the sub channel until the desired
sub-channel is selected. Further fine tuning of the frequency can be
made in 25kHz steps by highlighting the Tune section of Frequency
menu. Once the desired channel or frequency has been set escape
to the top level of the transmitter main menu.
AF Gain
To select the microphone gain setting in the menu.
Microphone
gain setting
Use the menu button to highlight the desired AF Gain option. To
confirm this choice press menu button and the transmitter will save
the setting and return to the main menu. Typical setting for lavalier
microphone is gain position 3.
Lock
The menu can be locked to prevent accidental access to the various
transmitter settings.
Set Lock
Select Lock to lock out the access to the settings and to prevent
accidental access to the menu.
Sleep
The transmitter can be put into ‘Sleep’, or standby mode to allow
the transmitter to conserve battery life when not being used for a
take. The transmitter can then be ‘woken up’ by using the sleep
menu or via the TX1010 app.
Sleep setting
Put into sleep mode by selecting sleep.
Options
menu
The Options menu provides access to the LF Cut, RF Power,
Screensaver, Encryption and System menus.
V1.4
Page 4

LF Cut
Accessing the LF Cut menu allows the user to select any one of five
LF cut settings to maximize the rejection of undesirable low
frequency noise. Any one of five LF Cut settings, ranging from 50Hz
to 200Hz can be selected.
RF Power
Three power settings can be selected to suit the environmental
conditions. The three power settings are 5mW, 20mW and 50mW.
Display
menu
To change display parameters enter the display menu. Entering
display menu allows the user to change the brightness and the
screensaver timer.
Brightness
The brightness of the OLED screen has 5 adjustable settings.
Screensaver
The screensaver can be switched off completely or it can be set to time
out after 5, 30 or 120 seconds. This reduces power consumption.
Encryption
The 1010 system allows the encryption of the transmitted signal to
ensure the complete privacy of the particular transmitter receiver
pairing. The encryption menu allows the user to generate a secure 4
digit key.
Key generator
Entering the encryption menu allows the user to generate a secure 4
digit key. This 4 digit number is then entered manually in the DX1010
receiver.
System
menu
Select System to enter the system menu.
Info
Enter the Info screen to read the parameters for the transmitter.
Parameters include the serial number, firmware issue number and the
frequency banding of the transmitter.
V1.4
Page 5

Region
Enter the Region menu to select TV regions to ensure the correct
selection for operation in your current region. In the region menu there
are 3 regions:
USA – 6MHz TV channels
EU – 8MHz TV channels
AU/NZ – 7 MHz TV channels
Update
firmware
Selecting the Update allows the user to update the firmware of the
transmitter using the micro SD card. Copy the firmware update file onto
a suitable micro SD card and insert it into the micro SD card slot in the
battery compartment of the transmitter. To prevent accidental
updating of the transmitter the user will be requested to confirm
whether to update the firmware.
Blue LED
Selecting the Blue LED menu allows the user to turn the blue LED on or
off if required. Confirm whether the blue LED is required to be switched
off. This selection is stored in memory so that the state if preserved
even if the batteries are changed.
Bluetooth
Menu
The Bluetooth menu can be accessed, allowing the user to turn the
Bluetooth on/off. It also allows the user to ‘forget the pairing’ of the
TX1010 with the iOS TxApp.
Restore
The restore function allows the user to reset the TX1010 to the factory
default settings.
Note: After a ‘Restore’ to factory settings the region will reset to EEurope so please select the current region in your locality before
proceeding further.
Battery type
The end user can set the battery type being used to ensure the accuracy
of the battery level indicator on the TX1010 and also on the TX battery
indicator in the receiver. The battery discharge curve algorithms for 3
different battery types are currently selectable. NiMH, Lithium and
Alkaline.
V1.4
Page 6

Recommended Mounting
The TX1010 transmitter is supplied with a neoprene pouch for attaching the transmitter to a
belt or waist line of trouser or skirt. This accessory ensures that the transmitter meets RF
Exposure guidelines. Other body-worn accessories used with this device must meet the
following requirements in order to comply with RF Exposure guidelines:
- Made of non-metallic material
- Transmitter orientated in vertical plane at waist height
- Maintains a minimum separation distance of approximately 7mm from body
Batteries
Upon finishing with any used batteries please dispose of them as special waste. In order to
protect the environment, only dispose of exhausted batteries.
TX1010 Frequency ranges
The TX1010 transmitter can tune over a switching bandwidth of up to 100MHz. The
frequency ranges are listed below:
470.2-547.8MHz
518.2-607.4MHz
594.2-693.8MHz [Europe only]
Please note that frequency range 608 – 614MHz is forbidden for use in US.
FCC Conformity
This device with its antenna complies with FCC RF radiation exposure limits set forth for an
uncontrolled environment. The device must not be co-located or operated in conjunction
with any other antenna or transmitter.
This device complies with Part 15 of the FCC Rules: Operation is subject to the following two
conditions:
(1) This device may not cause harmful interference, and
(2) This device must accept any interference received, including interference that may cause
undesired operation.
Caution:
Changes or modifications not expressly approved by Audio Ltd could void the user’s authority
to operate the equipment.
V1.4
Page 7

Industry Canada Conformity
This radio transmitter (20513-TX1010) has been approved by Industry Canada to operate
with the supplied monopole whip antenna only. Other antenna types are strictly prohibited
for use with this device.
This device operates on a no-protection no-interference basis. Should the user seek to obtain
protection from other radio services operating in the same TV bands, a radio licence is
required. Please consult Industry Canada’s document CPC-2-1-28, ‘Optional Licencing for
Low-Power Radio Apparatus in the TV Bands’, for details.
This device complies with Industry Canada’s licence exempt RSSs. Operation is subject to the
following two conditions:
(1) This device may not cause interference; and
(2) This device must accept any interference, including interference that may cause
undesired operation of the device.
FR
Le présent appareil est conforme aux CNR d’Industrie Canada applicables aux appareils radio
exempts de licence.
L’exploitation est autorisée aux deux conditions suivantes:
(1) l’appareil ne doit pas produire de brouillage; et
(2) l’utilisateur de l’appareil doit accepter tout brouillage radioélectrique subi, même si le
brouillage est susceptible d’en compromettre le fonctionnement.
V1.4
 Loading...