

Page 1

SPK-4GX
2.4GHz Digital Wireless
Stereo Speaker
System with Remote & Dual
Power Transmitter (Black)
Indoor/Outdoor
Owner's Manual
(Please read the instructions carefully before using this system)
www.audio-unlimited.com
Page 2

Introduction
This 2.4GHz digital wireless speaker system utilizes the most advanced wireless technology to
deliver dynamic, high-quality audio anywhere inside or outside your home. The wireless audio
transmission travels freely through walls, floors and other solid objects. Simply connect the
system to ANY audio source such as iPhone, iPod, MP3 player, Smartphone, computer, TV or home
theater system to enjoy full-spectrum, lifelike sound without complicated wiring and installation.
Features
1. 2.4GHz Frequency Hopping Spread Spectrum (FHSS) digital transmission.
2. 32-Channel scan-tuning between transmitter and receiver.
3. Audio output power up to 20 Watts RMS per channel.
4. Weather-resistant speakers and remote control.
5. Optional blue mood light.
6. Dual weather-resistant speaker driver (super bass and tweeter built-in).
7. Optional pairing between transmitter and speakers. (Only when using more than one speaker,
with optional purchase of additional SPK-24GX speaker).
8. Supports stereo audio (with optional additional SPK-24GX speaker).
9. Supports up to six speakers in either L/R stereo or mono modes.
10. AUX IN jack on the back of the speaker. This allows you to plug an audio source
DIRECTLY into the speaker (without the use of the wireless transmitter) with a standard
3.5mm audio cable (not included). This will produce sound in only that one speaker. Any
additional SPK-24GX speakers will not play the audio
11. Operating distance up to 50 meters (150‟) in open areas (less through walls and other
obstructions).
12. Works through walls, floors and anywhere in the room.
13. Virtually interference-free stereo quality.
14. Electronic Volume Control on Speakers.
15. Remote control unit that conveniently stores magnetically in the front of the speaker.
16. Speaker is powered by 6 „D‟ batteries (not included), or by included AC adapter.
17. Dual Powered Transmitter powered by 4 „AA‟ batteries (not included), or by included AC
adapter.
18. The transmitter supports up to six SPK-24GX speakers.
NOTE: This transmitter is not compatible with the earlier model SPK-24G (white color)
speakers.
Page 3

Package content
i. 1 x RF Transmitter
ii. 1 x RF Speaker
iii. 1 x Remote Control
iv. 1 x AC/DC Adapter for Transmitter
v. 1 x AC/DC Adapter for Speaker
vi. 1 x RCA to RCA Cable (to plug transmitter into TV or receiver)
vii. 1 x 3.5mm to ¼” Adapter Plug (to plug transmitter into receiver)
viii. 1 x User Manual
Page 4

Remote Control Storage
Power on/off
Mood light / Pair
Volume Up/Down
Front View
Transmitter
Speaker
Page 5
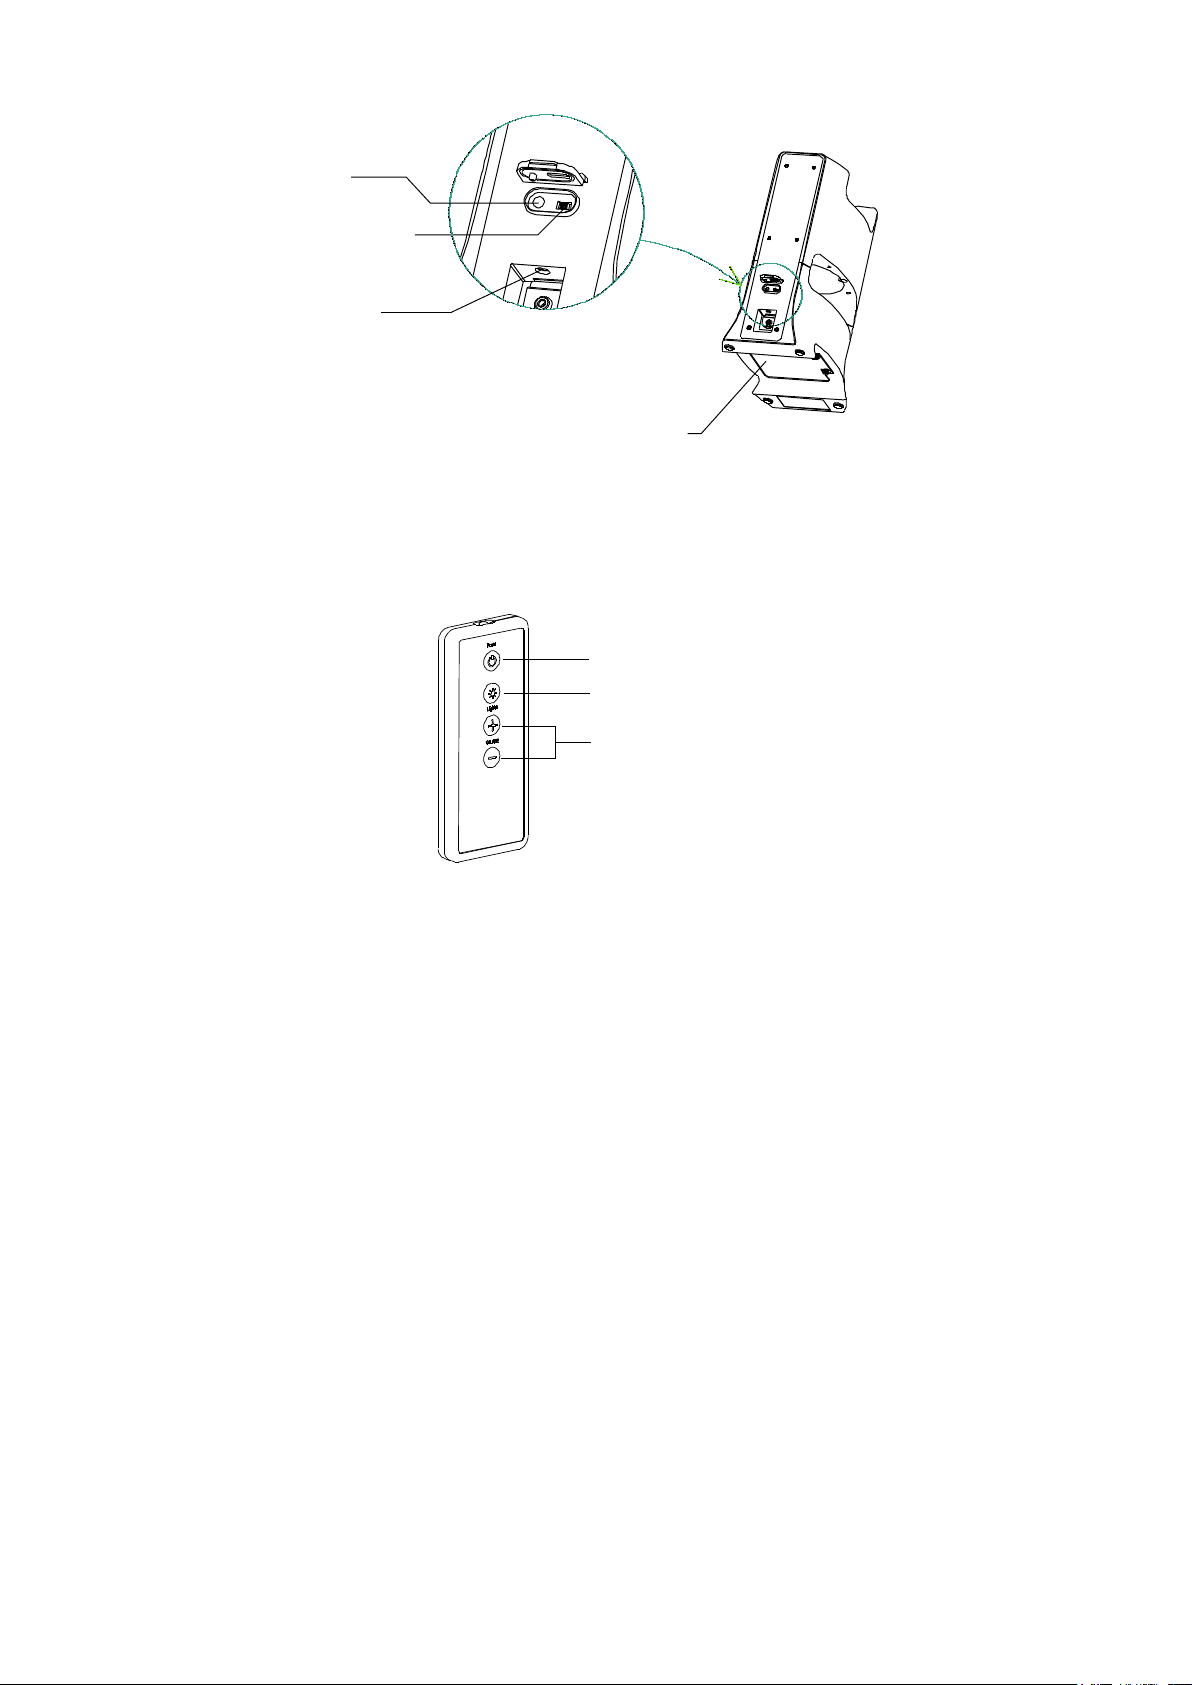
Rear View
Battery Compartment
R/M/L Switch
Aux In
DC IN 12V
Volume Up/Down
Mood Light
Power ON/OFF
Remote Control
Installation
Transmitter
1. Plug the included AC/DC adapter into a standard wall outlet.
2. Insert the adapter connector plug firmly into the DC IN jack located on the rear panel of the
transmitter base, OR
3. Insert 4 „AA‟ alkaline batteries (not supplied) in the battery compartment and close the
battery door. A blinking BLUE light on transmitter indicates drained batteries.
4. Extend the retractable audio cable located on the back panel of the transmitter and connect it
to the output jack of virtually any audio source.
Note: Do not fully extend the cable until ready to retract.
5. To retract the cable, pull it until it is fully extended and then allow it to feed back into the
base.
6. If the audio source device has red and white audio out RCA jacks use the included RCA to
RCA cable to connect the device to the transmitter. Plug the RCA cable into an open AUX
OUT port on the back of your receiver, or plug directly into your TV set. If the RCA cable
is used the retractable cable is not connected to any device and should not be extended.
Page 6

R
Pair
AUDIOIN
DC IN 6V
ONOFF
L
Power on indicator
Input
Storage Jack
For Plug When
Not In Use
Battery compartment
Speaker
Battery Power
1. To operate the speaker using battery power, gently turn the speaker over and open the
battery compartment cover located underneath.
2. Insert six (6) D alkaline batteries (not included) into the battery compartment, observing
proper +/- polarities as indicated in the speaker compartment.
3. Replace the battery compartment cover.
Page 7
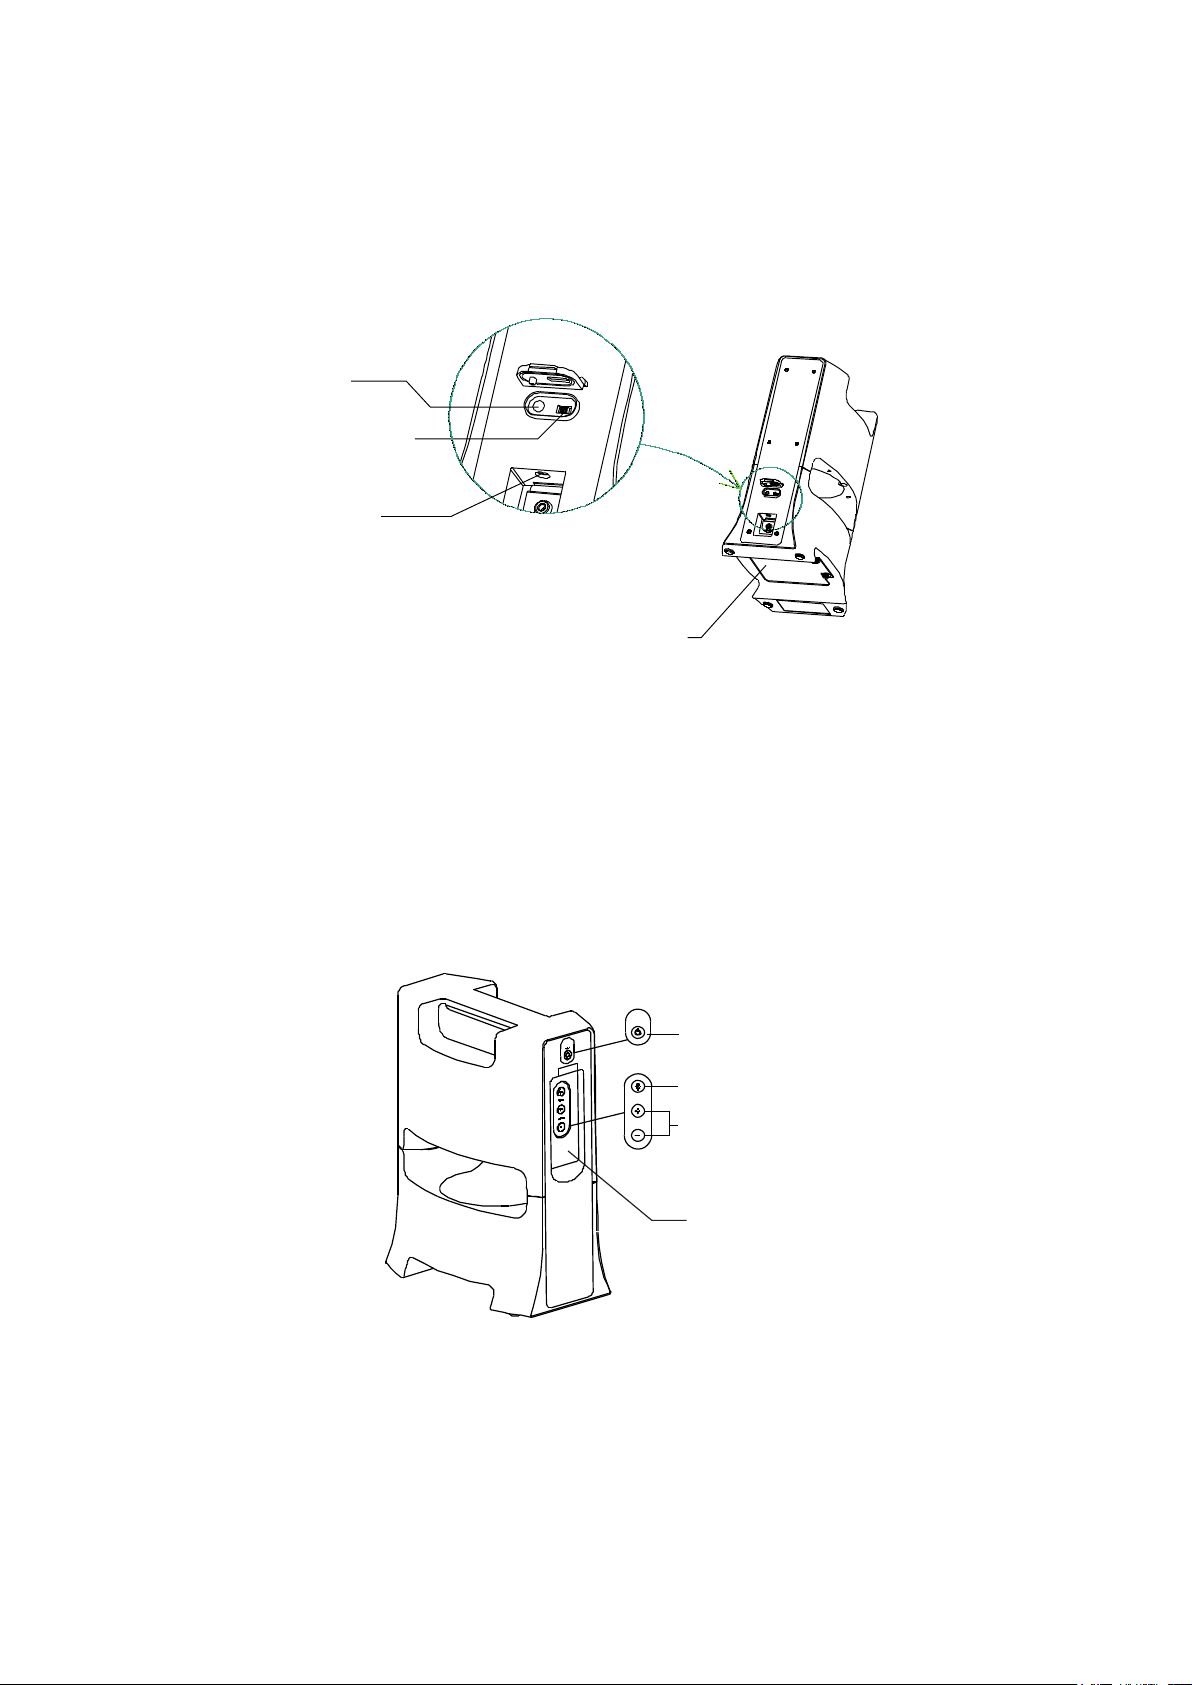
Rear View
Battery Compartment
R/M/L Switch
Aux In
DC IN 12V
Remote Control Storage
Power on/off
Mood light / Pair
Volume Up/Down
Front View
AC Power
1. To operate the speaker using AC power, plug the included 12V power adapter into a
standard wall outlet.
2. Insert the power adapter connector firmly into the DC IN jack located on the back panel of
the speaker.
Operation
1. To turn on the speaker, press and hold the POWER button for 3 seconds. The GREEN
power LED illuminates.
2. To turn off the speaker, press and hold the POWER button for 3 seconds again.
Page 8

Remote Control
1. The remote control is ready to use with a factory-installed button cell battery. It can be stored in
the recessed area on the front panel.
2. Press “+” “-” button to get desired volume level.
3. Press the Light button to turn on/off the Mood light feature.
4. When the speaker is on, pressing the “Power” button puts it in standby mode. The speaker
BLUE light changes to GREEN.
5. Pressing the “Power” button while the speaker is in standby mode puts it back to active mode.
The GREEN light changes to BLUE.
NOTE: The remote control can be used to raise or lower the volume or change the status of the
speaker from active to standby or from standby to active. If the speaker is completely powered
off, the remote will not power the system up.
Basic Operation
1. When the transmitter is plugged in or batteries are inserted, turn the “On/Off” switch to ON.
The transmitter's light will be GREEN.
2. To turn on the speaker, press and hold the POWER button on the front panel of the speaker for 3
seconds. The Power button‟s light will be GREEN.
3. Turn on the audio source and set the source volume to 75% of maximum. The BLUE light on
the transmitter and speaker illuminate when the audio signal link between the two is made.
This will typically take no more than 5 seconds.
4. If the audio source connected to the transmitter is turned off for less than 4 minutes, the BLUE
lights on the transmitter and the speaker remain on, but no sound is transmitted. When the
audio signal is turned back on, sound is transmitted again.
5. If no signal is detected for more than 4 minutes, the transmitter automatically turns off and goes
into STANDBY mode. The BLUE lights on the transmitter and the speaker switch to GREEN.
6. If no audio signal is detected from the transmitter for more than 15 minutes, the speaker
automatically turns off. The GREEN LED goes off.
7. To turn speakers on, press the POWER button on the front panel of the speaker for 3 seconds.
8. To turn the speakers off, press the POWER button on the front panel for 3 seconds.
PAIRING
1. PAIRING is needed when 2 or more speakers are being used with the same audio source. (With
optional purchase of additional SPK-24GX speaker).
2. Press the „Pair‟ button on the transmitter and the „Light/Pair‟ button on one of the speaker for 5
seconds there will be an audio test tone when the pairing process is finished.
3. The first speaker is now paired and memorized by the transmitter.
4. Repeat the procedure on the second speaker by pressing the “Pair” and the “Light/Pair” button
on the transmitter and the second speaker respectively.
5. Repeat this procedure on any additional speakers.
Page 9

Blue Mood Light
For mood light effect, press the LIGHT button on the speaker or remote control.
Left / Right Channel and Mono Selection
The SPK-24GX Wireless Speaker System comes with one speaker and is designed for either Mono
or Stereo playback. For stereo playback, an additional SPK-24GX speaker must be purchased
separately. Mono playback is suggested when each speaker is used in a separate area or room. The
transmitter supports up to a total of 6 speakers in stereo or mono modes.
Mono Playback
To enable Mono playback, ensure that the switch located on the back panel of the speaker is in the
MONO position.
Stereo Playback (ONLY applies with optional purchase of additional SPK-24GX
speaker).
To enable Stereo playback, set the switch on one of the two speakers' back panel to LEFT. Set the
switch on the other speaker to RIGHT.
Note 1: It is also possible to listen to only the Left or Right audio channel using only ONE speaker
To do so, simply set the switch on the speaker's back panel to LEFT or RIGHT.
Only the channel selected will be audible.
Note 2: If two speakers are connected to the system, ensure both speakers are placed within the
effective operational range. If either speaker is out of range it will cause distortion to
both speakers.
AUX In
To connect an audio device directly to the speaker insert a 3.5mm audio cable (not included) from
the source device into the „AUX In‟ jack located on the back panel of the speaker. This feature
sends audio directly to the connected speaker. It does not send an audio signal to any additional
speakers. Set the volume on the audio source device 75% of maximum.
Note:
If the source signal is too weak for reception, the speaker automatically switches off after
approximately 4 minutes to protect the unit and save power. If the source signal returns to an
adequate level, the speaker automatically switches back on.
When the speaker is in Standby mode, the speaker automatically switches off after
approximately 15 minutes to protect the unit and save power.
To switch speaker power back on during Standby mode, press the POWER button on the remote
control. The signal link between the transmitter and speaker reconnects automatically.
Page 10

Troubleshooting
No sound
Ensure the AC adapter is securely plugged into the wall outlet and the transmitter DC IN jack.
If using batteries to power the transmitter a blinking BLUE light on transmitter indicates drained
batteries. Replace with 4 fresh AA batteries.
Press the “PAIR” button on the transmitter and the „Light/Pair‟ button on the speaker for 5
seconds. There will be an audio test tone when the pairing process is finished. Repeat the
procedure on any additional speakers.
Ensure the speaker POWER button is in the ON position.
Speaker batteries may be too weak. Replace with new batteries or connect with the included
AC adapter.
Ensure the connected audio device is switched on and is producing a signal.
Ensure that the audio device volume level is set 75% of maximum.
Distortion
Speaker batteries may be too weak. Replace with new batteries or connect with the included AC
adapter. Blinking BLUE light on transmitter indicates drained batteries.
Ensure that the audio device volume level is set 75% of maximum.
The speakers are too far from the transmitter. Move closer to the transmitter base.
The audio input signal may be too low or too high. Set the audio source to 75% of maximum.
If using multiple speakers ensure all speakers are placed within the effective operational range.
If any speaker is out of range it will cause distortion on all speakers.
Page 11

Specifications
Transmission Mode: UHF Stereo
Carrier Frequency: 2.4GHz Digital
Operation Voltage: Transmitter, DC 6C 300mA
Speaker, DC 12V 1.5A or 6 x D alkaline batteries (not included)
Remote Control, 1 x CR2032 button cell
Frequency Response: 30 Hz – 20 KHz
Distortion: 0.5%
S/N Ratio: 65 dB
Operation Distance: Up to 50 meters (open area)
Speaker Audio Output Power: 20W Max. (RMS)
This product may contain chemicals listed in Proposition 65
(http://www.oehha.ca.gov/prop65/prop65_list/Newlist.html) that may be known to cause cancer, birth
defects or other reproductive harm.
ATTENTION:
The transmitter for this speaker set is designed to work with a wide variety of devices. Our
tests show the default volume levels of iPods, MP3 players and other devices connected to
the transmitter through the headphone jack does not have the signal strength required by
the transmitter. Raising the volume of your device will increase the signal strength to the
transmitter. The blue signal LED will switch from flashing to steady when the required signal
strength from your device is reached. We recommend that you keep the volume set on your
iPod or MP3 player at a minimum of ¾ of full volume.
WARNING:
When powering by AC household current, these devices must be used with the AC/DC
adapters supplied within the package. Do not attempt to power utilizing other AC or DC
adapters. Power adapters are for indoor use only --- do not use in wet areas or weather.
Page 12

SPK-24GX
Sistema de Altavoces Estéreo Digital
Inalámbrico a 2,4GHz para Uso Interior y Exterior
con
Control Remoto y Transmisor de
Alimentación Dual (Negro)
Manual del Usuario
(Por favor lea cuidadosamente las instrucciones antes de usar este sistema)
www.audio-unlimited.com
Page 13

Introducción
Este sistema de altavoces inalámbrico digital a 2,4 GHz utiliza la más avanzada tecnología inalámbrica para
entregar audio dinámico, de alta calidad, en cualquier parte dentro y fuera de su casa. La transmisión
inalámbrica de audio viaja libremente a través de paredes, pisos y otros objetos sólidos. Sólo tiene que
conectar el sistema a CUALQUIER fuente de audio, tal como iPhone, iPod, reproductor MP3, Smartphone,
computador, televisor o sistema de teatro en casa para disfrutar de un sonido natural, de amplio espectro, sin
necesidad de instalación y cableado complicados.
Características
1. Transmisión digital a 2,4GHz con Espectro Ensanchado por Salto de Frecuencia (FHSS).
2. 32 canales de sintonización por exploración entre el transmisor y el receptor.
3. Potencia de salida de audio de hasta 20 vatios RMS por canal.
4. Altavoces y control remoto resistentes al clima.
5. Luz ambiental azul opcional.
6. Unidad doble de altavoces resistentes al clima (súper graves y agudos incorporados).
7. Emparejamiento opcional entre transmisor y altavoces. (Solamente cuando se usa más de un altavoz,
con la compra opcional de un altavoz adicional SPK-24GX)
8. Soporta audio estéreo (con un altavoz opcional adicional SPK-24GX).
9. Soporta hasta seis altavoces en modos estéreo derecho/izquierdo o monofónico
10. Conexión AUX IN en el respaldo del altavoz. Esto le permite conectar una fuente de audio
DIRECTAMENTE al altavoz (sin usar el transmisor inalámbrico) con un cable de audio estándar de
3,5mm (no incluido), lo que producirá sonido sólo en ese altavoz. Cualquier altavoz adicional SPK24GX no reproducirá el audio.
11. Distancia de operación hasta 50 metros (150 pies) en áreas abiertas (menor a través de paredes y otros
obstáculos).
12. Funciona a través de paredes, pisos y en cualquier parte del salón.
13. Calidad estéreo virtualmente libre de interferencia.
14. Control Electrónico de Volumen en los altavoces.
15. Unidad de control remoto que se guarda cómoda y magnéticamente en el frente del altavoz.
16. El altavoz es alimentado por 6 baterías „D‟ (no incluidas), o por adaptadores de CA incluidos.
17. Transmisor de alimentación dual mediante 4 baterías „AA‟ (no incluidas), o por medio de adaptador de
CA incluido.
18. El transmisor soporta hasta seis altavoces SPK-24GX.
NOTA: Este transmisor no es compatible con los altavoces del modelo anterior SPK-24G (de color
blanco).
Page 14

Contenido del paquete
i. 1 Transmisor de RF
ii. 1 Altavoz de RF
iii. 1 Control Remoto
iv. 1 Adaptador de CA/CD para el transmisor
v. 1Adaptador de CA/CD para el altavoz
vi. 1 cable RCA a RCA (para conectar el transmisor al TV o al receptor)
vii. 1 enchufe adaptador de 3,5mm a ¼”de pulgada (para conectar el transmisor al receptor)
viii. 1 Manual del Usuario
Page 15

Vista Posterior
Compartimiento Baterías
Interruptor R/M/L
Aux In
DC IN 12V
Transmisor
Altavoz
Page 16

Control Remoto
Instalación
Transmisor
1. Conecte el Adaptador de CA/CD incluido en una toma estándar de pared.
2. Inserte firmemente el enchufe conector del adaptador en la toma DC IN ubicada en el panel
posterior de la base del transmisor, O
3. Inserte 4 baterías alcalinas „AA‟ (no suministradas) en el compartimiento de baterías y cierre
la puerta del compartimiento. Una luz AZUL intermitente en el transmisor indica
agotamiento de las baterías.
4. Extienda el cable retráctil de audio ubicado en el panel posterior del transmisor y conéctelo
a la toma de salida de virtualmente cualquier fuente de audio.
Nota: No extienda completamente el cable hasta que esté listo para retraerse.
5. Para retraer el cable, hálelo hasta que esté completamente extendido y luego déjelo regresar
a la base.
6. Si el dispositivo fuente de audio tiene tomas RCA rojo y blanco de salida, use el cable RCA
a RCA incluido para conectar el dispositivo al transmisor. Conecte el cable RCA a un
puerto abierto AUX OUT al respaldo de su receptor, o conéctelo directamente a su televisor.
Si se usa el cable RCA, el cable retráctil no se conecta a ningún dispositivo y no debe
extenderse.
Page 17

Vista Posterior
Compartimiento Baterías
Interruptor R/M/L
Aux In
DC IN 12V
Altavoz
Alimentación con Baterías
1. Para operar el altavoz usando alimentación con baterías, voltee suavemente el altavoz y abra
la tapa del compartimiento de baterías localizada por debajo.
2. Inserte seis (6) baterías alcalinas D (no incluidas) dentro del compartimiento, observando
que la polaridad +/- sea apropiada como se indica en el compartimiento del altavoz.
3. Coloque de nuevo la tapa del compartimiento de baterías.
Alimentación con CA
1. Para operar el altavoz usando alimentación con corriente alterna (CA), conecte el adaptador
de corriente de 12V incluido a una toma estándar de pared.
2. Inserte firmemente el conector del adaptador de corriente en la toma DC IN ubicada en el
panel posterior del altavoz.
Page 18

Almacenamiento Control Remoto
Encender/Apagar
Luz Ambiental/Emparejar
Subir/Bajar Volumen
Vista Frontal
Operación
1. Para encender el altavoz, mantenga oprimido por 3 segundos el botón POWER. El LED
VERDE de energía se ilumina.
2. Para apagar el altavoz, mantenga de nuevo oprimido por 3 segundos el botón POWER.
Control Remoto
1. El control Remoto se encuentra listo para el uso con una batería tipo botón instalada en fábrica.
El control se puede guardar magnéticamente en el área ahuecada del panel frontal.
2. Oprima los botones “+” “-” para obtener el nivel de volumen deseado.
3. Oprima el botón “Light” para encender/apagar la función de Luz Ambiental.
4. Cuando el altavoz está encendido, al oprimir el botón “Power” queda en modo suspendido.
La luz AZUL del altavoz cambia a VERDE.
5. Al presionar el botón “Power” mientras el altavoz está en modo de suspensión vuelve al modo
activo. La luz VERDE cambia a AZUL.
NOTA: El control remoto se puede usar para subir o bajar el volumen o para cambiar el estado
de los altavoces de activo a suspendido o de suspendido a activo. Si el altavoz está
completamente apagado, el control remoto no encenderá el sistema.
Operación Básica
1. Cuando el transmisor está conectado o las baterías están insertadas, mueva el interruptor
“On/Off” a ON. La luz del transmisor se pondrá en VERDE.
2. Para encender el altavoz, mantenga oprimido el botón POWER en el panel frontal del altavoz
durante 3 segundos. La luz del botón Power pasará a VERDE.
3. Encienda la fuente de audio y programe el volumen de la fuente al 75% del máximo. Se
iluminará la luz AZUL en el transmisor y el altavoz cuando se establezca la señal de audio entre
los dos. Normalmente esto no tomará más de 5 segundos.
4. Si la fuente de audio conectada al transmisor se apaga por menos de 4 minutos, las luces
AZULES en el transmisor y el altavoz siguen encendidas, pero el sonido no se transmite.
Cuando la señal de audio se enciende de nuevo, el sonido vuelve a transmitirse.
5. Si no se detecta señal por más de 4 minutos, el transmisor se apaga automáticamente y pasa al
modo SUSPENDIDO. Las luces AZULES en el transmisor y el altavoz pasan a VERDE.
Page 19

6. Si no se detecta señal de audio del transmisor por más de 15 minutos, el altavoz se apaga
automáticamente. El LED VERDE se apaga.
7. Para encender los altavoces, oprima el botón POWER en el panel frontal del altavoz durante 3
segundos.
8. Para apagar los altavoces, oprima el botón POWER en el panel frontal del altavoz durante 3
segundos.
EMPAREJAMIENTO
7. El EMPAREJAMIENTO es necesario cuando se están usando 2 o más altavoces con la misma
fuente de audio. (Con la compra opcional de un altavoz adicional SPK-24GX).
8. Oprima el botón „Pair‟ en el transmisor y el botón „Light/Pair‟ en un altavoz durante 5 segundos.
Habrá un tono de prueba de audio cuando el proceso de emparejamiento termine.
9. El primer altavoz está ahora emparejado y memorizado por el transmisor.
10. Repita el procedimiento en el segundo altavoz oprimiendo los botones “Pair” y “Light/Pair” en
el transmisor y en el segundo altavoz respectivamente.
11. Repita este procedimiento en cualquier altavoz adicional.
Luz Ambiental Azul
Para el efecto de luz ambiental, oprima el botón LIGHT en el altavoz o en el control Remoto.
Selección de Canal Izquierdo/Derecho y Monofónico
El Sistema de Altavoz Inalámbrico SPK-24GX viene con un altavoz y está diseñado para
reproducción Monofónica o Estéreo. Para reproducción estéreo, se debe adquirir de manera
separada un altavoz SPK-24GX. Se sugiere la reproducción monofónica cuando cada altavoz se use
en un área o habitación separada. El transmisor soporta hasta un total de 6 altavoces en los modos
monofónico o estéreo.
Reproducción Monofónica
Para habilitar la reproducción monofónica, cerciórese de que el interruptor ubicado en el panel
posterior del altavoz se encuentre en la posición MONO.
Reproducción Estereofónica (SÓLO aplica con la compra opcional de un altavoz
adicional SPK-24GX)
Para habilitar la reproducción estereofónica, mueva el interruptor en el panel posterior de uno de los
dos altavoces a la posición LEFT. Mueva el interruptor en el otro altavoz a la posición RIGHT.
Nota 1: También es posible escuchar sólo el canal de audio Izquierdo o Derecho usando únicamente
UN altavoz. Para hacerlo, simplemente mueva el interruptor en el panel posterior del
altavoz a LEFT o RIGHT. Sólo se escuchará el canal seleccionado.
Nota 2: Si dos altavoces están conectados al sistema, cerciórese de que ambos altavoces se
encuentren dentro del rango efectivo de operación. Si alguno de los altavoces está fuera
de rango, causará una distorsión en ambos altavoces.
Page 20

Vista Posterior
Compartimiento Baterías
Interruptor R/M/L
Aux In
DC IN 12V
AUX In
Para conectar un dispositivo de audio directamente al altavoz, inserte un cable de audio de 3,5mm
(no incluido) desde el dispositivo fuente a la toma „AUX In‟ ubicada en el panel posterior del
altavoz. Esta función envía el audio directamente al altavoz conectado. No envía señal de audio a
ningún altavoz adicional. Coloque el volumen en el dispositivo fuente de audio al 75% del máximo.
Nota:
Si la señal de la fuente es demasiado débil para recepción, el altavoz se apaga automáticamente
después de aproximadamente 4 minutos para proteger la unidad y ahorrar energía. Si la señal
de la fuente recupera un nivel adecuado, el altavoz se enciende automáticamente.
Cuando el altavoz está en modo Suspendido, el altavoz se apaga automáticamente después de
aproximadamente 15 minutos para proteger la unidad y ahorrar energía.
Para volver a encender el altavoz durante el modo Suspendido, oprima el botón POWER en el
control remoto. La conexión de la señal entre el transmisor y el altavoz se restablecerá
automáticamente.
Page 21

Corrección de Problemas
No hay sonido
- Cerciórese de que el adaptador de CA esté firmemente conectado a la toma de la pared y a la
toma DC IN del transmisor.
- Si usa baterías para alimentar el transmisor, una luz AZUL intermitente en el transmisor indica
que las baterías están agotadas. Reemplácelas con 4 baterías AA nuevas.
- Oprima el botón “PAIR” en el transmisor y el botón „Light/Pair‟ en los altavoces durante 5
segundos. Habrá un tono de prueba de audio cuando el proceso de emparejamiento haya
terminado. Repita el procedimiento en cualquier altavoz adicional.
- Cerciórese de que el botón POWER del altavoz esté en la posición ON.
- Las baterías del altavoz pueden estar demasiado débiles. Reemplácelas con baterías nuevas o
conecte el adaptador de CA incluido.
- Cerciórese de que el dispositivo de audio conectado esté encendido y produciendo señal.
- Cerciórese de que el nivel de volumen del dispositivo de audio esté al 75% del máximo.
Distorsión
- Las baterías del altavoz pueden estar demasiado débiles. Reemplácelas con baterías nuevas o
conecte el adaptador de CA incluido. La luz AZUL intermitente en el transmisor indica que
las baterías están agotadas.
- Cerciórese de que el nivel de volumen del dispositivo de audio esté al 75% del máximo.
- Los altavoces están demasiado alejados del transmisor. Acérquelos a la base del transmisor.
- La señal de entrada de audio puede ser demasiado baja o demasiado alta. Establezca la fuente de
audio al 75% del máximo.
- Si está usando varios altavoces, cerciórese de que todos los altavoces estén ubicados dentro del
rango efectivo de operación. Si algún altavoz está fuera de rango, causará distorsión en todos
los altavoces.
Page 22

Especificaciones
Modo de Transmisión UHF Estéreo
Frecuencia de Transmisión: 2,4GHz Digital
Voltaje de Operación: Transmisor, CD 6V 300mA
Altavoz, CD 12V 1,5A o 6 baterías alcalinas D (no incluidas)
Control Remoto, 1 batería tipo botón CR2032
Respuesta de Frecuencia: 30 Hz – 20 KHz
Distorsión: 0,5%
Relación Señal/Ruido: 65 dB
Distancia de Operación: Hasta 50 metros (en área abierta)
Potencia de Salida de Audio de Altavoz: 20 vatios máximo (RMS)
Este producto puede contener sustancias químicas listadas en la Proposición 65
(http://www.oehha.ca.gov/prop65/prop65_list/Newlist.html) que pueden ser conocidas por causar cáncer,
defectos congénitos u otros daños reproductivos.
ATENCIÓ N:
El transmisor para este juego de altavoces está diseñ ado para funcionar con una amplia
variedad de dispositivos. Nuestras pruebas muestran que los niveles de volumen
predeterminados de los iPods, reproductores MP3 y otros dispositivos conectados al
transmisor a travé s de la toma de audífono no tienen la fortaleza en la señ al requerida por
el transmisor. Al subir el volumen de su dispositivo se aumentará la fuerza de la señ al en el
transmisor. El LED azul de la señ al pasará de intermitente a estable cuando se alcance la
fuerza requerida en la señ al de su dispositivo. Recomendamos que mantenga el volumen de
su iPod o reproductor MP3 a un mínimo de ¾ del volumen total.
ADVERTENCIA:
Cuando se alimentan con la corriente alterna (CA) de la casa, estos dispositivos se deben
usar con el adaptador de CA/CD suministrado con el paquete. No trate de alimentarlos
utilizando otros adaptadores de CA o CD. Los adaptadores de corriente son para uso
interior solamente --- no los use en á reas hú medas o a la intemperie.
Page 23

SPK-24GX
Système à haut-parleur stéréo de 2,4GHz
numérique sans fil intérieur/extérieur
avec télécommande et
émetteur à double alimentation (noir)
Manuel de l'utilisateur
(Veuillez lire les instructions attentivement avant d'utiliser cet appareil)
www.audio-unlimited.com
Page 24

Introduction
Ce système de haut-parleur sans fil de 2,4 GHz GHz numérique utilise la technologie sans fil de
pointe pour émettre un son dynamique et de haute qualité partout à l'intérieur ou à l'extérieur de
votre maison. Le signal audio traverse les murs, les planchers et autres objets solides. Il suffit de
connecter le système à une QUELCONQUE source telle qu'un iPhone, un iPod, un lecteur MP3, un
smartphone, un ordinateur, une télévision ou un système home cinema pour profiter d'un son à
spectre complet et naturel sans installations ni câblage compliqués.
Caractéristiques
1. Transmission numérique à spectre étalé à sauts de fréquence de 2,4 GHz (FHSS).
2. 32 canaux de syntonisation par exploration entre l‟émetteur et le récepteur.
3. Puissance de sortie totale de 20 Watts RMS par canal.
4. Haut-parleur résistant à l'eau et télécommandé.
5. Lumière d'ambiance bleue en option.
6. Haut-parleur résistant aux intempéries (super bass et tweeter intégrés).
7. Jumelage optionnel entre l'émetteur et les haut-parleurs. (Seulement si on utilise plus d'un
haut-parleur, par l‟achat d‟un haut-parleur SPK-24GX supplémentaire).
8. Option stéréo (avec l‟ajout d‟un haut-parleur SPK-24GX).
9. Permet de connecter jusqu'à 6 haut-parleurs en stéréo G/D ou en mono.
10. Prise jack AUX IN à l‟arrière du haut-parleur. Ceci vous permet de brancher une source
audio DIRECTEMENT au haut-parleur (sans utiliser l'émetteur sans fil) avec un câble audio
standard de 3,5mm (non fourni). Le son ne sortira alors que de cet haut-parleur là. Tout
autre haut-parleur SPK-24GX restera silencieux
11. Portée jusqu'à 50 mètres (150') dans les espaces ouverts (moins au travers des murs ou
autres obstacles).
12. Fonctionne au travers des murs, planchers et partout dans une pièce.
13. Qualité stéréo virtuellement sans interférences.
14. Contrôle électronique de volume sur le haut-parleur.
15. Télécommande qui se range sur l‟avant du haut-parleur par aimant.
16. Le haut-parleur est alimenté par 6 piles D / LR20 (non fournies), ou par un adaptateur
secteur AC inclus.
17. L'émetteur de puissance double est alimenté par 4 piles AA (non fournies), ou par un
adaptateur secteur AC inclus.
18. L'émetteur supporte jusqu'à six haut-parleurs SPK-24GX. REMARQUE : Cet émetteur
n'est pas compatible avec le modèle antérieur de haut-parleurs SPK-24G (blanc).
Page 25

Contenu de l'emballage
i. 1 x émetteur à RF
ii. 1 x haut-parleur à RF
iii. 1 x télécommande
iv. 1 x adaptateur secteur pour l'émetteur
v. 1 x adaptateur secteur pour haut-parleur
vi. 1 x câble RCA à RCA (pour brancher l'émetteur à la télévision ou un récepteur)
vii. 1 x adaptateur de prise 3,5mm à ¼” (pour brancher l'émetteur au récepteur)
viii. 1 x manuel de l'utilisateur
Page 26

Remote Control Storage
Power on/off
Mood light / Pair
Volume Up/Down
Front View
Volume Up/Down
Mood Light
Power ON/OFF
Mise sous/hors tension
Lumière d’ambiance / Jumelage
Augmenter / Baisser le son
Rangement de la télécommande
Mise sous/hors tension
Lumière d‟ambiance
Augmenter / Baisser le son
Vue arrière
Compartiment à piles
Interrupteur R/M/L
Aux In
DC IN 12V
Vue avant
Émetteur
Haut-parleur
Power “ON” indicator = Voyant d‟alimentation
Télécommande
Page 27

compartiment à piles
Entrée
Rangement du câble
jack lorsque non utilisé
Voyant d’alimentation
Installation
Émetteur
1. Branchez l'adaptateur secteur inclus à une prise murale.
2. Insérez le connecteur de l'adaptateur dans la prise jack DC IN située au dos de la base de
l'émetteur, OU
3. Insérez 4 piles alcalines AA (non fournies) dans le compartiment à piles et fermez-le. Une
lumière BLEUE qui clignote sur l'émetteur indique que les piles sont faibles
4. Sortez le câble audio escamotable situé au dos de l'émetteur et connectez-le à la sortie jack
de toute source audio.
Remarque : Ne sortez pas entièrement le câble à moins de vouloir l'escamoter.
5. Pour escamoter le câble, tirez le jusqu'au bout et laissez-le se rembobiner dans la base.
6. Si la source audio a une connexion par câbles jack RCA rouge et blanc, utilisez le câble
RCA à RCA fourni pour connecter l'appareil à l'émetteur. Branchez le câble RCA à une
sortie AUX OUT située sur le récepteur, ou branchez-le directement sur votre poste de
télévision. Si le câble RCA est utilisé, le câble escamotable n'est pas connecté à un appareil
et ne devrait pas être sorti.
Voyant d‟alimentation
Haut-parleur
Alimentation par pile
1. Pour utiliser le haut-parleur avec des piles, retournez doucement le haut-parleur et ouvrez le
compartiment à piles situé en dessous.
2. Insérez six (6) piles alcalines D / LR20 (non fournies) dans le compartiment à piles, en
respectant les polarités +/- comme indiqué sur le compartiment.
3. Replacez le couvercle du compartiment à piles.
Page 28

Vue arrière
Compartiment à piles
Interrupteur R/M/L
Aux In
DC IN 12V
compartiment à piles
vue arrière
Alimentation secteur
1. Pour faire fonctionner un haut-parleur sur alimentation secteur, branchez l'adaptateur 12V à
une prise murale standard.
2. Insérez le connecteur de l'adaptateur dans la prise jack DC IN située au dos de la base du
haut-parleur.
Mise en route
1. Pour allumer le haut-parleur, appuyer et maintenir le bouton POWER enfoncé durant 3
secondes. La LED VERTE d'alimentation s'allume.
2. Pour éteindre le haut-parleur, appuyer à nouveau et maintenir le bouton POWER enfoncé
durant 3 secondes.
Page 29

Rangement de la télécommande
Mise sous/hors
Lumière d’ambiance / Jumelage
Augmenter / Baisser le son
Vue avant
Télécommande
1. La télécommande est prête à l'emploi et est fournie avec une pile bouton. Elle peut être rangée
dans la partie encastrée à l'avant du haut-parleur
2. Appuyez sur le bouton “+” “-” pour ajuster le volume.
3. Appuyez sur le bouton “Light” pour allumer/éteindre la lumière d'ambiance.
4. Lorsque le haut-parleur est allumé, appuyez sur le bouton “Power” pour le mettre en veille.
La lumière BLEUE du haut-parleur devient VERTE.
5. Appuyez sur le bouton “Power” lorsque le haut-parleur est en veille pour le rallumer. La
lumière VERTE du haut-parleur devient BLEUE.
REMARQUE : La télécommande peut être utilisée pour augmenter ou baisser le volume ou
changer l'état du haut-parleur, d'allumé à mis en veille ou de mis en veille à allumé. Si le hautparleur est complètement éteint, la télécommande ne pourra pas servir à allumer le système.
Utilisation de base
1. Lorsque l'émetteur est branché ou les piles insérées, mettre le bouton “On/Off”sur ON. La
lumière de l'émetteur devient VERTE.
2. Pour allumer le haut-parleur, appuyez et maintenez le bouton POWER situé sur l'avant enfoncé
durant 3 secondes. La lumière du bouton Power devient VERTE.
3. Allumez la source audio et mettez le volume de la source à 75% du maximum. La lumière
BLEUE de l'émetteur et du haut-parleur s'allument lorsque la connexion audio est établie entre les
deux éléments. Normalement cela ne prend pas plus de 5 secondes.
4. Si la source audio connectée à l'émetteur est éteinte durant moins de 4 minutes, la lumière
BLEUE de l'émetteur et du haut-parleur restent allumée, mais aucun son n'est transmis. Lorsque le
signal audio est rallumé, le son est transmis à nouveau.
5. Si aucun signal n'est détecté durant plus de 4 minutes, l'émetteur s'éteint automatiquement et se
met en VEILLE. La lumière BLEUE de l'émetteur et du haut-parleur deviennent VERTE.
6. Si aucun signal audio de l'émetteur n'est détecté durant plus de 15 minutes, le haut-parleur
s'éteint automatiquement. La LED VERTE s'éteint.
Page 30

7. Pour allumer le haut-parleur, maintenez le bouton POWER situé sur l'avant enfoncé durant 3
secondes.
8. Pour éteindre le haut-parleur, maintenez le bouton POWER situé sur l'avant enfoncé durant 3
secondes.
JUMELAGE
1. Le JUMELAGE est nécessaire si 2 haut-parleurs ou plus sont utilisés avec la même source
audio. (En achetant un haut-parleur SPK-24GX supplémentaire).
2. Appuyez sur le bouton "Pair" situé sur l'émetteur et sur le bouton "Light/Pair" situé sur l'un des
haut-parleurs durant 5 secondes. Un signal audio de test sera émis lorsque le processus de
jumelage aura terminé.
3. Le premier haut-parleur est à présent jumelé et mémorisé par l'émetteur.
4. Répétez cette procédure avec le deuxième haut-parleur en appuyant sur les boutons "Pair" et
"Light/Pair" situés sur l'émetteur et le deuxième haut-parleur respectivement.
5. Répétez cette procédure pour chaque haut-parleur additionnel.
Lumière d'ambiance bleue
Pour allumer la lumière d'ambiance bleue, appuyez sur le bouton LIGHT situé sur le haut-parleur ou
la télécommande.
Sélection des canaux Gauche / Droit et Mono
Le système de haut-parleur sans fil SPK-24GX est fourni avec un haut-parleur et permet une écoute
en mono ou en stéréo. Pour une émission en stéréo, l‟achat d‟un haut-parleur SPK-24GX
supplémentaire est nécessaire. Le mode mono est conseillé lorsque chaque haut-parleur est utilisé
dans une zone ou pièce différente. L'émetteur admet jusqu'à 6 haut-parleurs en mode stéréo ou
mono.
Mode mono
Pour faire fonctionner le mode mono, assurez-vous que le bouton situé au dos du haut-parleur est
sur la position MONO.
Mode stéréo (SEULEMENT en achetant un haut-parleur SPK-24GX
supplémentaire)
Pour faire fonctionner le mode stéréo, mettez le bouton situé au dos de l'un des haut-parleurs sur
LEFT (gauche). Mettez le bouton de l'autre haut-parleur sur RIGHT (droite)
Remarque 1 : Il est également possible d'écouter uniquement le canal Gauche ou Droit en utilisant
UN seul haut-parleur.
Il suffit simplement de mettre le bouton situé au dos du haut-parleur sur LEFT ou RIGHT.
Seul le canal sélectionné sera audible.
Remarque 2 : Si deux haut-parleurs sont connectés au système, assurez-vous que les deux sont
placés dans le périmètre de portée. Si l'un des haut-parleurs se trouve hors du périmètre de portée,
cela provoquera des distorsions sur les deux haut-parleurs.
Page 31

Vue arrière
Compartiment à piles
Interrupteur R/M/L
Aux In
DC IN
AUX In
Pour connecter un appareil audio directement au haut-parleur, branchez un câble audio 3,5mm (non
fourni) sur la source et sur la prise jack "AUX In" située au dos du haut-parleur. Ce branchement
envoie le son directement au haut-parleur connecté. Et n'envoie pas de signal audio aux hautparleurs supplémentaires. Réglez le volume de l'appareil source à 75% du maximum.
Remarque :
Si le signal source est trop faible pour la réception, le haut-parleur s'éteint automatiquement
après environs 4 minutes afin de protéger l'unité et économiser l'énergie. Si le signal source
retrouve un niveau adéquat, le haut-parleur se rallume automatiquement.
Quand le haut-parleur est en veille, il s'éteint automatiquement après environs 15 minutes afin
de protéger l'unité et économiser l'énergie.
Pour rallumer le haut-parleur qui se trouve en mode veille, appuyez sur le bouton POWER de la
télécommande. La connexion entre l'émetteur et le haut-parleur se rétablie automatiquement.
Page 32

Dépannage
Pas de son
Assurez-vous que l'adaptateur secteur est correctement branché à la prise murale et à la prise
jack "DC IN" de l'émetteur.
Si vous utilisez des piles pour alimenter l'émetteur, une lumière BLEUE qui clignote sur
l'émetteur indique que les piles sont faibles. Remplacez avec 4 piles AA neuves
Appuyez sur le bouton "PAIR" situé sur l'émetteur et sur le bouton "Light/Pair" situé sur le
haut-parleur durant 5 secondes. Un signal audio de test sera émis lorsque le processus de
jumelage aura terminé. Répétez cette procédure sur tous les haut-parleurs additionnels.
Assurez-vous que le bouton POWER du haut-parleur est en position ON.
Les piles du haut-parleur peuvent être trop faibles. Remplacez-les par des piles neuves ou
branchez-le en utilisant l'adaptateur secteur.
Assurez-vous que l'appareil audio connecté est branché et émet un signal.
Assurez-vous que le volume de l'appareil audio est réglé à 75% du maximum.
Distortion
Les piles du haut-parleur peuvent être trop faibles. Remplacez-les par des piles neuves ou
branchez-le en utilisant l'adaptateur secteur. Une lumière BLEUE qui clignote sur l'émetteur
indique que les piles sont faibles
Assurez-vous que le volume de l'appareil audio est réglé à 75% du maximum.
Le haut-parleur est trop loin de l'émetteur. Rapprochez-le de l'émetteur.
Le signal audio d'entrée peut être trop bas ou trop élevé. Réglez le volume de la source à 75%
du maximum.
Si vous utilisez plusieurs haut-parleurs, assurez-vous qu‟ils sont placés dans le périmètre de
portée. Si l'un des haut-parleurs se trouve hors du périmètre de portée, cela provoquera des
distorsions sur tous les haut-parleurs.
Page 33

Caractéristiques
Mode d'émission : UHF Stéréo
Fréquence utilisée : 2,4GHz Numérique
Voltage : Émetteur, DC 6C 300mA
Haut-parleur, DC 12V 1,5A ou 6 x piles alcalines D / LR20 (non
fournies)
Télécommande, 1 x pile bouton CR2032
Réponse en fréquence : 30 Hz – 20 KHz
Distorsion : 0,5%
Rapport S/B : 65 dB
Périmètre de portée : Jusqu'à 50 mètres (espace ouvert)
Sortie audio des haut-parleurs : 20W Max. (RMS)
Ce produit peut contenir des produits chimiques répertoriés dans la Proposition 65
(http://www.oehha.ca.gov/prop65/prop65_list/Newlist.html) connus pour pouvoir être à l'origine de cancers,
de malformations génétiques ou autres troubles de la reproduction.
ATTENTION :
L'é metteur de ce systè me de haut-parleur est conç u pour fonctionner avec de nombreux
d'appareils. Nos tests montrent que le volume par dé faut des iPods, lecteurs MP3 et autres
appareils connecté s à l'é met
pour l'é metteur. Augmenter le volume de votre appareil augmentera la puissance du signal
de l'é metteur. La LED bleue va cesser de clignoter lorsque la puissance de signal adé quate
aura é té atteinte par votre appareil. Nous vous conseillons de laisser le volume de votre
iPod ou lecteur MP3 à ¾ du volume maximal.
MISE EN GARDE :
Si vous utilisez le courant é lectrique domestique, ces appareils doivent ê tre branché s en
utilisant l'adaptateur secteur fourni dans l'emballage. N'essayez pas de las brancher en
utilisant d'autres adaptateurs. Les adaptateurs secteurs sont destiné s à ê tre utilisé
uniquement en inté rieur - ne pas les utiliser dans des zones humides ou par temps humide.
 Loading...