

Page 1
Phosphor User’s Guide
Audio Damage, Inc.
Release 1.1
Page 2

The information in this document is subject to change without notice and does not represent a commitment on
the part of Audio Damage, Inc. The software described by this document is subject to a License Agreement
and may not be copied to other media except as specifically allowed in the License Agreement. No part of this
publication may be copied, reproduced or otherwise transmitted or recorded, for any purpose, without prior
written permission by Audio Damage, Inc.
© 2011 Audio Damage, Inc. All rights reserved.
Credits
Software Design and Construction, Documentation
Chris Randall
Adam Schabtach
Field Testing
Jens Ågren
Steve Hamann
Jeff Laity
Mitchell Sigman
Made Possible By
Elle
Tracie
Fuzzy Logic
Alfred
Chica
Edwin
Garrus
Madeline
Pablo
Tali
Zed
Audio Unit version implemented using Symbiosis from NuEdge Development.
Page 3

License Agreement
BY INSTALLING THE SOFTWARE, YOU ARE CONSENTING TO BE BOUND BY THIS AGREEMENT. IF YOU DO NOT
AGREE TO ALL OF THE TERMS OF THIS AGREEMENT, THEN RETURN THE PRODUCT TO THE PLACE OF
PURCHASE FOR A FULL REFUND.
Single User License Grant: Audio Damage, Inc. ("Audio Damage") and its suppliers grant to Customer
("Customer") a nonexclusive and nontransferable license to use the Audio Damage software ("Software") in
object code form solely on a single central processing unit owned or leased by Customer.
Customer may make one (1) archival copy of the Software provided Customer affixes to such copy all
copyright, confidentiality, and proprietary notices that appear on the original.
EXCEPT AS EXPRESSLY AUTHORIZED ABOVE, CUSTOMER SHALL NOT: COPY, IN WHOLE OR IN PART,
SOFTWARE OR DOCUMENTATION; MODIFY THE SOFTWARE; REVERSE COMPILE OR REVERSE ASSEMBLE ALL
OR ANY PORTION OF THE SOFTWARE; OR RENT, LEASE, DISTRIBUTE, SELL, OR CREATE DERIVATIVE WORKS
OF THE SOFTWARE.
Customer agrees that aspects of the licensed materials, including the specific design and structure of
individual programs, constitute trade secrets and/or copyrighted material of Audio Damage. Customer agrees
not to disclose, provide, or otherwise make available such trade secrets or copyrighted material in any form to
any third party without the prior written consent of Audio Damage. Customer agrees to implement reasonable
security measures to protect such trade secrets and copyrighted material. Title to Software and
documentation shall remain solely with Audio Damage.
LIMITED WARRANTY. Audio Damage warrants that for a period of ninety (90) days from the date of shipment
from Audio Damage: (i) the media on which the Software is furnished will be free of defects in materials and
workmanship under normal use; and (ii) the Software substantially conforms to its published specifications.
Except for the foregoing, the Software is provided AS IS. This limited warranty extends only to Customer as
the original licensee. Customer's exclusive remedy and the entire liability of Audio Damage and its suppliers
under this limited warranty will be, at Audio Damage or its service center's option, repair, replacement, or
refund of the Software if reported (or, upon request, returned) to the party supplying the Software to
Customer. In no event does Audio Damage warrant that the Software is error free or that Customer will be
able to operate the Software without problems or interruptions.
This warranty does not apply if the software (a) has been altered, except by Audio Damage, (b) has not been
installed, operated, repaired, or maintained in accordance with instructions supplied by Audio Damage, (c) has
Page 4

been subjected to abnormal physical or electrical stress, misuse, negligence, or accident, or (d) is used in
ultrahazardous activities.
DISCLAIMER. EXCEPT AS SPECIFIED IN THIS WARRANTY, ALL EXPRESS OR IMPLIED CONDITIONS,
REPRESENTATIONS, AND WARRANTIES INCLUDING, WITHOUT LIMITATION, ANY IMPLIED WARRANTY OF
MERCHANTABILITY, FITNESS FOR A PARTICULAR PURPOSE, NONINFRINGEMENT OR ARISING FROM A
COURSE OF DEALING, USAGE, OR TRADE PRACTICE, ARE HEREBY EXCLUDED TO THE EXTENT ALLOWED BY
APPLICABLE LAW.
IN NO EVENT WILL AUDIO DAMAGE OR ITS SUPPLIERS BE LIABLE FOR ANY LOST REVENUE, PROFIT, OR
DATA, OR FOR SPECIAL, INDIRECT, CONSEQUENTIAL, INCIDENTAL, OR PUNITIVE DAMAGES HOWEVER
CAUSED AND REGARDLESS OF THE THEORY OF LIABILITY ARISING OUT OF THE USE OF OR INABILITY TO
USE THE SOFTWARE EVEN IF AUDIO DAMAGE OR ITS SUPPLIERS HAVE BEEN ADVISED OF THE POSSIBILITY
OF SUCH DAMAGES. In no event shall Audio Damage's or its suppliers' liability to Customer, whether in
contract, tort (including negligence), or otherwise, exceed the price paid by Customer. The foregoing
limitations shall apply even if the above-stated warranty fails of its essential purpose. SOME STATES DO NOT
ALLOW LIMITATION OR EXCLUSION OF LIABILITY FOR CONSEQUENTIAL OR INCIDENTAL DAMAGES.
The above warranty DOES NOT apply to any beta software, any software made available for testing or
demonstration purposes, any temporary software modules or any software for which Audio Damage does not
receive a license fee. All such software products are provided AS IS without any warranty whatsoever.
This License is effective until terminated. Customer may terminate this License at any time by destroying all
copies of Software including any documentation. This License will terminate immediately without notice from
Audio Damage if Customer fails to comply with any provision of this License. Upon termination, Customer
must destroy all copies of Software.
Software, including technical data, is subject to U.S. export control laws, including the U.S. Export
Administration Act and its associated regulations, and may be subject to export or import regulations in other
countries. Customer agrees to comply strictly with all such regulations and acknowledges that it has the
responsibility to obtain licenses to export, re-export, or import Software.
This License shall be governed by and construed in accordance with the laws of the State of Colorado, United
States of America, as if performed wholly within the state and without giving effect to the principles of conflict
of law. If any portion hereof is found to be void or unenforceable, the remaining provisions of this License
shall remain in full force and effect. This License constitutes the entire License between the parties with
respect to the use of the Software.
Page 5

Introduction
Phosphor is a polyphonic software synthesizer plug-in modeled on the alphaSyntauri hardware synthesizer.
Introduced in 1979, the alphaSyntauri used an Apple ][ microcomputer as its central processor and user
interface. While quite modest by contemporary standards, the alphaSyntauri can create a surprising wealth of
sounds easily, thanks to its simple but flexible approach to synthesis.
Rather than mimicking the small number of wave shapes available from the oscillators found in analog
synthesizers, the alphaSyntauri’s oscillators used tables of numbers—essentially samples of a single cycle of
an audio wave. The tables are filled with a process known as additive synthesis. The basic idea of additive
synthesis is that any sound wave can be created by adding together a large number of sine waves of different
frequencies. Each sine wave has a pure sound with no harmonics, but if you add a bunch of them together you
can create complex sounds. If you use enough sine waves, and if you control their relative loudness precisely
over the duration of a note, you can recreate just about any sound.1
Since the alphaSyntauri was limited by the computational power available in its day, it took a relatively simple
approach to additive synthesis. Each oscillator’s wave shape was created by adding together 16 sine waves,
which we’ll henceforth refer to as partials. The wave shape could not change over the duration of a note, but
each oscillator’s overall loudness was controlled by a separate envelope generator, and hence the timbre of
the note could be varied by mixing the two oscillators dynamically. Phosphor reproduces this system faithfully
and adds a couple of tricks of its own.
Phosphor harkens back to a time when high-quality digital synthesis was available only to people with huge
budgets or access to academic research facilities, but low-quality digital synthesis was finding its way into the
public ear through quarter-munching video games and 8-bit home computers. We hope you enjoy using it as
much as we enjoyed building it.
If You Don’t Like To Read Manuals
We understand. You just got a shiny new plug-in and you’d really rather play with it than read some dull
exposition about it. Go ahead, then—install it, load it up, flip through the presets, move some of the controls
around. Phosphor comes with a healthy assortment of built-in presets that will provide instant gratification
and keep you amused for quite some time. When you’re ready to dig deeper and create your own sounds, a
quick read of this manual should help you along.
1
For an in-depth explanation of how this works, see http://en.wikipedia.org/wiki/Additive_synthesis
Page 6

System Requirements
To use Phosphor, you'll need a Steinberg VST-compatible host application which conforms to the VST 2.0
specifications, and a computer capable of running it. For the Audio Unit version of Phosphor, you’ll need an
application capable of hosting Audio Unit plug-ins, and an Apple computer with an Intel CPU capable of
running it.
We support the use of Phosphor under Microsoft Windows XP, Vista, or Windows 7; and Apple OS X version
10.5 or newer.
Installation
Double-click the Phosphor Installer icon, and follow the instructions. During the installation process the
installer will ask you to enter your registration code. Your registration code uniquely identifies your purchase,
and you will need it if you need to reinstall your plug-in (for example, after upgrading to a new computer).
You can retrieve your code from your account at the Audio Damage website if you misplace it. Please don’t
share your code with your friends. We’re delighted if you like our products so much that you want to share
them, but please ask your friends to buy their own copy so that we can keep making new products.
On OS X, the installer installs both the AudioUnit and VST versions of Phosphor by default. If you click the
Customize button you can choose to not install one of these formats. If you’re running a 64-bit version of
Windows, you can choose to install either a 32- or 64-bit version of Phosphor, or both. On OS X, both the
AudioUnit and VST versions are combination 32/64-bit plug-ins.
To un-install from OS X, simply delete the plug-in from your VST folder, which is usually located at
/Library/Audio/Plug-Ins/VST/, and your AudioUnits folder, which is located at /Library/Audio/PlugIns/Components/. To un-install from Windows, delete the file named Phosphor.dll from your VST folder(s).
Page 7
Operation
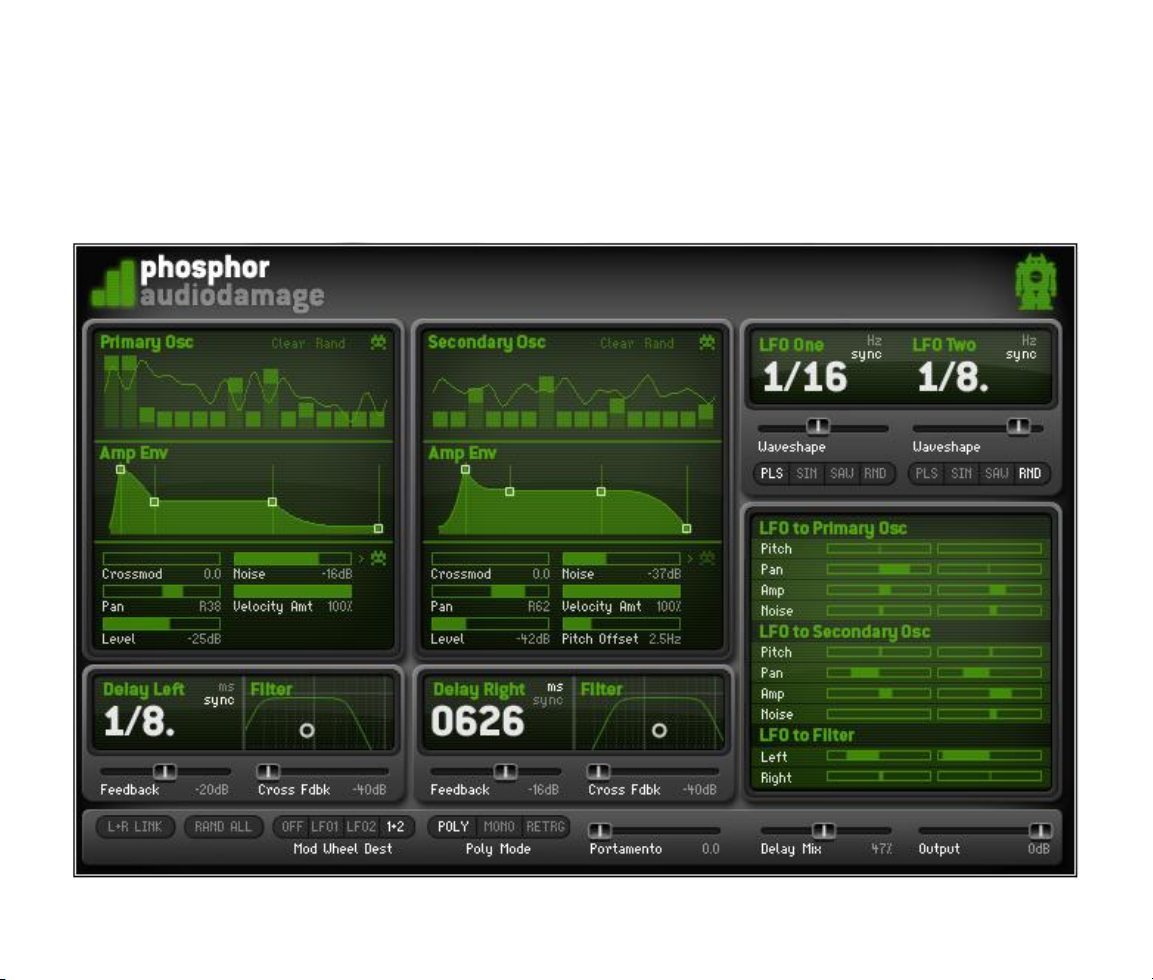
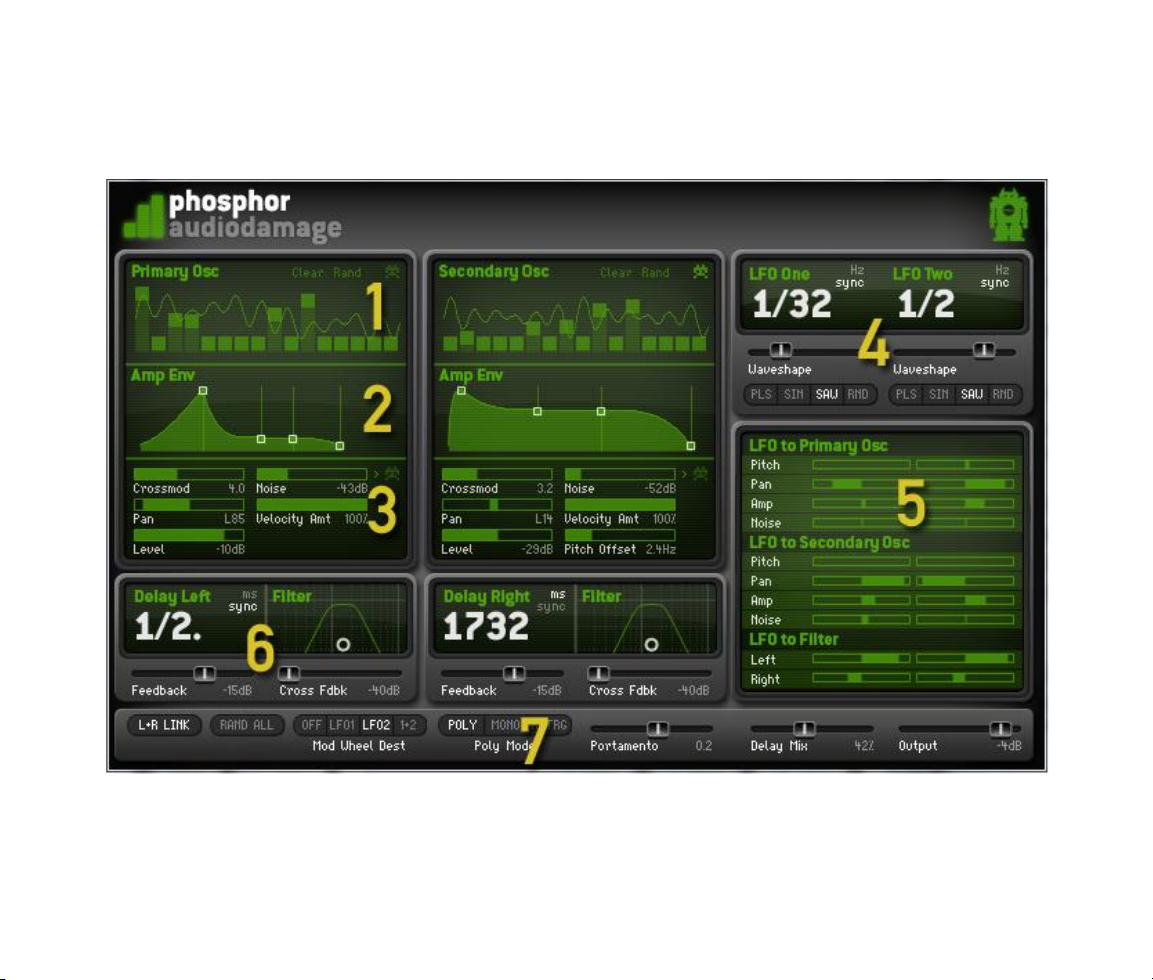
The following screen shot shows Phosphor’s user interface. The controls are described in the following
paragraphs.
1. Wavetable Oscillators
Phosphor’s core is a pair of audio oscillators, referred to as the Primary and Secondary Oscillators. Each
oscillator has its own wave table and hence its own timbre.
Page 8

The groups of vertical sliders near the top of Phosphor’s windows are called the partial sliders. The partial
sliders control the level of the partials used to calculate Phosphor’s wave tables, and hence control the tone of
the oscillators. Each oscillator has its own set of sixteen partial sliders which set the relative amplitudes of
each of the sixteen partials. The left-most slider sets the level of the fundamental, that is, the lowest-
frequency partial, which has the frequency of the note you’re playing. The next slider controls a partial whose
frequency is twice that of the fundamental (i.e., one octave above the root pitch). The next slider’s partial has
a frequency of three times that of the fundamental, and so on. A drawing of the resulting wave shape is
superimposed over the sliders. As you move a slider, you’ll see the wave shape change and hear the tone
change.
If you raise only the left-most partial slider, you’ll get a single sine wave with a pure tone:
If you raise a couple more sliders to the right, you’ll see some wiggle added to that wave, and hear higher
harmonics in the sound:
The CLEAR and RAND buttons above the partials sliders provide a couple of editing shortcuts. Clicking the
CLEAR button sets all of the sliders to zero. Clicking the RAND button sets all of the sliders to zero and then
sets about a third of them, chosen at random, to random levels.
Page 9

If you turn on the Vintage switch above the partials sliders on the right, the quality of Phosphor’s
oscillators is reduced to resemble the alphaSyntauri’s hardware. The Vintage switch introduces aliasing and
digital grunge which can add some interesting color to Phosphor’s tone.
2. Envelope Generators
Phospor employs a pair of envelope generators to shape the volume or loudness of each oscillator over the
duration of a note. Since Phosphor’s oscillators can create entirely different timbres, using the two envelope
generators to vary the relative loudness of each oscillator is one of the keys to producing interesting sound
with Phosphor.
Phosphor’s envelope generators use the traditional “ADSR” design found in numerous hardware and software
synthesizers. Unlike most ADSR envelope generators, Phosphor’s EGs let you control the curvature of the
Attack, Decay, and Release segments of the envelope.
Phosphor’s envelope generators have graphical controls that show you the shape of the envelope. Click and
drag the white handles to change the envelope parameters as follows:
Drag the handles horizontally to change the times; drag the two middle handles vertically to change the
sustain level. (The sustain level is the level at which the envelope remains while you hold down a key on your
keyboard.)
If you drag vertically between the handles (or to the left of the first handle), you change the curvature of the
envelope segment. The alphaSyntauri’s envelopes had only linear shape, but Phosphor’s adjustable curvature
provides a greater variety of envelope shapes.
Page 10

3. Oscillator Control Sliders
Beneath the envelope generators are groups of sliders which control several parameters for both of the
oscillators.
Crossmod
The Crossmod sliders enable the Primary and Secondary oscillators to
modulate each other’s frequency, creating a much wider range of tones
than they create individually. While Yamaha made frequencymodulation (FM) synthesis famous with the DX7, the NED Synclavier
combined wavetable and FM synthesis in a manner very similar to
Phosphor.
Moving the Primary oscillator’s Crossmod slider to the right increases the amount that the Secondary oscillator
modulates the Primary oscillator’s frequency. This changes the tone produced by the Primary oscillator (and
not the Secondary oscillator). In the usual parlance, the Primary oscillator is the carrier and the Secondary
oscillator is the modulator. Generally speaking, as you move the slider to the right, the tone of the Primary
oscillator will become brighter and more complex.
It works the other way around for the Secondary oscillator’s Crossmod slider: moving it to the right increases
the amount that the Primary oscillator modulates the Secondary oscillator, and in this instance we would say
that the Secondary oscillator is the carrier and the Primary oscillator is the modulator. Since both oscillators
can modulate each other, we call Phosphor’s FM scheme cross-modulation.
The signals used for cross-modulation originate after the envelope generator but before the Level slider
(described below). This means two things: first, since the timbre created by frequency modulation changes
with the amplitude of the modulating signal, you can use the envelope generator of the modulator to make
the tone of the carrier vary over the duration of the note. Second, you can use the level slider of the
modulator to reduce or remove its signal from Phosphor’s output so that you hear only the changing tone of
the carrier.
Noise
The Noise sliders control the loudness of noise generators whose outputs are mixed together with the signals
from the oscillators. The noise generators create white noise—noise with a flat frequency spectrum—and are
useful for adding bite to percussive sounds or a bit of grunge to the pure sine waves emanating from the
oscillators.
Page 11

If you click on the VINTAGE switch to the right of the Noise slider, the noise generator reproduces the
sound of noise sources found in computer sound generators that were contemporaries of the alphaSyntauri. In
this mode, the noise generators have some apparent pitch and will track both the keyboard and pitch-bend
wheel as you play. If you’ve played old video games, you’ll recognize the timbre of the noise generator,
particularly near the low end of the keyboard.
Pan
The Pan slider controls the stereo placement of the oscillators and noise sources. Moving the Pan slider left
and right moves the oscillator’s output in the corresponding direction in Phosphor’s stereo output.
Level
The Level sliders control the loudness of the oscillators and the noise sources. Moving the slider to the right
makes the oscillator’s tone and the noise louder, moving them to the left makes them quieter. Note that you
won’t hear the noise source unless you move the Noise slider at least somewhat to the right also.
Velocity Amount (Amt)
The Velocity Amt sliders allow Phosphor to respond to velocity information from your MIDI controller and/or
host sequencer. Moving the Velocity Amt slider to the right increases the influence that velocity has on the
loudness of the oscillator, i.e. playing your keyboard harder makes the oscillator louder. If you leave the
Velocity Amt slider at the far left, the oscillator’s loudness will be the same regardless of how vigorously you
pound the keyboard.
Pitch Offset
The Pitch Offset slider, present only on the Secondary Oscillator, raises the frequency of the Secondary
oscillator relative to that of the Primary oscillator. This slider has a fairly small range; at its rightmost position,
it raises the frequency of the Secondary oscillator by only 10Hz. Raising the frequency of the oscillator has
either or both of two effects. If both oscillators are heard at the same time, the Pitch Offset slider will
introduce a tremolo-like sound as the two oscillators beat against each other. If any cross-modulation is
active, the Pitch Offset slider will make the timbre of the carrier more complex and often somewhat
discordant.
Page 12
4. Low-Frequency Oscillators (LFOs)
Phosphor has two low-frequency oscillators (LFOs) that can be used to change, or modulate, several
parameters of the Primary and Secondary Oscillators, and the frequencies of the filters associated with the
delays.
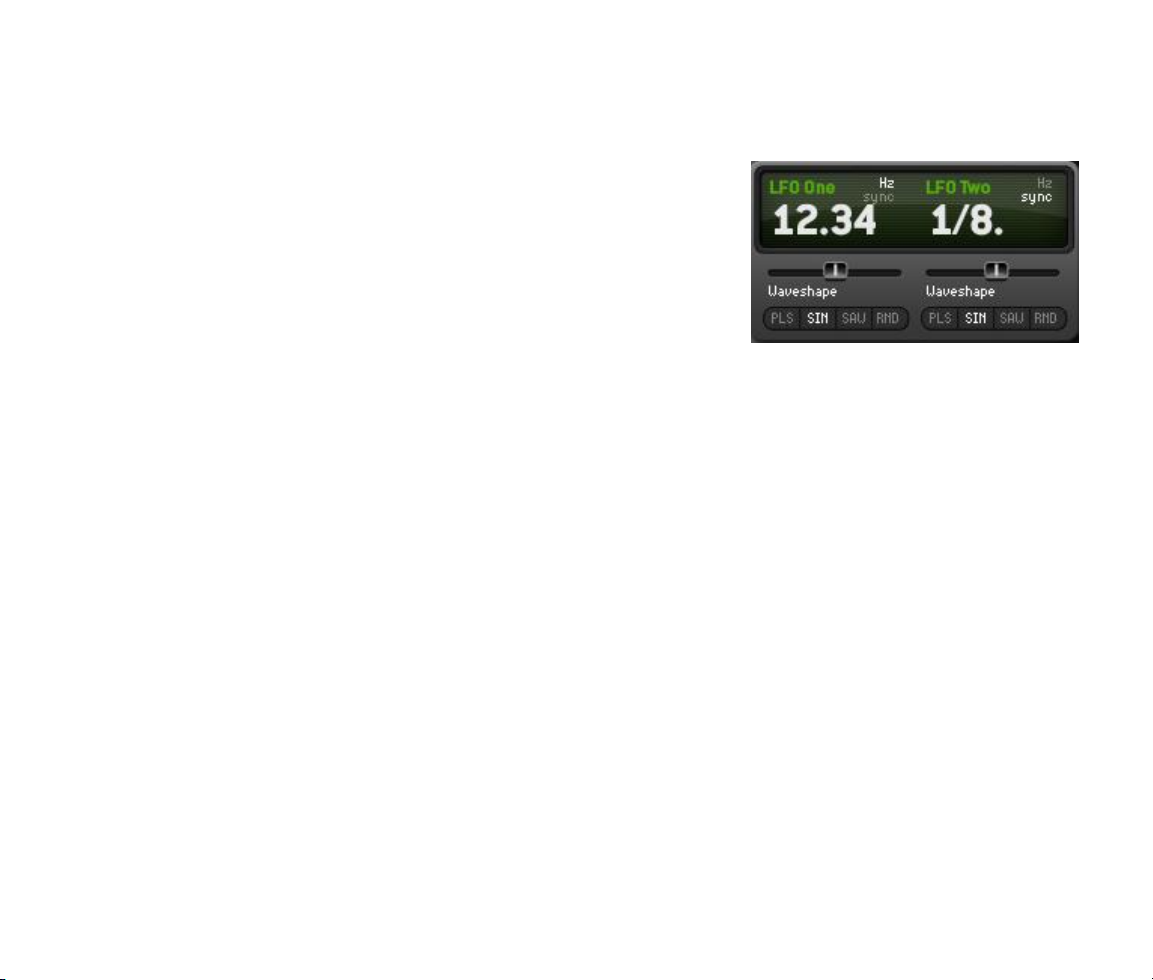
The numeric LFO controls determine how fast the output of the LFO
varies over time. They operate either in units of frequency (Hertz, or
cycles per second), or in metrical units. The LFO’s rate can be set from
one cycle every 100 seconds (or 0.01 cycles per second, abbreviated
0.01 Hz) to 14 cycles every second (14 Hz). Click on the unit indicators
in the upper-right corner of the controls (i.e. the words “Hz” and
“sync”) to switch between the two modes.
The WAVESHAPE slider and WAVEFORM buttons work together to control how the LFO’s output varies over
time. The WAVEFORM buttons let you choose one of four waveforms, with sawtooth, pulse, sinusoidal, and
randomly determined shapes. The WAVESHAPE slider changes the basic waveform in different ways,
depending on which waveform is chosen with the WAVEFORM buttons.
If the sawtooth wave is selected, and the WAVESHAPE slider is set to the middle of its range, the output
of the LFO rises and falls evenly between its lowest and highest values, creating a symmetric triangular
wave. If you move the WAVESHAPE slider to the left from its center, the LFO output rises more quickly
and falls more slowly. If you move the WAVESHAPE slider to the right, the LFO rises more slowly and falls
more quickly.
If the pulse wave is selected, and the WAVESHAPE slider is set to the middle of its range, the output of
the LFO jumps between its lowest and highest values, staying for an equal period of time at both values.
If you move the WAVESHAPE slider to the left, the output stays at its highest value for a shorter period of
time. If you move the WAVESHAPE slider to the right, the output stays at lowest value for a shorter
period of time. In engineering terms, the WAVESHAPE slider varies the duty cycle of the rectangular
wave.
If the sine wave is selected, and the WAVESHAPE slider is set to the middle of its range, the output of the
LFO varies smoothly between its lowest and highest values. The difference between a sine wave and a
triangle wave is that the triangle wave abruptly changes direction when it reaches its highest and lowest
values; whereas the sine wave gradually slows down, stops, and speeds up again when it changes
Page 13

directions. Moving the WAVESHAPE slider warps and skews the sine wave without creating any sharp
corners in its shape. Its effect is far easier to hear than to describe.
If the random wave is selected, and the WAVESHAPE slider is moved all the way to the left, the output of
the LFO jumps to a random value, changing at a rate determined by the numeric control. As you move the
WAVESHAPE slider to the right, the output moves more slowly from one random value to the next.
The diagram on the next page illustrates the different modulation signals generated by different settings of
the WAVEFORM and WAVESHAPE controls.
Page 14

5. Modulation Sliders
The horizontal sliders on the right side of Phosphor’s windows are called modulation sliders. They route signals
from the LFOs to the Primary and Secondary Oscillators, and to the filters in the delay lines. Each slider can be
thought of as controlling a connection between one of the LFOs and one of the parameters of one of the
oscillators. The left-hand column of sliders controls connections between LFO One and the oscillators and
filters; the sliders on the right control connections between LFO Two and the oscillators and filters.
Page 15

The sliders are bidirectional. If left at their center position, no signals from the LFOs reach the corresponding
parameter in the oscillators and filters. In general, moving a slider to the right of center causes the LFO to
increase the parameter’s value and moving it to the left of center causes the LFO to decrease the parameter’s
value. Simply click and drag on a slider to change its value. If you hold down the CTRL key on your keyboard
and click the slider, the slider will return to its center position.
More specifically, the sliders under the headings “LFO to Primary Osc” and “LFO to Secondary Osc” have the
following functions:
PITCH – moving the PITCH slider to the right causes the LFO to raise
the pitch of the oscillator, moving it to the left causes it to lower the
pitch. Use the PITCH slider to introduce subtle vibrato and trill effects,
or not-so-subtle pitch slides and jumps.
PAN – moving the PAN slider left or right of center causes the LFO to
move the output of the oscillator in the corresponding direction in the
stereo field. Note that the LFO’s influence is added to the position set
by the PAN slider in the Oscillator panes. Hence if for instance the
Oscillator PAN slider is set to the far left, and you move the PAN
modulation slider to the left, you won’t hear any change in the
oscillator’s position because the LFO can’t push it any further to the
left.
AMP – moving the AMP slider to the right of center causes the LFO to make the Oscillator louder, moving it to
the left causes the LFO to make the Oscillator quieter. The effect of the LFO is added to the loudness of the
oscillator as set by the LEVEL slider in the Oscillator pane.
NOISE - moving the NOISE slider to the right of center causes the LFO to make the noise generator louder,
moving it to the left causes the LFO to make the Oscillator noise generator. The effect of the LFO is added to
the loudness of the noise generator as set by the NOISE slider in the Oscillator pane.
The sliders under the heading “LFO to Filter” connect the LFOs to the
filters following the delay lines. The LFOs can modulate (change) the
frequencies of the filters. Moving these sliders to the left of center causes
the LFOs to decrease the filter frequencies (as if you were dragging the
dot in the filter’s control to the left), and moving the sliders to the right causes the LFOs to increase the filter
frequencies.
Page 16

Note that the amount that the LFOs control parameters can be affected by the modulation wheel on your MIDI
keyboard. See “Keyboard and Master Controls” below for more information.
6. Delay and Filter Controls
Because we at Audio Damage dearly love delay effects, we’ve added a stereo delay to Phosphor. The output of
each oscillator/noise source passes through its own delay. Each delay has a range of 0 to 1999 msec, or
approximately two seconds.
The numeric delay controls operate either in units of time or in metrical units, that is, fractions of a beat. Click
on the unit indicators in the upper-right corner of the controls (i.e. the words “ms” and “sync”) to switch
between the two modes. Click and drag up and down on the numbers to change the delay times. In the “ms”
mode, you can drag on individual digits to change the delay time by small or large amounts.
If the SYNC mode is active, Phosphor uses the current tempo reported by your host to calculate its delay
time. In this mode the delay time control sets the delay length in metrical units. The range of values is 1/32nd
to 1/1 (a whole measure), with dotted and triplet times available. Triplet values are denoted with a “T” after
the beat fraction, and dotted values are denoted with a period. For example, “1/8 .” indicates a delay time
with a dotted eighth note feel. Phosphor will track tempo changes, saving you from having to adjust its delay
time by hand when you change the tempo of your song.
The FEEDBACK slider controls the feedback level, that is, the amount of the output signal which is fed from
the output of the delay back into its input. Note that the feedback path goes through the filters.
The CROSS FDBK slider controls a second feedback path. As you move this slider to the right, some of the
signal is fed to the input of the other channel. For example, if you move the right-channel CROSS FDBK slider,
the right channel output signal is fed back into the input of the left channel. This cross-channel feedback can
be used to create delay effects that bounce back and forth.
Page 17

Phosphor has low-pass and high-pass filters which come after the delay lines in the signal chain. These filters
Moving the white dot horizontally changes the filter
frequencies in the same direction, moving the frequency
pass-band higher and lower
Moving the white dot vertically moves the filter frequencies
together and apart, making the frequency pass-band
narrower and wider
can be adjusted to alter the timbre of the delayed signal. For instance, you can use the low-pass filter to
create a “darker” sound, or the high-pass filter to create a “thinner” sound.
The filters are controlled in tandem with the graph-like controls labeled, appropriately enough, FILTER. Since
the filter controls change the low- and high-pass filters simultaneously the filters act like a band-pass filter
with a variable width. Dragging the white circle in the control changes the corner frequencies of both filters.
Dragging up and down moves the corner frequencies farther apart and closer together; dragging left and right
moves the frequencies in the same direction. As you pull the white dot downwards, the filters move together
and allow only a narrow band of frequencies to pass through. You can then move the dot left and right to hear
that band move up and down in frequency.
Page 18

7. Keyboard and Master Controls
The row of switches and sliders along the bottom of Phosphor’s window provide some handy shortcuts for
creating new sounds, control Phosphor’s response to MIDI keyboards, and setting output levels.
Starting from the left and heading right:
L+R Link
Turning on the L+R Link button cause the controls for the Primary Oscillator and the left delay/filter to affect
the corresponding controls for the Secondary Oscillator and the right delay/filter. In other words, if you move
a slider on the Primary Oscillator, the corresponding slider for the Secondary Oscillator will move as well. This
lets you rapidly adjust parameters both oscillators and delays/filters to the same setting. Note that it doesn’t
work the other way around: controls for the Secondary Oscillator and right delay/filter do not affect their
corresponding controls on the left. This lets you set both parameters to the same value with controls on the
left, then vary those on the right slightly.
Rand All
Clicking the Rand All button sets most of Phosphor’s controls to random positions. Some controls, such as
CROSSMOD, are not affected because randomizing them tends to not produce useful results. Also, some of the
modulation sliders are subjected to only slight amounts of randomization, again with the intent of producing
interesting results more often than not. Use the Rand All button to create unexpected starting points for new
sounds.
Mod Wheel Destination (Dest)
The MOD WHEEL DEST switches control whether the modulation wheel on your MIDI keyboard affects
Phosphor’s LFO. It has four positions: OFF, LFO1, LFO2, and 1+2. If set to LFO1, the mod wheel controls how
much LFO One affects the parameters it is connected to through the modulation sliders. Pushing the wheel
forward increases the LFO’s effect. If the Mod Wheel Dest switch is set to LFO2, the mod wheel controls LFO
Two. If it’s set to 1+2, the mod wheel controls both LFOs. If the switch is set to OFF—well, hopefully we don’t
need to explain this to you.
Page 19

Poly Mode
The Poly Mode switches determine how Phosphor responds when you play more than one note at a time on
your MIDI keyboard. It has three positions:
Poly – in this mode, Phosphor responds polyphonically, like a piano and most digital
synthesizers. Play several keys on your keyboard, and you’ll hear several notes.
Mono – in this mode, Phosphor plays only one note at a time. If you hold down a key on your
keyboard, and press another key, Phosphor will not play a new note, but will change
its pitch to that of the new key. In this mode, the envelope generators are not
restarted when you play additional keys.
Retrig – this is the same as Mono mode, but the envelope generators are retriggered every
time you press a key.
Portamento
The Portamento slider creates a sliding effect when the mono or retrig modes are active. If you hold down a
key and press another key, Phosphor’s pitch will slide to the second note at a rate determined by the sliders.
The further you move the slider to the right, the longer it takes Phosphor to slide from one note to the next.
The Portamento slider has no effect if Poly mode is active.
Delay Mix
The Delay Mix slider controls the relative loudness of Phospor’s raw output and the output from the delays and
filters. If you set the slider to the far left, you won’t hear the delayed/filtered signal at all. If you set it to the
far right, you’ll hear only the delayed/filtered signal. If you set it in the middle, you’ll hear equal amounts of
both.
Output
The Output slider controls Phosphor’s overall loudness. Phosphor’s signal can vary fairly widely depending on
how many partials you use and whether cross-modulation is employed; use this slider to compensate. Moving
towards the right makes Phosphor’s output louder.
Page 20

MIDI Controllers
Phosphor responds to MIDI continuous controller messages. You can use hardware MIDI controllers, such as
MIDI slider boxes or the knobs found on some MIDI keyboards, to adjust Phosphor’s parameters other than
the partials sliders.
Phosphor has a simple “MIDI Learn” mode for assigning its onscreen controls to MIDI controllers. To assign a
control to a MIDI controller:
1. Hold down the SHIFT and CTRL keys on your PC’s keyboard, or SHIFT and CMD keys if you’re using a Mac,
and click once on the control. A white box will be drawn around the control to indicate that it is ready
to learn which MIDI controller it will be assigned to.
2. Move the MIDI controller to send a continuous controller message—turn the knob, press the button,
move the slider, whatever is appropriate.
3. The white square will disappear. Now the control will move when you manipulate the MIDI controller.
When assigning a MIDI controller to Phosphor’s XY controls (the FM and Timbre voice controls as well as the
Filter/Feedback control), the XY control will move horizontally in response to the MIDI controller. Hold down
the OPTION key on your Mac keyboard, or the ALT key on a PC keyboard, to assign a MIDI controller to move
the XY control vertically. You can also use the option or alt key to assign a controller to the peak level of the
Pitch EG and the release curvature of the Amp EG.
Phosphor waits until it has received two consecutive continuous controller messages with the same controller
number before it makes an assignment. This filters out extraneous data sent by some MIDI controllers. If you
are assigning a button or switch on a MIDI controller, you may have to press or move the switch twice before
Phosphor recognizes the controller and assigns it to the desired knob.
To assign a different MIDI controller to a control, repeat the same procedure using a different
controller.
To cancel MIDI Learn mode without assigning a controller, hold down the SHIFT and CTRL keys (SHIFT
and CMD keys on a Mac) and click in any empty area in Phosphor’s window (i.e., don’t click on another
control). The white box will disappear.
Page 21

To remove a MIDI controller assignment from a control, SHIFT and CTRL keys, (SHIFT and CMD keys on a
Mac) click on the control once so that the white box appears, then click again on the same control.
Phosphor’s MIDI controller assignments apply to all presets and instances of Phosphor, in all host applications
that you use. The MIDI assignments are stored in a special file on your hard drive. The contents of this file are
read when Phosphor is loaded by your host. If you have two or more instances of Phosphor in use at once,
any MIDI assignments you make will not be propagated to the other instances until the next time that your
host loads the plug-ins.
Automation
Most of Phosphor’s parameters other than the partials sliders can be automated using your host's automation
features. Consult your host's documentation for information on how to use these features.
Presets
Phosphor comes with a selection of 80 presets, organized in the following categories: pads, lead synthesizer,
bass, keyboards, and special effects.
And Finally…
Thanks again for purchasing Phosphor. We make every effort to ensure your satisfaction with our products,
and want you to be happy with your purchase. Please write to support@audiodamage.com if you have any
questions or comments.
 Loading...