

Page 1
Panstation User’s Guide
Audio Damage, Inc.
Release 1.0
Page 2

The information in this document is subject to change without notice and does not represent a commitment on
the part of Audio Damage, Inc. The software described by this document is subject to a License Agreement
and may not be copied to other media except as specifically allowed in the License Agreement. No part of this
publication may be copied, reproduced or otherwise transmitted or recorded, for any purpose, without prior
written permission by Audio Damage, Inc.
© 2011 Audio Damage, Inc. All rights reserved.
Credits
Software Design and Construction, Documentation
Chris Randall
Adam Schabtach
Field Testing
Jens Ågren
Chad Clark
Hugo Goldbaby
Steve Hamann
Jeff Laity
Made Possible By
Elle
Tracie
Fuzzy Logic
Alfred
Chica
Edwin
Garrus
Madeline
Pablo
Tali
Zed
Audio Unit version implemented using Symbiosis from NuEdge Development.
Page 3

License Agreement
BY INSTALLING THE SOFTWARE, YOU ARE CONSENTING TO BE BOUND BY THIS AGREEMENT. IF YOU DO NOT
AGREE TO ALL OF THE TERMS OF THIS AGREEMENT, THEN RETURN THE PRODUCT TO THE PLACE OF
PURCHASE FOR A FULL REFUND.
Single User License Grant: Audio Damage, Inc. ("Audio Damage") and its suppliers grant to Customer
("Customer") a nonexclusive and nontransferable license to use the Audio Damage software ("Software") in
object code form solely on a single central processing unit owned or leased by Customer.
Customer may make one (1) archival copy of the Software provided Customer affixes to such copy all
copyright, confidentiality, and proprietary notices that appear on the original.
EXCEPT AS EXPRESSLY AUTHORIZED ABOVE, CUSTOMER SHALL NOT: COPY, IN WHOLE OR IN PART,
SOFTWARE OR DOCUMENTATION; MODIFY THE SOFTWARE; REVERSE COMPILE OR REVERSE ASSEMBLE ALL
OR ANY PORTION OF THE SOFTWARE; OR RENT, LEASE, DISTRIBUTE, SELL, OR CREATE DERIVATIVE WORKS
OF THE SOFTWARE.
Customer agrees that aspects of the licensed materials, including the specific design and structure of
individual programs, constitute trade secrets and/or copyrighted material of Audio Damage. Customer agrees
not to disclose, provide, or otherwise make available such trade secrets or copyrighted material in any form to
any third party without the prior written consent of Audio Damage. Customer agrees to implement reasonable
security measures to protect such trade secrets and copyrighted material. Title to Software and
documentation shall remain solely with Audio Damage.
LIMITED WARRANTY. Audio Damage warrants that for a period of ninety (90) days from the date of shipment
from Audio Damage: (i) the media on which the Software is furnished will be free of defects in materials and
workmanship under normal use; and (ii) the Software substantially conforms to its published specifications.
Except for the foregoing, the Software is provided AS IS. This limited warranty extends only to Customer as
the original licensee. Customer's exclusive remedy and the entire liability of Audio Damage and its suppliers
under this limited warranty will be, at Audio Damage or its service center's option, repair, replacement, or
refund of the Software if reported (or, upon request, returned) to the party supplying the Software to
Customer. In no event does Audio Damage warrant that the Software is error free or that Customer will be
able to operate the Software without problems or interruptions.
This warranty does not apply if the software (a) has been altered, except by Audio Damage, (b) has not been
installed, operated, repaired, or maintained in accordance with instructions supplied by Audio Damage, (c) has
Page 4

been subjected to abnormal physical or electrical stress, misuse, negligence, or accident, or (d) is used in
ultrahazardous activities.
DISCLAIMER. EXCEPT AS SPECIFIED IN THIS WARRANTY, ALL EXPRESS OR IMPLIED CONDITIONS,
REPRESENTATIONS, AND WARRANTIES INCLUDING, WITHOUT LIMITATION, ANY IMPLIED WARRANTY OF
MERCHANTABILITY, FITNESS FOR A PARTICULAR PURPOSE, NONINFRINGEMENT OR ARISING FROM A
COURSE OF DEALING, USAGE, OR TRADE PRACTICE, ARE HEREBY EXCLUDED TO THE EXTENT ALLOWED BY
APPLICABLE LAW.
IN NO EVENT WILL AUDIO DAMAGE OR ITS SUPPLIERS BE LIABLE FOR ANY LOST REVENUE, PROFIT, OR
DATA, OR FOR SPECIAL, INDIRECT, CONSEQUENTIAL, INCIDENTAL, OR PUNITIVE DAMAGES HOWEVER
CAUSED AND REGARDLESS OF THE THEORY OF LIABILITY ARISING OUT OF THE USE OF OR INABILITY TO
USE THE SOFTWARE EVEN IF AUDIO DAMAGE OR ITS SUPPLIERS HAVE BEEN ADVISED OF THE POSSIBILITY
OF SUCH DAMAGES. In no event shall Audio Damage's or its suppliers' liability to Customer, whether in
contract, tort (including negligence), or otherwise, exceed the price paid by Customer. The foregoing
limitations shall apply even if the above-stated warranty fails of its essential purpose. SOME STATES DO NOT
ALLOW LIMITATION OR EXCLUSION OF LIABILITY FOR CONSEQUENTIAL OR INCIDENTAL DAMAGES.
The above warranty DOES NOT apply to any beta software, any software made available for testing or
demonstration purposes, any temporary software modules or any software for which Audio Damage does not
receive a license fee. All such software products are provided AS IS without any warranty whatsoever.
This License is effective until terminated. Customer may terminate this License at any time by destroying all
copies of Software including any documentation. This License will terminate immediately without notice from
Audio Damage if Customer fails to comply with any provision of this License. Upon termination, Customer
must destroy all copies of Software.
Software, including technical data, is subject to U.S. export control laws, including the U.S. Export
Administration Act and its associated regulations, and may be subject to export or import regulations in other
countries. Customer agrees to comply strictly with all such regulations and acknowledges that it has the
responsibility to obtain licenses to export, re-export, or import Software.
This License shall be governed by and construed in accordance with the laws of the State of Colorado, United
States of America, as if performed wholly within the state and without giving effect to the principles of conflict
of law. If any portion hereof is found to be void or unenforceable, the remaining provisions of this License
shall remain in full force and effect. This License constitutes the entire License between the parties with
respect to the use of the Software.
Page 5

Introduction
Once upon a time, before the advent of computer-based recording, when the mere act of recording more than
two channels of audio involved specialized hardware costing tens of thousands of dollars, panning effects were
difficult. Dynamic panning meant someone had to twiddle the pan pots on the mixing desk, usually at
mixdown time since track counts were finite. Typically the mixing engineer was busy with the level faders, so
panning effects were rare, and modern effects like tempo-synced panning were out of the question. Expensive
signal processors called auto-panners were created to produce automated panning effects. Two of the most
renowned auto-panners were the Drawmer M500 dynamics unit and the Audio & Design PanScan. These units
are still highly prized in professional recording circles and change hands for twenty times the price of the plugin you just bought, or more.
At Audio Damage, we've often been sorely disappointed by the quality and feature set of the auto-panners
available in the plug-in market. We took it upon ourselves to create the most sophisticated autopanner/tremolo plug-in there is. With a feature set borrowing liberally from the M500 and the PanScan,
Panstation is a complete professional toolbox of panning and tremolo effects behind an easy-to-understand
and simple-to-program user interface.
Page 6

System Requirements
To use Panstation, you'll need a Steinberg VST-compatible host application which conforms to the VST 2.0
specifications, and a computer capable of running it. For the Audio Unit version of Phosphor, you’ll need an
application capable of hosting Audio Unit plug-ins, and an Apple computer with an Intel CPU capable of
running it.
We support the use of Panstation under Microsoft Windows XP, Vista, or Windows 7; and Apple OS X version
10.5 or newer.
Installation
Double-click the Panstation Installer icon, and follow the instructions. During the installation process the
installer will ask you to enter your registration code. Your registration code uniquely identifies your purchase,
and you will need it if you need to reinstall your plug-in (for example, after upgrading to a new computer).
Keep a copy of the code in a safe location and please don’t share it with your friends. We’re delighted if you
like our products so much that you want to share them, but please ask your friends to buy their own copy so
that we can keep making new products.
On OS X, the installer installs both the AudioUnit and VST versions of Panstation by default. If you click the
Customize button you can choose to not install one of these formats. If you’re running a 64-bit version of
Windows, you can choose to install either a 32- or 64-bit version of Panstation, or both.
To un-install from OS X, simply delete the plug-in from your VST folder, which is usually located at
/Library/Audio/Plug-Ins/VST/, and your AudioUnits folder, which is located at /Library/Audio/PlugIns/Components/. To un-install from Windows, use the included un-installer application.
Page 7

How It Works
While the notion of an automatic panning plug-in may seem simple enough, Panstation adds a number of
special tricks which bear some explanation. Since Panstation’s roots go back to studio hardware processors of
yesteryear, we’ll explain Panstation’s operation in the context of a hardware mixing desk.
Imagine if you plugged the same instrument—a synthesizer, for example—into two adjacent input channels on
a mixer, and turned the pan pots on the two channels to the far left and far right respectively. If you moved
the gain sliders on both channels up to the same level, the synthesizer sound would appear to be placed at
the center of the stereo field, because its sound would be equally loud in both the left and right channels.
Now, if you moved the left slider down, the sound would seem to move to the right because it would be louder
in the right channel. If you pushed the left slider back up to its original position and pulled the right slider
down, you’d hear the sound move to the left. If you repeatedly moved the sliders in opposite directions—one
up and the other down, alternately—the sound would move back and forth.
Obviously you could control the motion of the sound with the motion of your fingers on the faders. You’re your
fingers slowly and the sound would move slowly; move them quickly and the sound moves faster. Make small
motions with your fingers and the sound wouldn’t move far from the center of the stereo field, but yank the
sliders all the way up and down and the sound would jump back and forth from one far side to the other.
You might be wondering why we’re imagining doing this with a pair of level faders on two channels and not
just the panning knob on one channel. The answer is flexibility. Suppose you move the faders together, in the
same direction, rapidly up and down. Since the loudness of the sound will change by the same amount in both
channels, rather than panning effects you’ll hear tremolo effects, since tremolo is simply a repeated change in
a sound’s loudness.
If you actually did this rather than imagining it, you’d probably grow tired of moving the faders and it would
certainly be difficult to create the same exact effect more than once. This is why auto-panners—and
Panstation—were invented. Panstation is like a pair of magic fingers on your imagined mixer faders.
Panstation’s controls let you move those fingers rapidly or slowly, over small distances or large ones, in
opposite directions or together.
To put it in technical terms, Panstation uses a pair of low-frequency oscillators (LFOs) to control the gain of
the left and right audio channels. By varying the frequency, amplitude, wave shape, and relative phase of the
two LFOs, Panstation lets you quickly create a variety of panning, tremolo, and gating effects that would be
difficult and tedious to create by other means.
Page 8

Operation
Panstation can be used in a mono-in/stereo-out or stereo-in/stereo-out context. Since Panstation’s raison
d’être is creating stereo panning effects, it won’t work in a mono-in/mono-out context.
Most of Panstation’s onscreen controls are numbers which directly represent the current value of the
parameters. To change these controls, simply click on them with the mouse and drag up to increase the value,
down to decrease it. On most of these controls, clicking a specific digit and dragging up/down will change only
that digit. Use this technique to make small adjustments to controls by dragging on digits toward the right of
the control, and large adjustments by dragging on digits to the left. You can set most of the controls to default
values by holding down the CTRL key and clicking on the control.
Panstation has a few different modes of operation; not all of its controls are relevant to all modes. If a control
isn’t useful in the current mode, it is greyed out and won’t respond to mouse clicks. Here are two screenshots
of Panstation; the one on the left shows a mode in which most of the controls are inactive:
In the following pages we’ll describe each of Panstation’s controls. Panstation is not a terribly complex plug-in,
but some of its controls are interrelated and explaining one necessarily involves referring to others. Hence you
will find that sometimes we refer to a control in passing before later describing it in detail.
Page 9

Sum Input
Panstation is a stereo-in/stereo-out plug in; the two channels of audio are processed
independently. If you click the SUM INPUT switch, the left and right input signals are added
together, creating a mono input. This can be handy if you’re processing material with complete
channel separation, since for example panning a left-only signal to the hard right will produce silence.
Rate and Host Sync
The RATE control determines how fast Panstation’s low-frequency oscillators change the levels of the two
audio channels, and thus the speed of the panning or tremolo effect. The RATE control operates either in time
units—the number of cycles per second—or in metrical units, depending on the setting of the
HOST SYNC switch. If the HOST SYNC switch is off, Panstation’s LFOs run at whatever rate
you set with the RATE control. In this mode, the LFOs can run as slowly as 0.01Hz (one cycle
every 100 seconds) to 20Hz.
If the HOST SYNC switch is on, Panstation’s LFOs synchronize to the tempo and
position of your host DAW’s transport. The RATE control operates in metrical units,
expressed as fractions of a measure. For instance, if the RATE control is set to ¼, the
LFOs will complete four cycles every measure. The RATE control has a range of 1/32 to 2/1
(one cycle every two measures). Dotted and triplet values are indicated with a . and T
respectively.
Depth
The DEPTH control sets the amount that the low-frequency oscillators vary the gain of the
two audio channels, and hence the overall effect of Panstation. The DEPTH control has a
range of zero to 100%. When set at zero, Panstation has no effect on the audio passing
through it (unless you have the SUM INPUT switch turned on). As you increase the setting of
the DEPTH control, the change in gain increases and the sound will start to move back and
forth, and/or rise and fall in volume. At 100% the sound will move from one side of the stereo field to the
other, or change in loudness from full volume to silence.
Phase
The PHASE control sets the starting position of the LFO’s wave form, i.e. its phase, when it begins a cycle in
response to a trigger, or at the beginning of a measure when HOST SYNC is turned on. Phase is expressed in
degrees and ranges from 0 to 360. The exact effect of the PHASE control varies depending on which PAN
Page 10

SHAPE you’re using. For instance, if the Sine shape is active, and PHASE is set to zero, the
panning position will be at the center of the stereo field at the beginning of a measure. If PHASE
is set to 90, the panning position will be at the far right at the beginning of a measure, and at
the far left for a setting of 270. In tremolo applications, changing the PHASE changes the peaks
and valleys of the tremolo relative to the position of the beat.
Bias
The BIAS control makes Panstation’s effect greater on one channel or the other. At its default
setting of CTR, the levels of the two channels are modulated equally and the BIAS control has
no effect. Settings starting with the letter L reduce the amount of modulation on the right
channel, causing the panning effect to be greater on the left channel. Settings starting with the
letter R work the other way around, causing the panning effect to be greater on the right
channel.
Offset
The OFFSET control determines whether Panstation creates tremolo effects, panning effects, or a combination
of the two. This control sets the relative phase between the two LFOs. Like the PHASE control, the offset
control works in units of degrees, from zero to 360. If OFFSET is set to zero, the waves of the
LFOs are exactly in phase. If OFFSET is set to 180, the waves have opposite phase. Thinking
back to our imagined manipulations of the faders on a mixing desk, an OFFSET of zero would
mean moving your fingers together in the same direction, while an OFFSET of 180 would mean
moving your fingers in opposite directions. An OFFSET of 180 produces straightforward backand-forth panning, while an OFFSET of zero or 360 produces tremolo. Settings in between these values can
create panning that sounds ―circular‖ or tremolo with a hint of stereo movement.
Pan Law
Borrowing its name from mixer-design terminology, the PAN LAW popup menu
selects one of several panning laws. A panning law determines exactly how a
signal’s amplitude is changed as it moves from one side of the stereo field to the
other. A slightly silly amount of thought has gone in to designing different panning
laws for different situations and effects1. Within the context of Panstation,
however, all you need to know is that choosing a different panning law affects the
1
See for example Craig Anderton’s article at http://www.harmonycentral.com/docs/DOC-1106
Page 11

apparent loudness and distance of the sound as it moves back and forth. Since Panstation is intended for
creating special effects, none of its pan laws is necessarily better than the others. Try different settings in
different situations and let your ears choose.
The following panning laws are available:
Equal Power – this setting uses a panning law similar to the panning controls on hardware mixers
and software mixers present in DAWs. It varies the amplitude of the signal as it moves from one side
to the other so that its perceived loudness stays approximately constant.
M500 – this setting uses a panning law reproduced from the Drawmer M500. The M500’s panning law
makes the signal seem louder at the extreme left and right positions, attenuating it fairly sharply at
the center of the stereo field. This emphasizes the motion of the auto-panner and typically produces
the most dramatic results among the PAN LAW settings.
Equal Distance – this setting varies the loudness of the signal so that its apparent distance from the
listener’s head stays constant as the signal moves back and forth. It’s similar to the Equal Power
setting but can produce slightly more interesting results in some contexts.
Linear – this setting uses a mathematically simple panning law that varies the relative amplitudes of
the left and right channels in a linear (straight-line) manner. A linear panning law typically isn’t used
for mixing purposes since it tends to produce the ―hole in the middle‖ effect, i.e. the sound is quieter
when placed at the center of the stereo field than when placed at either side. In Panstation, however,
it’s useful as an intermediate setting whose effect is somewhere between the Equal Power and M500
settings.
If you have the OFFSET control set near zero or 360 to create tremolo effects rather than panning, the PAN
LAW control will have some effect on how the loudness of Panstation’s output rises and falls. The Linear
setting usually creates the most obvious results, but try other settings as well.
Pan Shape
The Pan Shape popup menu selects one of several wave shapes for the low-frequency oscillators. Different
wave shapes create different panning or tremolo effects, making the sound seem to move back and forth in
different trajectories. The available shapes are:
Page 12

Sine – a sinusoidal wave which rises and falls smoothly with no corners or sudden jumps. Use the
Sine shape to create basic back-and-forth panning effects or smooth tremolo.
Duo Sine – a combination of two sinusoidal waves of different frequencies, one faster than the other.
Like the Sine wave, this shape moves the sound back and forth smoothly but gives it an extra wobble
as it approaches either side.
Tri Sine – similar to the Duo Sine shape, but the extra wobble is faster.
Triangle – a wave which moves up and down in straight lines, rising at the same speed that it falls.
The audible difference between the Triangle wave and the Sine wave, when used for panning, is that
the Triangle wave makes the sound change direction immediately when it reaches either side;
whereas the Sine wave makes the sound seem to slow down as it approaches either side, pausing
briefly before it moves back in the opposite direction.
Steps – a wave with a series of flat lines, like a small staircase.
Use the Steps wave to make the sound jump through a series of
fixed positions in there stereo field. The Steps wave is also
useful for creating twitchy-sounding tremolo effects.
Ramp -> – a linear wave which makes the sound move from
left to right smoothly, then jump back to the far left. Note that
the Offset parameter must be set to 180 for this wave to have
that effect.
Ramp <- – just like Ramp -> but the sound moves smoothly
from right to left and jumps back to the far right.
Wide Square – a simple square wave which makes the sound
jump from one side to the other when used for panning, or gates
the sound on and off when used for tremolo.
Square – similar to the Wide Square setting, but with an extra
flat spot in the middle so that the sound seems to jump from the
center of the stereo field to one side and back, then jump from
the center to the other side and back.
Page 13

Diverge – somewhat similar to the Ramp shapes, the Diverge shape makes the sound move smoothly
from the center to one side, jump back to the center, move smoothly to the other side, and jump back
to the center. When used for tremolo effects, the Diverge shape makes the sound fade out to silence
then jump back to full volume.
Converge – like the Diverge setting, but the sound moves smoothly from one side to the center,
jumps to the other side, and moves smoothly back to the center. When used for tremolo effects, the
Converge shape makes the sound fade smoothly up to full volume then jump back to silence.
Aside from the Diverge and Converge shapes, all of the wave shapes are modeled on those found in the
Drawmer M500.
Triggered Operation
We haven’t yet mentioned one of Panstation’s more interesting features: triggering. Panstation can delay its
panning/tremolo effects until is triggered either by the incoming audio signal or a MIDI Note-On message.
Panstation can also count the number of triggers it receives, up 16, and fire on whichever trigger you
designate. Once Panstation is triggered, a simple envelope generator controls the intensity and duration of the
panning/tremolo effect.
The following controls all relate to Panstation’s triggered operation.
Trigger Source
The Trigger Source popup menu selects one of several operational modes in Panstation. These modes are as
follows:
Free – probably the most obvious mode, Free means that
Panstation runs continuously, without requiring a trigger to
start. It starts as soon as you insert it into your host, and keeps
going like an overused ad campaign. Most of the trigger-related
controls are disabled in this mode since they are not relevant.
Audio – The Audio Trigger Source setting means that
Panstation’s LFOs will not start oscillating until the plug-in
receives an audio signal (on either channel) that exceeds the
TRIGGER THRESHOLD setting. Once Panstation is triggered,
subsequent audio signals will not retrigger it until the envelope generator completes its cycle.
Page 14

MIDI Note Trigger – This setting causes Panstation to be triggered by any MIDI Note-On message it
receives, regardless of pitch or MIDI channel2. Contrary to the Audio Trigger Source, a subsequent
MIDI Note-On message will retrigger Panstation. The idea is that while you may not have exact control
over the levels of the audio material entering Panstation, you can exert exact control over the MIDI
notes you send to it.
MIDI Note Position – In this mode, MIDI Note-On messages completely determine Panstation’s
panning. If a middle-C note is received, the signal is placed at the center of the stereo field. Higherpitched notes move the sound to the right, lower pitches move it to the left. The LFOs and envelope
generator have no effect so all controls associated with them are disabled.
MIDI Pan Controller – Like the MIDI Note Position setting, but MIDI Continuous Controller Pan
messages (controller #10) control Panstation’s panning. (Yes, you can probably already do this with
your DAW, but it seemed silly to not put in this feature.)
Trigger Threshold
The TRIGGER THRESHOLD control sets the level of the audio signal at which Panstation
will trigger. The threshold is expressed in decibels relative to full scale, with a range of 40 to zero. When the input signal rises above the threshold, Panstation triggers.
Note that in order for Panstation to trigger on separate audio events, it needs to wait for
the input signal to fall back below the threshold before it can be triggered again. You may find that increasing
the threshold produces better results; raising the threshold means that only the loudest peaks of the signal
will be detected as triggers.
If you can’t get exactly the triggering response you want, use the MIDI Note Trigger mode and place MIDI
notes to trigger Panstation precisely.
2
Different host DAWs have different conventions for routing MIDI information to effects plug-ins. We won’t attempt to
explain all of these conventions here; consult the manual for your favorite host if you haven’t done this before.
Page 15

Trigger Time, Attack and Decay
Once Panstation is triggered, a synthesizer-style envelope generator controls the intensity of the
panning/tremolo. You can use the envelope generator to make panning effects that grow in width and stop
abruptly, tremolo that starts instantly and fades out, and so on. The maximum effect of the LFOs is still
controlled by the DEPTH control.
The ATTACK control determines how quickly the effect
starts after being triggered. It has a range of 1msec to 10
seconds. The TRIG TIME control sets how long the
panning continues after the attack phase. It has a range
of 1msec to 20 seconds. If you increase the value above 20 seconds, the control switches to ―INF‖ for infinity,
and the panning effect will continue indefinitely. Finally, The DECAY control determines how quickly the effect
fades out; it has a range of 100msec to 10 seconds.
If either MIDI Note Position or MIDI Pan Controller is the active trigger source, the ATTACK control has a
different function. For these trigger sources ATTACK sets the response time of a lag processor applied to the
MIDI data. As you raise the ATTACK setting, Panstation responds more slowly to changes in the MIDI data.
Use relatively small settings of a few milliseconds to provide fast response with some smoothing of sharp
jumps, and long settings to create panning effects that move slowly from one fixed position to another.
Trigger Count
The Count slider sets the number of triggers necessary to start Panstation’s envelope generator. For example,
if you set the Count slider to 4, four audio triggers or MIDI Note-Ons (depending on the Trigger Source) must
be received before the panning starts. The numbers to the right of the slider display the number of triggers
received followed by the setting of the Count slider.
You can reset the trigger counter to zero by holding the CTRL key and
clicking the numbers.
Alternate Trigger
The ALT TRIG switch, short for Alternate Trigger, flips the starting phase of the LFOs, as set by the
PHASE control, every other time Panstation is triggered. The exact effect of this control depends
upon the SHAPE and PHASE settings, but if these controls are set such that the panning starts on
one side, it will switch to the other side with each trigger.
Page 16

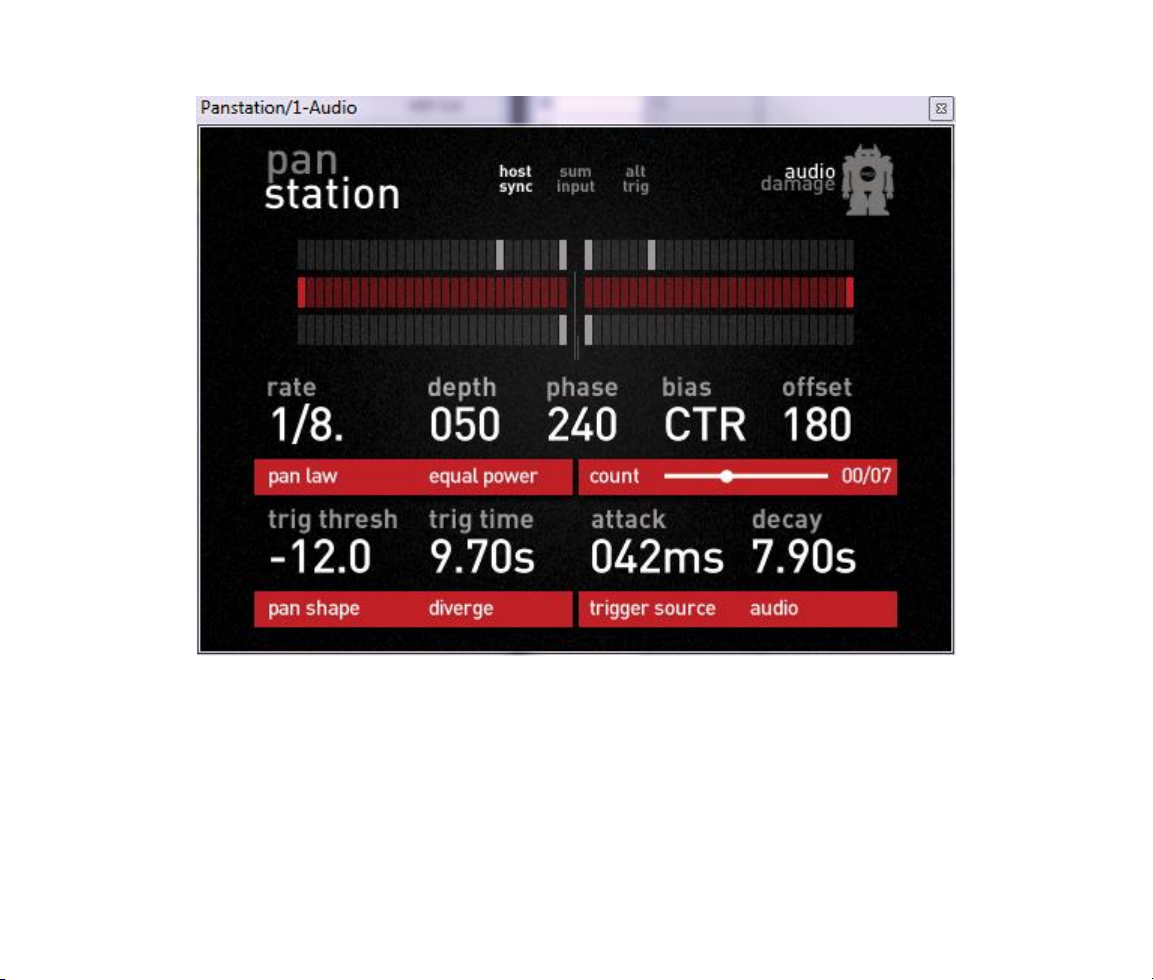
Meters
Panstation has several horizontal level meters at the top of its window. From top to bottom, these meters
display the level of the input signals, the gain of the channels as set by the LFOs, and the level of the output
signals. The meters indicate higher levels as they move outwards from the center.
When the Audio Trigger Source is active, the top meter has a pair of marks indicating the setting of the Trig
Threshold control. In the following screenshot, the input signal has an amplitude of -4dB on both channels,
and the LFOs have panned the signal to the right:
Page 17

MIDI Controllers
Panstation responds to MIDI continuous controller messages. You can use hardware MIDI controllers, such as
MIDI slider boxes or the knobs found on some MIDI keyboards, to adjust Panstation’s parameters.
Panstation has a simple ―MIDI Learn‖ mode for assigning its controls to MIDI controllers. To assign a control
to a MIDI controller:
1. Hold down the SHIFT and CTRL keys on your PC’s keyboard, or SHIFT and CMD keys if you’re using a Mac,
and click once on the control. A white box will be drawn around the control to indicate that it is ready
to learn which MIDI controller it will be assigned to.
2. Move the MIDI controller to send a continuous controller message—turn the knob, press the button,
move the slider, whatever is appropriate.
3. The white square will disappear. Now the control’s value will change when you manipulate the MIDI
controller.
Panstation waits until it has received two consecutive continuous controller messages with the same controller
number before it makes an assignment. This filters out extraneous data sent by some MIDI controllers. If you
are assigning a button or switch on a MIDI controller, you may have to press or move the switch twice before
Panstation recognizes the controller and assigns it to the desired knob.
To assign a different MIDI controller to a control, repeat the same procedure using a different
controller.
To cancel MIDI Learn mode without assigning a controller, hold down the SHIFT and CTRL keys (SHIFT
and CMD keys on a Mac) and click in any empty area in Panstation’s window (i.e., don’t click on
another control). The white box will disappear.
To remove a MIDI controller assignment from a control, SHIFT and CTRL keys, (SHIFT and CMD keys on a
Mac) click on the control once so that the white box appears, then click again on the same control.
Panstation’s MIDI controller assignments apply to all presets and instances of Panstation, in all host
applications that you use. The MIDI assignments are stored in a special file on your hard drive. The contents
of this file are read when Panstation is loaded by your host. If you have two or more instances of Panstation in
Page 18

use at once, any MIDI assignments you make will not be propagated to the other instances until the next time
that your host loads the plug-ins.
Automation
All of Panstation’s parameters can be automated using your host's automation features. Consult your host's
documentation for information on how to use these features.
And Finally…
Thanks again for purchasing Panstation. We make every effort to ensure your satisfaction with our products,
and want you to be happy with your purchase. Please write info@audiodamage.com if you have any questions
or comments.
 Loading...