

Page 1
Eos User’s Guide
Audio Damage, Inc.
Release 1.1
Page 2

The information in this document is subject to change without notice and does not represent a commitment on
the part of Audio Damage, Inc. The software described by this document is subject to a License Agreement
and may not be copied to other media except as specifically allowed in the License Agreement. No part of this
publication may be copied, reproduced or otherwise transmitted or recorded, for any purpose, without prior
written permission by Audio Damage, Inc.
© 2009, 2011 Audio Damage, Inc. All rights reserved.
Credits
Software Design and Construction, Documentation
Chris Randall
Adam Schabtach
Reverberation Algorithms and Implementation, Reverberant Words of Wisdom
Sean Costello, Valhalla DSP
Field Testing
Steve Hamann
Pierre Nuage
Made Possible By
Tracie
Elle
Fuzzy Logic
Chica
Edwin
Madeline
Pablo
Zed
In memory of Alex and Widget
Audio Unit version implemented using Symbiosis from NuEdge Development.
Page 3

License Agreement
BY INSTALLING THE SOFTWARE, YOU ARE CONSENTING TO BE BOUND BY THIS AGREEMENT. IF YOU DO NOT
AGREE TO ALL OF THE TERMS OF THIS AGREEMENT, THEN RETURN THE PRODUCT TO THE PLACE OF
PURCHASE FOR A FULL REFUND.
Single User License Grant: Audio Damage, Inc. ("Audio Damage") and its suppliers grant to Customer
("Customer") a nonexclusive and nontransferable license to use the Audio Damage software ("Software") in
object code form solely on a single central processing unit owned or leased by Customer.
Customer may make one (1) archival copy of the Software provided Customer affixes to such copy all
copyright, confidentiality, and proprietary notices that appear on the original.
EXCEPT AS EXPRESSLY AUTHORIZED ABOVE, CUSTOMER SHALL NOT: COPY, IN WHOLE OR IN PART,
SOFTWARE OR DOCUMENTATION; MODIFY THE SOFTWARE; REVERSE COMPILE OR REVERSE ASSEMBLE ALL
OR ANY PORTION OF THE SOFTWARE; OR RENT, LEASE, DISTRIBUTE, SELL, OR CREATE DERIVATIVE WORKS
OF THE SOFTWARE.
Customer agrees that aspects of the licensed materials, including the specific design and structure of
individual programs, constitute trade secrets and/or copyrighted material of Audio Damage. Customer agrees
not to disclose, provide, or otherwise make available such trade secrets or copyrighted material in any form to
any third party without the prior written consent of Audio Damage. Customer agrees to implement reasonable
security measures to protect such trade secrets and copyrighted material. Title to Software and
documentation shall remain solely with Audio Damage.
LIMITED WARRANTY. Audio Damage warrants that for a period of ninety (90) days from the date of shipment
from Audio Damage: (i) the media on which the Software is furnished will be free of defects in materials and
workmanship under normal use; and (ii) the Software substantially conforms to its published specifications.
Except for the foregoing, the Software is provided AS IS. This limited warranty extends only to Customer as
the original licensee. Customer's exclusive remedy and the entire liability of Audio Damage and its suppliers
under this limited warranty will be, at Audio Damage or its service center's option, repair, replacement, or
refund of the Software if reported (or, upon request, returned) to the party supplying the Software to
Customer. In no event does Audio Damage warrant that the Software is error free or that Customer will be
able to operate the Software without problems or interruptions.
This warranty does not apply if the software (a) has been altered, except by Audio Damage, (b) has not been
installed, operated, repaired, or maintained in accordance with instructions supplied by Audio Damage, (c) has
Page 4

been subjected to abnormal physical or electrical stress, misuse, negligence, or accident, or (d) is used in
ultrahazardous activities.
DISCLAIMER. EXCEPT AS SPECIFIED IN THIS WARRANTY, ALL EXPRESS OR IMPLIED CONDITIONS,
REPRESENTATIONS, AND WARRANTIES INCLUDING, WITHOUT LIMITATION, ANY IMPLIED WARRANTY OF
MERCHANTABILITY, FITNESS FOR A PARTICULAR PURPOSE, NONINFRINGEMENT OR ARISING FROM A
COURSE OF DEALING, USAGE, OR TRADE PRACTICE, ARE HEREBY EXCLUDED TO THE EXTENT ALLOWED BY
APPLICABLE LAW.
IN NO EVENT WILL AUDIO DAMAGE OR ITS SUPPLIERS BE LIABLE FOR ANY LOST REVENUE, PROFIT, OR
DATA, OR FOR SPECIAL, INDIRECT, CONSEQUENTIAL, INCIDENTAL, OR PUNITIVE DAMAGES HOWEVER
CAUSED AND REGARDLESS OF THE THEORY OF LIABILITY ARISING OUT OF THE USE OF OR INABILITY TO
USE THE SOFTWARE EVEN IF AUDIO DAMAGE OR ITS SUPPLIERS HAVE BEEN ADVISED OF THE POSSIBILITY
OF SUCH DAMAGES. In no event shall Audio Damage's or its suppliers' liability to Customer, whether in
contract, tort (including negligence), or otherwise, exceed the price paid by Customer. The foregoing
limitations shall apply even if the above-stated warranty fails of its essential purpose. SOME STATES DO NOT
ALLOW LIMITATION OR EXCLUSION OF LIABILITY FOR CONSEQUENTIAL OR INCIDENTAL DAMAGES.
The above warranty DOES NOT apply to any beta software, any software made available for testing or
demonstration purposes, any temporary software modules or any software for which Audio Damage does not
receive a license fee. All such software products are provided AS IS without any warranty whatsoever.
This License is effective until terminated. Customer may terminate this License at any time by destroying all
copies of Software including any documentation. This License will terminate immediately without notice from
Audio Damage if Customer fails to comply with any provision of this License. Upon termination, Customer
must destroy all copies of Software.
Software, including technical data, is subject to U.S. export control laws, including the U.S. Export
Administration Act and its associated regulations, and may be subject to export or import regulations in other
countries. Customer agrees to comply strictly with all such regulations and acknowledges that it has the
responsibility to obtain licenses to export, re-export, or import Software.
This License shall be governed by and construed in accordance with the laws of the State of Illinois, United
States of America, as if performed wholly within the state and without giving effect to the principles of conflict
of law. If any portion hereof is found to be void or unenforceable, the remaining provisions of this License
shall remain in full force and effect. This License constitutes the entire License between the parties with
respect to the use of the Software.
Page 5

Introduction
Thanks for purchasing Eos, the algorithmic reverb plug-in from Audio Damage. Eos consists of three highquality custom-designed reverb algorithms, made with the modern production environment in mind. Two
different plate simulators and our own Superhall algorithm give you a broad palette of reverb, and the easyto-understand interface makes adjusting the algorithms to suit your track incredibly simple.
Want a traditional dark plate reverb? Eos can do that. How about a short, dense room sound for your drum
buss? Not a problem. But where Eos really comes in to its own is when you drop Superhall on your piano or
synthesizer tracks. The incredibly long modulated hall sounds of Eno-style ambience are where Eos thrives,
something that is made of unobtanium with convolution 'verbs. Quite simply, an impulse response can not do
what Eos does. Period.
System Requirements
Eos is provided as both a VST and an AudioUnit plug-in for Windows and MacOS X. On Windows, you can
install either a 32- or 64-bit version of Eos, or both.
To use Eos, you'll need a Steinberg VST-compatible host application which conforms to the VST 2.0
specifications, and a computer capable of running it. For the Audio Unit version of Eos, you’ll need an
application capable of hosting Audio Unit plug-ins, and an Apple computer with an Intel CPU capable of
running it.
We support the use of Eos under Microsoft Windows XP, Vista, or Windows 7; and Apple OS X version 10.5 or
newer.
Page 6

Installation
Important Note for OS X Users: If you used a previous version of Eos and are updating to version 1.1,
please manually delete the VST and/or AudioUnit versions of Eos from your hard drive before installing version
1.1. The VST version is usually located at /Library/Audio/Plug-Ins/VST/Audio Damage/Eos.vst and the
AudioUnit version is located at /Library/Audio/Plug-Ins/Components/Eos.component. Deleting the files
prior to installation ensures a clean installation of the new version. We apologize for the inconvenience of this
extra step.
To install Eos, double-click the Eos Installer icon, and follow the instructions. During the installation process
the installer will ask you to enter your registration code. Your registration code uniquely identifies your
purchase, and you will need it if you need to reinstall your plug-in (for example, after upgrading to a new
computer). Keep a copy of the code in a safe location and please don’t share it with your friends. We’re
delighted if you like our products so much that you want to share them, but please ask your friends to buy
their own copy so that we can keep making new products.
To un-install from OS X, simply delete the plug-in from your VST folder, which is usually located at
/Library/Audio/Plug-Ins/VST/Audio Damage, and your AudioUnits folder, which is located at
/Library/Audio/Plug-Ins/Components/. To un-install from Windows, delete the file named Eos.dll from
your VST folder(s).
New in Version 1.1
Version 1.1 of Eos is a maintenance release. We’ve given the user interface a slight makeover, and we’ve
fixed several bugs in the AudioUnit implementation of Eos.
Page 7

Operation
Eos can be used in a mono-in/stereo-out or stereo-in/stereo-out context. Of the three reverb types in Eos,
one, Plate One, always sums its inputs to mono and is tailored for mono-in usage. The other two types have
stereo inputs. The reverberators create a stereo output signal even if the input signal is mono. The dry signal
is always passed through without summing.
Eos provides a number of presets to help you find settings appropriate for different instruments and contexts.
We suggest that you give Eos a try right away by dropping it into one of your current projects and flipping
through the presets. Once you’ve heard what Eos can do, come back to this manual when you’d like to read
about how to tailor Eos to your musical needs.
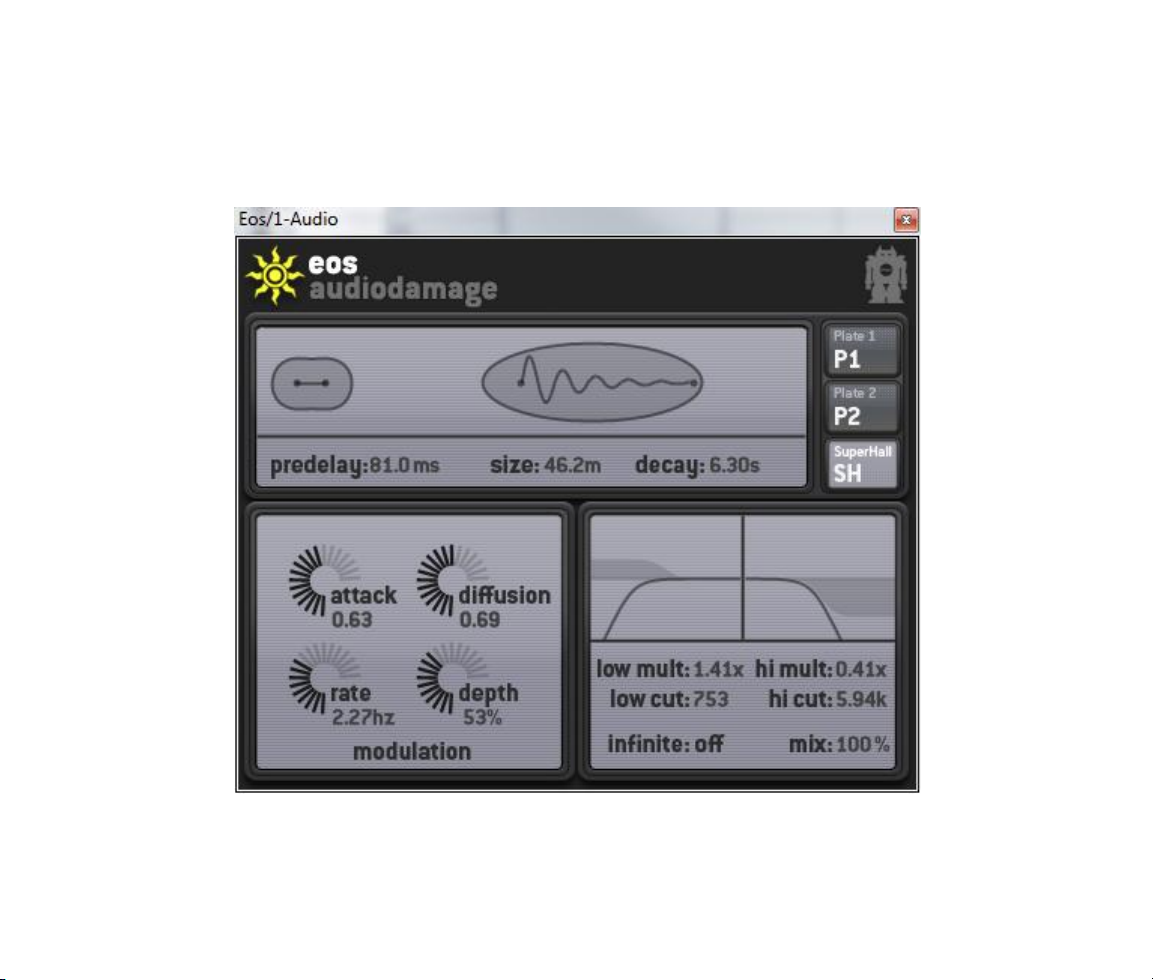
We’ll describe each of Eos’s controls in turn, starting with the controls at the top of the window.
Pre-Delay
The pre-delay simply delays the incoming signal before it reaches the reverberators, and hence how long the
reverberant sound will be delayed relative to the dry signal. Typically pre-delay is added to a reverb effect to
increase the perceived size of the simulated reverberant space: the bigger the space, the longer it takes the
reflected sound to reach the ears of the listener. Pre-delay also has creative applications. If the processed
signal is delayed enough, relative to the original signal, it becomes a separate sonic element. This works
particularly well with percussive sounds if the DECAY time is set fairly short.
You can adjust the pre-delay time in either of two ways. First, you can click and drag on the small circle in the
left of the graphic display. As you drag towards the right, the pre-delay time increases and the circle starts to
pull apart, representing the decoupling of the reverberated sound from the original. Second, you can click and
drag vertically on the displayed numeric value itself. Drag upwards to increase the pre-delay time, drag
downwards to decrease it. If you click to the right of the decimal point the value changes more slowly,
Page 8

allowing you to set the pre-delay time more precisely. Eos’s pre-delay has a range of zero to 300msec, or 0.3
seconds.
Size
The SIZE control varies the apparent size of the simulated acoustic space or the simulated metal plate. As will
be evident when you listen to it, rotating the SIZE knob changes the “bigness” of the reverberated sound. The
range of this control is 1-60 meters, although this is a somewhat arbitrary scale.
You can adjust the size in either of two ways. First, you can click and drag vertically on the oval on the right in
the graphic display. As you drag upwards, the size becomes larger and the oval becomes bigger. Second, you
can click and drag vertically on the displayed numeric value itself. Drag upwards to increase the size, drag
downwards to decrease it. If you click to the right of the decimal point the value changes more slowly,
allowing you to set the size more precisely.
Decay
The DECAY parameter controls how long it takes for the reverberated sound to fade out. This control has the
greatest influence on the overall sound of the effect. The range of this control is 0.1 to 10 seconds, which is
approximately the amount of time that it takes the reverb sound generated by a full-volume signal to fade to
silence. The actual amount of time it takes the signal to fade out is also affected by the reverb type, the SIZE
control, and the frequency multiplier controls (described below), so the numeric value of decay should be
considered a relative value.
Long reverb times are associated with large acoustic spaces, e.g., a large concert hall has a longer reverb
time than your bathroom. If you’re striving for a realistic reverberation effect you will not want to combine a
long DECAY setting with a small SIZE setting. On the other hand, don’t let the pursuit of realism discourage
you from combining extreme parameter settings to create unusual effects.
Type
Eos contains three different reverberation types: Plate One, Plate Two, and Superhall. Click on
the names at the right of Eos’s window to choose the different types. Each type has its own
sonic characteristics and hence different uses.
Plate One is inspired by the digital plate emulations of the 1970's, but with far more echo and
density. This reverb type adds the inputs together to a mono signal and creates an artificial
stereo output. Plate One has a natural decay at all settings of Decay and Size, and can be used
Page 9

to emulate small to large rooms as well as plates. Plate One lacks the metallic sound of most plate reverb and
plate emulations, except at small Size settings. Plate One produces a sound with the enveloping impact of a
plate reverb while remaining fairly colorless.
Plate Two is similar to Plate One, but with stereo inputs instead of mono and a higher echo density. Use Plate
Two on stereo mixes that may have cancellations when summed to mono, or when you desire the richest
plate sound.
Superhall is sonically inspired by the classic Concert Hall reverberators of the late 1970's and early 1980's.
Superhall retains the expansive imaging and gentle modulation of those devices while updating the echo
density and richness to modern standards. Superhall excels at long, gently modulating tails, producing a
flattering sonic wash.
Attack
The effect of the Attack control varies depending on which reverb type is selected. If the
Plate One or Plate Two type is selected, Attack controls the immediate impact of the reverb,
with higher settings of Attack resulting in a more "present" or direct sound. Higher Attack
settings also help retain the stereo imaging of the input signal, while lower settings produce
a more blended stereo image in the tail.
If the Superhall type is selected, Attack controls the slope of the initial reverb decay. At high Attack settings,
the tail exponentially decays at a rate determined by the Decay control. At mid settings of Attack, the initial
reverb decay is fairly flat, which can produce a "gated" effect with larger settings of Size and shorter settings
of Decay. When Attack is at a minimum, the reverb tail slowly fades in, at a rate determined by Size. Setting
Size to large values, Decay to its minimum value, and Attack to its minimum can produce a pseudo-reverse
sound.
Diffusion
The DIFFUSION knob controls how much the initial density of echoes (often known as early
reflections) builds up over time. Turning up the diffusion increases the build-up of echoes
immediately following the original signal. High diffusion settings work well for percussion,
but may sound too cluttered for vocals and full mixes.
Page 10

Modulation Rate and Depth
The modulation RATE and DEPTH knobs apply time-varying changes to the delay lines within the
reverberators. Modulation in a reverb serves two purposes. First, when applied in small amounts, it makes the
reverb effect seem more realistic and less artificial since its timbre changes subtly over time. The modulation
also breaks up any strong resonances in the reverberation network, reducing any tendency for it to sound
metallic.
Second, when applied in large amounts, modulation changes reverberation from
a spatial enhancement to a special effect. Large amounts of modulation create
pitch changes in the reverb. While too much modulation can cause unpleasant
pitch bends, just the right amount creates a rich chorusing effect when
combined with the original signal.
Obviously, then, modulation must be applied with care, depending on both the effect you want to achieve and
the instrument(s) you’re using. Eos provides two modulation controls, rate and depth. RATE controls how fast
the modulating signal changes, and DEPTH controls how much the modulating signal affects the reverb.
The RATE knob has a range of zero to five Hertz (cycles per second). Turning up the RATE knob makes the
sense of motion in the reverb more rapid. Eos’s modulators change shape randomly to make the modulation
unpredictable and hence more interesting to our ears. The DEPTH knob has a range of zero to 100%. Turning
up the DEPTH control makes the modulation stronger and more audible. If either of these knobs is set to its
lowest position, you won’t hear any modulation at all, of course.
The modulation settings are also reflected by the wiggly line in the graphic display at the top of Eos’s window.
As the RATE increases the line wiggles faster, and as the DEPTH increases the peaks of the wiggle become
higher.
Modulation is one of the respects in which algorithmic reverbs such as Eos differ from convolution-based
reverbs. An impulse response cannot recreate the way a modulated reverb changes over time. In much the
same way that a single sample cannot reproduce the timbral repertoire of an acoustic instrument, an impulse
response cannot reproduce the sonic richness of an algorithmic reverb.
Page 11

Reverb Frequency Multipliers
The display near the center of Eos’s window that looks like a frequency-response graph controls several
things. The shaded portions reflect filters that change the frequency response of the reverberators and hence
the tonal quality of the reverb tail. The LOW MULT (short for multiplier) setting determines whether low
frequencies are boosted or attenuated. This control has a range of 0.5 to two. If its value is less than one, low
frequencies decay more rapidly within the reverberator, relative to mid-range and high frequencies. If its
value is greater than one, low frequencies decay more slowly relative to other frequencies. If you’re looking
for that low-end “bloom” popular in reverb sounds from the 1980s, crank up the LOW MULT. You can change
the LOW MULT setting in either of two ways: either click and drag vertically in the left side of the frequencyresponse graph, or click and drag directly on the LOW MULT value itself.
The HI MULT (short for high multiplier) works in a similar manner, but
operates on high frequencies and only provides settings for
attenuation—that is, making high frequencies decay more rapidly than
the rest of the reverb tail. It has a range of 0.5 to one. Change the HI
MULT value either by clicking and dragging up and down in the right
half of the frequency-response graph, or by clicking and dragging up
and down on the HI MULT value.
If you’re particularly technically inclined you might be w ondering
about the corner frequencies of the low- and high-frequency multiplier
filters. Since those frequencies are rarely something that needs to be changed, we’ve tucked them away in a
couple of hidden parameters. They’re not visible in Eos’s window, but you can find them by looking at either
the generic editing controls that your host provides for plug-ins, or at the list of automatable parameters
displayed by your host. Eos comes with a number of presets with the multiplier filters carefully tuned so in
most cases you’ll be able to start with one of these presets and adjust it to your liking without changing those
frequencies. If you really want to tweak those parameters, you know where to find them.
Input Filters
Eos employs a pair of simple filters at the inputs of the reverberators to
control the overall tonal character of the reverb. The low-cut filter
reduces the low frequencies (“bass”) and the high-cut filter reduces the high frequencies (“treble”).
The settings of the low- and high-cut filters are reflected by the curved lines in the frequency-response graph.
Changing the LOW CUT control changes the frequency at which low signals are reduced; changing the HI CUT
control changes the frequency at which high signals are reduced. The LOW CUT control has a range of 20-
Page 12

2000Hz; the HI CUT control has a range of 200-20000Hz. Change these settings either by clicking and
dragging horizontally in the left and right areas of the frequency-response graph, or by clicking and dragging
vertically on the LOW CUT and HI CUT values.
It’s worth noting that reverb rarely needs to have a full 20kHz bandwidth. High frequencies tend to be
absorbed by the surroundings (walls, carpets, curtains, etc.) rather than reflected so our ears are accustomed
to hearing reverb without much high-frequency content. One early hardware reverberator, the Ursa Major
Space Station, had a bandwidth of only 7kHz. While this seems almost laughable by today’s standards, that
bandwidth was very much a part of its characteristic and popular sound. When its creator developed a modern
reissue of the Space Station, he carefully preserved and recreated the 7kHz bandwidth, even though
contemporary DSP hardware is capable of a much higher frequency response.
Mix
The MIX numerical adjusts the relative loudness of the processed signal and the original
signal. Click on it and drag vertically to change its value. If you set it at zero, you’ll hear
only the original, unprocessed signal. If you set it at 100%, you’ll hear only the
reverberation. You can probably guess what happens if you set it somewhere in between, right?
Where you should set the MIX control depends upon how you’re using the plug-in within your host program. If
you’re using it as a send effect, set the control to 100% so that only the processed signal is present in the
output since the dry signal is already entering your host’s mixer. If you’re using it as an insert effect on an
instrument channel, usually you’ll want a setting somewhere between 30 and 50% so that you hear more or
less equal amounts of the instrument’s signal and the reverberation. Let your ears be your guide, as always.
Note: The MIX control behaves somewhat differently than the other controls in Eos (and in other plug-ins).
Since it’s likely that you’ll want to put Eos in as either a send or an insert effect, set the MIX control
accordingly, and leave it there while you try different presets, the MIX control does not change when you
switch presets. Once you set the MIX knob to your liking in any instance of Eos, it will stay at that setting
when you change presets. When you save your session, or when you save either an individual preset or a
bank of presets as a separate file, the current setting of the MIX control is retained.
Infinite
The INFINITE button, when turned on, effectively sets the decay time of the reverberators
to infinity. Any signal present in the plug-in when you turn the infinite button on will be
Page 13

frozen, somewhat like a looped sample. When you turn the infinite button off, the usual decay time is restored
and the reverb fades out normally. Obviously the infinite control is suited to creating unusual effects and is
not likely to be something you use every day (unless, of course, creating unusual effects is your daily work).
Eos will process any signals arriving at its inputs when infinite is turned on. This means that the infinite mode
works best with very sparse source material. As long as infinite is on, new signals will be added to the sounds
circulating in the reverb, building up and eventually becoming loud and distorted. Whether or not this is useful
to you is your choice; we just wanted to warn you of the hazard.
MIDI Controllers
Eos responds to MIDI continuous controller messages. You can use hardware MIDI controllers, such as MIDI
slider boxes or the knobs found on some MIDI keyboards, to adjust Eos’s parameters.
Eos has a simple “MIDI Learn” mode for assigning its knobs and other controls to MIDI controllers. To assign a
control to a MIDI controller:
1. Hold down the SHIFT and CTRL keys on your PC’s keyboard, or SHIFT and CMD keys if you’re using a Mac,
and click once on the knob. If you want to use one of the controls that also has a graphic
representation, such as SIZE, LOW MULT, etc., click on the numeric value rather than the graphic. A
white box will be drawn around the control to indicate that it is ready to learn which MIDI controller it
will be assigned to.
2. Move the MIDI controller to send a continuous controller message—turn the knob, press the button,
move the slider, whatever is appropriate.
3. The white square will disappear. Now the knob will move when you manipulate the MIDI controller.
Eos waits until it has received two consecutive continuous controller messages with the same controller
number before it makes an assignment. This filters out extraneous data sent by some MIDI controllers. If you
are assigning a button or switch on a MIDI controller, you may have to press or move the switch twice before
Eos recognizes the controller and assigns it to the desired knob.
· To assign a different MIDI controller to a control, repeat the same procedure using a different
controller.
Page 14

· To cancel MIDI Learn mode without assigning a controller, hold down the SHIFT and CTRL keys (SHIFT
and CMD keys on a Mac) and click in any empty area in Eos’s window (i.e., don’t click on another
control). The white box will disappear.
· To remove a MIDI controller assignment from a control, SHIFT and CTRL keys, (SHIFT and CMD keys on a
Mac) click on the control once so that the white box appears, then click again on the same control.
Eos’s MIDI controller assignments apply to all presets and instances of Eos, in all host applications that you
use. The MIDI assignments are stored in a special file on your hard drive. The contents of this file are read
when Eos is loaded by your host. If you have two or more instances of Eos in use at once, any MIDI
assignments you make will not be propagated to the other instances until the next time that your host loads
the plug-ins.
Automation
All of Eos’s parameters can be automated using your host's automation features. Consult your host's
documentation for information on how to use these features.
And Finally…
Thanks again for purchasing Eos. We make every effort to ensure your satisfaction with our products, and
want you to be happy with your purchase. Please write support@audiodamage.com if you have any questions
or comments.
 Loading...