

Page 1

BigSeq2 User’s Guide
Audio Damage, Inc.
Release 1.0
21 March 2009
Page 2

The information in this document is subject to change without notice and does not represent a commitment on
the part of Audio Damage, Inc. The software described by this document is subject to a License Agreement
and may not be copied to other media except as specifically allowed in the License Agreement. No part of this
publication may be copied, reproduced or otherwise transmitted or recorded, for any purpose, without prior
written permission by Audio Damage, Inc.
© 2008 Audio Damage, Inc. All rights reserved.
Credits
Software Design and Construction, Documentation
Chris Randall
Adam Schabtach
Field Testing
Sean Costello
Matthew Davidson
Steve Hamann
Jeff Laity
Jim Murphy
Made Possible By
Tracie
Lisa
Fuzzy Logic
Alex
Chica
Pablo
Widget
Page 3

License Agreement
BY INSTALLING THE SOFTWARE, YOU ARE CONSENTING TO BE BOUND BY THIS AGREEMENT. IF YOU DO NOT
AGREE TO ALL OF THE TERMS OF THIS AGREEMENT, THEN RETURN THE PRODUCT TO THE PLACE OF
PURCHASE FOR A FULL REFUND.
Single User License Grant: Audio Damage, Inc. ("Audio Damage") and its suppliers grant to Customer
("Customer") a nonexclusive and nontransferable license to use the Audio Damage software ("Software") in
object code form solely on a single central processing unit owned or leased by Customer.
Customer may make one (1) archival copy of the Software provided Customer affixes to such copy all
copyright, confidentiality, and proprietary notices that appear on the original.
EXCEPT AS EXPRESSLY AUTHORIZED ABOVE, CUSTOMER SHALL NOT: COPY, IN WHOLE OR IN PART,
SOFTWARE OR DOCUMENTATION; MODIFY THE SOFTWARE; REVERSE COMPILE OR REVERSE ASSEMBLE ALL
OR ANY PORTION OF THE SOFTWARE; OR RENT, LEASE, DISTRIBUTE, SELL, OR CREATE DERIVATIVE WORKS
OF THE SOFTWARE.
Customer agrees that aspects of the licensed materials, including the specific design and structure of
individual programs, constitute trade secrets and/or copyrighted material of Audio Damage. Customer agrees
not to disclose, provide, or otherwise make available such trade secrets or copyrighted material in any form to
any third party without the prior written consent of Audio Damage. Customer agrees to implement reasonable
security measures to protect such trade secrets and copyrighted material. Title to Software and
documentation shall remain solely with Audio Damage.
LIMITED WARRANTY. Audio Damage warrants that for a period of ninety (90) days from the date of shipment
from Audio Damage: (i) the media on which the Software is furnished will be free of defects in materials and
workmanship under normal use; and (ii) the Software substantially conforms to its published specifications.
Except for the foregoing, the Software is provided AS IS. This limited warranty extends only to Customer as
the original licensee. Customer's exclusive remedy and the entire liability of Audio Damage and its suppliers
under this limited warranty will be, at Audio Damage or its service center's option, repair, replacement, or
refund of the Software if reported (or, upon request, returned) to the party supplying the Software to
Customer. In no event does Audio Damage warrant that the Software is error free or that Customer will be
able to operate the Software without problems or interruptions.
This warranty does not apply if the software (a) has been altered, except by Audio Damage, (b) has not been
installed, operated, repaired, or maintained in accordance with instructions supplied by Audio Damage, (c) has
Page 4

been subjected to abnormal physical or electrical stress, misuse, negligence, or accident, or (d) is used in
ultrahazardous activities.
DISCLAIMER. EXCEPT AS SPECIFIED IN THIS WARRANTY, ALL EXPRESS OR IMPLIED CONDITIONS,
REPRESENTATIONS, AND WARRANTIES INCLUDING, WITHOUT LIMITATION, ANY IMPLIED WARRANTY OF
MERCHANTABILITY, FITNESS FOR A PARTICULAR PURPOSE, NONINFRINGEMENT OR ARISING FROM A
COURSE OF DEALING, USAGE, OR TRADE PRACTICE, ARE HEREBY EXCLUDED TO THE EXTENT ALLOWED BY
APPLICABLE LAW.
IN NO EVENT WILL AUDIO DAMAGE OR ITS SUPPLIERS BE LIABLE FOR ANY LOST REVENUE, PROFIT, OR
DATA, OR FOR SPECIAL, INDIRECT, CONSEQUENTIAL, INCIDENTAL, OR PUNITIVE DAMAGES HOWEVER
CAUSED AND REGARDLESS OF THE THEORY OF LIABILITY ARISING OUT OF THE USE OF OR INABILITY TO
USE THE SOFTWARE EVEN IF AUDIO DAMAGE OR ITS SUPPLIERS HAVE BEEN ADVISED OF THE POSSIBILITY
OF SUCH DAMAGES. In no event shall Audio Damage's or its suppliers' liability to Customer, whether in
contract, tort (including negligence), or otherwise, exceed the price paid by Customer. The foregoing
limitations shall apply even if the above-stated warranty fails of its essential purpose. SOME STATES DO NOT
ALLOW LIMITATION OR EXCLUSION OF LIABILITY FOR CONSEQUENTIAL OR INCIDENTAL DAMAGES.
The above warranty DOES NOT apply to any beta software, any software made available for testing or
demonstration purposes, any temporary software modules or any software for which Audio Damage does not
receive a license fee. All such software products are provided AS IS without any warranty whatsoever.
This License is effective until terminated. Customer may terminate this License at any time by destroying all
copies of Software including any documentation. This License will terminate immediately without notice from
Audio Damage if Customer fails to comply with any provision of this License. Upon termination, Customer
must destroy all copies of Software.
Software, including technical data, is subject to U.S. export control laws, including the U.S. Export
Administration Act and its associated regulations, and may be subject to export or import regulations in other
countries. Customer agrees to comply strictly with all such regulations and acknowledges that it has the
responsibility to obtain licenses to export, re-export, or import Software.
This License shall be governed by and construed in accordance with the laws of the State of Colorado, United
States of America, as if performed wholly within the state and without giving effect to the principles of conflict
of law. If any portion hereof is found to be void or unenforceable, the remaining provisions of this License
shall remain in full force and effect. This License constitutes the entire License between the parties with
respect to the use of the Software.
Page 5

System Requirements
BigSeq2 is provided as both a VST and an AudioUnit plug-in for Windows and MacOS X. The MacOS X version
is a Universal Binary, compatible with both Intel- and Motorola-based Macs.
To use BigSeq2, you'll need a Steinberg VST-compatible host application which conforms to the VST 2.0
specifications, and a computer capable of running it. Note that BigSeq2 requires tempo and transportsynchronization information from its host, and hence will not work with programs that do not supply this
information such as Sound Forge.
For the AudioUnit version of BigSeq2, you’ll need an application capable of hosting AudioUnit plug-ins, and a
computer capable of running it. The following specifications represent minimum requirements.
For use with Microsoft Windows: For use with Apple Macintosh:
Windows XP or Vista Mac OS X version 10.4 or newer
512 MB RAM 512 MB RAM
Pentium III 600 MHz CPU Motorola G4/G5 or Intel CPU
High Color S-VGA Display
Display capable of “thousands of colors”
Installation
Double-click the BigSeq2 Installer icon and follow the instructions. During the installation process the installer
will ask you to enter your registration code. Your registration code uniquely identifies your purchase, and you
will need it if you need to reinstall your plug-in (for example, after upgrading to a new computer). Keep a
copy of the code in a safe location and please don’t share it with your friends. We’re delighted if you like our
products so much that you want to share them, but please ask your friends to buy their own copy so that we
can keep making new products.
To un-install from OS X, simply delete the plug-in from your VST folder, which is usually located at
/Library/Audio/Plug-Ins/VST/, and your AudioUnits folder, which is located at /Library/Audio/PlugIns/Components/. To un-install from Windows, simply delete the plug-in from your VST folder, which is
usually located at C:\Program Files\Steinberg\VstPlugins.
Page 6

Introduction
Thanks for purchasing BigSeq2, an extensive (dare we say "massive") upgrade to our BigSeq gate sequencer
plug-in. BigSeq2 starts with BigSeq's original concept, gating an audio track rhythmically, and turns it on its
ear with the addition of nine other effects, all of which can be sequenced.
BigSeq2 consists of six "blocks," each of which has its own time base, two sequencers, and one to three
effects. These effects can be turned on and off via the Gate Sequencer of that block, and their values can be
controlled with the Modulation Sequencer for that block. To make matters even more complicated, you can
drag the individual blocks around to change the order the effects occur.
That preceding paragraph makes the plug-in sound fairly complex, and we'd be lying if we told you it wasn't.
But it's easier than you think. Go play around with the presets for a while, and it'll start to make sense. Then
come back and read this manual. You'll have a better understanding of what's possible, and probably find a
few tricks you didn't see immediately.
Page 7

The Sequencers
Each of BigSeq2’s six effects blocks has its own pair of step sequencers, a Modulation Sequencer and a Gate
Sequencer. The Modulation Sequencer varies (modulates) one or more of the block’s parameters, while the
Gate Sequencer simply turns the block on or off. These sequencers enable BigSeq2 to create complex,
evolving sounds synchronized to your music. All of the sequencers run independently, but are always locked
to your host DAW’s transport. When your host program starts playing, BigSeq2’s sequencers start running;
when your host stops, so does BigSeq2.
All of the sequencers operate the same way for each block. We’ll describe the Gate Sequencer first since it’s a
little simpler.
Gate Sequencer
An effects block’s Gate Sequencer turns the block on or off. If every step of the Gate Sequencer is turned off,
the effects block won’t do anything audible. Here is what the Gate Sequencer looks like:
The row of squares represents the 32 steps
in the sequence. If a square is shaded, that
step’s gate is turned on. In the above
illustration, the first, third, fifth, etc. steps
are turned on. You can turn steps on and off
individually by clicking on them, and you can
turn several or all of them on or off by clicking on one and dragging across others.
At the bottom right of the Gate Sequencer panel are three buttons. When you click the RAND button, the
gates will be randomly set either on or off. About half of the gates will be turned on and about half will be
turned off every time you click the RAND button. When you click the CLEAR button, all of the gates are
turned off. This silences the effects block and gives you a blank slate upon which to draw a new pattern.
The RESET button is an on/off toggle switch. When turned on, the Gate Sequencer automatically randomizes
the gates every time the sequencer starts playing from the beginning. Turning RESET on is like clicking the
RAND button every time the sequencer starts the beginning of its pattern, except that BigSeq2 does the
clicking for you.
Page 8

The small rectangles immediately below the squares are the gate locks. (That little symbol to the left of the
row is a stylized image of a padlock.) When a step’s gate lock is turned on, that step is not affected by the
rand, reset, and clear buttons. A locked gate will remain either on or off when you click RAND or CLEAR, and
when RESET is turned on. You can still turn the gate on or off by clicking it with the mouse. The gate locks let
you keep parts of the gate pattern the same while other parts change randomly, producing patterns that have
some resemblance to each other but change over time.
The GLOBAL RESET popup menu at the bottom left of the Gate Sequencer panel determines whether, and
how often, the effects block’s sequencers are reset to their first position when your host DAW’s transport
reaches the beginning of a measure. Since BigSeq2’s sequencers can have patterns of any length from one to
32 steps long, and since the steps can have lengths other than simple durations like an eighth note, the
sequencers can potentially reach the end of their pattern at times that do not line up with the measures (or
major beats, e.g. quarter notes) of your host sequencer. Sometimes this is desirable since it can create effects
that move in and out of phase with your music in interesting ways. Other times, however, it is useful to
always have BigSeq2’s sequencers jump back to their first step at more predictable times, regardless of what
they’re currently doing.
If the GLOBAL RESET menu is set to “Off”, the sequencer will not be reset automatically in response to the
host DAW’s actions. The sequencer will merrily cycle along by itself, synchronized to your music’s tempo but
willfully ignorant of the placement of your music’s bar lines. If the GLOBAL RESET menu is set to any of its
other choices, which are “1 Measure” through “4 Measures”, the sequencer will jump back to its first step
whenever your host DAW’s transport crosses the corresponding number of bar lines. For example, if the
GLOBAL RESET menu is set to 2 Measures, BigSeq2’s sequencer will jump back to its first step at the
beginning of every other measure.
Note that the GLOBAL RESET menu affects both of the sequencers in all of the effects blocks. Each pair of
sequencers can have a different number of steps and step size (as we’ll describe shortly) and hence can
advance and cycle independently, but when a bar line triggers a reset in response to the GLOBAL RESET
setting, all of BigSeq2’s sequencers jump to their first steps.
Page 9

Modulation Sequencer
Each effects block has its own Modulation Sequencer. This sequencer can vary the values of the effects block,
changing a simple static audio effect into something that changes with the rhythm of your music.
The main feature of the Modulation
Sequencer panel is its row of 32 vertical
sliders. Each is topped with a circular handle;
the handle of the current step of the
sequencer is filled with orange. You can click
anywhere within a slider and its handle will
jump to the position of your mouse pointer.
You can also click and drag across the sliders
to move a number of them with one gesture.
Above the sliders is a bracket-like control.
This control sets the number of steps over
which the sequencer will cycle, from one to
32. Click and drag above the sliders to move
the right end of the bracket, setting the number of active steps. Inactive steps are dimmed and cannot be
changed with the mouse. There is also a handy display of the number of active steps below the sliders, labeled
(not surprisingly) “num steps”.
The number of active steps is the same for both the Modulation Sequencer and the Gate Sequencer beneath
it. The two sequencers advance from one step to the next in unison. However, since each effects block has its
own pair of sequencers with their own set of controls, and since the sequencers advance independently of
each other, each effects block can have a different sequence length. For example, the VCA sequencers can
have 16 active steps while the Delay sequencers have 23 active steps.
The popup menu below the sliders and on the left, labeled STEP SIZE, sets the duration of the sequencer
steps, relative to your host DAW’s current tempo and meter. Put another way, the STEP SIZE menu controls
how quickly the sequencers advance from one step to the next. The step size is expressed in units of beats.
Here are a couple of examples. If the step size is 1/8, and your host DAW’s time signature is set to 4/4,
BigSeq2’s sequencer will advance eight steps for each measure of music, since there are eight eighth notes in
a measure of 4/4 time. If you’re working on an uptempo waltz and have set the time signature to ¾ and the
step size to 1/16, BigSeq2’s sequencer will advance 12 steps in each measure, since there are four 16th notes
in each of the three beats of a measure of ¾ time, and three times four is 12.
Page 10

The STEP SIZE control affects both the Modulation Sequencer and the Gate Sequencer. Each effects block’s
sequencer can have its own step size setting. This means that BigSeq2’s sequencers can have very complex
interrelations since they each have their own number of steps and step size settings.
In the lower-left corner of the Modulation Sequencer panel is a row of switches for setting the play direction
for the sequencer. If the button labeled “” is selected, the sequencer plays steps in order from left to right.
(This is probably the mode in which you would expect the sequencer to operate.) If the button labeled “” is
selected, the sequencer plays in the opposite direction, moving from right to left. After it plays the leftmost
step it jumps back to the last active step. If the GLOBAL RESET control is set to something other than Off, the
sequencer will jump to this rightmost active step whenever the host DAW reaches the beginning of a measure
which resets the sequencer. Finally, if the button labeled “?” is selected, the sequencer chooses its next step
at random, jumping unpredictably among the active steps. These switches affect the operation of both the
Modulation Sequencer and the Gate Sequencer.
At the bottom right of the Gate Sequencer panel are three buttons. Their function is nearly identical to that of
the buttons with the same names in the Gate Sequencer. When you click the RAND button, the Modulation
Sequencer sliders will be to randomly chosen values. When you click the CLEAR button, all of the sliders are
set to zero, their lowest position.
The RESET button is an on/off toggle switch. When turned on, the Modulation Sequencer automatically
randomizes its sliders every time the sequencer starts playing from the beginning. Turning RESET on is like
clicking the RAND button every time the sequencer starts the beginning of its pattern.
The small rectangles immediately below the Modulation Sequencer sliders are the slider locks. (That little
symbol to the left of the row is a stylized image of a padlock.) When a step’s slider lock is turned on, that step
is not affected by the rand, reset, and clear buttons. A locked slider will retain its value when you click RAND
or CLEAR, and when RESET is turned on. You can still change the slider by clicking it with the mouse. The
slider locks let you keep parts of the modulation pattern the same while other parts change randomly,
allowing you to create variations of patterns with common values.
The horizontal slider labeled SMOOTHING controls whether the output of the Modulation Sequencer jumps
from one value to the next or moves in a ramp-like manner. If the slider is moved all the way to the left (such
that the box appears to be empty), the output of the Modulation Sequencer will immediately jump between
the values set by the vertical sliders as the sequencer moves from one step to the next. If you drag the
smoothing slider to the right, the Modulation Sequencer’s output will slide from one value to the next. The
amount of smoothing is not affected by the host DAW’s tempo, so it is possible to set the smoothing slider to
a high-enough value that you’ll hear little or no change in the sequencer’s output.
Page 11

By now, if you’re still paying attention, you’re probably thinking “well, this is all very elaborate and nice, but
what does the Modulation Sequencer actually do?” As we’ve said, the Modulation Sequencer can control the
parameters of the effects block. But before we describe how this actually works, we need to look at the effects
blocks themselves and their parameters. We’ll describe how the Modulation Sequencer controls those
parameters in the section titled “Modulation”, later on. You can skip ahead if you’re feeling impatient.
The Effects Blocks
Each of BigSeq2’s effects blocks has its own set of controls. These controls appear in the panel labeled Effect
on the right side of BigSeq2’s window. The controls for the current effects block appear in the panel; only one
effects block’s controls appear at a time. The current effects block is indicated by the illuminated box in the
Routing panel. Click on the boxes to bring the desired effects block’s control into view in the Effect panel.
Each effects block has two to five knobs for controlling the effect, shown as an arc of illuminated segments in
the panel. The name and value of each parameter is displayed in the lower-right section of the knob. Click and
drag vertically on the knobs to change the associated parameter. Most knobs also have a modulation-depth
slider; we’ll talk more about this slider later on in the section titled Modulation.
Next we’ll look at the controls for each effects block.
VCA
The VCA effects block is BigSeq2’s most important block, and also its most oddly named. Its name is
borrowed from analog synthesizer parlance; the letters “VCA” stand for Voltage Controlled Amplifier. In a
synthesizer, the VCA is typically used to control the overall loudness and shape of the sound. An analog
voltage controls how much a signal is amplified; by changing the shape of the voltage, you change the shape
of the sound. Obviously BigSeq2’s VCA is entirely digital and responds to numbers rather than voltages, but
we chose the name VCA because of its familiarity1.
1
Moreover, the term Voltage Controlled Amplifier is slightly misleading. Almost all VCAs found in synthesizers have a
maximum gain of unity; that is, they don’t actually amplify the signal, in the sense that “amplify” means “make louder”.
They make the signal quieter or (at most) pass it without alteration. Hence a VCA would be more accurately described as a
Voltage Controlled Attenuator, but who are we to argue with the terminology chosen and made popular by Dr. Robert Moog?
Page 12
To return to the actual point, the VCA effects block is a gate effect controlled by its sequencer. Together they
turn the signal on and off in time with your music and are more than capable of creating the rapid, rhythmic
gating effect commonly heard in a number of forms of electronic dance music. The VCA can also be used to
chop pieces out of drum loops, bass lines, vocals, synthesizer riffs, etc., creating new parts that can be
processed by BigSeq2’s other effects.
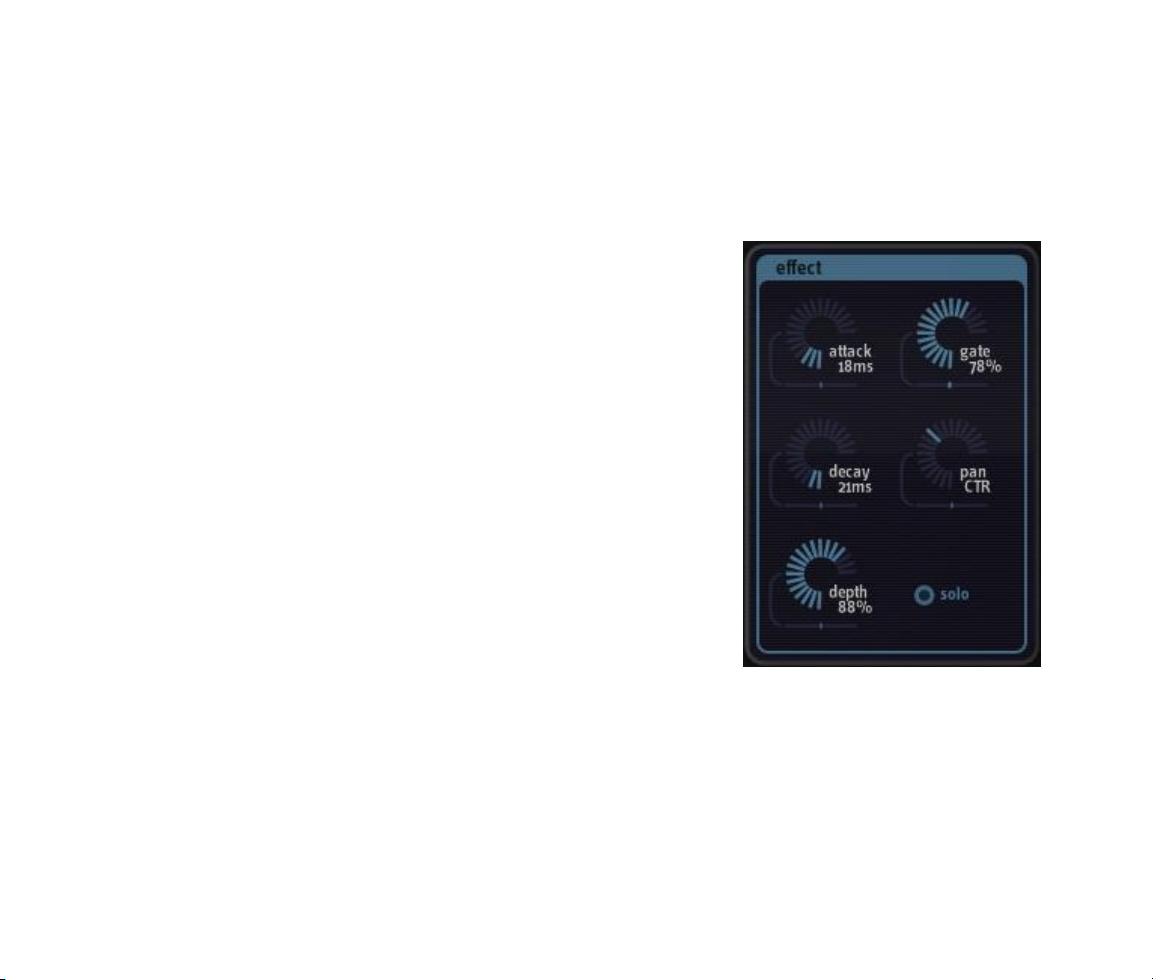
The VCA’s ATTACK and DECAY knobs control how quickly the gate turns on and off (or opens and closes).
The ATTACK knob controls how rapidly the gate turns on, allowing the
signal to pass; the DECAY knob controls how rapidly the gate turns off,
blocking the signal. If you leave both knobs at their lowest setting of
1msec (that is, one one-thousandth of a second), the gate will open
and close nearly instantly when triggered by the sequencer. As you
turn the knobs up, the ATTACK and DECAY times lengthen, making
the signal fade in and out as it passes through the VCA. Note that
these controls work in units of absolute time and are independent of
the tempo of your music. This means that at faster tempos, longer
ATTACK and DECAY settings can cause the gates to overlap. This can
be useful for creating tremolo-like effects.
The GATE knob controls how long the gate stays open, expressed as a
percentage of the sequencer step size. If the GATE knob is turned fully
clockwise, the VCA stays open for the entire duration of each step, that
is, for 100% of the duration of the step. If GATE is set to 100% and
the VCA is turned on by adjacent active triggers in its Gate Sequencer,
you won’t hear any gaps between one step and the next. At smaller
values, the VCA stays on for a fraction of the duration of the step. Very
small values may silence the signal altogether, particularly if the
ATTACK and DECAY knobs are turned up.
The DEPTH knob controls the overall intensity of the VCA. It controls how much the VCA attenuates the signal
when it is turned off. If DEPTH is set to 100%, the signal is completely silenced when the VCA is turned off—
that is, at each step for which the VCA’s Gate Sequencer is off. On the other hand, if DEPTH is set to zero, the
signal’s loudness is the same regardless of whether the VCA is on or off and the VCA has no effect on the
signal. At intermediate settings the DEPTH control allows some of the signal to pass when the VCA is off, thus
controlling the contrast between the loud steps (when the VCA is on) and the quiet steps (when the VCA is
off).
Page 13

Finally, the PAN knob controls the perceived stereo position of the VCA’s output. Rotate the knob to the left
and the sound will move towards the left speaker; rotate it to the right and the sound with move towards the
right.
Bits
The Bits effect block is a multi-purpose digital distortion processor. BITS
creates the popular “lo-fi” sample-rate reduction and bit-crusher digital
effects we’ve all come to know and love despite having 24-bit audio
converters and 64-bit signal-processing math readily available to us.
BITS has three knobs. The first knob, RATE, controls a sample-rate reducer.
As you turn this knob up, the signal is resampled at a lower rate than your
host’s current sampling rate. If this knob is turned all the way anticlockwise, the resampling process has no effect on the signal. As you turn
the knob up, the signal is sampled at a lower rate. If you turn this knob all
the way clockwise, the signal is sampled at 1/100th of your host’s sampling
frequency (e.g., 441Hz if you use the usual sampling frequency of
44100Hz).
The second knob, DEPTH, controls a bit-depth reduction or “bit-crushing”
process. If you leave the knob turned fully anti-clockwise, the signal is
passed with full resolution. (Like most host-based plug-ins, BigSeq2 uses
32 bits to represent signals internally, but your host software may use 16,
24, or 32 bits.) As you rotate the knob, the number of bits used to
represent the signal first drops to 16, and then decreases all the way to one
as you turn the knob fully clockwise.
The third knob, ERROR, is an Audio Damage original. It introduces errors in the bits used to represent the
signal. The knob controls how long the errors persist, and hence how much they damage the audio. If the
knob is rotated fully anti-clockwise, no errors are added to the signal. As you rotate the knob, progressively
more persistent errors are added to the signal, creating digital-sounding noise. The BITS and ERROR knobs
are somewhat complementary in that the effect of the ERROR function is less noticeable at high settings of
the BITS knob.
Page 14

Delay
BigSeq2’s Delay effects block contains a simple but versatile stereo delay.
It can be used for both tempo-synced echo/repeat effects and modulation
effects created by short delays such as simple chorusing, flanging, and
doubling.
The switches in the lower left of Delay’s panel control the maximum delay
time. When the DELAY switch is activated, the delay has a maximum
duration of two seconds. Also, when this switch is turned on, the delay
time is synchronized to the tempo setting of your host software. As you
adjust the time knob, you’ll see that the delay time is expressed in
rhythmic units. For example, if the time knob says “1/8”, the delay time
will be equal to the duration of an eighth note, regardless of the current
tempo of your music. Dotted and triplet values are available and are
denoted with a dot (.) and a ‘T’ respectively.
If the CHORUS or FLANGE buttons are activated, the delay time is not
synchronized to your song’s tempo, and has a value expressed in
milliseconds (thousandths of a second). When the CHORUS switch is
turned on, the maximum delay time is 100msec; when the FLANGE switch
is on, the maximum is 10msec.
The FINE knob lets you adjust the delay time with more precision than the TIME knob offers by itself. The
FINE control multiplies the TIME setting, and has a range from 0.5 to 2.0. In other words, the FINE knob
adjusts the time shown on the TIME knob, from one-half that value up to twice that value. When the DELAY
switch is turned on, the FINE knob lets you vary the echoes so that they are ahead of or behind the beat of
your music. In the CHORUS and FLANGE modes, the fine knob controls the timbre of the effect. In these
modes it is particularly useful to modulate the FINE knob with the Delay block’s Modulation Sequencer.
The Feedback parameter, labeled FDBK, sends some of the delay’s output back into its input. For longer delay
times the FDBK knob controls how many times the echoed signal repeats before fading out altogether. If
FDBK is turned all the way up to 100%, the delayed signal will repeat many times before it fades out. (It will
eventually fade out. The Delay block includes some internal filtering which helps distinguish the delayed signal
from the original.) In the CHORUS and FLANGE modes, the FDBK knob makes the effect sound thicker or
more intense.
Page 15

The SEND knob controls how much of the signal entering the Delay effects block actually passes through the
delay itself. The input signal is always sent to the output of the Delay block without attenuation, so the SEND
knob acts like an effects-send or aux-send knob on a mixing board. If the SEND knob is turned all the way
down to zero, you won’t hear any delayed signal. Note that you can use the Delay’s Modulation Sequencer to
control the SEND knob, routing more or less of the signal to the delay with each step.
Distort
The Distort effects block has two different distortion processors, named
Fuzz and Warp, connected in series (one after the other). Each
processor has a single knob.
The Fuzz processor is based on a model of a vintage distortion pedal
popular with many guitarists. The FUZZ knob controls the intensity of
the effect. Fuzz is perhaps most interesting at lower settings of the
FUZZ knob, where it imparts a somewhat grainy distortion to signals
regardless of their level. As you turn the knob up the distortion effect
becomes more extreme. Note that the Fuzz processor always distorts
the signal even when the knob is turned all the way down. (Obviously
you can turn it off altogether with the Gate Sequencer.)
The Warp processor, technically speaking, distorts the signal by using a
sinusoid as a non-linear transfer function. In less technical terms, it
makes odd noises by wrapping the signal around a sine wave. It creates
harsh distortion that can sound like hard clipping, or add metallicsounding overtones somewhat like ring modulation. The WARP knob
varies the frequency of the sine wave, and hence varies the timbre of
the distorted signal.
Page 16

Filter
The Filter effects block contains a filter (not surprisingly) with several
different modes. The FREQ controls the cutoff frequency of the filter. Rotate
the knob clockwise to increase the cutoff frequency.
The RES knob controls the resonance of the filter. As the resonance of a
filter increases, the filter's output emphasizes frequencies near its cutoff
frequency. In plainer terms, if you turn up the resonance knob, the filter
sounds more “synthy”. (Try it—you'll hear what we mean.) If the filter type
is set to 4P LP (see below) and you turn the resonance knob fully clockwise,
the filter will oscillate, producing a sustained tone even if the plug-in has no
input signal. Some of BigSeq2’s presets, such as “Self Osc Acid”, use the
self-oscillating filter to turn BigSeq2 into a mini sequenced synthesizer.
The TYPE knob switches the filter between several different filter models. As
you rotate the knob, watch the knob’s display to see which filter type is
active. The available types are:
Four-pole low pass (shown as “4P LP” in the parameter display) –
the filter type most commonly found in synthesizers. A low-pass filter attenuates or reduces signal
frequencies greater than its cutoff frequency and passes signal frequencies below its cutoff frequency
without alteration. As you rotate the frequency knob clockwise, the filter passes more of the signal's
high-frequency content and the output sounds brighter. If you turn the frequency knob fully counterclockwise, you may not hear any output at all because the entire signal has been filtered out.
Three-pole low pass (shown as “3P LP”): A low-pass filter with a frequency roll-off curve that is less
steep than that of the four-pole filter. Three-pole filters are fairly uncommon, but the three-pole lowpass filter found in a certain bass-line synthesizer defines entire genres of electronic music.
Two-pole low pass (shown as “2P LP”): A low-pass filter with a frequency roll-off curve that is less
steep than either the three-pole or four-pole low-pass filter. Two-pole filters are usually used for
gentler frequency-shaping applications, such as in equalizers or tone controls, but are found on some
synthesizers.
Four-pole high pass (shown as “4P HP”): A high-pass filter works in a manner opposite to that of a
low-pass filter: it reduces signal frequencies less than its cutoff frequency and passes signal
Page 17

frequencies above its cutoff frequency without alteration. As you rotate the frequency knob clockwise,
the signal loses its lower frequencies and the output sounds thinner. If you turn the frequency knob up
far enough, you might not hear anything at all because the entire signal has been filtered out.
Two-pole high pass (shown as “2P HP”): If you've been paying attention you can probably figure this
one out for yourself, right? It's a high-pass filter that has a less steep attenuation curve than the fourpole high-pass filter. Use it when you want to create a thinner sound without the drastic low-frequency
reduction of the four-pole high-pass filter.
Four-pole band pass (shown as “4P BP”): A band-pass filter allows a range of frequencies centered on
the cutoff frequency to pass and attenuates higher and lower frequencies. The width of the band of
frequencies is controlled by the Resonance control. Wah-wah pedals used by guitarists are based on
band-pass filters.
Freq
The Freq block contains a frequency shifter. A frequency shifter is a somewhat unusual beast in signal
processing and bears some explanation. For starters, a frequency shifter is not the same thing as a pitch
shifter. (If you’re looking for a pitch shifter, we suggest you head to our website at www.audiodamage.com
and read about Discord 2, our powerful and entertaining pitch-shifter plug-in.) The difference is that a pitch
shifter multiplies all of the frequency components of a signal by some number, which preserves their harmonic
relationship to each other. A frequency shifter adds some number to all of the frequency components of the
signal. This means that the harmonics of the signal no longer form the original ratios with each other, and the
timbre of the signal changes, becoming inharmonic and sometimes metallic-sounding2. At small shifting
intervals, frequency shifting can create lovely detuning and chorusing effects.
2
Frequency shifting is a close relative of ring modulation, which also produces metallic-sounding timbres. The difference is
that ring modulation creates two sets of frequency components: one set of components of higher frequency than the
original, and one set lower than the original. Frequency shifting creates only one set of frequency components, which can be
higher or lower than the components of the original signal. Hence a frequency shifter sort of creates half of the effect of a
ring modulator. Somewhat paradoxically, a frequency shifter is much more complicated to create—in either software or
hardware—than a ring modulator.
Page 18

The Frequency Shifter block has four knobs. The first knob, SHIFT, controls how much the signal’s frequency is
shifted. This knob has a range of -800Hz to +800Hz. A shift amount of zero produces no effect. Positive
amounts shift the signal upwards in frequency, negative amounts shift
it downwards.
The second knob, FINE, also controls the shift interval, but has a much
smaller range of -10Hz to +10Hz. The value of this knob is added to
the value of the SHIFT knob to determine the how much the signal is
shifted. For example, if the SHIFT knob is set to -56Hz and the FINE
knob is set to 5Hz, the signal will be shifted down by 51Hz. To create
subtle phasing and detuning effects, leave the SHIFT knob at zero and
vary the FINE knob.
The feedback knob, abbreviated FDBK, sends some of the pitch-shifted
signal back into the pitch shifter. This usually intensifies the pitchshifting effect.
The MIX knob controls the relative loudness of the original signal and
the pitch-shifted signal. If the knob is rotated fully anti-clockwise (so
that the value is 0%) you’ll hear only the original signal and none of
the pitch-shifted signal. If you rotate the knob fully clockwise, you’ll
hear only the pitch-shifted signal. At the center, 50% position, you’ll
hear equal amounts of the original and shifted signals.
Page 19

Routing
As we’ve mentioned previously, the six signal processing blocks in BigSeq2 can be arranged in any sequence.
The Routing panel near the bottom of BigSeq2’s window shows the current order of the blocks, and lets you
rearrange them.
The order of the blocks in the routing panel reflects the order in which the signal passes through them, from
left to right. In the picture above, the signal first goes through the Distort block, then through the Bits block,
then through the Filter, and so on.
You can rearrange the order of the blocks by clicking and dragging them. As you drag a block to the left or
right, the other blocks will scoot out of its way, allowing you to drop the block wherever you want in the
sequence.
Common Controls: Solo and Mute
Each of BigSeq2’s effect panels has two switches labeled SOLO and MUTE. The SOLO and MUTE switches act
in a manner similar to that of the solo and mute controls commonly found in mixers. When an effect’s SOLO
switch is illuminated, you will hear only that effects block in action; the other blocks will be silenced. Only one
effects block can be soloed at a time. If you turn on the SOLO switch for, say, the Filter block, switch to the
Distort block and turn on its SOLO switch, you will then hear only the Distort block. The MUTE switch silences
the effects block. More than one block can be muted at a time. The SOLO and MUTE switches toggle on and
off. Click them to switch them between their on and off states. Since the VCA is BigSeq2’s main effect, it has
no MUTE button.
Page 20

Output Controls
In the lower right of BigSeq2’s window are two simple but useful controls. The OUTPUT knob controls
BigSeq2’s overall output level. Use it to make BigSeq2 louder or softer as needed. The OUTPUT knob has a
range of -40dB to +6dB, so it can boost quiet signals or tame overly loud noises.
The ACTIVE button effectively turns BigSeq2 on and off. When the ACTIVE button is dimmed, BigSeq2 has no
effect on the incoming signal and passes it through without alteration. Click on the active button to turn it on
and off.
Page 21
Modulation
BigSeq2’s power lies in its modulation features—that is, the manner in which its Modulation Sequencers can
control (modulate) the parameters of the effects blocks. We’ve described how each effects block has a pair of
sequencers, and what parameters each effects block has; now we’ll describe how they work together. We’ll
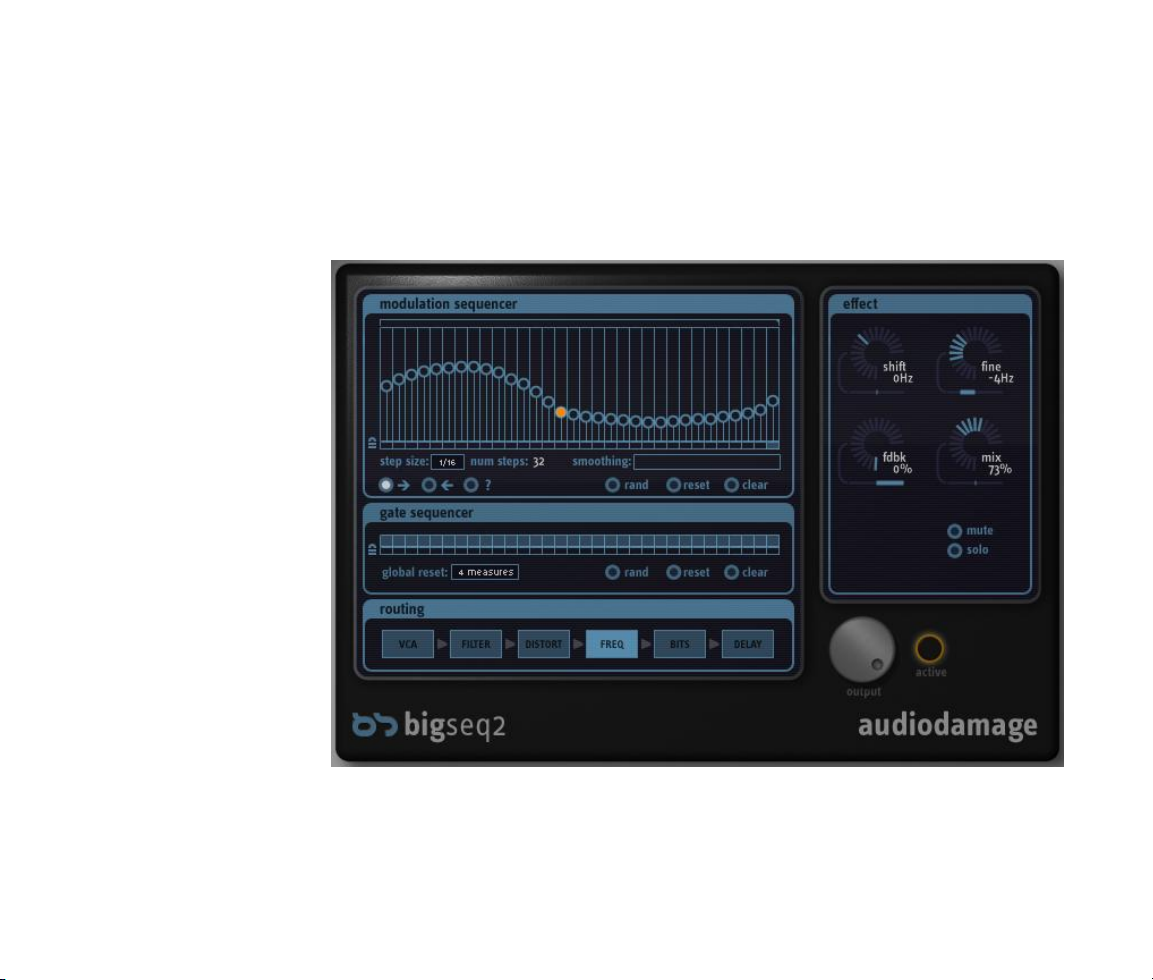
use the following screenshot as an example.
First notice that the
sequencer step size is set
to 1/16 and the number
of steps is 32. Assuming
that the host sequencer’s
time signature is set to
4/4, this means that the
step sequencer will
advance one step with
each sixteenth note, and
it will take two measures
for the sequencer to cycle
through all of its steps.
We’ve selected the
frequency shifter effects
block, as shown by the
illuminated FREQ box at
the bottom. The effect
panel shows the
frequency shifter’s
controls. Notice the
horizontal sliders beneath
each knob. These are the
modulation depth sliders that we mentioned earlier. The sliders are bidirectional; if left at their center setting,
the parameter is unaffected by the Modulation Sequencer. In the illustration above, the SHIFT and MIX
parameters’ modulation sliders are set to zero. Click and drag on the sliders to move them to the left or right.
Hold down the CTRL key on your PC’s keyboard, or the CMD key on a Macintosh keyboard, and click on a
slider to reset it to the center-zero position.
Page 22

If a modulation slider is moved to the right of center, the Modulation Sequencer’s output is added to the value
set by the parameter’s knob. The further to the right you move the slider, the greater the effect that the
Modulation Sequencer has on the parameter—that is, the more it increases that parameter’s value. If the
modulation slider is moved all the way to the right, the Modulation Sequencer can modulate the parameter
across its entire range.
If you move the modulation slider to the left of center, the sequencer’s output is subtracted from the value set
by the parameter’s knob. Again, the further that the slider is from the center, the greater the effect the
Modulation Sequencer has on the parameter.
Looking again at the screenshot, observe that the FDBK parameter is set to 0%. In the absence of the
Modulation Sequencer, this would naturally mean that the frequency shifter has no signal feedback. However,
the FDBK modulation slider is set all the way to the right. This means that the FDBK parameter will be
increased by the output of the Modulation Sequencer. Since the sliders in the Modulation Sequencer are set
from about a fifth of the way up to about two-thirds of the way up, the FDBK parameter will be varied from
about 20% to about 67% as the sequencer advances once with each sixteenth note.
Now look at the FINE parameter controls. The knob is set to -4Hz and the modulation slider is set about twothirds of the way to the left. This means that the FINE parameter will be decreased from its initial value of 4Hz by the Modulation Sequencer. The Modulation Sequencer will change the FINE parameter less than it’s
changing the FDBK parameter since the FINE modulation slider isn’t moved all the way to the left.
The Modulation Sequencers and sliders work the same way for all of BigSeq2’s effects blocks. Almost all of the
parameters in each effects block can be modulated by the Modulation Sequencer. You can now imagine how
BigSeq2 is capable of very complex, evolving sonic effects.
Page 23

MIDI Controllers
The VST version of BigSeq2 responds to MIDI continuous controller messages. You can use hardware MIDI
controllers, such as MIDI slider boxes or the knobs found on some MIDI keyboards, to adjust BigSeq2’s
parameters. You can assign MIDI controllers to the knobs, sliders, and switches in BigSeq2’s Effect panels,
and to some of the controls in the sequencer panels. You cannot assign MIDI controllers to the Modulation
Sequencer sliders or the Gate Sequencer switches, or to the step locks.
BigSeq2 has a simple “MIDI Learn” mode for assigning its controls to MIDI controllers. To assign a control to a
MIDI controller:
First, hold down the SHIFT and CTRL keys on your PC’s keyboard, or SHIFT and CMD keys if you’re
using a Mac, and click once on the control. A white box will be drawn around the control to indicate
that it is ready to learn which MIDI controller it will be assigned to.
Next, move the MIDI controller to send a continuous controller message—turn the knob, press the
button, move the slider, whatever is appropriate.
The white box will disappear. Now the control will move when you manipulate the MIDI controller.
BigSeq2 waits until it has received two consecutive continuous controller messages with the same controller
number before it makes an assignment. This filters out extraneous data sent by some MIDI controllers. If you
are assigning a button or switch on a MIDI controller, you may have to press or move the switch twice before
BigSeq2 recognizes the controller and assigns it to the desired control.
To assign a different MIDI controller to a control, repeat the same procedure using a different controller.
To cancel MIDI Learn mode without assigning a controller, hold down the SHIFT and CTRL keys (SHIFT and
CMD keys on a Mac) and click in any empty area in BigSeq2’s window (i.e., don’t click on another control).
The white box will disappear.
To remove a MIDI controller assignment from a control, SHIFT and CTRL keys, (SHIFT and CMD keys on a
Mac) click on the control once so that the white box appears, then click again on the same control.
BigSeq2’s MIDI controller assignments apply to all presets and instances of BigSeq2, in all host applications
that you use. The MIDI assignments are stored in a special file on your hard drive. The contents of this file are
Page 24

read when BigSeq2 is loaded by your host. If you have two or more instances of BigSeq2 in use at once, any
MIDI assignments you make will not be propagated to the other instances until the next time that your host
loads the plug-ins.
The AudioUnit version does not provide the same MIDI assignment features as the VST version. Almost all
AudioUnit hosts provide their own mechanism for assigning MIDI controllers to parameters, so it would be
redundant for us to implement MIDI controller assignments in the plug-in itself. Consult the documentation for
your AudioUnit host to learn how to use its MIDI features.
Automation
Many of BigSeq2's parameters can be automated using your host's automation features. The knobs, sliders,
and switches in BigSeq2’s Effect panels, and some of the controls in the sequencer panels, are available for
automation. Because VST places an upper limit on the number of parameters that can be presented by a plugin, you cannot assign MIDI controllers to the Modulation Sequencer sliders or the Gate Sequencer switches, or
to the step locks. (Consider that the sliders, gate switches, and lock switches for just one of BigSeq2’s six
sequencers would constitute 128 parameters.) Consult your host's documentation for information on how to
use these features.
And Finally…
Thanks again for purchasing BigSeq2. We make every effort to ensure your satisfaction with our products, and
want you to be happy with your purchase. Please write support@audiodamage.com if you have any questions
or comments.
 Loading...