

Page 1
Page 2

The information in this document is subject to change without notice and does not represent a commitment on !
the part of Audio Damage, Inc. The software described by this document is subject to a License Agreement !
and may not be copied to other media except as specifically allowed in the License Agreement. No part of this !
publication may be copied, reproduced or otherwise transmitted or recorded, for any purpose, without prior !
written permission by Audio Damage, Inc.!
!
© 2014 Audio Damage, Inc. All rights reserved.!
!
Software Design and Construction, Documentation!
Chris Randall!
Adam Schabtach!
!
Field Testing!
Jens Ågren!
Rob Cosh !
Don Gunn!
Steve Hamann!
Jeff Laity!
Ken Porter!
Karl Schindler!
Joshua Schnable !
!
Audio Unit version implemented using Symbiosis from NuEdge Development.!
!
!
!
!
!
!
!
!
!
!
!
!
!
Page 3

License Agreement:!
!
BY INSTALLING THE SOFTWARE, YOU ARE CONSENTING TO BE BOUND BY THIS AGREEMENT. IF YOU DO NOT !
AGREE TO ALL OF THE TERMS OF THIS AGREEMENT, THEN RETURN THE PRODUCT TO THE PLACE OF !
PURCHASE FOR A FULL REFUND.!
Single User License Grant: Audio Damage, Inc. ("Audio Damage") and its suppliers grant to Customer !
("Customer") a nonexclusive and nontransferable license to use the Audio Damage software ("Software") in !
object code form solely on any central processing unit owned or leased by Customer.!
Customer may make one (1) archival copy of the Software provided Customer affixes to such copy all !
copyright, confidentiality, and proprietary notices that appear on the original.!
!
EXCEPT AS EXPRESSLY AUTHORIZED ABOVE, CUSTOMER SHALL NOT: COPY, IN WHOLE OR IN PART, !
SOFTWARE OR DOCUMENTATION; MODIFY THE SOFTWARE; REVERSE COMPILE OR REVERSE ASSEMBLE ALL !
OR ANY PORTION OF THE SOFTWARE; OR RENT, LEASE, DISTRIBUTE, SELL, OR CREATE DERIVATIVE WORKS !
OF THE SOFTWARE.!
Customer agrees that aspects of the licensed materials, including the specific design and structure of !
individual programs, constitute trade secrets and/or copyrighted material of Audio Damage. Customer agrees !
not to disclose, provide, or otherwise make available such trade secrets or copyrighted material in any form to !
any third party without the prior written consent of Audio Damage. Customer agrees to implement reasonable !
security measures to protect such trade secrets and copyrighted material. Title to Software and !
documentation shall remain solely with Audio Damage.!
LIMITED WARRANTY. Audio Damage warrants that for a period of ninety (90) days from the date of shipment !
from Audio Damage: (i) the media on which the Software is furnished will be free of defects in materials and !
workmanship under normal use; and (ii) the Software substantially conforms to its published specifications. !
Except for the foregoing, the Software is provided AS IS. This limited warranty extends only to Customer as !
the original licensee. Customer's exclusive remedy and the entire liability of Audio Damage and its suppliers !
under this limited warranty will be, at Audio Damage or its service center's option, repair, replacement, or !
refund of the Software if reported (or, upon request, returned) to the party supplying the Software to !
Customer. In no event does Audio Damage warrant that the Software is error free or that Customer will be !
able to operate the Software without problems or interruptions.!
This warranty does not apply if the software (a) has been altered, except by Audio Damage, (b) has not been !
installed, operated, repaired, or maintained in accordance with instructions supplied by Audio Damage, (c) has been subjected to
abnormal physical or electrical stress, misuse, negligence, or accident, or (d) is used in !
ultrahazardous activities.!
DISCLAIMER. EXCEPT AS SPECIFIED IN THIS WARRANTY, ALL EXPRESS OR IMPLIED CONDITIONS, !
REPRESENTATIONS, AND WARRANTIES INCLUDING, WITHOUT LIMITATION, ANY IMPLIED WARRANTY OF !
Page 4

MERCHANTABILITY, FITNESS FOR A PARTICULAR PURPOSE, NONINFRINGEMENT OR ARISING FROM A !
COURSE OF DEALING, USAGE, OR TRADE PRACTICE, ARE HEREBY EXCLUDED TO THE EXTENT ALLOWED BY !
APPLICABLE LAW.!
IN NO EVENT WILL AUDIO DAMAGE OR ITS SUPPLIERS BE LIABLE FOR ANY LOST REVENUE, PROFIT, OR !
DATA, OR FOR SPECIAL, INDIRECT, CONSEQUENTIAL, INCIDENTAL, OR PUNITIVE DAMAGES HOWEVER !
CAUSED AND REGARDLESS OF THE THEORY OF LIABILITY ARISING OUT OF THE USE OF OR INABILITY TO !
USE THE SOFTWARE EVEN IF AUDIO DAMAGE OR ITS SUPPLIERS HAVE BEEN ADVISED OF THE POSSIBILITY !
OF SUCH DAMAGES. In no event shall Audio Damage's or its suppliers' liability to Customer, whether in !
contract, tort (including negligence), or otherwise, exceed the price paid by Customer. The foregoing !
limitations shall apply even if the above-stated warranty fails of its essential purpose. SOME STATES DO NOT !
ALLOW LIMITATION OR EXCLUSION OF LIABILITY FOR CONSEQUENTIAL OR INCIDENTAL DAMAGES.!
The above warranty DOES NOT apply to any beta software, any software made available for testing or !
demonstration purposes, any temporary software modules or any software for which Audio Damage does not !
receive a license fee. All such software products are provided AS IS without any warranty whatsoever.!
This License is effective until terminated. Customer may terminate this License at any time by destroying all !
copies of Software including any documentation. This License will terminate immediately without notice from !
Audio Damage if Customer fails to comply with any provision of this License. Upon termination, Customer !
must destroy all copies of Software.!
Software, including technical data, is subject to U.S. export control laws, including the U.S. Export !
Administration Act and its associated regulations, and may be subject to export or import regulations in other !
countries. Customer agrees to comply strictly with all such regulations and acknowledges that it has the !
responsibility to obtain licenses to export, re-export, or import Software.!
This License shall be governed by and construed in accordance with the laws of the State of Colorado, United !
States of America, as if performed wholly within the state and without giving effect to the principles of conflict !
of law. If any portion hereof is found to be void or unenforceable, the remaining provisions of this License !
shall remain in full force and effect. This License constitutes the entire License between the parties with !
respect to the use of the Software. !
!
!
!
!
!
!
!
!
!
Page 5

Introduction: !
!
Thank you for purchasing Basic, our subtractive-synthesis mono-synth. This instrument, like the name suggests, is designed with
simplicity in mind, for ease of understanding and speed of use. Its three anti-aliased oscillators provide the traditional analog
synthesis waveforms, created from high-quality samples of vintage hardware, along with the “Digigrit” wave lifted directly from the
ROM of an early digital synth. The two MS20-style cascaded filters add a distinctive growl to the proceedings, and the two traditional
ADSR envelopes and tempo-synced LFO provide all the modulation you need for most chores. !
!
!
System Requirements: !
!
To use the VST version of Basic, you’ll need a Steinberg VST-compatible host application which conforms to the VST 2.4
specification, and a computer capable of running it. For the Audio Unit version of Basic, you’ll need an application capable of hosting
Audio Unit plug-ins, and an Apple computer with an Intel CPU capable of running it. We support the use of Basic under any version of
Microsoft Windows from XP SP2 or newer; and Apple OS X version 10.6 or newer. !
!
Installation:!
!
Double-click the Basic installer icon, and follow the instructions. Basic does not have any DRM, so no registration code is required
during installation. However, we ask that you please don’t share this plug-in with your friends. We’re delighted if you like our products
so much that you want to share them, but please ask your friends to buy their own copy so that we can keep making new products.!
!
On OS X, the installer installs both the Audio Unit and VST versions of Basic. If your DAW gives you a choice of which format to use,
we recommend using the VST version. The OS X versions are combined 32/64-bit binaries. !
!
If you‘re running a 64-bit version of Windows, you can choose to install either 32- or 64-bit versions of Basic, or both. (There is no
reason to install 64-bit plug-ins on a 32-bit version of Windows, and there are good reasons to not do so.)!
!
!
!
!
!
!
!
!
!
Page 6
Overview: !
!
Basic is designed to be easy to understand. For veterans of analog and digital synthesis, we assume this manual won’t be necessary
at all, since Basic follows standard design conventions. In that light, we have written the manual with an eye to the person that is new
to synthesis, and with some explanations of the common terms one would find in most synthesizers. !
!
!
!
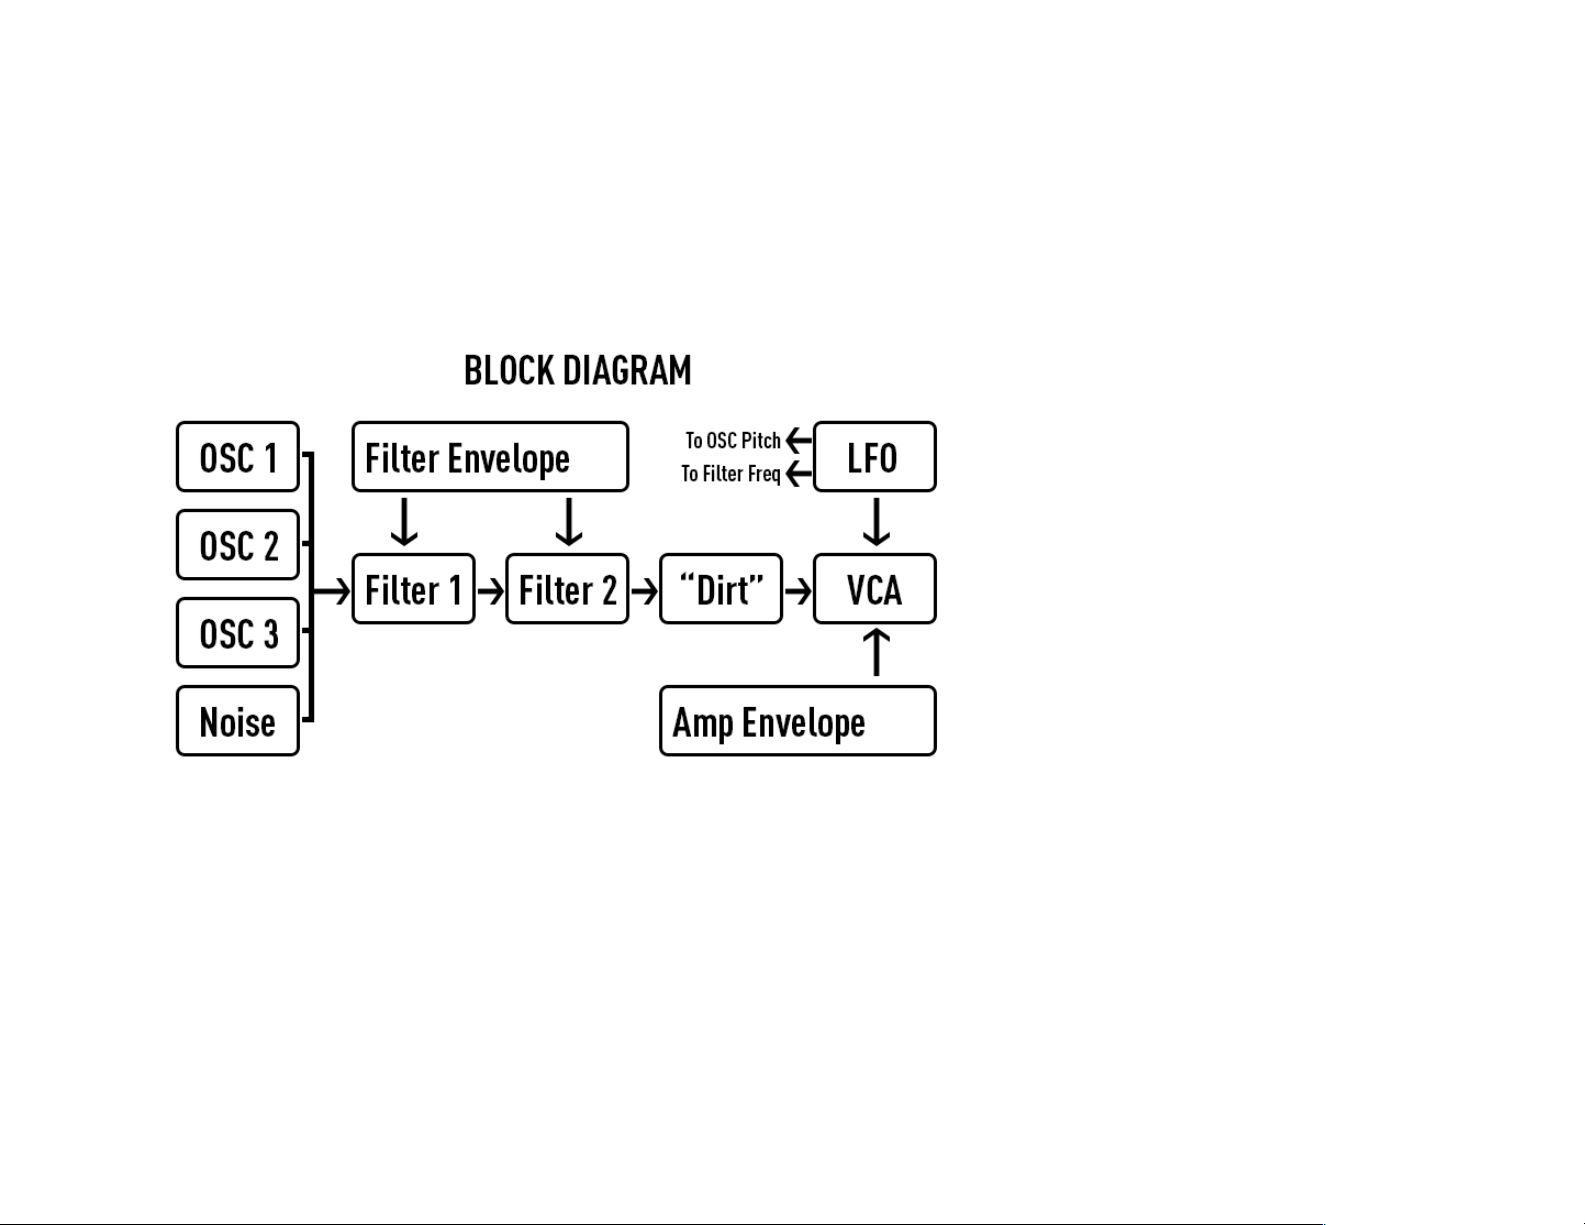
As you can see, Basic’s signal flow is is quite
simple; this or something similar is the
topology you will find in most analog
synthesizers. The oscillators and noise are
mixed together, then the resulting signal is
sent through each filter in turn, then through
the “dirt” block, and finally to the VCA. "
"
The Filter Envelope modifies the filters, while
the Amp Envelope controls the VCA, which
stands for “voltage controlled amplifier” and,
just like the amp in a stereo system, has the
final say in the volume of the signal.!
!
The LFO (“low frequency oscillator”), along
with the note velocity, aftertouch, and pitch and
mod wheels, modulates various aspects of the
signal. !
!
So, long story short, you have your things that make the sound (oscillators, noise generator), which go through things that modify the
sound (filters, “dirt,” VCA), and out the out-hole. The modulators (envelopes, LFO) modify the various parts. Simple as that! The next
few sections of this manual will talk about the individual blocks and what they do. !
!
!
!
!
!
!
Page 7

Oscillators And Noise:!
!
!
The three oscillators in Basic are the source of the audio signal. They are all identical, with the exception that OSC 2 and OSC 3 can
be synced to OSC 1. We’ll talk about that in a bit. !
!
The oscillators are of a type commonly referred to as “wavetable” oscillators. In a traditional oscillator in a synthesizer, either analog
or digital, the different waveforms are created as needed via mathematical methods. In a wavetable oscillator, the waveform is a
sample, usually a single cycle wave, arranged in a table. Hence the name. !
!
In the case of Basic, there are six waveform samples, which you can select
with the multi-switch under the “OSC” name. !
!
1.Triangle: This is a triangle waveform taken from a Minimoog. It has a warm,
smooth timbre that is useful for “hollow” sounds and sub bass. The filters have
little effect on this waveform, because it doesn’t have many high harmonics. !
!
2. Sawtooth: So-called because it looks like the teeth of a saw. This particular
sawtooth wave is sampled from the Oberheim SEM, an analog synth from the
late 1970s. This is a very bright timbre, and is the waveform that responds best
to filtering. !
!
3. Digigrit: This waveform is lifted directly from the ROM of a classic digital
synth from the late 1980s, and is included mainly because we thought it
sounded cool. This waveform doesn’t have much low harmonic content; sounds
that use it exclusively will not have any “bottom” or bass. !
!
4. Pulse 20%, 5. Square, and 6. Pulse 80%: These three waveforms, also
taken from the Oberheim SEM, are similar, varying only in pulse width. They
are, in timbre, somewhere between the smooth sound of the triangle and the
brashness of the sawtooth.!
!
In addition to the three oscillators, you’ll see a fourth control, labeled “NOISE,”
that lives between OSC 2 and OSC 3. This controls the amplitude of a white
noise source. !
!
Page 8

Tune & Level: !
!
Each oscillator has, in addition to the waveform selector, a control labeled “TUNE” and another labeled “LEVEL.” The TUNE knob
controls the relative pitch of that oscillator. The absolute pitch is controlled by the MIDI note input from your DAW or controller, and
the TUNE knob is offset from that. Say, for instance that you play a C3 note on your controller. The TUNE knob is capable of
adjusting the relative pitch of the oscillator up or down a maximum of one octave. The numerical display below the waveform selector
indicates the offset. So, if you have the TUNE knob at approximately 3 o’clock, the numerical display will be somewhere in the order
of +5.00. This means that the oscillator will sound a perfect fourth interval, five semi-tones above C3, or F3. !
!
The TUNE knobs of all three oscillators can be used to create interesting harmonic interactions. For instance, if you leave OSC 1 at
+0.00, and turn OSC 2 to +0.12 and OSC 3 to -0.12, this creates a very thick, “analog” sound when using the sawtooth or square
waves. Another fun trick is to tune OSC 2 up a perfect fifth (+7.00) and OSC 3 down an octave (-12.00). This will result in an
excellent “techno” bass sound when played around C1 to C2. !
!
The LEVEL control for each oscillator does exactly what it says on the panel: it controls the volume of that oscillator. You can think of
the three level controls (plus the NOISE control, which is also just a LEVEL for noise) as the faders on a mixer. That mixer’s output
goes to the filters. !
!
Glide: !
!
Glide, sometimes called (albeit not quite accurately) glissando, or more often, (and somewhat more correctly) portamento, is
controlled by the GLIDE knob, found between OSC 1 and OSC 2. This knob controls, in essence, the time it takes the oscillators to
get from the last pitch they played to a new one they’ve received. So, if you have GLIDE set to zero, and play a C3 followed by a C4,
the oscillators will play the C4 immediately. If you have it set to 12 o’clock, it will take about half a second for the oscillators to reach
the new pitch, as they slide (or glide, if you will) through all the intervening pitches. !
!
Sync: !
!
Between OSC 1 and OSC 2, and again between OSC 2 and OSC 3, on the left side, you’ll see two buttons labeled “SYNC.” The
upper one syncs the phase of OSC 2 to OSC 1, and the lower one syncs the phase of OSC 3 to OSC 1. The oscillator hard sync
sound is very distinctive, especially when the pitch of the slaved oscillator is modulated. The sync effectively forces the waveform of
the slaved oscillator to reset every time the waveform of the master oscillator (in both cases, OSC 1) starts over. It is difficult to
describe this effect in any meaningful way, so we encourage you to experiment with it. !
!
!
!
Page 9
Filters: !
!
Basic has two filters, in a configuration known as “cascaded” or “series.” This means that the mixed signal from the oscillators passes
through Filter 1, and then through Filter 2. Nominally, when one sees a cascaded filter design like this in “the real world,” for example
on the Korg MS20, the filters are fixed states. In the MS20, the first filter is a highpass topology, meaning that it attenuates low
frequencies, while the second filter is a lowpass that attenuates high frequencies. The two together form, for all intents and purposes,
a bandpass filter with a whole lot of knobs. !
!
Since it was no particular trouble to make both of these filters state-variable (that is, each one can be lowpass, bandpass, or
highpass) that is what we’ve done. You can recreate the MS20 filter sound fairly easily by putting the first filter in “HPF” mode and the
second one in “LPF” mode, if you would like.!
!
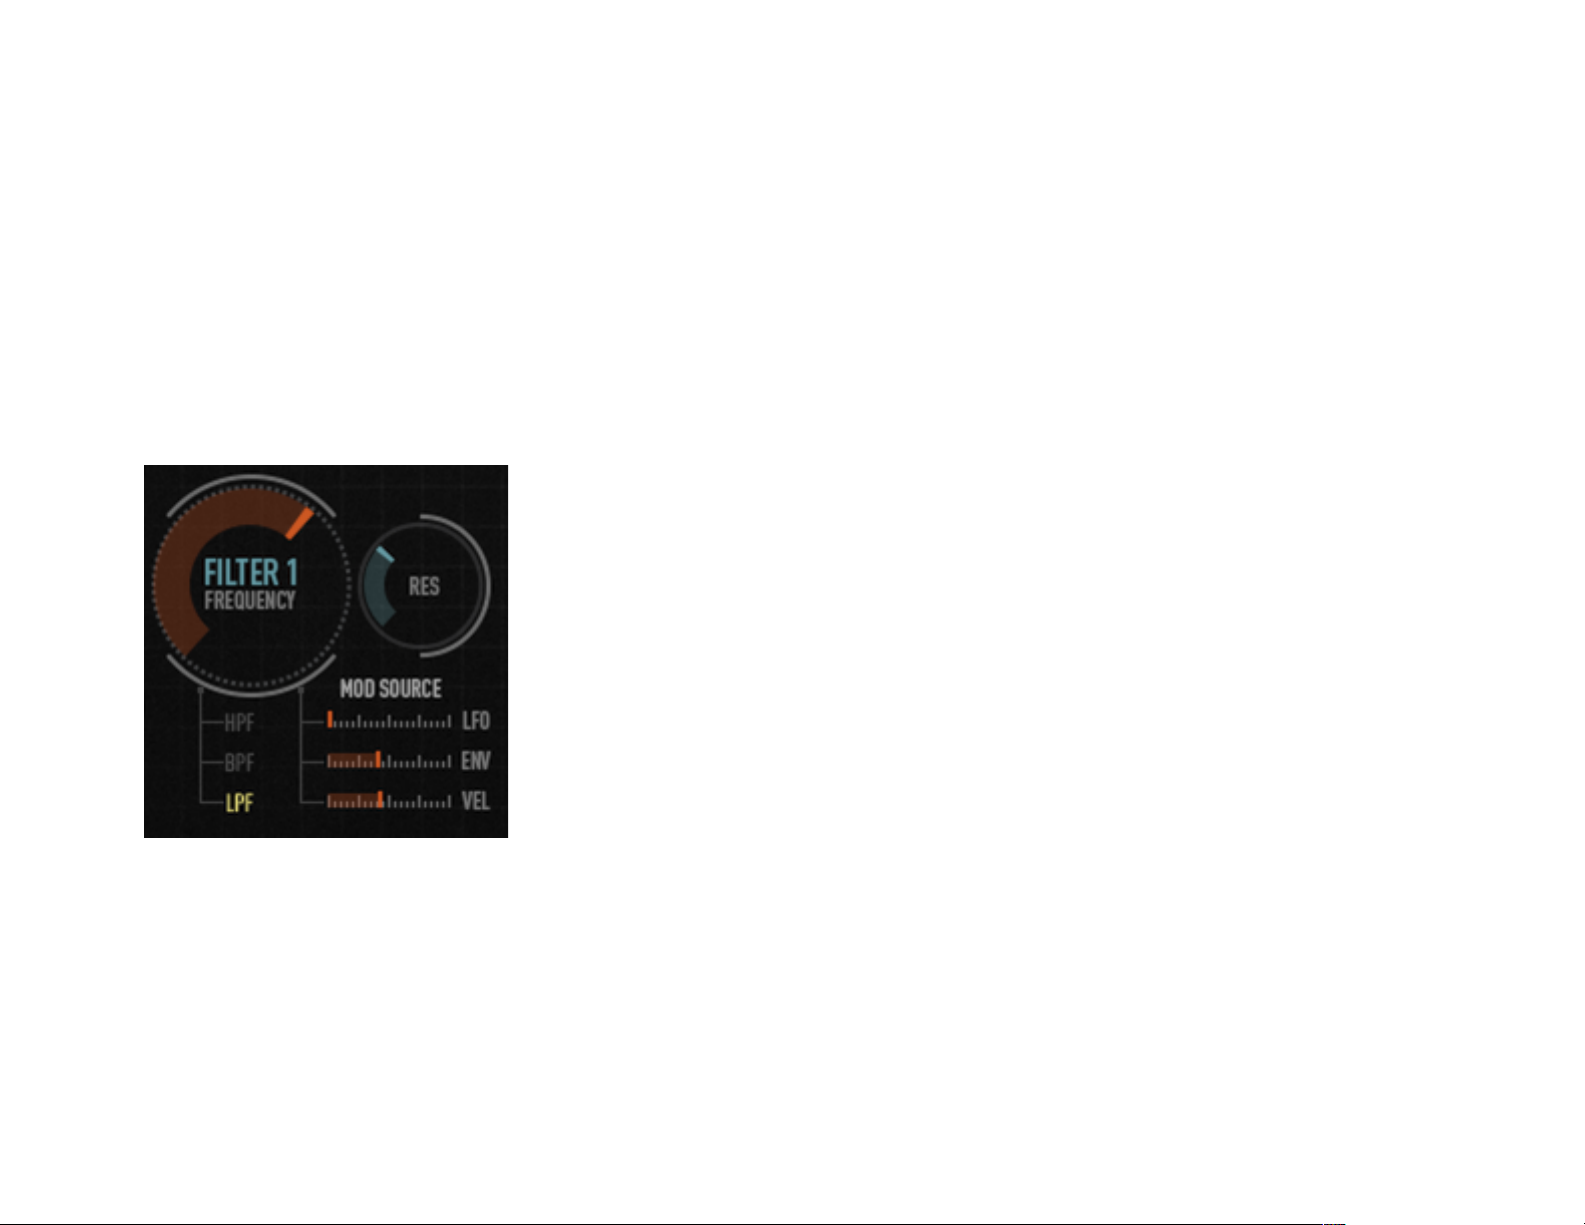
The filter controls are common to almost all subtractive synths, and are fairly easy to
understand. !
!
1.Frequency: This controls the corner frequency of the filter. "
"
2. Res: This is the resonance or emphasis of the corner frequency, also known as the “peak.”
The filters in Basic can self-resonate; when this control is set to higher values, from about 3
o’clock on, you’ll start to hear a tone at the frequency set by the Frequency control. Due to
the design of the filters in Basic, you’ll also begin to hear noticeable distortion in the signal. "
"
3. Mod Source: These three controls set the amount of modulation added to the Frequency
control. The first adds modulation from the LFO. The second from the Filter Envelope, and
the third from MIDI velocity (how hard you hit the key on your controller, essentially.) "
"
4. Topology: Each filter can be set to LPF (lowpass), BPF (bandpass), or HPF (highpass).!
!
!
The mod values in the filters are additive. That means that any modulation value is added to the filter frequency. For the envelope
and velocity, this should be fairly obvious. If your Frequency control is already on the high side, you won’t be able to add anything to it
with the envelope or velocity and hear the result in a meaningful way (although it may amuse your dog, if you have one.) For these
values to be effective, the Frequency control needs to be towards the anti-clockwise settings. !
!
Page 10

The LFO works slightly different. It is bi-polar, meaning that it can also subtract value from the Frequency control. So you’ll get the
best results when the Frequency is set towards the middle of its range. Once you learn the interaction, this will become more
obvious. We suggest experimentation is the best teacher in this regard. !
!
!
!
Envelopes: !
!
The two envelopes in Basic are of the attack/decay/sustain/release
variety, or “ADSR,” as they are known. The names of the knobs are
essentially what they do. Both envelopes trigger when Basic receives a
MIDI note on (with a caveat that we’ll discuss in a moment), and travel
through the first three stages (Attack, Decay, and Sustain) while the
note is held down. When the note is released, the Release stage
starts. !
!
The Filter Envelope can be applied to each filter individually with the
“ENV” sliders; this is generally used to give a particular bit of the sound
a certain emphasis. For instance, on a bass sound, you might want the
initial portion of the note to hit a bit harder, to replicate the sound of a
bass guitar being played with a pick. For this, you’d use zero Attack
and Sustain, a very short Decay, and a very short Release. "
"
The Amp Envelope controls the final amplifier of the synthesizer, and
as such, it has a couple extra controls. It operates, on the whole, in the
same way as the Filter envelope, though. If you want a sound with a
soft, smooth beginning and a long release (to replicate, say, a violin
being played in a mournful fashion) you would have a long Decay, a high Sustain, and very long Attack and Release stages. "
!
Velocity & Retrig: !
"
The VELOCITY slider below the Amp Envelope controls the amount of note velocity applied as a multiplier of the envelope. If the
Velocity is at zero, every note will play at the same volume, the theoretical maximum as described by the envelope settings. If the
Velocity slider is all the way to the right, at full, the velocity can be considered as a 0-to-1 multiplier on the envelope. So if you play a
note at MIDI velocity 64 (which is halfway) the multiplier on the envelope’s values will be 0.5x, and the note will play half as loud as
Page 11

the theoretical maximum. This is, perhaps, a somewhat nonsensical description, but put the slider full, and play the notes on your
controller at varying levels of velocity, and you’ll rapidly see how it works. !
!
The RETRIG control is used to facilitate staccato (as opposed to legato) playing. If this button is on, the envelope will begin its Attack
cycle every time a note is played, whether the preceding note was held down or not. If the button is off (which will be the preferred
method for most uses) a new note will only begin the attack phase if the note preceding it was released first; if the preceding note is
still held when the next note is played, the new note will begin at the Sustain phase. Note this button has no effect on the Filter
Envelope, which is always in legato mode. !
!
!
LFO:!
!
The LFO (which stands for “Low Frequency Oscillator”) is a dedicated oscillator for providing modulation. It can be applied to the
pitch of each individual oscillator (via the three PITCH sliders), the amplitude of the signal (via the AMP slider) or each of the filters
(via the LFO sliders under each filter.) The rate of the LFO is controlled by the SPEED knob. !
!
The LFO has four waveforms with waveshaping, accessible via the four-way waveform switch and the SHAPE slider immediately
underneath. !
!
1.Sine: When the SHAPE slider is at either extreme, the sine wave is
a pair of interesting rhythmic variations; when SHAPE is at the center
position, it is a pure sine. !
!
2. Ramp/Saw: When the SHAPE slider is to the left, this is a ramp
wave. When it is at the right, it is a sawtooth wave. In the center, it is
a triangle wave. "
"
3. Square: this is a square wave; the SHAPE slider has no effect on
this wave. !
!
4. Random: This is a random waveform. When the SHAPE slider is all
the way to the left, this waveform has hard-edged stepping. The
SHAPE slider effectively acts as a smoother. !
!
There are three switches that control the operation of the LFO. When the MOD WHEEL switch is active, the mod wheel MIDI
controller acts as a multiplier on the LFO’s amplitude. When the mod wheel is fully down (or off) you will hear no modulation from the
Page 12

LFO. When it is fully on, you will hear whatever the sliders are set to. "
"
The AFTERTOUCH switch works in the same way. When it is on, the LFO’s amplitude is controlled by the MIDI aftertouch value
coming from your keyboard. When both the MOD WHEEL and AFTERTOUCH switches are active, the LFO’s full amplitude will only
be achieved when both aftertouch and mod wheel values are at their maximum. !
!
The SYNC switch puts the LFO in to host sync mode, and the value display changes from Hz to note values. For instance, if you set
it to 1/8D, the cycle time of the LFO will be a dotted 1/8th note of the current tempo of your DAW. When the SYNC switch is not
active, the value is given in Hz, or cycles-per-second. !
!
!
Dirt & Output Level: !
!
The DIRT slider in the upper right hand corner of the user interface controls a sound shaping block immediately after the filters and
before the VCA. This block introduces a certain musically pleasing (to some people) distortion and EQ to the signal, and the DIRT
slider controls the amount of this effect that is added. When it is fully to the left, there is no distortion or EQ, and you hear the “real”
output of the filters. When it is fully to the right, a rather extreme amount of distortion and EQ is added to the signal. !
!
This works well for some sounds. For instance, patches that primarily use the sawtooth or “Digigrit” waveforms will usually benefit
from a bit of DIRT. Patches that rely entirely on the square waves will usually not sound very good with anything more than a touch of
DIRT. Apply to your taste, or don’t use it. Entirely up to you. !
!
The OUTPUT LEVEL slider does exactly what you think it does. Basic has a soft limiter that will kick in on extreme patches, and is
designed to never output a signal higher than -2dBfs; the OUTPUT LEVEL slider is a multiplier after the limiter, and will control the
overall volume. However, the way Basic is designed, you can usually just leave this all the way up, and control the volume of the
synth via the channel fader in your DAW. We can make no promises in this regard, but it is unlikely that you will be able to get the
output of Basic over -2dBfs, regardless of what you’ve programmed in the patch. !
!
A pro user may question the existence of these pair of blocks, but remember that Basic is designed with the educational market in
mind, and our reasoning is thus: the limiter is there because a less experienced user may run the risk of damaging his or her ears or
playback equipment with runaway resonance and the like and we wanted to mitigate negative experiences. The DIRT control and its
attendant shaping exists because, while we would normally add shaping and saturation at many points in the signal path to get the
end result we wanted (and we usually do this in most of our other products) we rarely bare any controls for this habit, and we thought
it may be interesting to show the effect of our normal methods. !
!
Also, it sounds cool. And we like things that sound cool. !
Page 13

Presets: !
!
Basic comes with a selection of 48 presets to get you started. We’ve tried to show the full range of abilities of the synth, while
providing some useful and/or amusing sounds. In the VST versions of the synth, these presets are “baked” in to the software, so you
never have to worry about overwriting them. In the AudioUnit version, hosts that utilize AU’s “factory preset” feature (like Logic and
Live 8) will show the “baked” presets as Factory Presets. Due to the fact that some host do not recognize Factory presets, we have
cloned the entire package in to the Presets folder in the OS X library. In this manner, hosts like Live 9 and Digital Performer also get
the same set. However, these cloned presets can be over-written, so use with care. The net result of all of this is that Logic basically
has two sets of presets: the Factory ones, and the cloned set. Nothing to worry about. !
!
In any event, if your host is able to use both AudioUnit and VST plug-ins (like Live and Studio One) we suggest you use the VST
version. !
!
!
And Finally… !
!
Thank you once again for purchasing Basic. We hope you enjoy it, and feel free to write us at info@audiodamage.com if you have
any questions or comments. We look forward to hearing from you! !
!
!
 Loading...