

Page 1

Axon User’s Guide
Audio Damage, Inc.
Release 1.1
Page 2

The information in this document is subject to change without notice and does not represent a commitment on
the part of Audio Damage, Inc. The software described by this document is subject to a License Agreement
and may not be copied to other media except as specifically allowed in the License Agreement. No part of this
publication may be copied, reproduced or otherwise transmitted or recorded, for any purpose, without prior
written permission by Audio Damage, Inc.
© 2010 Audio Damage, Inc. All rights reserved.
Credits
Software Design and Construction, Documentation
Chris Randall
Adam Schabtach
Field Testing
Brandon Daniel
Steve Hamann
Made Possible By
Elle
Tracie
Fuzzy Logic
Alfred
Edwin
Chica
Madeline
Pablo
Zed
Audio Unit version implemented using Symbiosis from NuEdge Development.
Page 3

License Agreement
BY INSTALLING THE SOFTWARE, YOU ARE CONSENTING TO BE BOUND BY THIS AGREEMENT. IF YOU DO NOT
AGREE TO ALL OF THE TERMS OF THIS AGREEMENT, THEN RETURN THE PRODUCT TO THE PLACE OF
PURCHASE FOR A FULL REFUND.
Single User License Grant: Audio Damage, Inc. ("Audio Damage") and its suppliers grant to Customer
("Customer") a nonexclusive and nontransferable license to use the Audio Damage software ("Software") in
object code form solely on a single central processing unit owned or leased by Customer.
Customer may make one (1) archival copy of the Software provided Customer affixes to such copy all
copyright, confidentiality, and proprietary notices that appear on the original.
EXCEPT AS EXPRESSLY AUTHORIZED ABOVE, CUSTOMER SHALL NOT: COPY, IN WHOLE OR IN PART,
SOFTWARE OR DOCUMENTATION; MODIFY THE SOFTWARE; REVERSE COMPILE OR REVERSE ASSEMBLE ALL
OR ANY PORTION OF THE SOFTWARE; OR RENT, LEASE, DISTRIBUTE, SELL, OR CREATE DERIVATIVE WORKS
OF THE SOFTWARE.
Customer agrees that aspects of the licensed materials, including the specific design and structure of
individual programs, constitute trade secrets and/or copyrighted material of Audio Damage. Customer agrees
not to disclose, provide, or otherwise make available such trade secrets or copyrighted material in any form to
any third party without the prior written consent of Audio Damage. Customer agrees to implement reasonable
security measures to protect such trade secrets and copyrighted material. Title to Software and
documentation shall remain solely with Audio Damage.
LIMITED WARRANTY. Audio Damage warrants that for a period of ninety (90) days from the date of shipment
from Audio Damage: (i) the media on which the Software is furnished will be free of defects in materials and
workmanship under normal use; and (ii) the Software substantially conforms to its published specifications.
Except for the foregoing, the Software is provided AS IS. This limited warranty extends only to Customer as
the original licensee. Customer's exclusive remedy and the entire liability of Audio Damage and its suppliers
under this limited warranty will be, at Audio Damage or its service center's option, repair, replacement, or
refund of the Software if reported (or, upon request, returned) to the party supplying the Software to
Customer. In no event does Audio Damage warrant that the Software is error free or that Customer will be
able to operate the Software without problems or interruptions.
This warranty does not apply if the software (a) has been altered, except by Audio Damage, (b) has not been
installed, operated, repaired, or maintained in accordance with instructions supplied by Audio Damage, (c) has
Page 4

been subjected to abnormal physical or electrical stress, misuse, negligence, or accident, or (d) is used in
ultrahazardous activities.
DISCLAIMER. EXCEPT AS SPECIFIED IN THIS WARRANTY, ALL EXPRESS OR IMPLIED CONDITIONS,
REPRESENTATIONS, AND WARRANTIES INCLUDING, WITHOUT LIMITATION, ANY IMPLIED WARRANTY OF
MERCHANTABILITY, FITNESS FOR A PARTICULAR PURPOSE, NONINFRINGEMENT OR ARISING FROM A
COURSE OF DEALING, USAGE, OR TRADE PRACTICE, ARE HEREBY EXCLUDED TO THE EXTENT ALLOWED BY
APPLICABLE LAW.
IN NO EVENT WILL AUDIO DAMAGE OR ITS SUPPLIERS BE LIABLE FOR ANY LOST REVENUE, PROFIT, OR
DATA, OR FOR SPECIAL, INDIRECT, CONSEQUENTIAL, INCIDENTAL, OR PUNITIVE DAMAGES HOWEVER
CAUSED AND REGARDLESS OF THE THEORY OF LIABILITY ARISING OUT OF THE USE OF OR INABILITY TO
USE THE SOFTWARE EVEN IF AUDIO DAMAGE OR ITS SUPPLIERS HAVE BEEN ADVISED OF THE POSSIBILITY
OF SUCH DAMAGES. In no event shall Audio Damage's or its suppliers' liability to Customer, whether in
contract, tort (including negligence), or otherwise, exceed the price paid by Customer. The foregoing
limitations shall apply even if the above-stated warranty fails of its essential purpose. SOME STATES DO NOT
ALLOW LIMITATION OR EXCLUSION OF LIABILITY FOR CONSEQUENTIAL OR INCIDENTAL DAMAGES.
The above warranty DOES NOT apply to any beta software, any software made available for testing or
demonstration purposes, any temporary software modules or any software for which Audio Damage does not
receive a license fee. All such software products are provided AS IS without any warranty whatsoever.
This License is effective until terminated. Customer may terminate this License at any time by destroying all
copies of Software including any documentation. This License will terminate immediately without notice from
Audio Damage if Customer fails to comply with any provision of this License. Upon termination, Customer
must destroy all copies of Software.
Software, including technical data, is subject to U.S. export control laws, including the U.S. Export
Administration Act and its associated regulations, and may be subject to export or import regulations in other
countries. Customer agrees to comply strictly with all such regulations and acknowledges that it has the
responsibility to obtain licenses to export, re-export, or import Software.
This License shall be governed by and construed in accordance with the laws of the State of Colorado, United
States of America, as if performed wholly within the state and without giving effect to the principles of conflict
of law. If any portion hereof is found to be void or unenforceable, the remaining provisions of this License
shall remain in full force and effect. This License constitutes the entire License between the parties with
respect to the use of the Software.
Page 5

Introduction
Axon introduces an Audio Damage original: the Neuron Sequencer. A radical departure from traditional x0xor MPD-style sequencers, the Neuron Sequencer generates rhythms and melodies with a network of
interconnected nodes called neurons. Each neuron has a flexible but simple to use FM-based synthesizer
capable of generating electronic percussion sounds and metallic tones. Axon includes an internal mixer for
setting the relative levels and stereo positions of these seven synthesizers. The mixer also feeds a stereo
delay and a pair of filters, both drawn from Audio Damage’s highly regarded effects plug-ins. Axon’s neurons
also transmit MIDI note messages so you can use Axon to drive your favorite hardware or software
synthesizers, sample players, etc. Axon can receive MIDI note messages and be used as a software
synthesizer without using its internal sequencer.
If You Don’t Like To Read Manuals
We understand. You just got a shiny new plug-in and you’d really rather play with it than read some dull
exposition about it. Go ahead, then—install it, load it up, flip through the presets, move some of the controls
around. Axon comes with a healthy assortment of built-in presets that will provide instant gratification and
keep you amused for quite some time.
However, eventually you may find that it’s not entirely clear exactly what’s going on. Hexagons blink, sounds
happen, beats emerge, but how? When you’re ready to learn about how Axon does what it does, come back to
this manual and read on.
System Requirements
To use Axon, you'll need a Steinberg VST-compatible host application which conforms to the VST 2.0
specifications, and a computer capable of running it. For the Audio Unit version of Axon, you’ll need an
application capable of hosting Audio Unit plug-ins, and an Apple computer with an Intel CPU capable of
running it.
We support the use of Axon under Microsoft Windows XP, Vista, or Windows 7; and Apple OS X version 10.5
or newer.
Page 6

Installation
Double-click the Axon Installer icon, and follow the instructions. During the installation process the installer
will ask you to enter your registration code. Your registration code uniquely identifies your purchase, and you
will need it if you need to reinstall your plug-in (for example, after upgrading to a new computer). You can
retrieve your code from your account at the Audio Damage website if you misplace it. Please don’t share your
code with your friends. We’re delighted if you like our products so much that you want to share them, but
please ask your friends to buy their own copy so that we can keep making new products.
On OS X, the installer installs both the AudioUnit and VST versions of Axon by default. If you click the
Customize button you can choose to not install one of these formats. If you’re running a 64-bit version of
Windows, you can choose to install either a 32- or 64-bit version of Axon, or both.
To un-install from OS X, simply delete the plug-in from your VST folder, which is usually located at
/Library/Audio/Plug-Ins/VST/, and your AudioUnits folder, which is located at /Library/Audio/PlugIns/Components/. To un-install from Windows, delete the file named Axon.dll from your VST folder(s).
What’s New in Version 1.1
Version 1.1 includes the following improvements:
Multiple outputs
Each of Axon’s synthesizers now has a separate output bus so that you can process the sounds
individually with your host software’s mixer.
New synchronization mode
Axon now optionally resets all of its node counters to zero when you stop your host software’s
transport, to provide more predictable alignment with other tracks.
Fewer Bugs
Timing problems when using Logic have been corrected, and an obscure issue with automation has
been removed.
Page 7

Operation
The following screen shot shows Axon’s user interface. The controls are described in the following paragraphs.
Page 8

1. Neuron Sequencer
Axon employs a unique new design for its internal sequencer. It is made up of a group of interconnected
objects we call neurons, so we call it the neuron sequencer. The neurons are displayed in a pane on the left of
Axon’s window.
The neurons are numbered from zero to seven. The neuron at the center is
Neuron 0. Neuron 1 is directly above Neuron 0, and the remaining neurons
are numbered in a clockwise fashion. The neuron with the blue hexagon in
the center (Neuron 5 in the illustration) is the selected neuron. To select a
neuron just click it with the mouse.
Any neuron can be connected to other neurons. Connected neurons send
signals, called pulses, to each other at metrical intervals. A neuron that
sends pulses to other neurons is called a transmitter. A neuron that
receives pulses from other neurons is called a listener. A neuron can be
both a transmitter and a listener.
Neuron 0 is special: it receives pulses at a fixed rate determined by your host program’s tempo, or Axon’s
internal timing source. We’ll describe Axon’s timing features in greater detail in a following section titled
Transport Controls; for now just remember that Neuron 0 always receives a steady stream of pulses
regardless of any connections in the neuron sequencer. Neuron 0 is the origin of pulses within the neuron
sequencer. If Neuron 0 isn’t connected to any other neurons, then no other neurons will receive (or send)
pulses.
Each neuron has a threshold value. The neurons each have a counter to keep track of how many pulses they
receive. When the number of received pulses exceeds the threshold value, the neuron fires and five things
happen simultaneously:
1. The neuron sends a pulse to any other neurons that are connected to it.
2. The neuron triggers its corresponding synthesizer voice, generating a sound.
3. A MIDI note message is transmitted by the plug-in to anything that might be connected to it, such as
a software or hardware synthesizer.
4. The outline of the neuron flashes blue in Axon’s window.
5. The neuron resets its pulse counter to zero.
Page 9

A neuron’s threshold has a value from zero to six. If its threshold is zero, the neuron will fire every time it
receives a pulse. If the threshold is one, it will fire every other time it receives a pulse; if the threshold is two,
it will fire after it receives three pulses, and so on.
The neuron’s threshold value is displayed with grey bars inside the neuron. The current value of the
pulse counter is displayed with white bars. The neuron shown at the left has a threshold value of
three and a pulse count of two.
To change a neuron’s threshold value, click on it with the mouse and drag vertically. You can also change the
threshold value of the currently selected neuron by clicking and dragging on the digit labeled THRSH near the
top center of Axon’s window.
Wiring Mode
Axon’s window has a special mode for making connections between neurons called wiring mode. The buttons
labeled WIRE and PLAY at the upper-right corner of the Neurons area let you switch between wiring mode and
play mode.
When wiring mode is active, the connections between the currently selected neuron and other neurons are
shown by bold outlines. Neurons that are listening to the current neuron have a blue outline. Neurons that are
sending to the current neuron have a grey outline.
In the following screenshot, Neuron 5 is the currently selected neuron. Neurons 1, 2, and 6 are all listening to
Neuron 5, and Neuron 5 is listening to Neuron 0.
Page 10

To make a connection from one neuron to another, first select a neuron by clicking it (as usual). Then hold
down the SHIFT key on your keyboard and click on another neuron to make it listen to the first neuron. The
second neuron’s outline will turn blue to indicate that it is a listener. You can make several neurons listen to
the first one by clicking each of them while holding the SHIFT key.
To remove a connection, do the same thing. Shift-clicking on a neuron that is a listener of the currently
selected neuron removes the connection. You can remove all of the connections for all of the neurons by
clicking the CLEAR ALL button at the lower-left corner. (Use with caution!)
You can connect any neuron to any number of other neurons. The only restriction is that you cannot connect
neurons such that the connections create a loop. Axon checks for loops as you make connections and will
prevent you from forming loops.
Creating patterns with Axon consists of finding combinations of connections and threshold values that produce
interesting results. Keep in mind that while the results can be unpredictable, they are not random.
2. Voice Controls
The controls in the upper-right area of Axon’s window control Axon’s
seven percussion synthesizers, which we call “voices” for short. Each
voice is a simple but flexible synthesizer based on a pair of oscillators
followed by a wave shaper. The seven voices share the controls; the
current voice is indicated by the solid blue hexagon in the Neurons
display, and by the digit labeled VOICE.
Voice
The VOICE control indicates which of Axon’s seven voices is currently
selected and can be modified by the other controls. You can switch
between voices either by clicking on the neurons or clicking and
dragging up/down on the VOICE digit.
Threshold
The THRSH control displays the threshold value of the voice’s neuron. Change the threshold value either by
dragging up/down on the voice’s neuron, or by dragging on the THRSH digit. The threshold value ranges from
zero to six and is also reflected by the number of light grey bars in the voice’s neuron.
Page 11

Pitch
The PITCH control sets the note that the voice plays. Notes are indicated with the usual names of “A” through
“G” followed by a single digit indicating the octave. C4 is middle C. Sharps are indicated by a # symbol
following the note name1. Click and drag up/down to change the pitch of the voice.
The PITCH control also sets the pitch of the MIDI note transmitted by Axon when the voice is triggered.
Amplitude Envelope Generator
The amplitude envelope generator, labeled AMP EG, controls the overall “shape” of the sound—that is, its
loudness over the duration of the note. Since Axon’s voices are intended for creating percussive sounds, the
AMP EG is fairly simple. It has a brief attack phase in which it jumps from silence to a peak, followed by a
release phase in which it fades back to silence. You can control the duration of both phases as well as their
curvature. The following diagram shows how to change the AMP EG by clicking and dragging on the control:
1
The omission of flat symbols from this control is accidental.
Page 12

Pitch Envelope Generator
The pitch envelope generator, labeled PITCH EG, is similar to the AMP EG but affects the frequency or pitch of
the sound. It has the same general characteristics as the amplifier envelope generator—an attack phase
followed by a release phase—but you can also vary the level of its peak by clicking and dragging its center
handle.
The position of the PITCH EG control peak determines how much the sound changes in frequency. If the peak
is at its lowest position, the sound will have the same pitch for its entire duration. As you raise the PITCH EG
peak handle you’ll hear the sound’s pitch bend. A PITCH EG setting with an instantaneous attack and a short
decay can add a “blip” to the sound, making its beginning more noticeable. A longer decay phase can be
particularly useful when using the voice to modulate other voices through the FM and Ring Mod busses (see
below).
FM XY
The grid labeled FM is a two-dimensional “XY” control that alters the frequency modulation parameters of the
synthesizer voice. Axon’s voice consists of two audio-frequency oscillators, one modulating (changing) the
frequency of the other. In the usual parlance, the two oscillators are referred to as the modulator and the
carrier. The carrier generates the sound that you actually hear, and the modulator changes the timbre of the
carrier by rapidly changing its frequency.
Moving the white circle of the FM XY control affects the oscillators in two ways. The horizontal position of the
circle sets the ratio of the frequencies of the two oscillators, and the vertical position of the circle determines
Page 13

how much the modulator modulates the carrier. In general terms, moving the circle left and right changes the
character or timbre of the sound, and moving it up and down changes its brightness.
If the circle is at the bottom edge of the grid, the modulating oscillator is effectively disconnected and you’ll
hear only a simple sine wave (i.e., a pure tone, and a fairly dull-sounding one at that). As you move the circle
upwards the amount of modulation increase and the sound becomes brighter. Try moving the circle up just
slightly from its lowest position and then moving it left and right to hear how changing the position of the
circle affects the sound.
Timbre XY
The grid labeled TIMBRE is another two-dimensional control which affects the voice’s tone. The TIMBRE
control adjusts a pair of mathematical functions which change the shape of the sound wave that is generated
by the oscillator. In other words, the timbre changes in two different ways as you move the white circle
horizontally and vertically.
If the circle is at the lower-left corner of the grid, the TIMBRE control has no effect on the sound. As you move
the circle either to the right or upwards, you’ll hear the sound change in character. Moving the circle vertically
usually has a greater effect than moving it horizontally. While the FM and TIMBRE controls adjust independent
parts of Axon’s synthesizers, you’ll find that both of them can alter the sound dramatically and the influence of
one is in some sense dependent on the position of the other.
Modulation Busses
The voice controls described so far affect Axon’s voices individually. Changing the pitch control of Voice 2, for
example, has no effect on Voice 3 or any of the other voices. The horizontal sliders at the bottom of the voice
panel allow Axon’s voices to affect each other, altering each other’s timbres in rhythmic and sometimes
unpredictable ways.
Axon contains a pair of internal busses similar to the effects-send busses in a mixing console. Each voice can
send a variable amount of its output to each of these busses. The two busses independently add together (or
sum) the signals from each voice. Each voice can also receive a variable amount of the summed signals from
the busses.
The voices send their signals to both busses in the same manner: two sliders controls how much of the voice’s
output is added to the buss. The voices receive signals from the busses in two different ways. The FM buss,
short for Frequency Modulation, changes the timbre of a voice by modulating its carrier oscillator in the same
manner as the modulator oscillator. The Ring buss, short for Ring modulation, essentially turns the output of
Page 14

the voice on and off at a rate equal to the frequency of the signal on the buss. This creates an effect similar to
the ring modulators found on analog synthesizers.
It is perhaps self-evident that the effect of both of the busses is easier to hear than it is to describe. The most
important point to remember as you experiment is that the voices are modulating each other. There are no
internal oscillators that generate the signals for FM and Ring busses. If no active voices have their FM Send
and Ring Send sliders positioned above their minimum values, there will be no signals sent to the busses and
you won’t hear any effect as you move the FM Receive and Ring Receive sliders.
FM Send/Receive
The FM SEND slider sets how much of the voice’s output is added to the FM buss. Moving the slider to the
right increases the amount that the voice’s signal contributes to the FM buss.
The FM RECEIVE slider sets how much the FM buss signal modulates the voice’s carrier oscillator—that is, how
much it changes the voice’s timbre by frequency modulation. If the slider is positioned at the far left the FM
buss has no effect on the voice.
Ring Send/Receive
The RING SEND slider sets how much of the voice’s output is added to the Ring buss. Moving the slider to the
right increases the amount that the voice’s signal contributes to the Ring buss.
The RING RECEIVE slider controls how much you’ll hear the Ring buss change the timbre of the voice. It
essentially acts as a level control. If the RING RECEIVE slider is at the far left, you’ll hear the voice unaltered
by the Ring buss. As you move the slider to the right, you’ll hear an increasing amount of the voice’s output
modulated by the Ring buss.
MIDI Only
If the MIDI ONLY switch is turned on (by clicking it—click it again to turn it off again), the voice does not
generate any sound by itself. Instead, only MIDI note on/off messages are transmitted by Axon. Since the
voice isn’t generating any sound, it doesn’t contribute to the FM and Ring busses either. Turning on the MIDI
ONLY switch can save a little of your computer’s available CPU resources if you’re using Axon exclusively to
control another synthesizer via MIDI.
Since the AudioUnit version of Axon does not transmit MIDI, the MIDI Only switch does not have any useful
effect when Axon is running in an AudioUnit host.
Page 15

Copy/Paste
The COPY and PASTE buttons let you copy all of the settings from one voice and apply them to another voice.
Click the COPY button and all of the values of the current voice’s controls are stored within Axon. Switch to a
different voice, click the PASTE button, and those stored values will be applied to the voice. This lets you
easily set up two or more of Axon’s voices to create the same, or similar, sounds.
The Copy/Paste mechanism does not affect the voice’s mixer settings, nor does it work between separate
instances of Axon. If you need to move voice settings between two instances, use your host’s preset-saving
mechanism to save one instance’s settings in a file, then load that preset file into the other instance(s).
3. Transport Controls
The controls near the upper-left corner of Axon’s window adjust Axon’s
timing and tempo parameters.
Clock
The numbers labeled CLOCK display Axon’s current operating tempo. If Axon is using its internal timing
source, click and drag up/down on these numbers to make Axon play faster/slower. If Axon is following your
host program’s timing source, the CLOCK control is disconnected.
Note that Axon’s factory presets are all set to use your host’s timing information. The tempo value displayed
by the CLOCK control is a suggested tempo marking for the preset.
Source
The switch to the right of the CLOCK label switches Axon between using your host program’s timing
information and its internal timing source to set its tempo. There are three modes, labeled HOST, RST, and
INT. If HOST is illuminated, Axon follows your host’s tempo changes. If INT is illuminated, Axon uses an
internal timing source whose rate is set by the Clock control to set its tempo. RST is the same as HOST but in
this mode Axon resets the pulse counters of all seven neurons to zero when you stop your host program’s
transport. While the RST mode provides more predictable synchronization between Axon and other tracks in
your composition, you may find that the timing offsets or phases between Axon’s voices are subtly changed
when you stop and restart the song.
Click the appropriate word to switch between HOST, RST, and INT.
Page 16

Rate
The RATE control sets the metrical unit of the pulses that trigger Axon’s central Neuron 0. Setting the RATE
control to 1/8 will trigger Neuron 0 every eighth note, setting it to 1/16 will trigger Neuron 0 every sixteenth
note, and setting it to 1/32 will trigger Neuron 0 every thirty-second note.
Transport
The buttons labeled STOP and PLAY start and stop Axon’s internal timing source. Click START to start Axon
playing, click STOP to stop it. (Betcha could have figured out that yourself, eh?) If Axon’s SOURCE control is
set to host, the STOP and PLAY buttons have no effect and Axon plays and stops in sync with your host
program’s transport.
4. Mixer Controls
Clicking the MIXER button near the lower left of Axon’s window reveals the mixer controls:
Each of Axon’s seven synthesizer voices has its own set of mixer controls. Looking from top to bottom, the
controls consist of:
Effects Send slider
This slider sends some or all of the voice’s sound to Axon’s delay and filter effects. Click and drag the slider to
the right to increase the amount of signal sent to the effects section. If all of the FX SND sliders are off (i.e. at
their leftmost position) you won’t hear anything from the effects since they won’t receive any signal.
Page 17

Pan slider
This slider moves the voice’s sound between the left and right sides of Axon’s output and thus sets its position
in the stereo field. Click and drag the slider left and right from its center position to move the voice
correspondingly. The pan slider does not affect the individual output busses for Axon’s voices.
Mute and Solo buttons
The mute and solo buttons, labeled M and S, selectively silence Axon’s voices. Clicking a voice’s Mute button
silences the voice. Clicking a voice’s Solo button silences all of the other voices. Any number of voices can be
muted at the same time, but only one voice can be soloed. If, for example, Voice 2’s Solo button is illuminated
and you click Voice 4’s Solo button, Voice 4 will become the only audible voice. Theses buttons do not affect
the individual output busses for Axon’s voices.
Level Slider
The vertical level sliders set the output level or loudness of the individual voices. Clicking and dragging a
voice’s slider upwards makes the voice louder. If you drag the slider all the way to the bottom you won’t hear
anything from that voice. The level slider does not affect the individual output busses for Axon’s voices.
Note that a pair of white lines is drawn around the level slider of the voice corresponding to the currently
selected neuron.
Master Slider
At the far right of Axon’s mixer panel is a slider which sets the overall output level. You may find that Axon’s
output is too loud (i.e., causes clipping in your audio interface) when several voices play simultaneously. Click
and drag the master slider downwards to reduce Axon’s output.
Page 18
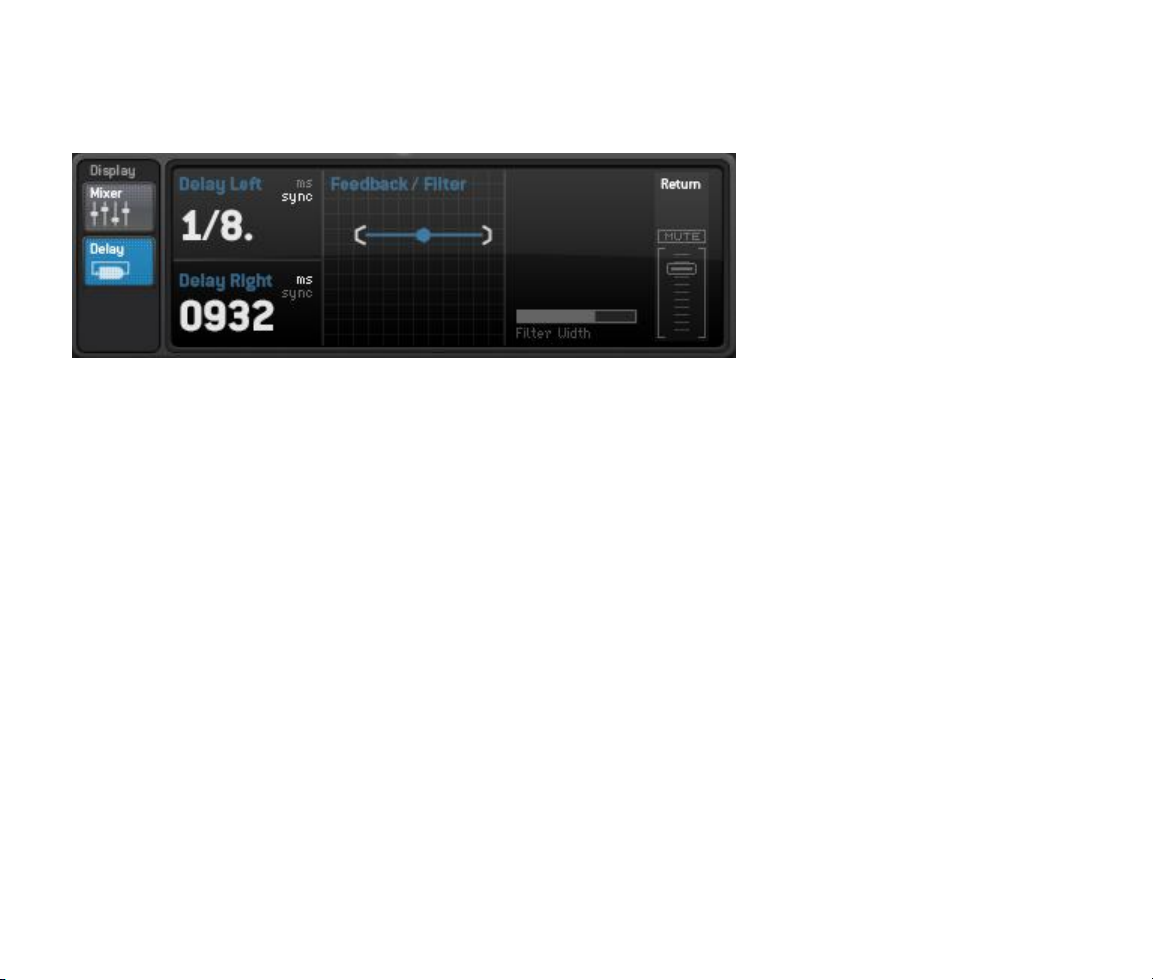
5. Delay and Filter Controls
Clicking the DELAY button near Axon’s lower-left corner reveals the controls for the delays and filter:
The DELAY LEFT and DELAY RIGHT controls change the amount that signals are delayed in relation to the
original (dry) signal. Each delay has a range of 0 to 1999 msec, or approximately two seconds.
The numeric delay controls operate either in units of time or in metrical units, that is, fractions of a beat. Click
on the unit indicators in the upper-right corner of the controls (i.e. the words MS and SYNC) to switch between
the two modes.
If the SYNC mode is active, Axon uses the current tempo reported by your host to calculate its delay time. In
this mode the delay time control sets the delay length in metrical units. The range of values is 1/32nd to 1/1 (a
whole measure), with dotted and triplet times available. Triplet values are denoted with a “T” after the beat
fraction, and dotted values are denoted with a period. For example, “1/8 .” indicates a delay time with a
dotted eighth note feel. Axon will track tempo changes, saving you from having to adjust its delay time by
hand when you change the tempo of your song.
The two-dimensional FEEDBACK/FILTER panel controls both the feedback level for the delays and the
frequencies of the filters. Axon has low-pass and high-pass filters which come after the delays. These filters
can be adjusted to alter the timbre of the delayed signal. The filters are controlled in tandem with the
FEEDBACK/FILTER control. Since the filter controls change the low- and high-pass filters simultaneously the
filters act like a band-pass filter with a variable width. Dragging the blue dot in the control changes the corner
frequencies of both filters. Dragging it to the left moves the filter frequencies downwards, making the delayed
signal darker; dragging it to the right moves the frequencies upwards, making the delayed sound brighter.
Page 19

The WIDTH slider to the right sets the separation of the low- and high-pass filters. Dragging the WIDTH slider
to the right moves the filters farther apart. If you make the filter separation small by dragging the WIDTH
slider to the left, you may not hear any of the delayed signal at all.
Dragging the blue dot up and down varies the feedback level of the delays. As you drag the dot upwards more
of the delayed signal will be fed back into the delays, creating more repeats.
The RETURN controls at the right side of the pane set the level of the delayed/filtered signal as it is mixed into
Axon’s output. Dragging the slider upwards increases the level of the signal. If you move it to its top position
the delayed signal will be about as loud as the original signals (although the filters may attenuate the signal,
depending on their settings). Click the MUTE button to silence the delayed signal altogether.
Note that the delayed/filtered signal is sent only to Axon’s stereo output channels, and not to the individual
voice channels.
Page 20

MIDI Notes
Voice
Note Name
MIDI Note Number
0
C4
60
1
D4
62
2
E4
64
3
F4
65
4
G4
67
5
A4
69
6
B4
71
Axon both sends and responds to MIDI note on/off messages. You can use Axon as a software synthesizer
without using its Neuron Sequencer, and you can use its Neuron Sequencer to control other synthesizers.
Receiving MIDI Notes
Axon’s seven voices are permanently assigned to the whole notes C4 through B4, i.e. the white keys on the
keyboard starting with middle C. Here’s a chart showing the voices and their assigned notes and MIDI note
numbers:
Sending MIDI Notes
The VST versions of Axon transmit a MIDI note message every time a voice is triggered. The MIDI note’s pitch
is set by the voice’s Pitch control. Its velocity is proportional to the position of the voice’s level slider in the
mixer (i.e. the higher the slider, the higher the velocity value). As described previously, if you turn on a
voice’s MIDI ONLY switch, the internal synthesizer for that voice will be turned off.
The AudioUnit version of Axon does not transmit MIDI. At the time of Axon’s production, very few AudioUnit
hosts provide the necessary information for AudioUnits to transmit MIDI data with accurate timing.
Page 21

MIDI Controllers
Axon responds to MIDI continuous controller messages. You can use hardware MIDI controllers, such as MIDI
slider boxes or the knobs found on some MIDI keyboards, to adjust Axon’s parameters.
Axon has a simple “MIDI Learn” mode for assigning its onscreen controls to MIDI controllers. To assign a
control to a MIDI controller:
1. Hold down the SHIFT and CTRL keys on your PC’s keyboard, or SHIFT and CMD keys if you’re using a Mac,
and click once on the control. A white box will be drawn around the control to indicate that it is ready
to learn which MIDI controller it will be assigned to.
2. Move the MIDI controller to send a continuous controller message—turn the knob, press the button,
move the slider, whatever is appropriate.
3. The white square will disappear. Now the control will move when you manipulate the MIDI controller.
When assigning a MIDI controller to Axon’s XY controls (the FM and Timbre voice controls as well as the
Filter/Feedback control), the XY control will move horizontally in response to the MIDI controller. Hold down
the OPTION key on your Mac keyboard, or the ALT key on a PC keyboard, to assign a MIDI controller to move
the XY control vertically. You can also use the option or alt key to assign a controller to the peak level of the
Pitch EG and the release curvature of the Amp EG.
Axon waits until it has received two consecutive continuous controller messages with the same controller
number before it makes an assignment. This filters out extraneous data sent by some MIDI controllers. If you
are assigning a button or switch on a MIDI controller, you may have to press or move the switch twice before
Axon recognizes the controller and assigns it to the desired knob.
To assign a different MIDI controller to a control, repeat the same procedure using a different
controller.
To cancel MIDI Learn mode without assigning a controller, hold down the SHIFT and CTRL keys (SHIFT
and CMD keys on a Mac) and click in any empty area in Axon’s window (i.e., don’t click on another
control). The white box will disappear.
To remove a MIDI controller assignment from a control, SHIFT and CTRL keys, (SHIFT and CMD keys on a
Mac) click on the control once so that the white box appears, then click again on the same control.
Page 22

Axon’s MIDI controller assignments apply to all presets and instances of Axon, in all host applications that you
use. The MIDI assignments are stored in a special file on your hard drive. The contents of this file are read
when Axon is loaded by your host. If you have two or more instances of Axon in use at once, any MIDI
assignments you make will not be propagated to the other instances until the next time that your host loads
the plug-ins.
Automation
All of Axon’s parameters can be automated using your host's automation features. Consult your host's
documentation for information on how to use these features.
Presets
Axon includes 42 built-in presets to serve as a demonstration of its capabilities and inspirations for your own
creations. Access the presets in the usual manner for your host software. The timing source is set to host for
all of the presets but suggested tempos are set on the tempo control.
We’re On TV!
Well, not really, but we do have a number of tutorial videos available online for your viewing pleasure. Many
of the topics described in this manual are demonstrated with video screencasts available in the Support
section of our website, http://www.audiodamage.com.
And Finally…
Thanks again for purchasing Axon. We make every effort to ensure your satisfaction with our products, and
want you to be happy with your purchase. Please write to support@audiodamage.com if you have any
questions or comments.
 Loading...