


Manual V1
Immersive Audio Interface
& Monitor Controller

Welcome to , your gateway into
the world of immersive mixing.
Designed to sit seamlessly between your DAW and your speakers, ORIA provides a platform
to control up to 20 outputs with an ecient combination of hardware and software. Whether
you are monitoring in 9.1.6 immersive, 7.1 surround sound, stereo or even Mono, ORIA is
flexible and powerful enough to handle a plethora of contemporary audio standards.
Designed with professional users in mind, and working with industry-leading partners,
Dolby(™) and Sonarworks(™), ORIA’s onboard DSP allows you to calibrate your speakers
to your room and deliver mixes that translate to the real world with confidence.
ORIA - Immersive, made easy.

01 Declaration of Conformities
02 Installation/Setup
What’s In The Box
Initial Setup
Mac Setup
Windows Setup
Using ORIA as a Standalone Monitor Controller
Registration with Audient ARC
Firmware Update Procedure
03 Hardware Features
ORIA Settings
Mic Preamps
Speaker Monitoring
Headphone Monitoring
Metering
04 Connectivity
Stereo Outputs
Surround Outputs
Digital I/O
AES Pinout
Wordclock
Clocking Configurations
Network Audio
USB
Technical Specifications

05 Software Features
Profiles
Monitoring
Room
Solo/Mute
Groups
Metering
Menu Bar
System Panel
Output Calibration
Manual Calibration
iPad App
Keyboard Shortcuts
06 Safety Information
Rack Mounting
07 Warranty Information

Declaration of Conformities
FCC Part 15B
This apparatus has been tested and found to comply with the limits of a class-A digital
device, pursuant to Part 15B of the FCC Rules. These limits are designed to provide
reasonable protection against harmful interference in a residential installation.
This equipment generates, uses and can radiate radio frequency energy and, if
not installed and used in accordance with the instructions, may cause harmful
interference to radio communications.
If this equipment does cause harmful interference to radio or television reception,
which can be determined by turning the equipment o and on, the user is encouraged
to try to correct the interference by one or more of the following measures:
1 Re-orient or relocate the receiving antenna
2 Increase the separation between the equipment and receiver
3 Connect the equipment into an outlet on a dierent circuit from that to
which the receiver is connected
4 Consult the dealer or an experienced radio/TV technician for help
Dolby, Dolby Atmos, Dolby Audio, and the double-D symbol are trademarks of Dolby
Laboratories Licensing Corporations.

We, Audient Ltd, Aspect House, Herriard, Hampshire, RG25 2PN, UK,
01256 381944, declare under our sole responsibility that the product ORIA
complies with Part 15 of FCC Rules.
Operation is subject to the following two conditions:
1. This device may not cause harmful interference,
2. This device must accept any interference received,
including interference that may cause undesired operation
We, Audient Ltd, declare that the product, the ORIA, to which this
declaration relates, is in material conformity with the appropriate CE
standards and directives for an audio product designed for consumer use.
We, Audient Ltd, declare that the product, the ORIA, to which this declaration
relates, is in material conformity with the appropriate UKCA standards and
directives for an audio product designed for consumer use.
Audient Ltd has conformed where applicable, to the European Union’s
Directive EN 63000:2018 on Restrictions of Hazardous Substances (RoHS) as
well as the following sections of California law which refer to RoHS, namely
sections 25214.10, 25214.10.2, and 58012, Health and Safety Code; Section
42475.2, Public Resources.
Under an environment with electrostatic discharge, the device may cease to
output sound (EUT could not operate properly). This requires the user reset
the device by unplugging & re-connecting to host computer.
As a device that provides power to other equipment power management
features are inappropriate for this product.
We, Audient, declare that the product, ORIA, to which this declaration relates,
is in material conformity with the appropriate PSE standards and directives
for an audio product designed for consumer use. METI Ordinance Appendix
12 J55032(H29).
IEC 62368 Test Report with Japan deviation.

Installation & Setup

What’s In The Box
1
1 x ORIA Unit
2
1 x Mains Power Cable
3
1 x USB C-C Cable
4
1 x Sonarworks (™) SoundID Reference Measurement Microphone
1
2
3
4

Initial Setup
Unpack your ORIA, plug in the included power cable and connect it to a USB port on
your computer. If your computer doesn’t have the appropriate USB port you may need
to use a third party cable.
Use ORIA’s Control Wheel to navigate through the front panel screen and take control
of Motion UI. Press the Control Wheel to confirm selections or toggle through options
provided by specific buttons.
Control WheelMotion UI Front Panel Function Button
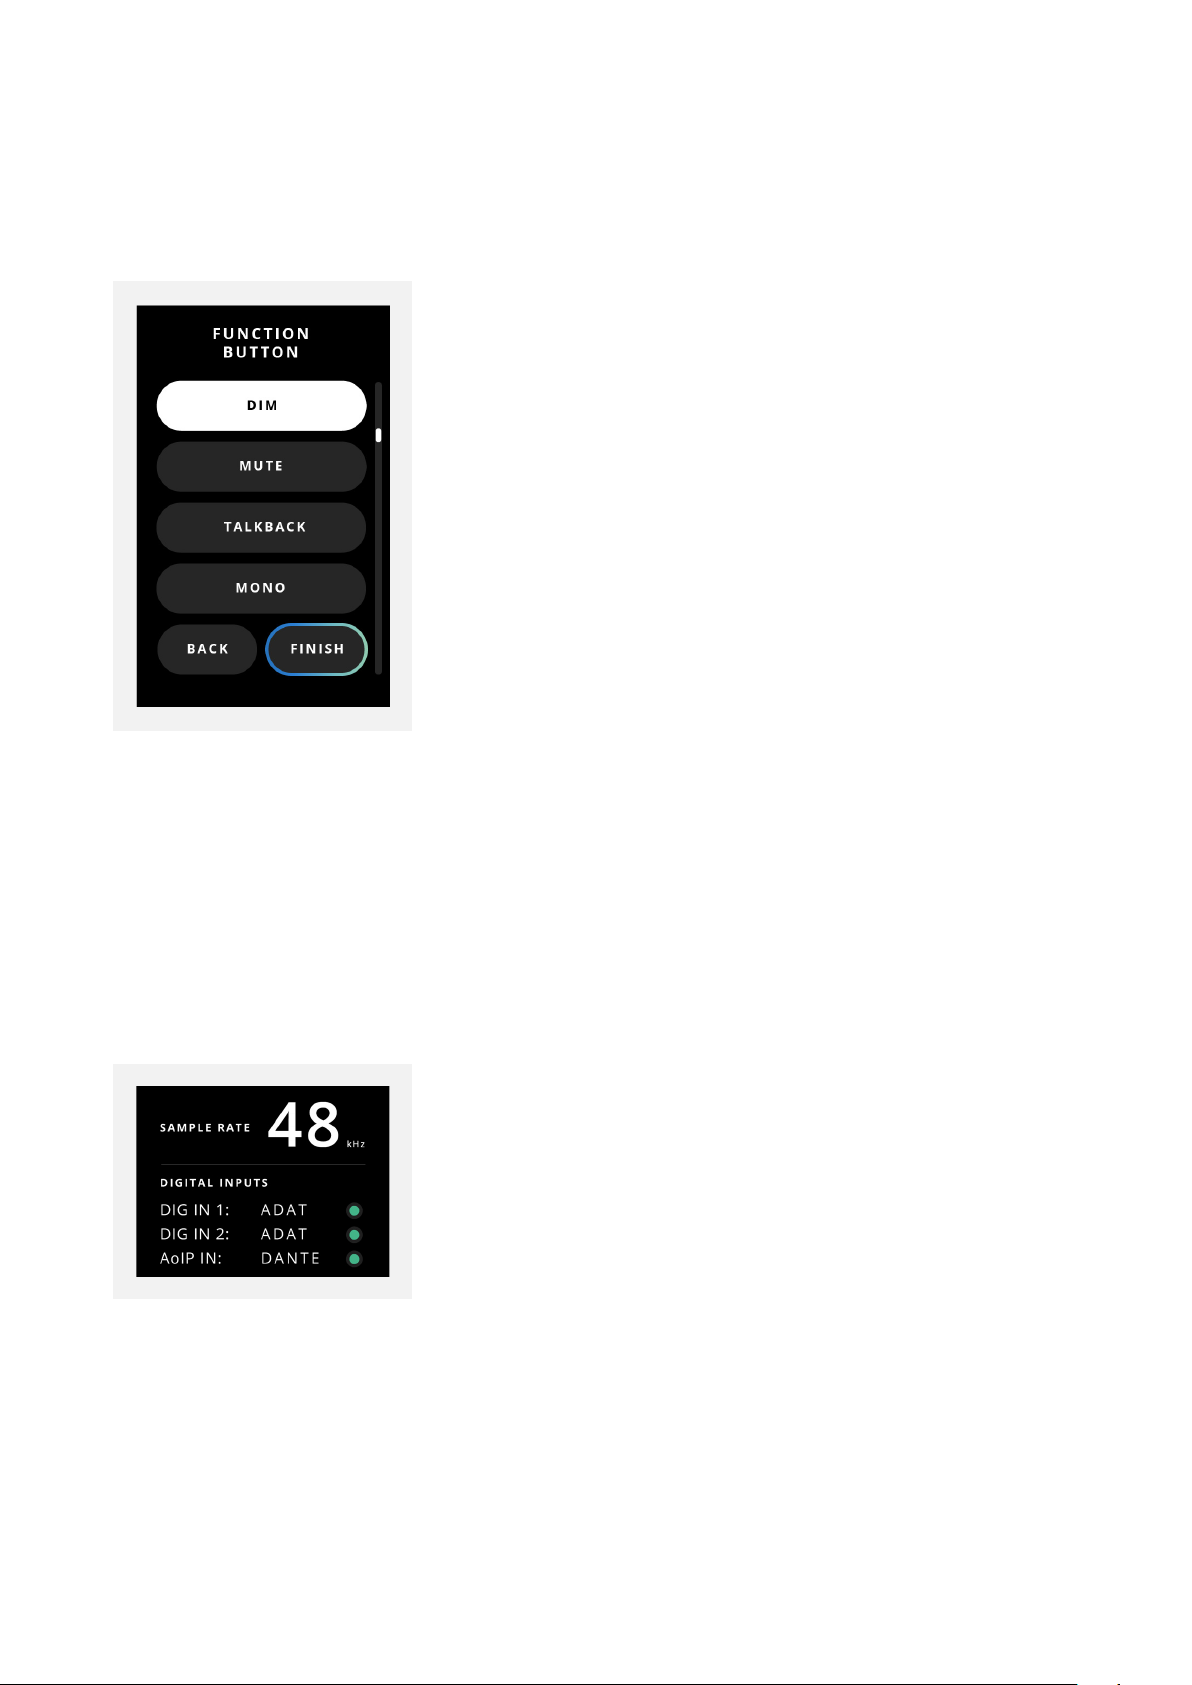
Once powered up you will be asked to set the screen brightness with the Control Wheel
(push to confirm), and then select which feature the Function Button controls - DIM,
Return to Reference, Talkback or Polarity Reverse - by scrolling to your preferred choice
and pressing confirm. Scroll to ‘Finish’ and press the Control Wheel again to complete
the initial setup.

Mac Installation
On macOS, ORIA will work straight away
without needing to install any drivers.
However, we do strongly recommend
installing the ORIA Desktop App, which gives
you advanced control over your ORIA and lets
you update your firmware when required.
Head to audient.com/ORIA/downloads to
download the latest version of the application.
Once downloaded, simply open the .dmg file
and then drag and drop the ORIA Desktop
App into your applications folder.
Windows Installation
ORIA will require drivers to work on Windows to ensure your computer and ORIA
will work together correctly. You can download the drivers from the ORIA website:
audient.com/ORIA/downloads. Once downloaded, run the .exe file to start the
installation process.
Follow the instructions on screen to complete the installation. This process may take
a little while so please be patient. Once complete, click ‘Finish’.

Using ORIA as a
x16
x16
Existing Audio Interface
2
1
OUT21
IN
Standalone Monitor Controller
ORIA is designed to function either as your computer’s Audio Interface or as a Standalone
Monitor Controller to provide immersive monitoring and calibration functionality to your
workflow.
As an Audio Interface
& Monitor Controller
As a Standalone
Monitor Controller
When being used as a Standalone Monitor Controller, ORIA can take audio from either
its ADAT input or via the Optional Dante Card using the Input source control of the ORIA
software. You will still need to connect ORIA to the computer via USB initially in order to
create your Profiles using the ORIA Desktop App and store them on ORIA.
We would recommend keeping the unit connected to the computer via USB even when
being used as a standalone Monitor Controller, as this allows for remote control of the
unit using the ORIA Desktop App, or ORIA iPad App. Whilst not currently available, the
ORIA iPad App will be available in the near future.
After setup, ORIA can be used without the USB connected if required, however, to
change profiles or make adjustments to your monitoring level, you would need to use
the controls on the front panel of the interface.

Registration with Audient ARC
ORIA comes bundled with a collection of professional software and services, giving
you everything you need to start recording from some of the industry’s leading
innovators.
Go to arc.audient.com, select ‘Register Your Product’ and enter your details to create
an account. You will then receive a verification email to your Inbox but you may
need to check your Spam/Junk folders. Once you’ve verified your account, register
your ORIA by entering the serial number and the unique 4-digit PIN found on the
underside of ORIA.
Now the product is registered, you can select from a wide array of free software and
plugins, giving you easy access to powerful creative tools straight away.


Firmware Update Procedure
Occasionally, Audient will release new firmware for ORIA to add additional features
and to ensure ongoing compatibility with Operating System updates.
Provided it has internet access, the ORIA Desktop App will periodically check if any
new firmware updates are available and inform you if there are any. You can also
check for updates at any time by going to the menu bar, and selecting:
Help > Check for Updates
If an update is available, the ORIA control app will notify you. Click ‘OK’ to begin the
firmware update process.
The ORIA Desktop App will then launch the Audient Firmware Upgrade software.
In this software, you will see a list of all Audient devices currently connected to your
computer. Select ORIA from the device list.
You can now choose to update from audient.com or from a local file. If your computer
has an internet connection you would want to select ‘From audient.com’ to ensure
you are installing the latest firmware version.
If your computer does not have an internet connection, please contact
support@audient.com and our team will be able to provide you with the latest
firmware file to install locally.
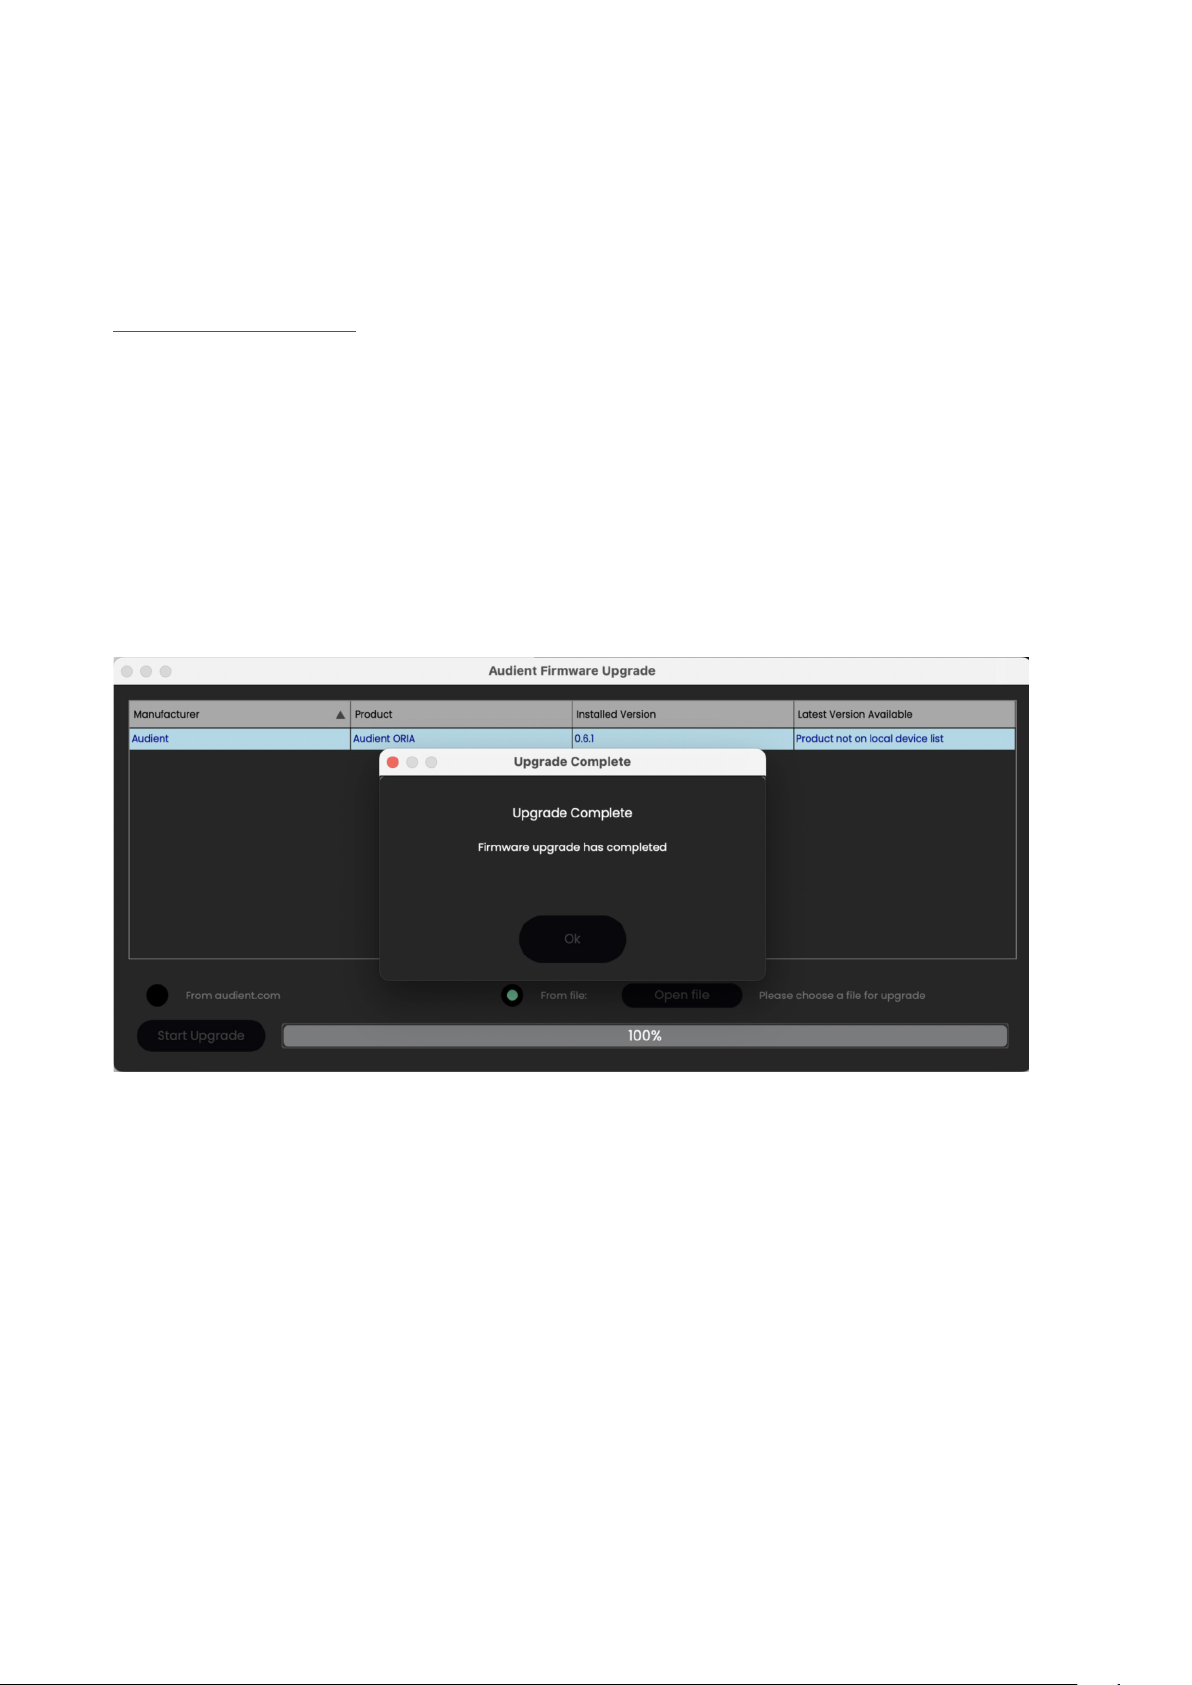
Now you can Click ‘Start Upgrade’ and the progress bar should begin to increment.
During the update process, the ORIA unit may restart multiple times.
Once complete, a notification will appear to confirm the update has been installed.
You can now close the Audient Firmware Upgrade Window and continue using your
ORIA.

Hardware Features

Hardware Features
Headphone Output
Selection Buttons
Profile Selection Button
Channel Select Button
Mic/Line/Inst Inputs
Instrument Input Selection Button
48V Phantom Power Button
Motion UI
Display Panel
Volume Button
Control Wheel
Headphone
Outputs
Function Button
Down Mix Selection Button
Stereo 2
Outputs
Optional AoIP Card
Mains Power Socket
USB-C Socket
AES Outputs 1-16
ADAT Inputs 1 and 2
Wordclock In and Out
Stereo 1
Outputs
Surround Outputs

ORIA Settings
When you press and hold the Control Wheel you can access a variety of global settings
for ORIA. Use the Control Wheel to cycle through the options.
Control Wheel
Power
Choose to switch o the ORIA (press the Control Wheel to power on the ORIA).
Brightness
Control the overall brightness of all LED’s and the display panel.
Function
Change what feature is assigned to the ‘Function Button’:
Status
Check the current sample rate and clocking sources. If the status light is:
• Green - this means that the unit has been successfully clocked
• Amber - the unit has detected a clock signal but at the wrong sample rate
• Red - no clock signal is detected

AOIP
Check the status of the networked audio connection (Active or Unactive) and your
ORIA’s IP address.
Factory Reset
Restore the ORIA to its factory settings.
**Be aware that this will remove any of your currently saved settings and Profiles.**

Mic Preamps
The ORIA features two Audient Console Mic Preamps that can deliver up to 60db of
gain, as well as receiving Line and Instrument level sources via the front-facing
combi-jacks.
When you press either of the 1 or 2 buttons you can then aect settings for each input
independently.
Mic/Line/Inst Inputs 1 & 2
Channel 1 Select Button
Channel 2 Select Button
Gain
Turn the Control Wheel to adjust the input gain. The XLR input is received at Mic level
whilst the TRS input is received at Line level.

Phantom Power
Press 48V to apply Phantom Power. The LED will turn red to indicate Phantom Power is
now active on the selected Mic Preamp Channel.
Phantom Power can only be applied to the XLR input, this to prevent accidental damage
to external instrument sources. Phantom Power will be blocked if the channel is using
Instrument Mode.
Mute
Hold down the respective channel button to mute/un-mute its input. The button’s LED
will flash white whilst the channel is muted.
Instrument Input
Pressing INST switches the preamp to accept high impedance/instrument levels via the
JFET Instrument Input.

Speaker Monitoring
You can quickly access a variety of monitoring options from the front panel.
Volume
Turn the Control Wheel to adjust the Volume for your chosen speaker configuration.
When the Main Outputs are selected, hold down the Control Wheel to mute or un-mute
the main outputs. The LED will flash white whilst the main output is muted.
Profile
Toggle between your four ‘favourite’ speaker configurations by tapping the ‘Profile’
button. Press and hold the button to access the full list of profiles and use the Control
Wheel to cycle through Profiles.

Down Mix
Control the Standalone Dolby(™) Renderer’s Down Mix functionality directly from
ORIA’s front panel. The Down Mix button will toggle through the dierent Output
options available.
This feature is only available if you are connected to the Dolby(™) renderer. An error
message will appear if this is not the case.
Function
Toggle on/o a pre-selected monitoring process via the ‘Function Button’. The function of
this button can be adjusted in the ORIA Desktop App and is explained later in this manual.
• Polarity - to check the phase coherence of your stereo mix.

• Return to Reference - When assigned to the Function Button the Return to
Reference (RTR) feature will return the Outputs Volume to the reference level
stored as part of the Active Profile. For example if your Profiles reference level
volume is -20dB, however you are currently monitoring at -15dB, you can use RTR
to quickly snap back to -20dB precisely. This will be shown on ORIA’s front panel
screen in the System Menu.
The Function button will also illuminate and remain illuminated to indicate that
you are currently listening at Reference Level.
• DIM - lowers the volume of your main outputs. The level of reduction can be
changed in System Mode of the ORIA Mixer Application.
• Talkback - feeds the chosen mic signal into the headphone outputs for
communicating with performers. See the System Mode for more information.

• MONO - outputs a mono-summed version of your stereo mix to check
mono-compatibility.
Headphone Monitoring
ORIA provides two independent outputs for headphone monitoring, either whilst
recording or mixing. Each output can be fed from a variety of sources via the System
Panel in the ORIA Desktop App.
Volume
Turn the Control Wheel to adjust the Volume for the select headphone output.
If you hold down the respective button you can mute/un-mute the headphone output
and the LED will flash white whilst the output is muted.

Metering
You can toggle through all of ORIA’s output meters (Surround, Headphone 1, Headphone
2, Stereo, ADAT or AoIP) by pressing the Control Wheel.
The display panel will default back to metering the outputs of your chosen speaker
configuration after 3 seconds without hardware interaction.
Any surround configurations that use less than 16 channels will have any unused
channels greyed out.
You can meter Inputs 1 & 2 by pressing the corresponding Channel Select Button and
then pressing the Control Wheel.

Connectivity

Stereo Outputs
ORIA provides two identical, balanced* stereo outputs (ST1 and ST2) to feed your
chosen stereo speakers. These outputs are relay-switched from the Stereo channels of
the surround outputs.
Surround Outputs
The ORIA also provides a comprehensive selection of balanced* surround outputs to
feed your chosen speaker configuration.
1115
1. Left (R)
2. Right (R)
3. Center (C)
4. Low Frequency Eects (LFE)
1357913
24681014 1216
9. Left Wide (Lw)
10. Right Wide (Rw)
11. Left Top Front (Ltf)
12. Right Top Front (Rtf)
5. Left Surround (Ls)
6. Right Surround (Rs)
7. Left Rear Surround (Lrs)
8. Right Rear Surround (Rrs)
*Due to the output topology implemented, unbalanced cables can be used if necessary.
13. Left Top Middle (Ltm)
14. Right Top Middle (Rtm)
15. Left Top Rear (Ltr)
16. Right Top Rear (Rtr)

Digital I/O
If you need to expand your audio inputs and outputs then the ORIA provides digital
options for both:
• 16 x AES Outputs (DB25) to feed speakers with AES/EBU inputs
• 2 x ADAT Inputs (Optical TOSLINK) providing up to a total of 16x input
channels at 44.1/48kHz or 8x channels at 88.2/96kHz (SMUX).
(Please note that the AES Outputs and Analog Surround Speaker Outputs cannot be
used at the same time).
AES Pinout
In order to provide 16 channels of audio via a single DB25 port, ORIA uses a standard
TASCAM pinout on its AES DB25 output as per the diagram below:
A standard Analog DB25 to 8x XLR loom can be used to break out the DB25 to 8 XLR
connectors, with each XLR carrying two channels of audio. This Loom can then be
connected to 110 Ohm AES XLR to XLR cables to feed your monitors.

Wordclock
You can choose to have the ORIA be the source of your studio’s clock signal (Controller*)
or receive a signal from an external source (Peripheral*) via the respective BNC Word
clock Input and Output.
**Please Note: Audient has chosen to move away from the traditional
terminology relating to clock sources - we will now be using Controller
(F.K.A. Master), and Peripheral (F.K.A. Slave).
Clocking Configurations
ORIA can be used as either the Controller, providing clock to other devices or as the
Peripheral, receiving a clock from other devices. It is important to only ever have one
Controller in a setup or you may get clicks and pops in your audio due to clocking errors.
Oria as the Controller:
Wordclock can be sent out of ORIA via the BNC Output to other devices to allow other
devices to sync to ORIA’s clock.
If you wish to connect multiple devices to ORIA’s BNC Output then you would need to
make use of BNC T-Connectors as shown in the diagrams. When connecting multiple
devices, it’s important that only the last device in the chain has its 75 Ohm BNC
termination enabled. If you are unsure how to enable/disable 75 Ohm termination,
please refer to the user manual for the external device.

Connecting ORIA to a single device via BNC:
ORIA
75 Ohm termination engaged
ASP880
Connecting ORIA to multiple devices via BNC:
ORIA
BNC-T Connector
2 x ASP880
75 Ohm termination engaged
Key: Optical TOSlink CableBNC Word Clock Cable

ORIA as the Peripheral:
ORIA can receive clock via the ADAT Input from an external device such as an
Audient ASP880.
Receiving a clock via ADAT
ORIA
Optical TOSlink Cable
Please note that ORIA cannot send the clock via ADAT as it has no ADAT outputs, if you
wish to use the ORIA as a master clock for an ADAT device, then a BNC connection
must be used.
ASP880
Receiving a clock via BNC
ORIA
BNC Word Clock Cable
iD44 Audio Interface

Setting The Clock Source
Once you have connected your external devices to ORIA as per the example diagrams,
you will need to instruct ORIA where to take its clock from. This is done in the System
Panel of the ORIA software. More information regarding this can be found in the System
Panel section of the manual.
Network Audio
ORIA can be fitted with the Optional Dante Card, which will provide 16 inputs to allow
ORIA to provide Immersive Monitor Control to a Dante Audio Network.
*Please Note: At the time of writing this manual, the Optional Dante Card is not
yet available. Additional information will be provided on the implementation
and use of this card upon its release in the near future.
USB
You can connect ORIA with your chosen computer via USB-C. If your computer doesn’t
have a USB-C port, then a third party USB-C to USB-A cable should be used instead.

Technical Specifications
Mic inputs:
• Gain: 60dB
• Max Input Level: +18dBu
• Crosstalk: <105dB
• THD+N: 0.0015% / -96dB
• EIN: -129dB
• CMRR: -85dB
• SNR: 100dB
• Frequency Response: ±0.5dB 20Hz to 40kHz
• Input Impedance: 1.5kΩ Balanced
Line input:
• Gain: -10dB to +50dB
• Max Input Level: +18dBu
• THD+N: 0.0015% / -96dB
• Input Impedance: 4.7kΩ Balanced
D.I / Instrument Input:
• Gain: 60dB
• Max Input Level: +18dBu
• THD+N: 0.16%
• SNR: 100dB
• Frequency Response: ±0.5dB 20Hz to 40kHz
• Input Impedance: 370kΩ Unbalanced
Line Outputs:
• Lineup Level: +18dBu
• THD+N: 0.0006%, -105dB
• Dynamic Range: 126.5dB
• Crosstalk: -123dB
• Frequency Response: ±0.3dB 10Hz to 40kHz
• Output Impedance: <100Ω Balanced

Headphone Outputs:
• Lineup Level: +18dBu
• THD+N: 0.0007% (-103dB)
• Dynamic Range: 124dB
• Crosstalk: -115dB
• Frequency Response: ±0.25dB 10Hz to 40kHz
• Output Impedance: <50 Ω Unbalanced
• Max Level @ 30R: 5.47V Peak, 3.87Vrms, 997mW
• Max Level @ 60R: 7.4V Peak, 5.29Vrms, 912mW
• Max Level @ 600R: 8.6V Peak, 6.09Vrms, 123mW
USB-C:
• Connector: USB Type C
• Included Cable: USB Type-C to Type-C
• Number of Input Channels: 34
(2 x Analogue, 16 Digital, 16 AOIP*)
• Number of Output Channels: 38
(20 Line Outs, 2 x Stereo Headphone Outs, 16 x AES)
*With AOIP card fitted
Digital Inputs:
• ADAT 16 Channels: 44.1kHz to 48kHz
• ADAT 8 Channels (SMUX): 88.2kHz to 96kHz
Word Clock Input and Output:
• Word Clock: 44.1kHz to 96kHz
DSP Latency:
Round Trip:
• 44.1kHz – 6.5ms
• 48kHz – 6.3ms
• 88.2kHz – 5.5ms
• 96kHz – 5.4ms
AOIP (Optional Dante Expansion Card):
• AOIP Inputs: 16 (44.1kHz to 96kHz)
Power Supply:
• Input Voltage: 85 – 264 VAC
• Input Frequency: 47 – 63Hz

Software Features

Light/Dark ModeProfiles
Bypass System ButtonMonitoring
RoomGroups
Setup Panel
Metering
The ORIA Desktop App is an intuitive platform designed to monitor, calibrate and control
your speaker array, with the ability to tailor the system to suit your layout and room.
Audient have partnered with the groundbreaking speaker calibration company,
Sonarworks(™) to get you started on your immersive mixing journey quickly and easily.

Profiles
Profiles are the heart of the ORIA control philosophy. When we select a Profile, we are
simultaneously selecting the choice of speakers assigned to that Profile alongside all of
the calibration parameters for every channel - all in one button press. This allows you
to quickly switch between Profiles which have been created for dierent monitoring
formats or target modes.
A total of 32 Profiles can be stored on ORIA itself. It is worth noting that although Profiles
are stored directly on ORIA’s hardware, they are controlled using the Profiles Panel or
the Profile button on the front of the unit.
A Profile stores all of the speaker calibration settings, including the EQ curve for every
channel, trim, delay and crossover as well as the overall channel routing.
You can either create new Profiles manually in the ORIA Desktop App or by importing
them from the SoundID Reference for Multichannel app by Sonarworks(™).
Creating a New Profile
To create a new Profile click the ‘+’ icon found in the top right of the Profiles Panel.
Name your Profile and hit Save. The Profile can be renamed by right clicking on it and
typing in the new name.
Duplicate an Existing Profile
To duplicate an existing Profile, right click on a Profile name in the Profiles Panel, and
select ‘duplicate’. A copy of the Profile will appear below the original Profile.
Rename a Profile
To rename a Profile, right click on the Profile name in the Profile Panel, and select
Rename. A cursor will appear enabling you to edit the text. Type the new name and
press enter when done.

Delete a Profile
To delete a Profile, right click on the Profile name in the Profile Panel and select delete.
A window will appear asking you to confirm your deletion.
Profile Organisation
The Profiles list is split into two sections. The ‘Favourite’ Profiles (F) are the four listed
above the dividing line, each with their own number. The Profiles below the dividing line
are the ‘Non-Favourite’ Profiles (NF).
Favourite Profiles
Non-Favourite Profiles

Profiles may be reordered at any time, simply by holding down the left mouse button
on the chosen profile and dragging it to the chosen location. When reordering profiles,
the following logic applies:
Favourite -> Favourite: The two Profiles will swap locations.
Favourite -> Non-Favourite: The Favourite Profile will be dropped where the user
intended. The top Non-Favourite Profile is moved up to the Favourite section.
Non-Favourite -> Non-Favourite: The Profile will drop where the user intended, and all
Profiles below will shue down.
Non-Favourite -> Favourite: The Non-Favorite Profile will replace the location of the
original Favourite Profile. The original Favourite Profile will now be placed at the top of
the Non-Favourite list, and every other profile will shue down.
Selecting a Profile
To use a Profile, you can simply click on it from the Profile list. This is now your inactive
Profiles. This Profile will be highlighted with white text while the other inactive will be
greyed out.
You can also select Profiles using the Profile Button on the front panel of the unit by
either tapping it to cycle through your designated favourite Profiles or pressing and
holding to select from the full list of Profiles.
Making Changes to a Profile
If changes are made to an active Profile then you will see a small ‘Save’ icon appear
next to the Profile in the list. To Save the Profile, simply click this icon and wait a few
moments for the Profile to be stored and loaded onto your ORIA. A green tick will
appear when this is complete.

If you try to change Profile or close the ORIA application without saving the changes
you’ll see a Dialogue Box window asking if you wish to save the changes to the current
Active Profile, create a new Profile or discard the changes.
Please note that you can have a maximum of 32 Profiles so if you have filled every slot,
the ‘Create New Profile’ will be greyed out and you will have to overwrite an existing
setting or discard changes.

Profile Status
If you have imported a Profile from Sonarworks(™) then a small Sonarworks logo will
appear next to it in the list. The logo’s colour will indicate it’s current status:
• White ‘S’ logo - Your Sonarworks(™) licence (trial or full) is valid
• Red ‘S’ logo - Your Sonarworks(™) trial licence has expired
Profiles with a red Sonarworks logo cannot be selected as the Active Profile.
If you attempt to select a Sonarworks Profile that has a red logo then a Dialogue Box
will appear prompting you to either purchase a valid Sonarworks license or if you have
already purchased a full Sonarworks license, re-import your Profile from SoundID
Reference for Multichannel.

Monitoring
Input Source
Select your audio inputs:
• USB
• ADAT
Output
Select your audio outputs:
• ANALOG
• AES
Volume
Control the overall volume of your selected speakers. This is controlled either by clicking
and dragging the control or by using the Control Wheel on the front of the unit.
Mute (M)
Mute all speakers outputs.
DIM
Reduce the overall volume by a chosen level. The level of reduction can be changed in
the System Panel of the ORIA Desktop App.

Global Delay
Introduce up to 100ms of delay to all speakers, helping align the audio playback with
video sources for lip sync.
Mono
Sums the Left and right channels together for mono compatibility checking.
Polarity
Flips the Phase of the Left channel and sums the outputs to MONO.
Return To Reference
Returns the Output level of ORIA to the Active Profiles saved Output Level.

Room
This section provides a visual display of your speaker configuration. The white USER
icon indicates the direction that the listener would face. The colours of the units
indicate which of the speaker Groups they belong to:
• HEIGHTS = Light Purple
• SIDES = Blue
• FRONTS = Dark Purple
• SUBS = Green
When a speaker is receiving audio, you will see a small waveform icon appear on it.
This is helpful when trying to identify which speaker output is playing audio during
setup and installation.

Solo /Mute
L
Speakers in the Room may be Solo’d or Muted using the following keyboard shortcuts:
• Mute - Left Click
• Solo - Shift + Left Click
Whilst a speaker is Solo’d, the Mute function will become unavailable for all other
speakers and groups. Users will be able to continue to Solo other speakers in the Room.
Solo’d speakers will have their corresponding meters active in the ‘Post’ metering
window.
Clearing Solo/Mute states is possible by using the following shortcut:
• Option (MacOS) / Alt (Windows) + Left Click
Clicking on a Solo’d speaker will clear all active Solos, and if clicked on a Muted Speaker
it will clear all active Mutes.

Groups
This monitoring function allows you to Mute or Solo predetermined groups of speakers:
• HEIGHTS (Ltf, Rtf, Ltm, Rtm, Ltr & Rtr)
• SIDES (Lw, Rw, Ls, Rs, Lrs & Rrs)
• FRONTS (L, R & C)
• SUBS (LFE/SUB)
• STEREO (L & R)
When individual speakers, or speaker Groups, are muted they will be greyed out in the
Room window.
Similarly, if a Speaker Group or Groups have been Solo’d then all other Groups will be
greyed out in the Room window.

Metering
The ORIA Desktop App provides a straightforward metering solution to allow you
to quickly check your levels, output routing and the impact of ORIA’s digital signal
processing (DSP). Meter settings are entirely independent of your Profiles, so will not
change when moving between Profiles.
PRE
This shows the signals entering the ORIA Desktop App from your DAW outputs.
PRE is selected as the default.
POST
This shows the signals leaving the ORIA Desktop App after the output DSP and going to
your speakers. POST Metering mode will take the volume control into account.
LFE/SUB
When in PRE metering mode, the Meter for the LFE channel will only show the audio
being sent to it from your DAW on the LFE channel. When in POST Metering mode
however, the meter will also show the audio that is being assigned to the SUB channel
from the crossovers you have applied on each speaker channel in the ORIA Desktop
App.
The labelling of this channel will change from ‘LFE’ when in PRE mode to ‘SUB’ when in
POST mode to indicate this dierence.

Muting/Soloing Channels
If a speaker channel is muted, then the meter for this channel will also be greyed out.
If a channel or channels are Solo’d, all other channels will be blacked out.
Muting Channels
Soloing Channels
Down Mix Status
If you have configured a renderer in the System
Panel then you can quickly check the current
Down Mix Status in the bottom right of the meters.
If no renderer has been selected then this will not
appear.
Expanded Metering Window
The Metering Panel can be expanded to its own window, allowing you to keep your meters
in the foreground whilst mixing. The Expanded Metering Window show more details such
as a dBFS scale and peak values.

Menu Bar
Light/Dark Mode
The ORIA Desktop App can be viewed in Light or Dark mode, depending on your
preference and your studio environment.
Dark Mode Toggle Light Mode Toggle
Master Bypass
This allows you to bypass all DSP settings on the ORIA Desktop App.
Setup Mode
This section allows you to manually edit the calibration settings for each individual
output. Click on a Speaker Icon in the Room section to see a range of options for that
speaker’s output. A halo will appear around that speaker to indicate it is currently being
edited.

Speaker Channel
Shows the name of the Channel currently being adjusted.
Mute (M)
You can Mute the individual speaker selected.
You can Mute a channel by pressing the ‘M’ key on your keyboard whilst in Setup Mode.
Solo (S)
You can Solo the individual speaker selected.
You can Solo a channel by pressing the ‘S’ key on your keyboard whilst in Setup Mode.
Copy/Paste
If you wish to use the same settings on other speakers then you can click the Copy
Button. You can then select another channel and click the Paste Button to apply the
copied settings to that channel.
You can also paste the DSP settings to a Speaker Group if you wish to use the same
settings for all speakers in that group.
Simply ‘Right Click’ on a Speaker Group within the Groups Panel and click Paste to copy.
Please note that only the EQ and Cross-over DSP settings will be pasted to groups. Trim
and Delay values should always be set on a per-speaker basis to ensure correct time
alignment of your speaker setup.

Reset
The Reset Button sets the channel back to its default settings. A Dialogue Box will appear
to confirm you wish to reset the settings to ensure settings are not reset by accident.
EQ
Each speaker output has its own EQ, featuring 8 bands that can adjust 12db between
20Hz - 20kHz and a Low and High shelf. This level of control enables the speaker’s
sonic performance to be fine-tuned to your configuration and room.
Click on one of the dots to adjust the settings for that particular band. The dot will be
highlighted to indicate that is the band being adjusted.
You can then either drag the dot on the graph to change its settings, or you can manually
enter your values by double-clicking on the Frequency, Gain and Q controls.
You can use the left and right arrows to cycle through the EQ bands. It is also possible
to cycle through the bands by holding the Command/CTRL keys and pressing the left
and right arrow keys on your keyboard.
Undo and Redo Buttons are provided should you make a mistake with your settings.
The Bypass EQ Button allows you to disable the EQ on this particular channel.

Output Controls
In this section you can control various options for each individual output:
At the bottom of the Setup Panel, there are three further controls for speaker calibration.
Trim
The first control is Trim, which raises or lowers the level of this speaker by up to 12 decibels,
in increments of 0.1 decibels. Click and drag this control to either add or remove Trim from
this speaker, alternatively double click on the control to input a numeric value manually.
Delay
The second control is Delay, which delays the signal from this speaker by the defined
amount of time. This is useful in time aligning speaker signals to arrive at the listener from
each speaker at the same time for optimal immersive imaging.
The Delay control has a range from 0 milliseconds to 75 milliseconds, in increments of 0.01
millisecond. Click and drag this control to add Delay to this speaker signal, alternatively
double click the control to manually enter a numeric value. The Delay control also has a
separate ‘On’ button to toggle the delay on and o.
Bass Management/Crossover
The third control is Crossover, and this is for configuring Bass Management. When engaged
by clicking the ‘On/O’ button, Bass Management is now enabled for this speaker. This
means that audio frequencies that had been sent to this speaker channel below the
defined frequency value seen in the control will be removed from this signal path, and
instead redirected to the subwoofer channel.
This is important in audio systems where the individual speakers may not be able to
faithfully recreate lower bass frequencies, and so redirecting these lower frequencies
to the subwoofer may provide a more optimal experience. Click and drag this control
to define the crossover frequency, below which audio will be sent to the subwoofer and
above which the audio will be sent to the defined speaker channel. Alternatively, double
click on the control to manually enter a frequency value.

System Panel
The System Panel at the top of the ORIA Desktop App lets us look under the hood at
the more advanced settings for connectivity and control. The System Panel is split into 3
dierent Pages which are selectable using the tabs on the left-hand side
General
DIM Trim
Here you adjust how much the level is reduced by when the DIM function is enabled.
Function Button
Select what the ‘F’ Button on the front panel of ORIA does from the following options:
• DIM (default)
• Talkback
• Return to Reference Level
• Mono
• Polarity Reverse
NOTE: Monitoring functions assigned to the hardware Function Button are not stored
as part of a profile. They are system wide.

Preferred Clock Source
This setting lets you choose what source is used as the Clock Source. By default, this will
be set to Internal but you can choose from Internal, ADAT or Word Clock.
When you select an external clock source, a clock indicator will appear to the right of
the clock source. The colour of this provides the clock status.
• Red: No Valid Clock Detected
• Amber: Clock Detected at Wrong Sample Rate
• Green: Clock Detected at Correct Sample Rate
If the indicator is red, please double-check your physical connections to the unit and
ensure you have selected the correct source.
If the indicator is amber, you will need to adjust either ORIA’s sample rate or the sample
rate of your external device so that the two devices are operating on the same sample rate.
If the clock indicator is green, then that means everything is set up correctly.
Headphone Setup
You can select which output channel of ORIA feeds Headphone Outputs 1+2 from the
following options:
• USB L + R
• USB 17 + 18
• USB 19 + 20
Most Renderers will allow you to send a separate Binaural Mix to a headphone output.
In this case you would need to select either Output 17+18 or Output 19+20 as your
Binaural output channels in your renderer and then select the chosen channel as your
headphone source.

Renderer
The Renderer Page is for connecting ORIA directly to the Dolby Atmos Renderer, both to
use the Down Mix Button on the ORIA hardware to cycle through dierent down mixing
format options, but also so that the Dolby Atmos Renderer can feed back information
to ORIA about which Down Mix format is in use.
Type
Make sure the Dolby Renderer is open on your system then Select the Dolby Atmos
Renderer.
Target
Choose from the list of renderers available on your system under the type selected.
If the Dolby Atmos Renderer is open and running on the same computer, the computer’s
name will appear in the Target drop down list. Select the local target and the Connection
Status at the top right of the panel should change from ‘Unavailable’ to ‘Connected’.
Manual Address
If you have selected ‘Manual Address’ from the ‘Target’ list here you can enter the IP
address of a specific renderer if you wish to control a renderer on a network, rather than
the local machine.

AES Routing
If using the AES outputs to feed your monitors, you may wish to re-assign the speaker
channels to make cable installation easier.
The AES Routing Page is where we can change the order of the AES Outputs, to make
cable routing in the studio easier. AES digital audio is provided in two-channel digital
streams over a single cable, and in a stereo setup it is expected by default to connect
one speaker to another in a chain. In an immersive setup, if we were to do this with left
and right pairs across 16 channels this could result in complex and untidy cable routing.
To alleviate this issue, we have implemented a solution in the ORIA hardware where
you can connect any speaker output to any AES channel, enabling much neater cable
routing than would otherwise be possible, where one AES stream can provide audio to
two adjacent speakers rather than using the default routing configuration.
For an example, it may be desirable to connect the Front Left and Left Wide speakers
together in a chain. To do this, we could designate AES 1 to be the Front Left speaker
and AES 2 to be the Left Wide Speaker, as each digital AES stream is provided as an
odd and even pair on a single cable.

The Front Left speaker is already set to AES 1 in this instance, but we would need
to change the routing of the Left Wide speaker, which is set to use AES 9 by
default. Click the dropdown menu next to the Left Wide speaker, and here we can
choose to change the routing to AES 2. As a result of this routing, we can also see
that the Front Right channel, which was previously assigned to AES 2, has now
deselected its output because only a single speaker can use an AES assignment
at one time. ORIA handles routing the calibration and volume features internally.
Make sure to test channel routing assignments after changing these settings.
Use the drop-down menus to select which channel is assigned to a particular speaker
output. Please note that each output can only be assigned to one speaker channel. If a
speaker channel is not being used then ‘NONE’ should be selected.

Output Calibration
As you add more speakers into your studio space, their placement and positioning
become increasingly important. You will also have to think about the way your whole
room is acoustically treated now that there are speakers behind and above your
listening position.
The ORIA’s DSP and Sonarworks(™) room calibration tools enable you to get the best
from your speakers but we recommend refining your speaker positions and improving
the sonic absorption and/or diusion solutions in your room to get the best surround
sweet-spot possible and before attempting a calibration.
If you are unsure about speaker placement or acoustic treatment then we strongly
recommend acquiring advice from a qualified acoustician to ensure you are getting
the most from your setup.
Automatic Calibration -
When you purchase an ORIA you can take advantage of a 60 day free trial version*
of the industry-leading measurement and calibration software SoundID Reference for
Multichannel by Sonarworks(™). This comprehensive tool measures and calibrates
a multichannel setup in less than an hour so you can get up and running (almost)
immediately.
*Once your trial period has expired you will need to purchase a perpetual licence
directly from Sonarworks(™) and re-import your measurements into the ORIA Desktop
App, or calibrate your speaker outputs manually via the Setup Mode. Profiles made
during the free trial period will no longer function once the trial period has ended.
Inside the ORIA box, you’ll find a Sonarworks Reference Microphone and a small card
with details on how to create an account with Sonarworks and download SoundID
Reference for Multichannel.
Click here to watch the Sonarworks calibration video.
Once you’ve installed SoundID Reference for Multichannel, you can simply follow the
on screen instructions that will walk you through the measurement process. A full 9.1.6
measurement process will take around 40 mins to an hour to complete.

Importing a (™) SoundiD Reference for
Multichannel Profile
macOS
Once you have completed the measurement process using SoundID Measure, import your
measurement results into SoundID Reference for Multichannel software. Here you can
create a SoundID Reference Profile with your desired Target Mode. For more information
on this process please consult Sonarworks product documentation.
Once complete, you’ll be given the option to ‘Export Preset to Device’.
Select ORIA from the list of devices.

Now, select ‘Direct transfer to Audient ORIA application’ and click ‘Next’.
This will automatically open the ORIA Desktop App and present you with a dialogue box
asking you to choose whether you overwrite an existing Profile in the ORIA Desktop App or
create a new one:

If you create a new Profile, you’ll be prompted to give it a name. If you choose to overwrite
an existing Profile, you’ll be given an option of which Profiles are available to overwrite.
The new Profile will now appear in the Profile Panel. Please note Profiles created with
SoundID Reference will be denoted by a Sonarworks ‘S’ appearing next to the Profile name.

Windows
Due to software limitations, at this moment in time, Sonarworks Sound ID Reference Profiles
cannot be loaded into the ORIA Desktop App on Windows. This functionality will be added
via a driver/firmware update imminently.
Adjusting a Profile
Please note that if you are using a Profile based on Sonarworks(™) measurements, the EQ
in the Setup Mode section will automatically be locked to prevent alterations.
The Trim, Delay and Crossover controls are also locked by default, but it is possible to make
adjustments to these. Click the ‘Locked’ button to unlock these settings, you can now make
adjustments.
Please note that if you are using a Profile based on Sonarworks(™) measurements then
the EQ in the Setup Mode section will automatically be locked to prevent alterations.
The Trim, Delay and Crossover controls are also locked by default but it is possible to make
adjustments to these. Click the ‘Locked’ button to unlock these settings, you can now make
adjustments.

Manual Calibration
If you prefer not to use Sonarworks, then third-party measurement software can be
used instead. The included Sonarworks Reference Microphone can be used for this,
or you can use your reference mic if preferred.
If using a third party software, it is not possible to directly import your settings into
ORIA, the speaker calibration settings must be entered manually.
The third party software should give you an EQ curve you can apply to each channel,
as well as Trim and Delay settings. These settings can then be entered manually for
each channel as explained in the Setup Menu section earlier in this manual.
When manually calibrating, you can adjust the following for each speaker channel:
• EQ (8 bands, 12db, 20Hz - 20kHz + Hi-shelf and Lo-shelf)
• Output Trim ( 6db)
• Delay Time (0-75ms)
• Crossover Point (30Hz - 500Hz)
This allows you to balance your speaker configuration and get the best surround
sweet-spot possible.

iPad Control

ORIA iPad App
Never miss a beat with ORIA’s iPad App. The power of touch grants you remote
access to all of ORIA’s control features from one centralised control hub. Adjust levels,
audition speakers, switch profiles and monitor your metering - all directly from your
desktop. Precise control without the complexity.
*Please Note: Whilst not currently available, the ORIA iPad App will be available
in the near future.
Coming soon to the App Store

Keyboard Shortcuts
Mac
Room Panel Buttons:
Toggle Solo - Shift + Click on speaker button
Clear all mutes - Option + Click on a muted speaker
Clear all solos - Option + Click or Option + Shift + Click on a solo’d speaker
Keyboard Shortcuts:
Show/Bring up the Meter Window - Command + Shift + M
Navigate EQ Bands* - Command + Left/Right arrows
*Only avaliable if the setup panel is visible
Windows
Room Panel buttons:
Toggle Solo - Shift + Click on speaker button
Clear all mutes - Alt + Click on a muted speaker
Clear all solos - Alt + Click or Alt + Shift + Click on a solo’d speaker
Keyboard Shortcuts:
Show/Bring up the Meter Window - Alt + Shift + M
Navigate EQ Bands* - Alt + Left/Right arrows
*Only avaliable if the setup panel is visible

Safety Information
Tel: 0044 1256 381944
IMPORTANT SAFETY INSTRUCTIONS
• Read instructions - All the safety and operating instructions should be read
before the product is operated.
• Retain instructions - The safety and operating instructions should be retained
for future reference.
• Heed Warnings - All warnings on the product and in the operating instructions
should be adhered to.
• Follow Instructions - All operating and use instructions should be followed.
• Cleaning - Unplug this product from the wall outlet before cleaning. Do not
use liquid cleaners or aerosol cleaners. Use a dry cloth for cleaning.
• Attachments - Do not use attachments not recommended by the product
manufacturer as they may cause hazards.
• Water and Moisture - Do not use this product near water-for example, near
a bath tub, wash bowl, kitchen sink, or laundry tub; in a wet basement; or
near a swimming pool; and the like.
• Accessories - Do not place this product on an unstable cart, stand, tripod,
bracket, or table. The product may fall, causing serious injury to a child or
adult and serious damage to the product. Any mounting of the product
should follow the manufacturer’s instructions, and should use a mounting
accessory recommended by the manufacturer.
• Flame Sources - No naked flame sources, such as lighted candles, should
be placed on the product.

Rack Mounting
ORIA requires 1U of vertical rackspace and a minimum of 400mm rack depth, allowing
for cables. It weighs 3.5kg and for fixed installations - such as a studio - the four front
panel mounting screws will provide adequate support. The front panel depth is 8mm
at the mounting positions.
ORIA does not generate significant heat, and is cooled by natural convection. We
recommend that the unit should not be used in locations where the ambient temperature
is greater than 35°C. Ventilation is via slots on either side of the enclosure, and these
must be clear of obstruction.
Do not mount ORIA immediately above or below any other equipment which generates
significant heat, for example, a power amplifier.

Warranty Information
Warranty Statement
Your ORIA comes with a manufacturer’s warranty for three years (36 months) from the
date of despatch to the end user.
The warranty covers faults due to defective materials used in manufacture and faulty
workmanship only.
During the warranty period Audient will repair or at its discretion replace the faulty unit
provided it is returned carriage paid to an authorised Audient service centre. We will
not provide warranty repair if in our opinion the fault has resulted from unauthorised
modification, misuse, negligence or accident.
We accept liability to repair or replace your ORIA as described above. We do not accept
any additional liability. This warranty does not aect any legal rights you may have
against the person who supplied this product - it is additional to those rights.
Warranty Limitations
This warranty does not cover damage resulting from accident or misuse.
The warranty is void unless repairs are carried out by an authorised service centre.
The warranty is void if the unit has been modified other than at the manufacturer’s
instruction.
The warranty does not cover components which have a limited life, and which are
expected to be periodically replaced for optimal performance.
We do not warrant that the unit shall operate in any other way than as described in this
manual.

 Loading...