

Page 1
User Manual / by Sharooz Raoo
Version 1.0 July 2018
c
2018 - Audiaire. All rights reserved.
www.audiaire.com
Page 2

Congratulations on purchasing Zone
and thank you for choosing Audiaire.
Our goal was to create an instrument
that encourages unique sound design
in the most musical way we could.
ZONE USER MANUAL 02
Your comments & feedback are always
welcome. [email protected]
Version 1.0 July 2018
c
2018 - Audiaire. All rights reserved.
www.audiaire.com
Page 3
Contents
ZONE USER MANUAL 03
1. Disclaimer and Legal Notices.
04
2. Minimum System Requirements
04
3. Installing, Registering and Launching Zone
05
+ Downloading and Installing iLok License
05
Manager
+ Moving a License
05
+ Using Zone in Demo Mode / Registering Zone
06
4. Feature Overview
07
5. Getting to know Zone
09
+ a) Playback Modes
09
+ b) Operation Menus
10
+ c) Unison Mode
11
+ d) Preset Browser
11
+ e) Oscillator Section
12
(i) Main Oscillators
12
(ii) Sub Oscillator and Noise Generator
14
(iii) Envelope Generator
15
(iv) Oscillator Modulation
16
+ f) Filter Section
18
+ g) LFO Section
20
+ h) Modulation Matrix
21
+ i) Sequencer Grid
23
Introduction
23
(i) Assigning a Control
23
(ii) Mode Selection
24
(iii) Global Lane
25
(iv) Note and Parameter Lanes
26
(v) Writing Lane Data
26
(vi) Lane Tools
27
(vii) Lane Preset List
28
(viii) Note Sequencer Lanes
34
(ix) Global Lane Presets
34
(x) Master Grid Controls
35
+ j) FX Section
35
+ k) Macros Section
42
+ l) EQ Section
43
+ m) Master Section
43
6. Control Behaviour and Key Commands
44
7. Presets
45
+ Creating Unique Presets
46
8. Troubleshooting / FAQ
47
9. Credits
49
Page 4

ZONE USER MANUAL 04
1.
Disclaimer and
Legal Notices
2.
Minimum System
Requirements
The information contained in this document is subject
to change without notice and does not represent a
commitment on the part of Audiaire. Audiaire shall
not be liable for any damages arising out of or
related to this document or the information contained
within it. No part of this publication or images may
be reproduced or transmitted in any form or for any
purpose without the written consent of Audiaire.
The software described by this document is subject to
a License Agreement and may not be copied to other
media except as detailed in the License Agreement.
VST3 , AU or AAX compatible host software.
MAC
+ OS 10.9 or higher. (64 bit only)
+ 2GB RAM (8GB recommended)
© 2018, Audiare Ltd. All rights reserved.
VST Plugin technology by Steinberg
VST is a trademark of Steinberg Media
Technologies GmbH
All other copyrighted trademarks belong
to their respective owners.
PC
+ Windows 7 or higher.
+ 2GB RAM (8GB recommended)
Page 5

3.
Installing, Registering
& Launching Zone
Zone uses the iLok system to authorise registration.
Before you’re able to launch software protected by
iLok, iLok License Manager will need a valid license
stored on either your computer, iLok USB Dongle, (if
you have one), or an iLok Cloud session.
Downloading and Installing iLok Licence Manager
You will need to go to the iLok website (ilok.com) and
Sign In or create a free account.
When creating your user account, ensure you create
a User ID that you can remember, as this is a crucial
part of the system and cannot be changed. It is also
advised to tick the ‘Notify me about important
iLok.com updates’ box, so you remain up to date.
From the home page of the iLok site, download and
run/install the iLok License Manager le.
If you have not yet, plug-in your USB iLok Dongle (if
you have one). If you are using a desktop computer,
it is best to plug the key in either via a back port
(that you rarely use) or a USB multi port extension.
Once you have installed the iLok License Manager,
load the application and go to Sign In.
ZONE USER MANUAL 05
You should now see your iLok user account as well
as details about your computer and any iLok Dongles
you currently have plugged in.
Moving a License onto an iLok Key or Computer
If you already have licenses within your iLok account,
they should now be displayed in the main window.
If you have not yet sent across your iLok license for
your product, you will have either had instructions
emailed to you or details will be included inside
of your User Guide included with your product.
With your license selected in the main window
‘Zone’, for example, there are several ways to
transfer the license (right-click, select ‘Activate’,
or drag & drop onto your desired iLok Dongle).
Firstly, check the Valid Locations section to see
what the license can be placed onto (dark grey).
When the license is dropped onto the destination,
a Conrm Activation prompt should display, check
to conrm that you selected the correct location,
and press ‘OK’.
Page 6
3.
Installing, Registering
& Launching Zone
Now if you select your iLok Dongle on the left-hand
side, the main window should then display all of
the licenses that you specically have on that key.
You can replace your license from your key back
into your main iLok account at any time (as long as
you have the relevant iLok key plugged in!) by simply
right-clicking the license name and selecting
‘Deactivate’. - Deactivate sounds a bit permanent,
but it just places the license back to your account!
Please ensure you check for frequent application
updates for your iLok license manager!
Using Zone in Demo Mode
If you wish to use Zone in demo mode, you can
do so for 14 days without any restriction. You will
still need to have iLok License Manager installed on
your computer or an iLok USB Dongle.
ZONE USER MANUAL 06
There are no differences
between the nal version
of Zone and the demo.
Once the demo times out
you will no longer be able
to use it and authorisation
will fail. You will be given
frequent reminders on start-up, outlining how long
your trial has left.
Registering and Authorising Zone
If you have purchased Zone, you will have been
given a unique registration code that enables a full
iLok license to be activated for the software. If you
authorise the license on your iLok Dongle, you will be
able to use Zone on any machine you wish as long
as your Dongle is plugged in. If the license is on your
computer, you can only use Zone on that machine
(with or without Dongle).
Unpack the Zone installer and open it. From the .pkg
(Mac) or .msi (PC) les, you will be prompted to pick
and choose which components you wish to install.
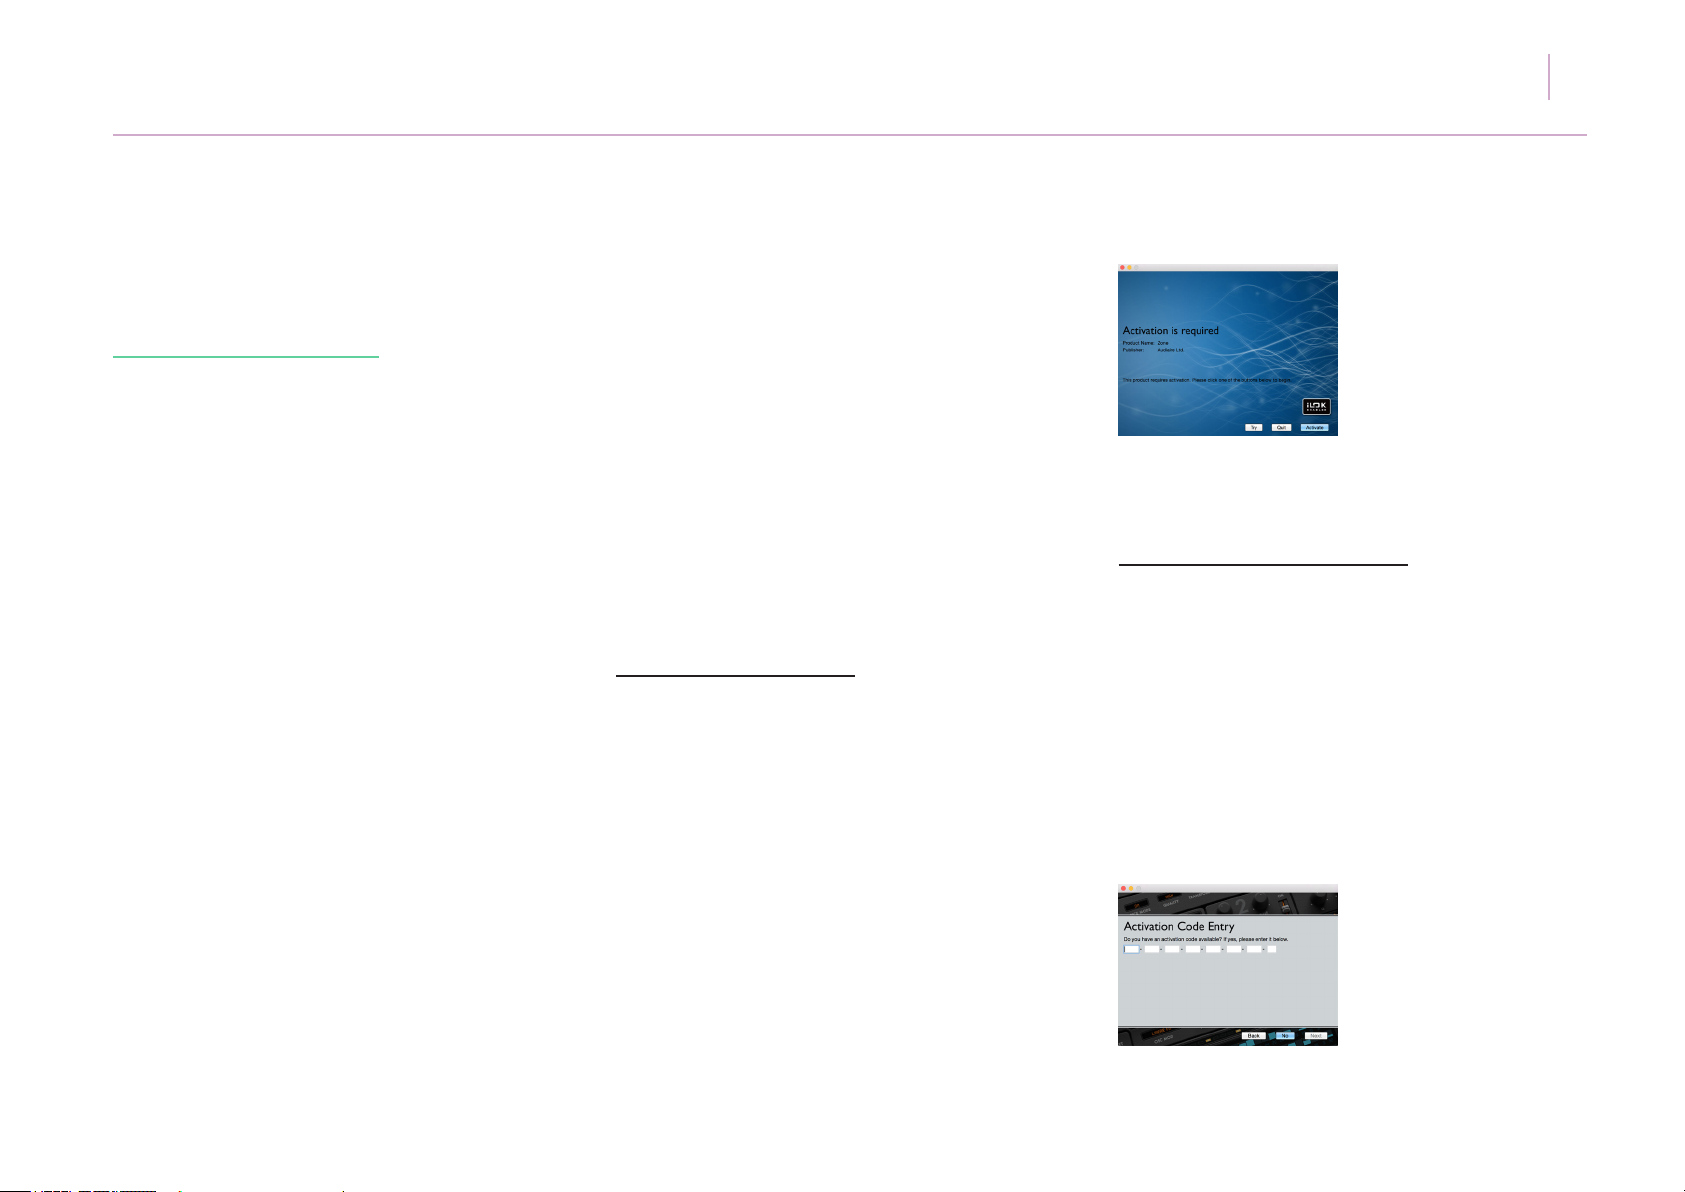
Zone installs as VST, AU or AAX. On activation click
Try and enter your iLok user ID and password.
Once you have unzipped and installed the required
Zone components, you
can enter your serial code
on rst launching Zone, or
if you were using a trial,
once that trial expires by
clicking the Activate box.
Page 7

ZONE USER MANUAL
07
4.
Feature Overview
Congratulations on purchasing Zone
and thank you for choosing Audiaire.
Our goal was to create an instrument
that encourages unique sound design
in a musical way, showcasing the
beautiful idiosyncrasies seen in the
modular world.
At the heart of Zone’s operation is a powerful
parameter sequencer that allows virtually every
control to be assigned to and modied by its own
independent sequencer, with unlimited lanes.
Zone can be played in three distinct modes. In its
simplest form, as a feature rich synthesiser with a
host of lters, wavetable oscillators with import
functionality, extensive multi-effects, powerful
modulation matrix and much more. With a 32
step note sequencer - allowing pitch, velocity,
gate, probability and +/- swing to be modied at
a variety of rates, synced to a DAW host. Or with
innite note and parameter sequencer lanes, each
running at its own independent rate and number of
steps, with complex tools and presets for modifying
lane behaviour.
Amongst its primary features are:
+ High quality analogue modelled oscillators with
unparalleled sound quality.
+ 151 Oscillator types with sub, noise and the ability
to load/save unique single-cycle waveforms.
+ More than 400 presets designed by some of the
world’s leading patch designers.
+ 95 global, unipolar and bipolar parameter
sequencer lane presets.
+ Inventive parameter sequencer with unlimited lanes,
each running at up to 27 different rates from 8/1
to 1/128.
+ Numerous oscillator modulation modes including
Exponential FM (as seen in Roland’s Jupiter 8),
Ring Modulation, Amplitude Modulation, Distortion
Modulation and more.
+ 20 insert FX types, including delay, stereo width,
reverb, chorus, anger, phaser, barber-pole phaser,
compression and decimator.
+ Many LFO waveshapes including ‘broken saw’ and
trapezoid, running freely or at 27 different rates.
Page 8

ZONE USER MANUAL
08
4.
Feature Overview
+ Multiple lter types (comb, notch, phaser,
circuit-bent, ‘acid’) with up to 48dB/octave roll-off.
+ Extensive modulation matrix with 8 slots and
numer ous sources.
+ Chord, hold note (for easy sound design editing)
and unison mode with up to 7 voice spread.
+ Fully assignable macro controls for easy
perfor mance control.
+ Clearly laid out, scalable GUI designed for ease-of use with one page editing.
Page 9
5.
Getting to know Zone
The easiest way to get acquainted with Zone is by
simply loading up a preset and jamming. After all
isn’t that how all instruments should be learned?
We have taken great care to ensure all controls
remain exposed on one screen.
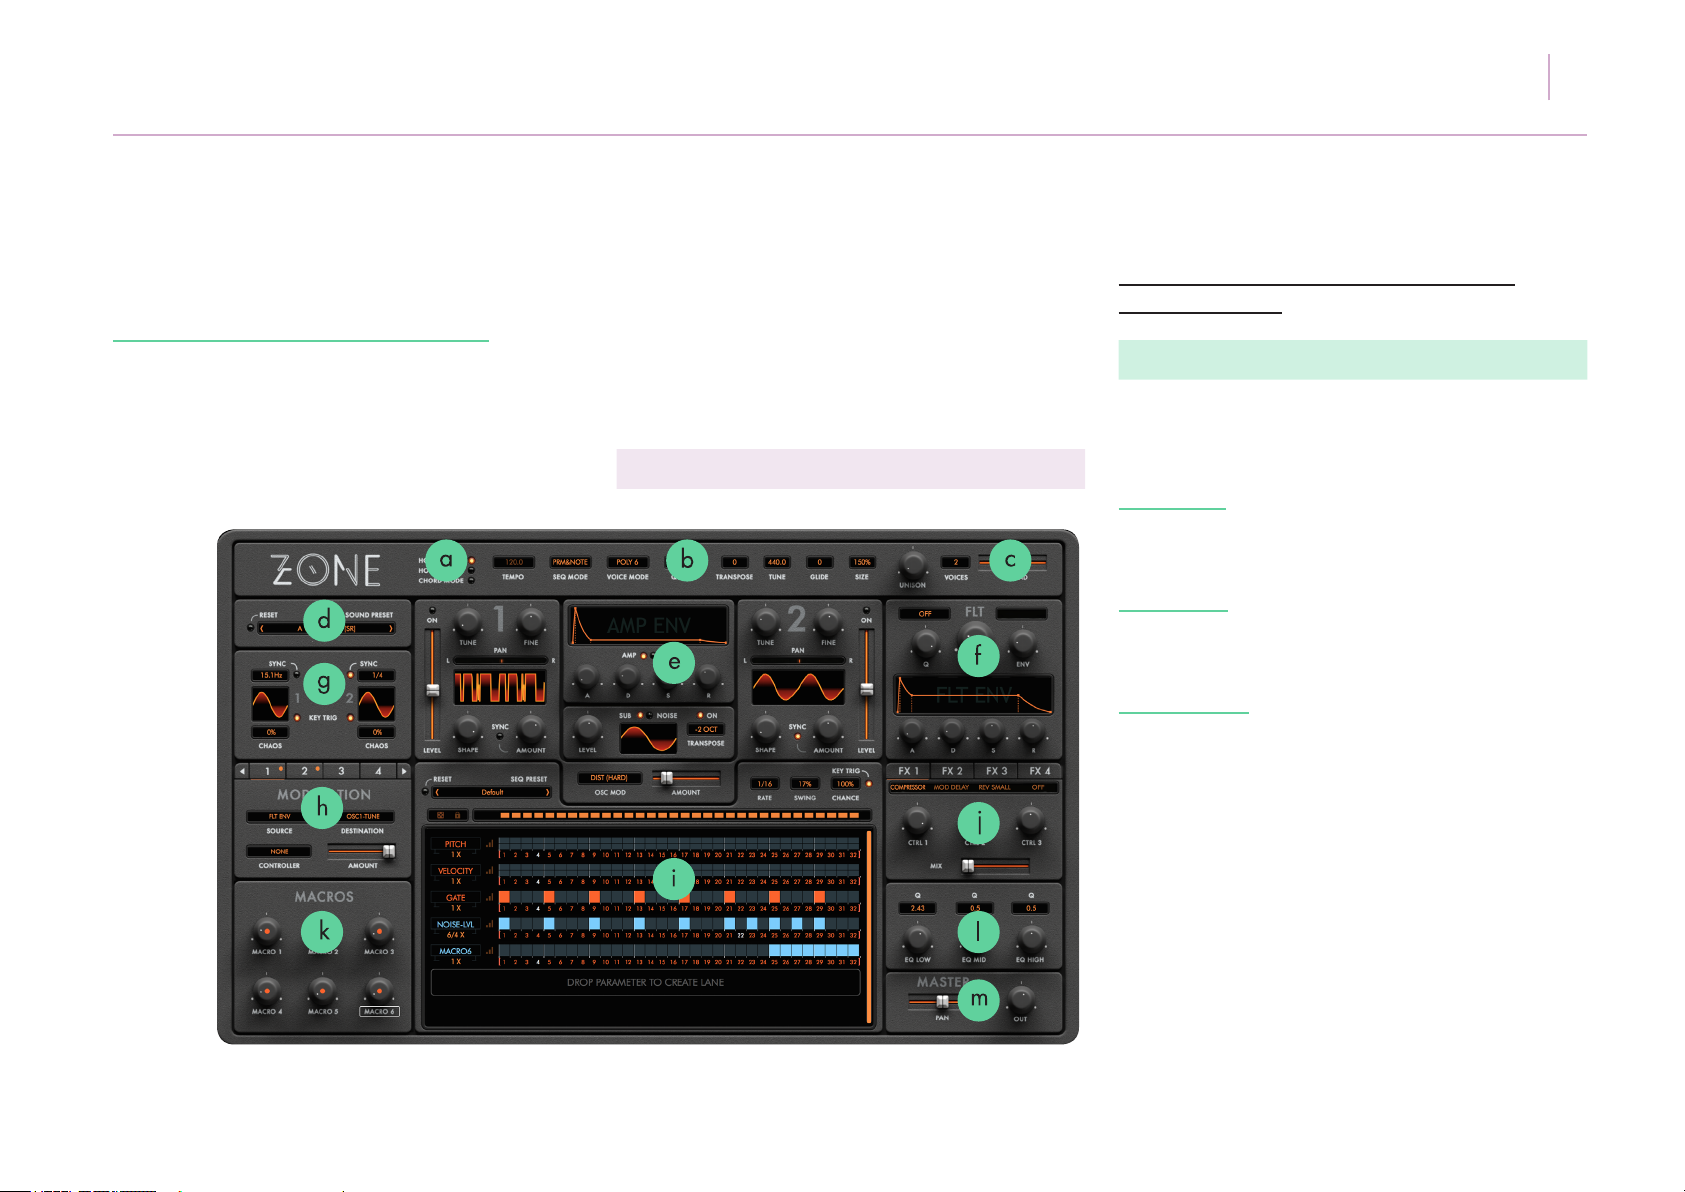
Below is an overview of Zone’s user interface.
ZONE USER MANUAL 09
The lettered points show the basic operational
features described:
a) Playback Modes
Click on the various playback mode LEDs to
activate them.
HOST SYNC - Synchronises the parameter sequence
lanes, LFO speeds and available insert effects types
to your host DAW tempo when lit.
HOLD NOTE - Applies an innite sustain to the tone
generated for easy, ‘hands free’ editing. Ideal for
complex sound design operation.
CHORD MODE - Remembers the currently played or
held simultaneous note pattern for storage into chord
mode. Play a chord and click the LED to assign that
chord to a single note. Click the LED again to reset
the mode to normal.
Page 10
5.
Getting to know Zone
ZONE USER MANUAL 10
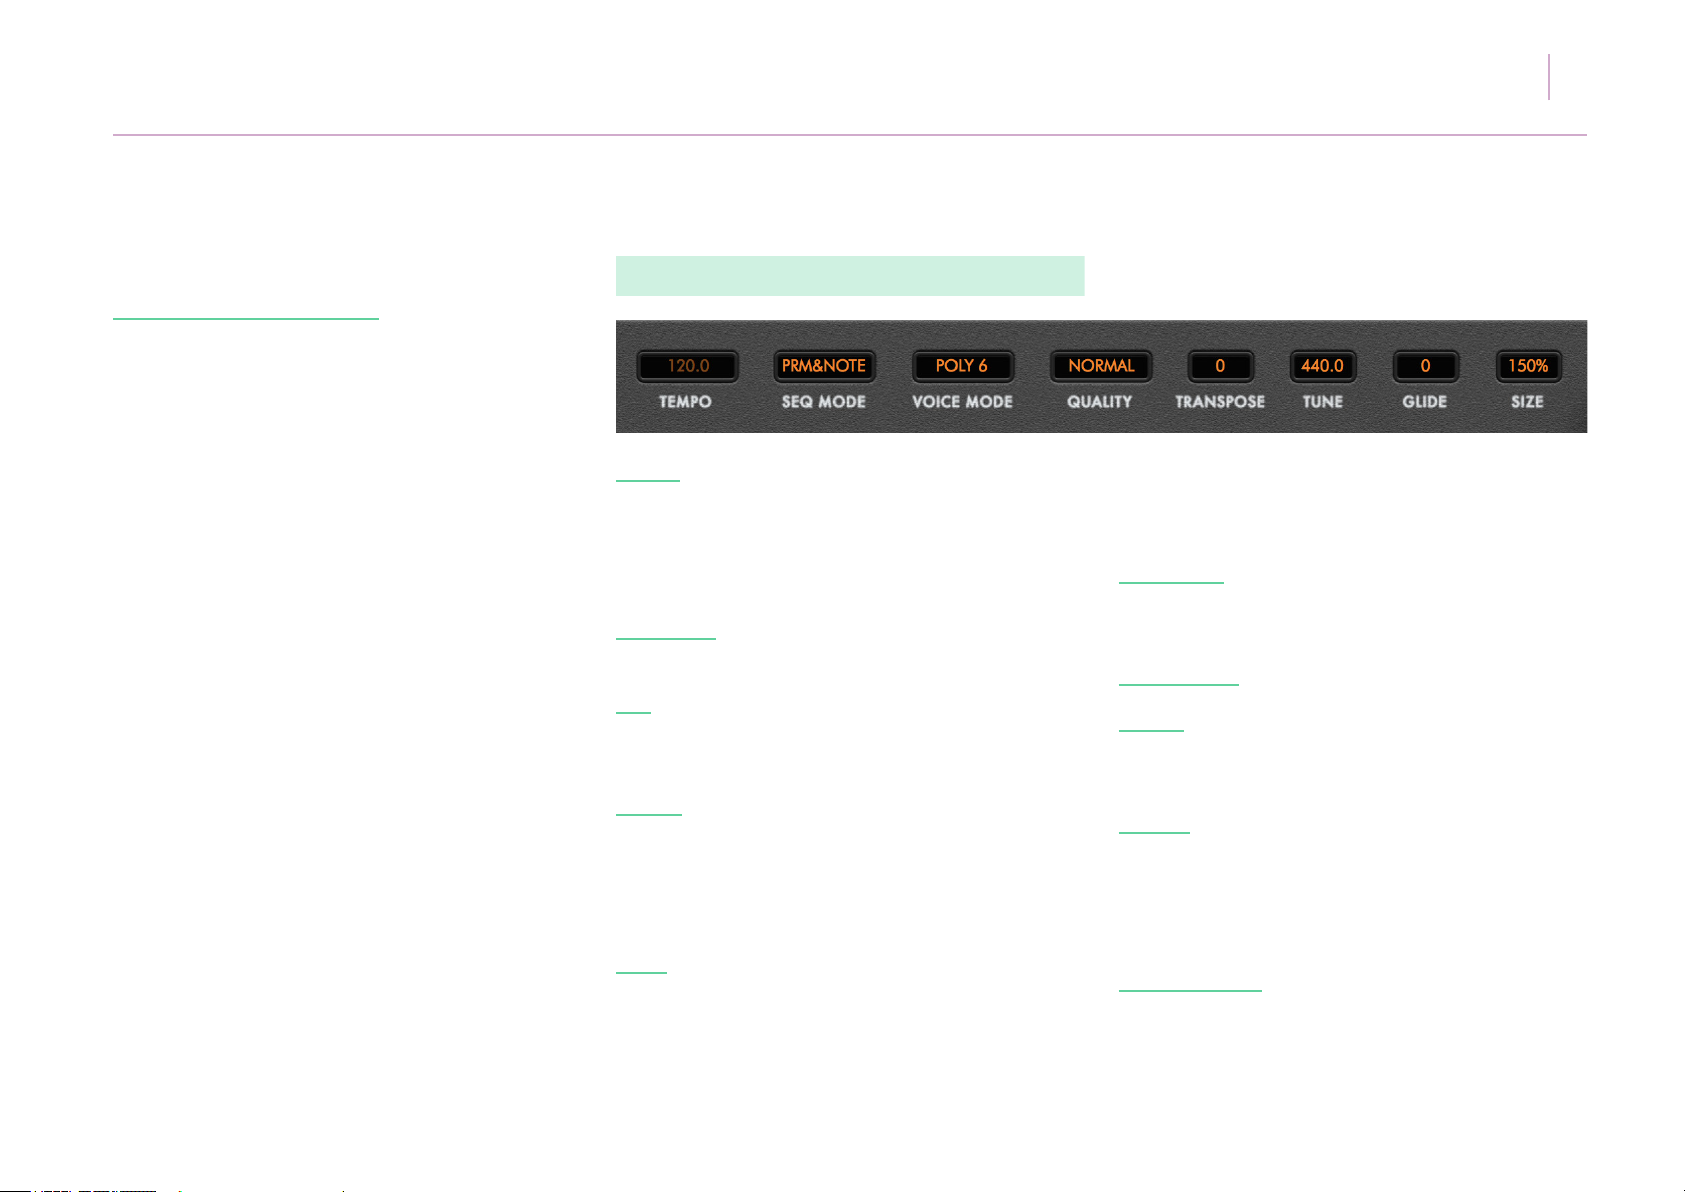
b) Operation Menus
TEMPO - When not Host Sync’ed to DAW, will
display the tempo in BPM at which Zone’s internal
clock will run. This value can be adjusted from 20.0
- 999.0. When Sync’ed to your DAW, this value will
still display the tempo but not be illuminated.
SEQ MODE - Zone operates in four distinct modes.
This menu selects those modes as follows:
OFF - The note and parameter sequencers are not
active. Zone will play as a ‘regular’ synthesiser, with
all controls active but the sequencer window blank.
PARAM - The parameter sequencer mode is active,
with lanes ready for click-and-drag assignment. If
a factory preset is loaded, the assigned parameter
sequencer lanes can be activated or deactivated by
selecting or deselecting this mode.
NOTE - The note sequencer mode is active. If a
default blank preset is selected - pitch, velocity and
gate lanes will appear, ready for programming. If a
factory preset is loaded, the programmed note
sequencer lanes can be activated or deactivated by
selecting or deselecting this mode.
PRM&NOTE - Both parameter sequencer and note
lanes are active. Note lanes are coloured orange and
parameter lanes blue. All lanes are synced by default.
VOICE MODE - Selects Zone’s polyphony as follows:
MONO - Monophonic operation where pitch glide is
performed between all events - envelopes and LFOs
are re-triggered for all events.
LEGATO - Monophonic operation where pitch glide is
performed only between legato notes (where a new
note is pressed while previous still held) - envelopes
and LFOs are re-triggered only on standalone note
events, and not for legato notes.
POLY 2,6,12,18 - Polyphonic operation with
respective maximum number of voices in playback.
Page 11
5.
Getting to know Zone
TRANSPOSE - Transposes the tone generated by
Zone +/- 48 semitones.
TUNE - Adjusts the global tuning of the tone
generated by Zone in Hz.
GLIDE - Adjusts the portamento slide of the tone when
in MONO or LEGATO modes.
ZONE USER MANUAL 11
d) Preset Browser
c) Unison Mode
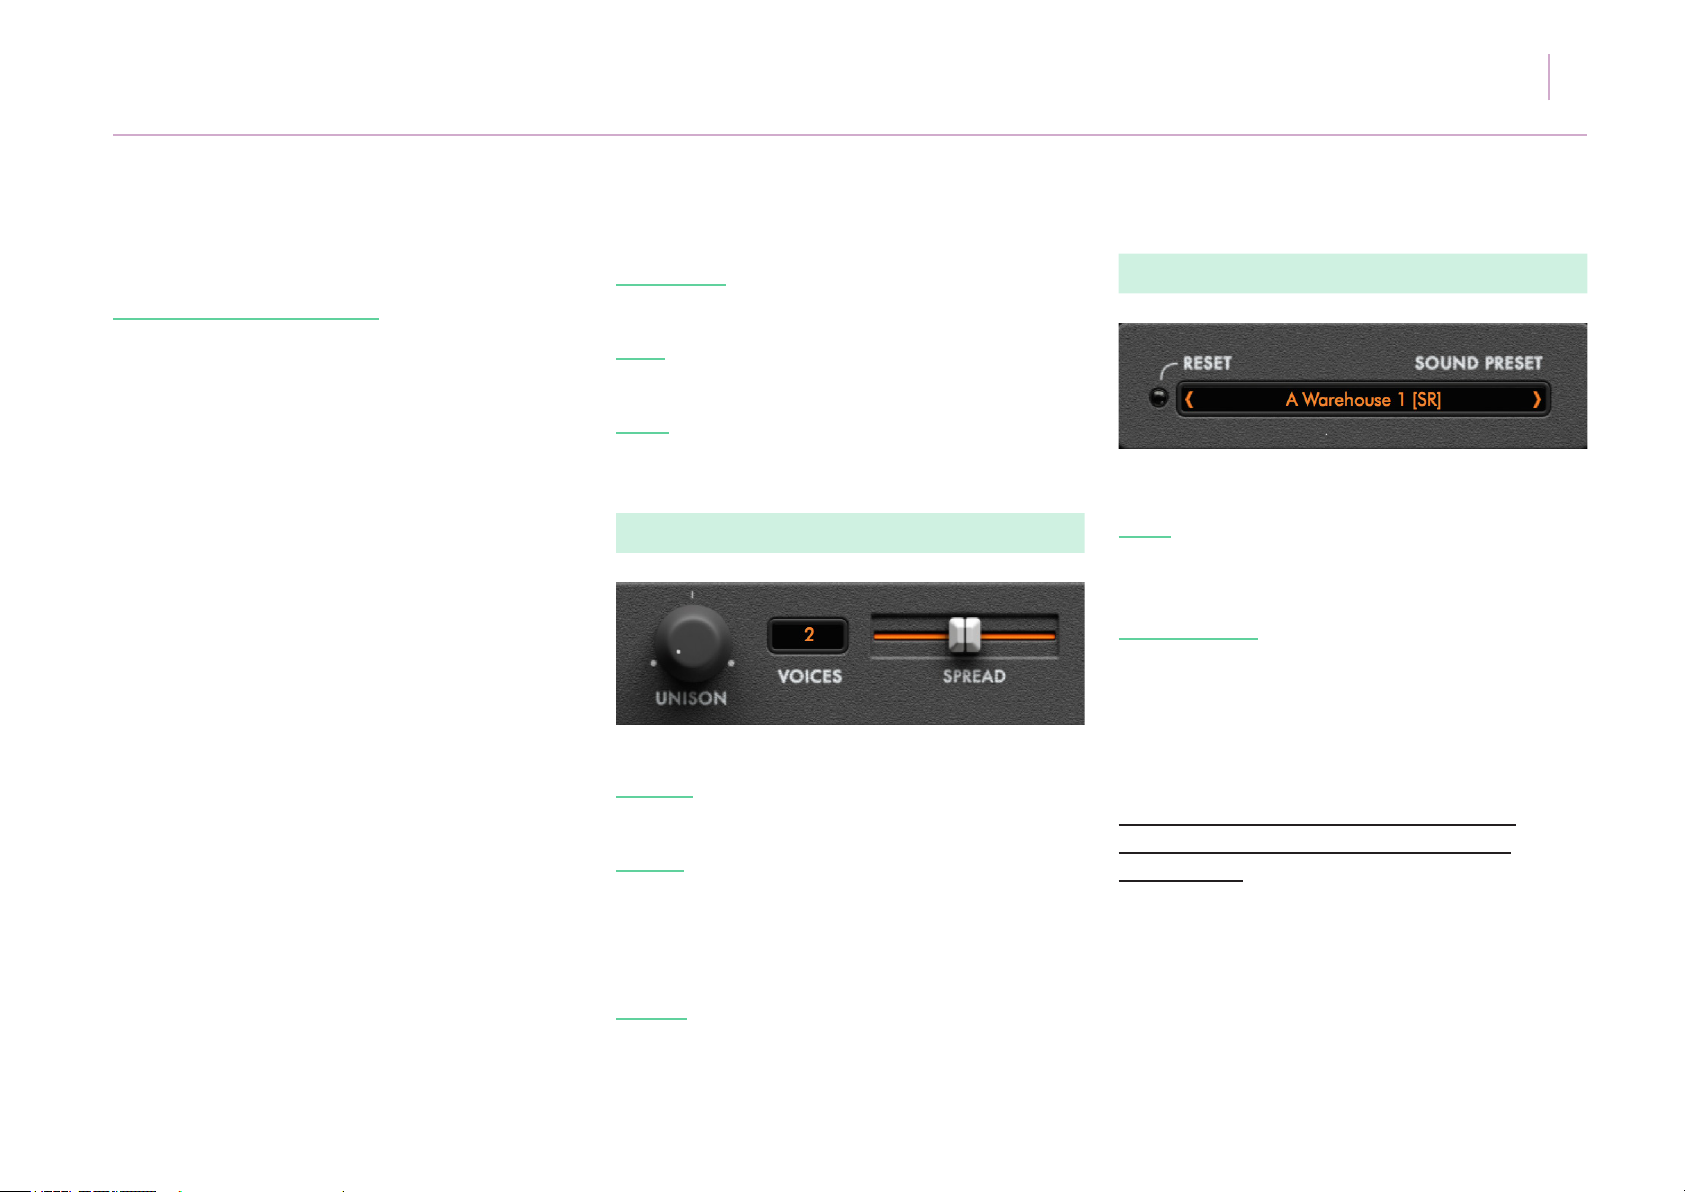
UNISON - This knob adjusts the relative tuning of the
voices played in unison.
VOICES - Sets the number of voices to be played, with
minor discrepancies in tuning, in unison from 1 - 7.
(Please note when set to 1 voice, the UNISON knob
is ‘greyed’ out and not operational).
SPREAD - Adjusts the stereo spread of the voices to
be played in unison.
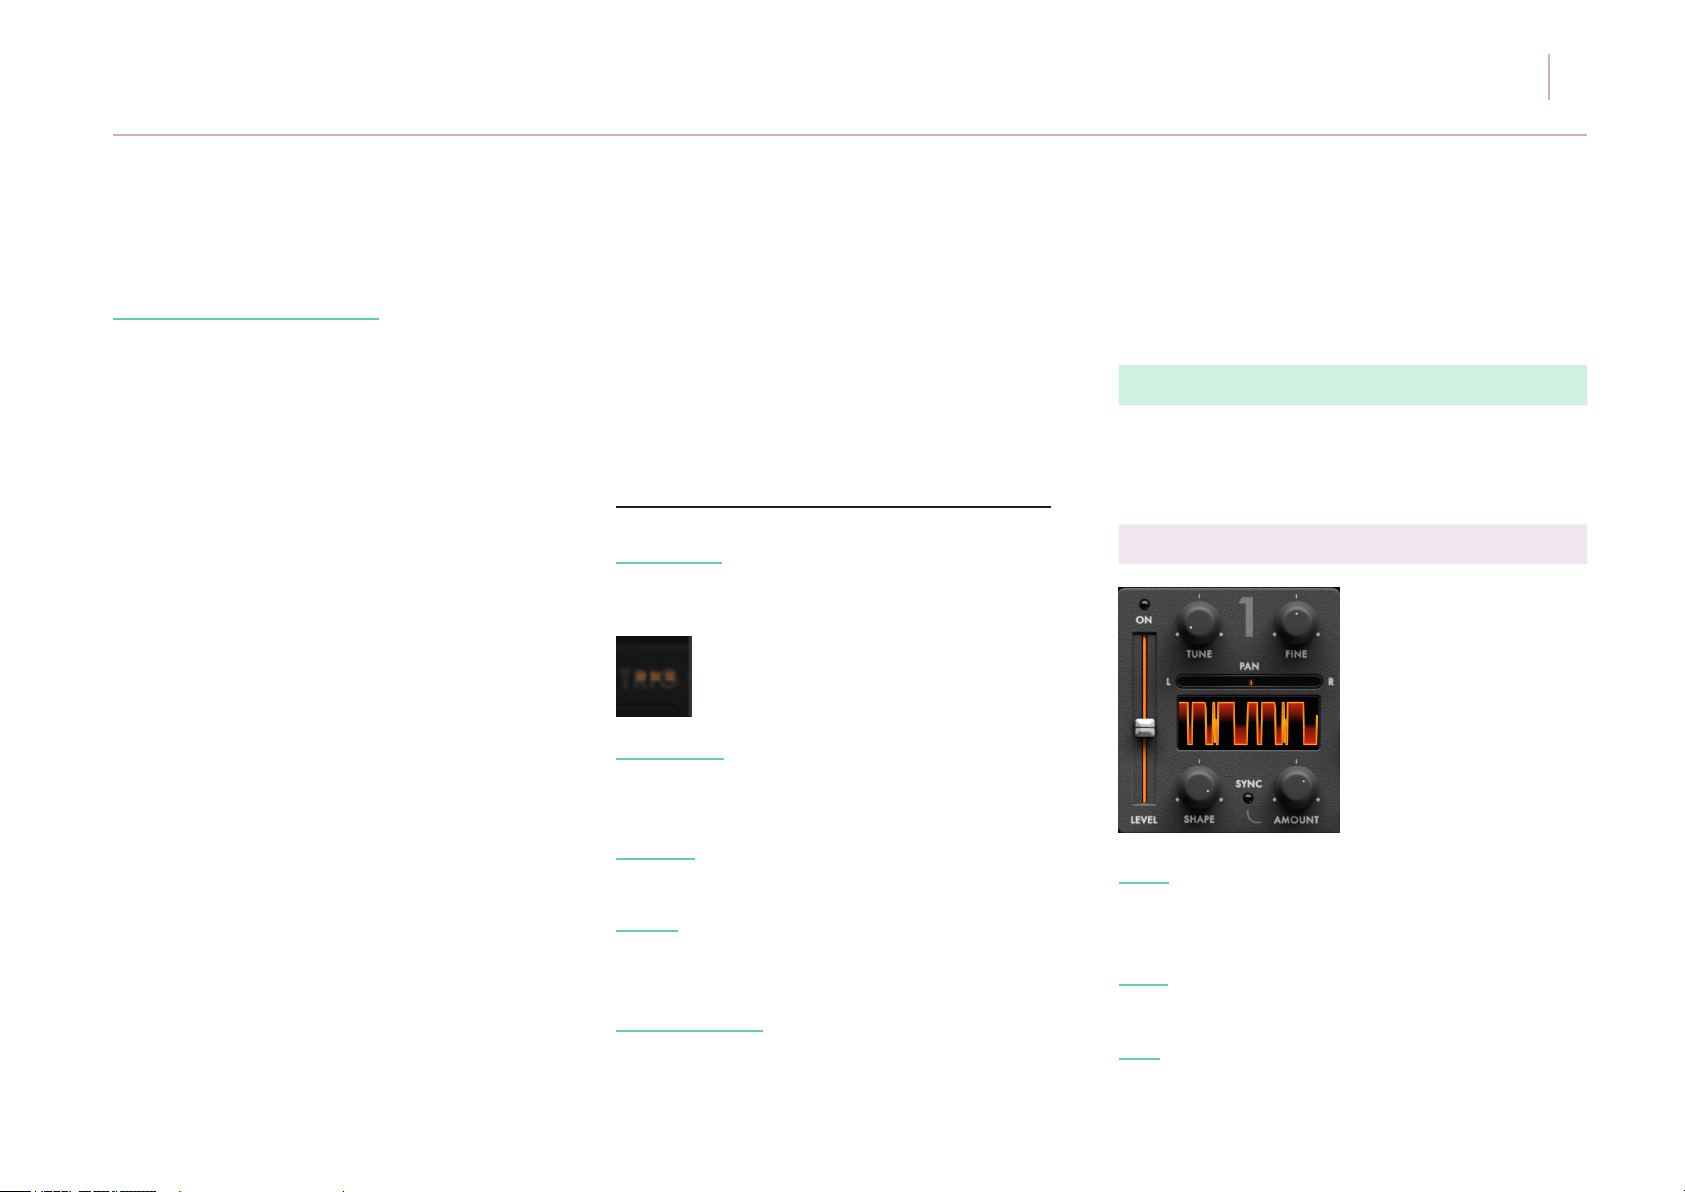
RESET - Clicking the RESET LED initialises the patch
worked on by resetting all controls, including the
clearing of parameter lanes, to their default position.
SOUND PRESET - Clicking inside the SOUND PRESET
bar launches the preset browser. Presets are divided
by banks on the left and preset selections on the right
hand browser. Selections can be browsed using the
scrollbar on the right or re-ordered using the white
arrow icon at the top of the right hand menu.
To save a new preset click on SAVE AS NEW.
The preset will appear in the USER menu and
be located at -
MAC:
HD/Library/Application Support/Audiaire/Zone/
Presets/User
Page 12
5.
Getting to know Zone
(Please note Library folder may be hidden. To access,
click on Finder and select the Go menu. Hold [alt]
and Library location will appear under the Go menu.
ZONE USER MANUAL 12
patches, you can simply write new folders by
adding to the Presets folder in which User and the
other banks are located.
PC:
C:\Users\<user>\AppData\Roaming\Audiaire\
Zone\Presets\User
To revert to default preset click on LOAD DEFAULT.
USER BANK - Within the USER bank, clicking on the
icon below will open a menu allowing OVERWRITE,
RENAME, DELETE and SHOW ON DISK options.
OVERWRITE - On selecting a patch, clicking the icon
will overwrite that patch with the present tone
settings.
RENAME - Opens a cursor box to rename the patch
clicked on.
DELETE - Permanently deletes a selected user patch
from memory. *Please note there is currently no
UNDO function.
SHOW ON DISK - Shows the location of the patch on
your local drive. Should you wish to add folders or
directories within Zone for easy storage of your
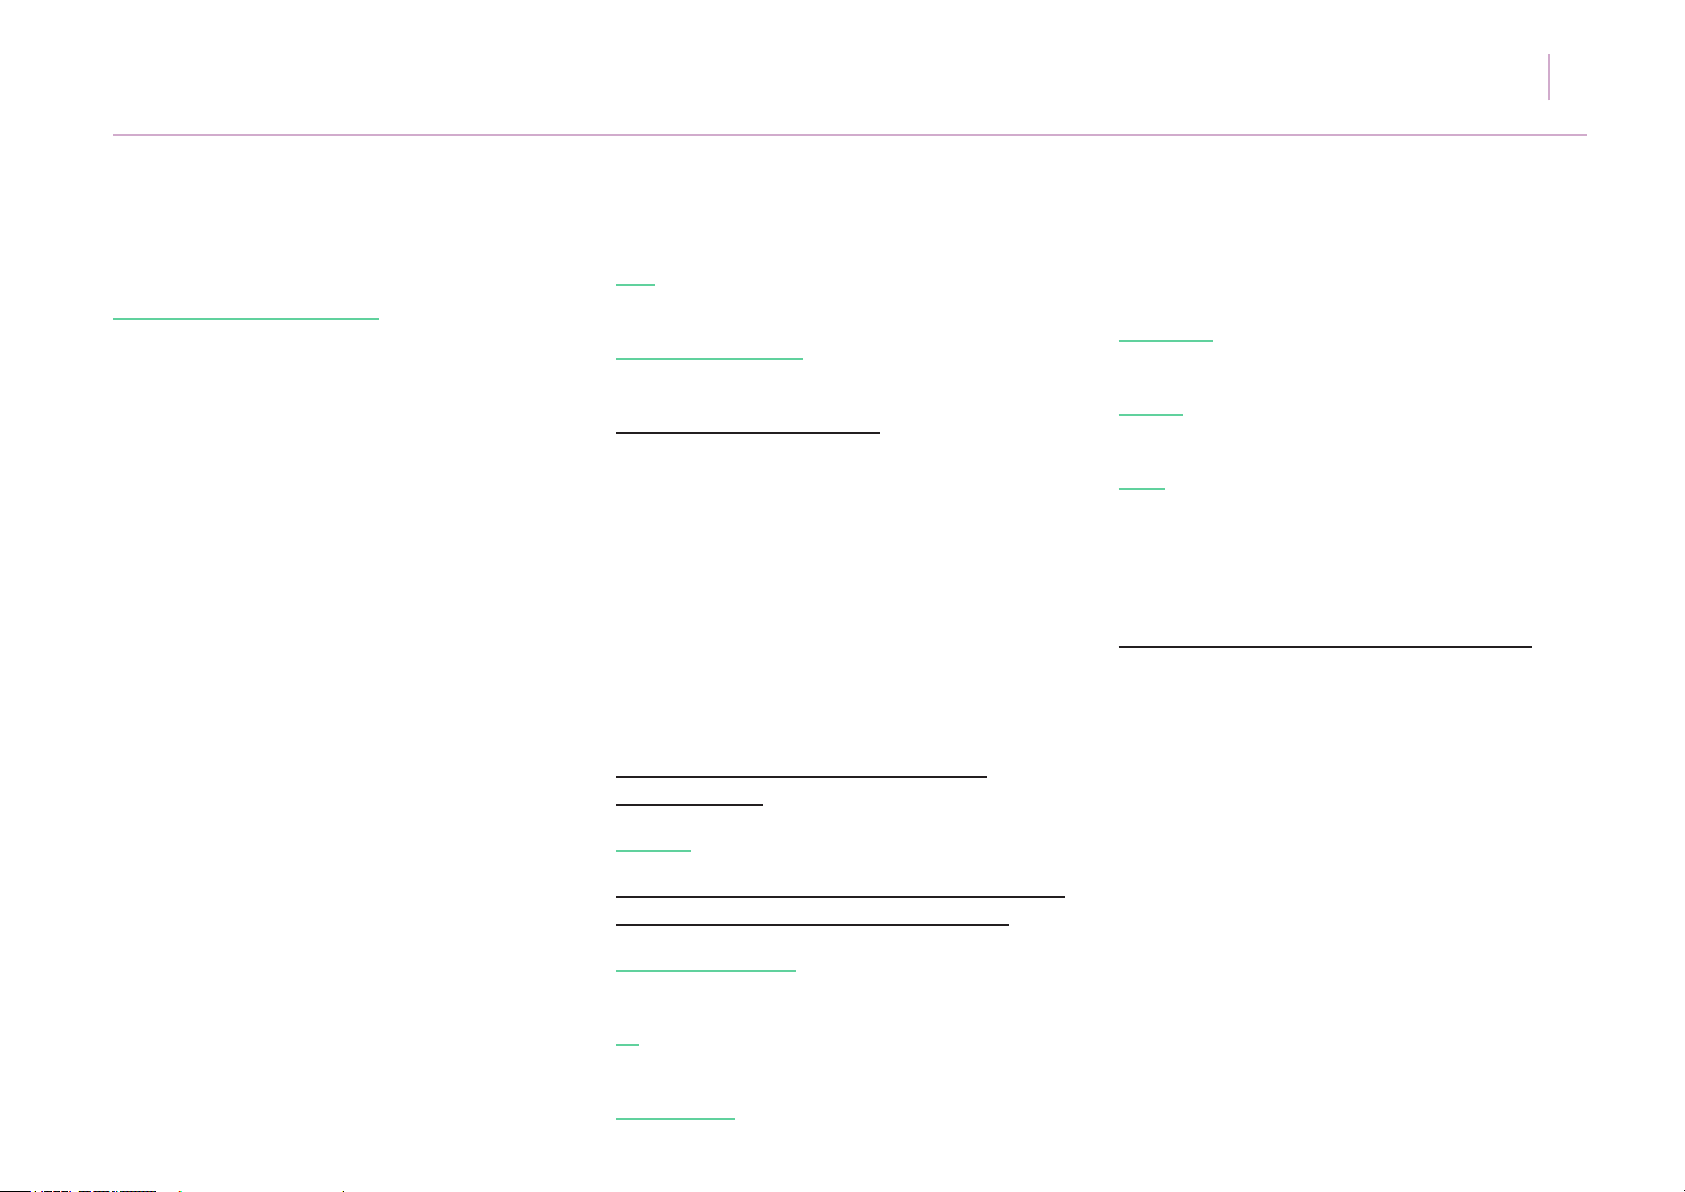
e) Oscillator Section
This section has two identical oscillators with the
following controls:
(i) Main Oscillator
LEVEL - Adjusts the relative volume of each oscillator.
Clicking the LED at the top switches the oscillator on
or off.
TUNE - Adjusts coarse tuning of the oscillator
+/- 24 semitones.
FINE - Adjusts ne tuning of the oscillator
+/- 50 cents.
Page 13
5.
Getting to know Zone
PAN - Adjusts the panning of the oscillator from
Left to Right.
WAVEFORM DISPLAY - Click to select and display
the waveform of the current oscillator.
Waveforms can be chosen by:
ZONE USER MANUAL 13
of the nest instruments in the world.
MODULAR - Waveforms custom created using classic
modular synthesisers.
VOCAL - Waveforms sampled from speech
synthesisers and bespoke vocal recordings.
1. Clicking in the centre of the display to reveal
a menu showing all available selections.
2. Clicking and dragging up and down on the
display to cycle back and forth through selections.
3. Clicking to the left or right of the display to
reveal arrow icons.
4. Using key modiers -
[alt and click] to revert to a default SINE waveform
[cmd and click] to randomise a selection.
*CTRL and click on PC
Waveforms are displayed according to the
following menus:
CLASSIC - Standard analogue modelled waveforms.
The following banks contain single cycle waveforms
sampled and processed specically for Zone:
BASS, LEAD, SYNTH - Waveforms created on and
sampled from the world’s nest analogue synths.
FX - Waveforms derived from an expertly recorded
foley collection, custom made for Zone.
INSTRUMENT - Waveforms sampled from some
USER - Allows user to import custom made single
cycle waveforms*. Clicking SHOW ON DISK will
reveal the directory in which waveforms are to be
placed. Clicking RESCAN will reveal the waveforms
in the directory.
Waveforms are stored at the following location:
MAC:
HD//Library/Application Support/Audiaire/Zone/
Wavetables/User
PC:
C:\Users\<user>\AppData\Roaming\Audiaire\
Zone\Wavetables
*Zone will read WAV, AIFF, FLAC, OGG les at
44.1kHz and 48kHz at both 16-bit and 24-bit.
The waveform should be exactly one ‘cycle’ in
length and should exhibit a clean ‘zero crossing’.
The original pitch of the waveform is unimportant
as this will be scaled accordingly. Using cycles of
notes around Middle C tends to give best results.
DC offsetting and normalisation are also performed
within Zone’s engine.
Page 14
5.
Getting to know Zone
SYNC - Each of Zone’s oscillators has an
independent built-in ‘hidden’ master oscillator that
it is independently synchronised with when this LED
is clicked.
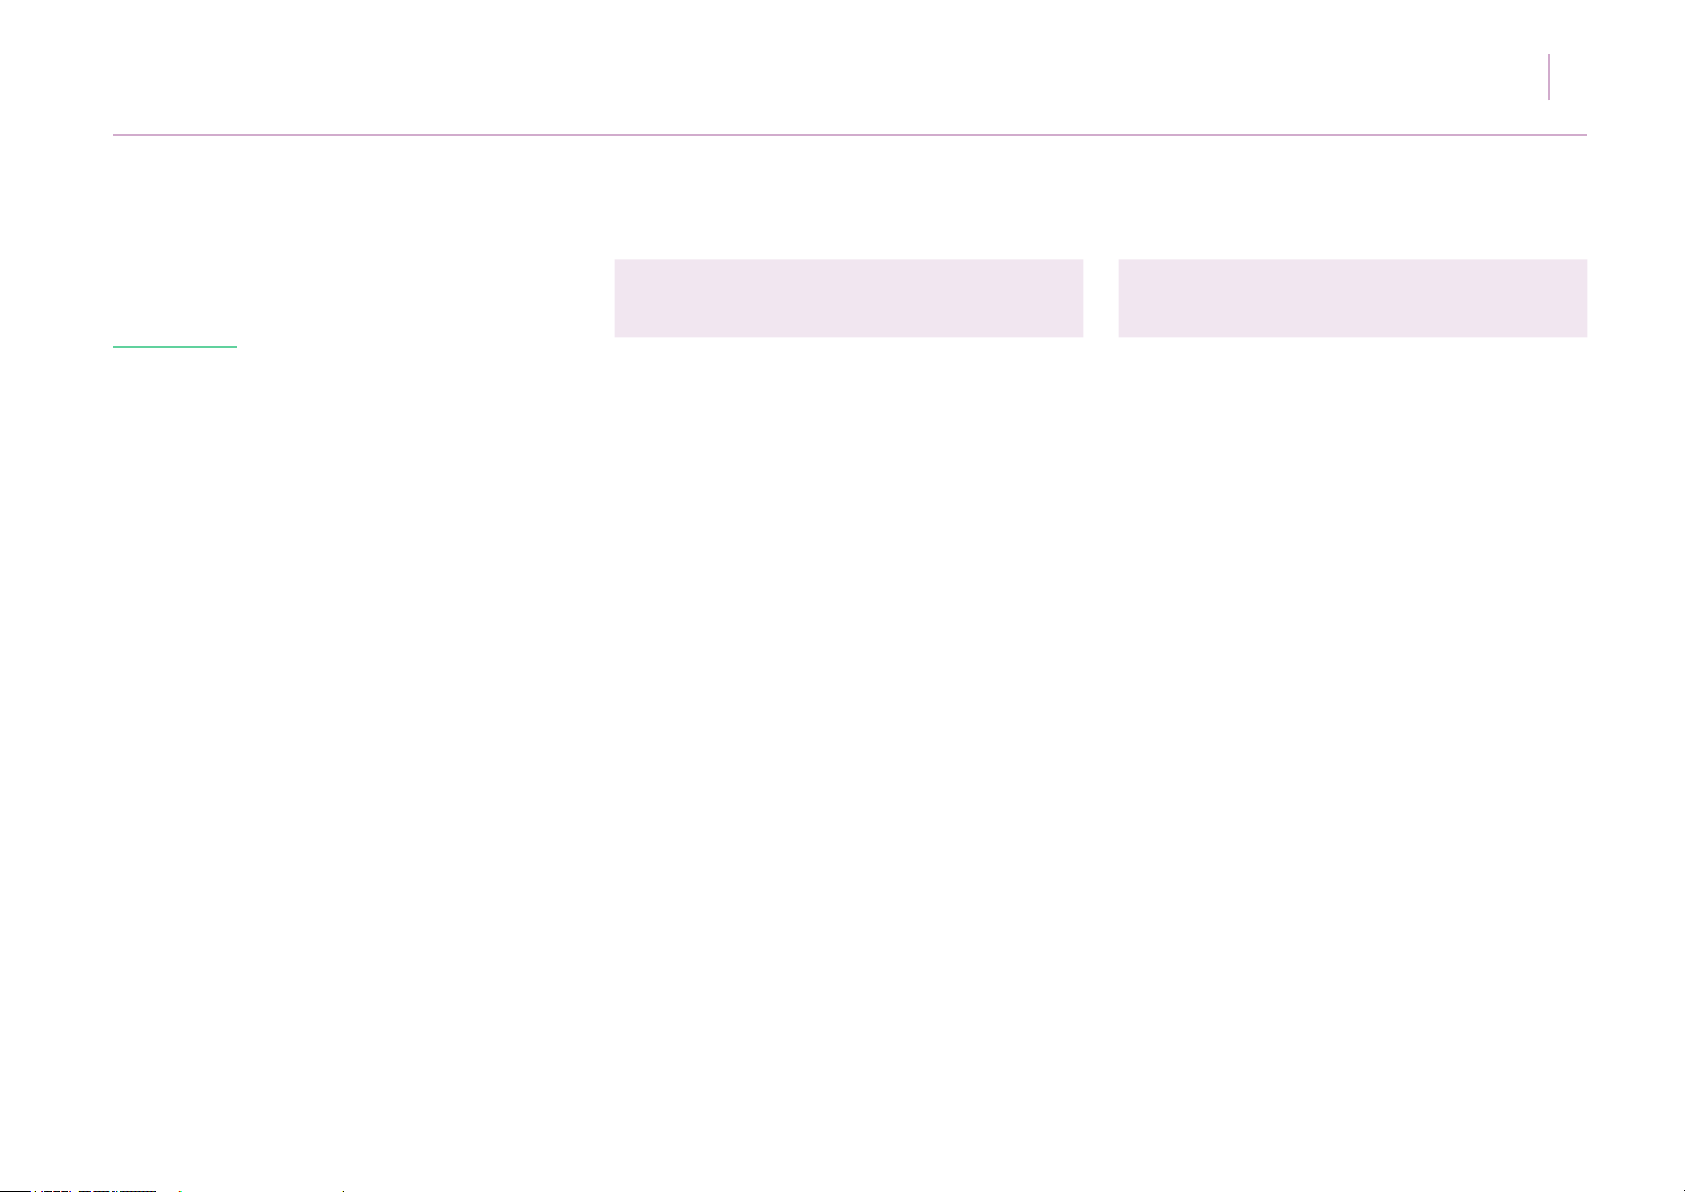
SHAPE - Changes the pulse width of the selected
waveform, which modies its harmonic content and
timbre.
AMOUNT - adjusts the amount of detune between
an oscillator and its ‘hidden’ master oscillator.
A note on ‘Analogue’ Oscillators:
Zone’s oscillator voices have different phases in
respect to each other. For some voices (for example
2 sine waves) voice phases add up perfectly. But
for other voices they can cancel out and this may
cause audible variations in tone across the same
note.
ZONE USER MANUAL 14
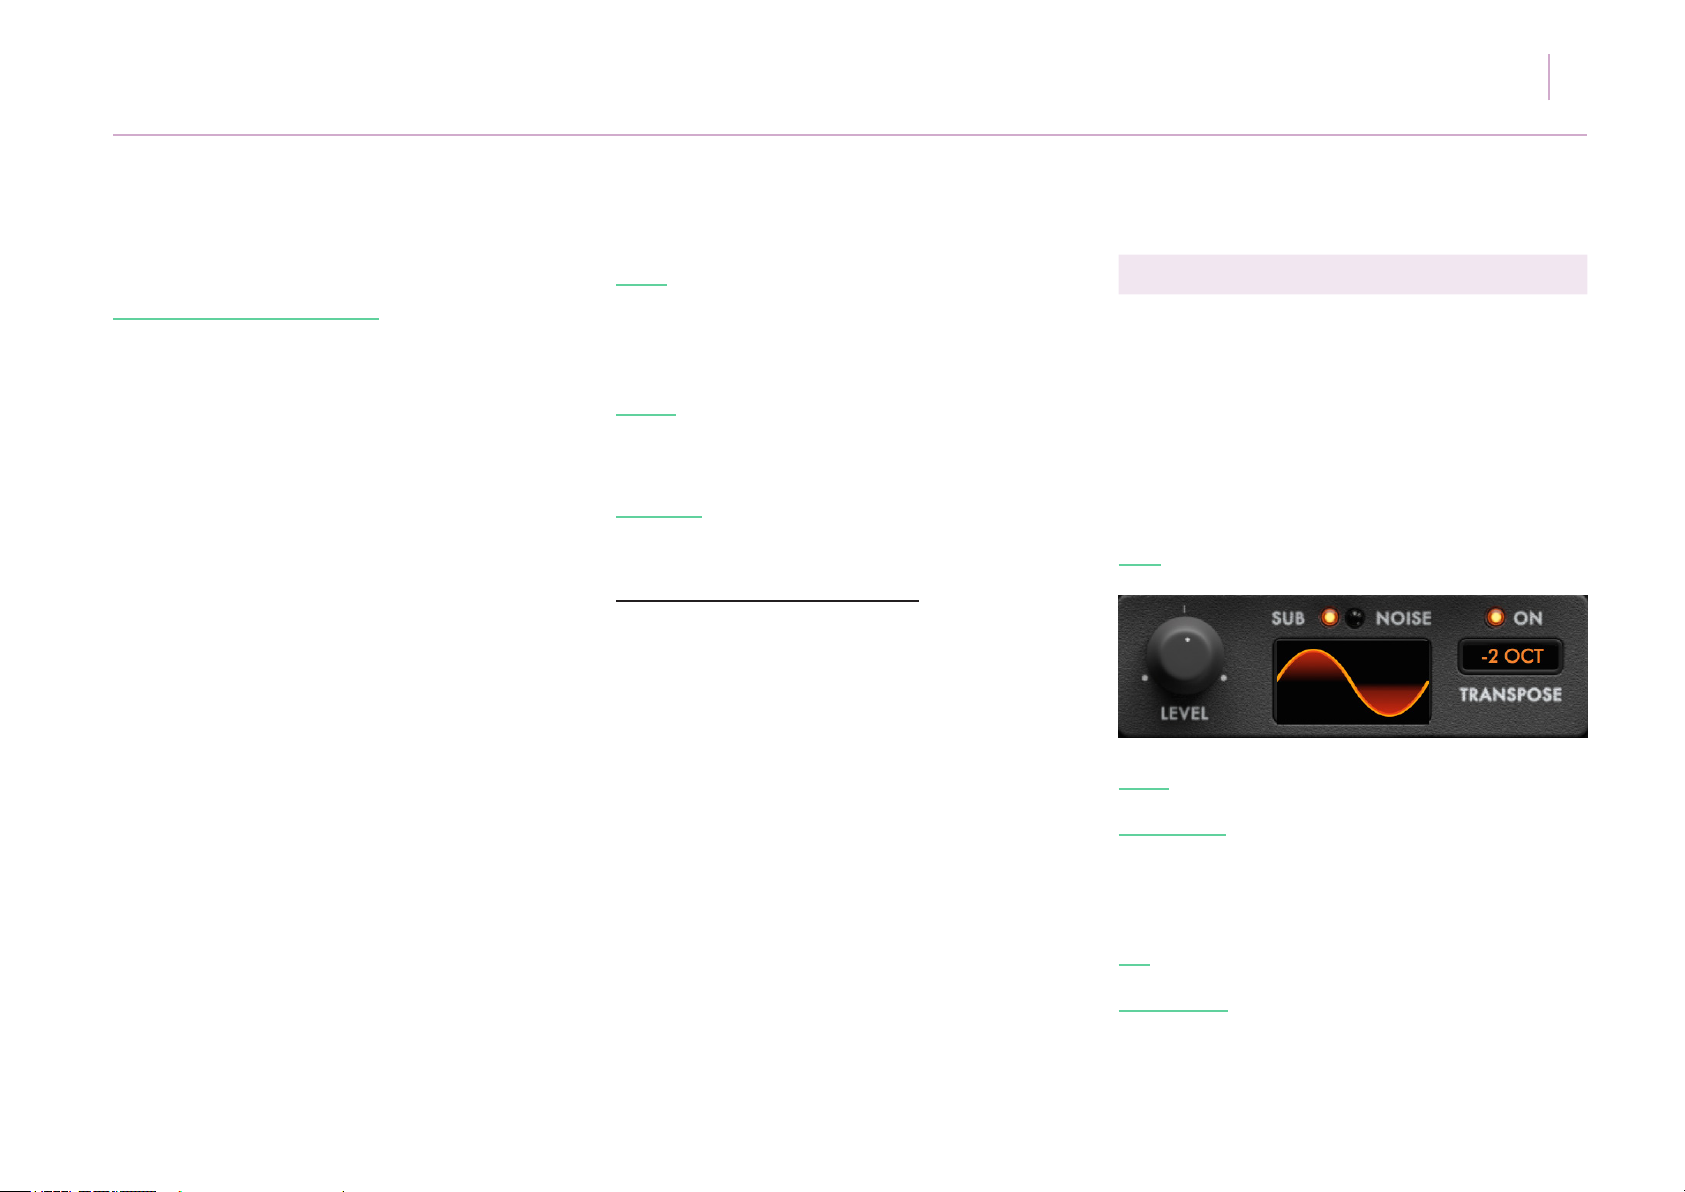
(ii) Sub Oscillator and Noise Generator
Zone has a dedicated sub-oscillator (with coarse
tuning linked to OSCILLATOR 1) and noise
generator.
Clicking the SUB and NOISE LEDs will switch
between and display dedicated controls for both
as follows:
SUB:
LEVEL - Adjusts the level of the sub-oscillator.
One way to cancel this effect is to reset the voice
phases on a key re-trigger. In this way, there is
perfect sync when both oscillators have no tuning/
detuning differences. The downside is that this will
not reect the state of real analogue synthesiser
circuitry. By clicking the ZONE logo and selecting
the checkbox next to RESET OSC ON KEY
RE-TRIGGER, this action can be toggled.
WAVEFORM - Select the sub waveform by clicking
and dragging (up & down) the display or clicking
the display to reveal one of the ve oscillator types
(SINE, TRIANGLE, SAW, SQUARE, PULSE).
ON - Clicking this LED turns the sub-oscillator ON.
TRANSPOSE - Clicking on or clicking and dragging
(up & down) in this box will select the tuning of the
sub-oscillator to either -1 OCTAVE or -2 OCTAVE.
Page 15
5.
Getting to know Zone
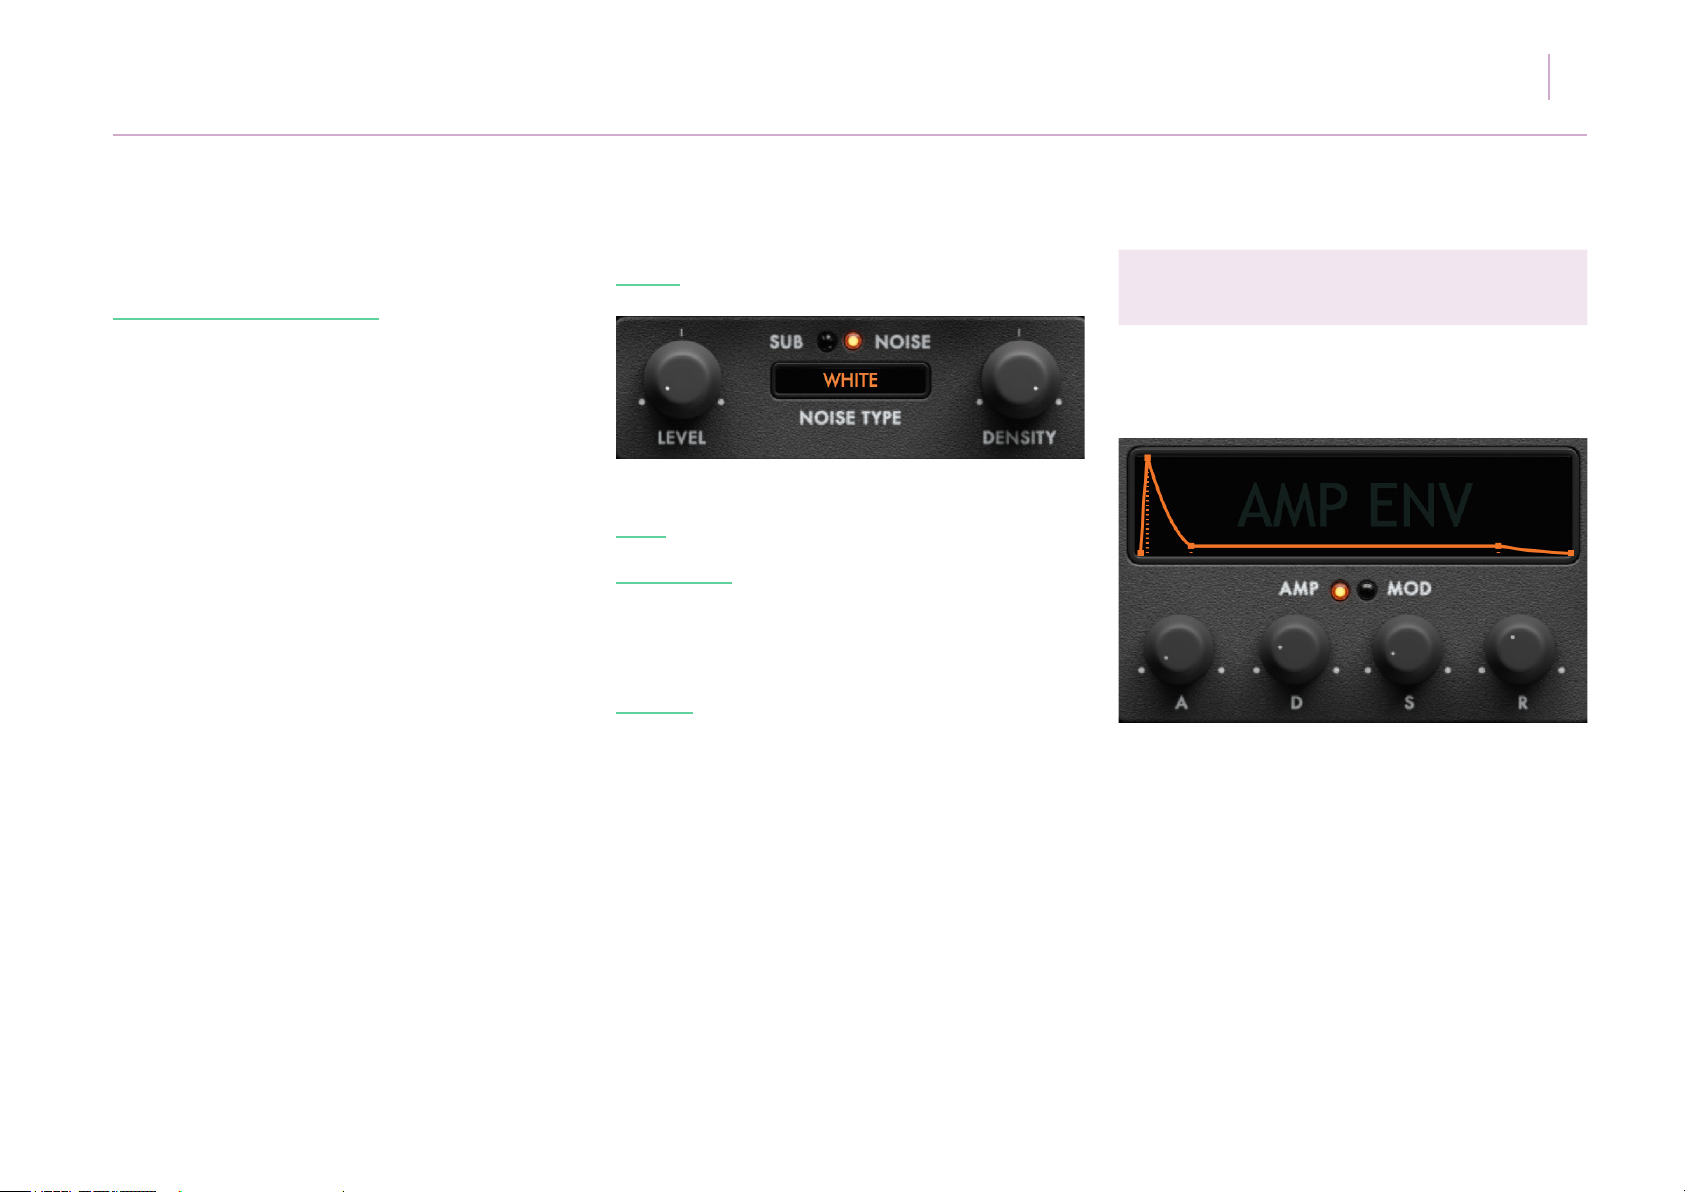
NOISE:
LEVEL - Adjusts the level of the noise generator.
NOISE TYPE* - Select the noise type by clicking
and dragging (up & down) the display or clicking
to reveal one of the four noise types (WHITE, PINK,
SHOT, VELVET).
DENSITY - Adjusts the spectral density of the noise
output.
ZONE USER MANUAL 15
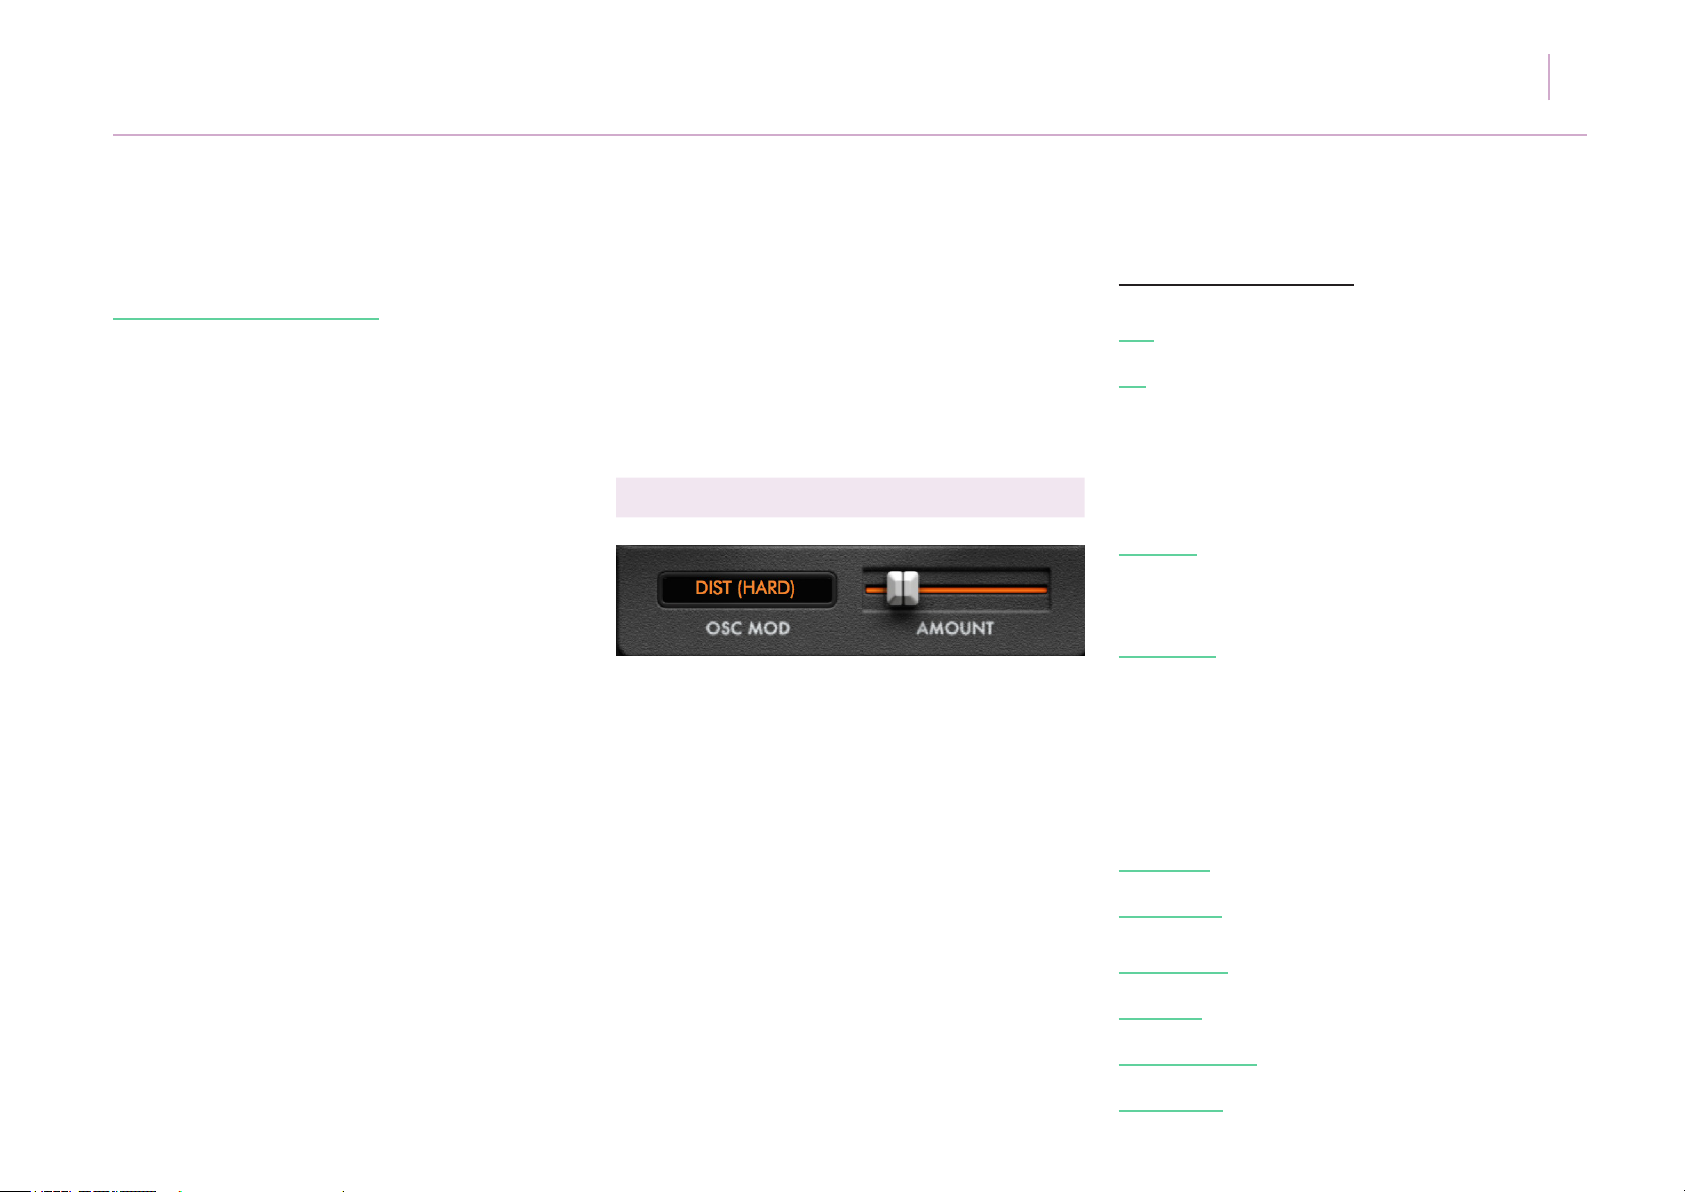
(iii) Envelope Generator (AMP ENVELOPE and
MOD ENVELOPE)
Each envelope is accessed by clicking its relative
(AMP or MOD) LED.
*Please note noise types are not adjusted
according to their relative amplitude and sonic
energy, therefore WHITE noise may be perceived
as sonically louder than the other noise types.
The ATTACK (A), DECAY (D), SUSTAIN (S) and
RELEASE (R) portions of the envelopes can be
adjusted (in ms) by clicking and dragging the
respective knobs. Please note that for shorter
ATTACK and DECAY settings, audible clicks may
occur in the audio. To eliminate these, click the A
or D knob and enter a numerical value a fraction
higher than that displayed.
The graphic display will reect the A/D/S/R
settings.
Page 16
5.
Getting to know Zone
The MOD ENVELOPE controls are adjusted by
exactly the same process as the AMP ENVELOPE
controls. Please note that MOD LIN or MOD EXP
must be selected as a MODULATION source, as
described in (g), in order for the MOD ENVELOPE
to function.
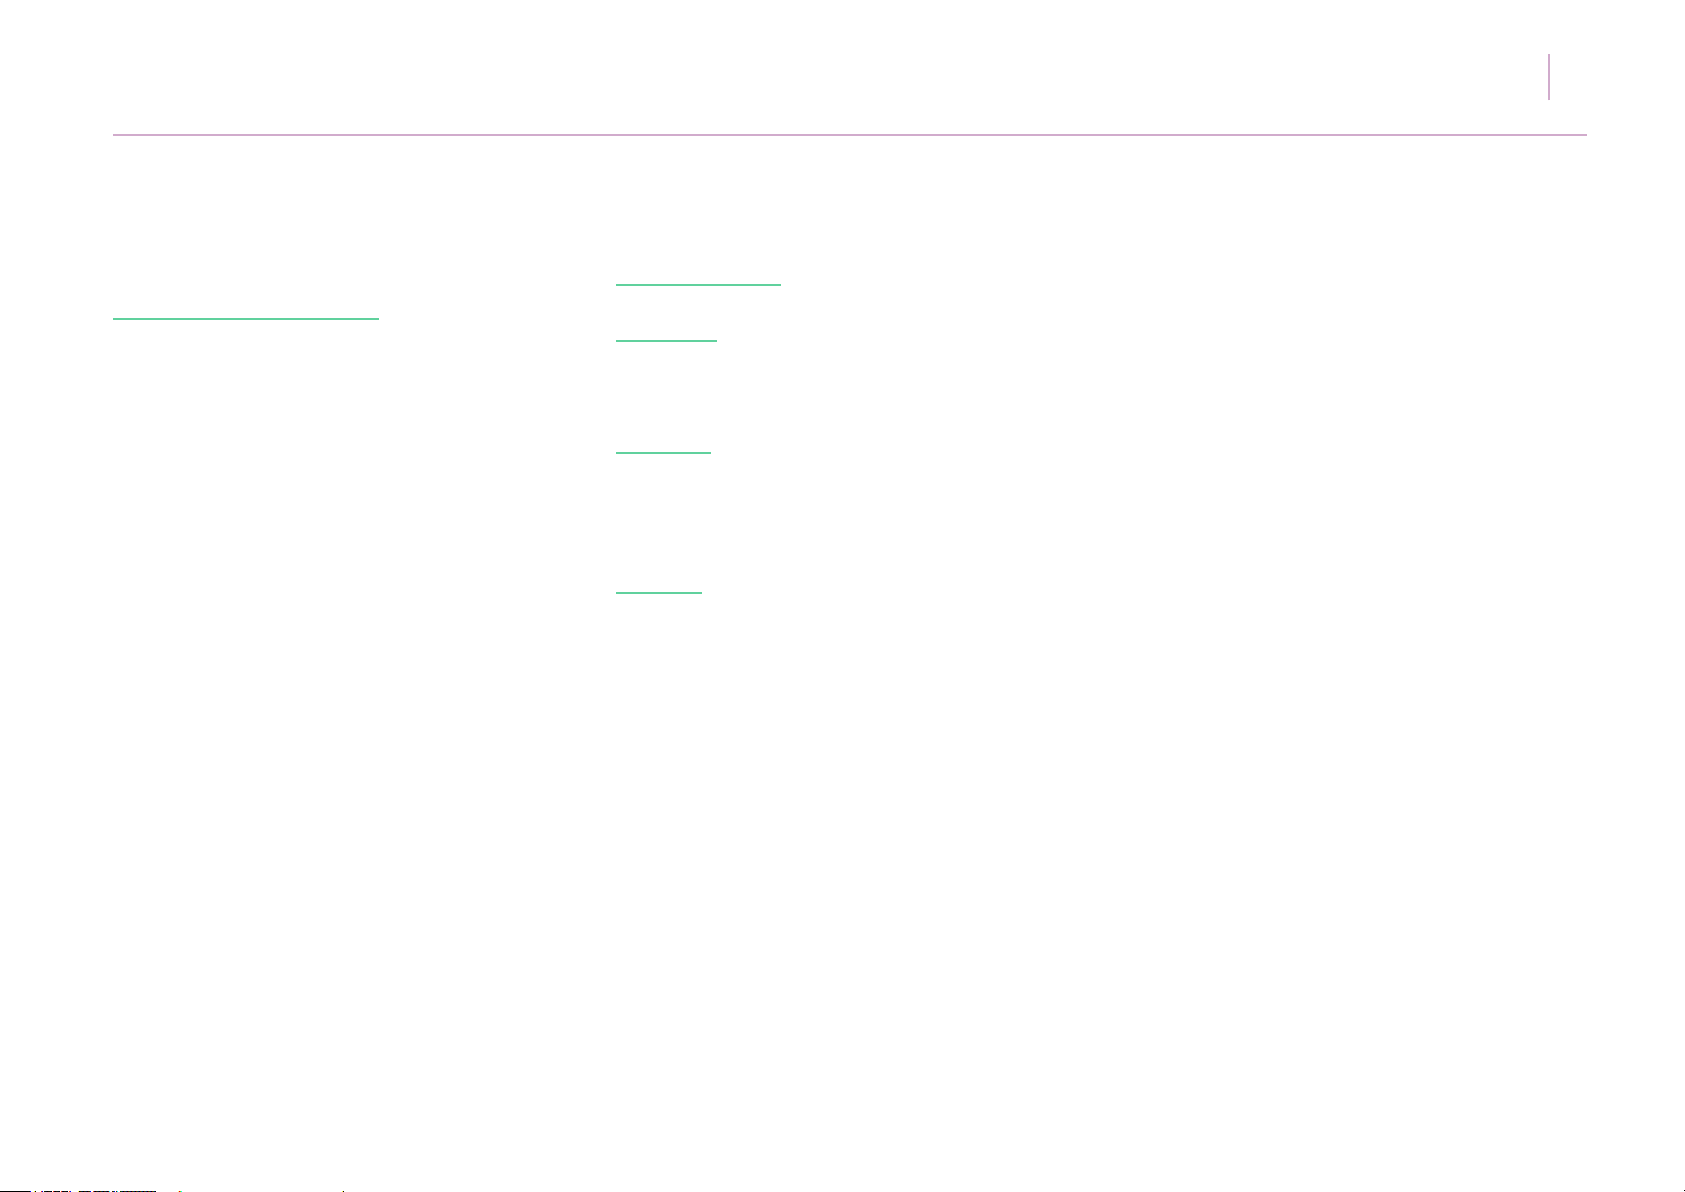
(iv) Oscillator Modulation
Key to Zone’s tone generation are its OSC MOD
modes.
These can be selected by clicking inside or click
and dragging within the OSC MOD box.
ZONE USER MANUAL 16
The modes are as follows:
OFF - No oscillator modulation will occur.
FM - Frequency Modulation, where the timbre of a
waveform is changed by modulating its frequency
with a modulator frequency that is also in the same
or similar audio range. Ideal for tonal, classic
digital synth sounds.
FM (EXP) - Exponential Frequency Modulation,
where the modulation happens at exponential
values (note frequencies).
DIST (MOD) - Both frequencies of both oscillators
are combined to produce a new wave. That
combined wave is then modulating, via
multiplication. In this process, distortion is also
added to add extra avour to it.
* AMOUNT controls the rate of the modulation
DIST (EXP) - Distortion with an exponential curve.
DIST (SOFT) - Soft clipping distortion.
DIST (HARD) - Hard clipping distortion.
DIST (TRI) - Triangular clipping distortion.
DIST (TRI-FOLD) - Triangle foldback distortion.
DIST (FOLD) - Single foldback distortion.
Page 17
5.
Getting to know Zone
ZONE USER MANUAL 17
DIST (MULTI-FOLD) - Multi-foldback distortion.
RING MOD - Ring Modulation - a form of amplitude
modulation, where only the sidebands are present
and not the original spectrum of frequencies.
AMP MOD - Amplitude Modulation, where an initial
oscillator (carrier), which is heard, is modulated by
the second oscillator (the modulator), which is not
directly heard.
AMOUNT - The amount by which OSC 2 is
modulating OSC 1. The Level of OSC 2 is
negligible since the signal is branched to OSC 1
before level control.
Page 18
5.
Getting to know Zone
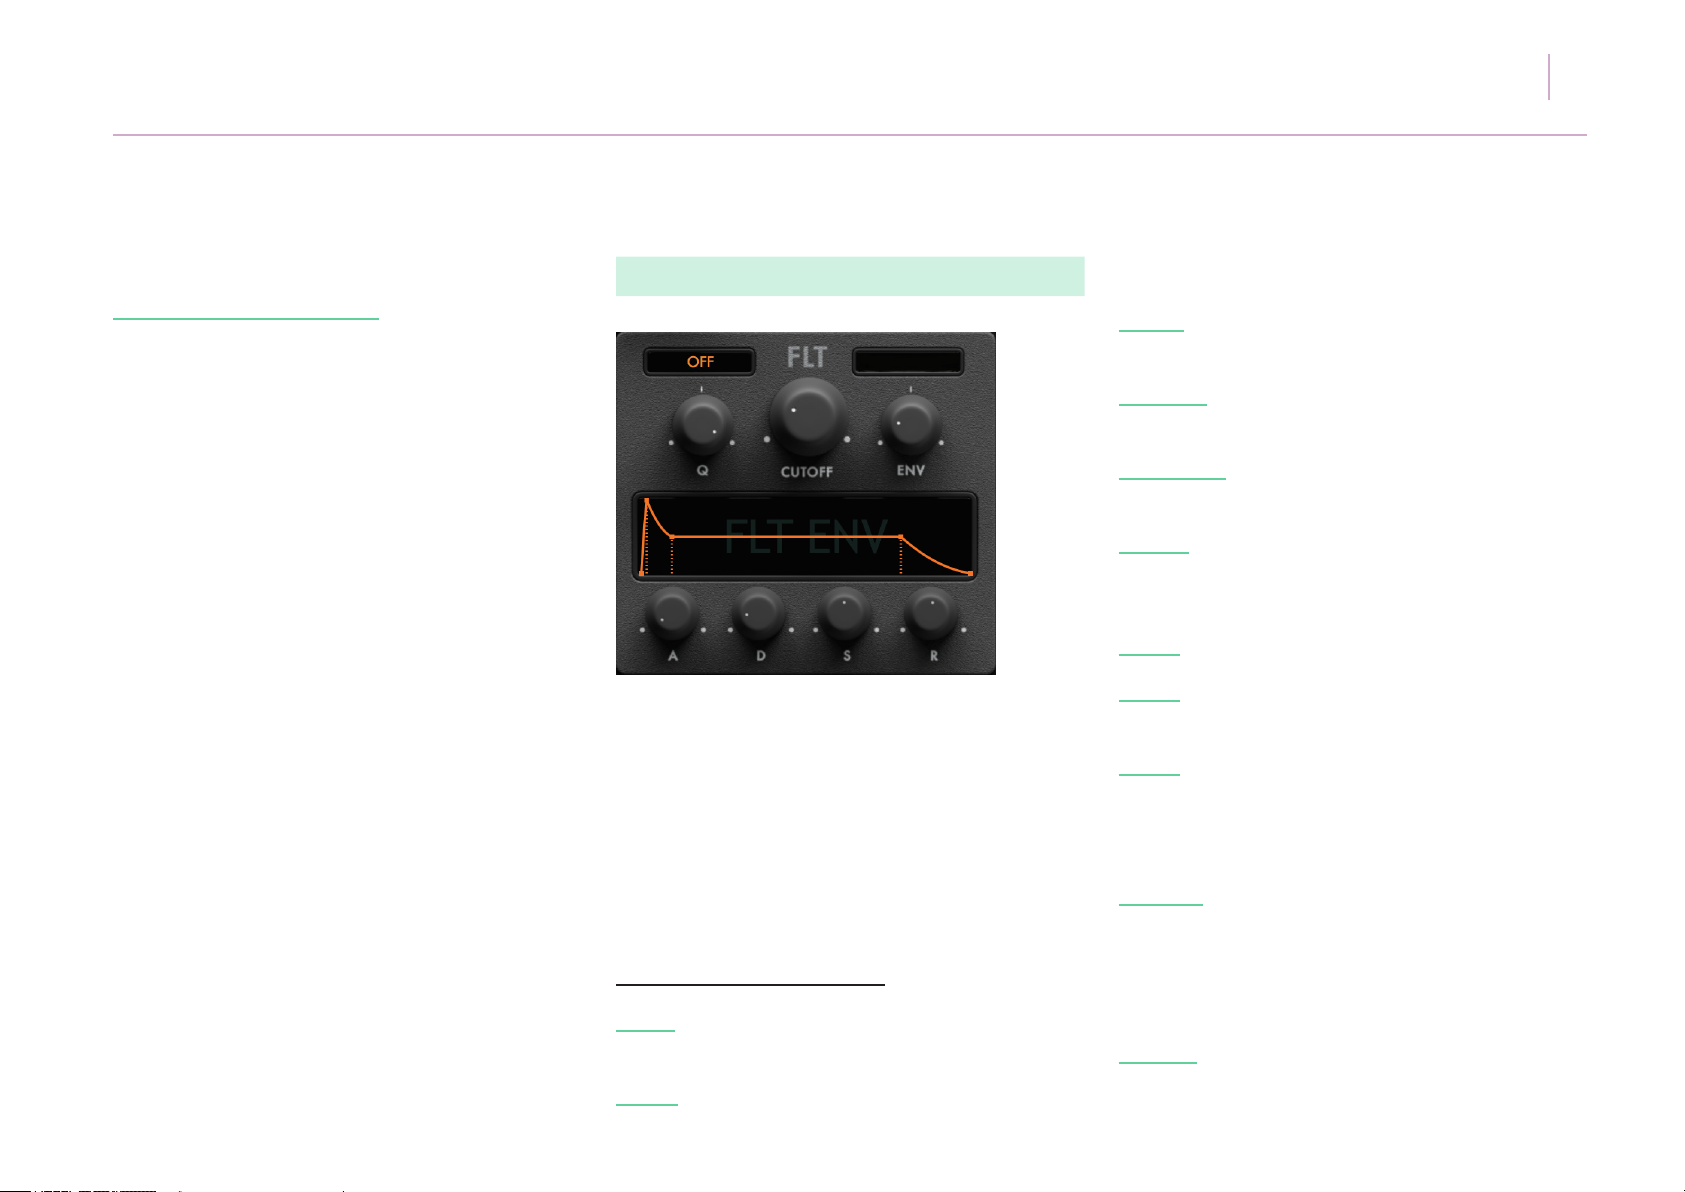
(f) Filter Section
ZONE USER MANUAL 18
with 12/24/48 dB per octave roll-off.
SVF HP - State variable High Pass Filter with
12/24/48 dB per octave roll-off.
SVF PEAK - State variable Peak Filter, peaking
at a specic frequency.
SVF NOTCH - State variable Notch Filter, (a band
stop lter with narrow stopband).
LADDER - Cascaded lter topology of 4 one pole
lters in series with a 24 dB per oct roll-off. Can
self-oscillate at maximum resonance.
TYPE 1 - Transparent, no ‘avour’.
The lter type can be cycled by click and dragging
on or clicking in the box to the top left of the
CUTOFF control.
Certain lter types have additional attributes
which are present in the box to the top right of the
CUTOFF control. These attributes range from the
sub-type of lter to its roll-off in dB per octave.
The lter types are as follows:
SVF LP - State variable Low Pass Filter
with 12/24/48 dB per octave roll-off.
SVF BP - State variable Band Pass Filter
TYPE 2 - Transistor-like distortion character, sounds
richer, more powerful and ‘fatter’.
TYPE 3 - A little more damped than TYPE 1 and
TYPE 2 but if resonance is increased gains a more
squelchy, ‘acid’ like character with a sharp
resonance peak.
SAL-K HP - 6 dB/oct - Based on the Sallen-Key
topology with a 6dB per octave roll-off.
Can self-oscillate at maximum resonance.
Similar in character to the SVF lters but with a
‘nastier’ growl.
SAL-K LP - 12 dB/oct - As above but with a 12dB
per octave roll-off.
Page 19

5.
Getting to know Zone
*Comb lters
These lters consist of the original signal with a
very short delayed version of itself added.
Opening the cutoff to the right decreases the delay
time.
ZONE USER MANUAL 19
Q - Emphasises a narrow resonant band of
frequencies around the cutoff frequency.
CUTOFF - Adjusts or sweeps the frequency in Hz
at which the signal sweeping through the system
reduces.
Dependant on the cutoff, some frequencies interfere
and cancel out each other.
The resonance determines how much of the
delayed signal is added (0 - 1).
FF COMB - The input branches to an original signal
and the delayed version. Then added to form the
output.
FB COMB - The input is added to a delayed version
of the output to form the new output. This output
branches to a delay line to form the delayed
version.
C-BENT - Circuit-bent lter, modelling a user
modied ‘mod’ producing a screaming
bit-degraded distortion effect.
PHASER - Feedback all-pass lter with varying
stages as below, producing characteristic peaks
and notches in the spectrum.
ENV - Adjusts the amount of modulation from the
lter envelope to the lter’s cutoff frequency.
A/D/S/R - Adjusts the amount (in seconds) of
attack, decay, sustain or release as follows:
A - The attack time of the envelope. The higher the
setting, the slower the attack time and the longer it
takes for the lter to open from the level set with the
lter cutoff knob to the level set by the lter
envelope amount.
D - The decay time of the envelope. After a sound
reaches the lter frequency set at its attack stage,
decay controls how quickly the lter then transitions
to the cutoff frequency set with the sustain knob.
The higher the setting, the longer the decay.
S - The lter cutoff frequency for the sustained
portion of the sound. The sound will stay at this
lter frequency for as long as a note is held on the
keyboard.
4 STAGE - 4 stage lter
6 STAGE - 6 stage lter
8 STAGE - 8 stage lter
R - The release time of the envelope. This controls
how quickly the lter closes after a note is released.
Page 20
5.
Getting to know Zone
(g) LFO Section
ZONE USER MANUAL 20
The shapes are as follows:
Basic shapes:
SINE, TRIANGLE, SAW, SQUARE, PULSE,
TRAPEZOID.
Advanced shapes:
NOTCH - A constant output waveform with
a narrow triangular dip once per cycle.
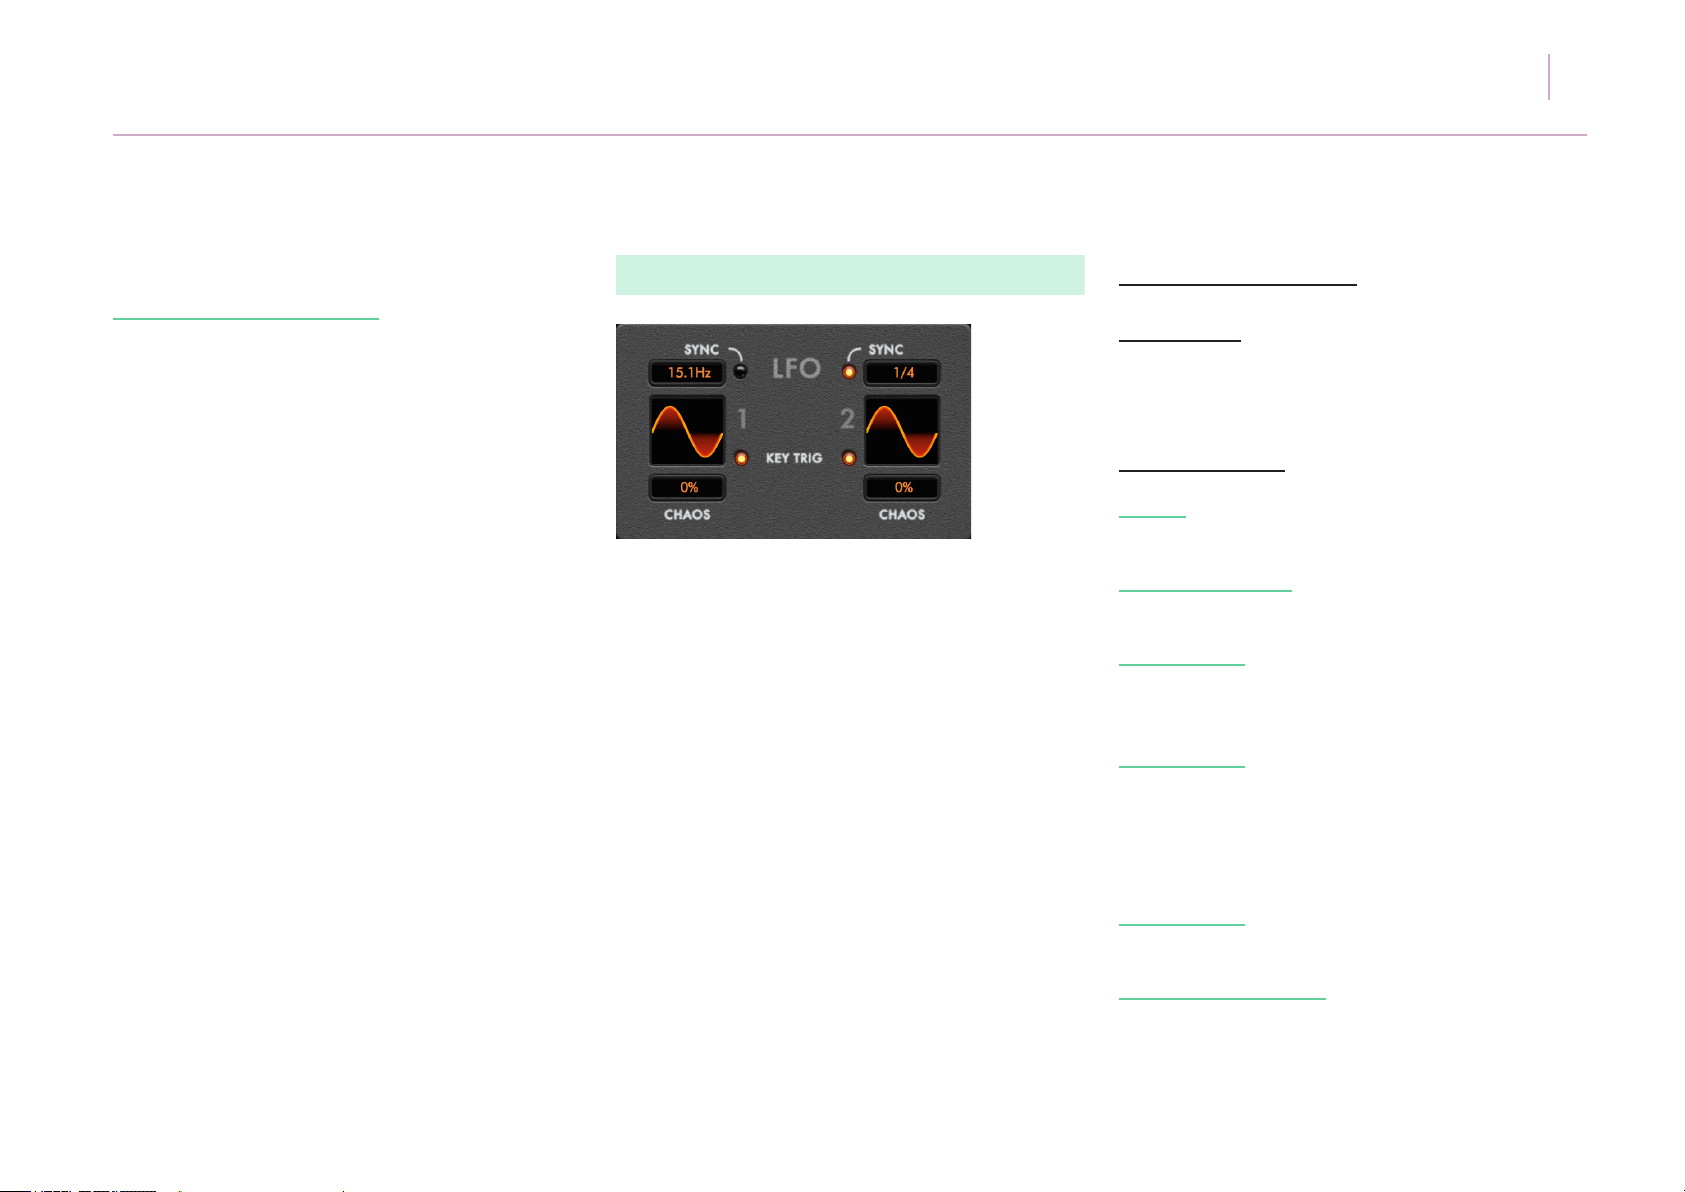
Zone has two dedicated LFOs both with identical
functionality.
When the SYNC LED is clicked it will illuminate
and the LFOs will synchronise with the master
tempo, running at 27 different speed increments precisely the same increments as the parameter
and note sequencer. At their slowest speed the
LFOs will run at (8) bars or an eighth of the DAW
synced / master tempo. At their fastest they will
run at (1/128), or 128 times the tempo.
When the SYNC LED is not illuminated, the LFOs
will run at a free rate, displayed in Hertz (Hz).
This range is from 0.1 to 100Hz.
The LFO wave shapes can be selected by clicking
on the waveform display and choosing from the
drop down menu.
BROKEN TRIANGLE - Produces an ‘M’ shaped
waveform.
BROKEN SAW - The rst half of the saw waveform
is offset slightly upwards, with the second half
period shifted slightly downward.
STAIRCASE 3x - This waveform consists of 3 small
step changes in level, hence the term staircase.
The height of each step will be made constant as is
the period of time over which the waveform resides
at a given level.
STAIRCASE 4x - As above but with 4 small step
changes.
S&H (SAMPLE & HOLD) - Produces a randomly
generated value and holds it constant for the
duration of the cycle.
Page 21
5.
Getting to know Zone
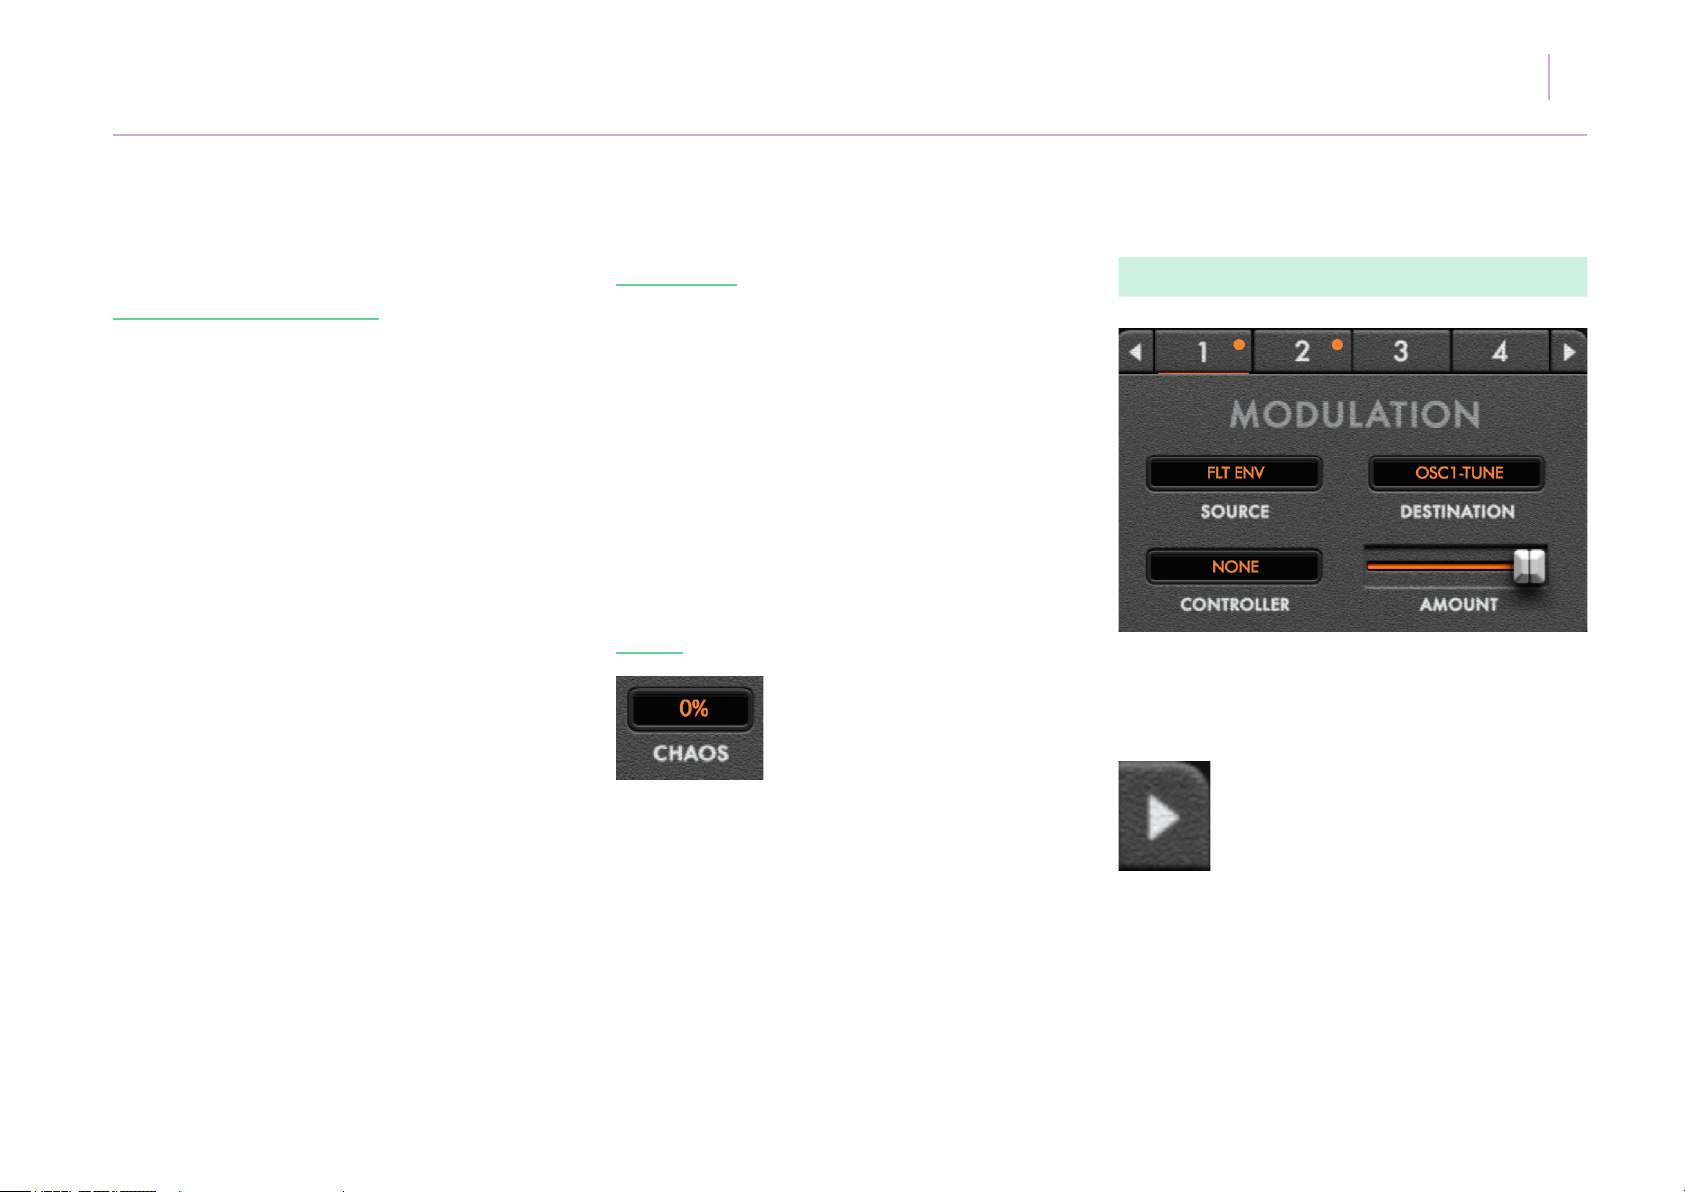
KEY TRIG LED
Clicking the KEY TRIG LED will synchronise the LFO
function re-starting with each key press.
When KEY TRIG is on, clicking and dragging up/
down in the waveform display adjusts its phase
offset position to vary the start position of the
waveform, creating unique variations on its original
shape.
Using the key modier [alt and click] returns the
waveform to its default position.
CHAOS
ZONE USER MANUAL 21
(h) Modulation Matrix
The LFO CHAOS amount is displayed in %.
Clicking and dragging this value adjusts the
amount of random variations in the wave shape
amplitude with each cycle of the LFO. When the
S&H waveform is selected, the value adjusts the
probability of the next step not being a new value
but a retained previous value, thus extending the
time length to an extra cycle. When set at 100%
the S&H waveform will effectively ‘freeze’ at the
last generated value perpetually until the amount
is decreased.
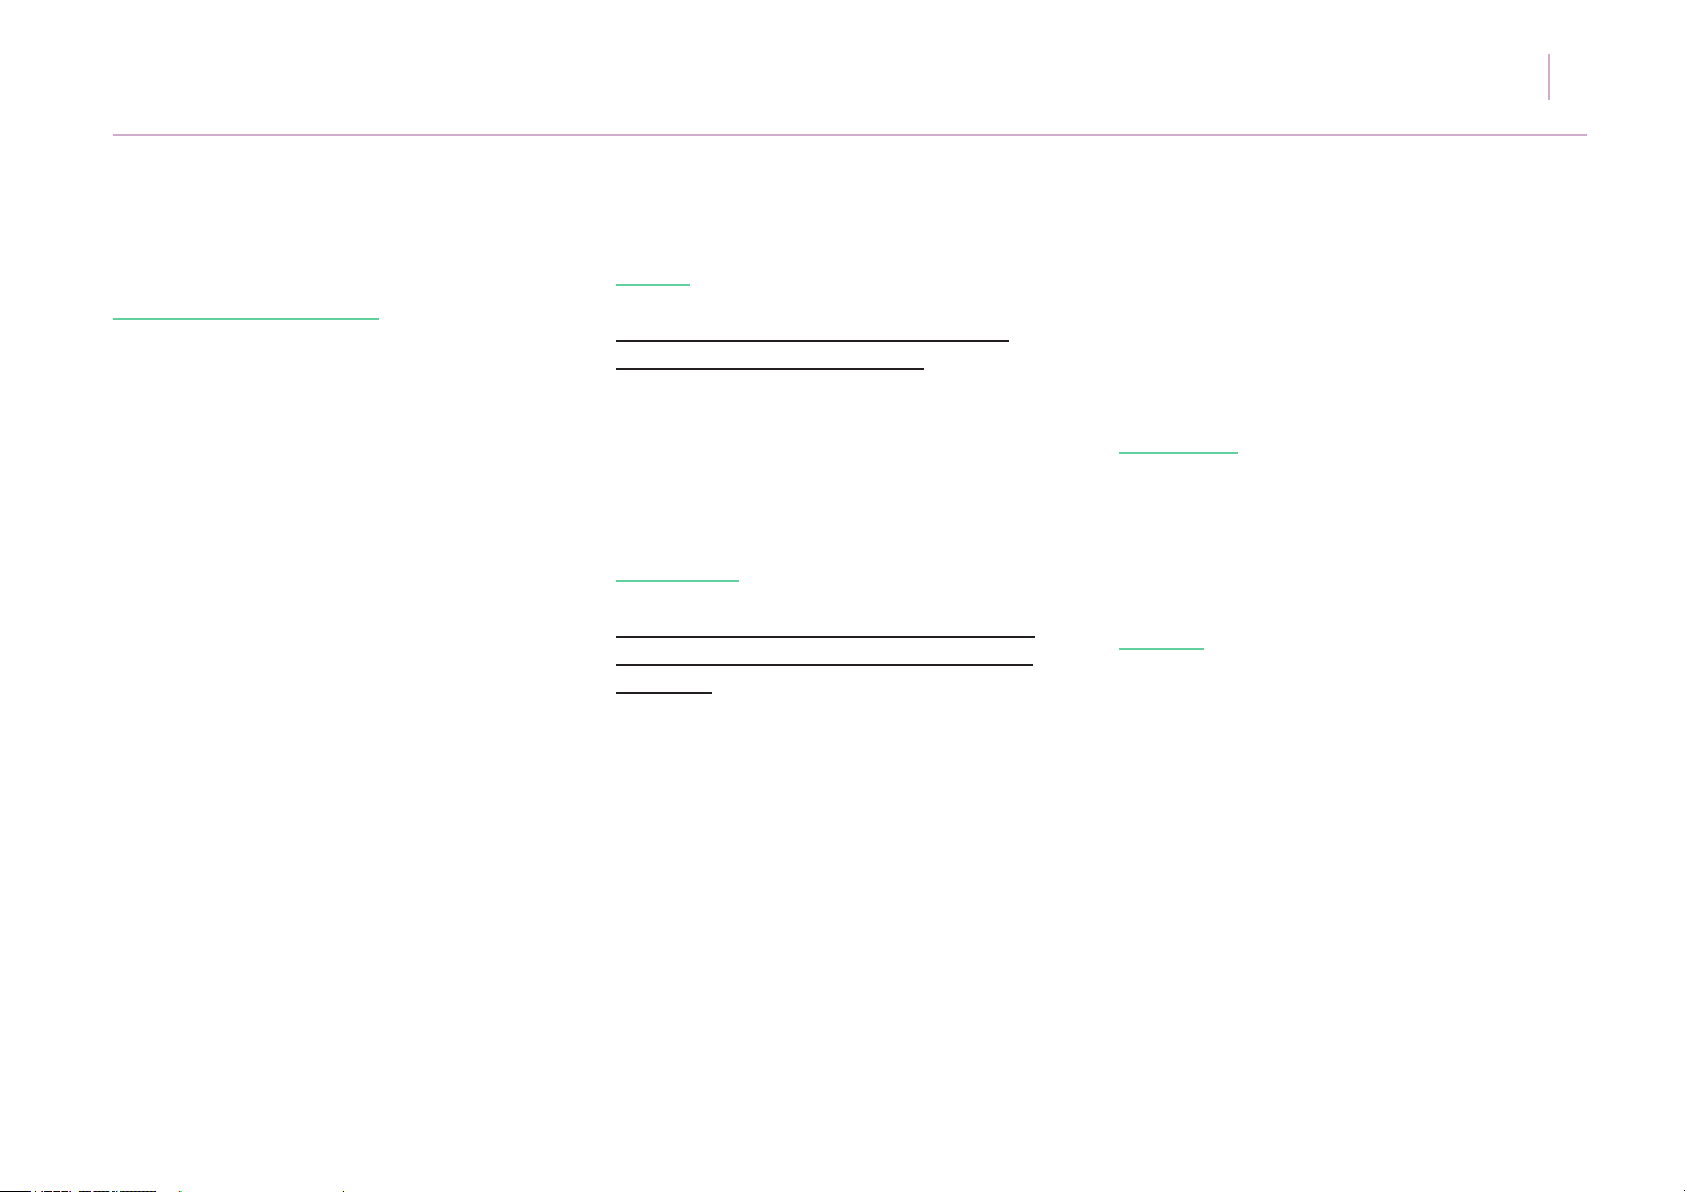
Zone allows up to eight different modulation
matrices to be assigned and routed simultaneously.
Clicking on a tab lights it underneath, selecting it.
Clicking the left and right cursor arrows toggles
between matrices 1 to 4 and 5 to 8.
Page 22
5.
Getting to know Zone
SOURCE
Clicking in the MODULATION SOURCE tab
selects from the following sources:
LFO 1, LFO 2, AMP ENV, (Amplitude Envelope),
FLT ENV (Filter Envelope), MOD LIN (Linear Mod
Envelope) MOD EXP (Exponential Mod Envelope),
KEY, (Key position) VELOCITY, (Key velocity levelled
from 0 -127) RANDOM (Random assignment).
DESTINATION
ZONE USER MANUAL 22
1 targeted at OSC 1 Tune. Mod 2 has LFO 2
targeted at OSC1 Tune at different Rate. Mod 1
cancels out Mod 2 and is the only modulation
applied to OSC 1 Tune instead of both Mods
being applied.
CONTROLLER
Clicking or click and dragging in the
CONTROLLER box sets the MIDI CC assignment
number (from 0 -127) whose behaviour controls
the MODULATION matrix.
Clicking in the DESTINATION* box selects the
function to be controlled by the sources above
as follows:
OSC 1 SHAPE, OSC 1 SYNC (Sync amount),
OSC 1 TUNE (Coarse tuning), OSC 1 FINE (Fine
tuning), OSC 1 LEVEL, OSC 1 PAN, SUB LVL (Sub
Oscillator level), OSC 2 SHAPE, OSC 2 SYNC
(Sync amount), OSC 2 TUNE (Coarse tuning), OSC
2 FINE (Fine tuning), OSC 2 LEVEL, OSC 2 PAN,
OSC MOD AMNT (Oscillator Modulation amount),
NOISE LVL, NOISE DENSITY, FILTER CUTOFF,
FILTER Q, FILTER DEPTH. *If there are 2 Mod
Matrices with the same DESTINATION, the Matrix
with the lower number will take exclusive control
over that destination. For example, Mod 1 has LFO
AMOUNT
Dragging the AMOUNT slider adjusts the degree
to which the SOURCE controls the DESTINATION
both positively (to the right) and negatively (to the
left), effectively inverting the LFO position if that is
selected as the SOURCE.
Page 23
5.
Getting to know Zone
(i) Sequencer Grid
INTRODUCTION
ZONE USER MANUAL 23
lanes can be assigned with a vertical scrollbar to
navigate them up or down. Each lane can run at
its own unique rate and number of steps with a
maximum of 32 steps per lane. Depending on
the state of the parameter assigned, Zone will
automatically assign either a unipolar or bipolar
lane. For example Tuning would be a unipolar
lane, where Filter Cutoff would be a bipolar lane.
Once a lane assignment has been made, the lane
data will override manual operation of that control.
So for example if Filter Cutoff is assigned to a lane,
the Cutoff knob cannot be manually tweaked or
otherwise automated in your host DAW. Please be
aware of this, if for example a control may appear
unresponsive - always check it hasn’t been
assigned to the grid!
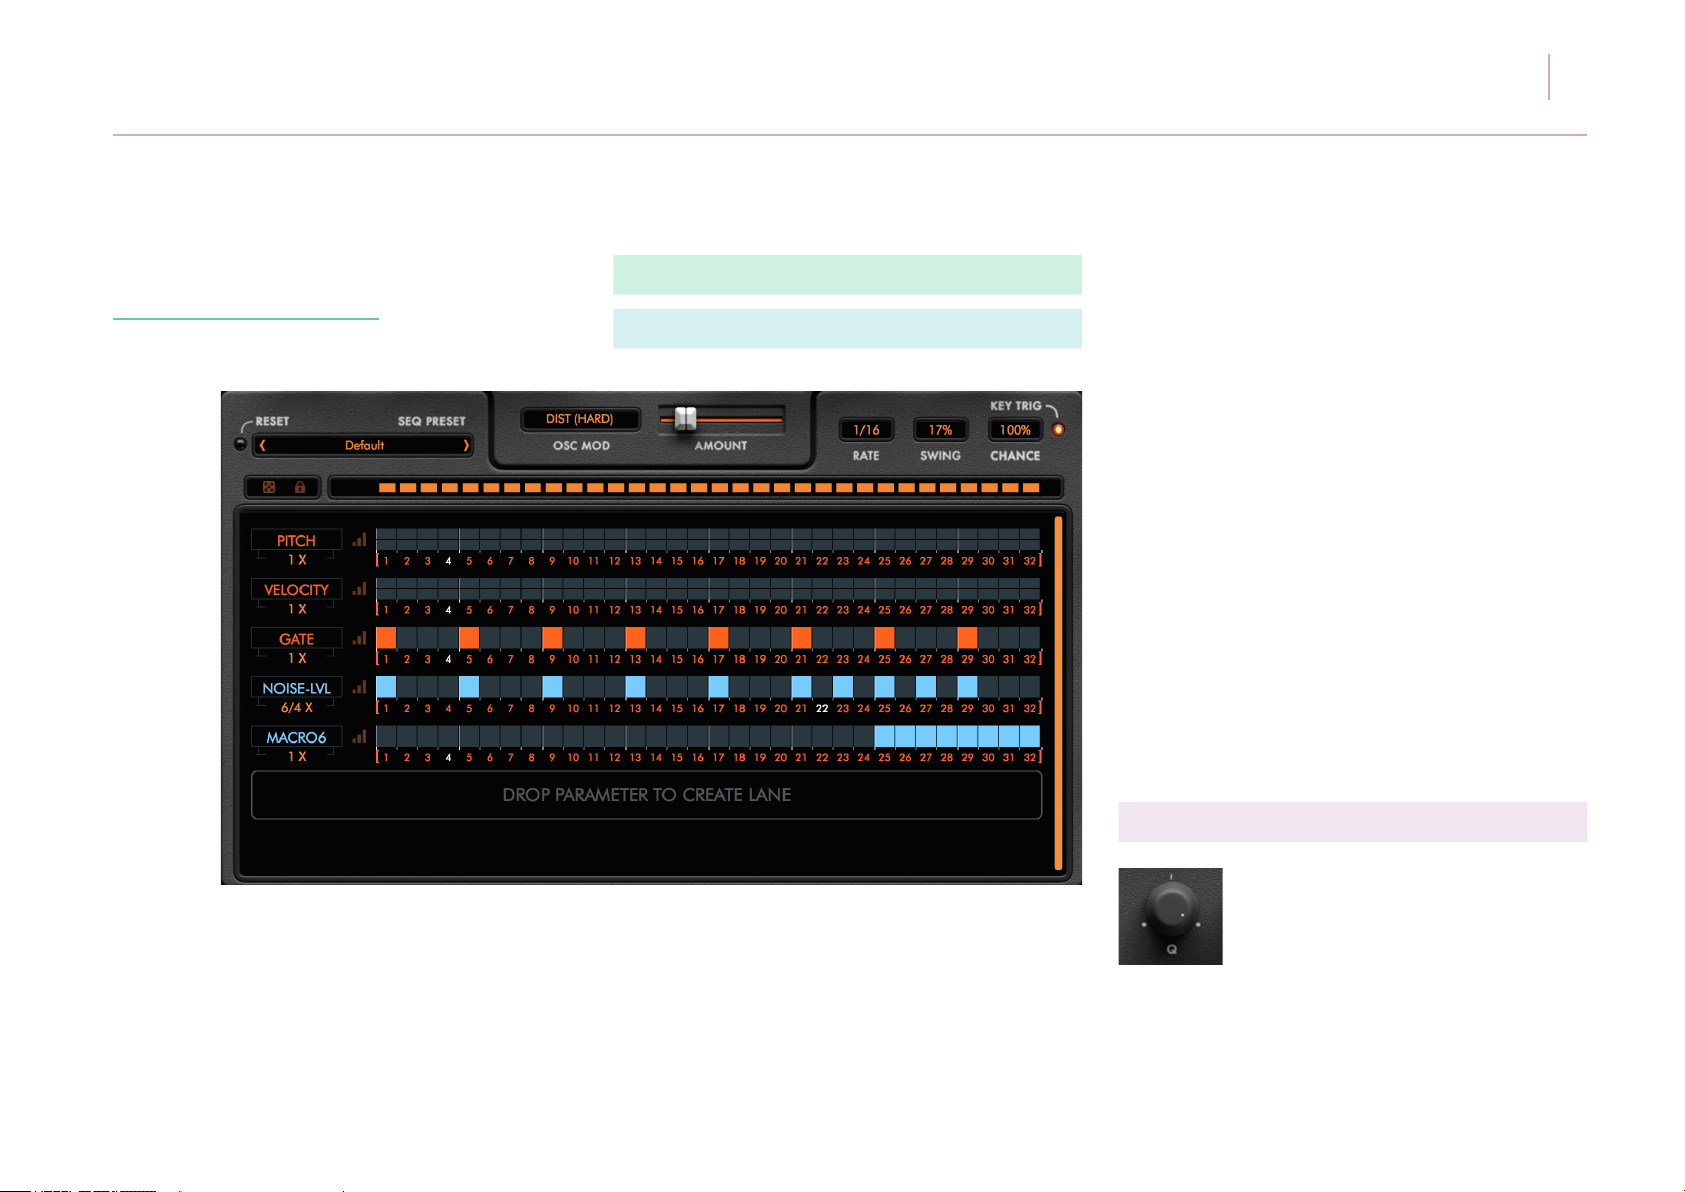
Key to Zone’s operation is its unique parameter
sequencer grid. Almost every synth control can
be dragged and dropped into its own sequencer
lane and edited by writing lane data into that lane.
The number of sequence lanes is limited only by
CPU performance. In theory an innite number of
(i) Assigning A Control
Clicking on a control label name will bring up a
‘hand’ icon and a blue box appears around that
label. This marks the control ready for click and
drag assignment into a new sequencer lane.
Page 24
5.
Getting to know Zone
If a blue box does not appear around a label, that
control is not assignable. There are only a few rare
exceptions where a control cannot be assigned.
Even controls such as Transpose can be sequenced.
The assignment parameter is then displayed in the
lane text eld in blue.
ZONE USER MANUAL 24
Upon selection of NOTE mode, three lanes will
appear, labelled as PITCH, VELOCITY and GATE.
A series of orange numbers across the bottom of
the lane display the number of sequence steps.
A ‘playhead’ denotes the current step playback
position by colouring it white.
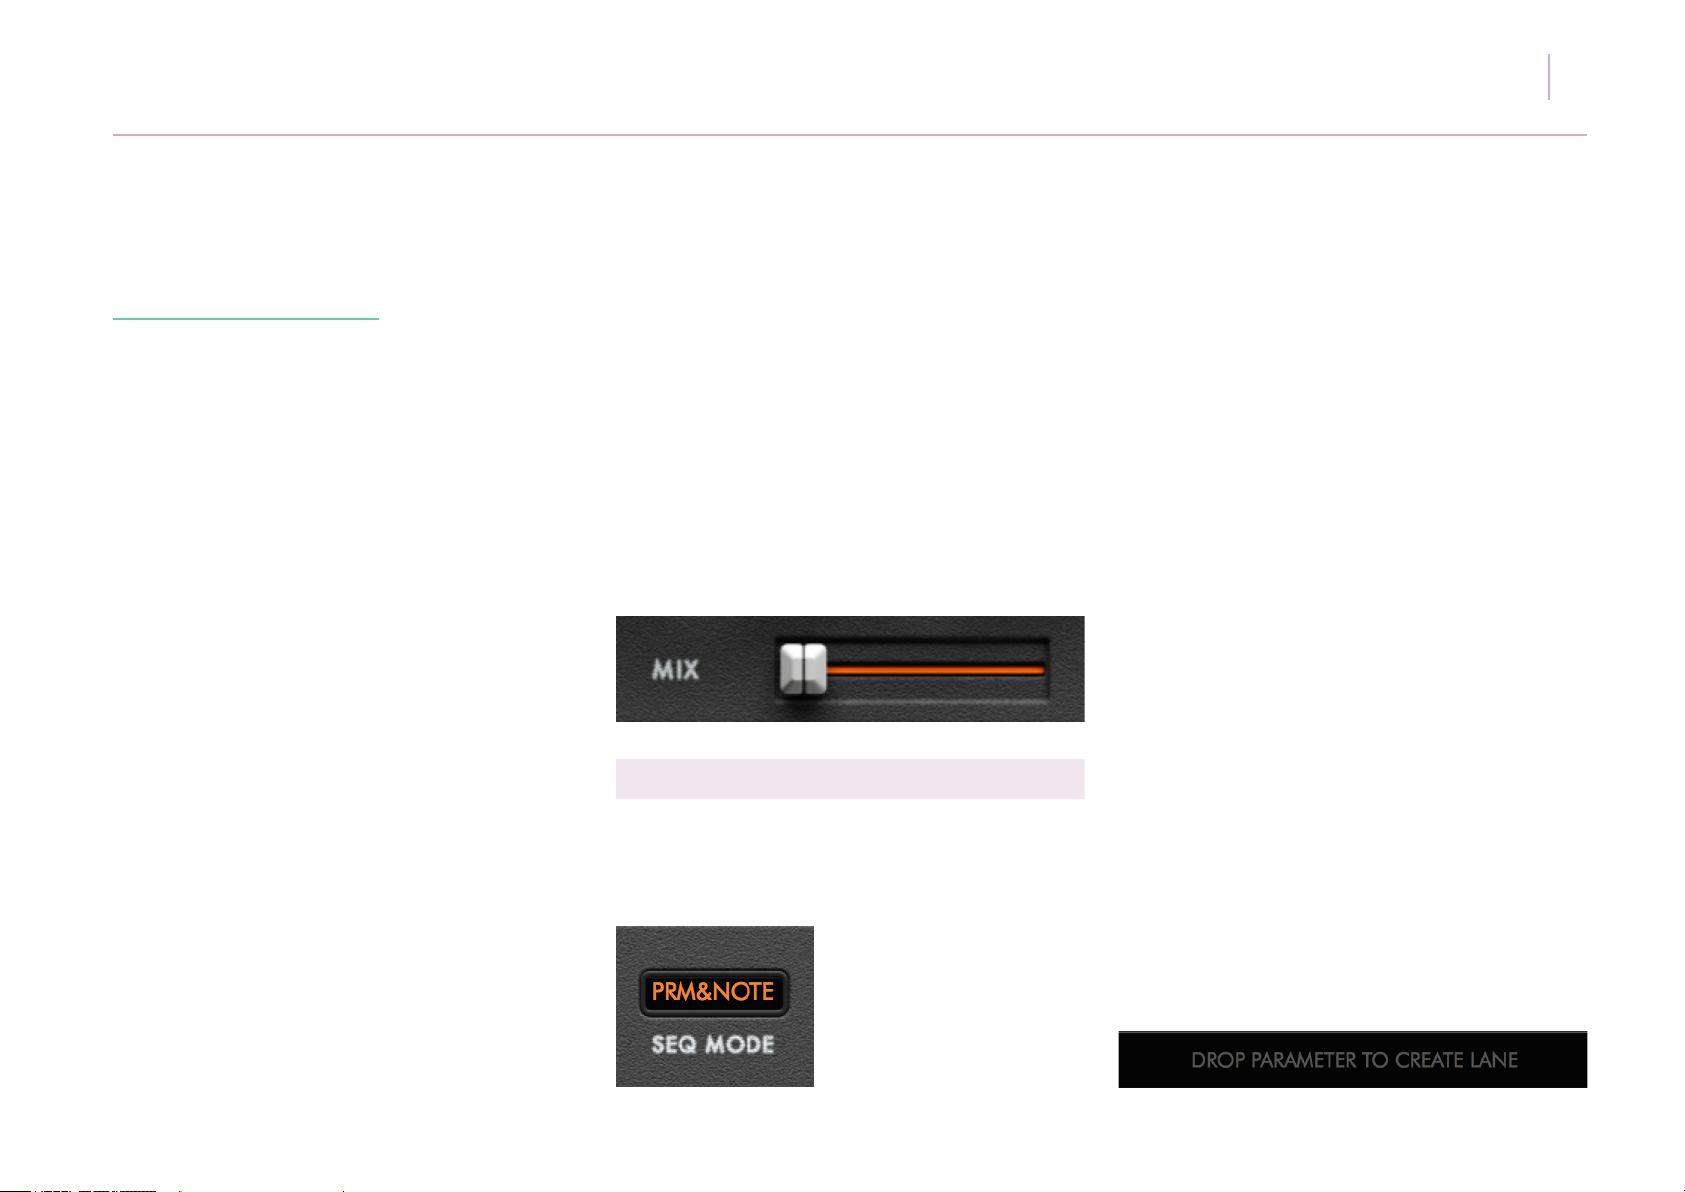
Knob, slider or fader positions do not move in
response to lane data. To do so would cause
unnecessary CPU load. Zone will instead show a
white rectangular box around an assigned control
label name as shown overleaf:
(ii) Mode Selection
Arming or assigning the note sequencer
requires SEQ MODE to be set to PARAM, NOTE
or PRM&NOTE mode.
Upon selection of PARAM mode, four empty lanes
will appear ready for assignment. While the source
assignment box is empty, the lane data will be
defaulted to rise to a crescendo* and will display
in blue.
*This action can be toggled on/off by clicking
the Zone logo in the top left of the GUI and
de-selecting the check box DEFAULT PARAMETER
LANE RAMP. When the checkbox is empty, new
parameter lane assignments will display no preset
lane data.
Upon selection of PRM&NOTE mode, both
parameter and note lanes as described above
will appear, with note data displayed in orange.
A new lane can also be assigned irrespective of
playback mode if a control label is dragged into
an empty lane slot as illustrated below
Page 25
5.
Getting to know Zone
(iii) Global Lane
ZONE USER MANUAL 25
Clicking the lock icon will retain all lane data and
parameter assignments irrespective of the preset
selected, so the synthesiser section will change but
not the sequencer grid.
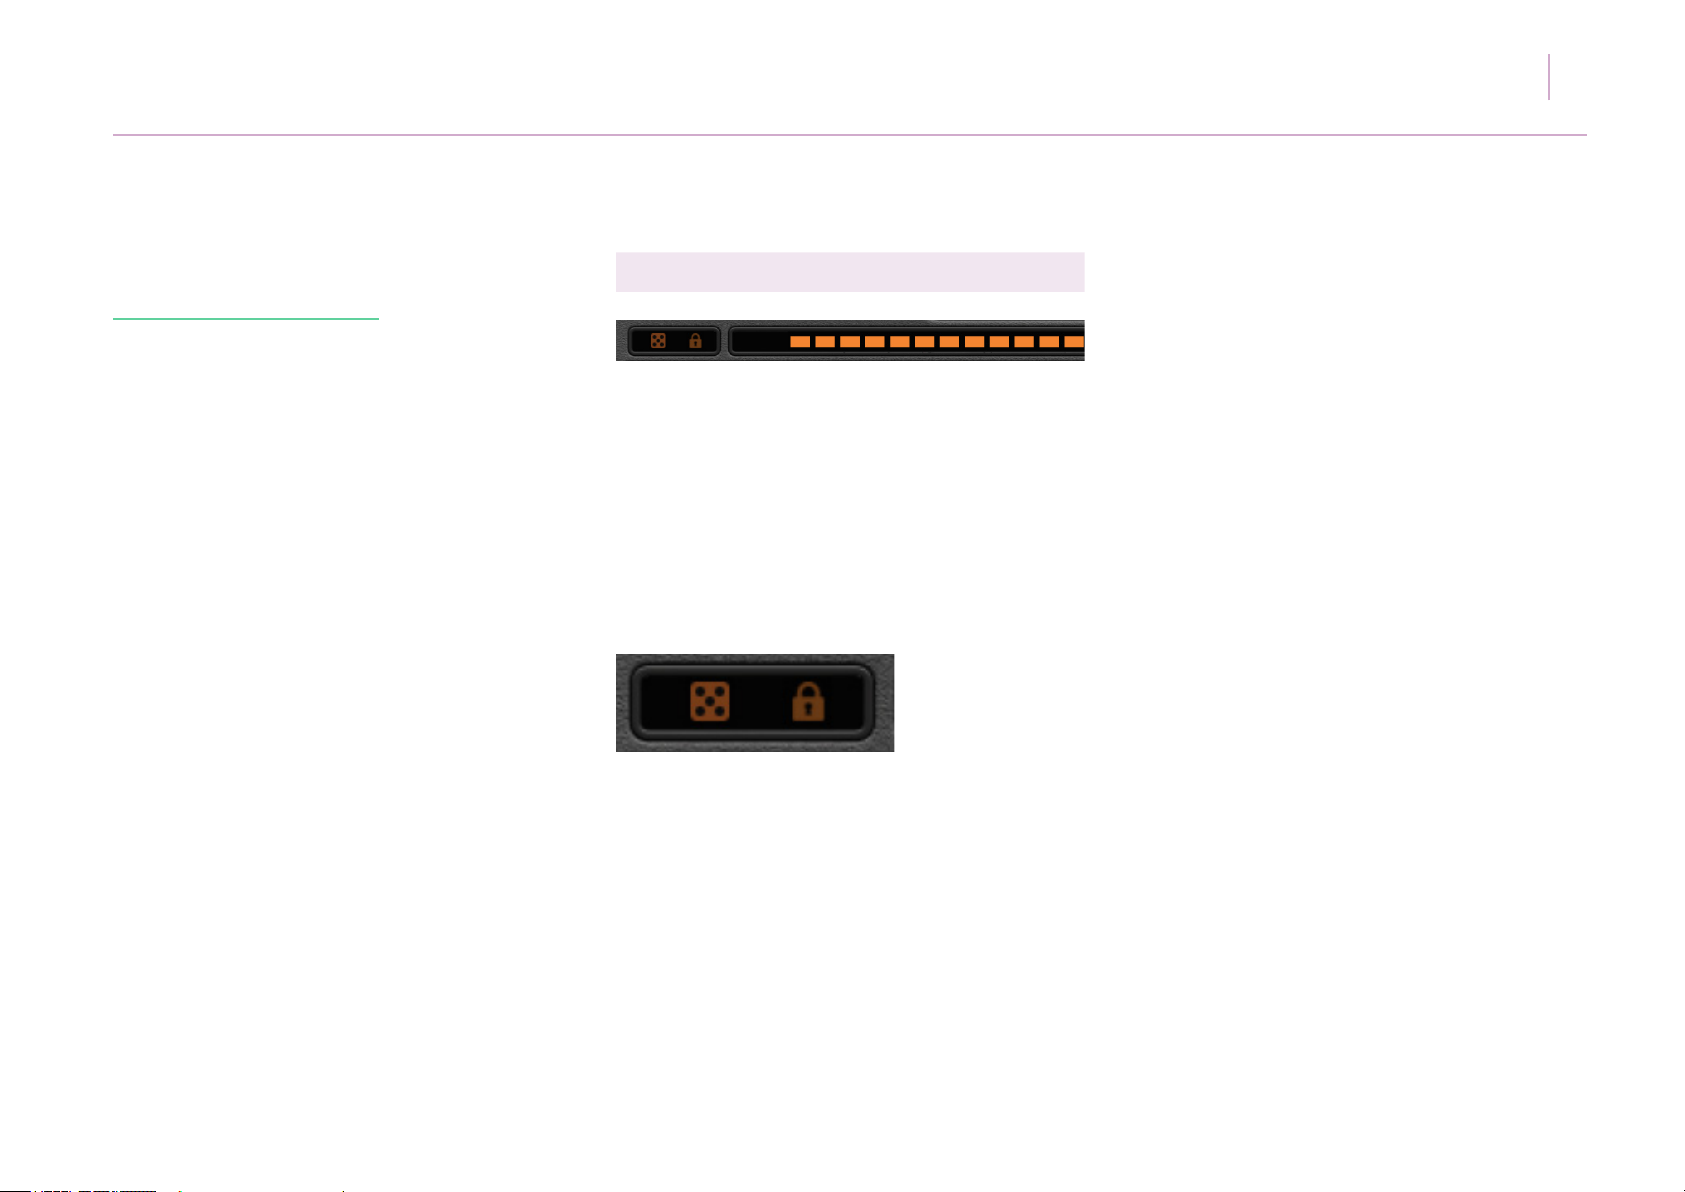
The global lane menu sits at the top of the
sequencer grid. Here individual sequence steps can
be muted and un-muted by clicking to illuminate or
disarm them.
Clicking the dice icon next to the global lane steps
will randomise all lane data in every lane on each
click of the icon.
[cmd] clicking on any of the steps will randomise
all values. *CTRL and click for PC users.
[alt] clicking on any of the steps will default them
to a fully illuminated state.
Page 26
5.
Getting to know Zone
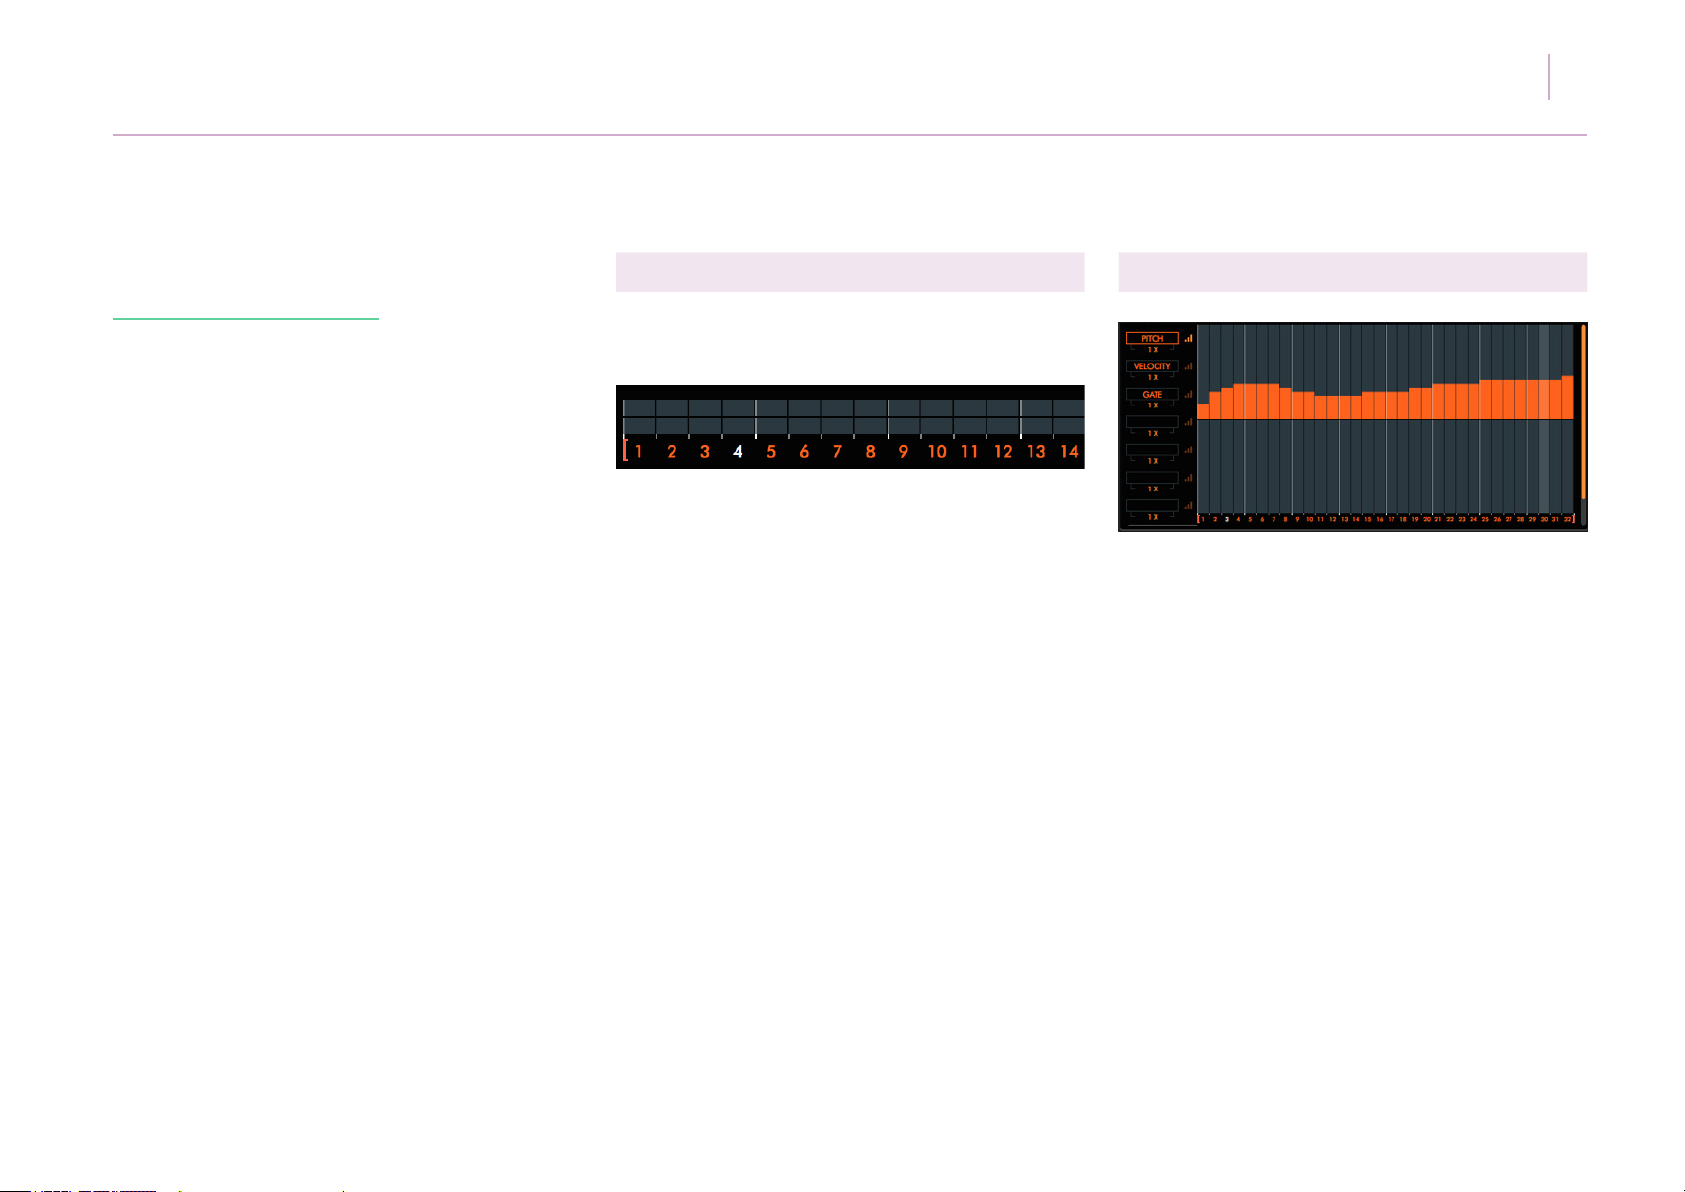
(iv) Note And Parameter Lanes
Note and parameter lanes display sequence
numbers at the bottom.
There are square brackets to either side of the
numbers, which when hovered over will display an
arrow icon. Each bracket can then be adjusted left
or right to select the number of sequence steps that
lane will play across. The sequence numbers that
fall outside the brackets will grey out. Note lane
steps are linked, where parameter lanes can each
be assigned a unique set of left and right markers.
Clicking the numbers will grey them out rendering
them inactive in sequence playback.*
ZONE USER MANUAL 26
(v) Writing Lane Data
Lane data can be written by clicking or click and
dragging anywhere within a lane on either of its
axes (if a unipolar lane), whether zoomed or not.
Right clicking in a lane will introduce a linear write
tool, enabling upward and downward fades.
Lane data is written in 0.1 to 100.0 % increments.
*This action can be toggled on/off by clicking
the Zone logo in the top left of the GUI and
de-selecting the check box CLICK STEP NUMBERS
MUTES STEPS
Where coarse pitch data is present for example
in a note sequencer lane, data moves in semitone
increments.
[cmd and] clicking in a lane will randomise its
values (within both axes if unipolar).
[alt and] clicking in a lane will clear it.
*CTRL and click on PC
Page 27
5.
Getting to know Zone
(vi) Lane Tools
To the left of the note and parameter lanes are lane
tools. Clicking on any of these icons will select that
lane. They function as follows:
ZONE USER MANUAL 27
Options Icon: Clicking this will bring up the Lane
Options menu with the following options:
ASSIGN PARAMETER - Assign any parameter to a
parameter lane from a list.
Zoom Icon: Clicking this icon zooms into the lane,
enabling it to utilise the full size of the sequencer
window. This is ideal for ne editing.
[cmd and] clicking this icon will randomise the lane
preset. *CTRL and click for PC users.
[alt and] clicking this icon will clear the lane data.
[shift] clicking this icon will advance through
available lane presets sequentially.
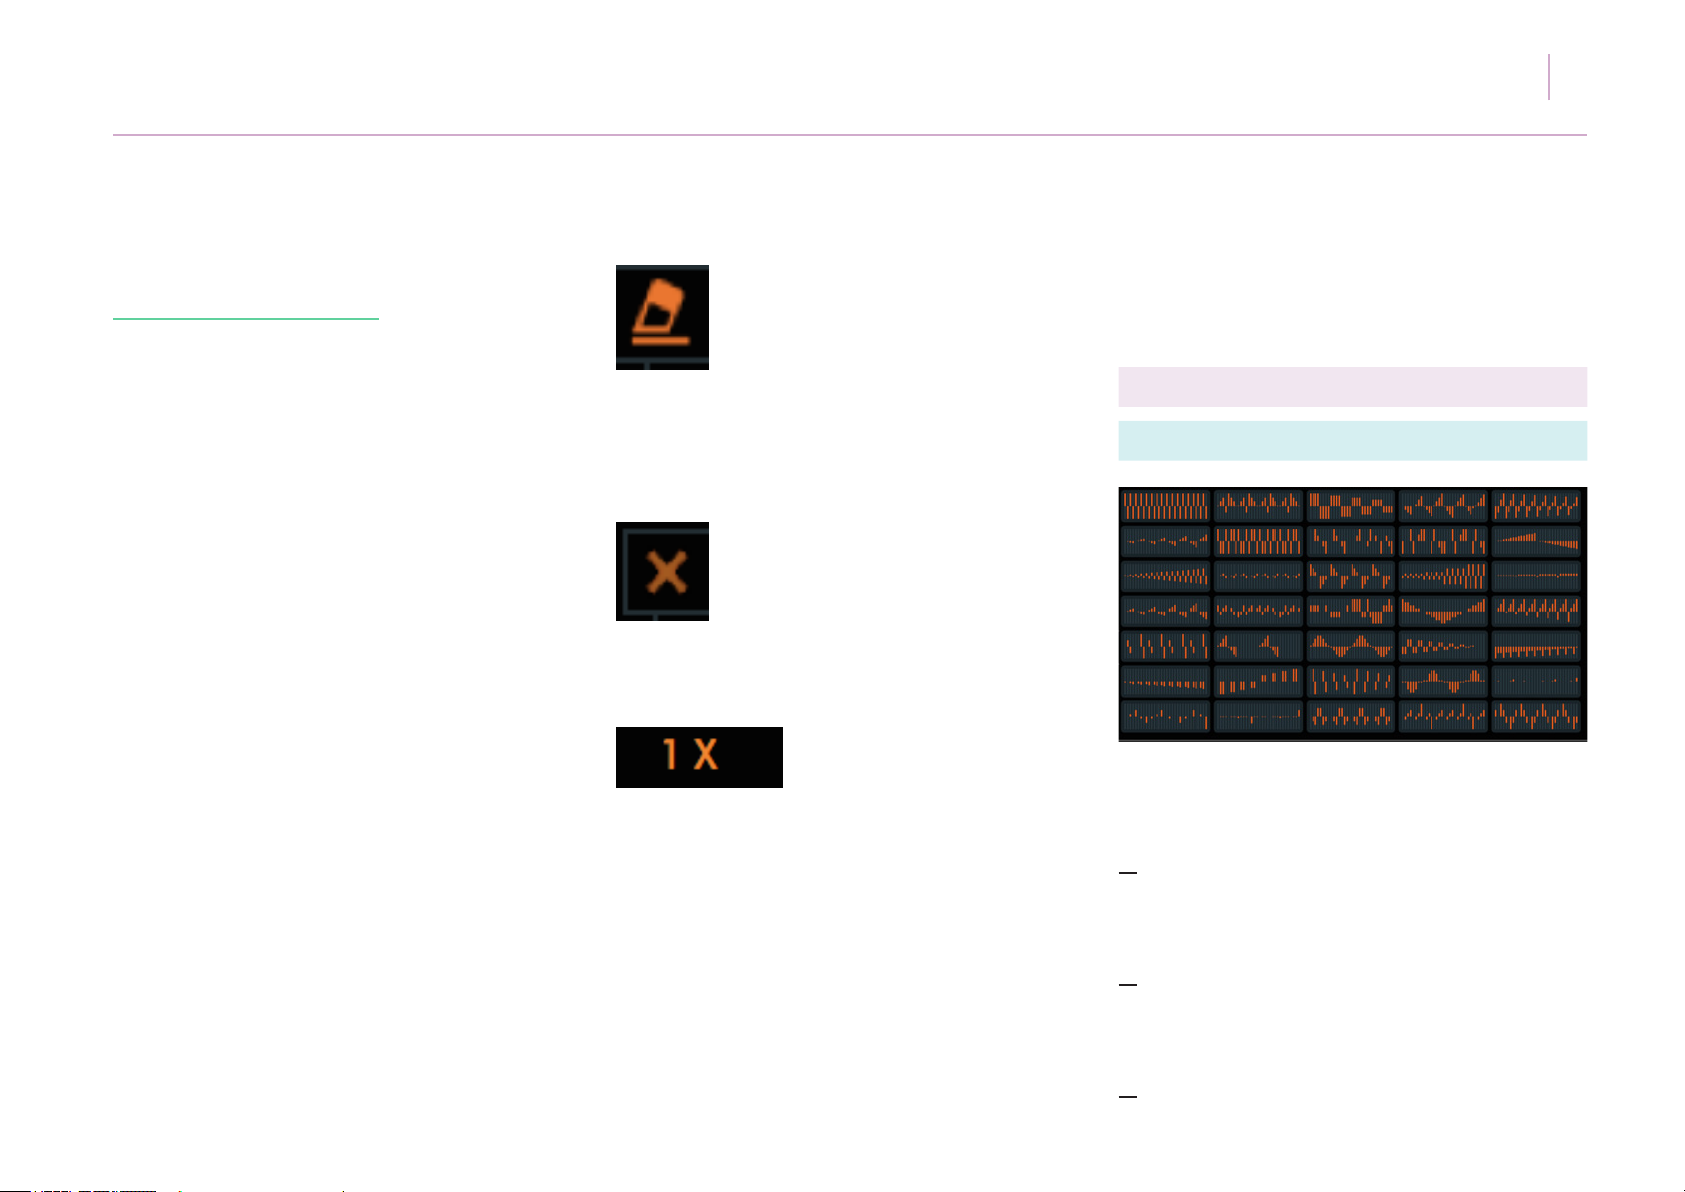
Lane Preset Icon: Will allow selection of any of 35
unique unipolar and 35 bipolar lane presets. There
is a basic graphic representation of each lane.
These are described in detail in (vii) LANE PRESET
LIST.
UN-ASSIGN PARAMETER - Un-assign any parameter
from a parameter lane.
COPY - Copy lane data.
PASTE - Paste lane data.
RANDOMISE - Randomise individual lane data with
each click.
FLIP HORIZONTALLY - Rotate lane data horizontally.
FLIP VERTICALLY - Flip lane data vertically.
CLEAR STEPS - Clear lane data but not parameter
assignment.
DESTROY LANE - The entire lane is cleared. (Only
available for parameter lanes, since note sequencer
lanes are linked).
Page 28
5.
Getting to know Zone
ZONE USER MANUAL 28
instance, please re-trigger MIDI data or repress
a key.
Erase Icon: Clicking this will erase the lane data
but retain its parameter assignment. This tool is not
available in note lanes since they have a common
assignment.
Un-assign Icon: Clicking this will un-assign the lane
parameter but retain its data.
Lane speed: Each lane will run at up to 27 different
rates (from 8X to 1/128th speed) relative to the
global RATE, which itself is a division of the
master tempo. If the global RATE is set at 1/16,
each of the 32 steps will represent a 16th note
value. A lane speed selection of 1X will play that
speed within a lane. A lane selection of 2X will
play twice as fast and so on.
(vii) Lane Preset List
Bipolar Lane Presets - (TUNE, PAN etc)
Lanes are described from left to right, top to
bottom, in numeric order as follows:
1. ‘Alternating Sixteenths’ - All steps are lled to
their maximum range, with the axis alternating at
every step.
2. ‘Pyramid Notch’ - A rise and fall pattern with
every eighth step starting at step four, falling into
the negative axis.
*Adjusting lane speed on the y can sometimes
cause lane step playback to un-sync. In this
3. ‘Descending Axis’ - Alternating sets of four steps,
gradually fading.
Page 29
5.
Getting to know Zone
4. ‘Contrary Pan’ - Varying gradients of rising and
falling steps across both axes. Great for panning!
5. ‘Jagged Fall’ - Rapid rises and falls across two
steps with a short fade.
6. ‘Subtle Crescendo’ - A subtle rise, with gradients
gradually getting steeper toward the end of the
pattern.
ZONE USER MANUAL 29
12. ‘Lemmings’ - Repeating every eight steps, a
pattern that mirrors itself in the opposite axis every
four steps.
13. ‘Saw Mirror’ - Basic saw shapes mirrored in
each axis, repeating every eight steps.
14. ‘Square Riser’ - A crescendo characterised by
the uniform shifting of axis every eight steps.
7. ‘Imperfect Harmony’ - All steps at maximum
and minimum values, alternating and mirroring the
behaviour of their preceding steps.
8. ‘Doodle’ - With interesting shifts between axes,
no pattern is presented, but a creative preset for
pitch control.
9. ‘Bounce to the Ounce’ - Shifting from alternate
positions on both axes, revealing an interesting
pattern, repeated twice in the phrase.
10. ‘Mirrored Crescendo’ - A subtle upward fade
in the positive axis, mirrored in the opposite axis in
the second half of the pattern.
11. ‘Contrary Crescendo’ 1’ - A crescendo with
alternate steps rising across both axes.
15. ‘Crescendo Dip’ - Gradually rising every eight
steps, the rst step dips into the opposite axis every
eight steps.
16. ‘Contrary Crescendo’ 2’ - A crescendo with
alternate steps rising across both axes.
17. ‘Pitch Pong’ - A varied pattern dipping into
both axes, repeating twice.
18. ‘Puddles’ - Making use of the full range of both
axes, an interesting linear pattern.
19. ‘Sine Waves’ - A digitised sine wave, starting
in the middle of a cycle.
20. ‘Contrary Sidechain’ - A ‘sidechain’ pattern
with the rst step of every four dipping into the
opposing axis, and gradually decreasing in value.
Page 30
5.
Getting to know Zone
21. ‘Big Dipper’ - Repeating every eight steps,
this pattern reaches the mid point and maximum
/minimum value of each axis.
22. ‘To and Fro’ - Rising and falling over eight
steps, then breaking for another eight steps and
repeating again.
23. ‘Fast Sine’ - A digitised sine wave that rises
and falls twice.
24. ‘Arrowhead’ - A long fade alternating across
both axes.
25. ‘Negative Riser’ - A crescendo across the
negative axis with a dip on alternate steps.
26. ‘Negative Fade’ - A fade across the negative
axis with a break on alternate steps.
ZONE USER MANUAL 30
29. ‘Sine Distortion’- A popular digitised
waveform with ‘background noise’ steps.
30. ‘Blips 1’ - Minor ‘disturbances’ across
the positive axis, repeating every sixteen
steps. Great for pitch lanes.
31. ‘Blips 2’ - Minor ‘disturbances’ across
the positive and negative axes.
32. ‘Melody Maker’ - A minor leaning pattern
which works well for pitch and tuning lanes.
33. ‘Crab Feet’ - An eight step pattern which
rises and falls across both axes.
34. ‘Top and Tail’ - Rising to the top of the
positive axis and dipping into the negative,
repeating every sixteen steps.
27. ‘Binary Wave’ - Rising from the minimum
value of the negative axis to the maximum value
of the positive axis with breaks on the rst and
fourth of every four steps.
28. ’Speaker Freaker’ - With steps mirrored in
alternate axes, a falling pattern across sixteen
steps, with a mirrored sequence across the
remaining sixteen steps.
35. ‘Broken Waves’ - A ‘broken’ saw wave
pattern repeating every eight steps across
both axes.
Page 31
5.
Getting to know Zone
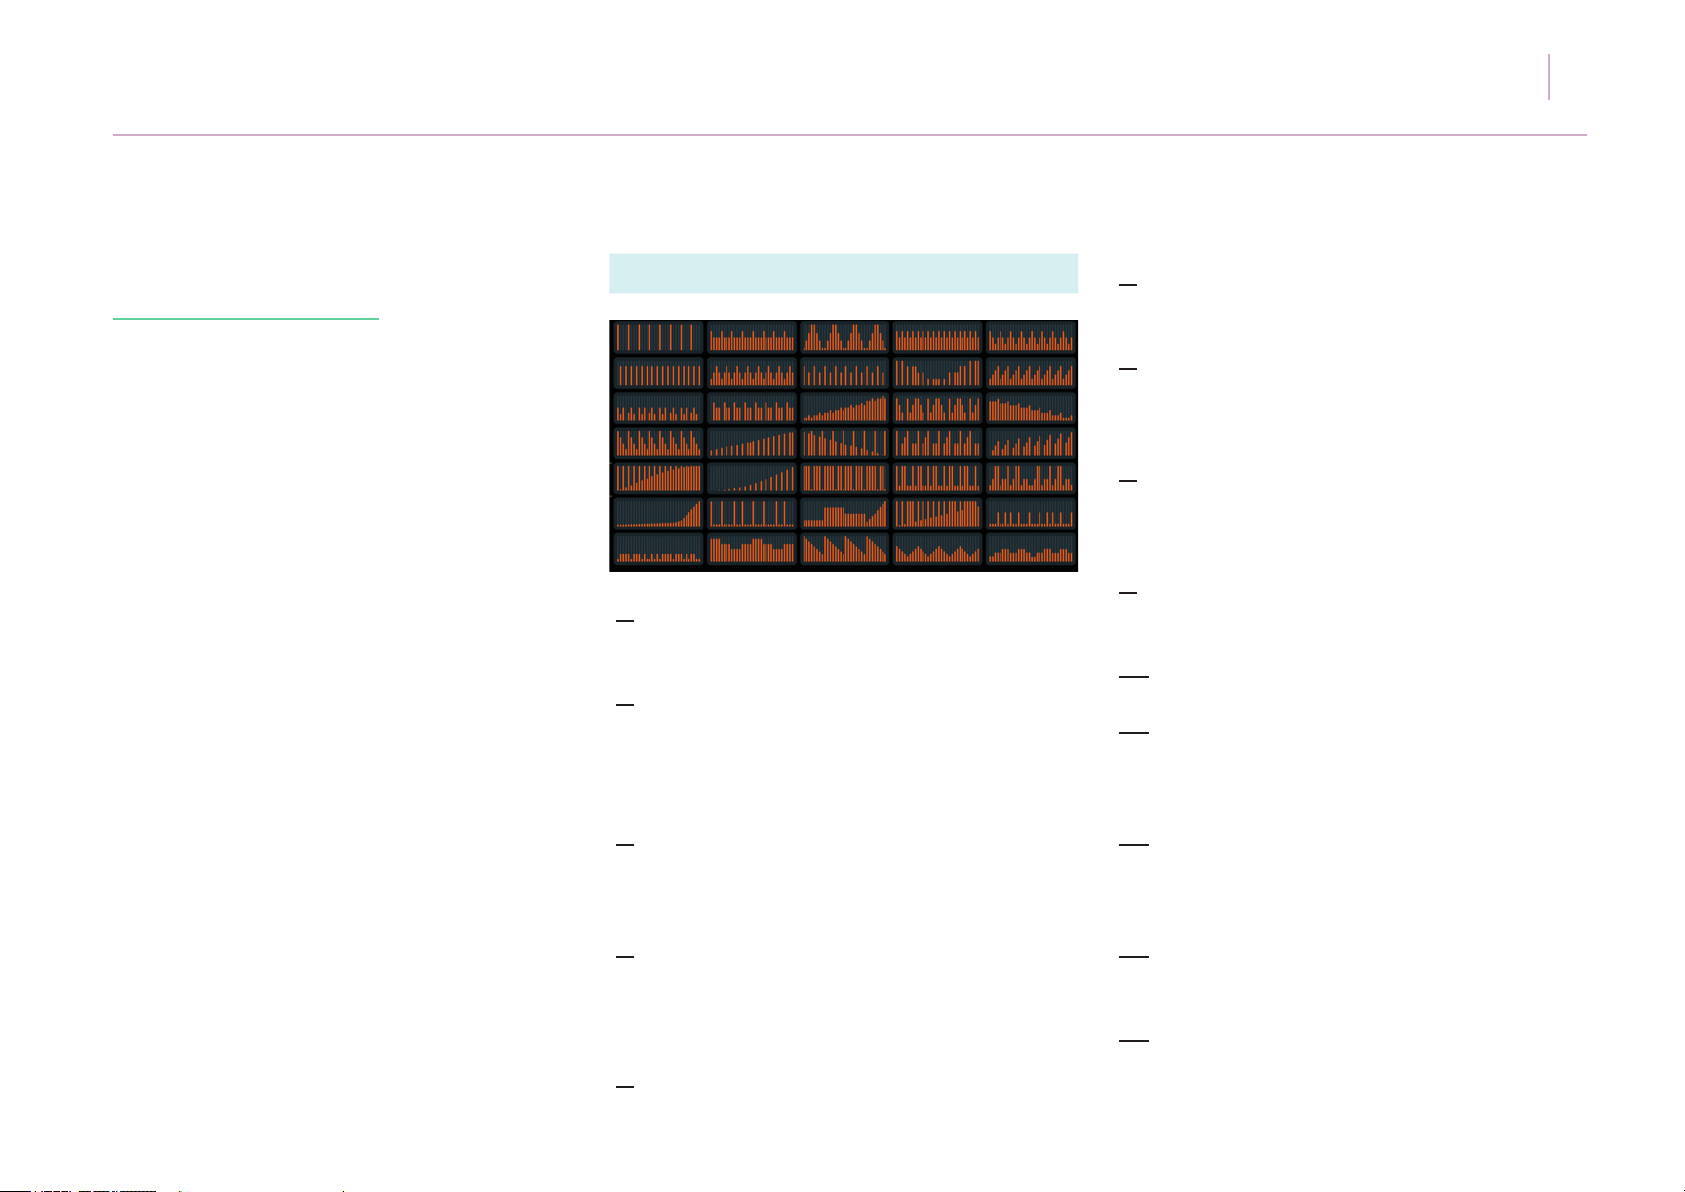
Unipolar Lane Presets (CUTOFF, LEVEL, etc)
1. ‘Four to the oor’ - Every fourth step is lled
to its maximum range starting on step 1.
2. ‘Accented Sixteenths 1’ - Every fourth step is
lled to 75% of its maximum range starting on step
1, with the remaining steps lled to half of their
maximum range.
ZONE USER MANUAL 31
6. Eighths’ - Every other step is lled to 75%
of its maximum range starting on step two.
7. ‘Up & Down 2’ - Rising every two steps and
falling on the following two steps. Repeating to
the end of the pattern.
8. Eighths 2’ - Every other step is lled alternately
to 75% and 50% of its maximum range starting
on step one.
9. ‘Symmetry-X’ - A sixteen step symmetrical
pattern where values gradually rise and fall.
10. ‘Sawtooth’ - A rising pattern every four steps.
11. ‘Teeth’ - Repeating every eight steps,
a sequence resembling teeth, with a break
every three steps.
3. ‘Up & Down 1’ - Rising every four steps and
falling uniformly on the following four steps.
Repeating to the end of the pattern.
4. ‘Accented Sixteenths 2’ - Every odd step is lled
to 75% of its maximum range starting with step
one, with every even step lled to 50% of its
maximum range.
5. ‘Down & Up’ - A fall and rise by 25% every
four steps.
12. ‘Frontchain’ - Repeating every four steps
with a rest every rst step, steps three and four
are at a 25% lower data value than step two.
13. ‘Analogue Riser’ - An upward crescendo
with a peak every third step.
14. ‘Fall & Rise’ - A falling and rising sequence
repeating every eight steps.
Page 32
5.
Getting to know Zone
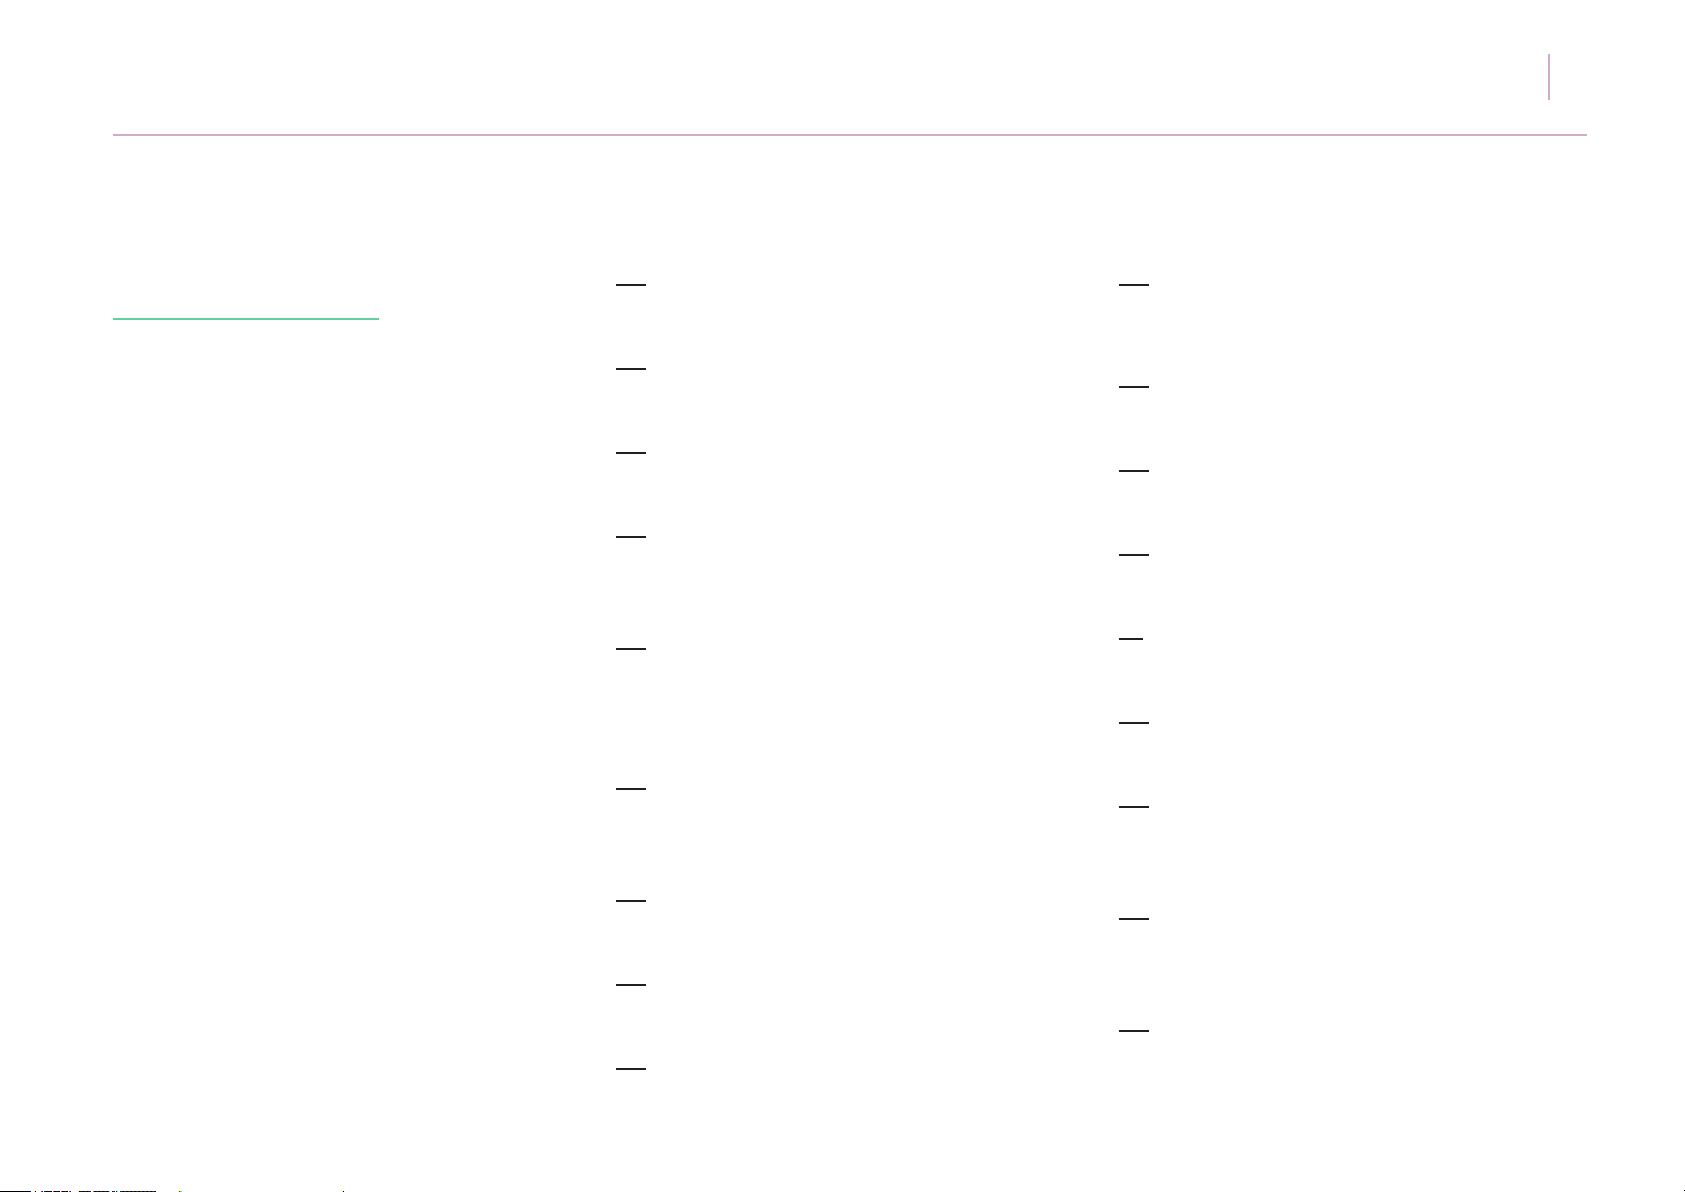
15. ‘Shaky Fade’ - A gradual fade with a peak
on every fourth step.
16. ‘Downchain’ - A falling pattern, repeating
every four steps.
ZONE USER MANUAL 32
24. ‘The Gap’ - An eight step repeating pattern
with maximum values dotted with smaller values
around 22.5%.
25. ‘Skyscrapers’ - A sixteen step recurring pattern
shaped like a city skyline.
17. ‘Altered Rise’ - A crescendo on alternate steps
with an added step on every sixteenth.
18. ‘4x4 Fade’ - A fade with full values on every
fourth step and a skipped value on every step
starting from step two.
19. ‘Second Step Shufe’ - An upward fade on the
rst four steps, with second step at minimum value
a ‘sidechain’ pattern on the second set of four
steps. Pattern repeats twice.
20. ‘Sidechain Crescendo’ - A gradual crescendo,
with every four steps rising, and a minimum value
on every four steps starting at step one.
21. ‘Eighths Crescendo’ - A steady crescendo with
every other step at full value starting at step one.
22. ‘Alternate Exponential’ - An exponential
crescendo with alternate steps at minimum value.
23. ‘Full House’ - All steps at maximum value with
a dip every fourth step.
26. ‘Sudden crescendo’ - A crescendo peaking
in the nal steps of the pattern.
27. ‘Shufe’ - Maximum values perpetuated by
drops in level every four, three and two steps.
28. ‘Waveshapes’ - Various popular waveforms,
changing every eight steps.
29. ‘Tall Trees’ - A crescendo peppered with
maximum value steps.
30. ‘Uneven Flow’ - Lower value steps mixed
with higher value steps at odd and even intervals,
repeating twice.
31. Pitter Patter’ - Lower value steps at 10%
interspersed with higher value steps at 30%,
n a complex pattern that repeats twice.
32. ‘Cityscape’ - A sixteen step recurring pattern
shaped like a city skyline.
Page 33
5.
Getting to know Zone
ZONE USER MANUAL 33
33. ’Inverted Saw’ - An inverted saw pattern
repeating every eight steps.
34. ‘Digi-sine’ - A digitised sine wave starting
in the middle of a period.
35. ‘Rise and Fall’ - A pattern that rises and falls
in even and uneven sets of steps repeating twice.
Page 34
5.
Getting to know Zone
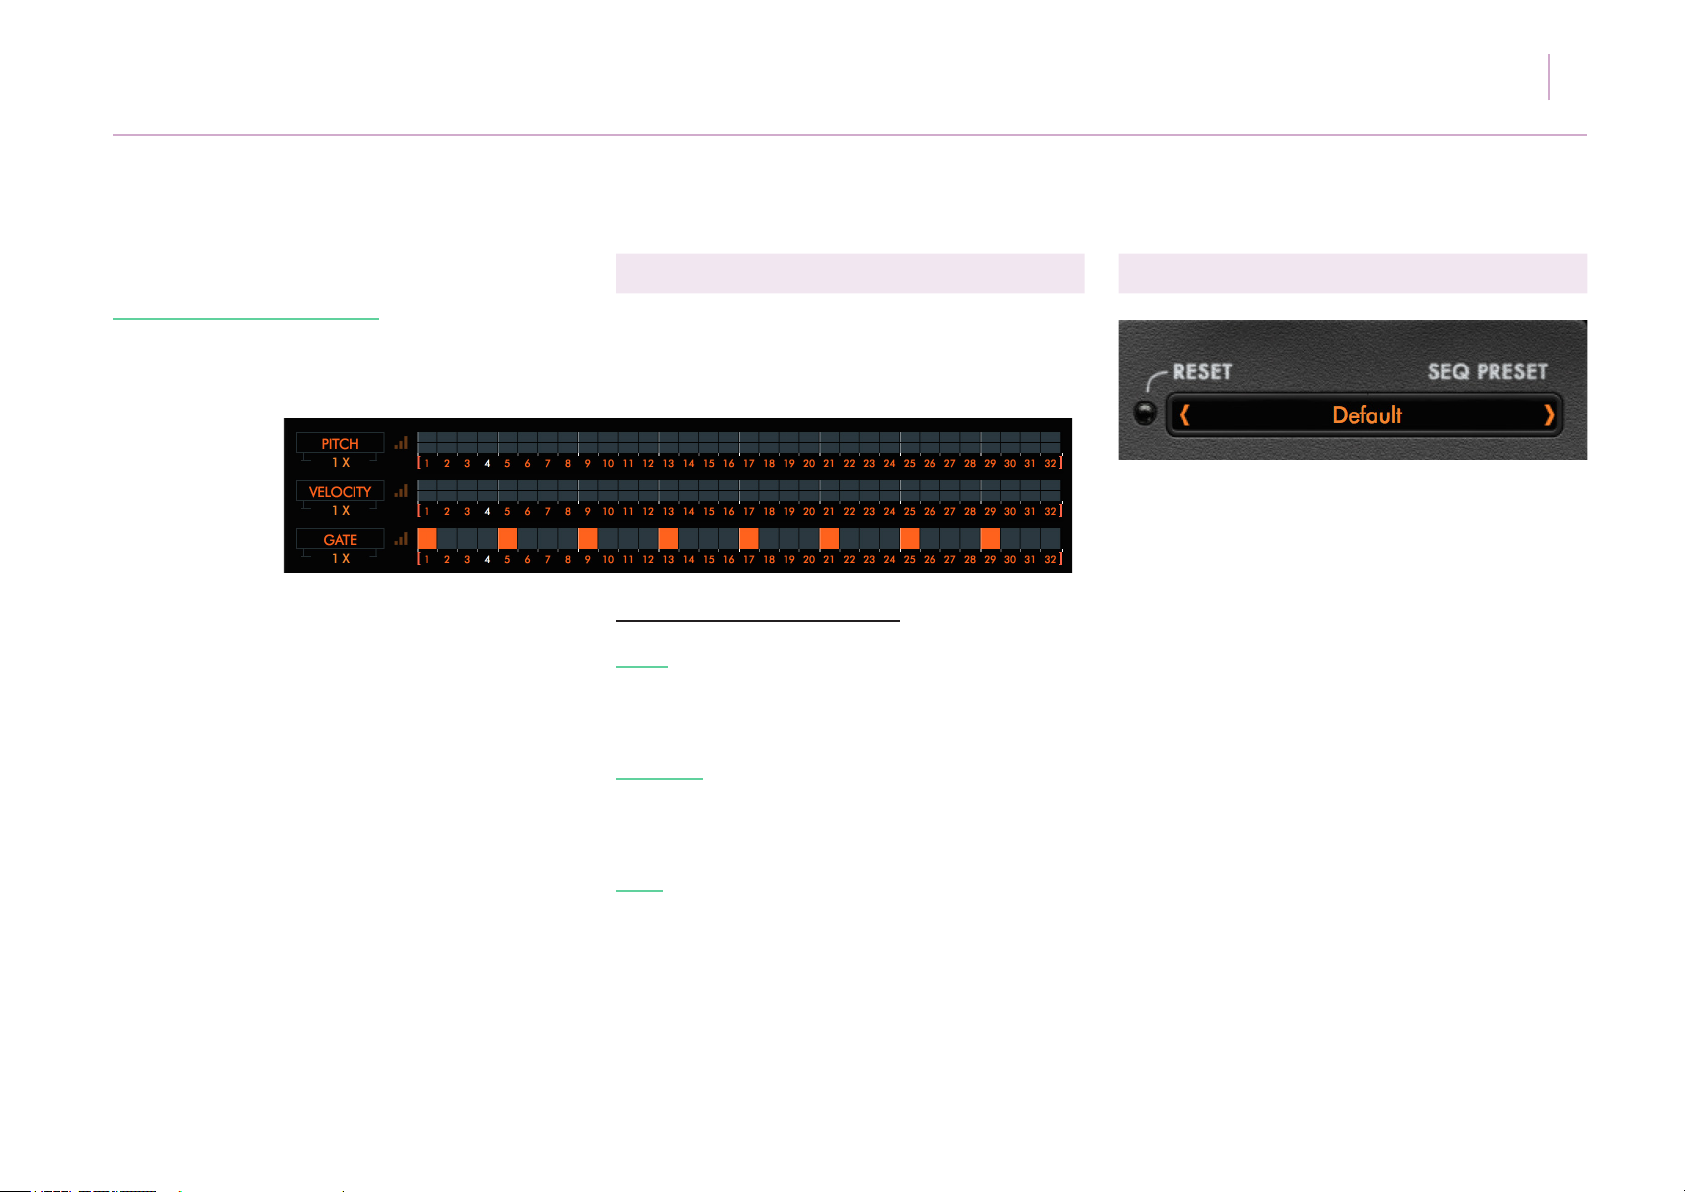
(viii) Note Sequencer Lanes
The note sequencer lanes have permanent
assignments. Step sequence L&R locators and
lane speeds are also linked.
These lanes function as follows:
PITCH
Displays pitch data across two axes in +/- 24
semitone increments.
VELOCITY
Displays velocity data across two axes in +/- 127
increments.
ZONE USER MANUAL 34
(ix) Global Lane Presets
25 global lane presets are provided, which give
a range of data values across multiple lanes.
Some presets have parameter assignments while
others simply provide data for control assignment,
for example alternating steps on/off across empty
lanes.
Clicking the RESET LED will clear ALL lane and
parameter assignments without warning!
GATE
Displays data in a unipolar lane from 0 -101%
where lower values are shorter notes and higher
values longer notes.
These lanes have only some of the LANE TOOLS
options of parameter lanes.
Page 35
5.
Getting to know Zone
(x) Master Grid Controls
The sequencer grid has the following master
controls:
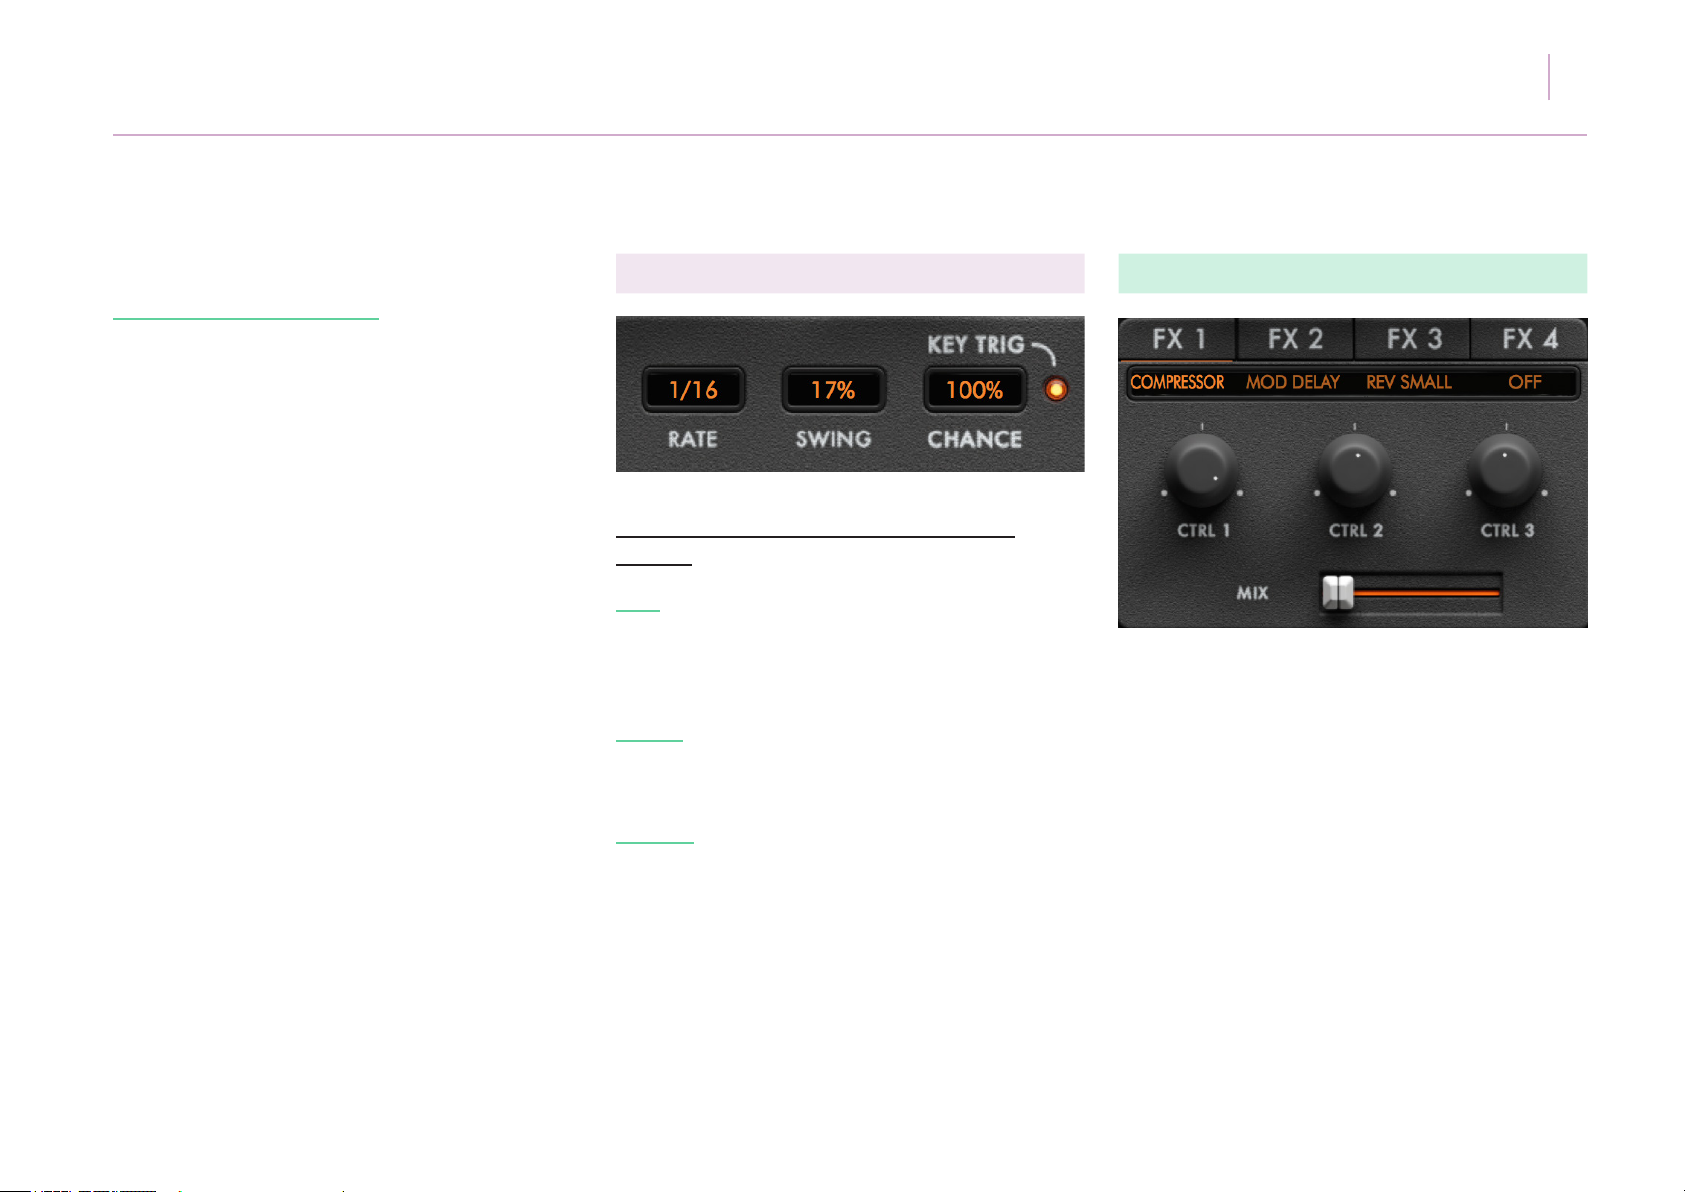
RATE Sets the rate to which all lane speeds are
relative. This rate is a division of the timing of the
Zone global master tempo. This value can be click
and dragged giving up to 27 different speeds.
SWING Adjusts the sequencer rate swing +/100%. A negative swing plays ‘behind’ the beat,
while a positive swing plays ahead of the beat.
CHANCE Adjusts the probability of note lane
sequence step playback. A high probability plays
all steps, while a low probability plays no steps.
ZONE USER MANUAL 35
(j) FX Section
Zone has a comprehensive FX section with every
parameter knob of each of the 20 available FX
types sequence-able on grid.
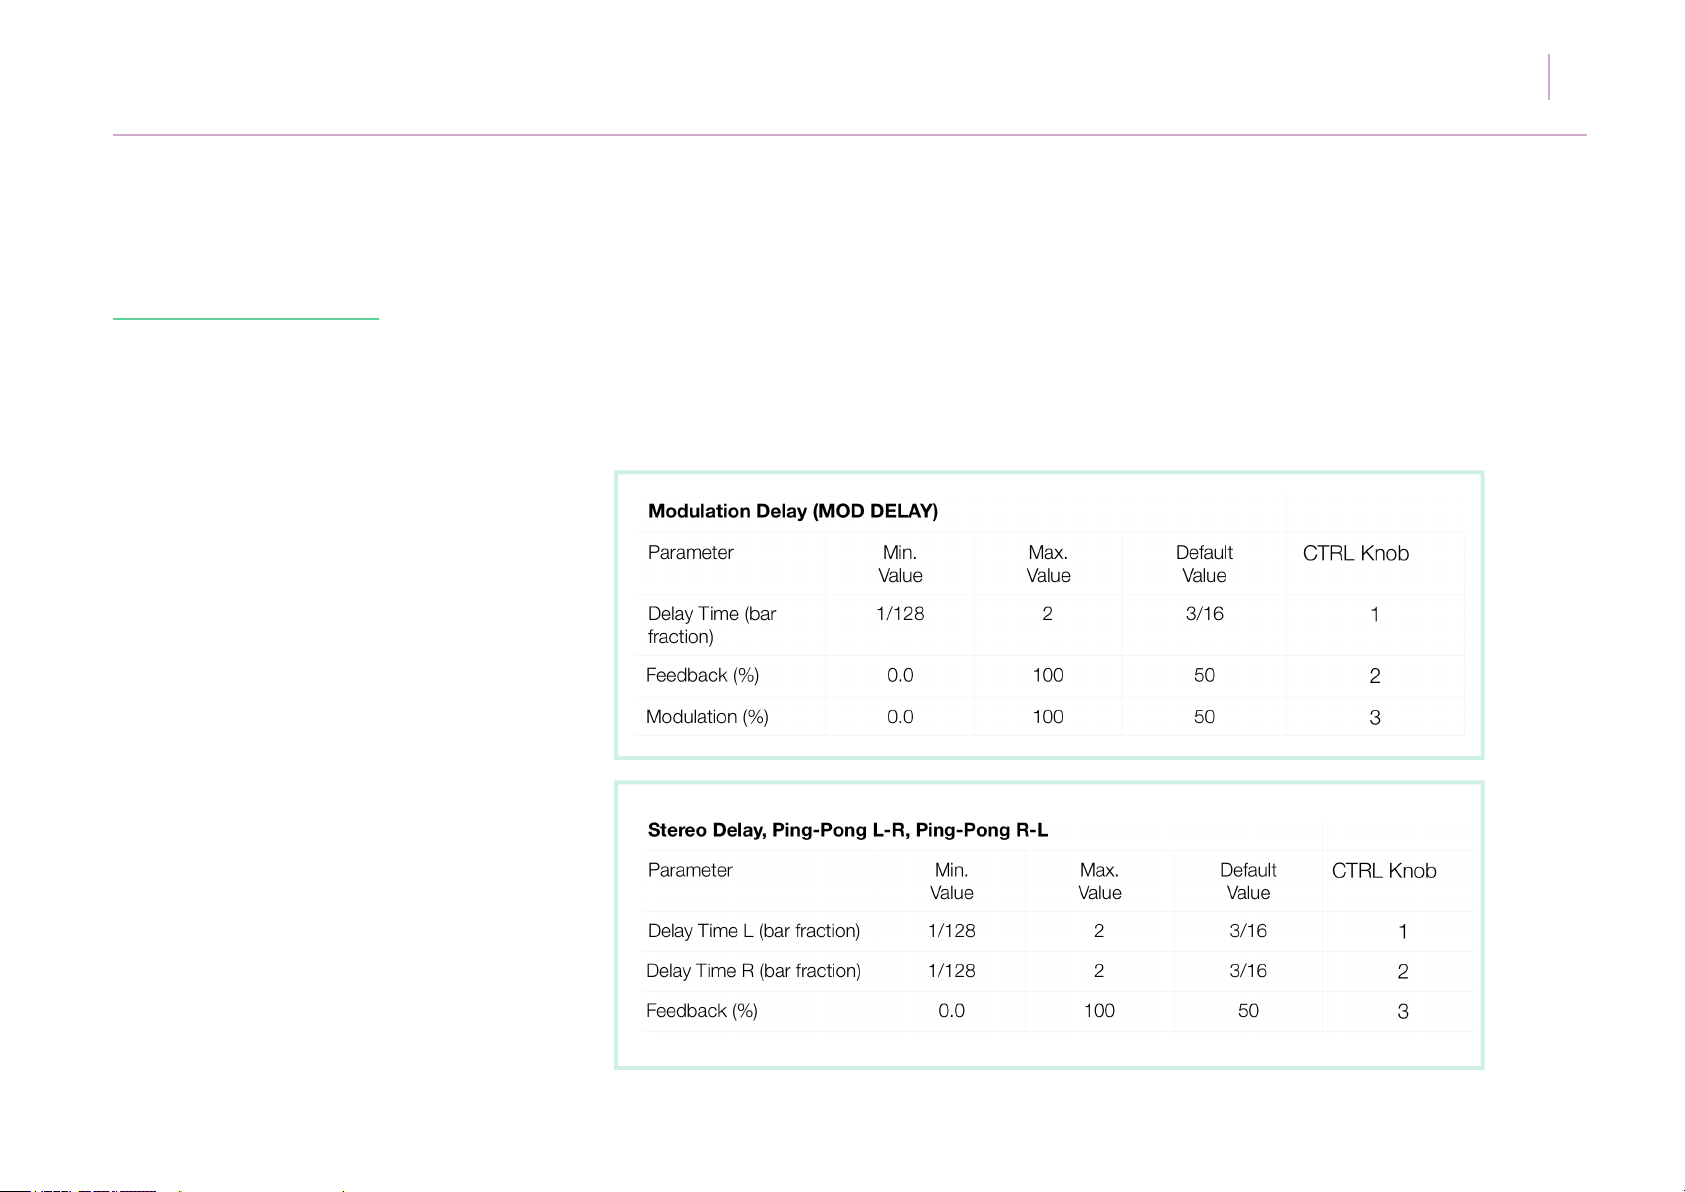
There are four insert FX types, which can be
selected by clicking on the relevant tab. There
is a MIX slider below which adjusts the dry/wet
balance.
When an FX type is selected, Zone will
automatically move the MIX slider to a preset
position in order for the effect type to be heard.
The FX can be ordered before or after the EQ
section by clicking the Zone logo and checking
the box next to ‘EQ BEFORE FX’
Page 36
5.
Getting to know Zone
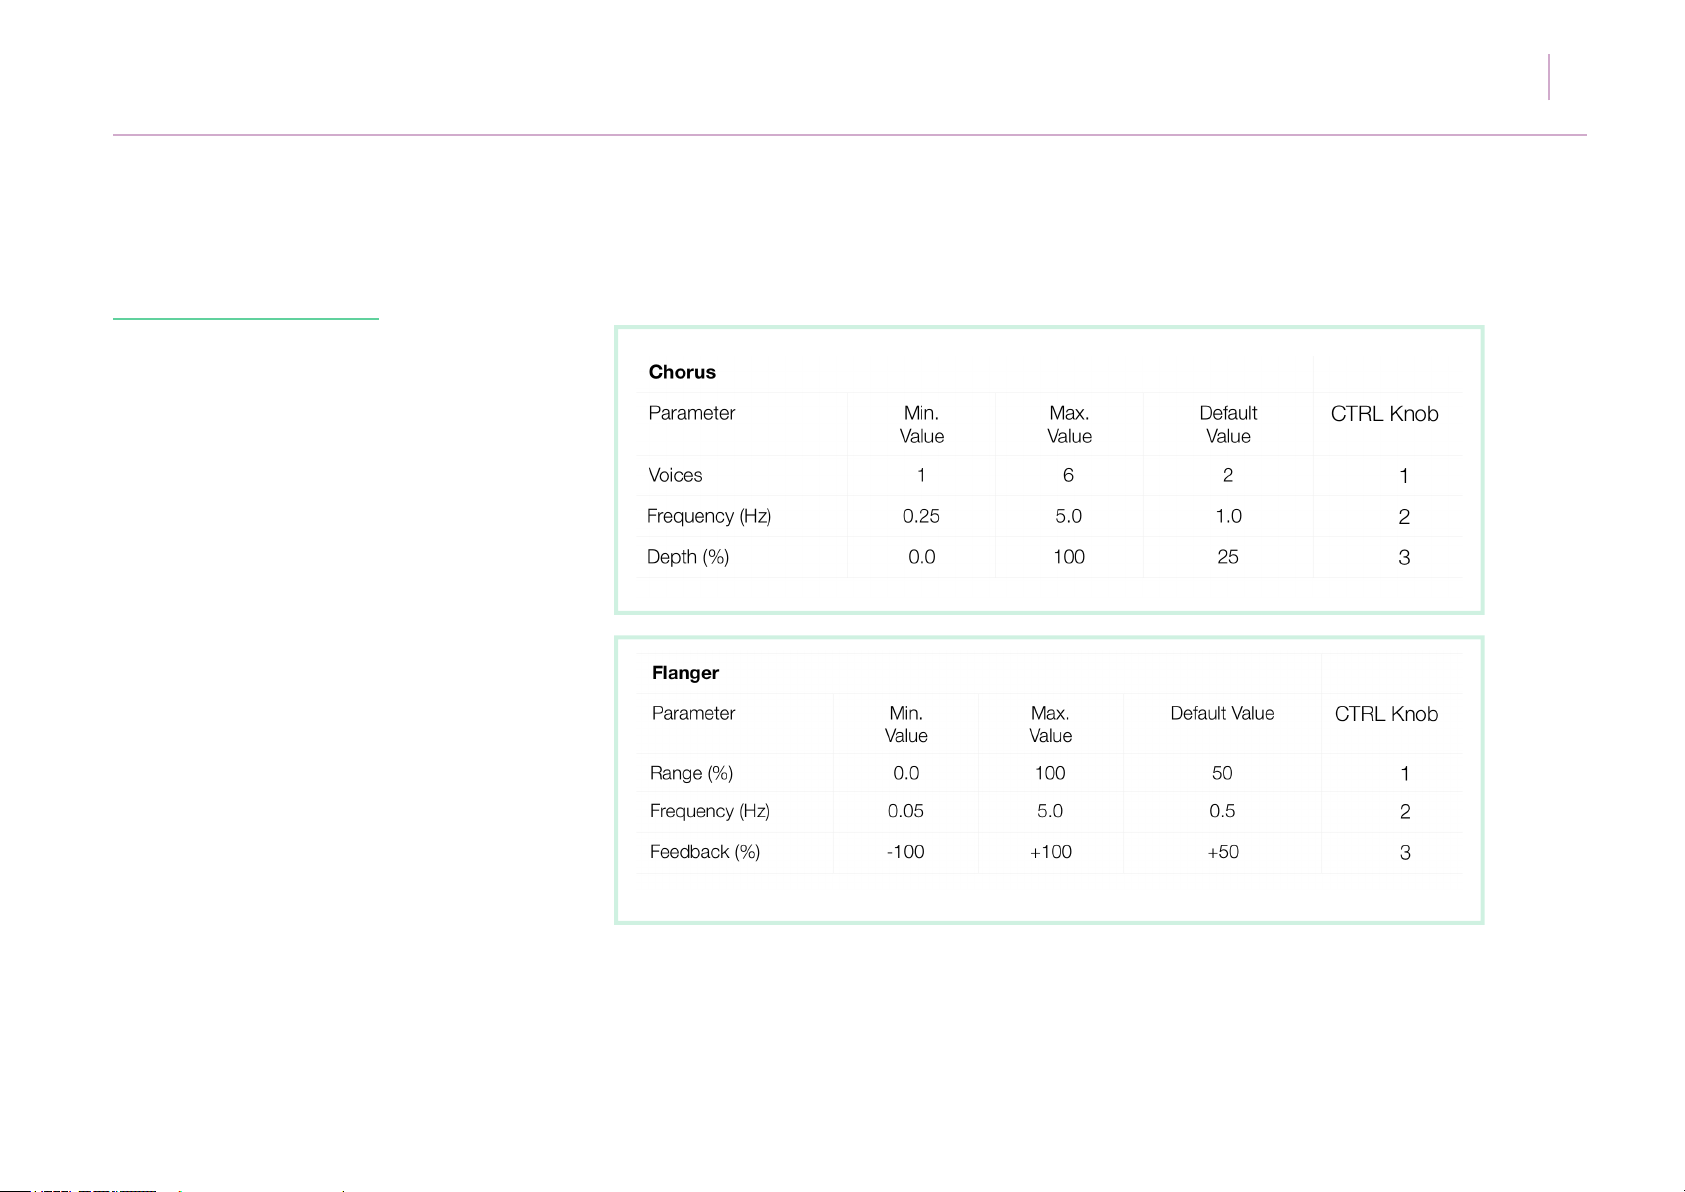
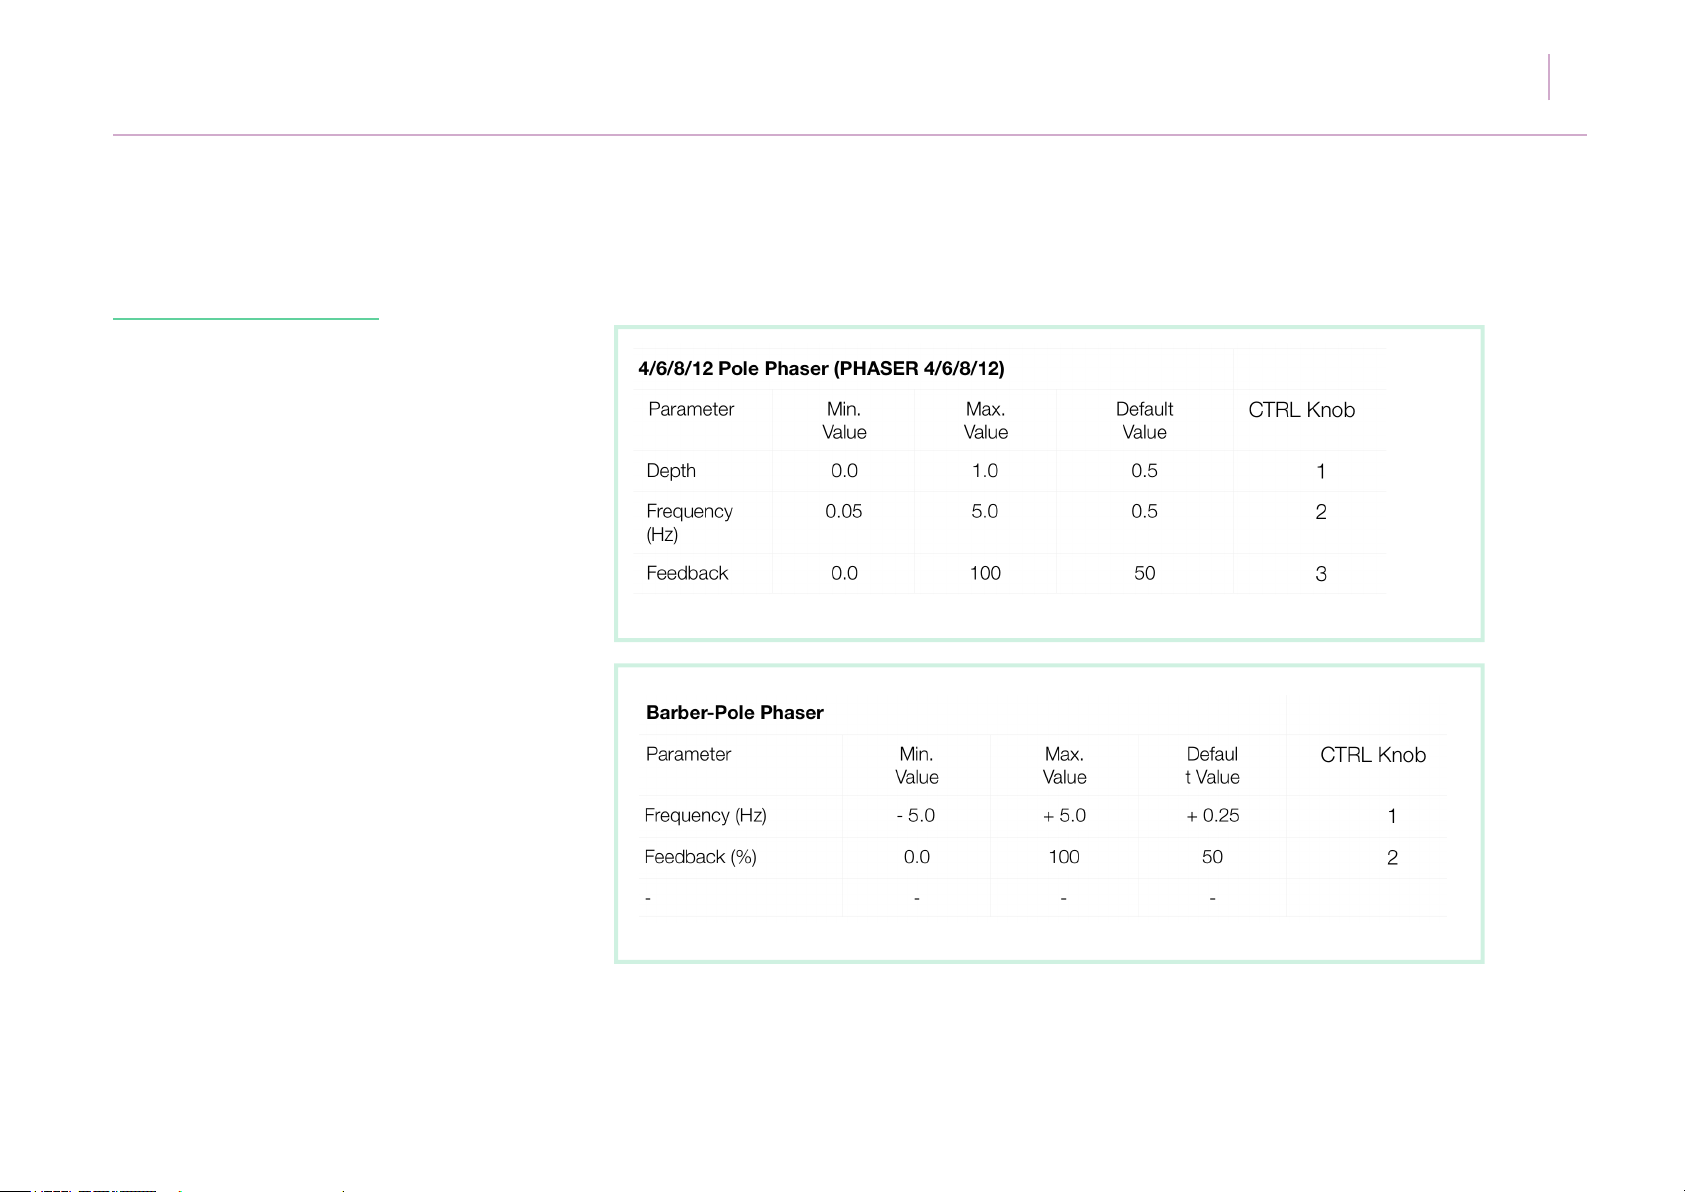
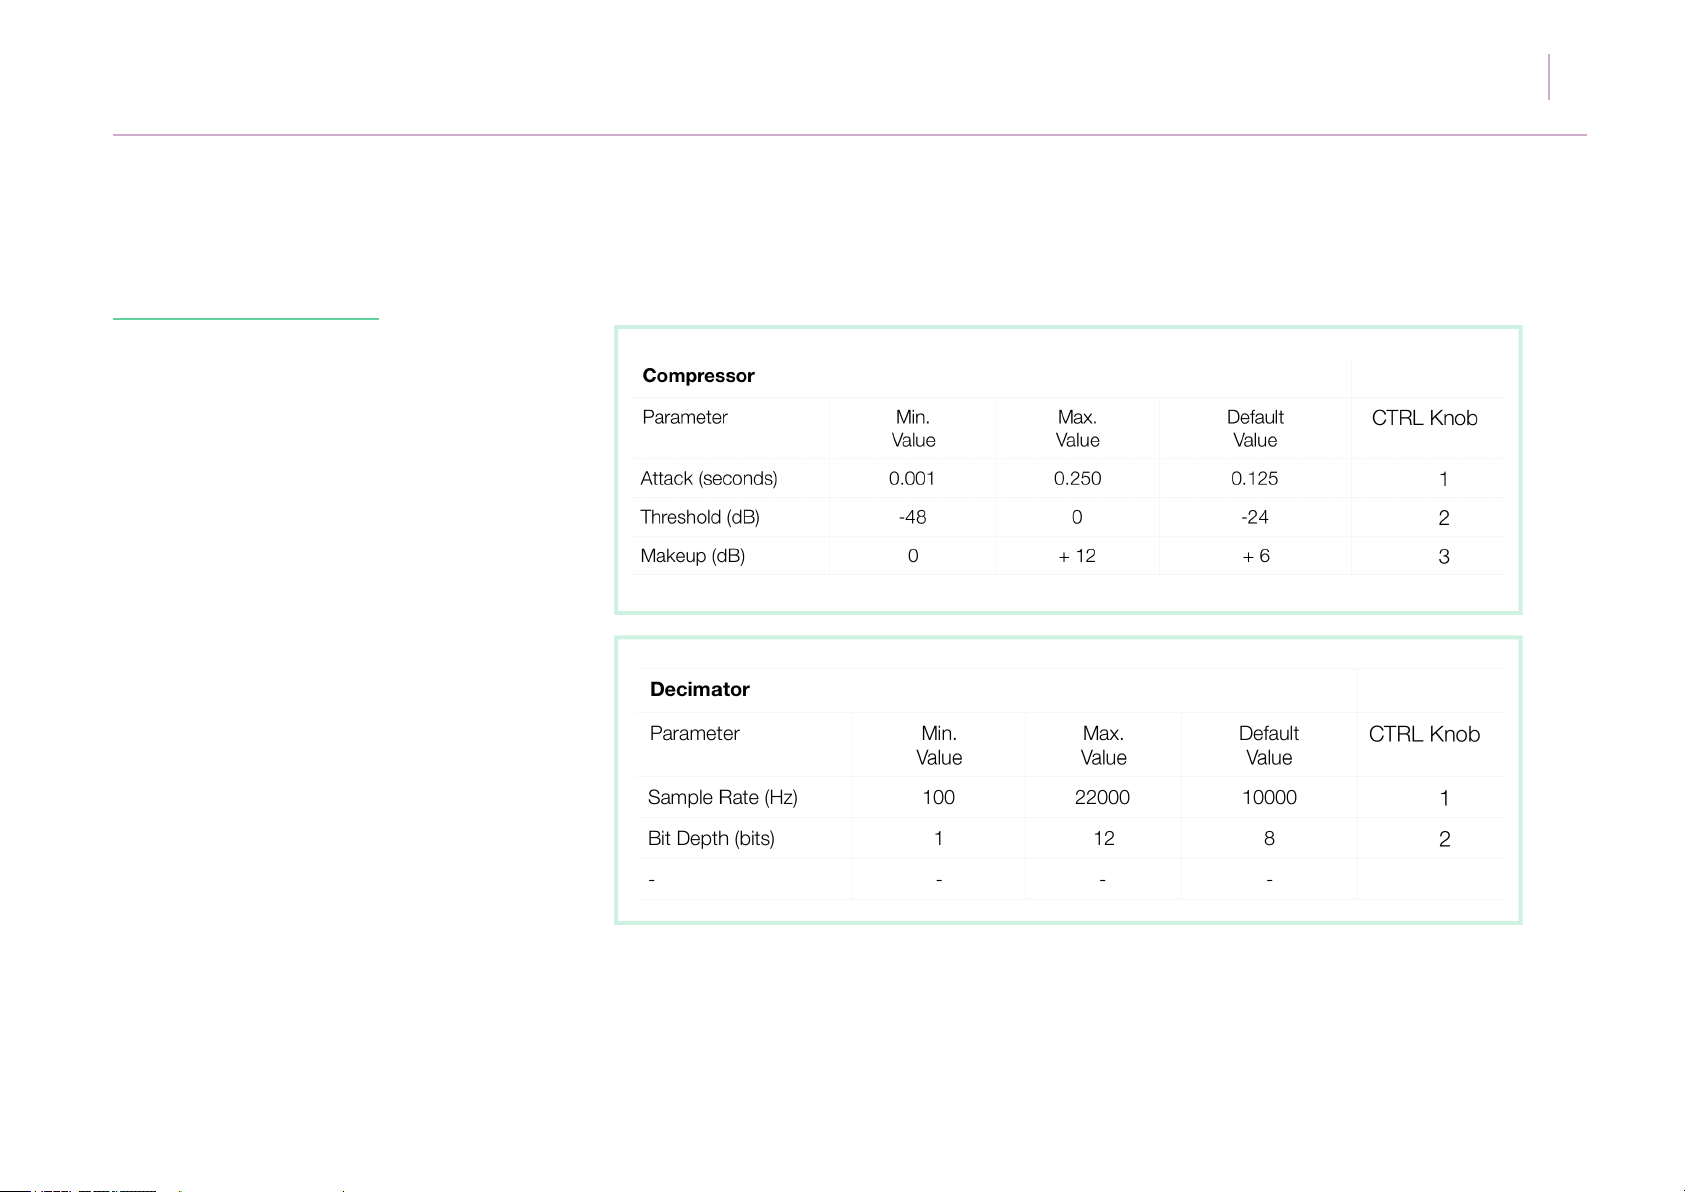
Each FX type has three knobs CTRL 1, CTRL 2
and CTRL 3 to control its parameters.
ZONE USER MANUAL 36
parameter of the new FX type selected. If a CTRL
knob is unused in an FX type it is ‘greyed’ out.
Once an FX CTRL knob is assigned to the
sequencer grid and that FX type is changed, the
assignment CTRL knob will change to control the
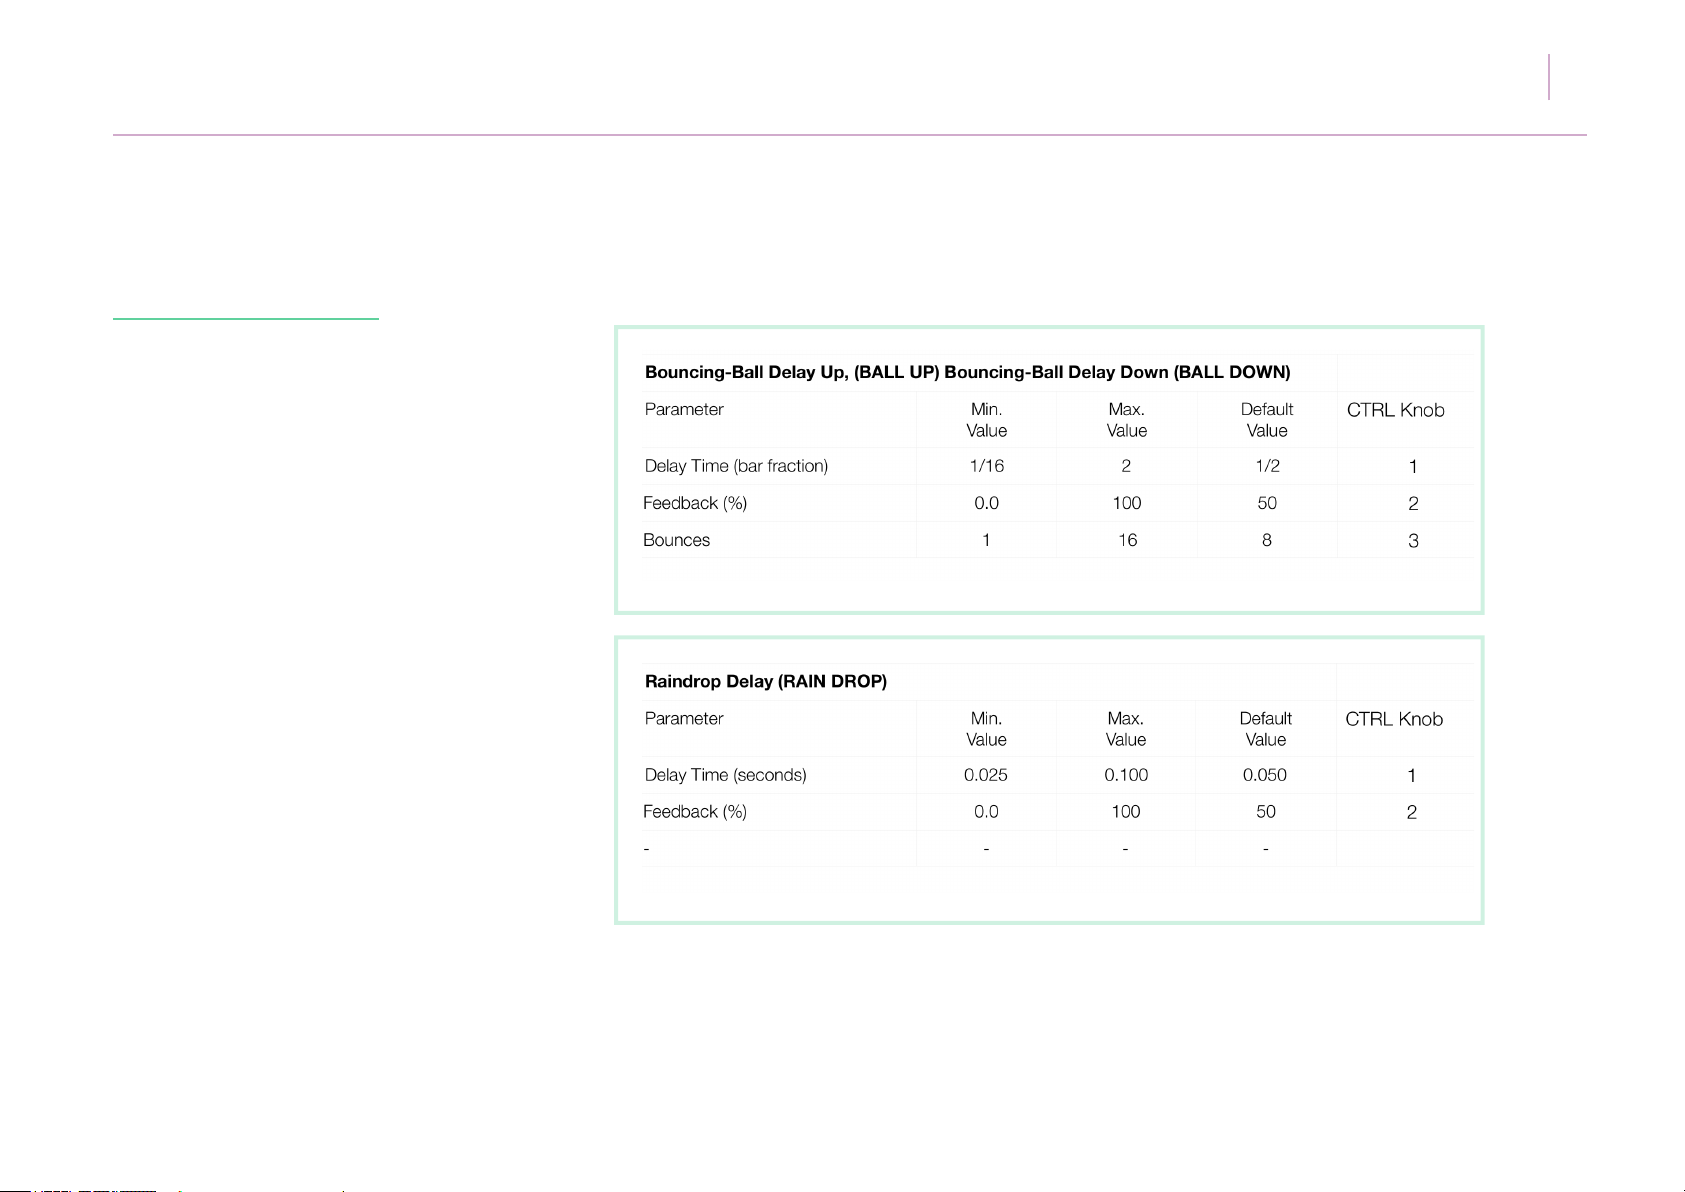
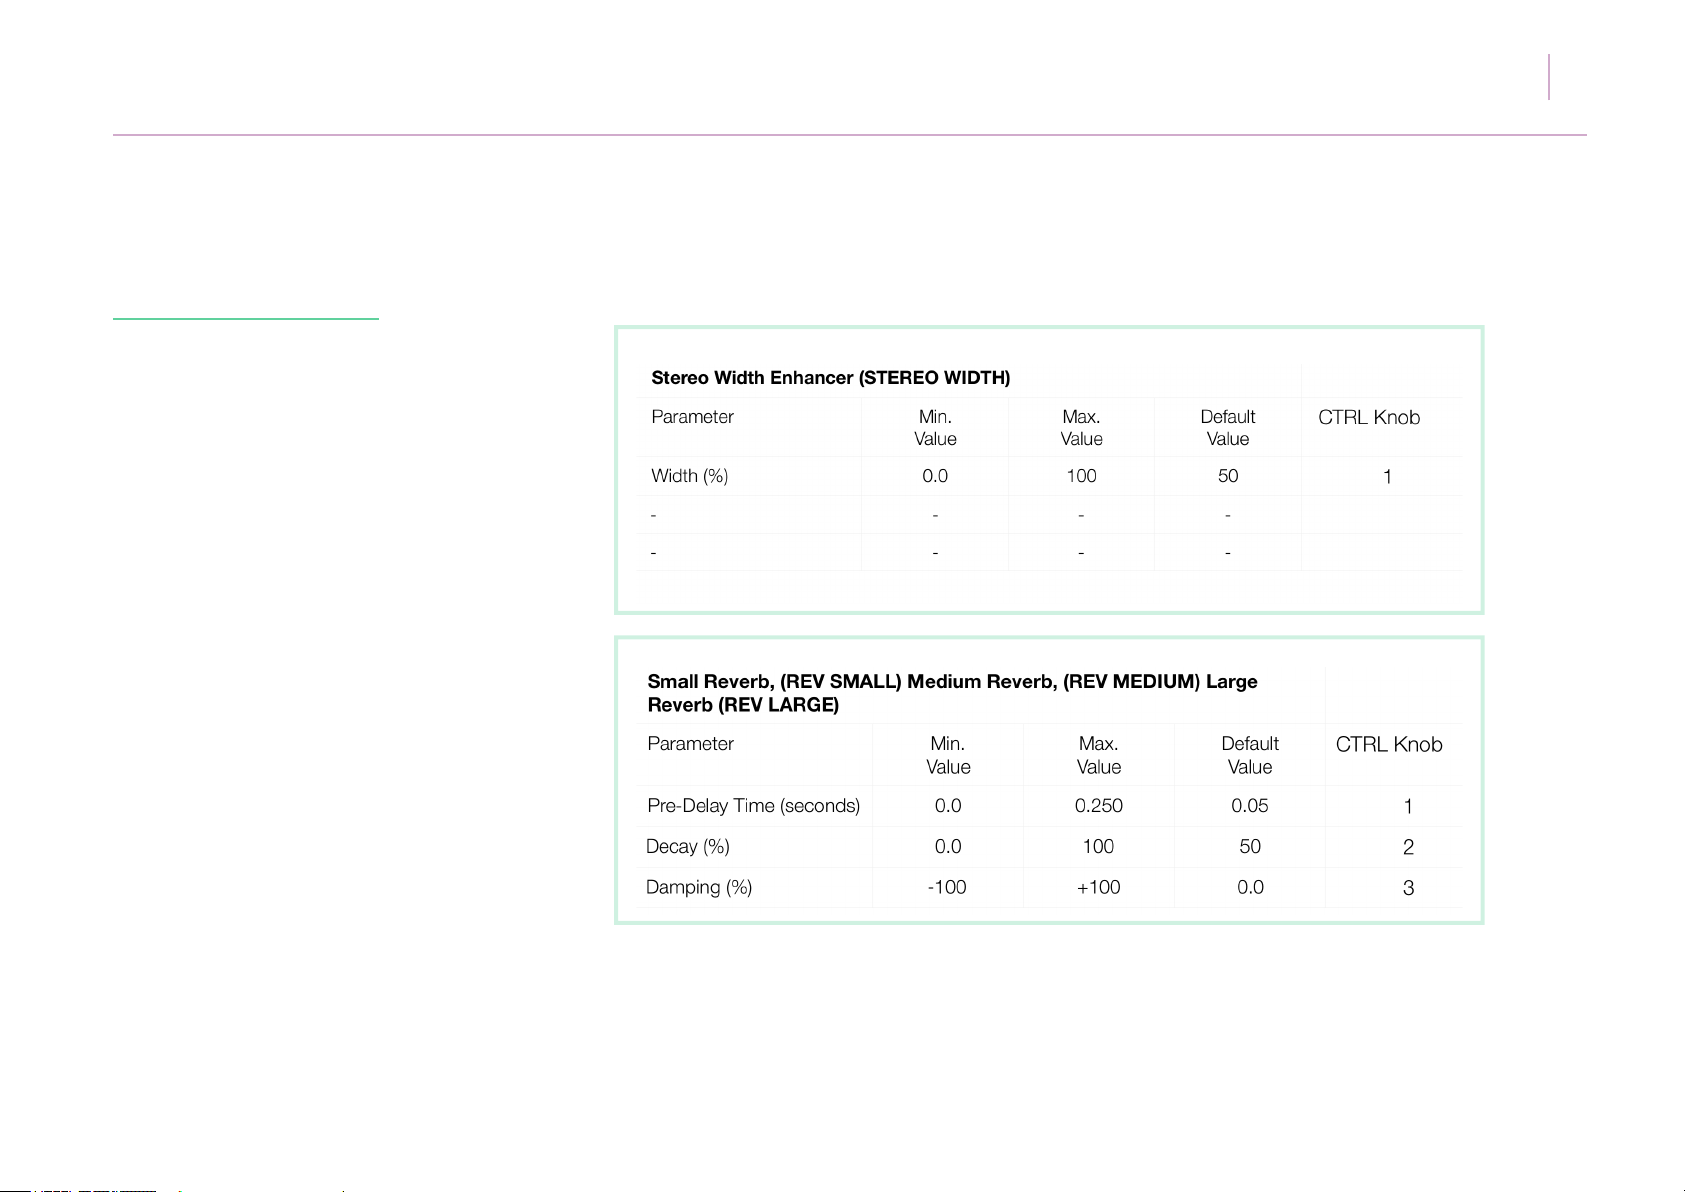
The FX types are as follows and the CTRL knobs
take the following functions:
Page 37
5.
Getting to know Zone
ZONE USER MANUAL 37
Page 38
5.
Getting to know Zone
ZONE USER MANUAL 38
Page 39
5.
Getting to know Zone
ZONE USER MANUAL 39
Page 40
5.
Getting to know Zone
ZONE USER MANUAL 40
(BARBER POLE)
Page 41
5.
Getting to know Zone
ZONE USER MANUAL 41
Page 42
5.
Getting to know Zone
(k) Macros Section
Zone allows up to ten individual controls to be
assigned to each of its Macros to be controlled by
one knob.
ZONE USER MANUAL 42
ATTACH menu. Please note some assignments such
as LFO Freq.* can only be assigned from menus.
*LFO Freq. can only be assigned if the value is
un-synced to tempo.
Values can be unassigned individually by right
clicking a knob and selecting the parameter under
the DETACH menu, or outright by clicking DETACH
ALL.
Please note that when Macros are assigned to the
parameter sequence grid they will automatically
be assigned to a unipolar lane, regardless of the
parameters assigned to them.
The Macro knobs take on MIDI CC Values 2 - 7
( CC 1 is reserved for Modulation Wheel
assignment) where Macro 1 is CC value 2, Macro
2 is CC 3 and so on.
A Macro can be assigned either by dragging an
object label onto a Macro knob (a blue box will
appear around the Macro marking it ready for
assignment) or by right clicking on the knob and
manually selecting the assignment from a list in the
Page 43
5.
Getting to know Zone
When a Macro has a valid assignment, a white
rectangular box will appear around its label name.
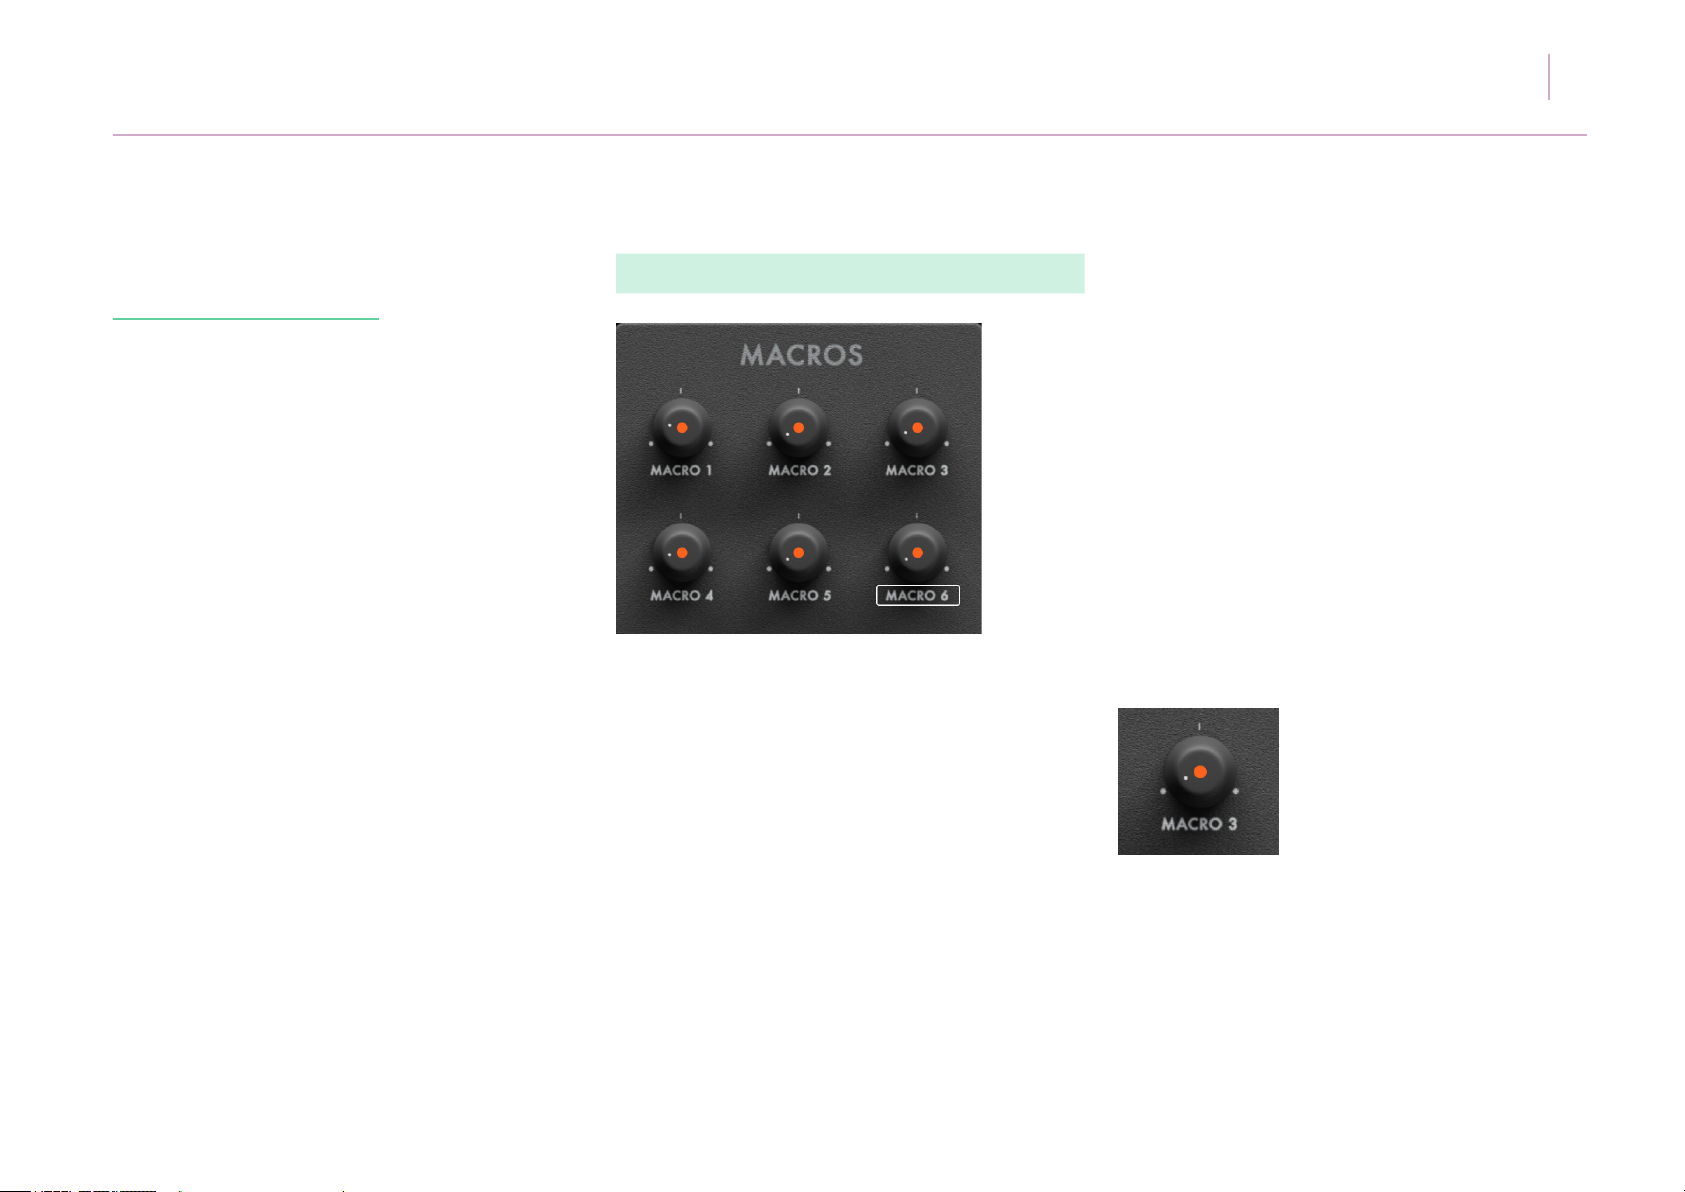
Macros can also be assigned to the parameter
sequence grid. When this is the case, an orange
dot appears in the middle of the Macro knob as
shown.
When a Macro has an assignment, moving the
Macro knob will take priority over the original
parameter control. So for example, if CUTOFF is
assigned to a Macro, the CUTOFF knob will no
longer function unless that value is detached. If
the same parameter is attached to two different
Macros, the Macro with the higher number takes
exclusive control of that parameter. For instance:
OSC 1 Shape is assigned to Macro 1 & 3.
Only Macro 3 will be able to control it.
ZONE USER MANUAL 43
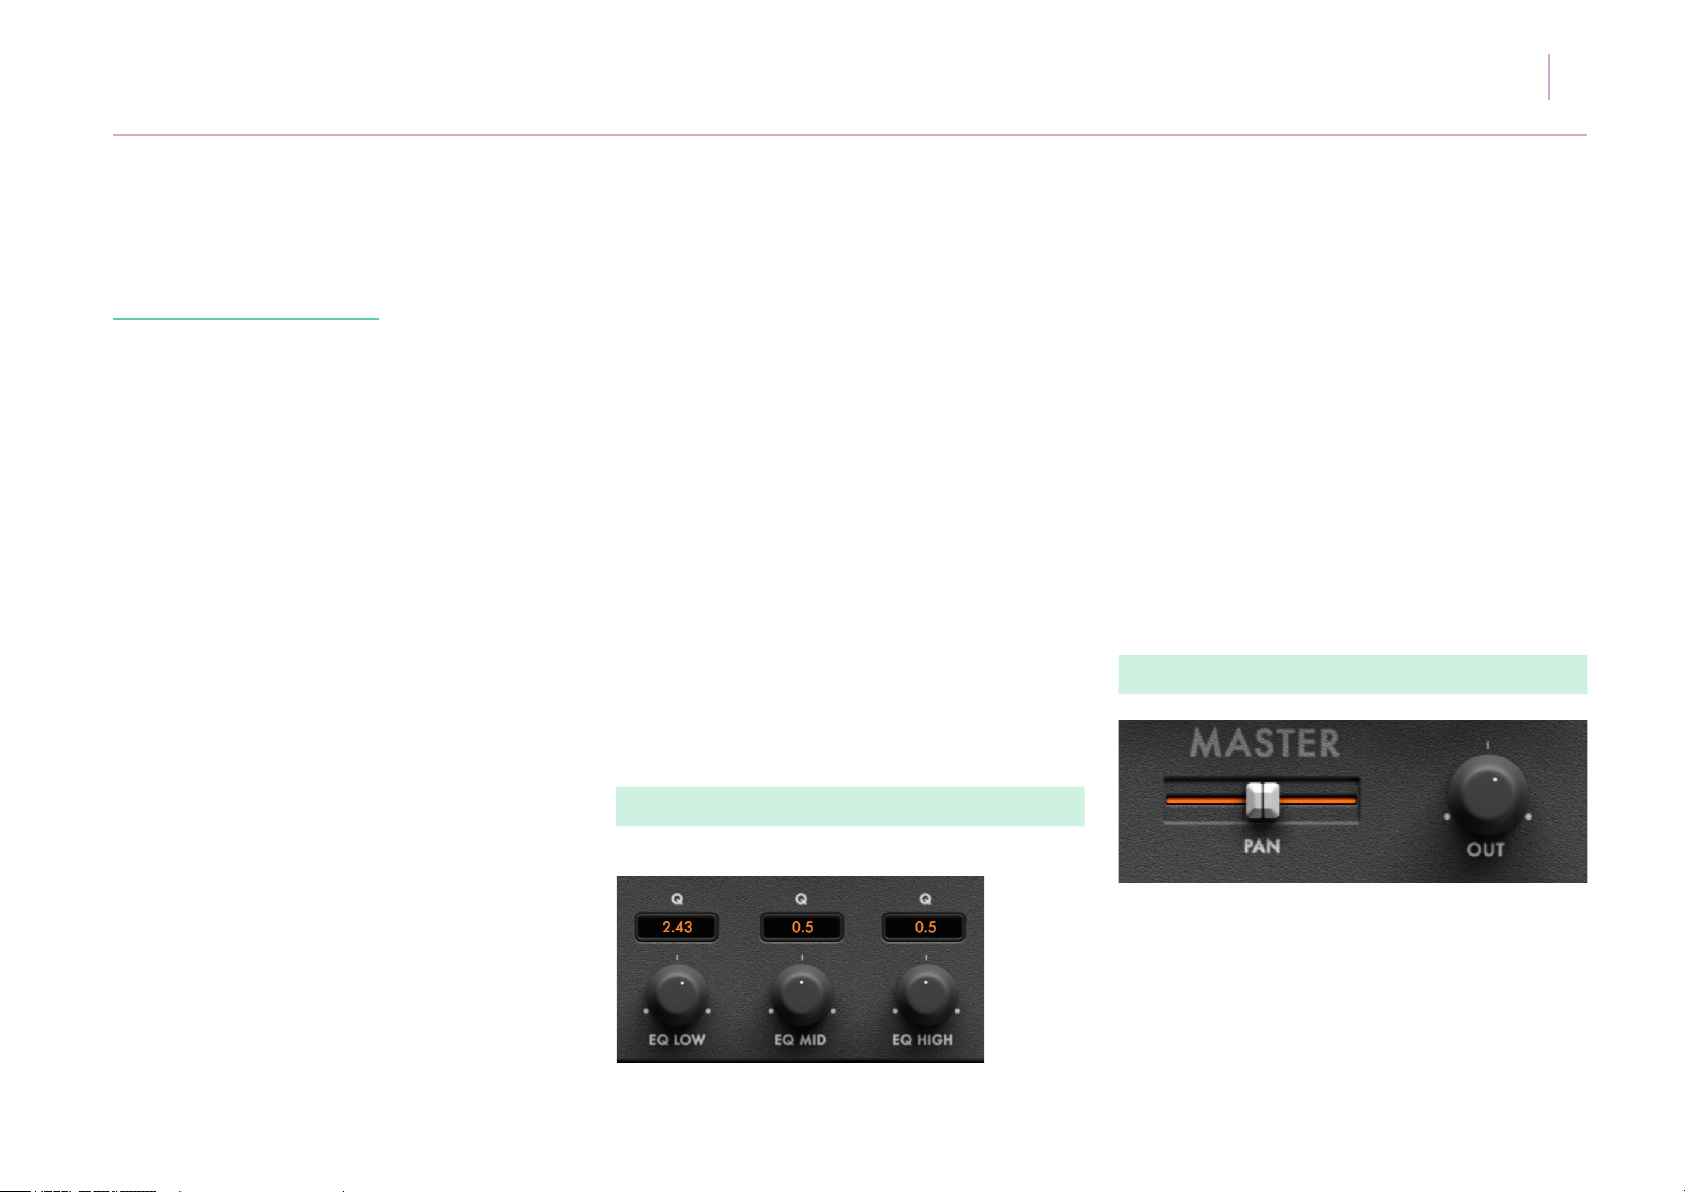
Zone has a 3-band parametric EQ with
independent Q controls for each band. The EQ
section can be congured to appear after or before
the FX section in the signal chain.
The knobs control gain (-10dB to +10dB) per band.
The EQ bands* are broken down as follows:
Low shelf at 250 Hz
Bell or Peak lter at 750 Hz
High shelf at 4kHz
*The Bell lter is a constant Q lter
(m) Master section
(l) EQ Section
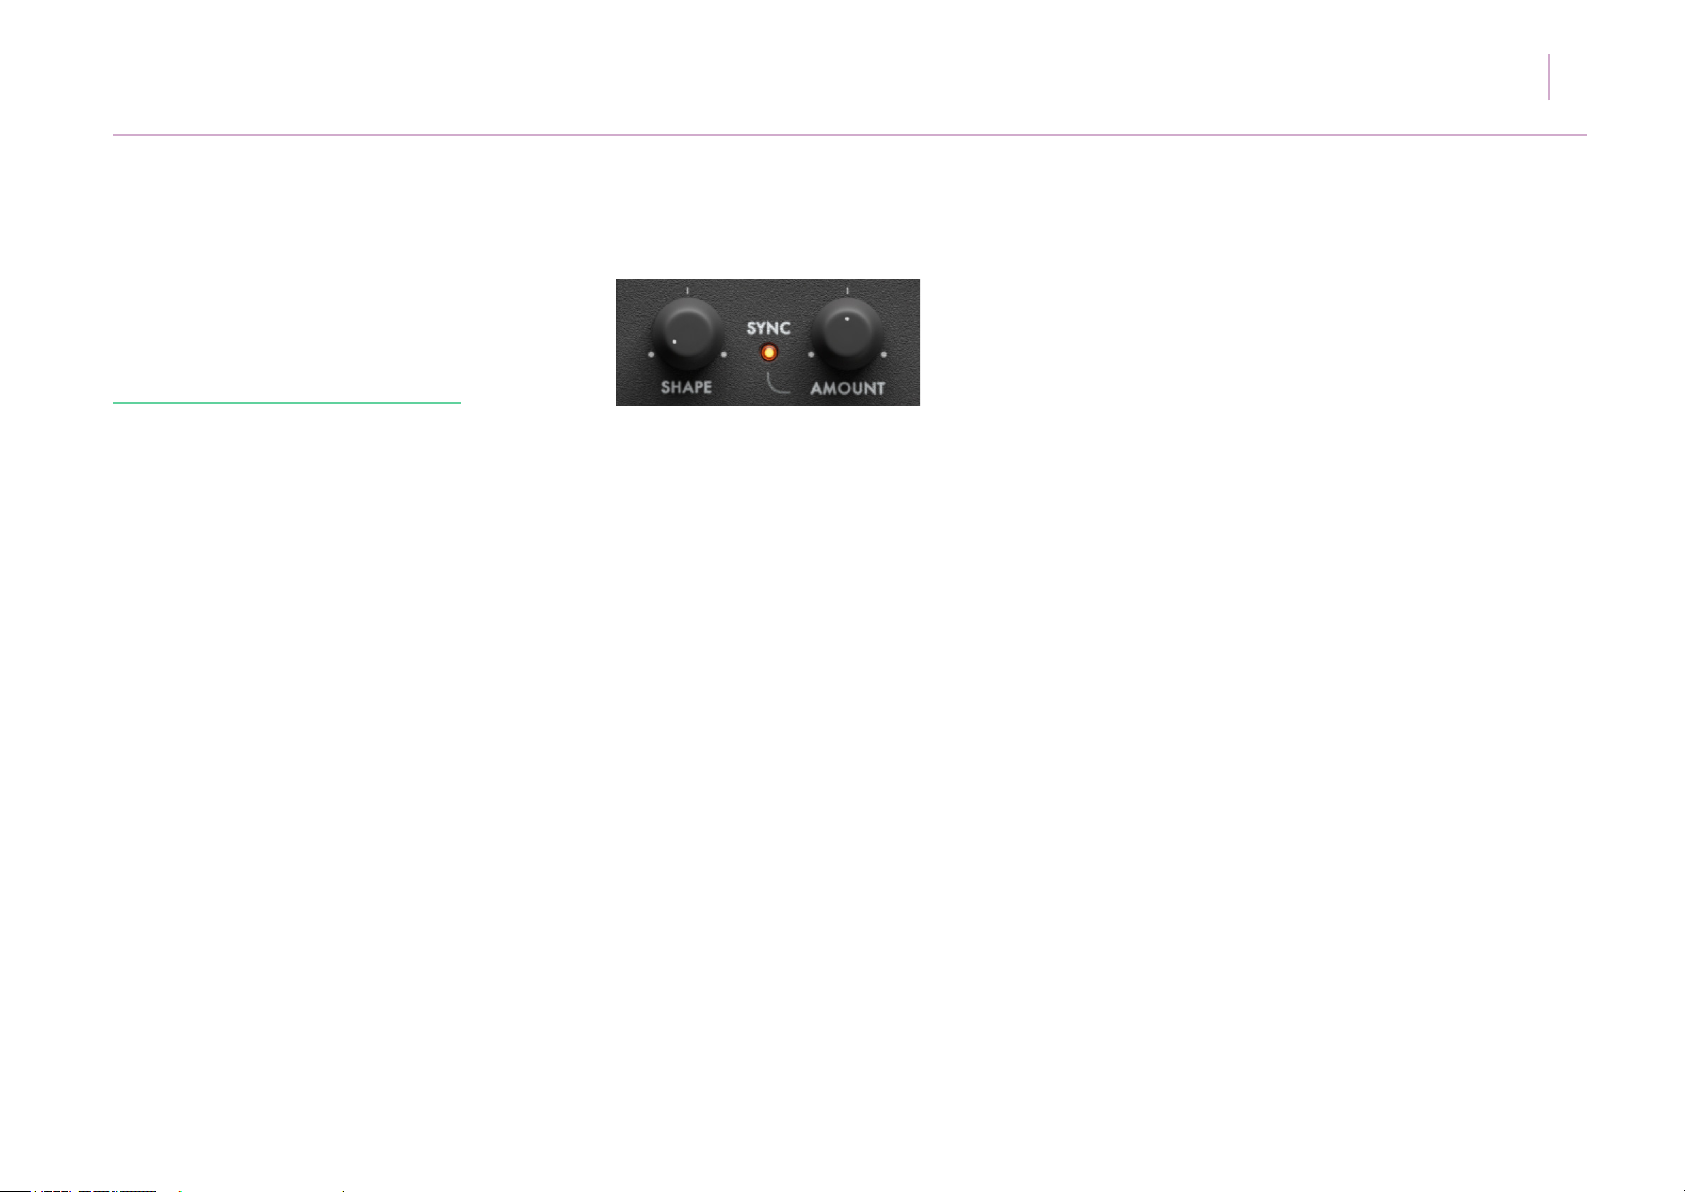
The MASTER section contains the master pan and
gain controls.
Zone’s effective gain range is from -80dB to
+10dB.
Page 44
6.
Control Behaviour
and Key Commands
ZONE USER MANUAL 44
On hovering a mouse cursor over any of Zone’s
knobs, faders or sliders, the current control value
and parameter type will display.
Double clicking a knob, fader, slider or text box
allows a value to be entered numerically.
As a general rule, every device in Zone behaves
in a default fashion as follows:
[alt] clicking a value will return it to its default orreset
position.
[cmd] clicking a value will affect its click and drag
value to shift in shorter increments.
*[CTRL] and click for PC users.
Page 45
7.
Presets
In Zone, presets are ordered by their category
type as follows:
Arp - Arpeggios - usually sounds that have parameter
and note sequence lanes assigned and are designed
to be played in sync with a beat.
Bass - Bass sounds, some of which also make good
lead tones.
Best Of - A selection of our personal favourite presets
within Zone. These presets can also be found in their
relevant category folders.
Drum & Beats - Individual drum hits and beats
generated using parameter or note sequencer lanes.
FX - Presets intended to be used as atmospheric
effects or drones, usually with no identiable pitch
or tone character.
ZONE USER MANUAL 45
Each preset name carries the initials of the sound
design who created it, as follows
SR - Sharooz Raoo - A producer, sound designer,
inventor of Zone and founder of Sample Magic.
AH - Andreas Håberlin - Pianist, composer and music
technologist with numerous sound design credits.
CD - Crystal Distortion - Founding member of
legendary international rave crew Spiral Tribe.
MVM - Milan Van Der Meer - A core member of the
Zone coding team, Moditone.
LLR - Louis La Roche - DJ/producer with illustrious
remix and production career.
RS - Rob Sparx - A seasoned sound design veteran
and bass music producer.
Lead - A selection of synth lead sounds, some of
which also double as bass sounds.
Pads - Synth pads and strings, designed to be played
polyphonically.
Synth - Workhorse synthesiser sounds, spanning a
range of classic tones to more unusual textures using
parameter data.
DC - Dean Coleman -DJ/producer with numerous
plaudits including remixes and productions for Deep
Dish, Roger Sanchez and numerous others.
AP - Artemiy Pavlov - Founder of Sinevibes, the
providers of DSP for Zone, and a former member
of the Roland sound design team.
NH - Niall Hoban - A sound designer and core team
member at Sample Magic.
Page 46
ZONE USER MANUAL 46
7.
Presets
Zone presets store all possible data - synth settings,
Macros, parameter /note lanes, FX settings etc, but
NOT user wavetables. These must be kept in their
assigned location in order for Zone to read them. If
removed, Zone will not be able to search for them.
If a preset is removed from its location, you will have
to re-launch Zone in order for the change to display
in the preset browser. If a preset is deleted, Zone will
play a default patch in place of that sound, until
re-launch is initiated.
Creating Unique Presets
The key to creating unique sounds in Zone is by
assigned and writing parameter data that is not
normally practical or possible using standard DAW
automation lanes or LFOs. Try the following to create
interesting presets:
4. Assign all Macros to parameter lanes and
randomise the sequencer grid to ip a tone beyond
recognition.
5. Experiment with OSC MOD modes, particularly
Exponential FM settings, which when adjusted even
slightly can signicantly alter tones.
6. Sequence NOISE values from minimum to
maximum on the sequencer grid to create drum loops
and hits.
7. Experiment with all available FILTER types.
Particularly those with a 48dB/octave slope. On
vocal waveforms, robotic speech synth sounds can
easily be created.
8. Lock the sequence grid and ip presets to get a
unique take on the sounds already contained within
Zone!
1. Run all lanes at different speeds and numbers of
steps to create ‘polyrhythms’ across parameters.
2. Try negative swing settings to play sequences
behind the beat.
3. Toggle sequence grid key trigger on/off to further
randomise synth settings.
Page 47

8.
Troubleshooting /
FAQ
Q. Why are knobs and sliders unresponsive to click?
A. Please check knobs and sliders have not been
assigned to a Macro or to the sequencer grid. If
they have they will not respond to movement or
automation.
ZONE USER MANUAL 47
The location for user wavetables is at:
MAC:
HD//Library/Application Support/Audiaire/Zone/
Wavetables/User
PC:
Q. Why is my CPU higher on some presets?
A. The Zone unison mode is a ‘true’ unison voice
generator in the sense that extra voices are just that.
There is no phantom replication of additional voices
to save on CPU. Try reducing the number of unison
VOICES, or adjusting your audio buffer setting to
around 256 or 512. Reducing the number of voices
under VOICE MODE or keeping audio QUALITY to
NORMAL will also reduce CPU values.
Q. My loaded wavetable has disappeared!
A. Please ensure you are keeping your User
wavetables in the same location and le path if you
switch machine or hard drive, otherwise Zone has
no mechanism to nd them. Clicking USER/RESCAN
on the waveform selection menu will cause Zone to
rescan your drive, so custom tables appear in the
dropdown menu.
C:\Users\<user>\AppData\Roaming\Audiaire\
Zone\Wavetables
Q. Zone’s audio output is clicking with each key
press. Why?
A. Check the ATTACK and DECAY settings on both
the AMP ADSR and FILTER ADSR. Move the ATTACK
knob a few increments until the clicking stops.
Q. The Zone internal sequencer is not starting in time
with my DAW. Why?
A. Ensure you have written MIDI note data and that
you are activating that data on MIDI note ‘on’ in
order to start the Zone internal sequencer. The easiest
way to do this is to restart playback from the
beginning of an audio loop or section.
Page 48

ZONE USER MANUAL 48
8.
Troubleshooting /
FAQ
Q. Zone sequencer lanes are going out of time with
each other. Why?
A. Sometimes when lane speeds are changed on the
y while a sequence is playing and lanes are running
at a series of different rates, lanes can fall out of time.
Restart playback to remedy this issue.
Q. I can hear audible noise or unwanted distortion on
voices. Why?
A. Check the FX settings if using Decimator or Filter
Q settings if using the Phaser or Bandpass Filters.
Sometimes when set at high Q values, these can
self-oscillate and cause wild distortion!
Q. LFO Sync amount is not assignable. Why?
A. LFO sync amount is only assignable if it is not
synced to tempo.
Q. I’m bored. What should I do!?
A. Click the sequencer dice icon to randomise all lane
presets. Even the most vanilla sounds can usually be
skewed beyond belief.
Q. When clicking the Lock icon in the Sequencer Grid,
why do some presets do not display any lane data?
A. This will indeed be the case if the playback mode
setting for that preset is not set to PARAMETR or PRM
& NOTE.
Q. My presets clip easily. Why!?
A. Because there is so much modulation and variation
happening in the sounds, particularly with lter Q, it
is very hard to set the ideal desired preset gain for
sounds without them appearing too quiet compared
with other sound sources. Experimentation is key!
Q. The chorus effect clicks when adjusted. Why?
A. The chorus VOICES knob will cause audible
clicking as it is switching modes and to do so needs
unique DSP to be loaded per step. Think of it as a
mode switch rather than a knob control.
Q. The note sequencer won’t play. Why?
A. Please make sure VOICE MODE is not set to
mono!
Page 49
9.
ZONE USER MANUAL 49
Credits
Click the ZONE logo to access full credits
Zone is brought to you by
www.audiaire.com
Concept, Executive Production, Sound Design,
Manual:
Sharooz Raoo
Development and DSP:
Stijn Frishert, Milan van der Meer, Danny van Sweiten (www.moditone.com)
Project Management and DSP:
Artemiy Pavlov (www.sinevibes.com)
UI Graphics:
Luis Burdallo
Logo:
Laura Price-Bates
 Loading...