

Page 1
User Manual / by Sharooz Raoo,
Ulas Koca & Katt Strike
Version 1.0 November 2019
c
2019 - Audiaire. All rights reserved.
www.audiaire.com
Page 2

Congratulations on purchasing Zenith
and thank you for choosing Audiaire.
Our goal was to port the diverse sound
ZENITH USER MANUAL 02
design functionality of our Zone VST
into as broad a range of instruments
as possible.
Your comments & feedback are always
welcome: [email protected]
Version 1.0 November 2019
c
2019 - Audiaire. All rights reserved.
www.audiaire.com
Page 3

Contents
ZENITH USER MANUAL
03
1. Disclaimer and Legal Notices.
04
2. Minimum System Requirements
04
3. Installing, Registering and Launching Zenith
05
+ Using Zenith in Demo Mode
05
+ Registering & Authorising Zenith
06
+ Uninstalling Zenith
07
+ Setting Up An Audiaire Account
07
+ Redeeming an Audiaire License
08
4. Setting up Zenith in your DAW
09
5. Sending MIDI from Zenith
12
6. Feature Overview
15
7. Getting to know Zenith
16
8. Troubleshooting / FAQ
44
9. Credits
47
10. Appendix A
48
11. Appendix B
51
Page 4

1.
ZENITH USER MANUAL
04
Disclaimer and
Legal Notices
2.
Minimum System
Requirements
The information contained in this document is subject
to change without notice and does not represent a
commitment on the part of Audiaire Ltd. Audiaire Ltd
shall not be liable for any loss or damages arising
out of or related to this document or the information
contained within it. No part of this publication or
images may be reproduced or transmitted in any
form or for any purpose without the written consent
of Audiaire Ltd.
The software described by this document is subject to
a License Agreement and may not be copied to other
media except as detailed in the License Agreement.
VST + AU compatible host software. Zenith does not
currently run on Propellerhead’s Reason software due
to lack of MIDI routing functionality. Note also that
Zenith installs as a VST2 and must be used with a
VST2 compatible DAW, as VST3 does not presently
allow for extensive MIDI routing.
© 2019, Audiare Ltd. All rights reserved.
VST Plugin technology by Steinberg VST is a
trademark of Steinberg Media Technologies GmbH
All other copyrighted trademarks belong to their
respective owners.
MAC
• OS 10.10 or higher. (64 bit only)
• 2GB RAM (8GB recommended)
PC
• Windows 8 or higher.
• 2GB RAM (8GB recommended)
Page 5

3.
Installing, Registering
Zenith uses account verication in order to authorise
registration.
ZENITH USER MANUAL
05
& Launching Zenith
In order to log in to Zenith upon setup, please ensure
that you have your Audiaire account details to hand.*
*For more details on setting up an Audiaire account,
please see the next section; creating an Audiaire
account.
Using Zenith in Demo Mode
Zenith can be used in demo mode for 20 minute
uninterrupted intervals. After 20 minutes of continuous
use, you will not be able to access Zenith without
logging in with a valid email (that is assigned to
your purchase of Zenith, via the Audiaire website).
In demo mode, presets cannot be saved and MIDI
CC data will drop out momentarily.
You do not need an Audiaire account to use the
demo. To install, simply download and unzip the
installer from www.audiaire.com/zenith. From the
.pkg (MAC) or .msi (PC) les, you will be prompted
to pick and choose which components you wish
to install.
Zenith installs as VST or AU.
Page 6

3.
Installing, Registering
& Launching Zenith
Registering and Authorising Zenith
Upon purchase you will be sent an email with a
download link for the plugin. Click the link to begin
the download and follow the steps above to install
your copy of Zenith. Please ensure that you have your
Audiare account details to hand, as you will be asked
to log in to Zenith when using it for the rst time.
When logging in, make sure that you have a valid
internet connection, as Zenith will need to verify your
ZENITH USER MANUAL
credentials via Audiaire’s server. After successfully
logging in, you will have access to the full version
of Zenith.
Note:
If you have forgotten/lost your Audiaire
password, you can recover it by visiting
https://www.audiaire.com/accounts/password_reset/
and following the steps to reset your password.
06
Page 7

3.
Installing, Registering
Uninstalling Zenith
For PC
ZENITH USER MANUAL
07
& Launching Zenith
Zenith contains an uninstaller, which you can launch
to uninstall all instances of it.
Please note: upon removing Zenith, all custom
presets will be removed and require restoration
upon re-installation. Please make a copy of any
les that you may wish to use later, as these cannot
be recovered.
You can also manually uninstall Zenith, by following
the steps below.
For Mac
To uninstall Zenith on Mac, you will need to remove
it from the following directories:
/Users/yourusername/Library/Application Support/
Audiaire/Zenith/
/Library/Audio/Plug-Ins/Components/Zenith.component
For PC users, you can uninstall Zenith by going to
your Control Panel > Programs > Uninstall
Programmes and selecting Zenith.
(Please note that the Library folder may be hidden.
To access, click Finder and select the Go menu. Hold
[alt] and Library location will appear under the Go
menu.)
Setting up an Audiaire Account
Setting up an Audiaire account is simple. To begin,
visit https://www.audiaire.com/register/?next=
and complete the steps for account registration.
Once you have logged in, you will be able to see the
licenses attached to your account as well as change
your account information and download demos from
the Audiaire site.
VST: /Library/Audio/Plug-Ins/VST/Zenith.vst
Page 8

3.
Installing, Registering
Redeeming an Audiaire License
ZENITH USER MANUAL
08
& Launching Zenith
If you purchased Zenith from a vendor other than
Audiaire, you will have received a unique license
code with your order. Please create an account if you
don’t already have one, login and redeem license
under the “Redeem Licenses” tab. Please ensure you
use the same email that the purchase was made with.
Page 9
4.
Setting up Zenith
in your DAW
09ZENITH USER MANUAL
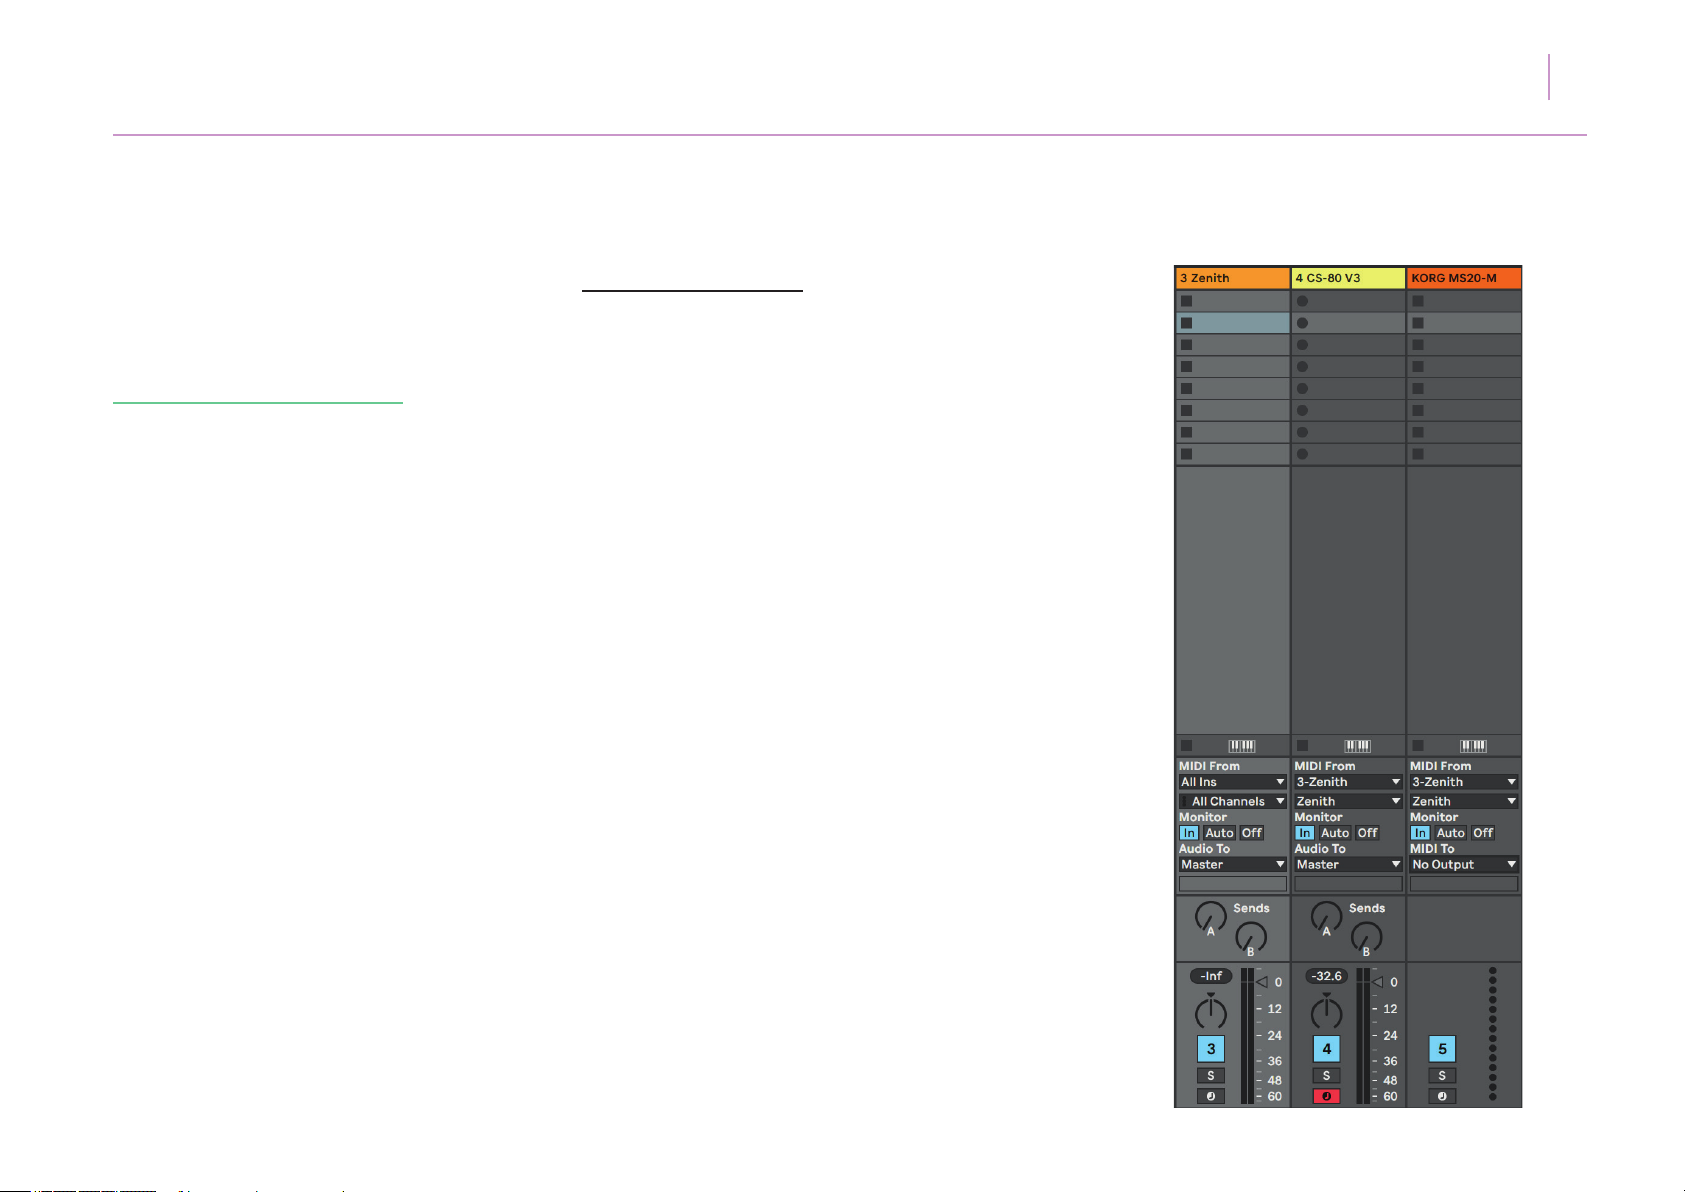
a). Ableton 9 and 10
Zenith can be used as an AU or VST within Ableton
but will not appear as a VST3.
Create a new Zenith Instrument track.
Create a MIDI track if using Zenith with hardware
devices or an Instrument track for the software device
you wish to control with it.
Ensure Monitor is set to In on the Zenith track and the
Instrument or MIDI track to be controlled by it.
Select Zenith in the MIDI From dialogue in both MIDI
From boxes.
If using a MIDI track ensure you have selected the
appropriate MIDI interface in the MIDI To box, even
if the appropriate MIDI interface has already been
selected from within Zenith.
Page 10
4.
Setting up Zenith
in your DAW
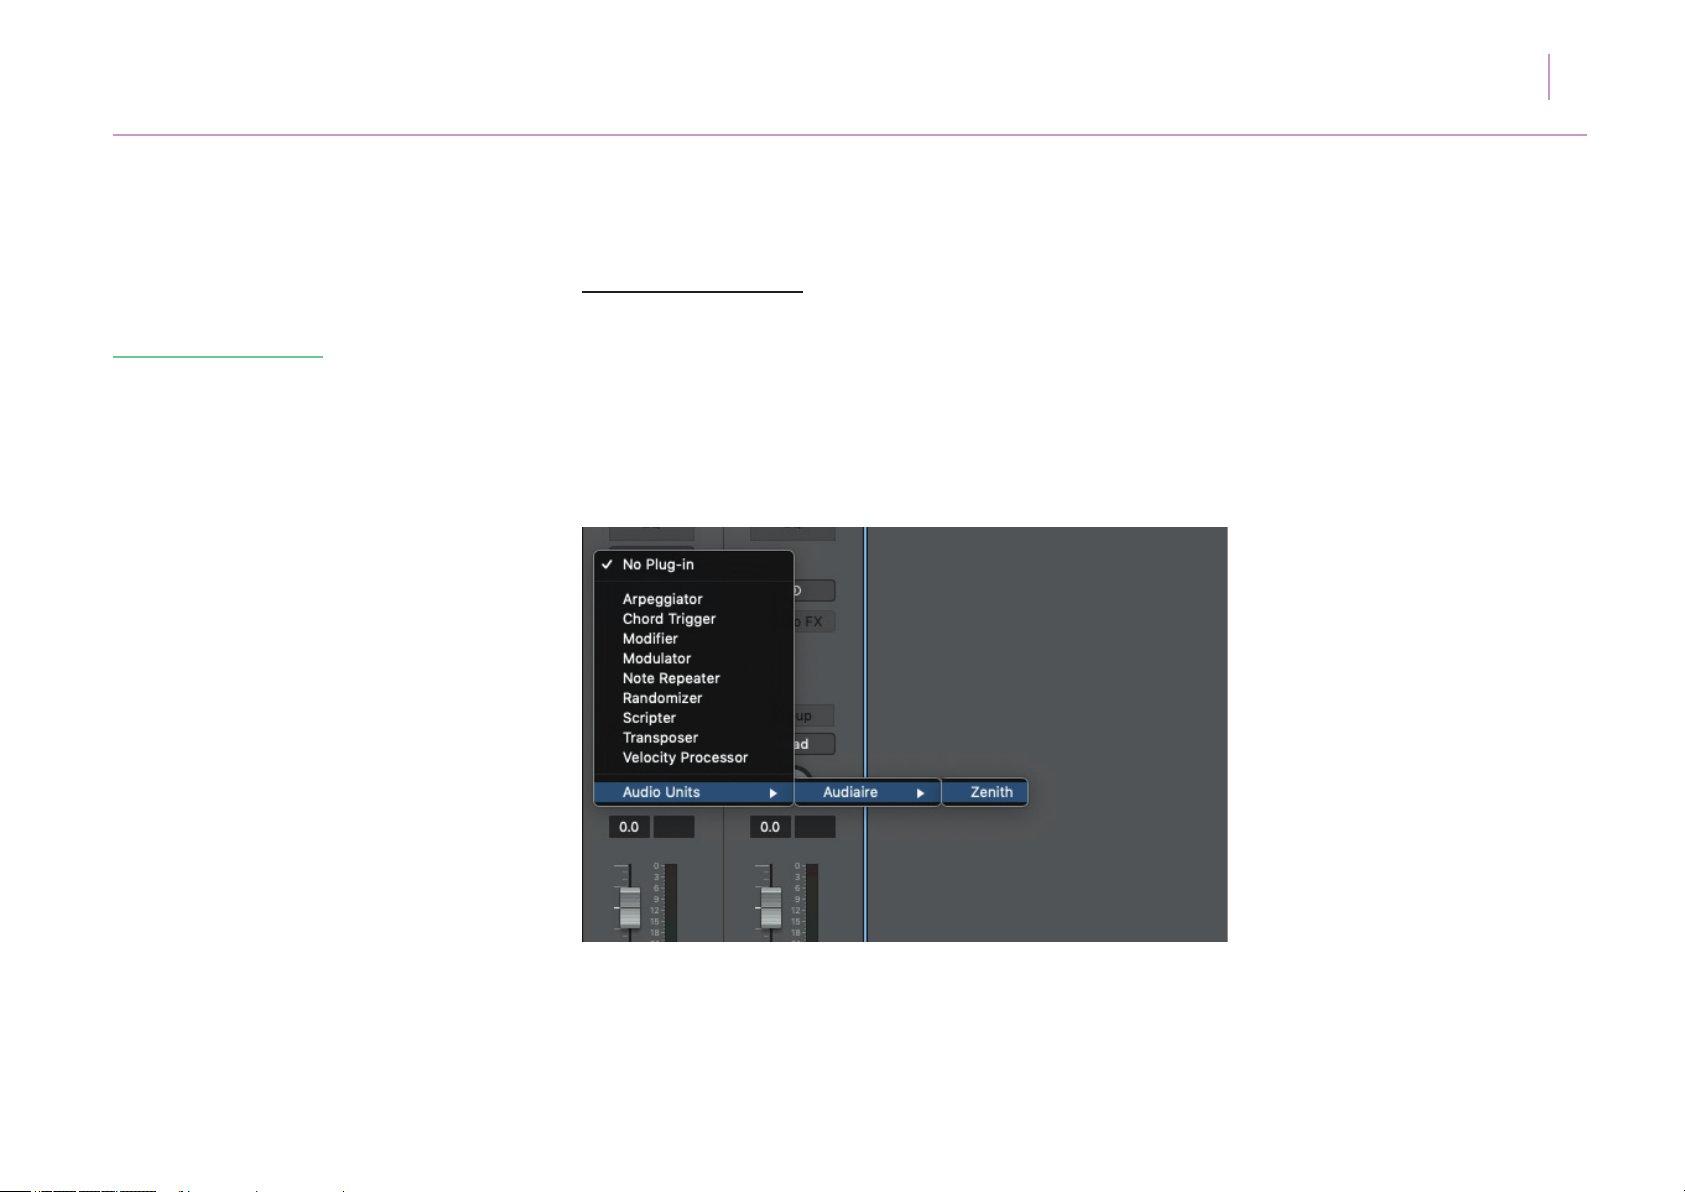
b). Apple Logic Pro X
Create a Software Instrument track or if controlling
a hardware device, an External MIDI Track on rst
launching your new Logic project.
If controlling an external MIDI device, click the
check-box. Use External Instrument plug-in and
ZENITH USER MANUAL
select your audio and MIDI interface input/output
where appropriate.
Select Zenith as a MIDI Insert FX within the channel
strip of your Software Instrument or External MIDI track
from MIDI FX > Audio Units > Audiaire > Zenith.
10
Page 11
4.
Setting up Zenith
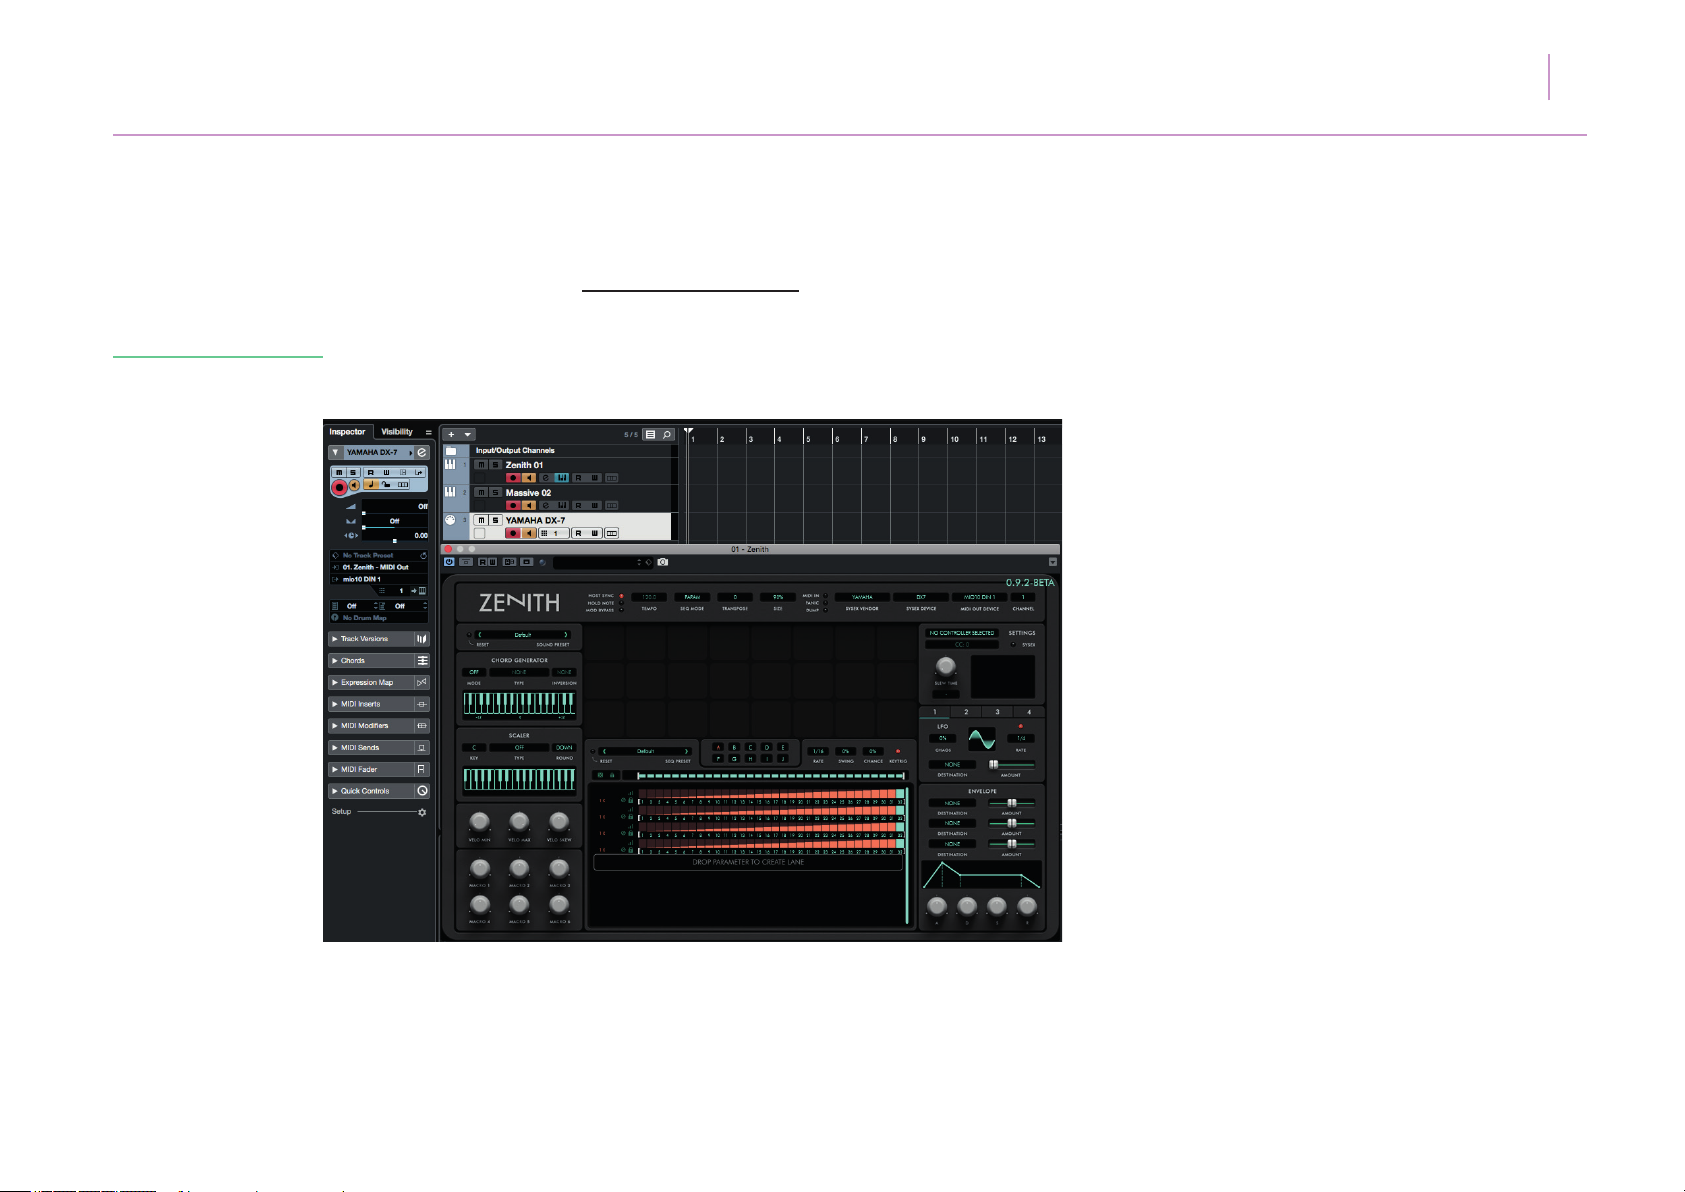
c). Steinberg Cubase
11ZENITH USER MANUAL
Create a new Zenith Instrument track.
in your DAW
Zenith can be used as a VST within Ableton but will not
as a VST3.
Create a MIDI track if using Zenith with hardware
devices or an Instrument track for the software device
you wish to control with it.
Ensure the record monitor button is on in the Zenith
track and the Instrument or MIDI track to be controlled
by it.
Select Zenith in the MIDI In box for the receiving
software Instrument or MIDI track.
If using an external MIDI track ensure you have select-
ed the appropriate MIDI interface in the MIDI Out box,
even if the appropriate MIDI interface has already
been selected from within Zenith.
Page 12
ZENITH USER MANUAL
12
5.
Sending MIDI from
Zenith
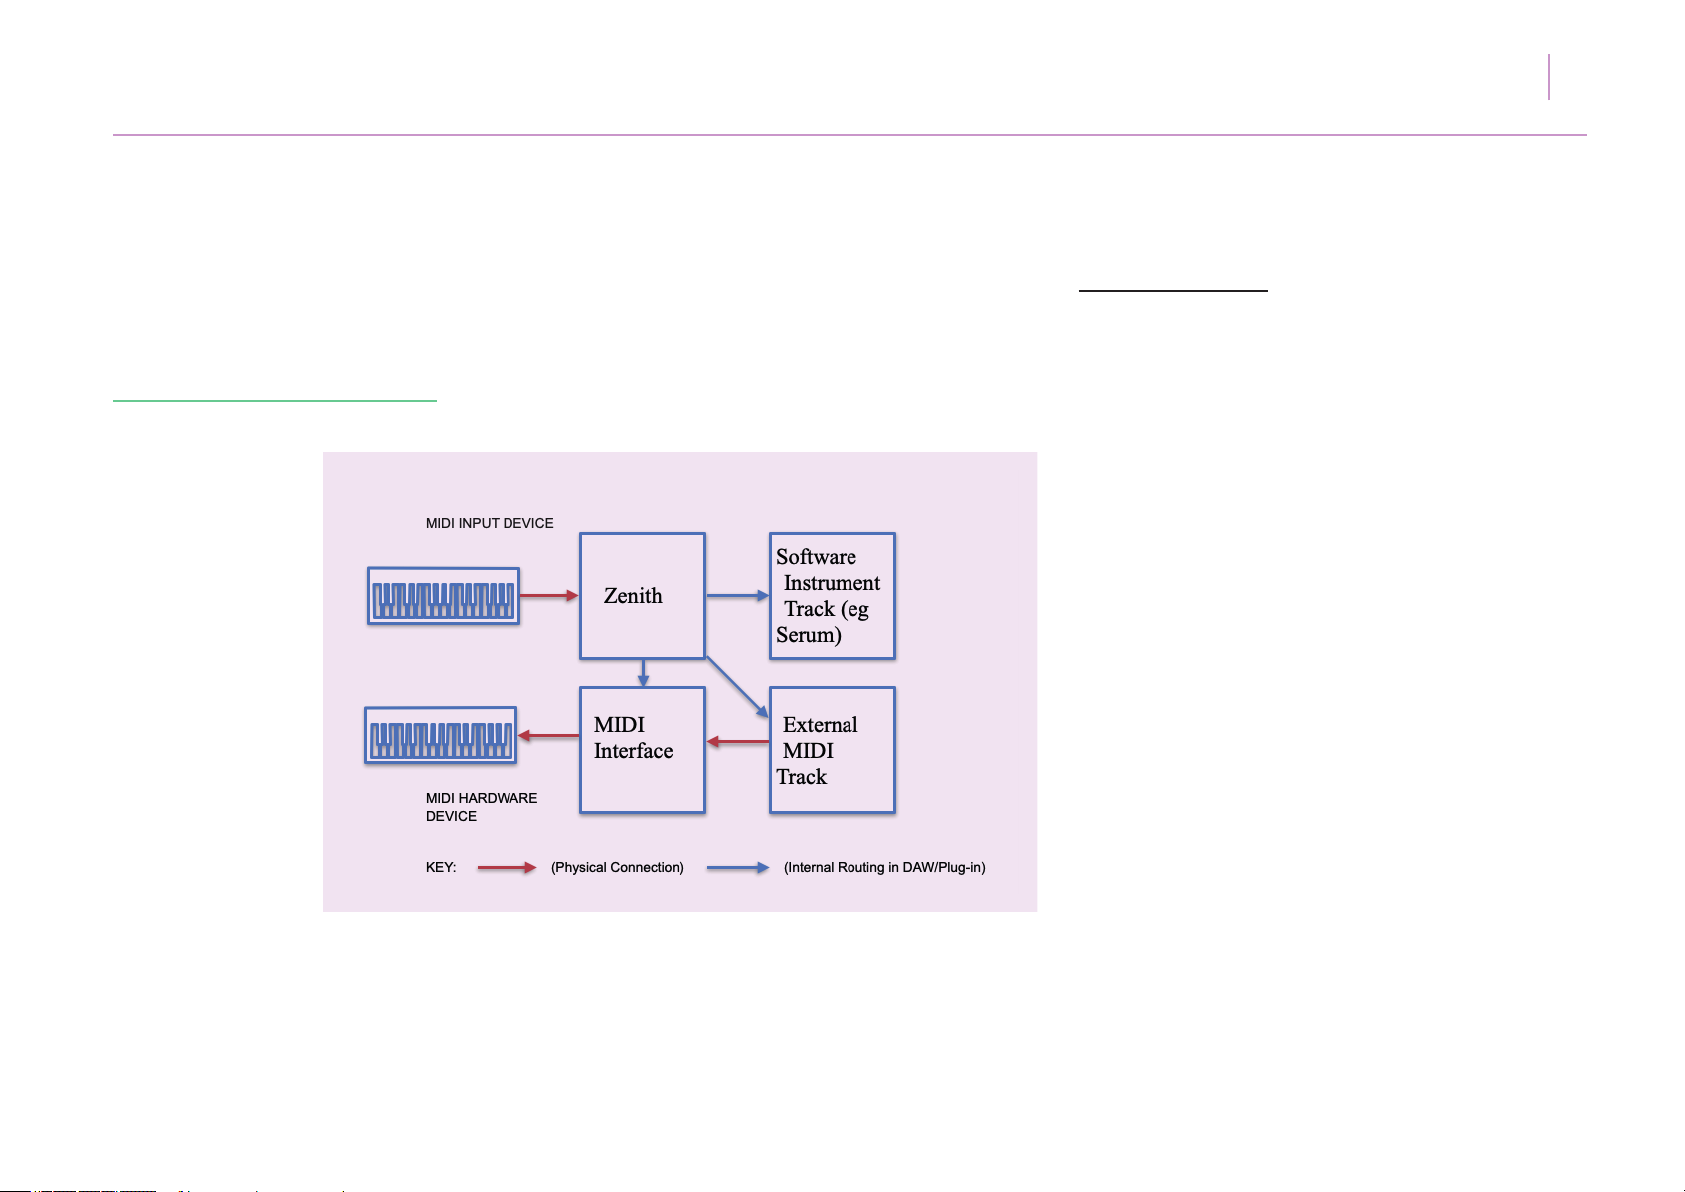
Zenith essentially functions as an insert between your
MIDI input and output devices (see diagram below).
Zenith sends note data, SysEx and MIDI CC data.
What is MIDI CC?
In MIDI terms, a continuous controller (CC) is a MIDI
message capable of transmitting a range of values,
usually 0 -127. The MIDI Spec makes 128 different
ontinuous controllers available for each MIDI channel,
although some of these have been pre-assigned to other
functions. CC’s are commonly used for things like MIDI
controlling volume (#7), pan (#10), data slider position
(#6), mod wheel (#1) and other variable parameters.
Use of CC’s in performance and sequencing can be a
major factor in adding life to MIDI music – but beware,
over-use of CC messages in hardware can result in MIDI
log-jam.
In order for your MIDI receiving device to correctly
accept incoming CC data from Zenith, that devices’s
CC numbers must be matched to Zenith’s.
Page 13
5.
Sending MIDI from
Zenith
MIDI Maps
Zenith ships with a number of presets for popular hardware and software devices. Once the appropriate preset
has been loaded in Zenith, the receiving
device may require a MIDI map to be loaded if it is
a software instrument. Loading the MIDI map for that
device will ensure its controls match those in the Zenith
preset, even if its presets are changed. Please consult
with your specific device manual to successfully load
and save MIDI maps. Zenith ships with MIDI maps for
all its devices where applicable.
Most hardware devices do not need pre-loaded MIDI
maps and have CCs listed in the MIDI Implementa-
tion spec in their manual back pages, therefore the
hardware device presets shipped with Zenith will not
require MIDI map loading, but may require device
specific operations such as ensuring all MIDI data is
receivable and CC control is switched on. Please refer
to your device manual.
13ZENITH USER MANUAL
You must then either match the CC to that of the
number of the receiving controller you are seeking
to control - this can be done manually or by using
the MIDI learn function in the receiving device if it
has one, and moving a control in Zenith to send
data appropriately to that CC.
Please make sure to save a MIDI map in the
receiving device or save your work in your DAW
otherwise you may lose controller assignments in
the receiving device.
Assigning Devices From Scratch
If you are assigned a device from scratch, you can set
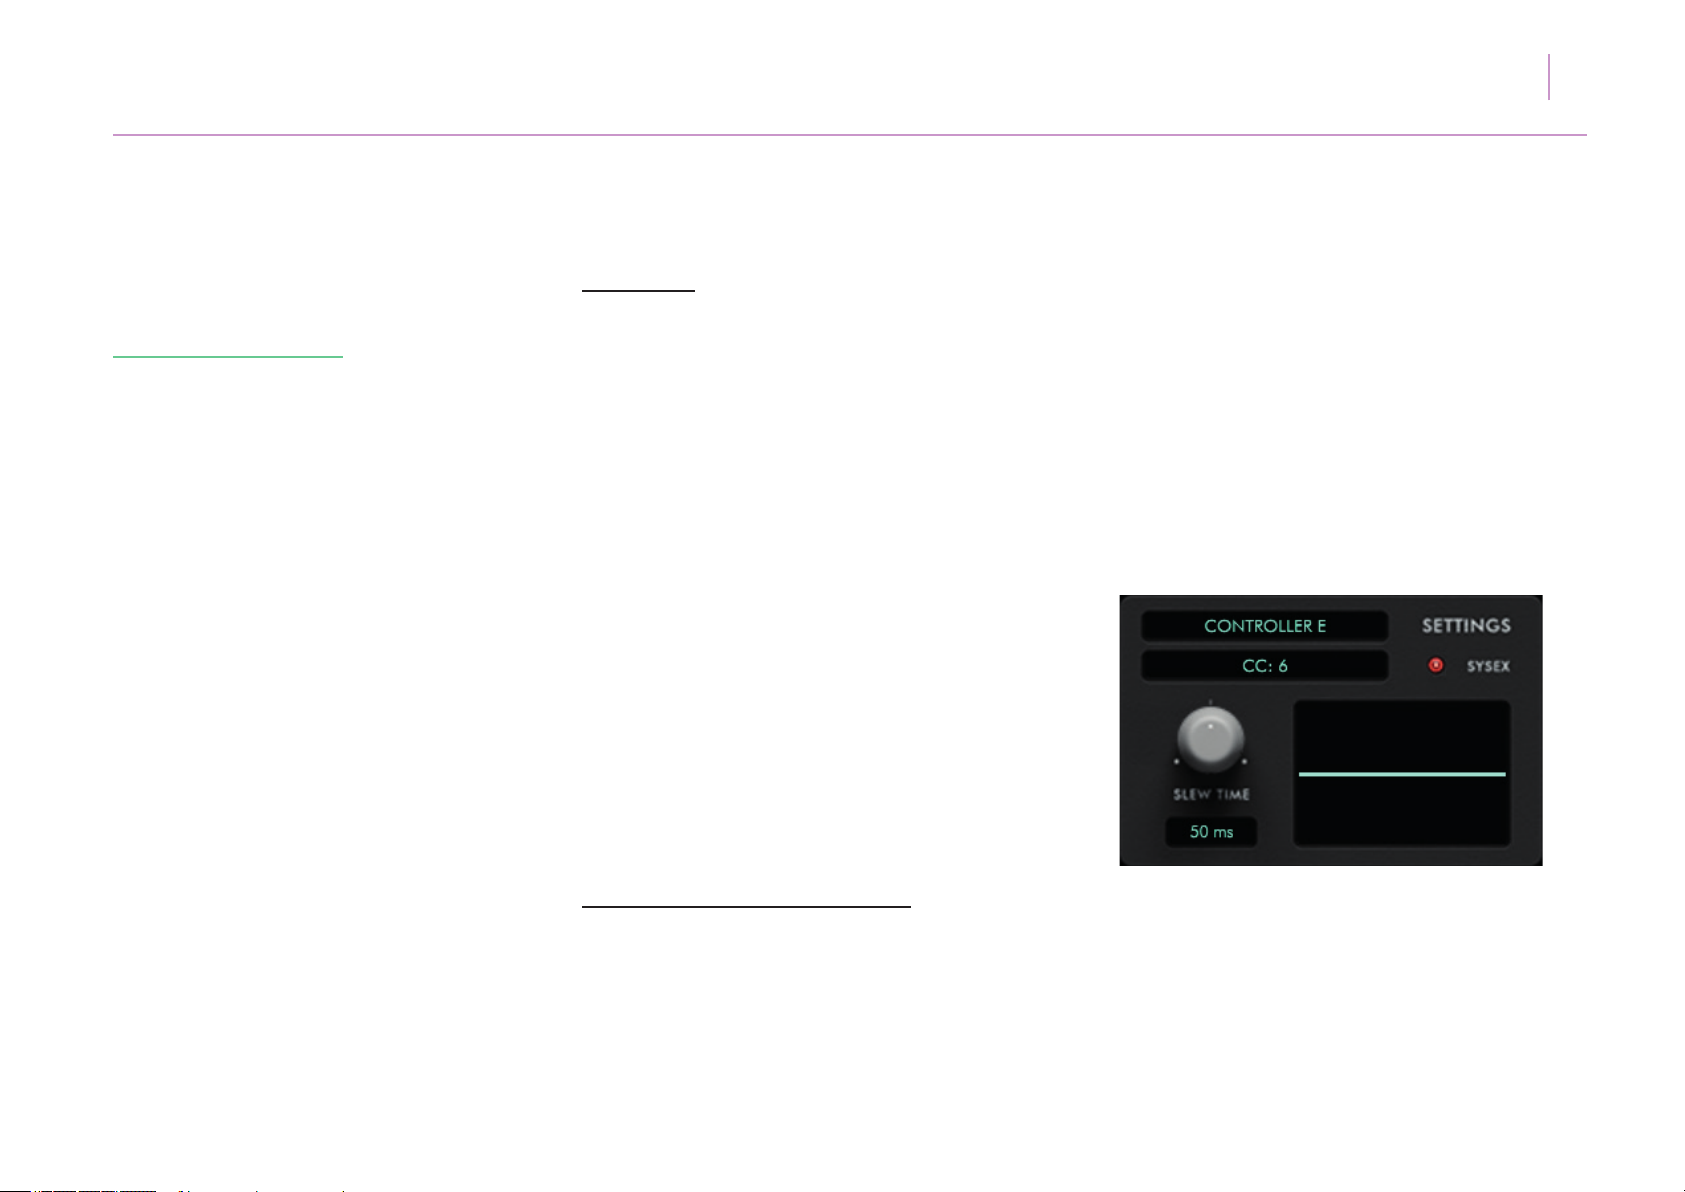
each Zenith device controller’s CC by clicking on it and
adjusting its CC number in the right hand menu, or if a
SysEx device click the SYSEX LED on.
Page 14
5.
Sending MIDI from
14ZENITH USER MANUAL
SysEx Device Operation
Zenith
For devices without CC control, Zenith can also send
SysEx data. In order to do this, that device’s SysEx
data parameters must be loaded into Zenith as a text
file, if it is not in the list of preset devices in the Zenith
SysEx drop down menu. See Appendix A for further
information on this.
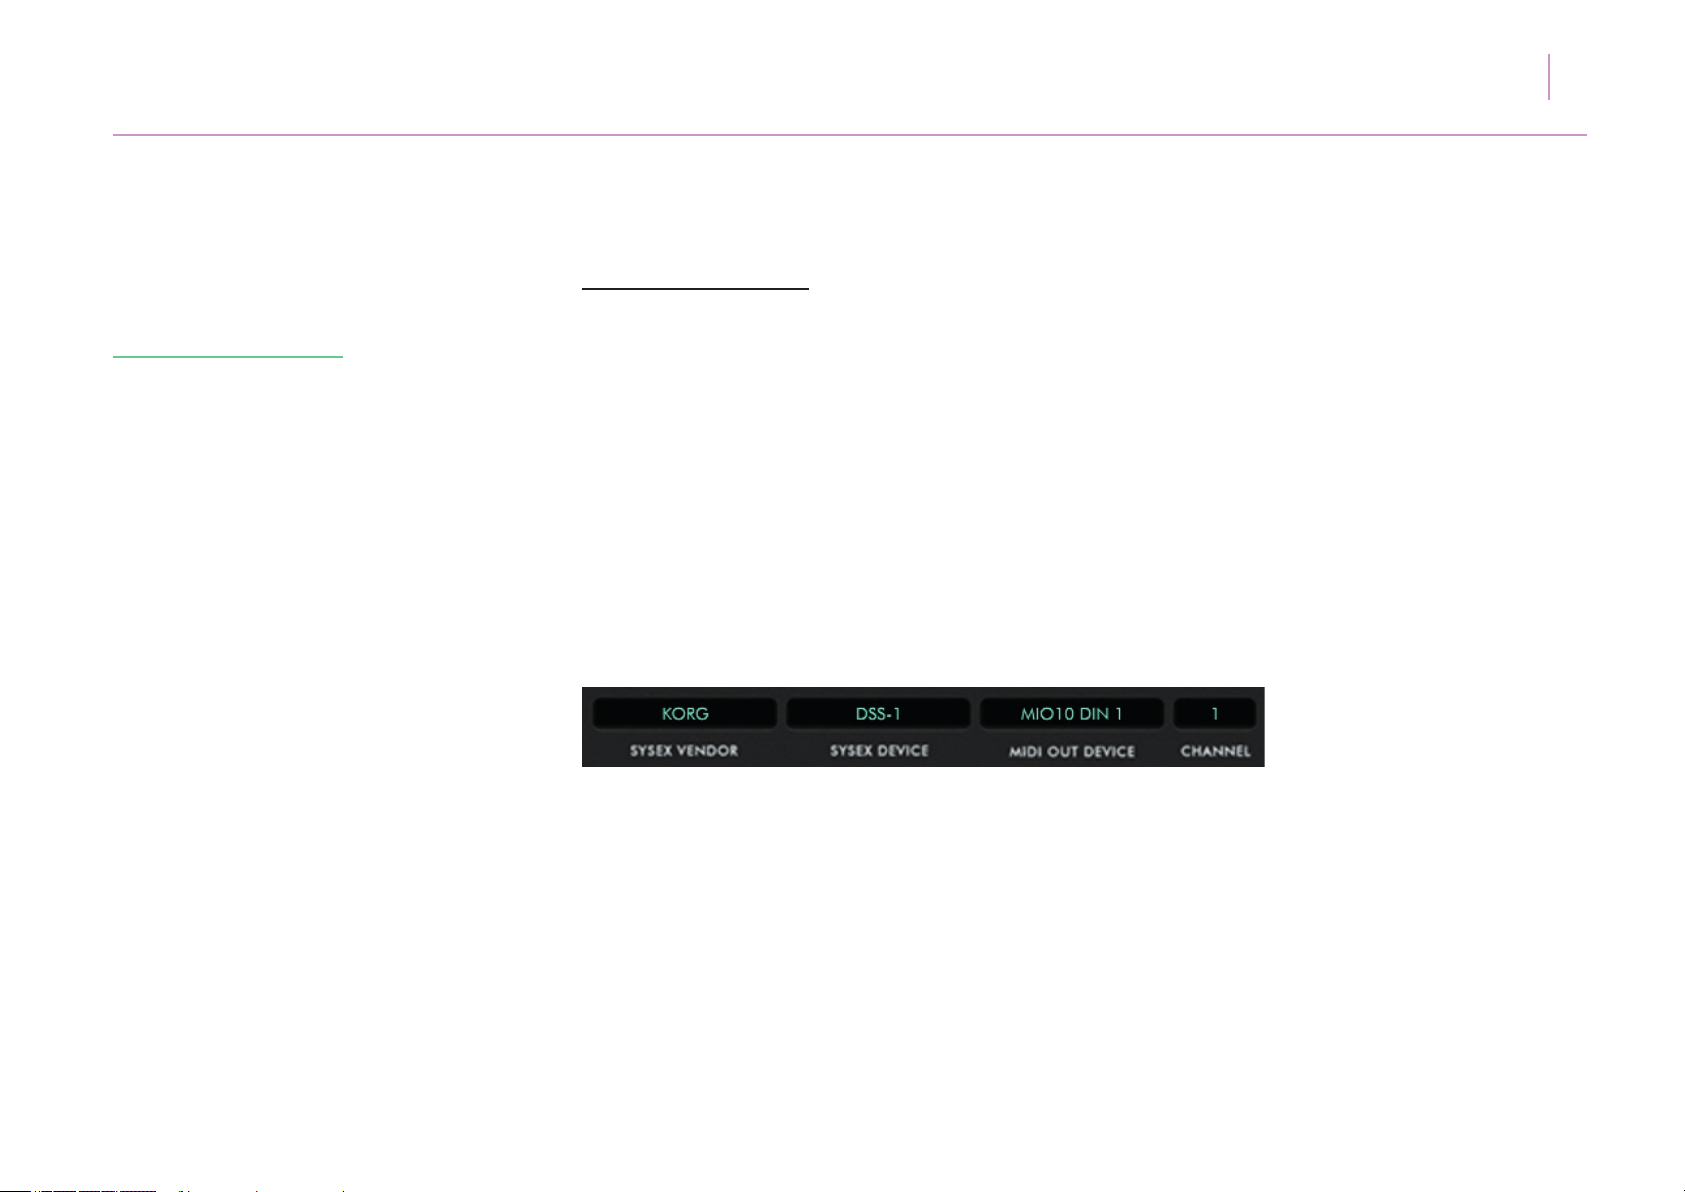
For SysEx devices to successfully function with Zenith,
‘switch on’ SysEx mode by selecting the appropriate
MIDI output and MIDI channel for the device from
Zenith (see below). Once the SysEx device has been
selected from within Zenith you must still load its preset.
Page 15

6.
Feature Overview
Congratulations on purchasing Zenith.
At the heart of Zenith’s operation are a series of
powerful MIDI processors which allow up to 24
different MIDI CC’s to be modied in their own
independent sequencer lanes. A unique customisable
user interface enables the creation of knobs, faders
and sliders for any device.
In addition there are 4 x CC LFOs and 3 x CC
envelopes and preset templates for many popular
software and hardware instruments.
15ZENITH USER MANUAL
• 27 lane and global sequencer speeds.
• Individual lane step mutes and independently
selectable sequence lengths.
• Sequencer +/- swing and probability controls.
• Powerful SysEx processing for controlling vintage
hardware synths lacking CC implementation or front
panel controls.
• 3 slew lter types per CC with adjustable time.
Zenith also includes a comprehensive chord generator,
with 22 chord types, each with three separate inversions, note scaler, velocity limiter, SysEx processor with
customisable scripting, 24 slew lters, 100 sequence
lane presets and an arpeggio editor.
Amongst Zenith’s primary features are:
• Preset maps for 100+ software and hardware
synths, drum machines and other MIDI receiving
devices.
• Extensive lane modication tools including
increase/decrease and shift step modiers plus
10 popular arpeggios and 13 scales per lane.
• Adjustable MIDI latency for SysEx devices.
• Low CPU usage with no license management
software to install.
Page 16
7.
Getting to know
Zenith
16ZENITH USER MANUAL
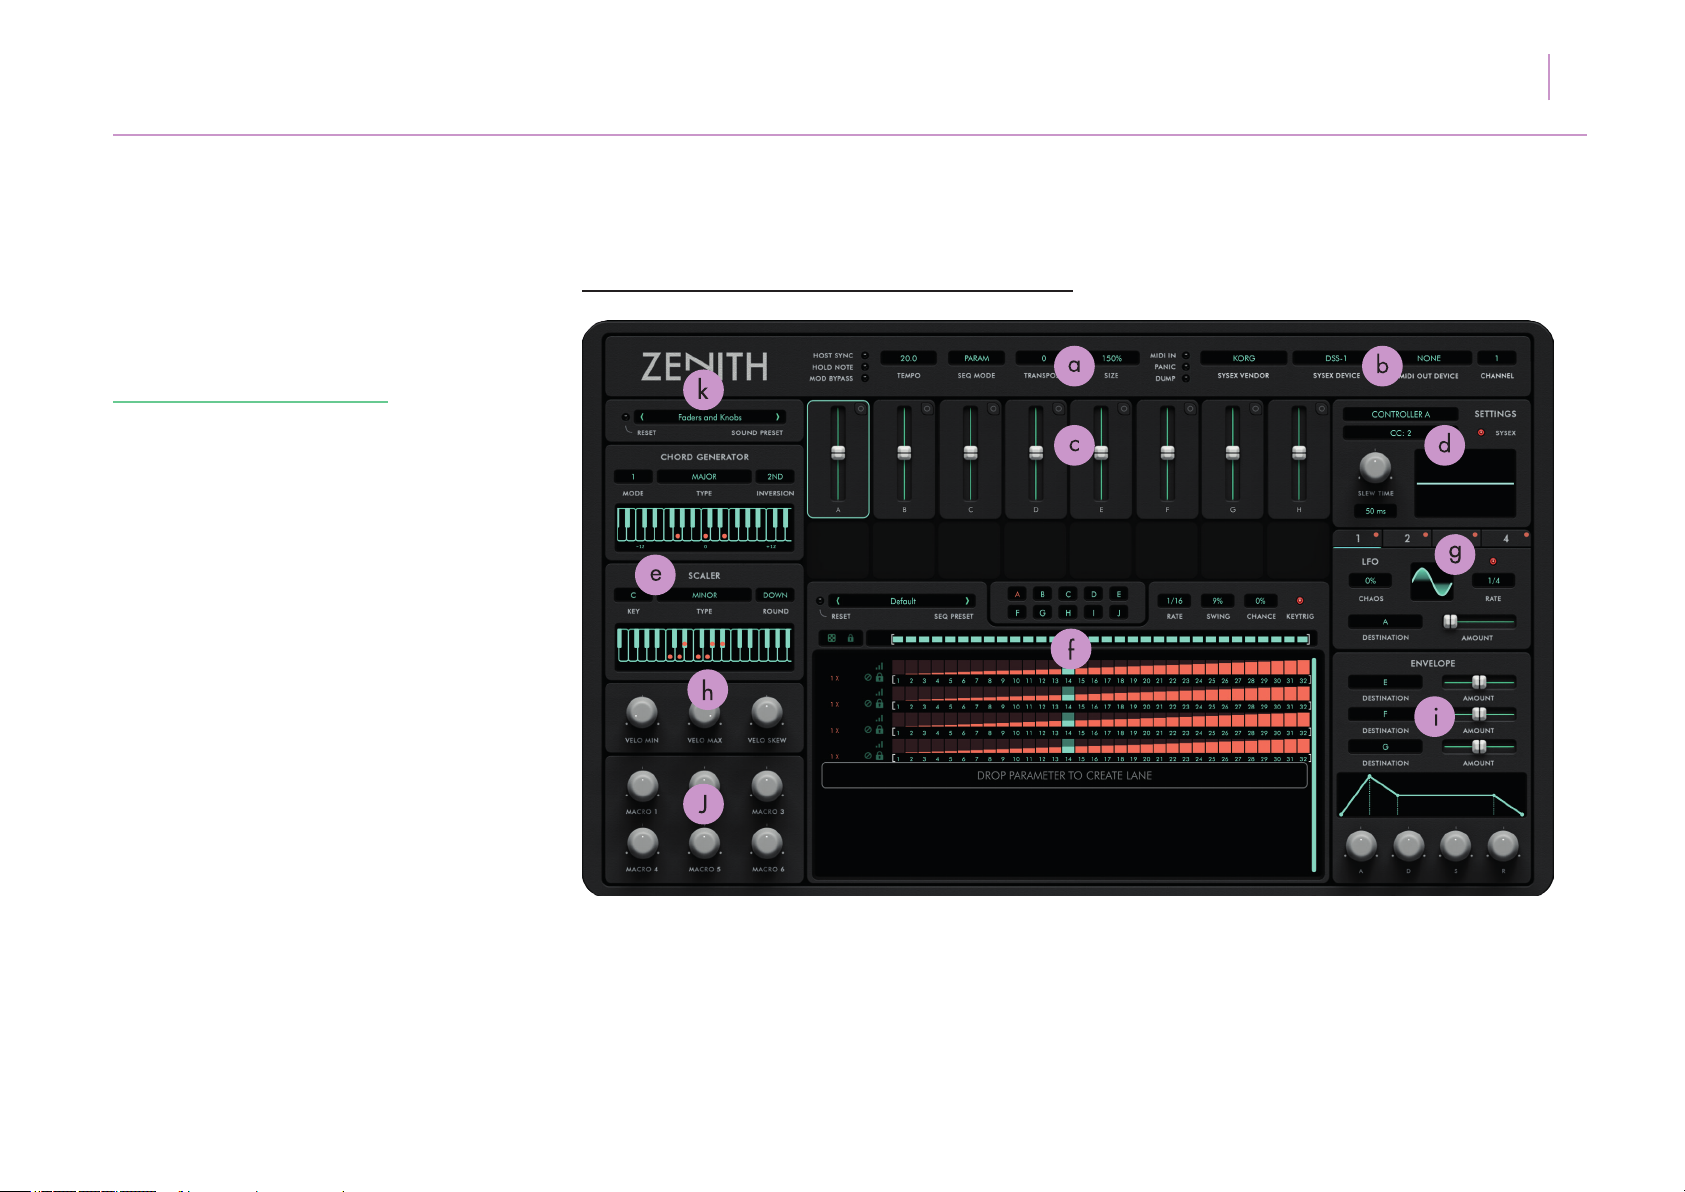
Below is an overview of Zenith’s user interface.
The lettered points show the basic operational
features which are described on the next page.
Page 17
7.
Getting to know Zenith
17ZENITH USER MANUAL
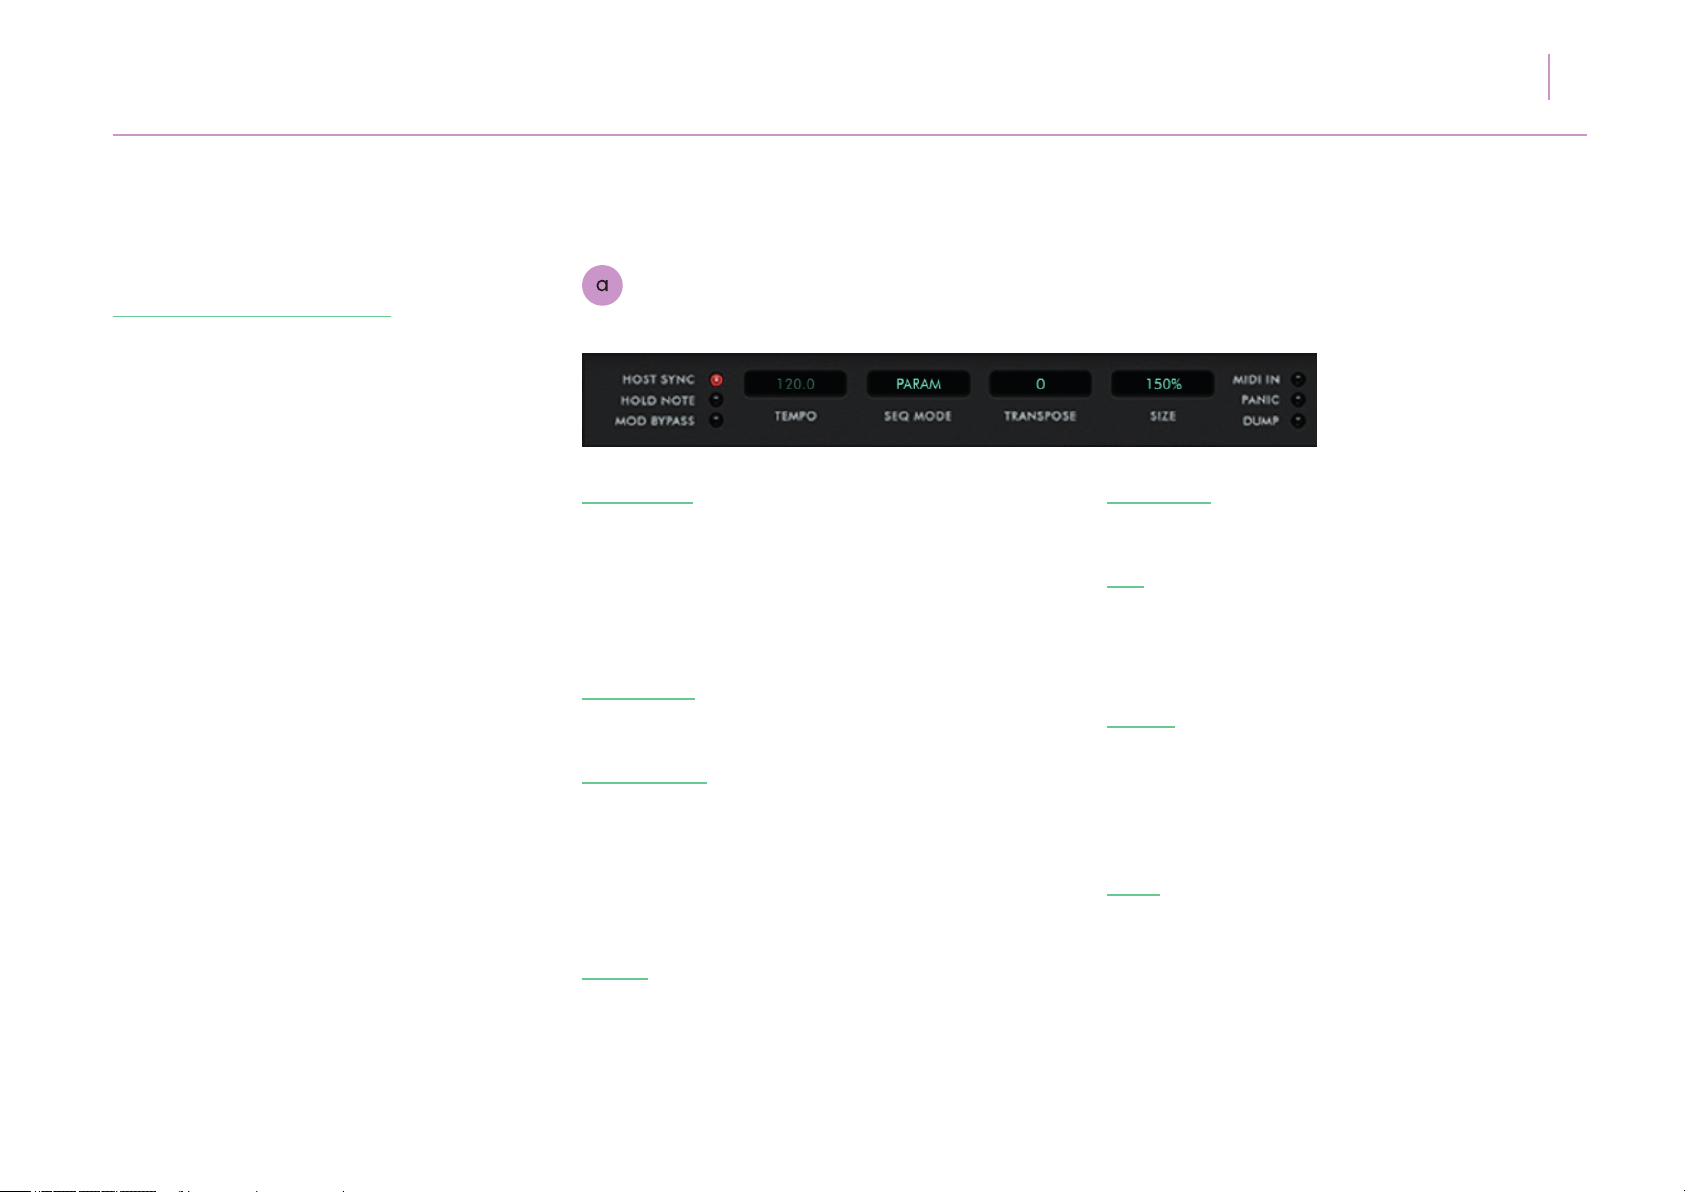
HOST SYNC - Click this LED to toggle ON/OFF host
sync to your DAW. When sync’ed to DAW, the LED
will illuminate and the TEMPO value will follow that
of your DAW. When not sync’ed the tempo display
can be adjusted by click dragging or double clicking
to enter a numeric value.
HOLD NOTE - Clicking the LED next to HOLD NOTE
will sustain a MIDI note innitely for easy editing.
MOD BYPASS - Bypasses the sequencer grid, LFOs
and ENVELOPE section from modifying MIDI CC
data. This function is useful when the receiving device
is in MIDI learn mode and you wish to ‘teach’ it one
CC value at a time without having the grid and LFOs
send multiple CCs to one control.
TEMPO - Displays in BPM the tempo at which Zenith’s
internal clock will run. This value can be adjusted
from 20.0 - 999.0.
SEQ MODE - Zenith operates in four distinct modes.
This menu selects those modes as follows:
OFF - The note and parameter sequencers are not
active. Zenith will output MIDI notes without any
sequencer modication, with all controls active but
the sequencer window blank.
PARAM - The parameter sequencer mode is active,
with lanes ready for click-and-drag assignment. If
a factory preset is loaded, the assigned parameter
sequencer lanes can be activated or deactivated by
selecting or deselecting this mode.
NOTE - The note sequencer mode is active. If a default
blank preset is selected - pitch, velocity and gate
lanes will appear, ready for programming. If a factory
preset is loaded, the programmed note sequencer
lanes can be activated or deactivated by selecting
or deselecting this mode.
Page 18

7.
Getting to know Zenith
18ZENITH USER MANUAL
PRM&NOTE - Both parameter sequencer and note
lanes are active. Note lanes are coloured orange and
parameter lanes blue. All lanes are synced by default.
TRANSPOSE - Transposes the MIDI note generated by
Zenith +/- 48 semitones.
SIZE - Click to change the size of Zenith’s GUI
from 50-200%.
MIDI IN - LED illuminates to show MIDI activity
within Zenith.
PANIC - Click this LED to temporarily cease sending
of MIDI data, if for example a hardware MIDI device
is glitching due to too much data or data at too high
a rate.
DUMP - Clicking this LED will send a ‘snapshot’
of current grid controller values and output them
to assigned controls in the MIDI receiving device
directly. No modulation or sequence data is added.
Just the position of each controller.
Page 19
7.
Getting to know Zenith
19ZENITH USER MANUAL
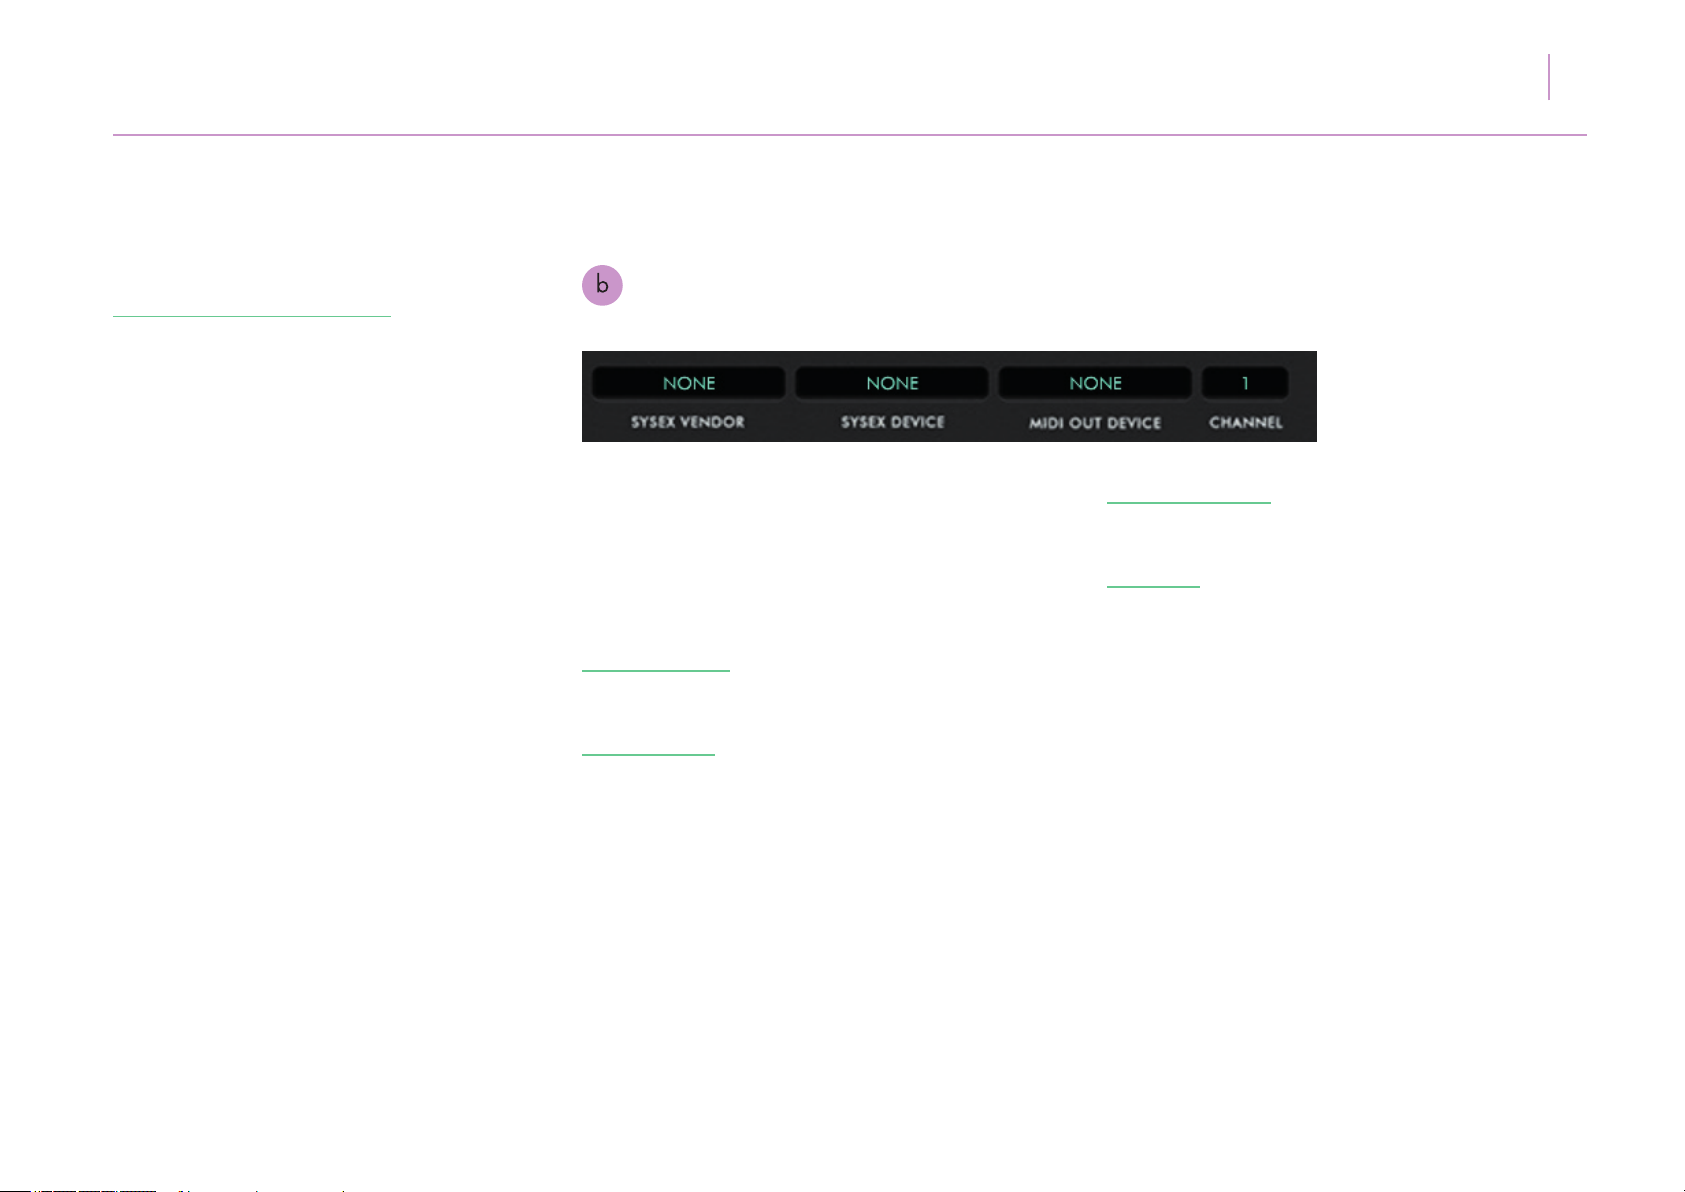
Selecting from the SYSEX panel will recall from a list
of applicable data receiving device presets. From this
menu you will need to select a MIDI interface from
which to send SysEx data and the corresponding
MIDI channel of that device.
SYSEX VENDOR - Displays the name of the
hardware device.
SYSEX DEVICE - Displays the precise model of
the hardware device selected.
MIDI OUT DEVICE - Selects the MIDI interface
from which Zenith sends MIDI or SysEx data.
CHANNEL - Sets the MIDI channel to which
Zenith sends MIDI or SysEx data.
Page 20
7.
Getting to know Zenith
20ZENITH USER MANUAL
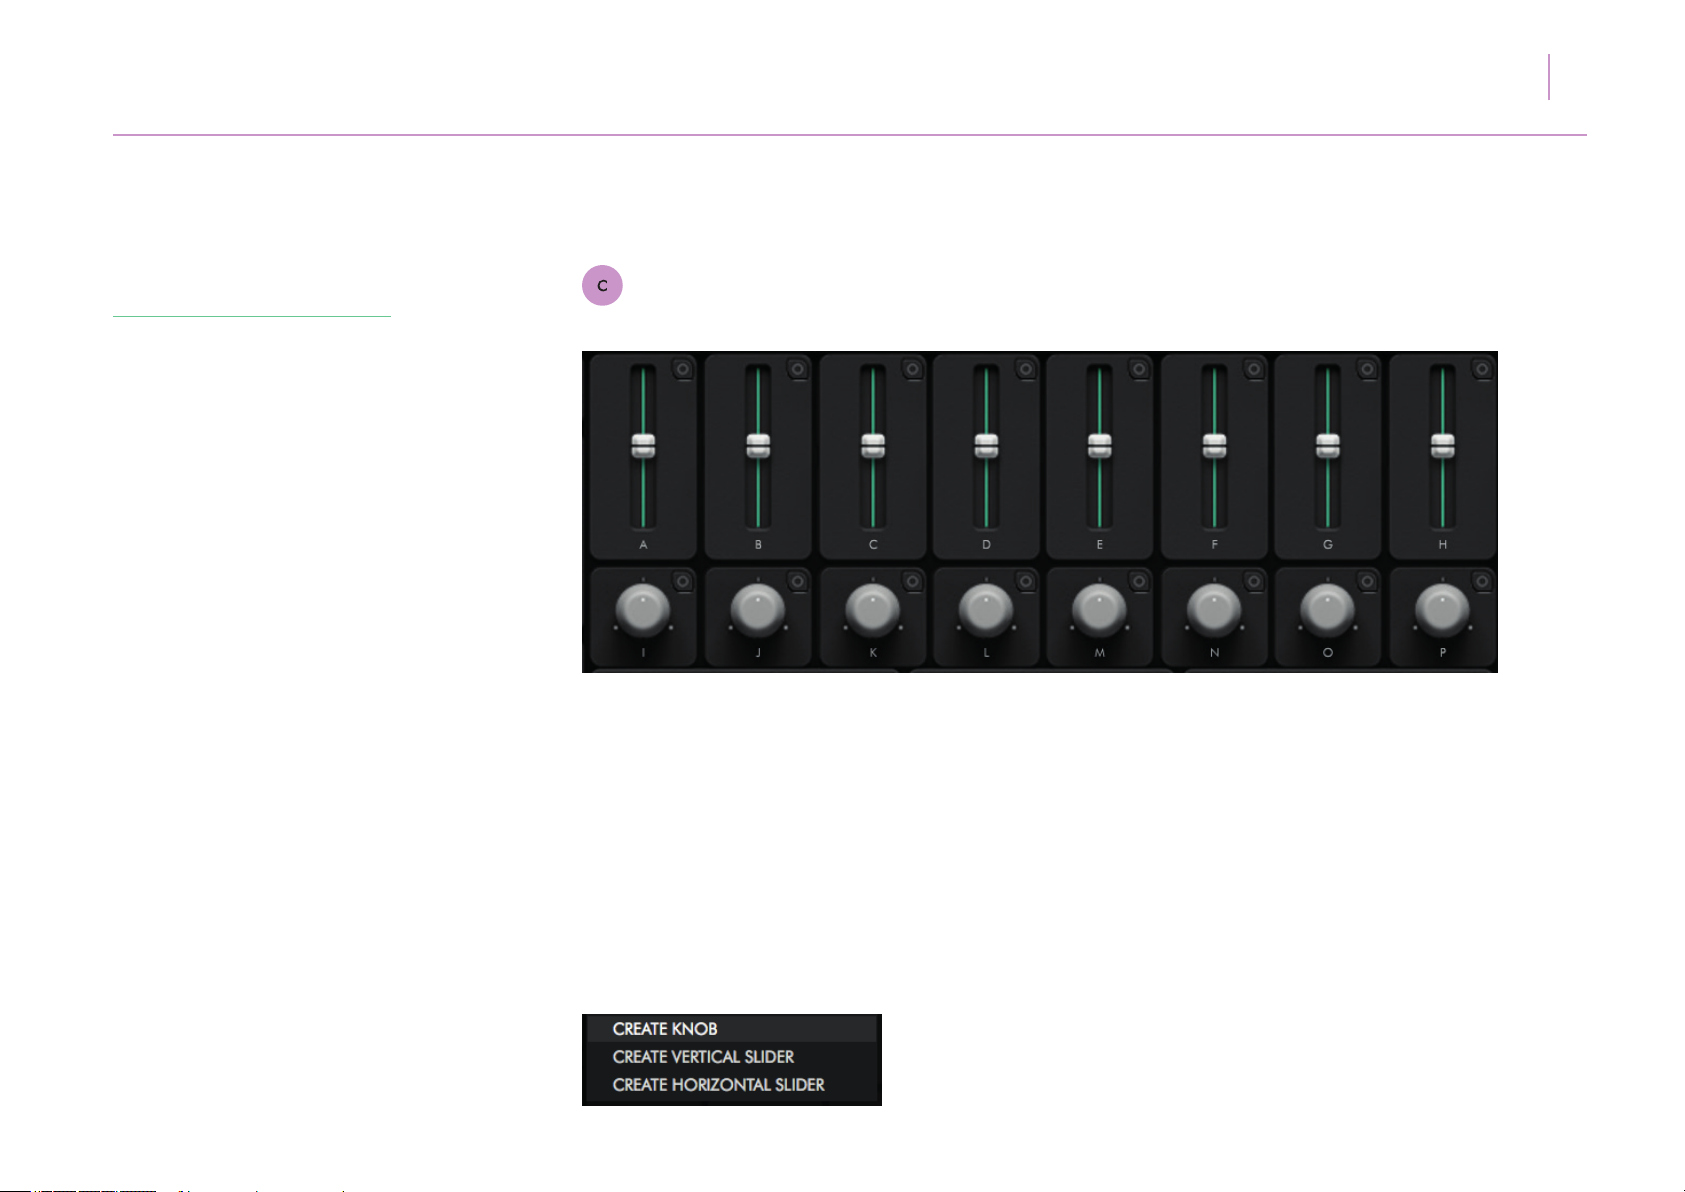
This is the main Zenith control environment where
new knobs, faders and sliders can be created to
match your receiving device CC.
Up to a maximum of 24 grid controllers can
be created.
Clicking anywhere in the grid will reveal a
menu allowing creation of a knob or vertical
/horizontal slider.
Page 21
ZENITH USER MANUAL 21
7.
Getting to know Zenith
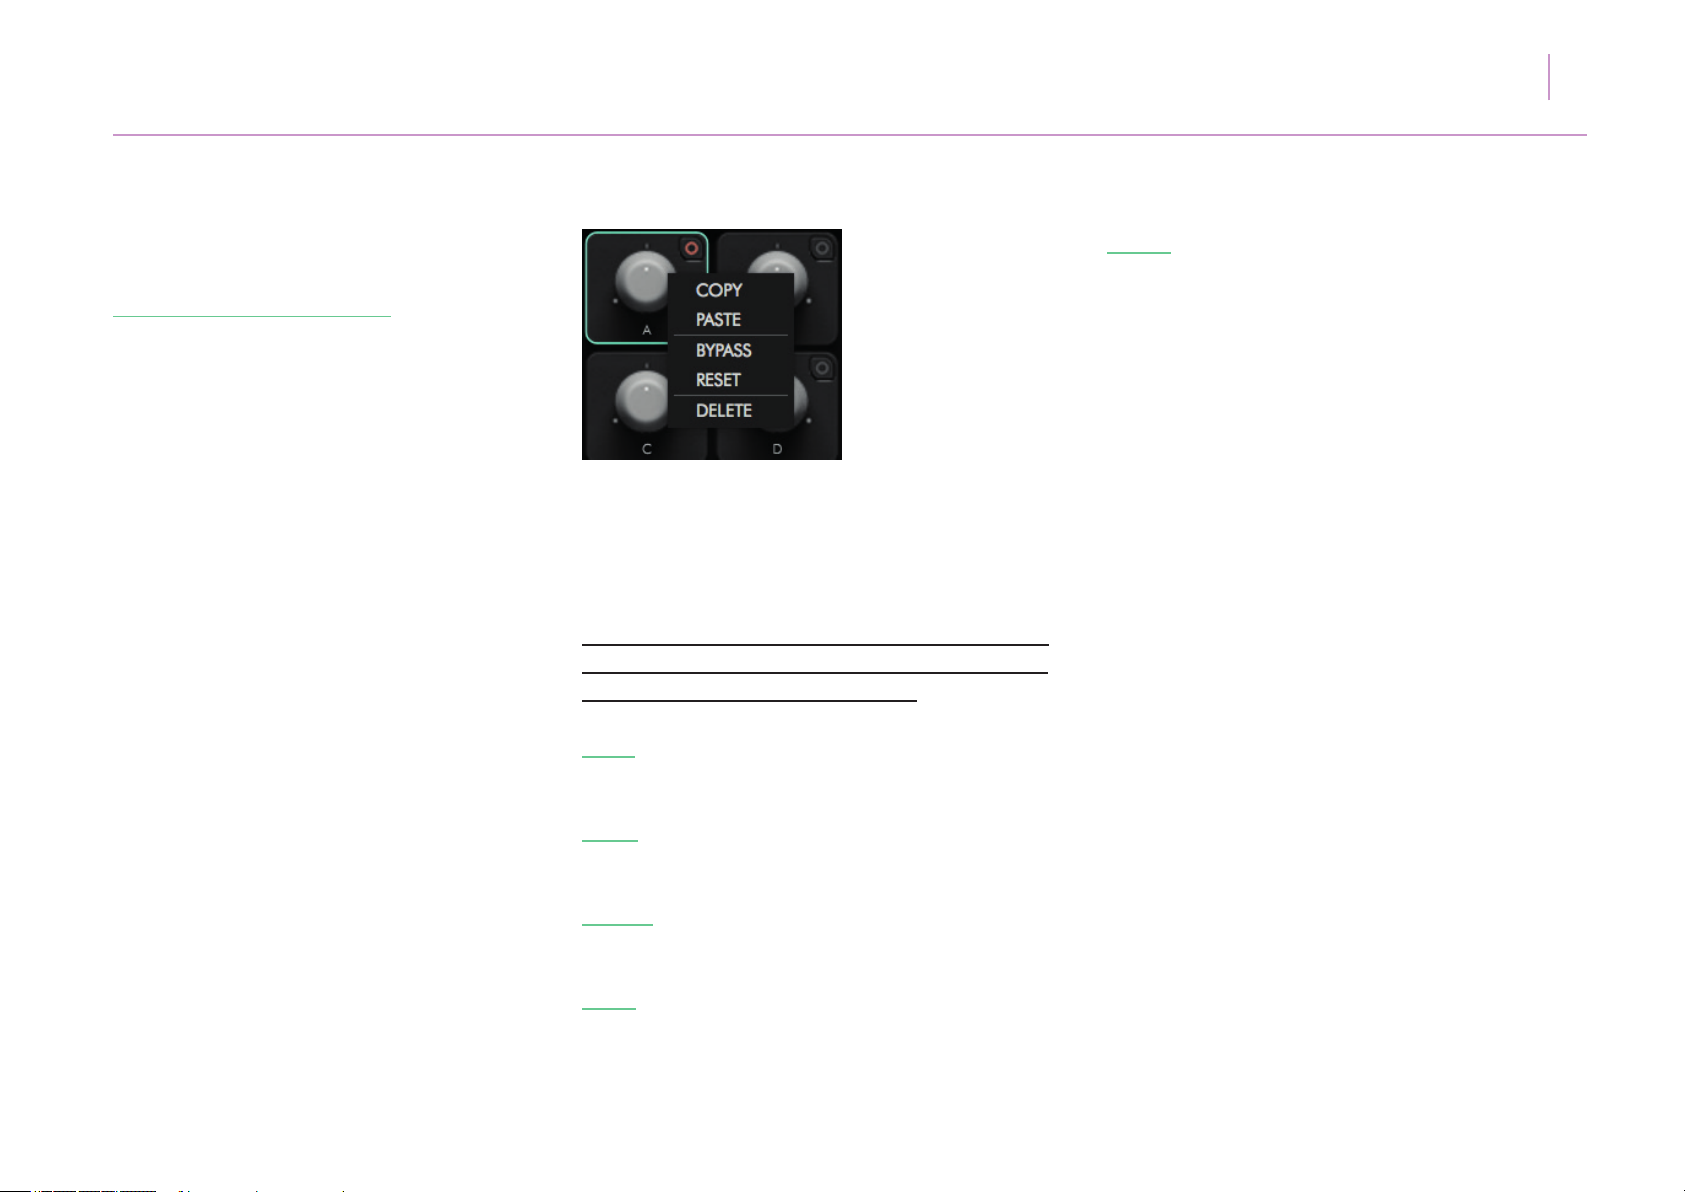
A grid controller can be selected by clicking
anywhere within its enclosure, which then
illuminates in green to denote selection.
Clicking the circle to the top right of a grid controller
will reveal a menu enabling COPY/PASTE/BYPASS/
RESET and DELETE options as follows:
COPY - Copy MIDI CC value and number from one
controller to another, irrespective of shape.
DELETE - Deletes a controller permanently.
Each time a new controller is created, its CC number
will increase by one, making for quick assignment of
new devices.
Double clicking on a controller letter will enable it
to be renamed.
Double clicking on a controller inner shape will
enable a CC value to be manually typed.
[ALT] and clicking on a controller will return its
CC value to default.
PASTE - Paste MIDI CC value and number from one
controller to another.
BYPASS - Stops a device from sending CC or
SysEx data.
RESET - Returns a controller to its default CC
number and value.
Page 22
7.
Getting to know Zenith
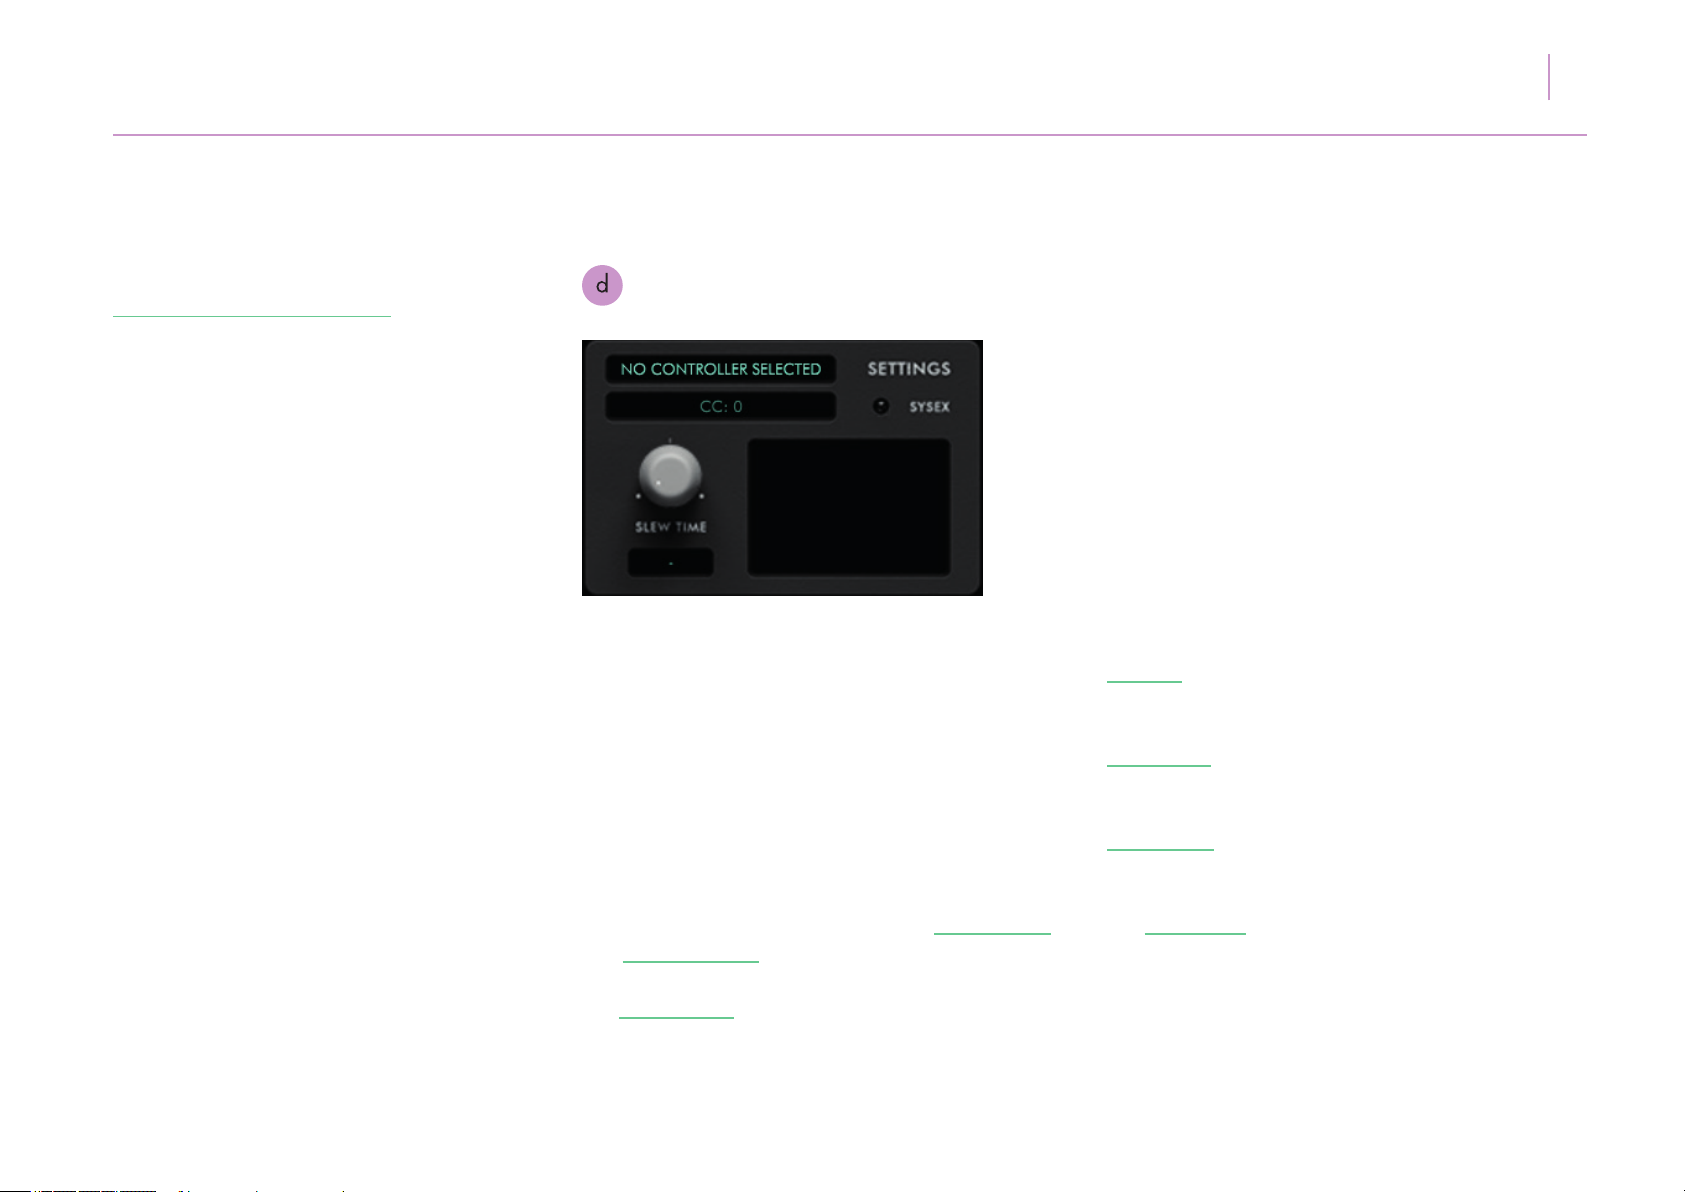
When a grid controller is clicked, its individual
SETTINGS will display accordingly.
The controller CC number can be set or adjusted
here by double clicking or entering a numeric value.
If the controller is congured to send SysEx, the
SYSEX LED can be clicked on/off to switch SysEx
on or off.
22ZENITH USER MANUAL
LINEAR: Will present a straight line time curve to
reach the destination grid value.
ONE POLE: Will present a non-linear curve to reach
the destination grid value.
TWO POLE: Will present a smoother non-linear curve
to reach the destination grid value.
Each controller also has its own unique SLEW FILTER
and SLEW TIMING control.
The SLEW FILTER sets the manner in which the controller
will respond to sequencer grid data as follows:
The SLEW TIME adjusts the amount time in ms taken
to reach the destination grid value.
Page 23
7.
Getting to know Zenith
23ZENITH USER MANUAL
2: A different chord TYPE and INVERSION can be
played across each octave from key Cx to Bx. The
root range of the notes in each chord will remain
constant across all octaves.
Octaves can be selected by clicking on any note
within an octave in the keyboard graphic, or by
playing the incoming MIDI note into Zenith. Clicking
to the left or right of the keyboard graphic will reveal
arrows to increase or decrease octave.
3: A different chord TYPE and INVERSION can be
played across every key from C0 - B8. A key chord
can be selected by clicking on any note in the
keyboard graphic, or by playing the incoming MIDI
note into Zenith. Clicking to the left or right of the
keyboard graphic will reveal arrows to increase or
decrease octave.
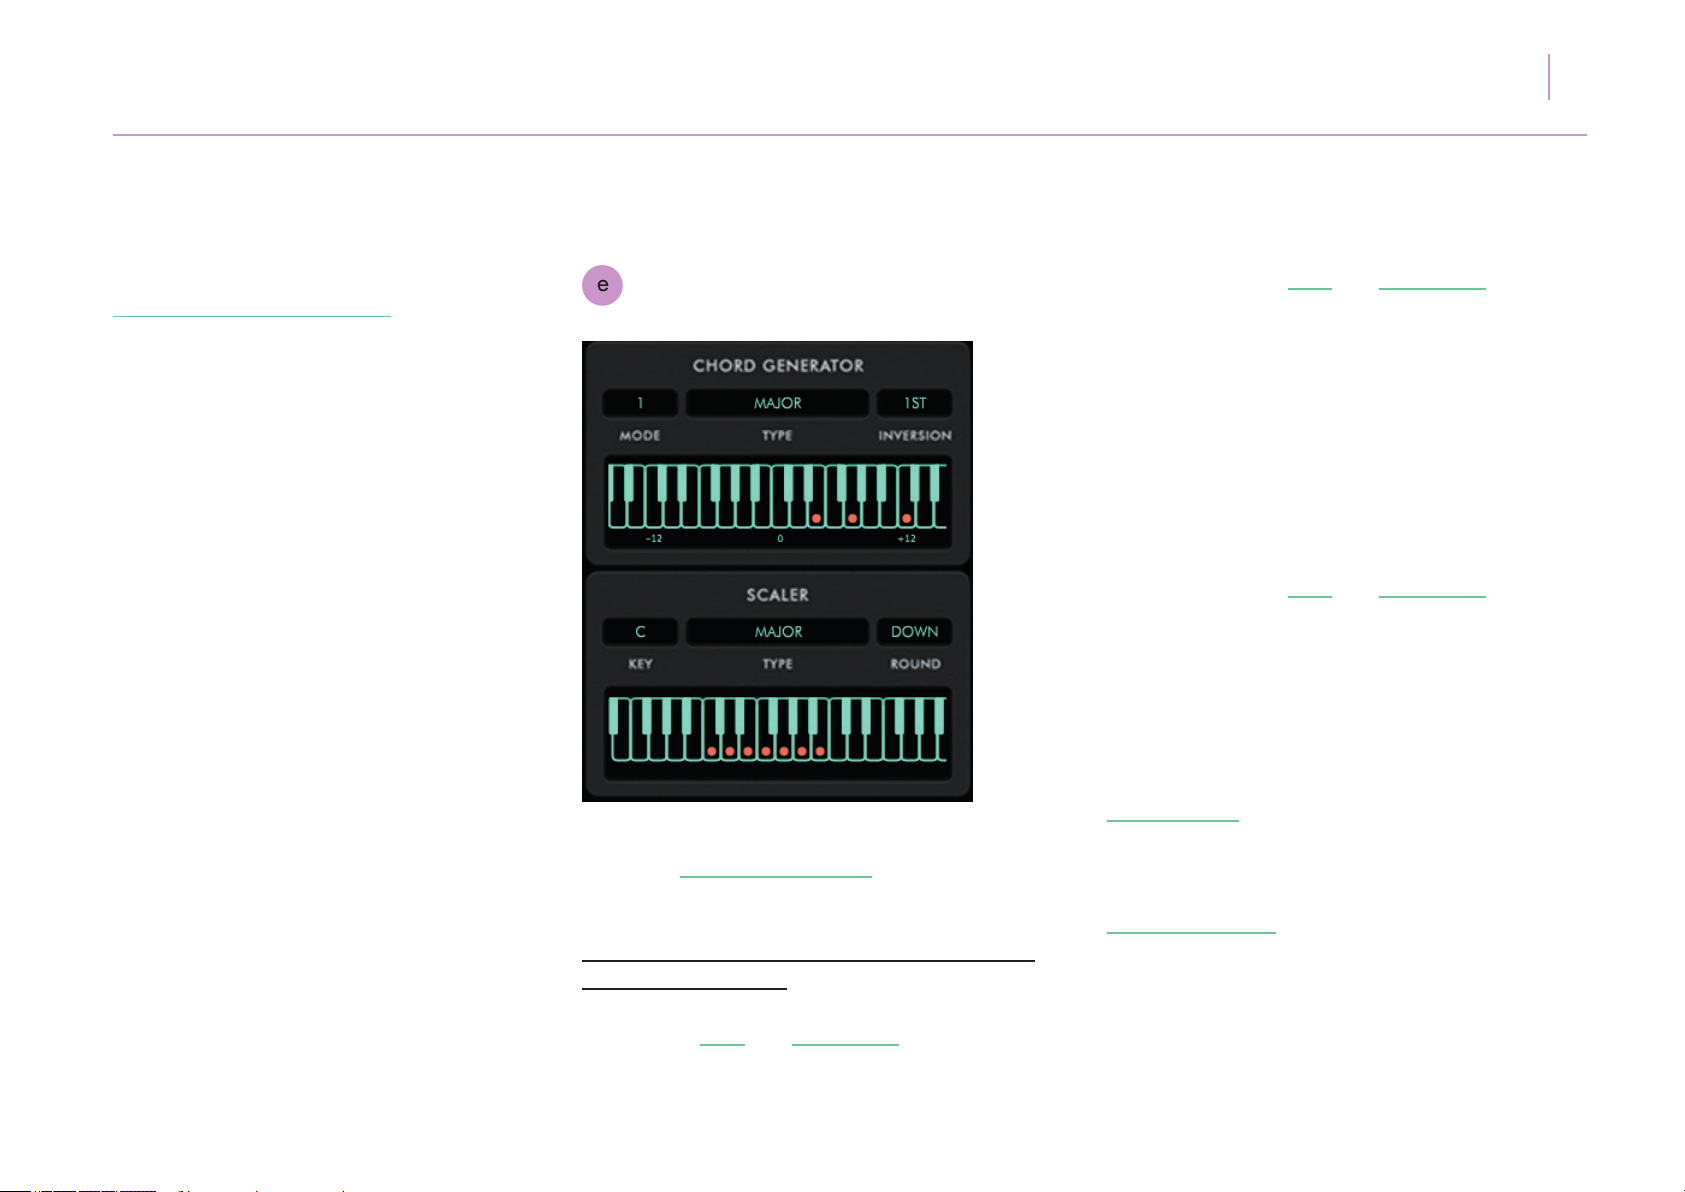
The Zenith CHORD GENERATOR modies MIDI note
data passing through Zenith to trigger chord shapes.
Clicking and selecting CHORD GENERATOR MODE
will operate as follows:
1: The chord TYPE and INVERSION will play across
all keys according to the pitch of the MIDI note
played into Zenith.
CHORD TYPES - Zenith contains 22 different chord
types. More information on chord voicing is available
in Appendix C of the manual.
CUSTOM CHORDS - In chord MODE 1, a custom
chord shape can be selected by clicking the keys
in the keyboard graphic which will form the notes
in that chord.
Page 24

24ZENITH USER MANUAL
7.
Getting to know Zenith
CHORD INVERSIONS - Selects different voicings
of each CHORD TYPE.
Zenith has a SCALER which automatically limits each
inputted MIDI note to the match the pitch of the notes
in a selected scale.
The SCALER is activated by selecting a scale type
from the dropdown menu. Further information on
scale types is available in Appendix C of the manual.
The SCALER has the following functionality:
KEY - Selects the scale key to which all notes will
be limited.
TYPE - Sets the scale type
ROUND - Arranges the notes in the scale either
UP or DOWN depending on selection.
Page 25
25ZENITH USER MANUAL
7.
Getting to know Zenith
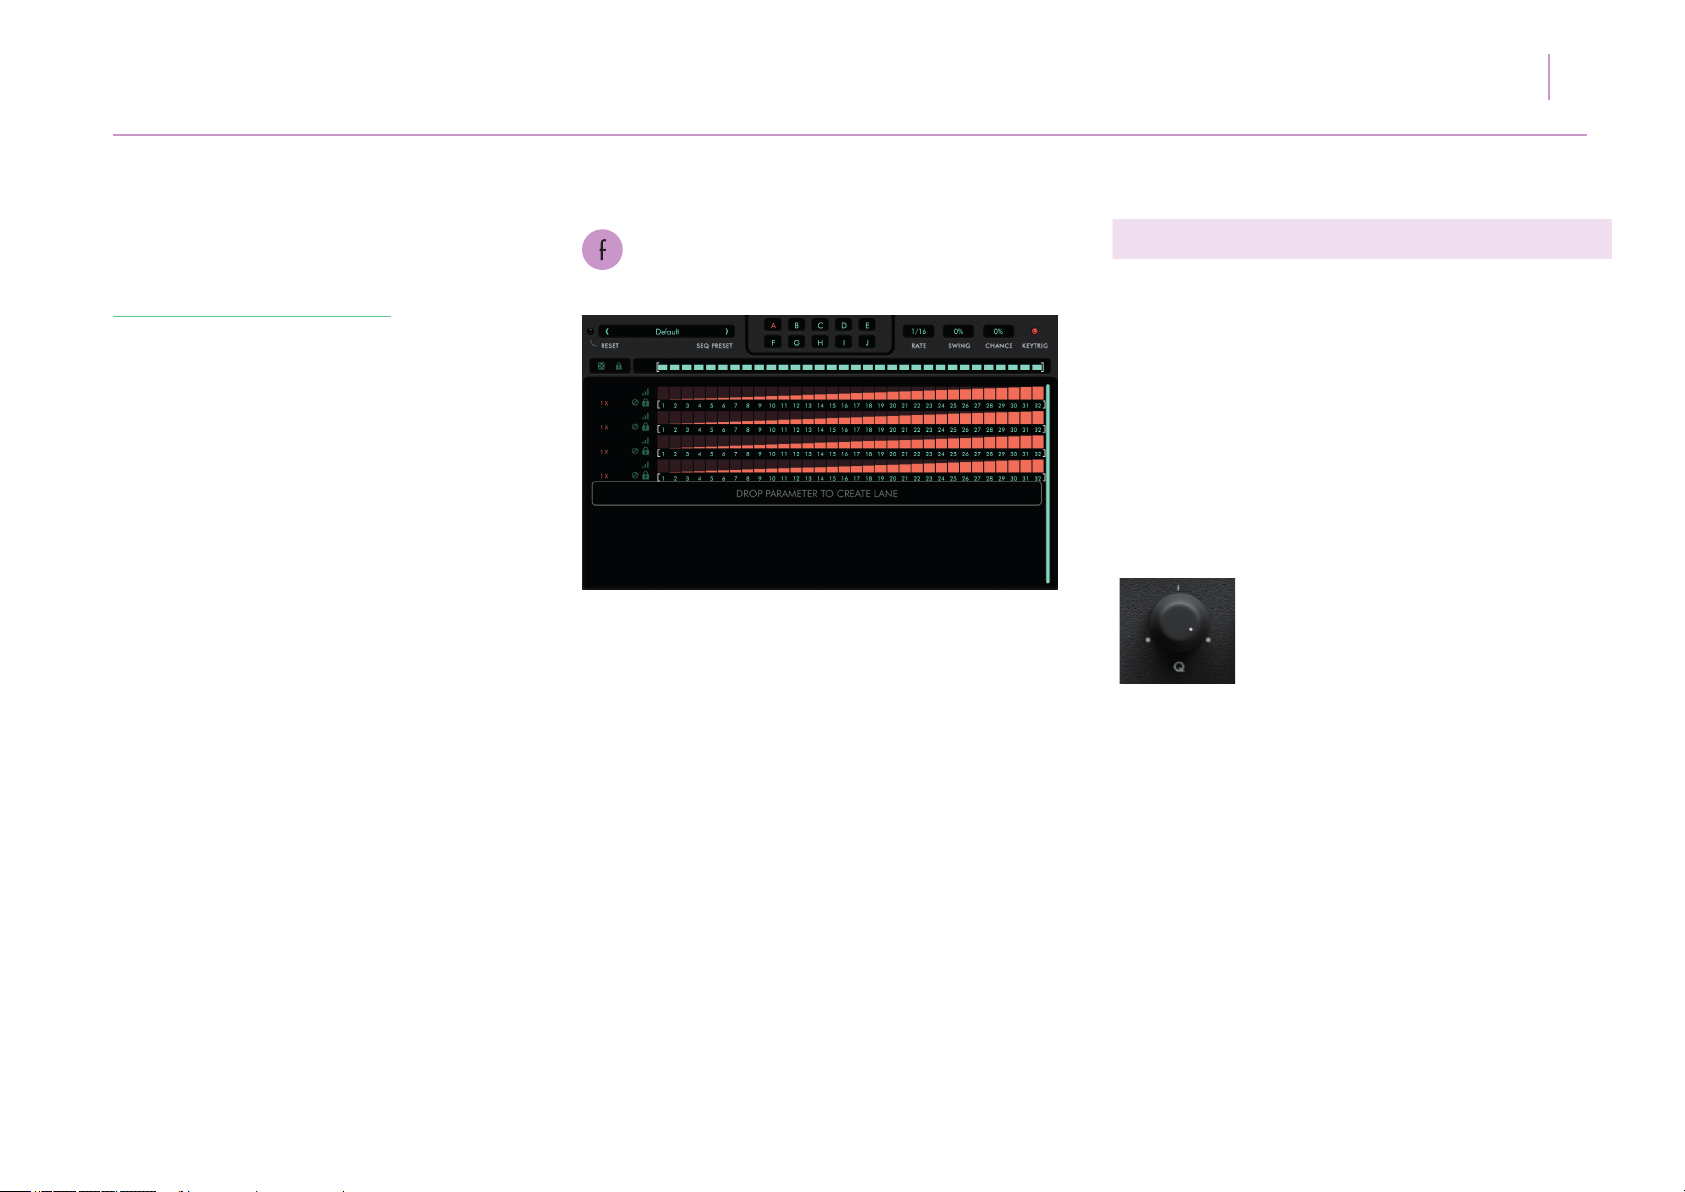
Central to Zenith’s operation is its parameter
sequencer grid.
Each lane can run at its own unique rate and number
of steps with a maximum of 32 steps per lane. Lanes
can be assigned with a vertical scrollbar to navigate
them up or down.
(i) Assigning a control
Clicking on a control label name will bring up a ‘hand’
icon and a box appears around that label. This marks
the control ready for click and drag
assignment into a new sequencer lane.
If a box does not appear around a label, that
control is not assignable. There are only a few
rare exceptions where a control cannot be assigned.
The assignment parameter is then displayed in the lane
text eld in blue.
Knob, slider or fader positions do not move in
response to lane data. To do so would cause
unnecessary CPU load. Zenith will instead show
a rectangular box around an assigned control.
Once a lane assignment has been made, the lane data
will override manual operation of that control. So for
example if a CC knob is assigned to a lane, that knob
cannot be manually tweaked or otherwise automated
in your host DAW.
Page 26
26ZENITH USER MANUAL
7.
Getting to know Zenith
(ii) Mode Selection
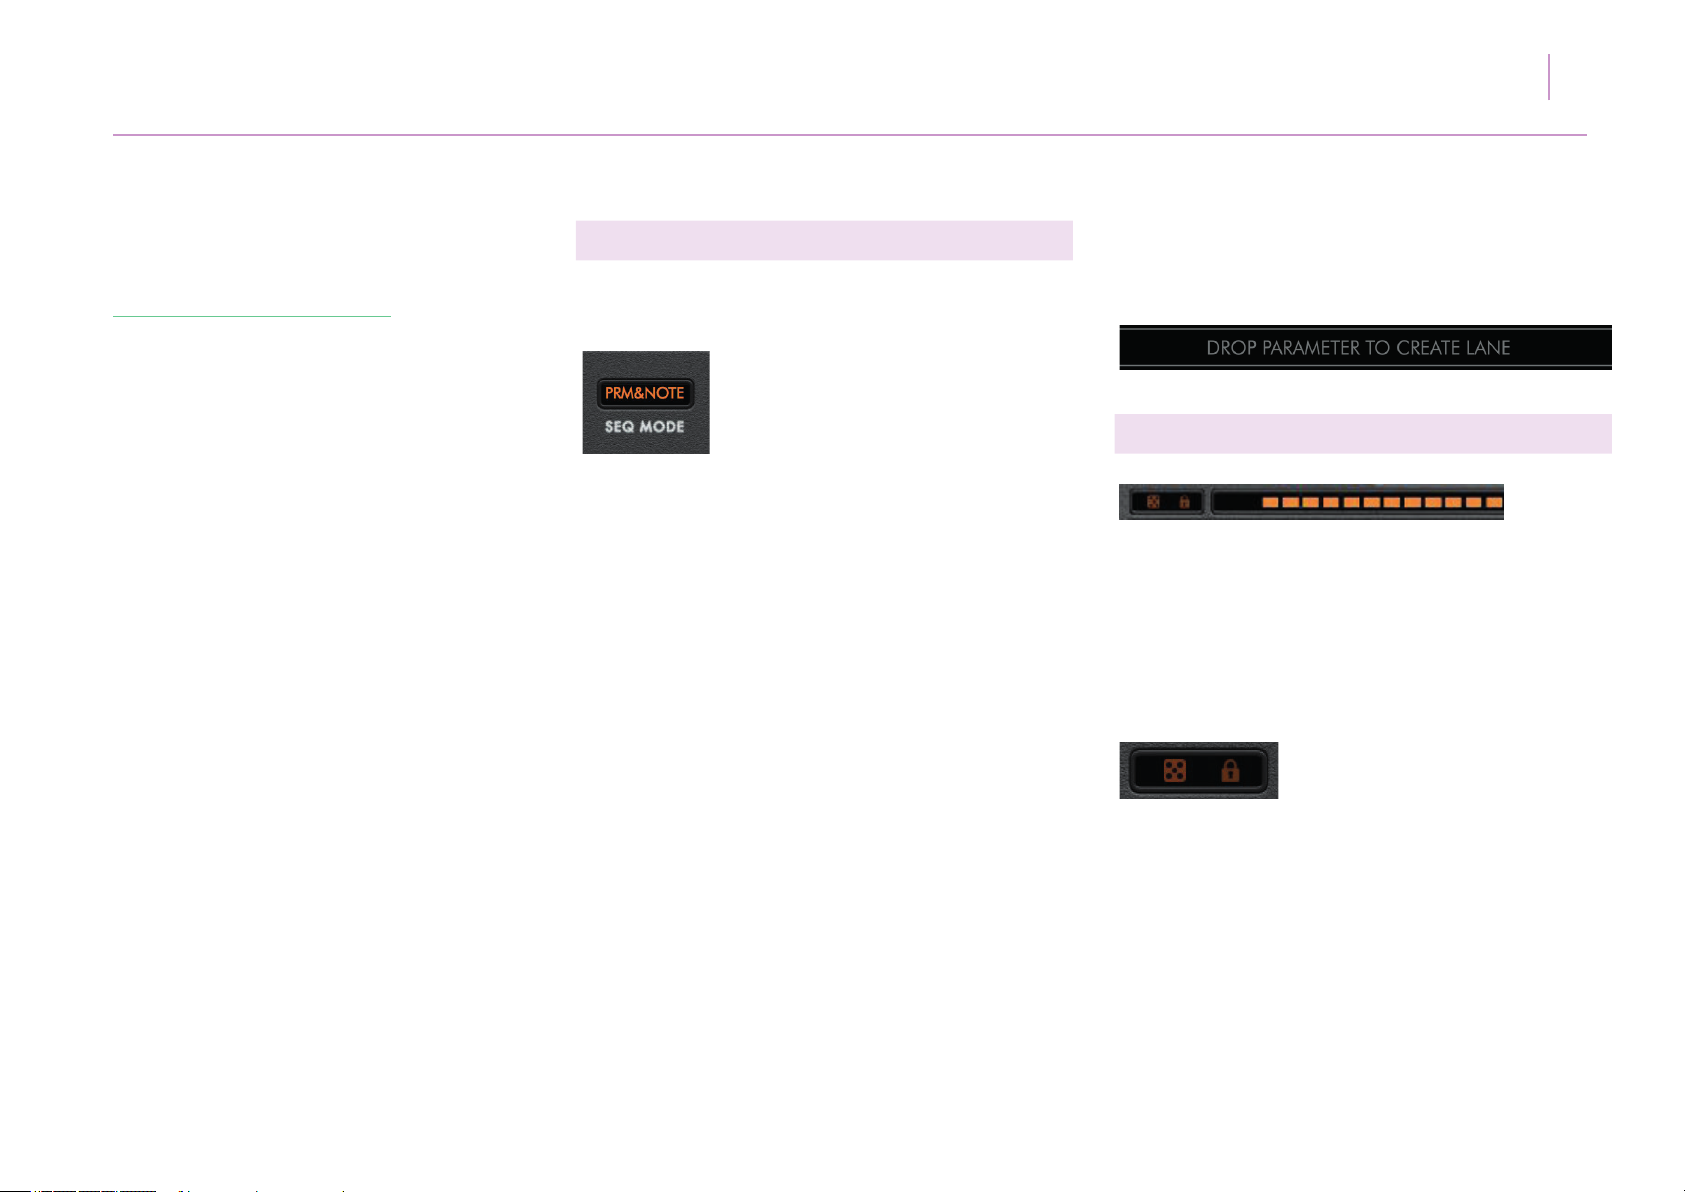
Arming or assigning the note sequencer requires SEQ
MODE to be set to PARAM, NOTE or PRM&NOTE mode.
Upon selection of NOTE mode, three lanes will
appear, labelled as PITCH, VELOCITY and GATE.
A series of numbers across the bottom of the lane
display the number of sequence steps.A ‘playhead’
denotes the current step playback position.
Upon selection of PARAM mode, empty lanes will
appear ready for assignment. While the source
assignment box is empty, the lane data will be
defaulted to rise to a crescendo* and will display
in orange.
A new lane can also be assigned irrespective of
playback mode if a control label is dragged into
an empty lane slot as illustrated below:
(iii) Global Lane
The global lane menu sits at the top of the sequencer
grid. Here individual sequence steps can be muted and
un-muted by clicking to illuminate or disarm them.
Clicking the dice icon next to the global lane steps will
randomise all lane data in every lane on each click of
the icon.
*This action can be toggled on/off by clicking
the Zenith logo in the top left of the GUI and
de-selecting the check box DEFAULT PARAMETER LANE
RAMP. When the checkbox is empty, new parameter
lane assignments will display no preset lane data.
Upon selection of PRM&NOTE mode, both parameter
and note lanes as described above will appear, with
note data displayed in orange.
Clicking the lock icon will retain all lane data and
parameter assignments irrespective of the preset
selected, so the grid controller section will change
but not the sequencer grid.
[cmd] clicking on any of the steps will randomise
all values. *CTRL and click for PC users.
[alt] clicking on any of the steps will default them
to a fully illuminated state.
Page 27
27ZENITH USER MANUAL
7.
Getting to know Zenith
(iv) Note and Parameter Lanes
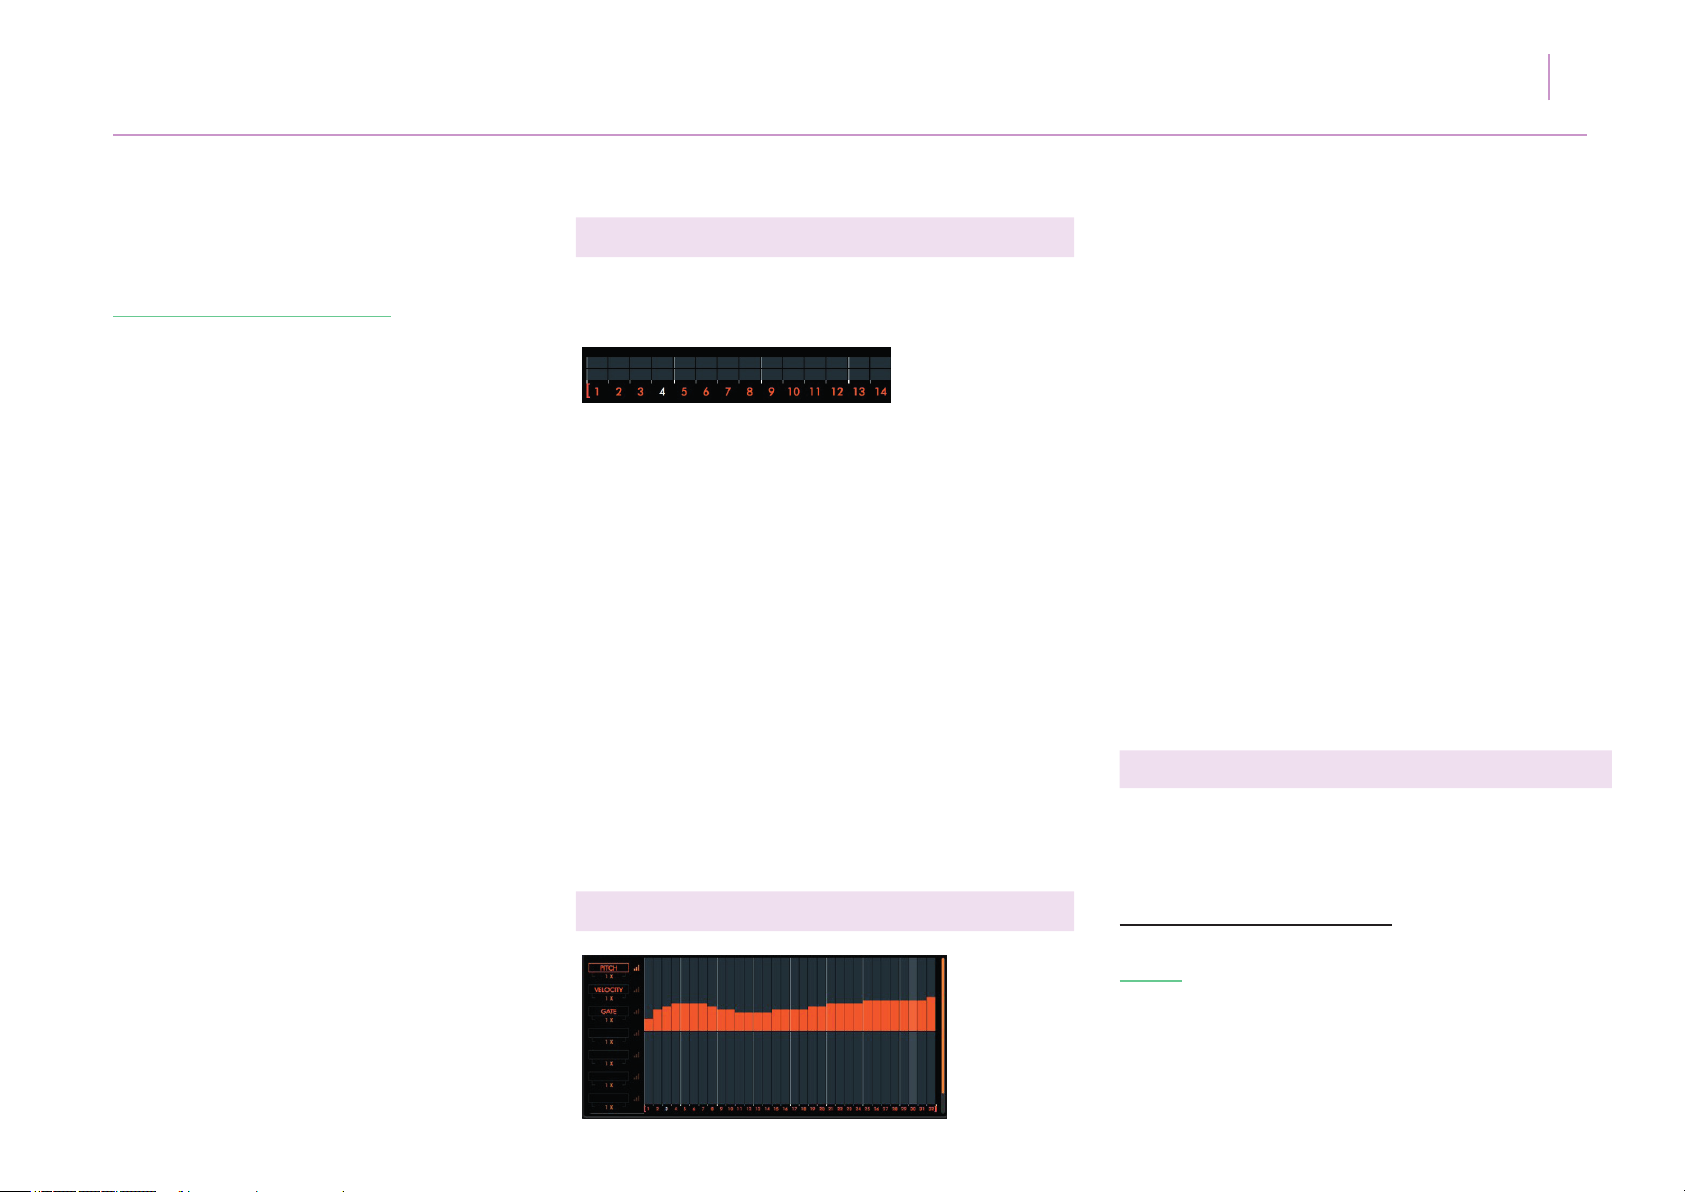
Note and parameter lanes display sequence numbers
at the bottom.
There are square brackets to either side of the
numbers, which when hovered over will display
an arrow icon. Each bracket can then be adjusted
left or right to select the number of sequence steps that
lane will play across. The sequence numbers
that fall outside the brackets will grey out. Note lane
steps are linked, where parameter lanes can each
be assigned a unique set of left and right markers.
Clicking the numbers will grey them out rendering them
inactive in sequence playback.*
*This action can be toggled on/off by clicking the
Zenith logo in the top left of the GUI and
de-selecting the check box CLICK STEP NUMBERS
MUTES STEPS
(v) Writing Lane Data
Lane data can be written by clicking or click and
dragging anywhere within a lane on either of its
axes (if a unipolar lane), whether zoomed or not.
Right clicking in a lane will introduce a linear write
tool, enabling upward and downward fades.
Lane data is written in 0.1 to 100.0 % increments.
Where coarse pitch data is present for example
in a note sequencer lane, data moves in semitone
increments.
[cmd and] clicking in a lane will randomise its
values (within both axes if unipolar).
[alt and] clicking in a lane will clear it.
*CTRL and click on PC
(vi) Lane Tools
To the left of the parameter lanes are the lane tools.
Hovering on the sequencer lane name display on any
of lanes will reveal additional tools.
These tools function as follows:
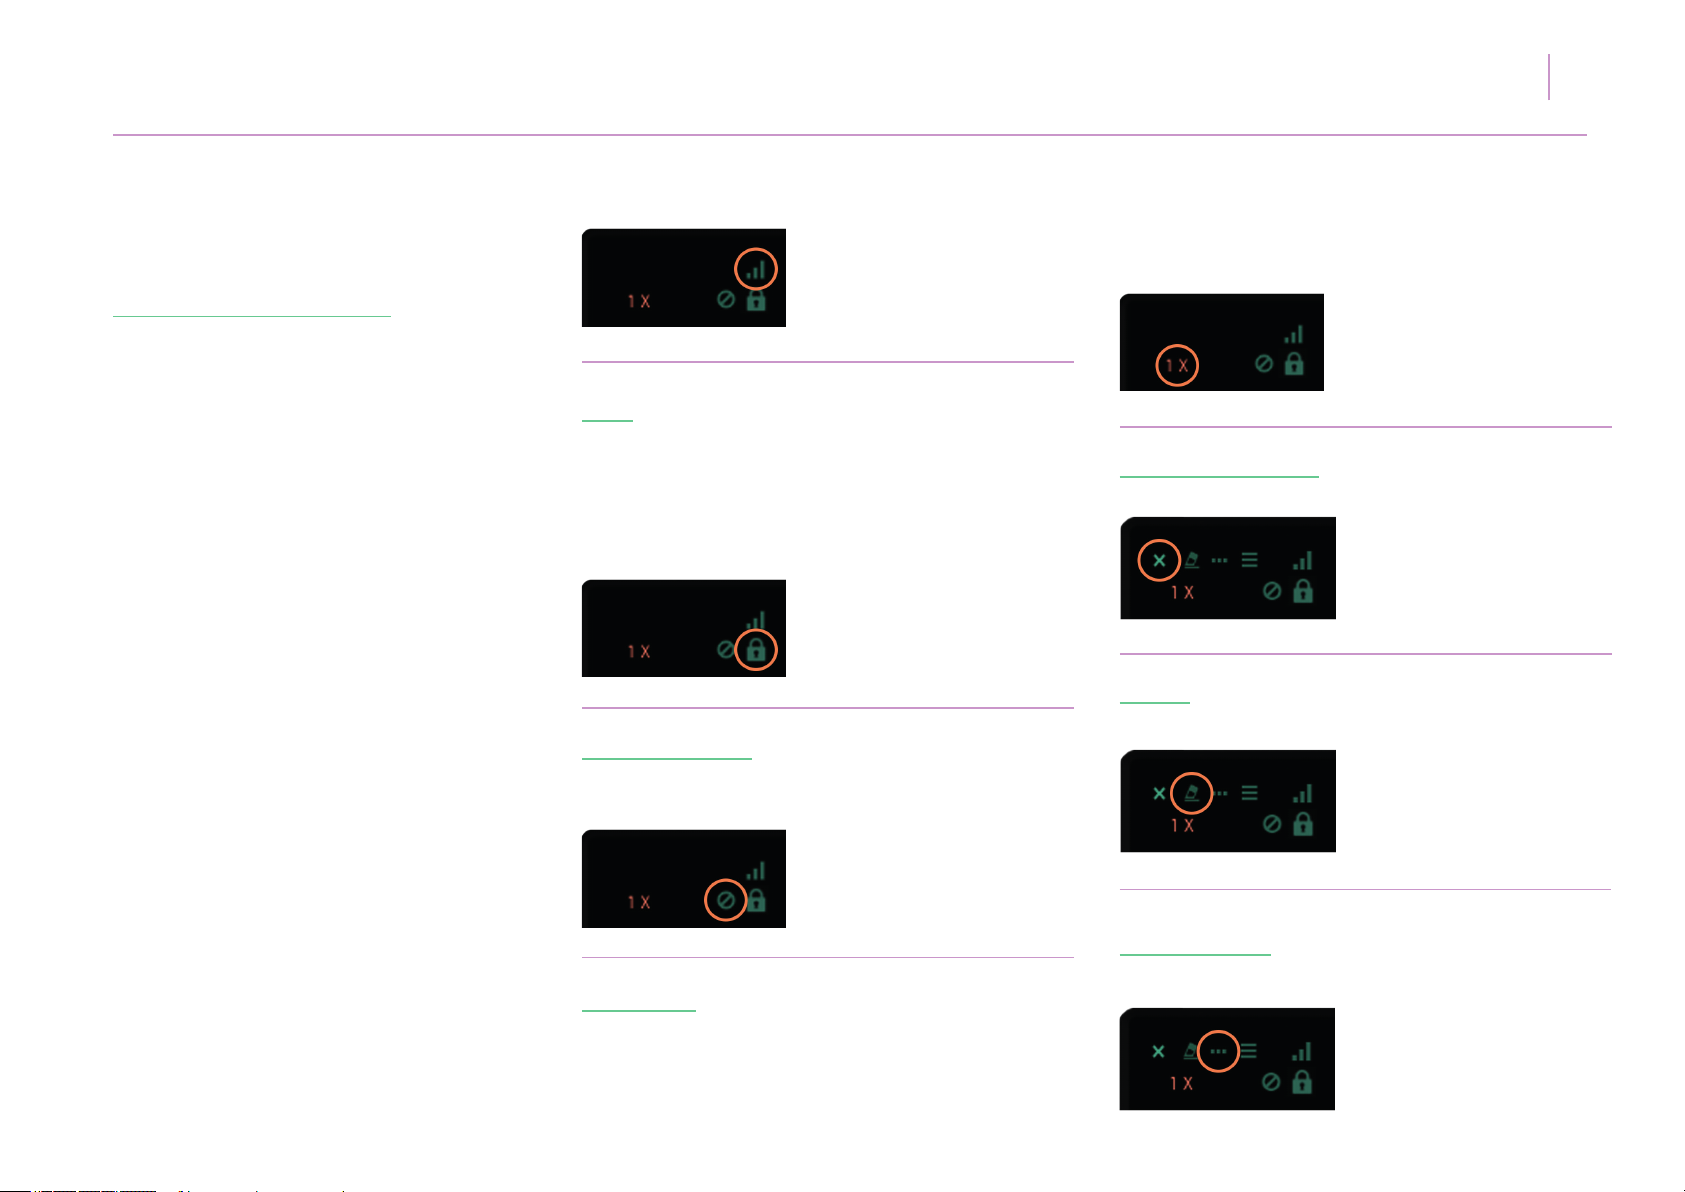
ZOOM - When clicked will illuminate and show a
zoomed display of lane data.
Clicking again will grey out the ZOOM icon and
display global sequencer lanes again.
Page 28
28ZENITH USER MANUAL
7.
Getting to know Zenith
LOCK - A lane can be locked by clicking and
illuminating the ‘lock’ icon to the right of its speed.
Locking a lane will mean its data cannot be altered by
way of writing or changing preset. Lane data can be
bypassed by clicking the ‘no entry’ icon to the left of
the ‘padlock’ icon.
CONTROL BYPASS - Clicking this icon will toggle ON/
OFF the ability to effect MIDI CC parameter
data on that lane.
selection of 1X will play that speed within a lane. A
lane selection of 2X will play twice as fast and so on.
ASSIGNMENT DELETE - Clicking the X icon will
un-assign the parameter in that current lane.
ERASER - Clicking this will erase all sequencer data
within the lane.
LANE SPEED - Each lane can run at up to 27 different
rates (from an eighth of to 1/128 x speed) relative to
the global RATE, which itself is a division of the master
tempo. If the global RATE is set at 1/16, each of the
32 steps will represent a 16th note value. A lane speed
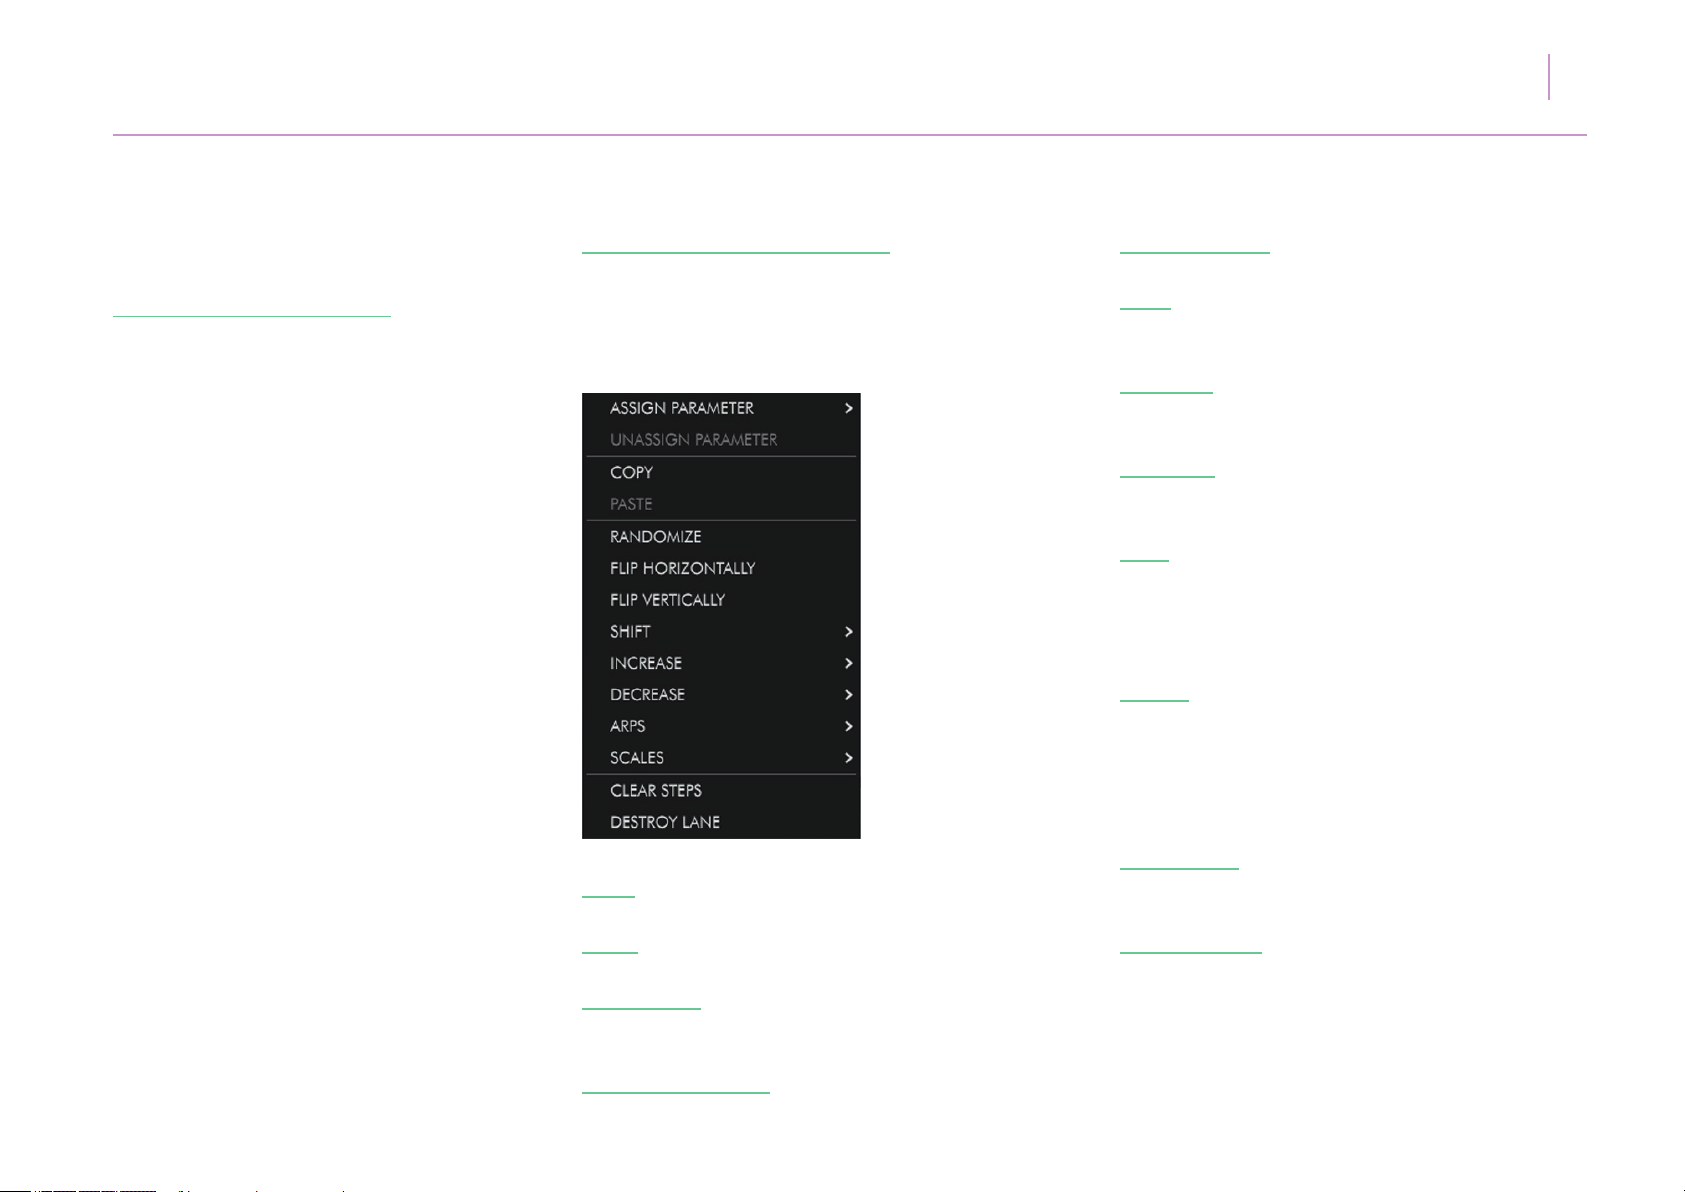
OPTIONS MENU - Clicking this icon will reveal a lane
options menu with selections as follows:
Page 29
29ZENITH USER MANUAL
7.
Getting to know Zenith
ASSIGN/UNASSIGN PARAMETER - Assigns or
unassigns the parameter in that current lane. This is
an alternative to dragging text labels, as some features
such as un-synced LFO rate cannot be dragged into the
sequencer grid.
FLIP VERTICALLY - Flip lane data vertically.
SHIFT - Shift data within a parameter lane forward or
backward on the grid from 1 to 16 steps.
INCREASE - Increase data value by 10 - 100% of its
original value.
DECREASE - Decrease data value by 10 - 100% of its
original value.
ARPS - Select from MAJOR, MINOR, SUSPENDED
2/4, MAJOR 7, MINOR 7, DOMINANT 7, MAJOR 6,
MIN MAJ 6 or MINOR 6 arpeggio types. Arpeggios
play across 4 repeating steps.
SCALES - Select from MAJOR, MINOR, HARMONIC
MINOR, MELODIC MINOR, DORIAN, PHRYGIAN,
LYDIAN, MIXOLYDIAN, LOCRIAN, PENTATONIC
MAJOR/MINOR, PENTATONIC YO and OKINAWAN
scales. Scales play between 4 and 8 repeating steps.
COPY - Copy lane data.
PASTE - Paste lane data.
RANDOMIZE - Randomize individual lane data with
each click.
FLIP HORIZONTALLY - Rotate lane data horizontally.
CLEAR STEPS - Clears lane data (with the exclusion
of note parameter assignment).
DESTROY LANE - Removes the lane and all of its
present data.
Page 30
30ZENITH USER MANUAL
7.
Getting to know Zenith
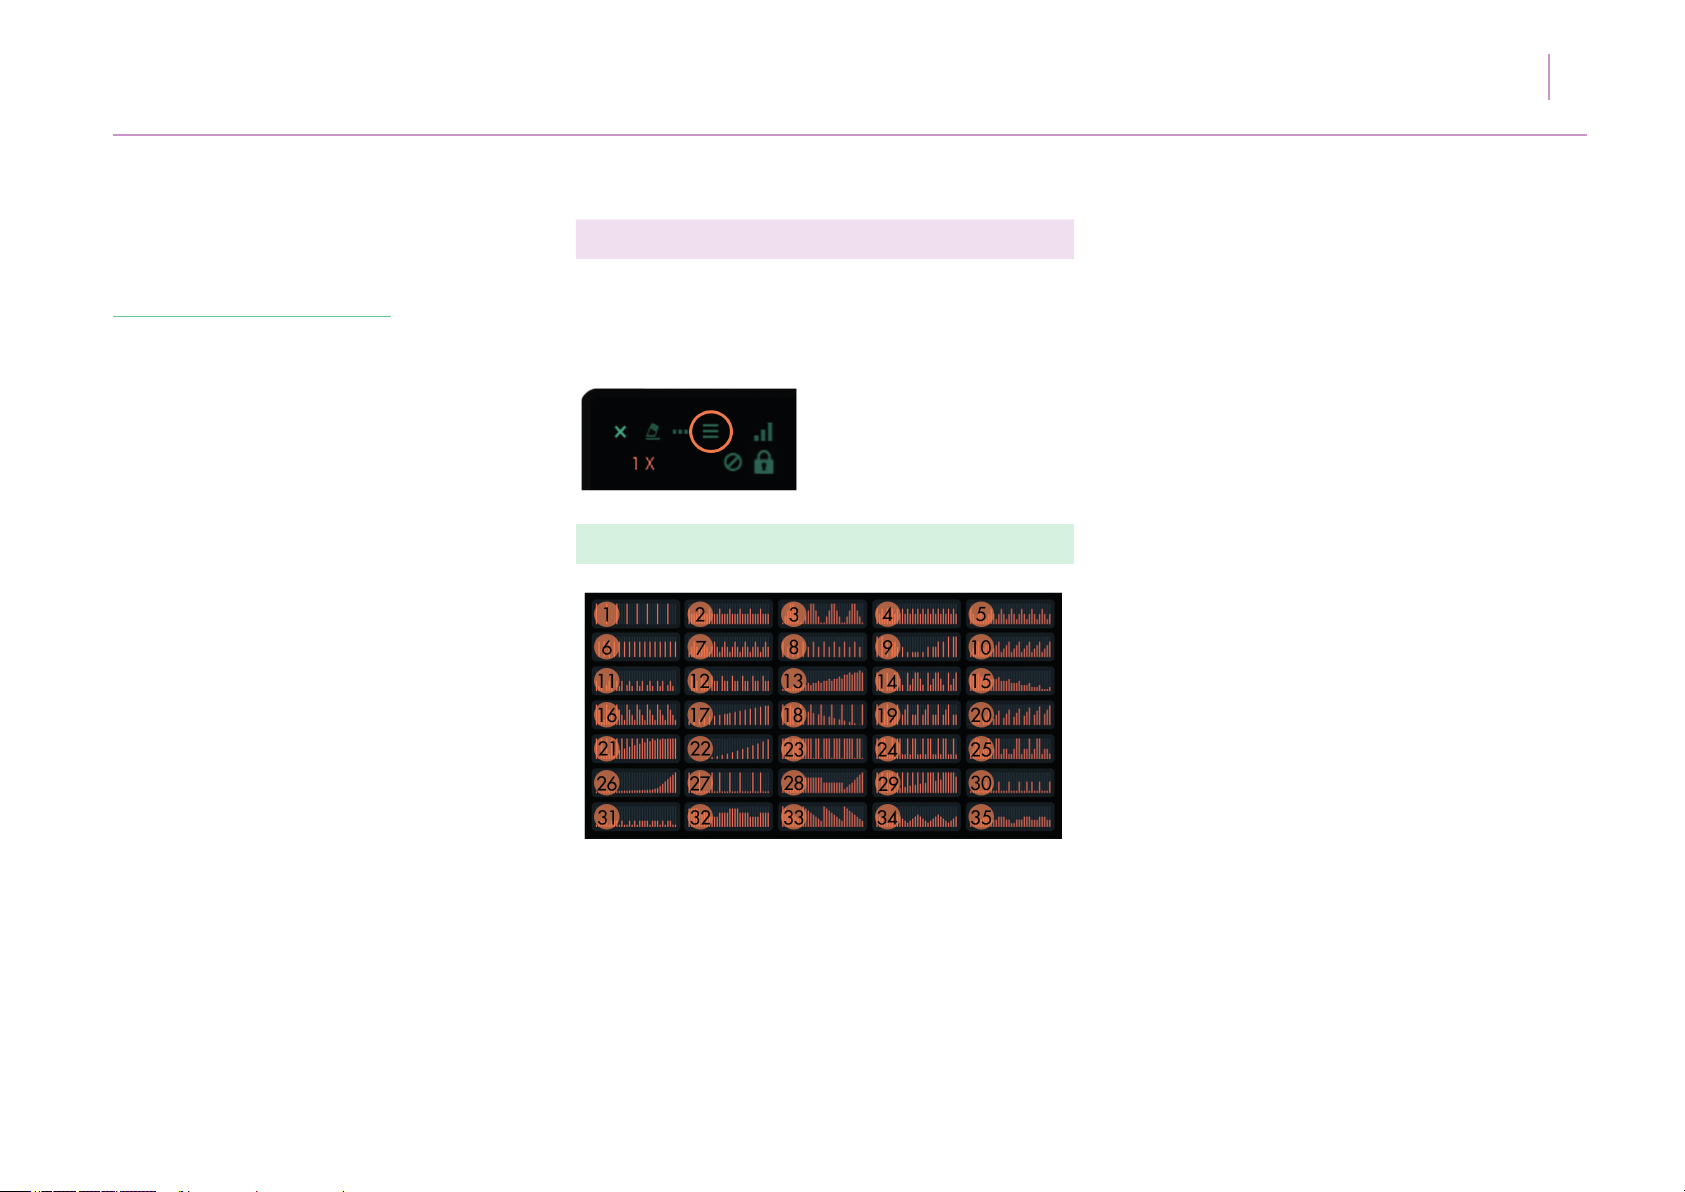
(vii) Lane Presets
Clicking this icon will reveal sequence lane presets
as follows. These can be selected by clicking their
revealed graphical representation icon.
Unipolar Lane Preset List
end of the pattern.
4. ‘Accented Sixteenths 2’ - Every odd step is lled to
75% of its maximum range starting with step one, with
every even step lled to 50% of its maximum range.
5. ‘Down & Up’ - A fall and rise by 25% every
four steps.
6. ‘Eighths’ - Every other step is lled to 75% of its
maximum range starting on step two.
7. ‘Up & Down 2’ - Rising every two steps and falling
on the following two steps. Repeating to the end of the
pattern.
8. ‘Eighths 2’ - Every other step is lled alternately
to 75% and 50% of its maximum range starting on
step one.
9. ‘Symmetry-X’ - A sixteen step symmetrical pattern
where values gradually rise and fall.
1. ‘Four to the oor’ - Every fourth step is lled to its
maximum range starting on step 1.
2. ‘Accented Sixteenths 1’ - Every fourth step is lled to
75% of its maximum range starting on step 1, with the
remaining steps lled to half of their maximum range.
3. ‘Up & Down 1’ - Rising every four steps and falling
uniformly on the following four steps. Repeating to the
10. ‘Sawtooth’ - A rising pattern every four steps.
11. ‘Teeth’ - Repeating every eight steps, a sequence
resembling teeth, with a break every three steps.
12. ‘Frontchain’ - Repeating every four steps with a
rest every rst step, steps three and four are at a 25%
lower data value than step two.
Page 31

31ZENITH USER MANUAL
7.
Getting to know Zenith
13. ‘Analogue Riser’ - An upward crescendo with
a peak every third step.
14. ‘Fall & Rise’ - A falling and rising sequence repeating every eight steps.
15. ‘Shaky Fade’ - A gradual fade with a peak on
every fourth step.
16. ‘Downchain’ - A falling pattern, repeating every
four steps.
17. ‘Altered Rise’ - A crescendo on alternate steps with
an added step on every sixteenth.
18. ‘4x4 Fade’ - A fade with full values on every fourth
step and a skipped value on every step starting from
step two.
19. ‘Second Step Shufe’ - An upward fade on the
rst four steps, with second step at minimum value a
‘sidechain’ pattern on the second set of four steps.
Pattern repeats twice.
20. ‘Sidechain Crescendo’ - A gradual crescendo, with
every four steps rising, and a minimum value on every
four steps starting at step one.
21. ‘Eighths Crescendo’ - A steady crescendo with
every other step at full value starting at step one.
22. ‘Alternate Exponential’ - An exponential
crescendo with alternate steps at minimum value.
23. ‘Full House’ - All steps at maximum value with
a dip every fourth step.
24. ‘The Gap’ - An eight step repeating pattern with
maximum values dotted with smaller values around
22.5%.
25. ‘Skyscrapers’ - A sixteen step recurring pattern
shaped like a city skyline.
26. ‘Sudden crescendo’ - A crescendo peaking in the
nal steps of the pattern.
27. ‘Shufe’ - Maximum values perpetuated by drops
in level every four, three and two steps.
28. ‘Waveshapes’ - Various popular waveforms, chang-
ing every eight steps.
29. ‘Tall Trees’ - A crescendo peppered with
maximum value steps.
30. ‘Uneven Flow’ - Lower value steps mixed with high-
er value steps at odd and even intervals,
repeating twice.
31. ‘Pitter Patter’ - Lower value steps at 10%
interspersed with higher value steps at 30%, in
a complex pattern that repeats twice.
Page 32

32ZENITH USER MANUAL
7.
Getting to know Zenith
32. ‘Cityscape’ - A sixteen step recurring pattern
shaped like a city skyline.
33. ’Inverted Saw’ - An inverted saw pattern
repeating every eight steps.
34. ‘Digi-sine’ - A digitised sine wave starting in the
middle of a period.
35. ‘Rise and Fall’ - A pattern that rises and falls in
even and uneven sets of steps repeating twice.
Page 33
33ZENITH USER MANUAL
7.
Getting to know Zenith
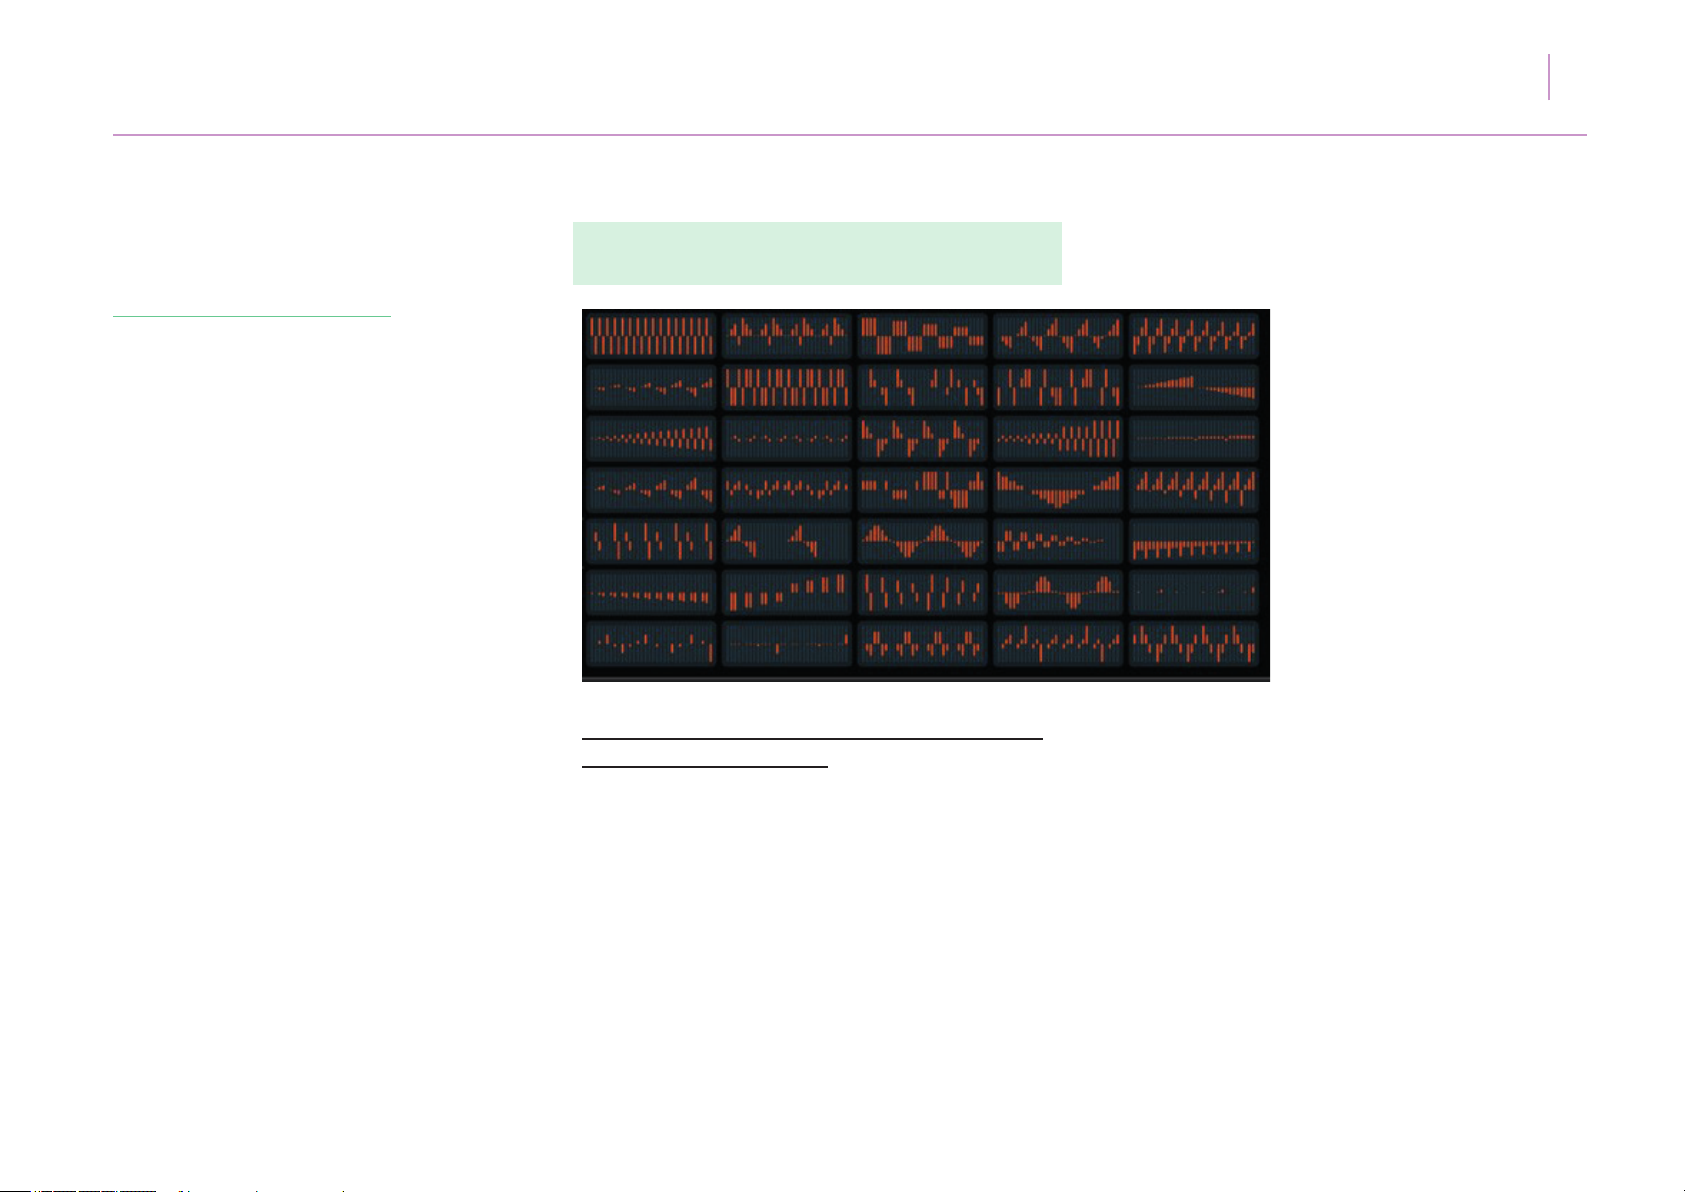
Bipolar Lane Preset List (PITCH, ENVELOPE
AMOUNT, ETC)
Lanes are described from left to right, top to bottom,
in numeric order as follows:
1. ‘Alternating Sixteenths’ - All steps are lled to their
maximum range, with the axis alternating at every step.
2. ‘Pyramid Notch’ - A rise and fall pattern with every
eighth step starting at step four, falling into the negative
axis.
3. ‘Descending Axis’ - Alternating sets of four steps,
gradually fading.
ing steps across both axes. Great for panning!
5. ‘Jagged Fall’ - Rapid rises and falls across two steps
with a short fade.
6. ‘Subtle Crescendo’ - A subtle rise, with gradients
gradually getting steeper toward the end of the
pattern.
7. ‘Imperfect Harmony’ - All steps at maximum and
minimum values, alternating and mirroring the
behaviour of their preceding steps.
4. ‘Contrary Pan’ - Varying gradients of rising and fall-
Page 34

34ZENITH USER MANUAL
7.
Getting to know Zenith
8. ‘Doodle’ - With interesting shifts between axes,
no pattern is presented, but a creative preset for
pitch control.
9. ‘Bounce to the Ounce’ - Shifting from alternate
positions on both axes, revealing an interesting
pattern, repeated twice in the phrase.
10. ‘Mirrored Crescendo’ - A subtle upward fade
in the positive axis, mirrored in the opposite axis
in the second half of the pattern.
11’. ‘Contrary Crescendo’ 1 - A crescendo with
alternate steps rising across both axes.
12. ‘Lemmings’ - Repeating every eight steps, a
pattern that mirrors itself in the opposite axis every
four steps.
13. ‘Saw Mirror’ - Basic saw shapes mirrored
in each axis, repeating every eight steps.
14. ‘Square Riser’ - A crescendo characterised by
the uniform shifting of axis every eight steps.
15. ‘Crescendo Dip’ - Gradually rising every eight
steps, the rst step dips into the opposite axis every
eight steps.
16. ‘Contrary Crescendo’ 2’ - A crescendo with
alternate steps rising across both axes.
17. ‘Pitch Pong’ - A varied pattern dipping into both
axes, repeating twice.
18. ‘Puddles’ - Making use of the full range of both
axes, an interesting linear pattern.
19. ‘Sine Waves’ - A digitised sine wave, starting
in the middle of a cycle.
20. ‘Contrary Sidechain’ - A ‘sidechain’ pattern with
the rst step of every four dipping into the opposing
axis, and gradually decreasing in value.
21. ‘Big Dipper’ - Repeating every eight steps,
this pattern reaches the mid point and maximum
/minimum value of each axis.
22. ‘To and Fro’ - Rising and falling over eight
steps, then breaking for another eight steps and
repeating again.
23. ‘Fast Sine’ - A digitised sine wave that rises and
falls twice.
24. ‘Arrowhead’ - A long fade alternating across
both axes.
25. ‘Negative Riser’ - A crescendo across the negative
axis with a dip on alternate steps.
Page 35

35ZENITH USER MANUAL
7.
Getting to know Zenith
26. ‘Negative Fade’ - A fade across the negative axis
with a break on alternate steps.
27. ‘Binary Wave’ - Rising from the minimum value
of the negative axis to the maximum value of the
positive axis with breaks on the rst and fourth
of every four steps.
28. ’Speaker Freaker’ - With steps mirrored in
alternate axes, a falling pattern across sixteen steps,
with a mirrored sequence across the remaining
sixteen steps.
29. ‘Sine Distortion’- A popular digitised waveform
with ‘background noise’ steps.
30. ‘Blips 1’ - Minor ‘disturbances’ across the
positive axis, repeating every sixteen steps.
Great for pitch lanes.
31. ‘Blips 2’ - Minor ‘disturbances’ across the
positive and negative axes.
which works well for pitch and tuning lanes.
33. ‘Crab Feet’ - An eight step pattern which rises and
falls across both axes.
34. ‘Top and Tail’ - Rising to the top of the positive axis
and dipping into the negative, repeating every sixteen
steps.
35. ‘Broken Waves’ - A ‘broken’ saw wave pattern
repeating every eight steps across both axes.
32. ‘Melody Maker’ - A minor leaning pattern
Page 36
36ZENITH USER MANUAL
7.
Getting to know Zenith
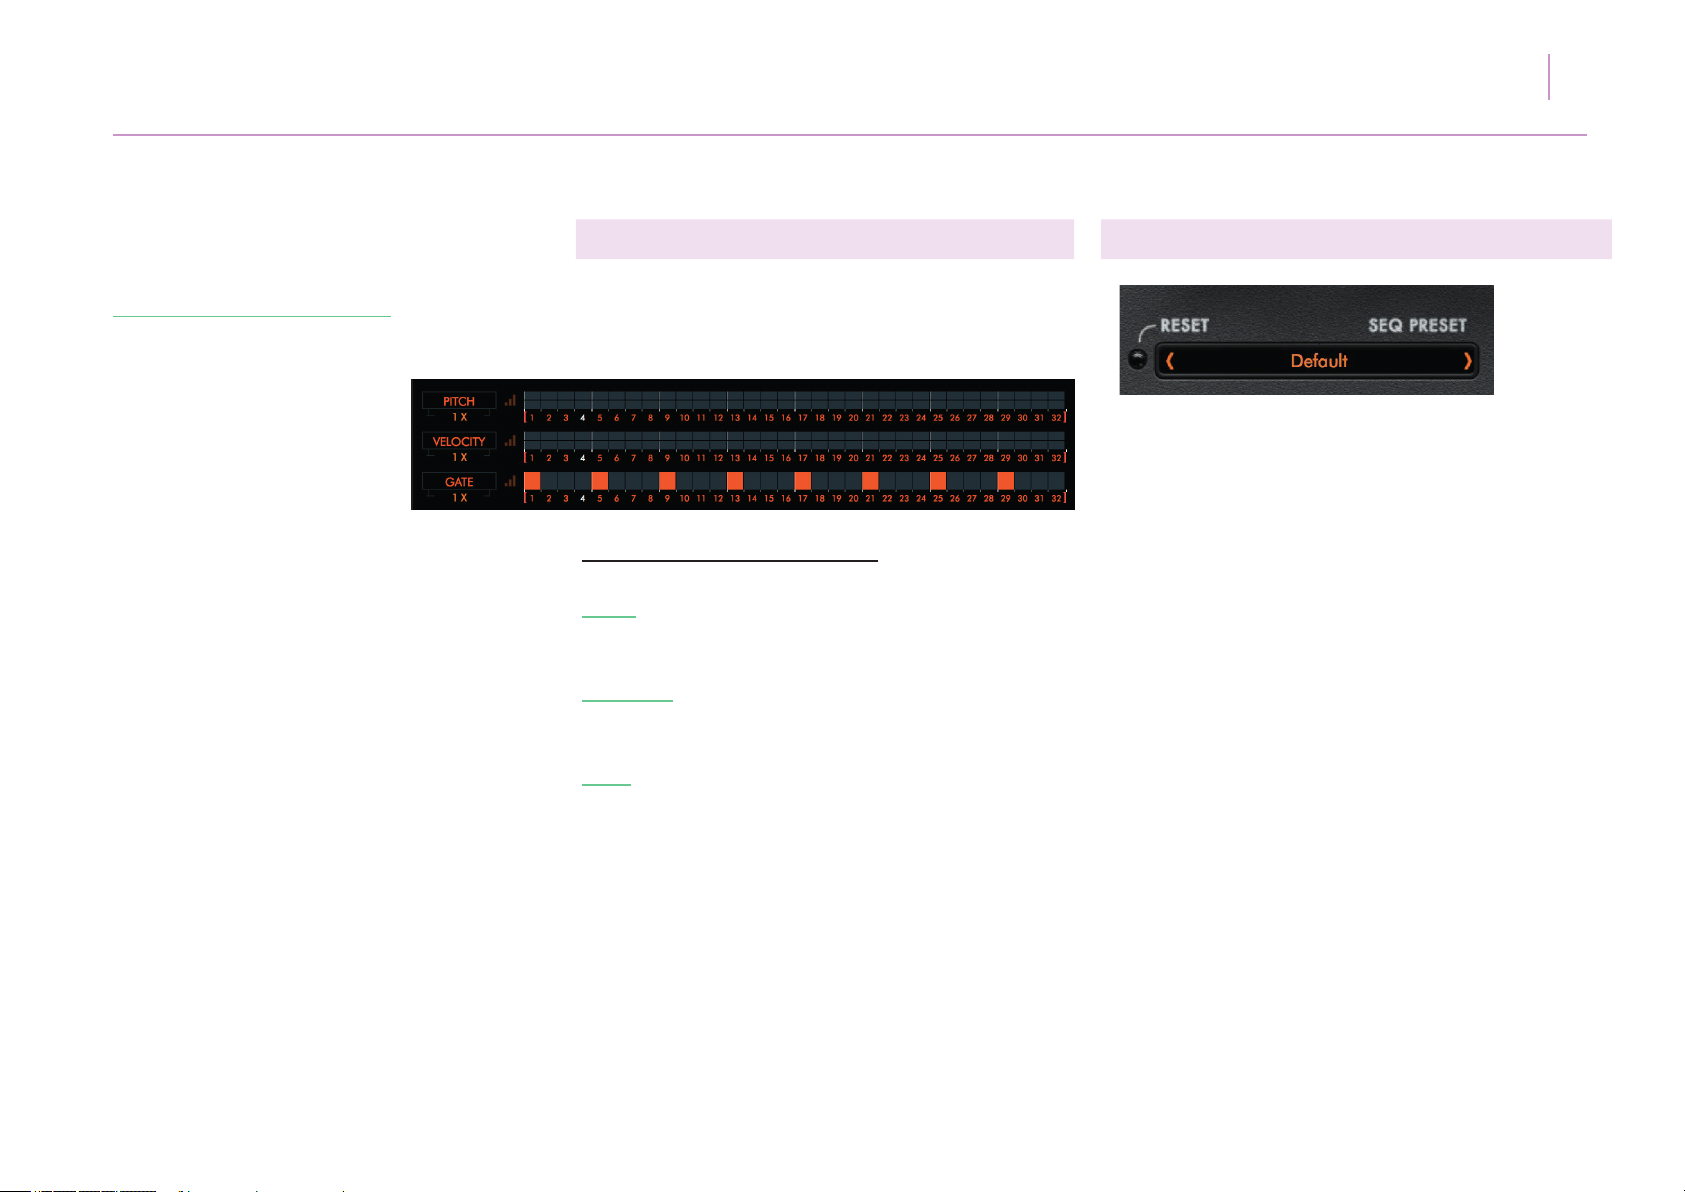
(viii) Note Sequencer Lanes
The note sequencer lanes have permanent
assignments. Step sequence L&R locators and
lane speeds are also linked.
These lanes function as follows:
PITCH - Displays pitch data across two axes in +/- 24
semitone increments.
VELOCITY - Displays velocity data across two axes in
+/- 127 increments.
GATE - Displays data in a unipolar lane from 0 -101%
where lower values are shorter notes and higher values
longer notes.
These lanes have only some of the LANE TOOLS
options of parameter lanes.
(ix) Global Lane Presets
30 global lane presets are provided, which give
a range of data values across multiple lanes.
Some presets have parameter assignments while
others simply provide data for control assignment, for
example alternating steps on/off across empty lanes.
Clicking the RESET LED will clear ALL lane and
parameter assignments.
The full list of GLOBAL SEQ PRESETS are available
in the manual in Appendix B.
A current snapshot of your global lane layout can be
saved to the desktop by clicking SAVE PRESET in the
dropdown menu and loaded back in by clicking
LOAD PRESET.
Page 37
37ZENITH USER MANUAL
7.
Getting to know Zenith
(x) Master Grid Controls
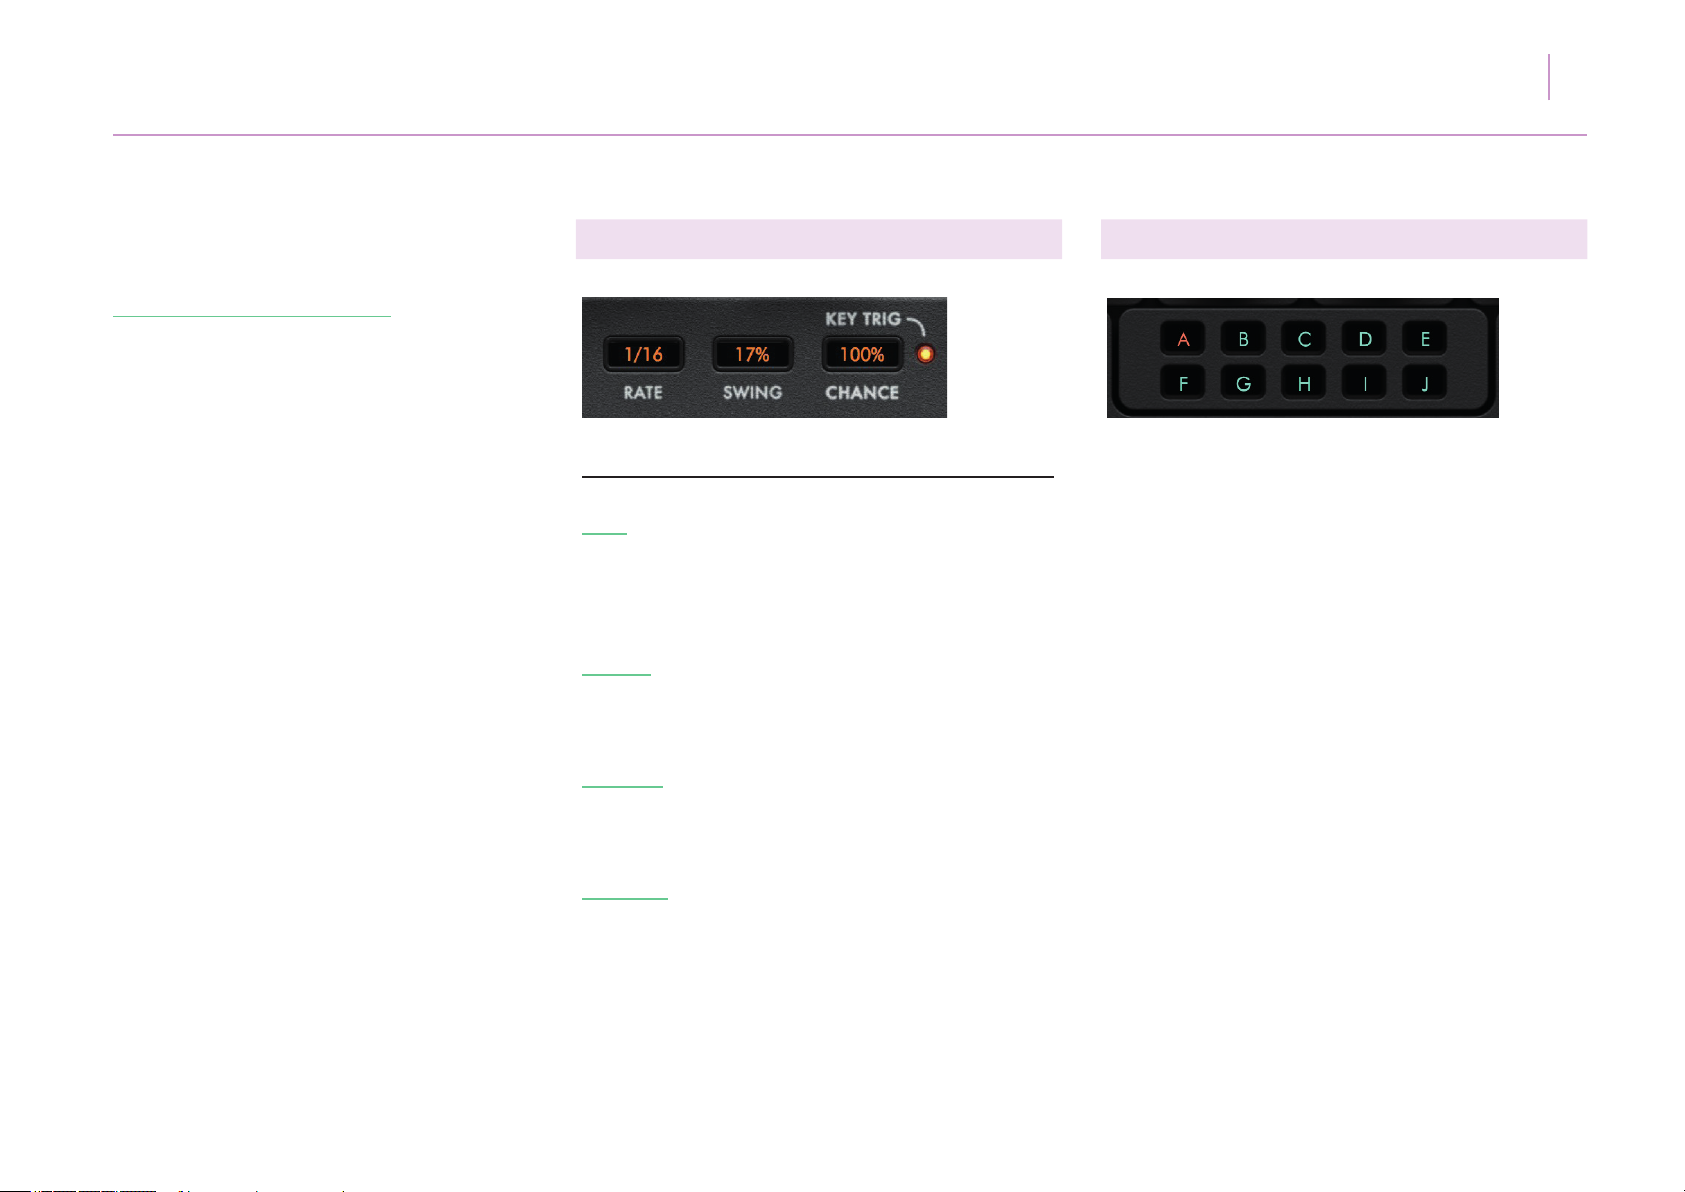
The sequencer grid has the following master controls:
RATE Sets the rate to which all lane speeds are
relative. This rate is a division of the timing of the
Zone global master tempo. This value can be click
and dragged giving up to 27 different speeds.
SWING Adjusts the sequencer rate swing +/- 100%.
A negative swing plays ‘behind’ the beat, while a
positive swing plays ahead of the beat.
CHANCE Adjusts the probability of note lane
sequence step playback. A high probability plays
all steps, while a low probability plays no steps.
(xi) Pattern Sequencer
Zenith’s pattern sequencer allows up to 10 different
pattern snapshots, each of which holds its own unique
sequence lane data to be toggled by clicking the
letter relevant to the pattern selection.
‘Chaining’ patterns via DAW plugin automation
enables Zenith to create entire tracks with plenty
of variation through a song.
KEY TRIG Clicking this LED toggles the MIDI
note triggering of all sequence lanes.
Page 38
38ZENITH USER MANUAL
7.
Getting to know Zenith
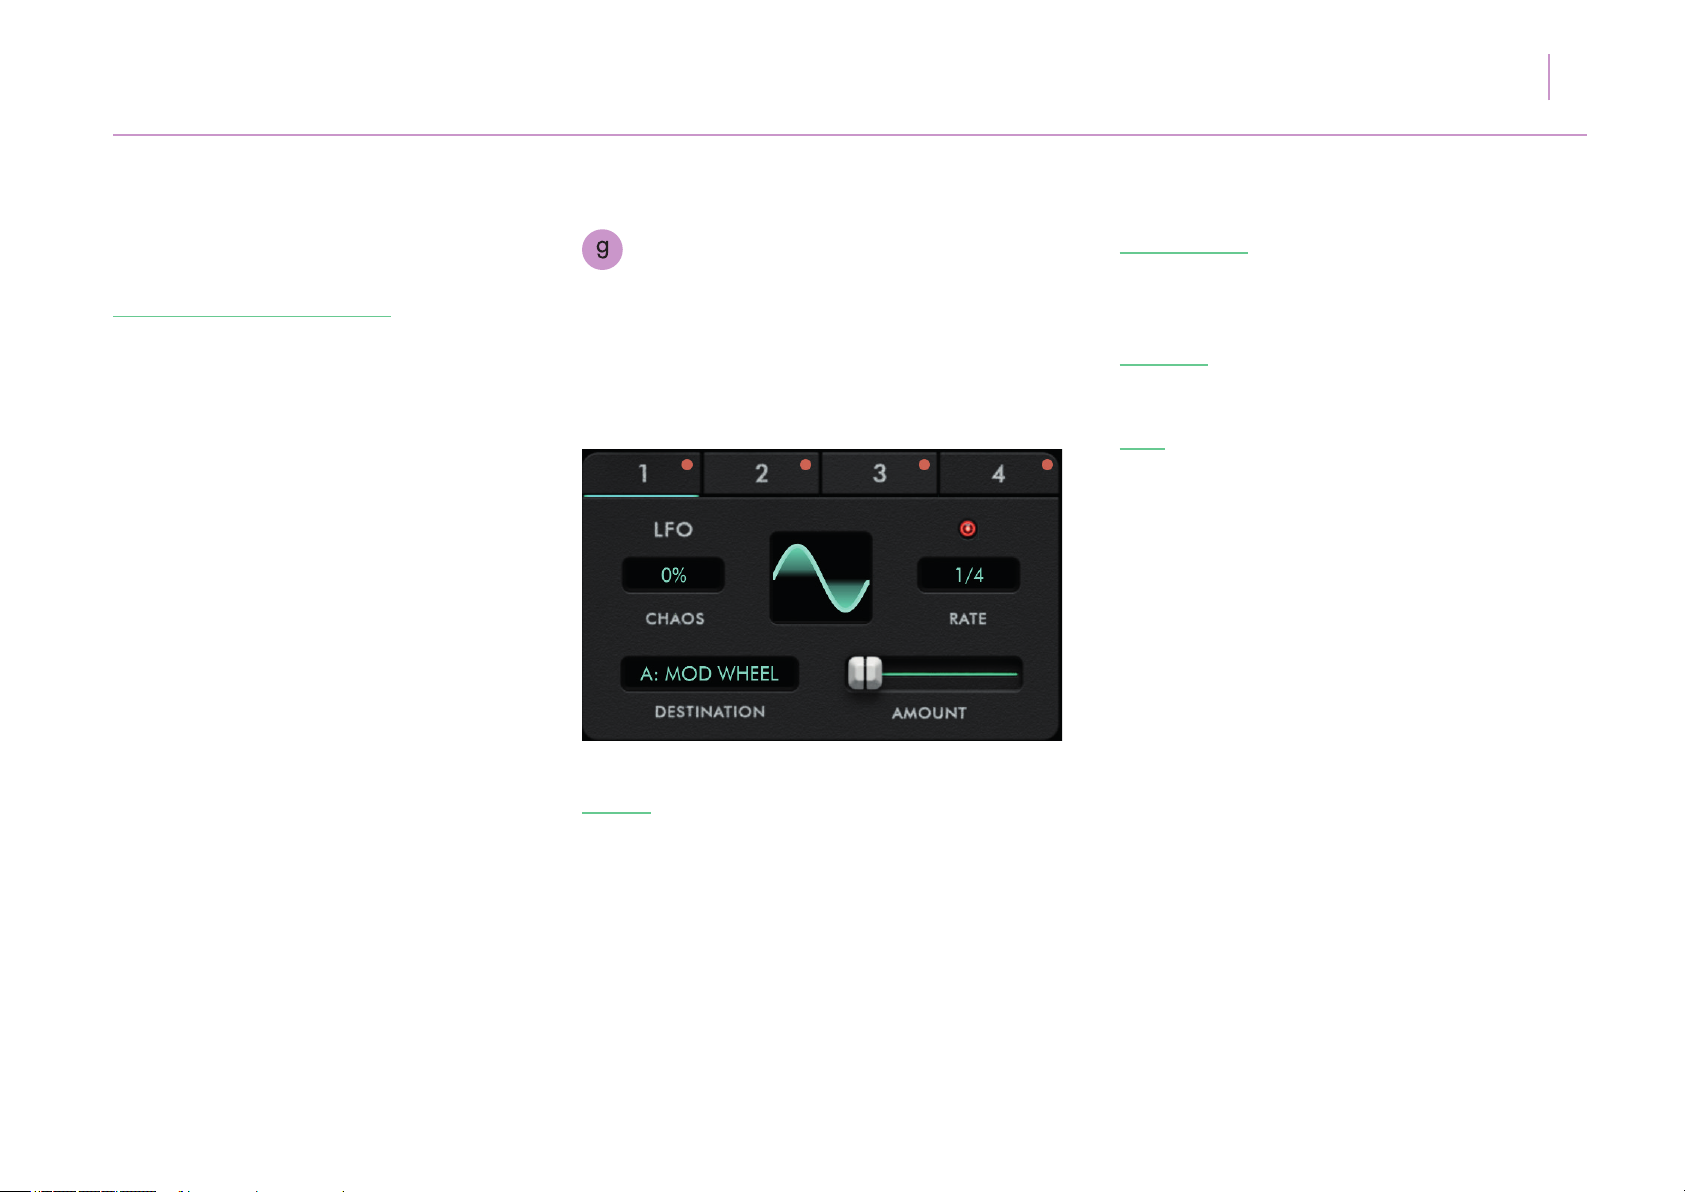
Zenith has four LFO slots, each of which can control its
own CC.
When a slot is labelled with an orange dot it has a
destination assigned and is ready for operation.
CHAOS - The LFO CHAOS amount is displayed in %.
Clicking and dragging this value adjusts the amount of
random variations in the wave shape amplitude with
each cycle of the LFO. When the S&H waveform is
selected, the value adjusts the probability of the
next step not being a new value but a retained
previous value, thus extending the time length to an
extra cycle. When set at 100% the S&H waveform will
effectively ‘freeze’ at the last generated value perpetually until the amount is decreased.
DESTINATION - Clicking in the DESTINATION box
selects the function to be controlled by the LFO from
a dropdown menu.
AMOUNT - Dragging the AMOUNT slider adjusts the
degree to which the LFO controls the DESTINATION.
RATE - When the SYNC LED is clicked it will illuminate
and the LFOs will synchronise with the master
tempo, running at 27 different speed increments -
precisely the same increments as the parameter and
note sequencer. At their slowest speed the LFOs will run
at (8) bars or an eighth of the DAW synced / master
tempo. At their fastest they will run at (1/128), or 128
times the tempo.
When the SYNC LED is not illuminated, the LFOs will
run at a free rate, displayed in Hertz (Hz). This range
is from 0.1 to 100Hz.
The LFO wave shapes can be selected by clicking
on the waveform display and choosing from the drop
down menu.
Page 39
39ZENITH USER MANUAL
7.
Getting to know Zenith
The shapes are as follows:
Basic shapes:
SINE, TRIANGLE, SAW, SQUARE, PULSE,
TRAPEZOID.
Advanced shapes:
NOTCH - A constant output waveform with a
narrow triangular dip once per cycle.
BROKEN TRIANGLE - Produces an ‘M’ shaped
waveform.
BROKEN SAW - The rst half of the saw waveform
is offset slightly upwards, with the second half period
shifted slightly downward.
STAIRCASE 3x - This waveform consists of 3 small
step changes in level, hence the term staircase. The
height of each step will be made constant as is the
period of time over which the waveform resides at
a given level.
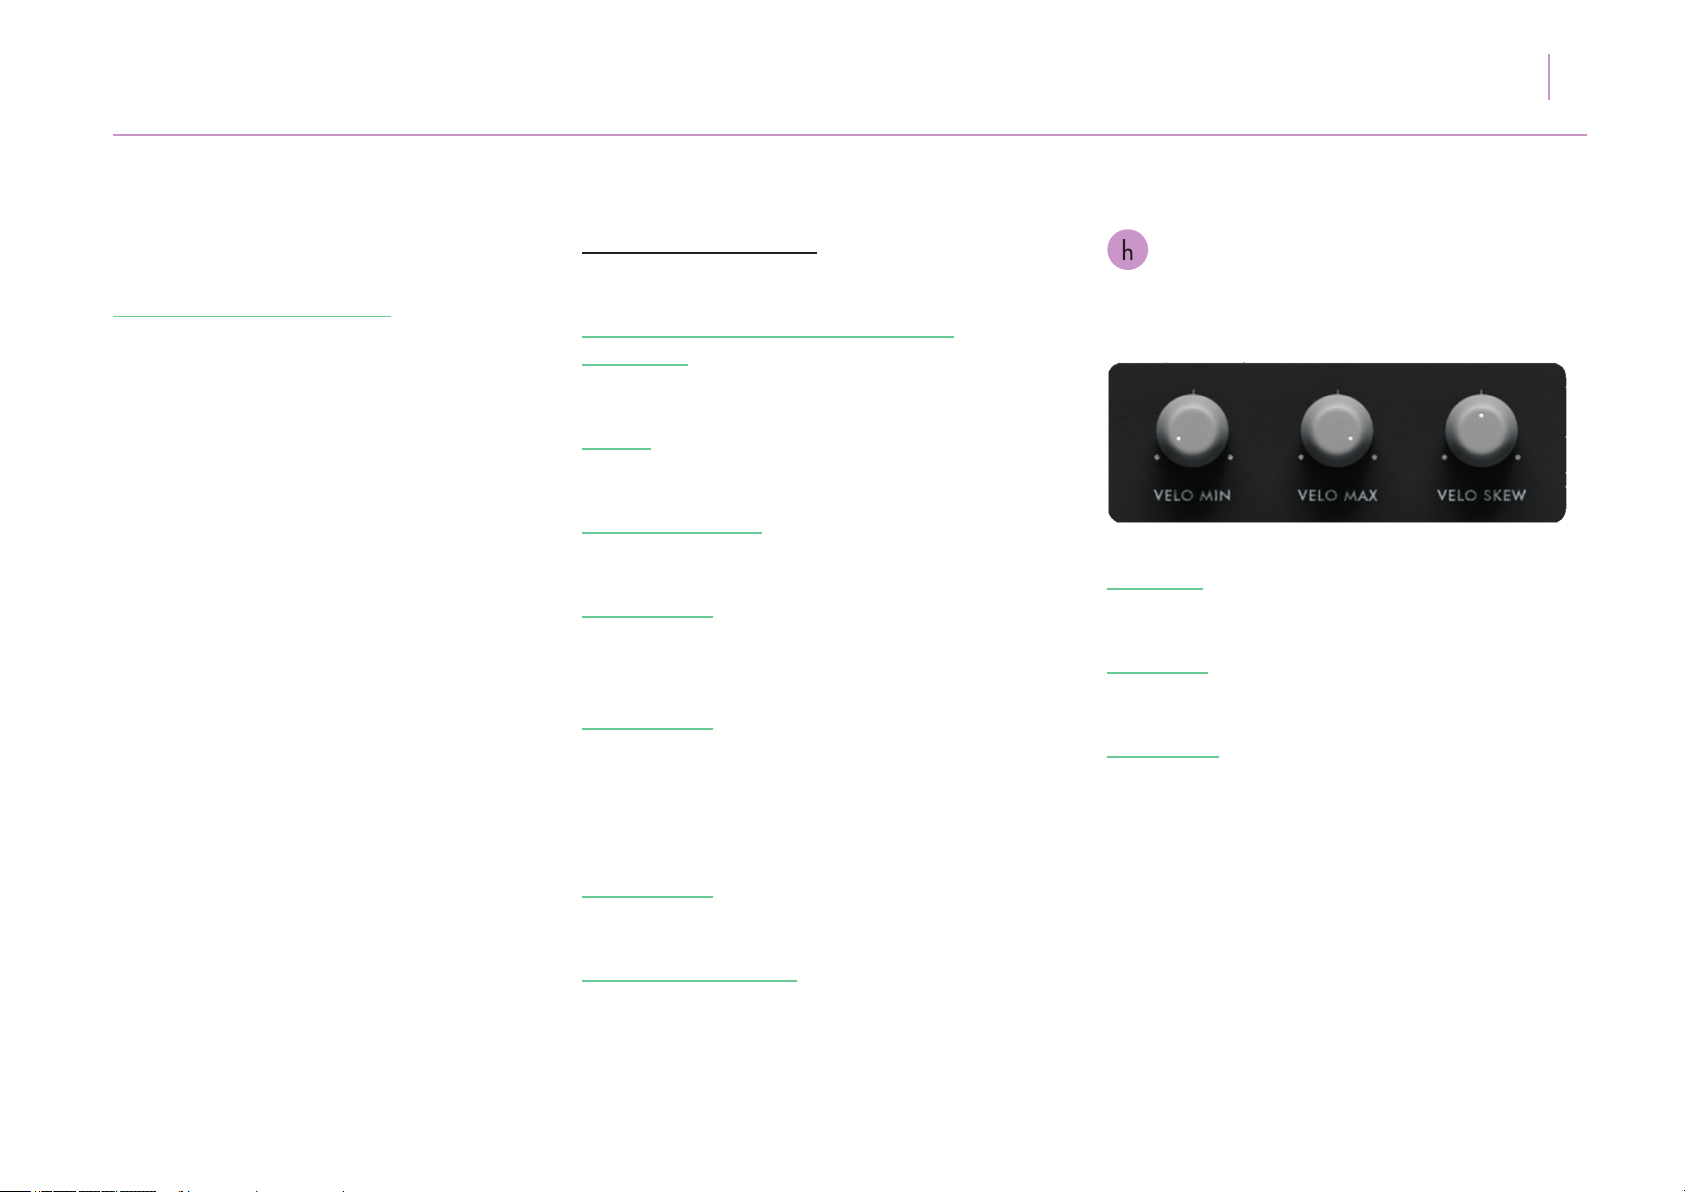
Zenith allows MIDI data to be ‘clamped’ according
to the following controls.
VELO MIN - This control sets the minimum
MIDI note velocity which Zenith will output.
VELO MAX - This control sets the maximum
MIDI note velocity which Zenith will output.
VELO SKEW - Skews the value between the
VELO MIN and VELO MAX.
STAIRCASE 4x - As above but with 4 small step
changes.
S&H (SAMPLE & HOLD) - Produces a randomly
generated value and holds it constant for the duration
of the cycle.
Page 40
40ZENITH USER MANUAL
7.
Getting to know Zenith
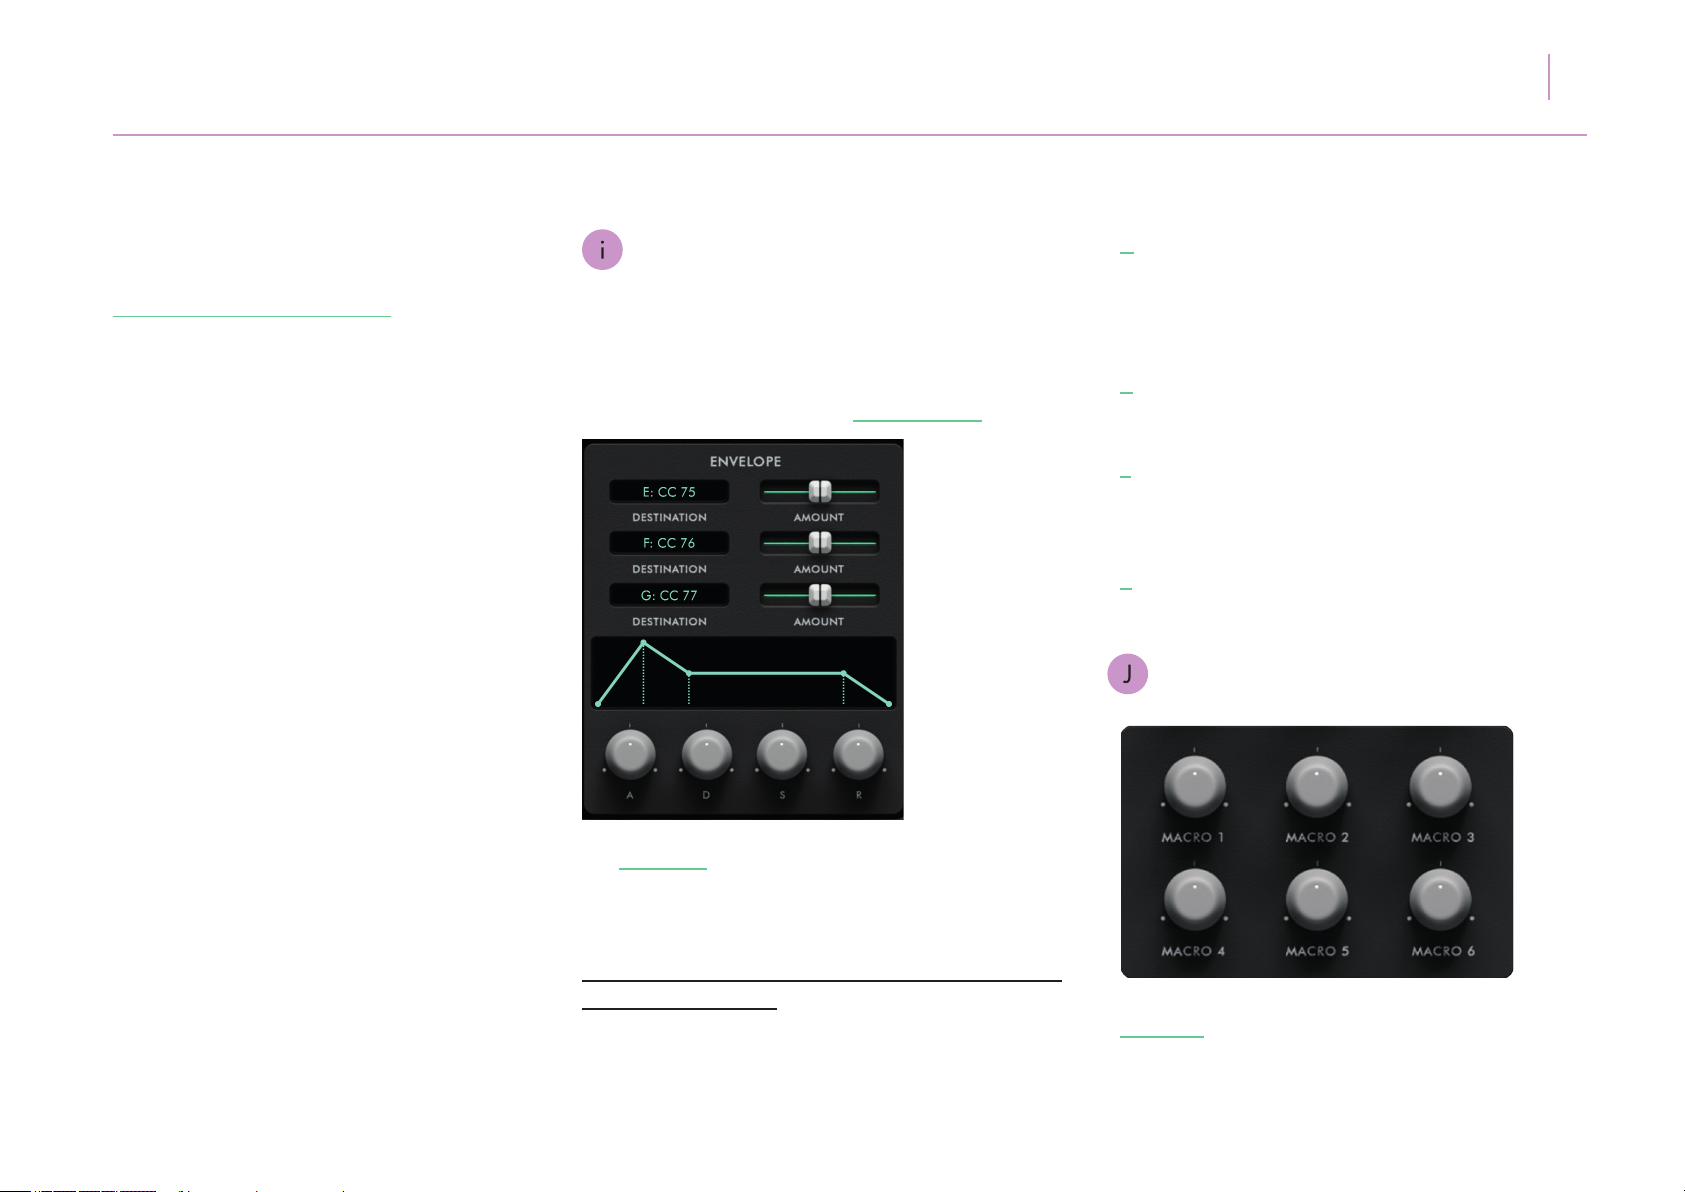
Zenith has an ENVELOPE GENERATOR for
up to 3 CCs.
A CC can be selected from a dropdown menu for each
envelope slot by clicking in its DESTINATION box.
A - The attack time of the envelope. The higher the
setting, the slower the attack time and the longer it
takes for the CC to open from the level set with the
CC knob to the level set by the envelope amount.
D - The decay time of the envelope. The higher the
setting, the longer the decay.
S - The CC value for for the sustained portion of the
sound. The sound will stay at this CC for as long as
a note is held on the keyboard.
R - The release time of the envelope. This controls how
quickly the CC closes off after a note is released.
The AMOUNT sliders will adjust the envelope amount
for each CC, negatively to the left and positively to
the right.
An ADSR envelope is at the bottom of the module with
the following controls:
Adjusts the amount (in seconds) of attack, decay,
sustain or release as follows:
MACROS - Each of Zenith’s 6 macro knobs can have
up to 10 parameters assigned to it. A Macro can be
assigned either by dragging a controller or parameter
label onto a Macro knob (a box will appear around
Page 41
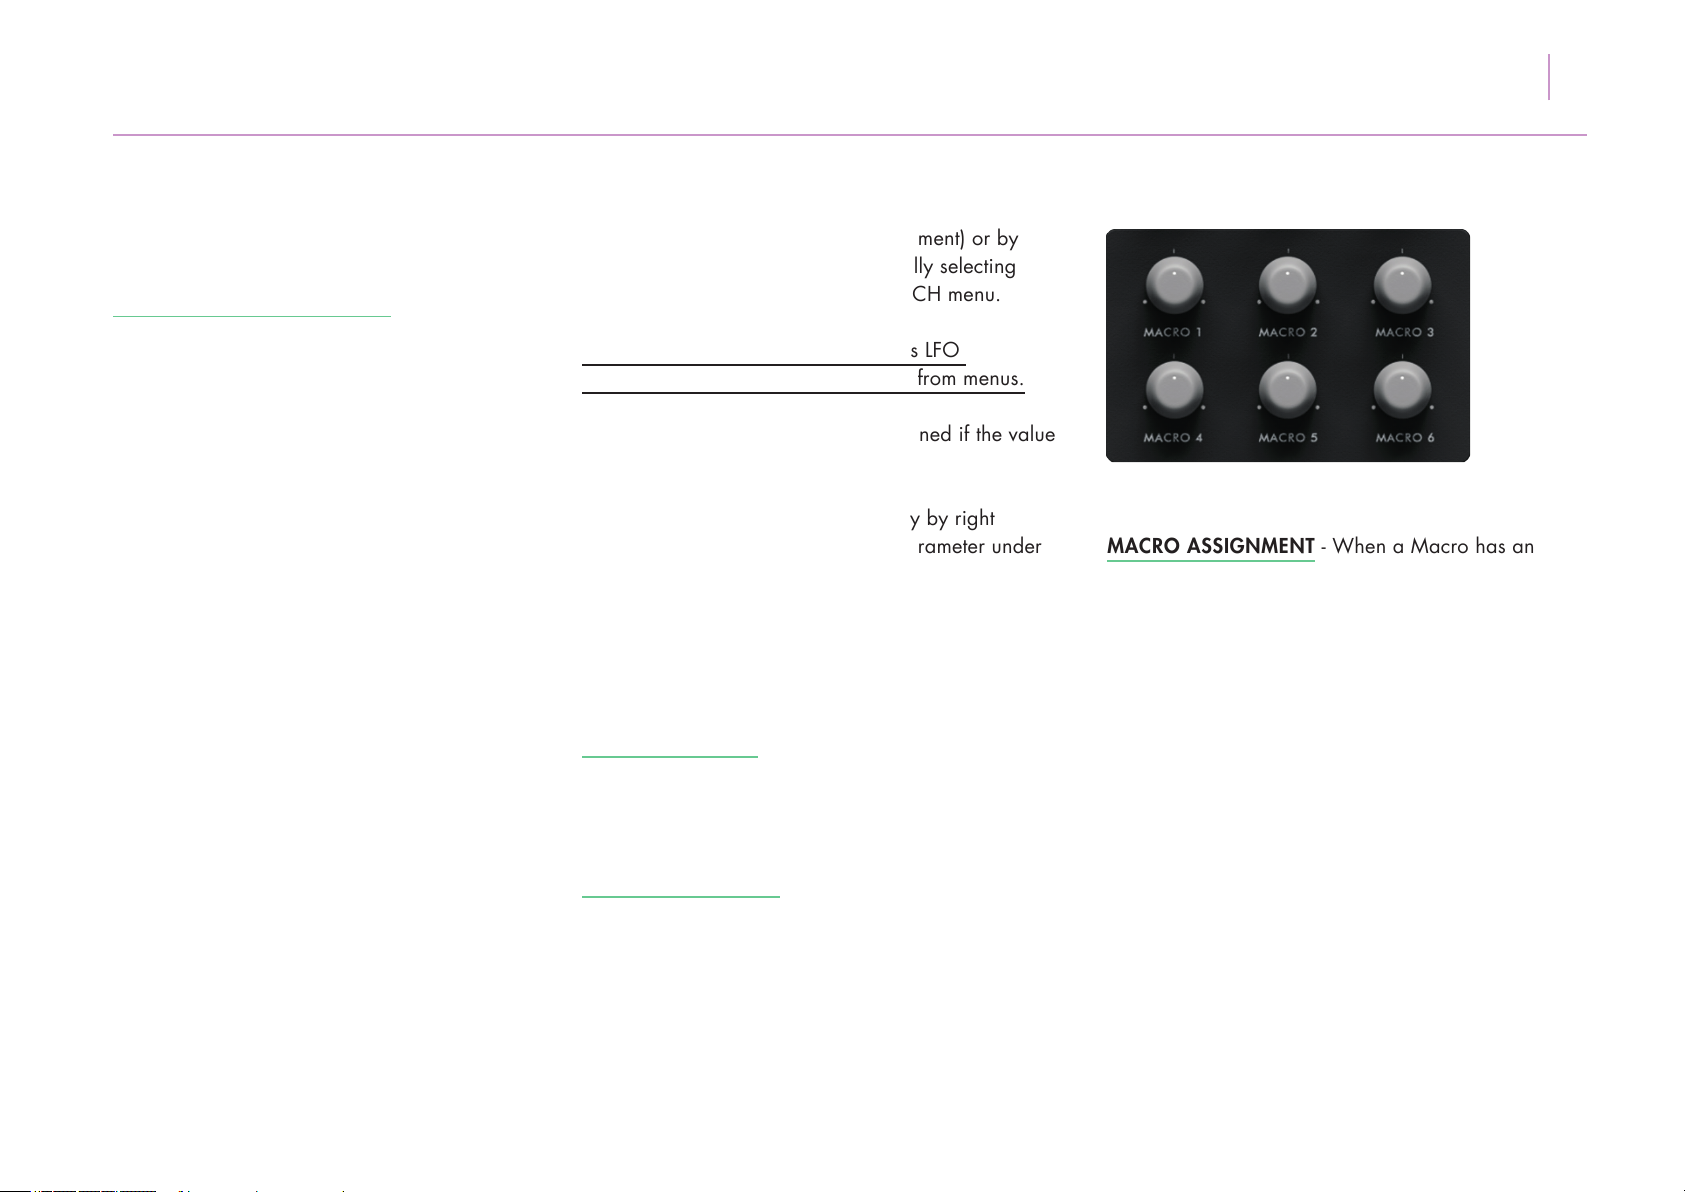
41ZENITH USER MANUAL
7.
Getting to know Zenith
the Macro marking it ready for assignment) or by
right clicking on the knob and manually selecting
the assignment from a list in the ATTACH menu.
Please note some assignments such as LFO
FREQUENCY.* can only be assigned from menus.
*LFO FREQUENCY. can only be assigned if the value
is un-synced to tempo.
Values can be unassigned individually by right
clicking a Macro and selecting the parameter under
the DETACH menu, or outright by clicking DETACH
ALL. Please note that when Macros are assigned to
the parameter sequence grid they will automatically
be assigned to a unipolar lane, regardless of the
parameters assigned to them.
NAMING MACROS - Each macro can be named by
double clicking the text below the dial. Once you
have updated a macro name, its sequencer lane
name will also update to reect this change.
MACRO ASSIGNMENT - When a Macro has an
assignment, moving the Macro knob will take priority
over the original parameter control. So for example,
if a CC is assigned to a Macro, the CC knob will no
longer function unless that value is detached. If the
same parameter is attached to two different Macros,
the Macro with the higher number takes exclusive
control of that parameter.
MACRO COLOURING - When a Macro is assigned
to the sequencer grid, a blue rectangular box will
appear around its label name. When a control or
parameter is assigned to a Macro, an orange dot
appears in the middle of the knob as shown. The
CC or parameter assigned to the macro will have
an orange label around its name eld. If that CC or
parameter is also assigned to the grid, it’s text label
will turn grey
Page 42
42ZENITH USER MANUAL
7.
Getting to know Zenith
(Please note Library folder may be hidden. To access,
click Finder and select the Go menu. Hold [alt] and
Library location will appear under the Go menu.
Options and Preset Menu
PC: C:\Users\yourusername\AppData\Roaming\
Audiaire\Zenith\Presets
To revert to default preset, clearing all data - select
LOAD DEFAULT.
RESET LED - Clicking the RESET LED will return all
parameters in Zenith to their default state. There is an
option to cancel this command if clicked in error.
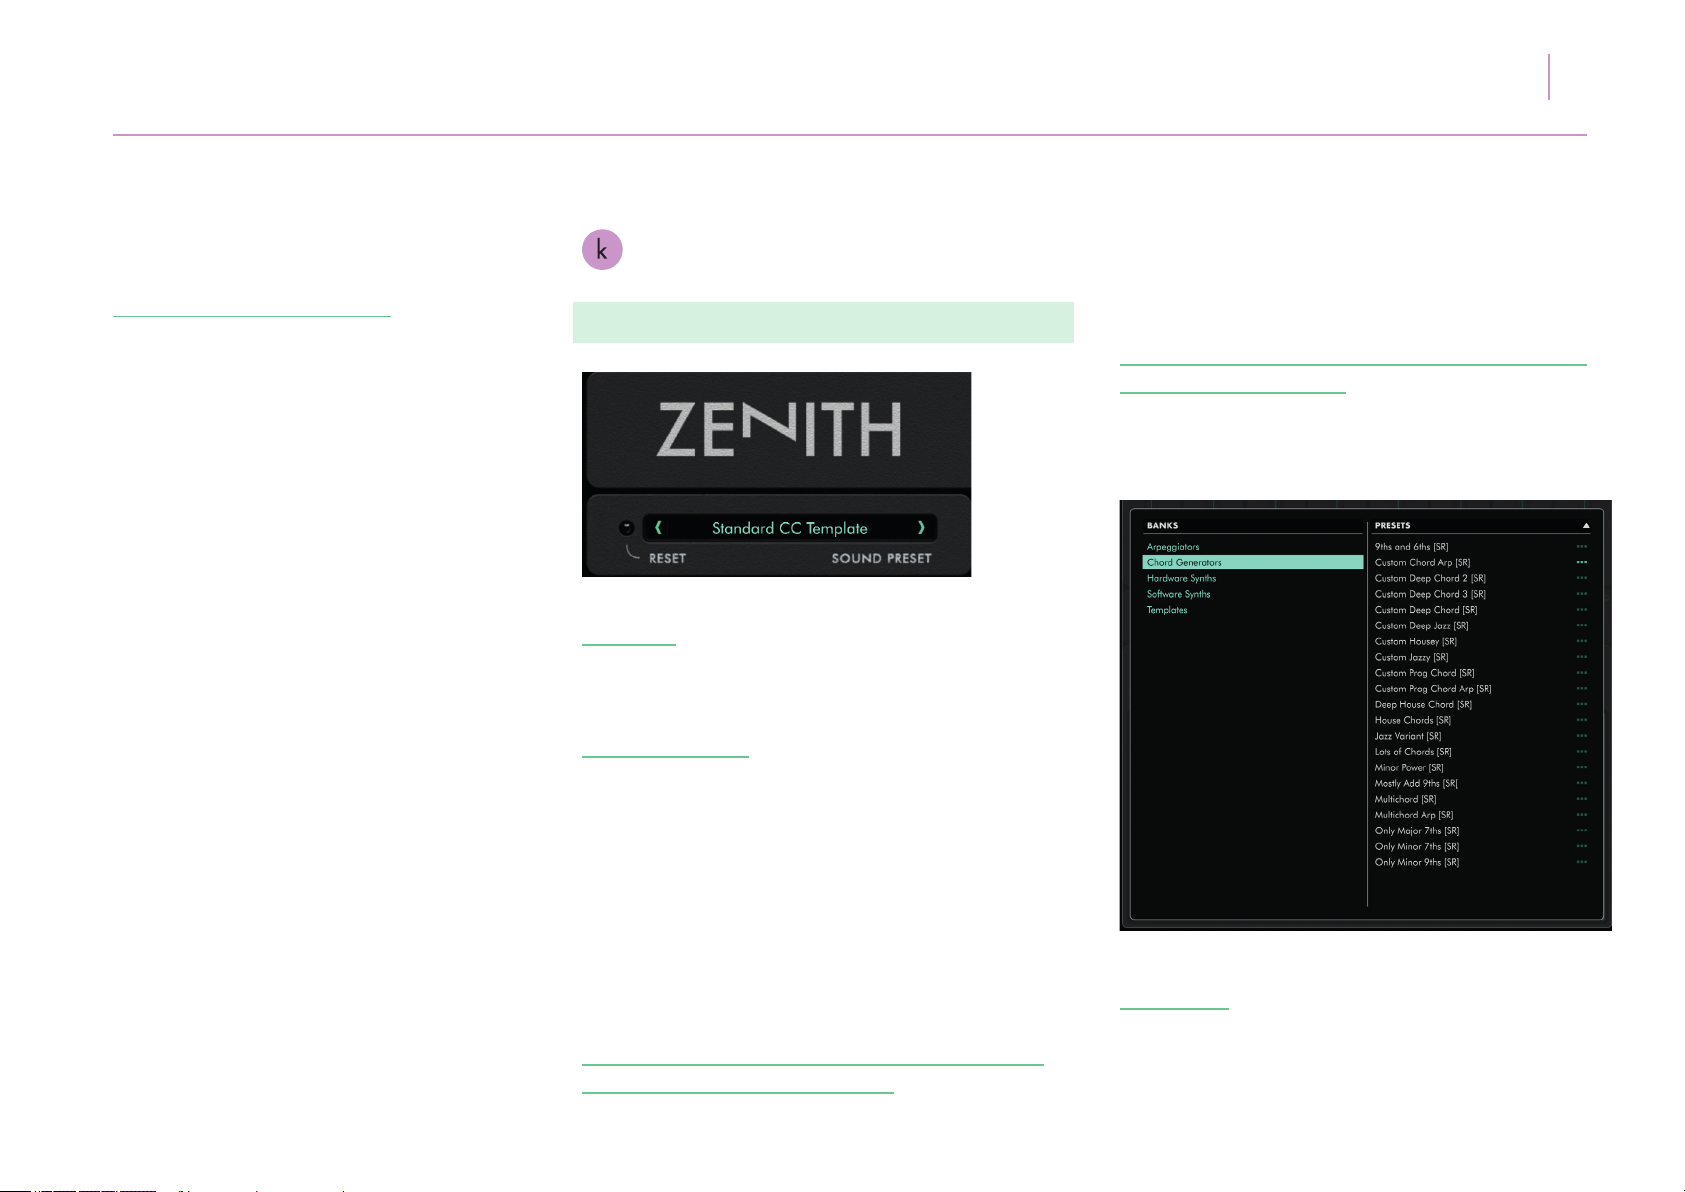
PRESET BROWSER - Clicking inside the SOUND
PRESET bar launches the preset browser. Presets are
divided by banks on the left and selections on the right.
Selections can be browsed using the scrollbar on the
right or re-ordered using the white arrow icon at the
top of the right hand menu.
To save a new preset click on SAVE AS NEW. The
preset will appear in the USER menu, be coloured
yellow and located at -
MAC: /Users/yourusername/Library/Application
Support/Audiaire/Zenith/Presets
USER BANK - Within the USER bank, clicking on the
icon below will open a menu allowing OVERWRITE,
RENAME, DELETE, SHOW ON DISK and COPY TO
options.
Page 43

43ZENITH USER MANUAL
7.
Getting to know Zenith
OVERWRITE - Upon selecting a patch, clicking
the icon will overwrite that patch with the current
displayed settings.
RENAME - Opens a cursor box to rename the
selected patch name.
DELETE - Permanently deletes a selected user patch
from memory. *Please note that there is no UNDO
function.
SHOW ON DISK - Shows the location of the patch
on your local drive. Should you wish to add folders
or directories within Zenith for easy storage of your
patches, you can do so by adding new folders within
the Presets folder, where the User and other banks from
Zenith are located.
(i) Zenith Logo
• Click to access additional options for Zenith along
with the credits and PDF manual.
DEFAULT PARAMETER LANE RAMP - Selecting
this option changes the defaulted sequencer lane
data shape.
MIDI LATENCY - Adjusts the latency in ms
(from 0-100) at which Zenith sends MIDI data
to SysEx devices.
Additional Options are as follows:
CLICK STEP NUMBERS MUTE STEPS Toggles on/off the
ability to mute steps by clicking on them and greying
them out during sequence playback.
Page 44
44ZENITH USER MANUAL
8.
Troubleshooting /
FAQ
Q. Zenith is requesting to log in before I could use it,
what credentials am I supposed to input?
A. You will need to sign up for an account at:
www.audiaire.com/account, once you have done this
and can see the Zenith license in your account, you
will be able to use your account credentials to sign-in.
Q. How can I make sure that my version of Zenith
is up to date?
A. You can download the latest version of Zenith, at:
www.audiaire.com/Zenith or by logging into your
Audiaire account and selecting the update button.
Q. I am ofine and Zenith is failing to launch. Why?
A. Zenith has a ‘call home’ period where it may
connect to our servers to check whether a valid license
is present. Sometimes if ofine, this process cannot be
completed and Zenith may revert back to demo mode.
In this instance, please connect to the internet, if only
temporarily and reload it.
Q. My DAW can’t see Zenith, what should I do?
MAC
/Users/yourusername/Library/Application Support/
Audiaire/Zenith/
/Library/Audio/Plug-Ins/Components/Zenith.component
VST: /Library/Audio/Plug-Ins/VST/Nuxx.vst
PC:
C:\Program Files\Steinberg\VstPlugins\Audiaire\
Zenith
(Please note that the Library folder may be hidden. To
access, click Finder and select the Go menu. Hold [alt]
and Library location will appear under the Go menu.)
If you can’t see Zenith, try rescanning your DAW
for plugins. This option can often be found under
preferences, or audio settings.
If Zenith is ‘blacklisted’ or not showing in Logic, please
try the following steps prescribed by Apple.
https://support.apple.com/en-us/HT201199
A. Please ensure your computer and software meet
Zenith’s minimum specications. Also check tyou have
installed Zenith correctly, by checking in the following
directories
Page 45

45ZENITH USER MANUAL
8.
Troubleshooting /
FAQ
Q. My device is not responding to Zenith’s MIDI
sequencer. Help!?
A.
1. Check your device is receiving ‘MIDI In’
from Zenith under your DAW’s routing options as described in the manual under the section “Setting
up Zenith in your DAW”.
2. Ensure your device can receive MIDI CC or SysEx
data. If it is a very old hardware device, it is possible it
only receives MIDI note data but not CC or SysEx.
3. If your receiving device is software, please be sure
the relevant MIDI map or controller assignments have
been set as described earlier in the manual under the
section ‘Sending MIDI From Zenith”.
4. Ensure the software device you are controlling is
not a VST3 as this protocol has limited MIDI routing
options within DAWs.
5. If your device is hardware, check the MIDI channel
on which it is set to receive (some drum machines only
receive on MIDI channel 10, and some modied vintage synths on channels 14 or 15). Please also check
it is set to receive MIDI CC and/or SysEx data (this is
usually selected via a switch or within the options menu
in newer devices)
6. Check your synth’s rmware or OS is up-to-date.
In some devices older rmware may not include CC
control.
You can some additional information on specic
hardware device setup in Appendix A at the end of
the manual.
Q. My device responds to Zenith but the preset grid
controllers are not properly assigned to the correct
knobs and faders in my receiving device. Why?
A. Please check that your receiving device has the
correct MIDI map loaded and/or saved. Zenith ships
with MIDI maps for all device presets which require
them.
If using hardware, please check your device rmware
or OS is up-to-date.
If using a SysEx receiving device, ensure you have
selected your SYSEX Vendor, Device, MIDI interface
and Channel from within Zenith,
Page 46
46ZENITH USER MANUAL
8.
Troubleshooting /
FAQ
Q. My hardware device stops responding when I use
the Zenith LFO at high speeds! Why?
A. MIDI CC data, when sent in bulk, can cause ‘log-
jams’ in hardware, particularly older synths. There
isn’t much that can be done since MIDI is essentially
serial data used to communicate, in some cases, with
very primitive hardware. Please try clicking the
PANIC LED. However, in this instance, the only
remedy is usually to restart your hardware device.
Q. When I load a Zenith preset, my receiving device
preset sounds different. Why?
A. This may happen because even though Zenith con-
trollers are by default set to a neutral position, your
receiving device preset may not have all its controls
set to a default position. You can usually remedy this
mismatch by reloading your receiver preset, while
retaining the preset in Zenith.
Q. My new SysEx device is still not showing, even after
I’ve added my custom .sysex le to the relevant le
location. Why?
A. Restart your DAW and relaunch Zenith in order for
it to properly ‘see’ your newly added SysEx vendor or
device.
Q. My SysEx device is experiencing latency. What
should I do?
A. Try clicking the Zenith logo and access the MIDI
Latency settings. The exact latency can be adjusted
in ms.
Q. Zenith has crashed and is not working, what should
I do?
A. Please make sure that you are running the latest
update of Zenith. To patch a crash, try closing and
relaunching your DAW and/or restarting your com-
puter. If Zenith continues to crash, contact us at
[email protected] with your computer
specs, including; format (PC/Mac), OS (High Sierra,
Windows 10, etc), which DAW you were using (including version number, i.e. Ableton 10.0.4) and any
other information that you think may be important.
Q. I really like your plugin, but I have some requests
for improvements. What is the best way to get in con-
tact with you?
A. We take all requests/ideas into consideration
for future updates. The best way to convey these, is
to post them on our Facebook page https://www.
facebook.com/audiaire which is actively monitored
by the Audiaire Team, or by using the contact pages
on our site.
Page 47
9.
Credits
47ZENITH USER MANUAL
Zenith is brought to you by
www.audiaire.com
Concept, Executive Production,
Presets & Manual:
Sharooz Raoofi
Development & DSP:
Milan van der Meer
UI Graphics:
Luis Burdallo
Product Management & Testing:
Ulas Koca
Logo & Graphic Design:
Laura Price-Bates
Page 48

48ZENITH USER MANUAL
10.
Appendix A.
Adding SysEx Devices
Should you wish to add to the list of SysEx devices in
Zenith, you will need to create an .xml le and place
in the below location, along with the other SysEx
device les.
In Windows, customer user SysEx les are found at:
%APPDATA%\Audiaire\Zenith\SysEx Devices\Vendor\synth.sysex
On Mac OS, customer user SysEx les are found at:
~/Library/Application Support/Audiaire\Zenith\SysEx Devices\Vendor\synth.sysex
E.g. C:\Users\username\AppData\Roaming\Audiaire\Zenith\SysEx Devices\Roland\Juno-106.sysex
SysEx les uses an XML structure. Below is an
example for the Roland Juno -106:
<?xml version=”1.0” encoding=”UTF-8”?>
<payload>
<byte>0x41</byte>
<byte>0x32</byte>
<byte x=”0x00”>xc</byte>
<byte>pp</byte>
<byte>vv</byte>
</payload>
The le name without an extension will be displayed
in the Sysex Menu.
The ’SysEx’ directory may contain one layer (or level)
of sub directories. The installed SysEx les use this to
discriminate between different vendors.Within each
sub directory, you can nd the SysEx les.
example of directories: [SysEx]
[Roland]
<juno.sysex>
<…>
[Yamaha]
<dx7.sysex>
[] = directory
<> = le
<?xml version=”1.0” encoding=”UTF-8”?>
<payload>
…
</payload>
This is the basic format of a SysEx message.
It should always contain a header followed by the
element ‘payload’.
The SysEx message is encoded in the format XML .
The lename must have the extension .sysex.
Page 49
ZENITH USER MANUAL
49
10.
Appendix A.
The payload element contains the byte messages
that will form the midi message. The number of byte
messages can be of variable length. The value of a
byte is represented in the hexadecimal format and
starts with the prex ‘0x’ followed by the hexadecimal
value (e.g. 0x4C). A SysEx message always starts and
ends with the values F0 and F7. No need to ll
in these bytes as they are wrapped around the
payload automatically.
Each byte message is placed in the sub element
‘byte’ in the payload. Here’s an example of a
SysEx message containing two bytes.
<?xml version=”1.0” encoding=”UTF-8”?>
<payload>
<byte>0x41</byte>
<byte>0x32</byte>
</payload>
Zenith allows 3 bytes to be variable within each
message, namely the MIDI channel, CC controller
number and CC value.
Instead of lling in a static value (e.g. 0x41),
placeholders are used to indicate the variable.
The placeholder ‘cc’ denotes the MIDI channel.
The placeholder ‘pp’ denotes the cc controller number
(parameter).
The placeholder ‘vv’ denotes the cc value.
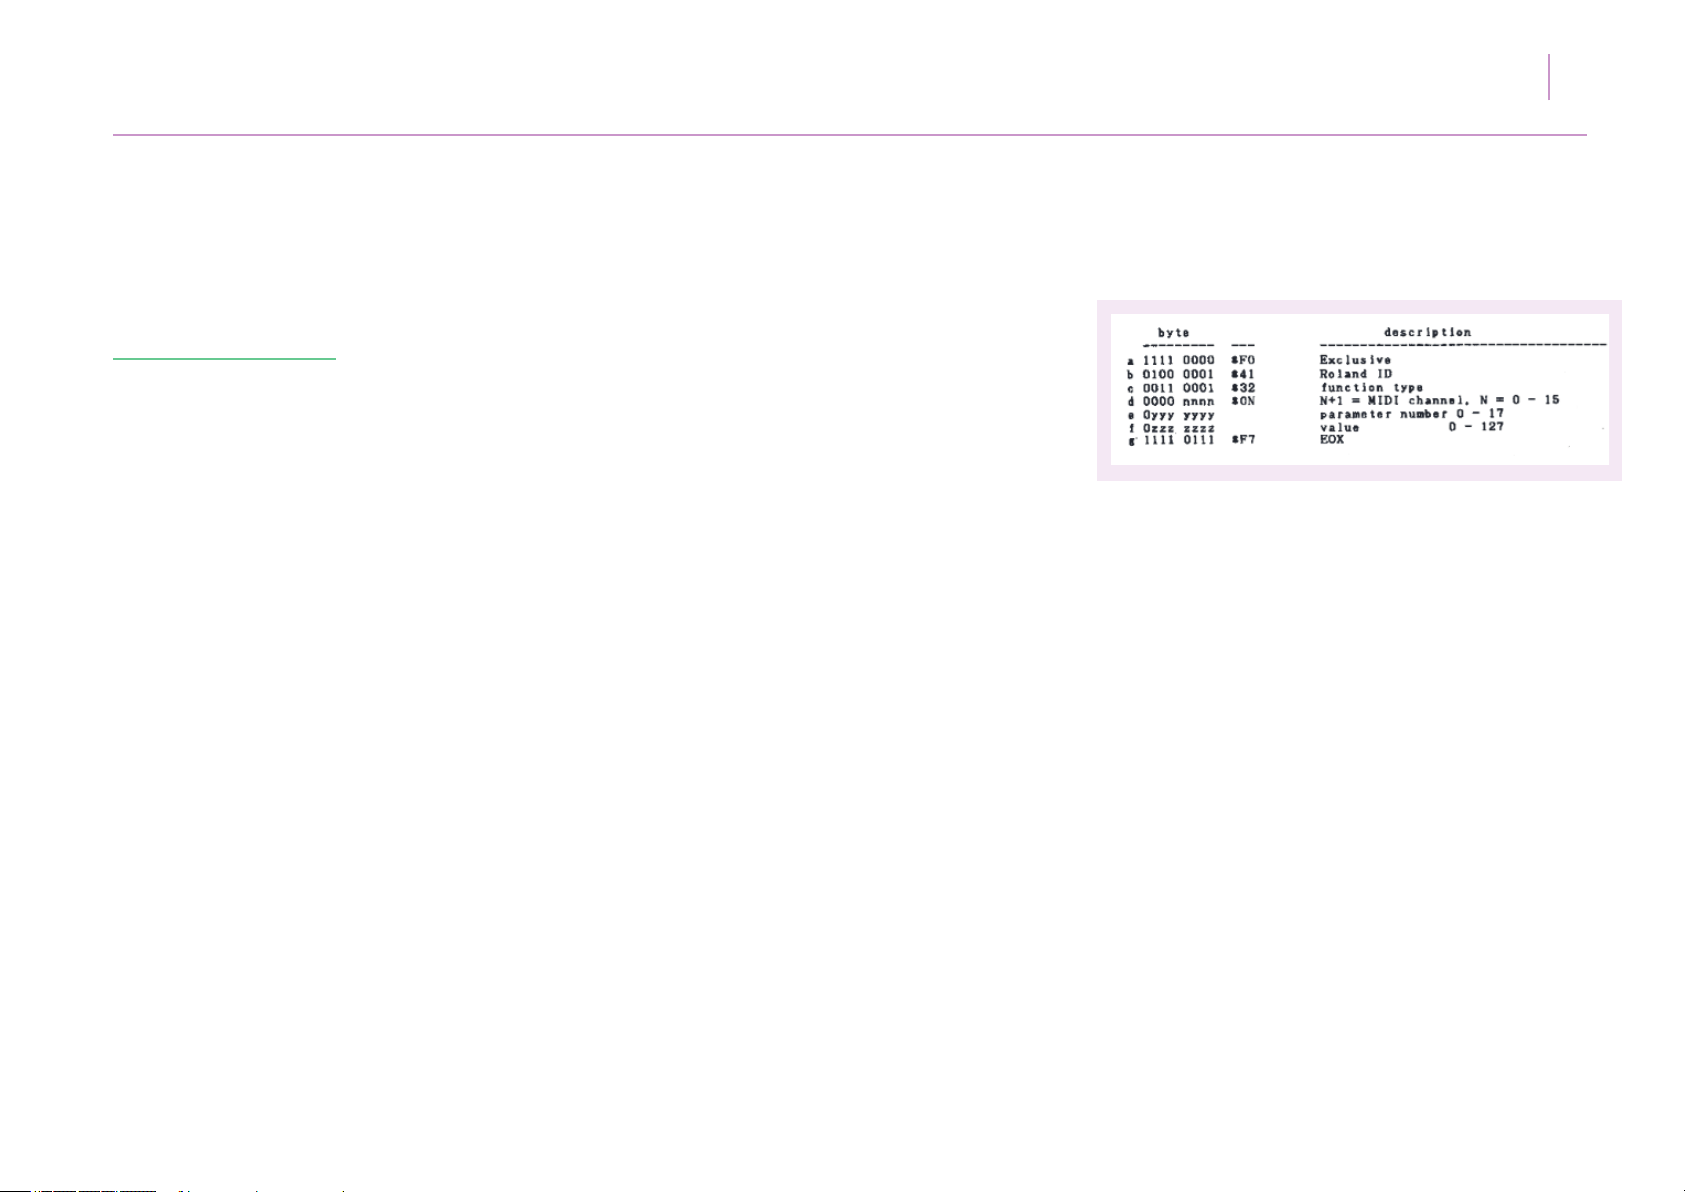
To compare, here is the Juno-106’s SysEx parameter
change message:
Here’s an example of a SysEx message with two static
bytes followed by three variable bytes, respectively
MIDI channel, controller number and controller value
<?xml version=”1.0” encoding=”UTF-8”?>
<payload>
<byte>0x41</byte>
<byte>0x32</byte>
<byte>cc</byte>
<byte>pp</byte>
<byte>vv</byte>
</payload>
In some occasions, one half of the byte, the nibble, is
used to store a value. In these cases, we can introduce
the special placeholder ‘x’ to indicate that value.
The ‘x’ value must be implemented as a hexadecimal
attribute of the byte element. For example:
<byte x=”0x10”>xc</byte>
Page 50

ZENITH USER MANUAL
50
10.
Appendix A.
The right nibble contains the MIDI channel value.
The left nibble contains the ‘x’ value.
If the channel value is described in the left nibble
we can have the following situation.
<byte x=”0x01”>cx</byte>
The ‘x’ value will be masked on a bitwise ‘OR’
operation with the channel value.
Page 51
ZENITH USER MANUAL
51
10.
Appendix B.
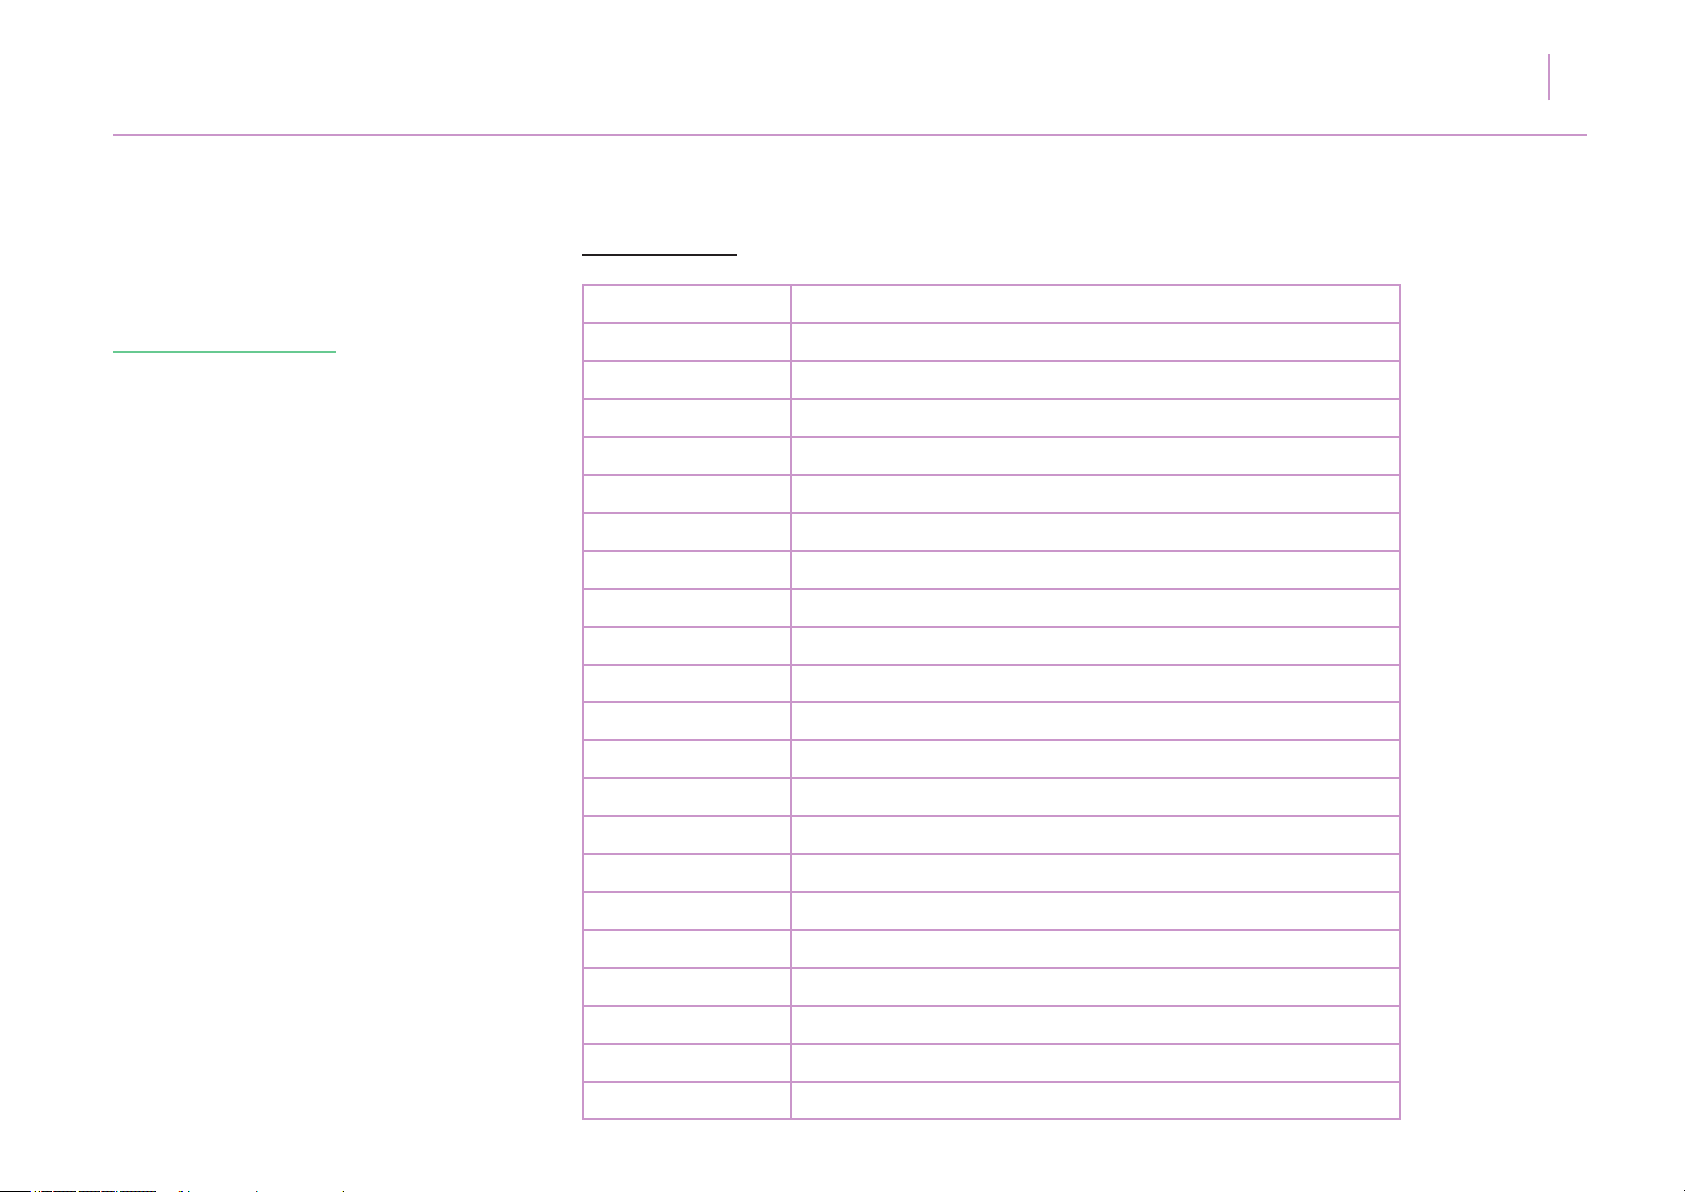
Chord Preset List
MODE
Major
Minor
Diminished
Augmented
Major 7th
Minor 7th
Dominant 7th
Diminished 7th
Half diminished
Sus 2
Sus 4
Power
Major 6th
DESCRIPTION
1st, 3rd and 5th note of scale
1st, attened 3rd and 5th note of scale
1st, attened 3rd and attened 5th note of scale
1st, 3rd and sharpened 5th note of scale
1st, 3rd, 5th and 7th note of scale
1st, attened 3rd, 5th and attened 7th note of scale
1st, 3rd, 5th and attened 7th note of scale
1st, attened 3rd, attened 5th and 7th note of scale
1st, attened 3rd, attened 5th and attened 7th note of scale
1st, 2nd and 5th note of scale
1st, 4th and 5th note of scale
1st and 5th note of scale
1st, 3rd, 5th and 6th note of scale
Minor 6th
Major 9th
Minor 9th
Dominant 9th
Major add 9th
Minor add 9th
Dom 7 #9
Dom 7 b5
1st, attened 3rd, 5th and 6th note of scale
1st, 3rd, 5th, 7th and 2nd(+8ve) note of scale
1st, attened 3rd, 5th, attened 7th and 2nd(+8ve) note of scale
1st, 3rd, 5th, attened 7th and attened 2nd(+8ve) note of scale
1st, 3rd, 5th and 2nd(+8ve) note of scale
1st, attened 3rd, 5th, 2nd(+8ve) note of scale
1st, 3rd, 5th, attened 7th and attened 3rd(+8ve) of scale
1st, 3rd, attened 5th and attened 7th note of scale
Page 52
ZENITH USER MANUAL
52
10.
Appendix B.
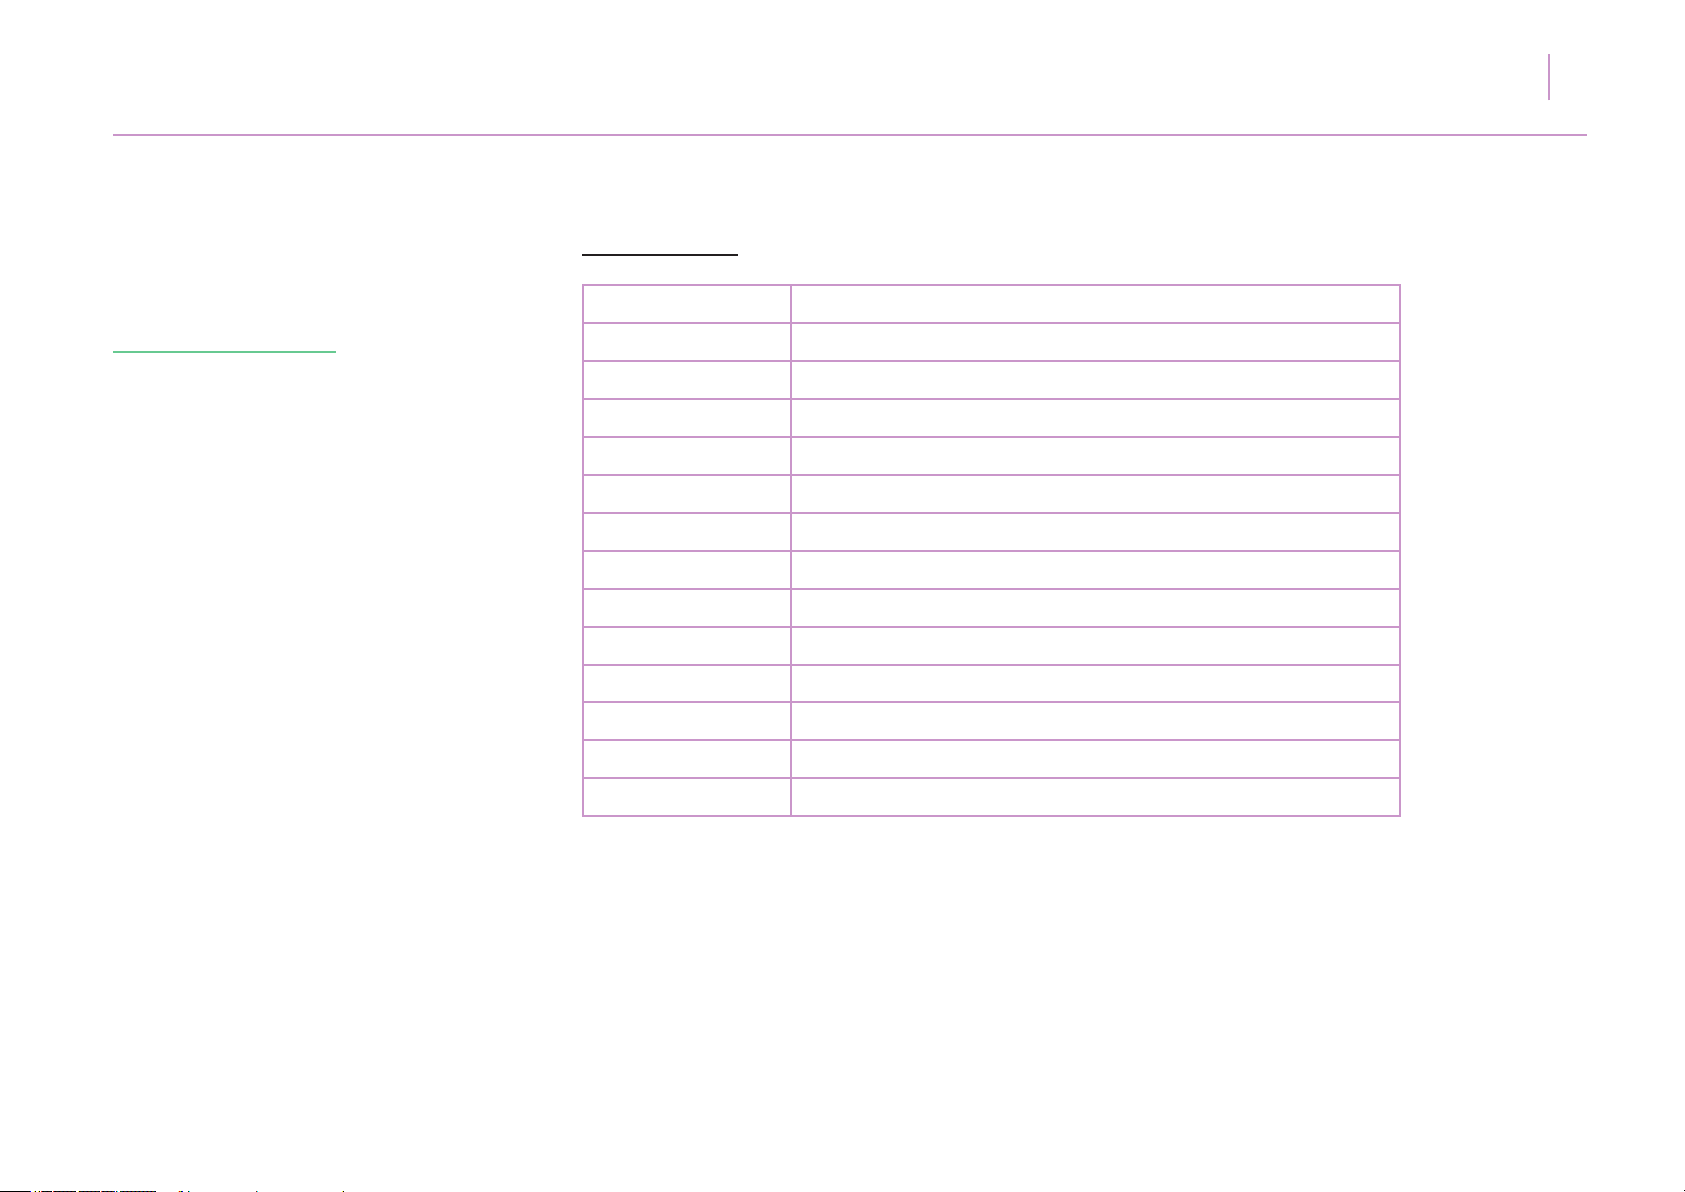
Scaler Preset List
SCALE
Major
Minor
Harm. Min
Mel. Min
Dorian
Phrygian
Lydian
Mixolydian
Locrian
Pentatonic maj
Pentatonic min
Pentatonic yo
Okinawan
ACCIDENTALS
*All natural
*Flattened 3rd, 6th and 7th
*Flattened 3rd and 6th
*Flattened 3rd
*Flattened 3rd and 7th
*Flattened 2nd, 3rd, 6th and 7th
*Sharpened 4th
*Flattened 7th
*Flattened 2nd, 3rd (NATURAL 3rd ALSO PLAYED) 5th, 6th, 7th
All Natural - 1st, 2nd, 3rd, 5th and 6th
1st, attened 3rd, 4th, 5th and attened 7th
1st, attened second, 4th, 5th an attened 6th
Full scale - Omit 2nd and 6th note
 Loading...