

Page 1

Protected by copyright. Copying for private or commercial purposes, in part or in whole, is not
permitted unless authorised by AUDI AG. AUDI AG does not guarantee or accept any liability
with respect to the correctness of information in this document. Copyright by AUDI AG.
Service
Body Repairs
Audi TT 2007 ➤
Edition 09.2009
Service Department. Technical Information
Page 2
Protected by copyright. Copying for private or commercial purposes, in part or in whole, is not
permitted unless authorised by AUDI AG. AUDI AG does not guarantee or accept any liability
with respect to the correctness of information in this document. Copyright by AUDI AG.
Repair Group overview for Body Repairs
Re pa ir G ro up
00 - Technical data
50 - Body - front
51 - Body - centre
53 - Body - rear
Service
Technical information should always be available to the foremen and mechanics, because their
careful and constant adherence to the instructions is essential to ensure vehicle road-worthiness and
safety. In addition, the normal basic safety precautions for working on motor vehicles must, as a
matter of course, be observed.
All rights reserved.
No reproduction without prior agreement from publisher.
Copyright © 2010 Audi AG, Ingolstadt A008JKI0120
Page 3
Protected by copyright. Copying for private or commercial purposes, in part or in whole, is not
permitted unless authorised by AUDI AG. AUDI AG does not guarantee or accept any liability
with respect to the correctness of information in this document. Copyright by AUDI AG.
Audi TT 2007 ➤
Body Repairs - Edition 09.2009
Contents
00 - Technical data . . . . . . . . . . . . . . . . . . . . . . . . . . . . . . . . . . . . . . . . . . . . . . . . . . . . 1
1 General notes . . . . . . . . . . . . . . . . . . . . . . . . . . . . . . . . . . . . . . . . . . . . . . . . . . . . . . . . . . . . 1
2 Vehicle identification data . . . . . . . . . . . . . . . . . . . . . . . . . . . . . . . . . . . . . . . . . . . . . . . . . . 2
2.1 Type plate and vehicle identification number . . . . . . . . . . . . . . . . . . . . . . . . . . . . . . . . . . . . 2
2.2 Vehicle data sticker . . . . . . . . . . . . . . . . . . . . . . . . . . . . . . . . . . . . . . . . . . . . . . . . . . . . . . 3
3 Expanded foam inserts . . . . . . . . . . . . . . . . . . . . . . . . . . . . . . . . . . . . . . . . . . . . . . . . . . . . 4
4 General notes on repairs to aluminium parts . . . . . . . . . . . . . . . . . . . . . . . . . . . . . . . . . . . . 6
5 General notes on repairs to steel parts . . . . . . . . . . . . . . . . . . . . . . . . . . . . . . . . . . . . . . . . 7
6 Body construction . . . . . . . . . . . . . . . . . . . . . . . . . . . . . . . . . . . . . . . . . . . . . . . . . . . . . . . . 8
6.1 Aluminium panels . . . . . . . . . . . . . . . . . . . . . . . . . . . . . . . . . . . . . . . . . . . . . . . . . . . . . . . . 8
7 Corrosion protection . . . . . . . . . . . . . . . . . . . . . . . . . . . . . . . . . . . . . . . . . . . . . . . . . . . . . . 10
8 Bonded joints . . . . . . . . . . . . . . . . . . . . . . . . . . . . . . . . . . . . . . . . . . . . . . . . . . . . . . . . . . . . 11
8.1 Bonded joints . . . . . . . . . . . . . . . . . . . . . . . . . . . . . . . . . . . . . . . . . . . . . . . . . . . . . . . . . . . . 11
8.2 Spot-welded/bonded joints . . . . . . . . . . . . . . . . . . . . . . . . . . . . . . . . . . . . . . . . . . . . . . . . . . 11
8.3 Inspecting and repairing bonded joints . . . . . . . . . . . . . . . . . . . . . . . . . . . . . . . . . . . . . . . . 11
8.4 Repair methods for replacing body parts . . . . . . . . . . . . . . . . . . . . . . . . . . . . . . . . . . . . . . 11
9 Body panel gaps/shut lines . . . . . . . . . . . . . . . . . . . . . . . . . . . . . . . . . . . . . . . . . . . . . . . . 12
9.1 Body - front and centre . . . . . . . . . . . . . . . . . . . . . . . . . . . . . . . . . . . . . . . . . . . . . . . . . . . . 12
10 Body dimensions . . . . . . . . . . . . . . . . . . . . . . . . . . . . . . . . . . . . . . . . . . . . . . . . . . . . . . . . 15
10.1 Floor group, front . . . . . . . . . . . . . . . . . . . . . . . . . . . . . . . . . . . . . . . . . . . . . . . . . . . . . . . . 15
10.2 Floor group, rear . . . . . . . . . . . . . . . . . . . . . . . . . . . . . . . . . . . . . . . . . . . . . . . . . . . . . . . . . . 16
10.3 Body - front . . . . . . . . . . . . . . . . . . . . . . . . . . . . . . . . . . . . . . . . . . . . . . . . . . . . . . . . . . . . . . 17
10.4 Body - centre . . . . . . . . . . . . . . . . . . . . . . . . . . . . . . . . . . . . . . . . . . . . . . . . . . . . . . . . . . . . 19
10.5 Body - rear . . . . . . . . . . . . . . . . . . . . . . . . . . . . . . . . . . . . . . . . . . . . . . . . . . . . . . . . . . . . . . 20
11 Straightening jig . . . . . . . . . . . . . . . . . . . . . . . . . . . . . . . . . . . . . . . . . . . . . . . . . . . . . . . . . . 21
11.1 Overview . . . . . . . . . . . . . . . . . . . . . . . . . . . . . . . . . . . . . . . . . . . . . . . . . . . . . . . . . . . . . . 21
11.2 Portal gauge . . . . . . . . . . . . . . . . . . . . . . . . . . . . . . . . . . . . . . . . . . . . . . . . . . . . . . . . . . . . 34
50 - Body - front . . . . . . . . . . . . . . . . . . . . . . . . . . . . . . . . . . . . . . . . . . . . . . . . . . . . . . 36
1 Longitudinal member, upper part with console (Coupé and Roadster identical) . . . . . . . . 36
1.1 Tools . . . . . . . . . . . . . . . . . . . . . . . . . . . . . . . . . . . . . . . . . . . . . . . . . . . . . . . . . . . . . . . . . . 36
1.2 Procedure . . . . . . . . . . . . . . . . . . . . . . . . . . . . . . . . . . . . . . . . . . . . . . . . . . . . . . . . . . . . . . 37
2 Support, left-side - Renewal (Coupé and Roadster identical) . . . . . . . . . . . . . . . . . . . . . . 43
2.1 Tools . . . . . . . . . . . . . . . . . . . . . . . . . . . . . . . . . . . . . . . . . . . . . . . . . . . . . . . . . . . . . . . . . . 43
2.2 Procedure . . . . . . . . . . . . . . . . . . . . . . . . . . . . . . . . . . . . . . . . . . . . . . . . . . . . . . . . . . . . . . 44
3 Support, right-side - Renewal (Coupé and Roadster identical) . . . . . . . . . . . . . . . . . . . . . . 46
3.1 Tools . . . . . . . . . . . . . . . . . . . . . . . . . . . . . . . . . . . . . . . . . . . . . . . . . . . . . . . . . . . . . . . . . . 46
3.2 Procedure . . . . . . . . . . . . . . . . . . . . . . . . . . . . . . . . . . . . . . . . . . . . . . . . . . . . . . . . . . . . . . 47
4 Upper longitudinal member for wheel housing - Renewal (Coupé and Roadster identical)
. . . . . . . . . . . . . . . . . . . . . . . . . . . . . . . . . . . . . . . . . . . . . . . . . . . . . . . . . . . . . . . . . . . . . . . . 50
4.1 Tools . . . . . . . . . . . . . . . . . . . . . . . . . . . . . . . . . . . . . . . . . . . . . . . . . . . . . . . . . . . . . . . . . . 50
4.2 Procedure . . . . . . . . . . . . . . . . . . . . . . . . . . . . . . . . . . . . . . . . . . . . . . . . . . . . . . . . . . . . . . 51
5 Suspension strut mounting - Renewal (Coupé and Roadster identical) . . . . . . . . . . . . . . . . 55
5.1 Tools . . . . . . . . . . . . . . . . . . . . . . . . . . . . . . . . . . . . . . . . . . . . . . . . . . . . . . . . . . . . . . . . . . 55
5.2 Procedure . . . . . . . . . . . . . . . . . . . . . . . . . . . . . . . . . . . . . . . . . . . . . . . . . . . . . . . . . . . . . . 56
6 Longitudinal member for wheel housing, upper, inner - Renewal (Coupé and Roadster
identical) . . . . . . . . . . . . . . . . . . . . . . . . . . . . . . . . . . . . . . . . . . . . . . . . . . . . . . . . . . . . . . . . 62
6.1 Tools . . . . . . . . . . . . . . . . . . . . . . . . . . . . . . . . . . . . . . . . . . . . . . . . . . . . . . . . . . . . . . . . . . 62
6.2 Procedure . . . . . . . . . . . . . . . . . . . . . . . . . . . . . . . . . . . . . . . . . . . . . . . . . . . . . . . . . . . . . . 63
7 Front longitudinal member - Renewal (Coupé and Roadster identical) . . . . . . . . . . . . . . . . 65
Contents i
Page 4
Protected by copyright. Copying for private or commercial purposes, in part or in whole, is not
permitted unless authorised by AUDI AG. AUDI AG does not guarantee or accept any liability
with respect to the correctness of information in this document. Copyright by AUDI AG.
Audi TT 2007 ➤
Body Repairs - Edition 09.2009
7.1 Tools . . . . . . . . . . . . . . . . . . . . . . . . . . . . . . . . . . . . . . . . . . . . . . . . . . . . . . . . . . . . . . . . . . 65
7.2 Procedure . . . . . . . . . . . . . . . . . . . . . . . . . . . . . . . . . . . . . . . . . . . . . . . . . . . . . . . . . . . . . . 66
8 Front longitudinal member - Partial renewal (Coupé and Roadster identical) . . . . . . . . . . 70
8.1 Tools . . . . . . . . . . . . . . . . . . . . . . . . . . . . . . . . . . . . . . . . . . . . . . . . . . . . . . . . . . . . . . . . . . 70
8.2 Procedure . . . . . . . . . . . . . . . . . . . . . . . . . . . . . . . . . . . . . . . . . . . . . . . . . . . . . . . . . . . . . . 71
9 Longitudinal member (front section) - Renewal (Coupé and Roadster identical) . . . . . . . . 73
9.1 Tools . . . . . . . . . . . . . . . . . . . . . . . . . . . . . . . . . . . . . . . . . . . . . . . . . . . . . . . . . . . . . . . . . . 73
9.2 Procedure . . . . . . . . . . . . . . . . . . . . . . . . . . . . . . . . . . . . . . . . . . . . . . . . . . . . . . . . . . . . . . 74
51 - Body - centre . . . . . . . . . . . . . . . . . . . . . . . . . . . . . . . . . . . . . . . . . . . . . . . . . . . . 77
1 Roof - Renewal . . . . . . . . . . . . . . . . . . . . . . . . . . . . . . . . . . . . . . . . . . . . . . . . . . . . . . . . . . 77
1.1 Tools . . . . . . . . . . . . . . . . . . . . . . . . . . . . . . . . . . . . . . . . . . . . . . . . . . . . . . . . . . . . . . . . . . 77
1.2 Procedure . . . . . . . . . . . . . . . . . . . . . . . . . . . . . . . . . . . . . . . . . . . . . . . . . . . . . . . . . . . . . . 78
2 Roof side member - Renewal . . . . . . . . . . . . . . . . . . . . . . . . . . . . . . . . . . . . . . . . . . . . . . 88
2.1 Tools . . . . . . . . . . . . . . . . . . . . . . . . . . . . . . . . . . . . . . . . . . . . . . . . . . . . . . . . . . . . . . . . . . 88
2.2 Procedure . . . . . . . . . . . . . . . . . . . . . . . . . . . . . . . . . . . . . . . . . . . . . . . . . . . . . . . . . . . . . . 89
2.3 Foam-filling roof side member . . . . . . . . . . . . . . . . . . . . . . . . . . . . . . . . . . . . . . . . . . . . . . 91
3 Outer roof frame - Renewal (Roadster) . . . . . . . . . . . . . . . . . . . . . . . . . . . . . . . . . . . . . . . . 102
3.1 Tools . . . . . . . . . . . . . . . . . . . . . . . . . . . . . . . . . . . . . . . . . . . . . . . . . . . . . . . . . . . . . . . . . . 102
3.2 Procedure . . . . . . . . . . . . . . . . . . . . . . . . . . . . . . . . . . . . . . . . . . . . . . . . . . . . . . . . . . . . . . 103
4 Front roof cross member - Renewal . . . . . . . . . . . . . . . . . . . . . . . . . . . . . . . . . . . . . . . . . . 107
4.1 Tools . . . . . . . . . . . . . . . . . . . . . . . . . . . . . . . . . . . . . . . . . . . . . . . . . . . . . . . . . . . . . . . . . . 107
4.2 Procedure . . . . . . . . . . . . . . . . . . . . . . . . . . . . . . . . . . . . . . . . . . . . . . . . . . . . . . . . . . . . . . 107
5 Rear roof frame - Renewal . . . . . . . . . . . . . . . . . . . . . . . . . . . . . . . . . . . . . . . . . . . . . . . . . . 110
5.1 Tools . . . . . . . . . . . . . . . . . . . . . . . . . . . . . . . . . . . . . . . . . . . . . . . . . . . . . . . . . . . . . . . . . . 110
5.2 Procedure . . . . . . . . . . . . . . . . . . . . . . . . . . . . . . . . . . . . . . . . . . . . . . . . . . . . . . . . . . . . . . 110
6 Outer A-pillar - Renewal . . . . . . . . . . . . . . . . . . . . . . . . . . . . . . . . . . . . . . . . . . . . . . . . . . . . 114
6.1 Tools . . . . . . . . . . . . . . . . . . . . . . . . . . . . . . . . . . . . . . . . . . . . . . . . . . . . . . . . . . . . . . . . . . 114
6.2 Procedure . . . . . . . . . . . . . . . . . . . . . . . . . . . . . . . . . . . . . . . . . . . . . . . . . . . . . . . . . . . . . . 115
7 Reinforcement tube and inner A-pillar - Renewal (Roadster) . . . . . . . . . . . . . . . . . . . . . . . . 122
7.1 Tools . . . . . . . . . . . . . . . . . . . . . . . . . . . . . . . . . . . . . . . . . . . . . . . . . . . . . . . . . . . . . . . . . . 122
7.2 Procedure . . . . . . . . . . . . . . . . . . . . . . . . . . . . . . . . . . . . . . . . . . . . . . . . . . . . . . . . . . . . . . 123
8 Inner A-pillar - Renewal (Coupé and Roadster) . . . . . . . . . . . . . . . . . . . . . . . . . . . . . . . . 128
8.1 Tools . . . . . . . . . . . . . . . . . . . . . . . . . . . . . . . . . . . . . . . . . . . . . . . . . . . . . . . . . . . . . . . . . . 128
8.2 Procedure . . . . . . . . . . . . . . . . . . . . . . . . . . . . . . . . . . . . . . . . . . . . . . . . . . . . . . . . . . . . . . 129
9 Inner B-pillar - Renewal (Roadster) . . . . . . . . . . . . . . . . . . . . . . . . . . . . . . . . . . . . . . . . . . 135
9.1 Tools . . . . . . . . . . . . . . . . . . . . . . . . . . . . . . . . . . . . . . . . . . . . . . . . . . . . . . . . . . . . . . . . . . 135
9.2 Procedure . . . . . . . . . . . . . . . . . . . . . . . . . . . . . . . . . . . . . . . . . . . . . . . . . . . . . . . . . . . . . . 136
10 Outer side member - Renewal . . . . . . . . . . . . . . . . . . . . . . . . . . . . . . . . . . . . . . . . . . . . . . 141
10.1 Tools . . . . . . . . . . . . . . . . . . . . . . . . . . . . . . . . . . . . . . . . . . . . . . . . . . . . . . . . . . . . . . . . . . 141
10.2 Procedure . . . . . . . . . . . . . . . . . . . . . . . . . . . . . . . . . . . . . . . . . . . . . . . . . . . . . . . . . . . . . . 142
11 Inner side member - Partial renewal (old part section) . . . . . . . . . . . . . . . . . . . . . . . . . . . . 149
11.1 Tools . . . . . . . . . . . . . . . . . . . . . . . . . . . . . . . . . . . . . . . . . . . . . . . . . . . . . . . . . . . . . . . . . . 149
11.2 Procedure . . . . . . . . . . . . . . . . . . . . . . . . . . . . . . . . . . . . . . . . . . . . . . . . . . . . . . . . . . . . . . 150
12 Inner side member - Renewal (Roadster) . . . . . . . . . . . . . . . . . . . . . . . . . . . . . . . . . . . . . . 154
12.1 Tools . . . . . . . . . . . . . . . . . . . . . . . . . . . . . . . . . . . . . . . . . . . . . . . . . . . . . . . . . . . . . . . . . . 154
12.2 Procedure . . . . . . . . . . . . . . . . . . . . . . . . . . . . . . . . . . . . . . . . . . . . . . . . . . . . . . . . . . . . . . 155
13 Floor panel - Renewal (Coupé and Roadster identical) . . . . . . . . . . . . . . . . . . . . . . . . . . . . 165
13.1 Tools . . . . . . . . . . . . . . . . . . . . . . . . . . . . . . . . . . . . . . . . . . . . . . . . . . . . . . . . . . . . . . . . . . 165
53 - Body - rear . . . . . . . . . . . . . . . . . . . . . . . . . . . . . . . . . . . . . . . . . . . . . . . . . . . . . . 168
1 Rear cross panel (top section) - Renewal (Coupé and Roadster identical) . . . . . . . . . . . . 168
1.1 Tools . . . . . . . . . . . . . . . . . . . . . . . . . . . . . . . . . . . . . . . . . . . . . . . . . . . . . . . . . . . . . . . . . . 168
ii Contents
Page 5

Protected by copyright. Copying for private or commercial purposes, in part or in whole, is not
permitted unless authorised by AUDI AG. AUDI AG does not guarantee or accept any liability
with respect to the correctness of information in this document. Copyright by AUDI AG.
Audi TT 2007 ➤
Body Repairs - Edition 09.2009
1.2 Procedure . . . . . . . . . . . . . . . . . . . . . . . . . . . . . . . . . . . . . . . . . . . . . . . . . . . . . . . . . . . . . . 169
2 Cross panel (inner section) - Renewal (Coupé and Roadster identical) . . . . . . . . . . . . . . 173
2.1 Tools . . . . . . . . . . . . . . . . . . . . . . . . . . . . . . . . . . . . . . . . . . . . . . . . . . . . . . . . . . . . . . . . . . 173
2.2 Procedure . . . . . . . . . . . . . . . . . . . . . . . . . . . . . . . . . . . . . . . . . . . . . . . . . . . . . . . . . . . . . . 173
3 Rain channel - Partial renewal . . . . . . . . . . . . . . . . . . . . . . . . . . . . . . . . . . . . . . . . . . . . . . 177
3.1 Tools . . . . . . . . . . . . . . . . . . . . . . . . . . . . . . . . . . . . . . . . . . . . . . . . . . . . . . . . . . . . . . . . . . 177
3.2 Procedure . . . . . . . . . . . . . . . . . . . . . . . . . . . . . . . . . . . . . . . . . . . . . . . . . . . . . . . . . . . . . . 178
4 Rear suspension strut mounting - Renewal (Coupé and Roadster identical) . . . . . . . . . . . . 183
4.1 Tools . . . . . . . . . . . . . . . . . . . . . . . . . . . . . . . . . . . . . . . . . . . . . . . . . . . . . . . . . . . . . . . . . . 183
4.2 Procedure . . . . . . . . . . . . . . . . . . . . . . . . . . . . . . . . . . . . . . . . . . . . . . . . . . . . . . . . . . . . . . 184
5 Rear longitudinal member - Partial renewal (Coupé and Roadster identical) . . . . . . . . . . 186
5.1 Tools . . . . . . . . . . . . . . . . . . . . . . . . . . . . . . . . . . . . . . . . . . . . . . . . . . . . . . . . . . . . . . . . . . 186
5.2 Procedure . . . . . . . . . . . . . . . . . . . . . . . . . . . . . . . . . . . . . . . . . . . . . . . . . . . . . . . . . . . . . . 186
6 Side panel - Renewal (Coupé) . . . . . . . . . . . . . . . . . . . . . . . . . . . . . . . . . . . . . . . . . . . . . . 189
6.1 Tools . . . . . . . . . . . . . . . . . . . . . . . . . . . . . . . . . . . . . . . . . . . . . . . . . . . . . . . . . . . . . . . . . . 189
6.2 Procedure . . . . . . . . . . . . . . . . . . . . . . . . . . . . . . . . . . . . . . . . . . . . . . . . . . . . . . . . . . . . . . 190
7 Side panel - Renewal (Roadster) . . . . . . . . . . . . . . . . . . . . . . . . . . . . . . . . . . . . . . . . . . . . 202
7.1 Tools . . . . . . . . . . . . . . . . . . . . . . . . . . . . . . . . . . . . . . . . . . . . . . . . . . . . . . . . . . . . . . . . . . 202
7.2 Procedure . . . . . . . . . . . . . . . . . . . . . . . . . . . . . . . . . . . . . . . . . . . . . . . . . . . . . . . . . . . . . . 203
8 Inner side panel - Renewal . . . . . . . . . . . . . . . . . . . . . . . . . . . . . . . . . . . . . . . . . . . . . . . . . . 211
8.1 Tools . . . . . . . . . . . . . . . . . . . . . . . . . . . . . . . . . . . . . . . . . . . . . . . . . . . . . . . . . . . . . . . . . . 211
8.2 Procedure . . . . . . . . . . . . . . . . . . . . . . . . . . . . . . . . . . . . . . . . . . . . . . . . . . . . . . . . . . . . . . 212
9 Rear wheel housing - Partial renewal (Coupé and Roadster identical) . . . . . . . . . . . . . . . . 217
9.1 Tools . . . . . . . . . . . . . . . . . . . . . . . . . . . . . . . . . . . . . . . . . . . . . . . . . . . . . . . . . . . . . . . . . . 217
9.2 Procedure . . . . . . . . . . . . . . . . . . . . . . . . . . . . . . . . . . . . . . . . . . . . . . . . . . . . . . . . . . . . . . 218
10 Rear wheel housing - Renewal (Coupé and Roadster identical) . . . . . . . . . . . . . . . . . . . . 222
10.1 Tools . . . . . . . . . . . . . . . . . . . . . . . . . . . . . . . . . . . . . . . . . . . . . . . . . . . . . . . . . . . . . . . . . . 222
10.2 Procedure . . . . . . . . . . . . . . . . . . . . . . . . . . . . . . . . . . . . . . . . . . . . . . . . . . . . . . . . . . . . . . 222
11 Spare wheel well - Partial renewal (Coupé and Roadster identical) . . . . . . . . . . . . . . . . . . 226
11.1 Tools . . . . . . . . . . . . . . . . . . . . . . . . . . . . . . . . . . . . . . . . . . . . . . . . . . . . . . . . . . . . . . . . . . 226
11.2 Procedure . . . . . . . . . . . . . . . . . . . . . . . . . . . . . . . . . . . . . . . . . . . . . . . . . . . . . . . . . . . . . . 227
12 Spare wheel well - Renewal (Coupé and Roadster) . . . . . . . . . . . . . . . . . . . . . . . . . . . . . . 230
12.1 Tools . . . . . . . . . . . . . . . . . . . . . . . . . . . . . . . . . . . . . . . . . . . . . . . . . . . . . . . . . . . . . . . . . . 230
12.2 Procedure . . . . . . . . . . . . . . . . . . . . . . . . . . . . . . . . . . . . . . . . . . . . . . . . . . . . . . . . . . . . . . 230
Contents iii
Page 6

Protected by copyright. Copying for private or commercial purposes, in part or in whole, is not
permitted unless authorised by AUDI AG. AUDI AG does not guarantee or accept any liability
with respect to the correctness of information in this document. Copyright by AUDI AG.
Audi TT 2007 ➤
Body Repairs - Edition 09.2009
iv Contents
Page 7
Protected by copyright. Copying for private or commercial purposes, in part or in whole, is not
permitted unless authorised by AUDI AG. AUDI AG does not guarantee or accept any liability
with respect to the correctness of information in this document. Copyright by AUDI AG.
00 – Technical data
1 General notes
This Manual describes only selected repair operations. A de‐
scription is given where the repair method differs from the original
manufacturing process.
Where the repair operation is not described: Separate the original
joint and repair using a replacement part.
If no description is given for any sub-parts supplied, these should
be matched up and butt welded with an SG continuous seam.
Please refer to the information in the Workshop Manual ⇒ General
Information; Body Repairs, General Body Repairs .
Audi TT 2007 ➤
Body Repairs - Edition 09.2009
1. General notes 1
Page 8
Protected by copyright. Copying for private or commercial purposes, in part or in whole, is not
permitted unless authorised by AUDI AG. AUDI AG does not guarantee or accept any liability
with respect to the correctness of information in this document. Copyright by AUDI AG.
Audi TT 2007 ➤
Body Repairs - Edition 09.2009
2 Vehicle identification data
2.1 Type plate and vehicle identification number
The vehicle identification number -B- (chassis number) is stam‐
ped on the flange in the plenum chamber.
The type plate -A- is attached to the wing mounting flange (rightside).
2 Rep. Gr.00 - Technical data
Page 9
Protected by copyright. Copying for private or commercial purposes, in part or in whole, is not
permitted unless authorised by AUDI AG. AUDI AG does not guarantee or accept any liability
with respect to the correctness of information in this document. Copyright by AUDI AG.
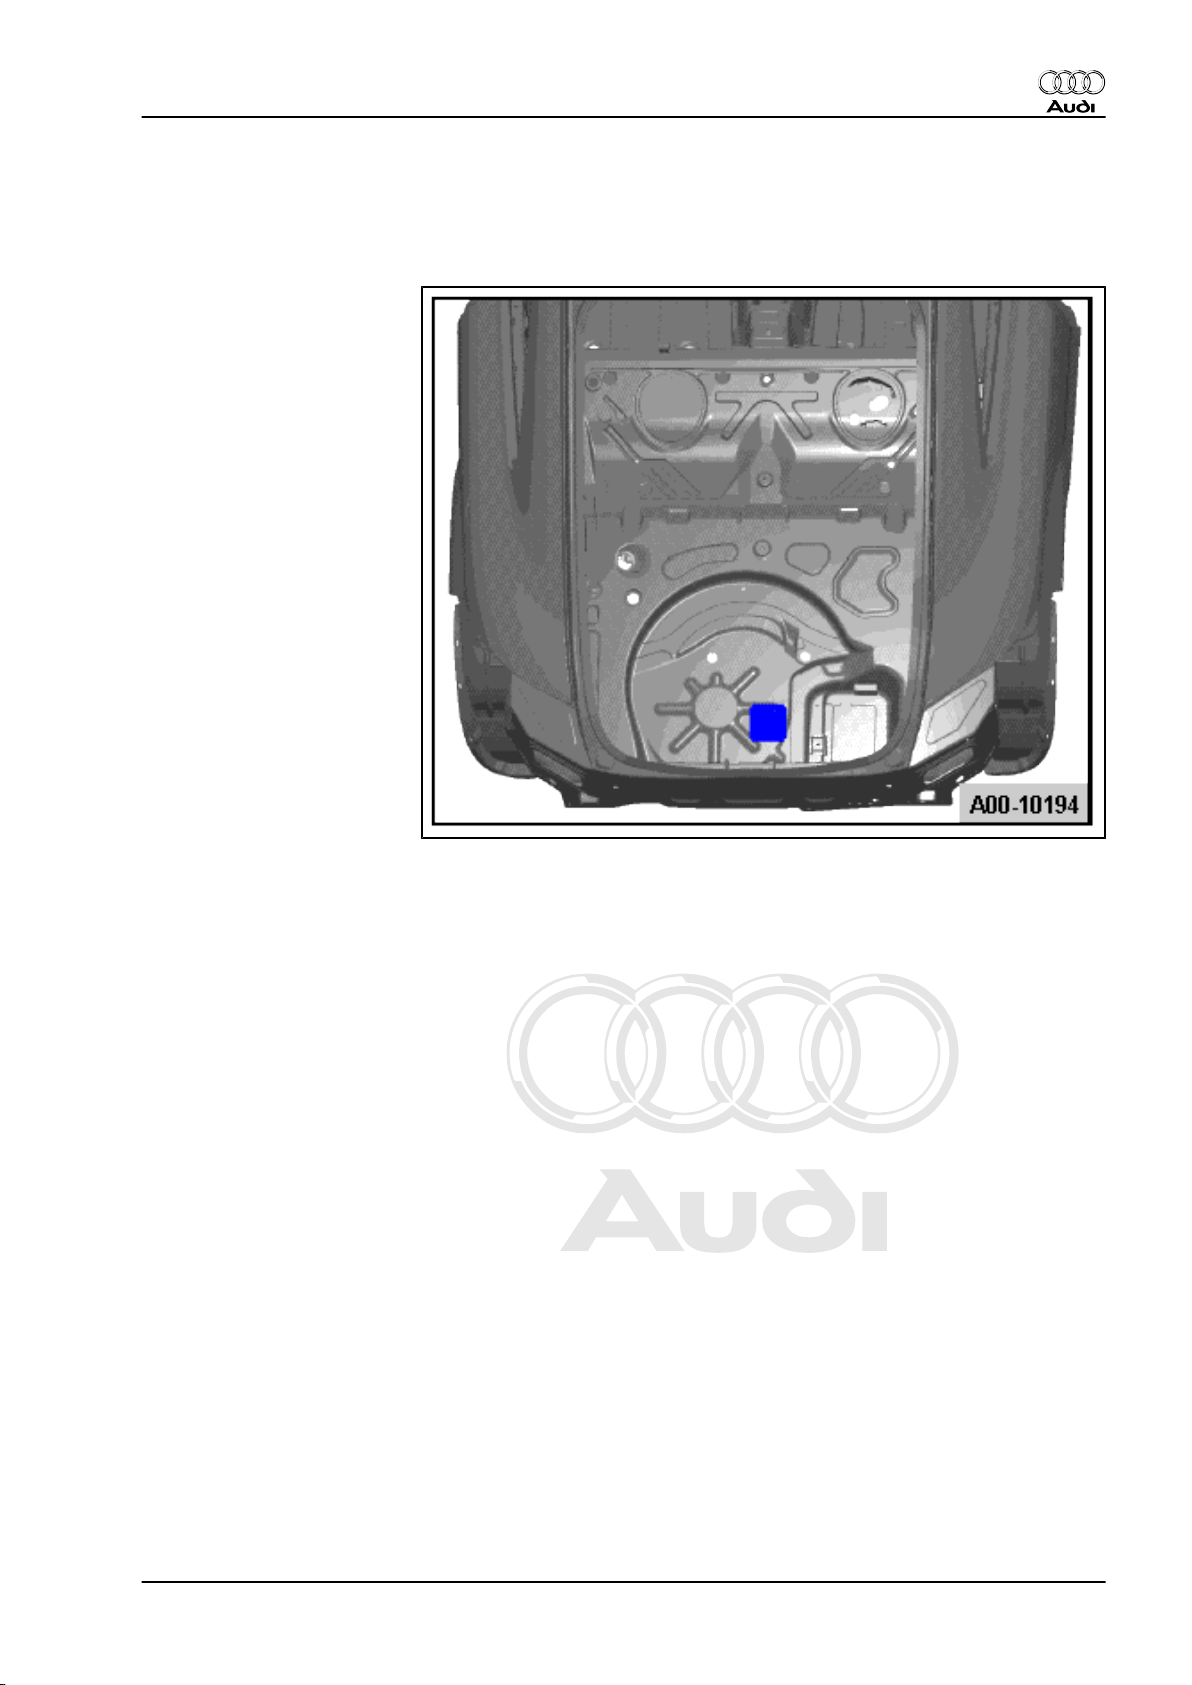
2.2 Vehicle data sticker
The vehicle data sticker is located in the spare wheel well at the
rear of the vehicle.
Audi TT 2007 ➤
Body Repairs - Edition 09.2009
2. Vehicle identification data 3
Page 10
Protected by copyright. Copying for private or commercial purposes, in part or in whole, is not
permitted unless authorised by AUDI AG. AUDI AG does not guarantee or accept any liability
with respect to the correctness of information in this document. Copyright by AUDI AG.
Audi TT 2007 ➤
Body Repairs - Edition 09.2009
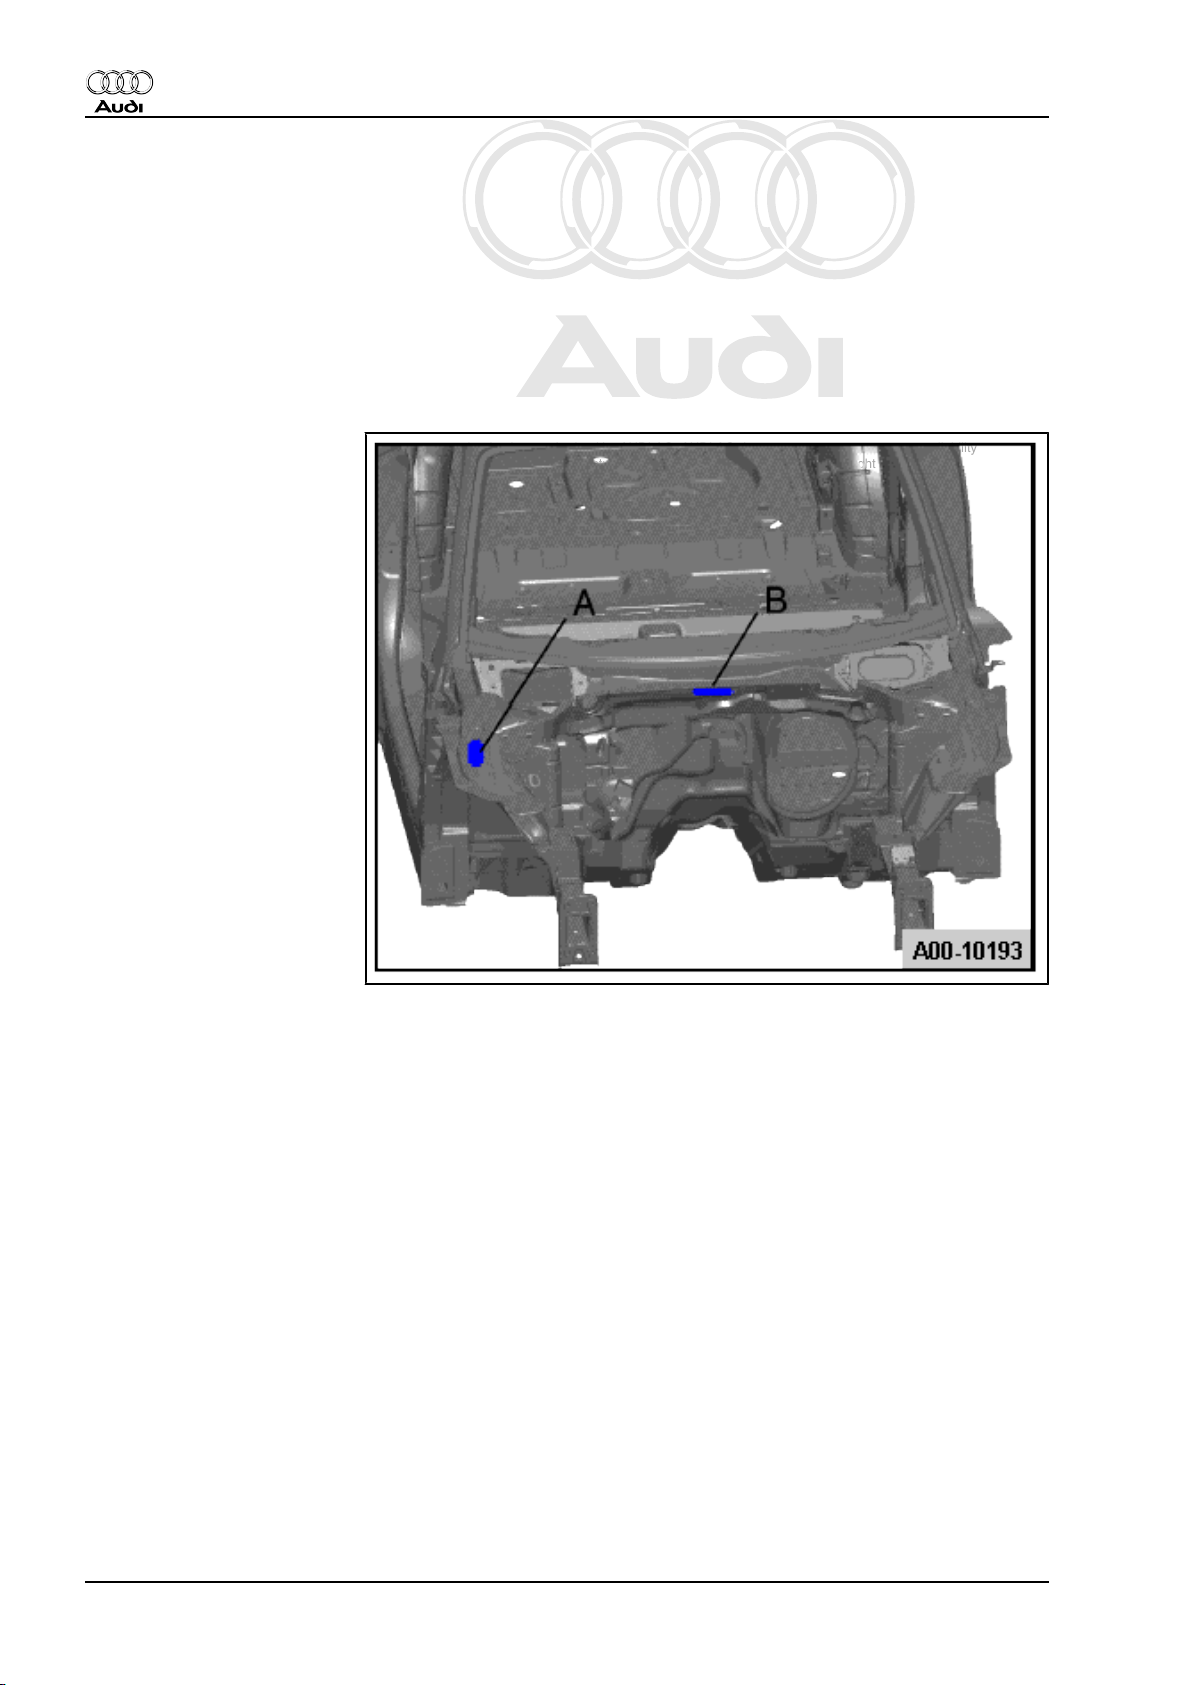
3 Expanded foam inserts
Various body cavities of the Audi TT 2007 are fitted with expanded
foam inserts.
The foam inserts reduce the noise transmitted to the interior when
driving.
These pre-moulded parts are fitted during body manufacture and
subsequently increase their volume in the paint shop drying oven
at approx. 180 °C after priming.
Caution
The replacement foam inserts expand only after reaching
about 180°C. For this reason, an additional filler foam is used
when performing repairs.
Filler foam required for repairs: D 506 KG1 A3.
As the required temperatures cannot be achieved under normal
workshop conditions, proceed as follows:
Remove residue of foam material on vehicle.
Restore paint coating; apply two coats (wet on wet) of glass/paint
primer D 009 200 02 if necessary, flash-off time approx.10 mi‐
nutes.
Requirement
Before continuing with this procedure, ensure that the replace‐
ment panel is ready for installation, i.e. cut to shape, matched up
to the vehicle, corrosion protection applied.
Renewing expanded foam insert
Fix expanded foam insert to vehicle.
Apply filler foam D 506 KG1 A3 to replacement panel.
Secure new part in position. Gently press in new part in vicinity of
expanded foam insert until it makes contact, and then weld into
place.
The foam hardens within 25 minutes.
Do not weld (SG) within 15 mm of the foam insert (on either side).
After painting the vehicle the repaired area must be cavity-sealed.
Location of expanded foam parts
4 Rep. Gr.00 - Technical data
Page 11
Protected by copyright. Copying for private or commercial purposes, in part or in whole, is not
permitted unless authorised by AUDI AG. AUDI AG does not guarantee or accept any liability
with respect to the correctness of information in this document. Copyright by AUDI AG.
Audi TT 2007 ➤
Body Repairs - Edition 09.2009
3. Expanded foam inserts 5
Page 12
Protected by copyright. Copying for private or commercial purposes, in part or in whole, is not
permitted unless authorised by AUDI AG. AUDI AG does not guarantee or accept any liability
with respect to the correctness of information in this document. Copyright by AUDI AG.
Audi TT 2007 ➤
Body Repairs - Edition 09.2009
4 General notes on repairs to alumini‐
um parts
The repair methods required for the purely aluminium body parts
are similar to the established procedures for the other Audi mod‐
els with aluminium body.
New joining technique
Flow-drill screws
Flow-drill screws can be easily released in the workshop and re‐
placed with new screws. Oversize screws are available for dam‐
aged threads. New panels have to be pre-drilled to take these
screws.
6 Rep. Gr.00 - Technical data
Page 13

Protected by copyright. Copying for private or commercial purposes, in part or in whole, is not
permitted unless authorised by AUDI AG. AUDI AG does not guarantee or accept any liability
with respect to the correctness of information in this document. Copyright by AUDI AG.
5 General notes on repairs to steel
parts
Note
We recommend that repairs should be performed in a specialist
Audi workshop for aluminium.
These repairs are essentially the same as for vehicles with an allsteel body. However, special precautions are required due to the
risk of contact corrosion occurring on the aluminium parts of the
body. The dust produced when sanding or grinding steel parts,
and in particular sparks from cutting and welding operations, must
not be allowed to drop onto aluminium parts. This also applies to
painted aluminium panels. The glowing steel particles can dam‐
age the paint and come into contact with the aluminium, which
can cause contact corrosion on the undamaged aluminium body.
For these reasons, the entire body must be carefully protected
with suitable covers and masking while steel repairs are being
performed. Similarly, cutting operations may only be carried out
with mechanical tools (body saw or nibbler). Where sanding or
grinding is unavoidable, use non-sparking sanding/grinding discs
(or such that produce only a minimum amount of sparking).
Audi TT 2007 ➤
Body Repairs - Edition 09.2009
5. General notes on repairs to steel parts 7
Page 14
Protected by copyright. Copying for private or commercial purposes, in part or in whole, is not
permitted unless authorised by AUDI AG. AUDI AG does not guarantee or accept any liability
with respect to the correctness of information in this document. Copyright by AUDI AG.
Audi TT 2007 ➤
Body Repairs - Edition 09.2009
6 Body construction
The Audi TT 2007 employs the ASF (Audi Space Frame) con‐
struction in an aluminium/steel body.
The repair methods are basically the same as the familiar alumi‐
nium repair methods, except that the combination of aluminium
and steel requires a number of new procedures.
This Workshop Manual describes standard repairs and repairs
carried out using repair methods which deviate from the original
manufacturing process.
Note the following for any repairs which are not described:
Separate at original joint; repair original joint using only genuine
replacement parts: see ⇒ General information; Body repairs,
General body repairs; Safety notes .
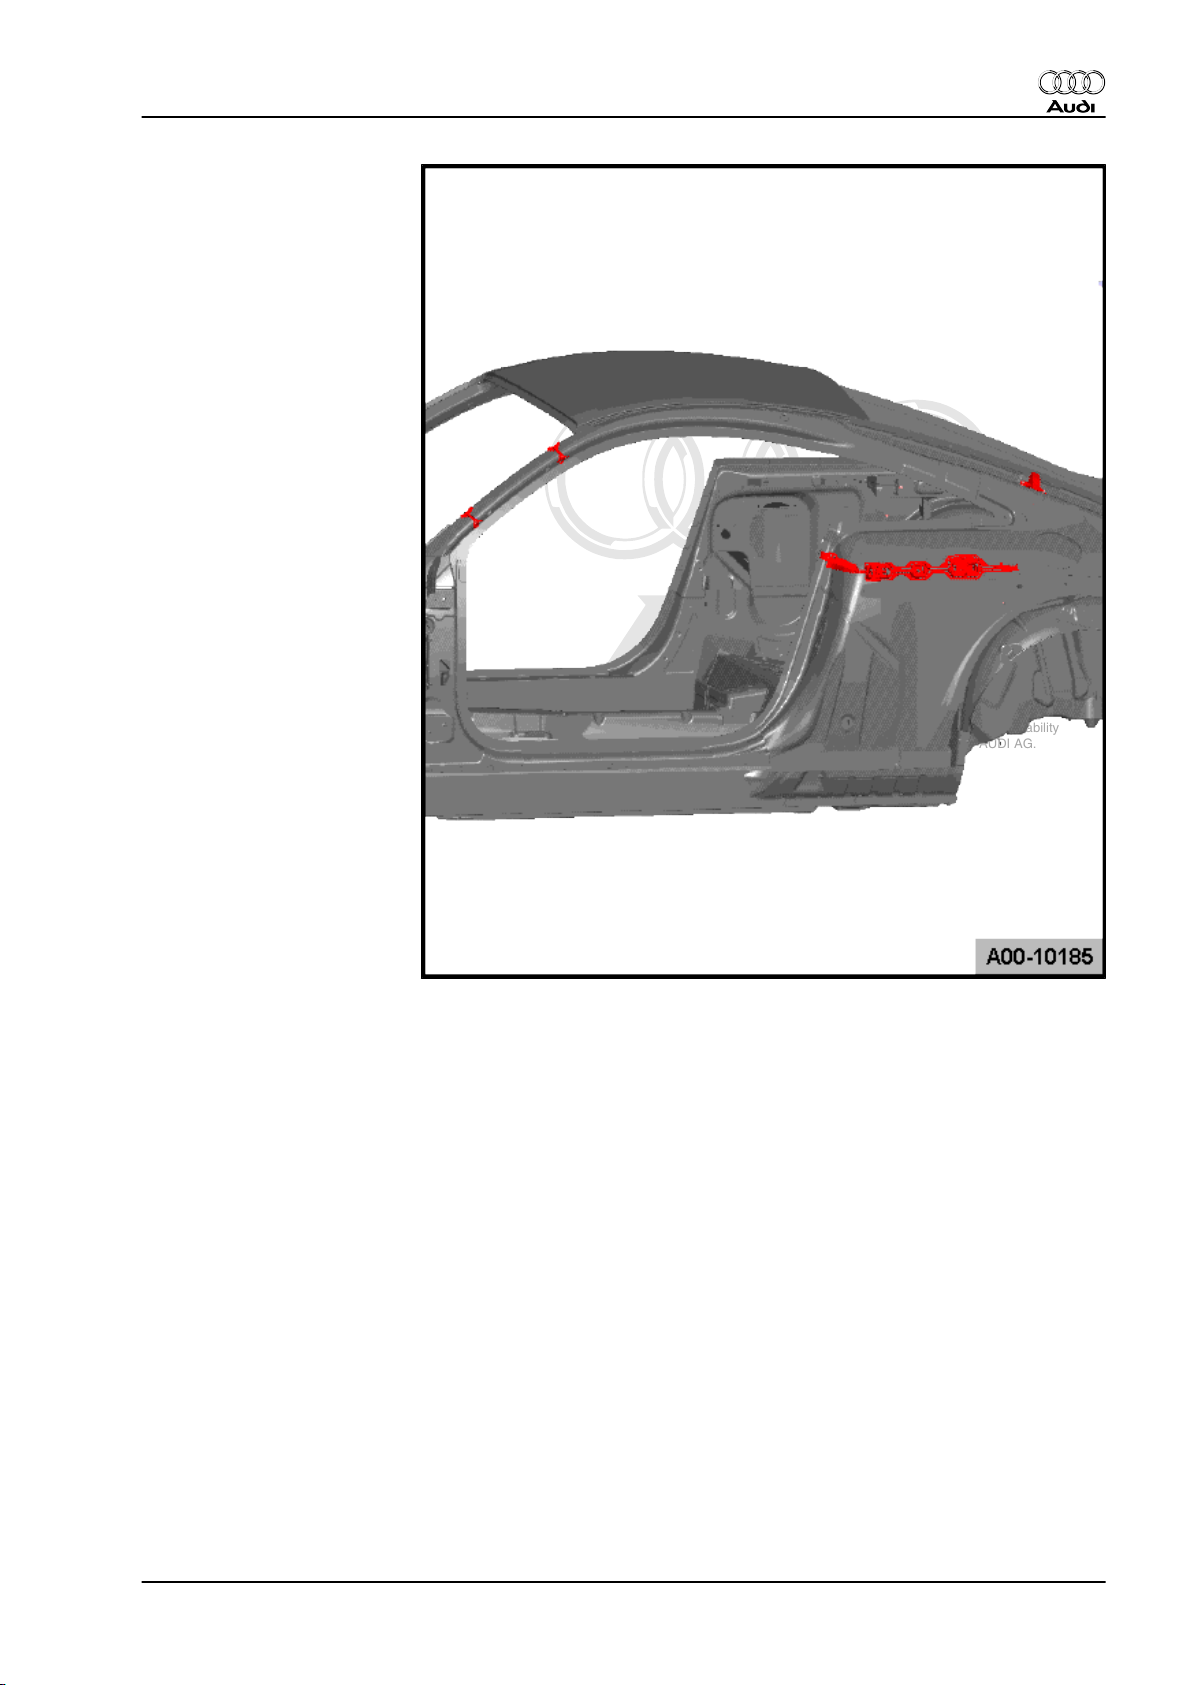
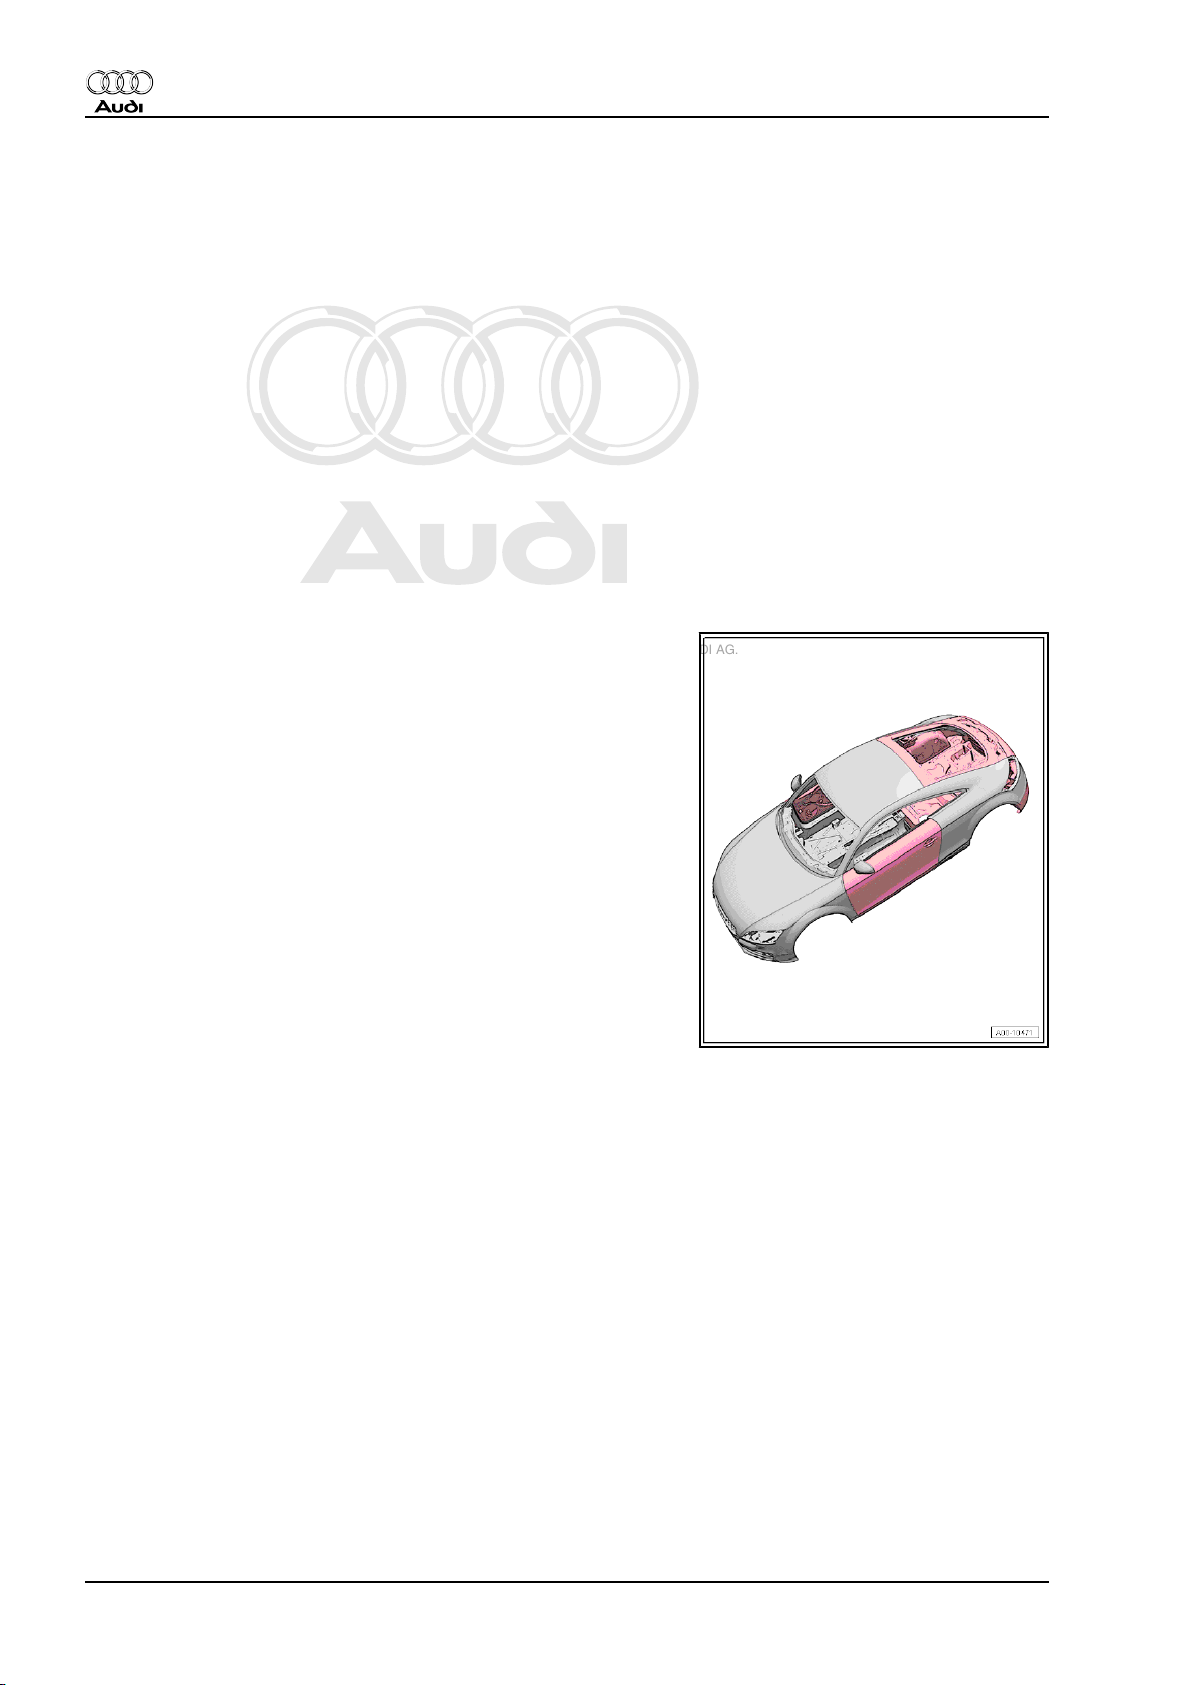
6.1 Aluminium panels
The areas of the body marked in grey - bonnet, plenum chamber,
front end and middle section - are made of aluminium.
⇒ Workshop Manual, General information; chapter on Work pro‐
cedures
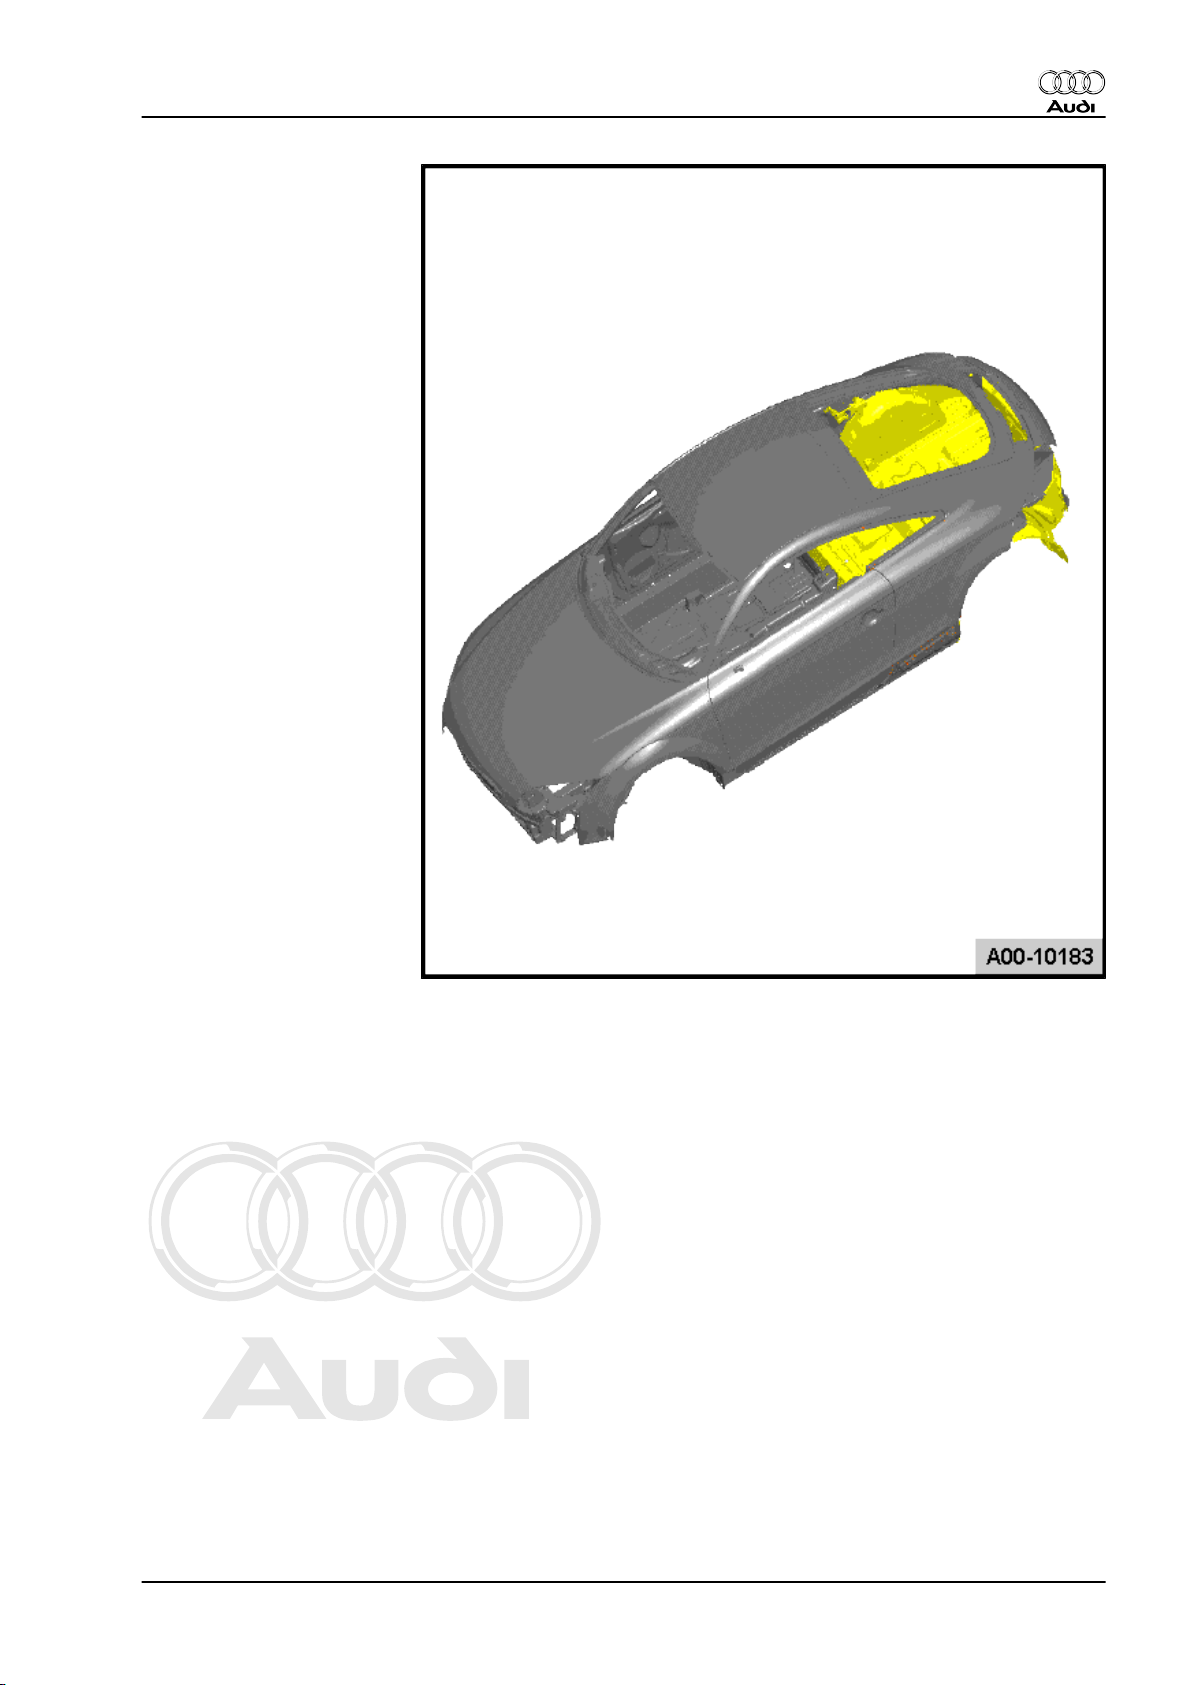
Extra-high-strength body panels
Extra-high-strength body panels are used in the following areas:
The steel panels marked in yellow have a tensile strength of 340
– 500 N/mm2.
⇒ Workshop Manual, General information; chapter on Work pro‐
cedures
8 Rep. Gr.00 - Technical data
Page 15
Protected by copyright. Copying for private or commercial purposes, in part or in whole, is not
permitted unless authorised by AUDI AG. AUDI AG does not guarantee or accept any liability
with respect to the correctness of information in this document. Copyright by AUDI AG.
Audi TT 2007 ➤
Body Repairs - Edition 09.2009
6. Body construction 9
Page 16

Protected by copyright. Copying for private or commercial purposes, in part or in whole, is not
permitted unless authorised by AUDI AG. AUDI AG does not guarantee or accept any liability
with respect to the correctness of information in this document. Copyright by AUDI AG.
Audi TT 2007 ➤
Body Repairs - Edition 09.2009
7 Corrosion protection
The rear section of the body is manufactured from panels galvan‐
ised on both sides. Certain areas are cavity-sealed and have to
be re-sealed after completing repair work.
10 Rep. Gr.00 - Technical data
Page 17
Protected by copyright. Copying for private or commercial purposes, in part or in whole, is not
permitted unless authorised by AUDI AG. AUDI AG does not guarantee or accept any liability
with respect to the correctness of information in this document. Copyright by AUDI AG.
8 Bonded joints
Bonded and spot-welded bonded joints are employed on the Audi
TT for increased body strength.
8.1 Bonded joints
In the case of adhesive-bonded joints, the joint between the sheet
metal parts is formed only by the adhesive.
8.2 Spot-welded/bonded joints
In spot welded bonded joints an electrically conductive adhesive
is used between the panels, which allows good root penetration
for spot welding.
The welding current must not be increased for spot-weld bonding
operations. The pre-press period must be extended to about 30
– 50 cycles because of the displacement of the adhesive. Always
use a fume extractor.
Spot-weld bonding is not carried out in the service sector.
8.3 Inspecting and repairing bonded joints
Audi TT 2007 ➤
Body Repairs - Edition 09.2009
Particular attention should be given to these joints when diag‐
nosing accident damage and performing body repairs.
Note the following points: Do not use a chisel to test the strength
of a joint or relieve stresses by hammering as this will damage or
destroy the bonded joint.
These joints should be inspected particularly closely when diag‐
nosing accident damage and after performing straightening work
on the body.
If the joint is not accessible with pop rivets, it must be repaired
with an arc-welded seam (SG). In this case the entire area of the
joint must be re-welded, as the heat produced by welding de‐
stroys the adhesive in the bonded joint. The SG seams should be
welded working from the thin to the thick panel. Always use a fume
extractor.
8.4 Repair methods for replacing body parts
When making repairs, welded joints can be used in place of all
spot-welded bonded joints and certain bonded joints if no suitable
body adhesive is available.
Do not make the repair with only the same spot welds or seams
as originally used in production. These alone are not adequate
for a proper joint.
The repair methods are shown in detail on the following pages.
Note
♦
If the instructions call for additional spot welds, these should
be applied in a single operation.
♦
Do not place new spot welds in-between the original spot
welds.
♦
SG plug welding should only be performed after spot welding.
♦
This avoids any increased shunt current when spot welding.
Ensure good root penetration at all joints.
Seal off repaired joint flanges and apply cavity sealing.
8. Bonded joints 11
Page 18
Protected by copyright. Copying for private or commercial purposes, in part or in whole, is not
permitted unless authorised by AUDI AG. AUDI AG does not guarantee or accept any liability
with respect to the correctness of information in this document. Copyright by AUDI AG.
Audi TT 2007 ➤
Body Repairs - Edition 09.2009
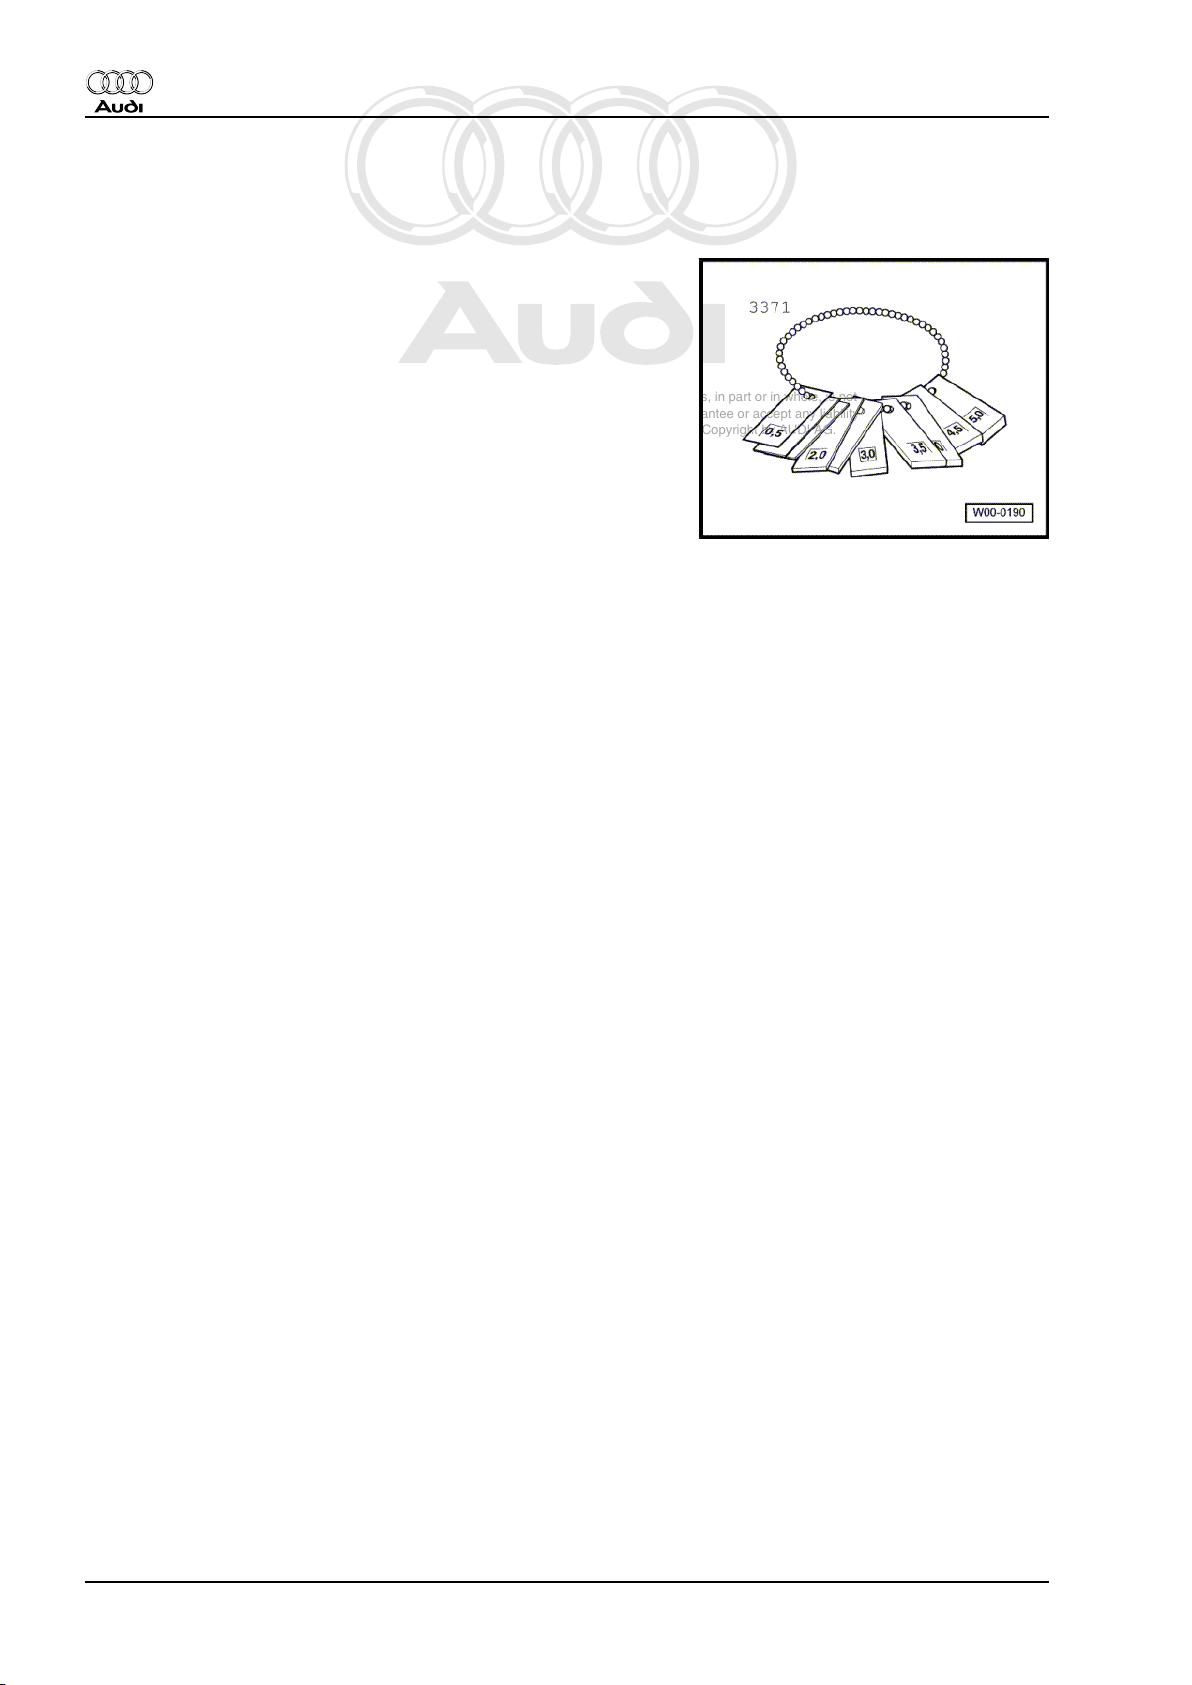
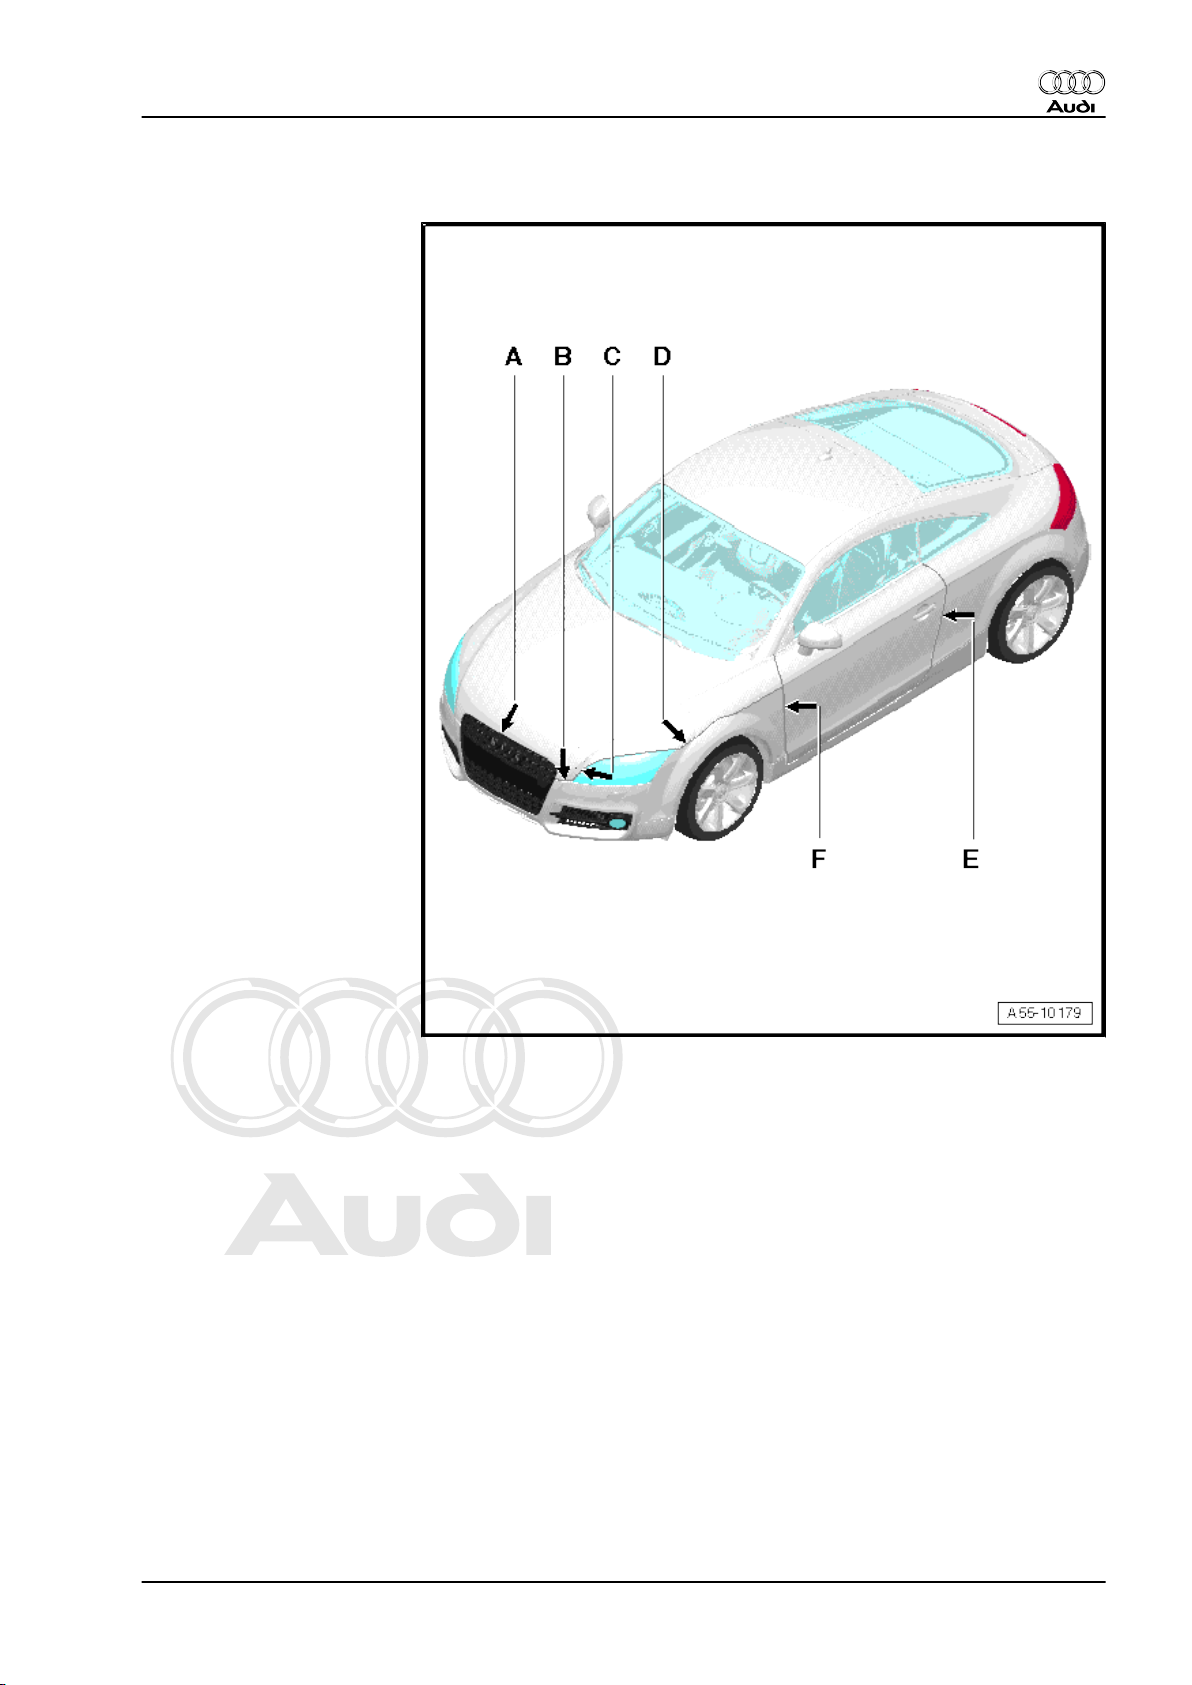
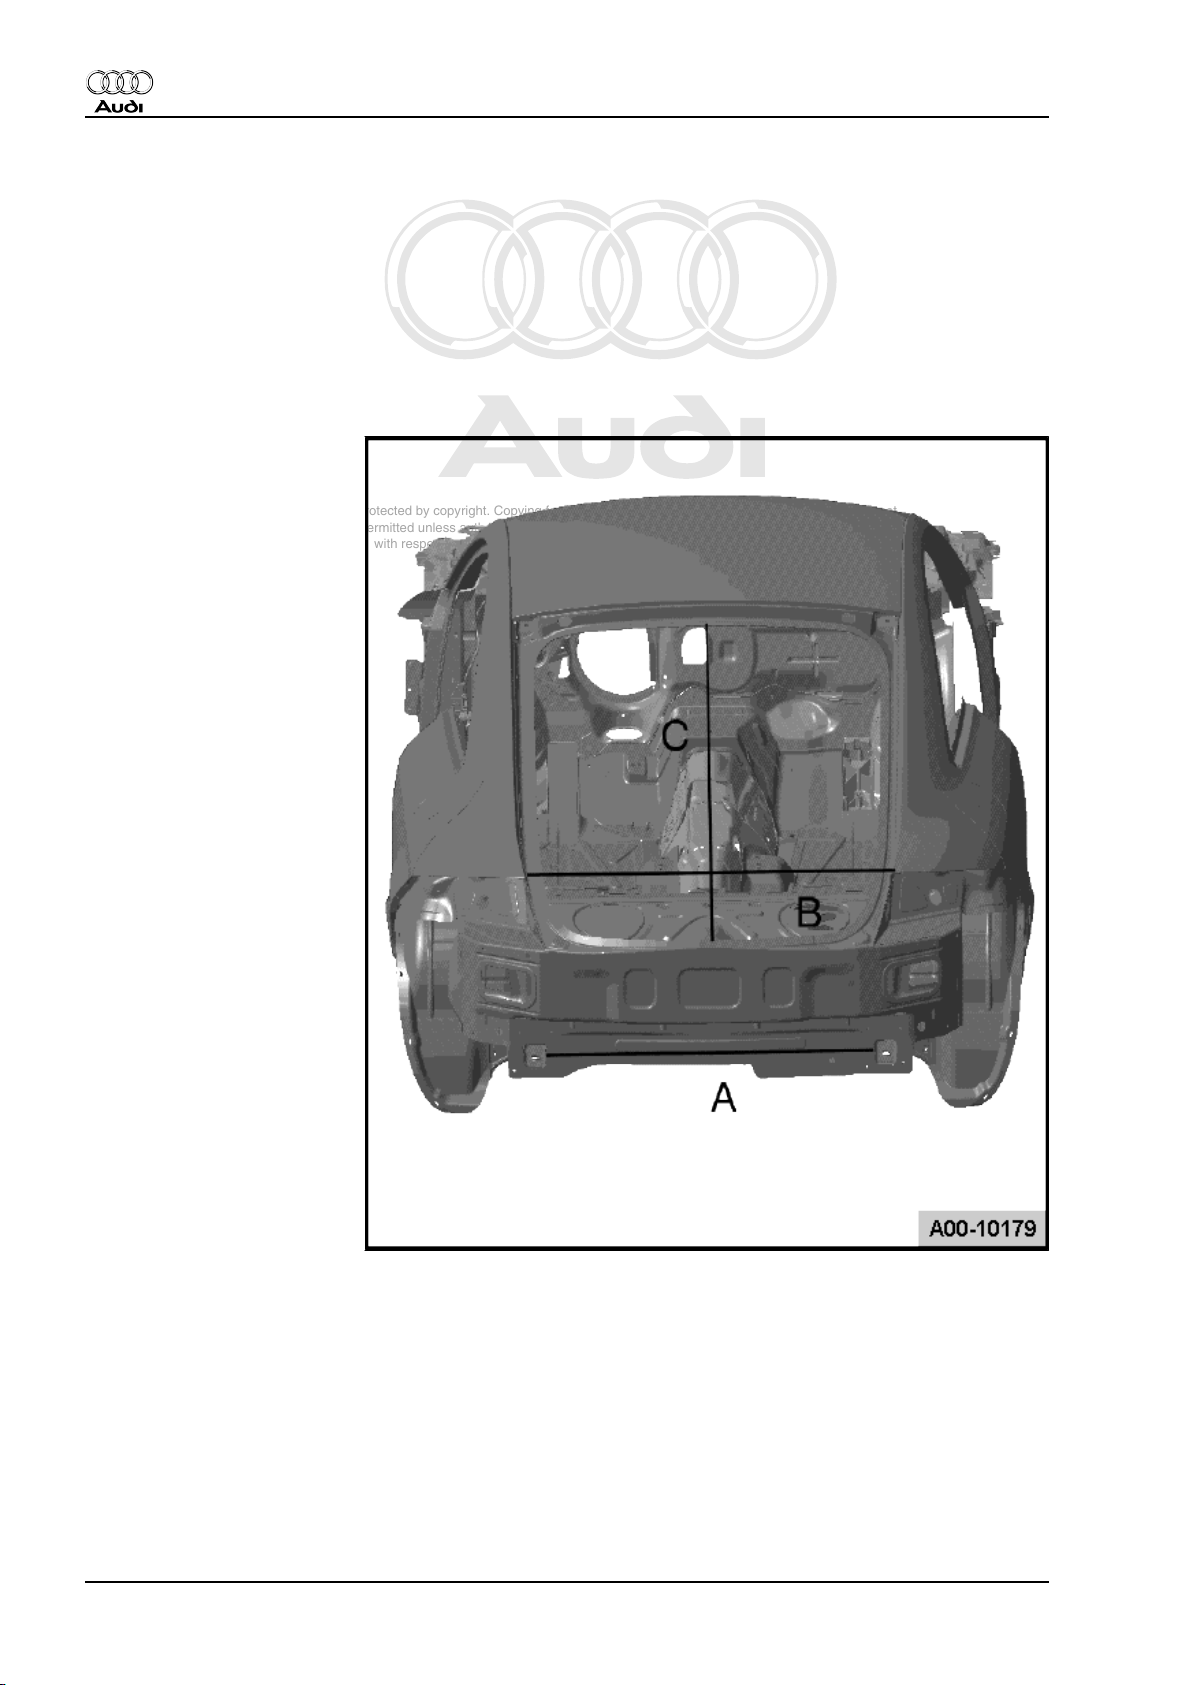
9 Body panel gaps/shut lines
Special tools and workshop equipment required
♦ Setting gauge -3371-
9.1 Body - front and centre
♦ Dimension A = 4.5 mm ± 0.5 mm
♦ Dimension B = 4.5 mm ± 0.5 mm
♦ Dimension C = 3.5 mm ± 0.5 mm
♦ Dimension D = 3.5 mm ± 0.5 mm
♦ Dimension E = 3.5 mm ± 0.5 mm
♦ Dimension F = 3.5 mm ± 0.5 mm
12 Rep. Gr.00 - Technical data
Page 19
Protected by copyright. Copying for private or commercial purposes, in part or in whole, is not
permitted unless authorised by AUDI AG. AUDI AG does not guarantee or accept any liability
with respect to the correctness of information in this document. Copyright by AUDI AG.
♦ Check that panel gaps are parallel with body lines
Audi TT 2007 ➤
Body Repairs - Edition 09.2009
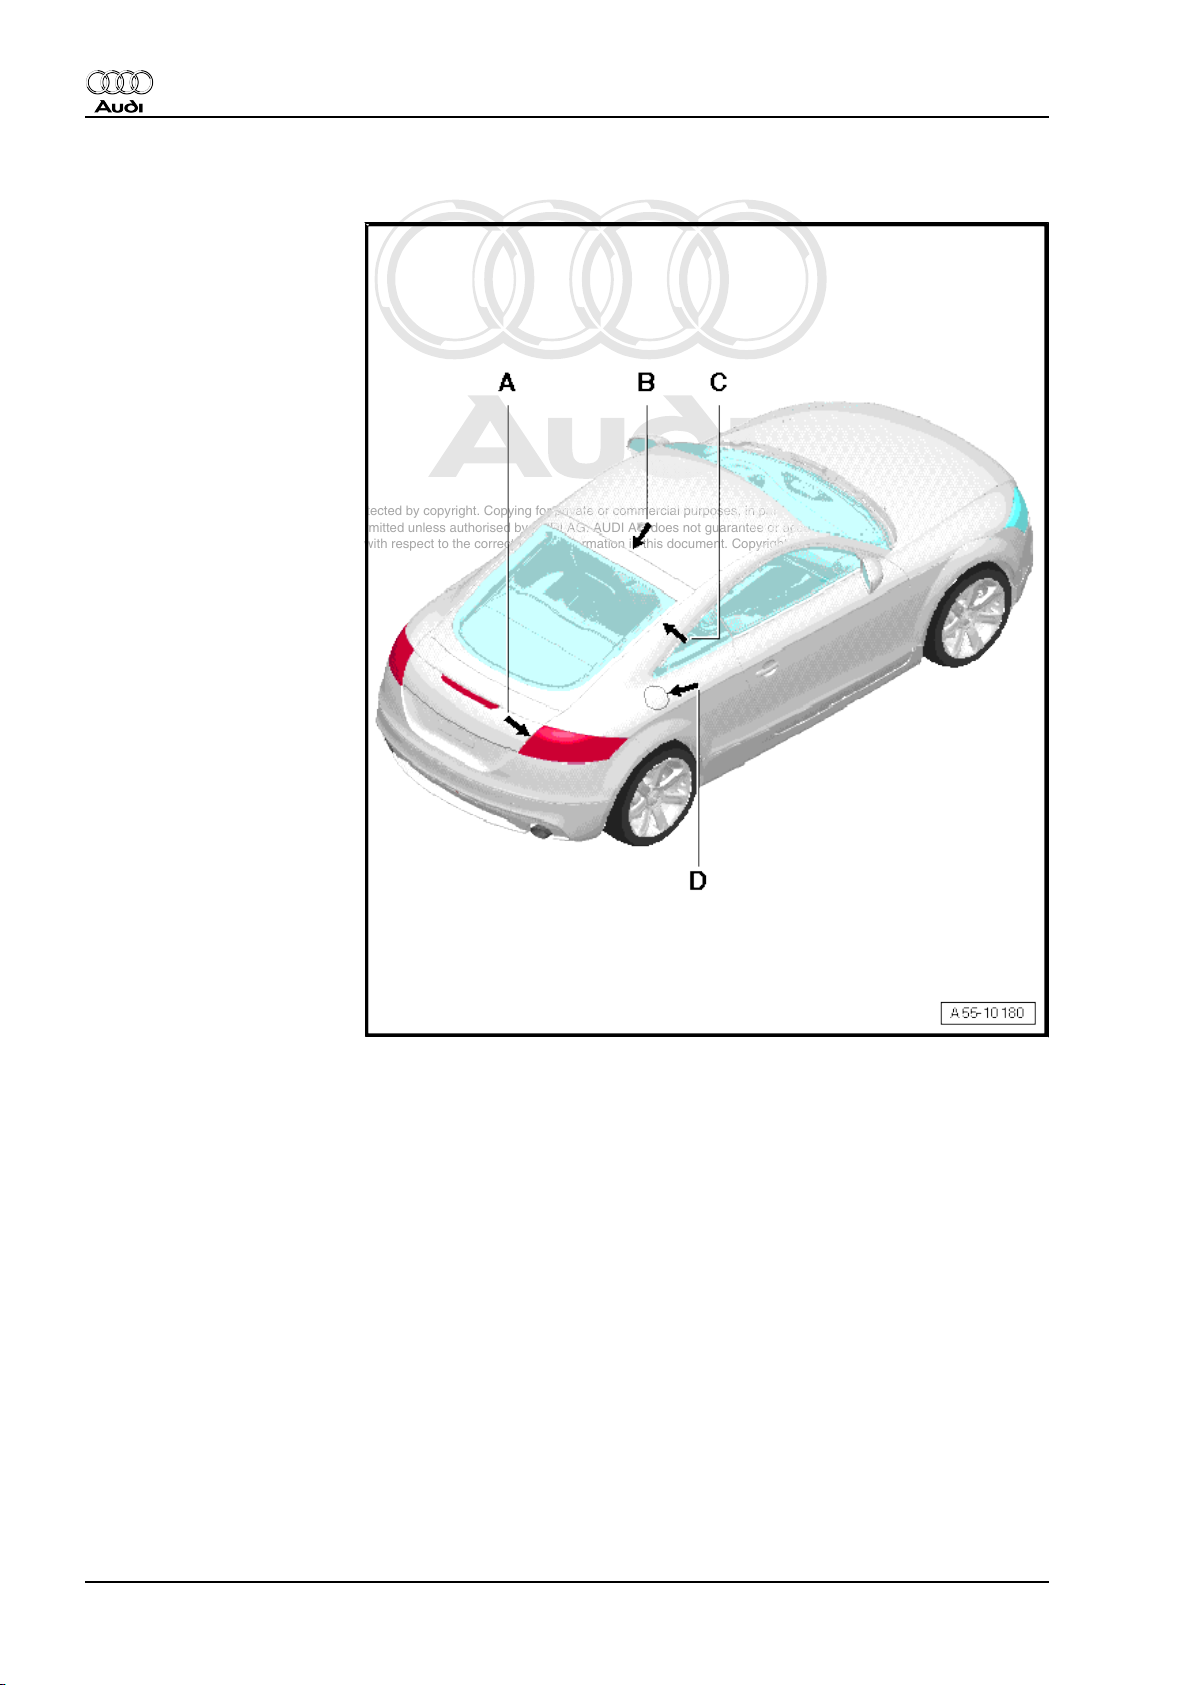
9.1.1 Body - rear
♦ Dimension A = 4.0 mm ± 0.5 mm
♦ Dimension B = 4.5 mm ± 0.5 mm
♦ Dimension C = 3.5 mm ± 0.5 mm
♦ Dimension D = 2.0 mm ± 0.5 mm
9. Body panel gaps/shut lines 13
Page 20
Protected by copyright. Copying for private or commercial purposes, in part or in whole, is not
permitted unless authorised by AUDI AG. AUDI AG does not guarantee or accept any liability
with respect to the correctness of information in this document. Copyright by AUDI AG.
Audi TT 2007 ➤
Body Repairs - Edition 09.2009
♦ Check that panel gaps are parallel with body lines
14 Rep. Gr.00 - Technical data
Page 21
Protected by copyright. Copying for private or commercial purposes, in part or in whole, is not
permitted unless authorised by AUDI AG. AUDI AG does not guarantee or accept any liability
with respect to the correctness of information in this document. Copyright by AUDI AG.
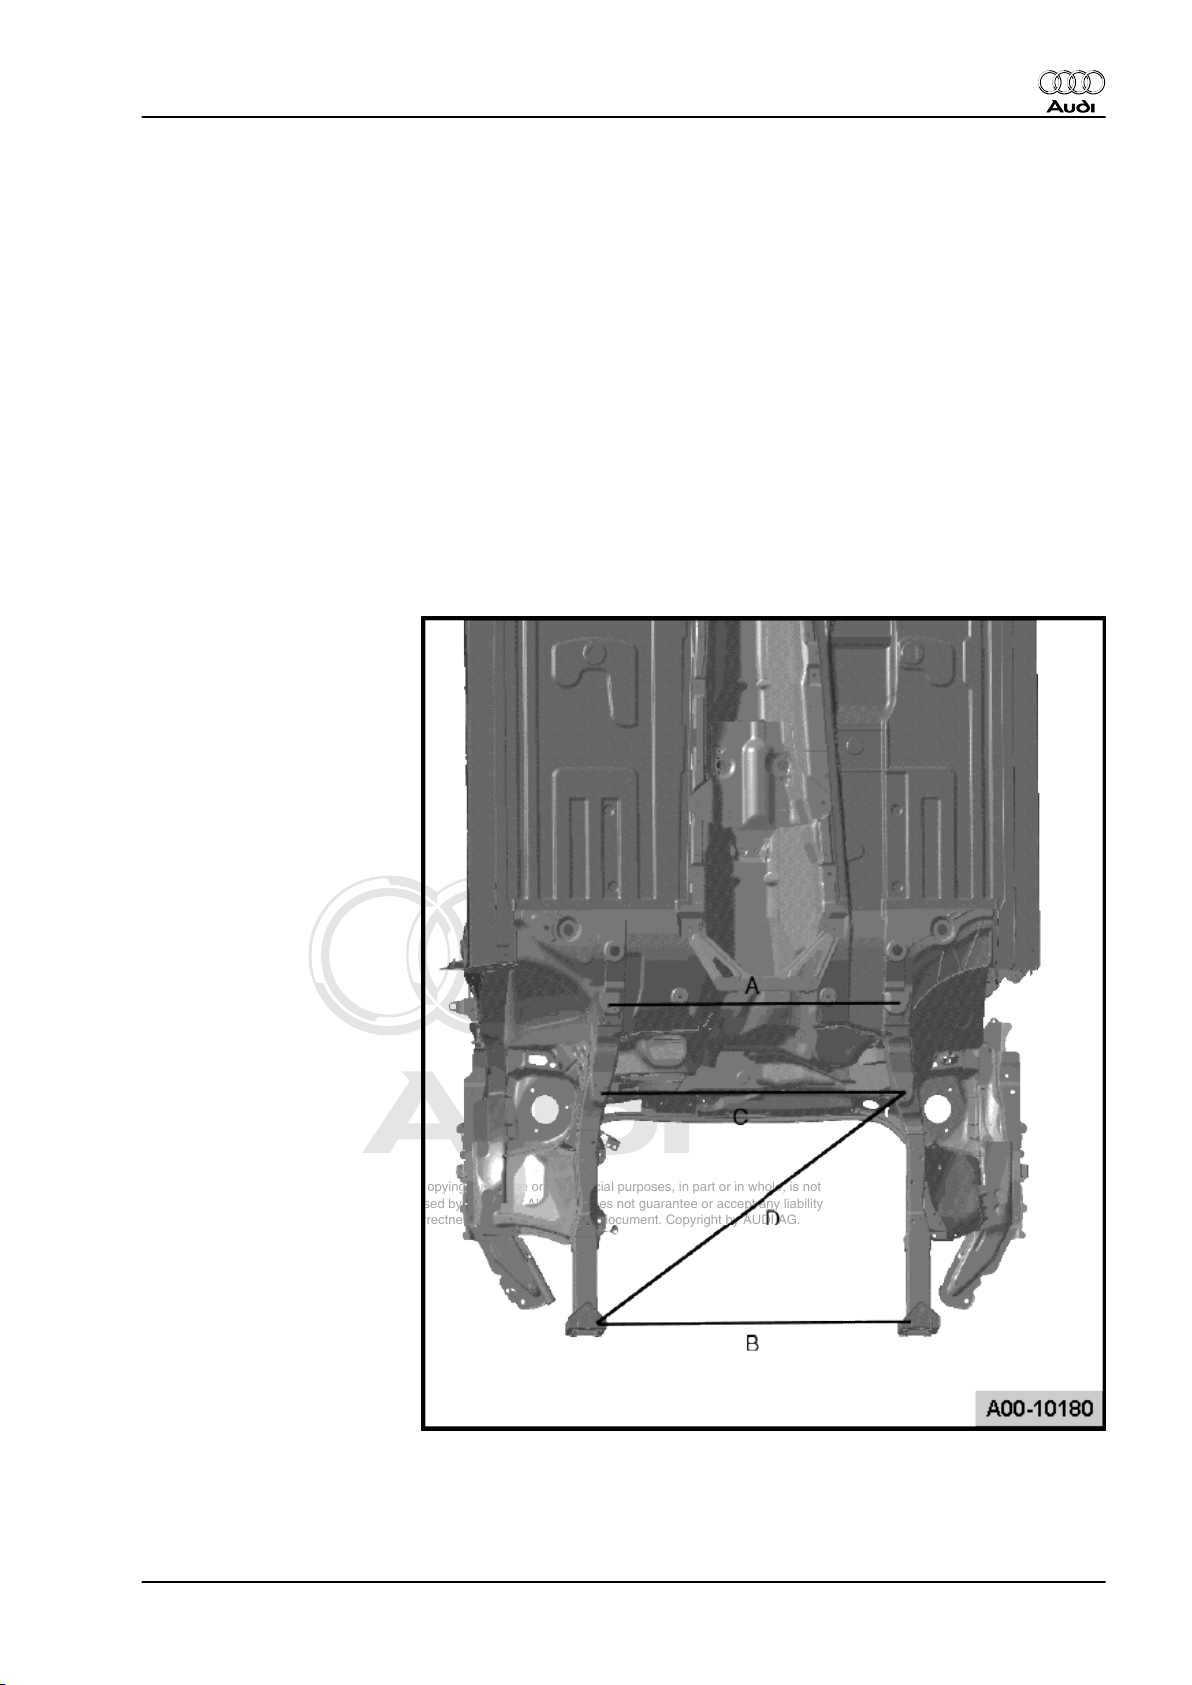
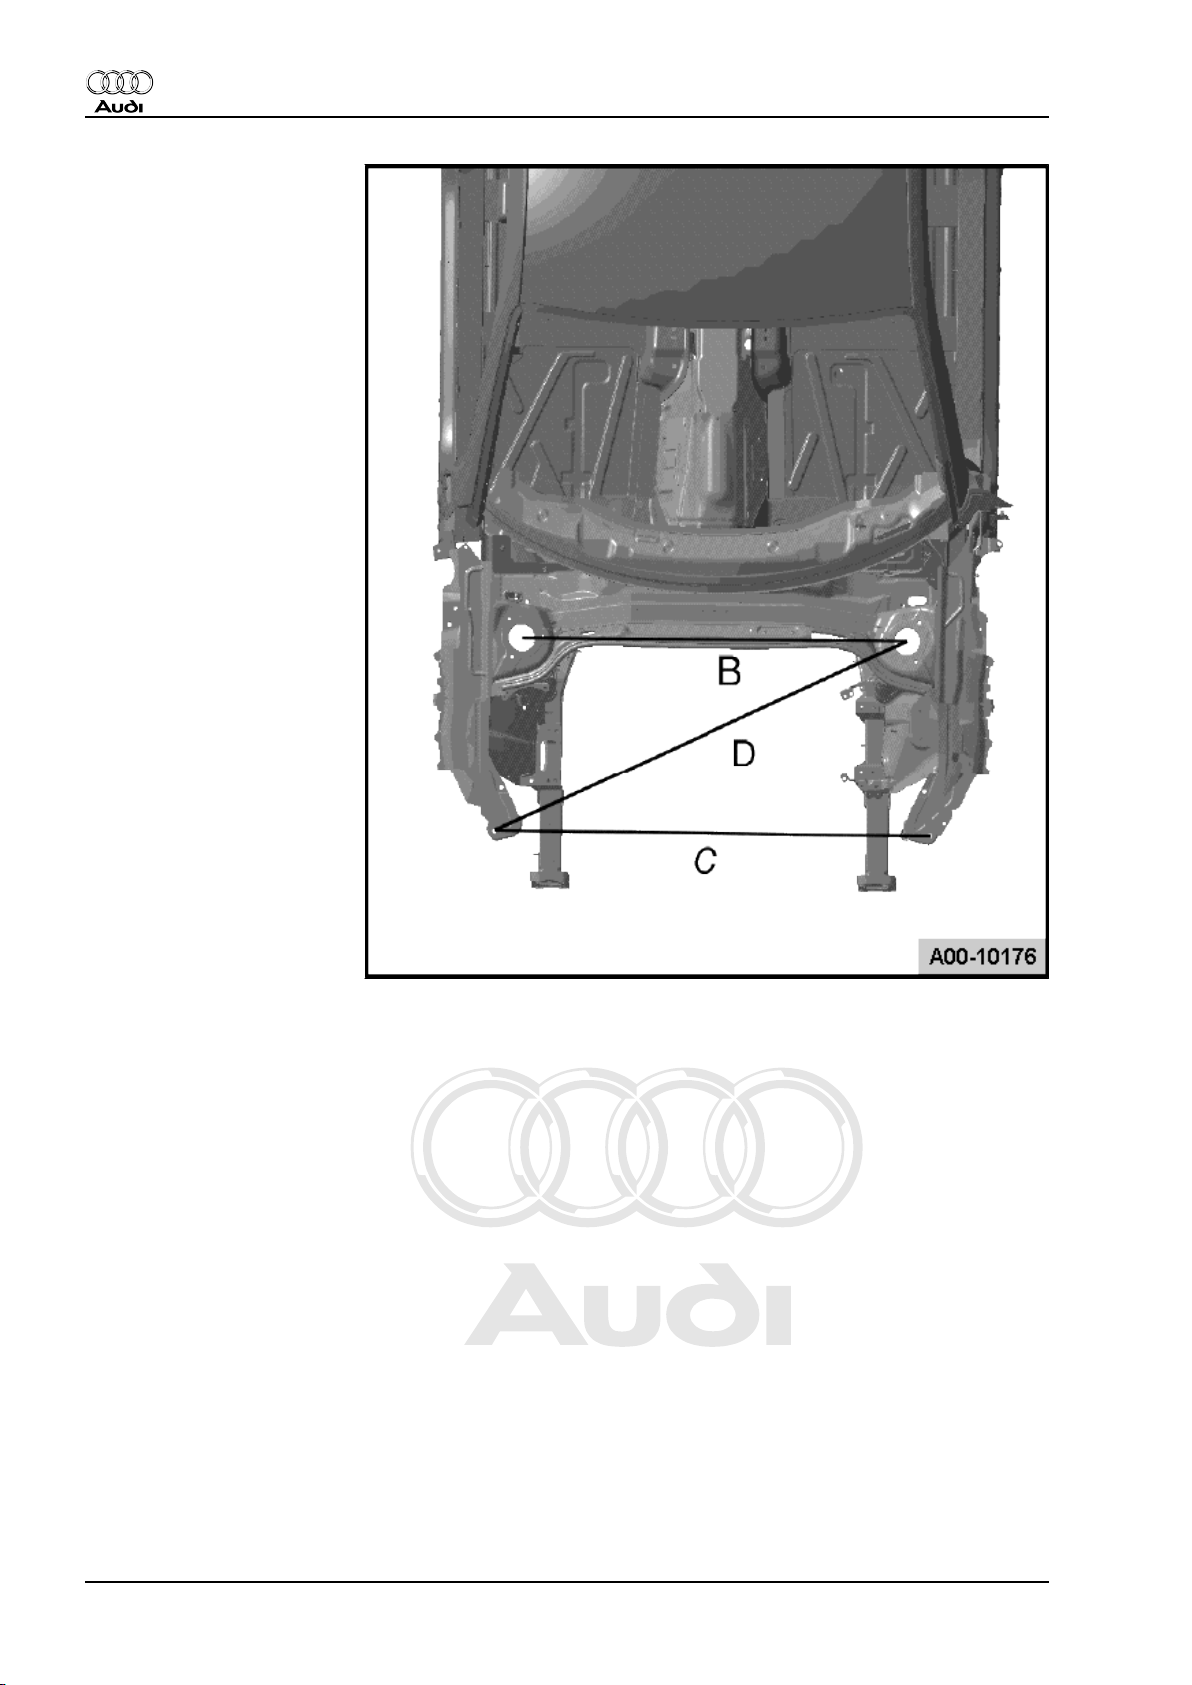
10 Body dimensions
10.1 Floor group, front
Distance between rear attachment points of front suspension
-a- 836 ± 2 mm
Distance between front longitudinal members (front)
-b- 899 ± 2 mm
Distance between front attachment points of front suspension
-c- 873 ± 2 mm
Diagonal distance between front longitudinal member and attach‐
ment points of front suspension
-d- 1084 ± 2 mm
Audi TT 2007 ➤
Body Repairs - Edition 09.2009
10. Body dimensions 15
Page 22
Protected by copyright. Copying for private or commercial purposes, in part or in whole, is not
permitted unless authorised by AUDI AG. AUDI AG does not guarantee or accept any liability
with respect to the correctness of information in this document. Copyright by AUDI AG.
Audi TT 2007 ➤
Body Repairs - Edition 09.2009
10.2 Floor group, rear
Distance between rear longitudinal members (rear)
-a- 978 ± 2 mm
Distance between rear longitudinal members (front)
-b- 980 ± 2 mm
Diagonal distance between longitudinal member (front) and lon‐
gitudinal member (rear)
-c- 1049 ± 2 mm
16 Rep. Gr.00 - Technical data
Page 23
Protected by copyright. Copying for private or commercial purposes, in part or in whole, is not
permitted unless authorised by AUDI AG. AUDI AG does not guarantee or accept any liability
with respect to the correctness of information in this document. Copyright by AUDI AG.
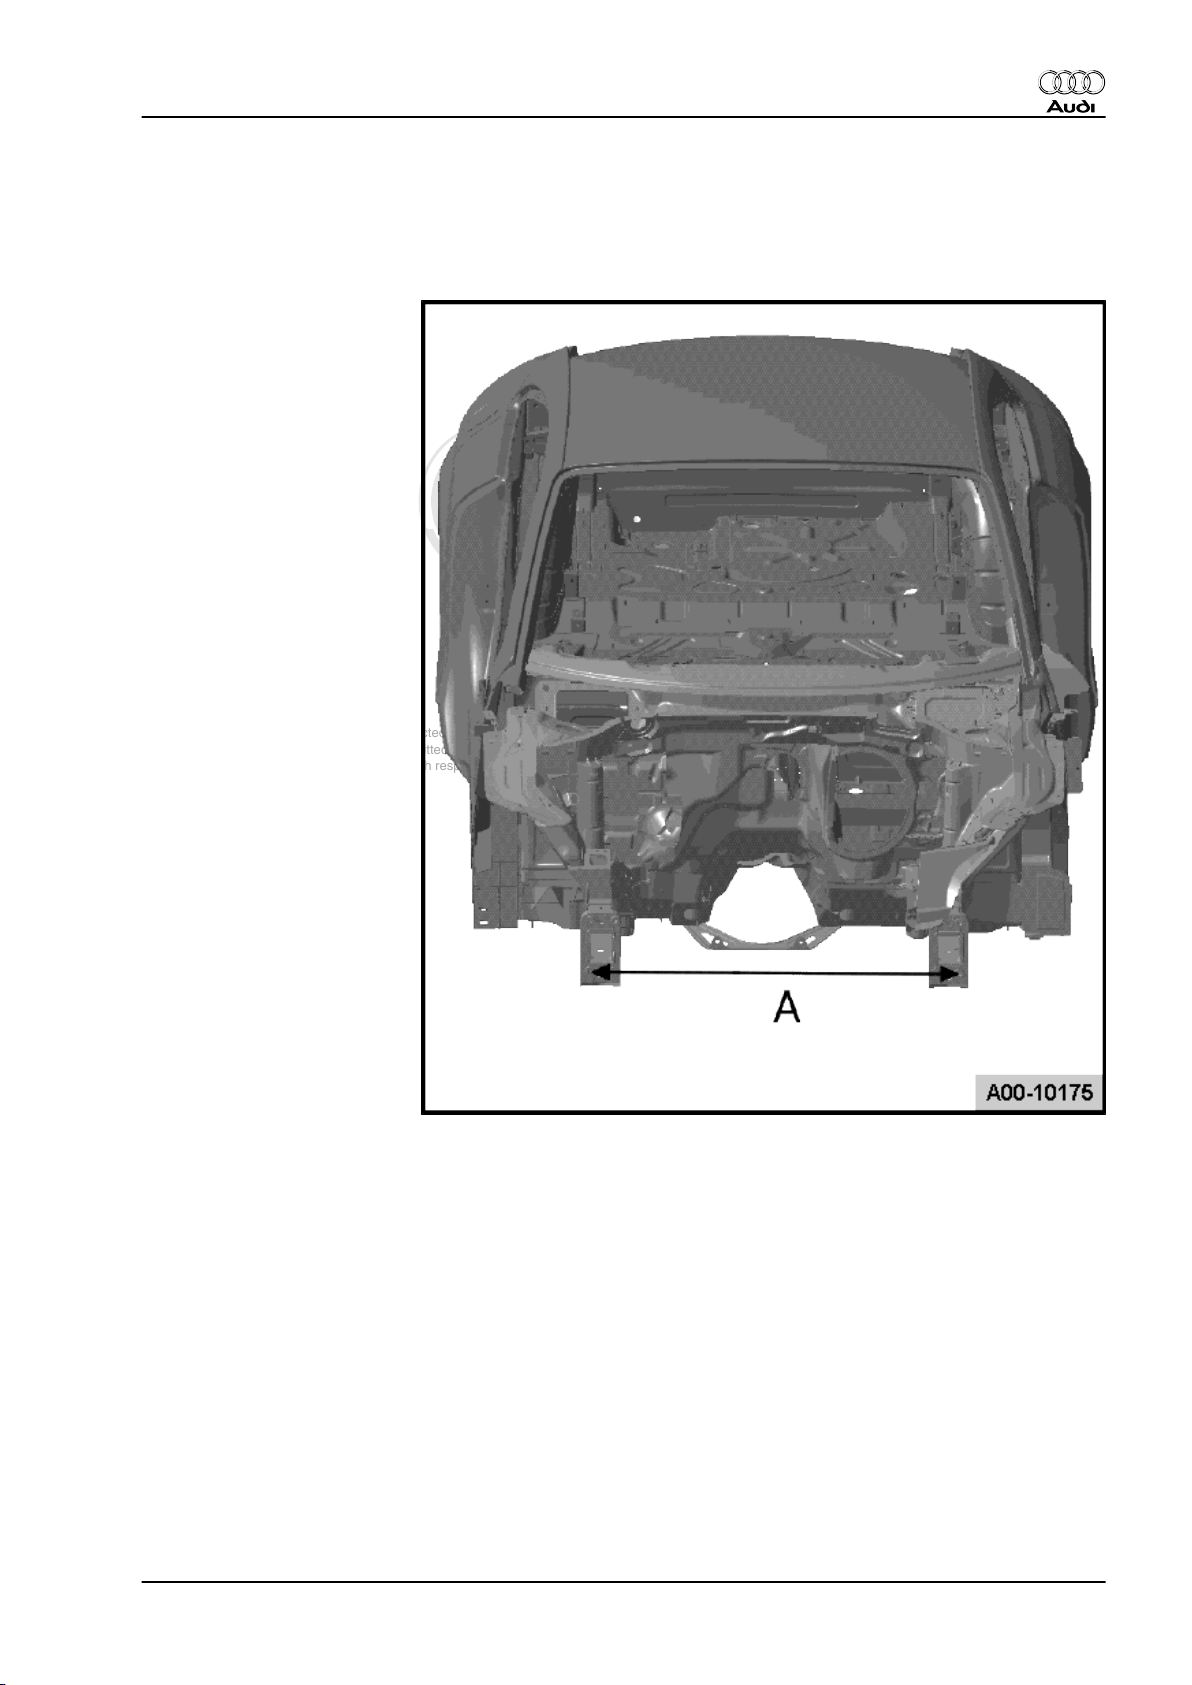
10.3 Body - front
Distance between front longitudinal members
-a- 1018 ± 2 mm
Audi TT 2007 ➤
Body Repairs - Edition 09.2009
Distance between suspension strut mountings
-b- 1129 ± 2 mm
Distance between wing panel mountings
-c- 1271 ± 2 mm
Diagonal distance between suspension strut mounting and wing
panel mounting
-d- 1317 ± 2 mm
10. Body dimensions 17
Page 24
Protected by copyright. Copying for private or commercial purposes, in part or in whole, is not
permitted unless authorised by AUDI AG. AUDI AG does not guarantee or accept any liability
with respect to the correctness of information in this document. Copyright by AUDI AG.
Audi TT 2007 ➤
Body Repairs - Edition 09.2009
18 Rep. Gr.00 - Technical data
Page 25
Protected by copyright. Copying for private or commercial purposes, in part or in whole, is not
permitted unless authorised by AUDI AG. AUDI AG does not guarantee or accept any liability
with respect to the correctness of information in this document. Copyright by AUDI AG.
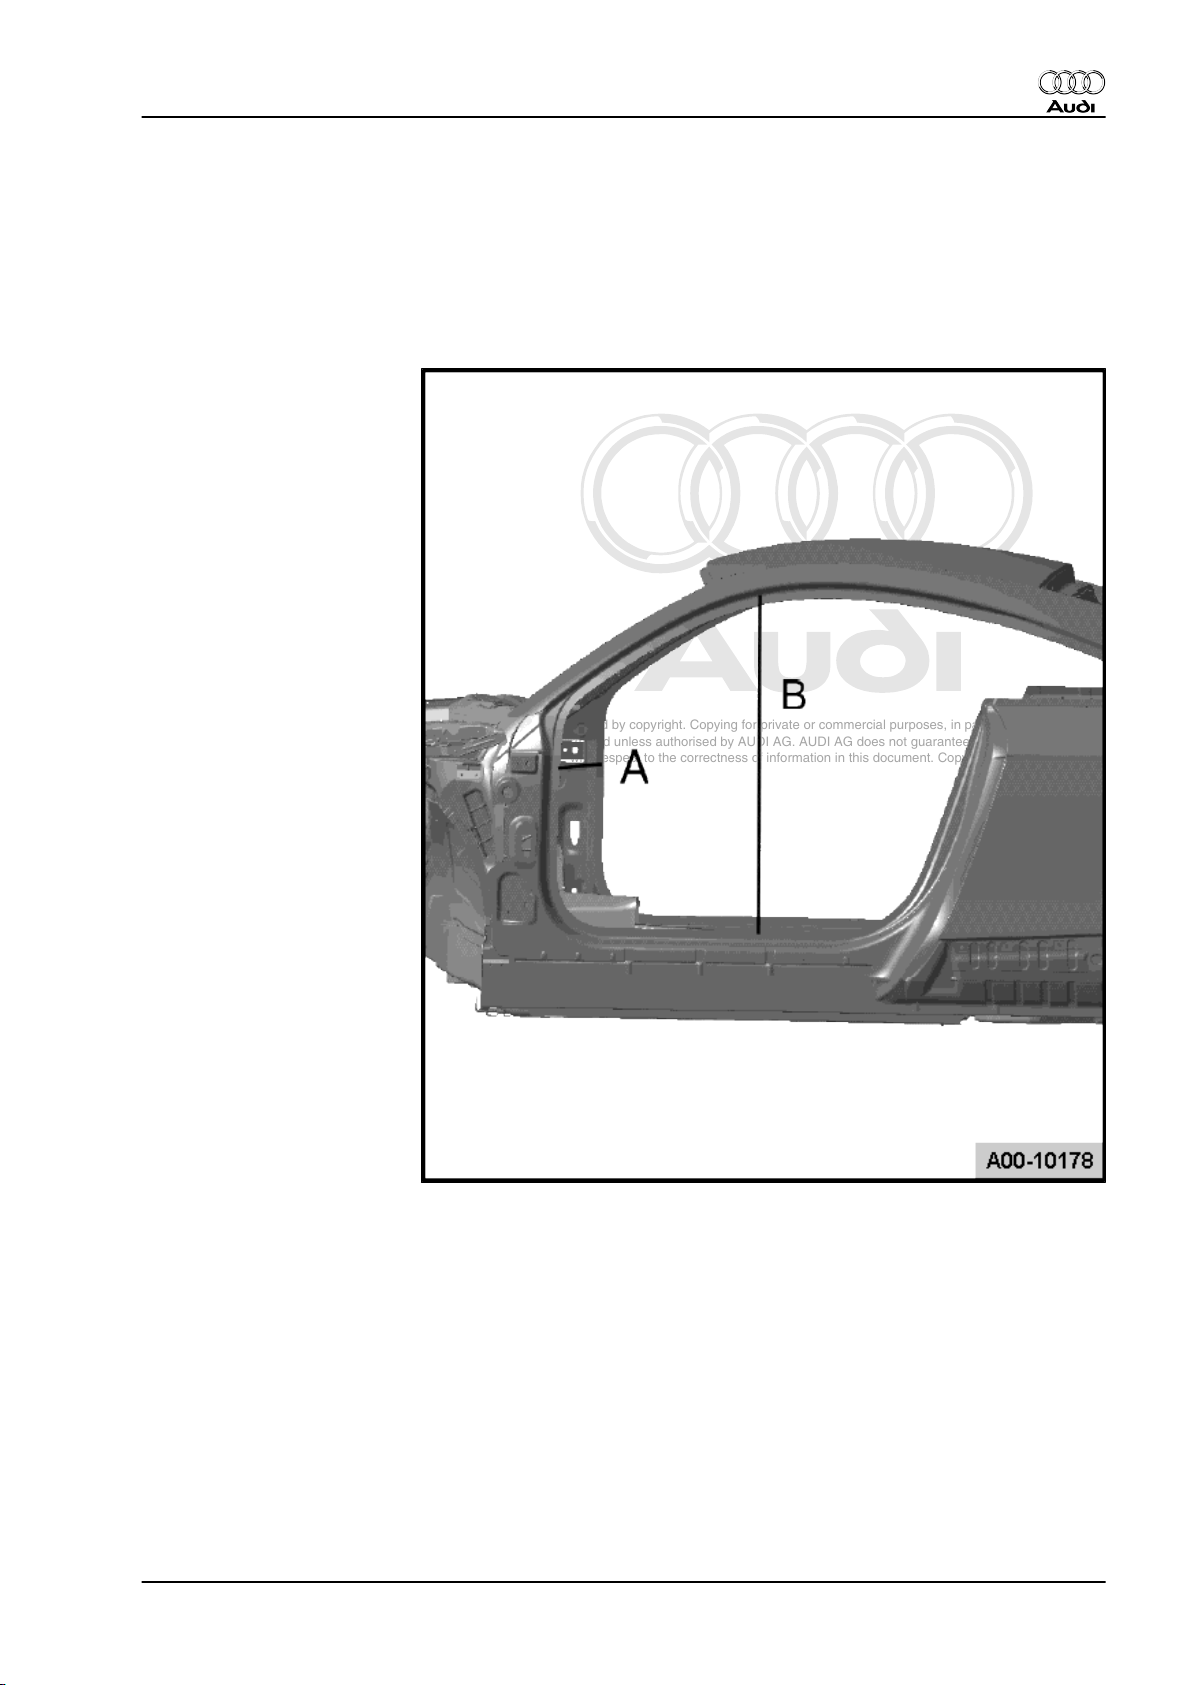
10.4 Body - centre
Distance between A-pillars
-a- 1534 ± 2 mm
Height of door opening
-b- 935 ± 2 mm
Audi TT 2007 ➤
Body Repairs - Edition 09.2009
10. Body dimensions 19
Page 26
Protected by copyright. Copying for private or commercial purposes, in part or in whole, is not
permitted unless authorised by AUDI AG. AUDI AG does not guarantee or accept any liability
with respect to the correctness of information in this document. Copyright by AUDI AG.
Audi TT 2007 ➤
Body Repairs - Edition 09.2009
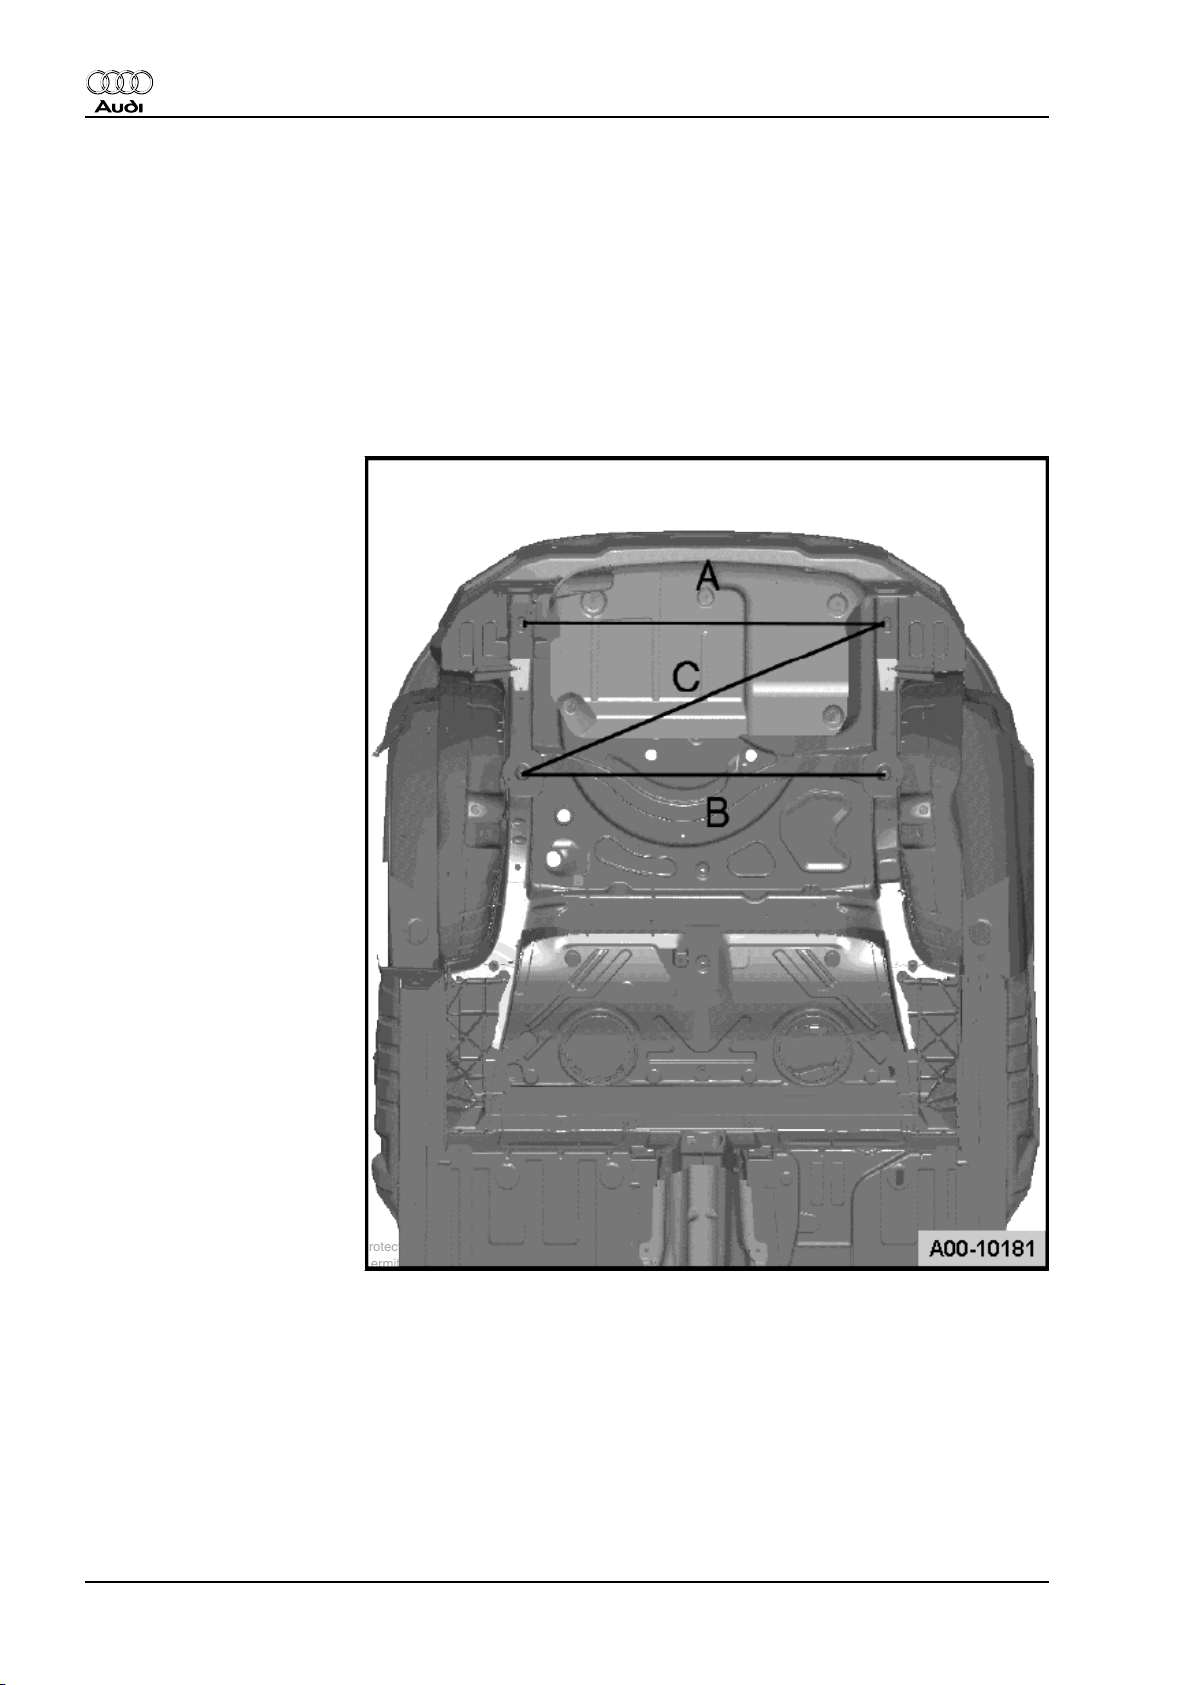
10.5 Body - rear
Distance between rear longitudinal members
-a- 1044 ± 2 mm
Distance between side panels
-b- 913 ± 2 mm
Distance between rear cross panel flange and roof flange
-c- 1269 ± 2 mm
20 Rep. Gr.00 - Technical data
Page 27
Protected by copyright. Copying for private or commercial purposes, in part or in whole, is not
permitted unless authorised by AUDI AG. AUDI AG does not guarantee or accept any liability
with respect to the correctness of information in this document. Copyright by AUDI AG.
11 Straightening jig
11.1 Overview
Audi TT 2007 ➤
Body Repairs - Edition 09.2009
Note
♦
The item numbers in the illustrations are identical with the end
numbers on the alignment bracket mountings.
♦
The item numbers of the alignment bracket mountings marked
with a circle are for checking the body with mechanical units
installed.
♦
Check the clearance of the alignment brackets before placing
them on the straightening jig. Any obstructing components
should be detached or removed.
♦
The required basic set size is given for the alignment bracket
mountings.
Alignment bracket set Audi TT -VAS 6384-
11. Straightening jig 21
Page 28

Protected by copyright. Copying for private or commercial purposes, in part or in whole, is not
permitted unless authorised by AUDI AG. AUDI AG does not guarantee or accept any liability
with respect to the correctness of information in this document. Copyright by AUDI AG.
Audi TT 2007 ➤
Body Repairs - Edition 09.2009
2 - MZ 142 and TV 400
3 - Spacer
4 - MZ 142 and alignment bracket mounting
6 - MZ 260
8 - MZ 602
10 - Spacer
12 - MZ 260
14 - MZ 140
16 - Left and right centring piece identical
18 - Bracket without MZ and alignment bracket
20 - MZ 140
22 - MZ 080
24 - MZ 080 and 22
25 - Spacer
26 - MZ 200
28 - MZ 602
30 - MZ 260
32 - MZ 200
Overview of alignment bracket positions with MZ elements for
vehicles with mechanical units installed
Overview of front alignment brackets
22 Rep. Gr.00 - Technical data
Page 29
Protected by copyright. Copying for private or commercial purposes, in part or in whole, is not
permitted unless authorised by AUDI AG. AUDI AG does not guarantee or accept any liability
with respect to the correctness of information in this document. Copyright by AUDI AG.
Audi TT 2007 ➤
Body Repairs - Edition 09.2009
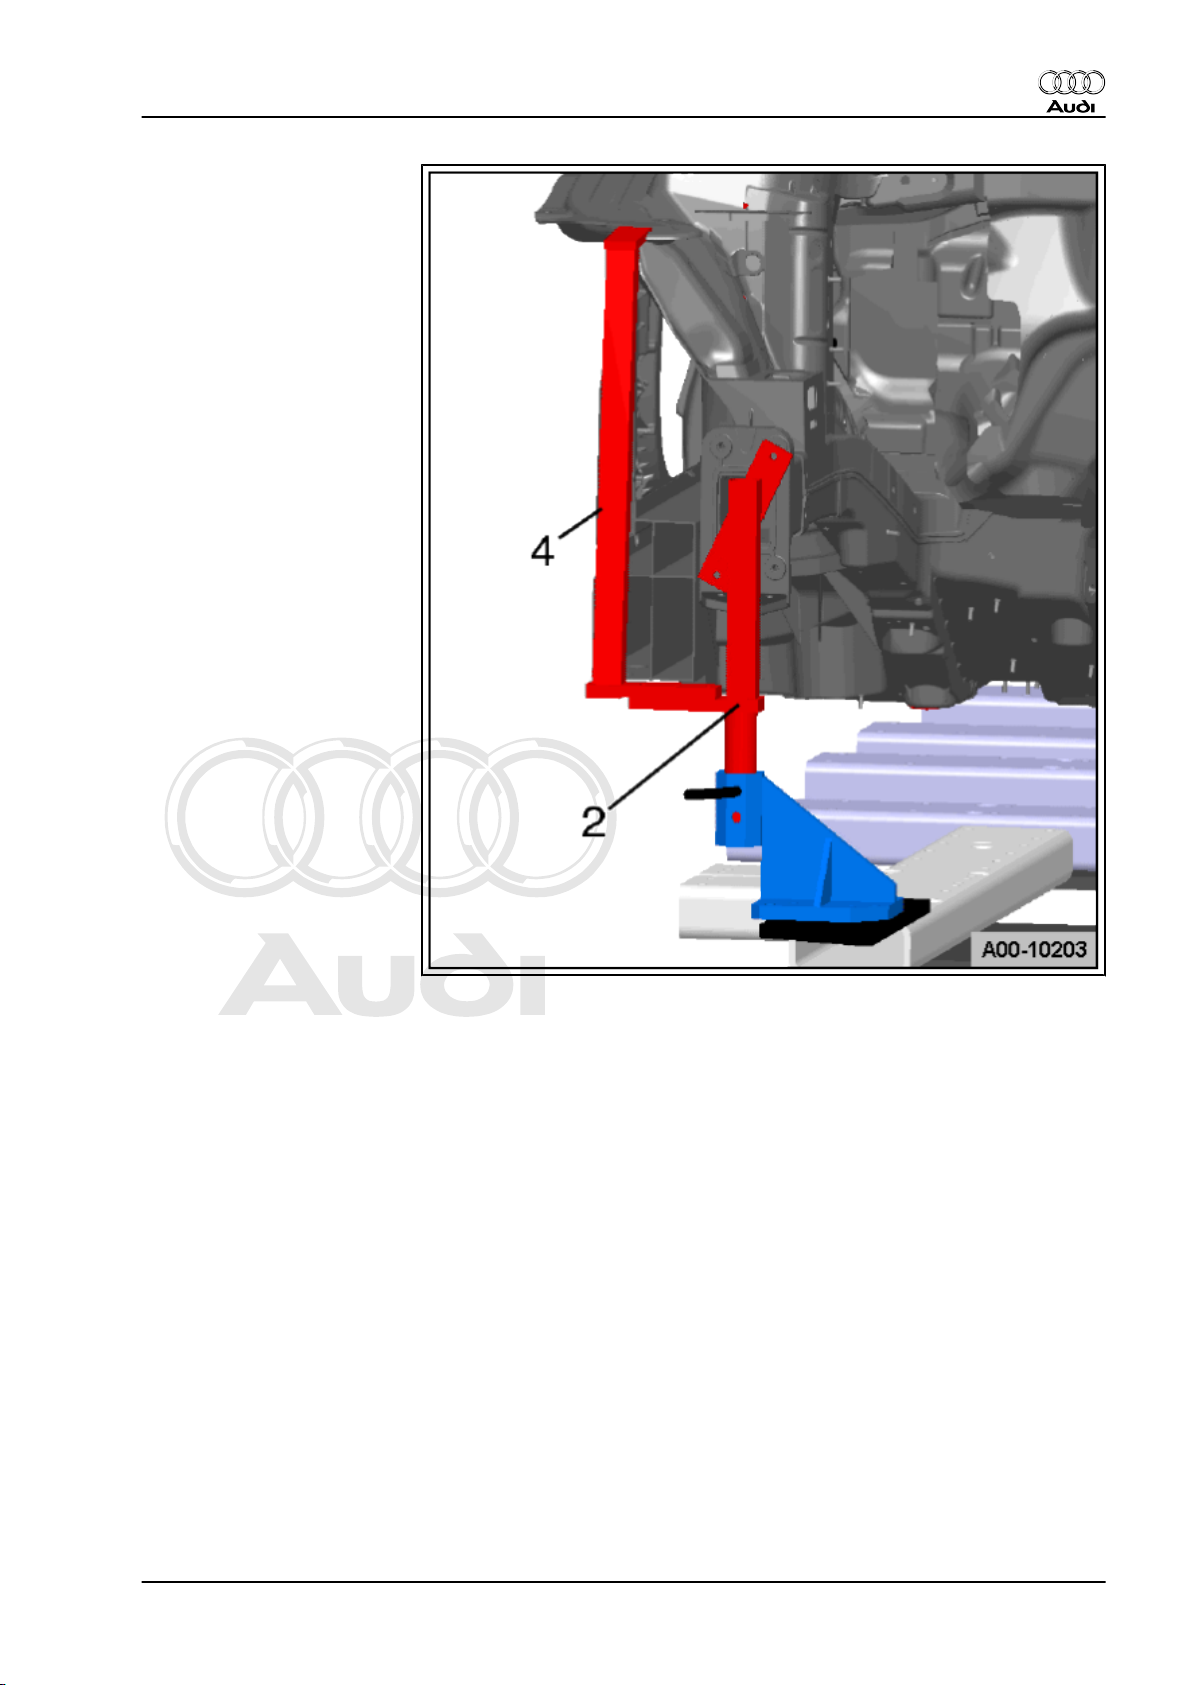
2 - Front longitudinal member
When checking, bolt on MZ last, as the longitudinal position of the
impact absorber mounting can vary by several mm due to pro‐
duction tolerances - if necessary do not bolt down.
3 - Front longitudinal member / top of wheel housing
Overview of front alignment brackets
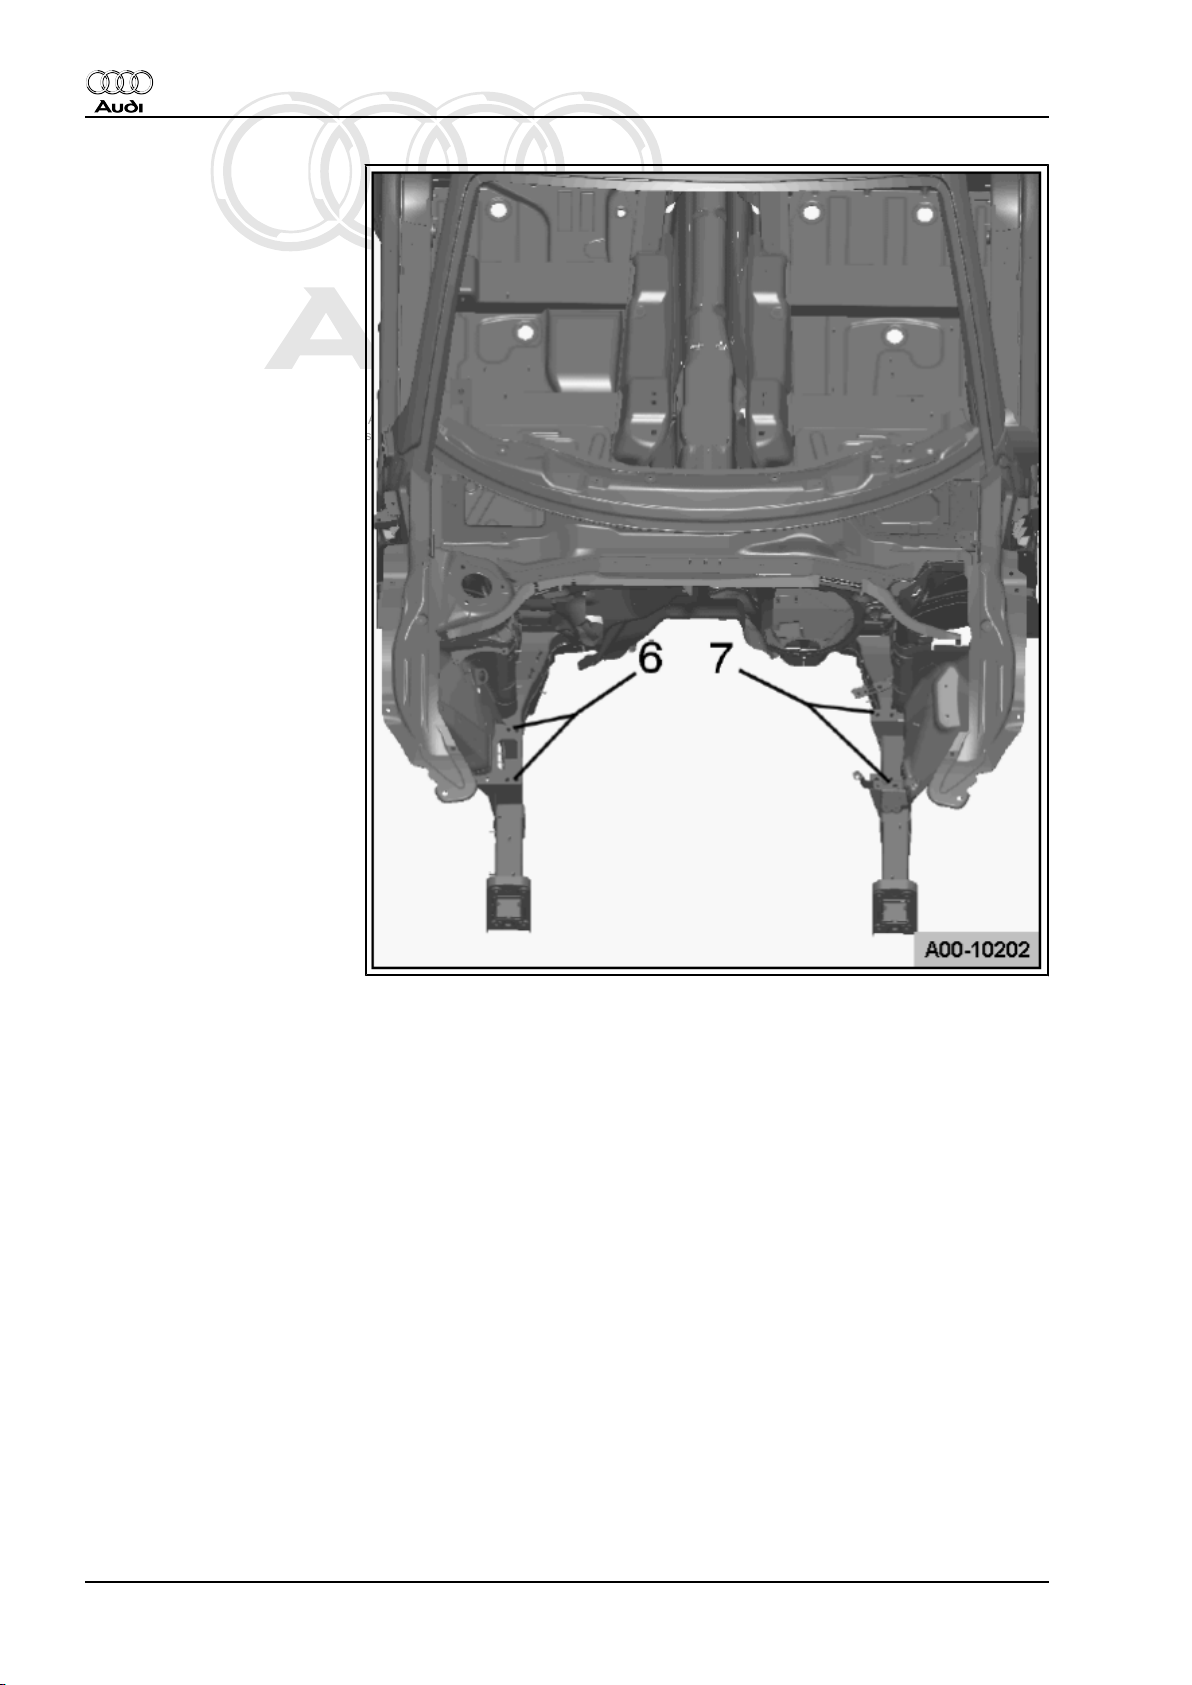
6 - Engine carrier mounting
7 - Engine carrier mounting
11. Straightening jig 23
Page 30
Protected by copyright. Copying for private or commercial purposes, in part or in whole, is not
permitted unless authorised by AUDI AG. AUDI AG does not guarantee or accept any liability
with respect to the correctness of information in this document. Copyright by AUDI AG.
Audi TT 2007 ➤
Body Repairs - Edition 09.2009
Overview of front alignment brackets
24 Rep. Gr.00 - Technical data
Page 31

Protected by copyright. Copying for private or commercial purposes, in part or in whole, is not
permitted unless authorised by AUDI AG. AUDI AG does not guarantee or accept any liability
with respect to the correctness of information in this document. Copyright by AUDI AG.
Audi TT 2007 ➤
Body Repairs - Edition 09.2009
6 - Gearbox console
11. Straightening jig 25
Page 32

Protected by copyright. Copying for private or commercial purposes, in part or in whole, is not
permitted unless authorised by AUDI AG. AUDI AG does not guarantee or accept any liability
with respect to the correctness of information in this document. Copyright by AUDI AG.
Audi TT 2007 ➤
Body Repairs - Edition 09.2009
7 - Engine console
Overview of front alignment brackets
26 Rep. Gr.00 - Technical data
Page 33

Protected by copyright. Copying for private or commercial purposes, in part or in whole, is not
permitted unless authorised by AUDI AG. AUDI AG does not guarantee or accept any liability
with respect to the correctness of information in this document. Copyright by AUDI AG.
Audi TT 2007 ➤
Body Repairs - Edition 09.2009
11. Straightening jig 27
Page 34

Protected by copyright. Copying for private or commercial purposes, in part or in whole, is not
permitted unless authorised by AUDI AG. AUDI AG does not guarantee or accept any liability
with respect to the correctness of information in this document. Copyright by AUDI AG.
Audi TT 2007 ➤
Body Repairs - Edition 09.2009
8 - Suspension strut mounting
12 - Mounting for subframe
18 - Mounting for side member
Overview of centre alignment brackets
28 Rep. Gr.00 - Technical data
Page 35

Protected by copyright. Copying for private or commercial purposes, in part or in whole, is not
permitted unless authorised by AUDI AG. AUDI AG does not guarantee or accept any liability
with respect to the correctness of information in this document. Copyright by AUDI AG.
Audi TT 2007 ➤
Body Repairs - Edition 09.2009
11. Straightening jig 29
Page 36

Protected by copyright. Copying for private or commercial purposes, in part or in whole, is not
permitted unless authorised by AUDI AG. AUDI AG does not guarantee or accept any liability
with respect to the correctness of information in this document. Copyright by AUDI AG.
Audi TT 2007 ➤
Body Repairs - Edition 09.2009
18 - Mounting for side member
19 - Spacer, identical on left and right sides
30 Rep. Gr.00 - Technical data
Page 37

Protected by copyright. Copying for private or commercial purposes, in part or in whole, is not
permitted unless authorised by AUDI AG. AUDI AG does not guarantee or accept any liability
with respect to the correctness of information in this document. Copyright by AUDI AG.
Audi TT 2007 ➤
Body Repairs - Edition 09.2009
20 - Mounting for propshaft
11. Straightening jig 31
Page 38

Protected by copyright. Copying for private or commercial purposes, in part or in whole, is not
permitted unless authorised by AUDI AG. AUDI AG does not guarantee or accept any liability
with respect to the correctness of information in this document. Copyright by AUDI AG.
Audi TT 2007 ➤
Body Repairs - Edition 09.2009
22 -24 - Rear suspension strut mounting
Overview of rear alignment brackets
32 Rep. Gr.00 - Technical data
Page 39

Protected by copyright. Copying for private or commercial purposes, in part or in whole, is not
permitted unless authorised by AUDI AG. AUDI AG does not guarantee or accept any liability
with respect to the correctness of information in this document. Copyright by AUDI AG.
Audi TT 2007 ➤
Body Repairs - Edition 09.2009
11. Straightening jig 33
Page 40

Protected by copyright. Copying for private or commercial purposes, in part or in whole, is not
permitted unless authorised by AUDI AG. AUDI AG does not guarantee or accept any liability
with respect to the correctness of information in this document. Copyright by AUDI AG.
Audi TT 2007 ➤
Body Repairs - Edition 09.2009
22 - Mounting for rear axle
24 - Spacer, identical on left and right sides
– Line up with holes as shown.
26 - Drilling in longitudinal member
28 - Suspension strut mounting
30 - Drilling in longitudinal member
32 - Mounting for rear longitudinal member
11.2 Portal gauge
Portal gauge supplement Audi TT/TT Roadster -VAS 5007/30-
34 Rep. Gr.00 - Technical data
Page 41

Protected by copyright. Copying for private or commercial purposes, in part or in whole, is not
permitted unless authorised by AUDI AG. AUDI AG does not guarantee or accept any liability
with respect to the correctness of information in this document. Copyright by AUDI AG.
A - Extension
B - Telescopic column
C - Cross bar 1200 mm
1 - Mounting for A-pillar
5 - Mounting for B-pillar
Audi TT 2007 ➤
Body Repairs - Edition 09.2009
11. Straightening jig 35
Page 42

Protected by copyright. Copying for private or commercial purposes, in part or in whole, is not
permitted unless authorised by AUDI AG. AUDI AG does not guarantee or accept any liability
with respect to the correctness of information in this document. Copyright by AUDI AG.
Audi TT 2007 ➤
Body Repairs - Edition 09.2009
50 – Body - front
RO: 50 40 55 00
1 Longitudinal member, upper part with
console (Coupé and Roadster identi‐
cal)
WARNING
Always observe safety precautions.
Safety notes ⇒ General Information; Body Repairs, General Body
Repairs ; Safety notes .
1.1 Tools
Special tools and workshop equipment required
♦ Compact angle grinder -VAS 5167-
♦ Pneumatic glue gun -V.A.G 2005 B-
♦ Shielded arc welding equipment 250A -VAS 6388-
36 Rep. Gr.50 - Body - front
Page 43

Protected by copyright. Copying for private or commercial purposes, in part or in whole, is not
permitted unless authorised by AUDI AG. AUDI AG does not guarantee or accept any liability
with respect to the correctness of information in this document. Copyright by AUDI AG.
♦ Rechargeable riveter -VAS 5279A-
1.2 Procedure
Cutting locations
• Longitudinal member (bottom section) already removed
Engine console
– Separate original joint with rechargeable riveter -VAS 5279B- .
– Remove large punch rivets. Use rechargeable riveter -VAS
5279A- with attachments D13 and D14 from -VAS 5279/2 - or
rechargeable riveter -VAS 5279B- with attachments D13 and
D14 .
– Remove small punch rivets. Use rechargeable riveter -VAS
5279A- with attachments S1 and E2 from -VAS 5279/2 - or
rechargeable riveter -VAS 5279B- with attachments S1 and
E2 .
– Remove remaining material using compact angle grinder -
VAS 5167- .
Audi TT 2007 ➤
Body Repairs - Edition 09.2009
1. Longitudinal member, upper part with console (Coupé and Roadster identical) 37
Page 44

Protected by copyright. Copying for private or commercial purposes, in part or in whole, is not
permitted unless authorised by AUDI AG. AUDI AG does not guarantee or accept any liability
with respect to the correctness of information in this document. Copyright by AUDI AG.
Audi TT 2007 ➤
Body Repairs - Edition 09.2009
Replacement part
♦ Engine console
♦ Body adhesive DA 001 730 A2
Preparing new part
– Prepare flanges on body and new parts for welding.
Welding in
– Fix new part in position with alignment bracket.
– Weld in engine console using shielded arc welding equipment
250A -VAS 6388- : SG continuous seam.
– Rivet in new part using rechargeable riveter -VAS 5279B- .
Countersink holes, working inwards from outside. Use recharge‐
able riveter -VAS 5279A- with attachments D15 and D16 from VAS 5279/2 - or rechargeable riveter -VAS 5279B- with
attachments D15 and D16 .
38 Rep. Gr.50 - Body - front
Page 45

Protected by copyright. Copying for private or commercial purposes, in part or in whole, is not
permitted unless authorised by AUDI AG. AUDI AG does not guarantee or accept any liability
with respect to the correctness of information in this document. Copyright by AUDI AG.
Audi TT 2007 ➤
Body Repairs - Edition 09.2009
– Weld in engine console using shielded arc welding equipment
250A -VAS 6388- : SG continuous seam.
1. Longitudinal member, upper part with console (Coupé and Roadster identical) 39
Page 46

Protected by copyright. Copying for private or commercial purposes, in part or in whole, is not
permitted unless authorised by AUDI AG. AUDI AG does not guarantee or accept any liability
with respect to the correctness of information in this document. Copyright by AUDI AG.
Audi TT 2007 ➤
Body Repairs - Edition 09.2009
Gearbox console
– Separate original joint with rechargeable riveter -VAS 5279B- .
40 Rep. Gr.50 - Body - front
Page 47

Protected by copyright. Copying for private or commercial purposes, in part or in whole, is not
permitted unless authorised by AUDI AG. AUDI AG does not guarantee or accept any liability
with respect to the correctness of information in this document. Copyright by AUDI AG.
Audi TT 2007 ➤
Body Repairs - Edition 09.2009
Replacement part
♦ Gearbox console
♦ Body adhesive DA 001 730 A2
Preparing new part
– Prepare flanges on body and new parts for welding.
Welding in
– Fix new part in position with alignment bracket.
– Weld in gearbox console using shielded arc welding equip‐
ment 250A -VAS 6388- : SG continuous seam.
1. Longitudinal member, upper part with console (Coupé and Roadster identical) 41
Page 48

Protected by copyright. Copying for private or commercial purposes, in part or in whole, is not
permitted unless authorised by AUDI AG. AUDI AG does not guarantee or accept any liability
with respect to the correctness of information in this document. Copyright by AUDI AG.
Audi TT 2007 ➤
Body Repairs - Edition 09.2009
42 Rep. Gr.50 - Body - front
Page 49

Protected by copyright. Copying for private or commercial purposes, in part or in whole, is not
permitted unless authorised by AUDI AG. AUDI AG does not guarantee or accept any liability
with respect to the correctness of information in this document. Copyright by AUDI AG.
RO: 50 22 55 50
2 Support, left-side - Renewal (Coupé
and Roadster identical)
WARNING
Always observe safety precautions.
Safety notes ⇒ General Information; Body Repairs, General Body
Repairs ; Safety notes .
2.1 Tools
Special tools and workshop equipment required
♦ Compact angle grinder -VAS 5167-
♦ Pneumatic glue gun -V.A.G 2005 B-
Audi TT 2007 ➤
Body Repairs - Edition 09.2009
♦ Shielded arc welding equipment 250A -VAS 6388-
♦ Rechargeable riveter -VAS 5279A-
2. Support, left-side - Renewal (Coupé and Roadster identical) 43
Page 50

Protected by copyright. Copying for private or commercial purposes, in part or in whole, is not
permitted unless authorised by AUDI AG. AUDI AG does not guarantee or accept any liability
with respect to the correctness of information in this document. Copyright by AUDI AG.
Audi TT 2007 ➤
Body Repairs - Edition 09.2009
2.2 Procedure
Cutting locations
– Separate original joint with rechargeable riveter -VAS 5279A- .
– Remove large punch rivets. Use rechargeable riveter -VAS
5279A- with attachments D13 and D14 from -VAS 5279/2 - or
rechargeable riveter -VAS 5279B- with attachments D13 and
D14 .
– Remove small punch rivets. Use rechargeable riveter -VAS
5279A- with attachments S1 and E2 from -VAS 5279/2 - or
rechargeable riveter -VAS 5279B- with attachments S1 and
E2 .
– Remove remaining material using compact angle grinder -
VAS 5167- .
Replacement parts
♦ Punch rivet
♦ Support
♦ Body adhesive DA 001 730 A2
44 Rep. Gr.50 - Body - front
Page 51

Protected by copyright. Copying for private or commercial purposes, in part or in whole, is not
permitted unless authorised by AUDI AG. AUDI AG does not guarantee or accept any liability
with respect to the correctness of information in this document. Copyright by AUDI AG.
Preparing new part
– Prepare flanges on body and new parts for welding.
Riveting in
– Rivet in support using rechargeable riveter -VAS 5279A- .
Countersink holes, working inwards from outside. Use recharge‐
able riveter -VAS 5279A- with attachments D15 and D16 from VAS 5279/2 - or rechargeable riveter -VAS 5279B- with
attachments D15 and D16 .
– Weld in support using shielded arc welding equipment 250A -
VAS 6388- : SG continuous seam.
Audi TT 2007 ➤
Body Repairs - Edition 09.2009
2. Support, left-side - Renewal (Coupé and Roadster identical) 45
Page 52

Protected by copyright. Copying for private or commercial purposes, in part or in whole, is not
permitted unless authorised by AUDI AG. AUDI AG does not guarantee or accept any liability
with respect to the correctness of information in this document. Copyright by AUDI AG.
Audi TT 2007 ➤
Body Repairs - Edition 09.2009
RO: 50 22 55 50
3 Support, right-side - Renewal (Coupé
and Roadster identical)
WARNING
Always observe safety precautions.
Safety notes ⇒ General Information; Body Repairs, General Body
Repairs ; Safety notes .
3.1 Tools
Special tools and workshop equipment required
♦ Compact angle grinder -VAS 5167-
♦ Pneumatic glue gun -V.A.G 2005 B-
♦ Shielded arc welding equipment 250A -VAS 6388-
♦ Rechargeable riveter -VAS 5279A-
46 Rep. Gr.50 - Body - front
Page 53

Protected by copyright. Copying for private or commercial purposes, in part or in whole, is not
permitted unless authorised by AUDI AG. AUDI AG does not guarantee or accept any liability
with respect to the correctness of information in this document. Copyright by AUDI AG.
♦ Pneumatic sabre saw -V.A.G 1523A-
3.2 Procedure
Cutting locations
Note
Partial renewal is possible with the separating cut shown. Place
a backing plate of the same material behind the joint and make
SG continuous seam.
Audi TT 2007 ➤
Body Repairs - Edition 09.2009
– Separate original joint with rechargeable riveter -VAS 5279A- .
– Remove large punch rivets. Use rechargeable riveter -VAS
5279A- with attachments D13 and D14 from -VAS 5279/2 - or
rechargeable riveter -VAS 5279B- with attachments D13 and
D14 .
– Remove small punch rivets. Use rechargeable riveter -VAS
5279A- with attachments S1 and E2 from -VAS 5279/2 - or
rechargeable riveter -VAS 5279B- with attachments S1 and
E2 .
– Remove remaining material using compact angle grinder -
VAS 5167- .
3. Support, right-side - Renewal (Coupé and Roadster identical) 47
Page 54

Protected by copyright. Copying for private or commercial purposes, in part or in whole, is not
permitted unless authorised by AUDI AG. AUDI AG does not guarantee or accept any liability
with respect to the correctness of information in this document. Copyright by AUDI AG.
Audi TT 2007 ➤
Body Repairs - Edition 09.2009
Replacement parts
♦ Punch rivet
♦ Support
♦ Body adhesive DA 001 730 A2
Preparing new part
– Prepare flanges on body and new parts for welding.
Riveting in
– Rivet in support using rechargeable riveter -VAS 5279A- .
– Weld in support using shielded arc welding equipment 250A -
VAS 6388- : SG continuous seam.
Countersink holes, working inwards from outside. Use recharge‐
able riveter -VAS 5279A- with attachments D15 and D16 from VAS 5279/2 - or rechargeable riveter -VAS 5279B- with
attachments D15 and D16 .
48 Rep. Gr.50 - Body - front
Page 55

Protected by copyright. Copying for private or commercial purposes, in part or in whole, is not
permitted unless authorised by AUDI AG. AUDI AG does not guarantee or accept any liability
with respect to the correctness of information in this document. Copyright by AUDI AG.
Audi TT 2007 ➤
Body Repairs - Edition 09.2009
3. Support, right-side - Renewal (Coupé and Roadster identical) 49
Page 56

Protected by copyright. Copying for private or commercial purposes, in part or in whole, is not
permitted unless authorised by AUDI AG. AUDI AG does not guarantee or accept any liability
with respect to the correctness of information in this document. Copyright by AUDI AG.
Audi TT 2007 ➤
Body Repairs - Edition 09.2009
RO: 50 72 55 00
4 Upper longitudinal member for wheel
housing - Renewal (Coupé and
Roadster identical)
WARNING
Always observe safety precautions.
Safety notes ⇒ General Information; Body Repairs, General Body
Repairs ; Safety notes .
4.1 Tools
Special tools and workshop equipment required
♦ Compact angle grinder -VAS 5167-
♦ Pneumatic glue gun -V.A.G 2005 B-
♦ Shielded arc welding equipment 250A -VAS 6388-
♦ Rechargeable riveter -VAS 5279A-
50 Rep. Gr.50 - Body - front
Page 57

Protected by copyright. Copying for private or commercial purposes, in part or in whole, is not
permitted unless authorised by AUDI AG. AUDI AG does not guarantee or accept any liability
with respect to the correctness of information in this document. Copyright by AUDI AG.
♦ Pneumatic sabre saw -V.A.G 1523A-
4.2 Procedure
Cutting locations
– Roughly cut out part using pneumatic sabre saw -V.A.G
1523A- .
– Separate original joint with rechargeable riveter -VAS 5279A- .
– Remove large punch rivets. Use rechargeable riveter -VAS
5279A- with attachments D13 and D14 from -VAS 5279/2 - or
rechargeable riveter -VAS 5279B- with attachments D13 and
D14 .
– Remove small punch rivets. Use rechargeable riveter -VAS
5279A- with attachments S1 and E2 from -VAS 5279/2 - or
rechargeable riveter -VAS 5279B- with attachments S1 and
E2 .
– Remove remaining material using compact angle grinder -
VAS 5167- .
Audi TT 2007 ➤
Body Repairs - Edition 09.2009
4. Upper longitudinal member for wheel housing - Renewal (Coupé and Roadster identical) 51
Page 58

Protected by copyright. Copying for private or commercial purposes, in part or in whole, is not
permitted unless authorised by AUDI AG. AUDI AG does not guarantee or accept any liability
with respect to the correctness of information in this document. Copyright by AUDI AG.
Audi TT 2007 ➤
Body Repairs - Edition 09.2009
Replacement parts
Note
Use a 4 mm aluminium solid rivet if pressing out the old rivets
created a hole.
Parts
♦ 3.35 x 5 mm punch rivet
♦ Upper wheel housing longitudinal member
♦ Body adhesive DA 001 730 A2
Preparing new part
– Prepare flanges on body and new parts for welding.
Riveting in
– Apply 2-component adhesive DA 001 730 A2 to entire riveting
area using pneumatic glue gun -V.A.G 2005 B- .
Riveting in new part
– Position new part and fix in place.
52 Rep. Gr.50 - Body - front
Page 59

Protected by copyright. Copying for private or commercial purposes, in part or in whole, is not
permitted unless authorised by AUDI AG. AUDI AG does not guarantee or accept any liability
with respect to the correctness of information in this document. Copyright by AUDI AG.
Body Repairs - Edition 09.2009
Note
Holes must be stamped prior to riveting on.
Secure new part on bracket set.
– Rivet in new part using rechargeable riveter -VAS 5279A- .
Countersink holes, working inwards from outside. Use recharge‐
able riveter -VAS 5279A- with attachments D15 and D16 from VAS 5279/2 - or rechargeable riveter -VAS 5279B- with
attachments D15 and D16 .
Note
Use a 4 mm aluminium solid rivet if pressing out the old rivets created a hole.
Audi TT 2007 ➤
– Secure to A-pillar with an M5 x 18 flange bolt.
4. Upper longitudinal member for wheel housing - Renewal (Coupé and Roadster identical) 53
Page 60

Protected by copyright. Copying for private or commercial purposes, in part or in whole, is not
permitted unless authorised by AUDI AG. AUDI AG does not guarantee or accept any liability
with respect to the correctness of information in this document. Copyright by AUDI AG.
Audi TT 2007 ➤
Body Repairs - Edition 09.2009
Note
♦
The new parts may not be provided with the holes for the bol‐
ted connections.
♦
In this case the new parts have to be drilled out for the bolted
connections.
Note
5.3 x 5 mm punch rivets were previously fitted in the area of the
suspension strut mounting. A stepped seam (stitch seam) must
be made here instead of the punch rivets.
– Make stepped seam (stitch seam) in area of suspension strut
mounting.
54 Rep. Gr.50 - Body - front
Page 61

Protected by copyright. Copying for private or commercial purposes, in part or in whole, is not
permitted unless authorised by AUDI AG. AUDI AG does not guarantee or accept any liability
with respect to the correctness of information in this document. Copyright by AUDI AG.
RO: 50 74 55 50
5 Suspension strut mounting - Renew‐
al (Coupé and Roadster identical)
WARNING
Always observe safety precautions.
Safety notes ⇒ General Information; Body Repairs, General Body
Repairs ; Safety notes .
5.1 Tools
Special tools and workshop equipment required
♦ Compact angle grinder -VAS 5167-
♦ Pneumatic glue gun -V.A.G 2005 B-
Audi TT 2007 ➤
Body Repairs - Edition 09.2009
♦ Shielded arc welding equipment 250A -VAS 6388-
♦ Rechargeable riveter -VAS 5279A-
5. Suspension strut mounting - Renewal (Coupé and Roadster identical) 55
Page 62

Protected by copyright. Copying for private or commercial purposes, in part or in whole, is not
permitted unless authorised by AUDI AG. AUDI AG does not guarantee or accept any liability
with respect to the correctness of information in this document. Copyright by AUDI AG.
Audi TT 2007 ➤
Body Repairs - Edition 09.2009
♦ Pneumatic sabre saw -V.A.G 1523A-
5.2 Procedure
Cutting locations
• Longitudinal member (top section) already removed
WARNING
Do not damage adjoining castings.
Note
Refer to General information on aluminium regarding punch rivets
with one-sided access.
– Make separating cut in plenum chamber flange using pneu‐
matic sabre saw -V.A.G 1523A- .
– Separate original joint at support for suspension strut mount‐
ing using rechargeable riveter -VAS 5279A- .
– Remove large punch rivets. Use rechargeable riveter -VAS
5279A- with attachments D13 and D14 from -VAS 5279/2 - or
rechargeable riveter -VAS 5279B- with attachments D13 and
D14 .
– Remove small punch rivets. Use rechargeable riveter -VAS
5279A- with attachments S1 and E2 from -VAS 5279/2 - or
rechargeable riveter -VAS 5279B- with attachments S1 and
E2 .
56 Rep. Gr.50 - Body - front
Page 63

Protected by copyright. Copying for private or commercial purposes, in part or in whole, is not
permitted unless authorised by AUDI AG. AUDI AG does not guarantee or accept any liability
with respect to the correctness of information in this document. Copyright by AUDI AG.
Audi TT 2007 ➤
Body Repairs - Edition 09.2009
Note
Refer to General information on aluminium regarding punch rivets with one-sided access.
– Separate punch rivet with one-sided access at A-pillar (inner).
– Separate original joint with rechargeable riveter -VAS 5279A- .
5. Suspension strut mounting - Renewal (Coupé and Roadster identical) 57
Page 64

Protected by copyright. Copying for private or commercial purposes, in part or in whole, is not
permitted unless authorised by AUDI AG. AUDI AG does not guarantee or accept any liability
with respect to the correctness of information in this document. Copyright by AUDI AG.
Audi TT 2007 ➤
Body Repairs - Edition 09.2009
Replacement parts
♦ Pop rivets
♦ Punch rivets (self-piercing rivets)
♦ Suspension strut mounting
♦ Body adhesive DA 001 730 A2
Note
Refer to General information on bonding.
Preparing new part
– Prepare flanges on body and new parts for welding.
– Prepare flanges on body and new parts for riveting.
Welding in
– Fix new part on alignment bracket.
58 Rep. Gr.50 - Body - front
Page 65

Protected by copyright. Copying for private or commercial purposes, in part or in whole, is not
permitted unless authorised by AUDI AG. AUDI AG does not guarantee or accept any liability
with respect to the correctness of information in this document. Copyright by AUDI AG.
Note
SG continuous weld seam can also be used in place of riveted
joints.
Riveting in
– Weld windscreen cross member to suspension strut mounting
using shielded arc welding equipment 250A -VAS 6388- : SG
continuous seam.
– Rivet suspension strut mounting to longitudinal member (top
section) using rechargeable riveter -VAS 5279A- .
– Rivet suspension strut mounting to longitudinal member using
rechargeable riveter -VAS 5279A- .
Countersink holes, working inwards from outside. Use recharge‐
able riveter -VAS 5279A- with attachments D15 and D16 from VAS 5279/2 - or rechargeable riveter -VAS 5279B- with
attachments D15 and D16 .
– Weld in new part using shielded arc welding equipment 250A
-VAS 6388- : SG continuous seam.
Audi TT 2007 ➤
Body Repairs - Edition 09.2009
5. Suspension strut mounting - Renewal (Coupé and Roadster identical) 59
Page 66

Protected by copyright. Copying for private or commercial purposes, in part or in whole, is not
permitted unless authorised by AUDI AG. AUDI AG does not guarantee or accept any liability
with respect to the correctness of information in this document. Copyright by AUDI AG.
Audi TT 2007 ➤
Body Repairs - Edition 09.2009
– Weld in at separating cut on plenum chamber using shielded
arc welding equipment 250A -VAS 6388- : SG continuous
seam.
– Weld in new part using shielded arc welding equipment 250A
-VAS 6388- : SG continuous seam.
Rivet in remaining joint using rechargeable riveter -VAS 5279A- .
Countersink holes, working inwards from outside. Use recharge‐
able riveter -VAS 5279A- with attachments D15 and D16 from VAS 5279/2 - or rechargeable riveter -VAS 5279B- with
attachments D15 and D16 .
60 Rep. Gr.50 - Body - front
Page 67

Protected by copyright. Copying for private or commercial purposes, in part or in whole, is not
permitted unless authorised by AUDI AG. AUDI AG does not guarantee or accept any liability
with respect to the correctness of information in this document. Copyright by AUDI AG.
Audi TT 2007 ➤
Body Repairs - Edition 09.2009
5. Suspension strut mounting - Renewal (Coupé and Roadster identical) 61
Page 68

Protected by copyright. Copying for private or commercial purposes, in part or in whole, is not
permitted unless authorised by AUDI AG. AUDI AG does not guarantee or accept any liability
with respect to the correctness of information in this document. Copyright by AUDI AG.
Audi TT 2007 ➤
Body Repairs - Edition 09.2009
RO: 50 52 55 50
6 Longitudinal member for wheel hous‐
ing, upper, inner - Renewal (Coupé
and Roadster identical)
WARNING
Always observe safety precautions.
Safety notes ⇒ General Information; Body Repairs, General Body
Repairs ; Safety notes .
6.1 Tools
Special tools and workshop equipment required
♦ Compact angle grinder -VAS 5167-
♦ Pneumatic glue gun -V.A.G 2005 B-
♦ Shielded arc welding equipment 250A -VAS 6388-
♦ Rechargeable riveter -VAS 5279A-
62 Rep. Gr.50 - Body - front
Page 69

Protected by copyright. Copying for private or commercial purposes, in part or in whole, is not
permitted unless authorised by AUDI AG. AUDI AG does not guarantee or accept any liability
with respect to the correctness of information in this document. Copyright by AUDI AG.
6.2 Procedure
Cutting locations
– Separate original joint with rechargeable riveter -VAS 5279A- .
– Remove large punch rivets. Use rechargeable riveter -VAS
5279A- with attachments D13 and D14 from -VAS 5279/2 - or
rechargeable riveter -VAS 5279B- with attachments D13 and
D14 .
– Remove small punch rivets. Use rechargeable riveter -VAS
5279A- with attachments S1 and E2 from -VAS 5279/2 - or
rechargeable riveter -VAS 5279B- with attachments S1 and
E2 .
– Remove remaining material using compact angle grinder -
VAS 5167- .
Audi TT 2007 ➤
Body Repairs - Edition 09.2009
Replacement part
♦ Upper wheel housing longitudinal member
6. Longitudinal member for wheel housing, upper, inner - Renewal (Coupé and Roadster identical) 63
Page 70

Protected by copyright. Copying for private or commercial purposes, in part or in whole, is not
permitted unless authorised by AUDI AG. AUDI AG does not guarantee or accept any liability
with respect to the correctness of information in this document. Copyright by AUDI AG.
Audi TT 2007 ➤
Body Repairs - Edition 09.2009
Note
Riveted/bonded joint can also be used in place of weld seam.
Welding in
– Weld in upper wheel housing longitudinal member using shiel‐
ded arc welding equipment 250A -VAS 6388- : SG continuous
seam.
64 Rep. Gr.50 - Body - front
Page 71

Protected by copyright. Copying for private or commercial purposes, in part or in whole, is not
permitted unless authorised by AUDI AG. AUDI AG does not guarantee or accept any liability
with respect to the correctness of information in this document. Copyright by AUDI AG.
RO: 50 79 55 00
7 Front longitudinal member - Renewal
(Coupé and Roadster identical)
WARNING
Always observe safety precautions.
Safety notes ⇒ General Information; Body Repairs, General Body
Repairs ; Safety notes .
7.1 Tools
Special tools and workshop equipment required
♦ Compact angle grinder -VAS 5167-
♦ Pneumatic glue gun -V.A.G 2005 B-
Audi TT 2007 ➤
Body Repairs - Edition 09.2009
♦ Shielded arc welding equipment 250A -VAS 6388-
♦ Rechargeable riveter -VAS 5279A-
7. Front longitudinal member - Renewal (Coupé and Roadster identical) 65
Page 72

Protected by copyright. Copying for private or commercial purposes, in part or in whole, is not
permitted unless authorised by AUDI AG. AUDI AG does not guarantee or accept any liability
with respect to the correctness of information in this document. Copyright by AUDI AG.
Audi TT 2007 ➤
Body Repairs - Edition 09.2009
7.2 Procedure
Cutting locations
– Separate original joint using compact angle grinder -VAS
5167- .
– Remove remaining material using compact angle grinder -
VAS 5167- .
– Separate original joint using compact angle grinder -VAS
5167- .
– Remove remaining material using compact angle grinder -
VAS 5167- .
66 Rep. Gr.50 - Body - front
Page 73

Protected by copyright. Copying for private or commercial purposes, in part or in whole, is not
permitted unless authorised by AUDI AG. AUDI AG does not guarantee or accept any liability
with respect to the correctness of information in this document. Copyright by AUDI AG.
Audi TT 2007 ➤
Body Repairs - Edition 09.2009
Replacement part
♦ Longitudinal member
Preparing new parts
– Prepare flanges on body and new parts for welding.
Welding in
– Weld in longitudinal member using shielded arc welding equip‐
ment 250A -VAS 6388- : SG continuous seam.
7. Front longitudinal member - Renewal (Coupé and Roadster identical) 67
Page 74

Protected by copyright. Copying for private or commercial purposes, in part or in whole, is not
permitted unless authorised by AUDI AG. AUDI AG does not guarantee or accept any liability
with respect to the correctness of information in this document. Copyright by AUDI AG.
Audi TT 2007 ➤
Body Repairs - Edition 09.2009
– Weld in new part on bracket set using shielded arc welding
equipment 250A -VAS 6388- : SG continuous seam.
– Weld in connecting bracket using shielded arc welding equip‐
ment 250A -VAS 6388- ; re-establish original joint: SG contin‐
uous seam.
68 Rep. Gr.50 - Body - front
Page 75

Protected by copyright. Copying for private or commercial purposes, in part or in whole, is not
permitted unless authorised by AUDI AG. AUDI AG does not guarantee or accept any liability
with respect to the correctness of information in this document. Copyright by AUDI AG.
Audi TT 2007 ➤
Body Repairs - Edition 09.2009
7. Front longitudinal member - Renewal (Coupé and Roadster identical) 69
Page 76

Protected by copyright. Copying for private or commercial purposes, in part or in whole, is not
permitted unless authorised by AUDI AG. AUDI AG does not guarantee or accept any liability
with respect to the correctness of information in this document. Copyright by AUDI AG.
Audi TT 2007 ➤
Body Repairs - Edition 09.2009
RO: 50 79 55 02
8 Front longitudinal member - Partial
renewal (Coupé and Roadster iden‐
tical)
WARNING
Always observe safety precautions.
Safety notes ⇒ General Information; Body Repairs, General Body
Repairs ; Safety notes .
8.1 Tools
Special tools and workshop equipment required
♦ Pneumatic glue gun -V.A.G 2005 B-
♦ Shielded arc welding equipment 250A -VAS 6388-
♦ Rechargeable riveter -VAS 5279A-
70 Rep. Gr.50 - Body - front
Page 77

Protected by copyright. Copying for private or commercial purposes, in part or in whole, is not
permitted unless authorised by AUDI AG. AUDI AG does not guarantee or accept any liability
with respect to the correctness of information in this document. Copyright by AUDI AG.
♦ Pneumatic sabre saw -V.A.G 1523A-
8.2 Procedure
Cutting locations
– Separate original joint using compact angle grinder -VAS
5167- .
– Remove remaining material using compact angle grinder -
VAS 5167- .
Audi TT 2007 ➤
Body Repairs - Edition 09.2009
8. Front longitudinal member - Partial renewal (Coupé and Roadster identical) 71
Page 78

Protected by copyright. Copying for private or commercial purposes, in part or in whole, is not
permitted unless authorised by AUDI AG. AUDI AG does not guarantee or accept any liability
with respect to the correctness of information in this document. Copyright by AUDI AG.
Audi TT 2007 ➤
Body Repairs - Edition 09.2009
Replacement part
♦ Longitudinal member (bottom section): part section
Preparing new parts
– Prepare flanges on body and new parts for welding.
Welding in
– Weld in longitudinal member at front using shielded arc weld‐
ing equipment 250A -VAS 6388- : SG continuous seam.
72 Rep. Gr.50 - Body - front
Page 79

Protected by copyright. Copying for private or commercial purposes, in part or in whole, is not
permitted unless authorised by AUDI AG. AUDI AG does not guarantee or accept any liability
with respect to the correctness of information in this document. Copyright by AUDI AG.
RO: 50 80 55 00
9 Longitudinal member (front section) -
Renewal (Coupé and Roadster iden‐
tical)
WARNING
Always observe safety precautions.
Safety notes ⇒ General Information; Body Repairs, General Body
Repairs ; Safety notes .
9.1 Tools
Special tools and workshop equipment required
♦ Pneumatic sabre saw -V.A.G 1523A-
Audi TT 2007 ➤
Body Repairs - Edition 09.2009
9. Longitudinal member (front section) - Renewal (Coupé and Roadster identical) 73
Page 80

Protected by copyright. Copying for private or commercial purposes, in part or in whole, is not
permitted unless authorised by AUDI AG. AUDI AG does not guarantee or accept any liability
with respect to the correctness of information in this document. Copyright by AUDI AG.
Audi TT 2007 ➤
Body Repairs - Edition 09.2009
9.2 Procedure
– Detach part.
WARNING
Take care not to damage aluminium node castings.
Replacement parts
♦ Front longitudinal member
♦ Connecting collar with bolts
74 Rep. Gr.50 - Body - front
Page 81

Protected by copyright. Copying for private or commercial purposes, in part or in whole, is not
permitted unless authorised by AUDI AG. AUDI AG does not guarantee or accept any liability
with respect to the correctness of information in this document. Copyright by AUDI AG.
Audi TT 2007 ➤
Body Repairs - Edition 09.2009
Bolting on
– Match length if necessary. Distance from node casting at least
1 mm.
Preparing new parts
Note
Threads must be free of paint and grease.
– Insert longitudinal member with connecting collar in node cast‐
ing.
Note
Align longitudinal member with bolted-on parts.
– Hand-tighten bolts.
– Tighten bolts 1 - 5. (Tightening torque 24 Nm).
– Seal joint between longitudinal member and node casting.
9. Longitudinal member (front section) - Renewal (Coupé and Roadster identical) 75
Page 82

Protected by copyright. Copying for private or commercial purposes, in part or in whole, is not
permitted unless authorised by AUDI AG. AUDI AG does not guarantee or accept any liability
with respect to the correctness of information in this document. Copyright by AUDI AG.
Audi TT 2007 ➤
Body Repairs - Edition 09.2009
76 Rep. Gr.50 - Body - front
Page 83

Protected by copyright. Copying for private or commercial purposes, in part or in whole, is not
permitted unless authorised by AUDI AG. AUDI AG does not guarantee or accept any liability
with respect to the correctness of information in this document. Copyright by AUDI AG.
51 – Body - centre
RO: 51 03 55 00
1 Roof - Renewal
WARNING
Always observe safety precautions.
Safety notes ⇒ General Information; Body Repairs, General Body
Repairs ; Safety notes .
1.1 Tools
Special tools and workshop equipment required
♦ Compact angle grinder -VAS 5167-
♦ Drill -VAS 5830-
♦ Grinder -VAS 5170-
♦ Pneumatic glue gun -V.A.G 2005 B-
Audi TT 2007 ➤
Body Repairs - Edition 09.2009
♦ Shielded arc welding equipment 250A -VAS 6388-
♦
1. Roof - Renewal 77
Page 84

Protected by copyright. Copying for private or commercial purposes, in part or in whole, is not
permitted unless authorised by AUDI AG. AUDI AG does not guarantee or accept any liability
with respect to the correctness of information in this document. Copyright by AUDI AG.
Audi TT 2007 ➤
Body Repairs - Edition 09.2009
♦ Rechargeable riveter -VAS 5279A-
♦ Tensioning strap -T10038-
♦ Pneumatic sabre saw -V.A.G 1523A-
1.2 Procedure
Cutting locations
– Roughly cut out roof using pneumatic sabre saw -V.A.G
1523A- .
– Separate original joint with rechargeable riveter -VAS 5279A- .
– Remove large punch rivets. Use rechargeable riveter -VAS
5279A- with attachments D13 and D14 from -VAS 5279/2 - or
rechargeable riveter -VAS 5279B- with attachments D13 and
D14 .
– Remove small punch rivets. Use rechargeable riveter -VAS
5279A- with attachments S1 and E2 from -VAS 5279/2 - or
rechargeable riveter -VAS 5279B- with attachments S1 and
E2 .
– Carefully bend open half-sections of roof until brazed joint
breaks.
– Remove remaining material.
78 Rep. Gr.51 - Body - centre
Page 85

Protected by copyright. Copying for private or commercial purposes, in part or in whole, is not
permitted unless authorised by AUDI AG. AUDI AG does not guarantee or accept any liability
with respect to the correctness of information in this document. Copyright by AUDI AG.
Audi TT 2007 ➤
Body Repairs - Edition 09.2009
– Remove remaining material on roof frame using compact an‐
gle grinder -VAS 5167- .
Caution
Take care not to damage the roof frame when removing remain‐
ing material with the compact angle grinder -VAS 5167- .
1. Roof - Renewal 79
Page 86

Protected by copyright. Copying for private or commercial purposes, in part or in whole, is not
permitted unless authorised by AUDI AG. AUDI AG does not guarantee or accept any liability
with respect to the correctness of information in this document. Copyright by AUDI AG.
Audi TT 2007 ➤
Body Repairs - Edition 09.2009
Replacement parts
♦ Roof
♦ 4 Clamping bolts
♦ Silicone remover LSE 020 100 A3
♦ Body adhesive DA 001 730 A2
♦ Punch rivets (self-piercing rivets)
Note
♦
It is important to keep to the following procedure to ensure a
satisfactory and effective roof repair.
♦
Bonded areas must not be treated with filler coat before bond‐
ing in centre roof section.
Reference for dimensions A + B is edge of roof.
Dimension A = 311 mm
Dimension B = 571 mm
Dimension C = 11.3 mm from inner roof frame
80 Rep. Gr.51 - Body - centre
Page 87

Protected by copyright. Copying for private or commercial purposes, in part or in whole, is not
permitted unless authorised by AUDI AG. AUDI AG does not guarantee or accept any liability
with respect to the correctness of information in this document. Copyright by AUDI AG.
– Press out rivets at this location with rechargeable riveter -VAS
5279A- .
– Remove large punch rivets. Use rechargeable riveter -VAS
5279A- with attachments D13 and D14 from -VAS 5279/2 - or
rechargeable riveter -VAS 5279B- with attachments D13 and
D14 .
– Remove small punch rivets. Use rechargeable riveter -VAS
5279A- with attachments S1 and E2 from -VAS 5279/2 - or
rechargeable riveter -VAS 5279B- with attachments S1 and
E2 .
– Drill holes for roof support using drill -VAS 5830- , ∅6.5 mm.
Audi TT 2007 ➤
Body Repairs - Edition 09.2009
Preparing new part
– Clean roof side members and new roof panel (replacement
part) with silicone remover LSE 020 100 A3.
Bonding in roof
– Mask off roof side members with adhesive tape at joint with
roof panel to avoid unnecessary sanding.
– Mask off replacement roof panel with adhesive tape at joint
with roof side members to avoid unnecessary sanding.
1. Roof - Renewal 81
Page 88

Protected by copyright. Copying for private or commercial purposes, in part or in whole, is not
permitted unless authorised by AUDI AG. AUDI AG does not guarantee or accept any liability
with respect to the correctness of information in this document. Copyright by AUDI AG.
Audi TT 2007 ➤
Body Repairs - Edition 09.2009
– Apply body adhesive -DA 001 730 A2- to roof cross members
at front and rear.
– Prepare adhesive cartridges required for bonding.
– Cut static mixer from body adhesive set -DA 001 730 A2- down
to 4th notch to obtain required bead cross-section.
– Apply adhesive beads to roof side members with pneumatic
glue gun -V.A.G 2005 B- .
82 Rep. Gr.51 - Body - centre
Page 89

Protected by copyright. Copying for private or commercial purposes, in part or in whole, is not
permitted unless authorised by AUDI AG. AUDI AG does not guarantee or accept any liability
with respect to the correctness of information in this document. Copyright by AUDI AG.
Audi TT 2007 ➤
Body Repairs - Edition 09.2009
– Tension two tensioning straps -T10038- across the roof.
– Use a plastic wedge to obtain the required depth.
Note
To avoid damage to the centre roof section or side panel frame, the tensioning straps should not be too tight.
1. Roof - Renewal 83
Page 90

Protected by copyright. Copying for private or commercial purposes, in part or in whole, is not
permitted unless authorised by AUDI AG. AUDI AG does not guarantee or accept any liability
with respect to the correctness of information in this document. Copyright by AUDI AG.
Audi TT 2007 ➤
Body Repairs - Edition 09.2009
– Rivet in roof at front using rechargeable riveter -VAS 5279A- .
Countersink holes, working inwards from outside. Use recharge‐
able riveter -VAS 5279A- with attachments D15 and D16 from VAS 5279/2 - or rechargeable riveter -VAS 5279B- with
attachments D15 and D16 .
84 Rep. Gr.51 - Body - centre
Page 91

Protected by copyright. Copying for private or commercial purposes, in part or in whole, is not
permitted unless authorised by AUDI AG. AUDI AG does not guarantee or accept any liability
with respect to the correctness of information in this document. Copyright by AUDI AG.
Audi TT 2007 ➤
Body Repairs - Edition 09.2009
– Rivet in roof at rear using rechargeable riveter -VAS 5279A- .
Countersink holes, working inwards from outside. Use recharge‐
able riveter -VAS 5279A- with attachments D15 and D16 from VAS 5279/2 - or rechargeable riveter -VAS 5279B- with
attachments D15 and D16 .
1. Roof - Renewal 85
Page 92

Protected by copyright. Copying for private or commercial purposes, in part or in whole, is not
permitted unless authorised by AUDI AG. AUDI AG does not guarantee or accept any liability
with respect to the correctness of information in this document. Copyright by AUDI AG.
Audi TT 2007 ➤
Body Repairs - Edition 09.2009
Note
♦
After completing the riveted joint, the vehicle must be left
standing for 8 hours on a level surface at a room temperature
of 15° C to allow the adhesive components to harden (curing
time).
♦
Do not continue working on the vehicle until the curing time
has elapsed.
Fit roof support in pre-drilled holes.
86 Rep. Gr.51 - Body - centre
Page 93

Protected by copyright. Copying for private or commercial purposes, in part or in whole, is not
permitted unless authorised by AUDI AG. AUDI AG does not guarantee or accept any liability
with respect to the correctness of information in this document. Copyright by AUDI AG.
Audi TT 2007 ➤
Body Repairs - Edition 09.2009
1. Roof - Renewal 87
Page 94

Protected by copyright. Copying for private or commercial purposes, in part or in whole, is not
permitted unless authorised by AUDI AG. AUDI AG does not guarantee or accept any liability
with respect to the correctness of information in this document. Copyright by AUDI AG.
Audi TT 2007 ➤
Body Repairs - Edition 09.2009
RO: 51 35 55 00
2 Roof side member - Renewal
WARNING
Always observe safety precautions.
Safety notes ⇒ General Information; Body Repairs, General Body
Repairs ; Safety notes .
The repair “Foam-filling roof side member” must be entered in the
Service record section of the Service Schedule under Workshop
remarks.
2.1 Tools
WARNING
When renewing the roof side member, a structural foam must
be applied on vehicles up to chassis number
TRUZZZ8JZ81044000 to provide reinforcement for a roof car‐
rier.
It is important to keep exactly to the specified sequence.
Note
♦
After applying the foam fill, the vehicle must be left standing
on a flat surface for 24 hours at a room temperature of 15° C
to allow the epoxy hard foam to harden (curing time).
♦
Do not continue working on the vehicle until the curing time
has elapsed.
Special tools and workshop equipment required
♦ Shielded arc welding equipment 250A -VAS 6388-
88 Rep. Gr.51 - Body - centre
Page 95

Protected by copyright. Copying for private or commercial purposes, in part or in whole, is not
permitted unless authorised by AUDI AG. AUDI AG does not guarantee or accept any liability
with respect to the correctness of information in this document. Copyright by AUDI AG.
♦ Rechargeable riveter -VAS 5279A-
♦ Pneumatic sabre saw -V.A.G 1523A-
Audi TT 2007 ➤
Body Repairs - Edition 09.2009
2.2 Procedure
Left roof side member foam-filled: yes / no
Right roof side member foam-filled: yes / no
Cutting locations
– Separate original joint with rechargeable riveter -VAS 5279A- .
– Remove large punch rivets. Use rechargeable riveter -VAS
5279A- with attachments D13 and D14 from -VAS 5279/2 - or
rechargeable riveter -VAS 5279B- with attachments D13 and
D14 .
– Remove small punch rivets. Use rechargeable riveter -VAS
5279A- with attachments S1 and E2 from -VAS 5279/2 - or
rechargeable riveter -VAS 5279B- with attachments S1 and
E2 .
– Make separating cuts using pneumatic sabre saw -V.A.G
1523A- .
2. Roof side member - Renewal 89
Page 96

Protected by copyright. Copying for private or commercial purposes, in part or in whole, is not
permitted unless authorised by AUDI AG. AUDI AG does not guarantee or accept any liability
with respect to the correctness of information in this document. Copyright by AUDI AG.
Audi TT 2007 ➤
Body Repairs - Edition 09.2009
Replacement part
♦ Roof side member (sub-part)
Preparing new part
Prepare new part for riveting.
Riveting in
– Rivet in roof side member using rechargeable riveter -VAS
5279A- .
Countersink holes, working inwards from outside. Use recharge‐
able riveter -VAS 5279A- with attachments D15 and D16 from VAS 5279/2 - or rechargeable riveter -VAS 5279B- with
attachments D15 and D16 .
– Weld in roof side member using shielded arc welding equip‐
ment 250A -VAS 6388- : SG continuous seam.
90 Rep. Gr.51 - Body - centre
Page 97

Protected by copyright. Copying for private or commercial purposes, in part or in whole, is not
permitted unless authorised by AUDI AG. AUDI AG does not guarantee or accept any liability
with respect to the correctness of information in this document. Copyright by AUDI AG.
Audi TT 2007 ➤
Body Repairs - Edition 09.2009
2.3 Foam-filling roof side member
2.3.1 Procedure
The repair “Foam-filling roof side member” must be entered in the
Service record section of the Service Schedule under Workshop
remarks.
Left roof side member foam-filled: yes / no
Right roof side member foam-filled: yes / no
Note
♦
After riveting in, the vehicle must be left standing on a flat sur‐
face for 24 hours at a room temperature of 15° C to allow the
bonded components to harden (curing time).
♦
Do not continue working on the vehicle until the curing time
has elapsed.
2. Roof side member - Renewal 91
Page 98

Protected by copyright. Copying for private or commercial purposes, in part or in whole, is not
permitted unless authorised by AUDI AG. AUDI AG does not guarantee or accept any liability
with respect to the correctness of information in this document. Copyright by AUDI AG.
Audi TT 2007 ➤
Body Repairs - Edition 09.2009
Note
The instructions listed here apply to the left side of the vehicle.
The procedure for the right side is similar.
It is important to keep exactly to the procedure as described:
Heat the cartridge of structural foam material for 30 minutes in a
water bath at a constant temperature of approx. 60 °C.
The cartridge can also be heated at 60° C in a suitable oven, if
available.
Remove inner A-pillar trim.
Remove roof trim strips.
Mask rivet holes with commercially available adhesive tape.
Prepare static mixer for foaming operation.
Fill holes with foam and then immediately re-fit bolts.
Install inner A-pillar trim.
Install roof trim strips.
Replacement parts
♦ 4 x 2-component epoxy hard foam -D 506 110 A2-
♦ 22x pop rivet N 910 197 01
Special tools and workshop equipment required
♦ Drill -VAS 5830-
♦ Removal wedge -3409-
♦ Hand-cartridge gun -V.A.G 1628-
92 Rep. Gr.51 - Body - centre
Page 99

Protected by copyright. Copying for private or commercial purposes, in part or in whole, is not
permitted unless authorised by AUDI AG. AUDI AG does not guarantee or accept any liability
with respect to the correctness of information in this document. Copyright by AUDI AG.
♦ Pop rivet pliers -VAS 5072-
– Heat the cartridge of structural foam material for 30 minutes in
a water bath at a constant temperature of approx. 60 °C.
The cartridge can also be heated at 60° C in a suitable oven, if
available.
1 - Cartridge of 2-component
structural foam material
– Open cap.
Audi TT 2007 ➤
Body Repairs - Edition 09.2009
2 - Static mixer
3 - Extension hose
4 - Adapter
Note
5 - Union nut
– Screw onto structural
foam cartridge -1- to‐
gether with static mixer
-2-.
Removing upper A-pillar trim
Special tools and workshop equipment required
2. Roof side member - Renewal 93
Page 100

Protected by copyright. Copying for private or commercial purposes, in part or in whole, is not
permitted unless authorised by AUDI AG. AUDI AG does not guarantee or accept any liability
with respect to the correctness of information in this document. Copyright by AUDI AG.
Audi TT 2007 ➤
Body Repairs - Edition 09.2009
♦ Removal wedge -3409-
Removing
– Unclip C-pillar trim -1- in area adjacent to upper A-pillar trim
-2-.
– Starting at top, unclip upper A-pillar trim -2- using removal
wedge -3409- .
– Lift out upper A-pillar trim -2-.
Installing
Install in reverse sequence. Note the following:
Note
♦
If any trim clips remain seated in the body mounting points,
they should be removed and re-fitted in the trim.
♦
Check the clips for damage or deformation and renew if nec‐
essary.
– Start by inserting upper A-pillar trim -1- in ribbed section of
dash panel -2- in direction of -arrow-.
– Clip upper A-pillar trim -2- into place and fold lip of door seal
-3- over upper A-pillar trim -2-.
Removing roof trim strip
94 Rep. Gr.51 - Body - centre
 Loading...