

Page 1
Audi RS 4 Cabriolet
Quick reference guide
Page 2
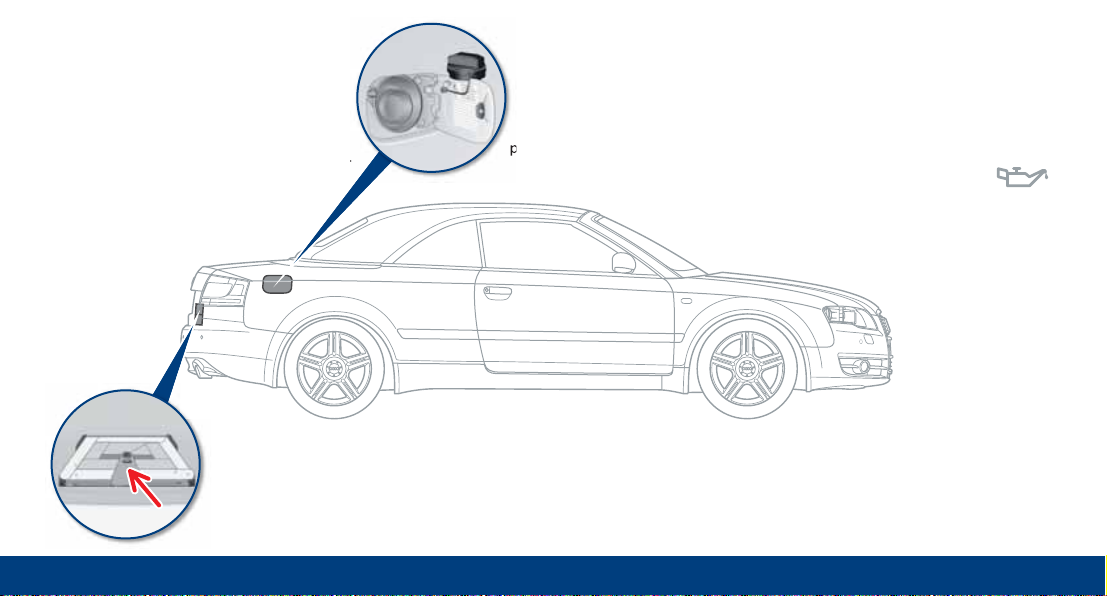
Fuel
(see sticker)
Tyre pressures
(see sticker on door
pillar on driver side)
Fuel tank flap
To open:
Press the right side of the flap.
To close:
Press the tank flap until you hear
it click into place.
Engine oil
The correct oil specifications and engine oil
capacity are listed in
the Performance,
weights and dimen -
sions section of the
Owner’s Manual.
Warning triangle
The compartment for the warning
triangle is located inside the boot lid.
Page 3
Welcome
Dear Audi Driver,
This quick reference guide gives you
an overview of the main features and
controls of your vehicle. However, it
cannot replace the detailed Owner’s
Manual which contains important
information and safety warnings.
Please refer to your Owner's Manual
for detailed information on your vehicle.
You will find everything you need to
know about the radio, CD, navigation, TV
and telephone functions in the Operating
Manual for your sound system or
navigation system.
We wish you safe and enjoyable
motoring with your new Audi.
AUDI AG
Page 4
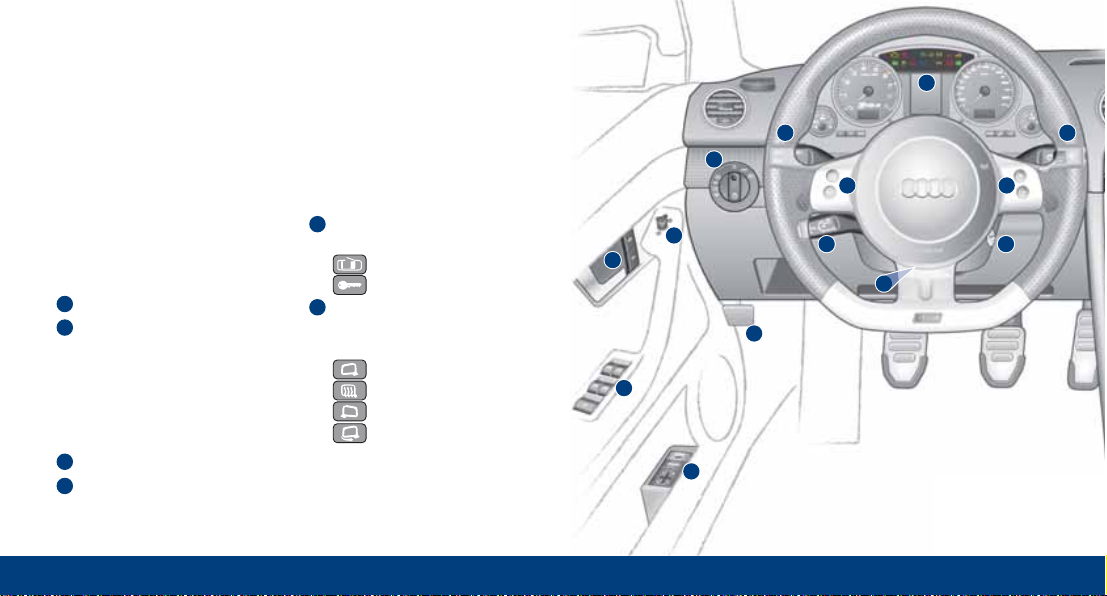
Controls and
displays
Buttons for seat memory
Electric windows
To set the desired position:
Press/pull to the first stop
and hold.
„One-touch“ function:
Press/pull briefly to the
second stop.
Bonnet lock release
Steering wheel position
adjuster
4
3
1
2
Door handle and
central locking switch
Unlock
Lock
Adjuster for exterior
mirrors
Turn the adjuster for:
Left exterior mirror
Exterior mirror heating
Right exterior mirror
Exterior mirror
retraction
Press the adjuster to move
the mirror glass in the
desired direction.
5
6
1
2
3
5
6
7
8 8
9
10
11
13
4
12
Page 5
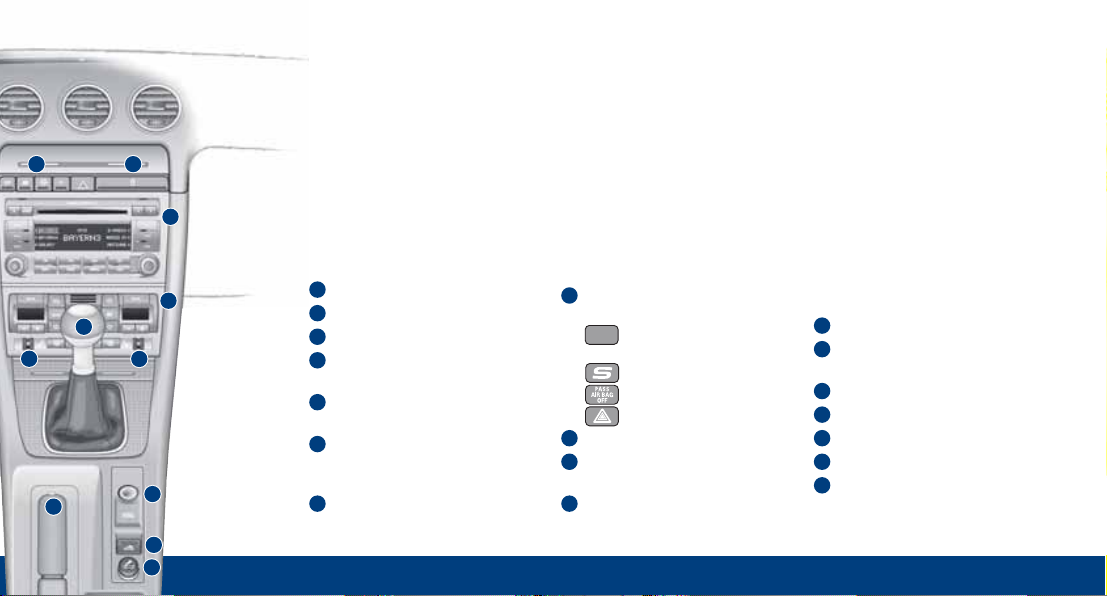
Overview
Driver’s seat heating
Front passenger’s seat
heating
Gear lever
Handbrake
START button
Power-operated soft top
Cigarette lighter/
electrical socket
20
22
24
23
21
19
18
Switches and warning
lamps for:
Electronic stabilisation
program
Sport mode
Passenger airbag off
Hazard warning lights
Storage tray
Sound system or
navigation system
Air conditioner
17
16
15
14
Cruise control system
Controls on steering wheel
Light switch
Turn signal and main beam
lever
Instruments and warning/
indicator lamps
Windscreen wipers/washer
and buttons for on-board
computer
Ignition lock
10
9
13
12
11
8
7
14 15
16
17
18
20
21
23
22
24
19
ESP
Page 6
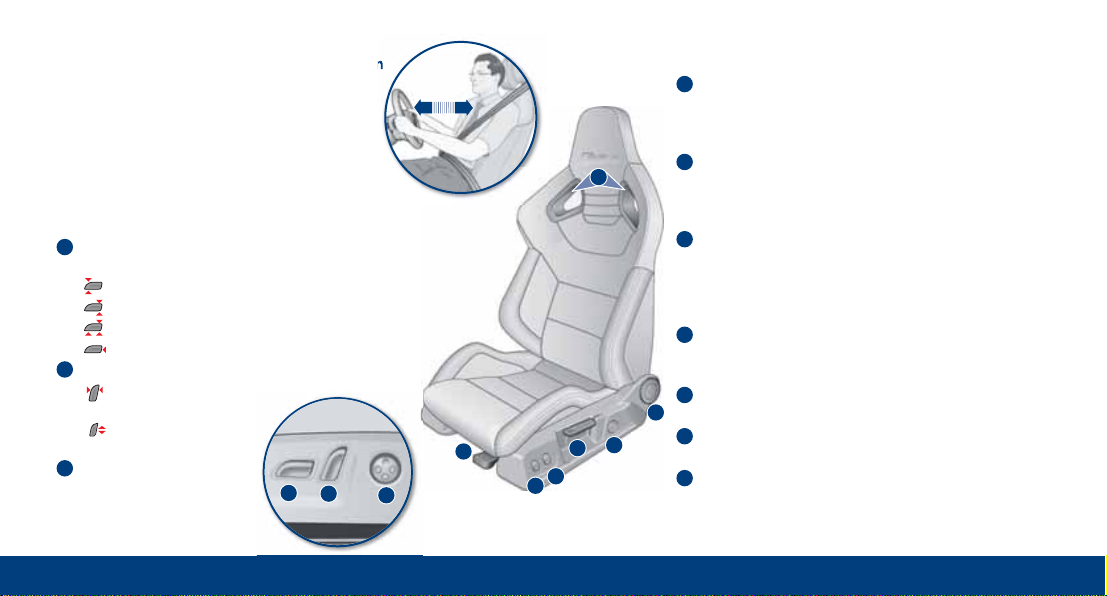
Sitting position
Sit in a normal upright position and
do not sit too close to the steering
wheel. If necessary, also adjust the
position of the steering wheel.
Seat adjustment
Electric seat adjustment
To adjust seat height and move seat backwards
or forwards:
Front of seat cushion up/down
Rear of seat cushion up/down
Seat up/down
Seat forwards/backwards
To adjust backrest:
Backrest further upright/
further reclined
Head restraint
up/down
To adjust lumbar
support:
Press the appropriate
part of the switch.
2
3
1
Seat adjustment for RS bucket seat (sports seat)
To move seat backwards or forwards:
Lift the lever and move the seat. Then release the
lever and move the seat further until the catch
engages.
To inflate and deflate side padding on seat:
Press the control upwards or downwards to
inflate or deflate the side padding on the seat as
desired.
To inflate and deflate backrest side padding on
seat:
Press the control upwards or downwards to
inflate or deflate the backrest side padding on
the seat as desired.
To adjust seat height:
Lift or press the lever repeatedly until the seat
reaches the desired height.
To adjust lumbar support:
Press the appropriate part of the switch.
To adjust backrest:
Take your weight off the backrest and turn the knob.
Easy entry function:
Lift the lever and fold the backrest down/return
it to its upright position.
10
9
8
7
6
5
4
1
2
min.
25 cm
10
9
8
4
3
7
6
5
Page 7
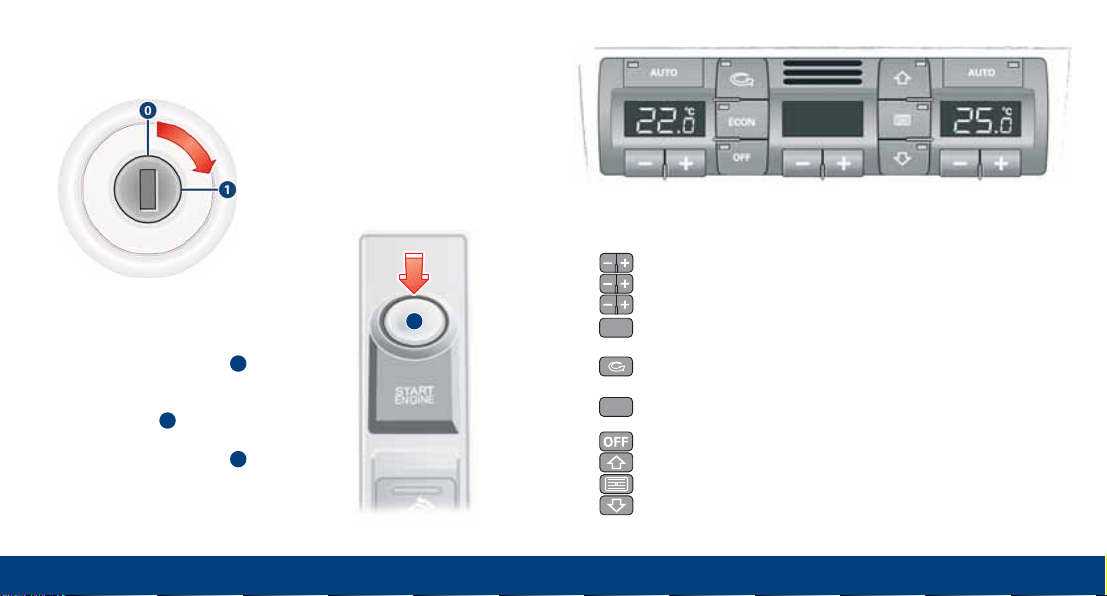
First steps
Starting the engine
To switch on the ignition:
Turn the key to position .
To start the engine:
Press the clutch and press and hold the
START button until the engine starts.
To switch off the engine:
Turn the key to position .
2
0
1
Air conditioner
Switches for air conditioner
Buttons on left: Temperature selection for left side
Buttons on right: Temperature selection for right side
Buttons in centre: Blower speed
Automatic mode
Set the desired temperature and press the button
Air recirculation
Circulates and filters the air in the interior of the vehicle
ECON mode
Activates/deactivates air cooling
To deactivate the air conditioner
Air to the windows
Air from the dashboard outlets
Air to the footwells
ECON
AUTO
2
Page 8
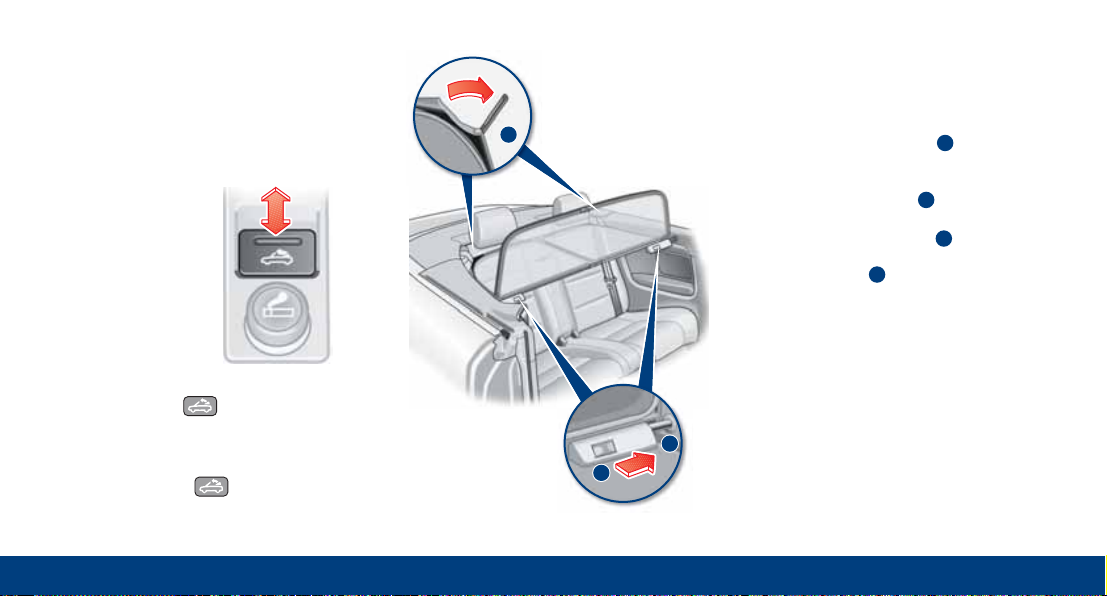
Windbreak
Setting up:
p Take the windbreak out of the storage
bag (luggage compartment).
p Fold the two side sections outwards.
p Pull out the retainer pegs (left/right)
and hold the windbreak in a horizontal
position against the backrest upholstery.
p Slide the retainer pegs (left/right) all
the way into the mountings.
p Press the release catches (left/right)
and slide the locking pins into the
mounting holes at the sides.
p Fold the vertical section of the windbreak
into the fully upright position.
Removing:
Follow the instructions in reverse order.
C
B
A
A
Power-operated
soft top
To open the soft top:
Switch on the ignition.
Pull and hold the switch until the
soft top is fully open.
To close the soft top:
Switch on the ignition.
Press and hold the switch until the
soft top is fully closed.
A
C
B
Page 9
Technology
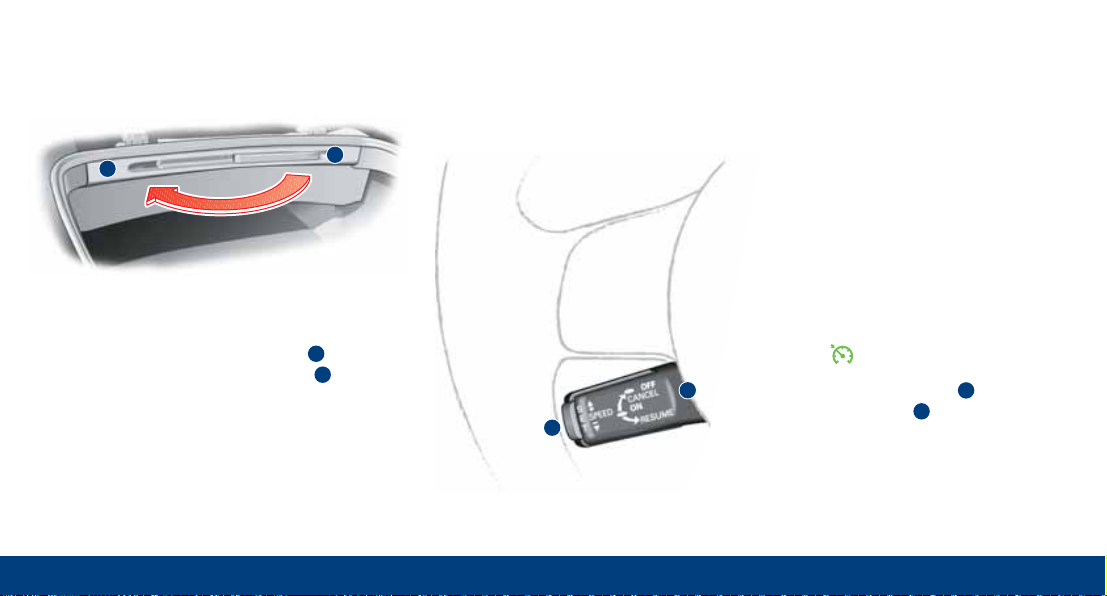
Cruise control
system
When the system is switched on, the
indicator lamp appears in the instrument
cluster.
To switch on/off: Pull/press lever .
To set speed: Press button .
To adjust stored speed: Press lever up (faster)
or down (slower).
1
2
1
2
The storage box can be raised in order to
extend the luggage compartment.
The soft top must be closed!
To raise: Slide the lever to position .
To lower: Slide the lever to position .
B
A
Variable
soft top storage box
A
B
Page 10
1
2
2
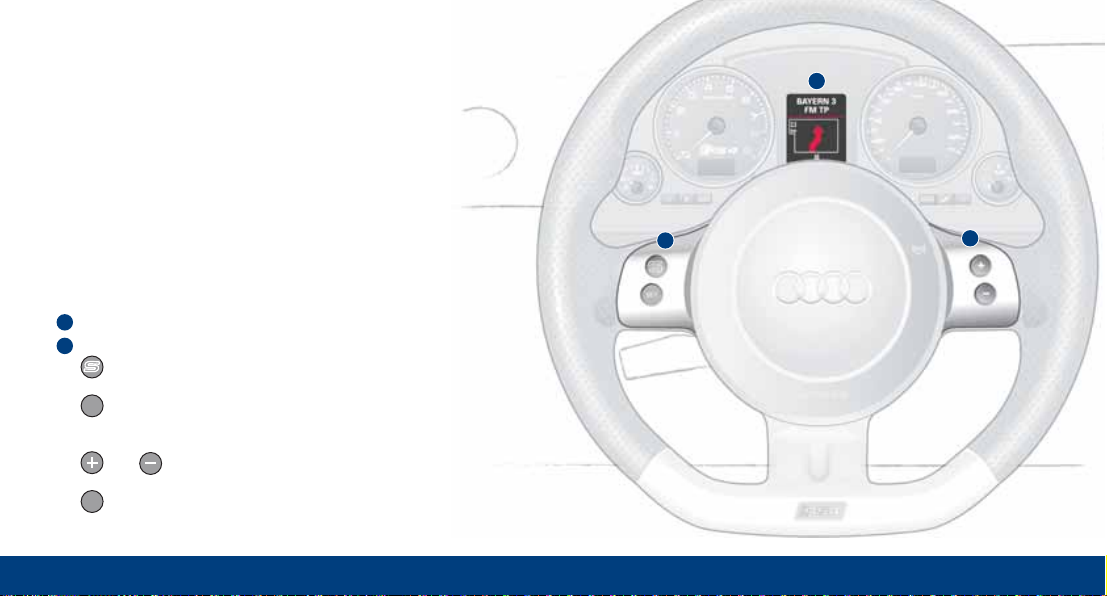
Audi Navigation System plus
Components
Driver information system
Controls on steering wheel
button: Press briefly to switch the sport mode on or
off.
button: Briefly press repeatedly to switch between the
active audio source and the navigation, telephone and
on-board computer functions.
and buttons: Briefly press repeatedly to scroll
through the on-board computer displays.
button: Press briefly to activate the selected menu.
SET
SET
2
1
Page 11
3
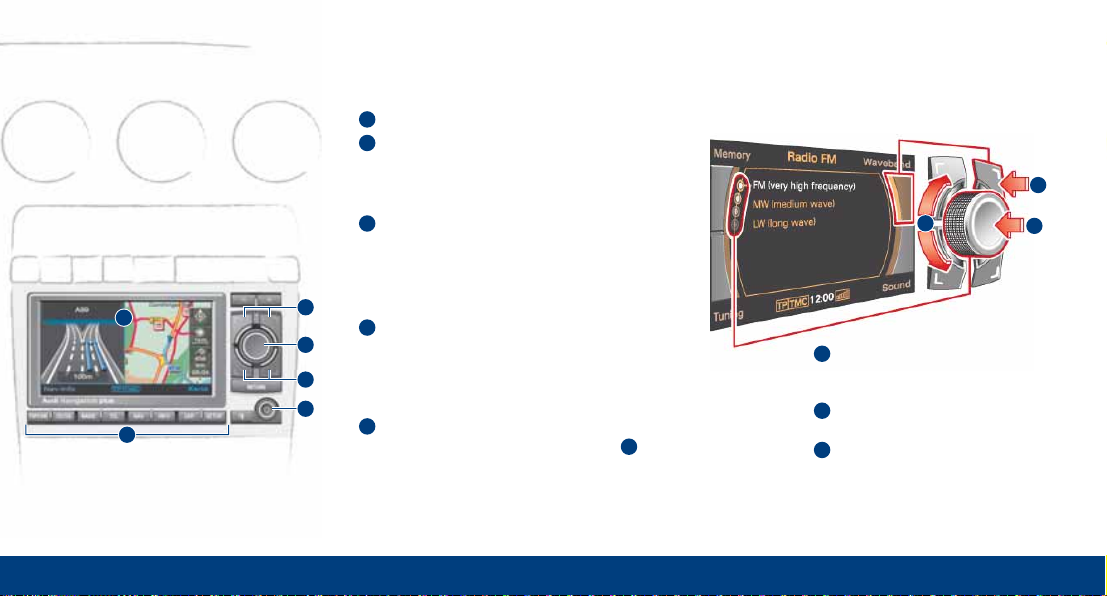
Operating logic
The operating logic for
accessing the functions is
always the same.
To call up the menu in a
corner of the display: Press
the corresponding button.
To select: Turn the rotary
pushbutton.
To confirm: Press the rotary
pushbutton.
A
C
B
C
A
B
Display
Function selector buttons
Press one of the buttons
(e.g. RADIO) to activate
the desired mode.
ON/OFF button
To switch on: Press briefly.
To adjust volume: Turn.
To mute: Press briefly.
To switch off: Press and hold.
Control buttons
To activate one of the functions
shown in the four corners of
the display, press the control
button for that corner of the display.
Rotary pushbutton
To select a menu item on display :
Turn the rotary pushbutton.
To confirm selection:
Press the rotary pushbutton.
3
7
5
6
4
3
Infotainment
6
7
6
5
4
Page 12
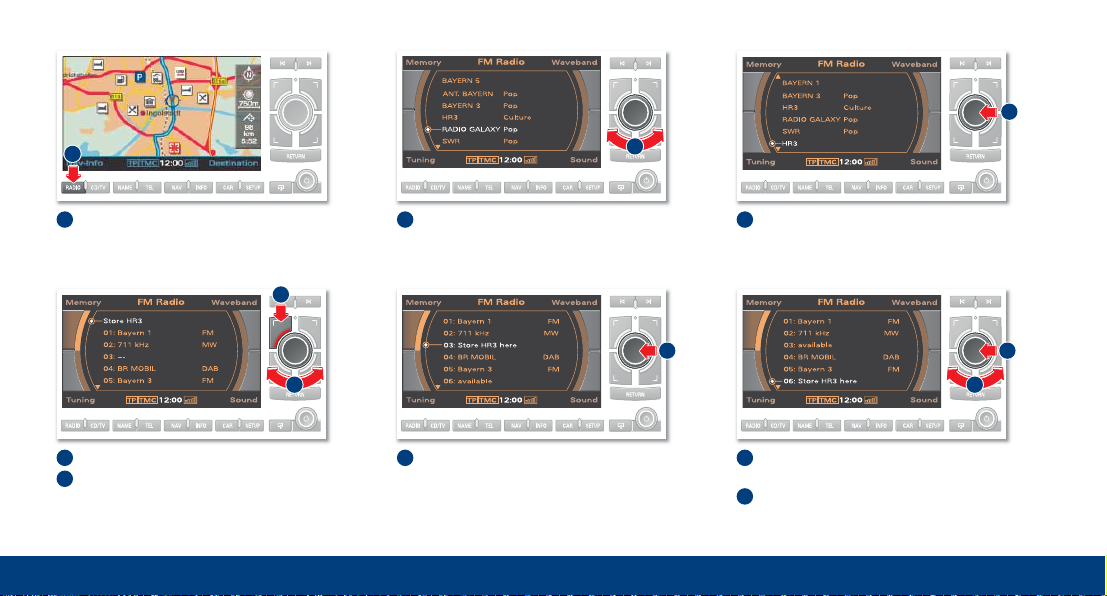
Turn the rotary pushbutton and select
the desired memory position.
Press the rotary push button to confirm.
8
7
Press the control button for ”Memory”.
Turn the rotary pushbutton and, if
desired, select ”Store <station name>”.
5
4
Press the rotary pushbutton. The next
free position in the memory list will be
highlighted.
6
Storing a radio station
Press the RADIO function selector
button.
1
Press the rotary pushbutton to confirm.
3
Turn the rotary pushbutton and select
the desired station.
2
1
2
3
4
6
5 7
8
Page 13
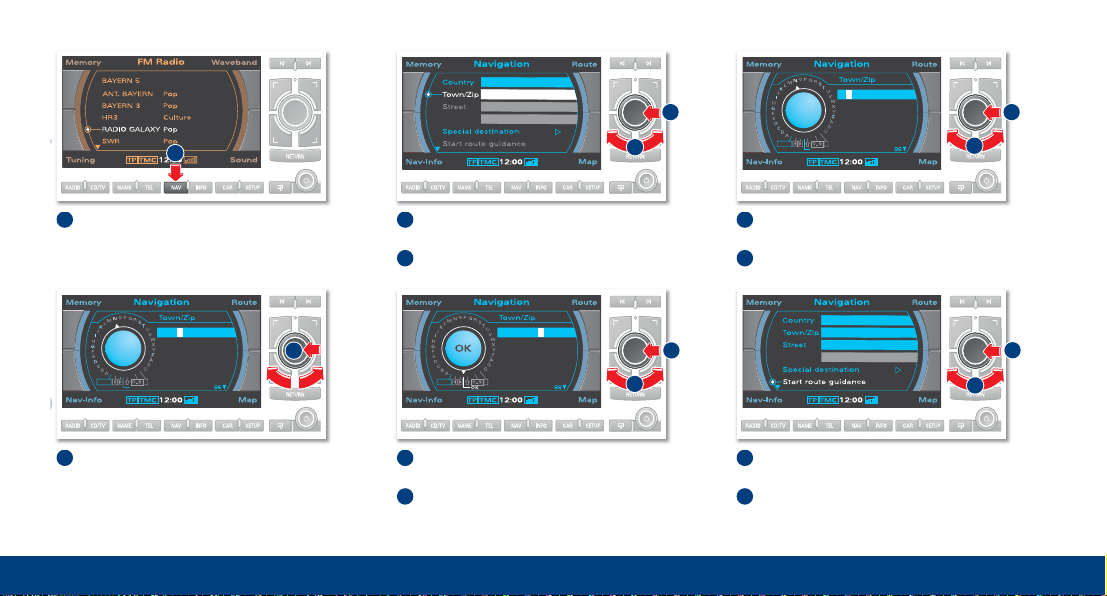
Infotainment
Press the NAV function selector button.
1
Turn the rotary pushbutton and select
the first letter of the destination town.
Press the rotary pushbutton to confirm.
5
4
Select ”Start route guidance” from the
menu.
Press the rotary pushbutton to confirm.
The route will be calculated.
10
9
Turn the rotary pushbutton and select
”Town/ZIP”.
Press the rotary pushbutton to confirm.
3
2
Repeat the above step to enter the
remaining letters of the destination
town until the name of the desired
town appears on the display.
6
When you have entered the town, turn
the rotary pushbutton and select ”OK”.
Press the rotary pushbutton to confirm.
8
7
Starting the navigation system
Germany
M
MÜNCH-LEU…
MÜNCHAUR…
MÜNCHBERG
MÜNCHEBERG
DEL
LIST
N
MÜNCHEN/MÜNCHEN (…
Centre
Germany
132
5
467
8910
N
DEL
LIST
MÜN
MÜNCH-LEU…
MÜNCHAUR…
MÜNCHBERG
MÜNCHEBERG
MÜNCHEN
MÜNCH-LEU…
MÜNCHAUR…
MÜNCHBERG
MÜNCHEBERG
DEL
Page 14
Functions
Establishing a BluetoothTMconnection
for a mobile phone
You can quickly connect a Bluetooth
mobile phone to the onboard phone
system on your navigation system:
p Switch on the ignition, navigation
system and mobile phone.
p On your mobile phone, select the menu
that looks for Bluetooth devices (e.g.
”Hands-free”).
p On the mobile phone, select ”Audi UHV”
and confirm.
p Enter the PIN ”1234” on your mobile
phone.
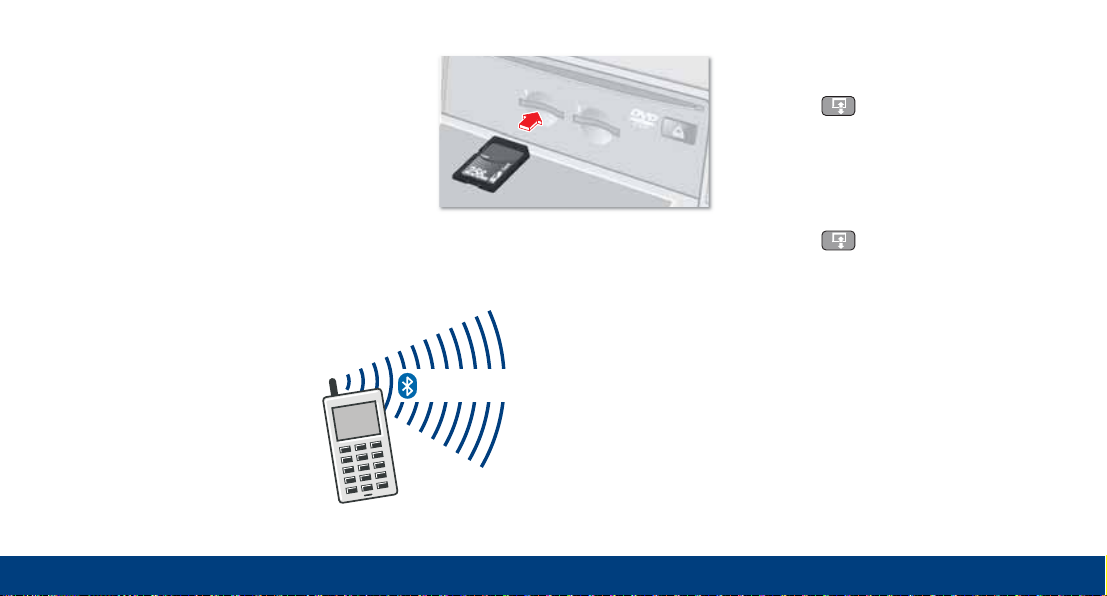
Memory cards
Loading:
p Press the button to open the
display.
p Insert the memory card into the reader
slot as shown in the illustration and
press in the memory card until you feel
it click into place.
Removing:
p Press the button to open the
display.
p Press in the memory card. The card will
be released and can then be removed
from the reader slot.
Bluetooth
©
Infotainment
Page 15
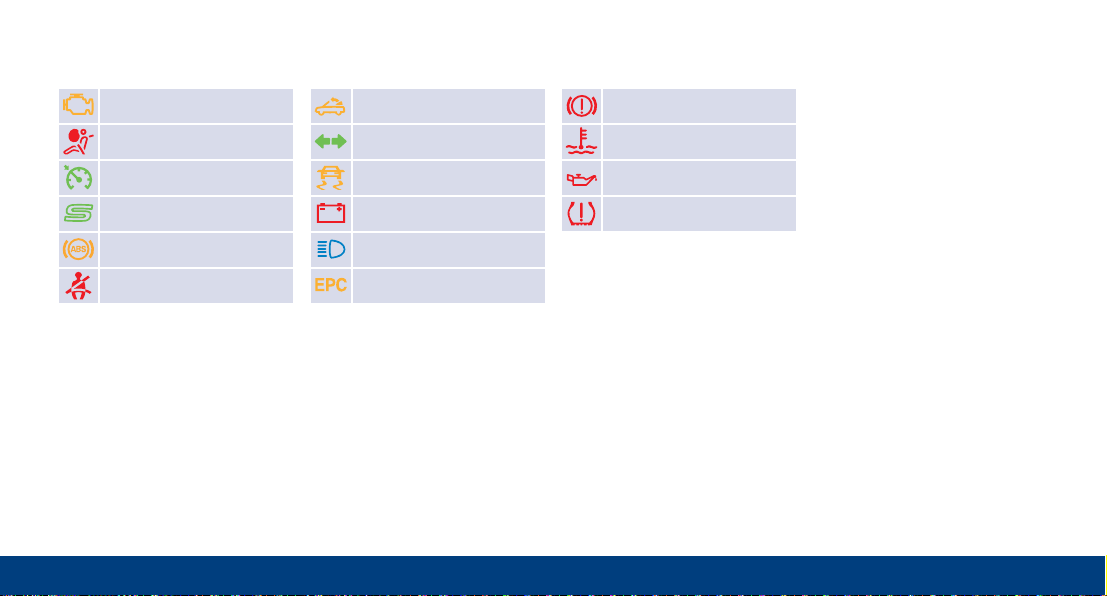
Warning and indicator lamps
© 2007 AUDI AG
AUDI AG reserves the right to alter any part of the vehicle, its equipment and technical specifications.
No legal commitment can be implied by the information, illustrations or descriptions in this publication.
No part of this publication may be reprinted, reproduced or translated without the written permission
of AUDI AG. All rights under the laws of copyright are expressly reserved by AUDI AG. Subject to alter ation
and amendment. Concept and layout: Pfriemer GmbH. Printed in Germany.
If one of these red symbols lights up in the
display while you are driving, stop the car
immediately, switch off the engine and refer to
the Owner’s Manual.
Fault in the brake system
Fault in the cooling
system
Engine oil pressure
too low
Tyre pressure too low
Warning symbols
Power-operated soft top
Turn signals/
hazard warning lights
Electronic stabilisation
program (ESP)
Alternator
1)
Main beam headlights
Engine management
1)
Emission control system
Airbag system
1)
Cruise control system
Sport mode
Anti-lock brake system
1)
Seat belt warning lamp
Warning and indicator lamps
1)
If this warning lamp lights up when driving, please contact a qualified workshop without delay.
Page 16

Audi RS 4 Cabriolet
Kurzanleitung
englisch 11.07
282.562.813.20
www.audi.com
 Loading...