

Page 1

EMBi
Smart Healthcare Wristband
Bracelet Connecté Santé
Intelligentes Armband für das
Gesundheitswesen
Braccialetto Smart Healthcare
Pulsera Inteligente de Salud
Page 2

Audar EMBi.
EMBi,
Page 3
ECG/PPG He art Rate and Blood Pressure Monitor
Steps, Dis tance Travelled and Calorie Log
Sleep Qual ity Monitoring
Smart Call and Message Notifica tion s
Compatible with Apple iOS and Android
1. Sca n the QR code below with your device or search
for ‘AUDAR’ to do wnload and install the app from
Google Play or the Apple App Store.
EMBi
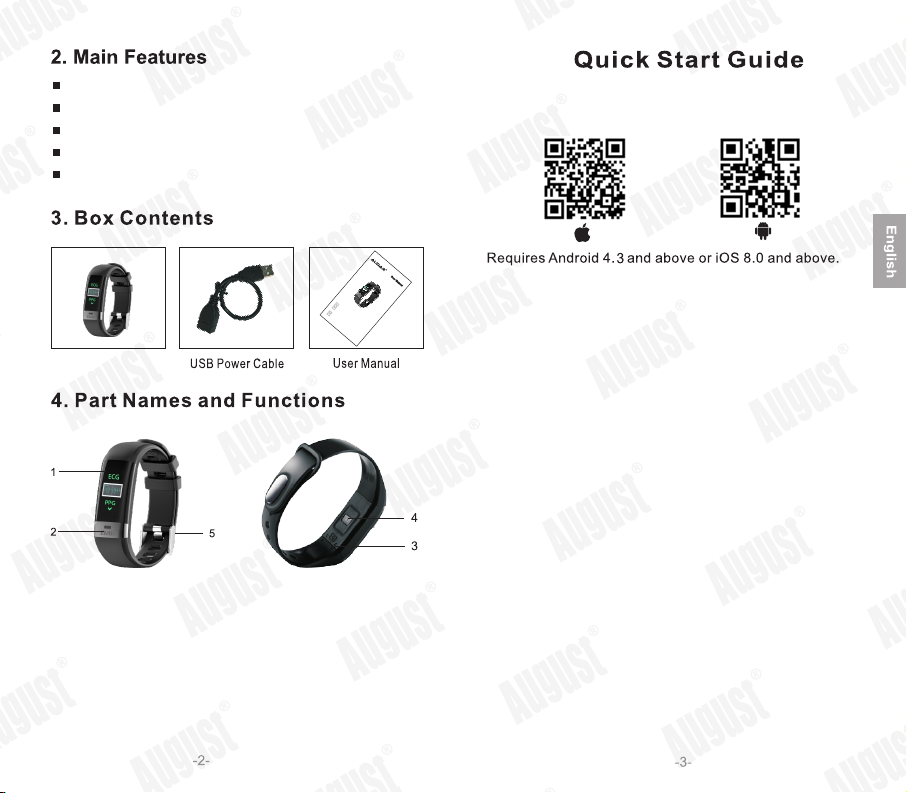
1. Colour TFT Display
2. Touch Button
3. USB Charging Connector
4. Multifuncti on Sensor
5. Wristband Clip
EMBi
S
m
Br
ar
a
t H
In
c
e
te
e
G
l
e
al
l
es
l
t C
i
th
gen
Brac
u
c
o
n
a
nn
P
d
t
re Wri
es
ul
he
c
ec
ia
s
A
i
e
t
té Sa
le
rmb
s
ra I
w
stban
tto S
es
n
an
n
te
e
t
mar
d für das
n
é
l
d
i
gente d
t H
eal
e S
t
h
c
al
a
re
u
d
1. Please ful ly charge the EM Bi before its first use or if
left unused for a long period of time. To charge the
devi ce, first unplug the strap of the wristband. This
will reveal the USB connector, which can be plugged
into a po were d USB port or connected using the
prov ided cable. If the EMBi isn’t charging, please
inse rt it into the USB port the ot her way around.
2. The ba ttery icon will fill up wh ile charging. When
char ged, a full battery will be displayed. Ensure tha t
the output voltage from the USB port or the charger
is 5V.
3. Press and hold the touch button for 3 seconds to turn
the EMBi on.
4. Ensure that the EMBi is within 10 meters of you r device.
To pair, launch AUDA R and press ‘Pair wristband’.
Ensu re that you grant permission or accept the
syst em requirement when prom pted to do so.
5. Onc e paired, enter the personal information req uest ed
and press ‘Save’. Then, set yo ur health goal (the
number of steps you aim to walk each day). Once
finished, pr ess save to go to the home page of the app.
6. The EMBi is ready to use.
Page 4
Time and Date(Dafault Display)
Steps, Distance and Calories
ECG
5.1 .3
Heart Rate
5.1 .4
Messages
5.1 .5
Find Device
5.1 .6
Sleep
5.1 .7
Stopwatch
5.1 .8
Sport Mode
5.1 .9
5.1 .10
EMBi Information
5. 2
AUDAR Application
5.2 .1
5. 2.2
5. 2.3
5.2 .3. 1
5.2 .3. 2
5.2 .3. 3
5.2 .3. 4
5.2 .3. 5
5.2 .3.6
5. 2.4
5.2 .4. 1
5.2 .4. 2
5.2 .4. 3
5.2 .4. 4
5.2 .4. 5
5.2 .4. 6
5.2 .4. 7
5.2 .4. 8
6.C harging
7.T roubleshooting
8.S pecifications
9.W arranty
Pairing
Personal Information
Home Page
Steps
Sleep
Heart Rate
HRV analysis (ECG)
Blood Pressure
Fatigue
Device Options
Personal Information
Weekly Report
Activate Camera
Run
Device Management
General Settings
About
Logout
5. Operation
1
1
2
2
5
5
5
6
6
7
7
7
8
8
8
9
10
10
11
11
12
12
13
14
15
16
17
17
18
18
18
19
21
21
21
21
23
24
25
5.1 Wristband
Press and hold the touch button for 3 seconds to turn the EMBi on.
To turn off the EMBi:
1. Press the touch button to choose EMBi off mode.
2. Press and hold the touch button for 3 seconds.
3. Press the touch button to select yes to confirm that you wish to
turn the EMBi off.
4. Press and hold the touch button for 3 seconds to confirm that
you wish to turn the EMBi off.
Press the touch button to activate the screen. Once activated the
screen will light up for 5 seconds. While the screen is activated,
press the touch button to cycle through the following modes: Time
and Date (Default Display), Sports data (Steps, Distance, Calories),
ECG, Heart Rate, Blood Pressure, Messages, Find Device, Sleep,
Stop Watch, Sport Mode and EMBi System Information.
Measurements are for reference only and are not for medical use.
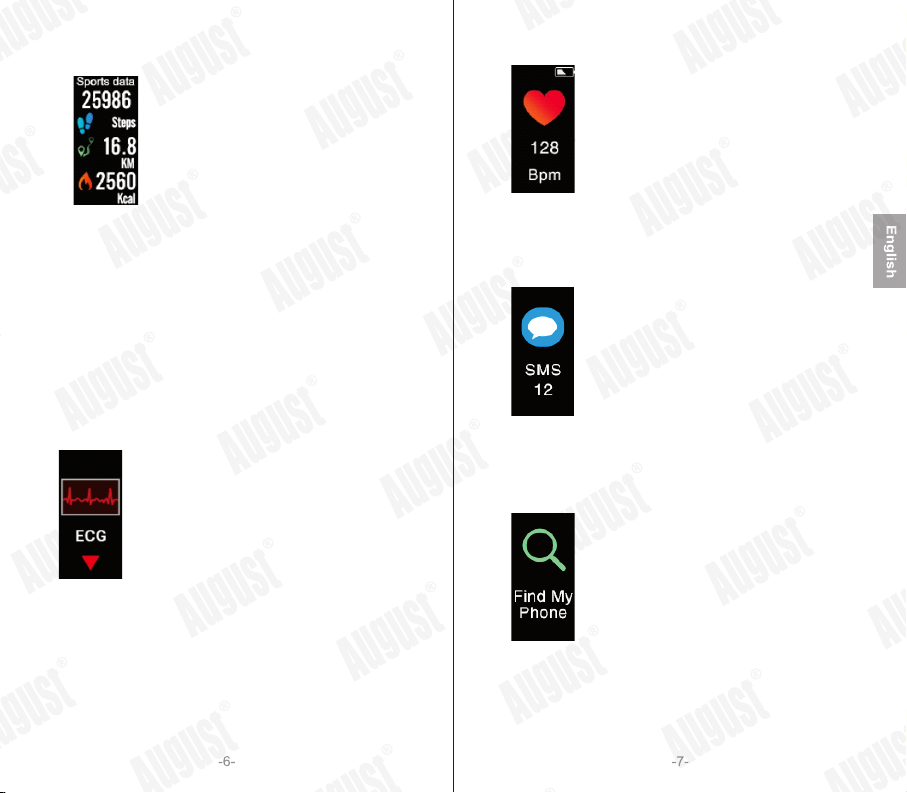
5.1.1Time and Date (Default Display)
Bluetooth connection status
(Shows when connected) Battery status
Time
Day
Date (DD/MM)
Themes1 Themes2
Themes3
The time and date will be set automatically when you pair the EMBi.
Press and hold the touch button for 3 seconds to choose different
themes.
Page 5
5.1.2Steps, Distance and Calories
Steps Walked
Distance
5.1.4Heart Rate
Calories
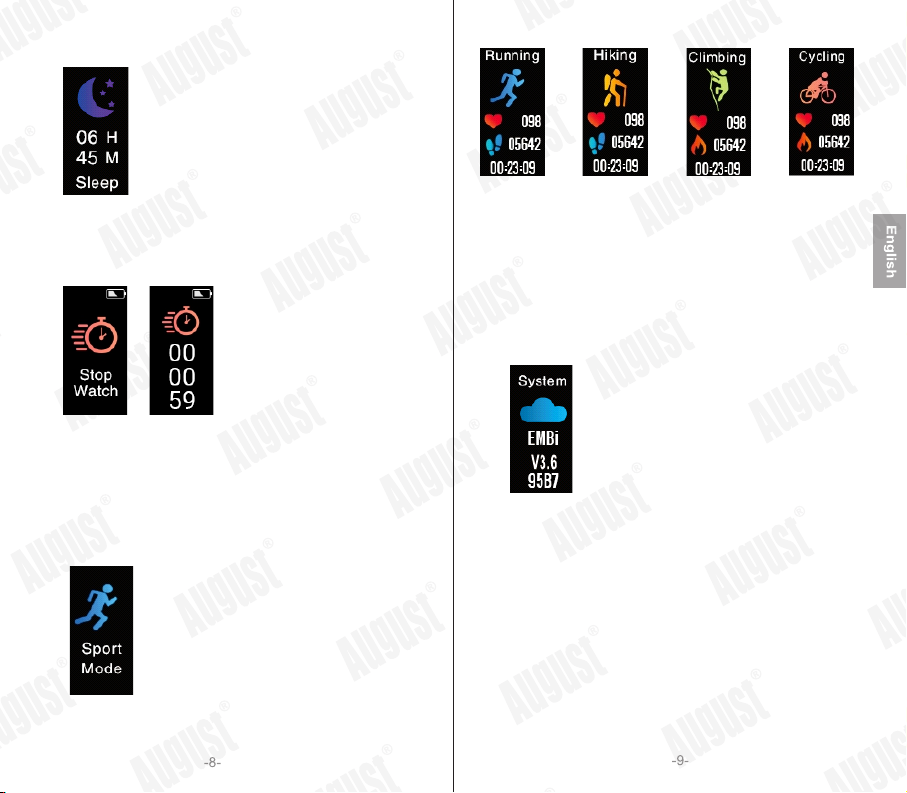
The EMBi will display the number of steps you have walked. For an
accurate reading, we recommend that you ensure that the details
entered in the personal information section are as accurate as possible
(please refer to 5.2.2).
The EMBi will calculate the distance you have walked from the number
of steps that you have taken. For an accurate reading, we recommend
that you ensure that the details entered in the personal information
section are as accurate as possible (please refer to 5.2.2).
The EMBi will calculate the calories you have burnt according to the
number of steps you have walked.
5.1.3ECG
ECG
When you enter ECG mode, and touch the ECG metal contact piece,
EMBi will begin measuring your ECG. When the ECG is measured,
touch your finger on the entire metal piece, and keep your finger still
during the measurement. This can take about 30 seconds. Once
finished, the ECG data can be checked on AUDAR.
Note: If the ECG waveform is disordered or drifts seriously, the heart
rate and blood pressure may not be accurate, so please re-measure.
If the skin of the finger is dry, please wet the skin or dip water on the
metal piece and measure again. Measurements are for reference only
and are not for medical use.
Heart Rate
When you enter heart rate mode, the EMBi will begin measuring your
heart rate. This can take up to a minute. Once finished, the EMBi will
vibrate and display your current heart rate in BPM (beats per minutes).
5.1.5Messages
Messages
When you enter Messages mode, the EMBi will show a summary of
the messages on your phone. Press and hold the touch button for 3
seconds, and the EMBi will show detailes of the messages.
5.1.6Find Device
Find Paired Device
Press and hold the touch button for 3 seconds to activate the ‘Find
Paired Device’ function. The paired device will ring or vibrate depending
on its settings, allowing you to locate it.
Note: the paired device needs to be within Bluetooth range in order to
be found (10m). If you are not able to hear the device, try moving to
another room and activating the function again.
Page 6
5.1.7Sleep
Sleep Data
When you enter sleep mode, the EMBi will display the data about
your sleep.
5.1.8Stopwatch
Running Hiking Climbing Cycling
Press and hold the touch button for 3 seconds to activate sport mode
choosing function. Then, press the button to switch the sport mode.
There are four types of sport modes: Running, Hiking, Climbing and
Cycling. After choosing the sport mode you want, hold the touch button
for 3 seconds to start. During working out, hold the touch button for 3
seconds to pause or resume the stopwatch. Under the paused state,
press the touch button to exit.
Minutes
Seconds
Milliseconds
Press and hold the touch button for 3 seconds to start the stopwatch.
Press the touch button to pause or resume the stopwatch.
Press and then hold the touch button for 3 seconds to return to the
main menu.
5.1.9Sport Mode
Sport Mode
5.1.10 EMBi Information
EMBi’s system information
The EMBi Information section provides you with a unique identifier for
the wristband. This is useful if you are pairing the wristband when there
are multiple EMBi is nearby.
Page 7
5.2AUDAR Application
Scan the QR code below or search for ‘AUDAR’ to download and
install the app from Google Play or the Apple App Store.
Requires either Android 4.3 and above or iOS 8.0 and above.
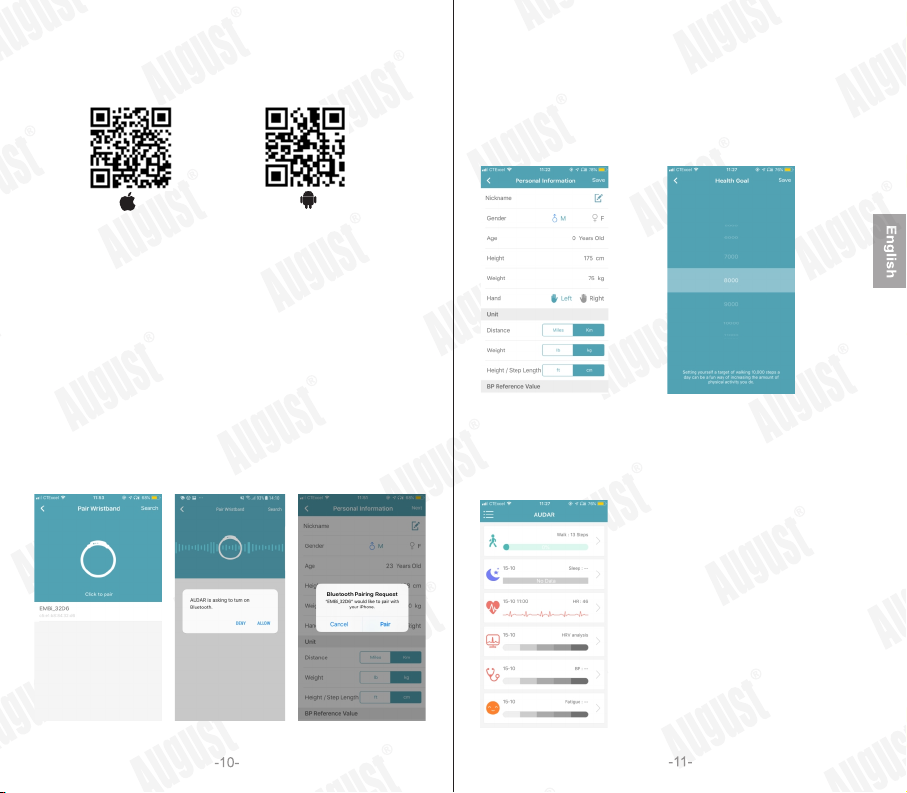
5.2.1Pairing
1. Enable the Bluetooth on your device and ensure that it is within 10
meters of the EMBi.
2. Launch ‘AUDAR’ and select ‘Pair wristband’.
3. Select EMBi from the device list.
4. If more than one EMBi is nearby, check the MAC address on the
EMBi in order to determine which one to select (please refer to 5.1.10).
5. Once paired, the Bluetooth connection status icon will appear on the
screen of the EMBi.
Please note: for Android devices, ensure that you grant system
permission to ‘AUDAR’ when prompted to do so. For iOS devices,
ensure that you confirm the Bluetooth connection requirement
when prompted.
5.2.2Personal Information
Once the EMBi is paired, enter the personal information requested and
press ‘Save’. Then, set your health goal (the number of steps you aim to
walk each day). Once finished, press save to go to the home page.
You can edit this information later. Please refer to 5.2.4.1 for further
instructions.
5.2.3 Home Page
The home page allows you to see the number of steps you have
walked, the time you have slept and the most recent measurements
of your heart rate, HRV analysis, blood pressure and fatigue state.
Note: Measurements are for reference only and are not for medical use.
Page 8
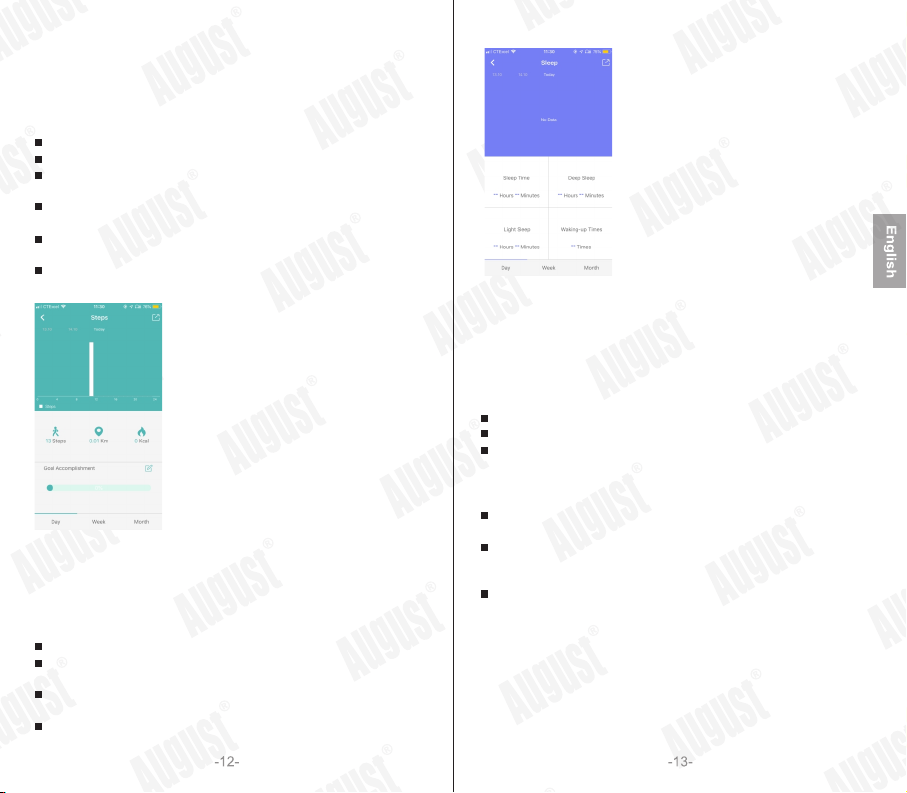
5.2.3.1 Steps
The current step count will be displayed on the home page. Tap on the
steps section on the home page to view more information.
Note: Measurements are for reference only and are not for medical use.
Slide the date to the right to view older data.
Tap a bar on the chart to view the exact number of steps walked.
Underneath the bar chart, you can find more information about the
steps taken, distance walked and calories burnt.
Press <Notes> to change your health goal (the number of steps
you aim to walk each day).
Select day, week or month to change the length of the period
displayed.
Press share and choose a social media service to share the most
recent information.
5.2.3.2 Sleep
The most recent sleep data will be displayed on the home page. Tap
on the sleep section on the home page to view more information.
Note: Measurements are for reference only and are not for medical use.
Slide the date to the right to view older data.
Tap a bar on the chart to view the exact amount of sleep during
that time.
Select a day, week or month to change the length of the period
displayed.
Press share and choose a social media service to share your
recent sleep data.
5.2.3.3 Heart Rate
The most recent heart rate measurement will be displayed on the home
page. Tap on the heart rate section on the home page to view more
information or conduct a measurement.
Note: Measurements are for reference only and are not for medical use.
The most recent measurement is shown on the top half of the screen.
Press <Single measure> to take a new measurement.
Press <real-time measurement> to display your heart rate in real time.
Press <real-time measurement> again to deactivate. Note: Real-time
Measurement needs to be deactivated in order to return to the home
page.
Other recent measurements are shown on the bottom half of the
screen. Slide up to view older measurements.
Select a day, week or month to view a bar chart of your heart rate
measurements. Tap on one bar in the chart to view more detailed
information. Slide the date to the right to view older data.
Press share and choose a social media service to share the most
recent measurement.
Page 9
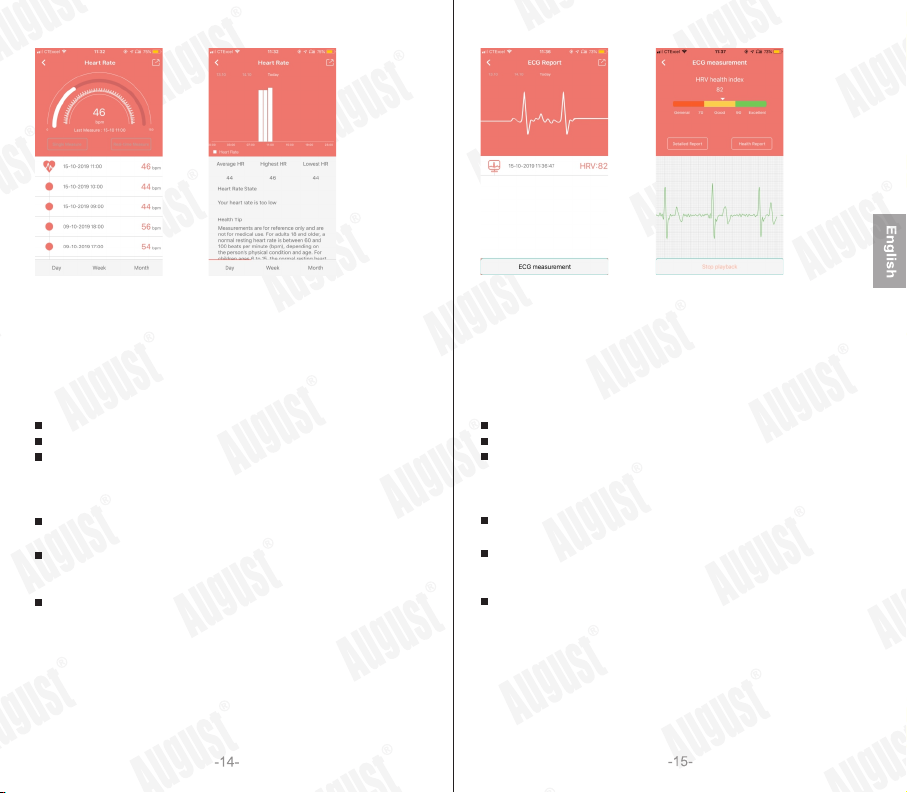
5.2.3.4 HRV analysis (ECG)
The HRV analysis measurement will be displayed on the home page.
Tap the HRV analysis section on the home page to view older
measurements or to carry out a new measurement.
Note: Measurements are for reference only and are not for medical use.
The most recent measurement is shown on the top half of the screen.
Press <single measure> to take a new measurement.
Press <real-time measurement> to display your blood pressure in
real time. Press <real-time measurement> again to deactivate. Note:
Real-time Measurement needs to be deactivated in order to return to
the home page.
Other recent measurements are shown on the bottom half of the
screen. Slide up to view older measurements.
Select day, week or month to view a bar chart of your blood
pressure measurements. Tap on one bar in the chart to view more
detailed information. Slide the date to the right to view older data.
Press share and choose a social media service to share the most
recent measurement.
5.2.3.5 Blood Pressure
The most recent blood pressure measurement will be displayed on the
home page. Tap on the blood pressure section on the home page to
view older measurements or to carry out a new measurement.
Note: Measurements are for reference only and are not for medical use.
The most recent measurement is shown on the top half of the screen.
Press <single measure> to take a new measurement.
Press <real-time measurement> to display your blood pressure
in real time. Press <real-time measurement> again to deactivate.
Note: Real-time Measurement needs to be deactivated in order to
return to the home page.
Other recent measurements are shown on the bottom half of the
screen. Slide up to view older measurements.
Select day, week or month to view a bar chart of your blood pressure
measurements. Tap on one bar in the chart to view more detailed
information. Slide the date to the right to view older data.
Press share and choose a social media service to share the most
recent measurement.
Page 10
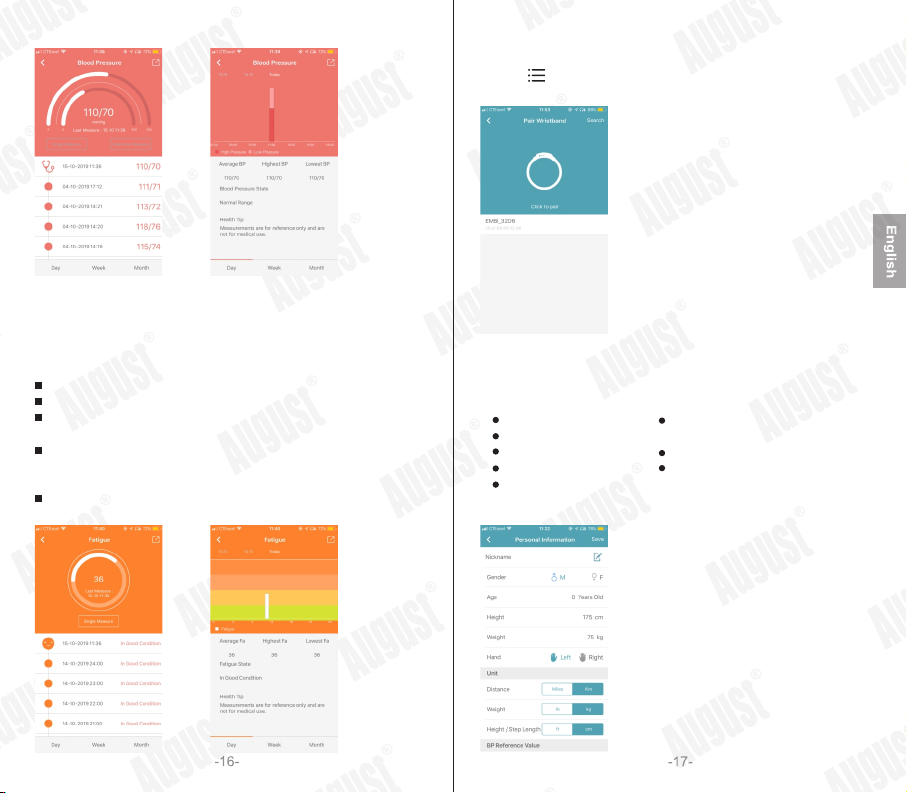
5.2.3.6 Fatigue
The fatigue state will be displayed on the home page. Tap on the
fatigue section to view more detailed information or carry out a new
measurement.
The most recent measurement is shown on the top half of the screen.
Press <single measure> to take a new measurement.
Other recent measurements are shown on the bottom half of the
screen. Slide up to view older measurements.
Select day, week or month to view a bar chart. Tap on one bar in the
chart to view more detailed information. Slide the date to the right to
view older data.
Press share and choose a social media service to share the most
recent measurement.
5.2.4 Device Options
Press < > to display the device options menu. Tap on
one of the options to enter that section.
5.2.4.1 Personal Information
From this section, you can view and amend the following personal
information:
Gender
Age
Height
Weight
Wearing hand
Once finished, press save to go back to the main page of the app.
Units used for distance, height
and weight
Time format
Blood pressure reference values
Page 11
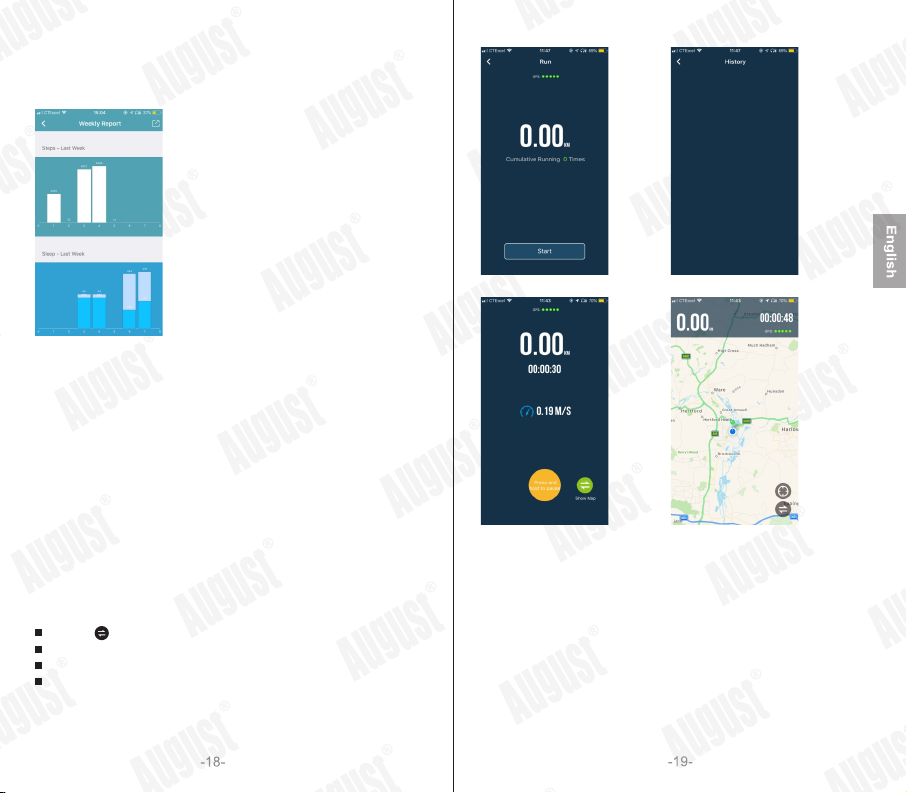
5.2.4.2Weekly Report
The weekly report allows you to view all of the previous week’s data
on one screen.
5.2.4.3Activate Camera
This function allows you to activate the camera on your phone remotely
by shaking the EMBi.
1. Tap on ‘Activate camera’ to begin.
2. Once the camera is activated, shake the wrist wearing the EMBi to
take a photo.
3. Press “Cancel” to return to the home page.
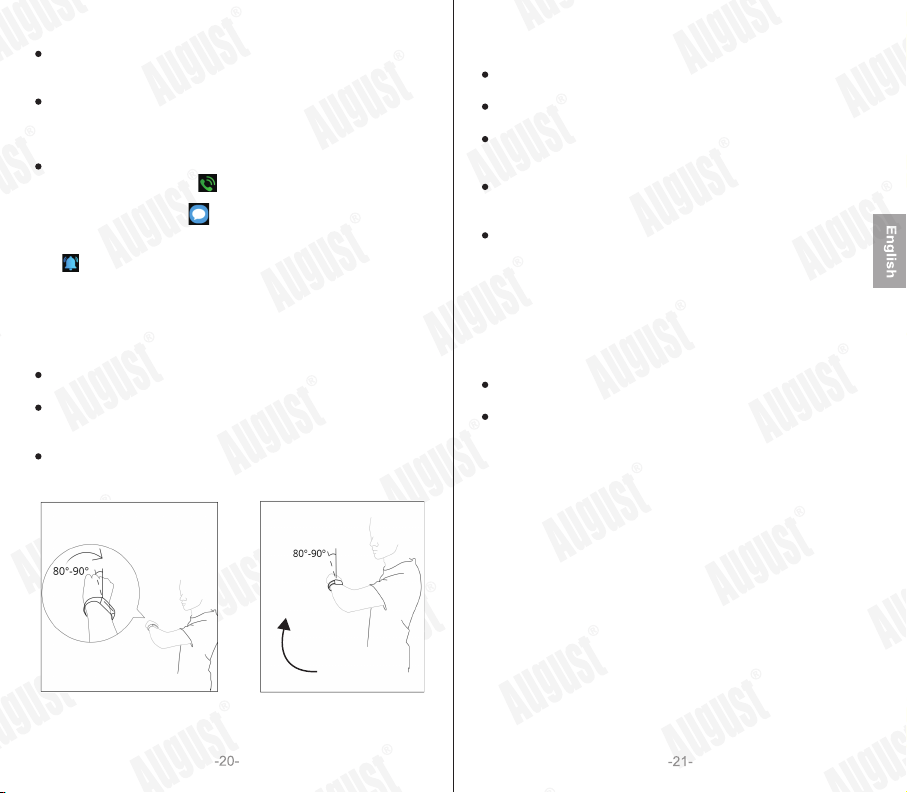
5.2.4.4Run
This function will help you to monitor your running.
Press on ‘Cumulative Running X Times’ to view your running history.
Press on ‘Start’ to begin running.
Press < > to switch between normal and map display.
Press and hold the yellow button to pause.
While paused, press the green button to resume.
Press the red button to finish running.
5.2.4.5Device Management
The device management screen allows you to check the battery
level of the EMBi and use the following functions:
Page 12
Connection Management
- View the wristband’s connection status
- Pair or unpair the wristband
Search Wristband
- Pressing ‘Search Wristband’ will cause the wristband to vibrate,
allowing you to find it. Note: the search function will work only if the
wristband is within Bluetooth range (10m).
Reminder (allows you to set silent vibrating notifications)
- Phone Call Notification: < > will be displayed when there
is an incoming call.
- Message Notification: < > will be displayed when there is
an incoming message.
- Alarm Clock: The wristband will vibrate at the set time and
< > will be displayed on the screen.
- App Notification: From this section, you can toggle whether to display
notifications from a range of apps such as Facebook, Twitter,
WhatsApp etc.
- Do Not Disturb: The do not disturb function allows you to set a period
during which all notifications will be ignored (e.g. at night time from
23:00 to 08:00).
Automatic Screen Activation : While enabled, the screen will activate
when you move your wrist.
Automatic Hourly Measurement : While enabled, a measurement will
be conducted automatically every hour on the hour. We recommend
enabling this function in order to receive the most accurate data.
Firmware Upgrade: This page displays the current firmware version
of the wristband and informs you whether a newer version is available.
5.2.4.6General Settings
Personal Information: please refer to section 5.2.4.1 for further
information.
Health Goal: allows you to set the number of steps you aim to
walk each day.
Third Party App Integration
- Apple Health (Apple Devices Only)
- Google Fit (Android Devices Only)
Restore Factory Settings: allows you to perform a full factory reset,
which will remove all data and delete the connection between the
application and the wristband.
Delete Data: allows you to delete all data saved on either the
wristband or the application.
5.2.4.7About
The About section displays the version number of the application
and allows you to access the Help feature.
From the Help section, you can
Send us feedback and suggestions about either the wristband or the
AUDAR application, or report a bug.
View a list of frequently asked questions (tap on one of the questions
to read the answer).
5.2.4.8Logout
The Logout section allows you to logout your account.
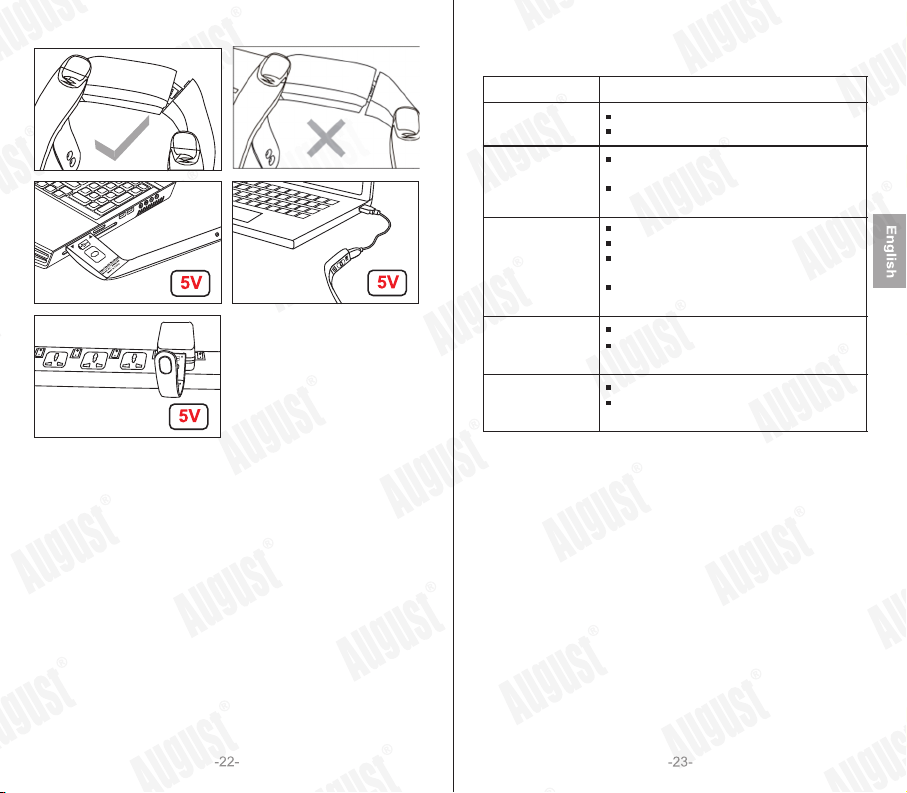
6. Charging
To charge the EMBi, first unplug the strap of the wristband. This will
reveal the USB connector, which can be plugged into a powered USB
port or connected using the provided cable. If the EMBi isn’t charging,
please insert it into the USB port the other way around.
Page 13
Bi
EM
i
MB
E
The battery icon will fill up while charging. When charged, a full battery
will be displayed. Ensure that the output voltage from the USB port or
the charger Is 5V.
7.Troubleshooting
Unable to turn on
Unable to charge
Unable to pair
No data in the app
Unable to receive
notifications
SolutionsProblems
Fully charge the EMBi
Press and hold the touch button for 3 seconds
Insert the EMBi into the powered USB port the
other way around
Use the provided charging cable to connect to
the powered USB port
Confirm that Bluetooth is enabled on your device
Confirm that the EMBi is within 10m of the device
Confirm that the Mac address on the EMBi is the
same as that shown in the app
Ensure that you accept the system requirements
when pairing
Confirm that the EMBi is paired to the device
Try enabling Automatic Hourly Measurement in
the Device Management
Confirm that the EMBi is paired to your device
Check the Reminder settings in the Device
Management section
Page 14
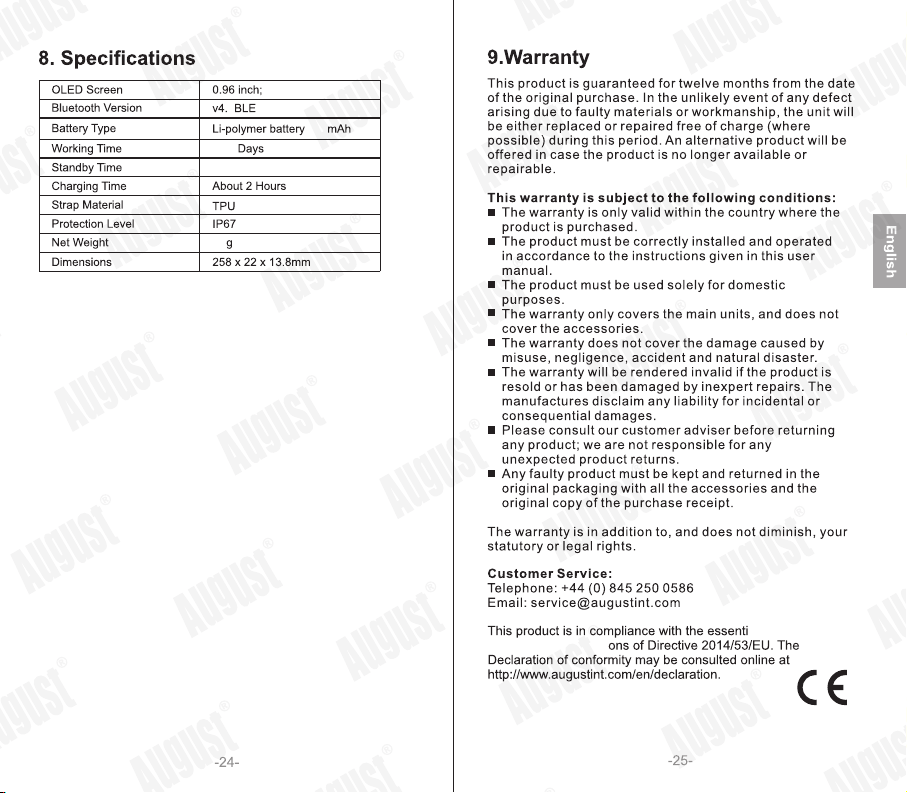
2
5~7
Up to 1 5 Day s
25
105
Page 15
 Loading...