

Page 1
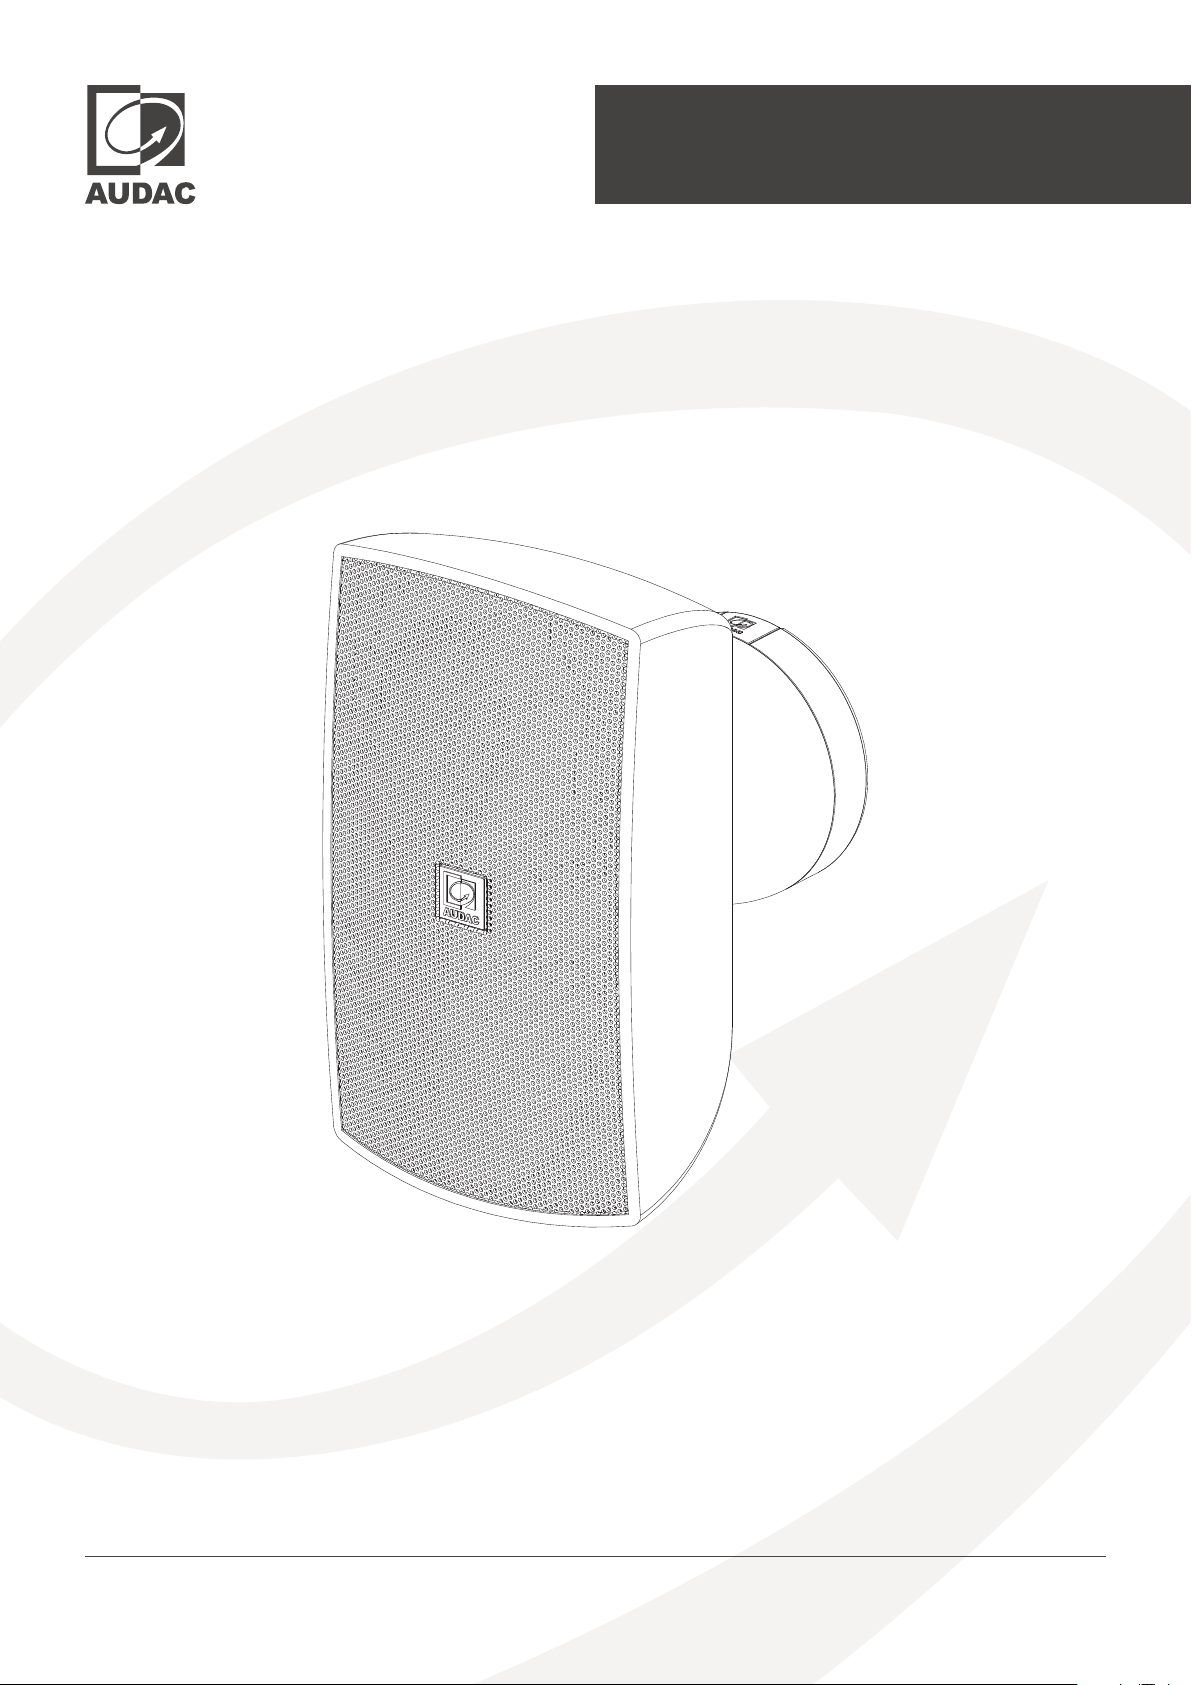
User manual
ATEOxM
audac.eu
Page 2
ADDITIONAL INFORMATION
This manual is put together with much care, and is as complete as could be on the publication date.
However, updates on the specifications, functionality or software may have occurred since publication. To
obtain the latest version of both manual and software, please visit the Audac website @ www.audac.eu.
REV-1.3
ATEOxM- User manual02
Page 3

Table of contents
Introduction 04
Bright sound, effortless installation � � � � � � � � � � � � � � � � � � � � � � � � � � � � � � � � � � � � � � � � � � � � � � � � � � � � � � � � 04
Precautions 05
Chapter 1 06
CleverMount+™ � � � � � � � � � � � � � � � � � � � � � � � � � � � � � � � � � � � � � � � � � � � � � � � � � � � � � � � � � � � � � � � � � � � � � � � � � � � 06
Chapter 2 07
Installing ATEOxM � � � � � � � � � � � � � � � � � � � � � � � � � � � � � � � � � � � � � � � � � � � � � � � � � � � � � � � � � � � � � � � � � � � � � � � � � 07
Chapter 3 010
Positioning ATEOxM � � � � � � � � � � � � � � � � � � � � � � � � � � � � � � � � � � � � � � � � � � � � � � � � � � � � � � � � � � � � � � � � � � � � � � 010
Technical specifications 011
ATEOxM - User manual 03
Page 4

Introduction
Bright sound, effortless installation
The ATEOxM series are extraordinary loudspeakers especially designed for fixed installation in- & outdoor
applications, ranging from modern residential applications to the most demanding designer applications
in environments such as retail stores, pubs, restaurants or even clubs.
The ATEOxM ensures a true-to-nature, high-fidelity reproduction of music and speech, whilst maintaining
an ultra-flat frequency response. It features a stunningly designed and elegant-looking weatherproof ABS
housing which is fitted with high-quality components. What makes this loudspeaker range so exceptional
is the specially designed mounting bracket using the weatherproof CleverMount+™ technology, making
the loudspeaker cabinet flow together with the mounting bracket providing great ease for installing the
loudspeaker in one good-looking entity. This design loudspeaker forms the ideal solution for fixed-install
indoor and outdoor applications.
With the improved CleverMount+™ innovation, mounting and connection of the loudspeaker happens
in seconds after attaching the wall plate to the desired location. During installation, the wires can easily
be connected to the integrated WAGO connectors. For ease of installation & modification, the ATEOxM
loudspeakers come with an external power tap selection switch located on the rear of the speaker. Like this,
it’s really child’s play to install a large number of loudspeakers in no time.
All ATEOxM series speakers are available in black (/B) or white (/W).
ATEOxM- User manual04
Page 5
Precautions
READ FOLLOWING INSTRUCTIONS FOR YOUR OWN SAFETY
ALWAYS KEEP THESE INSTRUCTIONS. NEVER THROW THEM AWAY
ALWAYS HANDLE THIS UNIT WITH CARE
HEED ALL WARNINGS
FOLLOW ALL INSTRUCTIONS
NO NAKED FLAME SOURCES, SUCH AS LIGHTED CANDLES, SHOULD BE PL ACED ON THE APPARATUS
DO NOT STICK ANY OBJECTS THROUGH THE VENTILATION OPENINGS.
DO NOT INSTALL THIS UNIT NEAR ANY HEAT SOURCES SUCH AS RADIATORS OR OTHER APPARATUS THAT PRODUCE HEAT
PLACE THE UNIT ON A STABLE BASE OR MOUNT IT IN A STABLE RACK
ONLY USE ATTACHMENTS & ACCESSORIES SPECIFIED BY THE MANUFACTURER
UNPLUG THIS APPARATUS DURING LIGHTNING STORMS OR WHEN UNUSED FOR LONG PERIODS OF TIME
USE THE APPARATUS ONLY IN MODERATE CLIMATES
CAUTION SERVICING
This product contains no user serviceable parts. Refer all servicing to qualified service
personnel. Do not perform any servicing (unless you are qualified to)
EC DECLARATION OF CONFORMITY
This product conforms to all the essential requirements and further relevant specifications
described in following directives: 2014/30/EU (EMC) & 2014/35/EU (LVD).
WASTE ELECTRICAL AND ELECTRONIC EQUIPMENT WEEE
The WEEE marking indicates that this product should not be disposed with regular
household waste at the end of its life cycle. This regulation is created to prevent any
possible harm to the environment or human health.
This product is developed and manufactured with high quality materials and components
which can be recycled and/or reused. Please dispose this product at your local collection
point or recycling centre for electrical and electronic waste. This will make sure that it will be
recycled in an environmentally friendly manner, and will help to protect the environment
in which we all live.
ATEOxM - User manual 05
Page 6
Chapter 1
CleverMount+™
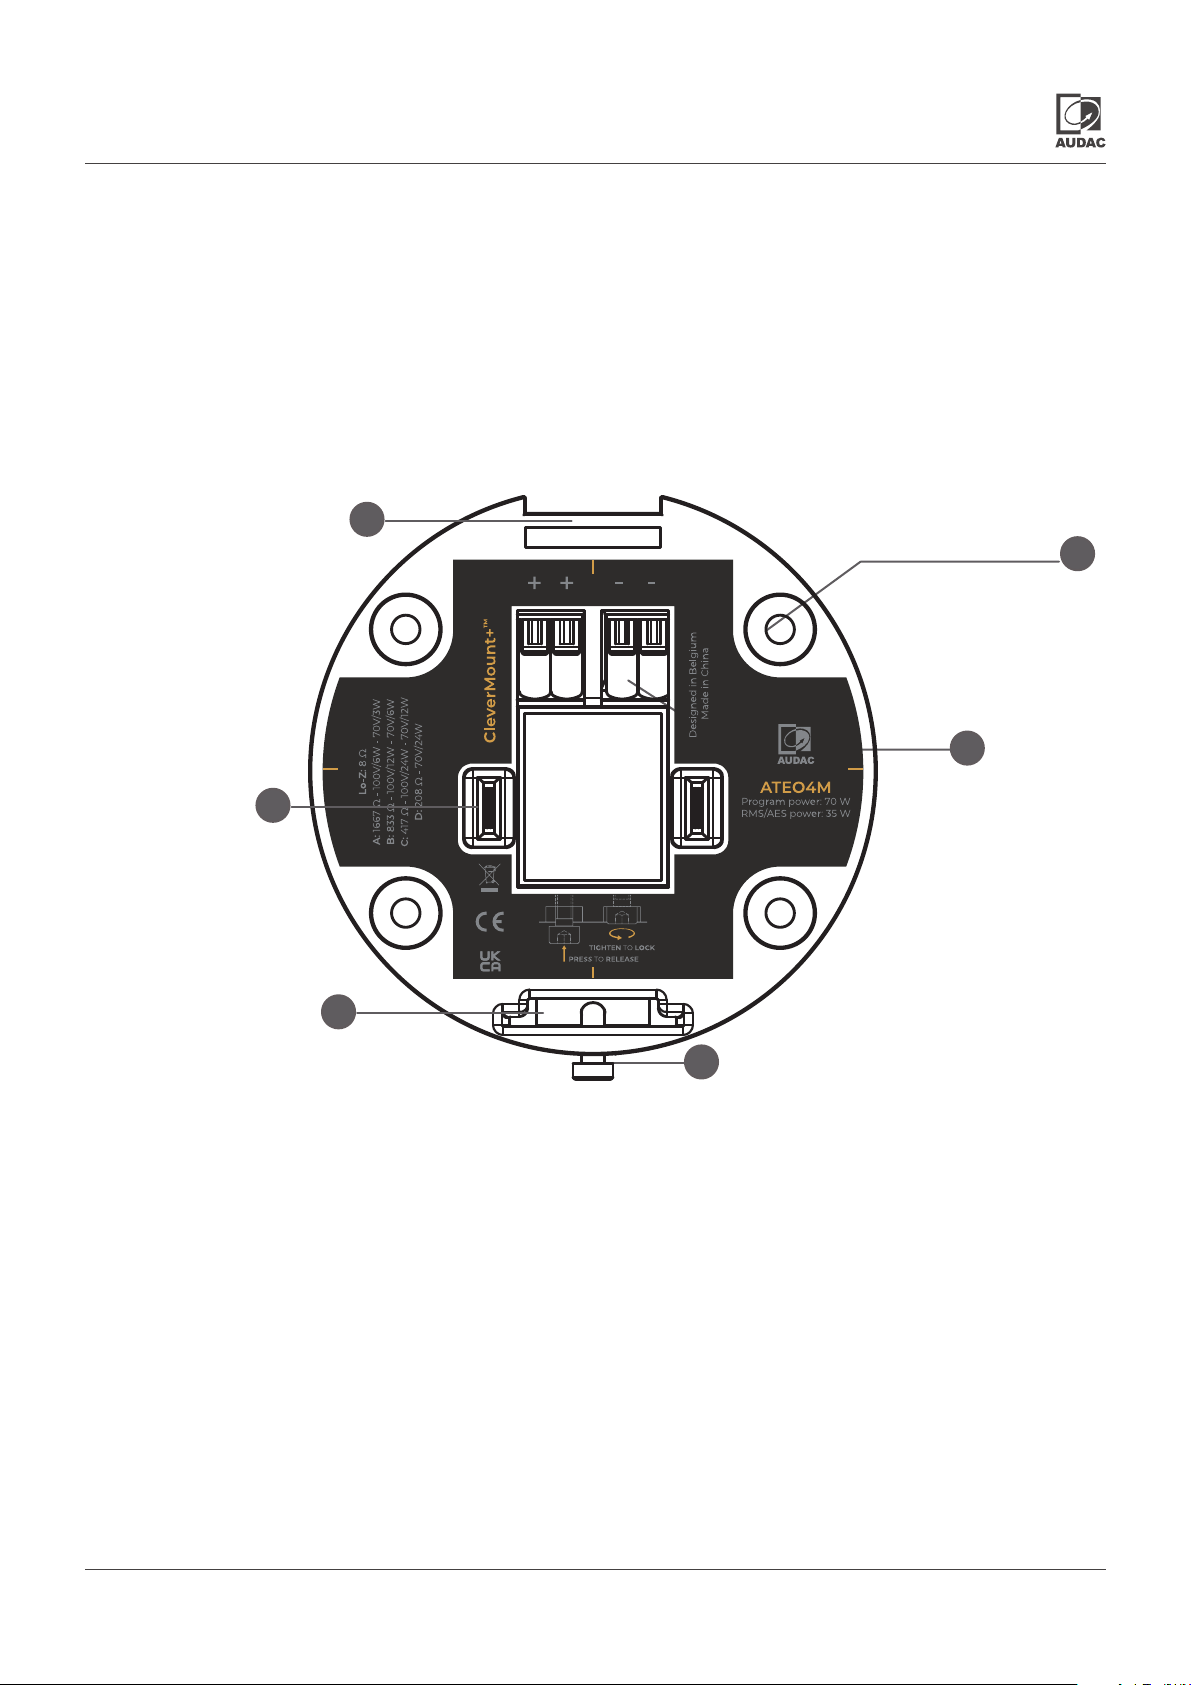
Thanks to the patented CleverMount+™ mounting technology these loudspeakers have the advantage of
making the speaker cabinet flow together with the mounting bracket providing a great ease for installing
the loudspeaker in one good-looking entity. A safe installation of the loudspeaker is acquired thanks to the
separate bracket base.
Mounting brackets come with official WAGO connectors for the perfect high-quality and reliable electrical
installation. Great installer convenience is provided with the WAGO spring cage terminals, no additional
tools needed.
2
1
3
3
2
2
1) Wall mounting holes
The wall mount has to be fixed by four screws in a quadrangular shape. The used fasteners should be chosen
depending to the mounting surface (brick, concrete, wood, ... )
2) Speaker attachment points and spring-loaded locking
ATEOxM has a hook and a latch connection on it and those connection should be placed to attachment
points on CleverMount+™ mounting system. When the mounting is done correctly, a clicking sound will be
heard. There is also a spring-loaded locking mechanism to lock the attached speaker or to release it from
the wall mount.
3) WAGO connectors and contact blades
CleverMount+™ mounting technology has two pieces of WAGO terminal connectors on it for connection
and daisy chaining. One terminal port on each connector is connected to a contact blade for speaker and
mounting system mating. Polarity of each terminal is indicated on CleverMount+™ mounting system.
ATEOxM- User manual06
Page 7
Chapter 2
Installing ATEOxM
With the improved CleverMount+™ innovation, mounting and connection of the loudspeaker happens
in seconds after attaching the wall plate to the desired location. During installation, the wires can easily
be connected to the integrated WAGO connectors. For ease of installation & power configuration, the
ATEOxM loudspeakers come with an external power tap selection rotary switch located on the rear of the
speaker. Makes it easy to install a large number of loudspeakers in no time.
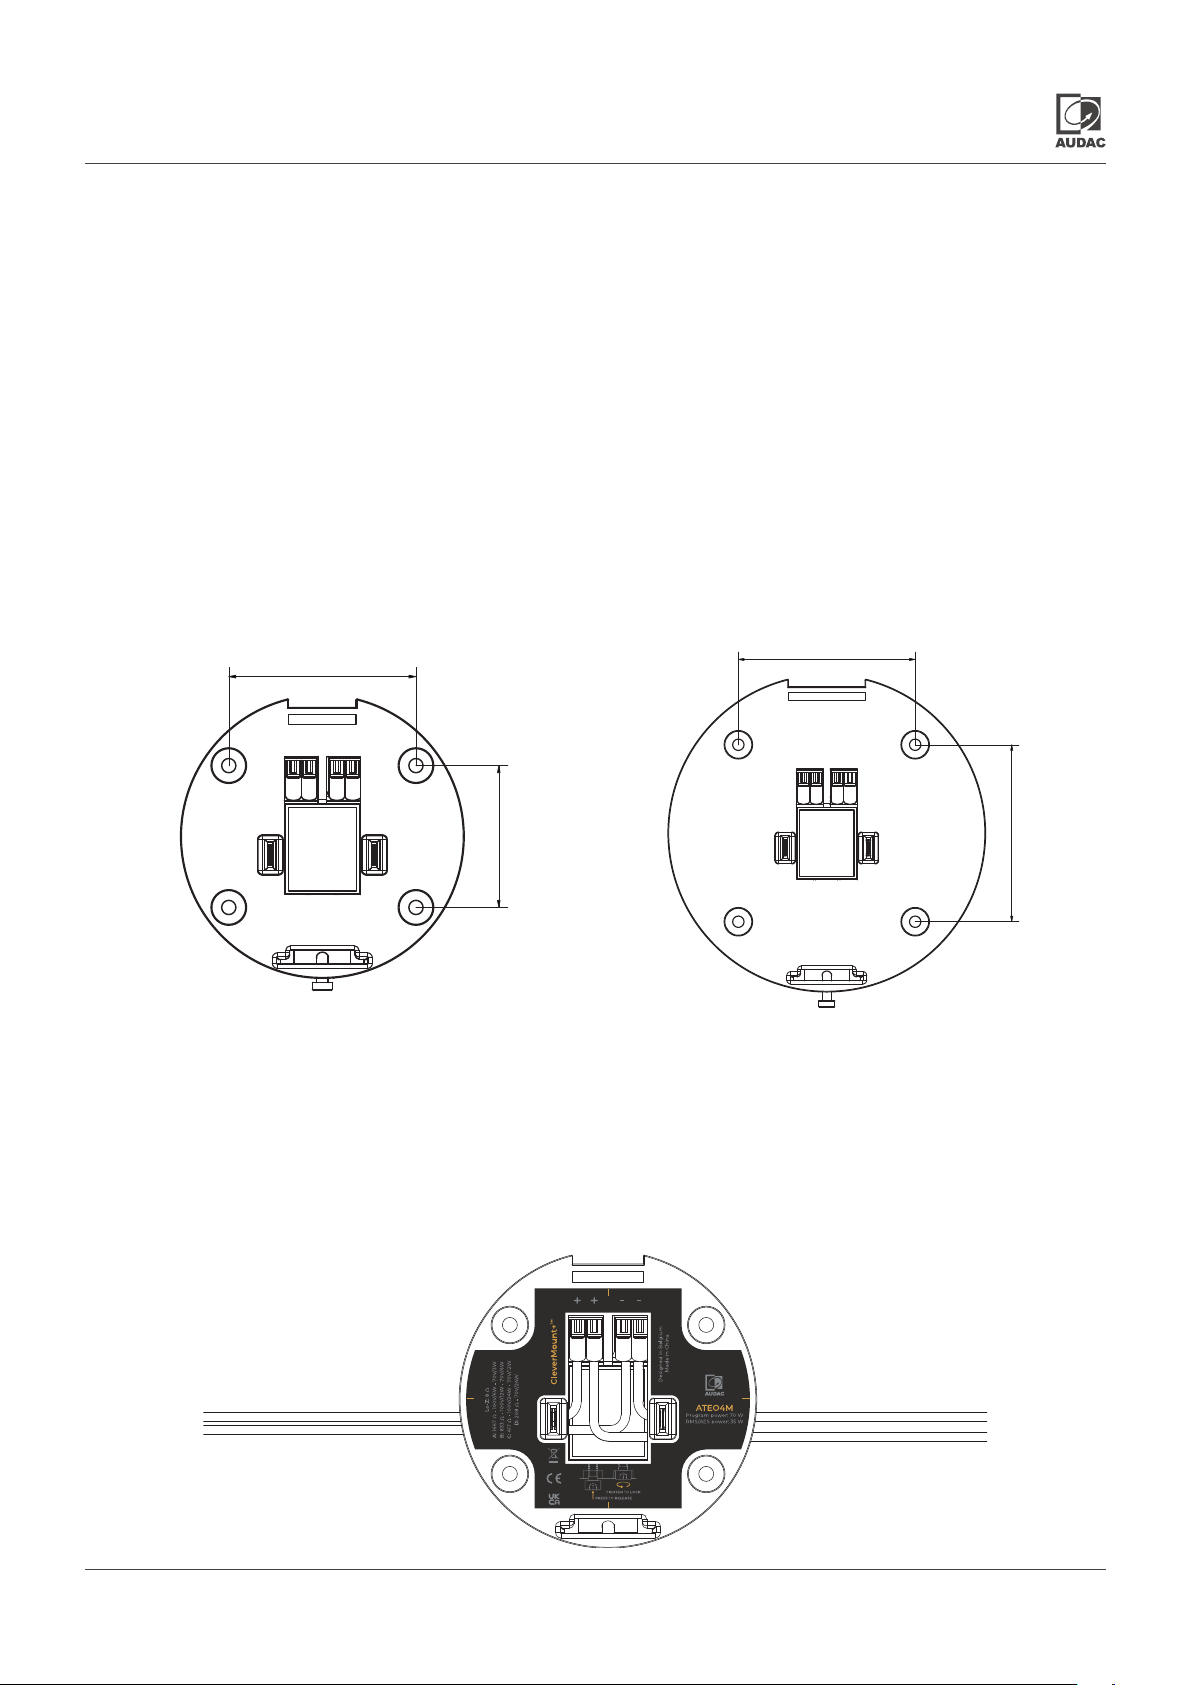
1) Install CleverMount+™ mounting system
The first step is mounting the supplied wall mount to the desired location on the wall. The wall mount has
to be fixed by four screws in a quadrangular shape. Distance between mounting holes are shown below.The
used fasteners should be chosen depending to the mounting surface (brick, concrete, wood, ... )
ATEO4M ATEO6 M
66
0
5
78
8
7
2) Make the connections
After the wall mount is installed, the connections can be made. The wires coming from the amplifier
shall be connected to the corresponding terminals of the WAGO terminal block connector. The positive
or the signal output of the amplifier should be connected to the first corresponding positive terminal of
the WAGO connector, while the negative or the common should be connected to the first corresponding
negative terminal of the WAGO connector. Positive and negative connection points are clearly indicated
on CleverMount+™. Secondary terminal block connection points can be used to wire the next ATEOxM.
ATEOxM - User manual 07
Page 8
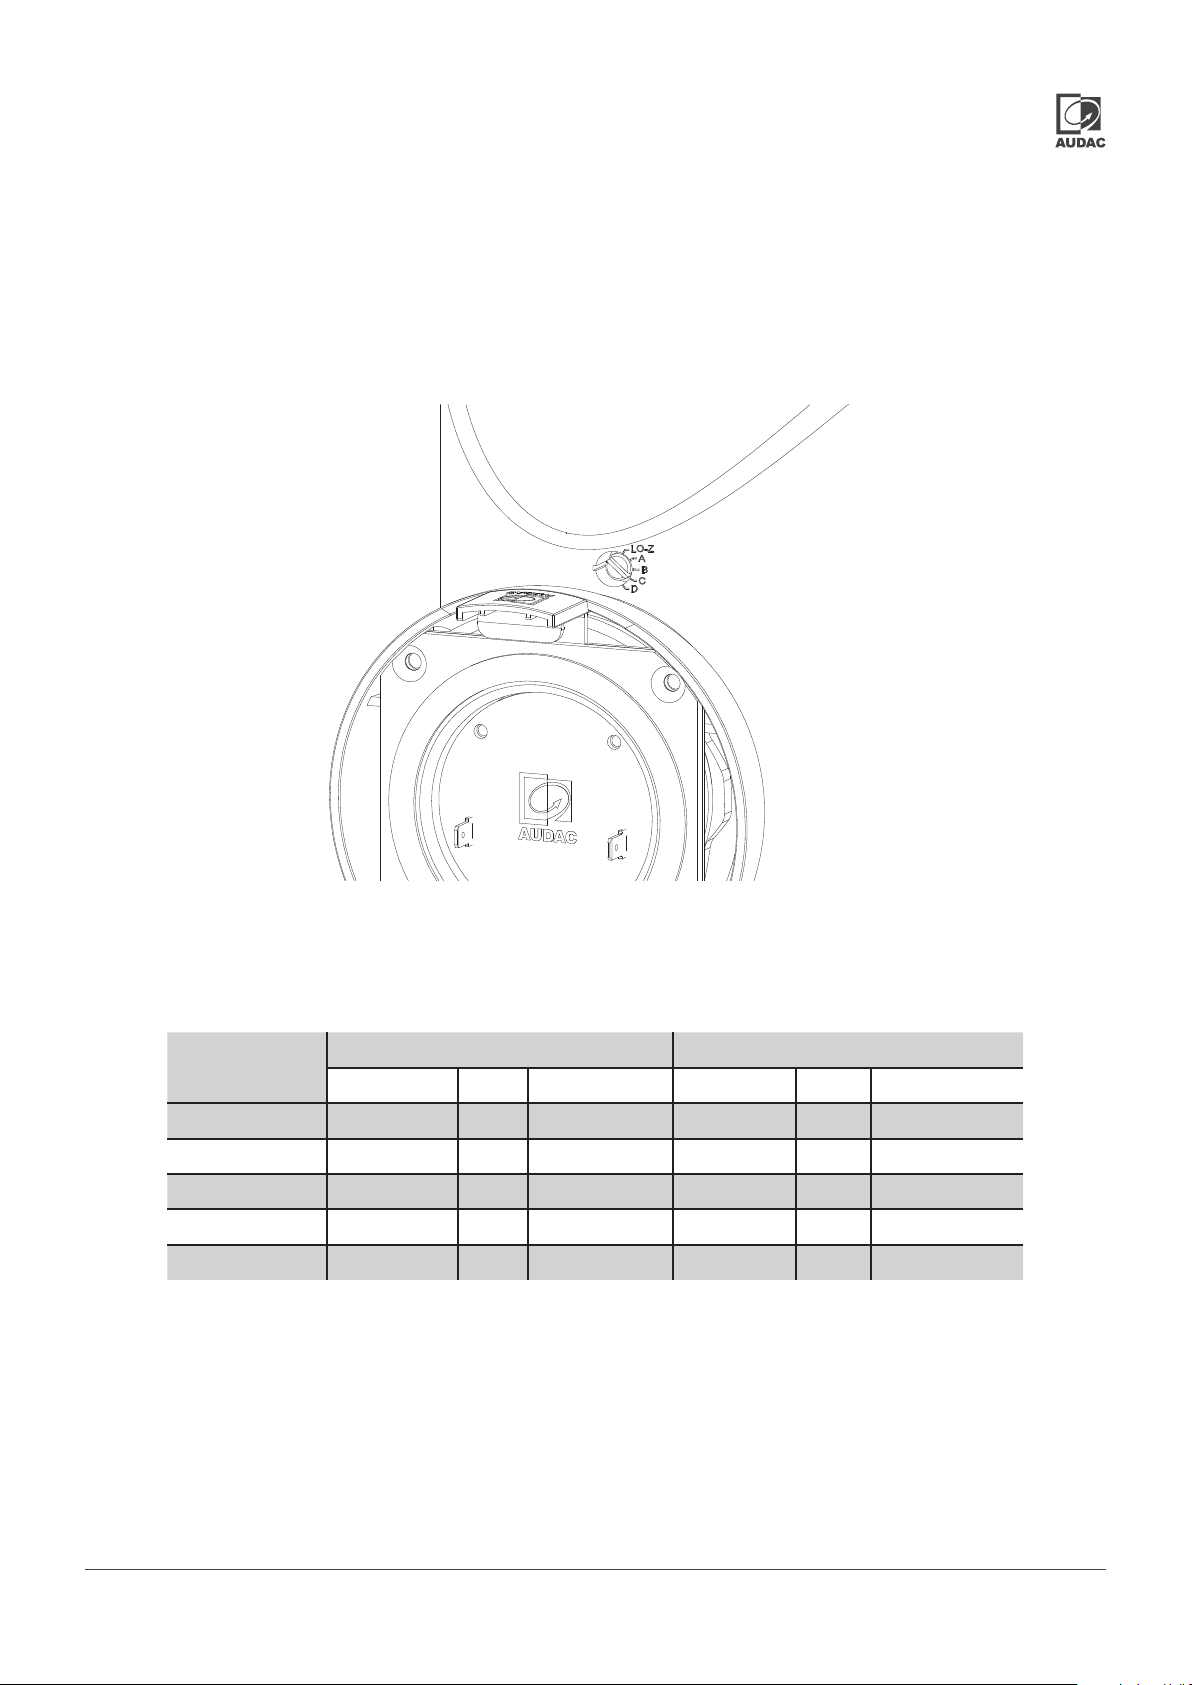
3) Set the external power tap selection on ATEOxM (not for ATEOxDM)
The ATEOxM can be connected in low impedance (8 ) or high impedance (70/100V) systems. For use in
high impedance (70/100V) systems, various power tappings can be selected. Depending on whether the
speaker will be used in LO-Z or 70/100V applications, the ATEOxM has an integrated external power tap
selector hidden on the rear which is protected by a plastic cap. On the otherhand, the ATEOxDM can be
connected only in low impedance ( 16 ) and there is no rotary switch on it.
When using in constant voltage 70V/100V systems, the power taps can be adjusted in 4 steps of impedance
through selection of the correct connection terminals indicated with A, B, C & D. Each position corresponds
with a specific impedance / power setting indicated on a label on the wall plate and in the table below.
Rotary switch
100V 70V Imp. 100V 70V Imp.
LO-Z
A 6W 3W 1667 12.5W
B 12W 6W 833 25W 12.5W 400
C 24W 12W 417 50W 25W 200
D Not in use 24W 208 Not in use 50W 100
ATEO4M ATEO6M
8 (ATEO4M)
6.25W
8 (ATEO6M)
800
ATEOxM- User manual08
Page 9
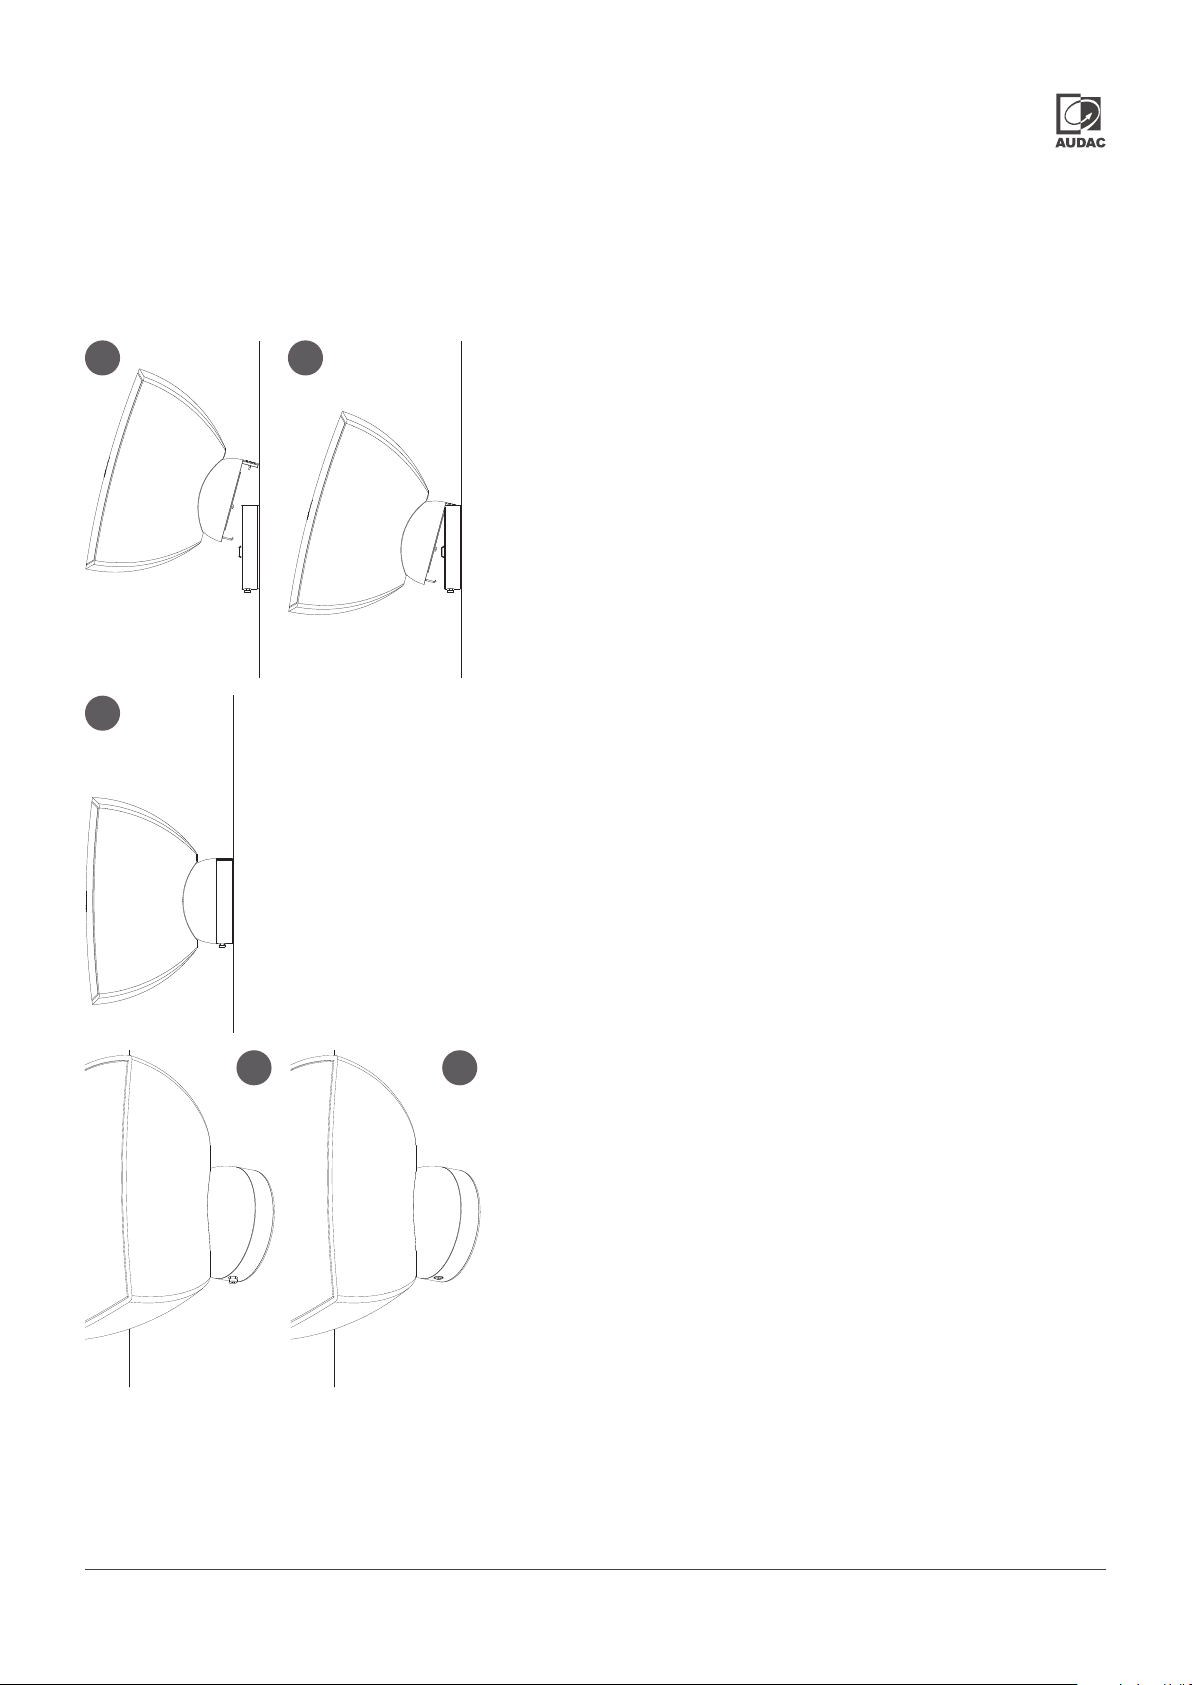
4) Mount ATEOxM on CleverMount+™
CleverMount+™ mounting system provides great ease of installing the ATEOxM. Secure and safe installation
of the speaker is ensured thanks to the separate bracket base. Installation is described below in 5 steps.
1
3
2
Step 1
ATEOxM has two connection latches on it and those
connection latches should be placed to attachment points
on CleverMount+™ mounting system.
Step 2
Carefully place the top hook to its place on the mounting
system and slowly push the ATEOxM and be sure connection
blades and the bottom latch is inserted.
Step 3
When the mounting is done correctly, connecting blades of
mounting system will be mated with ATEOxM and a clicking
sound will be heard.
4
ATEOxM - User manual 09
5
Step 4
There is a spring-loaded locking mechanism on the bottom
to lock the attached speaker or to release it from the wall
mount. The ATEOxM can be taken out of its place by pushing
the spring-loaded locking bolt when it is not locked.
Step 5
Tighten the spring-loaded locking bolt placed at the bottom
with the Allen key to ensure secure and safe permanent
installation.
Page 10
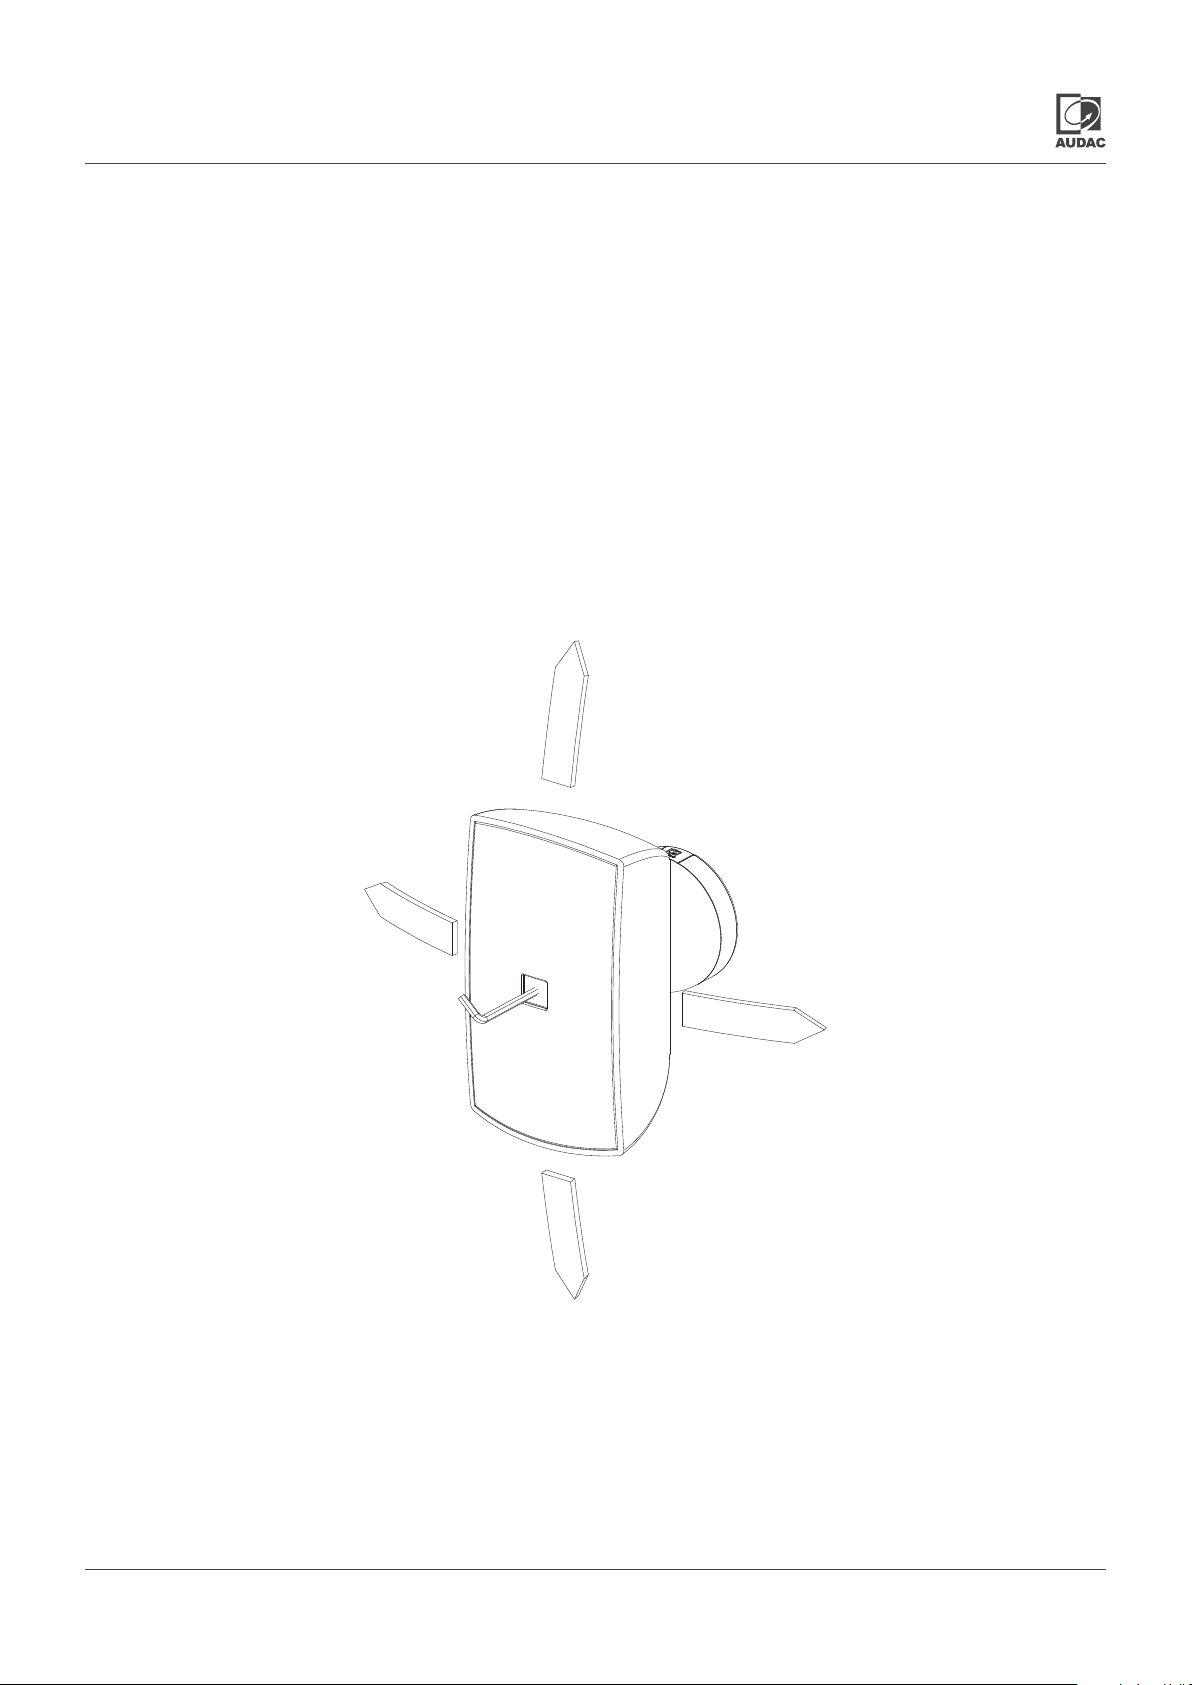
Chapter 3
Positioning ATEOxM
The last step in the mounting procedure of the speaker is pointing it in the desired direction by untightening
the Allen-key bolt located in the centre of the speaker grill. The AUDAC logo comes separately to be placed
in the centre of the speaker grill after the positioning of the ATEOxM. After this bolt is untightened by a few
turns, the speaker will be in a free state, making it possible to move it into the left (30°), right (30°), up (5°)
and down (30°) position. It can also be rotated from vertical to horizontal position (rotate counter-clockwise).
Once the speaker is placed in position and pointing into the right direction, it can be locked by tightening
the allen-key bolt. Subsequently the logo should be placed again in front of the allen-key bolt.
The ATEOxM has a protection class of IP66 thanks to the fully sealed cabinet and hydrophobic cloth behind
the grill. Position the ATEOxM at a minimum down tilt of 5° for outdoor installations. Standing water is
avoided trough this installation.
ATEOxM- User manual010
Page 11
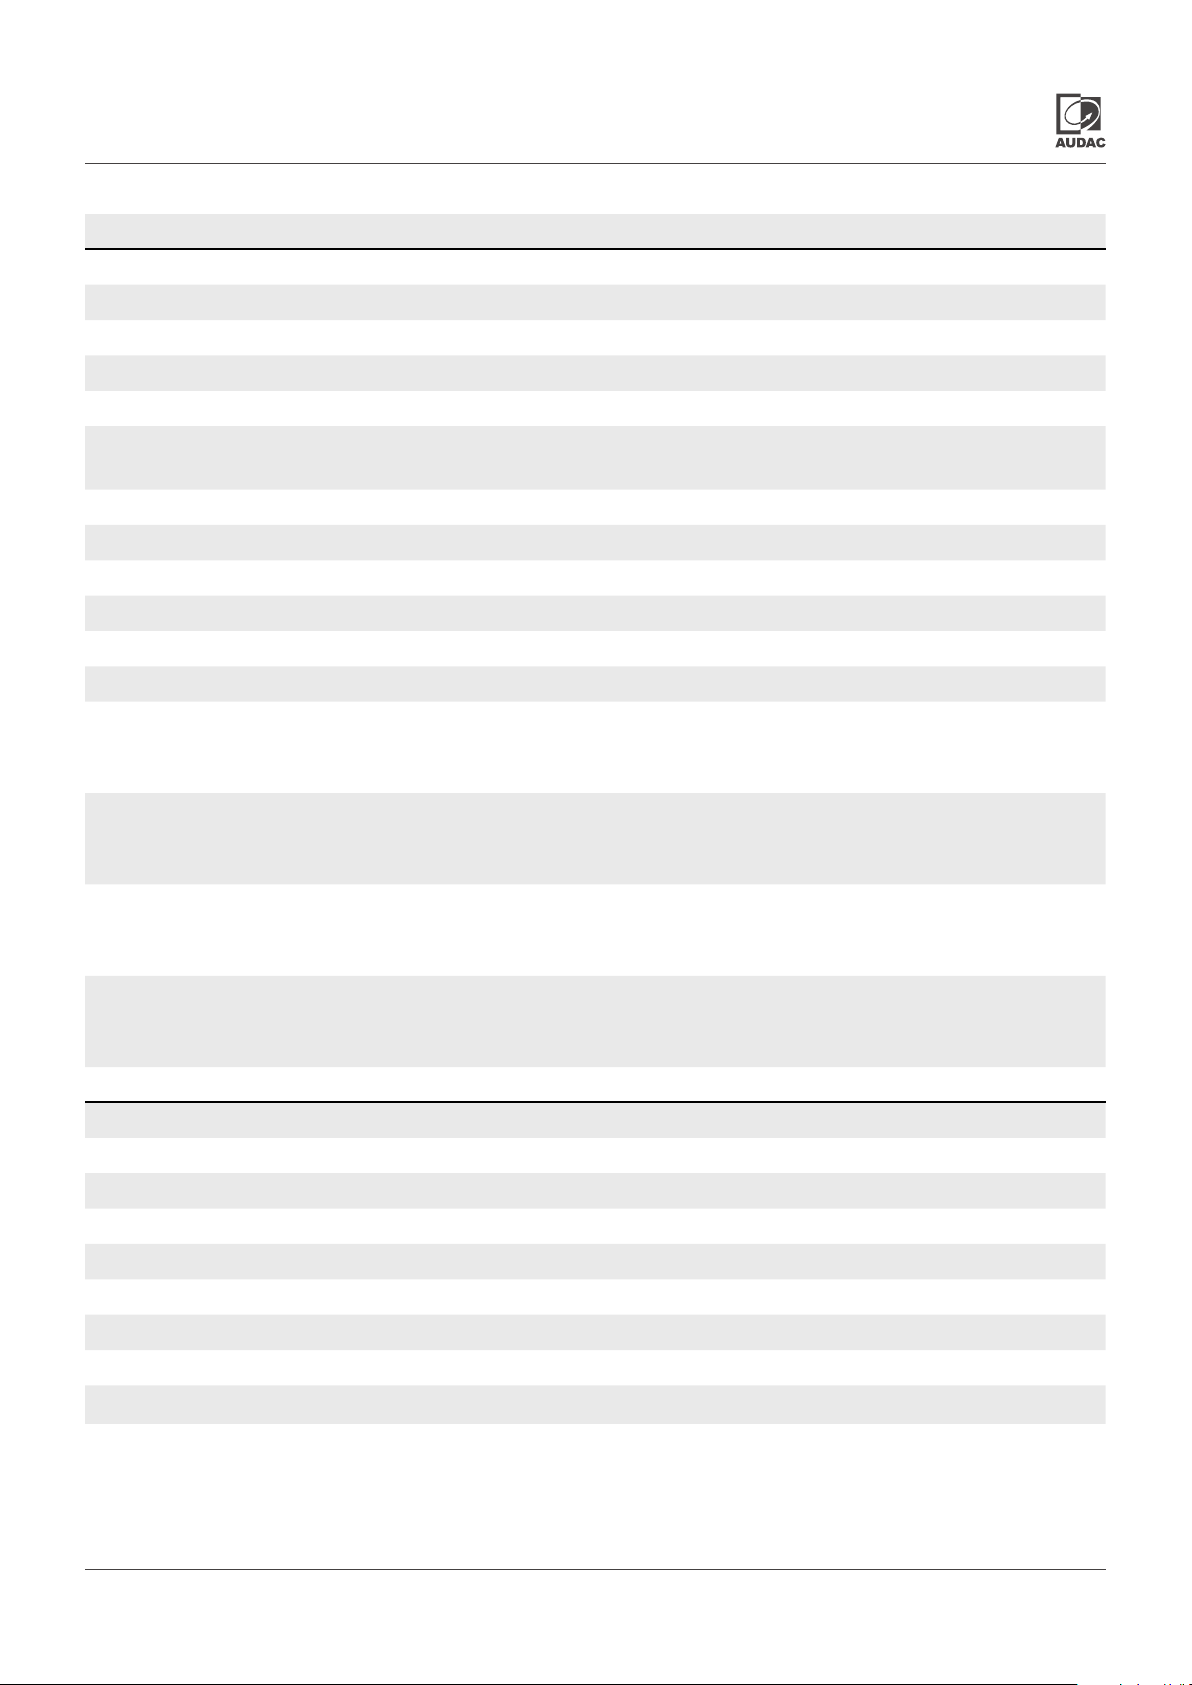
Technical specifications
ATEO4M ATEO6M
Peak Power handling 140W 240W
Program Power handling 70W 120W
RMS/AES power handling 35W 60W
Nominal impedance 8
Sensitivity 1W/1m 86 dB 89 dB
Sound pressure Max W/1m 101 dB @ 8
100 dB @ 100V
Frequency response ± 3dB 100 Hz - 20kHz 65 Hz - 20 kHz
Dispersion Horizontal 130 120
Vertical 130 120
Connectors 2 x WAGO terminal block connections
Drivers 4” MF / LF Woofer 6” MF / LF Woofer
1” Dome tweeter 1” Dome tweeter
Line Transformer Tappings
A
B
C
D
1667
6W @ 100V
3W @ 70V
833
12W @ 100V
6W @ 70V
417
24W @ 100V
12W @ 70V
208
Not in use @ 100V
24W @ 70V
106 dB @ 8
105 dB @ 100V
800
12.5W @ 100V
6.25W @ 70V
400
25W @ 100V
12.5W @ 70V
200
50W @ 100V
25W @ 70V
100
Not in use @ 100V
50W @ 70V
Ingress Protection rating IP66
Construction ABS
Front finish Aluminium grill with hydrophobic cloth
Colour Black (RAL9005)
White (RAL9003)
Dimensions (w x h x d) 136 x 244 x 153 mm 193.1 x 347.5 x 215.2 mm
Weight 2.050 kg 3.820 kg
Included accessories 2 x Allen-key wrench
Optional accessories WMP40M WMP60M
WMA40M WMA60M
RMA45M
ATEOxM - User manual 011
Page 12
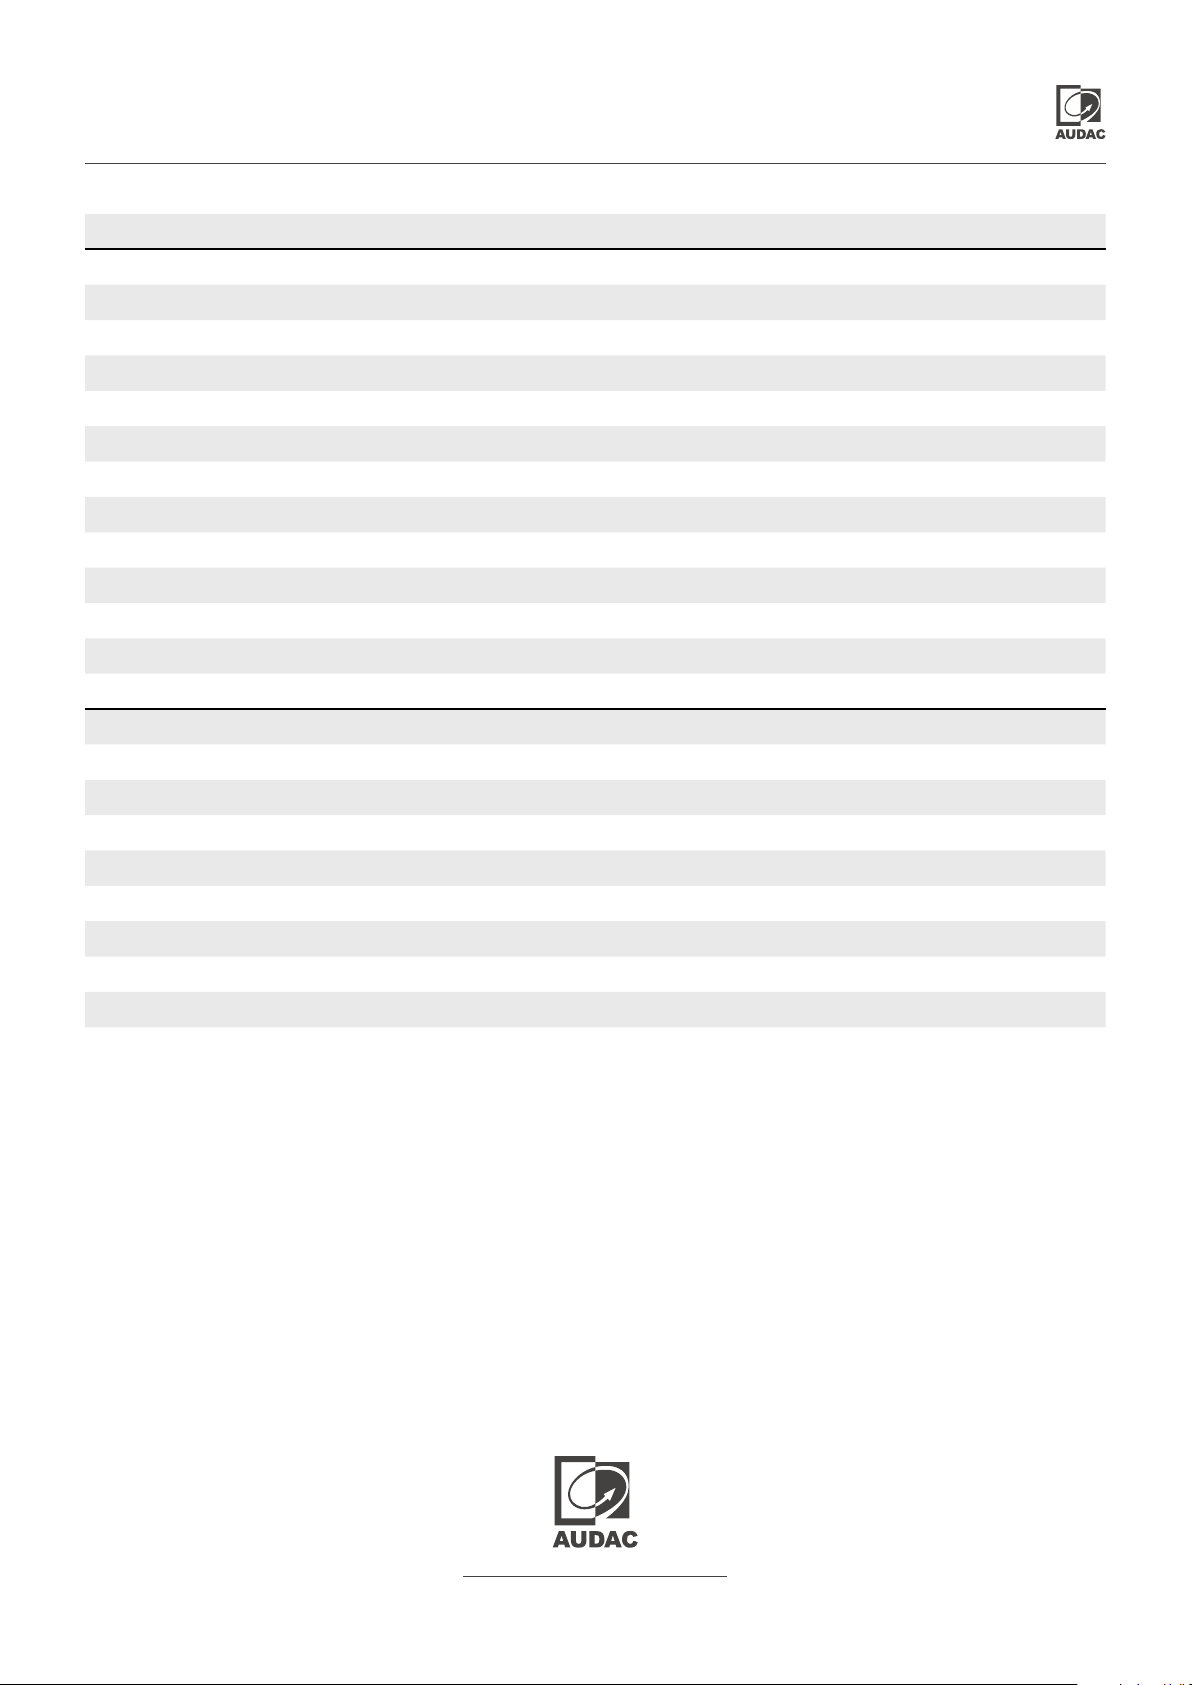
Technical specifications
ATEO4DM ATEO6DM
Peak Power handling 140W 240W
Program Power handling 70W 120W
RMS/AES power handling 35W 60W
Nominal impedance 16
Sensitivity 1W/1m 86 dB 89 dB
Sound pressure Max W/1m 101 dB @ 16 106 dB @ 16
Frequency response ± 3dB 100 Hz - 20kHz 65 Hz - 20 kHz
Dispersion Horizontal 1300 1200
Vertical 1300 1200
Connectors 2 x WAGO terminal block connections
Drivers 4” MF / LF Woofer 6” MF / LF Woofer
1” Dome tweeter 1” Dome tweeter
Ingress Protection rating IP66
Construction ABS
Front finish Aluminium grill with hydrophobic cloth
Colour Black (RAL9005)
White (RAL9003)
Dimensions (w x h x d) 136 x 244 x 153 mm 193.1 x 347.5 x 215.2 mm
Weight 1.75 kg 3.47 kg
Included accessories 2 x Allen-key wrench
Optional accessories WMP40M WMP60M
WMA40M WMA60M
RMA45M
Discover more on audac.eu
 Loading...