

Page 1
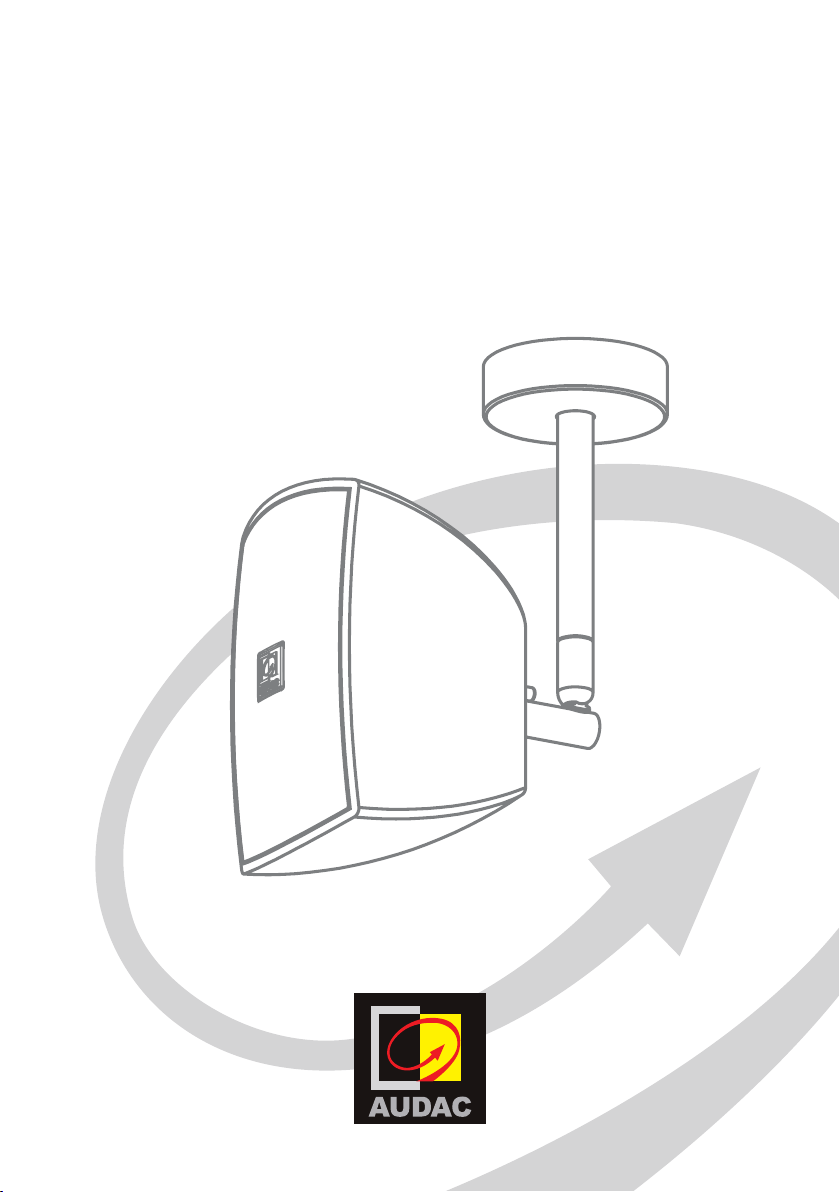
ATEO2S
User & Installation manual
www.audac.eu
Page 2

2
Page 3

3
Introduction
Compact full-range speaker with ClickMount™
The ATEO is a series of extraordinary loudspeakers especially designed for fixed install
indoor applications, ranging from modern residential applications to the most demanding
designer applications in environments such as retail stores, pubs, restaurants or even
clubs.
The ATEO2S is an ultra-compact model of this serie, which smoothly integrates into any
interior like no other loudspeaker. Fitted with a 2” aluminum cone driver, it provides a
full-range, warm and detailed sound with an improved response in the low frequencies
due to the ported enclosure. It features a stunningly designed and elegant looking ABS
housing which is fitted with high-quality components. The newly designed mounting
bracket uses the ClickMount™ technology and allows the installation of the speaker on
any ceiling or horizontal surface while directional placement and tilting can be done in
any possible direction.
The minimalistic bracket design in combination with the elegant designed cabinet
provides an elegant solution which finds its application in any type of interior.
The installation of the speaker is done by fixing the included L-shaped bracket to the
desired location on the ceiling and connecting the wires to the spring clamp terminal
block. After this is done, the female connection socket on the rear of the speaker needs
to be plugged on the male connection part of the bracket. This way the speaker is
instantly fixated and connected.
All ATEO series speakers are available in Black (/B) or White (/W).
Page 4
4
Precautions
READ FOLLOWING INSTRUCTIONS FOR YOUR OWN SAFETY
• ALWAYS KEEP THESE INSTRUCTIONS FOR FUTURE REFERENCE. NEVER THROW THEM
AWAY
• ALWAYS HANDLE THIS UNIT WITH CARE
• CLEAN ONLY WITH DRY CLOTH
• HEED ALL WARNINGS AND FOLLOW ALL INSTRUCTIONS
• NEVER EXPOSE THIS EQUIPMENT TO RAIN, MOISTURE, ANY DRIPPING OR SPLASHING
LIQUID. AND NEVER PLACE AN OBJECT FILLED WITH LIQUID ON TOP OF THIS DEVICE
• DO NOT INSTALL THIS UNIT NEAR ANY HEAT SOURCES SUCH AS RADIATORS OR
OTHER APPARATUS THAT PRODUCE HEAT
• DO NOT PLACE THIS UNIT IN ENVIRONMENTS WITH A HIGH LEVEL OF DUST, HEAT,
MOISTURE OR VIBRATION
• THIS UNIT IS DEVELOPED FOR INDOOR USE ONLY. DO NOT USE IT OUTDOORS
• ONLY USE ATTACHMENTS & ACCESSORIES SPECIFIED BY THE MANUFACTURER.
• ONLY INSTALL THE SPEAKER IN LOCATIONS THAT CAN STRUCTURALLY SUPPORT THE
WEIGHT OF THE SPEAKER. IGNORING THIS CAN BRING THE SPEAKER DOWN.
• DO NOT USE ANY OTHER METHOD THAN SPECIFIED TO MOUNT THE SPEAKER. IF
EXTREME FORCE IS APPLIED TO THE SPEAKER, IT COULD FALL DOWN
• ATTACH A SAFETY WIRE TO THE SPEAKER WHEN IT IS MOUNTED HIGH UP.
ONLY USE INDUSTRY-ACCEPTED RIGGING TOOLS AND METHODS
• CAREFULLY CHECK THE UNIT’S CONDITION AFTER UNPACKING.
IF THERE IS ANY DAMAGE TO THE CARTON BOX OR THE UNIT ITSELF, INFORM YOUR
VENDOR IMMEDIATELY.
• ALWAYS FOLLOW THE LOCAL REGULATIONS AND REQUIREMENTS REGARDING
INSTALLATION, SUSPENSION AND CONNECTION OF THIS LOUDSPEAKER. EVEN WHEN
OTHERWISE SPECIFIED IN THIS DOCUMENT.
• THE INSTALLATION OF THIS LOUDSPEAKER SHALL BE DONE BY QUALIFIED
PERSONNEL ONLY.
Page 5
5
CAUTION
• USE CABLES OF THE RIGHT GAUGE TO CONNECT THE LOUDSPEAKER
• USE CABLES WITH CLEAR COLOUR CODING INDICATING THE POLARITY AND
MAINTAIN THE SAME POLARITY THROUGHOUT THE WHOLE SYSTEM.
• ONLY USE THE CORRECT AMPLIFIER OUTPUT VOLTAGE AND IMPEDANCE.
EXCEEDING THESE LIMITS COULD CAUSE FIRE OR OTHER FAILURES.
• AVOID EXPLOSIONS: DO NOT USE THE SPEAKER AROUND GASOLINE,
THINNER OR OTHER COMBUSTIBLES
• AVOID ELECTRIC SHOCKS: SWITCH OFF THE AMPLIFIER WHEN CONNECTING
THE LOUDSPEAKER
• DO NOT USE THE LOUDSPEAKER FOR AN EXTENDED PERIOD OF TIME AT
DISTORTED SOUND. THIS COULD CAUSE PERMANENT DAMAGE.
CAUTION - SERVICING
This product contains no user serviceable parts. Refer all servicing
to qualified service personnel. Do not perform any servicing
(unless you are qualified to do so.)
EC DECLARATION OF CONFORMITY
This product conforms to all the essential requirements and further
relevant specifications described in following directives: 2014/30/
EU (EMC) and 2014/35/EU (LVD)
WASTE ELECTRICAL AND ELECTRONIC EQUIPMENT (WEEE)
The WEEE marking indicates that this product should not be
disposed with regular houshold waste at the end of its product
life. This regulation is created to protect both the environment
and human health.
This product is developed and manufactured with high quality
materials and components which can be recycled and/or reused.
Please dispose this product to your local collection point or
recycling centre for electrical and electronic waste. This will
make to sure that it will be recycled on an environmentally friendly
manner, and will help to protect the environment in which we all
live.
Page 6
6
Installing the ATEO2S
ClickMount™ Technology
Every ATEO2S speaker uses the unique Clickmount™ technology, offering an elegant
and slim solution for mounting the loudspeaker to the ceiling, while providing a great
ease for installing the loudspeaker.
Using this mounting solution, the speaker can be installed on any ceiling or horizontal
surface, while directional placement and tilting can be done in any possible direction,
even after the speaker is already installed.
The installation of the loudspeaker should be done according to a simple 4-step
procedure, which is described below:
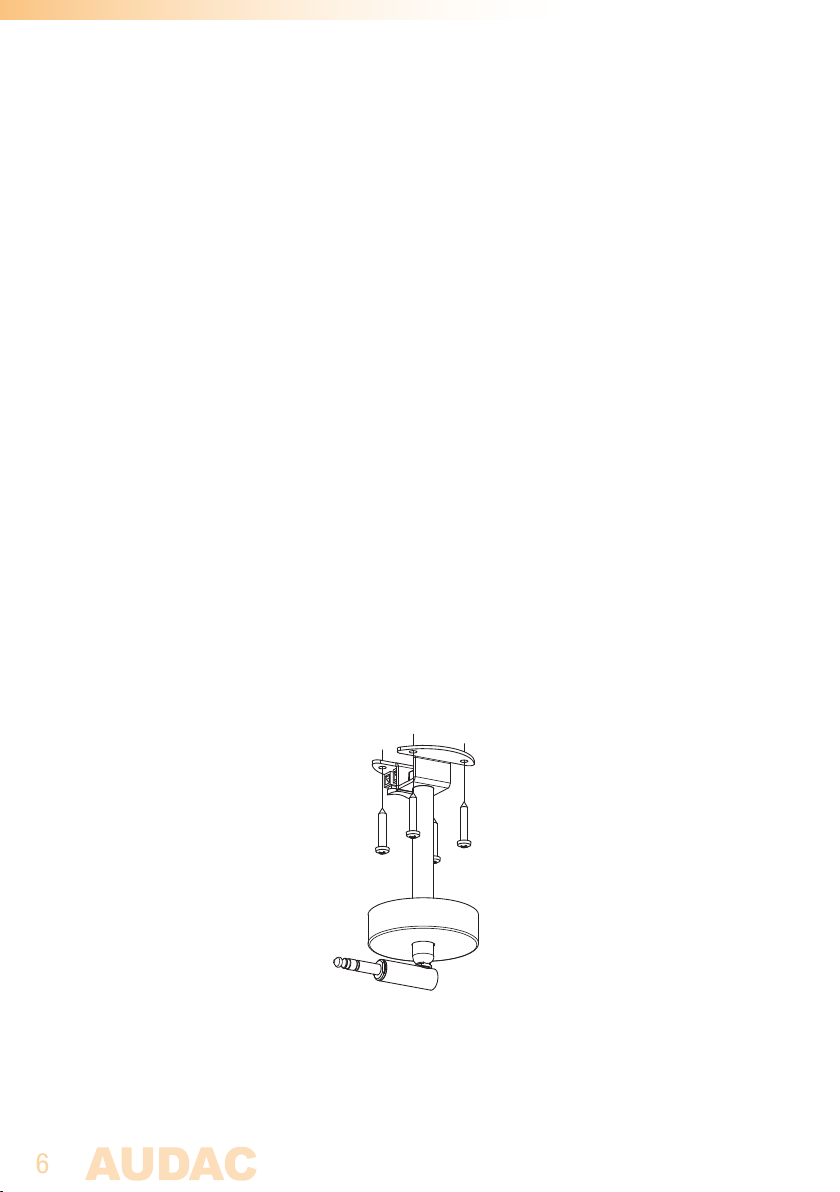
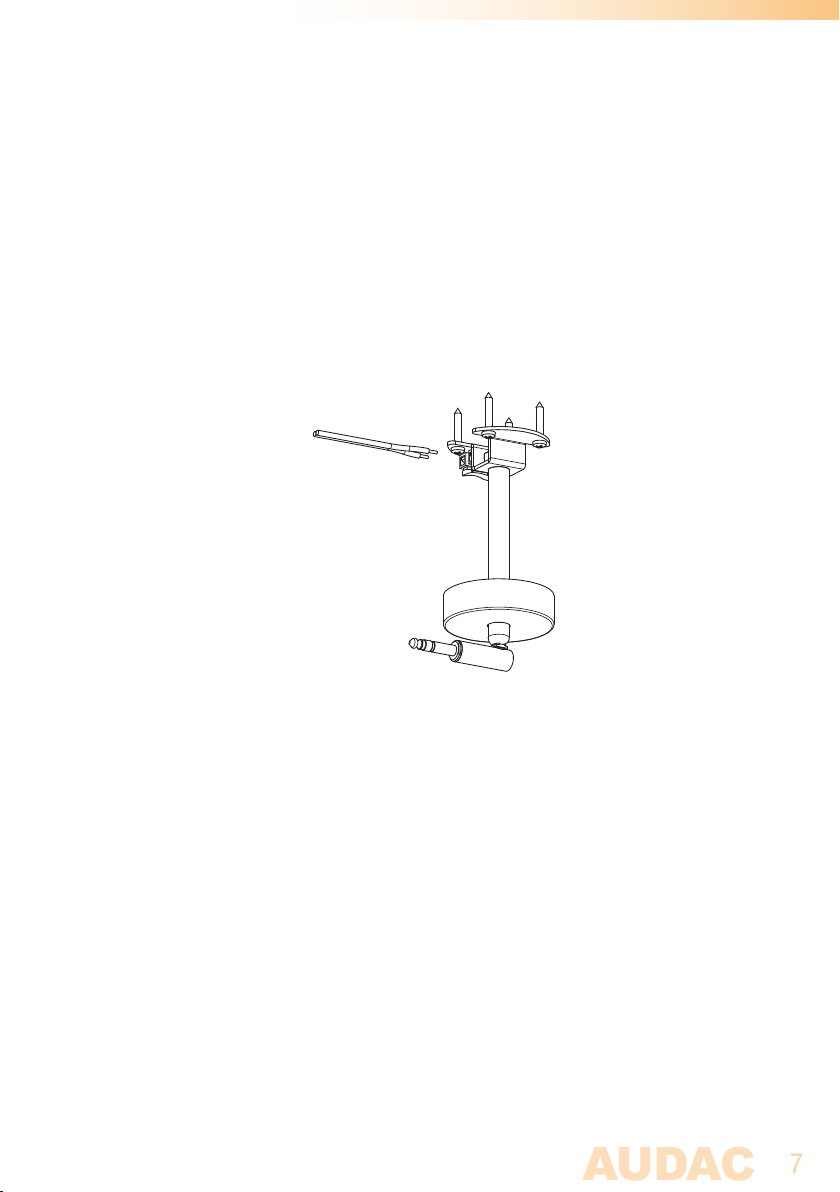
Step 1: Attach the mounting bracket
The first step is to attach the mounting bracket to the desired location. The mounting
bracket has to be fixed by four screws in a square shape. The mutual distance is 35mm
in both directions. The used fasteners should be chosen according to the mounting
surface (brick, concrete, wood, ... )
Page 7
7
Step 2: Make the connections
After the mounting bracket is attached, the connections shall be made. The ATEO2S
only allows connection in low impedance mode (8 Ohm for ATEO2S and 16 Ohm for
ATEO2SD) and therefore a terminal block connector is provided. The wires coming
from the amplifier should be connected to the spring clamp terminal block connector.
The polarity is indicated through the color coding of the wires. The red wire is the +
terminal while the black wire is the COM terminal. Make sure the polarity is always
correct throughout the entire system.
Once connected, the ceiling cover can be slided and clicked in place, nicely covering
the screws and connections. Mind the direction of the fixation clips at the inner side of
the cover, to make sure they nicely get into place when pressed onto the bracket.
Mind the polarity markings when wiring the loudspeaker cables.
Page 8
8
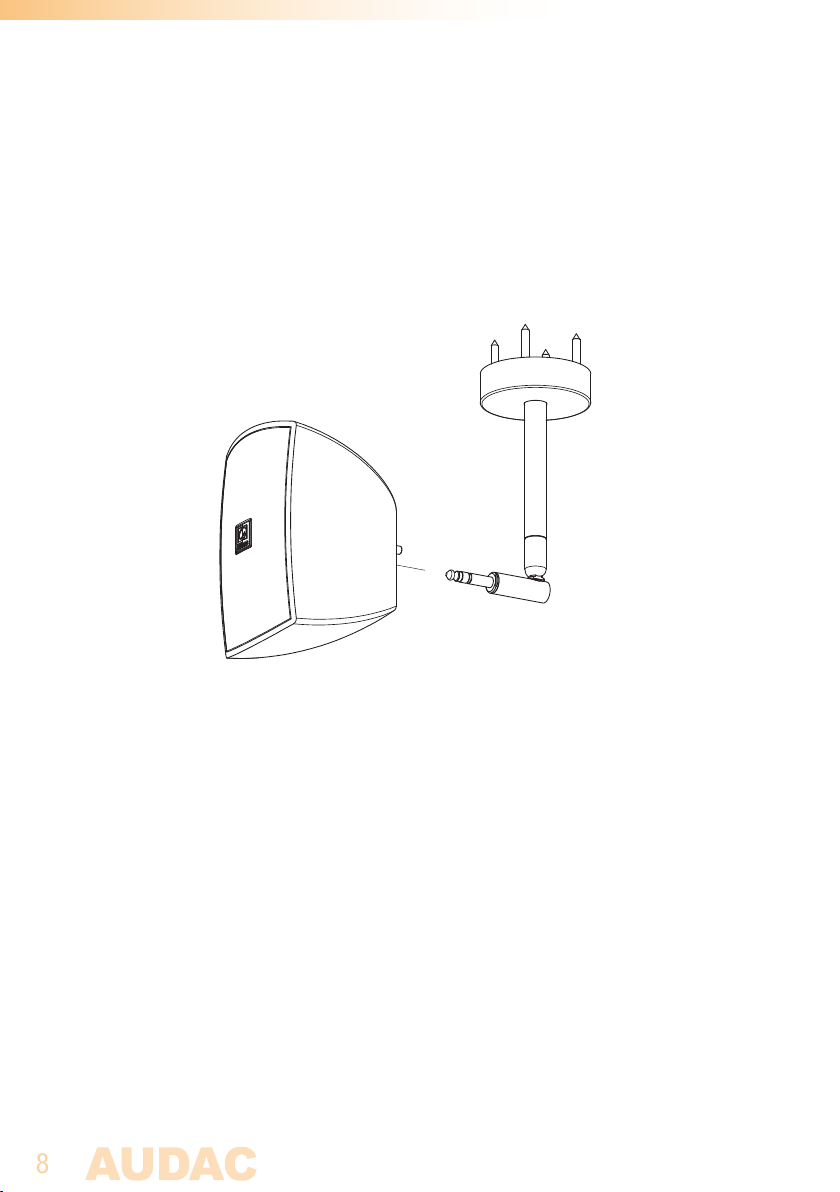
Step 3: Attach the speaker
After the bracket is mounted and the connections have been made, the speaker shall be
attached. Attaching is simply done by inserting the male 6.3 mm plug from the bracket
into the female counterpart on the rear side of the loudspeaker. Once inserted, the
speaker shall be pressed on the male part until the connections are clicked in position.
Now the speaker is safely fixated and connected.
Step 4: Position the loudspeaker
The last step in the installation procedure of the speaker is pointing it into the correct
direction. The ball joint mechanism allows adjustment of the direction of the loudspeaker
without requiring any tools.
Carefully point the speaker into the correct direction and it will automatically remain in
this position.
Page 9
9
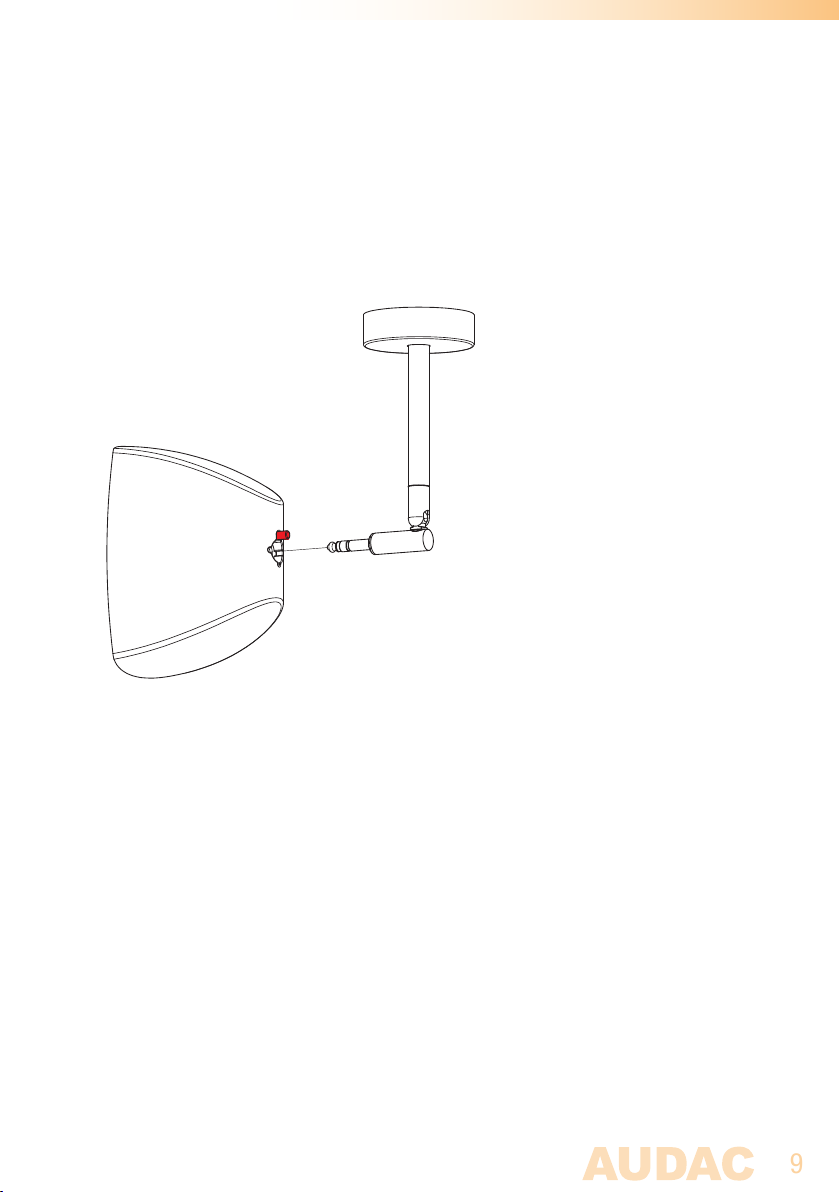
Detaching the speaker
In case the speaker needs to be detached from the bracket press the small button on
the back of the speaker, marked on the drawing below. This will release the locking
mechanism inside the speaker. Do this while pulling the speaker from the male part of
the bracket to detach the speaker.
Page 10

10
Additional Information
Technical specifications
Max Power 20 Watt
RMS Power 10 Watt
Nominal impedance ATEO2S
ATEO2SD
Sensitivity (1W/1m) 83 dB
Sound Pressure (Max W/1m)
@ 8 Ohm
Frequency Response (± 3 dB) 120 Hz - 20 kHz
Drivers 2” Aluminum full range
Connectors 2-pin spring clamp
Mounting bracket ClickMount™
Construction ABS
Front finish Fine perforated steel grill
Incline Angle Left & Right 175°
Bottom 90°
Top 0°
8 Ohm
16 Ohm
93 dB
Colour White ATEO2S/W (RAL9003)
ATEO2SD/W (RAL9003)
Black ATEO2S/B (RAL9005)
ATEO2SD/B (RAL9005
Dimensions (W x H x D) 80.5 x 201.7 x 158.7 mm
Weight 0.52 Kg
Packaging Carton box (pair)
Shipping weight & Volume 1.35 Kg - 0.0084 Cbm (pair)
 Loading...