

Page 1
User manual
ARES5A
Page 2

ADDITIONAL INFORMATION
This manual is put together with much care, and is as complete as could be on the publication date. However,
updates on the specifications, functionality or software may have occurred since publication.
ARES5A - User manual02
Page 3

Table of contents
Introduction 05
Active speaker system � � � � � � � � � � � � � � � � � � � � � � � � � � � � � � � � � � � � � � � � � � � � � � � � � � � � � � � � � � � � 05
Precautions 06
Chapter 1 08
Connections and connectors � � � � � � � � � � � � � � � � � � � � � � � � � � � � � � � � � � � � � � � � � � � � � � � � � � � � � � 08
Chapter 2 09
Overview ARES5A: Rear � � � � � � � � � � � � � � � � � � � � � � � � � � � � � � � � � � � � � � � � � � � � � � � � � � � � � � � � � � 09
Overview ARES5: passive
� � � � � � � � � � � � � � � � � � � � � � � � � � � � � � � � � � � � � � � � � � � � � � � � � � � � � � � � 010
Chapter 3 011
Placement and mounting � � � � � � � � � � � � � � � � � � � � � � � � � � � � � � � � � � � � � � � � � � � � � � � � � � � � � � � � � � 011
Technical specications 013
Notes 014
ARES5A - User manual 03
Page 4

ARES5A - User manual04
Page 5

Introduction
Active speaker system
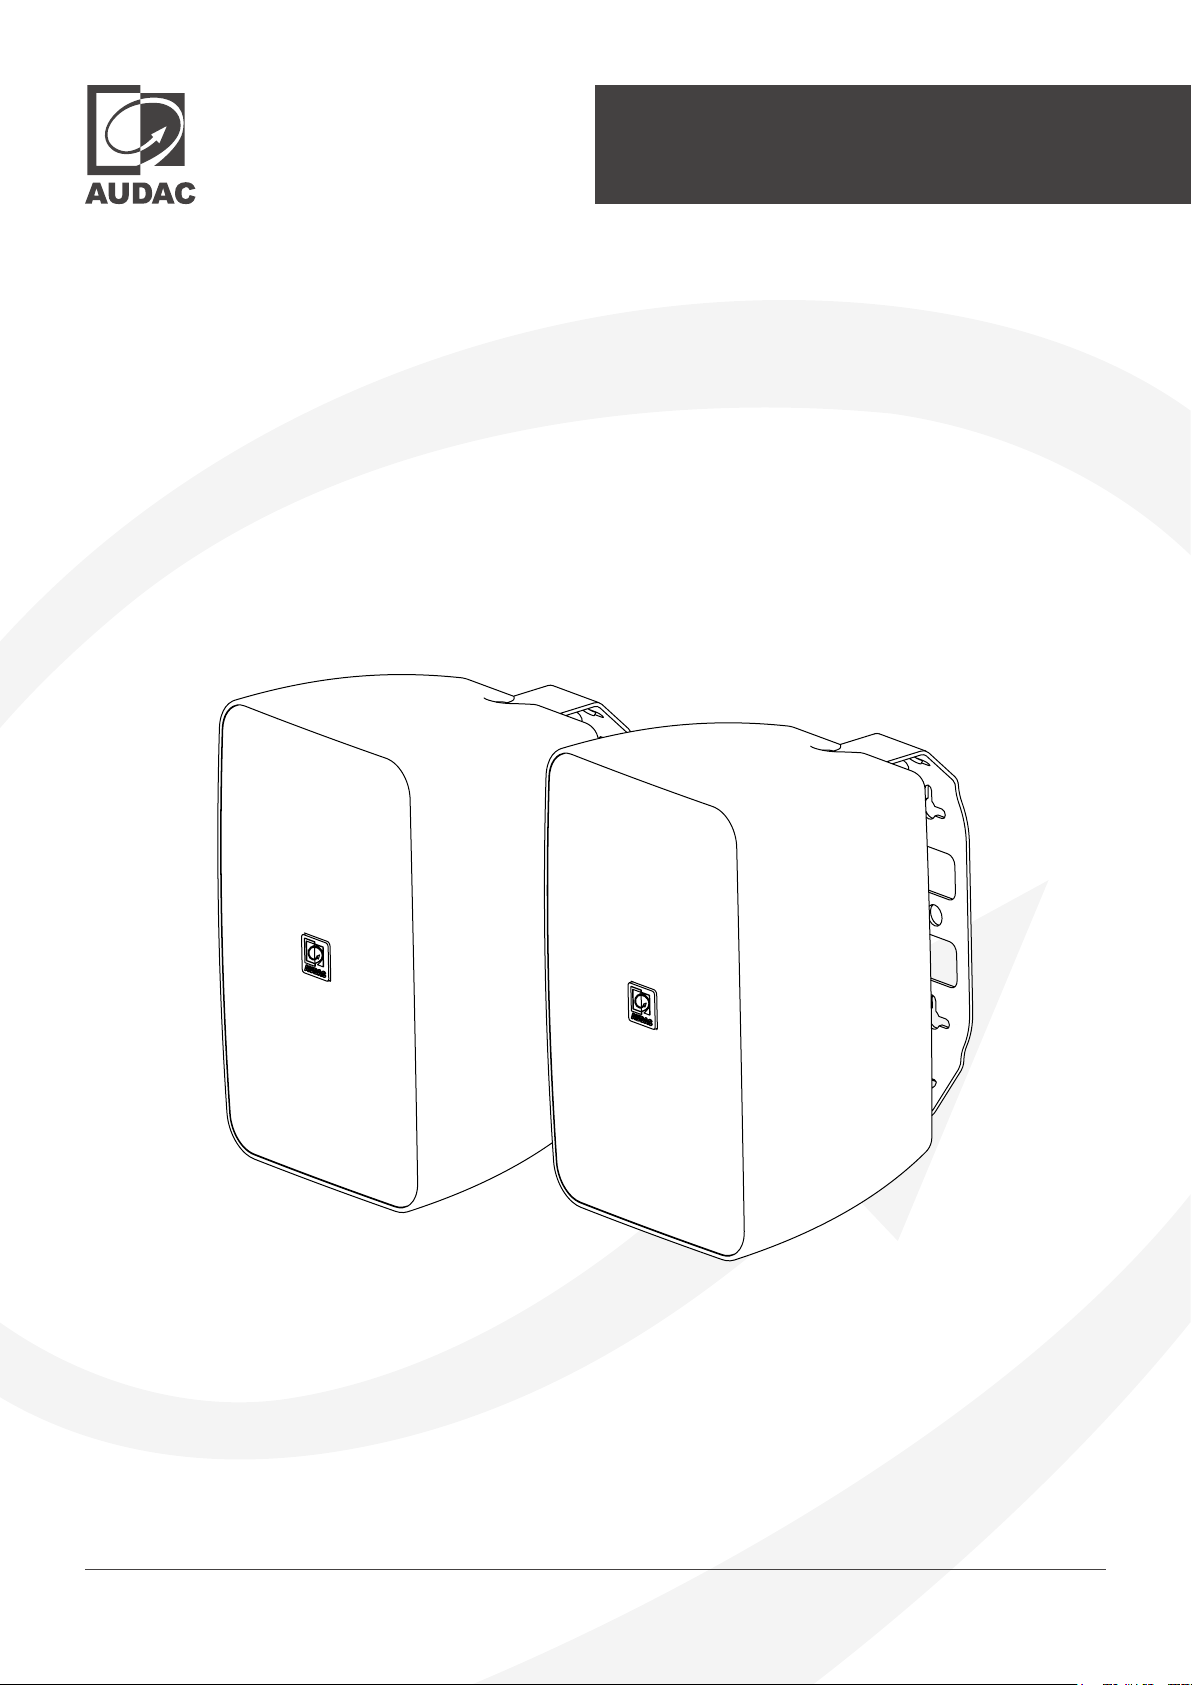
The ARES5A is a 2-way active speaker system consisting of an active and passive unit to be linked with each other.
It offers an easy and exible solution for a wide variation of applications, producing a clear and powerful sound.
The integrated amplier can deliver a power of 2 x 40 Watt and includes a stereo line input which is implemented
balanced and unbalanced, allowing convenient connection to any kind of audio source. Unbalanced audio sources
are connected through a 3.5 mm jack connector, while balanced sources can be connected to the terminal block
input connection allowing long signal runs without interference. A volume potentiometer allows the user to adjust
the level of loudness while the two-band tone control allows equalization of treble and bass. The auto-standby
mode reduces the power consumption when no input signal is detected. The active speaker includes an stereo
amplier module, also delivering the input signal to the passive unit.
A special designed bracket systems allows close to wall installation of the speakers, while the recessed bracket
structure guarantees an optimal cosmetic outlook of the system.
A remote input connection implemented trough an RJ45 connector allows wall panel connections, allowing
expansion of the system through remote input modules. A variation of optional remote input units with different
input possibilities is available.
ARES5A - User manual 05
Page 6

Precautions
READ FOLLOWING INSTRUCTIONS FOR YOUR OWN SAFETY
ALWAYS KEEP THESE INSTRUCTIONS. NEVER THROW THEM AWAY
ALWAYS HANDLE THIS UNIT WITH CARE
HEED ALL WARNINGS
FOLLOW ALL INSTRUCTIONS
NEVER EXPOSE THIS EQUIPMENT TO RAIN, MOISTURE, ANY DRIPPING OR SPLASHING LIQUID. AND NE VER PL ACE AN OBJECT FILLED WITH
LIQUID ON TOP OF THIS DEVICE
NO NAKED FLAME SOURCES, SUCH AS LIGHTED CANDLES, SHOULD BE PLACED ON THE APPARATUS
DO NOT PLACE THIS UNIT IN AN ENCLOSED ENVIRONMENT SUCH AS A BOOKSHELF OR CLOSET. ENSURE THERE IS ADEQUATE
VENTILATION TO COOL THE UNIT. DO NOT BLOCK THE VENTILATION OPENINGS.
DO NOT STICK ANY OBJECTS THROUGH THE VENTILATION OPENINGS.
DO NOT INSTALL THIS UNIT NEAR ANY HEAT SOURCES SUCH AS RADIATORS OR OTHER APPARATUS THAT PRODUCE HEAT
DO NOT PLACE THIS UNIT IN ENVIRONMENTS WHICH CONTAIN HIGH LEVELS OF DUST, HEAT, MOISTURE OR VIBRATION
THIS UNIT IS DEVELOPED FOR INDOOR USE ONLY. DO NOT USE IT OUTDOORS
PLACE THE UNIT ON A STABLE BASE OR MOUNT IT IN A STABLE RACK
ONLY USE ATTACHMENTS & ACCESSORIES SPECIFIED BY THE MANUFACTURER
UNPLUG THIS APPARATUS DURING LIGHTNING STORMS OR WHEN UNUSED FOR LONG PERIODS OF TIME
ONLY CONNECT THIS UNIT TO A MAINS SOCKET OUTLET WITH PROTECTIVE EARTHING CONNECTION
THE MAINS PLUG OR APPLIANCE COUPLER IS USED AS THE DISCONNECT DEVICE, SO THE DISCONNECT DEVICE SHALL BE READILY
OPERABLE
USE THE APPARATUS ONLY IN MODERATE CLIMATES
CAUTION
The symbols shown are internationally recognized symbols that warn about potential hazards of electrical products.
The lightning ash with arrow point in an equilateral triangle means that the unit contains dangerous voltages. The
exclamation point in an equilateral triangle indicates that it is necessary for the user to refer to the users manual.
These symbols warn that there are no user serviceable parts inside the unit. Do not open the unit. Do not attempt to service
the unit yourself. Refer all servicing to qualied personnel. Opening the chassis for any reason will void the manufacturer’s
warranty. Do not get the unit wet. If liquid is spilled on the unit, shut it off immediately and take it to a dealer for service.
Disconnect the unit during storms to prevent damage.
ARES5A - User manual06
Page 7

CAUTION - SERVICING
This product contains no user serviceable parts. Refer all servicing to qualied service personnel. Do
not perform any servicing (unless you are qualied to)
EC DECLARATION OF CONFORMITY
This product conforms to all the essential requirements and further relevant specications described
in following directives: 2014/30/EU (EMC) and 2014/35/EU (LVD)
WASTE ELECTRICAL AND ELECTRONIC EQUIPMENT (WEEE)
The WEEE marking indicates that this product should not be disposed with regular household waste
at the end of its life cycle. This regulation is created to prevent any possible harm to the environment
or human health.
This product is developed and manufactured with high quality materials and components which can be
recycled and/or reused. Please dispose this product at your local collection point or recycling centre for
electrical and electronic waste. This will make sure that it will be recycled in an environmentally friendly
manner, and will help to protect the environment in which we all live.
ARES5A - User manual 07
Page 8
Chapter 1
Connections and connectors
CONNECTION STANDARDS
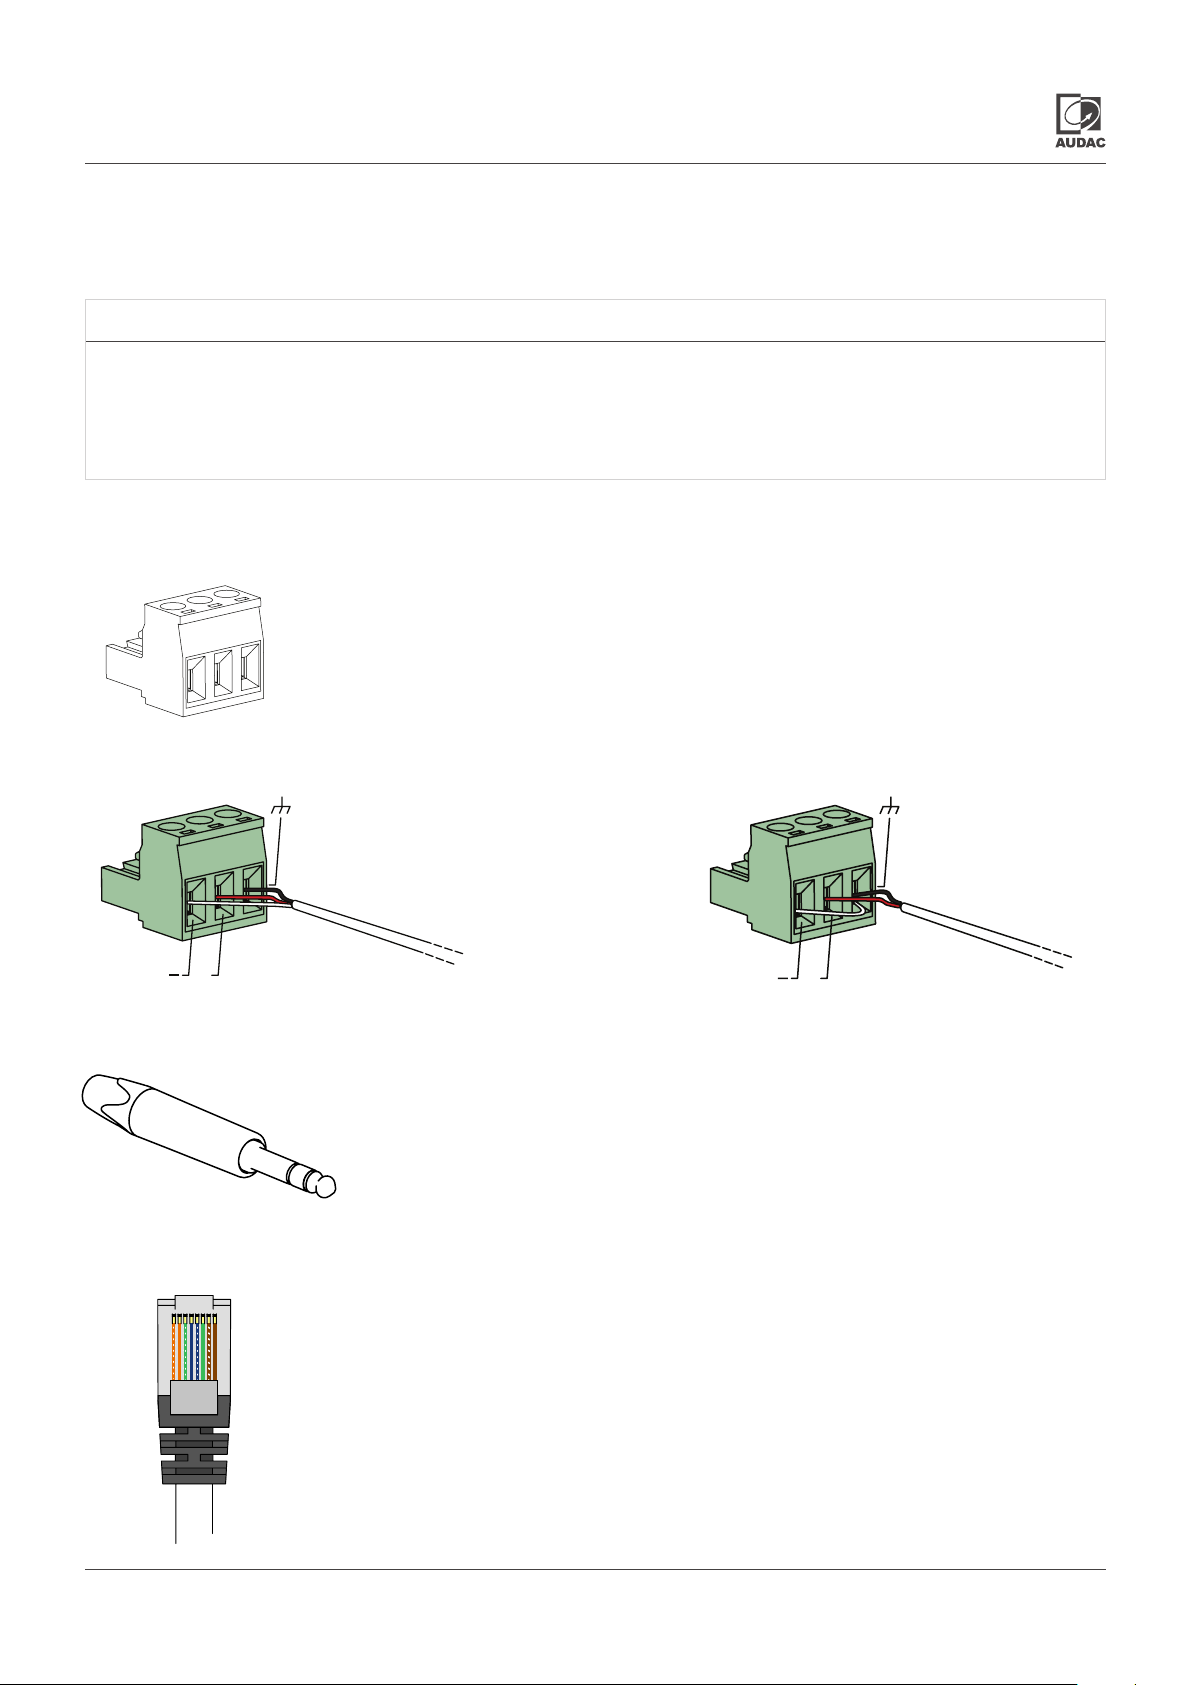
The in- and output connections for AUDAC audio equipment are performed according to international wiring
standards for professional audio equipment
3-Pin Terminal block:
For unbalanced line input connections
Left:
Center:
Right:
For balanced signal input connections For unbalanced signal input connections
+
3.5 mm jack:
For unbalanced line input connections
Tip:
Ring:
Sleeve:
Signal -
Signal +
Ground
Left
Right
Ground
(XLR Pin 3)
(XLR Pin 2)
(XLR Pin 1)
+
RJ45 (Audio, +24V DC)
Remote input units
Pin 1 White-Orange Left channel +
Pin 2 Orange Left channel -
Pin 3
Pin 4
Pin 5 White-Blue Not connected
Pin 7
Pin 8
White-Green +24V DC
Blue Not connected
Pin 6 Green GND
White-Brown Right channel +
Brown Right channel -
ARES5A - User manual08
Page 9
Chapter 2
Overview ARES5A: Rear
10
1
4
5
2
7
6
8
3
9
CAUTION: To reduce risk of fire or electrical
shock, do not expose this unit to rain or
moisture
ATTENTION: Pour réduire les risques
d’incendie ou d’électrocution, ne pas
exposer cet appareil à la pluie ou à l’humidité
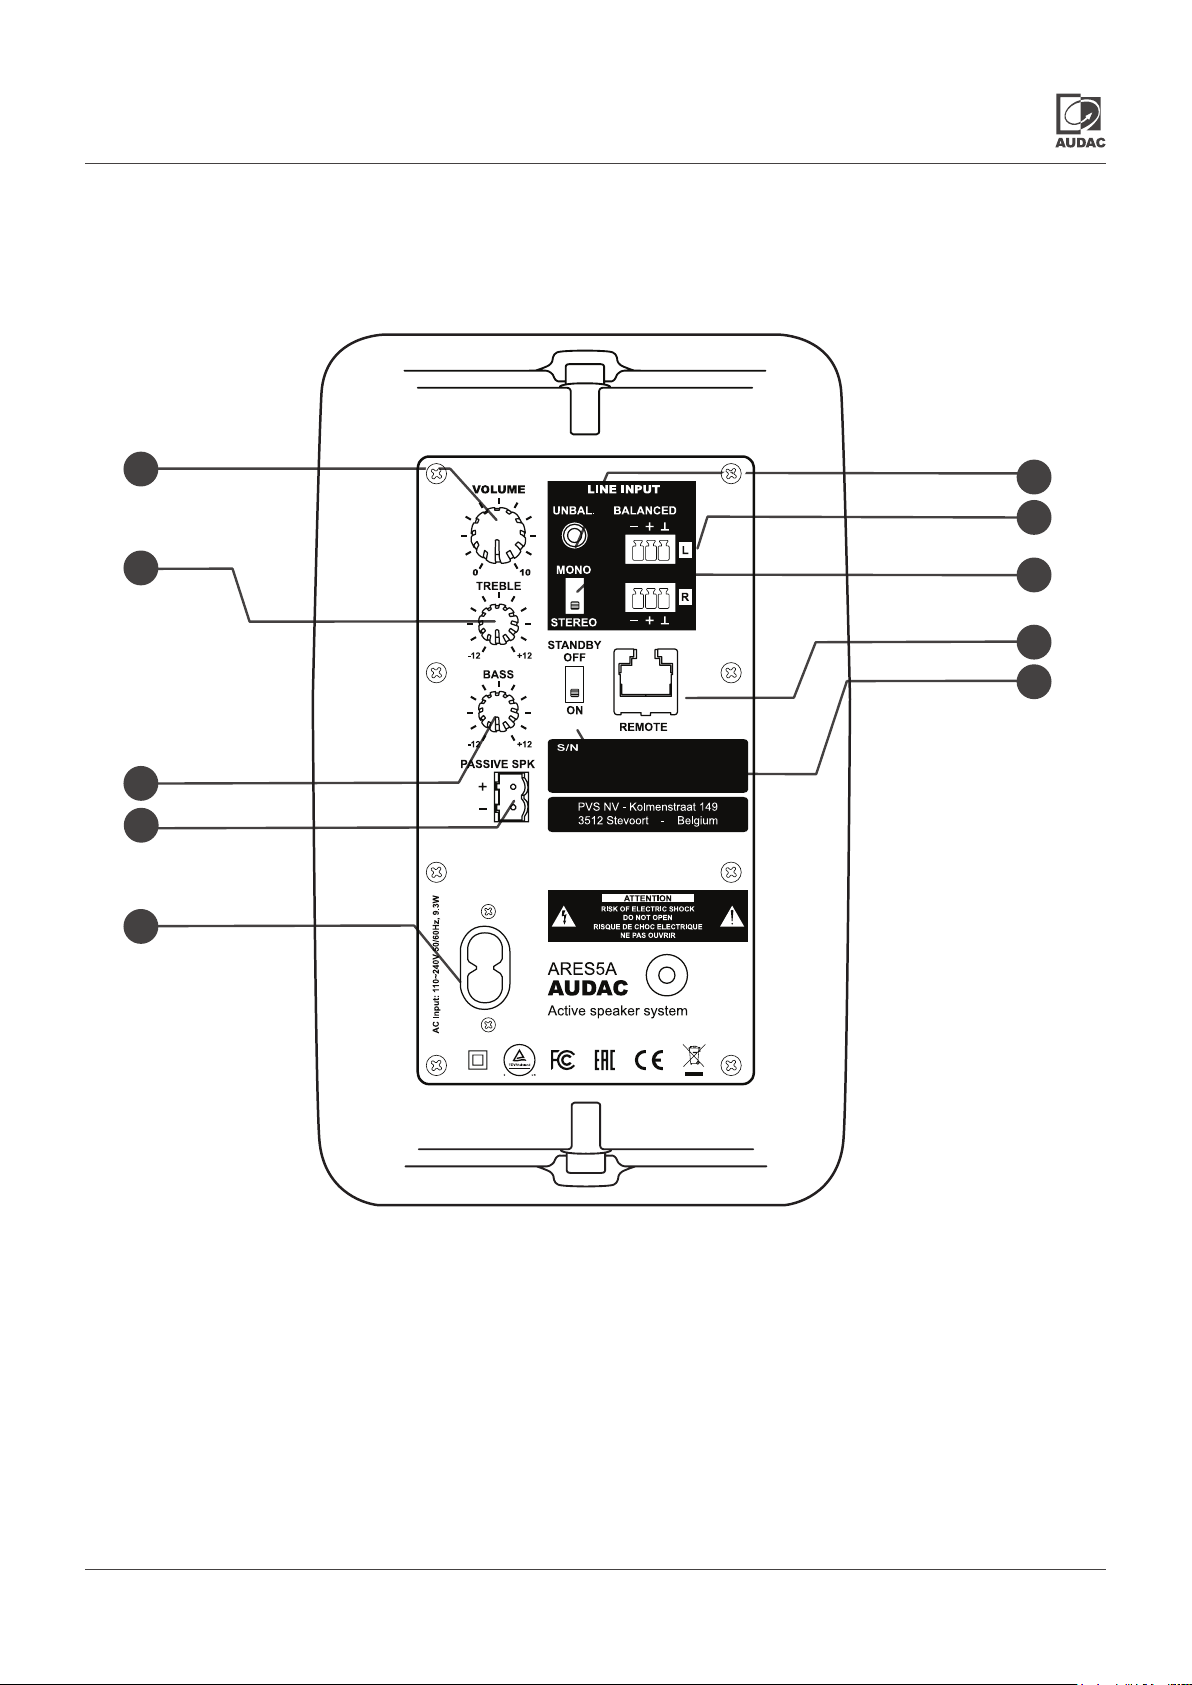
1) Volume control
This button controls the general volume of the speaker
system.
2) Treble control
This button allows you to increase or decrease the high
frequencies by 12 dB. By adding high frequencies, the
intelligibility can be improved. In the center position, the
sound is neutral. You can adjust it to the desired level.
ARES5A - User manual 09
Page 10
3) Bass control:
7) Stereo/mono switch:
By adding bass, you can add warmth to your music.
Decreasing bass can improve the intelligibility of spoken
messages, certainly in reverberant rooms. These values
can be increased or decreased by 12 dB
4) Unbalanced line input 3.5mm:
The audio source from a portable device like a laptop,
a phone, … can be connected to this unbalanced line
input. The applied signal should be a line-level signal.
5) Balanced line input:
These inputs can be used when connecting source
devices with a balanced output signal. The balanced
input connections are performed using three-pin
Terminal block connectors. Balanced signals are less
sensitive for interference caused by external devices.
For this reason is balanced wiring recommended when
using long cable runs between the source device and
the speakers, or when installed in areas where a lot of
interference occurs.
This switch allows the operation mode to be switched
between mono and stereo mode. When the speaker
is operated in mono, the left and right input signals will
be mixed and fed to the amplier.
8) Standby switch:
In normal operation, the speaker switches to standby
mode after ~20 minutes of inactivity (no signal detection).
It automatically wakes-up in presence of an input signal.
This switch allows to enable & disable the auto standby
mode in situations where this behavior is not desirable.
When switched ON, the power LED illuminates in blue
color, while orange when switched to standby.
9) Speaker output:
This two pin terminal block connector should be used to
connect the supplied passive loudspeaker. Using other
loudspeakers can give bad results and even cause
damage to the main unit. Be sure that the polarity of
the speakers is correct.
6) Remote connector:
Remote input units can be connected to this RJ45 input
connector. For more information about compatible devices
and further information about pinouts, cable runs and
technical possibilities, check additional documentation on
our websites or from the optional accessories.
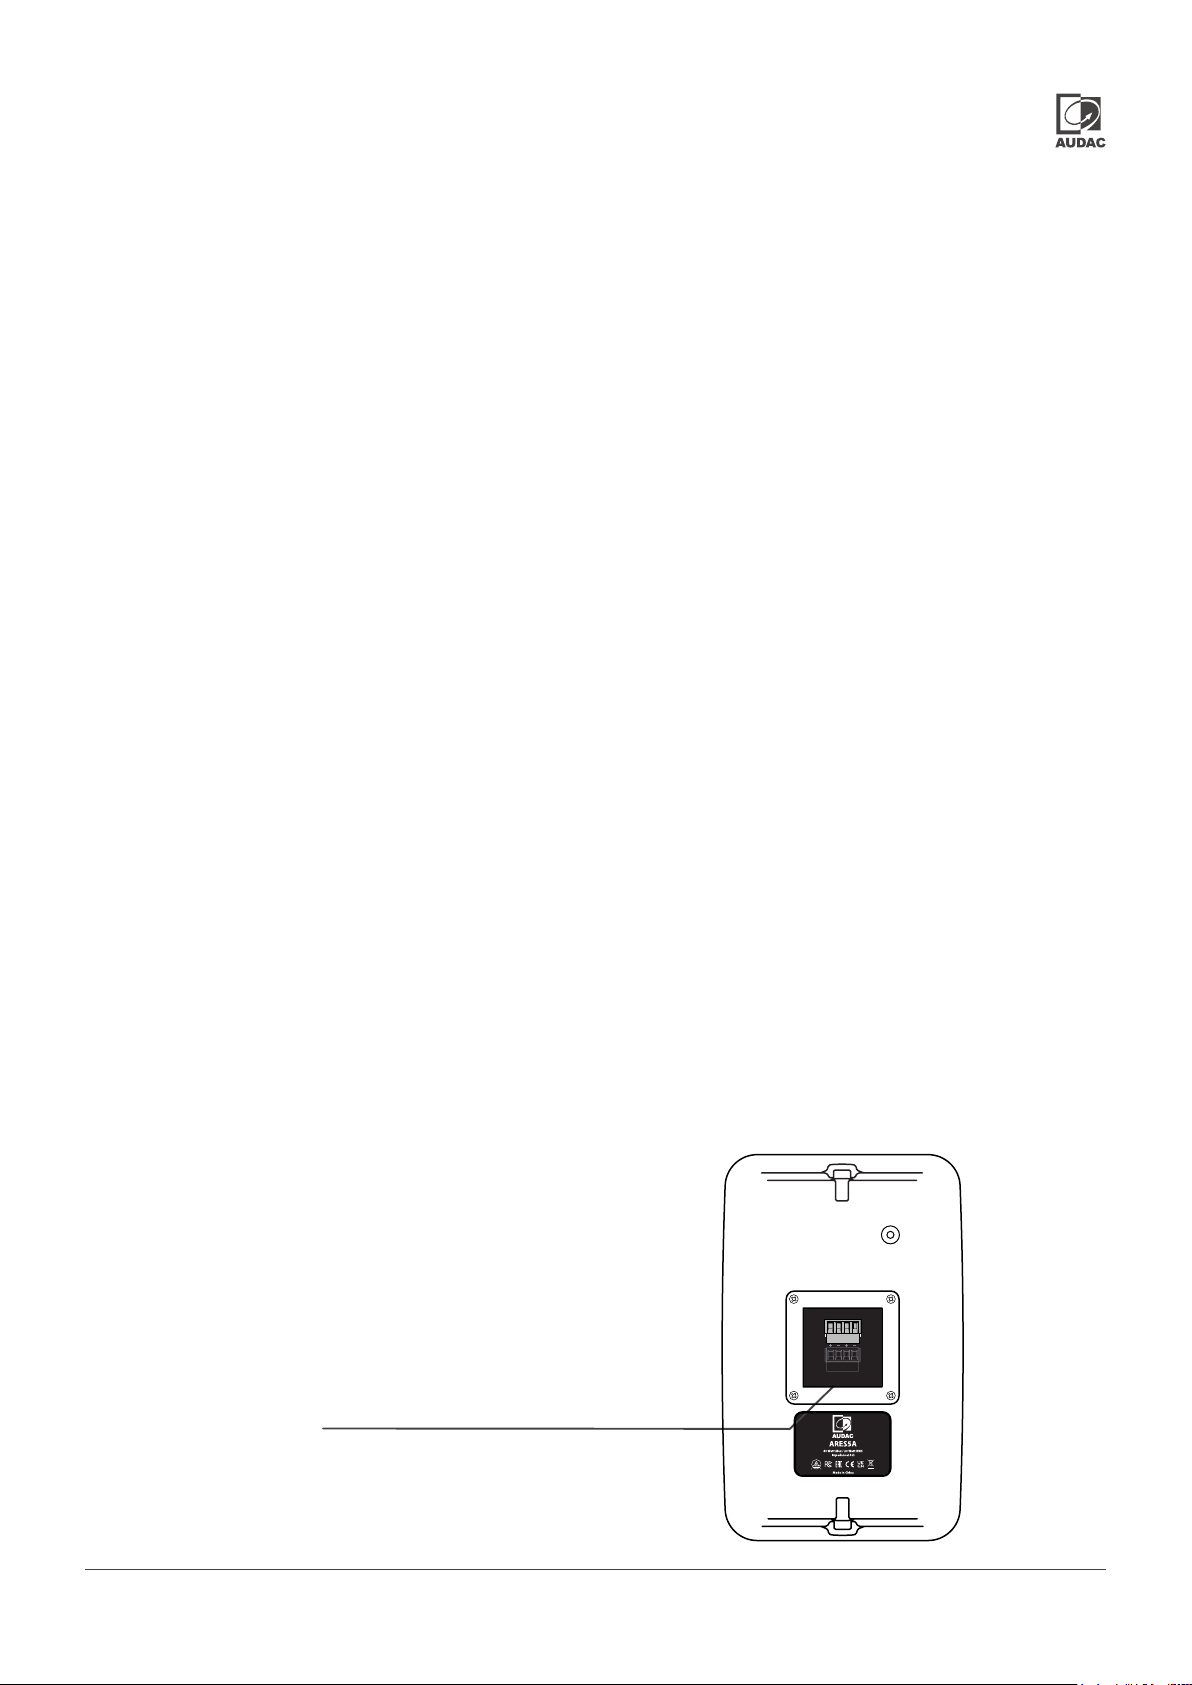
Overview ARES5: passive
Terminal block connector
10) Power supply socket:
The unit should be connected to the mains circuit by using
a standard IEC C7/C8 power cord.
ARES5A - User manual010
Page 11
Chapter 3
Placement and mounting
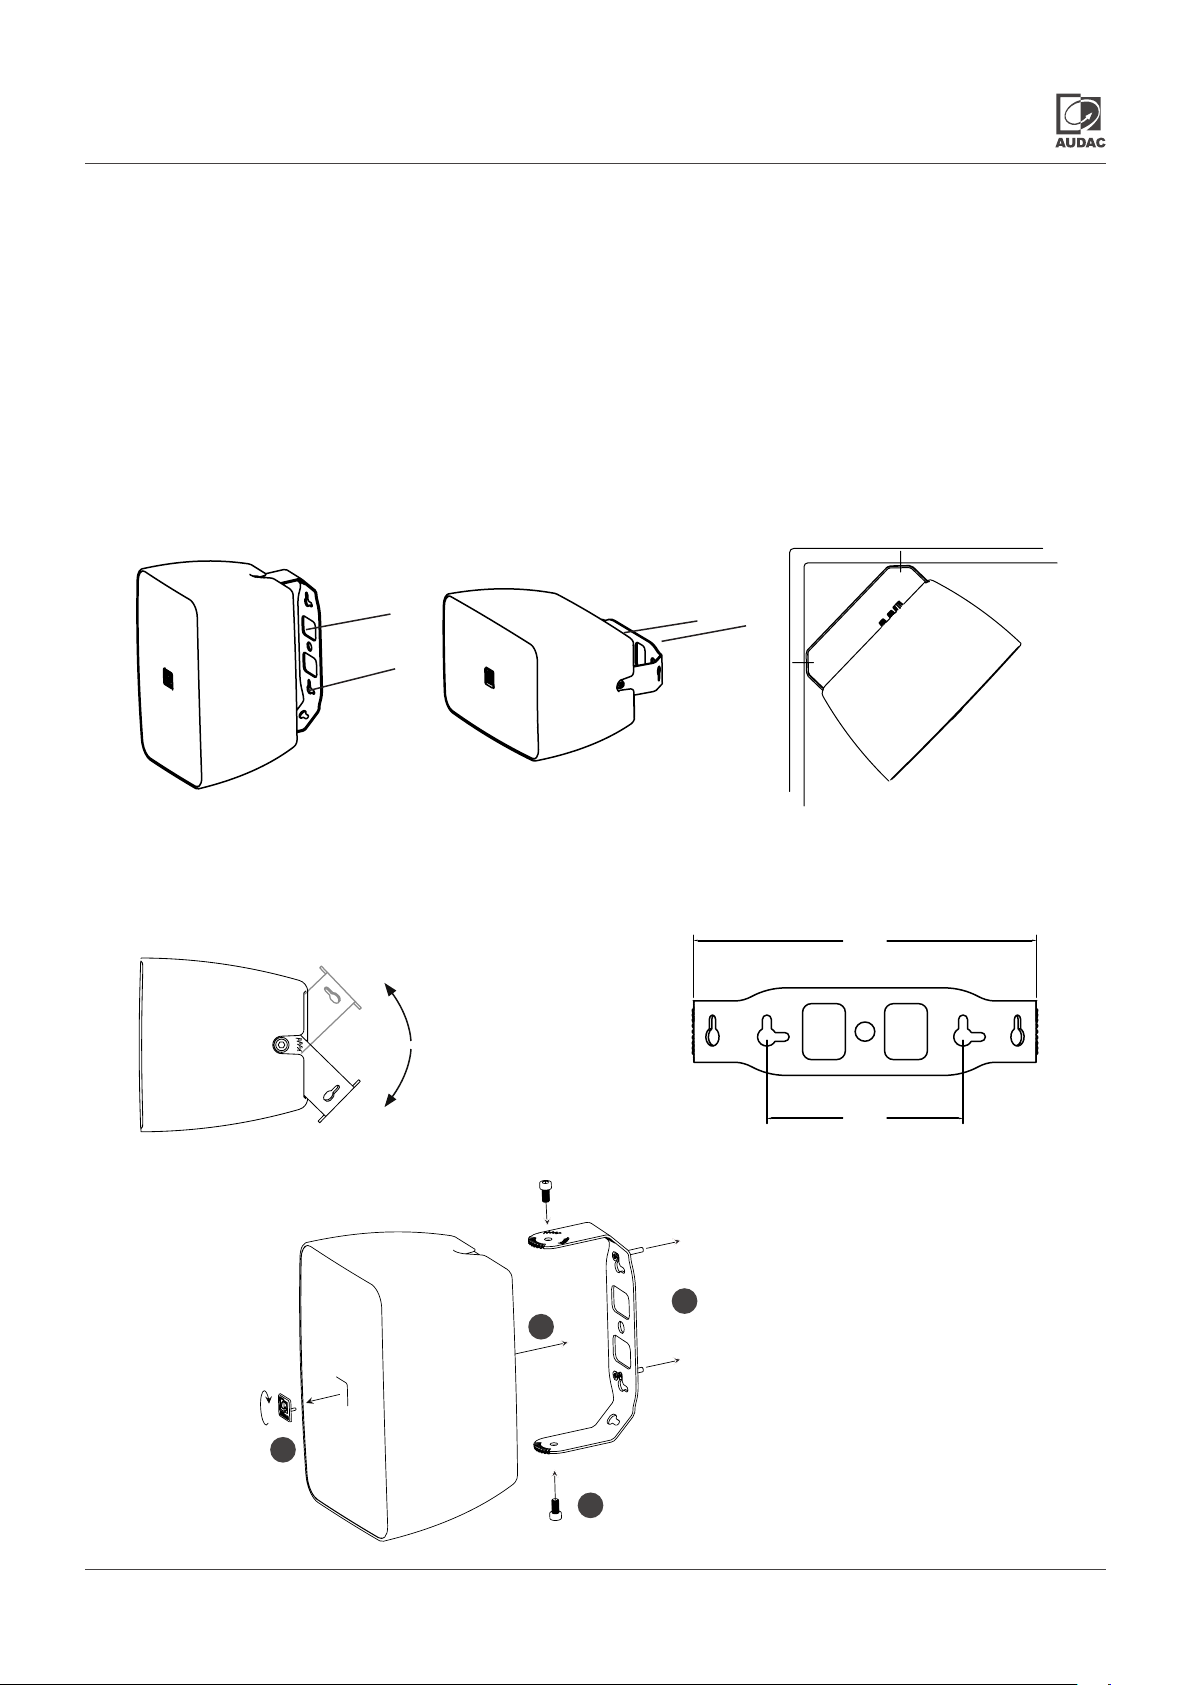
The ARES5A has to be xed to the wall by two screws and plugs. Two screws and plugs are supplied, but should
be selected depending on the mounting surface. The screws are tted into the provided slots of the bracket. The
shape of the slots allows the screws to be inserted into the wall rst, after which the speaker is suspended. There
are three different mounting possibility’s for the ARES5A: horizontally, vertically or corner. Make sure the appropriate
fasteners are used, depending on the mounting surface (brick, concrete, wood, ...)
1) Vertical mounting
Inclination angle
45°
Installation
45° tilt up
45° tilt down
3) Corner mounting2) Horizontal mounting
Installation dimensions
192.00
110.00
1:
Attach the bracket to the
mounting surface
1
2
2:
Insert the bracket in the provided slots
in the cabinet and tighten the two bolts
3:
Fix the ARES in the preferred position
Adjust the AUDAC logo into the correct
4
3
4:
position by pulling and rotating it.
ARES5A - User manual 011
Page 12
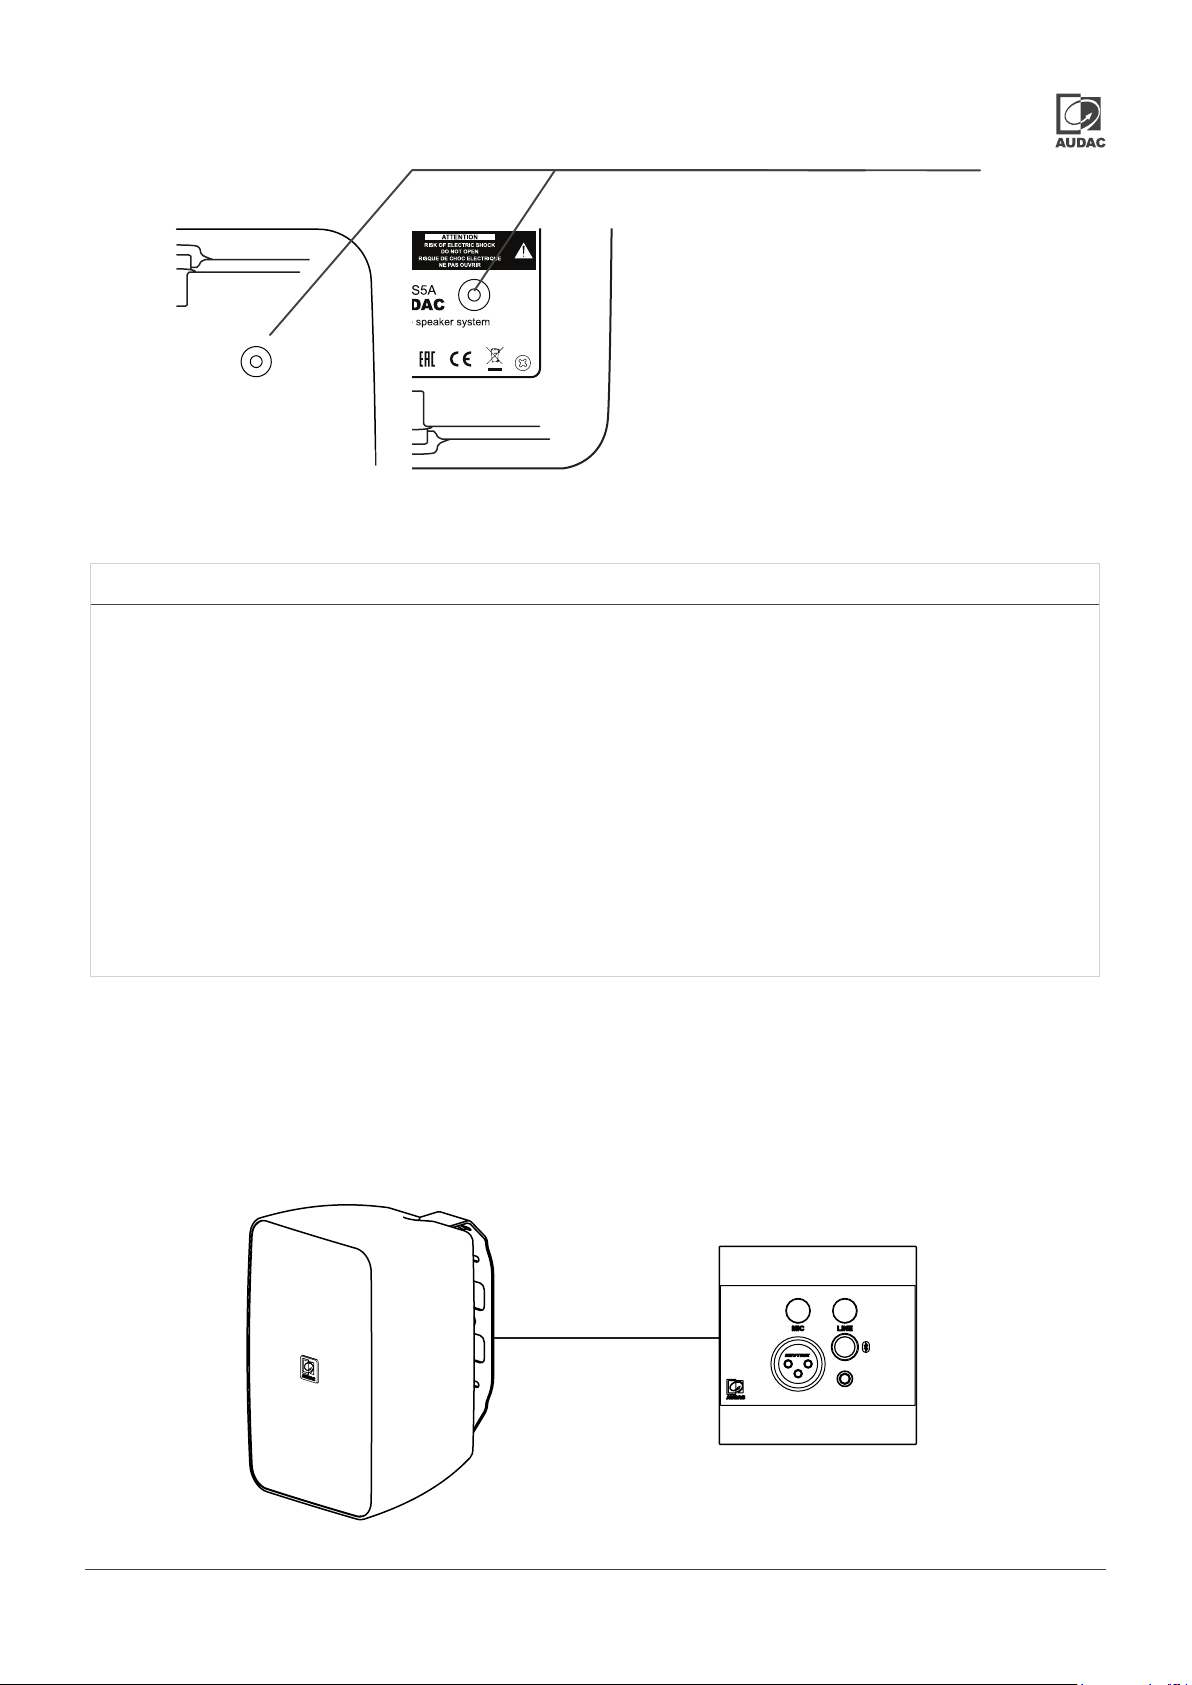
Safety bushing
CAUTION: To reduce risk of fire or electrical
shock, do not expose this unit to rain or
moisture
ATTENTION: Pour réduire les risques
d’incendie ou d’électrocution, ne pas
exposer cet appareil à la pluie ou à l’humidité
ARES5 - passive ARES5 - active
ATTENTION
• Installation must be carried out by qualied personnel only.
Drop safety bushing
The ARES5 has a M6 safety
bushing. This provides the option
of mounting drop safety wires.
Please check your local regulations
if this is required.
• Incorrect assembly can result in severe personal injury and property damage (if you intend to install this product
yourself, you must check for installations such as electrical wiring and plumbing that may be buried inside the wall).
• It is the installer’s responsibility to verify that the wall will safely support the total load of the unit and wall brackets.
• Additional tools (not included) are required for the installation.
• Do not over tighten screws.
• Keep this instruction manual for future reference.
Remote input connector
It is optional to connect the ARES5A to a remote input unit. The connection is made using a CAT cable, whereby the minimum
requirement for the connection is a CAT5E. The signal strength, with the use of a CAT5E cable, is strong enough up to a length
of 100 meters. The power to the wall panel is distributed from the speaker. Check www.audac.eu for all compatible devices.
ARES5A
UTP CAT5E cabling
(or better)
Up to 100m
WP225
ARES5A - User manual012
Page 13
Technical specications
Frequency response 80 Hz - 20 kHz
Sensitivity (1W / 1m) 89dB
Sound pressure (Max W / 1m)
RMS Power 2 x 20 Watt
MAX Power
Drivers HF 0.5” Mylar tweeter
LF 5 1/4” Polypropylene woofer
Dispersion Horizontal 210°
Vertical 205°
Construction Cabinet ABS
Bracket Powder coated steel
Power consumption Standby 0.35 W
Idle 3.1 W
1/8 output power 11.3 W
1/3 output power 17 W
Connectors Power IEC C7/C8 input connector
Input Unbalanced (3.5 mm jack)
Speaker output 2-pin 5.08mm Terminal block
105dB
2 x 40 Watt
Balanced (3.081mm 3-pin Terminal block)
Remote connector (RJ45)
Controls 2-band tone control
Volume control
Colors White (RAL9003)
Black (RAL9005)
Dimensions 150 x 240 x 175 mm (exl bracket)
150 x 240 x 206 mm (incl bracket)
Packaging Carton box (pair)
Weight net (pair) 3.23 Kg
Shipping weight / volume (pair) 4.48Kg / 0.03 Cbm
Shipping weight masterpack (4pieces) 21.11 Kg / 0.12 Cbm
Accessories included Wall mounting bracket set
Mains power cable (1.5 meter)
Speaker cable (3.5 meter)
Mounting screws + plugs
Optional accesoiries AUDAC wall panel
(check www.audac.eu for compatible products)
90° bracket
MBK455/B (black)
MBK455/W (white)
ARES5A - User manual 013
Page 14

Notes
ARES5A - User manual014
Page 15

Notes
ARES5A - User manual 015
Page 16

 Loading...