

Page 1
400-102-000-A 1/4
MODELS TH102 & TH102-3
SUMMARY
OPTIONS SELECTION
To change the temperature from °C to °F and back, maintain DAY
buton pressed down as RESET button is being pressed on and
released. Then release DAY button.
To change the time format from 24 hrs. to 12 hrs. and back, maintain
HOUR button pressed down as RESET button is being pressed on
and released. Then release HOUR button.
To change the heating control from proportional to on/off and back,
maintain MIN button pressed down as RESET button is being
pressed on and released. Then release MIN button.
TO SET TIME AND DAY
Press on DAY, HOUR and MIN buttons to adjust time and day.
TO RECORD THE HEATING PROGRAMS
Set the operating mode to AUTO. Use the PGM button to select the
program to be recorded or modified. Once the program is selected,
use HOUR and MIN buttons to set time and or to select
temperature setting.
TO RECORD THE ECONO PROGRAMS
Set the operating mode to ECONO. Use the PGM button to select the
program to be recorded or modified. Once the program is selected,
use DAY, HOUR and MIN buttons to set time and or to select
temperature setting.
OPERATING MODES
To select an operating mode, use MODE button.
AUTO: Runs the program. or shows temperature setting
and can override temporarily your programming.
MAN: Maintain the selected temperature. or change
the temperature setting.
ECONO: Maintain a temperature setting up to the user's pre-
programmed day and time. or shows temperature
setting and can override temporarily your programming.
INSTALLATION
Note: The "Problems and Solutions" section at the end of this user's guide
will help you to correct your problems during the installation.
This thermostat has been designed to operate with any installation which has a
RESISTIVE load not exceeding 2500 W @ 240 VAC or 1250 W @ 120 VAC such
as electric baseboards, radiant ceilings and floors, electric convectors, etc. It is
not compatible with a low voltage controller used by a central heating system or
systems using a contactor or a relay whose current is under 1.0 A.
Electricians or experienced technicians should install the thermostat.
This thermostat is designed to be used with a self-protected heating system
equipped with thermal cut off and circuit breaker.
PARTS INCLUDED
- One (1) thermostat
- Two (2) 6-32 screws, 1 ½ inches
- Two (2) solderless connectors
TURN OFF POWER OF THE HEATING SYSTEM AT THE MAIN POWER
PANEL TO AVOID ELECTRICAL SHOCK. Keep air vents of thermostat clean
and free from obstructions.
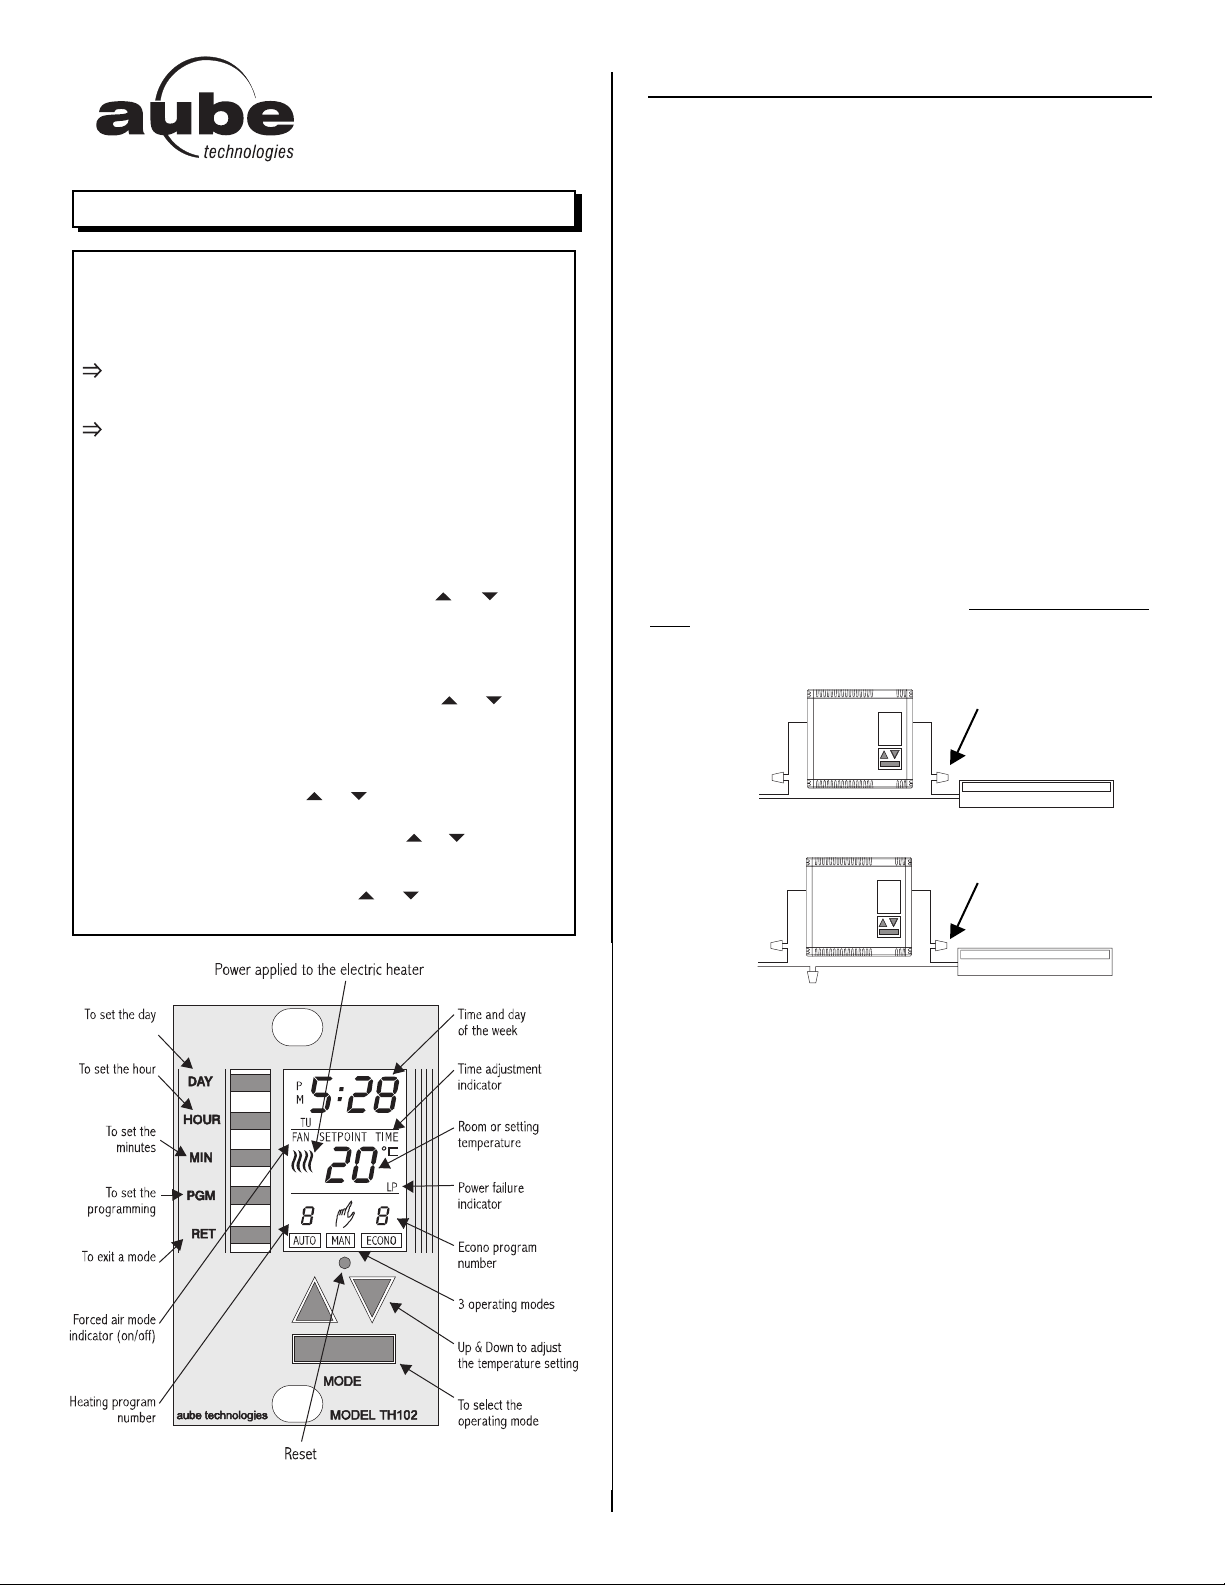
1) Connecting wires and mounting thermostat
Connect the rear thermostat wires to the power supply and to the electric heater
wires using solderless connectors for copper wires (there is no polarity for the
wires). See schematic diagram.
2-wire installation :
Electric baseboard
120 / 240 VAC
Line
Solderless
connector for
copper wires
NOTE: To access the programmable keyboard, remove the cover by placing
your fingers to the right side of the thermostat and pull toward you.
Push the excess wire back into the electrical box to prevent interference with the
thermostat. Secure the thermostat using the supplied screw. Once the thermostat
is properly installed, return power to heating system.
Note 1 : All cables and connections must conform to the local electrical
code.
Note 2 : In normal use at full capacity (2500 W), the housing temperature of
the thermostat can reach 35 to 40 °C.
WARNING : Special CO/ALR solderless connectors must be used when
connecting with aluminum conductors.
2) Options selection
Some options have been factory set. Those default settings are :
• The temperature is in °C, the heating control is proportional and the time
format is 24 hrs.
2.1 Temperature displayed in °C or °F
To change the temperature from °C to °F and back, maintain DAY button pressed
down as RESET button is being pressed on and released. Then release DAY button.
2.2 Time format displayed in 24 hours or 12 hours
To change the time format from 24 hrs. to 12 hrs. and back, maintain HOUR button pressed down as RESET button is being pressed on and released. Then
release HOUR button.
4-wire installation :
Electric baseboard
120 / 240 VAC
Line
Solderless
connector for
copper wires
Page 2
400-102-000-A 2/4
2.3 Proportional or ON/OFF heating control
This thermostat has been factory set to proportionally control electric
baseboards, radiant systems and convectors. Since proportional control uses a
fast commutation rate, it is not compatible with fan equipped systems (see
characteristics). Also, this control mode could occasionally create light flickering,
especially in rural area.
You can change the control mode to make it compatible with fan equipped
systems or to eliminate the light flickering.
To do so, maintain MIN button pressed down as RESET button is being pressed
on and released. Then release MIN button. Following this operation, the display
will show the fan indicator. To return to proportional control, repeat the same
operation.
3) Memory backup
In the event of a power failure, an internal circuit will maintain the programming.
The display will stay on for 15 minutes. An indicator "LP" will be shown on the
display. Beyond this period, the display will turn off. Only the time will have to be
set if power failure is more than six hours. The thermostat will return to the same
operation mode as set before the power failure.
4) First power-up
When power is applied for the first time, the
display must show the day and hour as follows:
0:00 MO (Monday)
The active operation mode is the framed MAN mode, the
temperature setpoint is 20 °C and the ambiant
temperature is displayed.
If the display is different, maintain PGM button pressed
down as RESET button is being pressed and released.
Then release PGM button.
500 WATTS OR LESS INSTALLATION
During the 30 minute period following the installation or a long power failure
(more than 6 hours), the light intensity of the display decreases when a button is
pressed on while the thermostat is in the heat mode. This problem will disappear
when the accumulator for the memory backup will be charged.
OPERATING MODES
The thermostat has three (3) operating modes:
AUTO, MAN and ECONO.
They are selected through the MODE button. On display, the active mode is
framed. The frame moves on to the next mode each time the MODE button is
pressed on.
The AUTOmatic mode runs in sequence (hourly) the
programs recorded by the user.
Pressing on the or displays the temperature
setting and the SETPOINT indicator for five (5)
seconds.
To see the weekday and weekend programs, select the
AUTO mode and press successively on PGM button to
see the programs appear on the display.
The MAN mode allows the user to override the
programming.
The first time the or is pressed on, the temperature setting is displayed. For all subsequent times
pressed on, the temperature setting will change 1 °C.
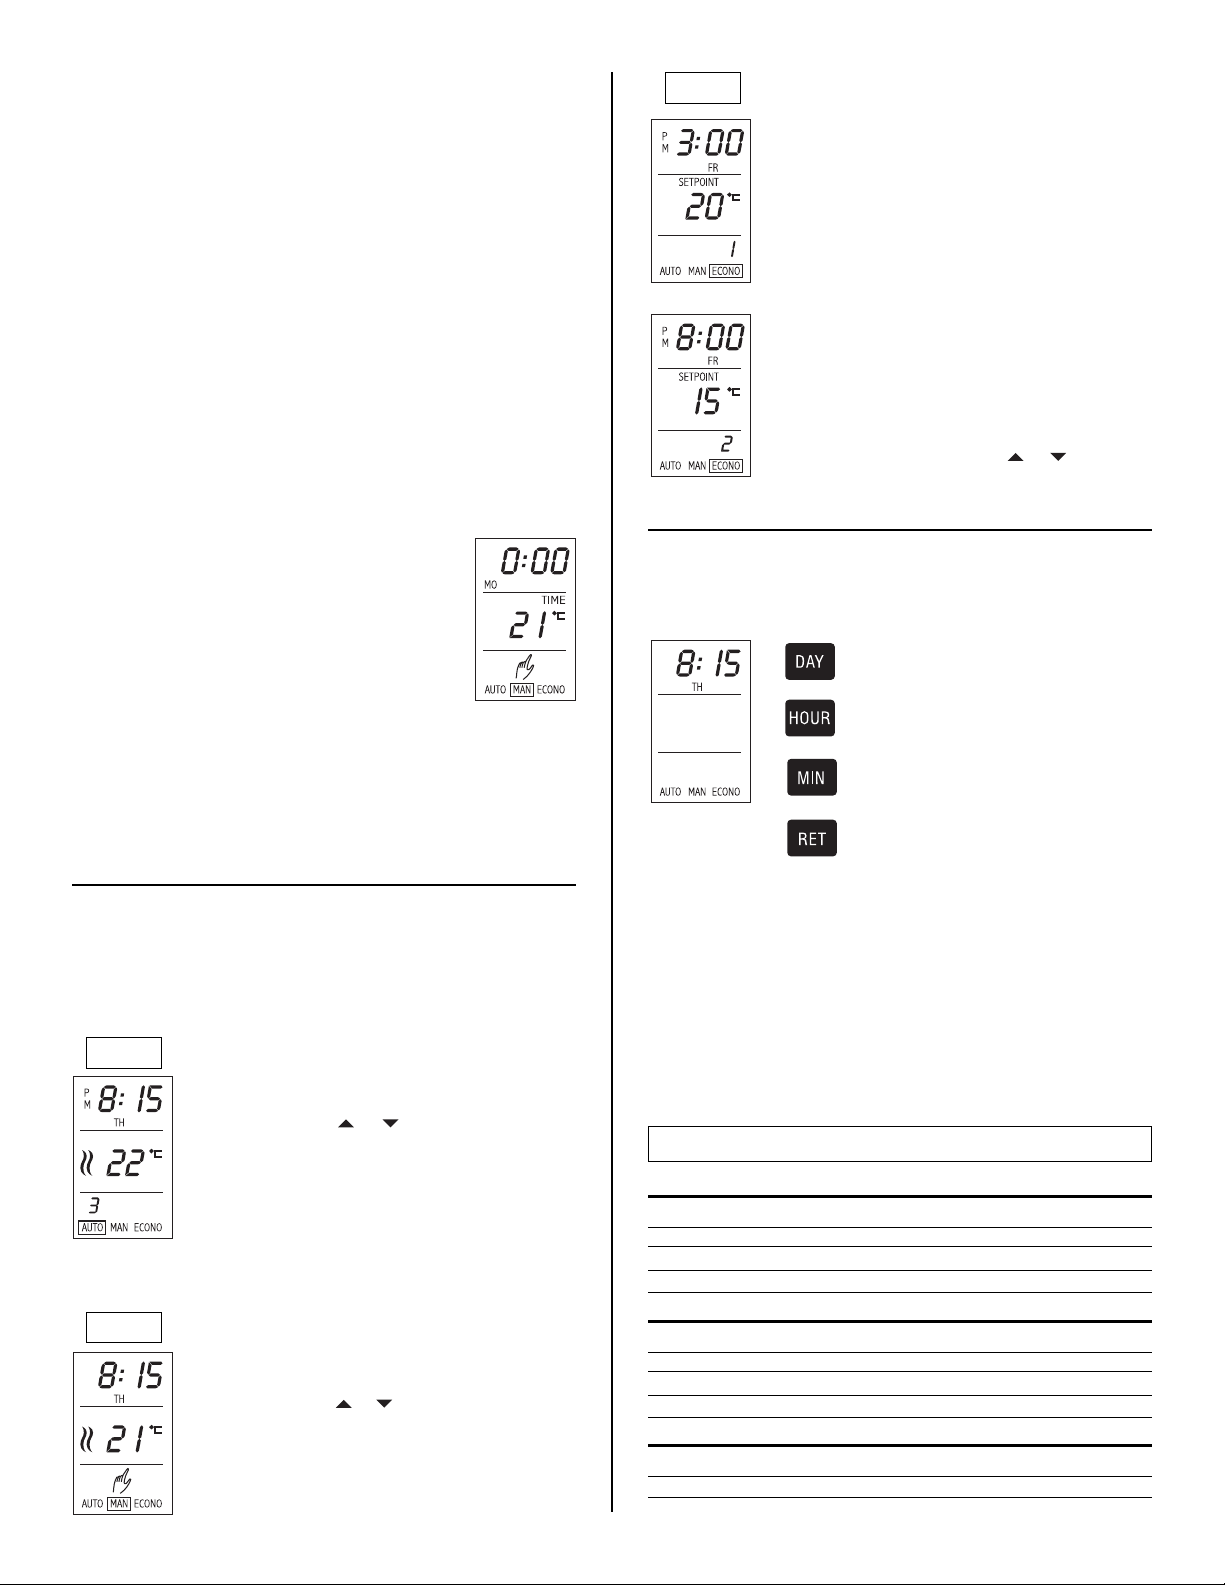
The ECONO mode has two (2) programs in which the
day, the time and the setpoint has to be programmed. For
instance, this operating mode can be used for a cottage
installation where the user goes only on weekends.
Program 1: Friday 3:00 PM, 20 °C
Program 2: Friday 8:00 PM, 15 °C
The temperature will be maintained at 20 °C Friday from
3:00 PM to 8:00 PM, and maintained at 15 °C the rest of
the week.
This gives you a comfortable temperature at your arrival
and if you are not going to your cottage for the weekend,
there will be only a minimal heating period.
To see the ECONO programs, select the ECONO
operating mode and press on PGM button successively
to see programs 1 and 2 appear on the display. In
ECONO mode, pressing on the or displays the
temperature setting.
PROGRAMMING
1) Adjustment of time and day
Example of setting: Thursday 8:15 AM
Use DAY, HOUR and MIN buttons to set the
time.
Once set, press on RET button to exit the time
and day adjustment mode
Note 1 : Time indicator is showing you that the time must be set.
Note 2 : The thermostat has an automatic return. When such functions as
time recording, programs recording, etc., are not completed by
pressing on RET button, the thermostat will automatically exit the
mode after 60 seconds.
2) Typical suggested programs
This thermostat can store up to four (4) daily programs for weekdays and four (4)
daily programs for the weekend. Also, there is two (2) programs for the ECONO
mode. To practice programming use the following example.
AUTO
ECONO
MAN
Weekday programs (Mon...Friday)
Program 1 6:30 AM 20 °C
Program 2 8:30 AM 15 °C
Program 3 4:30 PM 20 °C
Program 4 11:00 PM 15 °C
Weekend programs (Sat & Sun)
Program 1 7:00 AM 20 °C
Program 2 8:30 AM 15 °C
Program 3 4:30 PM 20 °C
Program 4 11:00 PM 15 °C
ECONO mode programs (weekend cottage)
Program 1 Friday 3:00 PM 20 °C
Program 2 Friday 8:00 PM 15 °C
Program number Time Temperature setting
Page 3

400-102-000-A 3/4
3) Recording the heating programs
Select the AUTO mode.
Press on PGM button once.
The default values or the last recording of
program 1 will be displayed.
The default values are :
• 20 °C and the time -- -- : -- --
The days Monday to Friday are displayed to
show that this program is for weekdays.
Press on HOUR and MIN buttons until 6:30 AM
is displayed.
Press on or until 20 °C is displayed.
The first program is recorded.
Press on PGM button again to record or modify
weekday programs 2, 3 and 4 and weekend
programs 1, 2, 3 and 4.
Use HOUR, MIN, or buttons to modify
the time and setpoint of programs.
Programming is now completed. Press on RET
button or wait for the "automatic return" to exit
the programming mode.
Note: A program time left at -- -- : -- -- is considered inactive.
To reset a program, use PGM button to select
the program, then press on MODE button.
To review programs, press on PGM button
successively to see the programs one after the
other and make modification if required.
4) Recording the ECONO programs
Select the ECONO mode.
Press on PGM button once.
The default values or the last recording of program 1 will be displayed.
The default values are :
• 10 °C and the time -- -- : -- --
Use DAY, HOUR, MIN and or buttons to
record the day, the time and the setpoint of
program 1.
Press a second time on PGM key.
The default values or the last recording of program 2 will be displayed.
Use DAY, HOUR, MIN and or buttons to
modify the day, time and setpoint of program 2.
Programming is now completed. Press on RET
button or wait for the "automatic return" to exit
the programming mode.
CHARACTERISTICS
1) Proportional and on/off controls
This thermostat works differently than the conventional electro-mechanic one.
The latter can have a differential of temperature up to 4 °C while this electronic
thermostat has one of only 0.3 °C. This slight oscillation eliminates the discomfort
often found with conventional electro-mechanic thermostats.
The proportional controller determines the amount of power required by the
electric heating system to maintain the exact ambient temperature of the
temperature setting.
To see this process, the display shows, in
real time, the percentage of power applied
to the electric heating system.
If you have programmed the heating control to ON/OFF to control a fan equipped
system, the display will show the fan indicator and 100% when the heating system
will turn ON and 0% when it will turn OFF.
In this case, the temperature regulation
will be ±0.5 °C around the setpoint.
2) Characteristics
• Models: TH102 and TH102-3
• Electronic programmable line voltage thermostat (2 wires non polarized)
• Supply: 120/240 VAC, 50/60 Hertz
• Load: 10.4 A maximum, 1.0 A minimum (Resistive only)
• Power: 2500 W @ 240 VAC or 1250 W @ 120 VAC (TH102)
3000 W @ 240 VAC or 1500 W @ 120 VAC (TH102-3)
• Power consumption (off): 860 mW
• Approvals: CSA / UL
• Display range: 0 to 99 °C (0 to 99 °F)
• Setting range: 5 to 27 °C (40 to 80 °F)
• Storage: -20 to 50 °C (-4 to 120 °F)
• Temperature regulation: 0.3 °C (proportional), +/- 0.5 °C (ON/OFF)
• Precision: ± 0.5 °C
• 10 programs: 4 weekday programs, 4 weekend programs and 2 ECONO
programs
NOTE : In normal use at full capacity (2500 W), the housing temperature
of the thermostat can reach 35 to 40 °C.
Page 4

11/05/04 400-102-000-A 4/4
WARRANTY
AUBE TECHNOLOGIES INC. ONE (1) YEAR LIMITED WARRANTY
This product is warranted against material defects and workmanship in normal use for a period of one year, from the date of the original purchase from authorized dealers.
During this period, AUBE technologies inc. will repair or replace the product with a new or of equivalent quality at AUBE'S option, without charge, any product proven defective in normal use.
Warranty does not cover transportation costs. Nor does it cover a product subjected to misuse or accidental damage. This warranty does not cover the cost of installation,
removal or reinstallation.
This limited warranty is in lieu of all other warranties, obligations or liabilities expressed or implied by the company. In no event shall AUBE technologies inc. be liable for consequential or incidental damages resulting from installation of this product. Some states or provinces do not allow limitations on how long an implied warranty lasts, or the
exclusion or limitation of incidental or consequential damages, so the above exclusions or limitations may not apply to you. This warranty gives you specific legal rights and
you may also have other rights which vary from state to state.
The defective product and the original sale receipt must be returned to the original dealer or shipped pre-paid, insured and addressed to:
Aube technologies inc.
Customer Service
705, Montrichard
Iberville (Quebec)
Canada J2X 5K8
If you have any questions concerning the installation or programming of this product, please call our technical assistance at (450) 358-4600 for the Montreal area or
1-800-831-AUBE for outside area, Monday to Friday between 8:30 AM and 5:00 PM Eastern time.
PROBLEMS AND SOLUTIONS
PROBLEMS
No display
The thermostat is hot
The thermostat is loosing the time but not the programming
Room temperature shown is wrong
Heating system always on
The thermostat displays heating but heating system is
not turned on
Programs do not change as you want
The lights of the house flicker
Erratic or dim display
CAUSES
- Circuit breaker is open
- Power failure more than 15 minutes
- In normal use at full capacity (2500 W), the housing
temperature of the thermostat can reach 35 to 40 °C
- Power failure more than 6 hours
- A draft is near the thermostat
- Bad installation
- Bad installation
- Power failure ("LP" indicator shown on display)
- Incorrect programming hours
- Wrong programming mode selected
- Flickering lights are due to the fast commutation of
current through the baseboard controlled by the
thermostat
SOLUTIONS
- Check 120 / 240 VAC presence at the thermostat
- Eliminate the draft
- Check installation
- Maintain PGM button pressed down as RESET
button is being pressed and released. Then release
PGM button.
- Check installation
- Check 120 / 240 VAC presence at the thermostat
- Check actual time in AM & PM as well as program
times (AM is not displayed)
- Make sure operating mode is set to AUTO
- Use the ON/OFF control mode. Maintain MIN button
pressed down as reset button is being pressed and
released. Then release MIN button.
- Maintain PGM button pressed down as RESET
button is being pressed on and released
- For a 500 W or less installation, the display could be
dim after the first power-up or a long power failure
when the thermostat is in heat mode. See first
power-up section.
 Loading...