

Page 1
TH110-DP-P
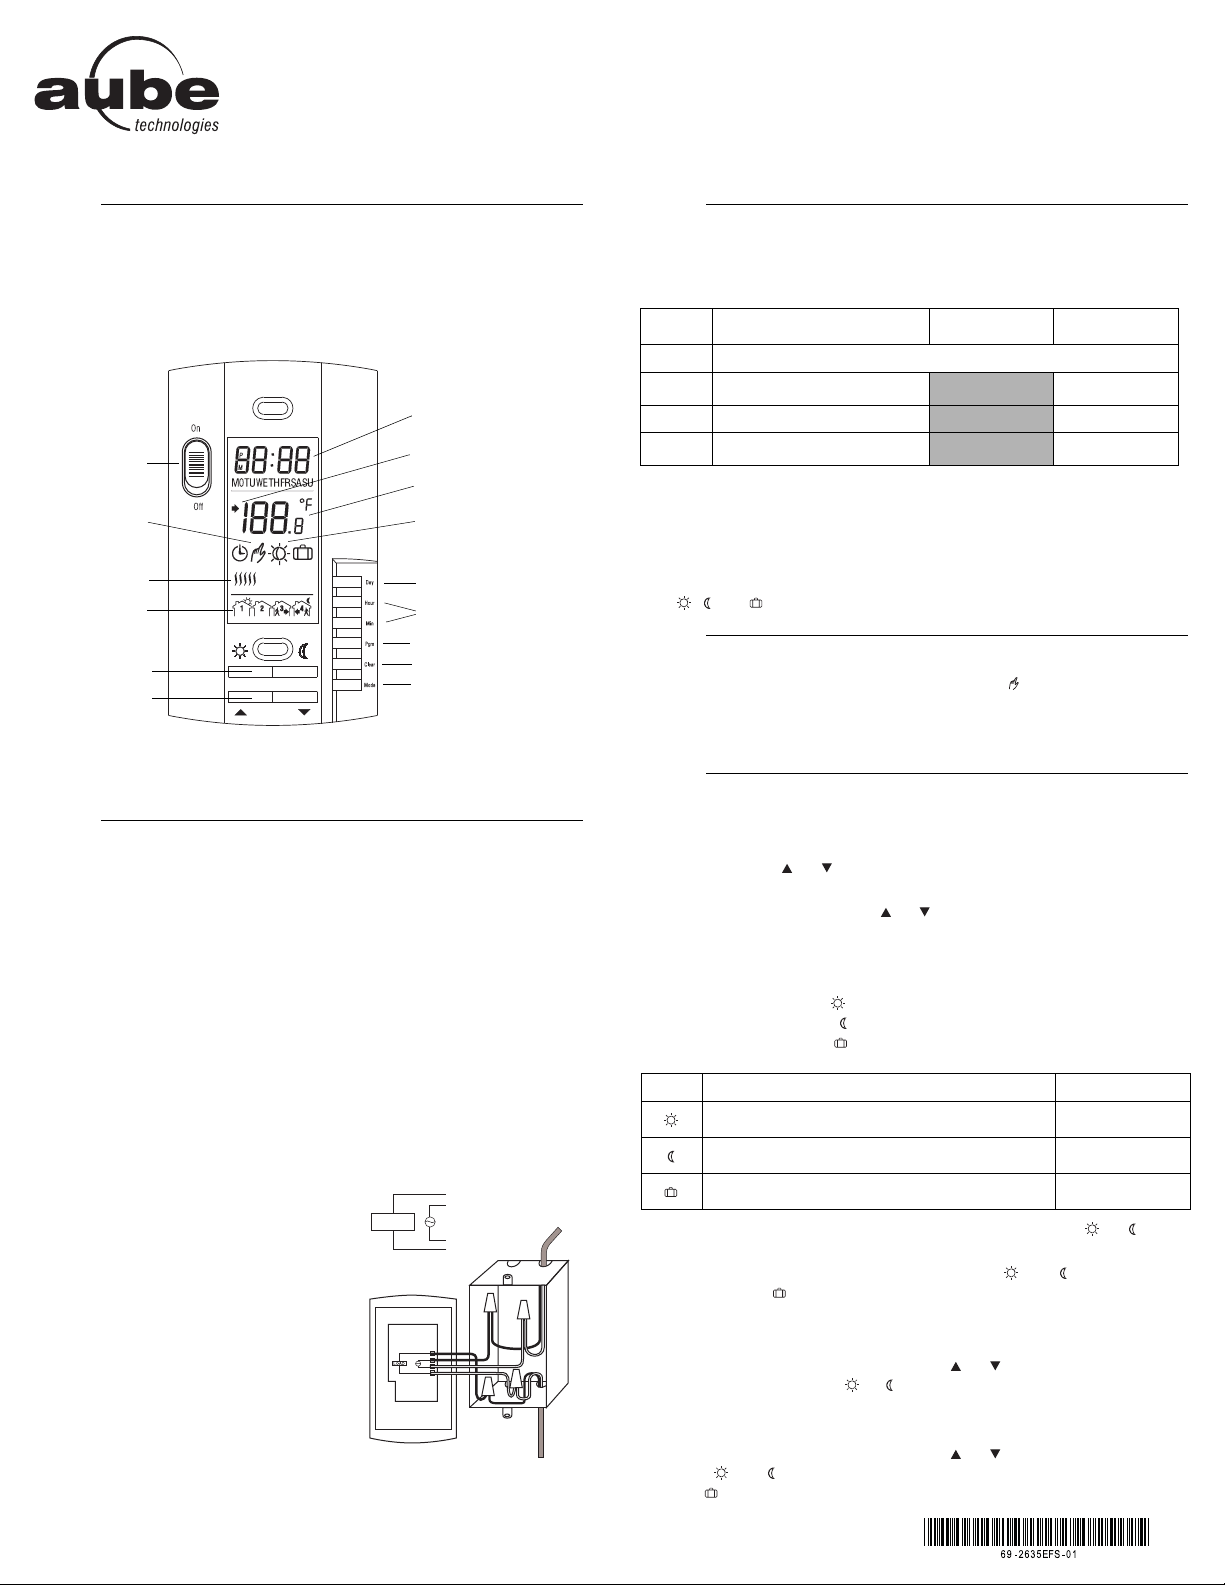
To select the
operating mode
To set the day
To set the time
Time and day
Temp erature
Operating
mode icons
On/Off
switch
To skip a period
To program the schedule
Preset temperature
icons
Temperature
adjustment
Temperature
preset buttons
Heating
indicator
Periods
Appears during the
setpoint display
Power
Load
Load
Black
Red
Owner’s Guide
Programmable Thermostat
1.
This programmable thermostat can be connected to an electric heating system such as an electric baseboard, a radiant ceiling, a floor heating system,
an electric convector, etc. It is not compatible with a central heating system.
Description
The configuration switches are on the back of the thermostat. Default (factory)
settings are inside the gray cells.
a. Early Start can be used in Automatic mode only. When this function is
b. If you change the temperature display format, the preset temperatures
Upon power-up, the thermostat is in manual mode ( ) and displays the room
temperature.
Press the Hour and Min buttons to set the thermostat’s clock.
Press the Day button to set the day.
* Set the switch to Off to cut power to the heater. This will not affect the time and tem-
perature settings.
TURN OFF POWER TO THE HEATING SYSTEM AT THE MAIN POWER
PANEL TO AVOID ELECTRICAL SHOCK.
• The installation must be carried out by an electrician.
• All cables and connections must conform to the local electrical code.
• Special CO/ALR solderless connectors must be used when connecting
• Install the thermostat onto an electrical box.
• Install the thermostat about 5 feet high, on an inside wall facing the
• Avoid locations where there are air drafts (such as the top of a staircase
• Do not install the thermostat on a wall that conceals chimney or stove
Connection
with aluminum conductors.
heater.
or an air outlet), dead air spots (such as behind a door), or direct sunlight.
pipes.
2.
Connect the thermostat wires to the
power line and to the load using solderless connectors for copper wires.
Push the excess wire back into the
electrical box to prevent interference
with the thermostat.
Secure the thermostat using two 6-32
screws.
Return power to heating system.
NOTE: Always keep the thermostat's vents
clean and unobstructed.
TH110-DP-P 1/6
Setpoint
The thermostat normally displays the room temperature. To view the set temperature, press the or button briefly. The set temperature will appear for
5 seconds.
To change the setpoint, press the or button until the desired temperature
is displayed. To scroll faster, hold the button.
Using a preset temperature
The thermostat has 3 preset temperatures:
Comfort temperature
Economy temperature
Vacation temperature
• To use the Comfort or Economy temperature, press the or button
• To use the Vacation temperature, press both and buttons simulta-
Storing a preset temperature
To store the Comfort or Economy temperature:
To store the Vacation temperature:
Configuration
# Configurations UP DN
SW1 Not used
SW2
SW3 Time format
SW4
Early Start
Temperature format
enabled, the thermostat calculates the optimal time to start heating in
order to obtain the desired temperature by the set time. The thermostat
re-assesses the start time daily based on the previous day’s performance.
( , and ) will return to their default settings.
a
b
Disable Enable
12-hour 24-hour
°F °C
Power-up
Temperature Setting
Icon Intended use Default setting
Comfort (when at home) 70 °F (21 °C)
Economy (when asleep or away from home) 62 °F (16 °C)
Vacation (during prolonged absence) 50 °F (10 °C)
respectively. The corresponding icon will be displayed.
neously. The icon will be displayed.
Set the desired temperature using the or button. Press and hold
the appropriate button ( or ) for approximately 3 seconds until the
corresponding icon is displayed.
Set the desired temperature using the or button. Press and hold
both and buttons simultaneously for approximately 3 seconds until
the icon is displayed.
3.
4.
5.
Page 2
schedule. To place the thermostat in this mode, press Mode until is dis-
played. The icons of the current period and preset temperature ar e also displayed.
be set manually. To place the thermostat in this mode:
Operating Modes
Automatic - The temperature is set according to the energy-saving
Temporary Bypass: If you modify the setpoint (by pressing the , ,
or button) when the thermostat is in automatic mode, the new setpoint will be used until the end of the current period. When the next
period starts, the temperature set for that period becomes the new setpoint.
Manual - The energy-saving schedule is not used. The temperature must
Press Mode until is displayed.
Set the temperature using the , , or button.
Vacation - The thermostat is set to the Vacation temperature. Press both
and buttons simultaneously to place the thermostat in Vacation mode.
The schedule consists of 4 periods per day which represents a typical week
day. You can program the thermostat to skip the periods that do not apply to
your situation. For example, you can skip periods 2 and 3 for the weekend.
The Comfort ( ) temperature is used in periods 1 and 3 and the Economy
( ) temperature is used in periods 2 and 4. For example, when the period
changes from 1 to 2, the setpoint automatically changes from Comfort setting
( ) to Economy setting ( ).
You can have a different program for each day of the week; i.e., each period
can start at different time for each day of the week. The thermostat has been
programmed with the following schedule.
To modify the schedule:
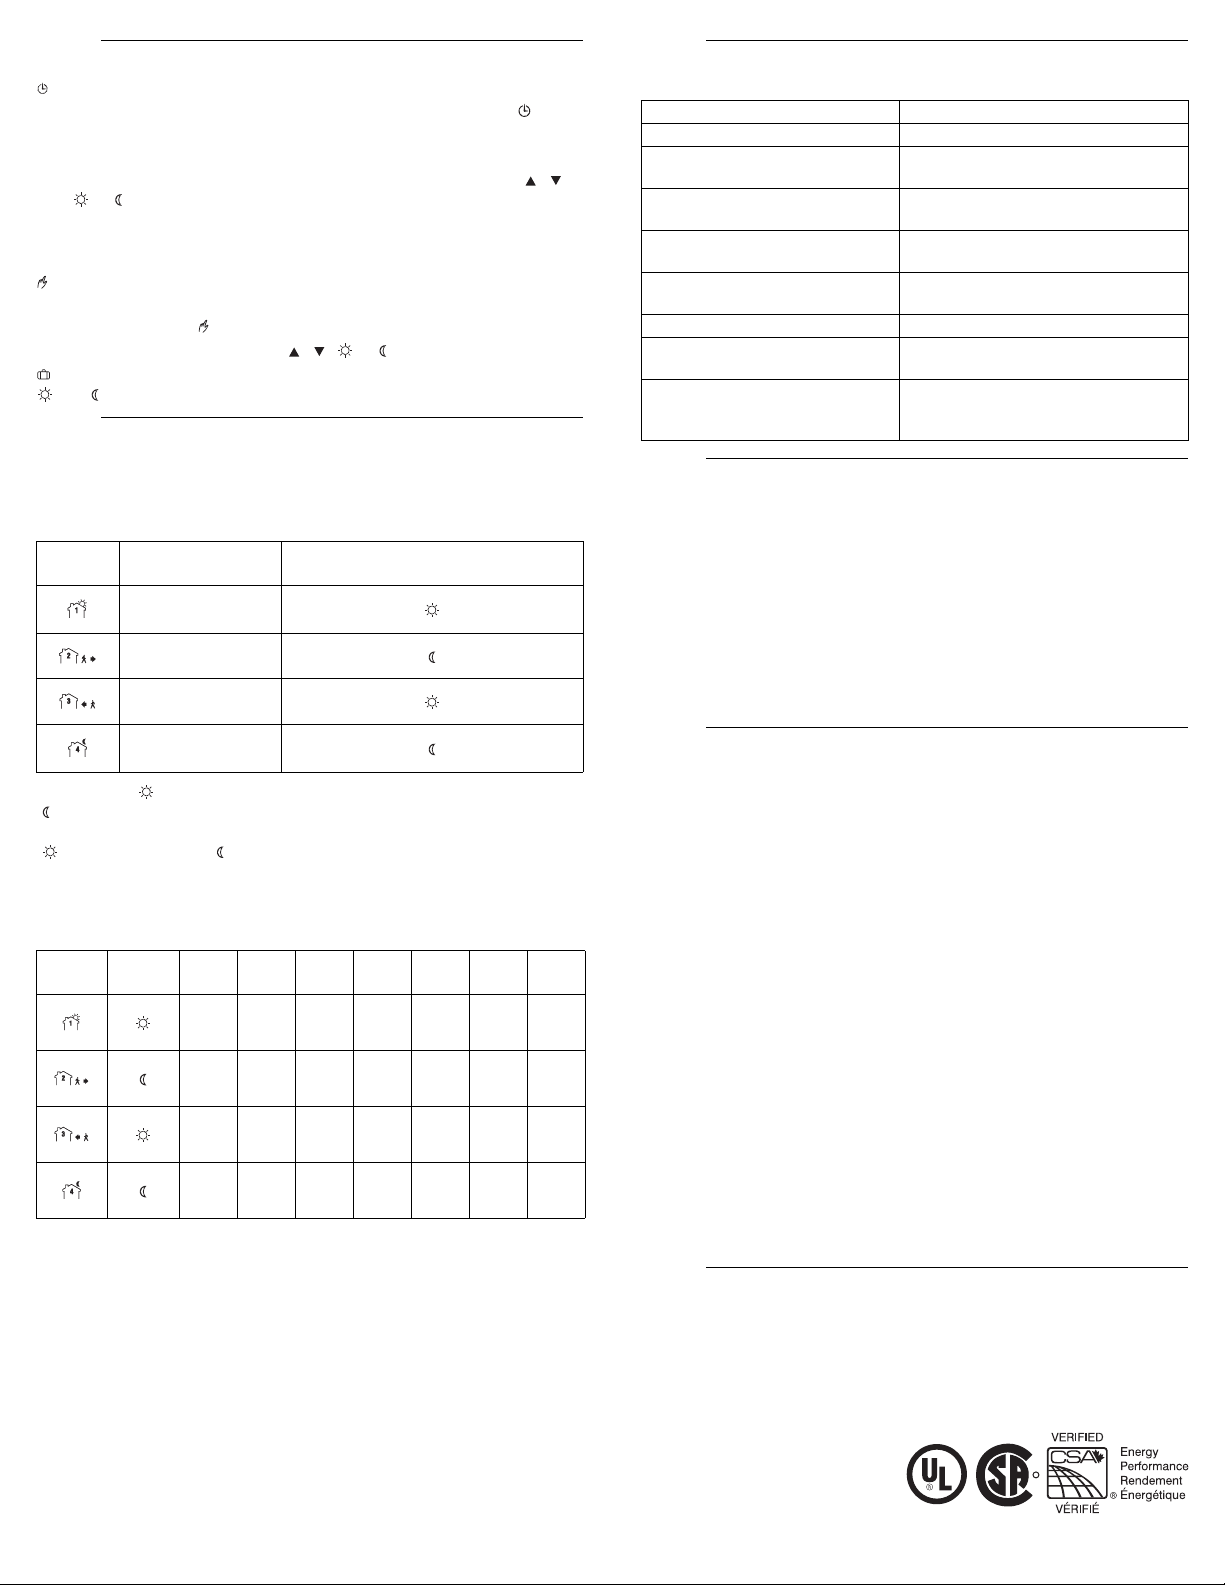
Energy-saving Schedule
Period Description Associated preset temperature
Wake-up
Away from home
Return home
Sleep
Period Setting
MO TU WE TH FR SA SU
6:00 AM6:00 AM6:00 AM6:00 AM6:00 AM6:00 AM6:00
8:00 AM8:00 AM8:00 AM8:00 AM8:00
6:00 PM6:00 PM6:00 PM6:00 PM6:00
10:00 PM10:00 PM10:00 PM10:00 PM10:00 PM10:00 PM10:00
AM
PM
--:-- --:--
--:-- --:--
AM
PM
Press Pgm to access the programming mode. Period 1 is selected.
Press Day to select the day to program (hold for 3 seconds to select the
entire week).
Press Hour and Min to set the start time of the selected period, or press
Clear if you want to skip the period (--:-- is displayed).
Press Pgm to select another period, or press Day to select another day.
Then repeat step 3.
Press Mode to exit the programming mode.
NOTE: If no button is pressed for 60 seconds, the thermostat will automati-
cally exit the programming mode.
6.
Problems Solutions
The thermostat’s screen is blank. The thermostat’s switch is set to Off.
LO is displayed.
HI is displayed.
The wrong time is displayed.
The measured temperature is wrong.
The heater is always On. Check the thermostat wiring.
The heater is off however the thermostat indicates that heating is On.
The temperature does not change
7.
according to the energy-saving
schedule
Power: 240 Vac, 60 Hz
Maximum load: 16 A maximum (resistive only)
Display range: 32 °F to 140 °F (0 °C to 60 °C)
Display resolution: 0.1 °F (0.1 °C)
Setpoint range: 40 °F to 86 °F (5 °C to 30 °C)
Setpoint interval: 1 °F (1 °C)
Storage: -4 °F to 120 °F (-20 °C to 50 °C)
Data backup: In the event of a power outage, most set tings are saved. Only the
time must be re-adjusted if the power outage lasts more than 2 hours. The thermostat will return to the mode that was active prior to the powe r ou tage.
Honeywell warrants this product, excluding battery, to be free from defects in the workmanship or materials, under normal use and service, for a period of three (3) years from
the date of purchase by the consumer. If at any time during the warranty period the product is determined to be defective or malfunctions, Honeywell shall repair or replace it (at
Honeywell's option).
If the product is defective,
This warranty does not cover removal or reinstallation costs. This warranty shall not
apply if it is shown by Honeywell that the defect or malfunction was caused by damage
which occurred while the product was in the possession of a consumer.
Honeywell's sole responsibility shall be to repair or replace the product within the terms
stated above. HONEYWELL SHALL NOT BE LIABLE FOR ANY LOSS OR DAMAGE OF
ANY KIND, INCLUDING ANY INCIDENTAL OR CONSEQUENTIAL DAMAGES
RESULTING, DIRECTLY OR INDIRECTLY, FROM ANY BREACH OF ANY WARRANTY,
EXPRESS OR IMPLIED, OR ANY OTHER FAILURE OF THIS PRODUCT. Some provinces, states or regions do not allow the exclusion or limitation of incidental or consequential damages, so this limitation may not apply to you.
THIS WARRANTY IS THE ONLY EXPRESS WARRANTY HONEYWELL MAKES ON
THIS PRODUCT. THE DURATION OF ANY IMPLIED WARRANTIES, INCLUDING THE
WARRANTIES OF MERCHANTABILITY AND FITNESS FOR A PARTICULAR PURPOSE, IS HEREBY LIMITED TO THE THREE-YEAR DURATION OF THIS WARRANTY.
Some provinces, states or regions do not allow limitations on how long an implied warranty lasts, so the above limitation may not apply to you.
This warranty gives you specific legal rights, and you may have other rights which vary
from one province, state or region to another.
705 Montrichard
Saint-Jean-sur-Richelieu (Québec)
J2X 5K8
Canada
1-800-831-2823
aube.service@honeywell.com
www.aubetech.com
Troubleshooting
The measured temperature is below the
display range. Heating is activated.
The measured temperature is above the
display range.
The thermostat was without power for
more than 2 hours.
The thermostat is located in a spot
exposed to an air draft.
Check the thermostat wiring.
Check that the thermostat is in Automatic
mode. Check also the schedule and clock
settings.
Technical Specifications
3840 watts @ 240 Vac
Warranty
(i) return it, with a bill of sale or other dated proof of purchase, to the place from which
you purchased it, or
(ii) contact Honeywell. Honeywell will make the determination whether the product
should be returned, or whether a replacement product can be sent to you.
Customer Assistance
R
8.
9.
10.
11.
TH110-DP-P 2/6
Printed in USA 2011-04-14
Page 3

Pour sélectionner le
mode de fonctionnement
Pour régler le jour
Pour régler l’heure
Heure et jour
Température
Icônes des modes
de fonctionnement
Commutateur
Marche/Arrêt
« On/Off »*
Pour sauter une période
Pour programmer l’hora i r e
Icônes des préréglages
de température
Réglage de
température
Boutons des
préréglages de
température
Indicateur de
chauffage
Périodes
Apparaît durant l’affichag e de
la température de consigne
Alimentation
Charge
Charge
N
R
TH110-DP-P
Guide du propriétaire
Thermostat programmable
1.
Le thermostat programmable peut être relié à un appareil de chauffage électrique tel qu’une plinthe électrique, un plafond radiant, un plancher chauffant,
un convecteur électrique, etc. Il n'est pas compatible avec un système de
chauffage central.
Description
Les commutateurs de configuration sont à l’arrière du thermostat. Les sélections par défaut sont dans les cases grises :
a. Le démarrage anticipé fonctionne dans le mode automatique seulement.
b. Si vous changez le format d'affichage de la température, les boutons de
Lors de la mise sous tension, le thermostat est en mode manuel ( ) et affiche
la température de la pièce.
Appuyer sur Hour et Min pour régler l’horloge du thermostat.
Appuyer sur Day pour régler le jour.
* Positionner le commutateur à « Off » pour couper l’alimentation de l’appareil de chauf-
fage. Cela n'affectera pas les réglages d’heure et de température.
COUPER L'ALIMENTATION DU SYSTÈME DE CHAUFFAGE AFIN D'ÉVITER TOUT RISQUE DE CHOC ÉLECTRIQUE.
• L’installation doit être effectuée par un électricien.
• Tous les câbles et les raccordements doivent être conformes au code
• Pour le raccordement à des fils en aluminium, des connecteurs spéciaux
• Installer le thermostat sur une boîte électrique.
• Installer le thermostat à environ 1,5 mètres du sol, sur un mur intérieur
• Éviter les endroits où il y a des courants d’air (comme le haut d’un esca-
• Ne pas installer le thermostat sur un mur qui dissimule des conduits d’air
Raccorder les fils du thermostat aux
Fixer le thermostat à l'aide des vis
Mettre le système sous tension.
NOTE: Assurez-vous que les ouvertures
d'aération du thermostat sont propres et
dégagées.
TH110-DP-P 3/6
Raccordement
d’électricité local.
marqués CO/ALR doivent être employés.
faisant face à l’appareil de chauffage.
lier ou une sortie d’air), des points d’air stagnant (comme derrière une
porte), des rayons de soleil.
ou d’une cheminée.
fils du système de chauffage électrique et de l'alimentation au moyen de
connecteurs sans soudure pour fils de
cuivre.
6-32 fournies.
2.
Consigne
Le thermostat affiche normalement la température de la pièce. Pour voir la
température de consigne (réglée), appuyer sur le bouton ou brièvement.
La température de consigne apparaîtra pendant 5 secondes.
Pour changer la consigne, appuyer sur le bouton ou jusqu’à ce que la
température désirée soit affichée. Pour faire défiler la consigne plus rapidement, maintenir le bouton enfoncé.
Utilisation des préréglages de température
Le thermostat a 3 préréglages de température :
Température Confort
Température Économie
Température Vacances
• Pour utiliser la température Confort ou Économie, appuyer sur le bouton
• Pour utiliser la température Vacances, appuyer sur les boutons et
Enregistrement des préréglages de température
Pour enregistrer le préréglage de température Confort ou Économie :
Pour enregistrer le préréglage de température Vacances :
Configuration
# Configurations Haut Bas
SW1 Non utilisé
SW2
Démarrage anticipé
SW3 Format d’affichage de l’heure 12 heures 24 heures
SW4
Format d’affichage de la température
Quand cette fonction est permise, le thermostat calcule l'heure optimale pour
débuter le chauffage afin d'obtenir la température désirée à l’heure réglée. Le
thermostat réévalue l'heure de début quotidiennement basée sur la performance de la veille.
préréglage ( , et ) retourneront à leurs valeurs par défaut.
a
Off (Désactivé) On (Activé)
b
°F °C
Mise sous tension
Réglage de température
Icône Utilisation prévue Par défaut
Confort (l’occupant est à la maison) 70 °F (21 °C)
Économie (l’occupant est absent durant
le jour ou couché)
Vacances (absence prolongée) 50 °F (10 °C)
ou . L’icône correspondante sera affichée.
simultanément. L’icône sera affichée.
Régler la température désirée à l'aide du bouton ou . Appuyer sur le
bouton de préréglage approprié ( ou ) pendant 3 secondes jusqu’à
ce que l’icône correspondante soit affichée.
Régler la température désirée à l'aide du bouton ou . Appuyer sur
les boutons de préréglages et simultanément jusqu’à ce que
l’icône soit affichée.
62 °F (16 °C)
3.
4.
5.
Page 4

l’horaire éconergétique. Pour placer le thermostat dans ce mode, appuyer sur
Mode jusqu’à ce que l’icône soit affichée. La période courante est aussi
affichée.
rature doit être fait manuellement. Pour placer le thermostat dans ce
mode :
Modes de fonctionnement
Automatique - la température est contrôlée selon les réglages de
Dérogation temporaire : si vous modifiez la consigne (en appuyant sur
le bouton , , ou ) lorsque le thermostat est en mode automatique, la nouvelle consigne sera utilisée jusqu'à la fin de la période courante. Lors du début de la prochaine période, la température réglée pour
la période en question devient la nouvelle consigne.
Manuel - l’horaire éconergétique n’est pas utilisé. Le réglage de la tempé-
Appuyer sur Mode jusqu’à ce que l’icône soit affichée.
Régler la température en utilisant le bouton , , ou .
Vacances - Le thermostat est placé à la température Vacances. Appuyer
sur les boutons et simultanément pour placer le thermostat en mode
Vacances.
L’horaire comprend 4 périodes par jour. Vous pouvez programmer le thermostat pour sauter les périodes qui ne sont pas applicables à votre situation. Par
exemple, vous pouvez sauter les périodes 2 et 3 pour la fin de semaine.
La température Confort ( ) est utilisée dans périodes 1 et 3 et la
température Économie ( ) est utilisée dans les périodes 2 et 4. Par exemple,
la température Confort ( ) passe à la température Économie ( ) lorsque la
période 1 passe à la période 2.
Vous pouvez avoir un programme différent pour chaque jour de la semaine,
c.-à-d. chaque période peut commencer à une heure différente pour chaque
jour de la semaine. Le thermostat a été programmé avec l’horaire suivant.
Période Réglage
Pour modifier l’horaire :
Horaire éconergétique
Période Description Réglage
Réveil
Départ
Retour
Coucher
LU
MA
ME
(MO)
(TU)
(WE)
6h00 6h00 6h00 6h00 6h00 6h00 6h00
8h00 8h00 8h00 8h00 8h00 --:-- --:--
18h00 18h00 18h00 18h00 18h00 --:-- --:--
22h00 22h00 22h00 22h00 22h00 22h00 22h00
JE
(TH)
VE
(FR)
SA
(SA)
DI
(SU)
Appuyer sur Pgm pour accéder au mode de programmation. La période
1 est sélectionnée.
Appuyer sur Day pour sélectionner le jour à programmer (appuyer pen-
dant 3 secondes pour sélectionner la semaine entière).
Appuyer sur Hour et Min pour régler l’heure du début de la période
sélectionnée, ou appuyer sur Clear pour sauter la période (--:-- est affiché).
Appuyer sur Pgm pour sélectionner une autre période ou appuyer sur
Day pour sélectionner un autre jour. Ensuite répéter l’étape 3.
Appuyer sur Mode pour sortir du mode de programmation.
NOTE: Si on n’appuie sur aucun bouton pendant 60 secondes, le thermostat
sortira automatiquement du mode de programmation.
6.
7.
Alimentation : 240 Vca, 60 Hz
Charge :16 A maximum (résistive seulement)
Plage d’affichage : 32°F à 140°F (0°C à 60°C)
Résolution d’affichage :0,1°F ( 0,1°C)
Plage de réglage : 40°F à 86°F (5°C à 30°C)
Intervalle de réglage : 1°F (1°C)
Entreposage : -4°F à 120°F (-20°C à 50°C)
Protection de données : En cas de panne de courant, la plupart des régla-
ges sont conservés. Seule l’heure doit être réglée si la panne de courant dure
plus de 2 heures. Le thermostat retournera au mode qui était en cours avant
la panne de courant.
Honeywell garantit ce produit, à l'exception des piles, contre tout vice de fabrication ou de
matière dans la mesure où il en est fait une utilisation et un entretien convenables, et ce, pour
trois (3) ans à partir de la date d'achat par le consommateur. En cas de défectuosité ou de mauvais fonctionnement pendant la période de garantie, Honeywell remplacera ou réparera le produit (au gré de Honeywell).
Si le produit est défectueux,
La présente garantie ne couvre pas les frais de retrait ou de réinstallation. La présente garantie
ne s'appliquera pas s'il est démontré que la défectuosité ou le mauvais fonctionnement est dû à
un endommagement du produit alors que le consommateur l'avait en sa possession.
La responsabilité de Honeywell se limite à réparer ou à remplacer le produit conformément aux
modalités susmentionnées. HONEYWELL N'EST EN AUCUN CAS RESPONSABLE DES
PERTES OU DOMMAGES, Y COMPRIS LES DOMMAGES INDIRECTS OU ACCESSOIRES
DÉCOULANT DIRECTEMENT OU INDIRECTEMENT D'UNE VIOLATION QUELCONQUE
D'UNE GARANTIE, EXPRESSE OU TACITE, APPLICABLE AU PRÉSENT PRODUIT NI DE
TOUTE AUTRE DÉFECTUOSITÉ DU PRÉSENT PRODUIT. Certaines provinces ou régions ne
permettent pas l'exclusion ou la restriction des dommages indirects et, par conséquent, la
présente restriction peut ne pas s'appliquer.
LA PRÉSENTE GARANTIE TIENT LIEU DE TOUTES LES AUTRES GARANTIES,
EXPRESSES OU TACITES, ET LES GARANTIES DE VALEUR MARCHANDE ET DE
CONFORMITÉ À UNE FIN PARTICULIÈRE SONT PAR LES PRÉSENTES EXCLUES APRÈS
LA PÉRIODE DE TROIS ANS DE LA PRÉSENTE GARANTIE. Certaines provinces ou régions
ne permettent pas de limiter la durée des garanties tacites et, par conséquent, la présente
limitation peut ne pas s'appliquer.
La présente garantie donne au consommateur des droits légaux spécifiques et peut-être
certains autres droits qui peuvent varier selon la province, létat ou la région.
705 Montrichard
Saint-Jean-sur-Richelieu (Québec)
J2X 5K8
Canada
1-800-831-2823
aube.service@honeywell.com
www.aubetech.com
Dépannage
Problème Explications/Solutions
Rien ne s’affiche à l’écran. Le commutateur est placé sur Arrêt « Off ».
LO est affiché.
HI est affiché.
L’heure af fichée est erronée.
La température mesurée est erronée. Le thermostat est exposé aux courants d’air .
Le chauffage reste toujours activé. Le thermostat est mal branché.
Le chauffage est désactivé, cependant
le thermostat indique le contraire.
Le réglage de température ne change
pas selon l’horaire éconergétique.
La température mesurée est inférieure à la
plage d’affichage. Le chauffage est activé.
La température mesurée est supérieure à la
plage d’affichage.
Le thermostat n’était pas sous tension pendant plus de 2 heures.
Le thermostat est mal branché.
S’assurer que le thermostat est en mode
automatique. Vérifier aussi les réglages de
l’horaire et de l’horloge du thermostat.
Fiche technique
3480 watts (NI) @ 240 Vca
Garantie
(i) le retourner, accompagné d'une preuve d'achat indiquant la date d'achat, à l’endroit où il a
été acheté, ou
(ii) contacter Honeywell. Honeywell déterminera a lors si le prod uit doit être retourné ou si un
produit de remplacement peut vous être expédié.
Service
R
8.
9.
10.
11.
TH110-DP-P 4/6
Imprimé aux É.-U. 2011-04-14
Page 5

Para escoger el modo de
funcionamiento
Para fijar el día
Para fijar la hora
Hora y día
Temperatura
Íconos del modo de
funcionamiento
Interruptor
On/Off
Para saltar un período
Para programar el horario
Íconos de temperatura
predefinida
Ajuste de
temperatura
Botones de ajuste
previo de
temperatura
Indicador de
calefacción
Períodos
Aparece durante la
visualización del
punto de ajuste
Alimentación
Carga
Carga
Negro
Rojo
TH110-DP-P
Guía para el usuario
Termostato programable
1.
Este termostato programable puede conectarse a un sistema de calefacción
eléctrico, tal como una estufa eléctrica de zócalo, un cielorraso radiante, un
piso calefaccionado, un convector eléctrico, etc. No es compatible con un
sistema de calefacción central.
Descripción
Los conmutadores de configuración están en la parte posterior del termostato. Los ajustes de fábrica se indican sobre fondo gris.
a. El encendido anticipado puede usarse en Modo Automático solamente.
b. Si se cambia el formato de visualización de la temperatura, las
Cuando se lo enciende, el termostato está en modo manual ( ) e indica la
temperatura actual.
Presionar los botones Hour (hora) y Min (minutos) para ajustar el reloj
* Poner el interruptor en “Off” para cortar la alimentación del aparato de calefacción.
Los ajustes de la hora y la temperatura no se verán afectados.
CORTAR LA ALIMENTACIÓN DEL SISTEMA DE CALEFACCIÓN EN EL
PANEL DE ALIMENTACIÓN PRINCIPAL PARA EVITAR CHOQUES ELÉCTRICOS.
• La instalación debe hacerla un electricista.
• Todos los cables y conexiones deb en ser conformes con el código de
• Deben usarse conectores especiales CO/ALR sin soldadura cuando se
• El termostato debe instalarse en una caja de electricidad.
• El termostato debe instalarse a alrededor de 1,5 m (5 pies) del piso, en
• Deben evitarse los lugares con corrientes de aire (en lo alto de una
• No debe instalarse el termostato en una pared que oculte conductos de
Connexión
electricidad local.
conecten conductores de aluminio.
una pared interior frente al aparato de calefacción.
escalera o en una salida de aire), los puntos en los que el aire no circula
(detrás de una puerta) o que reciben la luz directa del sol.
chimeneas o estufas.
2.
Los cables del termostato deben
conectarse a la alimentación y a la
carga por medio de conectores sin
soldadura para cables de cobre.
Empujar el excedente de cables den-
Fijar el termostato con dos tornillos
Reconectar el sistema de calefacción.
NOTA: Mantener siempre los agujeros de
ventilación del termostato limpios y sin
obstrucciones.
TH110-DP-P 5/6
tro de la caja de electricidad para prevenir interferencias con el termostato.
6-32.
Presionar el botón Day para ajustar el día.
Punto de ajuste
El termostato indica normalmente la temperatura del momento. Para ver el
punto de ajuste, presionar el botón o brevemente. El punto de ajuste
aparecerá durante 5 segundos.
Para cambiar el punto de ajuste, presionar el botón o hasta que
aparezca la temperatura deseada. Para hacerla desfilar más rápido, mantener oprimido el botón.
Uso de la temperatura predefinida
El termostato tiene 3 temperaturas predefinidas:
Temperatura de confort
Temperatura de economía
Temperatura de vacaciones
• Para usar la temperatura Confort o Economía, presionar el botón o
• Para usar la temperatura de Vacaciones, presionar los botones y
Para salvaguardar una temperatura predefinida
Para salvaguardar la temperatura de Confort o Economía:
Para salvaguardar la temperatura de Vacaciones:
Configuración
# Configuraciones ARRIBA ABAJO
SW1 No se usa
SW2
Encendido anticipado
SW3 Formato de la hora
SW4
Formato de la temperatura
Cuando esta función está activada, el termostato calcula el momento
óptimo de encendido de la calefacción para obtener la temperatura
deseada a la hora establecida. El termostato reevalúa cada día el
momento de encendido sobre la base del resultado del día anterior.
temperaturas predefinidas ( , y ) volverán a los valores de
fábrica.
a
Desactivado Activado
12 horas 24 horas
b
°F °C
Encendido
del termostato.
Ajuste de la temperatura
Ícono Uso Ajuste de fábrica
Confort (en la casa) 70 °F (21 °C)
Economía (durmiendo o fuera de la casa) 62 °F (16 °C)
Vacaciones (durante ausencias prolongadas) 50 °F (10 °C)
respectivamente. Aparecerá el ícono correspondiente.
simultáneamente. Aparecerá el ícono .
Ajustar la temperatura deseada con el botón o . Presionar y mantener orpimido el botón adecuado ( o ) durante aproximadamente 3
segundos hasta que aparezca el ícono correspondiente.
Ajustar la temperatura deseada con el botón o . Presionar y mantener simultáneamente los botones y durante aproximadamente 3
segundos hasta que aparezca el ícono .
3.
4.
5.
Page 6

energía. Para poner el termostato en este modo, presionar Mode hasta que
aparezca el ícono . Aparecerán también los íconos del período corriente y
de la temperatura predefinida.
Modos de funcionamiento
Automático - La temperatura se fija según el horario de ahorro de
Cancelación temporaria: Si se modifica el punto de ajuste (oprimiendo
los botones , , o ) cuando el termostato está en modo
automático, el nuevo punto de ajuste estará activo hasta que finalice el
período corriente. Cuando comience el nuevo período, la temperatura
establecida para dicho período será el nuevo punto de ajuste.
Manual - El horario de ahorro de energía no está en uso. La temperatura debe fijarse manualmente. Para colocar el termostato en este
modo:
Presionar Mode hasta que aparezca el ícono .
Ajustar la temperatura usando los botones , , o .
Vacaciones - El termostato está en la temperatura del modo vacaciones.
Presionar los botones y simultáneamente para poner le termostato en
modo vacaciones.
El horario consiste en 4 períodos por día que representan un día de semana
típico. Se puede programar el termostato para saltar períodos que no correspondan a la situación. Por ejemplo, se pueden saltar los períodos 2 y 3 para
el fin de semana.
La temperatura de Confort ( ) se usa en los períodos 1 y 3 y la temperatura
de Economía ( ) en los períodos 2 y 4. Por ejemplo, cuando el período
cambia de 1 a 2, el punto de ajuste cambia automáticamente del punto de
Confort ( ) al punto de Economía ( ).
Se puede tener un programa diferente para cada día de la semana, es decir,
cada período puede comenzar a una hora diferente para cada día. Se ha
programado el termostato con el siguiente horario:
Para modificar este horario:
Horario de ahorro de energía
Período Descripción Temperatura predefinida asociada
Despertar
Fuera de la casa
De regreso en la casa
Dormir
Período Ajuste
LU MA MIE JUE VIE SA DO
6:00 AM6:00 AM6:00 AM6:00 AM6:00 AM6:00 AM6:00
AM
8:00 AM8:00 AM8:00 AM8:00 AM8:00
6:00 PM6:00 PM6:00 PM6:00 PM6:00
10:00 PM10:00 PM10:00 PM10:00 PM10:00 PM10:00 PM10:00
AM
PM
--:-- --:--
--:-- --:--
PM
Presionar Pgm para acceder al modo de programación. Se selecciona
el período 1.
Presionar Day para seleccionar el día que se desea programar (man-
tener presionado 3 segundos para seleccionar toda la semana).
Presionar Hour y Min para ajustar la hora de inicio del período seleccio-
nado, o presionar Clear si se desea saltar el período (aparece --:-- ).
Presionar Pgm para seleccionar otro período, o Day para seleccionar
otro día. Repetir entonces la etapa 3.
Presionar Mode para salir del modo de programación.
NOTA: Si durante 60 segundos no se presiona ningún botón, el termostato
saldrá automáticamente del modo de programación.
6.
Problemas Soluciones
La pantalla del termostato está en
blanco.
Se visualiza LO en pantalla.
Se visualiza HI en pantalla.
Aparece la hora equivocada.
La temperatura medida no es correcta.
El calefactor está siempre encendido
(ON).
El termostato indica que la calefacción
está encendida (ON) pero el calefactor
no está encendido (ON).
La temperatura no cambia según el
7.
horario de ahorro de energía.
Alimentación: 240 Vac, 60 Hz
Carga máxima: 16 A (resistiva solamente)
Margen de visualización de la temperatura: 32 °F a 140 °F (0 °C a 60 °C)
Resolución de visualización de la temperatura: 0,1 °F (0,1 °C)
Margen de ajuste: 40 °F a 86 °F (5 °C a 30 °C)
Intervalo de ajuste: 1 °F (1 °C)
Almacenamiento: -4 °F a 120 °F (-20 °C a 50 °C)
Salvaguarda de los datos: en caso de falla de la alimentación eléctrica, la mayor parte
de los datos quedan salvaguardados. Sólo debe reajustarse la hora si la falla dura más
de dos horas. El termostato volverá al modo que estaba activado antes de la falla de alimentación.
Í
Honeywell garantiza que este producto, sin incluir las baterías (si las hubiera), no presentará
defectos en los materiales ni en lo referente a la mano de obra, en condiciones normales de uso
y de servicio, por un período de tres (3) años a partir de la fecha de compra por el consumidor.
Si en cualquier momento, durante el período de vigencia de la garantía, se determina que el
producto es defectuoso o que funciona mal, Honeywell lo reparará o lo reemplazará (a elección
de Honeywell).
Si el producto es defectuoso:
Esta garantía no cubre los costos de desinstalación y reinstalación. Esta garantía no será válida
si se demuestra que el defecto o el mal funcionamiento se deben a un daño que ocurrió cuando
el producto estaba en posesión del consumidor.
La única responsabilidad de Honeywell será la de reparar o reemplazar el producto de acuerdo
con los términos aquí establecidos. HONEYWELL NO SERA RESPONSABLE DE NINGUNA
PÉRDIDA NI DE NINGÚN DAÑO DE NINGÚN TIPO, INCLUIDOS LOS DAÑOS IMPREVISTOS
O DERIVADOS QUE RESULTE N, DIRECTA O INDIRECTAMENTE, DEL INCUM PLIMIENTO
DE CUALQUIER GARANTÍA, EXPRESA O IMPLÍCITA, O DE CUALQUIER OTRA FALLA DE
ESTE PRODUCTO. Algunos estados, provincias o regiones no permiten la exclusión o la limitación de los daños imprevistos o derivados, por lo que es posible que la limitación no se aplique
en su caso.
ÉSTA ES LA ÚNICA GARANTIA EXPRESA QUE HONEYWELL OTORGA SOBRE ESTE PRODUCTO. LA DURACIÓN DE CUALQUIER GARANTÍA IMPLÍCITA, INCLUIDAS LAS
GARANTÍAS DE APTITUD E IDONEIDAD PARA UN FIN DETERMINADO, QUEDA, POR EL
PRESENTE, LIMITADA A LA DURACIÓN DE TRES AÑOS DE ESTA GARANTÍA. Algunos
estados, provincias o regiones no permiten limitaciones en cuanto a la duración de las
garantías implícitas. Por lo tanto, es posible que la limitación anterior no se aplique en su caso.
Esta garantía le brinda derechos legales específicos y usted podría tener otros derechos que
varían para cada estado, provincia o región.
705 Montrichard
Saint-Jean-sur-Richelieu (Québec)
J2X 5K8
Canada
1-800-831-2823
aube.service@honeywell.com
www.aubetech.com
Solución de problemas
El interruptor del termostato está en “Off”.
La temperatura medida es inferior al margen
de visualización de la temperatura. La
calefacción está activada.
La temperatura medida es superior al margen
de visualización de la temperatura.
El termostato estuvo desconectado durante
más de 2 horas.
El termostato está expuesto a corrientes de
aire.
Verificar las conexiones del termostato.
Verificar las conexiones del termostato.
Verificar si el termostat o está en Modo
Automático. Verificar también el horario y el
ajuste del reloj.
Especificaciones técnicas
3840 watts @ 240 Va c
Garantía
I. Devuélvalo al lugar donde lo compró, acompañado por la factura de compra o de otra
prueba de compra que incluya la fecha.
II. Comuníquese con Honeywell. Hon eywell determin ará si deb erá devolver el producto o si
se le enviará un producto de reemplazo.
Asistencia al cliente
R
8.
9.
10.
11.
TH110-DP-P 6/6
6
Impreso en EE.UU. 2011-04-14
 Loading...