

Page 1

IP/Network Doorbell
Quick Installation Guide
V3.1
Page 2
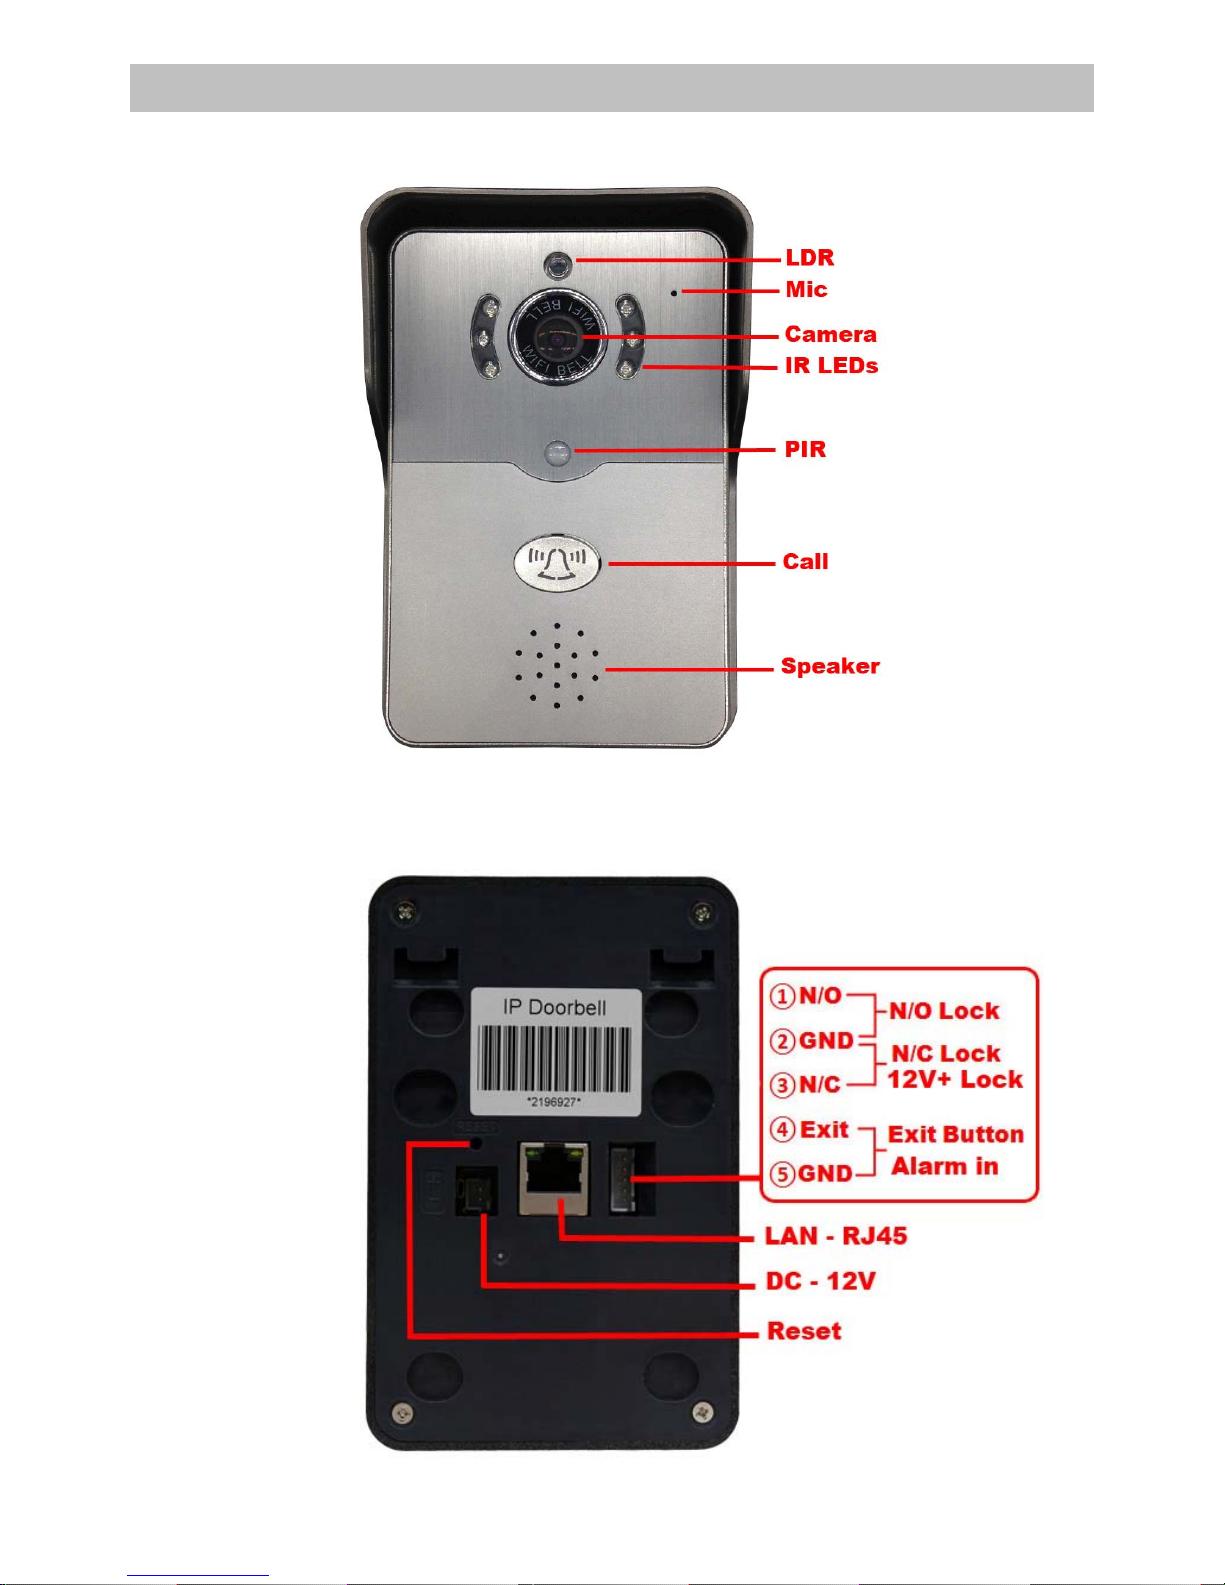
1. Interfaces Instruction
1. Front Panel
2. Back Panel
Page 3
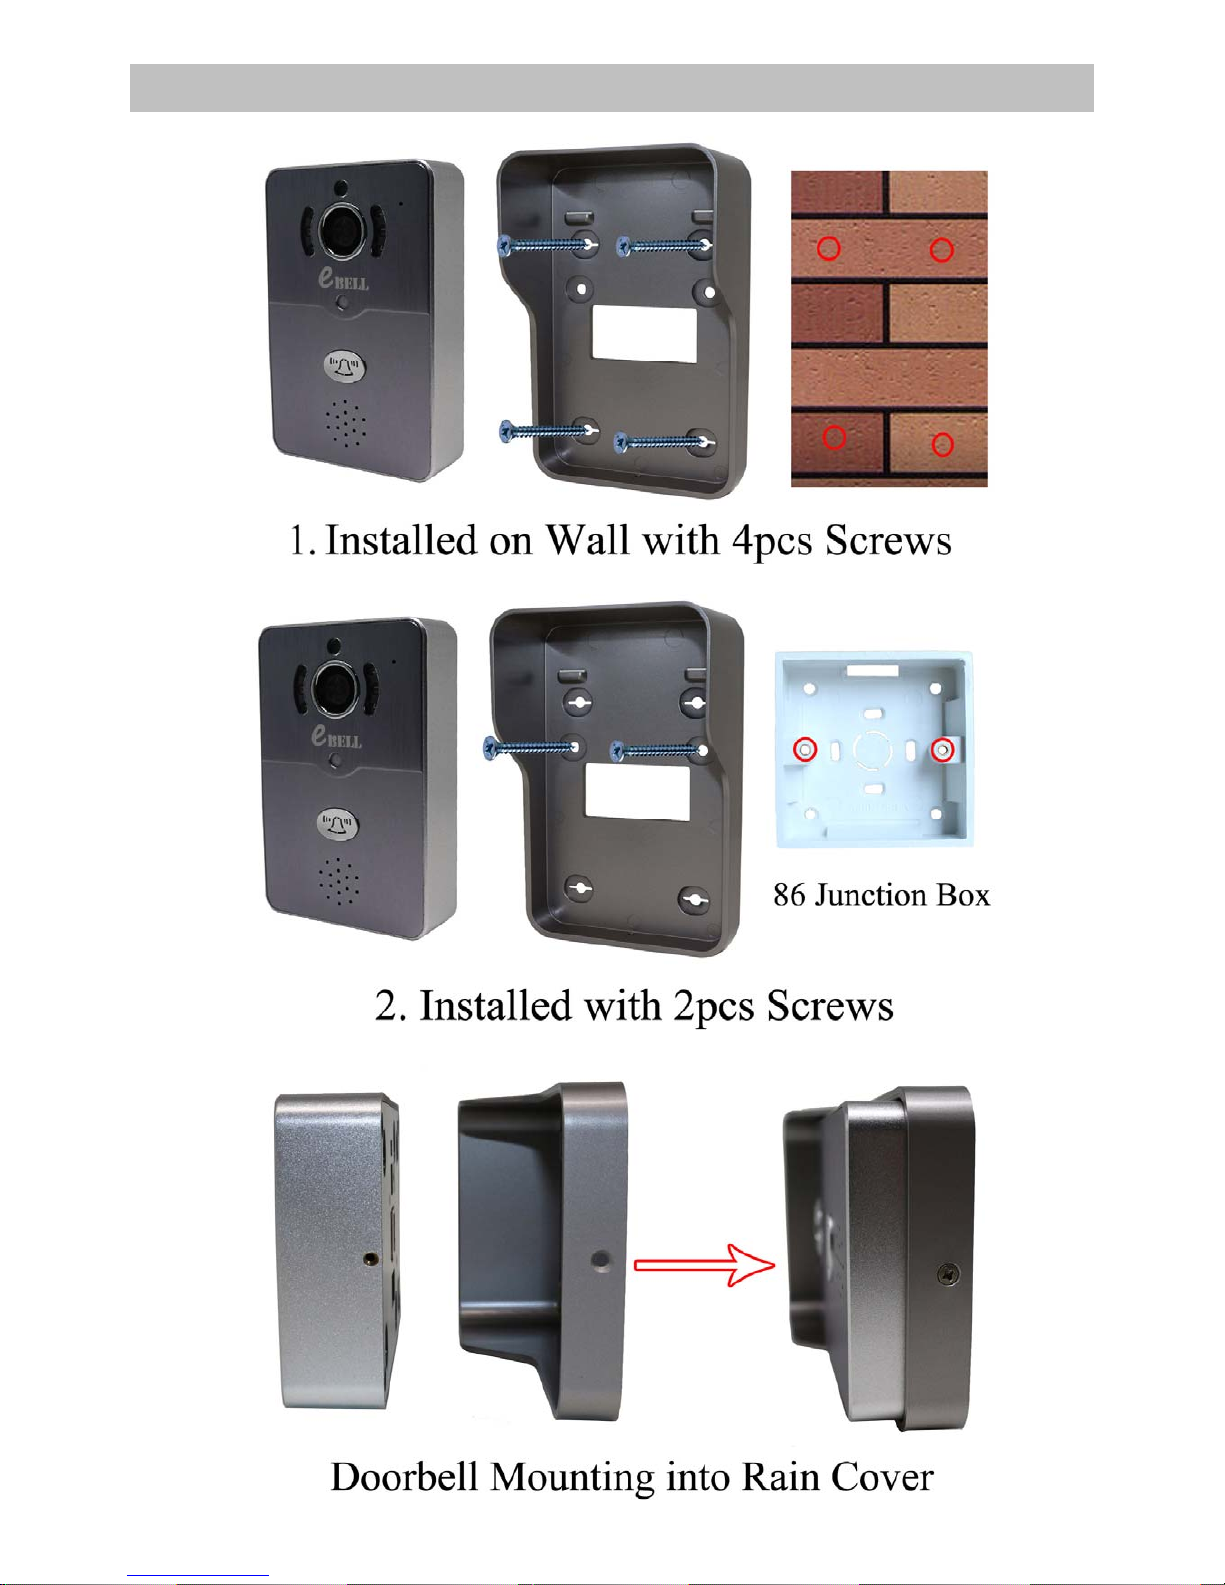
2. Doorbell Installation
Page 4
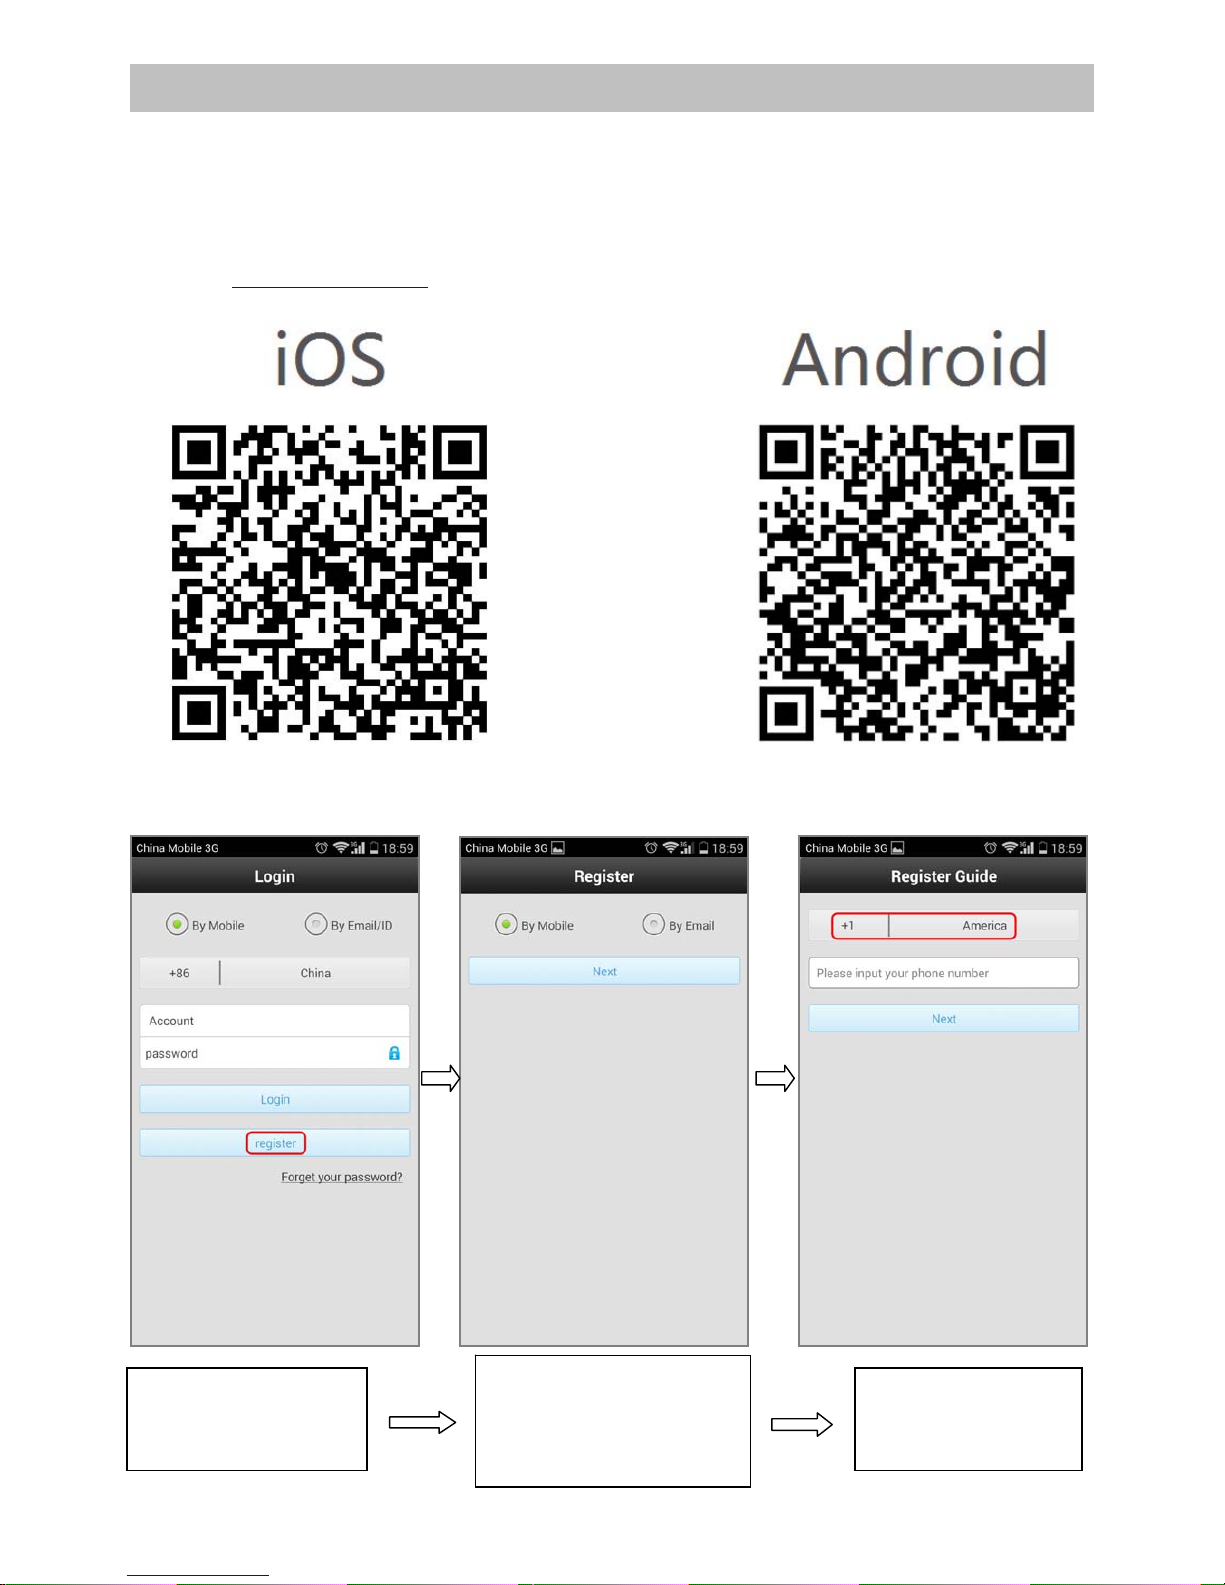
3. Mobile Phone APP
1. Install APP
a. Scan the below QR Code.
b. Search “Yoosee” on APP Store.
c. Visit http://www.yoosee.co to download.
2. Register and login APP.
3. Make sure you
choose your country
right to receive code.
2. Choose register mode
and finish it as tips.
(Mobile phone registration
is recommended)
1.Open APP and click
“register”.
Page 5
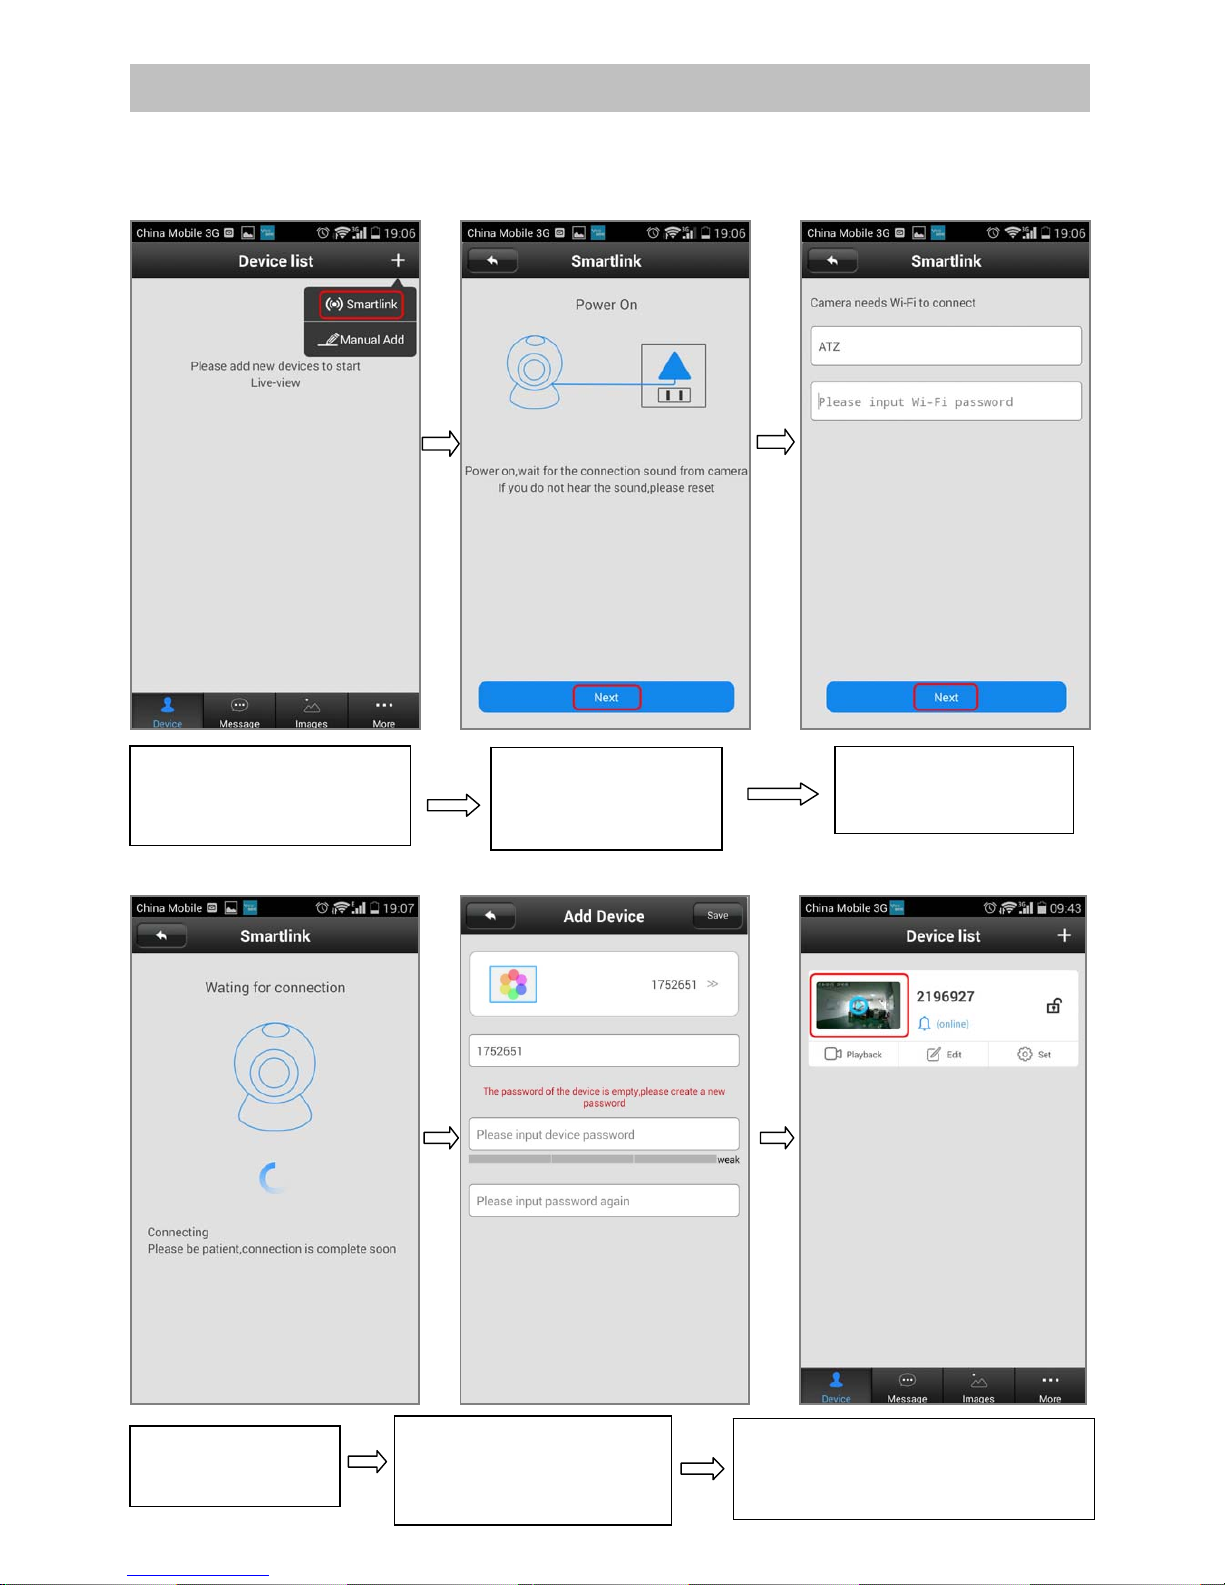
4. Network Configuration
1. Power on the doorbell and wait for starting. (It will have the sound tip if the doorbell starts).
2. Smartlink mode to make Wi-Fi connection - within 5 minutes with doorbell power on.
Tip: Ensure the Wi-Fi that you set can connect to the mobile phone or tablet normally.
1.Open the software. Click
on “+” on the top right and
choose “Smartlink”.
2. Operate as tips.
Click “NEXT” when
finished.
3. Input Wifi password
and click “NEXT”.
4.Wait for the WiFi
connection.
5. Setup password after
wifi settings and click
“Save” button on top right.
6. APP will automatically jump to
the equipment list. Click device
window, you can preview the video.
Page 6
Remark: For security purpose, there is no default password, which need the user set the device password
for the first time. (Password must be 6-30 characters, including alphabetic and number.)
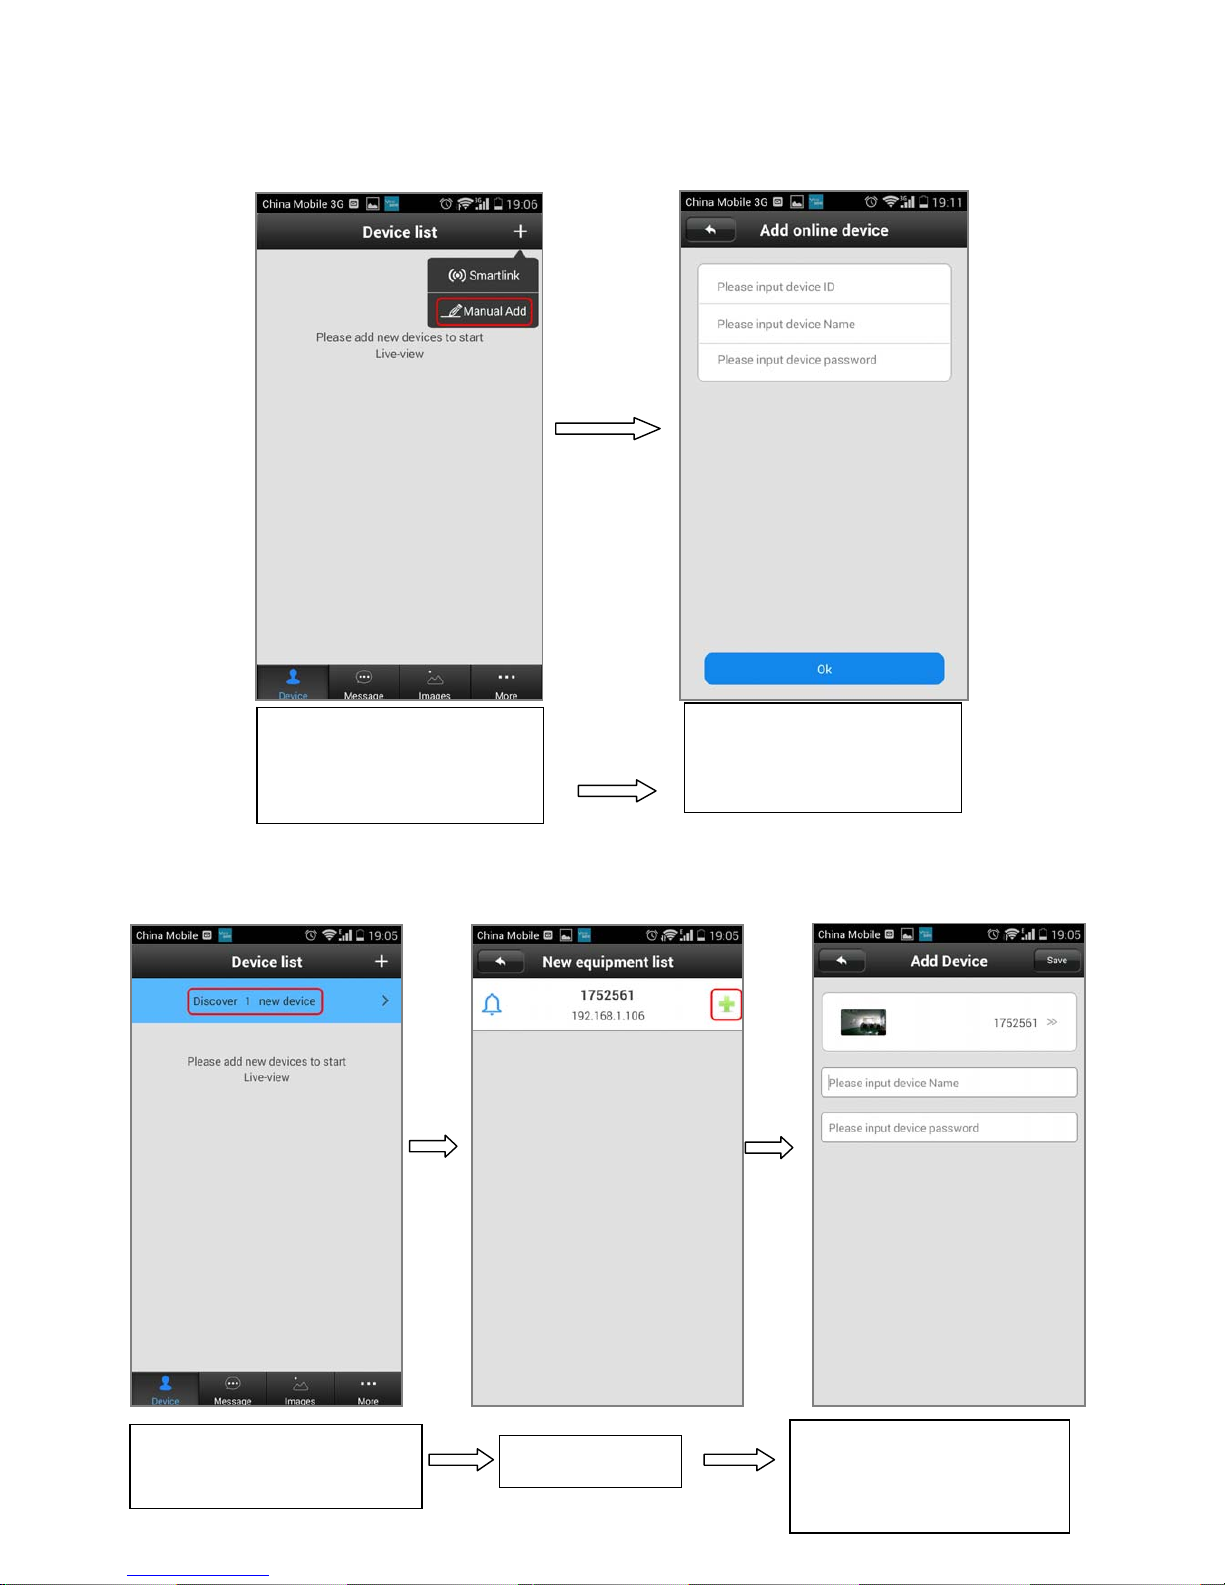
3. Add doorbell remotely, choose “Manual Add”.
4. Connect doorbell in same LAN with RJ45.
1. Open the software. Click
on “+” on the top right and
choose “Manual Add”.
2. Input device ID, name
and password and click
“Ok” button.
1.Open the software. Click
on “Discover 1 new device”
2.Click “+”
3. Input device name and
password and click “Save”
button on top right
Page 7
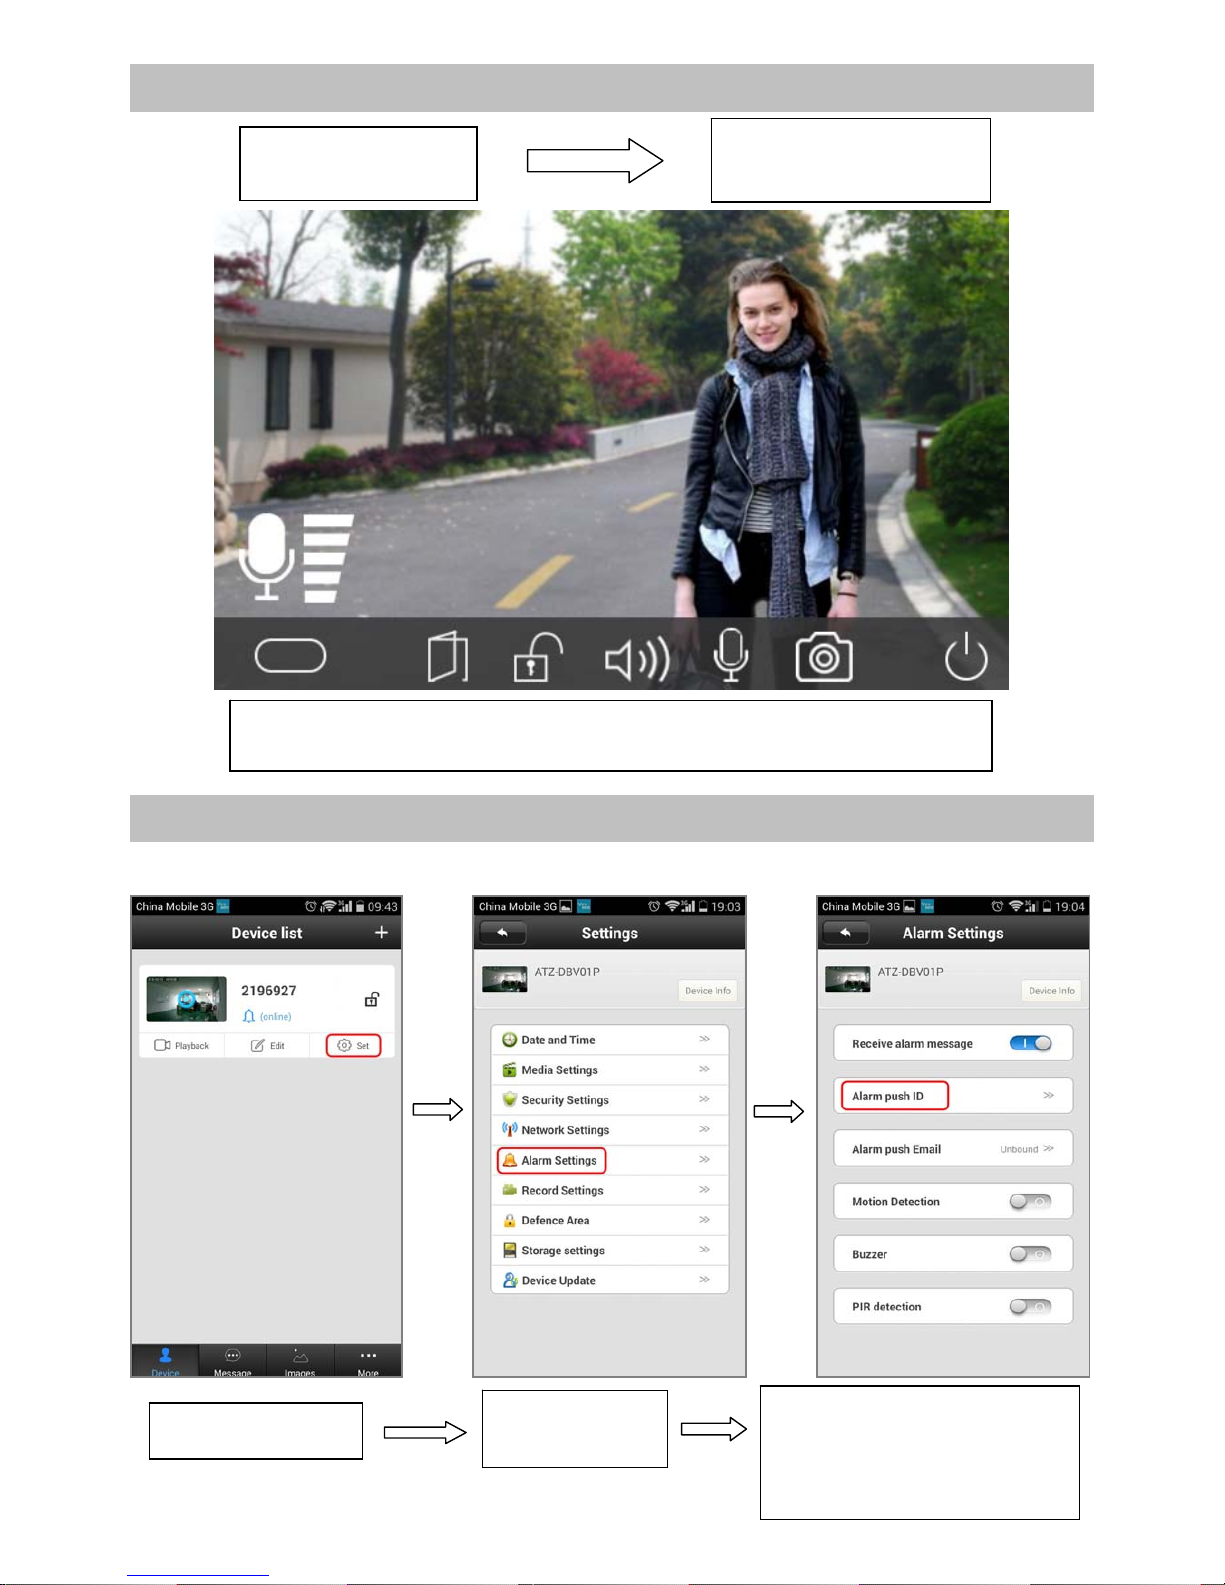
5. Visitor Calling
6. Security Protection
1. Alarm Settings
1.Visitor press the Call
button.
2. Popup message from
APP, answer or hang up.
3. After answering, you can call intercom, take photos, open the door etc. Full
duplex intercom call, which is more convenient to use.
1.Click “Set”
2. Choose Alarm
Settings
3. Check whether the receiving
alarm information bar is on and
whether your account is on
Alarm push ID list.
Page 8
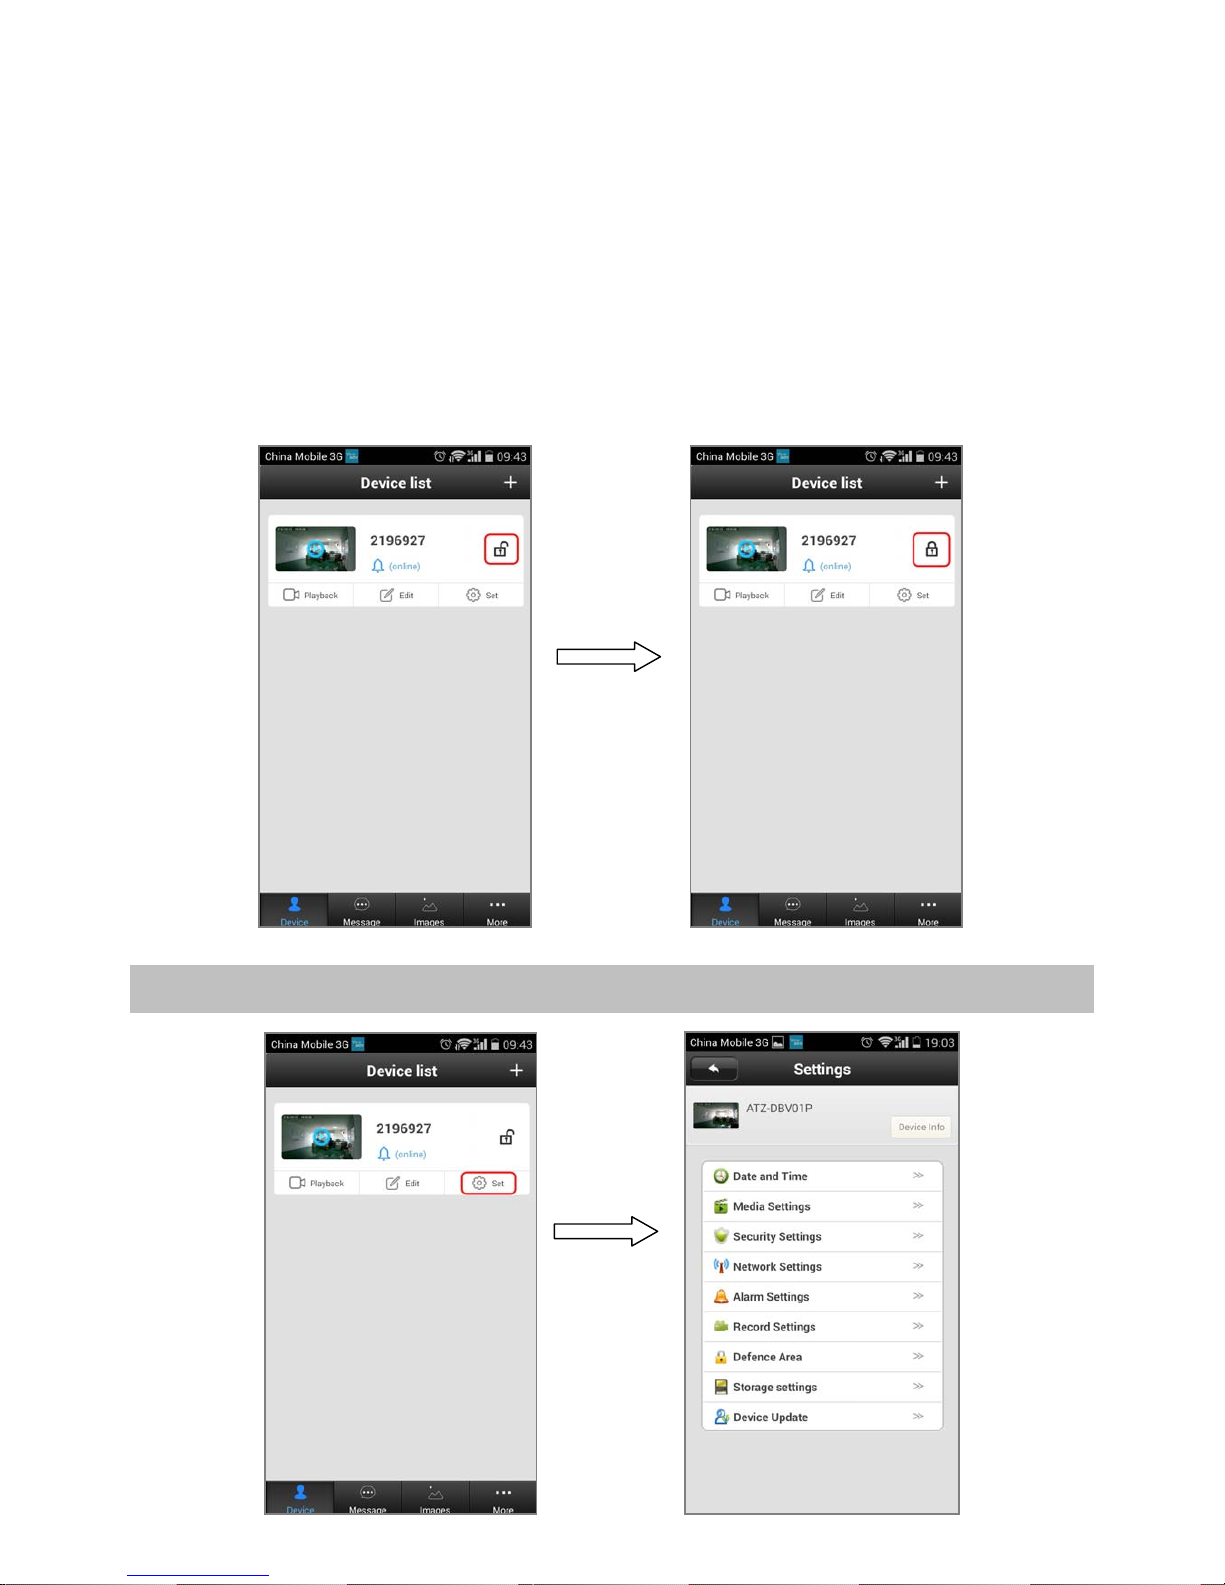
Alarm Settings:
Receive alarm message: Opened by default. If closed, user cannot receive messages and alarm push.
Alarm push ID: Add the first mobile phone by default configuration for bell. Support Max. five accounts.
Alarm push Email: Binding mailbox. Bell will send visitor call and alarm images to the mailbox.
Motion Detection: Closed by default. The bell alarm acts when object moves if motion detection is open.
Buzzer: Closed by default. It will send out the alarm when the buzzer is open.
PIR (Human Infrared Detection): Closed by default. Capture warming is more sensitive and accurate.
2. Protection and Removal
Remove Protection Mode: Removal protection by default. Your mobile phone will not receive the alarm.
Protection Mode: Your mobile phone will receive the alarm.
7. Device Other Information
Page 9
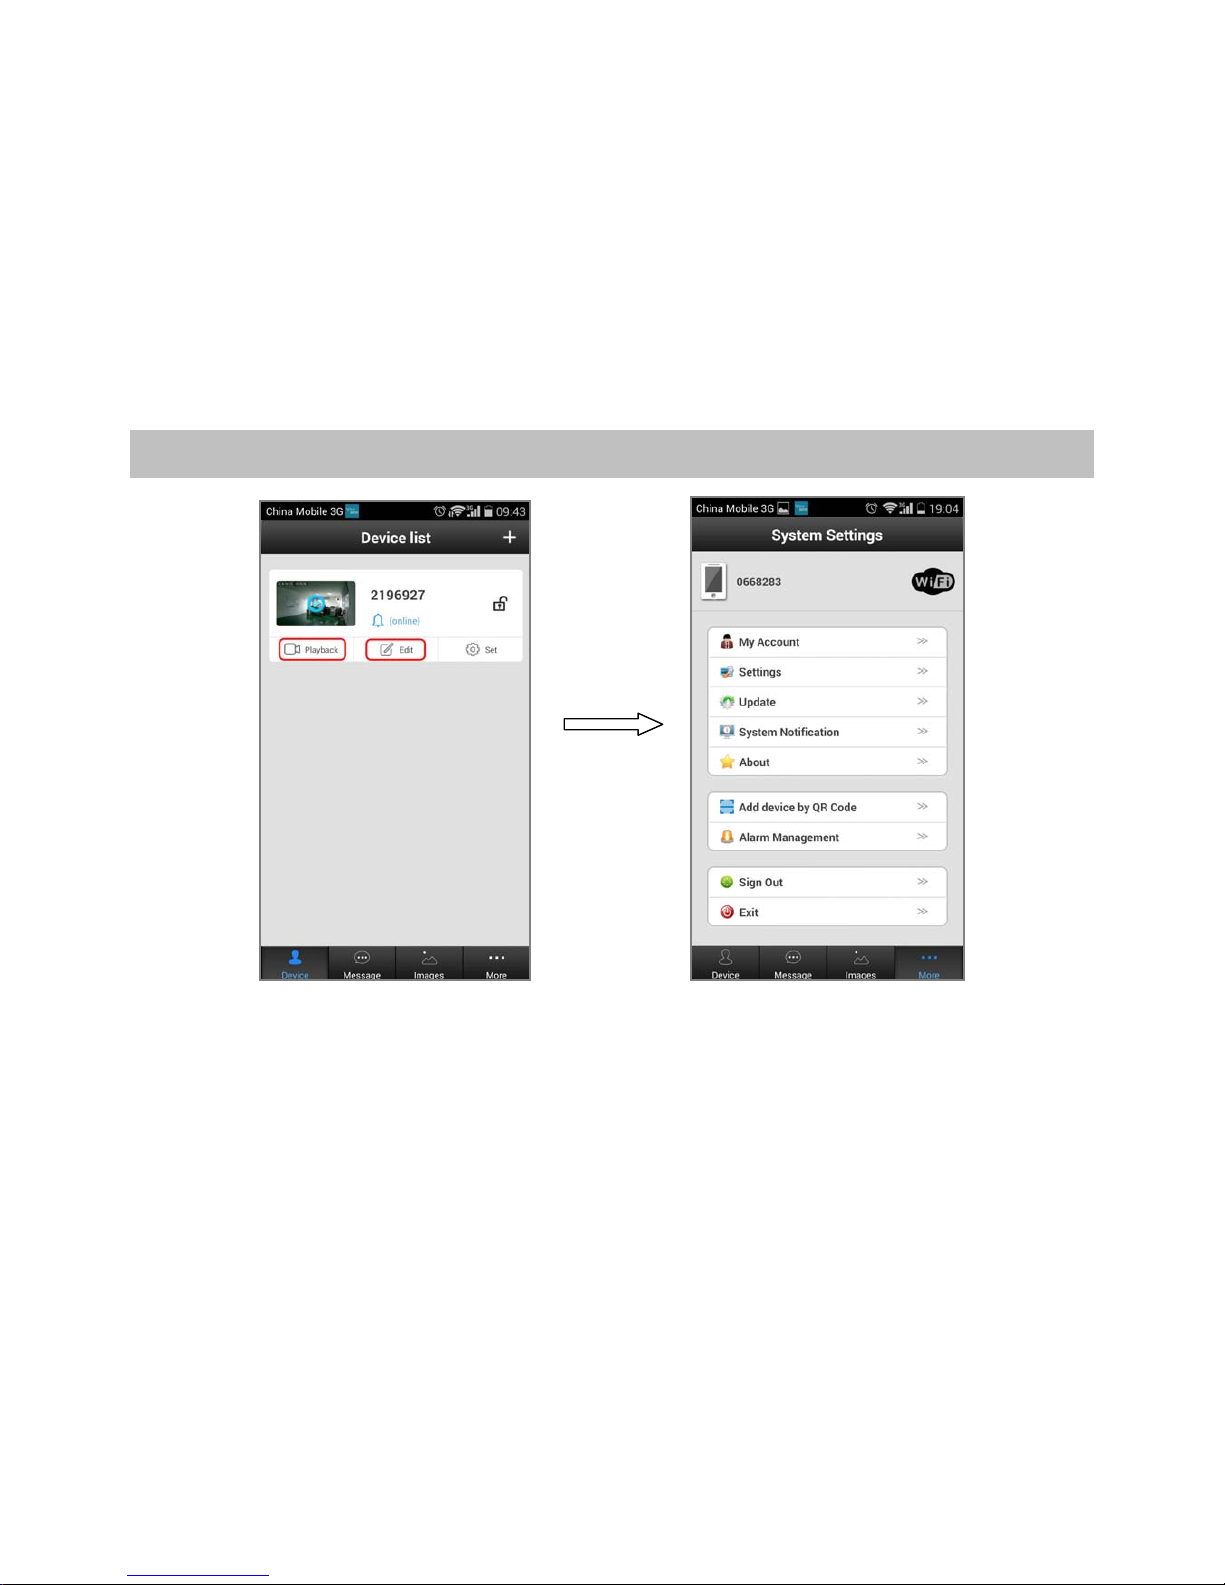
Device Info: Display the current firmware information of the device.
Date and Time: Set device time, the default automatic time synchronization network.
Media Settings: Set image format (N/P) and reversal.
Security Settings: Modify Admin Password.
Network Settings: Switch the wired network and WiFi network.
Alarm Settings: Configure the door phone alarm information.
Record Settings: Set the recording mode (optional, need to work with TF card).
Defence Area: Not available
Storage Setting: Check the TF card information
Device Update: Check device firmware update
8. APP Function Introduction
Playback: Play TF card recording (optional).
Edit: Edit device name and password.
Device: Display the device list.
Message: Record the visitor and alarm messages.
Image: Record the screenshot.
More:
My Account: Check and configure information about current account, modify the account password.
Settings: Configuration alarm and call ring, automatically start and hang up, icon configuration.
Update: Check APP update version
System Notification: Important system notification
About: APP description and version
Add device by QR Code: As tips, scan the QR code to configure WiFi network and add IP doorbell.
Alarm Management: Configure alarm interval and alarm shielding device.
Sign Out: Sign out current account
Exit: Exit APP
Page 10
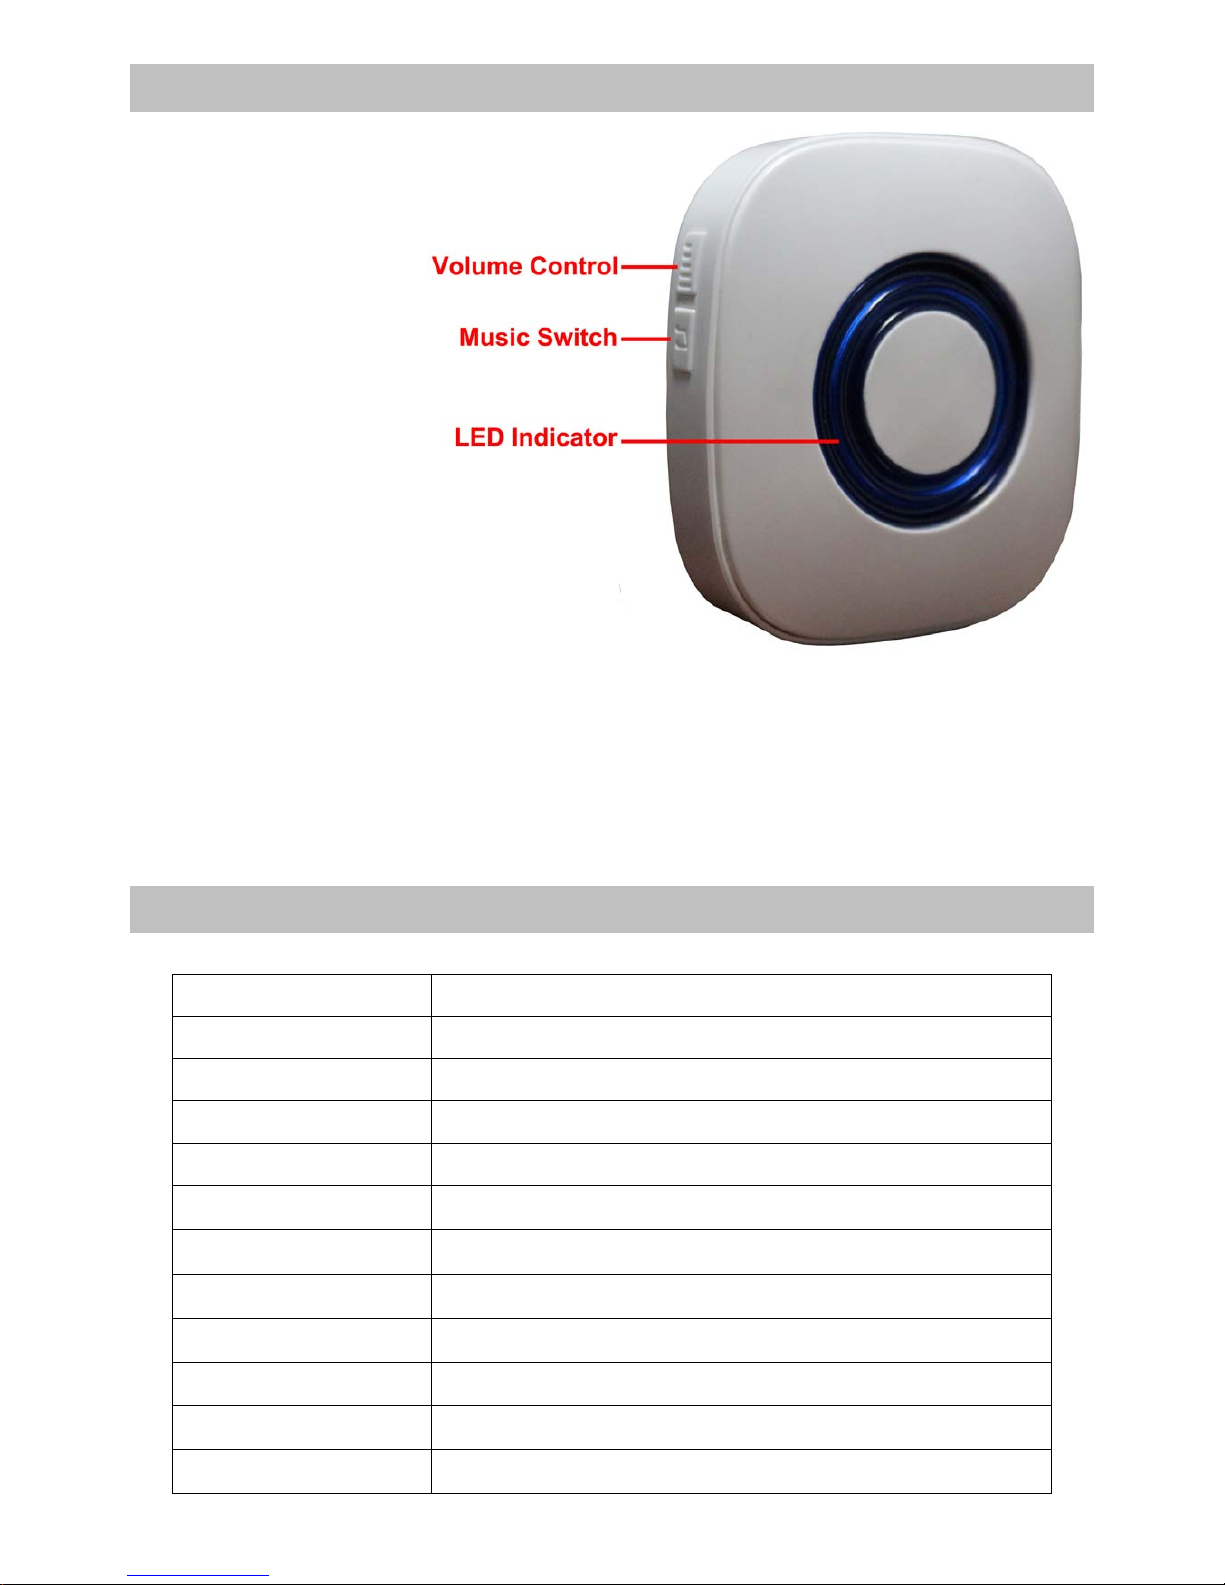
9. Indoor Dingdong Chime/Bell
1. 433MHz
2. Learning Code
3. Distance: 30-80m
4. 52 Musics
Pairing Program Instruction
1. Select music before pairing.
2. Activate Pairing – 2 ways as below:
a. Press both volume button and music button.
b. Long press volume button for 5 seconds.
When either operation above is finished, hearing “Dong” with LED indicator flash, press call
button on IP doorbell in 5 seconds. It means pairing succeed if selected music is played.
3. Two or more indoor bell pairing - Follow point 2 once again to get paired one by one.
4. All pairing memory clearance - Long press music button for 5 seconds.
10. Main Specification
Chipset Hi 3518E
WiFi
One-Key WiFi Connection
Indoor Bell
433MHz, Learning Code, Distance: 80m
Storage
Support Max. 64GB TF Card
Resolution 1.0MP - 720P (1280*720), VGA (640*480), QVGA (320*240)
Audio
Full-duplex Audio, G .71 1A
Alarm Motion Detection
PIR (The human body infrared sensor detection)
V isual Angle
2.1mm Lens, 145° super wide angle
Night V ision
6pcs LED Lights, IR 3m, IR-Cut, no Color Change
Support Protocol
TCP/IP, UDP, SMTP, DHCP, UPnP, P2P, ONVIF
Item Size (L x W x H) 134 x 87 x 29mm
Certificate ISO, CE, FCC, RoHS
 Loading...