

Page 1
EXS-1
User’s Manual
EN
Page 2

Welcome.
Contents
Package Contents . . . . . . . . . . . . . . . . . . . . . . . . . . . . . . . . . . . . . . . . . . . . . . . . . . . . . . . . . 3
1 Setup . . . . . . . . . . . . . . . . . . . . . . . . . . . . . . . . . . . . . . . . . . . . . . . . . . . . . . . . . . . . . . . . . 4
Assembly Guide . . . . . . . . . . . . . . . . . . . . . . . . . . . . . . . . . . . . . . . . . . . . . . . . . . . . . . . . . . . 4
Connecting the Pads . . . . . . . . . . . . . . . . . . . . . . . . . . . . . . . . . . . . . . . . . . . . . . . . . . . . . . . 7
Top Panel . . . . . . . . . . . . . . . . . . . . . . . . . . . . . . . . . . . . . . . . . . . . . . . . . . . . . . . . . . . . . . . . 8
Connections on the Rear Panel . . . . . . . . . . . . . . . . . . . . . . . . . . . . . . . . . . . . . . . . . . . . . . . 9
Power On / O . . . . . . . . . . . . . . . . . . . . . . . . . . . . . . . . . . . . . . . . . . . . . . . . . . . . . . . . . . . 10
2 Performing . . . . . . . . . . . . . . . . . . . . . . . . . . . . . . . . . . . . . . . . . . . . . . . . . . . . . . . . . . . . 11
Home Screen . . . . . . . . . . . . . . . . . . . . . . . . . . . . . . . . . . . . . . . . . . . . . . . . . . . . . . . . . . . . 11
Performing . . . . . . . . . . . . . . . . . . . . . . . . . . . . . . . . . . . . . . . . . . . . . . . . . . . . . . . . . . . . . . 11
Changing the Drum Kit . . . . . . . . . . . . . . . . . . . . . . . . . . . . . . . . . . . . . . . . . . . . . . . . . . . . . 11
Song Playback . . . . . . . . . . . . . . . . . . . . . . . . . . . . . . . . . . . . . . . . . . . . . . . . . . . . . . . . . . . 12
Using the Metronome . . . . . . . . . . . . . . . . . . . . . . . . . . . . . . . . . . . . . . . . . . . . . . . . . . . . . . 13
Using the Visualizer. . . . . . . . . . . . . . . . . . . . . . . . . . . . . . . . . . . . . . . . . . . . . . . . . . . . . . . . 13
3 Menu Functions and Settings . . . . . . . . . . . . . . . . . . . . . . . . . . . . . . . . . . . . . . . . . . . . 14
SONG . . . . . . . . . . . . . . . . . . . . . . . . . . . . . . . . . . . . . . . . . . . . . . . . . . . . . . . . . . . . . . . . . 15
METRONOME . . . . . . . . . . . . . . . . . . . . . . . . . . . . . . . . . . . . . . . . . . . . . . . . . . . . . . . . . . . 18
RECORDING . . . . . . . . . . . . . . . . . . . . . . . . . . . . . . . . . . . . . . . . . . . . . . . . . . . . . . . . . . . . 19
INST LEVEL (Adjusting the volume of each pad) . . . . . . . . . . . . . . . . . . . . . . . . . . . . . . . . . . 20
SETUP . . . . . . . . . . . . . . . . . . . . . . . . . . . . . . . . . . . . . . . . . . . . . . . . . . . . . . . . . . . . . . . . . 21
4 Important Notice . . . . . . . . . . . . . . . . . . . . . . . . . . . . . . . . . . . . . . . . . . . . . . . . . . . . . . . 29
Important Safety Information. . . . . . . . . . . . . . . . . . . . . . . . . . . . . . . . . . . . . . . . . . . . . . . . . 29
Important Information about Use . . . . . . . . . . . . . . . . . . . . . . . . . . . . . . . . . . . . . . . . . . . . . 30
Specications . . . . . . . . . . . . . . . . . . . . . . . . . . . . . . . . . . . . . . . . . . . . . . . . . . . . . . . . . . . . 30
Support . . . . . . . . . . . . . . . . . . . . . . . . . . . . . . . . . . . . . . . . . . . . . . . . . . . . . . . . . . . . . . . . 30
• Please see “4 Important Notice” (p.29) before using EXS-1.
• The description contents on xD3 may vary depending on the rmware version. Please check the latest rmware / updated
information on the ATV website.
• Illustrations and pictures shown in this manual are for instructional purposes only, and may appear somewhat dierent from
the actual specications.
• The company and product names in this manual are the trademarks or registered trademarks of their respective
companies.
2
Page 3
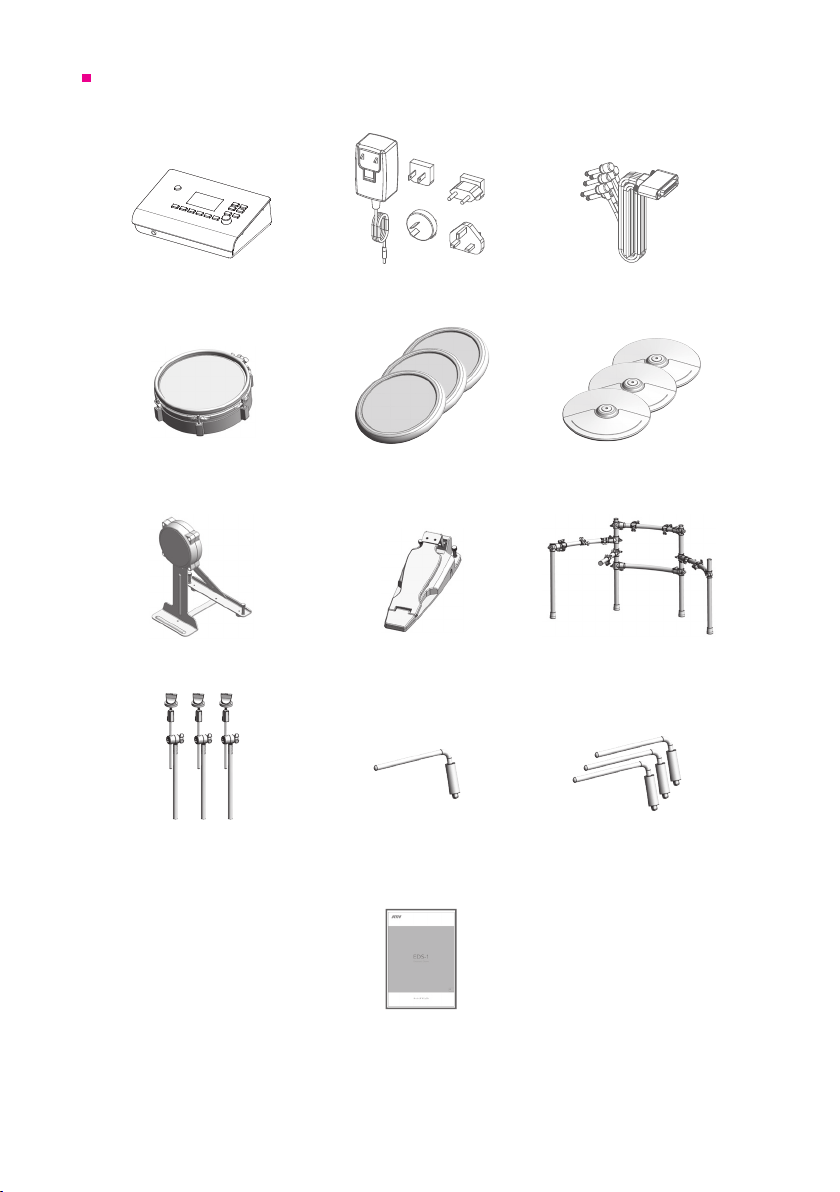
Package Contents
This product includes the following items.
xD3 Drum Module Multi-trigger Cable
Snare Pad Tom Pads (x3) Cymbal Pads (x3)
Kick Pad
Cymbal Arms (x3) Snare Pad Rod Tom Pad Rods (x3)
AC Adapter & plugs
Hi-hat Controller Drum Stand
SD Memory Card
Cable Tie
User’s Manual (This booklet)Tuning Key
3
Page 4
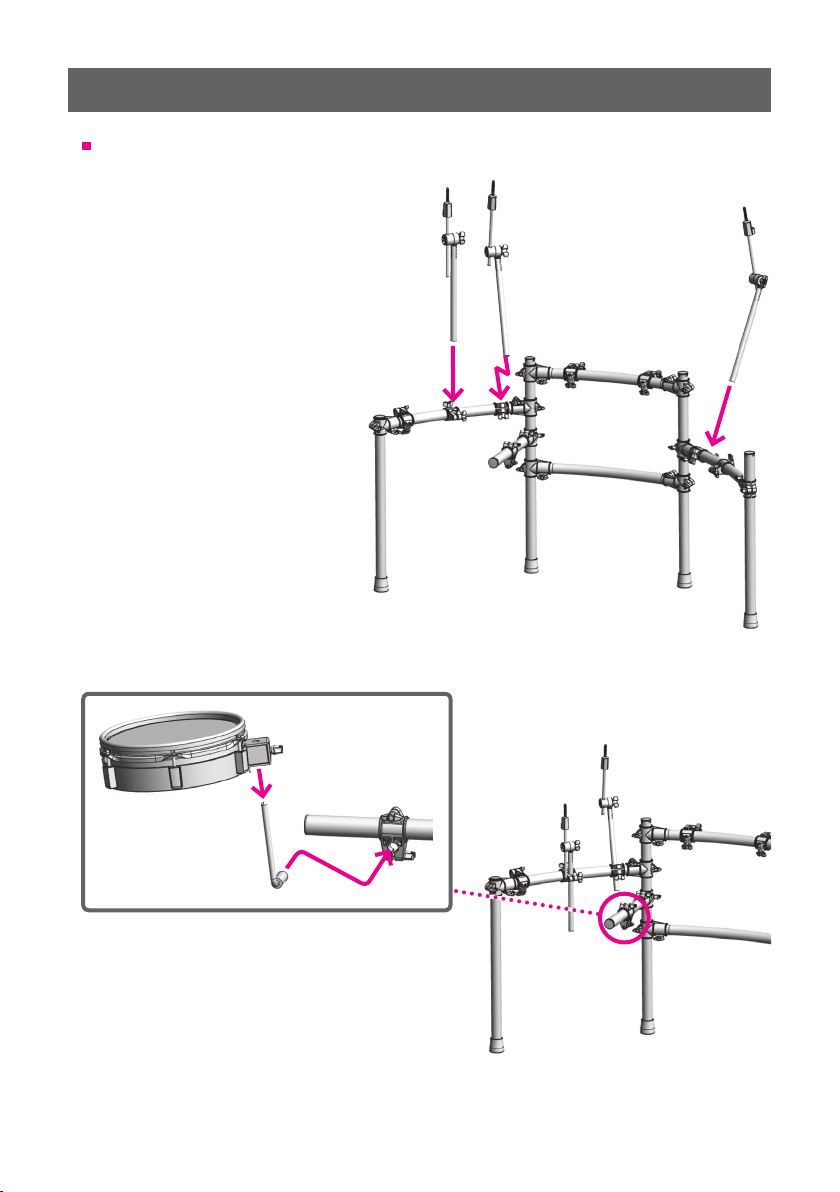
1 Setup
Assembly Guide
1 Attaching cymbal arms
as shown below
2 Attaching the snare pad
2
1
Tighten it using the tuning key included
in the package
4
Page 5
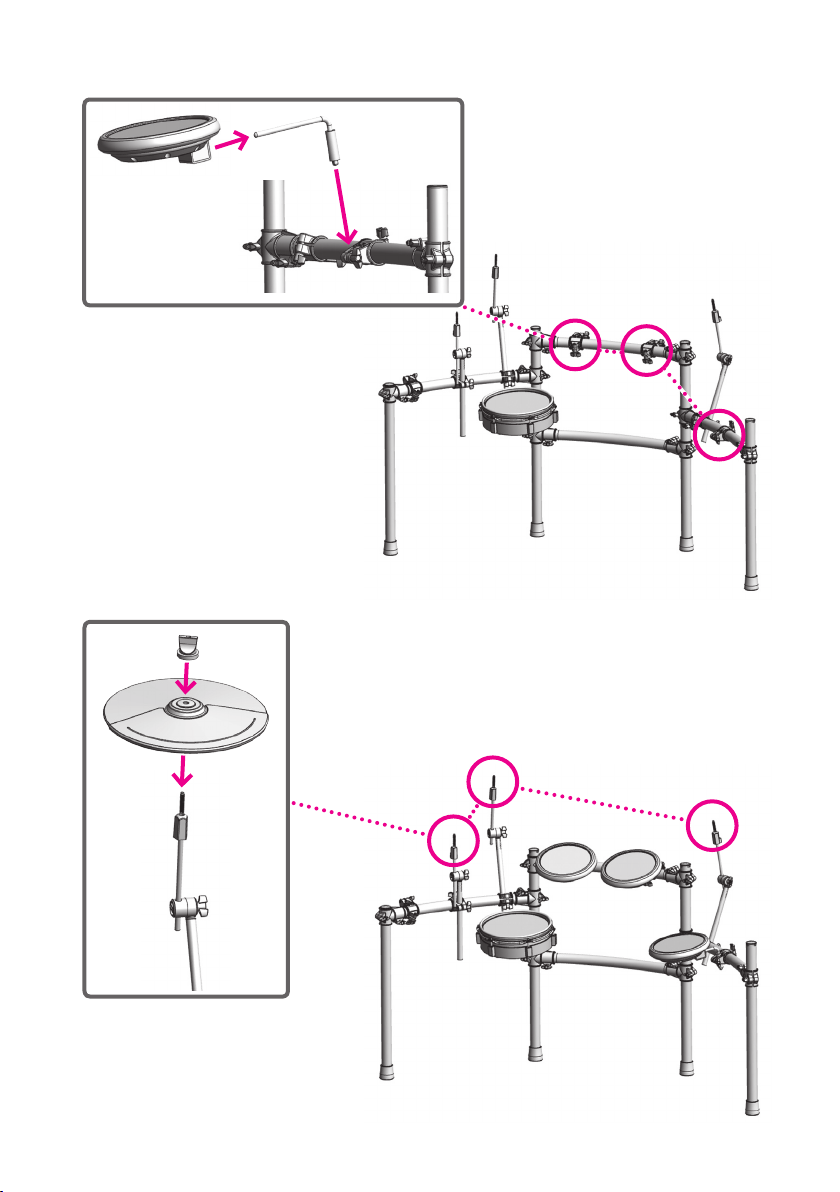
3 Attaching the tom pads
2
4 Attaching the cymbal pads
1 Setup
1
2
1
5
Page 6

5 Attaching the xD3 drum module
6 Arranging the kick pad and hi-hat controller as shown below
1 Setup
* Kick pedal is not included.
* If the kick pad is not stable after attaching the kick pedal, loosen the thumbscrew on the back of the kick pad
and adjust it to be stable.
* Please be careful not to scratch the oor with the anchor bolts from the kick pad and hi-hat controller.
* After assembling, please check if the knobs of each part is rmly tightened.
6
Page 7
1 Setup
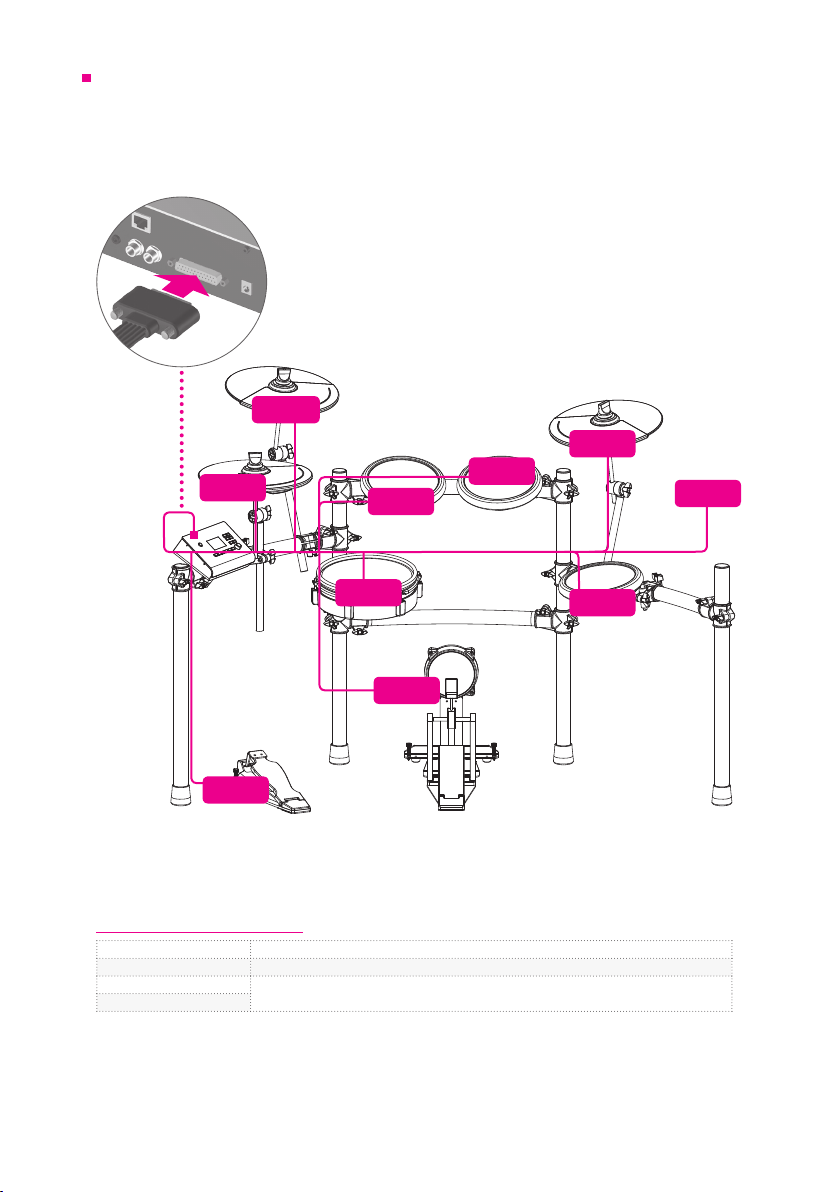
Connecting the Pads
Connect the multi-trigger cable of the xD3 drum module to each pad.
Check the corresponding labels written on the plugs of the multi-trigger cable and connect it as
shown below.
CR
RD
HH
T1
T2
BEL
*
SN
K
CTL
* BEL plug is not used. Please x it to the stand
without removing the cap.
Drumming Techniques
Snare drum Head shot, Rim-shot, Side-stick (p.12)
Hi-hat Bow, Edge, Opening-Closing, Foot Close, Foot Splash
Crash cymbals
Ride cymbals
Bow, Edge
7
T3
Page 8
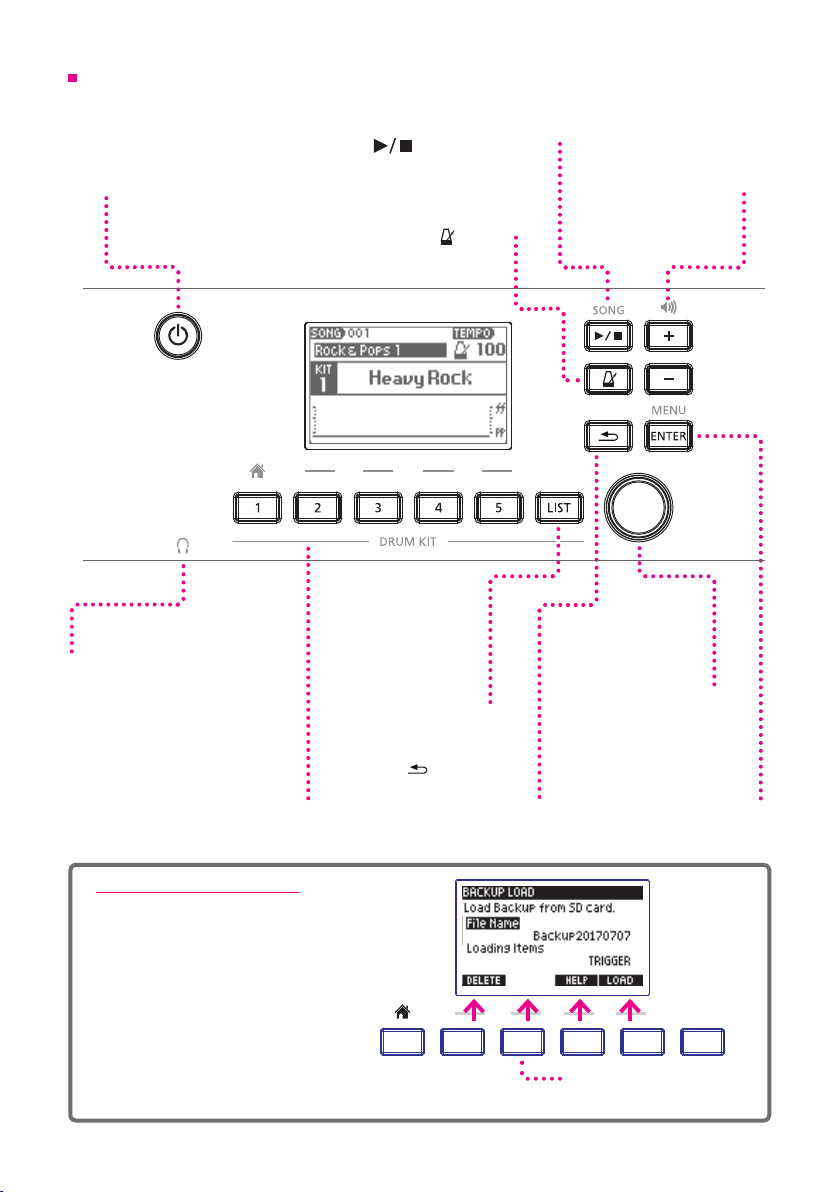
Top Panel
VOLUMESONG
ENTER
VOLUMESONG
VOLUMESONG
MENU
ENTER
MENU
Only the buttons being operated light up.
1 Setup
Power Button
Long-press this button to
turn the power on/o.
PHONES
Audio jack for headphones.
Drum Kit Buttons [1]—[5]
[1]—[5] Use to select registered
drum kits.
Pressing [1] button will lead you to
Home Screen.
SONG [
SD memory card is necessary for the song
list and enables you to
Return to the previous screen.
] (PLAY/STOP) Button
Use to start and stop the song.
playbacks.
Metronome [
Use to turn on / o the
built-in metronome.
Pressing the button
displays the drum kit
] Button
[LIST] Button
select a kit.
[
] (BACK) Button
VOLUME [+][–] Buttons
Use to adjust the headphone
and output volume.
Value Knob
Use to change and
select dierent settings
and items.
[ENTER/MENU] Button
Use to determine / select
parameters and values.
On the home screen,
“Menu” is displayed.
.
About the Function Buttons
Other than "Home" screen, the drum kit
buttons [2] [3] [4] [5] are used to select
corresponding items and functions on
the screen.
For example, corresponding functions
of the screen on the right are:
[2] Button = DELETE
[4] Button = HELP
[5] Button = LOAD
1 2 3 4 5
8
Buttons for which there is no
corresponding item are unlit.
LIST
Page 9
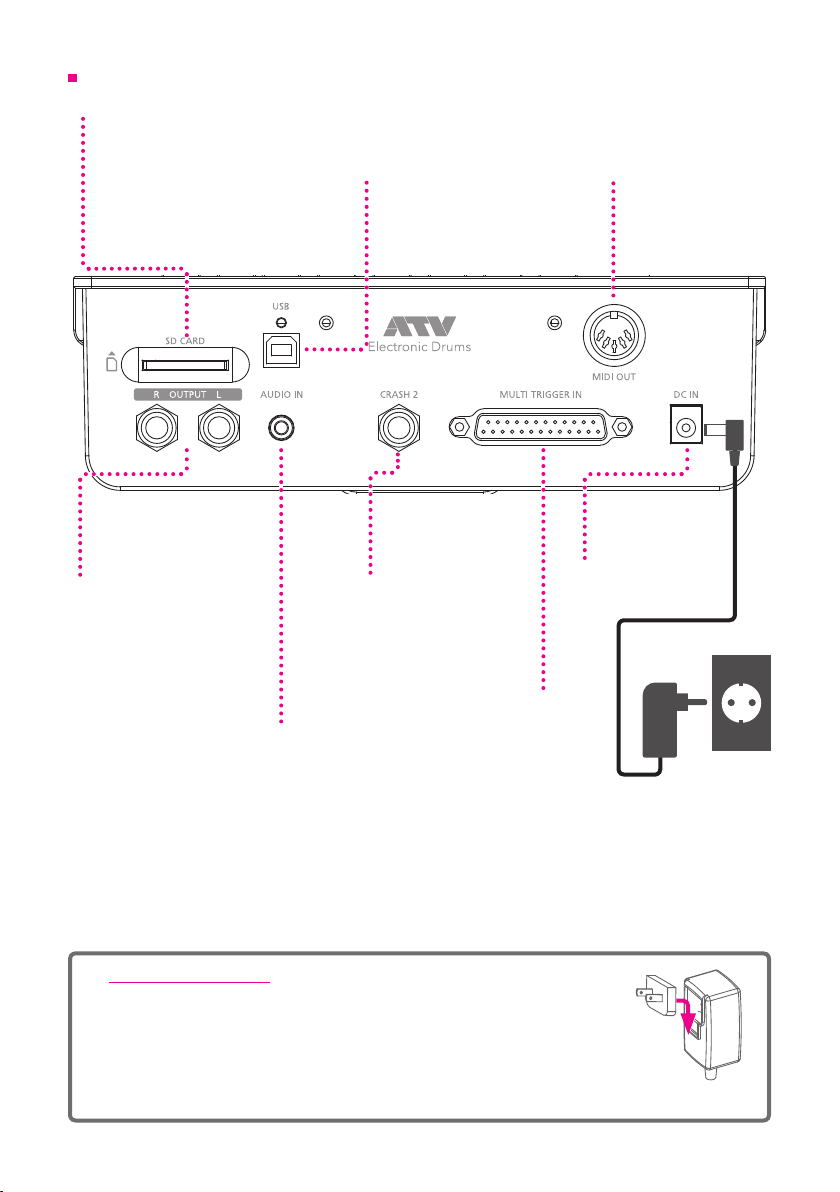
Connections on the Rear Panel
SD CARD
Insert the package-included SD card.
The SD card contains song data.
You can also add other songs. (p.17)
You can back-up xD3 drum module data
and import sound data, as well. It supports
SD / SDHC cards up to 32 GB.
USB
The xD3 can be connected to a
Mac or Windows PC, allowing MIDI
messages to be transmitted and
received. Use a USB 2.0 cable.
1 Setup
MIDI OUT
Connect MIDI devices
and send MIDI signals.
OUTPUT
Use to output audio signal
and connect to a powered
speaker or mixer.
AUDIO IN
Use to input audio from an external
sound source like a music player.
You can also play along with the xD3
audio and listen.
Output from OUTPUT and
PHONES.
CRASH 2
Enables to connect
additional cymbal pads
to expand drum kit.
MULTI TRIGGER IN
Connection port for the multi-trigger
cable, which enables input of the
trigger signals from the pads.
About the AC adapter
The AC adapter can be used worldwide.
Attach the included plug that is suitable for the type of outlet in your
country.
* You must use only the included AC adapter and plug.
DC IN
Connect the included
AC adapter here.
9
Page 10

Connecting Audio Equipment
USB
SD CARD
DC IN
2
1
AUX
ATV LINK
MULTI TRIGGER
TRIGGER INPUT
In order to use xD3 drum module, the following (commercially available items) is required.
• Headphones, powered speakers, etc.
• You can play along with a song by connecting your computer / tablet headphone
to the AUDIO IN jack.
R OUTPUT L
AUDIO IN
1 Setup
Stereo phone
Stereo mini
Mono phone
L R
Power On / O
Turning the power on
1 Lower the volume of the connected amp or speakers.
2 Long-press the power button of the xD3.
The power turns on.
Turning the power o
1 Lower the volume of the connected amp or speakers.
2 Long-press the power button of the xD3.
The power turns o.
All settings are saved.
* Disconnecting the AC adapter without turning o the power will cause malfunctions. You must turn o the
power by pressing the power button.
Turning the power o automatically (auto power-o)
If the xD3 has not been played or operated for 30 minutes, it automatically turns o the power in
order to conserve electricity. You can disable this function. For details, refer to p.21.
10
Page 11

2 Performing
VOLUMESONG
MENU
2 3 4 5
ENTER
LIST
MENU
VOLUMESONG
MENU
ENTER
LIST
MENU
Home Screen
This screen is displayed after turning on the power in the home screen.
If you press the [1] (HOME) button from any screen, you will return
to the Home Screen.
1
Home Screen will be displayed when playing the drums.
Song Playback Icon
Song Number
Song Name
Drum Kit Number
Drum Kit Name
Metronome Tempo
Visualizer (p.13)
Visually displays the
dynamics and timing of the
shots.
What is Drum Kit?
The synthesizer patch assigned to each pad is called "drum kit". Changing the type of drum kit to
jazz or rock also switches the sound of each pad to the sound suitable for that genre.
Performing
1 When you hit the pad, it resounds.
The sound changes naturally according to the strength of hitting.
2 Use VOLUME [+][–] to adjust the volume.
* Please adjust to an accurate volume. If the volume is too low,
it may cause you to exert unnecessary force to hit, possibly
injuring your hands and arms. Also, if the volume is too loud, it
may cause inconvenience and burden to your ears and there is
a danger of causing hearing loss or the like. Please be careful
especially when playing the drums around young children. You
can limit the maximum volume. (p.21)
Changing the Drum Kit
1 Press one of drum kit buttons [1]—[5].
1 2 3 4 5
The drum kit saved for each button is loaded.
* It takes several seconds to load the drum kit.
2 When the drum kit name is displayed,
you can start playing.
11
Page 12

Selecting a drum kit from the list
VOLUMESONG
ENTER
You can select a drum kit other than drum kit buttons [1]—[5].
1 Press the [LIST] button.
The list of drum kits will be displayed.
2 Select the drum kit with the value knob.
3 Press the [ENTER] button.
The selected drum kit will be loaded.
Playing the side stick technique
You can play the side stick technique with a snare drum.
1 Press the [LIST] button.
The list of drum kits is displayed.
2 Press [5] (SIDE STICK) to set it to "ON".
If you do not want it to produce a sound, set it to "OFF".
3 Press the [
] button to return to the home screen.
Song Playback
* To play a song, you need to insert the provided SD card.
1 Press the SONG [ ] button.
The song will be played.
2 Turn the value knob to select your favorite song.
The song name will be displayed.
3 Press the SONG [ ] button again to stop.
• If you press the metronome in advance, you can play it alongside with a song.
• You can play wav le songs. (p.17)
• Use the song screen (p.15) to adjust the volume and other functions of the song.
2 Performing
* You can not change the tempo of the song.
12
Page 13

Using the Metronome
VOLUMESONG
VOLUMESONG
VOLUMESONG
ENTER
2 Performing
1 Press the [
The metronome will play.
] button.
2 Use the value knob to adjust the tempo.
3 Press the [
Using the Visualizer
The visualizer visually displays the dynamics and timing of shots.
When metronome is turned o
Shot strength is displayed as a bar graph. The last shot
is displayed on the far right, and the previous shot moves
to the left. Here, you can visually check the strength of
hitting.
When metronome is turned on
The pointer scrolls according to the tempo, and the timing
and strength of the shot are displayed in a bar graph.
Because the bar graphs are displayed real-time, you can
visually check the timing and the variation of the strength
of hitting by continuously hitting the same rhythm according to the metronome.
Clear display by pressing the [
] button again to stop.
] button.
Latest shot
Bar LinePointer Beat
Modifying the drum kit buttons’ registration
You can modify the drum kit you want to load with the drum kit buttons [1]—[5].
1 Press the [LIST] button.
The drum kit list is displayed.
2 Select and load the drum kit you want to register.
3 Hold down the drum kit button (one of the [1]—[5] buttons you want to register) for 2
seconds.
A message will be displayed when the registration is completed.
13
Page 14

3 Menu Functions and Settings
VOLUMESONG
ENTER
Other functions and settings of xD3 are accessible from the menu.
1 Press the [ENTER/MENU] button from the Home Screen.
The menu will be displayed.
2 Turn the value knob to select the item and conrm with the [ENTER] button.
SONG Use to set the song playback, volume, and marker settings. p.15
METRONOME Use to make detailed settings for the metronome. p.18
RECORD Use to record drum performance. p.19
INST LEVEL Use to adjust the volume for each pad of each drum kit. p.20
SETUP Overall setting for the xD3 drum module. p.21
3 Press the [
] button or the [1] (HOME) button to return.
14
Page 15

3 Menu Functions and Settings
SONG
On the song screen, you can select a song and play it, adjust the volume for each song,
and set the marker.
When stopped
Song Number /
Song Playback
When playing
(Previous) / Skip
Name
Position
Song Volume Clear Marker
Loop Setting Help Screen Display
Marker
10 seconds
Skip backward
forward (Next)
Loop Icon
Playing Time
Playing Time
Marker Setting
Selecting a song and play / stop
1 Turn the value knob to select a song.
* You can not select a song while operating the volume or marker.
2 Press the SONG [ ] button to play / stop.
During playback, you can skip 10-second backward / 10-second forward by pressing the [3] and
[4] buttons.
Adjusting the volume of the song
1 Press the [2] (VOLUME) button and turn the value
knob to adjust the volume.
2 Press the [2] (VOLUME) button again.
Loop setting
When you turn on the loop, songs will be played repeatedly.
1 While stopped, press the [3] (LOOP) button to turn the loop on / o.
When you turn on the loop, a loop icon will be displayed.
15
Page 16

3 Menu Functions and Settings
Markers
You can set up to 9 markers at any position in the song
and jump to the specied marker.
Adding Markers
1 Play the song.
2 Press the [5] (MARKER) button and use the value knob to select "ADD".
3 Press the [ENTER] button at the playtime you want to add a marker.
After that, a marker has been added.
Marker Jump
1 Use the value knob to select the marker number and press the [ENTER] button.
To jump to the beginning of the song, select "TOP".
Clear Marker
1 While the song is stopped, press the [5] (MARKER) button.
2 Select the marker you want to delete and press the [ENTER] button.
* Settings for volume, loop, and markers are stored for each song.
* You can not change the tempo of the song.
16
Page 17

Playing audio le (wav)
You can put your wav le in the SD card and play it as a song.
Supported Format
File Type Windows Wave (RIFF)
Filename Extension wav, WAV
Sampling Frequency 48 kHz
Bit Depth 16 bits
File Size Up to 2 GB
Set-up
Copy the wav le to the SD card root folder.
SD Card
My Song 1.wav
My Song 2.wav
My Song 3.wav
* You can put up to 100 wav les.
* “wav” les that are put in folders are not recognized.
* It does not support le names with 2-byte characters.
3 Menu Functions and Settings
Playback
Select the wav le following the instructions from “Selecting a song and play / stop” (p.15) and
play it.
17
Page 18

3 Menu Functions and Settings
VOLUMESONG
METRONOME
On the metronome screen, you can set metronome's tempo and beat, volume, sound, and so on.
Help Screen
Tap Tempo
1 Turn the value knob to select the item you want to set.
Tempo Tempo
Beat Beat
Note Musical Note (note value of the beat)
Sound Sound
Level Volume Level
Start w/CR1
When you hit the CRASH 1 cymbal, the metronome will sound only for one or
two measure/s. By hitting CRASH 1 regularly, you can check if it is keeping the
time beat.
1. Set it to "MEAS 1" or "MEAS 2".
2. Press the [
3. Hit the CRASH 1 cymbal. The metronome plays between every 1 or 2
measures.
] button. CR ashes on the screen.
4 Press the [ENTER] button and change the value with the value knob.
5 Press the [ENTER] button to conrm the value.
Tap tempo
You can set the tempo by pressing the TAP button several times. It is useful to play the
metronome alongside with the songs that have unknown tempo.
1 Press the [5] (TAP) button according to the beat.
The tempo is set.
18
Page 19

3 Menu Functions and Settings
RECORDING
You can record a drum performance and listen objectively. You can also record while playing
a song.
Exit
Record
Play / Stop
Recording
1 Start playing drums or press the SONG [ ] button to play the song.
The recording will start.
* When recording alongside with the metronome, turn on the metronome in advance.
2 Press the [4] ( ) button to stop recording.
Playback
3 Press the [4] ( ) button.
The playback will start.
4 Press the [4] ( ) button to stop playback.
5 To record again, press the [5] (REC) button and repeat from Step 1.
* The previous recorded data will be deleted.
6 To end recording, press [2] (EXIT).
You will return to the home screen.
* When you turn o xD3 drum module, the recording data are erased.
* You can not play songs after the recording starts.
* You can not play the metronome after the recording starts.
* You can not change the tempo of the metronome after the recording starts.
19
Page 20

INST LEVEL (Adjusting the volume of each pad)
You can adjust the volume of each pad for each kit.
1 Hit the pad with the volume you want to change.
2 Use the value knob to change the volume.
3 Repeat steps 1 and 2.
* It is stored for each kit.
3 Menu Functions and Settings
20
Page 21

SETUP
SYSTEM
3 Menu Functions and Settings
Target Pad Display
System Tab
Trigger Tab
Help Screen Display
Utility Tab
1 Press the [2] (SYSTEM) button and select the System tab.
2 Use the value knob to select the desired item and press the [ENTER] button.
LCD Contrast Adjust the contrast of the display.
LCD Brightness Adjust the brightness of the display.
Auto Power O
Master Vol Limit
MIDI Channel Sets the MIDI channel for sending and receiving. Normally set to 10.
MIDI Note#
Pad Pan Set the stereo panning of each pad
Firmware Firmware version
Product ID Product ID
The xD3 drum module automatically turns o after a 30-minute period of
inactivity to reduce power consumption.
Change the time setting of the auto power-o function.
30 mins : The power turns o after 30 minutes.
4 hours : The power turns o after 4 hours.
DISABLE : The power can not be turned o.
Set to the maximum volume when pressing the [+] button.
It restricts the maximum volume of xD3 drum module to prevent hearing loss,
etc. due to excessive high volume.
Set the MIDI note number of each pad transmission.
* For the snare pad, set the head part (A) and the rim part (B) respectively.
* For the cymbal pad, set the bow part (A) edge part (B) respectively.
* Only one sound will play if the note number is duplicated.
3 Use the value knob to change the value and press the [ENTER] button to conrm.
21
Page 22

3 Menu Functions and Settings
TRIGGER
This setting handles and corrects the sensor information of the pad in order to maximize
the performance of the xD3 drum module.
Setting the triggers is important when using the equipment for the rst time or when changing
the type of pad.
Target Pad Display
System Tab
Trigger Tab
Help Screen Display
Utility Tab
1 Press the [3] (TRIGGER) button and select the trigger tab.
2 Use the value knob to select an item and press the [ENTER] button.
* This setting is the same with all other drum kits.
Total Pad Response
Pad Type
Sensitivity
Head-Rim Adjust
Pedal HH Sens Use to adjust the volume of the foot-close and foot-splash of the hi-hat.
Cross-Talk Cancel
Wizard
Increase the sensitivity of all pads to produce a powerful sound even with slight
taps by little children or the like. The sensitivity increases as you increase the
plus value.
Use to set the type of pad connected to each trigger input.
* Please use the default setting.
Use to adjust the sensitivity of each pad. The sensitivity increases as you
increase the value.
Use to adjust the boundary between the head-shot and the rim-shot of the
snare drum pad.
If the rim-shot sounds even if you hit the head-shot, adjust it to H side.
If it is dicult to play the rim-shot, adjust it to the R side.
Use to prevent “cross-talk” which occurs when there is a wrong transmission
between pads.
Simply hit each pad according to the Cross-talk Cancel Wizard and the setting
will be completed.
For the detailed instruction, see "Cross-talk Cancel Wizard" (p.23).
* Execute this wizard when installing the drum kit for the rst time.
* Cross-talk may occur if you change the pad or change the mount location.
In such case, run this wizard.
3 Use the value knob to change the item and conrm by pressing the [ENTER] button.
22
Page 23

3 Menu Functions and Settings
Cross-talk Cancel Wizard
1 Press the [5] (NEXT) button.
To cancel, press the [2] (CANCEL) button.
2 Follow the instructions on the screen and strike the indicated pad 3 times
with powerful hits.
Indicated Pad
OK Display
* If you press [RETRY], the strikes you made so far will be erased and you can start over.
3 When "OK" is displayed, press the [5] (NEXT) button to advance to the next step.
4 Repeat step 1 and step 2 the same way.
xD3 drum module measures the cross-talk condition of all connected pads.
KICK > SNARE > TOM 1 > TOM 2 > TOM 3 > HI-HAT > CRASH 1 > RIDE > CRASH 2
* If the indicated pad is not connected, press [SKIP].
5 When the screen below is displayed, check if there is no cross-talk problem after playing
and press the [5] (OK) button.
* If there is cross-talk problem, press the [2] (RETRY) button and repeat the wizard again.
* Cross-talk problem may not be prevented completely.
23
Page 24

UTILITY
3 Menu Functions and Settings
System Tab
Trigger Tab
Help Screen Display
Utility Tab
1 Press the [4] (UTILITY) button and select the Utility tab.
2 Select the item with the value knob and press the [ENTER] button.
xD3 drum module backs up the contents of the internal storage
to the SD card.
Backup Save
Backup Load
Import Kit
SD Card Format
Factory Reset
Insert the SD card in to the xD3 drum module.
* In order not to lose valuable data, we recommend you to
periodically do backup.
Use to load backup from the SD card to the xD3 drum module.
* All data in xD3 drum module will be deleted.
Use to import drum kit data downloaded from the ATV Sound
Store to the xD3 drum module. You can increase the number
of drum kits.
Use to format the SD card.
* When formatting is performed, all contents from the SD card
will be deleted.
Use to restore xD3 to its factory setting.
* All data in the xD3 will be deleted.
p.25
p.26
p.27
p.28
p.28
24
Page 25

Backup Save
3 Menu Functions and Settings
Help Screen
Display
Save
1 Use the value knob to select "File Name" and press the [ENTER] button.
2 Enter the backup le name.
Move the position with the pointer and change the characters with the value knob.
Delete character
Insert character
Right pointer
Left pointer
3 Press the [ENTER] button to conrm the le name.
4 Use the value knob to select "Saving Items" and press the [ENTER] button.
5 Select the item you want to save and conrm by pressing the [ENTER] button.
KIT Use to save all drum kits.
TRIGGER Use to save the trigger setting.
KIT+TRIGGER Use to save the drum kit and trigger settings.
ALL Use to save all data in xD3.
6 Press the [5] (SAVE) button to save settings.
When saving is completed, the word "Completed" is displayed.
* When ALL is selected, it takes about 10 minutes to save.
25
Page 26

Backup Load
3 Menu Functions and Settings
Delete Backup
CAUTION
When you load the backup, some or all of the data in xD3 will be deleted.
Load Backup
Help Screen Display
1 Use the value knob to select "File Name" and press the [ENTER] button.
Use the value knob to select the le name to load and press the [ENTER] button to conrm.
2 Use the value knob to select "Loading Items" and press the [ENTER] button.
3 Select the item to load and press the [ENTER] button to conrm.
* These items that can be selected depending on the contents of the backup.
KIT
TRIGGER
KIT+TRIGGER
ALL
Select to load drum kit.
* The drum kit in the xD3 drum module will be deleted.
Select to load the trigger setting.
* The trigger setting in the xD3 drum module will be deleted.
Select to load drum kit and trigger settings.
* The drum kit and trigger settings in the xD3 drum module will be
deleted.
Select to load all data in xD3.
* All data in the xD3 drum module will be deleted.
4 [5] Press the (LOAD) button to save.
When loading is complete, the screen indicates “Completed.”
* When ALL is selected, it takes about 10 minutes to load.
5 Press the power button to turn o the power, and then turn the power on again.
Backup is now loaded.
Deleting Backup File
Delete the backup le in the SD card.
1 In step 1 above, select the le to be deleted.
2 Press the [2] (DELETE) button.
Conrmation message will be displayed.
3 [5] Press the (OK) button to delete.
To cancel the deleting process, press the [2] (CANCEL) button.
26
Page 27

3 Menu Functions and Settings
Import Kit
1 Place the downloaded drum kit le (xxxx.xd3kit) in the Import folder of the SD card.
SD Card
ATV
Import
* If there is no "Import" folder, it will be created once the SD card is inserted into the xD3 drum module.
2 Insert the SD card in to the xD3 drum module.
Import
Help Screen Display
3 Select the drum kit le to import with the value knob.
4 Press the [5] (IMPORT) button to import.
When the import is completed, the screen indicates “Completed.”
* It takes about 5 minutes to import.
* The downloaded drum kit le can only be imported in to the xD3 drum module when the product IDs matched.
If the products IDs do not match, the following message is displayed.
"This xD3 doesn’t have a permission to import "xxxx"."
ATV SOUND STORE
You can purchase additional drum kit for xD3 drum module on this website.
* For product ID required for account registration, please see p.21.
http://store.atvcorporation.com/
27
Page 28

SD Card Format
Format
CAUTION
Formatting the SD card will delete all its data.
1 Insert the SD card in to the xD3 drum module.
2 Press the [5] (FORMAT) button.
Conrmation message will be displayed.
3 Press the [5] (OK) button to format.
To cancel, press [2] (CANCEL) button.
When formatting is completed, the screen indicates “Completed.”
Factory Reset
3 Menu Functions and Settings
Reset
CAUTION
All data in the xD3 drum module will be deleted when restored to its factory setting.
1 Press the [5] (RESET) button.
Conrmation message will be displayed.
2 Press the [5] (OK) button to reset.
To cancel, press [2] (CANCEL).
When reset is completed, the screen indicates “Completed.”
3 Press the power button to turn the power o, and then turn the power on again.
The module is now restored to its factory setting.
28
Page 29

4 Important Notice
Important Safety Information
Always follow the basic precautions listed below to avoid the possibility of serious injury from re,
electrical shock or other hazards, and serious damages to EXS-1 instrument or other goods and
assets. Before using EXS-1, be sure to read all the safety information below.
About the symbols
About warnings and cautions
"Caution": Calls your attention to a point
of caution
"Do not ...": Indicates a prohibited action
"You must ...": Indicates a required action
WARNING
Dismantling and remodeling are prohibited.
Under no circumstances should any of the
components of this product be taken apart or
customized.
Do not expose the instrument to the following
conditions to avoid deformation, discoloration
or more serious damage:
• Extreme temperature (direct sunlight, near
heating equipment, etc)
• Extreme humidity (bathroom, wet oor, etc)
• Places with high salinity level
• Places subject to water or rain
• Excessive dusty or dirty location
Do not damage the power cord
Do not bend the power cord or damage it.
Do not place anything heavy on the power cord.
The power cord may be damaged and may result re
or electrical shock.
Use the supplied AC adapter
• Use only the specied adapter.
• Use only the voltage specied as correct for
the instrument.
Turn o the power when abnormality or failure
occurs
When one of the following problems occurs,
immediately turn o the power switch and
disconnect the electric plug from the outlet. Then
have the device inspected by the store / ATV service
personnel.
• The power cord or plug becomes frayed or
damaged.
• It emits unusual smell or smoke.
• Some foreign object has been dropped into
the instrument.
• There is a sudden abnormality or failure occurred
during the use of the instrument.
Do not drop or give strong impact
Do not drop the instrument or give strong shocks.
Never insert or remove the AC adapter / electric plug
with wet hands to avoid being electrocuted.
Indicates a hazard that could
result in death or serious injury
Warning
Indicates a hazard that could
result in injury or property
Caution
damage
CAUTION
Plugging and unplugging electric plug
Be sure to have the power plug when inserting or
removing the AC adapter into or from the equipment
main unit or an outlet.
Do not place a lot of extensions and junctions on
an electrical outlet. (Octopus wiring)
The outlet may heat abnormally and may cause re.
Check the electric plug periodically and remove
any dirt or dust that may have accumulated on it
There is a danger of electric shock or short circuit.
When you are not using the instrument for a long
time, make sure to unplug the power cord from
the electrical outlet.
It may cause electric shock, re or break down.
Remove all connections when moving the main unit
Before moving the instrument, remove all connected
cables, to prevent damage to the cables or injury to
anyone who might trip over them.
Do not place the instrument in an unstable position
It might accidentally fall over and break down or
cause injuries.
Do not put things on top of the instrument or put
heavy things on it
It might cause damage. Also, do not apply excessive
force to buttons, knobs, input / output terminals, etc.
It might cause a malfunction.
Do not operate for long periods of time at a high
volume level
Do not use the instrument/device or headphones for a
long period of time at a high or uncomfortable volume
level, since this can cause permanent hearing loss.
You should take special care whenever handling
its components
Be careful with the tips of supports, arms, screws,
and the like. Sharp tips can easily injure ngers if
these components are not handled carefully.
Keep small parts out of the reach of children
Please keep small parts out of reach to prevent
children from accidental swallowing and choking.
Pay attention when handling of moving parts
Be careful not to insert your ngers, etc. in the
moving parts. Young children should be supervised
by a guardian to eliminate any possibility of injury,
please make sure that the equipment is only
operated by adults.
29
Page 30

Important Information about Use
4 Impor tant Notice
Installation
• Do not use the instrument in the vicinity of a TV, radio,
stereo equipment, mobile phone, or other electric
devices. Otherwise, the instrument, TV or radio may
generate noise.
• Do not expose the instrument to excessive dust or
vibrations, or extreme cold or heat (such as in direct
sunlight, near a heater, or in a car during the day) to
prevent the possibility of panel dis-guration, damage
to the internal components or unstable operation.
Power Supply
• Even when the power switch is turned o, electricity is
still owing to the product at the minimum level. When
you are not using the product for a long time, make sure
to unplug the power cord from the wall AC outlet.
Cleaning
• When cleaning the equipment, be sure to use a clean,
dry cloth. Cleaning products that contain organic
solvents, paint thinner, detergents, and chemicallytreated cleaning cloths can cause discoloration and/or
warping and should not be used.
Data
• The company cannot be held responsible for damage
caused by improper use or modications to the
instrument or data that is lost or destroyed.
• The stored contents may be lost due to malfunction
of equipment or incorrect operation. Please backup
important data.
Specications
Electronic Drum Sound Module
Model: xD3
Item Specication
Terminals and Jacks
Power supply DC 12 V
Power consumption 600 mA
OUTPUT L/R: mono phone x2
PHONES: stereo phone
AUDIO IN: stereo mini-phone
MULTI TRIGGER INPUT: Dedicated multi connector
CRASH 2 TRIGGER INPUT: TRS phone
USB: 2.0 Type B connector (High Speed)
MIDI OUT: DIN connector
SD CARD: SD/SDHC card
DC IN: only for the included AC adapter
About copyrights
• This product incorporates audio / sound data contents
in which ATV and third parties own copyrights. Using
and copying these materials without permission (except
for personal and other uses permitted by the copyright
law) is prohibited.
• ATV owns copyrights of the contents embedded or
attached to this product. Such copyrighted materials
include, without limitation, all computer software, sound /
audio les, style / image data les, etc. Any unauthorized
use of such programs and contents outside of personal
use is not permitted under relevant laws.
• Do not make, resell, redistribute, or republish the abovementioned contents attached or aliated to the product.
About this manual
• The illustrations as shown in this manual are for
instructional purposes only, and may appear somewhat
dierent from those on your instrument.
• The company names and product names in this manual
are the trademarks or registered trademarks of their
respective companies.
* Specications and appearance of this product are subject to change without notice for improve-
ment.
Support
Refer to the following URL for manuals, rmware updates, and other information.
http://products.atvcorporation.com/drums/xd3/
30
Page 31

For EU countries
EN
DE
FR
IT
ES
PT
NL
DA
This symbol on the product means that used electrical and electronic equipment should not be mixed with
general household waste. The correct disposal will help prevent potential negative eects on human health
and the environment. For proper treatment, recovery and recycling, please contact your city oce, waste
disposal servicer or the shop which you purchased the product.
Dieses Symbol auf dem Produkt bedeutet, dass elektrische und elektronische Altgeräte nicht mit
gewöhnlichem Haushaltsabfall vermischt werden sollten. Durch die korrekte Entsorgung werden Umwelt und
Menschen vor möglichen negativen Folgen geschützt. Bitte wenden Sie sich bezüglich ordnungsgemäßer
Behandlung, Rückgewinnung und Recycling an ihre zuständige Behörde, Ihren Wertstohof oder an das
Geschäft, in dem Sie das Produkt erworben haben.
Ce symbole sur le produit signie que les équipements électriques et électroniques usagés ne doivent pas
être mélangés avec les déchets ménagers. L’élimination appropriée aidera à prévenir les eets négatifs
potentiels sur la santé humaine et l’environnement. Pour un traitement, une récupération et un recyclage
appropriés, veuillez contacter votre mairie, le service d’élimination des déchets ou le magasin où vous avez
acheté le produit.
Questo simbolo sul prodotto indica che l’apparecchio elettrico ed elettronico usato non deve essere smaltito
insieme ai normali riuti domestici. Un corretto smaltimento del prodotto contribuisce a prevenire possibili
eetti nocivi sulla salute umana e ambientale. Per il trattamento, il recupero e il riciclaggio appropriati,
contattare l’ucio competente locale, il fornitore del servizio di smaltimento riuti o il negozio in cui è stato
acquistato il prodotto.
Este símbolo en el producto indica que los equipos eléctricos y electrónicos usados no deben mezclarse
con la basura doméstica. Su correcta eliminación ayudará a evitar posibles efectos negativos sobre la salud
humana y el medio ambiente. Para un tratamiento, recuperación y reciclaje adecuados, póngase en contacto
con su ayuntamiento, servicio de eliminación de residuos o el establecimiento donde adquirió el producto.
Este símbolo no produto signica que o equipamento elétrico e eletrónico não deve ser misturado com os
resíduos domésticos normais. A eliminação correta ajudará a prevenir possíveis efeitos negativos na saúde
humana e no meio ambiente. Contacte as entidades responsáveis locais, o centro de tratamento de resíduos
ou a loja onde adquiriu o produto para saber como tratar, recuperar e reciclar resíduos.
Dit pictogram betekent dat gebruikte elektrische en elektronische apparatuur niet samen met huishoudelijk
afval kan worden afgevoerd. Deze juiste wijze van afvalverwijdering draagt bij aan de preventie van mogelijke
negatieve invloeden op de gezondheid van de mens en het milieu. Neem contact op met uw gemeente of
afvalverzamelpunt of de winkel waar u het product hebt gekocht, voor de juiste behandeling, behoud en
recycling.
Dette symbol på produktet betyder, at brugt elektrisk og elektronisk udstyr ikke må blandes med almindeligt
husholdningsaald. Den korrekte bortskaelse vil hjælpe med at forhindre potentielle negative virkninger på
menneskers sundhed og miljøet. For korrekt behandling, indsamling og genbrug skal du kontakte dit lokale
kommunekontor, aaldsstation eller butikken, hvor du købte produktet.
ATV EUROPE LDA.
Praça do Bom Sucesso Square No 61-Room 701, 4150-146 Porto Portugal
ATV Corporation
888-340 Nakagawa, Hosoe-cho, Kita-ku, Hamamatsu, Shizuoka 431-1304, JAPAN
31
Page 32

www.atvcorporation.com
© 2017 ATV Corporation All rights reserved.
2017 Rev.01
 Loading...