

ATV aDrums EXS-3, aDrums EXS-5, aDrums EXS-1, aDrums EXS-2 User Manual
aDrums EXS-3
User’s Manual
EN
JA

Welcome.
Contents
Setup ............................................................3
Package Contents ................................................................... 3
Assembly Guide ..................................................................... 4
Top Panel ......................................................................... 10
Rear Panel ........................................................................ 11
1 Getting Ready...................................................12
Connecting Audio Equipment .......................................................... 12
Connecting the Pads................................................................. 12
Zones supported by the xD3's trigger inputs ............................................... 13
Power On / O ..................................................................... 13
SETUP - Trigger Settings.............................................................. 14
Cross-talk Cancel Wizard ............................................................. 15
SETUP - Utility Functions.............................................................. 16
2 Performing .....................................................22
Home Screen ...................................................................... 22
Performing ........................................................................ 22
Changing the Drum Kit ............................................................... 23
Selecting a drum kit from the list ........................................................ 23
Song Playback ..................................................................... 23
Using the Metronome ................................................................ 24
Using the Visualizer .................................................................. 24
3 Menu Functions and Settings .......................................25
SONG ............................................................................26
METRONOME...................................................................... 29
RECORDING....................................................................... 30
INST LEVEL (Adjusting the volume of each pad) ............................................ 31
SETUP - System Settings ............................................................. 31
4 Detailed Information ..............................................32
Specications ...................................................................... 32
Support........................................................................... 32
5 Important Notice.................................................33
Important Safety Information ........................................................... 33
Important Information about Use ........................................................ 34
Before using aDrums EXS-3 be sure to read ‘5 Important Notices’ p.33.
2
Setup
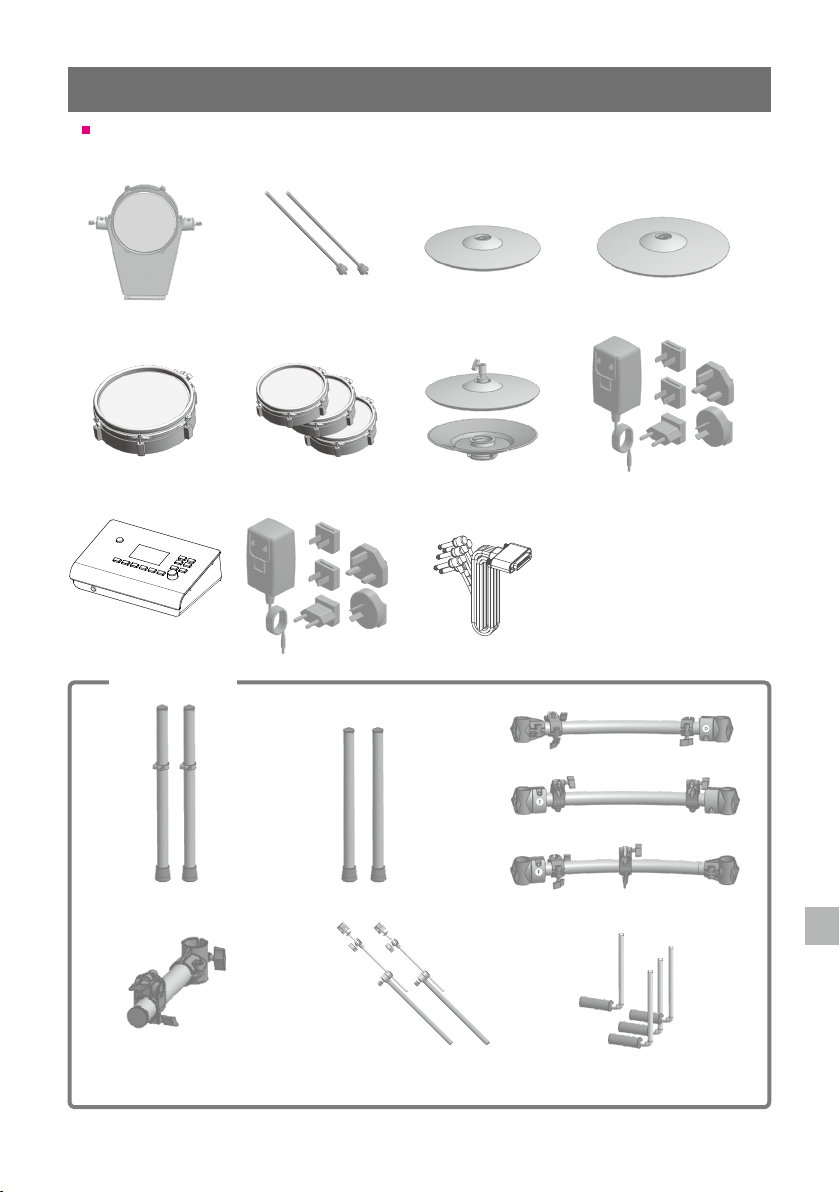
Package Contents
This product includes the following items.
Kick Pad
xD3 drum sound
instrument
Drum Rack
Spurs for Kick Pad x2
Tom Pads x3Snare Pad
AC adapter
Crash Cymbal Pad
Hi-hat pad
Multi-trigger cable
Ride Cymbal Pad
AC adapter for hi-hat pad
Quick Start Guide
SD memory card
Cable tie
Drum key
Tube D
Tube E
Tube A x2 Tube B x2
Tube C
Cymbal arms x2
Tube F
Drum arms x4
3
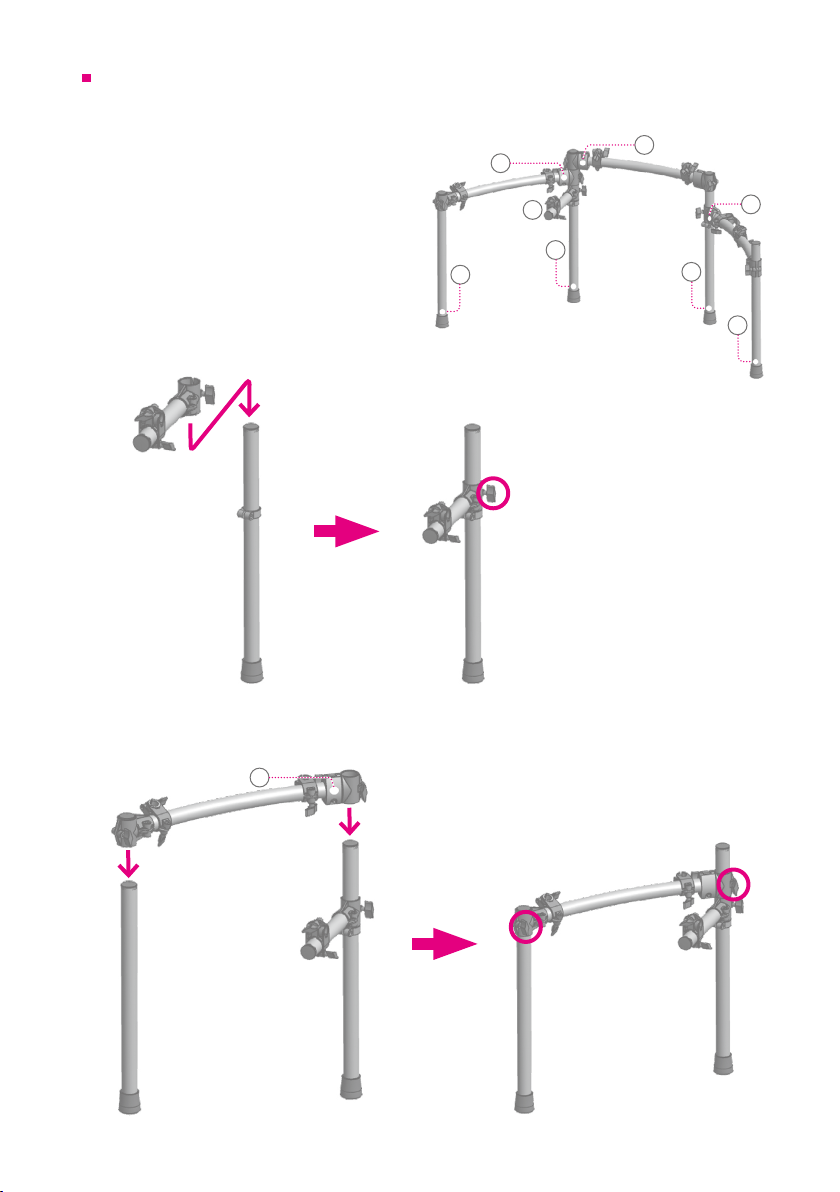
Assembly Guide
Connect tubes A to F as the gure right shows.
*A corresponding label (A to F) is attached to each tube.
Setup
E
D
B
Insert tube A into the tube C clamp
1
Tube C
Tube A
Insert tube A and tube B into the clamps at the ends of tube D
2
D
C
A
A
*Securely tighten the clamp bolt
F
B
Tube B
Tube D
Stand L
*Securely tighten the
clamp bolts
Tube A
4
Insert tube A and tube B into the clamps at the ends of tube F
3
F
Tube F
Setup
Stand R
Tube A
Tube B
Attach tube E clamps to stands L and R
4
Stand L
70mm
*Securely tighten the
clamp bolts
E
Tube E
Stand R
5
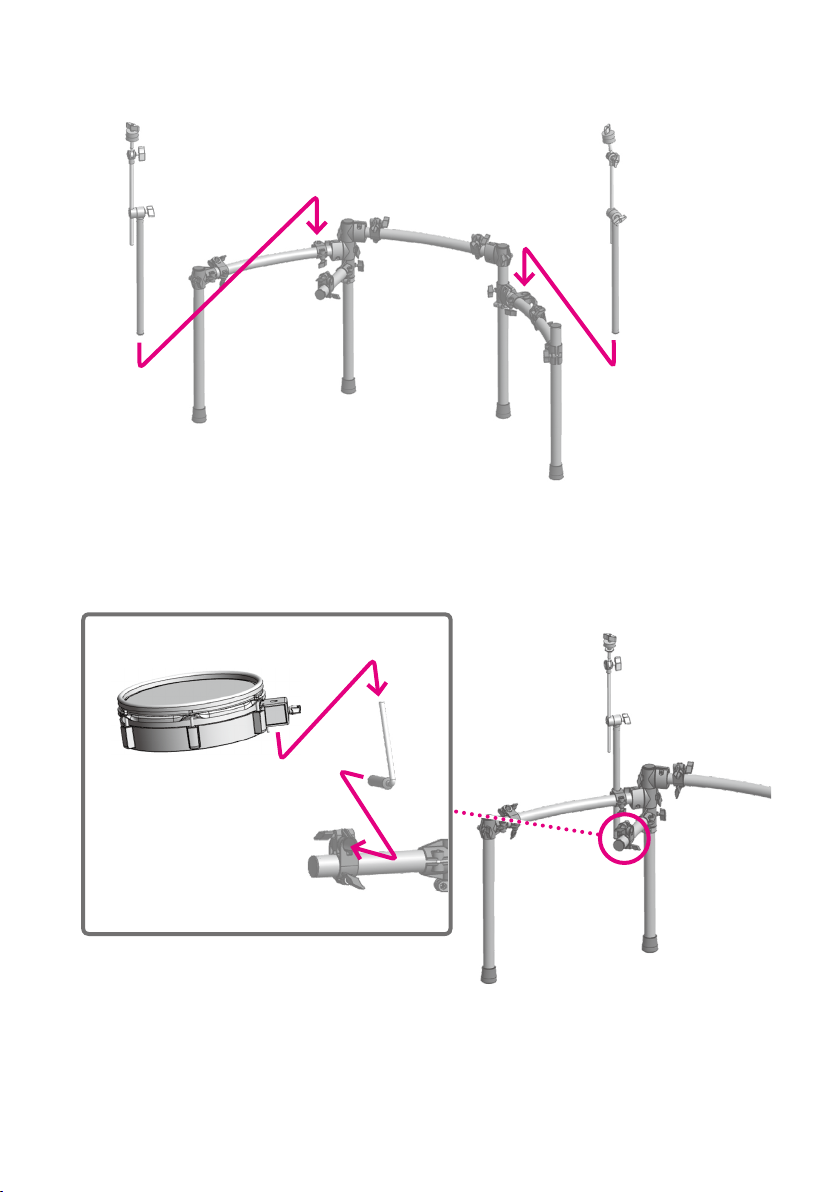
Attach the cymbal boom arms
5
*Securely tighten all bolts
Attach the L-arm to the clamp (1) and the snare to the L-arm (2)
6
Setup
2
*Securely tighten all bolts
*Adjust the tension of the pad head using the included tuning key.
1
6
Attach the tom L-arms to the clamps (1)
7
and the toms to the L-arms (2) as shown
Setup
2
1
*Securely tighten all bolts
*Adjust the tension of the head using the tuning key
included in the package.
Attach the cymbal pads to the boom arms.
8
2
1
2
1
Crash cymbal
Ride cymbal
Do not over tighten the wing-nuts. For a natural
feel, cymbals should swing freely.
7
Attach the hi-hat cymbals
9
2
1
Hi-hat stand
Setup
AC adapter for hi-hat optical
sensor (bottom cymbal). Switch
“On” (light is lit).
*This AC adaptor can be used
4
worldwide. Please connect the
adaptor to a plug attachment (several
types included) that is correct for the
country of use.
3
*A hi-hat stand is not included.
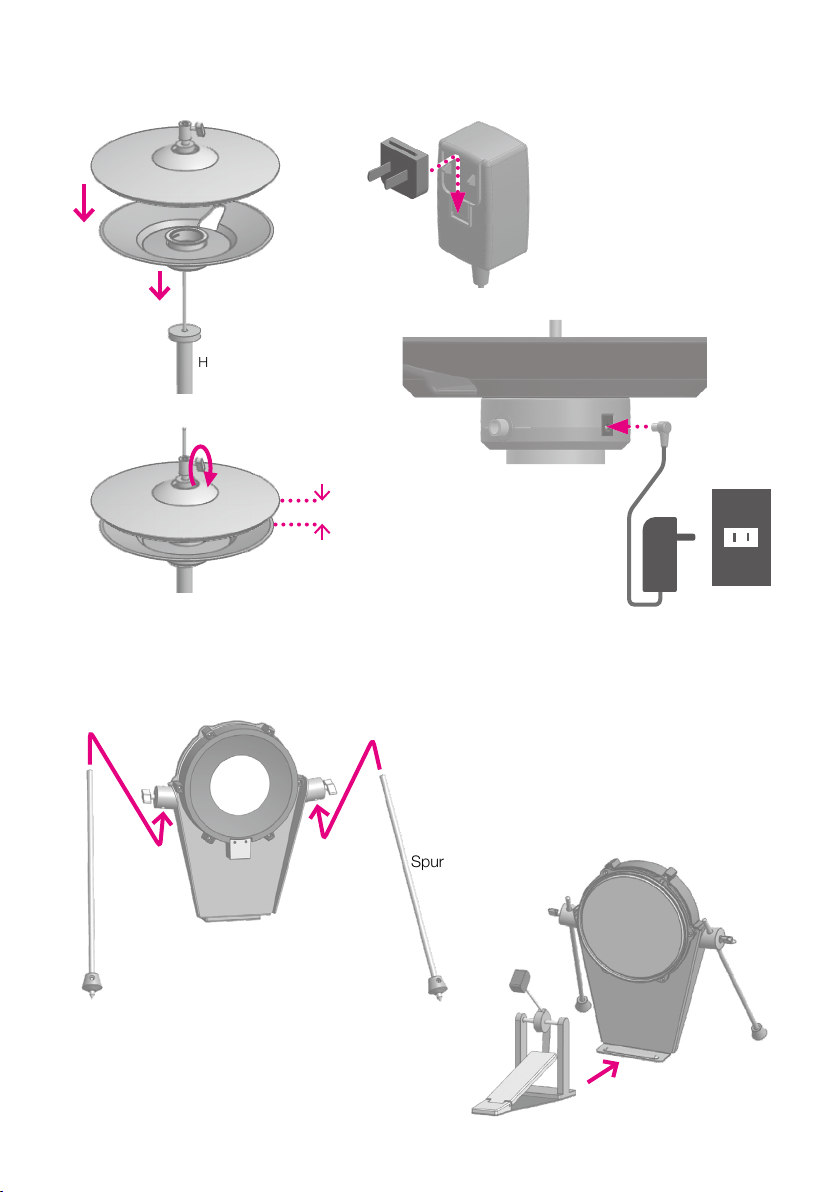
Attach the spurs to the kick drum pad
10
1
*Tighten the knobs
2--3cm
5
6
2
Spur
*A kick pedal is not included.
*The tip of the spur can be adjusted so it protrudes from the rubber
stopper.
*Note that the spikes can damage oors.
*Note that the spikes can damage your body.
8
3
Attach the xD3 drum sound instrument
11
*After completing the assembly verify that all the bolts are securely tightened.
Setup
9
VOLUMESONG
ENTER
VOLUMESONG
VOLUMESONG
MENU
ENTER
MENU
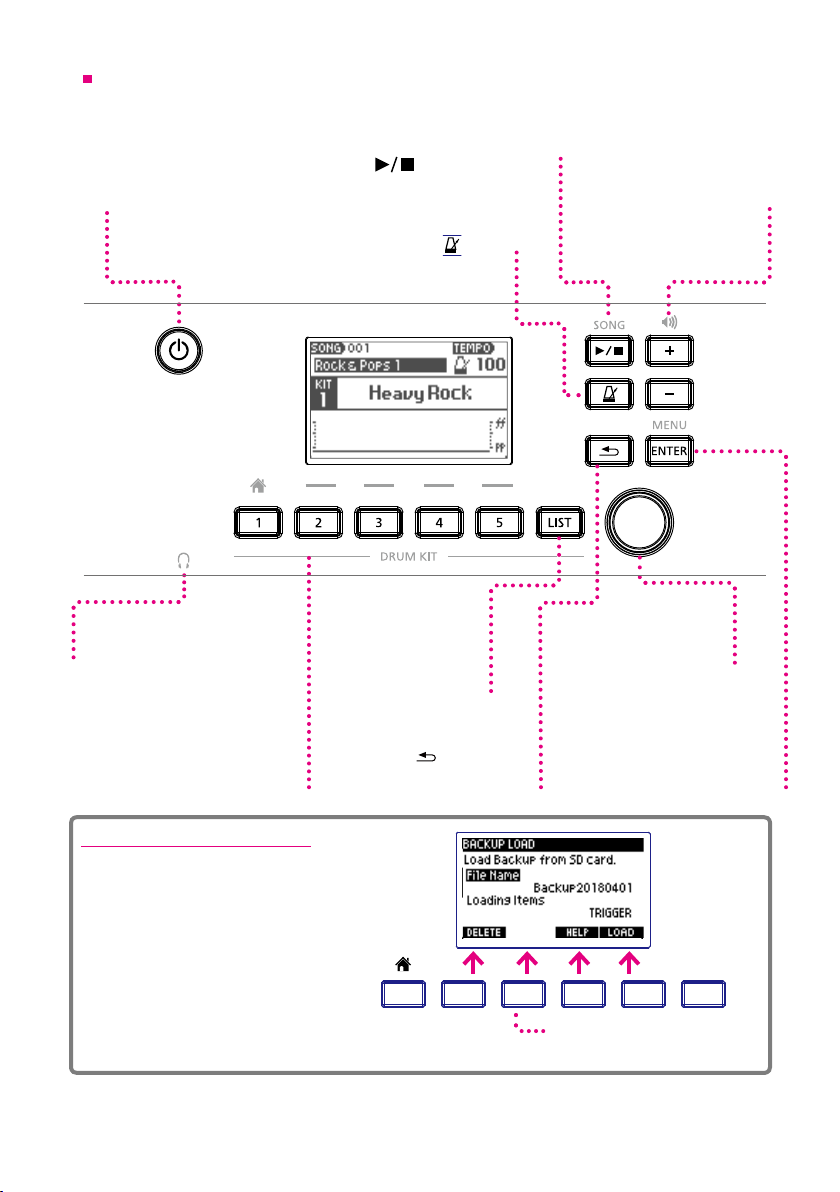
xD3 Top Panel
Only the buttons being operated light up.
Power Button
Long-press this button to
turn the power on/o.
PHONES
Audio jack for headphones.
Drum Kit Buttons[1]--[5]
[1]—[5] Use to select registered
drum kits.
Press button [1] to return to the Home
screen.
SONG [
An SD memory card is necessary
Press to display the list of
drum kits for selection.
Return to the previous screen.
](PLAY/STOP)Button
Use to start and stop the song.
for song playback.
Metronome[
Use to turn on / o the
built-in metronome.
[LIST]Button
]Button
[
](BACK)Button
Setup
VOLUME [+][–]Buttons
Use to adjust the
headphone and output volume.
Value Knob
Use to select dierent
menu items and settings.
Use also to adjust values.
[ENTER/MENU] Button
From the home screen, press to
access the main menu. Use [ENTER]
to conrm menu and setting selection
and adjusted values.
About the Function Buttons
Aside from the "Home" screen, buttons
[2] [3] [4] [5] are used to select displayed
menu functions.
For example, as shown on the screen
(right):
[2] Button = DELETE
[4] Button = HELP
[5] Button = LOAD
1 2 3 4 5
Buttons for which there are no
corresponding menu items are unlit. .
10
LIST
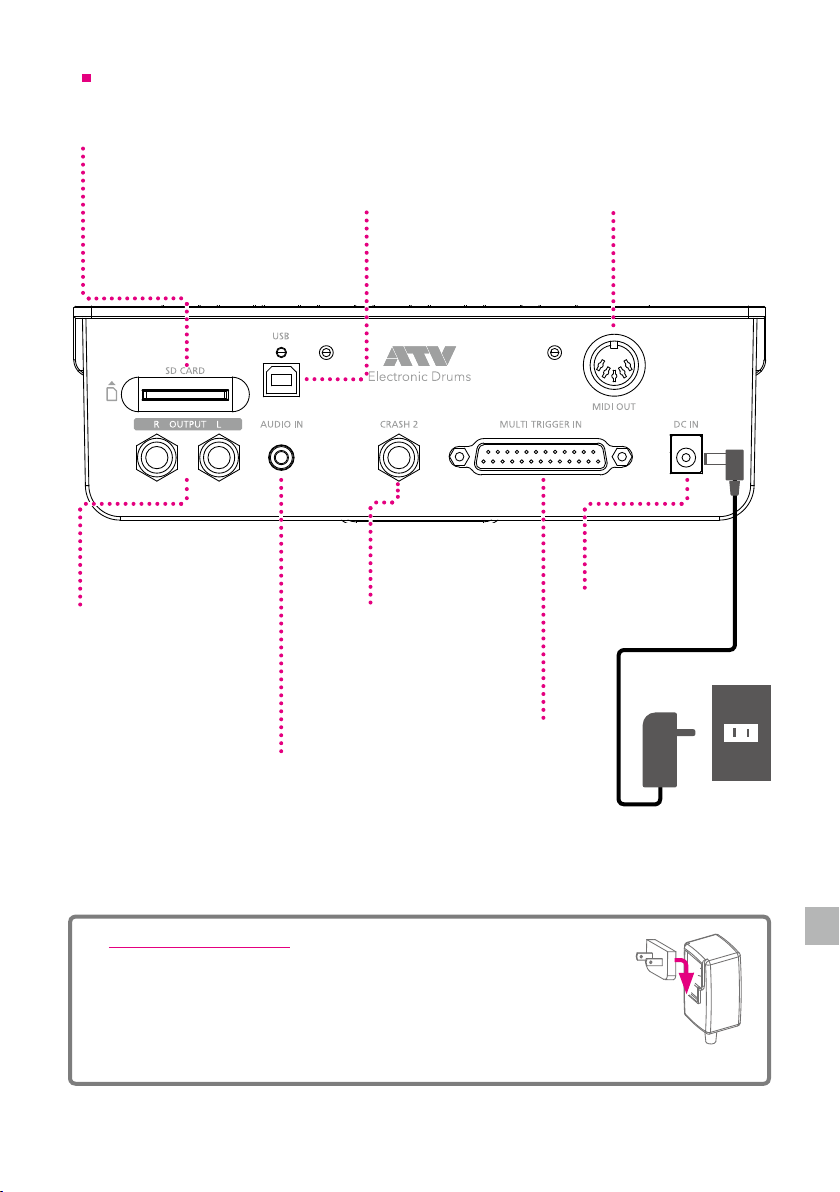
xD3 Rear Panel
SD CARD
Insert the included SD card that contains
song data. Additional songs can also be
stored and loaded. The SD card is also used
to back-up and import xD3 sound data. The
xD3 is only compatible with SD /SDHC cards
from 2 GB up to 32 GB.
USB
The xD3 can be connected to a
Mac or Windows PC, allowing MIDI
messages to be transmitted and
received. Use a USB 2.0 cable.
Setup
MIDI OUT
Connect MIDI devices
and send MIDI signals.
OUTPUT
These jacks output the
audio signal. Connect
them to a powered
speaker, mixer or audio
interface.
AUDIO IN
Connect a music player here
so you can play along with the
input audio. The AUDIO IN signal
is routed to main OUTPUT and
PHONES.
CRASH 2
Connect an additional
cymbal pad to
expand the drum set.
MULTI TRIGGER IN
Connect the included multi-trigger
cable here to input trigger signals
from the pads.
About the AC adapter
The AC adapter can be used worldwide.
Attach the included plug that is suitable for the type of outlet in your
country.
*You must use only the included AC adapter and plug.
DC IN
Connect the included
AC adapter here.
11
 Loading...