

Attwood 5980, 5040, 5940, 5045, 5080 User Manual

®
Off
Lens Helmet
"O" Ring
Lens Bayonet Channels
Centerline Mark
1/8" (3mm) Pilot Holes
3/4" (19mm) Dia. Hole
On
•
•
•
•
•
•
3
12-Volt
Navigation Lights
All-Round Lights: 5940, 5980
Sidelights: 5040, 5045, 5080
Installation Instructions
SAVE THESE INSTRUCTIONS
Form Number 69379 Rev. B 03-10
FEATURES
The Attwood Pulsar Navigation Lights are designed for boats upto 39.6 ft.
(12 meters). They feature impact resistant, UV-stable polycarbonate
housings. The lens completely encloses the bulb and socket for a splash
resistant seal. Lights meet USCG CFR 183.810, ABYC A-16 requirements,
and all applicable standards as tested by Imanna Labs, March 1997.
5040, 5045, and 5080 are Sidelights with 1 Nautical Mile visibility. 5940
and 5980 are All-Round Lights with 2 Nautical Mile visibility. All use Lamp
9235, #906, 13V, 6 Candle Power.
REQUIRED FOR INSTALLATION
• Cordless drill with 1/8", 3/8", and 3/4" (3, 10, and 19mm) bits.
• Screwdriver.
• Two #8 or #10 stainless pan head screws per light.
• Non-silicone sealant.
WARNING:
To prevent personal injury, disconnect the power source when installing
or servicing this product. Always remove the boat from the water before
using 120V AC power tools.
LOCATION (All-Round Lights)
All-Round Lights must be mounted a minimum of 1 meter above the
sidelights, on a smooth surface where the 360° beam will not be obstructed.
Light must not shine on operator or on anything in operator’s field of view.
(Figure 1)
Important: Before drilling mounting holes, be sure that light shines within
5° of horizontal when the boat is floating.
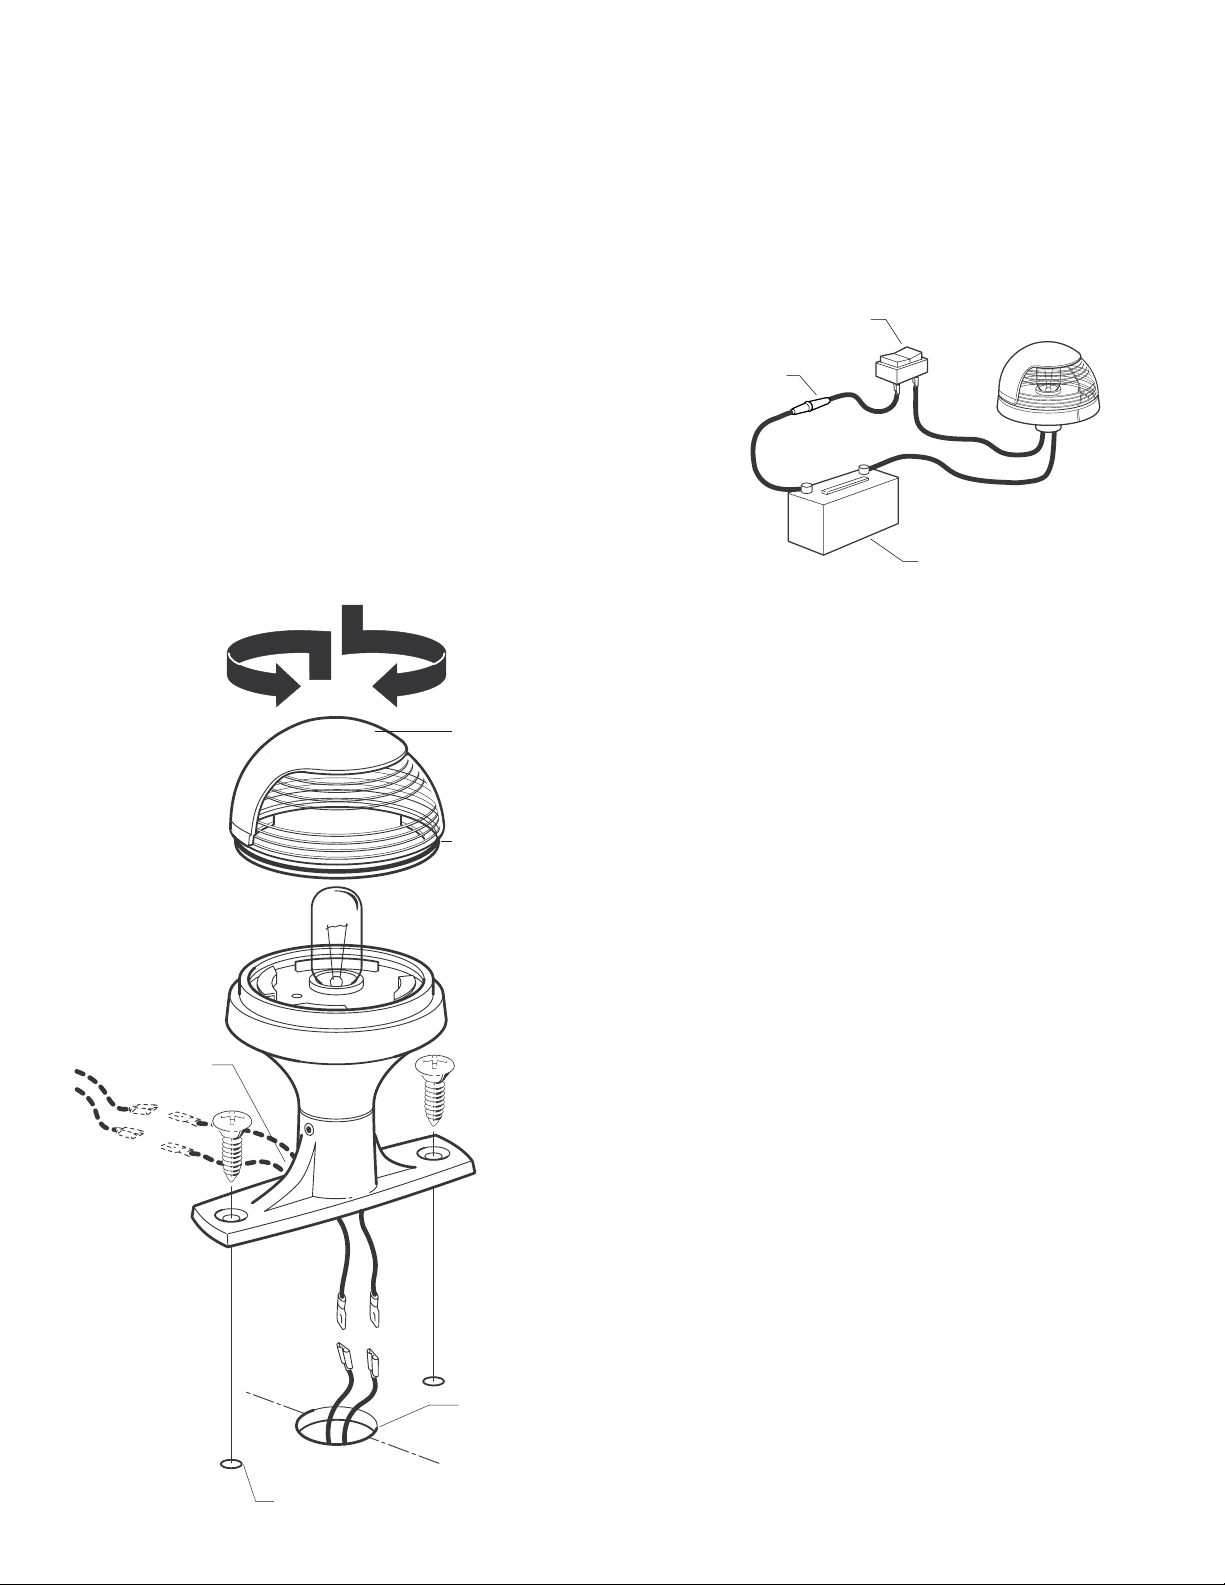
INSTALLATION, DECK MOUNT
All-Round Lights
1. To access mounting holes, gently twist lens helmet counterclockwise
to remove.
2. Place light in position as shown in Figure 1.
Important: Before drilling, be sure that light will shine within 5° of
horizontal when boat is floating.
3. Mark and drill 3/4" (19mm) diameter hole. (Figure 3)
4. Thread wire leads and base stem into hole. Mark location of screw
holes. Proceed to Step 5 below.
Bi-Color Sidelights and Sidelight Pairs
1. To access mounting holes, gently twist lens helmet counterclockwise
to remove.
2. Place sidelight(s) in position as shown in Figure 2.
Important: Before drilling, be sure that sidelights will shine straight
ahead and within 5° of horizontal when boat is floating.
3. For Bi-Color Combination light, mark and drill a 3/4" (19mm) diameter
hole on the boat centerline. For Sidelight Pairs, mark and drill a 3/4"
(19mm) diameter hole on each side deck of the boat, equal distance
from the bow. (Figure 3)
4. Thread wire leads and base stem into hole. Align centerline mark with
straight-ahead position and mark location of screw holes.
5. Remove base and drill 1/8" (3mm) pilot holes for both screws.
6. Bring 12V DC (+) and (-) wires up through deck hole. Connect wires
using waterproof crimp on butt joint connectors.
7. Activate light to verify proper operation.
8. Apply a thin bead of non-silicone sealant into groove on underside
of base to prevent water from entering hull or cabin. Do not allow
sealant to enter the lens bayonet channels.
9. Align and fasten base with stainless screws. Do not over tighten.
10. Replace lens helmet flush on base and turn clockwise until click is
heard and felt. (Figure 3)
Figure 3
Figure 1
One meter
or 39-3/8"
LOCATION (Sidelights)
Mount sidelights to a smooth surface on the gunwale, deck or
superstructure where the light beam will not be obstructed. Position BiColor combination light as far forward as possible. (Figure 2)
Important: Before drilling mounting holes, be sure sidelights shine straight
ahead and that they shine within 5° of horizontal when the boat is floating.
Figure 2
Red
(Port)
Green
(Starboard)
Red
(Port)
Green
(Starboard)
INSTALLATION, RAISED BASE MOUNT
All-Round Lights
1. Place light in position as shown in Figure 1.
Important: Before drilling, be sure that light will shine within 5° of
horizontal when boat is floating.
2. Mark and drill 3/8" (10mm) diameter hole (Figure 4; Sidelight lens
is shown).
3. Thread wire leads and base stem into hole. Mark location of screw
holes. Proceed to Step 4 below.
Bi-Color Sidelights and Sidelight Pairs
1. Place sidelight(s) in position as shown in Figure 2.
Important: Before drilling, be sure that sidelights will shine straight
ahead and within 5° of horizontal when boat is floating.
2. For Bi-Color Combination light, mark and drill 3/8" (10mm) diameter
hole on the boat centerline. For Sidelight Pairs, mark and drill 3/8"
(10mm) diameter hole on each side deck of the boat, equal distance
from the bow. (Figure 4)
3. Thread wire leads and base stem into hole. Align lens division with
straight-ahead position and mark location of screw holes.
4. Remove base and drill 1/8" (3mm) pilot holes for both screws.
5. Bring 12V DC (+) and (-) wires up through deck hole. Connect wires
using waterproof crimp on butt joint connectors.
6. Activate light to verify proper operation.
7. Apply non-silicone sealant to underside of base.
8. Align and fasten base with stainless screws. Do not over tighten.
(Figure 4)
Figure 4
On
Off
FINAL WIRING
CAUTION:
Power source must be positive 12V DC only. All positive (+12V DC)
wires must be fused to protect the circuit. Attwood Pulsar Navigation
Lights require a 1-amp fuse. Failure to make proper connections and
fusing will void product warranty.
1. Neatly thread wires to dash avoiding any areas where abrasion or
snagging may occur.
2. Use waterproof crimp on butt joint connectors to attach wires to a
switch on the dash that allows for two-position operation - one for
running lights and one for anchor lights. Test lights for proper
operation. (Figure 5)
Figure 5
3-Way Switch
•
1-Amp Fuse
•
Pos. (+)
Neg. (-)
•
12V DC
MAIINTENANCE
For cleaning or to replace bulb, gently twist lens helmet counter clock-wise
to remove. Replace with standard #906 lamp, Attwood #9235. Check“O”-ring
for cracks and insure that it is properly positioned on lens. Replace lens
helmet on base and turn clockwise until click is heard and felt.
Notch
•
•
1/8" (3mm)
Pilot Holes
•
•
Lens Helmet
"O" Ring
•
3/8" (10mm)
Dia. Hole
ATTWOOD LIMITED WARRANTY
ATTWOOD CORPORATION, 1016 North Monroe, Lowell, Michigan 49331
(“Attwood”) warrants to the original consumer purchaser that Attwood
brand products will be free from defects in materials and workmanship
under normal use and service for one year from the date of original consumer
purchases. This limited warranty is not applicable if the product has been
damaged by accident, improper installation, unreasonable or improper
use, lack of proper maintenance, unauthorized repairs or modifications,
normal wear and tear, or other causes not arising out of defects in materials
or workmanship. Attwood products are warranted for use on pleasure boats.
Any other use - including but not limited to commercial, racing, or non-marine
use - are not covered under this warranty. Attwood’s obligation under this
warranty is limited to repair of the product at Attwood’s plant or replacement
of the products at Attwood’s option without expense to the original consumer
purchaser. Any expenses involved in the removal, reinstallation or
transportation of the product are not covered by this warranty. The product
must be returned to Attwood’s plant at the address above, postage prepaid,
and insured with proof of original purchase including date. If Attwood is
unable to replace the product and repair is not commercially practical or
cannot be timely made, or if the original consumer purchaser is willing to
accept a refund in lieu of repair or replacement, Attwood may refund the
purchase price, less an amount for depreciation. The acceptance by
Attwood of any product returned or any refund provided by Attwood shall
not be deemed an admission that the product is defective or in violation
of any warranty. Products that are replaced or for which a refund is
issued become the property of Attwood.
THIS WARRANTY IS ATTWOOD’S ONLY EXPRESS WARRANTY OF
THIS PRODUCT. NO IMPLIED WARRANTY SHALL EXTEND BEYOND
ONE (1) YEAR FROM THE DATE OF ORIGINAL CONSUMER PUR-CHASE.
ATTWOOD SHALL NOT BE LIABLE FOR ANY DAMAGES FOR LOSS
OF USE OF THIS PRODUCT, NOR FOR ANY OTHER INCIDENTAL OR
CONSEQUENTIAL DAMAGES, COSTS OR EXPENSES.
Some states do not allow limitations on how long an implied warranty
lasts or the exclusion or limitation of incidental or consequential damages,
so the above limitations and exclusions may not apply to you. This warranty
gives you specific legal rights, and you may have other rights which vary
from state to state.
© 2003 Attwood Corporation
1016 N. Monroe Street, Lowell, MI 49331-0260 www.attwoodmarine.com
 Loading...