

Page 1
®
(+)
(+)
(-)
(-)
Motor
Unit
•
Battery
Retainer
Wire
Lead
Switch
•
•
3
WaterBuster® Power
™
Pump
Water Pump, 4140
Attwood marine hardware, navigational lighting, bilge pumps, and other
marine accessories are specified more than any other brand by America’s
best-known boat manufacturers as original equipment. Look to Attwood
for quality replacement parts and marine accessories.
SAVE THESE INSTRUCTIONS
Form Number 69243 Rev. C 00-01
FEATURES:
The Attwood WaterBuster
is a compact, submersible pump. It is extremely handy around the
dock, the house or farm.
The Waterbuster will lift water to a maximum height of 4 feet and
pumps in excess of 200 gallons per hour with fresh batteries.
The pump is made of high-impact plastic. It is completely portable
and ready for use when 3 “D” size alkaline batteries are installed
(batteries not included). It comes complete with a 42" hose and a
male hose fitting for attachment to your garden hose.
U.S. Patent Pending.
OPERATING INSTRUCTIONS:
IMPORTANT: To avoid airlock (flow stoppage), submerge
pump in water before turning on. If pump must be turned
on before being submerged, it may take 10-30 seconds for
the water to begin to flow (allowing pump to clear airlock).
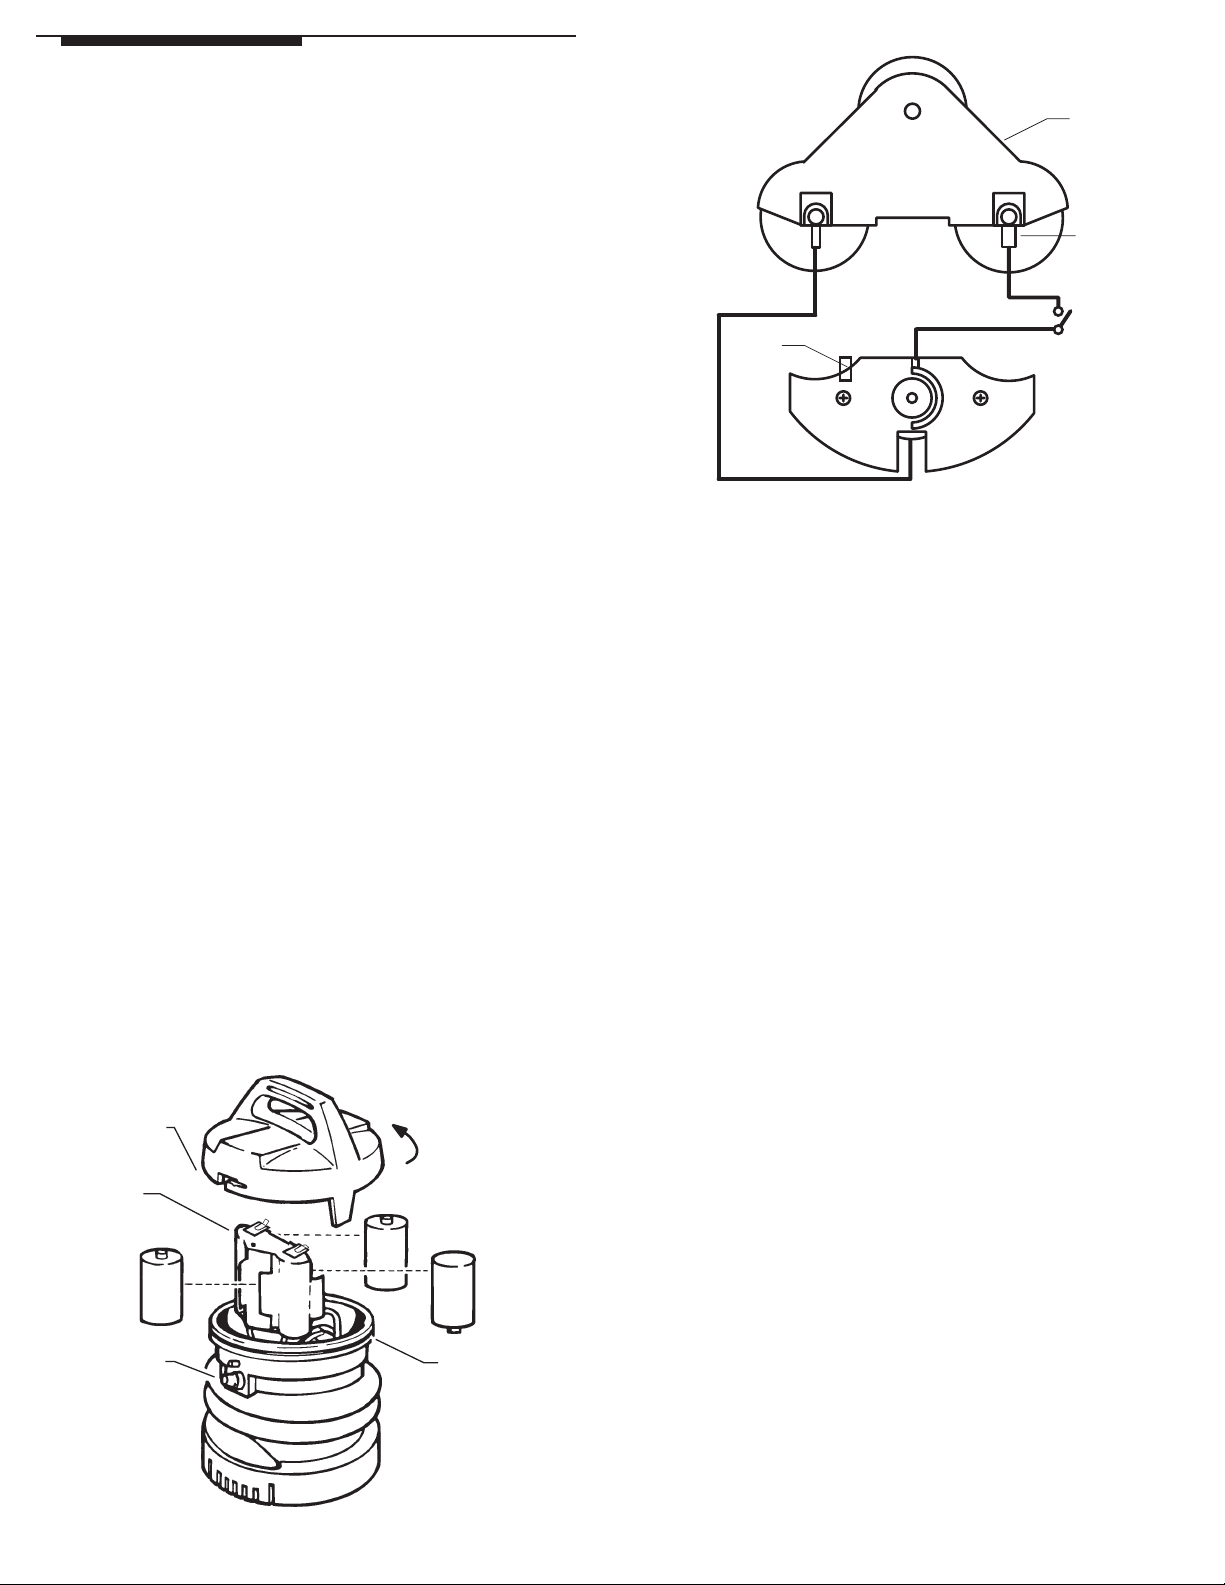
• To install batteries, remove top cover of pump by turning the
handle counter-clockwise (see Figure 1). Unplug the wire
leads and remove battery retainer (see Figure 1 Detail). Insert
three (3) alkaline “D” size batteries in position as indicated on
the battery retainer. Replace battery retainer, re-attach wire
leads, and lock cover into place (wire leads are different sizes
to prevent improper wiring). The pump is completely portable
and ready for use when batteries are installed.
Figure 1
Top Cover
Battery
Retainer
Top Cover
Cordless
®
Power Pump™ Cordless Water Pump
•
•
•
•
To Open
3 “D” Batteries
O-Ring
Figure 1 Detail
• Place pump into water at the deepest point possible. Make
sure the pump is located in an area free of debris to avoid
clogging. With bottom filter plate attached, pump will sink.
If you wish pump to float, remove bottom plate by removing
the two screws. The pump will then naturally float in an
upright position.
NOTE: Floating the pump is desired when you wish to pump out
an area that has debris at the bottom. See step 1 under Servicing
Instructions. Some possible uses are: emptying aquariums without
picking up aquarium gravel; filling a livewell with the same water as
being fished; pumping out pools or reservoirs of greater depth than
the pump hose length; and pumping basement sump reservoir to
avoid sludge at the bottom.
IMPORTANT: Keep pump tethered to prevent it from floating
out of reach.
• To start pump, push switch located directly below cover. Hold
pump in position until the water begins flowing out of the hose.
Check frequently to be sure water is flowing properly and
pump is free from debris.
• If water is flowing slowly, check hose for kinks or debris. Turn
pump off if it is necessary to remove debris. To remove debris,
simply remove pump from water and turn it upside down,
looking for obvious obstructions. If further inspection is
necessary, consult Servicing Instructions.
NOTE: After use, always flush the pump thoroughly with fresh clean
water especially after pumping sea water or chlorine-treated water.
BATTERY & PUMP TIPS:
• Install fresh, name-brand alkaline batteries in this pump. While
they may cost a bit more, tests have shown that they will run
this pump continuously for up to 5 hours, while standard “D”
batteries will last only 1/2 hour or less.
• Remove batteries from the pump when they are discharged or
if the pump will be stored for an extended period. Discharged
batteries occasionally leak, which will destroy the electrical
circuit of the pump.
• Dispose of used batteries in a safe place. Follow battery
manufacturer’s recommendations. Do not burn them because
they can explode. Do not throw in lakes, streams or rivers.
• Keep the inside of the pump dry at all times. If it does get wet
inside, dry it immediately. A hair dryer held 12" away works
well. Make certain the cover is tight before immersing the
pump. Keep the O-ring lubricated with petroleum jelly.
Page 2
SERVICING INSTRUCTIONS FOR CLEANING OUT DEBRIS
AND HOSE REPLACEMENT:
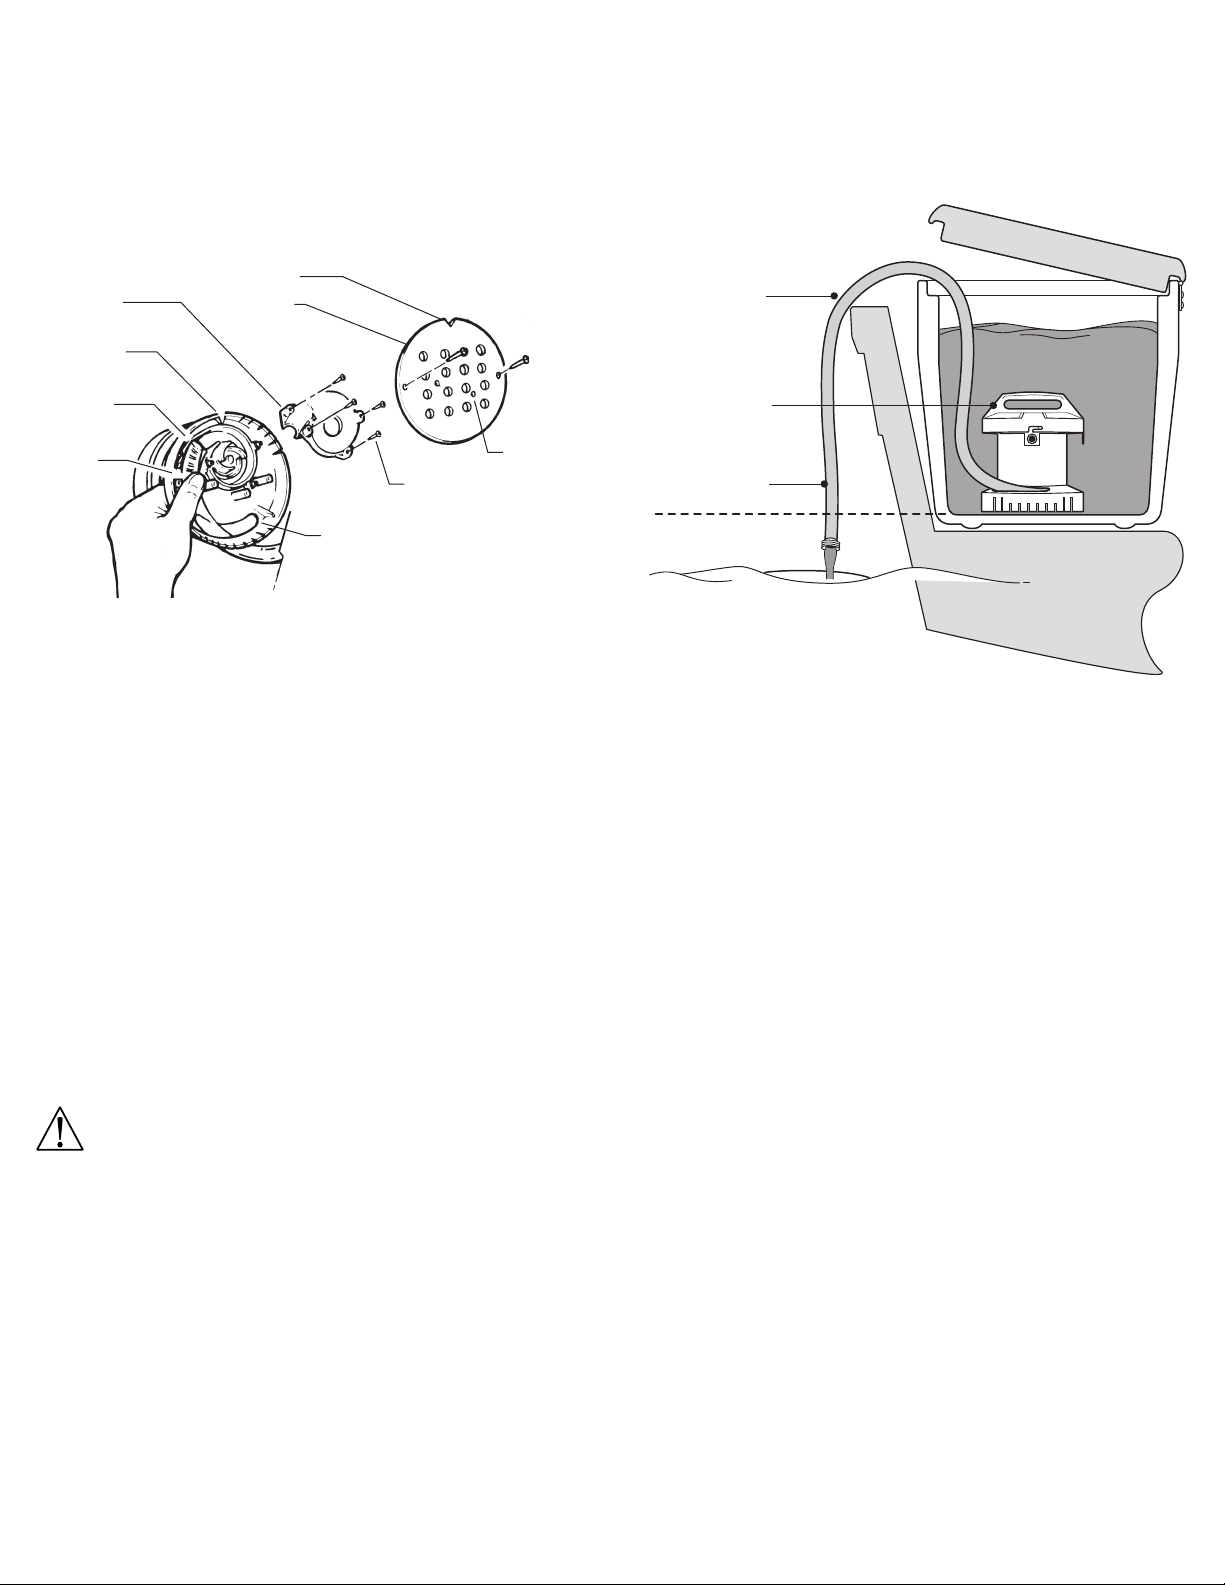
1. Turn the WaterBuster Power Pump upside down and remove
the filter screen by removing the two screws with a Phillips
screwdriver. Remove all debris.
NOTE: There are two extra screw holes in the screen that line up
with a screw post in the pump. These were added for any extra
support that you may need (see Figure 2).
Figure 2
Notch
Impeller
Chamber Cap
V-Shape
Protrusion
End of
Ribbed
Section
Extension
Hose
•
•
Filter
Screen
•
•
•
•
•
Screws
•
Hose
Opening
•
Extra
Screw
Holes
NOTE: To conserve batteries, you may use a siphon action (see
Figure 3). The discharge end of the hose must be below the water
level. To completely drain the water, it must be below the lowest
water level. With the pump and hose as shown, turn the pump on
until water flows, then turn the pump off. Water will continue to flow,
but at a slower rate. This method to can also increase the pumping
rate with the pump turned on.
Figure 3
Hose
Pump
Siphon
Action
Keep End of Hose Below
Lowest Water Level
2. Remove the impeller chamber cover by removing all four
screws. Remove all possible debris.
NOTE: The correct rotation of the impeller is counterclockwise,
when viewing from the bottom of the pump. If the impeller rotates
clockwise, or not at all, check the batteries for correct insertion.
3. When replacing the hose, remove impeller chamber cover (see
Step 2 above). Remove existing hose and thread replacement
hose clockwise through the hose opening in the pump housing.
4. Place the end of the hose to the end at the ribbed section of
the impeller chamber (see Figure 2). Make sure there are no
kinks in the hose.
5. To keep the hose in place, brace the hose with your thumb just
outside the impeller chamber. Replace the impeller chamber
cover and secure it by bracing your thumb on top of it. Replace
and install screws. DO NOT OVER TIGHTEN.
6. Replace the filter screen by lining up the screw holes with the
screw posts and the notch in the screen with the V-shaped
protrusion in the pump housing. Replace and install screws.
DO NOT OVER TIGHTEN.
WARNINGS:
This product is intended for pumping water only. Do not
use to pump gasoline, diesel fuel or chemicals of any kind.
Fluids other than water may destroy this product and/or
create a fire hazard.
This portable pump is not intended for permanent installation
in a bilge or sump area. It should not be used in situations
where risk of personal injury or property damage could result
from pump or battery failure.
Do not use any power source other than three (3) “D” size alkaline
batteries to power the pump.
Do not attempt to recharge batteries while installed in this product.
ATTWOOD LIMITED WARRANTY
ATTWOOD CORPORATION, 1016 North Monroe, Lowell, Michigan 49331
(“Attwood”) warrants to the original consumer purchaser that Attwood brand
products will be free from defects in materials and workmanship under normal
use and service for one year from the date of original consumer purchases.
This limited warranty is not applicable if the product has been damaged by
accident, improper installation, unreasonable or improper use, lack of proper
maintenance, unauthorized repairs or modifications, normal wear and tear,
or other causes not arising out of defects in materials or workmanship.
Attwood products are warranted for use on pleasure boats. Any other use—
including but not limited to commercial, racing, or non-marine use—are not
covered under this warranty. Attwood’s obligation under this warranty is limited
to repair of the product at Attwood’s plant or replacement of the products at
Attwood’s option without expense to the original consumer purchaser. Any
expenses involved in the removal, reinstallation or transportation of the
product are not covered by this warranty.
The product must be returned to Attwood’s plant at the address above,
postage pre-paid, and insured with proof of original purchase including date.
If Attwood is unable to replace the product and repair is not commercially
practical or cannot be timely made, or if the original consumer purchaser
is willing to accept a refund in lieu of repair or replacement, Attwood may
refund the purchase price, less an amount for depreciation. The acceptance
by Attwood of any product returned or any refund provided by Attwood shall
not be deemed an admission that the product is defective or in violation of
any warranty. Products that are replaced or for which a refund is issued
become the property of Attwood.
THIS WARRANTY IS ATTWOOD’S ONLY EXPRESSED WARRANTY OF
THESE PRODUCTS. NO IMPLIED WARRANTY INCLUDING, WITHOUT
LIMITATION, THE IMPLIED WARRANTIES OF MERCHANTABILITY AND
FITNESS FOR A PARTICULAR PURPOSE, SHALL BE EXTENDED BEYOND
THE WARRANTY PERIOD STATED ABOVE FOR EACH PRODUCT.
ATTWOOD SHALL NOT BE LIABLE FOR ANY DAMAGES, FOR LOSS
OF USE OF THIS PRODUCT, NOR FOR ANY OTHER INCIDENTAL OR
CONSEQUENTIAL DAMAGES, COSTS, OR EXPENSES.
Some states do not allow limitations on how long an implied warranty lasts
or the exclusion or limitation of incidental or consequential damages, so the
above limitations and exclusions may not apply to you. This warranty gives
you specific legal rights, and you may have other rights which vary from
state to state.
© 2000
Attwood
Subsidiary Steelcase Inc.
1016 N. Monroe Street, Lowell, MI 49331-0260
 Loading...