

ATTO Technology XstreamCORE FC 7500, XstreamCORE FC 7550, XstreamCORE FC 7600 Installation And Operation Manual
Page 1

ATTO XstreamCORE®
Installation and Operation Manual
ATTO XstreamCORE FC 7500
16-Gigabit Quad Fibre Channel to 12-Gigabit SAS Storage Controller
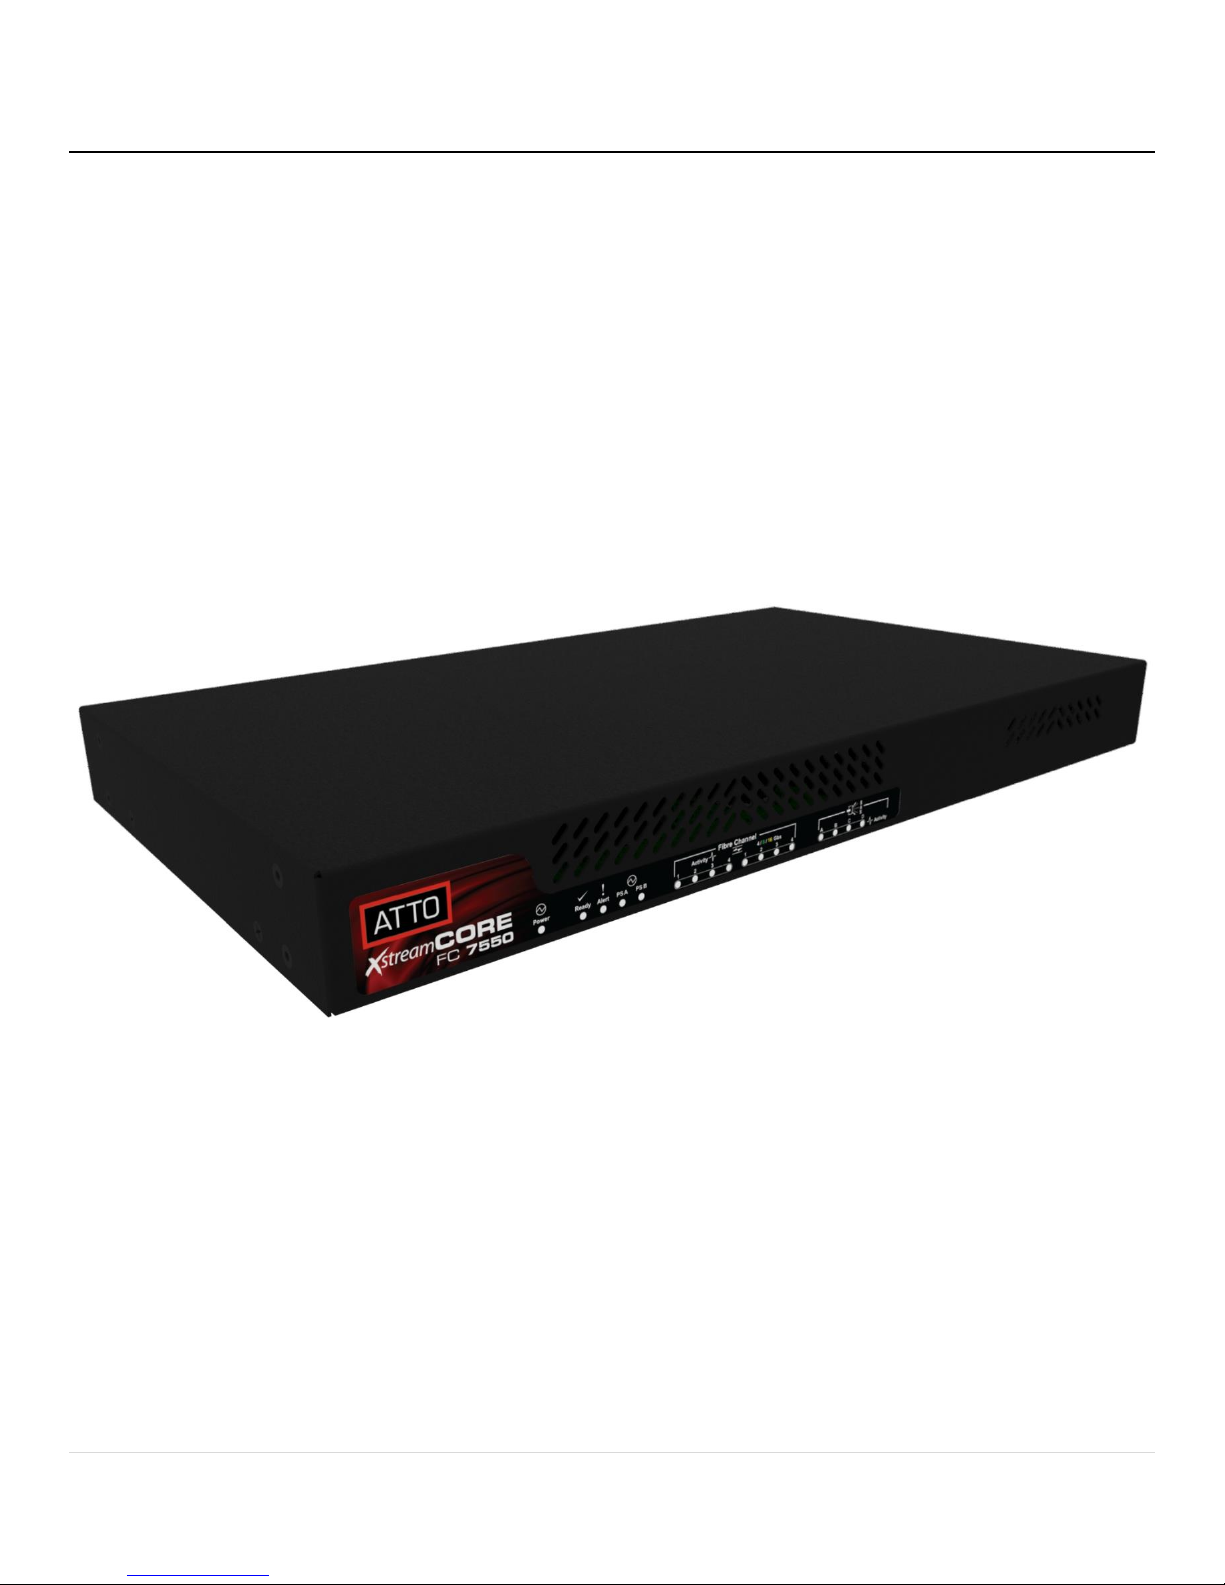
ATTO XstreamCORE FC 7550
16-Gigabit Quad Fibre Channel to 12-Gigabit SAS Storage Controller
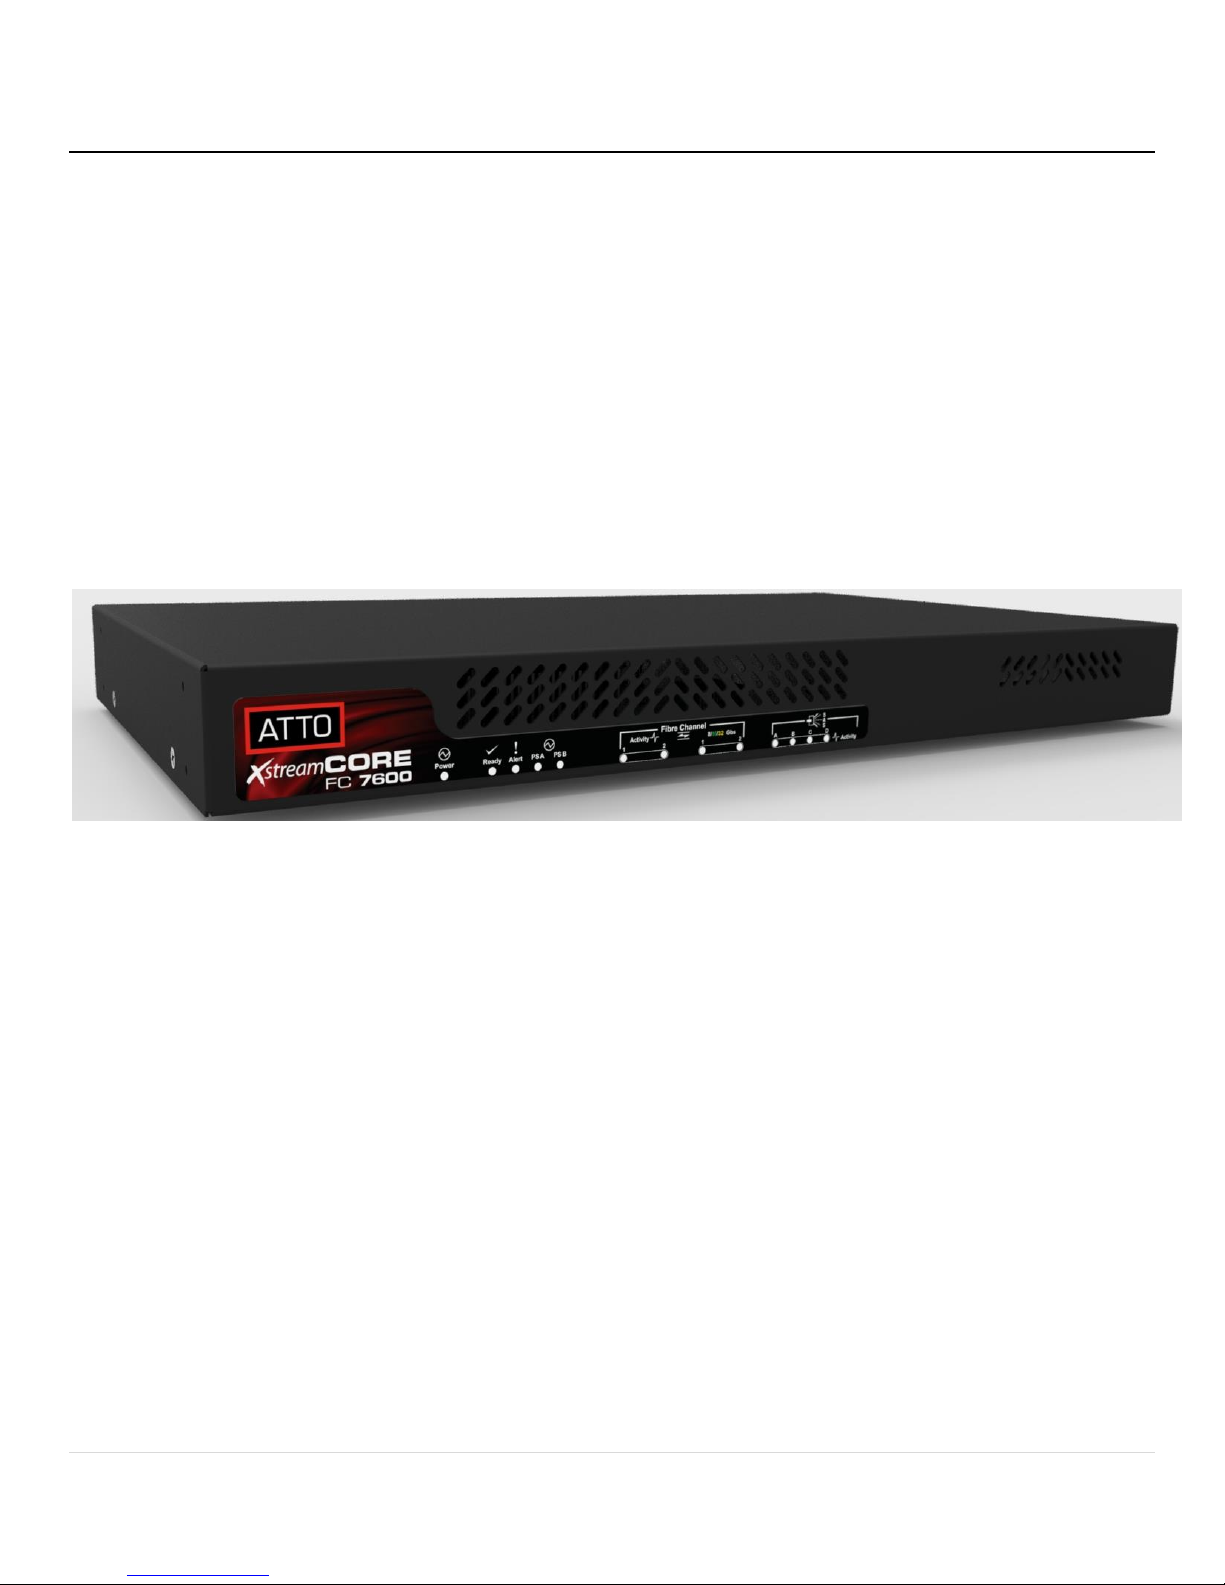
ATTO XstreamCORE FC 7600
32-Gigabit Dual Fibre Channel to 12-Gigabit SAS Storage Controller
©
2018 ATTO Technology, Inc. All rights reserved. All brand or
product names are trademarks of their respective holders.
No part of this manual may be reproduced in any form or by
any means without the express written permission of ATTO
Technology, Inc.
10/2018 PRMA-0464-000MD
Page 2

2 | P a g e
Table of Contents
Table of Contents .................................................................................................................................................................................. 2
ATTO XstreamCORE Overview................................................................................................................................................... 5
ATTO XstreamCORE™ FC 7500 features, benefits ................................................................................................................................. 5
ATTO XstreamCORE FC 7550 features, benefits .................................................................................................................................... 6
ATTO XstreamCORE FC 7600 features, benefits .................................................................................................................................... 7
ATTO XstreamCORE™ FC 7500
....................................................................................................................................................... 8
Cooling and airflow
............................................................................................................................................................................. 8
Power
................................................................................................................................................................................................. 8
Fibre Channel ports
............................................................................................................................................................................. 8
SAS/SATA ports
................................................................................................................................................................................... 8
Management ports
............................................................................................................................................................................. 8
LED indicators
..................................................................................................................................................................................... 8
ATTO
XstreamCORE
FC 7550
...................................................................................................................................................... 10
Dimensions ...................................................................................................................................................................................... 10
Cooling and airflow ......................................................................................................................................................................... 10
Power .............................................................................................................................................................................................. 10
Fibre Channel ports ......................................................................................................................................................................... 10
SAS/SATA ports ............................................................................................................................................................................... 10
Management ports.......................................................................................................................................................................... 10
LED indicators .................................................................................................................................................................................. 10
ATTO
XstreamCORE
FC 7600
...................................................................................................................................................... 12
Dimensions ...................................................................................................................................................................................... 12
Cooling and airflow ......................................................................................................................................................................... 12
Power .............................................................................................................................................................................................. 12
Fibre Channel ports ......................................................................................................................................................................... 12
SAS/SATA ports ............................................................................................................................................................................... 12
Management ports.......................................................................................................................................................................... 12
LED indicators .................................................................................................................................................................................. 12
Install the XstreamCORE ......................................................................................................................................................... 14
Unpack the packing box; verify contents ........................................................................................................................................ 14
Install the XstreamCORE ................................................................................................................................................................. 14
Discover the IP address ................................................................................................................................................................... 14
Internet Explorer setup ................................................................................................................................................................... 15
Page 3

3 | P a g e
Begin initial configuration ............................................................................................................................................................... 15
Installation and Removal of Power Supply Modules ...................................................................................................................... 15
Configure the XstreamCORE .................................................................................................................................................... 16
Preliminary steps ............................................................................................................................................................................. 16
Port configurations .......................................................................................................................................................................... 16
Modify passwords ........................................................................................................................................................................... 16
Map Devices ........................................................................................................................................................................... 17
XstreamCORE mapping ................................................................................................................................................................... 17
SAS/SATA device mapping .............................................................................................................................................................. 17
RAID device mapping ...................................................................................................................................................................... 17
Mapping Devices with SMP ............................................................................................................................................................. 18
AutoMap devices ............................................................................................................................................................................ 18
Remote Monitoring, Management .......................................................................................................................................... 19
SNMP-based monitoring ..................................................................................................................................................................... 20
Email messages provide error notification .......................................................................................................................................... 22
Update Firmware .................................................................................................................................................................... 23
Using XstreamVIEW™ ...................................................................................................................................................................... 23
Using FTP ......................................................................................................................................................................................... 23
Interface Options .................................................................................................................................................................... 24
Using XstreamVIEW™ System Manager .............................................................................................................................................. 24
Opening an XstreamVIEW™ session ................................................................................................................................................ 24
Optimizing XstreamVIEW™ in Internet Explorer ............................................................................................................................. 24
Using the serial port ............................................................................................................................................................................ 25
Using Telnet ......................................................................................................................................................................................... 25
Appendix A Cabling ................................................................................................................................................................. 26
SAS/SATA connections .................................................................................................................................................................... 26
Fibre Channel connections .............................................................................................................................................................. 26
Serial port connections ................................................................................................................................................................... 26
Ethernet connections ...................................................................................................................................................................... 26
Appendix B CLI Provides ASCII-based Interface ............................................................................................................................... 27
CLI Error Messages .............................................................................................................................................................................. 28
CLI Summary Reference....................................................................................................................................................................... 28
Command explanations ....................................................................................................................................................................... 31
Appendix C Standards and Compliances 7550 ................................................................................................................................. 39
Regulatory Notices .............................................................................................................................................................................. 39
FCC Notices (US only) ...................................................................................................................................................................... 39
Page 4

4 | P a g e
Compliance with ICES-003............................................................................................................................................................... 39
Compliance with EN Regulations .................................................................................................................................................... 39
Appendix D Standards and Compliances 7600 ................................................................................................................................. 40
Regulatory Notices .............................................................................................................................................................................. 40
FCC Notices (US only) ...................................................................................................................................................................... 40
Compliance with ICES-003............................................................................................................................................................... 40
Compliance with EN Regulations .................................................................................................................................................... 40
Page 5

5 | P a g e
ATTO XstreamCORE Overview
The ATTO XstreamCORE 7500/7550/7600 is a storage controller that connects multiple shelves of SAS and SATA JBOD storage and virtualizes
it to a Fibre Channel SAN Connection.
The ATTO XstreamCORE FC 7500/7550/7600 allows IT
departments to architect storage systems with the flexibility
to use standard interface off-the-shelf storage hardware with
increased bandwidth and low latency levels which improve
performance and response. As a Data Center building block,
the7500/7550/7600 allows IT managers to architect their
storage solution on their terms, avoiding vendor lock-in with
modularity at each layer. The 7500/7550/7600 is used to
aggregate and virtualize storage on a SAN (Storage Area
Network) and has undergone qualifications with industry
leading storage and SAN infrastructure products. The
7500/7550/7600 is easily integrated into IT infrastructures,
providing lower operational costs with tools like a PCIe
Analyzer, Drive Map Director™ and XstreamVIEW™.
ATTO XstreamCORE™ FC 7500 features, benefits
The ATTO XstreamCORE™ FC 7500 is a 16-Gigabit Fibre
Channel to 12-Gigabit SAS storage controller configured with
two independent 16Gb Fibre Channel ports and four 12Gb
x4 SAS connectors.
Designed to integrate industry-leading performance and
SAN capabilities into the future generation of storage
solutions, the XstreamCORE™ FC 7500 uses a highperformance architecture suited for OEMs looking to
incorporate SAS or SATA disk storage devices in their Fibre
Channel SAN.
Two independent 16Gb Fibre Channel ports which
auto-negotiate to 4Gb, 8Gb or 16Gb Fibre Channel
SFP+ Fibre Channel modules included
Dual Power Supply
Full support for FC-AL, FC-AL2, FC-FLA, FC-FS, FCP-3,
PLDA
Support for private loop, public loop, point-to-point
or fabric point-to-point
Support for direct connect to F-port switches
Four independent 12Gb SAS/SATA x4 mini-SAS HD
connectors which auto-negotiate to 3Gb, 6Gb or
12Gb
Automatic LUN Mapping
Patented Drive Map Director™ reduces operating
expense by auto-configuring storage
2500 MB/s throughput for 1 MB transfers
500,000 IOPS for 4KB read transfers and 400,000 IOPS
for 4KB write transfers
XstreamVIEW™ integrated management console for
remote configuration, management and diagnostic
capabilities
Supports SAS and SATA hard disk drives
Page 6
6 | P a g e
ATTO XstreamCORE FC 7550 features, benefits
The ATTO XstreamCORE FC 7550 is a 16-Gigabit Quad Fibre
Channel to 12-Gigabit SAS storage controller configured with
four independent 16Gb Fibre Channel ports and four 12Gb x4
SAS connectors.
Designed to integrate industry-leading performance and SAN
capabilities into the future generation of storage solutions,
the XstreamCORE FC 7550 uses a high-performance
architecture suited for OEMs looking to incorporate SAS or
SATA disk storage devices in their Fibre Channel SAN.
Four independent 16Gb Fibre Channel ports which
auto-negotiate to 4Gb, 8Gb or 16Gb Fibre Channel
Ability to aggregate up to 4 hosts without an
external switch
SFP+ Fibre Channel modules included
Dual Power Supply
Full support for FC-Fs, FCP-3
Support for direct connect to F-port switches
Four independent 12Gb SAS/SATA x4 mini-SAS HD
connectors which auto-negotiate to 3Gb, 6Gb or
12Gb
Automatic LUN Mapping
Patented Drive Map Director™ reduces operating
expense by auto-configuring storage
6,000 MB/s throughput for 1 MB transfers
1,200,000 IOPS for 4KB read transfers and 900,000
IOPS for 4KB write transfers
XstreamVIEW™ integrated management console for
remote configuration, management and diagnostic
capabilities
Supports SAS/SATA hard disk drives, SSDs, and Tape
Supports Host Group Mapping
Page 7
7 | P a g e
ATTO XstreamCORE FC 7600 features, benefits
The ATTO XstreamCORE FC 7600 is a 32-Gigabit Quad Fibre
Channel to 12-Gigabit SAS storage controller configured with
two independent 32Gb Fibre Channel ports and four 12Gb x4
SAS connectors.
Designed to integrate industry-leading performance and SAN
capabilities into the future generation of storage solutions,
the XstreamCORE FC 7600 uses a high-performance
architecture suited for OEMs looking to incorporate SAS or
SATA disk storage devices in their Fibre Channel SAN.
Two independent 32Gb Fibre Channel ports which
auto-negotiate to 8Gb, 16Gb or 32Gb Fibre Channel
Ability to aggregate up to 2 hosts without an
external switch
SFP+ Fibre Channel modules included
Dual Power Supply
Full support for FC-Fs, FCP-3
Support for direct connect to F-port switches
Four independent 12Gb SAS/SATA x4 mini-SAS HD
connectors which auto-negotiate to 3Gb, 6Gb or
12Gb
Automatic LUN Mapping
Patented Drive Map Director™ reduces operating
expense by auto-configuring storage
6,000 MB/s throughput for 1 MB transfers
1,200,000 IOPS for 4KB read transfers and 900,000
IOPS for 4KB write transfers
XstreamVIEW™ integrated management console for
remote configuration, management and diagnostic
capabilities
Supports SAS/SATA hard disk drives, SSDs, and Tape
Supports Host Group Mapping
Page 8

8 | P a g e
ATTO XstreamCORE™ FC 7500
The ATTO XstreamCORE™ FC 7500 is a high-performance storage controller which adds 16-Gigabit Fibre Channel
connectivity to 12-Gigabit SAS or SATA storage devices.
The XstreamCORE™ FC 7500 is available in an industrystandard 1U form factor for easy integration into racks.
Dimensions
Width: 17.3 inches
Length: 9.9 inches
Height: 1.7 inches (1U)
Weight: approximately 10 pounds
Cooling and airflow
Operating temperature: 5-40 °C external
Humidity: 10-90% non-condensing
Air enters from the front and is exhausted out the
connector side. Ambient air near the inlets should
not exceed 40°C. The unit automatically stops
operation if the temperature goes beyond this
threshold.
Do not block the enclosure’s vents. The
XstreamCORE™ does not allow data transfer if overheating
occurs.
Power
The 7500 features two hot swappable power
supplies and can be operated with only a single
power supply inserted. Each power supply has a
standard IEC320 power receptacle and cooling fan.
The power requirements of the ATTO
XstreamCORE™ FC 7500 plus the power draw of
other equipment in the rack must not overload the
supply circuit and or wiring of this rack.
Input voltage: 100-240; VAC 1A; 50/60Hz.
Fibre Channel ports
The dual independent 16Gb/s Fibre Channel ports
connect the XstreamCORE™ FC 7500 to Fibre Channel
hosts using optical SFP+ connectors and multimode
fiber optic cable. Make sure all cables are anchored
securely at both ends with the proper connectors.
SAS/SATA ports
The four (x4) 12Gb/s SAS/SATA connectors connect
storage devices into the Storage Area Network (SAN)
using mini-SAS HD cable plug connectors.
Management ports
Management is provided using the dual
100/1000BASE-T Ethernet ports accessible from two
right angle RJ-45 connectors, or the RS-232 serial
header console port accessible from the serial RJ-45
connector.
LED indicators
LED indicators can be viewed from the connector
side and the front side of the XstreamCORE™ FC
7500.
LEDs on the connector side are:
Power Supplies: One LED for each supply. Blue
indicates on and ready, while blinking Red indicates
an unplugged or failed supply.
Ready/Alert: On one shared LED a lit green means
ready, yellow indicates an alert condition.
Ethernet port connectors: A green LED embedded in
each Ethernet port connector indicates Link/Activity,
where green solid indicates link, blinking indicates
activity and OFF means no link is present. A second
green LED embedded in each Ethernet port
connector indicates connection speed, where green
solid indicates either a 100MbE or 1000MbE
connection.
Fibre Channel port: A lit green LED indicates link,
and OFF means no link. FC Port LEDs are located next
to the SFP connectors.
SAS/SATA device: SAS LEDs are located below the
mini-SAS HD connector. A lit green LED indicates a
link has been established on at least one PHY, and
OFF means there are no links.
LEDs on the faceplate are:
Page 9
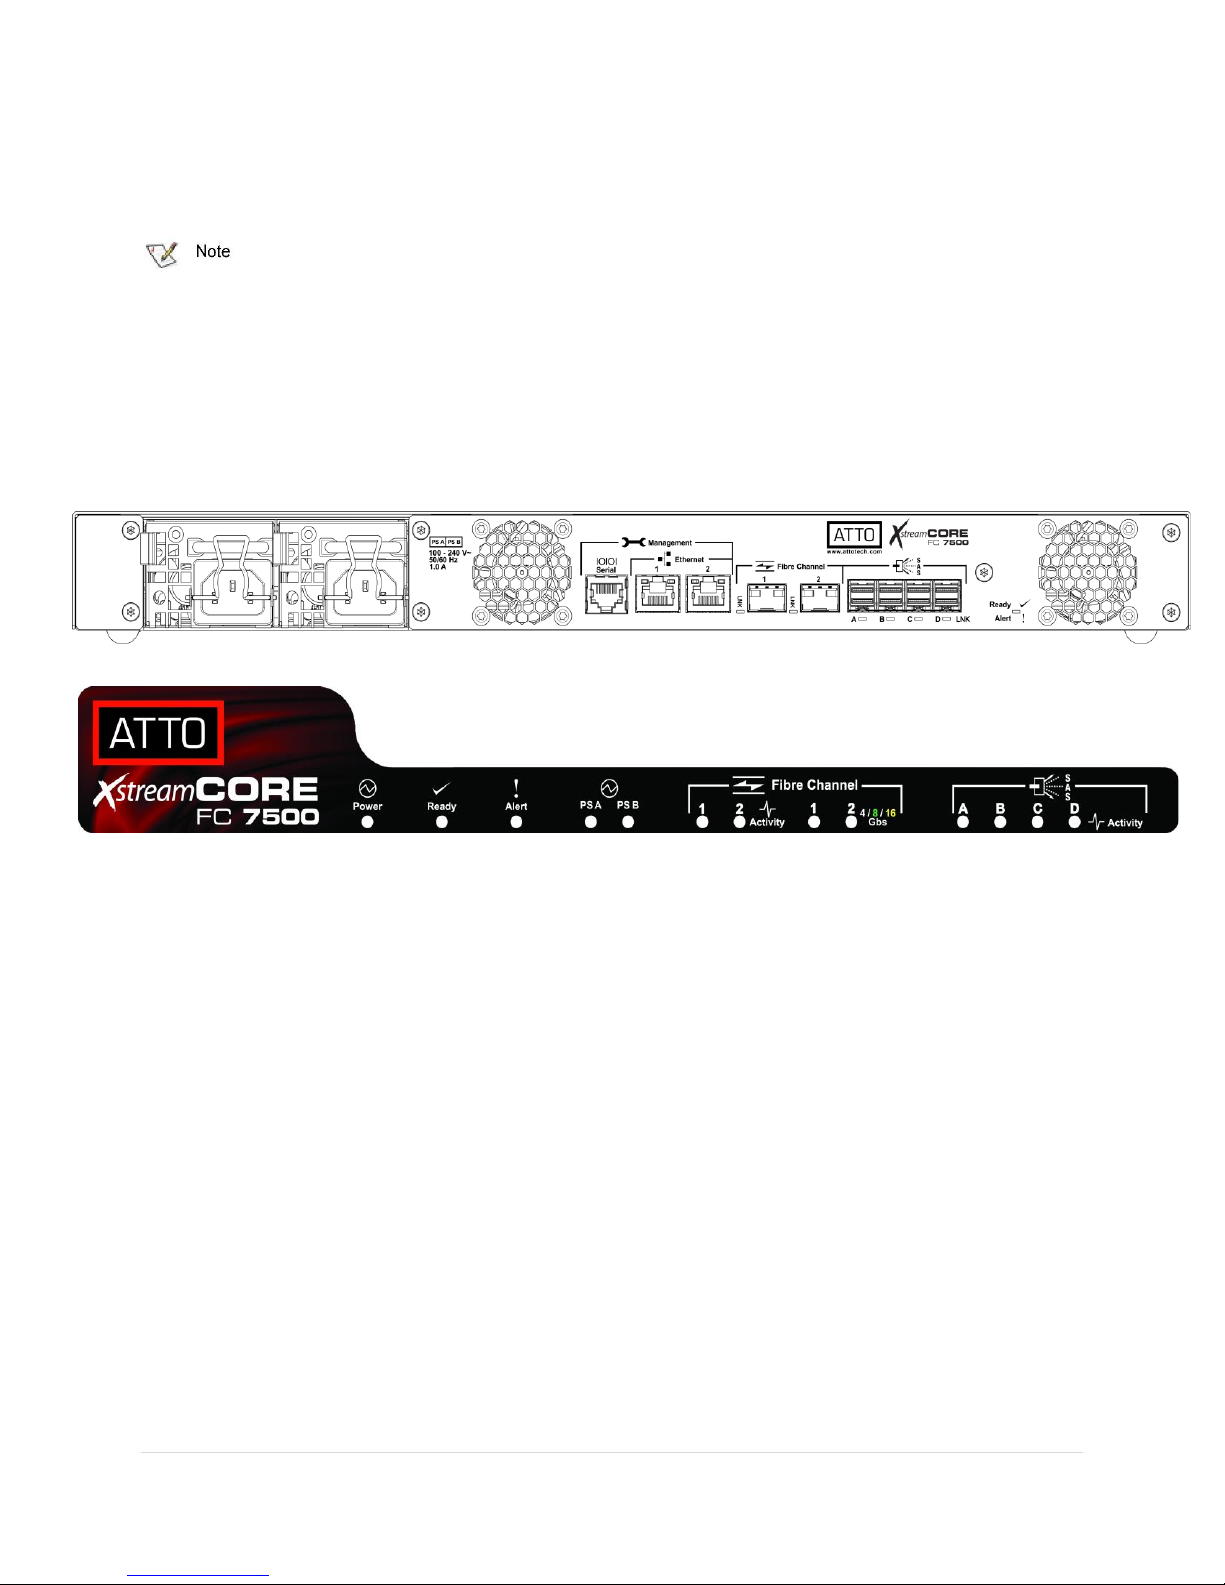
9 | P a g e
Power Supplies: One LED for each supply. Green
indicates on and ready while amber indicates an
unplugged or failed supply.
If both power supplies are on and both LEDs
are yellow at the same time, this indicates a bad status
connection. Status harnesses may not be connected.
Power: A lit green LED indicates power has been
turned ON to the storage controller.
Ready: A lit green LED indicates ready and OFF to
show not ready.
Alert: A lit yellow LED indicates an alert condition.
Fibre Channel Port Activity: A lit green FC port
activity LED indicates FC traffic on the port, and OFF
indicates no port activity.
Fibre Channel Port Speed: A bi-color FC port speed
LED is lit as follows: Yellow = 16Gb/s, Green = 8Gb/s,
and OFF = 4Gb/s.
SAS/SATA Device Activity: A lit green LED for each
SAS connector indicates port activity on at least one
PHY in the connector, and OFF means no port
activity.
EXHIBIT 1 7500 CONNECTORS, LEDS AND POWER RECEPTAC LE ON THE CONNECTOR SIDE.
EXHIBIT 2 7500 LEDS ON THE FACEPLATE .
Page 10

10 | P a g e
ATTO
XstreamCORE
FC 7550
The ATTO XstreamCORE FC 7550 is a high-performance storage controller which adds 16-Gigabit Quad Fibre Channel connectivity to 12Gigabit SAS or SATA storage devices.
The XstreamCORE FC 7550 is available in an industry-standard
1U form factor for easy integration into racks.
Dimensions
Width: 17 inches
Length: 11 inches
Height: 1.7 inches (1U)
Weight: approximately 10 pounds
Cooling and airflow
Operating temperature: 5-40 °C external
Humidity: 10-90% non-condensing
Air enters from the front and is exhausted out the connector
side. Ambient air near the inlets should not exceed 40°C. The
unit automatically stops operation if the temperature goes
beyond this threshold.
Do not block the enclosure’s vents. The XstreamCORE does
not allow data transfer if overheating occurs.
Power
The XstreamCORE FC 7550 features two hot swappable
power supplies and can be operated with only a single power
supply inserted. Each power supply has a standard IEC320
power receptacle and cooling fan. The power requirements of
the ATTO XstreamCORE FC 7550 plus the power draw of
other equipment in the rack must not overload the supply
circuit and or wiring of this rack.
Input voltage: 100-240VAC; 1A; 50/60Hz.
Fibre Channel ports
The quad independent 16Gb/s Fibre Channel ports connect
the XstreamCORE FC 7550 to Fibre Channel hosts using
optical SFP+ connectors and multimode fiber optic cable.
Make sure all cables are anchored securely at both ends with
the proper connectors.
SAS/SATA ports
The four (x4) 12Gb/s SAS/SATA connectors connect storage
devices into the Storage Area Network (SAN) using mini-SAS
HD cable plug connectors.
Management ports
Management is provided using the dual 100/1000BASE-T
Ethernet ports accessible from two right angle RJ-45
connectors, or the RS-232 serial header console port
accessible from the serial RJ-45 connector.
LED indicators
LED indicators can be viewed from the connector side and the
front side of the XstreamCORE FC 7550.
LEDs on the connector side are:
Power Supplies: One LED for each supply. Blue indicates ON
and ready, while blinking Red indicates an unplugged or failed
supply.
Ready/Alert: On one shared LED a lit green means ready,
yellow indicates an alert condition.
Ethernet port connectors: A green LED embedded in each
Ethernet port connector indicates Link/Activity, where green
solid indicates link, blinking indicates activity and OFF means
no link is present. A second green LED embedded in each
Ethernet port connector indicates connection speed, where
green solid indicates either a 100MbE or 1000MbE
connection.
Fibre Channel port: A lit green LED indicates link, and OFF
means no link. FC Port LEDs are located next to the SFP
connectors (7600 only) or below the SFP connectors (7550
only).
SAS/SATA device: SAS LEDs are located below the mini-SAS
HD connector. A lit green LED indicates a link has been
established on at least one PHY, and OFF means there are no
links.
LEDs on the faceplate are:
Power Supplies: One LED for each supply. Green indicates ON
and ready while amber indicates an unplugged or failed
supply.
If both power supplies are on and both LEDs are yellow at
the same time, this indicates a bad status connection. Status harnesses
may not be connected.
Power: A lit green LED indicates power has been turned ON
to the storage controller.
Page 11

11 | P a g e
Ready: A lit green LED indicates ready, and OFF indicates not
ready.
Alert: A lit yellow LED indicates an alert condition.
Fibre Channel Port Activity: A lit green FC port activity LED
indicates FC traffic on the port, and OFF indicates no port
activity.
Fibre Channel Port Speed: A bi-color FC port speed LED is lit
as follows: Yellow = 16Gb/s, Green = 8Gb/s, and OFF = 4Gb/s.
SAS/SATA Device Activity: A lit green LED for each SAS
connector indicates port activity on at least one PHY.
EXHIBIT 3 7550 CONNECTORS, LEDS AND POWER RECEPTAC LE ON THE CONNECTOR SIDE.
EXHIBIT 4 7550 LEDS ON THE FACEPLATE .
Page 12

12 | P a g e
ATTO
XstreamCORE
FC 7600
The ATTO XstreamCORE FC 7600 is a high-performance storage controller which adds 32-Gigabit Dual Fibre Channel connectivity to 12Gigabit SAS or SATA storage devices.
The XstreamCORE FC 7600 is available in an industry-standard
1U form factor for easy integration into racks.
Dimensions
Width: 17 inches
Length: 11 inches
Height: 1.7 inches (1U)
Weight: approximately 10 pounds
Cooling and airflow
Operating temperature: 5-40 °C external
Humidity: 10-90% non-condensing
Air enters from the front and is exhausted out the connector
side. Ambient air near the inlets should not exceed 40°C. The
unit automatically stops operation if the temperature goes
beyond this threshold.
Do not block the enclosure’s vents. The XstreamCORE does
not allow data transfer if overheating occurs.
Power
The XstreamCORE FC 7600 features two hot swappable
power supplies and can be operated with only a single power
supply inserted. Each power supply has a standard IEC320
power receptacle and cooling fan. The power requirements of
the ATTO XstreamCORE FC 7600 plus the power draw of
other equipment in the rack must not overload the supply
circuit and or wiring of this rack.
Input voltage: 100-240; VAC 1A; 50/60Hz.
Fibre Channel ports
The dual independent 32Gb/s Fibre Channel ports connect
the XstreamCORE FC 7600 to Fibre Channel hosts using
optical SFP+ connectors and multimode fiber optic cable.
Make sure all cables are anchored securely at both ends with
the proper connectors.
SAS/SATA ports
The four (x4) 12Gb/s SAS/SATA connectors connect storage
devices into the Storage Area Network (SAN) using mini-SAS
HD cable plug connectors.
Management ports
Management is provided using the dual 100/1000BASE-T
Ethernet ports accessible from two right angle RJ-45
connectors, or the RS-232 serial header console port
accessible from the serial RJ-45 connector.
LED indicators
LED indicators can be viewed from the connector side and the
front side of the XstreamCORE FC 7600.
LEDs on the connector side are:
Power Supplies: One LED for each supply. Blue indicates on
and ready, while blinking Red indicates an unplugged or failed
supply.
Ready/Alert: On one shared LED a lit green means ready,
yellow indicates an alert condition.
Ethernet port connectors: A green LED embedded in each
Ethernet port connector indicates Link/Activity, where green
solid indicates link, blinking indicates activity and OFF means
no link is present. A second green LED embedded in each
Ethernet port connector indicates connection speed, where
green solid indicates either a 100MbE or 1000MbE
connection.
Fibre Channel port: A lit green LED indicates link, and OFF
means no link. FC Port LEDs are located next to the SFP
connectors (7600 only) or below the SFP connectors (7550
only).
SAS/SATA device: SAS LEDs are located below the mini-SAS
HD connector. A lit green LED indicates a link has been
established on at least one PHY, and OFF means there are no
links.
LEDs on the faceplate are:
Power Supplies: One LED for each supply. Green indicates on
and ready while amber indicates an unplugged or failed
supply.
If both power supplies are on and both LEDs are yellow at
the same time, this indicates a bad status connection. Status harnesses
may not be connected.
Power: A lit green LED indicates power has been turned ON
to the storage controller.
Page 13
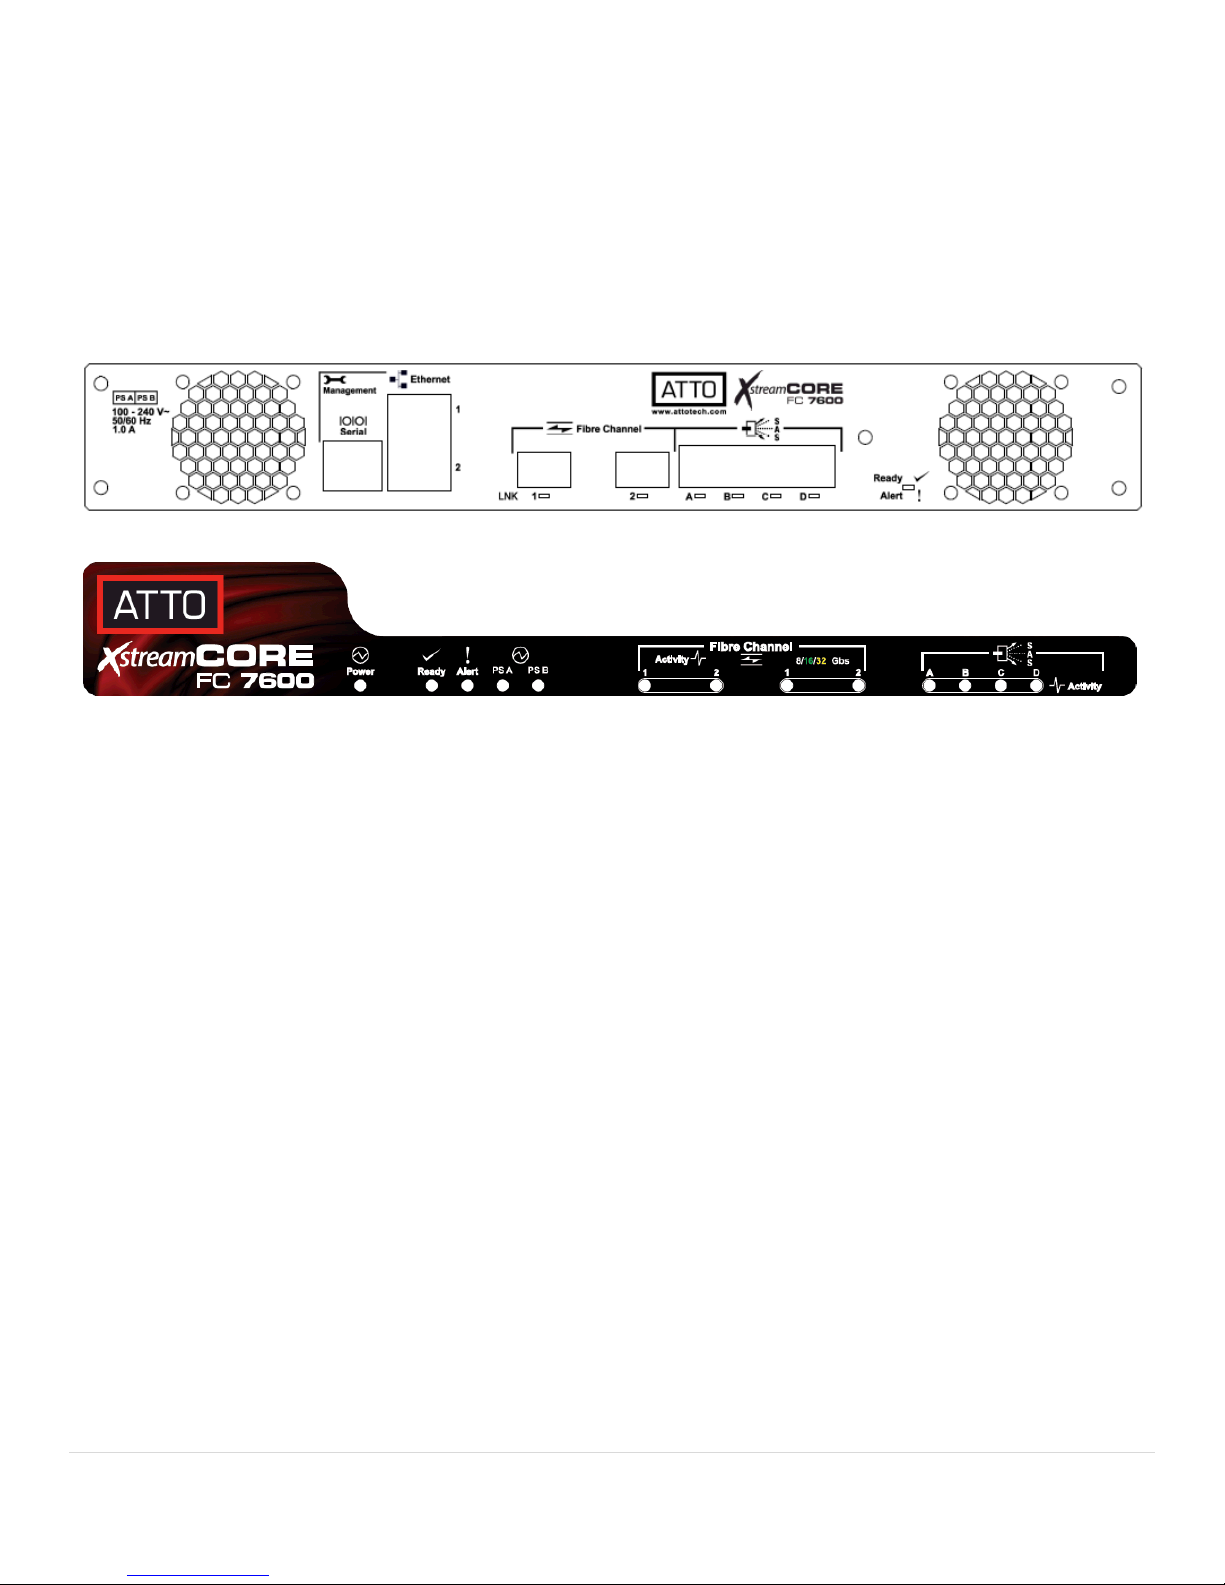
13 | P a g e
Ready: A lit green LED indicates ready and OFF to show not
ready.
Alert: A lit yellow LED indicates an alert condition.
Fibre Channel Port Activity: A lit green FC port activity LED
indicates FC traffic on the port, and OFF indicates no port
activity.
Fibre Channel Port Speed: A bi-color FC port speed LED is lit
as follows: Yellow = 32Gb/s, Green = 16Gb/s, and OFF =
8Gb/s.
SAS/SATA Device Activity: A lit green LED for each SAS
connector indicates port activity on at least one
EXHIBIT 5 7600 CONNECTORS, LEDS AND POWER RECEPTAC LE ON THE CONNECTOR SIDE.
Exhibit 6 7600 LEDS ON THE FACEPLATE.
Page 14

14 | P a g e
Install the XstreamCORE
If you have not already completed the instructions on the Quick Start page packed with your XstreamCORE, use the following instructions to
install the XstreamCORE.
Unpack the packing box; verify contents
The XstreamCORE. Note the serial number of
your XstreamCORE unit:
________________________
Power cords
“L” brackets for mounting in a 19” rack
Ethernet cable
RS-232 cable
Install the XstreamCORE
1. Place the XstreamCORE on a stable flat surface or install
it into a standard rack.
2. If installing into a rack, attach the brackets to both sides
of the XstreamCORE enclosure. Then install the
XstreamCORE assembly horizontally within the rack so it
does not reduce the air flow within the rack.
EXHIBIT 7 BRACKETS TO INSTALL THE XSTREAM CORE INTO A RACK.
3. Connect the host computer by connecting the cable to FC
port 1, 2, 3, or 4.
4. Connect target devices by connecting SAS cables to SAS
connector A, B, C or D.
5. Power up the target devices.
6. Connect the Ethernet port to your network.
7. Connect the AC power cords from the XstreamCORE to
the proper AC
source outlets.
Power is automatically supplied to the 7500/7550/7600
when plugged into an AC outlet.
The power source must be connected to a protective earth
ground and comply with local electrical codes. Improper grounding
may result in an electrical shock or damage to the unit. Also, be aware
that this unit is powered on once a power source is connected. Make
sure the power supply module is fully inserted before applying power.
Failure to do so may cause injury or damage the unit.
If you are using a rack:
Properly ground the XstreamCORE to the rack
equipment. The earth ground connection must be
maintained.
The power requirements plus the power draw of
the other equipment in the rack must not
overload the supply circuit and/or wiring of the
rack.
8. Wait for the XstreamCORE Ready LED to light, indicating
that the XstreamCORE has completed its power-on self
test sequence.
Discover the IP address
The XstreamCORE is initially configured with DHCP
enabled. It is best if you have access to a DHCP server.
1. Power on your system and log in as a user with proper
administrative privileges from the computer attached to
the XstreamCORE Ethernet port on the same domain.
2. Go to www.atto.com.
3. Select Downloads from the Support menu.
4. Register or log in if previously registered.
5. Select Storage Controllers from the product list.
6. Select your model.
7. From the table, find your Operating System.
8. Click on the entry for the QuickNAV™ utility.
9. Select a download destination and allow the download to
complete. Double-click the downloaded QuickNAV™ file
to install onto your operating system.
10. Locate the XstreamCORE with the serial number
recorded earlier.
11. Highlight the serial number.
12. Click Next.
13. If a DHCP server is available on your network, an address
is assigned automatically by the server. Note the
assigned address:
_____________________________________
If you do not have a DHCP server, get an IP address and
subnet mask from your network administrator, type it into the area
provided, and click on Next.
14. Click on Launch Browser. Your browser points to the
ATTO XstreamVIEW™ splash screen. If you use Internet
Explorer as a browser, you may continue on to the
Page 15

15 | P a g e
optional Internet Explorer setup below. If not, continue
on to Begin initial configuration.
Internet Explorer setup
1. Open your browser
2. Go to the browser toolbar and select Tools.
3. Select Internet Options.
4. In the Internet Options screen, select the Security tab.
5. Click on the Trusted Sites icon.
6. Click on the Sites button.
7. Uncheck the Require server verification
check box.
8. In the text box Add this web site to the zone, add the IP
address of the appliance. You may use wild cards.
9. Click Close.
10. At the bottom of the Internet Options dialog, click OK.
Begin initial configuration
1. The XstreamVIEW™ interface welcome screen appears.
Click on Enter Here.
2. Type in the user name and password.
The default values are user name root and password
Password. The user name is case insensitive and the password is case
sensitive. It is best practice to change the default user name and
password. Refer to Modify passwords.
3. The XstreamVIEW™ status page appears. Continue to
Map Devices.
Installation and Removal of Power
Supply Modules
1. To remove a power supply module, first remove the
power cord.
2. Press the side latch inward and pull out on the handle
3. To install a power module, insert module until you hear
the latch click.
Handle and latch should be on top.
4. Install power cord.
Remove the power source before removing the power
supply module. Failure to do so may cause injury or damage the unit
EXHIBIT 5 XSTREAMCORE FC 7500, LEDS, POWER RECEPTACLE AND PORTS
EXHIBIT 8 XSTREAMCORE FC 7600, LEDS, POWER RECEPTAC LE AN D PORTS
EXHIBIT 9 XSTREAMCORE FC 7550, LEDS, POWER RECEPTACLE AN D PORTS
Page 16

16 | P a g e
Configure the XstreamCORE
To configure the ATTO XstreamCORE, use the ATTO XstreamVIEW™ System Manager GUI. Default values are appropriate for most
configurations, but may be modified.
The best way to access the XstreamCORE to view and change
settings is to use ATTO XstreamVIEW™ System Manager, a
browser-based graphical interface. Other methods are also
available. Refer to Interface Options
Help is available from within XstreamVIEW™ by clicking on
the text indicating each setting. For more information on any
of these parameters, refer to the specific CLI command in
Command explanations.
To change mapping, refer to Map Devices
To use Email notification or SNMP, refer to Remote
Monitoring, Management.
You may make changes to several pages before going to the
Restart page and restarting the XstreamCORE to save the
changes.
Preliminary steps
1. If you are not already in the XstreamVIEW™ interface,
type the IP address of your XstreamCORE in a standard
browser as found in Using XstreamVIEW™ System
Manager, click Enter Here, type in your user name and
password, and click OK.
2. The Status page appears.
Choose one of the following
options:
View all settings to
ensure they are
appropriate for your
configuration.
Keep the automatic
settings created
when you powered
up your Fibre storage
controller and do
nothing, accepting all
the default settings
for all ports.
Use the individual pages listed on the side
menu to make changes or use other features
such as Email notification or SNMP as needed.
Port configurations
1. Follow the Preliminary steps.
2. Click on the port you wish to configure on the left hand
menu: Ethernet, Serial Port or Fibre Channel.
3. Select the parameters you wish to change.
4. Click Submit.
5. If you have completed all changes for this session, go to
the Restart page and restart the Fibre storage controller.
Modify passwords
1. Follow the Preliminary steps.
2. From the side menu select controller. The storage
controller Configuration page is displayed. The
Administrator user name that you are currently logged in
with and the current read only user name, if present, are
displayed in their text boxes.
3. Enter the Administrator (Admin) password where
indicated.
4. Enter appropriate information into the New Admin
Password, Confirm New Admin Password or New Read
Only Password and Confirm New Read Only Password
text boxes.
5. Click Submit.
6. If you have completed all changes for this session, go to
the Restart page and restart the XstreamCORE.
Page 17

17 | P a g e
Map Devices
After getting an IP address and logging into the ATTO XstreamVIEW™ System Manager, you have options to map devices so that th e
XstreamCORE can access the devices in your network.
The ATTO XstreamCORE allows parallel SAS/SATA devices to
participate in a Fibre Channel arbitrated loop or on a fabric.
Fibre Channel and SAS/SATA use different models to address
devices. The XstreamCORE translates between these
addressing models.
XstreamCORE mapping
WWN:
To identify each Fibre Channel device while addressing, each
Fibre Channel device is assigned a unique World Wide Name
(WWN). The 64-bit WWN has the following format:
Field
Name
WWN
Format
Company ID
Device ID
Byte 0 1 2 3 4 5 6 7
Value
20
00
00
10
86
xx
xx
xx
SAS/SATA device mapping
SAS/SATA devices connected to the XstreamCORE are viewed
as Fibre Channel LUNs to the host computer.
The ATTO XstreamVIEW™ interface displays the current
mapping information for SAS/SATA devices. Refer to Interface
Options.
SCSI commands sent to offline devices are rejected.
RAID device mapping
When using the XstreamCORE FC 7550 or XstreamCORE FC
7600 with a device that supports multiple LUNs behind a
target, such as a RAID array, you must disable SAS Mapping
by Topology.
1. If you are not already in the XstreamVIEW™ interface,
type the IP address of your XstreamCORE into a standard
browser
2. Click on the Advanced menu item on the left side of the
screen
3. The Advanced CLI Configuration page appears
4. Type Set SASMapByTopology disabled
5. Type SaveConfiguration restart
6. Once the XstreamCORE restarts, any attached RAID
devices will be scanned and all LUNs will be mapped.
If SASMapByTopology is enabled, RAID Processor LUNs
will be mapped, but not RAID Groups. Alternatively, you may connect
to the CLI via the XstreamCORE serial port and issue the above
commands.
Drive Map Director
TM
Drive Map Director uses SMP to provide a predictable
mapping structure for devices attached to the XstreamCORE
FC 7550 and XstreamCORE FC 7600. To use this feature, drive
enclosures must support SAS expanders with SMP protocol
such as the HP StorageWorks D2700 SAS JBOD. If SMP
supporting expanders are not present in your storage system
the XstreamCORE will revert to the AutoMap feature (see
Automap devices)
Page 18

18 | P a g e
Mapping Devices with SMP
Drive Map Director assigns a Fibre target number to each
shelf of storage and a Fibre LUN is reserved for each slot
within the enclosure. This numbering scheme is static and will
remain with the shelf and slot location whenever a drive or
shelf is added or removed. This allows maps to remain the
same when shelves or drives need to be swapped out due to
failure and remain consistent during power cycles of the
XstreamCORE.
1. If you are not already in the XstreamVIEW™ interface,
type the IP address of your XstreamCORE in a standard
browser as found in Using XstreamVIEW™ System
Manager, click Enter Here, type in your user name and
password, and click OK.
2. The Status page appears.
3. From the XstreamVIEW™ main menu, click on the
Mapping menu item on the left side of the screen.
4. The Mapping page appears. If your storage supports
SMP, the XstreamVIEW™ System Manager will display
mapping information for your devices.
If your devices do not support SMP you will be able to use
the AutoMap feature to map your storage devices.
AutoMap devices
1. If you are not already in the
XstreamVIEW™ interface, type the
IP address of your XstreamCORE in a
standard browser as found in Using
XstreamVIEW™ System, click Enter
Here, type in your user name and
password, and click OK.
2. The Status page appears.
3. From the XstreamVIEW™ main
menu, click on the Mapping menu
item on the left side of the screen.
4. The Mapping page appears. Wait for
the automatic scan for devices to
complete.
5. Click AutoMap.
6. All the commands necessary to enable mapping and the
command SaveConfiguration norestart are performed.
Page 19

19 | P a g e
Remote Monitoring, Management
The Ethernet port provides monitoring and management using the XstreamVIEW™ System Manager.
Remote system monitoring may be set up through the
Remote Management page of the XstreamVIEW™ interface
using the Simple Network Management Protocol (SNMP) or
Email.
Various types of problems may create a notification:
Device errors such as medium error, aborted
command and hard error
Device transitions from online to offline
Critical and warning temperature conditions
Power supply status conditions
Messages may state that a device is not working, a medium
has an error, or a command has been stopped.
You may designate which warning level a recipient receives.
For example, a recipient with a critical severity level only
receives critical messages and not warning or informational
messages.
In both monitoring systems, you select the warning levels for
each recipient:
All: all warnings, critical events and
informational messages
Warning: events which are either warnings or
critical events
Critical: only events which are critical
None: no messages are sent
EXHIBIT 10 THE REMOTE MANAGEMENT PAGE IN THE XSTREAMVIEW™ SYSTEM MANAGER
Page 20

20 | P a g e
SNMP-based monitoring
The Simple Network Management Protocol (SNMP) facilitates
the exchange of management information between network
devices.
An agent residing in the XstreamCORE takes information from
the XstreamCORE and translates it into a form compatible
with SNMP.
Consult your network administrator for further assistance
with SNMP.
1. If you are not already in the XstreamVIEW™ interface,
type the IP address of your XstreamCORE in a standard
browser as found in Using XstreamVIEW™ System
Manager, click Enter Here, type in your user name and
password, and click OK.
2. On the left-hand menu, click Remote Management.
3. The Remote Management page appears.
4. Click on the enabled radio button next to the SNMP
heading.
5. Click on the appropriate radio button for SNMP Traps,
SNMP Extended Traps.
6. SNMP Traps and SNMP Extended Traps are
notifications for SNMP functions such as device
transition and device error.
7. Enter the IP addresses of those who should receive
messages (SNMP trap recipients) in the text boxes on the
left.
8. Select the type of message you wish each recipient to
receive from the drop down box next to each address.
9. Click Submit.
Page 21

21 | P a g e
EXHIBIT 11 EVENTS TRIGGERING SNMP NOTIFICATION FOR EX TENDED OR STANDAR D TRAP GENERATION , SEVERITY LEVEL AND EXP LANATION
Event
Severity
Level
Extended
Traps
disabled
Extended
Traps
enabled
Explanation
Aborted
Command
Warning
No
Yes
A command has been aborted.
Device
Transition
Info
No
Yes
A target device has failed, become offline or come online.
Fibre Channel
Loop Down
Info
Yes
Yes
A loop down event on a Fibre Channel port has occurred.
Fibre Channel
Loop Up
Info
Yes
Yes
A loop up event on a Fibre Channel port has occurred.
Hardware Error
Critical
No
Yes
An unrecoverable target device failure.
Illegal Request
Info
No
Yes
An illegal SCSI request has been attempted.
Medium Error
Warning
No
Yes
A command terminated with an error condition that may have been
caused by a flaw in the target device’s physical medium or its recorded
data.
Power Supply
Down
Critical
Yes
Yes
A power supply has powered down or was down after unit power-up.
Temperature
Info
Yes
Yes
The unit’s internal temperature has increased or decreased to within
standard operating ranges.
Temperature
Critical
Yes
Yes
Unit’s internal temperature has increased to at or above the maximum
operating temperature or decreased to at or below the minimum
operating temperature.
Temperature
Warning
Yes
Yes
Unit’s internal temperature has increased to at or within the unit’s
maximum operating temperature less the unit’s temperature warning
offset or decreased to at or within the unit’s minimum operating
temperature plus the unit’s temperature warning offset.
Unit Attention
Info
No
Yes
A unit attention condition has occurred.
Unit Power On
Info
Yes
Yes
The unit has been powered up.
Page 22

22 | P a g e
Email messages provide error notification
Email notification allows the XstreamCORE to send an Email
message to you, a network administrator or other users when
certain events occur. Serious error messages are sent
immediately, while messages for less serious errors are sent
every 15 minutes.
You may send Emails to up to five Email addresses and
designate which conditions prompt each Email notification.
When an event that has been designated as requiring Email
notification occurs, the XstreamCORE sends the message; it
cannot respond to a rejection by a server for an invalid
address. Ensure all Email addresses typed in are valid.
Each Email is time stamped when it leaves as part of the
SMTP header information.
1. If you are not already in the XstreamVIEW™ interface,
type the IP address of your XstreamCORE in a standard
browser as found in Using XstreamVIEW™ System
Manager, click Enter Here, type in your user name and
password, and click OK.
2. On the left-hand menu, click Remote Management.
3. The Remote Management page appears.
4. Click on the enabled radio button next to the Email
Notification heading.
5. Type in the SMTP Server IP address.
6. Type in the user name and password of your SMTP Email
account if your server requires it
7. Type in the sender address (Emails show this name in the
From field).
8. Type in up to five Email addresses.
9. Choose All, Warning, or Critical for each Email address.
10. When all information is typed in, click Submit.
EXHIBIT 12 THE EMAIL MESSAGES SENT BY THE XSTREAMCORE FOLLOW THIS FORMAT.
Subject: [The Type of Event that Occurred]
Message Body:
This is a status message from [XstreamCORE name]. Identifying information as well as the most recent entries from the event log
appear below.
*************** Unit Information ***************
Serial Number : [Serial Number]
IP Addresses: [IP Address1]
[IP Address2]
*************** Event Log Entries ****************
Page 23

23 | P a g e
Update Firmware
The ATTO XstreamCORE has several processors which control the flow of data. The firmware to control these processors can be upgraded in
the field using the PUT command from an FTP connection utility over an RS-232 serial connection. The preferred method is to use ATTO
XstreamVIEW™ System Manager.
The recommended method for updating firmware for the
XstreamCORE is the Firmware Update page in the ATTO
XstreamVIEW™ interface.
The XstreamCORE firmware is distributed as a .zbd file from
the ATTO Technology web site at www.atto.com. Download
the file and note the filename.
There is always a backup image in the XstreamCORE, in
case the flashing process fails. After updating the firmware, verify the
correct program version is executing by viewing the status page and
checking the firmware revision number.
Using XstreamVIEW™
1. If you are not already in the XstreamVIEW™ interface,
type the IP address of your XstreamCORE in a standard
browser as found in Using XstreamVIEW™ System
Manager, click Enter Here, type in your user name and
password, and click OK.
2. Click on the Firmware Update menu item on the left-
hand side of the page.
3. The Firmware Update page appears. Click the Browse or
Choose File button to locate the firmware that you
downloaded earlier.
4. Select the file.
5. Click Upload.
6. Wait until a success message is displayed.
7. Click on the Restart button at the bottom of the page.
Using FTP
1. Establish an FTP link to the storage controller that is to
be flashed.
The FTP connection must be set up for both Active mode
and Binary mode for the transfer to complete correctly.
2. Use the PUT command to download the firmware file to
the storage controller. For example:
3. PUT c:\controller_firmware\xc750200.zbd
4. Once the download is complete, cycle power on the
XstreamCORE to implement the
new firmware.
Page 24

24 | P a g e
Interface Options
Alternative methods to the ATTO XstreamVIEW™ Interface may be used to manage the XstreamCORE. ATTO XstreamVIEW™ System
Manager is the recommended interface.
Using XstreamVIEW™ System Manager
Each page in the ATTO XstreamVIEW™ System Manager
provides information and/or configuration parameters based
on a specific topic.
ATTO XstreamVIEW™ is the recommended management tool
for the XstreamCORE. It is a web-based graphical user
interface (GUI) that allows you to manage the XstreamCORE
by clicking choices and commands in traditional GUI fashion
or by entering CLI commands directly, as you would in a
terminal emulation session, on the Advanced CLI
Configuration page.
Opening an XstreamVIEW™ session
1. Point your browser at the IP address of the
XstreamCORE. Refer to Discover the IP address.
2. The XstreamVIEW™ home page is displayed. Click Enter.
3. Enter the user name and password values.
The default values are user name: root and password:
Password. The user name is case insensitive and password is case
sensitive. It is best practice to change user names and passwords.
Refer to Modify passwords.
4. The Status page appears.
Each page can be reached through the menu at the side of
each page. An image on each page’s header shows each port
in the product faceplate. Each port is clickable and takes you
to the appropriate page.
If you have completed configuration operations and have
clicked Submit on the page you are viewing, go to the Restart
page and restart the XstreamCORE to save the settings.
If you have not completed configuration changes, go on to
the next page.
Optimizing XstreamVIEW™ in Internet Explorer
1. Go to the browser toolbar and select Tools.
2. Select Internet Options.
3. Select the Security tab.
4. Click on the Trusted Sites icon.
5. Select the Custom Level button.
6. Go to the Miscellaneous topic and set the Allow META
REFRESH option to Enable.
7. Press the OK button in the open dialogs to apply the
updated settings.
Page 25

25 | P a g e
Using the serial port
1. Connect a cable from XstreamCORE RS-232 serial port to
the serial (COM) port on a personal computer.
2. Turn on the XstreamCORE.
3. Start a terminal emulation program on the personal
computer, and use it to connect to the XstreamCORE. For
example, if you are using HyperTerminal on a computer
running a Windows operating system,
Type XstreamCORE in the New Connection dialog
box.
Click OK.
In the Connect To dialog box, for the Connect using
field select the COM port number to which your
serial cable is connected.
Click OK.
In the COM Properties dialog box select the
following values:
Bits per second: 115200
Data Bits: 8
Parity: None
Stop Bits: 1
Flow Control: None
Terminal type: ASCII
Echo: on
Click OK.
4. After you connect to the XstreamCORE, start-up
messages are displayed. These messages are only
displayed at start-up. The last line in the start-up
message sequence is Ready.
5. In serial port sessions, there is no prompt on the line
below the word Ready. Begin typing commands in the
blank line where the cursor is resting. No user name or
password is required for serial port access.
6. To verify that you have connected successfully, type help
after the Ready prompt and press Enter.
If a list of all available commands does not appear on the
screen, review the steps in this section, check the cable, or contact
service personnel until the problem is solved.
If you have difficulty using the serial port, verify that you
have the correct settings and that your serial cable is less then two
meters in length.
Using Telnet
Up to three Telnet sessions can be conducted simultaneously.
A serial port session can use the CLI while Telnet sessions are
open. Whichever session issues the first set CLI command can
continue to issue set commands, while the other sessions can
only issue get commands or display information. Once a
connection is established, refer to CLI Provides ASCII-based
Interface.
1. Connect to the XstreamCORE from a computer on the
same Ethernet network.
2. Start a Telnet session.
There is more than one way to connect to the
XstreamCORE using a telnet program.Your telnet program may
operate differently than in the following instructions.
3. At the telnet prompt, issue the open command where
x.x.x.x is the IP address of the XstreamCORE.
4. telnet > open x.x.x.x
5. If you have to specify a port type, enter the port type
“telnet” and the terminal type “vt100”.
6. port type: telnet
7. terminal type: vt100
8. Enter the default values for the user name, root, and the
password, Password, if you did not set new values in
Modify passwords
Page 26

26 | P a g e
Appendix A Cabling
ATTO XstreamCORE SAS connections connect SAS or SATA storage devices into the Fibre Channel Storage Area Network (SAN). Use an
Ethernet connection to use the ATTO XstreamVIEW™ System Manager.
Make sure all cables are anchored securely at both ends with
the proper connectors.
SAS/SATA connections
The XstreamCORE supports a wide variety of SAS & SATA
storage devices.
Each SAS connection is totally independent from the other
SAS connection. SAS PHY auto-negotiates the appropriate
sync rates with the connected devices. Check the type of
cable, cable length limit and number of devices
recommended for each port.
Keep cable lengths as short as possible to ensure the highest
signal quality and performance. These cable lengths include
the wiring inside the devices.
Device type
Max Cable
Length
Max Speed
SFF8644 - SFF8644
1m
12Gb/s
SFF8644 - SFF8644
3m
12Gb/s
SFF8644 - SFF8644
6m
12Gb/s
SFF8644 - SFF8088
1m
6Gb/s
SFF8644 - SFF8088
3m
6Gb/s
SFF8644 - SFF8088
10m
6Gb/s
SFF8643 - SFF8643
1m
12Gb/s
SFF8643 - SFF8087
1m
12Gb/s
Fibre Channel connections
Fibre Channel technology offers a variety of cabling options.
The type of cable required varies depending upon the
application, environment, distance and product.
Cable Type
32Gb/s
16Gb/s
8Gb/s
62.5 µm
OM1
15m
21m
70m
50 µm
OM2
35m
50m
150m
50 µm
OM3
100m
150m
380m
50 µm
OM4 125m
190m
400m
Long wave,
Single
Mode
10,000m
10,000m
10,000m
Long wave operation requires long wave SFP+ modules
(not supplied).
Serial port connections
The ATTO XstreamCORE supports remote service operations
over the RS-232 serial port using standard terminal emulation
software available with most systems.
Connect a RJ45 to DB-9 serial cable (null modem) between
the ATTO XstreamCORE serial port and one of the computer's
serial COM ports.
A gender changer or DB-9 to DB-25 converter may be needed
depending on the cables being used.
Ethernet connections
The 100/1000BASE-T Ethernet ports provide remote
monitoring and management using the ATTO XstreamVIEW™
System Manager.
When you connect an Ethernet cable between the
XstreamCORE and a 100/1000BASE-T connection, you may
need a crossover cable connecting directly to a computer.
The ATTO XstreamCORE auto detects the Ethernet speed by
default.
All cable types listed on this page are available on the
ATTO web store at www.atto.com/store
Page 27

27 | P a g e
Appendix B CLI Provides ASCII-based Interface
The command line interface (CLI) provides access to the ATTO XstreamCORE Services through a set of ASCII commands. CLI commands may
be entered while in CLI mode.
XstreamCORE Services provide configuration and monitoring
for the XstreamCORE. The command line interface (CLI) is a
set of ASCII-based commands which perform these tasks. CLI
commands may be entered while in CLI mode.
CLI commands are context sensitive and generally follow a
standard format: [Get|Set] Command
[Parameter1|Parameter2] followed by the return or enter
key
CLI commands are case insensitive: you may type all upper or
all lower case or a mixture. Upper and lower case in this
manual and the help screen are for clarification only.
Commands generally have three types of operation: get, set
and immediate.
The get form returns the value of a parameter or setting and
is an informational command.
Responses to get commands are followed by Ready.
The set form is an action that changes the value of a
parameter or configuration setting. It may require a
SaveConfiguration command and a restart of the system
before it is implemented. The restart can be accomplished as
part of the SaveConfiguration command or by using a
separate FirmwareRestart command. A number of set
commands may be issued before the SaveConfiguration
command.
Responses to set commands are either an error message or
Ready. *. The asterisk indicates you must use a
SaveConfiguration command to finalize the set command.
SaveConfiguration asks if you want to restart the system or
not.
Set commands which do not require a SaveConfiguration
command, defined as immediate commands, are executed.
Responses to Immediate commands are either an error
message or data results followed
by Ready.
EXHIBIT 13 SYMBOLS, TYPEFACES AND ABBREVIATIONS USED TO INDICATE FUNCTIONS AND E LEMENTS OF THE COMMAND LINE INTERFACE USED IN
THIS MANUAL.
Command conventions
Symbol
Indicates
[ ]
Required entry
< >
Optional entry
|
pick one of
…
Ellipses, repetition of preceding item
\n
end of line
-
a range (6 – 9 = 6, 7, 8, 9)
fl
Fibre Channel LUN (0 <= fl <= 255)
fp
Fibre Channel port number (1<= fp <=1 or 2)
sasConn
SAS connector name (A, B, C, D)
mp1
Ethernet port used to manage the XstreamCORE
Page 28

28 | P a g e
CLI Error Messages
The following error messages may be returned by the Command line Interface
ERROR. Invalid Command. Type 'Help' for command list.
ERROR. Wrong/Missing Parameters
Usage: <usage string>
ERROR. Command Not Processed
CLI Summary Reference
A summary of the Command Line Interface commands, their defaults, and where you can find the specific command. Commands
which have no default values associated with them have a blank entry in that column of the table.
Command
Default
Example
AutoMap
automap
BootFibreDelay
0
set bootfibredelay 15
ControllerLun
enabled
get controllerlun
ControllerModel
get controllermodel
ControllerName
“ “
set controllername Omega6
ClearCLILog
ClearCliLog
ClearEventLog
cleareventlog
CoreDumpInfo
CoreDumpInfo
DataMoverStats
get DataMoverStats [all]
Date
set date 03/03/2003
DeleteAllMaps
deleteallmaps
DisplayInitiators
DisplayInitiators
DumpCLILog
DumpCliLog <NumEntries | all>
DumpConfiguration
dumpconfiguration
DumpEventLog
dumpeventlog
EmailFromAddress
get emailfromaddress
EmailNotify
disabled
get emailnotify
EmailNotifyAddress
set emailnotifyaddress 5 bw@abc.com
EmailPassword
set emailpassword
EmailServerAddress
0.0.0.0
get emailsesrveraddress
Page 29

29 | P a g e
EmailUsername
set emailusername beta321
EthernetSpeed
auto
set ethernetspeed 100
Exit exit
FCDataRate
auto
get fcdatarate 1
FCPortErrors
get fcporterrors all
FCPortList
fcportlist
FCSCSIBusyStatus
busy
get fcscsibusystatus
FCSFPInfo
get fcsfpinfo all
FCWWName
get fcwwname 1
FirmwareRestart
firmwarerestart
FlashImages
flashimages
Help
help automap
HGAddInitiator
HGAddInitiator [HostGroupName] [WWN]
HGAddLUN
HGAddLUN [HostGroupName] [lun]
HGCreate
HGCreate [HostGroupName]
HGDelete
HGDelete [HostGroupName | all]
HGDisplay
HGDisplay [HostGroupName | all]
HGMapping
get HGMapping
HGRemoveInitiator
HGRemoveInitiator [HostGroupName] [WWN]
HGRemoveLUN
HGRemoveLUN [HostGroupName] [lun]
HGRename
HGRename [PrevHostGroupName]
[NewHostGroupName]
IdentifyController
disabled
set identifycontroller enabled
IdentifyLUN
IdentifyLUN [lun] ...
Info info
IPAddress
10.0.0.1
get ipaddress mp1
IPDHCP
enabled
set ipdhcp mp1 disabled
IPDNSServer
get ipdnsserver
IPGateway
0.0.0.0
set ipgateway mp1 200.10.22.3
IPSubnetMask
255.255.0.0
get ipsubnetmask mp1
IsReserved
isreserved
Page 30

30 | P a g e
MaxOpTemp
90
get maxoptemp
MinOpTemp
0
set minoptemp 10
OEMConfigFile
get oemconfigfile
OpTempWarn
10
set optempwarn 15
Password
Password
set password
Performance
get performance
Ping ping mp1 192.42.155.155
ReadOnlyPassword
Password
set readonlypassword
ReadOnlyUsername
user
get readonlyusername
Reserve
reserve
ResetFCPortErrors
resetfcporterrors 1
RestoreConfiguration
restoreconfiguration default
RouteDisplay
routedisplay fc
SASConnectorInfo
get sasconnectorinfo all
SASEnclosures
sasenclosures 1
SASMapByTopology
setsasmapbytopology enabled
SASPortList
sasportlist
SASTargets
sastargets
SaveConfiguration
saveconfiguration restart
SerialNumber
get serialnumber
SerialPortBaudRate
115200
set serialportbaudrate 19200
SerialPortEcho
enabled
get seriallportecho
SNMP
disabled
set SNMP enabled
SNMPDumpMIB
snmpdumpmib
SNMPExtendedTraps
disabled
get snmpextendedtraps
SNMPTrapAddress
0.0.0.0 none
set snmptrapaddress 6 192.42.155.155 all
SNMPTraps
disabled
set snmptraps enabled
SNTP
enabled
get sntp
SNTPServer
129.6.15.30
set sntpserver 129.6.15.30
StopIdentifyLUN
StopIdentifyLUN [lun] ...
Temperature
get temperature
Page 31

31 | P a g e
Time
00:00:00
set time 03:32:30
TimeZone
EST
set timezone pst
Uptime
get uptime
Username
root
set username Barbara
VerboseMode
enabled
set verbosemode disabled
Command explanations
AutoMap
Automap will automatically map a subset of target devices visible
to the firmware to a set of Fibre Channel LUNs. All previous maps
will be deleted.
AutoMap
Requires a SaveConfiguration command
BootFibreDelay
BootFibreDelay sets the delay (in seconds) after startup befo re
enabling the Fibre Channel ports. The value "0" constitutes no
delay.
Default: 0 (no delay)
set BootFibreDelay [0-255]
Requires a SaveConfiguration command
get BootFibreDelay
ClearCliLog (Immediate, Supported In-Band)
Clears the contents of the CLI command log.
Usage: ClearCliLog
ClearEventLog
ClearEventLog clears the contents of the event log.
ClearEventLog
ControllerLun (OEM Configurable, Disabled on Error)
ControllerLun controls the automatic generation of a controller
device at LUN 0. After enabling or disabling the controller LUN,
save configuration and run automap to re-map all devices.
set ControllerLun [enabled | disabled]
get ControllerLun
ControllerModel
ControllerModel reports the specific model and firmware
information to the CLI.
get ControllerModel
ControllerName (OEM Configurable, Disabled on Error)
ControllerName provides a descriptive ASCII name assigned to
the unit. This field is used by applications to identify individual
units. The specified name can be up to a maximum of 32
characters. If the name contains spaces, it must be enclosed in
quotation marks. Unlike other non-immediates, changes to
ControllerName take
effect immediately.
set ControllerName [name]
get ControllerName
CoreDumpInfo
Displays information concerning a core dump stored by a prior
fault.
CoreDumpInfo
DataMoverStats
Displays statistics on aggregate data copied by the Data Mover.
Shows the previous hour and minute. Use "all" to display
statistics over the entire 24 hour period.
Usage: get DataMoverStats [all]
Page 32

32 | P a g e
Date
Date sets/displays the current date. The date range is
01/01/2000 to 12/31/2099.
Default: 01/01/2000
set Date [MM] / [DD] / [YYYY]
Requires a SaveConfiguration command
get Date
DeleteAllMaps
Removes all mapped devices from the map table. Upon the
subsequent POST, if no maps are present the default maps will be
loaded.
DeleteAllMaps
Requires a SaveConfiguration command
DisplayInitiators
Displays the FC Port world-wide name of the connected initiators.
DisplayInitiators
DumpCliLog (Immediate, Supported In-Band)
Dumps the contents of the CLI command log to the current CLI
session. The column "EvLog#" is the current Event Log number as
seen in DumpEventLog. The keyword "EXCEPT" indicates an
exception occurred while processing the command, and the
keyword "RESTART" indicates the unit was restarted.
Usage: DumpCliLog <NumEntries | all>
DumpConfiguration
Dumps system's configuration.
DumpConfiguration
DumpEventLog
DumpEventLog can be used to dump the contents of the event
log to an RS-232 or telnet session. With no parameters, the last
2048 entries will be displayed. The optional parameter "all"
specifies all entries will be displayed. An optional numeric
parameter specifies the maximum number of entries to display
from the end of the log.
DumpEventLog <NumEntries | all>
EmailFromAddress
EmailFromAddress configures the email address that this system
will use to talk to the email server. Full email address is a fully
qualified Internet email address, not more than 128 characters
long.
set EmailFromAddress [full email address]
get EmailFromAddress
EmailNotify
EmailNotify turns on and off email notification. Default is
disabled.
Default: disabled.
set EmailNotify [enabled | disabled]
get EmailNotify
EmailNotifyAddress
EmailNotifyAddress configures notification addresses. Index is a
number between 1 and 5, inclusive. Full email address is a fully
qualified Internet email address, not more than 128 characters
long. The level can be "all", "informational", "warning", "critical"
or "none". This is the minimum level of severity in order for the
event to trigger an email notification.
set EmailNotifyAddress [index] [full email address]
[warning level]
get EmailNotifyAddress <index | all>
EmailPassword
EmailPassword sets the password used to authenticate the login
to the SMTP email server. The password must not be more than
64 characters. A password is not required if the email server does
not require authentication.
set EmailPassword
Requires a SaveConfiguration command
EmailServerAddress
EmailServerAddress configures the address of the server that
should be contacted in order to send out emails. Either an IP
address or a fully qualified domain (e.g. mail.myserver.com) may
be specified.
set EmailServerAddress [IP address]
Requires a SaveConfiguration command
get EmailServerAddress
EmailUsername
EmailUsername sets the username used to authenticate the login
to the SMTP email server. The username must not be more than
128 characters. A username is not required if the email server
does not
require authentication.
set EmailUsername [username]
Requires a SaveConfiguration command
get EmailUsername
Page 33

33 | P a g e
EthernetSpeed
EthernetSpeed determines the speed of any Ethernet port(s). If
Auto is enabled then the Ethernet speed will be negotiated and
the value in parentheses returned by the 'get' command indicates
the current speed of the Ethernet connection.
Default: auto
set EthernetSpeed [mp[n]] [10 | 100 | 1000 | auto]
Requires a SaveConfiguration Restart command
get EthernetSpeed [mp[n] | all]
If auto enabled, returned value in parentheses indicates
current speed
Exit
Exit terminates the current CLI session over Telnet. This command
has no effect if used during a serial RS-232 session.
exit
FCDataRate
FCDataRate specifies the Fibre Channel data rate (4Gb, 8Gb or
32Gb) or auto-negotiation to the highest speed (auto). 32Gb
cannot be specified when FcConnMode is set to 'loop'.
Default: auto
(7600) set FCDataRate [fp | all] [8Gb | 16Gb | 32Gb | auto]
(7500) set FCDataRate [fp | all] [4Gb | 8Gb | 16Gb | auto]
Requires a SaveConfiguration Restart command
get FCDataRate [fp | all]
FCPortErrors
FCPortErrors displays the number of Fibre Channel errors that have
occurred since the last reboot/power-on or ResetFCPortErrors
command at the Fibre Channel controller level.
get FCPortErrors [fp | all]
FCPortList
FCPortList returns a list of available FC ports and their current
status. Valid status values are Up, Down, Failed, Reserved and
Disabled.
FCPortList
FCSCSIBusyStatus
This option controls reporting of either a ‘BUSY’ or ‘QUEUE FULL’
status at a point in time when SCSI commands cannot be
accepted.
set FCSCSIBusyStatus [busy | qfull]
Requires a SaveConfiguration Restart command
get FCSCSIBusyStatus
FCSFPInfo
FCSFPInfo displays information about the specified Fibre Channel
SFP.
get FCSFPInfo [fp | all]
FCWWName
FCWWName reports the World Wide Node Name of the Fibre
Channel interface referenced.
get FCWWName [fp | all]
FirmwareRestart
FirmwareRestart resets and reinitializes the firmware. Use the
'forced' option to override any CLI reservations held by other
sessions.
FirmwareRestart <forced>
FlashImages
FlashImages displays the metadata for software images currently
stored in the Flash device. The optional parameter “validate” also
validates the CRC of the flash images. Note that the CRC
validation causes a multi-second delay.
Usage: FlashImages <validate>
Help
The Help command issued with no parameters displays a list of
available CLI commands. When a CLI C ommand name is
specified, a command usage string and command description is
presented on the CLI.
Help [command name]
HGAddInitiator
Adds an initiator to an existing Host Group. WWN specifies the
world-wide name of the FC Port to be added to the Host Group;
the CLI command “DisplayInitiators” can be used to display
connected initiators.
HGAddInitiator [HostGroupName] [WWN]
HGAddLUN
Adds a LUN to an existing Host Group. The CLI command
“RouteDisplay FC” can be used to display attached LUNs.
HGAddLUN [HostGroupName] [lun]
Page 34

34 | P a g e
HGCreate (Immediate, Disabled on Error, Supported In-Band)
Creates a new empty Host Group. HostGroupName is an ASCII
name for the Host Group comprised of 32 characters or less (only
alpha-numeric characters, dashes, and underscores allowed). A
Host Group will expose specified LUNs to specified initiators. To
add a LUN to a Host Group use the CLI command "HGAddLUN"
and to add a host to a Host Group use the CLI command
"HGAddInitiator".
Usage: HGCreate [HostGroupName]
HGDelete
Deletes an existing Host Group.
HGDelete [HostGroupName | all]
HGDisplay
Displays Host Group status information for the specified Host
Group, or for all Host Groups.
HGDisplay [HostGroupName | all]
HGMapping
Changes the systems ability to expose specific LUNs to specific
initiators or to expose all LUNs to all initiators.
set HGMapping [enabled | disabled]
get HGMapping
HGRemoveInitiator
Deletes an initiator from an existing Host Group. The CLI
command “DisplayInitiators” can be used to display connected
initiators.
HGRemoveInitiator [HostGroupName] [WWN]
HGRemoveLUN
Removes a LUN from an existing Host Group. The CLI command
“RouteDisplay FC” can be used to display attached LUNs.
HGRemoveLUN [HostGroupName] [lun]
HGRename (Immediate, Disabled on Error, Supported In-Band)
Renames an existing Host Group. HostGroupNames must be
comprised of 32 characters or less. Only alpha-numeric
characters, dashes, and underscores are allowed.
Usage: HGRename [PrevHostGroupName]
[NewHostGroupName]
IdentifyController
IdentifyController causes the 'Alert' LED to blink to enable
identification of this system. Disable this option to cancel the
blinking.
Default: disabled
set IdentifyController [enabled | disabled]
get IdentifyController
IdentifyLUN
Lights the LED(s) of disk drive(s) associated with one or more FC
LUNs.
IdentifyLUN [lun] ...
Info
Info displays version numbers and other product information for
key components. Use the optional 'brief' parameter to show a
more concise subset of system information.
Info <brief>
IPAddress
IPAddress controls the current IP address of any Ethernet port(s).
If IPDHCP is enabled, then the 'get' command reports the current
IP address assigned by the network DHCP server, followed by the
(DHCP) identifier.
Default: 10.0.0.1
set IPAddress [mp[n]] [xxx.xxx.xxx.xxx]
Requires a SaveConfiguration Restart command
get IPAddress [mp[n] |all]
IPDHCP
IPDHCP allows acquisition of an IP address from a network DHCP
server. When this option is disabled, the IP address used will be
specified by the IPAddress CLI command.
Default: enabled
set IPDHCP [mp[n]] [enabled | disabled]
Requires a SaveConfiguration Restart command
get IPDHCP [mp[n] | all]
IPDNSServer
Controls the current DNS Server address. If IPDHCP
Error!
Reference source not found.
is enabled, then this value is
automatically detected. If IPDHCP
Error! Reference source not
found.
is disabled, then this value must be manually set.
set IPDNSServer [xxx.xxx.xxx.xxx]
get IPDNSServer
Page 35

35 | P a g e
IPGateway
IPGateway controls the current default gateways used by any
Ethernet port(s). If IPDHCP is enabled, the 'get' command reports
the current IP gateway assigned by the network DHCP server.
Default: 0.0.0.0
set IPGateway [mp[n]] [xxx.xxx.xxx.xxx]
Requires a SaveConfiguration Restart command
get IPGateway [mp[n] |all]
IPSubnetMask
IPSubnetMask controls the current subnet masks used by any
Ethernet port(s). If IPDHCP is enabled, the 'get' command reports
the current IP subnet mask assigned by the network DHCP server.
Default: 255.255.0.0
set IPSubnetMask [mp[n]] [xxx.xxx.xxx.xxx]
Requires a SaveConfiguration Restart command
get IPSubnetMask [mp[n] |all]
IsReserved
IsReserved displays the reservation status of the current services
session/interface.
IsReserved
MaxOpTemp
Regulates/displays the maximum enclosure temperature alarm
of the XstreamCORE in degrees Celsius. If the temperature of the
XstreamCORE rises above the maximum MaxOpTemp, thermal
control event handling occurs. Valid entries are between 75
degrees and 90 degrees.
Default: 90
set MaxOpTemp [75-90]
Requires a SaveConfiguration Restart command
get MaxOpTemp
MinOpTemp
Regulates/displays the minimum enclosure temperature alarm of
the XstreamCORE in degrees Celsius.Valid entries are between 0
degrees and 15 degrees.
Default: 0
set MinOpTemp [0-15]
Requires a SaveConfiguration Restart command
get MinOpTemp
OEMConfigFile
Returns the “name” (the contents of the first record) of the OEM
configuration file stored in persistent memory.
get oemconfigfile
OpTempWarn
Regulates/displays the number of degrees in Celsius before a
warning is sent to the user. Valid entries are between 0 degrees
and 15 degrees.
Default: 10
set OpTempWarn [0-15]
Requires a SaveConfiguration Restart command
get OpTempWarn
Password
Specifies password for all non-serial sessions: Telnet, FTP and
XstreamVIEW™ interface. You are prompted for the current
password, to enter the new password, and to confirm the new
password. If local Echo is enabled, password echoes all *
characters. If VerboseMode has been enabled, CLI requests that
you re-enter the password. When the password is all 0s, Telnet
and FTP do not validate the password and MD5 authentication is
disabled.Configure an empty password by pressing the Enter key
when prompted for the new password and the new password
confirmation.Passwords are case sensitive and can be 1-32
characters long with
no spaces.
Default: Password
set Password
Requires a SaveConfiguration command
Performance
Returns system performance data. Data consists of the average
rate (MB/s) and number of I/Os (IO/s) measured over the
previous sampling period (approximately one second). Successful
SCSI Read (28h, 88h, A8h) and Write (2Ah, 8Ah, AAh) commands
are considered I/Os. Factors that may affect reported
performance include port availability and saturation, transfer
size, target device speeds, and overall system utilization.
get Performance
Ping
Sends an ICMP echo request to the specified host.
Ping [mp[n] [IP Address] <count <size>>
Page 36

36 | P a g e
ReadOnlyPassword
Specifies password for all non-serial sessions: Telnet, FTP and
XstreamVIEW™ interface. ReadOnlyPassword is case sensitive, 0
to 32 characters, and cannot contain spaces. Configure an empty
password by not specifying one.
Default: Password
set ReadOnlyPassword
Requires a SaveConfiguration command
ReadOnlyUsername
Specifies user name for all Telnet, FTP and XstreamVIEW™ user
management console sessions. Username is case insensitive, 1-32
characters, no spaces.
Default: User
set ReadOnlyUsername
Requires a SaveConfiguration command
get ReadOnlyUsername
Reserve
Prevents other CLI sessions from modifying the XstreamCORE.
When the XstreamCORE services interface is reserved, set
commands are unavailable but get commands are available. At
least one service interface always has access to the XstreamCORE
at all times. This interface always reports RELEASED status, since
it may issue set commands. Reservation of the XstreamCORE is
implicit: if the configuration is changed by any user of CLI
sessions, the XstreamCORE becomes RESERVED. Executing a
SaveConfiguration command, RestoreConfiguration or
FirmwareRestart forced releases the XstreamCORE so that other
devices may modify it.
Reserve
ResetFCPortErrors
Resets all FC error counts for the specified port to zero. Refer to
FCPortErrors command.
ResetFCPortErrors [fp | all]
RestoreConfiguration
Restores configuration to either the default configuration or the
configuration last saved into non-volatile memory. The saved
option undoes any changes made since the last save.
RestoreConfiguration [Default | Saved | Factory]
RouteDisplay
Displays a list of Fibre Channel to SCSI address mappings on the
XstreamCORE.
RouteDisplay FC <fp> <lun>
SASConnectorInfo
SASConnectorInfo displays information about the specified SAS
connector. Valid connector names are A through D.
get SASConnectorInfo [sasConn | all]
SASEnclosures (Immediate, Disabled on Error, Supported InBand)
Displays a list of attached enclosures. If no arguments are
specified, only the enclosure summary table is displayed. If PHYID
is specified, this displays connection details for active PHYs. If
SlotMap is specified, device details for enclosure slots are
displayed. EncIdx displays details for the specified enclosure.
Usage: SASEnclosures < [PHYID | SlotMap] <EncIdx> >
SASMapByTopology
SASMapByTopology specifies how target devices are mapped to
LUNs. When enabled, LUNs are numbered based on the SAS
topology, with gaps where there are open slots. When disabled,
LUNs are assigned to devices as they are discovered, which may
change over time. If all is specified, every enclosure and its drives
are displayed.
set SASMapByTopology [enabled | disabled]
get SASMapByTopology
SASPortList
Lists the status of all available SAS ports.
SASPortList
SASTargets
Lists the physical devices that are connected to all SAS connectors
and PHYs.
SASTargets
SaveConfiguration
Many commands require a SaveConfiguration command to be
executed as indicated by the return Ready. *. When you invoke a
SaveConfiguration command, the current configuration is
permanently saved in the XstreamCORE and the new
configuration becomes the active configuration. If a firmware
restart is required to make the requested change permanent, you
are asked to confirm the restart. You can override this request by
indicating the override value on the command line. You may
make several changes through commands before implementing
the restart, but once you have restarted the XstreamCORE, all the
command changes created before the restart and save are
implemented. If you select the restart option, the XstreamCORE
executes its complete start up cycle.
SaveConfiguration <Restart | NoRestart>
Page 37

37 | P a g e
SerialNumber
Reports the XstreamCORE serial number. The serial number,
unique for each XstreamCORE, is a 13-character field. The first
seven alphanumeric characters are an abbreviation of the
XstreamCORE name while the remaining six numbers are the
individual XstreamCORE board’s number.
get SerialNumber
SerialPortBaudRate
SerialPortBaudRate configures the baud rate for the RS-232 serial
port. The number of data bits per character is fixed at 8 with no
parity.
Default: 115200
set SerialPortBaudRate [ 9600 |19200 | 38400 | 57600 |
115200]
Requires a SaveConfiguration Restart command
get SerialPortBaudRate
SerialPortEcho
Control/reports the status of the display of keyboard input. When
enabled, all non-control character keyboard input is output to the
display. Local ASCII terminal (or terminal emulator) echo settings
should be set to disabled while using SerialPortEcho enabled
Default: enabled
set SerialPortEcho [enabled | disabled]
Requires a SaveConfiguration Restart command
get SerialPortEcho
SNMP
Controls whether or not SNMP functions on the XstreamCORE.
Default: disabled
set SNMP [enabled | disabled]
get SNMP
SNMPDumpMIB (Immediate, Supported In-Band)
Dumps the contents of the specified private SNMP MIB to the
current CLI session. If no parameter is specified, the Controller
private MIB is dumped. For further assistance with SNMP, consult
your network administrator.
Usage: SNMPDumpMIB <Controller | Product | SMI | TC>
SNMPExtendedTraps
Controls Extended SNMP trap functioning such as device
transition and device error. Consult your network administrator
for further assistance with SNMP.
Default: disabled
set SNMPExtendedTraps [enabled | disabled]
get SNMPExtendedTraps
SNMPTrapAddress (OEM Configurable, Disabled on Error)
Sets and displays IP Trap Addresses and Trap Levels. "Index" is a
value from 1 to 6. "IPv4 address" is the host that wishes to
receive traps. "Level" is the severity level required to trigger a
trap: "None", "All", "Warning" (all warning and critical traps
shall be sent), "Critical" (only Critical events shall trigger a trap).
Usage: set SNMPTrapAddress [index] [IPv4 address] [level]
get SNMPTrapAddress <index | All>
SNMPTraps
Controls SNMP trap functions.Consult your network
administrator for further assistance with SNMP.
Default: disabled
set SNMPTraps [enabled | disabled]
get SNMPTraps
SNTP
Controls whether the XstreamCORE contacts a specified SNTP
time server to initialize or synchronize the time.
Default: enabled
set SNTP [enabled | disabled]
Requires a SaveConfiguration Restart command
get SNTP
SNTPServer (OEM Configurable, Disabled on Error)
SNTPServer sets/displays the IP addresses used to retrieve the
SNTP time. Index range is 1-3 indicating the server slot to
set/display. Enter 0.0.0.0 to disable a time server slot.
Usage: set SNTPServer [Index] [IP address]
get SNTPServer <Index | All>
Page 38

38 | P a g e
StopIdentifyLUN
Stops lighting the LED(s) of disk drive(s) associated with one or
more FC LUNs.
StopIdentifyLUN [lun | all]
Temperature
Displays the current internal temperature of the XstreamCORE in
degrees Celsius.
get Temperature
Time
Controls/displays the time in a 24-hour format. The default time
is 00:00:00 and is accurate until the XstreamCORE is reset or
power-cycled when it returns to the default.Time cannot be set if
SNTP is enabled.
Default: 0:00:00
set Time [HH :MM :SS]
Requires a SaveConfiguration command
get Time
TimeZone
Controls/displays the time zone if SNTP is disabled. Setting may
be EST, CST, MST PST or a numerical offset from GMT in the
format +/- HH:MM. When SNTP is enabled, applies the time zone
setting to the time retrieved from a specified SNTP time server to
determine local time.
Default: EST
set TimeZone [EST | CST | MST | PST | [+ / - HH : MM]]
Requires a SaveConfiguration command
get TimeZone
Uptime
Returns the time [days:hrs:min:sec] since the last reboot.
get Uptime
Username
Specifies user name for all Telnet, FTP and XstreamVIEW™ user
management console sessions. Username is case insensitive, 1-32
characters, no spaces.
Default: root
set Username [username]
Requires a SaveConfiguration command
get Username
VerboseMode
Specifies the detail of feedback for the command line interface.
Disabling this option removes parameter names from action
commands and removes descriptions from information
commands.
Default: enabled (returns have parameter information)
set VerboseMode [enabled | disabled]
get VerboseMode
Page 39

39 | P a g e
Appendix C Standards and Compliances 7550
The equipment described in this manual generates and uses radio frequency energy. If this equipment is not used in strict accordance with
the manufacturer's instruction, it can and may cause interference with radio and television reception.
Regulatory Notices
FCC Notices (US only)
This equipment has been tested and found to comply with the limits for a Class A digital device, pursuant to part 15 of the FCC Rules.
These limits are designed to provide reasonable protection against harmful interference in a residential installation. This equipment
generates, uses and can radiate radio frequency energy and, if not installed and used in accordance with the instructions, may cause
harmful interference to radio communications. However, there is no guarantee that interference will not occur in a particular
installation. If this equipment does cause harmful interference to radio or television reception, which can be determined by turning
the equipment off and on, the user is encouraged to try to correct the interference by one or more of the following measures: •
Reorient or relocate the receiving antenna. • Increase the separation between the equipment and receiver. • Connect the
equipment into an outlet on a circuit different from that to which the receiver is connected. • Consult the dealer or an experienced
radio/TV technician for help. Modifications not expressly approved by the manufacturer could void the user's authority to operate
the equipment under FCC rules.
Compliance with ICES-003
This Class A digital apparatus complies with Canadian ICES-003.
Cet appareil numérique de la classe A est conforme à la norme NMB-003 du Canada.
Compliance with EN Regulations
Marking by the symbol indicates compliance of this ATTO device to the EMC Directive and the Low
Voltage Directive of the European Union.
The ATTO XstreamCORE FC 7500/7550/7600 complies with Directive 2011/65/EC on the Restriction of the Use of Hazardous
Substances in Electrical and Electronic Equipment RoHS2 (recast) and take the following exemptions:
6(c)- Copper allot containing up to 4% lead by weight.
7(a) -Lead in high melting temperature type solders (i.e. lead based alloys containing 85% by weight or more lead).
7(c)-l -Electrical and electronic components containing lead in a glass or ceramic other than dielectric ceramic in capacitors, e.g.
piezoelectronic devices, or in glass or ceramic matrix compound.
15 - Lead in solders to complete a viable electrical connection between semiconductor die and carrier within integrated circuit flip
chip packages.
UL60950-1/CSA C22.2 No. 60950-1
The product has been certified and bears the Mark, as applicable, of the EMC and Product Safety authorities as indicated below:
Safety: TUV 72141224, EN 60950-1, CE, CSA 60950-1, UL 60950-1, CB IEC60950-1 (all national deviations)
Emissions/Immunity: FCC Part 15 Class A, ICES-003, CE - EN55032, EN55024, IEC61000-3-2, IEC61000-3-3
Page 40

40 | P a g e
Appendix D Standards and Compliances 7600
The equipment described in this manual generates and uses radio frequency energy. If this equipment is not used in strict acc ordance with
the manufacturer's instruction, it can and may cause interference with radio and television reception.
Regulatory Notices
FCC Notices (US only)
This equipment has been tested and found to comply with the limits for a Class A digital device, pursuant to part 15 of the FCC Rules.
These limits are designed to provide reasonable protection against harmful interference in a residential installation. This equipment
generates, uses and can radiate radio frequency energy and, if not installed and used in accordance with the instructions, may cause
harmful interference to radio communications. However, there is no guarantee that interference will not occur in a particular
installation. If this equipment does cause harmful interference to radio or television reception, which can be determined by turning
the equipment off and on, the user is encouraged to try to correct the interference by one or more of the following measures: •
Reorient or relocate the receiving antenna. • Increase the separation between the equipment and receiver. • Connect the
equipment into an outlet on a circuit different from that to which the receiver is connected. • Consult the dealer or an experienced
radio/TV technician for help. Modifications not expressly approved by the manufacturer could void the user's authority to operate
the equipment under FCC rules.
Compliance with ICES-003
This Class A digital apparatus complies with Canadian ICES-003.
Cet appareil numérique de la classe A est conforme à la norme NMB-003 du Canada.
Compliance with EN Regulations
Marking by the symbol indicates compliance of this ATTO device to the EMC Directive and the Low
Voltage Directive of the European Union.
The ATTO XstreamCORE FC 7600 complies with Directive 2011/65/EC on the Restriction of the Use of Hazardous
Substances in Electrical and Electronic Equipment RoHS2 (recast) and take the following exemptions:
6(c)- Copper allot containing up to 4% lead by weight.
7(a) -Lead in high melting temperature type solders (i.e. lead based alloys containing 85% by weight or more lead).
7(c)-l -Electrical and electronic components containing lead in a glass or ceramic other than dielectric ceramic in capacitors, e.g.
piezoelectronic devices, or in glass or ceramic matrix compound.
15 - Lead in solders to complete a viable electrical connection between semiconductor die and carrier within integrated circuit flip
chip packages.
UL60950-1/CSA C22.2 No. 60950-1
Page 41

41 | P a g e
The product has been certified and bears the Mark, as applicable, of the EMC and Product Safety authorities as indicat ed below:
Safety:
CU 72141224 04, EN 60950-1, CE, CSA 60950-1, UL 60950-1, CB IEC60950-1 (all national deviations)
Emissions/Immunity:
FCC Part 15 Class A, ICES-003, CE - EN55032, EN55024, IEC61000-3-2, IEC61000-3-3
Page 42

42 | P a g e
Warranty Information
ATTO Technology, Inc. limited warranty
ATTO Technology, Inc. (“ATTO”) warrants to the original purchaser of this product (“Product”) that the Product is free from d efects in
material and workmanship for the term described for this specific Product on ATTO's website (
www.atto.com
). ATTO's liability shall be
limited to replacing or repairing any defective product at ATTO's option. There is no charge for parts or labor if ATTO determines that this
product is defective.
PRODUCTS WHICH HAVE BEEN SUBJECT TO ABUSE, MISUSE, ALTERATION, NEGLECT, OR THOSE PRODUCTS THAT HAVE BEEN SERVICED,
REPAIRED OR INSTALLED BY UNAUTHORIZED PERSONNEL WILL NOT BE COVERED UNDER THIS WARRANTY. DAMAGE RESULTING FROM
INCORRECT CONNECTION OR AN INAPPROPRIATE APPLICATION OF THIS PRODUCT SHALL NOT BE THE RESPONSIBILITY OF ATTO. LIABILITY
UNDER THIS LIMITED WARRANTY IS LIMITED TO ATTO PRODUCT(S). DAMAGE TO OTHER EQUIPMENT CONNECTED TO ATTO PRODUCT(S) IS
THE CUSTOMER'S RESPONSIBILITY. THIS LIMITED WARRANTY IS MADE IN LIEU OF ANY OTHER WARRANTIES, EXPRESS OR IMPLIED. ATTO
DISCLAIMS ANY IMPLIED WARRANTIES OF MERCHANTABILITY OR FITNESS FOR A PARTICUL AR PURPOSE TO THE EXTENT IMPLIED
WARRANTIES CANNOT BE EXCLUDED, SUCH IMPLIED WARRANTIES ARE LIMITED IN DURATION TO THE EXPRESS WARRANTY PERIOD
APPLICABLE TO THE PRODUCT. BECAUSE SOME STATES OR JURISDICTIONS DO NOT ALLOW LIMITATIONS ON THE DURATION OF IMPLI ED
WARRANTIES, THE ABOVE MAY NOT BE APPLICABLE. ATTO'S RESPONSIBILITY TO REPAIR OR REPLACE A DEFECTIVE PRODUCT IS THE SOLE
AND EXCLUSIVE REMEDY PROVIDED TO THE CUSTOMER FOR BREACH OF THIS WARRANTY.
ATTO IS NOT RESPONSIBLE FOR DAMAGE TO OR LOSS OF ANY DATA, PROGRAMS OR ANY MEDIA. THE PRODUCTS ARE NOT INTENDED FOR
USE IN: (I) MEDICAL DEVICES OR THE MEDICAL FIELD; OR (II) USE IN RUGGED APPLICATIONS.
ATTO IS NOT LIABLE FOR ANY INDIRECT, SPECIAL, INCIDENTAL, OR CONSEQUENTIAL DAMAGES, IRRESPECTIVE OF WHETHER ATTO HAS
BEEN ADVISED OF THE POSSIBILITY OF SUCH DAMAGES. NO ATTO DEALER, AGENT OR EMPLOYEE IS AUTHORIZED TO MAKE ANY
MODIFICATION, EXTENSION OR ADDITION TO THIS WARRANTY.
This warranty gives you specific legal rights, and you may also have other rights which vary from state to state.
 Loading...