

ATTO Technology FibreBridge 2100R, FibreBridge 2200D, FibreBridge 2200R, FibreBridge 2300D, FibreBridge 3200R Installation And Operation Manual
Page 1

ATTO Technology, Inc.
ATTO FibreBridge
Installation & Operations
Manual
FibreBridge 2100R, 2200R/D and 3200R
© 2000 ATTO Technology, Incorporated. All rights reserved. All brand or product names are trademarks of their respective holders.
No part of this manual may be reproduced in any form or by any means without the express written permission of ATTO
Technology, Incorporated.
Rev. D 1/01 Document Control Number: PRMA-0220-000
Page 2

ATTO Technology, Inc. ATTO FibreBridge Installation & Operation Manual
ATTO Technology, Inc.
- i -
Page 3

ATTO Technology, Inc. ATTO FibreBridge Installation & Operation Manual
CHAPTER 1: INTRODUCTION..............................................................................................................................................1
FIBREBRIDGE PRODUCT MODULE DESCRIPTION....................................................................................................................1
FC RACK S YSTEM PRODUCT DESCRIPTION.............................................................................................................................1
FIBRE CHANNEL TECHNOLOGY .................................................................................................................................................2
REFERENCES: ................................................................................................................................................................................ 2
CHAPTER 2: ATTO FIBREBRIDGE™ BENEFITS AND FEATURES .......................................................................3
ATTO FIBRECHAIN™..................................................................................................................................................................3
FIBRE CHANNEL S WITCH SUPPORT ...........................................................................................................................................3
FIBREBRIDGE FEATURE COMPARISON......................................................................................................................................4
CHAPTER 3: ATTO FC RACK ENCLOSURE AND POWER MODULES ..............................................................5
PHYSICAL DIMENSIONS...............................................................................................................................................................5
MOUNTING....................................................................................................................................................................................5
ENVIRONMENTAL.........................................................................................................................................................................6
COOLING AIRFLOW......................................................................................................................................................................6
COOLING FANS.............................................................................................................................................................................6
INTERNAL POWER DISTRIBUTION..............................................................................................................................................7
POWER MODULE..........................................................................................................................................................................7
LED INDICATOR..........................................................................................................................................................................8
IEC POWER RECEPTACLE AND S WITCH...................................................................................................................................8
INSTALLATION AND REMOVAL..................................................................................................................................................8
ATTO FC RACK SYSTEM INSTALLATION CONSIDERATIONS................................................................................................9
CHAPTER 4 : ATTO FIBREBRIDGE™ PRODUCT MODULE INTEGRATION.................................................10
ENVIRONMENTAL.......................................................................................................................................................................10
COOLING AIRFLOW....................................................................................................................................................................10
POWER REQUIREMENTS............................................................................................................................................................10
FIBRE CHANNEL PORTS.............................................................................................................................................................12
SCSI PORTS................................................................................................................................................................................12
FIBRECHAIN
ATTO FIBRECHAIN
™
PORTS (2100 MODEL ONLY)...........................................................................................................................13
™
PORT LEDS (2100R MODEL ONLY)..................................................................................................13
LED INDICATORS.......................................................................................................................................................................13
ETHERNET PORT .........................................................................................................................................................................14
S ERIAL PORT ...............................................................................................................................................................................14
INSTALLATION AND REMOVAL................................................................................................................................................14
CHAPTER 5: FIBREBRIDGE™ 2200R/D ............................................................................................................................15
PHYSICAL DIMENSIONS.............................................................................................................................................................15
MOUNTING..................................................................................................................................................................................16
ENVIRONMENTAL.......................................................................................................................................................................17
COOLING AND AIRFLOW ...........................................................................................................................................................17
POWER S UPPLY..........................................................................................................................................................................17
IEC POWER RECEPTACLE AND S WITCH.................................................................................................................................17
FIBRE CHANNEL PORT ..............................................................................................................................................................18
SCSI PORTS................................................................................................................................................................................18
LED INDICATORS.......................................................................................................................................................................19
ETHERNET PORT .........................................................................................................................................................................19
S ERIAL PORT ...............................................................................................................................................................................19
CHAPTER 6: CABLING A FIBREBRIDGE™...................................................................................................................20
“QUICK” INSTALLATION INSTRUCTIONS................................................................................................................................20
SCSI CABLING............................................................................................................................................................................20
ATTO Technology, Inc.
- ii -
Page 4

ATTO Technology, Inc. ATTO FibreBridge Installation & Operation Manual
SCSI TERMINATION ..................................................................................................................................................................21
FIBRE CHANNEL CABLING........................................................................................................................................................22
GBICS..........................................................................................................................................................................................22
GBIC MODULE AND GBIC GUIDE S YSTEM..........................................................................................................................23
GBIC INSTALLATION INSTRUCTIONS ......................................................................................................................................23
GBIC REMOVAL INSTRUCTIONS ..............................................................................................................................................24
MEDIA INTERFACE ADAPTERS (MIA).....................................................................................................................................24
MIA INSTALLATION..................................................................................................................................................................25
CHAPTER 7: FIBREBRIDGE SERVICES .........................................................................................................................26
MONITORING AND MANAGING THE ATTO FIBREBRIDGE...................................................................................................26
ATTO BRIDGETOOLS GRAPHICAL INTERFACE CONFIGURATION PROGRAM...................................................................26
ACCESSING THE ATTO FIBREBRIDGE OVER THE RS-232 INTERFACE..............................................................................26
ACCESSING THE ATTO FIBREBRIDGE OVER THE ETHERNET PORT ...................................................................................27
Setting up the IP Address using the RS-232 port............................................................................................................27
Accessing the ATTO FibreBridge using a Telnet session over Ethernet ....................................................................28
Accessing through FTP........................................................................................................................................................28
CHAPTER 8: SERVERLE SS BACKUP SUPPORT.........................................................................................................30
W HAT IS SERVERLESS BACKUP?..............................................................................................................................................30
TARGET DESCRIPTORS ...............................................................................................................................................................31
S EGMENT DESCRIPTORS............................................................................................................................................................31
GENERAL OPERATION OF S ERVERLESS BACKUP ..................................................................................................................31
ENABLING S ERVERLESS BACKUP ON THE FIBREBRIDGE.....................................................................................................31
CHAPTER 9: UPDATING THE FIRMWARE WITHIN THE FIBREBRIDGE.....................................................32
FLASHING THE FIBREBRIDGE...................................................................................................................................................32
CHAPTER 10: ADDRESSING SCSI DEVICES................................................................................................................33
IDENTIFYING THE FIBREBRIDGE..............................................................................................................................................33
IDENTIFYING THE SCSI DEVICES CONNECTED TO THE FIBREBRIDGE...............................................................................34
DEFAULT ADDRESS TRANSLATION.........................................................................................................................................35
APPENDIX A: FIBRE CHANNEL TO SCSI ADDRESS MAPPING........................................................................36
FIBRE CHANNEL W ORLD WIDE NAME (WWN)....................................................................................................................37
ARBITRATED LOOP PORT ADDRESS (AL_PA) ....................................................................................................................... 37
SCSI BUS IDENTIFIER ............................................................................................................................................................... 37
SCSI TARGET IDENTIFIER........................................................................................................................................................38
SCSI LOGICAL UNIT NUMBER.................................................................................................................................................38
W HAT IS A LOGICAL UNIT ?......................................................................................................................................................38
HIERARCHICAL ADDRESSING MODEL....................................................................................................................................38
ADDRESSING FIELD FORMAT ...................................................................................................................................................38
PERIPHERAL DEVICE ADDRESSING METHOD........................................................................................................................39
V IRTUAL DEVICE ADDRESSING METHOD .............................................................................................................................. 40
LOGICAL UNIT ADDRESSING METHOD...................................................................................................................................40
FIBREBRIDGE DEFAULT MODE................................................................................................................................................40
ADDRESS DESCRIPTORS............................................................................................................................................................41
SCSI-3 INQUIRY COMMAND................................................................................................................................................41
SCSI-3 REPORT LUNS COMMAND......................................................................................................................................42
S ETTING THE ID OF THE FIBREBRIDGE...................................................................................................................................42
ADDRESSING CONNECTED SCSI DEVICES.............................................................................................................................42
CONFIGURATION FOR CONSECUTIVE IDS...............................................................................................................................44
CONFIGURATIONS FOR RAID CONTROLLERS........................................................................................................................44
ATTO Technology, Inc.
- iii -
Page 5

ATTO Technology, Inc. ATTO FibreBridge Installation & Operation Manual
APPENDIX B: RADIO AND TELEVISION INTERFERENCE...................................................................................46
APPENDIX C: CIRCUIT BOARD DIMENSIONS & IMPORTANT JUMPER LOCATIONS ..........................48
APPENDIX D: FIBRE CHANNEL RESOURCES ...........................................................................................................51
APPENDIX E: FIBRE CHANNEL ACCESSORIES.......................................................................................................52
APPENDIX F: HOW TO CONTACT ATTO TECHNOLOGY, INC........................................................................54
ATTO Technology, Inc.
- iv -
Page 6

ATTO Technology, Inc. ATTO FibreBridge Installation & Operation Manual
Chapter 1: INTRODUCTION
This manual will provide an overview of the various ATTO FibreBridge products and product modules as
well as describe how to install and configure the bridge for optimal operation. The following products will
be discussed:
• FibreBridge 2100R – Rackmount bridge module
• FibreBridge 3200R – Rackmount bridge module
• FibreBridge 2200R/D – Rackmount or Desktop bridge
• FC Rack System – Rack enclosure to hold the FibreBridge modules
Many features and procedures are similar amongst the FibreBridge modules. This manual is written to
cover all of the products listed above. Differences will be called out when necessary.
FibreBridge Product Module Description
As a recognized leader in SCSI & Fibre Channel technology, ATTO takes proven SCSI technology and
combines it with Fibre Channel to allow end users to leverage investments in current SCSI equipment
while benefiting from the advantages of Fibre Channel.
FibreBridges provide a means of attaching parallel SCSI devices to a Fibre Channel arbitrated loop or
fabric. They efficiently pass SCSI commands between the Fibre Channel bus and independent SCSI
busses, manage the transaction between the two architectures and maintain the internal integrity of the
unit. The FibreBridge simply communicates with Fibre Channel initiators and SCSI targets. Therefore, it
is operating system independent.
ATTO FibreBridge Product Modules (models 2100R and 3200R) are designed to be installed into the
ATTO FC Rack System. Combined, the bridge product modules and rack system are intended for high
reliability, availability and serviceability environments.
The FibreBridge 2200R/D product is ideal for installations where high availability is not as much of a
concern as cost. This bridge provides all of the features and functionality of the other products, except it
is designed to be a stand-alone unit. It does not get installed into the FC Rack system, and therefore
does not have redundant power supplies or cooling systems. The power supply and cooling system are
designed into the enclosure. This enclosure was designed for operation on either a desktop/table or in a
19” rack. Two “L” brackets are included for installation into a rack.
FC Rack System Product Description
The ATTO FC Rack System is a configurable 19” rack system with two bays designed to house ATTO’s
Fibre Channel product modules. The 1U-rackmount enclosure provides the flexibility to integrate the
ATTO FibreBridge ™ Product Module and the ATTO FibreCenter™ Product Module together, separately
or in pairs.
The following items are included with the ATTO FC Rack System:
• Up to (2) ATTO FibreBridge Product Modules.
• One (1) or two (2) Power Modules.
• One (1) or two (2) AC shielded power cord(s).
• Two (2) Rackmount “L” brackets and (4) screws for mounting the unit into the rack.
If any of these items are missing or damaged, please contact an ATTO Technology Authorized Sales Representative.
ATTO Technology, Inc.
- 1 -
Page 7

ATTO Technology, Inc. ATTO FibreBridge Installation & Operation Manual
Fibre Channel Technology
Fibre Channel is a serial communications interface designed for the transfer of large amounts of data
between a variety of hardware systems over long distances. It is becoming a key technology for
applications that require shared, high bandwidth access to storage.
Fibre Channel provides a logical point-to point serial channel for the transfer of data between a buffer at a
source device and a buffer at a destination device. It moves buffer contents from one port to another,
without regard to the format or meaning of the data. In this way, Fibre Channel allows different upper level
protocols such as SCSI-3 to run over Fibre Channel hardware.
The Fibre Channel architecture is structured as a hierarchical set of protocol layers. Defined within these
layers are the rules for signal interfaces, serial encoding and decoding, error control, frame format and
communications protocols. Fibre Channel provides a range of implementation possibilities and purposely
isolates the transmission medium from the control protocol so that each implementation may use a
technology best suited to the application environment.
References:
ATTO FibreBridge Software User Manual
ATTO BridgeTools Installation and Operation Manual
ANSI – Fibre Channel FC-PH
ANSI – Fibre Channel Arbitrated Loop FC_AL
ANSI – Fibre Channel Protocol for SCSI FCP
ATTO Technology, Inc.
- 2 -
Page 8

ATTO Technology, Inc. ATTO FibreBridge Installation & Operation Manual
Chapter 2: ATTO FibreBridge™ Benefits and Features
The different ATTO FibreBridge Product Modules come with a variety of features in an effort to offer users
a choice of cost-effective as well as high end solutions for including native SCSI devices into a Fibre
Channel Storage Area Network (SAN). Below is a list of some of the key features available, followed by a
table identifying which features are offered in the different models.
• Fibre Channel ports are 1.0625 Gigahertz (100 MB/sec)
• Support for Class 2, Class 3, and Intermix ANSI Fibre Channel specifications
• Fibre Channel ports have fabric switch support for PLDA, Public Loop Login (NL_Ports) as well
as Fabric Direct Connect (N_Ports)
• Fibre Channel ports that support Full Duplex transmissions are available on some models
• Fixed DB9 copper ports that are MIA compliant available on some models
• GBIC ports for DB9 copper, HSSDC copper, short wave optical, or long wave optical interfaces
available on some models
• Two independent SCSI busses – Ultra2 LVD, Single Ended, or High Voltage Differential (HVD)
models available
• SCSI busses auto-negotiate appropriate synch rates
• Either FibreChain™ or a second Arbitrated Loop Fibre Channel port is available for daisy chaining
bridge modules together, or to chain bridges to ATTO FibreCenter™ hubs
• LEDs for monitoring Fibre Channel and SCSI bus activity, the status of the power supplies, and
unit ready
• RS-232 serial support for remote monitoring and management either through a command line
interface or menu system
• Ethernet port provides SNMP and Telnet based monitoring and management either through a
command line interface or menu system
• Full support of Extended Copy command allowing for Serverless Backup operation
• Support for Fibre Alliance MIB
• Up to 5000 I/Os per second as well as 95 Mbytes/sec sustained throughput measured
• Field upgradeable firmware from either the RS-232 or Ethernet ports, or directly over the Fibre
Channel connection
• Operating System independent
• Java based BridgeTools software included to allow configuration, monitoring, management, and
updating firmware from many different operating systems
ATTO FibreChain
™
ATTO's exclusive FibreChain expansion ports enable both the ATTO FibreBridge and ATTO FibreCenter
(hub) Product Modules to be daisy chained together in the same arbitrated loop on a fixed cost per port
basis, thus reducing total cost of ownership. ATTO Technology provides FibreChain cables for these
ports. ATTO FibreChain ports are not compatible with standard Fibre Channel cables.
Fibre Channel Switch Support
All models of the FibreBridge can be configured to support connectivity to arbitrated loop or fabric
topologies.
The FibreBridge 2100R uses Public Loop Login for connection to FL_Ports on fabric switches and is not
compatible with F_Ports. The FibreBridge 3200R and 2200R/D have the ability to log into F_Ports as well
as FL_Ports on switches. Some older model switch ports have separate F_Ports and FL_Ports. Be sure
to connect the Bridge to the appropriate port. Some newer switches have the ability to detect if a device
ATTO Technology, Inc.
- 3 -
Page 9

ATTO Technology, Inc. ATTO FibreBridge Installation & Operation Manual
can support F_Ports or FL_Ports and automatically configure itself. ATTO Technology recommends that
this mode of operation not be used. It is better to force the port to the desired mode.
When connecting the bridge to a F_Port device, set the port connection mode to “Point-to-Point.” When
connecting to a FL_Port device, set the port connection mode to “Loop”. The port connection mode of the
bridge can be set using the RS-232, Ethernet, or in-band ATTO BridgeTools communication links.
FibreBridge Feature Comparison
2100R
Feature
1.0625 GHz Fibre Channel ports (100 MB/sec) X X X
Fibre Channel ports support Class 3 and intermix specifications X X X
Fibre Channel ports support Class 2 specifications - X X
Fibre Channel ports support PLDA and Public Loop Login for
connection to FL_Ports on switches
Fibre Channel ports support Direct Fabric Attach for connection to
F_Ports on switches
Fibre Channel ports support Full Duplex transmissions - X X
Fixed DB9 Copper Fibre Channel ports – MIA compliant X - GBIC Fibre Channel ports - X X
Two independent SCSI busses X X X
SE or HVD SCSI models X X X
LVD SCSI models - X X
Full support of Extended Copy command allowing for Serverless
Backup operation
FibreChain™ Ports for daisy chaining to additional ATTO
FibreBridge or FibreCenter
Second Fibre Channel port for daisy chaining to other ATTO
bridges or hubs in an Arbitrated Loop
Unit Ready, Power Supply status, Fibre Channel and SCSI bus
activity LEDs
FibreBridge
Module
X X X
- X X
- X X
X - -
- X -
X X X
3200R
FibreBridge
Module
2200R/D
FibreBridge
RS-232 serial port - X X
Ethernet port with SNMP and Telnet support - X X
Support for Fibre Alliance MIB - X X
Redundant power supplies and cooling X X FibreBridge module installs into ATTO FC Rack System X X FibreBridge unit has power supply and cooling built in such that it
can operate as is on a desktop, or be mounted into a 19” rack
cabinet
- - X
ATTO Technology, Inc.
- 4 -
Page 10
ATTO Technology, Inc. ATTO FibreBridge Installation & Operation Manual
(31.7mm)
1.72”
Chapter 3: ATTO FC Rack Enclosure and Power Modules
This chapter provides an overview of the ATTO FC Rack System and the Power Modules, as well the
installation process for the Power Modules. The main enclosure of the ATTO FC Rack System houses all
the FibreBridge™ Product Modules and Power Modules. There are two bays for FibreBridge Product
Modules and two bays for Power Modules.
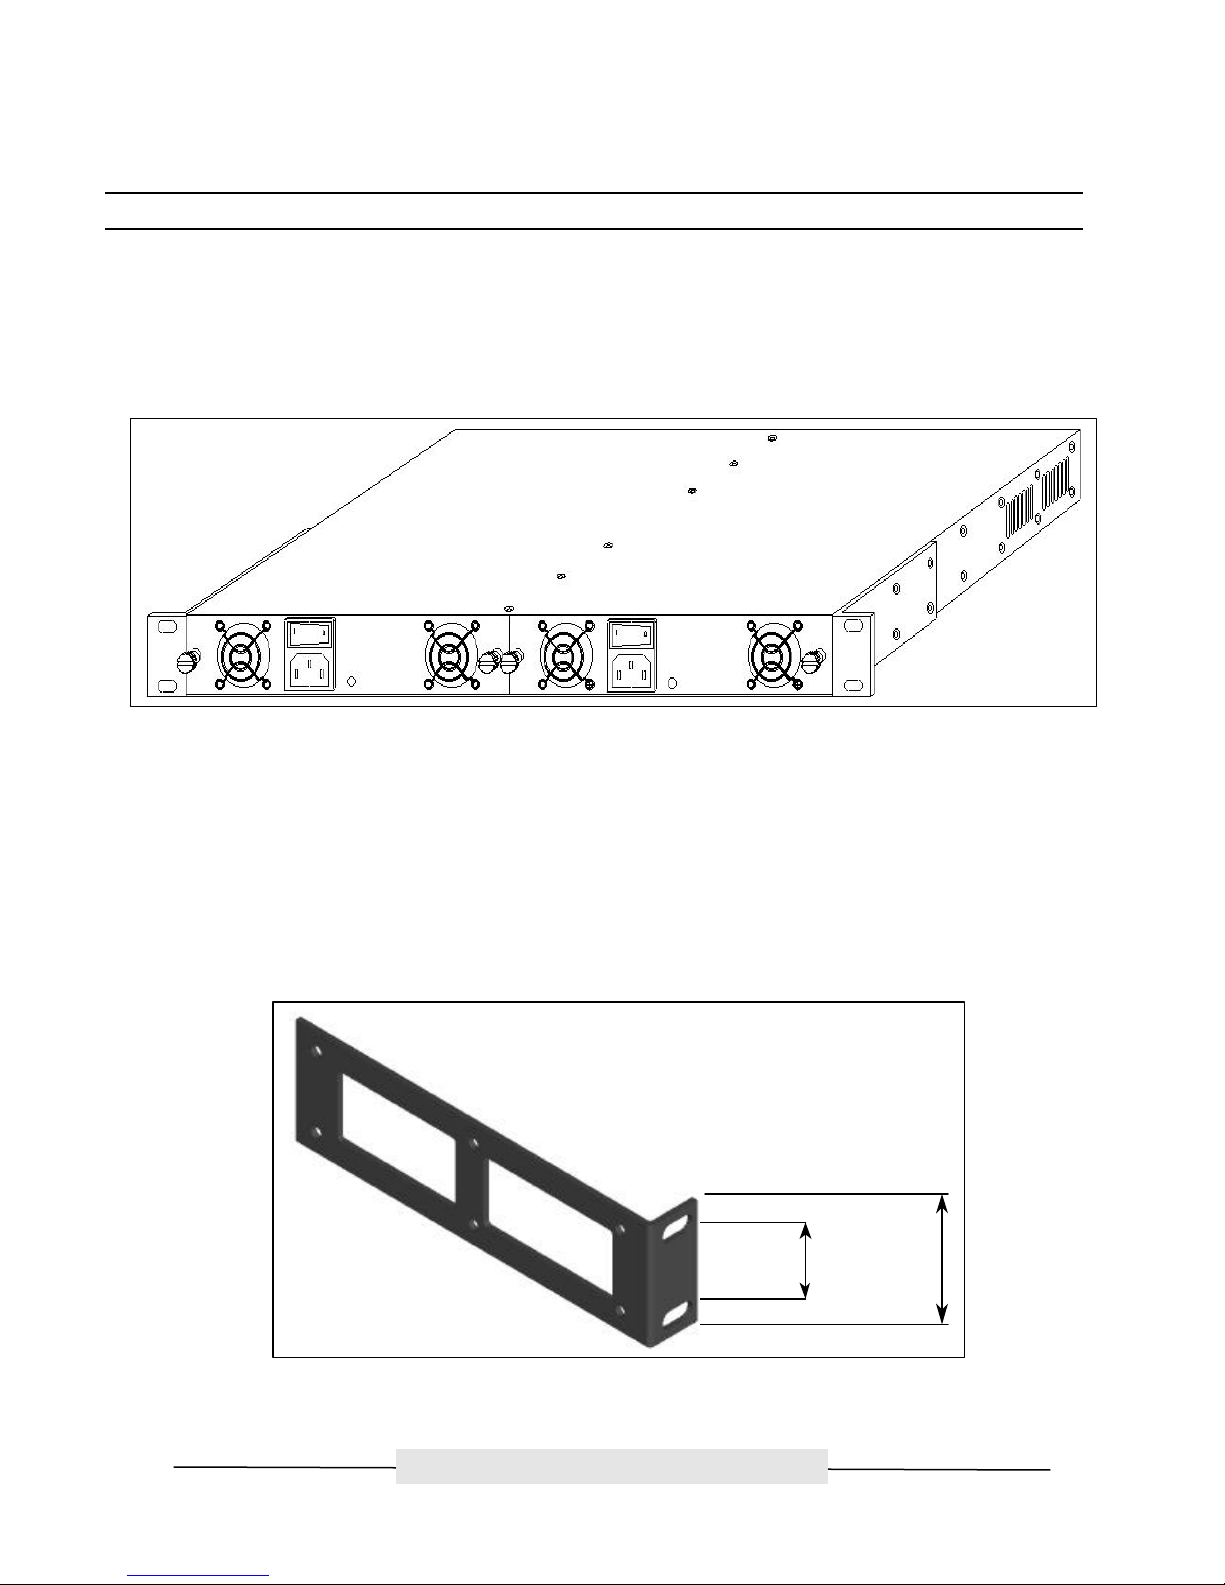
Physical Dimensions
Figure 3.1 Rear view with dual redundant power supplies
The physical dimensions of the ATTO FC Rack System are
17.4" W x 17"D x 1.72"H
(441.6mm W x 431.5mm D x 43.7mm H)
Mounting
The ATTO FC Rack System can be installed with the ATTO Product Modules facing the front or the back
because the "L"-brackets can be installed on either end. The mounting holes on the "L"-bracket fit a
standard 19” rack, using a centered 1.25” (31.7mm) hole pattern.
1.25”
(43.6mm)
Figure 3.2 "L" Mounting Bracket
ATTO Technology, Inc.
- 5 -
Page 11
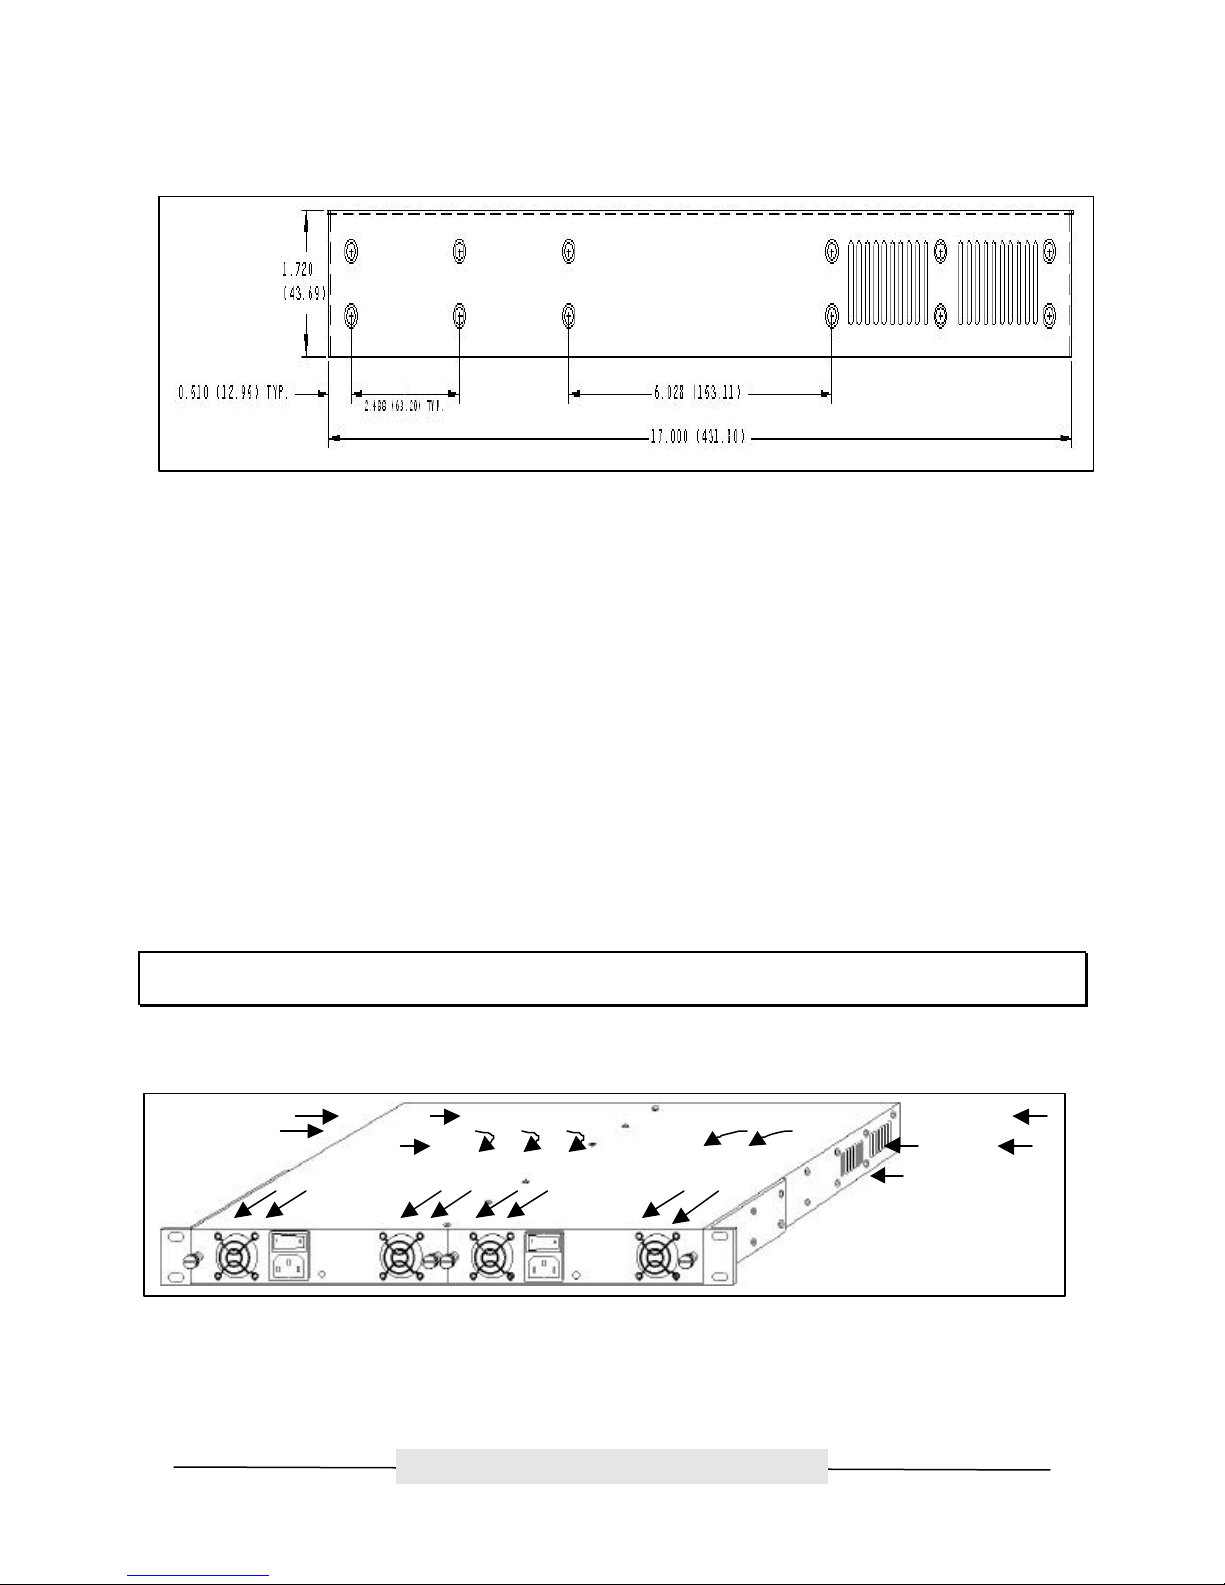
ATTO Technology, Inc. ATTO FibreBridge Installation & Operation Manual
Figure 3.3 Side view with hole dimensions in inches (mm in parentheses)
Environmental
The ATTO FC Rack System is designed to operate in an environment that is 0°-40° C, 0-90% humidity
and non-condensing.
Cooling Airflow
Each Power Module provides a total of 16 CFM of airflow. A system that has two Power Modules installed
will have a total of 32 CFM of airflow. Air enters through the sides of the enclosure and is exhausted out
the Power Modules. Ambient air near the inlets should not exceed 40°C.
Cooling Fans
Each Power Module has two (2) 8-CFM fans, exhausting air out of the unit. The power for the fans is
provided from the backplane. The backplane takes the power from both supplies and combines them so
that a power supply’s fans will run whether or not the supply itself is operating.
WARNING: DO NOT BLOCK THE VENTS ON EITHER SIDE OF THE MAIN ENCLOSURE. BLOCKING THE VENTS MAY
CAUSE OVERHEATING AND COULD DAMAGE THE PRODUCT.
Figure 3.4 Cooling Airflow
ATTO Technology, Inc.
- 6 -
Page 12
ATTO Technology, Inc. ATTO FibreBridge Installation & Operation Manual
Internal Power Distribution
The ATTO FC Rack System provides a redundant power scheme with two "hot swappable" Power Supply
Modules. Each Power Supply Module feeds 12V to the backplane. From there, the power is distributed to
the bridge modules and the fans.
A failure of one power supply will not affect the functionality of the bridge modules or the cooling system
since the second supply is still supplying power to the backplane. In a redundant power supply
installation, one supply can be removed and replaced without affecting the rest of the system in any way.
The Product Module is responsible for detecting power supply failures, voltage regulation, and failover.
NOTE: Power Modules will load balance when there are two present in the ATTO FC Rack System
Power Module
The Power Module is a hot swappable unit that contains enough power to supply two ATTO Product
Modules and four cooling fans. It is designed to slide into the ATTO FC Rack System enclosure, in either
of the two bays, on the end of the rack enclosure that is closer to the backplane. This is the end that is
farthest away from the cooling vents in the sides of the rack enclosure (see figures 3-1, 3-3 and 3-4).
The Power Module supplies power to the ATTO Product Modules. In addition it powers the fans for
cooling. The Power Module contains a power supply with the following specifications.
• Input voltage: 110/230V AC, with an operating input range of 90-132V AC or 175-264V ac, 47-
63Hz, single phase. The AC input range selection is automatic. No manual jumper or switch over
is required.
• Output voltage: +12 Volts @ 5 Amps (60 watts) continuous, 5.8 amps (70 watts) peak.
Figure 3.5 Rack System Power Module
ATTO Technology, Inc.
- 7 -
Page 13

ATTO Technology, Inc. ATTO FibreBridge Installation & Operation Manual
• Power Draw: The maximum power draw is 2 Amps @ 110 Volts for the entire ATTO FC Rack
System. When the ATTO FC Rack System has two Power Modules, the entire unit will still draw
only 2 Amps @ 110 Volts.
LED Indicator
The green LED indicator on the Power Module will light when the module is correctly installed and the
switch is turned on. This LED indicates that power is being drawn from this module and is available on the
backplane. A Power Module that is turned on when not installed will not have the LED illuminated. It is not
recommended and can be dangerous if the AC power cord is plugged in and the power switch is turned
on with an uninstalled Power Module.
IEC Power Receptacle and Switch
The Power Module has one standard IEC320 power receptacle and switch for easy adaptability to
different voltage standards throughout the world.
Installation and Removal
To install a power module:
Step 1. Make sure the power switch on the rear of the power module is in the off position and the power
cord is disconnected.
Step 2. Slide the power module into the rack enclosure until you feel it make contact with the backplane
connector. The face of the power module should be flush against the rack enclosure edges.
Step 3. Secure the power module by tightening the two thumb screws (hand tight).
Step 4. Connect the AC power cord to the power module and plug it into an appropriate receptacle.
Figure 3.7 Power Module Connector Pinout
ATTO Technology, Inc.
- 8 -
Page 14

ATTO Technology, Inc. ATTO FibreBridge Installation & Operation Manual
Step 5. Turn the power switch on the power module to the on position. Verify that the green LED is
illuminated.
The correct method for removal of a power module is as follows:
Step 1. The power switch on the rear of the power module must be in the off position. Make sure the
power LED is NOT illuminated.
Step 2. Disconnect the power cord from the power module as well as the AC power source.
Step 3. Loosen the two thumb screws on the face of the power module.
Step 4. Carefully slide the power module out of the rack enclosure.
ATTO FC Rack System Installation Considerations
• Operating Temperature – The manufacturer’s maximum rated ambient temperature is 40 C.
Consideration should be given to installing the FC Rack system in an environment where this
temperature could be compromised.
• Reduced Air Flow – Consideration should be given to installing the FC Rack system in an
environment where the air flow required for safe operation could be compromised.
• Mechanical Loading – Mounting of the FC Rack system should be that no uneven mechanical
loading is imposed upon the FC Rack system.
• Circuit Overloading – Consideration should be given to the supply circuit to which the FC Rack
system is connected. Overloaded supply circuits may have hazardous effects to the overcurrent
protection and supply wiring and thus damage the FC Rack system and its modules. Appropriate
consideration of the equipment nameplate rating should be used when addressing this concern.
• Reliable Grounding – Reliable grounding of the rack mounted equipment should be maintained.
ATTO Technology, Inc.
- 9 -
Page 15
ATTO Technology, Inc. ATTO FibreBridge Installation & Operation Manual
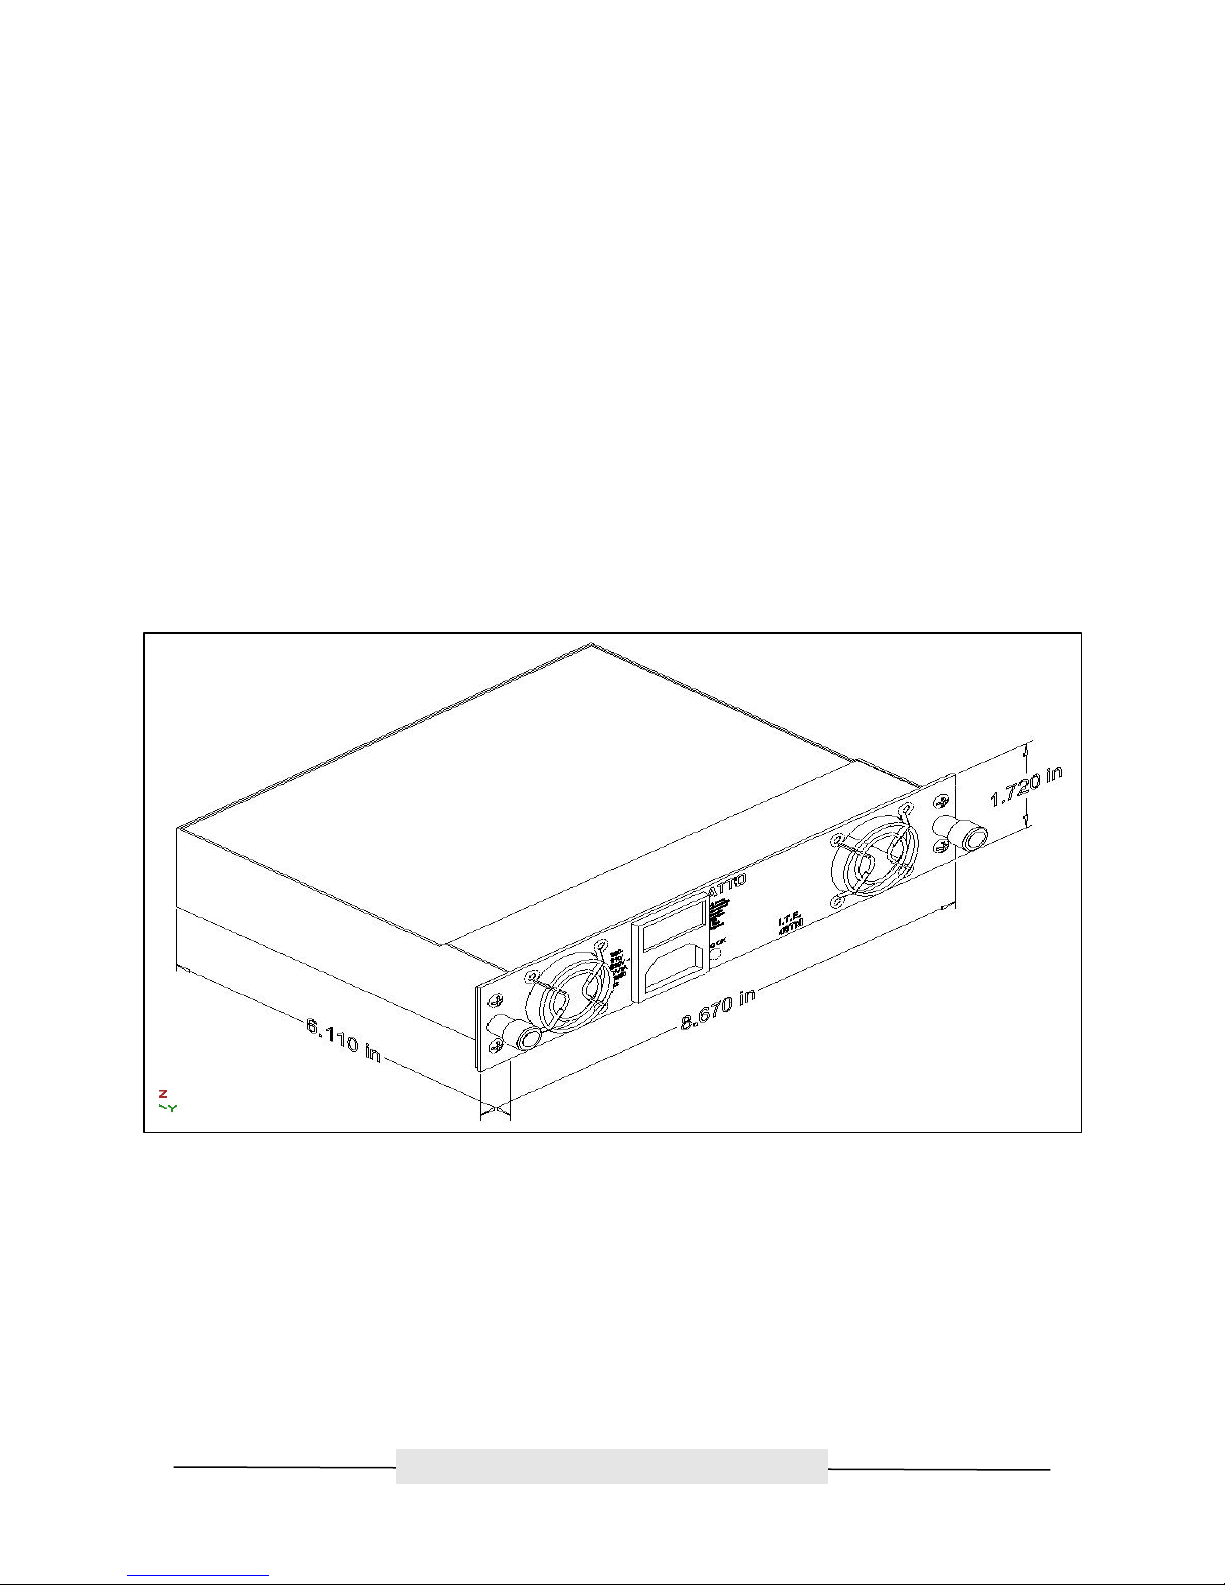
Chapter 4: ATTO FibreBridge™ Product Module Integration
This chapter provides an overview of the ATTO FibreBridge Product Modules and their installation
process.
ATTO FibreBridge module is designed to slide into and mount to either of the two module bays on the
main FC Rack Enclosure chassis. The bridge module must be inserted into the face of the rack chassis
where the cooling grids are located. The connector on the back of the bridge module is only used to
supply a power and ground connection to the backplane of the rack enclosure.
Figure 4.1 ATTO FibreBridge Product Module
Environmental
The ATTO FibreBridge modules are designed to operate in an environment that is 0°-40° C, 0-90%
humidity and non-condensing.
Cooling Airflow
The FibreBridge module cooled by external sources. Air enters through the sides of the module and is
drawn out from the rear. Ambient air near the inlets should not exceed 40°C. The FC Rack system
provides a minimal of 16 CFM of airflow. A system that has two Power Modules installed will have a total
of 32 CFM of airflow.
Power Requirements
The FibreBridge module has the following power supply requirements:
• Recommended Supply Voltage: +12 Volts @ 5 Amps (60 watts) continuous
• Power Draw: The maximum power draw is 1 Amp @ 110 Volts
ATTO Technology, Inc.
- 10 -
Page 16

ATTO Technology, Inc. ATTO FibreBridge Installation & Operation Manual
Figure 4.2 ATTO FibreBridge Power Connector
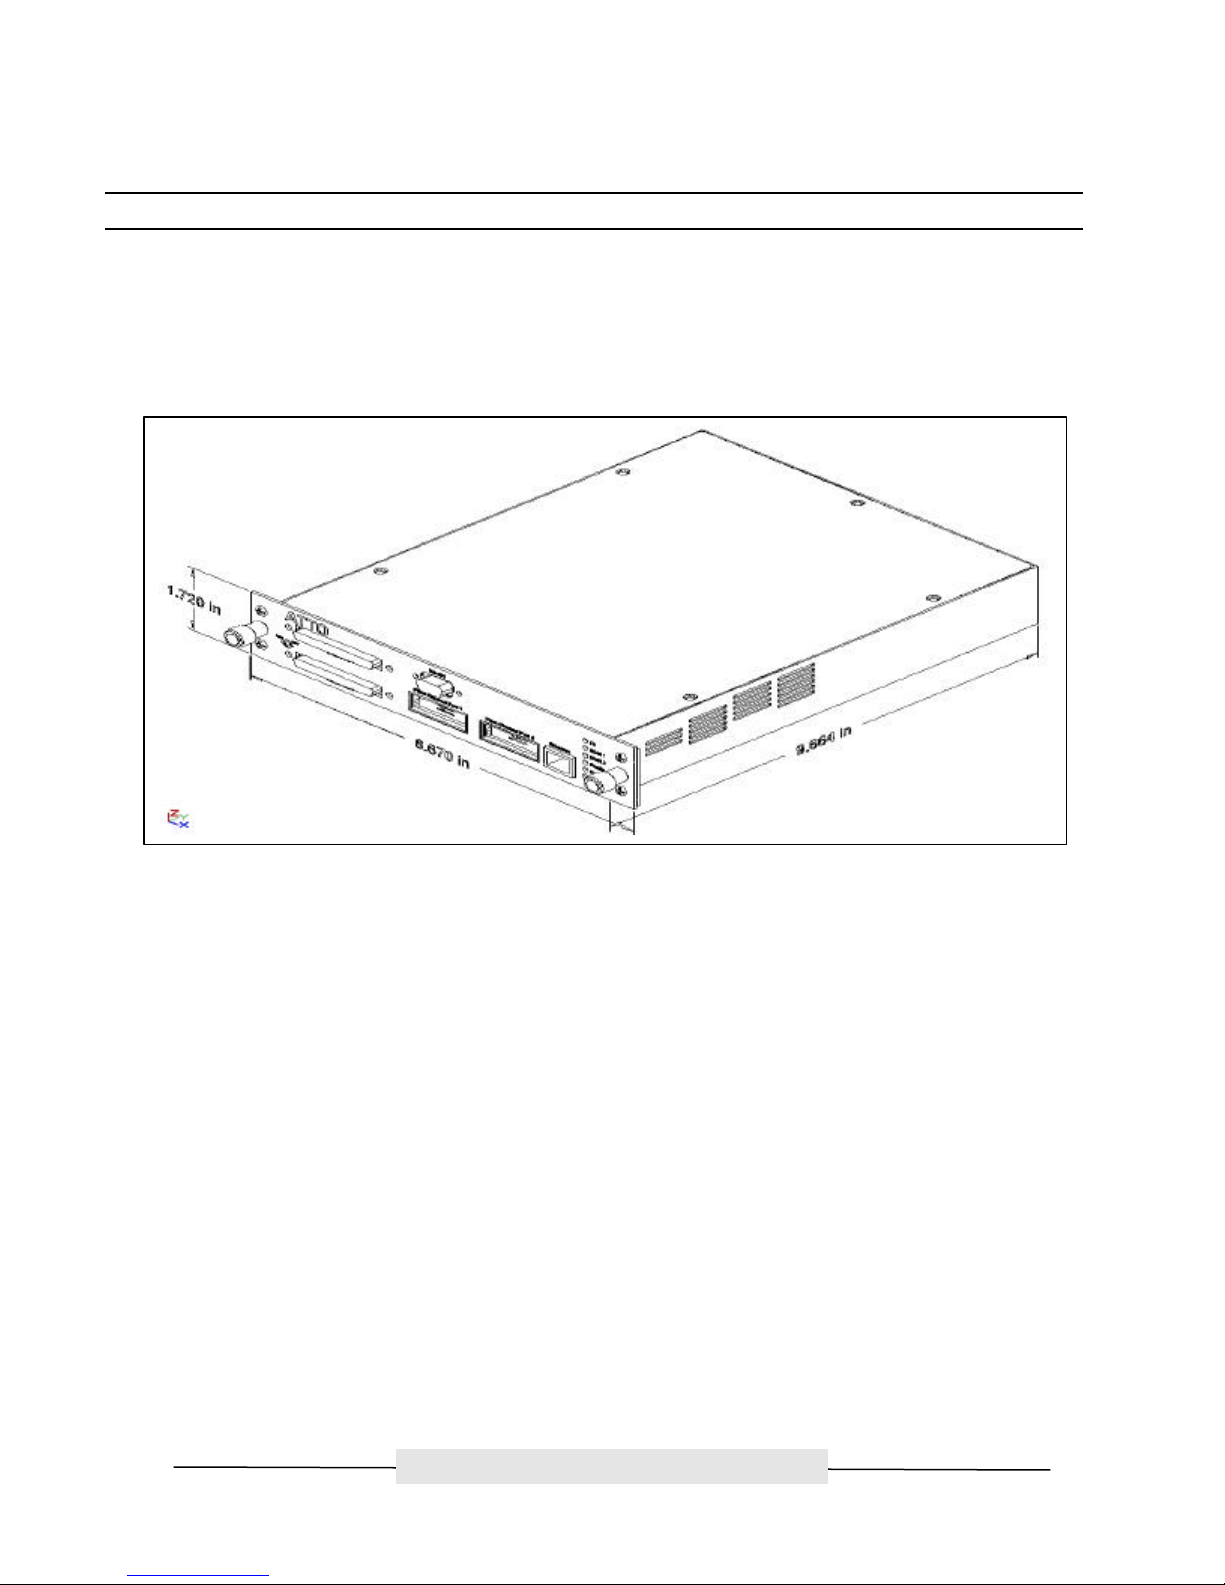
Figure 4.3 ATTO FibreBridge 2100R Product Module
Figure 4.4 ATTO FibreBridge 3200R Product Module
ATTO Technology, Inc.
- 11 -
Page 17

ATTO Technology, Inc. ATTO FibreBridge Installation & Operation Manual
Fibre Channel Ports
The Fibre Channel ports on the bridge modules are used to connect the bridge into either a Fabric or
Arbitrated Loop. Some of the features for the Fibre Channel ports include:
• 1.0625 Gigahertz (100 MB/sec)
• Support for Class 2, Class 3, and Intermix ANSI Fibre Channel specifications
• Support PLDA, Public Loop Login (NL_Ports) as well as Fabric Direct Connect (N_Port)
• Support for Full Duplex transmissions
• Fixed DB9 copper ports that are MIA compliant or GBIC ports for DB9 copper, HSSDC copper,
short wave optical, or long wave optical interfaces
Refer to the comparison chart in Chapter 2 to determine which features apply to the models of the
FibreBridge.
Some models of the FibreBridge can be configured to support connectivity to arbitrated loop or fabric
topologies. When connecting these bridges to an F-Port device, set the Port Connection Mode to “Pointto-Point.” When connecting to a FL-port device, set the port connector mode to “Loop” mode. The ATTO
FibreBridge uses public loop login to log into a FL-Port on a fabric switch. The port connection mode of
the bridge can be set using the RS-232, Ethernet, or in-band ATTO BridgeTools communication links.
Other models of the FibreBridge only support Public Loop Login for connection to FL_Ports on fabric
switches.
Some models of the FibreBridge come with two Fibre Channel ports to daisy chain bridges together, to
daisy chain bridges to hubs, or to connect additional Fibre Channel drives without using valuable switch
or hub ports. The implementation involves an arbitrated loop within the bridge. This means that if Fibre
Channel port 1 is connected to a switch and port 2 is connected to an additional loop device, the Switch
port must be configured as an FL_Port (loop mode). F_Port devices will not work in this environment.
The FibreBridge must also be configured for “Loop Mode”. “Point to Point” mode will not work for daisy
chaining.
The two Fibre Channel ports cannot be configured in a failover connection environment with switches in
that it is not possible to have more than one switch port connected in this arbitrated loop. When using
both Fibre Channel ports on the bridge, eac h port will need to be configured as a NL_Port. When devices
are powered up, each NL_Port must sign in with the other ports on the loop. Each port first attempts to
find a FL_Port within the loop. When it does, it knows it is a part of a public loop connected to a fabric. If
it does not, it knows it is a part of a private loop consisting of other NL_Ports only. Arbitrated loops can
have up to 126 active NL_Ports but only one active FL_Port because the FL_Port is considered the
master. Having two switch ports (same switch or different switches) is illegal because there would be two
FL_Ports.
At this time, the Fibre Channel ports only support initiator devices. A SCSI based host computer
connected to the SCSI side of the bridge will not be able to communicate with a Fibre Channel drive
connected to the Fibre Channel port.
SCSI Ports
The two SCSI ports on the bridge modules are used to connect storage devices into the Fibre Channel
Storage Area Network (SAN). A FibreBridge can be ordered with any of the following types of SCSI
ports:
• Ultra 2 (LVD) SCSI– 80 MB/sec max per bus
ATTO Technology, Inc.
- 12 -
Page 18

ATTO Technology, Inc. ATTO FibreBridge Installation & Operation Manual
• Single Ended Ultra SCSI – 40 MB/sec max per bus
• High Voltage Differential (HVD) Ultra SCSI – 40 MB/sec max per bus
Each of the two ports is totally independent from the other. This means that each bus is capable of 15
devices and each bus is capable of 40/80 MB/sec (Ultra/Ultra2). There are a few advantages to this.
First, you are able to use software striping to create a RAID 0 group that includes devices from both SCSI
busses. This can effectively increase your overall performance to 80 MB/sec for Ultra SCSI or 100
MB/sec (the Fibre Channel bandwidth limit) for Ultra2 SCSI. Using ExpressRAID software from ATTO
also gives you the ability to stripe hardware RAID controllers together. Another advantage is that each
SCSI bus auto-negotiates the appropriate synch rates with the connected devices. If slower “Legacy”
devices are mixed with faster Ultra2 devices, the bus will only communicate at the rate of the slowest
device, wasting the performance capabilities of the faster devices. With the ATTO FibreBridge, it is
possible to connect slower “Legacy” devices of one SCSI bus of the bridge while connecting faster
devices on the second. Each bus can communicate at independent rates.
The ATTO FibreBridge supports a wide variety of SCSI storage devices including stand-alone drives,
removable drives, JBODs, RAIDs, tape, CD and DVD drives, changers, and libraries, magneto optical
drives, as well as Jaz and Zip devices.
FibreChain™ Ports (2100 model only)
The FibreChain expansion ports enable both the ATTO FibreBridge and ATTO FibreCenter (hub) Product
Modules to be daisy chained together in the same arbitrated loop on a fixed cost per port basis, thus
reducing total cost of ownership. The signal pin-out is different between standard Fibre Channel cables
and FibreChain cables. ATTO Technology can provide the custom FibreChain cables for these ports.
The FibreChain ports are connected to the Fibre
Channel ports on the same arbitrated loop
internal to the bridge. When more than one
FibreBridge is chained together, the loop is
essentially being expanded. Two FibreChain
Fibre Channel
Port
ports are only necessary for chaining three or
more bridges together.
FibreChain ports are limited in their functionality
in that they do not re-time nor re-generate the
FibreChain
Port 2
FibreChain
Port 1
signals like a standard Fibre Channel port does.
Because of this, FibreChain cables are limited in
distance to assure signal integrity.
Figure 4.5 FibreChain Expansion
ATTO FibreChain™ Port LEDs (2100R model only)
There is a yellow LED adjacent to each ATTO FibreChain expansion port that will remain lit if the
ATTO FibreChain expansion port is not being used (there is no connection to the port). When an
expansion cable is connected and a link is established, the LED will go off. These LEDs will indicate
cable connections only. They do not indicate cable signal activity.
LED Indicators
Power A, Power B – Two LEDs are used `to indicate if power is available from each of the two supplies.
The ATTO FibreBridge only requires power from one of the sources in order to operate.
ATTO Technology, Inc.
- 13 -
Page 19

ATTO Technology, Inc. ATTO FibreBridge Installation & Operation Manual
FC Activity – This LED blinks to show activity occurring on the Fibre Channel port of the unit. The LED
may appear to be steadily lit during times of very high activity.
SCSI 1 Activity, SCSI 2 Activity – One LED for each SCSI bus displays activity on that SCSI bus.
Ready – A few seconds after power has been applied, the Ready LED should be illuminated. This
indicates that the FibreBridge has passed its power on self-test and is now ready for normal operation.
Ethernet Port
The 10/100 BaseT Ethernet port provides SNMP and Telnet based monitoring and management through
a command line interface, menu system or graphical interface (BridgeTools). Refer to the FibreBridge
Software manual and the BridgeTools manual for details on the available commands for communication
with the bridge.
Serial Port
The RS-232 serial port provides support for remote monitoring and management through a command line
interface, menu system or graphical interface (BridgeTools). Refer to the FibreBridge Software manual
and the BridgeTools manual for details on the available commands for communication with the bridge.
Installation and Removal
Note that since the FibreBridge modules are hot swappable, it is not necessary to turn power off to install
or remove bridge modules.
To install a FibreBridge module:
Step 1. Slide the bridge module into the rack enclosure until you feel it make contact with the backplane
connector. The face of the bridge module should be flush against the rack enclosure edges.
Step 2. Secure the bridge module by tightening the two thumbscrews (hand tight).
Step 3. If not already done, apply power to the rack enclosure.
Step 4. The Fibre Channel and SCSI activity LEDs will blink for three or four seconds during the
module’s power on self-test. The green Ready LED will illuminate once the unit is ready for operation.
The correct method for removal of a bridge module is as follows:
Step 1. Disconnect all cables from the face of the bridge module.
Step 2. Loosen the two thumbscrews on the face of the bridge module.
Step 3. Carefully slide the bridge module out of the rack enclosure.
ATTO Technology, Inc.
- 14 -
Page 20

ATTO Technology, Inc. ATTO FibreBridge Installation & Operation Manual
Chapter 5: FibreBridge™ 2200R/D
This chapter provides an overview of the ATTO FibreBridge 2200R/D.
The FibreBridge 2200R/D is a Fibre Channel to SCSI bridge for high throughput enterprise environments
that is designed for cost sensitive implementations. The 2200R/D contains all of the high end
connectivity, monitoring, and management features as the FibreBridge 3200 module, but without the dual
redundant power supply and cooling systems. The bridge and power supply circuits are permanently
mounted within the enclosure and are not hot swappable.
The enclosure was designed to be versatile. It comes with attached feet for convenient desktop
environments, but includes mounting brackets to easily convert to standard 19” rack enclosures.
Physical Dimensions
Figure 5.1 FibreBridge2200R/D Front View
Figure 5.2 FibreBridge2200R/D Rear View
ATTO Technology, Inc.
- 15 -
Page 21

ATTO Technology, Inc. ATTO FibreBridge Installation & Operation Manual
The physical dimensions of the FibreBridge 2200R/D are
16.725" W x 10"D x 1.72"H
(424.5mm W x 253.8mm D x 43.7mm H)
Mounting
The FibreBridge 2200R/D was designed with all of the cable connections and the power switch on one
side, while the LED indicators are on the opposite side. When mounting this unit into a rack, the "L"brackets can be installed so that either the LED side of the bridge or the connector side can be facing
front. The mounting holes on the "L"-bracket fit a standard 19” rack, using a centered 1.25” (31.7mm) hole
pattern.
Figure 5.3 "L" Mounting Bracket
Figure 5.4 2200R/D Side view with hole dimensions
ATTO Technology, Inc.
- 16 -
Page 22

ATTO Technology, Inc. ATTO FibreBridge Installation & Operation Manual
Environmental
The FibreBridge 2200 is designed to operate in an environment that is 0°-40° C, 0-90% humidity and non-
condensing.
Cooling and Airflow
There are two fans in the FibreBridge 2200R/D. Each can provide approximately 3 CFM of airflow.
Cooling is from side to side where air enters in from the left side and is exhausted out the right. Ambient
air near the inlets should not exceed 40°C.
WARNING: DO NOT BLOCK THE VENTS ON EITHER SIDE OF THE MAIN ENCLOSURE. DOING SO MAY CAUSE
OVERHEATING AND COULD DAMAGE THE PRODUCT.
Power Supply
The FibreBridge 2200R/D contains a universal supply that provides the necessary power for the bridge
board and the cooling fans. Refer to the following specifications.
• Input voltage: 110/230V AC, with an operating input range of 90-132V AC or 175-264V ac, 47-
63Hz, single phase. The AC input range selection is automatic. No manual jumper or switch over
is required.
• Output voltage: +12 Volts @ 5 Amps (60 watts) continuous, 5.8 amps (70 watts) peak.
• Power Draw: The maximum power draw is 2 Amps @ 110 Volts.
IEC Power Receptacle and Switch
The supply has one standard IEC320 power receptacle and switch. This allows for easy adaptability to
different voltage standards throughout the world.
Figure 5.5 Cooling Airflow
ATTO Technology, Inc.
- 17 -
Page 23

ATTO Technology, Inc. ATTO FibreBridge Installation & Operation Manual
Figure 5.6 FibreBridge 2200R/D Connector Face
Fibre Channel Port
The Fibre Channel port on the bridge is used to connect the bridge into either a Fabric or Arbitrated Loop.
Some of the features for the Fibre Channel port include:
• 1.0625 Gigahertz (100 MB/sec)
• Support for Class 2, Class 3, and Intermix ANSI Fibre Channel specifications
• Support PLDA, Public Loop Login (NL_Ports) as well as Fabric Direct Connect (N_Port)
• Support for Full Duplex transmissions
• GBIC port for DB9 copper, HSSDC copper, short wave optical, or long wave optical interfaces
The FibreBridge 2200R/D can be configured to support connectivity to arbitrated loop or fabric topologies.
When connecting to an F-Port device, set the Port Connection Mode to “Point-to-Point.” When connecting
to a FL-port device, set the port connector mode to “Loop” mode. The bridge uses public loop login to log
into a FL-Port on a fabric switch. The port connection mode of the bridge can be set using the RS-232,
Ethernet, or in-band ATTO BridgeTools communication links.
At this time, the Fibre Channel port only supports initiator devices. A SCSI based host computer
connected to the SCSI side of the bridge will not be able to communicate with a Fibre Channel drive
connected to the Fibre Channel port.
SCSI Ports
The two SCSI ports on the bridge modules are used for connecting storage devices into the Fibre
Channel Storage Area Network (SAN). A FibreBridge can be ordered with any of the following types of
SCSI ports:
• Ultra 2 (LVD) SCSI– 80 MB/sec max per bus, downward compatible with all forms of single ended
SCSI
• High Voltage Differential (HVD) Ultra SCSI – 40 MB/sec max per bus
Each of the two ports is totally independent from the other. This means that each bus is capable of 15
devices and each bus is capable of 40/80 MB/sec (Ultra/Ultra2). There are a few advantages to this.
First, you are able to use software striping to create a RAID 0 group that includes devices from both SCSI
busses. This can effectively increase your overall performance to 80 MB/sec for Ultra SCSI or 100
MB/sec (the Fibre Channel bandwidth limit) for Ultra2 SCSI. Using ExpressRAID software from ATTO
also gives you the ability to stripe hardware RAID controllers together. Another advantage is that each
SCSI bus auto-negotiates the appropriate synch rates with the connected devices. If slower “Legacy”
devices are mixed with faster Ultra2 devices, the bus will only communicate at the rate of the slowest
device, wasting the performance capabilities of the faster devices. With the ATTO FibreBridge, it is
ATTO Technology, Inc.
- 18 -
Page 24

ATTO Technology, Inc. ATTO FibreBridge Installation & Operation Manual
possible to connect slower “Legacy” devices of one SCSI bus of the bridge while connecting faster
devices on the second. Each bus can communicate at independent rates.
The ATTO FibreBridge supports a wide variety of SCSI storage devices including stand-alone drives,
removable drives, JBODs, RAIDs, Tape, CD and DVD drives, changers, libraries, magneto optical drives,
Jaz and Zip devices.
LED Indicators
Figure 5.7 LED Indicators on FibreBridge 2200R/D
Power– There is an LED to indicate if power is available from the supply.
FC Activity – This LED blinks to show activity occurring on the Fibre Channel port of the unit. This may
appear to be steadily lit during times of very high activity.
SCSI 1 Activity, SCSI 2 Activity – There is one LED for each SCSI bus that displays activity on the SCSI
bus.
Ready – A few seconds after power has been applied, the Ready LED should be illuminated. This
indicates that the FibreBridge has passed its power on self-test and is now ready for normal operation.
Ethernet Port
The 10/100 BaseT Ethernet port provides SNMP and Telnet based monitoring and management through
a command line interface, menu system or graphical interface (BridgeTools). Refer to the FibreBridge
Software manual and the BridgeTools manual for details on the available commands for communication
with the bridge.
Serial Port
The RS-232 serial port provides support for remote monitoring and management through a command line
interface, menu system or graphical interface (BridgeTools). Refer to the FibreBridge Software manual
and the BridgeTools manual for details on the available commands for communication with the bridge.
ATTO Technology, Inc.
- 19 -
Page 25

ATTO Technology, Inc. ATTO FibreBridge Installation & Operation Manual
Chapter 6: Cabling a FibreBridge
“Quick” Installation Instructions
1. Connect SCSI devices to the ATTO FibreBridge using a SCSI cable with a 68-pin fine pitch or “P”
connector for each port on the bridge. The bridge is terminated internally. Be aware of cable
limitations for the SCSI bus, which are:
• Three (3) meters and four devices, or one and a half (1.5) meters and eight devices when using
Single-Ended UltraSCSI devices
• Twenty-five (25) meter and 15 devices when using Differential UltraSCSI devices
• Twelve (12) meters and 15 devices when using LVD Ultra2 SCSI devices
These cable lengths include the wiring inside the devices. It is important to keep cable lengths as
short as possible to ensure the highest signal quality and performance.
2. Each SCSI port in the ATTO FibreBridge has an internal factory setting of ID "7". This is typical for a
SCSI initiator device because ID 7 will have the highest priority. Make sure the IDs of the SCSI
devices connected to the bridge are set to something other than seven. Terminate each SCSI bus
after the last device. It is recommended to use sequential IDs starting at 0 for the SCSI devices.
3. Install a GBIC into either socket on the front of the bridge. It does not matter which socket you
choose, as they are both on the same loop within the bridge. Slide the GBIC in until it locks into place.
Attach a suitable Fibre Channel cable to the GBIC.
™
4. When the FibreBridge 3200R is in “loop” mode (NL_Port), the second GBIC port can be used to daisy
chain multiple bridge modules together using a standard Fibre Channel cable. The second GBIC port
cannot be used when in “point-to-point” (N_Port) mode.
5. The FibreChain ports on the FibreBridge 2100R can be used to daisy chain multiple bridges together
by using an ATTO FibreChain cable. The pin out on standard Fibre Channel cables is not compatible
with FibreChain ports. Contact ATTO Technology for FibreChain cables.
6. It is recommended that SCSI devices be powered on first followed by the ATTO FC Rack System and
finally the host computers. The power switch is located between the fans on the rear of the unit. For a
PC, it is important that all devices are powered on before the host because a PC will only scan for
devices during boot.
SCSI Cabling
The ATTO FibreBridge uses an industry standard 68-pin “P” (16-bit) connector on each of its’ SCSI ports.
The Ultra SCSI specification limits:
• Ultra SCSI High Voltage Differential (HVD) cable lengths to twenty-five meters, 15 devices
• Ultra SCSI Single Ended (SE) cable lengths to three meters, four devices or one and a half
meters, eight devices
• Ultra 2 Low Voltage Differential (LVD) cable lengths to 12 meters, 15 devices
ATTO Technology, Inc.
- 20 -
Page 26

ATTO Technology, Inc. ATTO FibreBridge Installation & Operation Manual
For best performance, keep SCSI cabling distances as short as possible.
A FibreBridge with an LVD SCSI personality module is downward compatible with Single Ended Ultra
SCSI as well as Fast, Wide, or Narrow SCSI devices. The entire SCSI bus will operate at the speed of the
slowest device. If you wish to mix devices of different SCSI speeds on the bridge, it is best to separate
them. That is, put the slower devices on bridge SCSI bus 1, and the faster devices on bridge SCSI bus 2.
Each bus is independent so each can operate at a different speed.
The high voltage differential bridge is only compatible with HVD SCSI devices.
For maximum performance, it is possible to stripe devices across both SCSI busses. ATTO’s
ExpressRAID software for PC or MAC can be used to create RAID 0 groups consisting of drives attached
to both SCSI busses. For example, four Ultra SCSI drives striped together on bridge bus 0 will reach a
performance limit of near 40 MB/sec (the Ultra SCSI limit). Four Ultra SCSI drives on bridge bus 1 striped
with four drives on bridge bus 2 will sustain nearly 80 MB/sec. ATTO’s ExpressRAID also makes it
possible to stripe multiple hardware RAID controllers together.
SCSI Termination
Figure 6.1 Typical SCSI Cables
ATTO Technology, Inc.
- 21 -
Page 27

ATTO Technology, Inc. ATTO FibreBridge Installation & Operation Manual
Both ends of each SCSI bus require termination. The ATTO FibreBridge has built-in automatic
termination. A terminator does need to be placed on the bus after the last SCSI device. It is important
that the correct type of terminator be used for the type of bridge being used: LVD, HVD, or SE.
ATTO
FibreBridge
Built in
Termination
Termination
Figure 6.2 SCSI Termination
Fibre Channel Cabling
Fibre Channel technology offers a variety of cabling options including standard copper, equalized copper,
multimode fiber optic, and single mode fiber optic. The type of cable to use varies depending upon the
application, environment and distance. The following tables illustrate the different cable options available:
Table 6.1 Copper Cable Recommendations
Cable Length Cable Type Connector
< 15 Meters Unequalized DB9
≥15, ≤ 30
Meters
Equalized DB9
Table 6.2 Fiber Optic Cable Recommendations
Cable Length Cable Type Cable Size Connector Laser Type
Up to 175
Meters
Up to 500
Meters
Up to 10
Kilometers
Multi Mode 62.5 micron Duplex SC Short Wave
Multi Mode 50 micron Duplex SC Short Wave
Single Mode 9 micron Duplex SC Long Wave
Fibre optic cable implementations tend to be more expensive than copper, but they are not susceptible to
noise and other interference. If copper Fibre Channel cables are used, it is important to make sure they
are separated from power cables and are not coiled or tangled. Be sure to use a high quality cable
designed specifically for Fibre Channel applications.
GBICs
Some models of the FibreBridge use GBICs as the Fibre Channel interface into the bridge. GBICs are a
small form factor plug-in module that can be removed or inserted without powering off the receiving
socket. They give the flexibility to easily change between copper and optical cables with minimal effort
and configuration time. GBICs are available in Passive, Active, HSSDC and DB9 Copper as well as Long
and Short wave Fibre Optic forms. Passive copper GBICs are not recommended.
ATTO Technology, Inc.
- 22 -
Page 28

ATTO Technology, Inc. ATTO FibreBridge Installation & Operation Manual
The FibreBridge modules do not come standard with GBIC modules. They must be ordered separately.
GBIC Module and GBIC Guide System
Figures 6.3 and 6.4 depict a typical GBIC and GBIC guide system. GBICs may be removed and replaced
with the power on.
Figure 6.3 GBIC Module
GBIC Installation Instructions
1. Orient the GBIC as shown in Figure 6.5. The keyway is ON THE BOTTOM for the port insertion.
2. Slide the GBIC into the port opening (the spring-loaded door will open as the GBIC is pushed in). If
the GBIC slides in only an inch (2.5cm) before it stops, the keyway in the wrong position. Flip the
GBIC over and try again.
3. Push the GBIC in until the GBIC latches snap into place.
4. Cable the port.
Figure 6.4 GBIC Guide System
ATTO Technology, Inc.
- 23 -
Page 29

ATTO Technology, Inc. ATTO FibreBridge Installation & Operation Manual
Figure 6.5 GBIC Installation
GBIC Removal Instructions
1. Disconnect the cable (if one is connected) from the GBIC being removed.
2. Using the thumb and forefinger of one hand, grasp the GBIC latches and squeeze them toward the
center of the GBIC. While squeezing, withdraw the GBIC from the chassis. The force required to
overcome the friction of the pins in the GBIC connector and withdraw it from the chassis may be more
than fingers can exert without slipping off the latches. A piece of double-backed tape on a thumb and
forefinger can be used to get a better grip on the GBIC. Do not under any circumstances use pliers or
similar tools as they may damage the GBIC.
3. With the GBIC withdrawn, a small spring-loaded door will close the opening.
Media Interface Adapters (MIA)
Some models of the FibreBridge come with a fixed DB9 copper Fibre Channel interface port. These ports
can easily be converted to a fiber optic interface by attaching a Media Interface Adapter to the DB9
connector on the bridge. These DB9 connectors are MIA compliant, meaning they contain additional
control signals and power to support an external MIA for electrical to optical conversion. The MIA is a
fully contained electrical-to-optical and optical-to-electrical converter. The following is the pin out for each
DB9 connector:
Pin # Name Pin # Name
1 TX+ 6 TX2 VCC 7 ODIS+
3 FAULT 8 GND
4 KEY 9 RX5 RX+
Figure 6.6 Illustration of the DB9 Connector
ATTO Technology, Inc.
- 24 -
Page 30

ATTO Technology, Inc. ATTO FibreBridge Installation & Operation Manual
Bottom
DB-9 Connector
Figure 6.7 MIA – DB9 Connector
MIA Installation
Connect the MIA to the FibreBridge by plugging the male DB9 connector on the MIA to the female DB9
connector on the bridge. Be sure to secure the MIA to the DB9 connector.
Connect a fiber optic cable, with SC type connectors to the MIA . Each connector on an MIA is different;
one acts as a transmitter and the other as a receiver. If these wires are crossed during installation, no
signal will be present.
Transmit
Receive
Figure 6.8 MIA Transmit and Receive Lines
ATTO Technology, Inc.
- 25 -
Page 31

ATTO Technology, Inc. ATTO FibreBridge Installation & Operation Manual
Chapter 7: FibreBridge Services
Monitoring and Managing the ATTO FibreBridge
The ATTO FibreBridge Services can be used to configure and tune the bridge for many different
environments and applications, update the firmware, configure the addresses of the connected SCSI
devices, monitor internal power and temperature status, report on hardware diagnostics and log failures.
There are three methods available for a user to communicate with the ATTO FibreBridge:
• In-band Fibre Channel link for FibreBridge 2100R, 2200R/D and 3200R
• SNMP or Telnet over Ethernet for FibreBridge 2200R/D and 3200R
• RS-232 for FibreBridge 2100R, 2200R/D and 3200R
Communication over Ethernet or the RS-232 serial port can be performed using a command line interface
or a menu system. Refer to the ATTO FibreBridge Software manual for a list of the available commands
and their syntax.
ATTO BridgeTools Graphical Interface Configuration Program
The simplest method to communicate with the bridge is to use ATTO BridgeTools. It is a Java-based
graphical interface configuration utility designed to be an easy way to flash firmware and manage the
configuration for all models of the FibreBridge. It can use any of the connection methods listed above,
depending upon the model, with the exception of the RS-232 for the FibreBridge 2100R. This bridge only
uses the serial port to report power on self-test diagnostics.
The BridgeTools program currently supports:
• Windows 95/98, NT, and 2000
• MAC OS 9.1 and earlier
• Solaris 2.7 and 2.8
Refer to the ATTO BridgeTools manual for complete instructions to how to install and operate the
program.
Accessing the ATTO FibreBridge over the RS-232 interface
The serial port on the FibreBridge 2100R can only be used to monitor the power on self-test diagnostics.
To perform this operation, connect a DB9 crossover cable to the serial port on the Bridge. Have an active
link open (such as HyperTerminal) and apply power to the bridge. A series of messages will be displayed
reporting the current firmware level and status of the bridge. After this has completed and the bridge
becomes ‘Ready’, the serial port has no other functionality.
The FibreBridge 2200R/D and 3200R have support for the complete set of remote service operations
over the RS-232 serial port either through a command line interface, menu system or graphical interface
(BridgeTools). The following steps illustrate how these bridges may be configured using standard
terminal emulation software available with most operating systems:
ATTO Technology, Inc.
- 26 -
Page 32

ATTO Technology, Inc. ATTO FibreBridge Installation & Operation Manual
1) Connect a DB9 crossover serial cable (null modem) between the ATTO FibreBridge serial port
and one of the computer's serial COM ports. A gender changer or DB-9 to DB-25 converter may
be needed depending on the cables being used.
2) Enable the computer’s serial port and initiate a terminal emulation link.
3) Set the following serial parameters in your terminal program:
a) Bits per second: 9600
b) Data Bits: 8
c) Parity: None
d) Stop Bits: 1
e) Flow Control: None
4) Use ASCII as the terminal type. Echo needs to be on.
5) Refer to the FibreBridge Software manual for details on configuring the bridge using the Services
menu or command line Interface.
Accessing the ATTO FibreBridge over the Ethernet Port
The 10/100 BaseT Ethernet port provides SNMP and Telnet based monitoring and management for the
FibreBridge 2200R/D and 3200R models either through a command line interface, menu system or
graphical interface (BridgeTools).
The default IP address is 10.0.0.1 and the default subnet mask is 255.255.255.0. These
parameters can be changed using the RS-232 Interface or Telnet .
Setting up the IP Address using the RS-232 port
The ATTO FibreBridge should first be configured for the network using the RS-232 port. It is
possible to directly connect to the bridge using the default IP address. However, it is not
recommended. To use the default IP address, skip to the next section. To set up the IP Address
using the RS-232 interface, do the following:
1) Connect a DB-9 serial cable to the ATTO FibreBridge serial port and establish a link as described
above.
2) Enter the menu system by typing MENU at the prompt:
a) At the FibreBridge Main Menu, select option FibreBridge Configuration
b) At the FibreBridge Configuration Menu, select option Network Configuration
c) At the Network Configuration Menu, select option IP Address
d) Enter the desired IP Address
3) To set the IP Subnet Mask, follow the instructions below:
a) At the FibreBridge Main Menu, select option FibreBridge Configuration
b) At the FibreBridge Configuration Menu, select option Network Configuration
c) At the Network Configuration Menu, select option IP Subnet Mask
d) Enter the desired IP Subnet Mask
4) To set the IP Gateway, follow the instructions below:
a) At the FibreBridge Main Menu, select option FibreBridge Configuration
ATTO Technology, Inc.
- 27 -
Page 33

ATTO Technology, Inc. ATTO FibreBridge Installation & Operation Manual
Tip: When using Telnet, the session within
b) At the FibreBridge Configuration Menu, select option Network Configuration
c) At the Network Configuration Menu, select option IP Gateway
d) Enter the desired IP Gateway
5) To set the FibreBridge Name, follow the instructions below:
a) At the FibreBridge main Menu, select option FibreBridge Configuration
b) At the FibreBridge Configuration Menu, select option FibreBridge Name [“ “]
c) Enter the desired FibreBridge Name. The name can be no more than eight characters. It is
recommended that a unique name be chosen to make identification of the unit easier.
6) To save the configuration, follow the instructions below:
7) At the FibreBridge Main Menu, select option Save/Restore Configuration
8) At the Save/Restore Configuration Menu, select option Save Configuration
9) At the Save Configuration Menu, select option Restart, to save the configuration and restart the
FibreBridge
Note: Any changes must be saved and will not take effect until the ATTO FibreBridge is restarted.
Accessing the ATTO FibreBridge using a Telnet session over Ethernet
The following steps are necessary to access the ATTO FibreBridge via Ethernet .
1) Connect an Ethernet cable between the FibreBridge and a 10/100Base-T connection. A
crossover cable must be used if connecting directly to a computer.
2) The ATTO FibreBridge will auto detect the Ethernet speed.
3) The product module can be accessed using any standard Telnet program. To connect via telnet,
supply the IP address to the Telnet program. It is recommended that local echo be set to on if the
Telnet software supports it. Use either Vt100 or ASCII terminal emulation for communication.
Firmware and NVRAM updates can be accomplished through a standard FTP program. See
below for more information on accessing the product module with FTP.
4) Verify that the bridge can be accessed on the local Ethernet by using the Ping utility. On most
systems, type ping <IP Address>. If there is no response from the product module, it may not be
connected correctly to the network, or is somehow unreachable from the computer from which it
is being pinged. Check network connections and security as well as the ATTO FibreBridge itself.
the FibreBridge remains active for a time,
even after you log out of the Telnet program.
Please remember to log out or disconnect
from the Telnet session before exiting the
Telnet program itself.
Accessing through FTP
The following steps provide a guide through the FTP set-up and configuration for the
ATTO FibreBridge:
1) Access the ATTO FibreBridge using Ethernet as described previously.
2) Access the ATTO FibreBridge at the IP address that was previously set (or the default).
ATTO Technology, Inc.
- 28 -
Page 34

ATTO Technology, Inc. ATTO FibreBridge Installation & Operation Manual
Tip: When using FTP with the FibreBridge
3) Login to the ATTO FibreBridge. The username that the bridge will accept is sysadmin. Enter
userid as the password.
4) Make sure that the FTP program is in Binary mode.
3200R, remember to close the connection
using a standard FTP CLOSE command or
similar process before exiting the FTP
program.
ATTO Technology, Inc.
- 29 -
Page 35

ATTO Technology, Inc. ATTO FibreBridge Installation & Operation Manual
Chapter 8: Serverless Backup Support
What is Serverless Backup?
Serverless Backup is an application that allows data to be copied between two storage devices (Fibre
Channel disks, SCSI disks and SCSI tapes) with minimal to no intervention from a server.
As the volume of data on a network grows, the resources required to back up this data also grow. Data
protection requires that large volumes of data be copied from on-line storage devices to dedicated archive
devices. This places a very heavy load on the host processors, I/O busses, memory busses, and frontend network, thus reducing the server’s ability to “serve” its clients, as well as a general reduction in
performance.
Serverless Backup utilizes the T10/99-143r1 Extended Copy command to allow a “copy manager” (the
FibreBridge) to execute the entire read and write operations necessary to move the data. Blocks of data
are moved directly from the Fibre Channel storage through the bridge to SCSI tape or from SCSI storage
through the bridge to the SCSI tape, all at Fibre Channel and SCSI speeds (as compared to moving data
across the Ethernet network). A copy “agent” is still required to execute on the server in order to provide
a user interface to initiate a backup or restore operation as well as manage and synchronize the
movement of data sets. This copy agent is either included, or available as an add-on with many of the
high-end tape backup software applications on the market.
ATTO
Figure 8.1 Serverless Backup
ATTO Technology, Inc.
- 30 -
Page 36

ATTO Technology, Inc. ATTO FibreBridge Installation & Operation Manual
The Extended Copy command contains target and segment descriptors that are used to define which
data is to be moved between which devices. With Serverless backup, the server sends a single
Extended Copy command to the FibreBridge. The bridge then interprets the segment descriptors and
issues read commands to the appropriate devices. Once enough data is read, the bridge will issue write
commands to the appropriate device. Once all of the segment descriptors have been executed, the
bridge will send status to the copy agent running in the server. In this way, the data never passes into the
server. Thus freeing the CPU and Memory to process other requests.
Target Descriptors
Target Descriptors allow the host to describe the devices to be involved in the Extended Copy. In order
to be compatible with all of the Copy Agent Application packages, the FibreBridge implementation
supports World Wide Name, N_Port ID, and WWN plus N_Port ID descriptor types.
Segment Descriptors
Segment Descriptors describe the data to copy and how much of it. The two most common types of
Target Descriptors are “block (disk) to stream (tape)” and “stream (tape) to block (drive)”. The
FibreBridge also supports “block to block”, “inline to stream” and “stream to discard” descriptors.
General Operation of Serverless Backup
Serverless Backup is available in the following models of the FibreBridge at no extra charge:
• FibreBridge 3200R
• FibreBridge 2200R/D
The FibreBridge will execute Extended Copy to and from SCSI disk and tape drives connected directly to
the FibreBridge as well as from Fibre Channel disk drives. The hard drives that you are backing up or
restoring to can be anywhere on the Storage Area Network, including SCSI drives attached to the bridge.
Note that the FibreBridge will support up to 830 MBytes of data to be copied in a single Extended Copy
command. Larger files must be backed up or restored using additional operations. The bridge can
support up to two simultaneous Extended Copy commands.
Please check the ATTO Technology, Inc. web site at www.attotech.com for a complete list of all of the
applications supported as well as detailed installation and configuration tips.
Enabling Serverless Backup on the FibreBridge
The following steps are necessary to enabled Serverless Backup on the FibreBridge.
1) Access the FibreBridge either through RS 232 or Ethernet(see previous chapter for details).
2) After Ready prompt, type set Fcinitiator enabled.
3) At next Ready prompt, type saveconfiguration restart.
4) The FibreBridge is now ready for Serverless Backup.
ATTO Technology, Inc.
- 31 -
Page 37

ATTO Technology, Inc. ATTO FibreBridge Installation & Operation Manual
Chapter 9: Updating the Firmware Within the FibreBridge
Flashing the FibreBridge
The FibreBridge has four separate processors controlling the flow of data. The firmware to control these
processors can easily be upgraded in the field using either:
• Write buffer command over the in-band Fibre Channel connection
• PUT command from an FTP connection
• ZModem utility over an RS-232 serial connection
Using the ATTO BridgeTools configuration software is the easiest way to update firmware over the inban, Ethernet, or serial links. The FibreBridge firmware is distributed as a compressed .JAR file and can
be obtained from the ATTO Technology, Inc. web site at www.attotech.com. The firmware is updated on
a regular basis so it is recommended to check for a new version often. The firmware does not need to be
decompressed if using BridgeTools to flash. Refer to the detailed instructions within the BridgeTools
manual to proceed.
The firmware can also be flashed using FTP. This process does require the distributed file to be
uncompressed into an image file (.IMA). Establish an FTP link to the bridge that is to be flashed as
described above. Use the PUT command to download the firmware. For example:
$ PUT c:\bridge_firmware FB3200100.IMA
Refer to the ATTO FibreBridge Software manual for further details on the PUT command. It is important
not to flash the wrong file. If it is flashed incorrectly or with the wrong firmware, DO NOT RECYCLE the
power. Instead, attempt to upload the correct file into the product module. If this does not work, call ATTO
Technical Support.
Once the download is complete, cycle power on the FibreBridge to have the new firmware control the
bridge.
The RS-232 serial link can also be used to flash new firmware into the FibreBridge. Again, the .JAR file
needs to be uncompressed into an image file (.IMA) before flashing. Refer to the ATTO FibreBridge
Software manual for details on using the ZModem command to load new firmware.
ATTO Technology, Inc.
- 32 -
Page 38

ATTO Technology, Inc. ATTO FibreBridge Installation & Operation Manual
Chapter 10: Addressing SCSI Devices
The FibreBridge is very dynamic in how SCSI devices are mapped into Fibre Channel addresses. This
allows the user to virtually have any possible SCSI configuration. An overview of device addressing is
given below. Refer to Appendix A for a detailed explanation of the FibreBridge addressing methodology.
Identifying the FibreBridge
To a host computer, the FibreBridge will show up as a: Bus : Target ID : LUN
The bus depends upon which PCI slot the host adapter is plugged into within the host computer. The ID
is determined from either the Soft or Hard Fibre Channel ID of the FibreBridge (AL_PA). The FibreBridge
is set to use Soft IDs by default. The bridge can be set to use a Hard ID by using FibreBridge Services to
set the appropriate bit in the NVRAM. It is recommended to use Hard Addressing for UNIX applications
because the operating system does not automatically scan for devices. The LUN of the FibreBridge can
also be set using FibreBridge Services (BridgeTools is recommended). The default value is 14.
If you want the FibreBridge to be detected by the operating system, its Soft Fibre LUN value must be set
within the range of the operating system. The bridge does not need to be detected for normal operation.
The bridge DOES need to be detected if you want to use the in-band connection method for BridgeTools.
The FibreBridge will never be detected in UNIX environments because the operating system does not
contain a native device driver for bridge type devices.
The following is a brief overview of the steps involved in setting the ID and LUN of the FibreBridge. Refer
to the BridgeTools manual for further information.
1. Load BridgeTools onto your PC.
2. Physically connect to the bridge using either the in-band Fibre Channel link, a crossover (null
modem) RS-232 serial cable, or an Ethernet cable (crossover cable if a hub or switch is not being
used). Skip to step 3 if you use RS-232 or Ethernet.
2.1. If you were using the Fibre Channel link to talk to the bridge, it would be best to connect
directly from a host adapter to the FibreBridge at first instead of going through a switch. This
is because the default Fibre Channel port mode for the FibreBridge is set to NL_Port (Loop
Mode). Some switches do not have the ability to auto detect between N_Port and NL_Port
devices. Make sure the host adapter is set for NL_Port mode.
2.2. For the Fibre Channel link, you also need to make sure the operating system and the host
adapter are set to be able to detect at least LUNs 0 - 15. The bridge must be detected by
the operating system in order to use in-band communications. The FibreBridge default LUN
is 14.
3. Launch the BridgeTools program and select your connection method.
4. Once a connection is established, a window will appear showing some basic information for the
FibreBridge. Take note of the WorldWide Name (WWN) because some switches require this for
addressing purposes.
ATTO Technology, Inc.
- 33 -
Page 39

ATTO Technology, Inc. ATTO FibreBridge Installation & Operation Manual
5. Select the Fibre Channel tab from the main window.
5.1. From within the Fibre Channel panel, the FibreBridge can be set to use Hard Addressing if
desired. Default = Soft Addressing.
5.2. Select the value of the Hard Address. Default value = 3.
5.3. Set the FibreBridge Soft Fibre LUN to the desired value. Default value = 14
6. Select the Save/Restore Tab within BridgeTools. Select the ‘Save Settings’ option and then the
‘Restart Firmware’ option for the changes to take effect.
Identifying the SCSI Devices Connected to the FibreBridge
As described above, the FibreBridge will be identified by a Bus, Target ID, and LUN. All SCSI devices
connected to the bridge will also be identified by the same Bus and Target as the bridge, but will have a
unique LUN.
For example, if the FibreBridge is at: Bus 0, Target 3, LUN 14
A SCSI device connected to that Bridge could be at: Bus 0, Target 3, LUN 0
The FibreBridge will translate the SCSI device’s Target ID into a Fibre Channel LUN, depending upon the
Addressing Mode selected. Refer to the BridgeTools manual and the description of the Fibre Channel to
SCSI Address Translation in Appendix A of this manual for details.
The SCSI portion of the bridge acts as a SCSI Initiator and therefore must have an initiator ID. Data going
from the bridge to a device requires the format "from ID X to ID Y". This is how the device knows who to
respond to on the SCSI bus. This SCSI Initiator Soft ID can also be set using SCSI FibreBridge Services.
The default value is 7. This is ideal for most configurations, but it is critical to make sure the SCSI
devices that are connected to the bridge are set to different IDs than this initiator ID to avoid device
conflicts.
The two SCSI channels on the Bridge are totally independent. You can have both SCSI channels of the
bridge set to the same ID and you can have a drive on bridge channel #1 set to ID 0 and also a drive on
bridge channel #2 set to 0.
Some operating systems are limited in the number of LUNs they can use. It is best to keep the SCSI
device Target ID as low as possible to assure they will be translated into a LUN between 0 and 31. For
example, if there are eight SCSI devices to be connected to the bridge, connect four of them to
FibreBridge SCSI Bus 1 and set their IDs to 0, 1, 2 and 3. Connect the remaining four devices to
FibreBridge SCSI Bus 2 and set their IDs to 0, 1, 2 and 3. With the default Address Translation method
of the bridge, these devices will be translated into Fibre Channel LUNs 0 through 7.
ATTO Technology, Inc.
- 34 -
Page 40

ATTO Technology, Inc. ATTO FibreBridge Installation & Operation Manual
Default Address Translation
The default Address Translation method should be sufficient for most configurations.
For devices connected to FibreBridge SCSI Bus 1:
SCSI Target ID 0 1 2 3 4 5 6 7
Translated into Fibre LUN 0 2 4 6 8 10 12 14
For devices connected to FibreBridge SCSI Bus 2:
SCSI Target ID 0 1 2 3 4 5 6 7
Translated into Fibre LUN 1 3 5 7 9 11 13 15
If this mapping is not acceptable, the translation can be modified using FibreBridge Services. Refer to the
BridgeTools manual and Appendix A for details.
ATTO Technology, Inc.
- 35 -
Page 41

ATTO Technology, Inc. ATTO FibreBridge Installation & Operation Manual
Appendix A: Fibre Channel to SCSI Address Mapping
The ATTO Technology FibreBridge allows parallel SCSI devices to participate in a Fibre Channel
arbitrated loop or on a fabric. Fibre Channel and parallel SCSI use different models to address devices.
The FibreBridge translates between these addressing models. This paper describes both addressing
models and address mapping, and provides guidelines for establishing addresses in typical
configurations.
The following chart provides an overview of data and control flow between the application and the SCSI
device through a number of stages. Many details of operation are hidden due to a very high level of
abstraction.
Application
Operating System
Host Bus Adapter
FCP (SCSI)
FibreBridge
Read & write data.
SCSI LUN addressing in OS native form, e.g. dense LUN list starting at 0.
Maps OS native LUNs to Addressing Method (PDAM, VDAM, LUAM, none).
FCP_CMD: 4 levels of 16-bit LUNs plus CDB plus data.
Parse LUN (per Addressing Method) into SCSI Bus or FibreBridge/SCSI address.
Executes SCSI commands directed to the FibreBridge.
SCSI bus
SCSI device
Transport SCSI address, CDB, and data to/from SCSI device.
SCSI device operation.
Addressing Devices Connected to the FibreBridge
SCSI devices connected to the FibreBridge also show up as Fibre Channel LUNs to the host computer.
This is intuitive because the SCSI devices must be on the same addressing level as the SCSI portion of
the FibreBridge. This implies that the FibreBridge must be set to a different ID than the devices on the
bus.
Even though the host computer will see the SCSI portion of the FibreBridge as a LUN, we should instead
refer to this address as a SCSI Target ID (to be consistent with the SCSI world). SCSI devices connected
directly to the FibreBridge will also be referred to as having Target IDs instead of LUNs. This is what
allows you to have a LUN of a LUN. If the FibreBridge is a Target ID, and a RAID Controller connected to
the FibreBridge is a Target ID, then SCSI drives connected to the RAID Controller can be addressed as
LUNs - or a LUN of a Fibre Channel LUN (or, as we just defined it – a LUN of a Target ID). One problem
now remains. How does the host computer identify these drives? The SCSI Target IDs (FibreBridge,
directly connected drives, & RAID controllers) are combined with LUNs (drives connected to the RAID
Controllers) into one level of addressing – LUNs, as seen by the host computer.
This "combining" of SCSI Target IDs and SCSI LUNs into one level of addressing is made possible by the
number of bits available in the first level addressing field (two bytes) within the FCP_ LUN field. The
FibreBridge designates a certain number of bits for the SCSI LUN, the Target ID, and the Bus. The Bus
Identifier is used to distinguish between the two SCSI busses on the FibreBridge and will be discussed in
more detail below. The methodology behind this follows the rules of SCSI Hierarchical Addressing.
ATTO Technology, Inc.
- 36 -
Page 42

ATTO Technology, Inc. ATTO FibreBridge Installation & Operation Manual
Fibre Channel Addressing
Fibre Channel World Wide Name (WWN)
Each Fibre Channel device is assigned a unique World Wide Name (WWN). The WWN is used to identify
all Fibre Channel devices. The 64-bit WWN has the following format:
Field Name
Byte 0 1 2 3 4 5 6 7
Value 20 00 00 10 86 xx xx xx
The WWN Format field indicates the format of the remaining fields in the WorldWide Name.
The Institute of Electrical and Electronics Engineers (IEEE) assigns the Company ID field. All
manufacturers of Fibre Channel equipment register with the IEEE to obtain a unique Company
Identification value. The IEEE manages the Company ID assignment, guaranteeing that no two
manufacturers will have the same Company ID.
The Device ID field contains a unique value assigned by ATTO Technology to every Fibre Channel
product produced by ATTO Technology.
When combined, these three fields create a 64-bit value, which is used to uniquely identify every Fibre
Channel device.
Arbitrated Loop Port Address (AL_PA)
On a Fibre Channel Arbitrated Loop, the FibreBridge appears at a single Arbitrated Loop Port Address
(AL_PA). Each device on an arbitrated loop is assigned a unique AL_PA during loop initialization. The
FibreBridge supports both modes of AL_PA assignment, commonly referred to as Hard and Soft
Addressing.
Soft Addressing allows the loop initialization master to assign the FibreBridge a unique AL_PA during the
loop initialization process. When Soft Addressing is in effect, the AL_PA assigned to the FibreBridge
cannot be determined prior to loop initialization. For example, adding new devices to an arbitrated loop
may change the AL_PA assigned to the FibreBridge.
WWN Format Company ID Device ID
Hard Addressing allows a predetermined AL_PA to be assigned to the FibreBridge. The FibreBridge will
attempt to acquire the desired hard AL_PA. If another device has already been assigned the specified
AL_PA, the FibreBridge will acquire a currently unassigned AL_PA.
ATTO BridgeTools software gives the user the ability to select either Hard or Soft Addressing modes.
The default mode is Soft Addressing.
SCSI Address Components
The SCSI devices connected to the FibreBridge are uniquely addressed by a three-part address.
SCSI Bus Identifier
The SCSI Bus Identifier indicates on which of the two FibreBridge SCSI bus ports the device resides.
ATTO Technology, Inc.
- 37 -
Page 43

ATTO Technology, Inc. ATTO FibreBridge Installation & Operation Manual
SCSI Target Identifier
The SCSI Target Identifier indicates the SCSI ID assigned to the target. Each device on the same
physical SCSI bus must be assigned a unique SCSI ID. A Wide (16-bit) SCSI bus will support a maximum
of 16 SCSI IDs (including the SCSI ID assigned to the FibreBridge).
SCSI Logical Unit Number
The SCSI Logical Unit Number indicates the logical unit being addressed within the specified target.
SCSI Architecture Model (SAM-2) Logical Unit Addressing
The SCSI Architecture Model – 2 (SAM-2) specification defines a reference model that specifies common
behaviors for SCSI devices, and an abstract structure that is generic to all SCSI-3 I/O system
implementations. The structure for Logical Unit Addressing is detailed below.
What is a Logical Unit?
A logical unit is the entity that executes SCSI Commands sent by SCSI initiators. A logical unit is
addressed by a Logical Unit Number (LUN). A LUN is represented by a 64-bit number in Fibre Channel
and a 5-bit number in parallel SCSI. The FibreBridge will map between an 8-byte (64-bit) Fibre Channel
LUN and a parallel SCSI LUN.
Hierarchical Addressing Model
SAM-2 defines the concept of hierarchical LUN addressing and the four addressing levels that are
supported. The hierarchical LUN address is shown in the table below.
7 6 5 4 3 2 1 0
Bit
Byte
0 (MSB)
1
2 (MSB)
3
4 (MSB)
5
6 (MSB)
7
The FibreBridge implements a single level of hierarchical LUN addressing by using the 16-bit “First Level
Addressing Field”. The contents of the second, third and fourth level addressing fields are ignored by the
FibreBridge.
Addressing Field Format
Each of the four addressing level fields is structured as a 16-bit value with the following format.
First level addressing field
Second level addressing field
Third level addressing field
Fourth level addressing field
(LSB)
(LSB)
(LSB)
(LSB)
ATTO Technology, Inc.
- 38 -
Page 44

ATTO Technology, Inc. ATTO FibreBridge Installation & Operation Manual
Bit Number
15 14 13 12 11 10 9 8 7 6 5 4 3 2 1 0
Address
Method
Bits 15-14 contain the Address Method code. This code is used to determine how the remaining 14 bits
are to be interpreted by SCSI devices. The following table defines the available Addressing Methods.
Address Method Code
Address Method Specific Definition
Description
00b Peripheral device addressing method
01b Virtual device addressing method
10b Logical unit addressing method
11b
RESERVED
An overview of the three defined Addressing Methods is given below. The fields are listed as defined in
the SAM-2 specification. Details of each Addressing Method are discussed later in this document.
These Address Methods provide alternative user definable paths to SCSI devices. The Peripheral Device
Addressing Method (PDAM) is the predominant method and is what is used in the examples that follow.
Since by definition, bits 15-14 are 00, it is the only method that can be used by host/environments
supporting <16 bits of LUN addressing. If the host/environment can support 16 bits, then any of the 3
addressing methods can apply.
Peripheral Device Addressing Method
Bit Number
15 14 13 12 11 10 9 8 7 6 5 4 3 2 1 0
0 0 Bus Identifier Target / LUN
By definition, PDAM address 0 (bus = target = LUN = 0) selects the FibreBridge.
The Target field identifies the SCSI ID of the addressed SCSI device. The LUN field will select the logical
unit in the addressed target. Since the SCSI Architectural Model – 2 (SAM-2) does not specify exactly
which bits are assigned to the Target and which bits to the LUN, the FibreBridge makes this user
definable. The default assignments are listed below.
Bit Number
15 14 13 12 11 10 9 8 7 6 5 4 3 2 1 0
0 0 N/A Bus Identifier Target LUN
The location and width of the Bus, Target and LUN fields are field programmable and are stored in the
FibreBridge non-volatile RAM. This allows custom address translations to be created to meet special
requirements for the customer, operating system, host bus adapter or peripheral device. Another NVRAM
ATTO Technology, Inc.
- 39 -
Page 45

ATTO Technology, Inc. ATTO FibreBridge Installation & Operation Manual
parameter allows the host to specify that the peripheral device addressing method will be used regardless
of the Addressing Method field in the first level address. This allows custom address translations to be
built for systems that may not properly support hierarchical addressing.
Virtual Device Addressing Method
Bit Number
15 14 13 12 11 10 9 8 7 6 5 4 3 2 1 0
0 1 LUN
The LUN field indicates the address of the device to which the command will be routed. The FibreBridge
will extract the Bus Number, Target and LUN fields from the LUN based upon parameters contained in
FibreBridge non-volatile RAM. The default configuration imposes the following definitions on the LUN
field. The SAM-2 specification leaves this to be too arbitrary so again, the FibreBridge default settings
are as listed below.
Bit Number
15 14 13 12 11 10 9 8 7 6 5 4 3 2 1 0
0 1 N/A LUN Target Bus Identifier
Again, the location and width of the Bus, Target and LUN fields are field programmable and are stored in
FibreBridge non-volatile RAM. This allows custom address translations to be created to meet special
requirements for the customer, operating system, host bus adapter or peripheral device.
Logical Unit Addressing Method
Bit Number
15 14 13 12 11 10 9 8 7 6 5 4 3 2 1 0
1 0 Target Bus Number LUN
The Logical unit address method behaves exactly as the Peripheral device address method with two
notable exceptions – field placement and width. The Bus number and Target fields have been moved.
The LUN and Target fields are larger and the Bus number field is smaller. The FibreBridge will decode
logical unit addressing as described in the peripheral device address method section. Just as with the
peripheral and virtual modes, the location and width of the Bus, Target and LUN fields are field
programmable. The default mode for Logical Addressing is the same as defined in the SAM-2
specification.
FibreBridge Default Mode
By default, the FibreBridge suppresses the above methods of Hierarchical Addressing and uses its own
method, which closely follows the rules of peripheral addressing. This method of addressing is in effect
regardless of the Address Method field in the first level address unless you select the option to perform
LUN translations.
15 14 13 12 11 10 9 8 7 6 5 4 3 2 1 0
0 0 N/A LUN Target Bus
Bit Number
ATTO Technology, Inc.
- 40 -
Page 46

ATTO Technology, Inc. ATTO FibreBridge Installation & Operation Manual
This default method of addressing was developed with the assumption that not all host adapter
manufacturers have designed the hierarchical addressing methodology into their products yet. Since the
bit positions here are also easily modified in non-volatile RAM, this addressing will work with all host
adapters that only use one byte of LUN addressing.
Fibre Channel to SCSI Address Mapping
Hosts send commands to the FibreBridge (and attached SCSI devices) by sending FCP_CMND (Fibre
Channel Command) Frames to the AL_PA assigned to the FibreBridge during loop initialization. Each
FCP_CMND frame contains an 8-byte FCP_LUN field. The first level addressing field of the FCP_LUN
provides the three SCSI addressing components required to uniquely address a device. FCP_LUN
addressing levels 2 – 4 are ignored.
Address Descriptors
The Bus, Target, and LUN fields are set up using Address Descriptors. The SCSI Architecture Model
specification provides a guideline mapping the FCP_LUN first level addressing field into SCSI addressing
components. The FibreBridge uses user configurable Address Descriptors to effect this translation.
The FibreBridge contains an Address Descriptor for the Peripheral Device, Virtual Device, and Logical
Unit addressing methods. The Addressing Method specified in the FCP_LUN (bits 15-14) selects the
appropriate Address Descriptor.
Each Address Descriptor defines the size and location of each of the three SCSI addressing components
within the FCP_LUN first level addressing field. One hexadecimal digit is assigned to each of Bus,
Target, and LUN, with the left 4 bits indicating the rightmost bit-position of the respective field, and the
right 4 bits indicating the width of that field. Address Descriptors therefore are three bytes in length,
<bus><lun><target>.
For example, an address descriptor 820344 defines the bus (82), LUN (03), and target (44) components.
This bus component is a 2 bit field starting in bit-position 8; the LUN component is a 3 bit field starting in
bit-position 0; and the target component is a 4 bit field starting in bit-position 4. Additional addressing
examples representing typical configurations are provided below. The translation process masks off any
unmapped bits, and as a corollary, not all fields need to be mapped. Fields must be contiguous (e.g.
bllttb is not permitted - the bus field may not be split).
FibreBridge Address Descriptors are stored in non-volatile memory. They are field configurable using
SCSI WRITE/READ BUFFER commands or through ATTO BridgeTools software.
BridgeTools is the preferred method to set the Address Descriptor fields because of the supplied
graphical user interface.
SCSI-3 Command Changes for Hierarchical Addressing Support
The FibreBridge supports a limited set of SCSI commands directly, as described in Commands
documentation (see References above). A brief description of addressing-related aspects for commands
follows.
SCSI-3 INQUIRY Command
The Inquiry Data returned in the response from the SCSI-3 Inquiry command issued to the FibreBridge
includes the HiSupport bit set to 1. This indicates that the FibreBridge supports hierarchical addressing,
ATTO Technology, Inc.
- 41 -
Page 47

ATTO Technology, Inc. ATTO FibreBridge Installation & Operation Manual
and the Report LUNs command as described in the next section. FibreBridge hierarchical addressing is
limited to the first-level LUN support. More information is available in the reference documentation.
SCSI-3 REPORT LUNs Command
The SCSI-3 Report LUNs command returns a sorted list of LUNs available (at the time of execution of the
Report LUNs command) on the FibreBridge. LUNs in the returned LUN-list are formatted according to the
Peripheral Device Addressing Method. Although Report LUNs may be issued to the FibreBridge or to any
SCSI device attached to the FibreBridge, it is always executed by the FibreBridge and is not forwarded to
any attached SCSI devices. Additional information is available in the reference documentation.
What to Expect When Setting Device IDs
Most users will be able to use the FibreBridge Default Addressing Method to achieve full functionality.
Setting the ID of the FibreBridge
The ID is determined from either the Soft or Hard Fibre Channel ID of the FibreBridge (AL_PA). The
FibreBridge is set to use Soft IDs by default. The bridge can be set to use a Hard ID by using FibreBridge
Services to set the appropriate bit in the NVRAM. The LUN of the FibreBridge can also be set using
FibreBridge Services (BridgeTools is recommended). The default value is 14.
If you want the FibreBridge to be detected by the operating system, its Soft Fibre LUN value must be set
within the range of the operating system. The bridge does not need to be detected for normal operation.
The bridge DOES need to be detected if you want to use the in-band connection method for BridgeTools.
The FibreBridge will never be detected in UNIX environments because the operating system does not
contain a native device driver for bridge devices.
Addressing Connected SCSI Devices
Below is the default addressing mode bit definitions. Bits 0 through 7 are used to fully define a SCSI
device with a Target ID and a LUN connected to one of the two FibreBridge busses.
Bit Number
15 14 13 12 11 10 9 8 7 6 5 4 3 2 1 0
0 0 N/A LUN Target Bus
An operating system will identify this SCSI device under the AL-PA of the FibreBridge, based upon its
hard or soft ID, and the LUN based upon the bit definition above.
The four bit Target Field gets filled in from the SCSI ID (0 through 15) that you select for your connected
SCSI device. The three bit LUN Field gets filled in from the SCSI LUN (0 through 7) selected for your
connected SCSI device. Since the FibreBridge contains two independent busses, but is only being
detected as a single device from the host's point of view, the FibreBridge must manage the addressing
between bus 1 and bus 2. The bus bit(s) in the LUN byte is used to distinguish between SCSI bus 1 and
2. If you set the bus bit(s) to 0, SCSI Bus 1 of the FibreBridge will be selected. A 1 will select Bus 2. The
default addressing mode of the FibreBridge has the Bus Identifier bit in position 0. This translates to Bus
ATTO Technology, Inc.
- 42 -
Page 48

ATTO Technology, Inc. ATTO FibreBridge Installation & Operation Manual
1 containing even numbered LUNs (the bus bit is the LUN byte is always 0) while Bus 2 will only have
odd numbered LUNs (the bus bit is the LUN byte is always 1).
Some Fibre Channel host adapters are set to only address LUNs 0 through 7 by default. This
corresponds to only the first three bits in byte 1 of the FCP_LUN field. The bus designator is taking up
one of these bits, leaving only two of the Target bits to address devices. This means that with the default
settings of the FibreBridge, you are limited to four devices per FibreBridge SCSI channel, and they must
be set to IDs 0 through 3. Depending on how many SCSI devices are connected to the bridge, and the
IDs that they are set to, the host adapters may need to be configured to support more LUNs. Refer to the
manual supplied with the host adapter for instructions on making this change.
As an example, consider the following configuration:
• Say a FibreBridge has its Hard ID set to 3 and is using the default LUN value of 14
à FibreBridge will be detected at ID 3 LUN 14
• You set the ID of a SCSI drive #1 connected to Bus 1 of the FibreBridge to 1
LLL = 000 TTTT = 0001 B = 0
LUN Byte: LLLT TTTB à 0000 0010 = Fibre Channel LUN 2
à SCSI drive #1 will be detected at ID 3 LUN 2
• You set the ID of SCSI drive #2 connected to Bus 2 of the FibreBridge to 1
LLL = 000 TTTT = 0001 B = 1
LUN Byte: LLLT TTTB à 0000 0011 = Fibre Channel LUN 3
à SCSI drive #1 will be detected at ID 3 LUN 3
• You set the ID of a SCSI RAID Controller on Bus 1 of the Bridge to 0
LLL = 000 TTTT = 0000 B = 0
LUN Byte: LLLT TTTB à 0000 0000 = Fibre Channel LUN 0
à RAID Controller will be detected at ID 3 LUN 0
• You set the ID of a RAID group connected to the controller to 2
LLL = 010 TTTT = 0000 B = 0
LUN Byte: LLLT TTTB à 0100 0000 = Fibre Channel LUN 64
à RAID group will be detected at ID 3 LUN 64
For this configuration, all of the devices would be detected except for the RAID Group. This is because
the translated LUN would be 64. Most operating systems, and Fibre Channel host adapters are not
capable of supporting LUNs over 31. One way to compensate would be to change the address
translation of the FibreBridge as follows:
ATTO Technology, Inc.
- 43 -
Page 49

ATTO Technology, Inc. ATTO FibreBridge Installation & Operation Manual
Bit Number
15 14 13 12 11 10 9 8 7 6 5 4 3 2 1 0
0 0 N/A LUN Target Bus
The RAID Group at SCSI LUN 2 will now be mapped as follows:
LLLL = 0010 TTT = 000 B = 0
LUN Byte: LLLL TTTB à 0010 0000 = Fibre Channel LUN 32
à RAID group will be detected at ID 3 LUN 32
Configuration for Consecutive IDs
The Default Addressing mode of the FibreBridge is ideal when you wish to connect SCSI hard drives and
for most SCSI tape drive configurations. Problems may arise with some tape or CD Jukebox application
programs that require consecutive IDs for the devices connected to a SCSI bus. The Default Addressing
mode also poses a problem with SCSI RAID Controllers.
These limitations are easily overcome because you can program the addressing mode in the FibreBridge.
The reason for putting the Bus Identifier bit in position 0 is to improve performance through the
FibreBridge. In the SCSI world, device ID 0 has the highest priority, followed by ID 1, 2, and so on. By
having even IDs on Bus 1 and Odd IDs on Bus 2, the priorities are balanced between the two busses.
If you need to design for consecutive IDs on the SCSI bus, simply move the bit position of the SCSI Bus
Identifier.
Bit Number
15 14 13 12 11 10 9 8 7 6 5 4 3 2 1 0
0 0 N/A LUN Bus Target
For FibreBridge SCSI channel 1: SCSI Device ID 0 1 2 3
Translated LUN as it appears to the Host 0 1 2 3
For FibreBridge SCSI channel 2: SCSI Device ID 0 1 2 3
Translated LUN as it appears to the Host 4 5 6 7
Configurations for RAID Controllers
If you need to design for RAID Controllers with multiple LUNs, simply move the bit position of the SCSI
LUN Identifier.
ATTO Technology, Inc.
- 44 -
Page 50

ATTO Technology, Inc. ATTO FibreBridge Installation & Operation Manual
Bit Number
15 14 13 12 11 10 9 8 7 6 5 4 3 2 1 0
0 0 N/A LUN Target Bus
This mapping will allow for two RAID controllers on each FibreBridge SCSI bus (with SCSI IDs 0 and 1).
LLLLLL = 000000 T = 0 B = 0 LUN Byte: LLLL LLTB à 0000 0000 = Fibre Channel LUN 0
LLLLLL = 000000 T = 1 B = 0 LUN Byte: LLLL LLTB à 0000 0010 = Fibre Channel LUN 2
LLLLLL = 000000 T = 0 B = 1 LUN Byte: LLLL LLTB à 0000 0001 = Fibre Channel LUN 1
LLLLLL = 000000 T = 1 B = 1 LUN Byte: LLLL LLTB à 0000 0011 = Fibre Channel LUN 3
In a system that supports 32 Fibre Channel LUNs, each of the four RAID Controllers would be capable of
accessing 7 RAID Groups; with the exception of the device that would be translated to LUN 14.
LLLLLL = 000011 T = 1 B = 0 LUN Byte: LLLL LLTB à 0000 1110 = Fibre Channel LUN 14
Do NOT set a SCSI device ID to a value that would conflict with the LUN of the FibreBridge itself. The
default value is set to LUN 14, but this can easily be modified if necessary.
Steps in establishing device addresses when configuring a system
1. Identify all SCSI devices to be supported on the FibreBridge.
2. Identify any inter-device or intra-device addressing requirements (e.g. contiguous LUNs).
3. Identify any host/environment addressing constraints.
4. Identify the specific SCSI device address for each device.
5. Identify device specific parameters for tuning FibreBridge performance.
ATTO Technology, Inc.
- 45 -
Page 51

ATTO Technology, Inc. ATTO FibreBridge Installation & Operation Manual
Appendix B: Radio and Television Interference
The equipment described in this manual generates and uses radio frequency energy. If this equipment is
not used in strict accordance with the manufacturer's instruction, it can and may cause interference with
radio and television reception. See the Technical Specification sheet for the ATTO FibreBridge Product
Module for a full list of certifications for that particular model.
ATTO FibreBridge (all models)
FCC Standards
WARNING!
This equipment generates, uses, and can radiate radio frequency energy and, if not installed and
used in accordance with the instruction manual, may cause interference to radio communications.
It has been tested and found to comply with the limits for a Class A computing device pursuant to
Subpart J of Part 15 of FCC rules, which are designed to provide a reasonable protection against
such interference when operating in a commercial environment. Operation of this equipment in a
residential area is likely to cause interference, in which case the user, at his own expense, will be
required to take whatever measures may be required to correct the interference.
If this equipment does cause interference to radio and television reception, which can be determined by
turning the equipment off and on, try to correct the interference by one or more of the following measures:
• Move the receiving antenna.
• Relocate the computer with respect to the receiver, or move the computer away from the receiver.
• Plug the computer into a different outlet so the computer and receiver are on different branch circuits.
• If necessary, consult an ATTO authorized dealer, ATTO Technical Support Staff, or an experienced
radio/television technician for additional suggestions.
The booklet How to Identify and Resolve Radio/TV Interference Problems prepared by the Federal
Communications Commission is a helpful guide. It is available from the US Government printing office,
Washington, DC 20402, Stock No. 004-000-00345-4.
Canadian Standards
This Class A digital apparatus meets all requirements of the Canadian Interference-Causing Regulations.
Cet appareil numerique de la classe A respecte toutes les exigences du Reglement sur le materiel
brouilleur du Canada.
European Standards
Declaration of Conformity
This following statement applies to the ATTO FibreBridge Product Module. This device has been tested in
the basic operating configuration and found to be compliant with the following European Union standards:
• Application of Council Directive: 89/336/EEC
• Standard(s) to which conformity is declared: EN55022, EN50082-1
This Declaration will only be valid when this product is used in conjunction with other CE approved
devices and when the entire system is tested to the applicable CE standards and found to be compliant.
ATTO Technology, Inc.
- 46 -
Page 52

ATTO Technology, Inc. ATTO FibreBridge Installation & Operation Manual
Further results of FCC Testing
"In certain instances, extraordinary variances in the AC power supplied to this unit will require the
operating system's normal error recovery procedure to retry the current SCSI command. In this case, the
unit can fully recover with no loss of data, and without user intervention. Note that other exceptional
conditions in addition to variances in the AC power, such as improper cabling or unrecognized
commands, may also trigger these normal error recovery procedures"
ATTO Technology, Inc.
- 47 -
Page 53

ATTO Technology, Inc. ATTO FibreBridge Installation & Operation Manual
Appendix C: Circuit Board Dimensions & Important Jumper
Locations
Maximum Height
= 1.582” (4.015 cm)
Figure C-1 ATTO FibreBridge 2100R Product Module Board Layout
ATTO Technology, Inc.
- 48 -
Page 54

ATTO Technology, Inc. ATTO FibreBridge Installation & Operation Manual
Figure C-2 ATTO FibreBridge 2200R/D and 3200R Product Modules’ Board Layout
ATTO Technology, Inc.
- 49 -
Page 55

ATTO Technology, Inc. ATTO FibreBridge Installation & Operation Manual
Figure C-3 ATTO FibreBridge 3200R Connector Layout
ATTO Technology, Inc.
- 50 -
Page 56

ATTO Technology, Inc. ATTO FibreBridge Installation & Operation Manual
Appendix D: Fibre Channel Resources
To learn more about Fibre Channel, investigate the following resources:
• Fibre Channel Industry Association – www.fibrechannel.com
• FibreAlliance
• Celestra Consortium
• Storage Area Networking Industry Association (SNIA) – www.snia.org
• Cern – www.cern.ch
• Fibre Channel Consortium – www.iol.unh.edu
ATTO Technology, Inc.
- 51 -
Page 57

ATTO Technology, Inc. ATTO FibreBridge Installation & Operation Manual
Appendix E: Fibre Channel Accessories
The following is a list of Fibre Channel accessories that are available through ATTO Technology. Contact
an ATTO Technology authorized sales representative to order any of these.
--------------------------------------------------
ATTO FC Rack System (build to order)
FC Rack Enclosures with Power Supplies
FCRS-BAS1-000…… Rack System with Single Power Supply
FCRS-BAS2-000…… Rack System with Redundant Power Supplies
FibreBridge 2100R
FCBR-DU08-000…….ATTO FibreBridge 2100R HVD Standard
FCBR-DU64-000…… ATTO FibreBridge 2100R HVD Enhanced
FCBR-SU08-000…… ATTO FibreBridge 2100R Single-Ended Standard
FCBR-SU64-000…… ATTO FibreBridge 2100R Single-Ended Enhanced
FibreBridge 3200R
FCBR-3200-RH0…… ATTO FibreBridge 3200R HVD Replacement Unit
FCBR-3200-RL0…… ATTO FibreBridge 3200R LVD Replacement Unit
Field Replacement Units (FRU)
PWRA-0000-FRU…… Power Module for ATTO FC Rack System
FCBR-DU08-FRU…….ATTO FibreBridge 2100R HVD Standard Replacement Unit
FCBR-DU64-FRU…… ATTO FibreBridge 2100R HVD Enhanced Replacement Unit
FCBR-SU08-FRU…… ATTO FibreBridge 2100R Single-Ended Standard Replacement Unit
FCBR-SU64-FRU…… ATTO FibreBridge 2100R Single-Ended Enhanced Replacement Unit
FCBR-3200-RHF…… ATTO FibreBridge 3200R HVD Replacement Unit
FCBR-3200-RLF…… ATTO FibreBridge 3200R LVD Replacement Unit
--------------------------------------------------
FibreBridge 2200R/D
FCBR-2200-DH0…… Fibre Channel to HVD Ultra SCSI Bridge Desktop or Rackmount
FCBR-2200-DL0…… Fibre Channel to LVD Ultra2 SCSI Bridge Desktop or Rackmount
MIAs
ADAP-MIAS-BLK ..MIA Adapter-Short Wave
GBICS
GBIC-DB90-000....GBIC – DB9 Active Copper Interface
GBIC-HSDC-000..GBIC – HSSDC Active Copper Interface
GBIC-SWFO-000..GBIC – Short Wave Optical Duplex SC Interface
Cables/Copper
CBL-FCCU-003 ....DB9 Copper Fibre Channel Cable (Unequalized) – 3m.
CBL-FCCU-010 ....DB9 Copper Fibre Channel Cable (Unequalized) – 10m.
CBL-FCCE-020.....DB9 Copper Fibre Channel Cable (Equalized) – 20m.
CBL-HSDB-003 ....HSSDC to DB9 Copper Fibre Channel Cable (Une qualized) – 3m.
ATTO Technology, Inc.
- 52 -
Page 58

ATTO Technology, Inc. ATTO FibreBridge Installation & Operation Manual
CBL-HSDB-010 ....HSSDC to DB9 Copper Fibre Channel Cable (Unequalized) – 10m.
CBL-HSHS-003 ....HSSDC to HSSDC Copper Fibre Channel Cable (Unequalized) – 3m.
CBL-HSHS-010 ....HSSDC to HSSDC Copper Fibre Channel Cable (Unequalized) – 10m.
Cables/Optical
CBL-FCFI-005 ...... 5 Meter Cable-Duplex 50 Micron Multi-mode FC/Optical
CBL-FCFI-010 ...... 10 Meter Cable-Duplex 50 Micron Multi-mode FC/Optical
CBL-FCFI-030 ...... 30 Meter Cable- Duplex 50 Micron Multi-mode FC/Optical
Cables/FibreChain
CBL-FCFC-001.....FibreChain 24” Cable
Cables/SCSI
CBL-FP68-C3.......68-pin “P” / 50-pin Centronics – 1m
CBL-FP68-C6.......68-pin “P” / 50-pin Centronics – 2m
CBL-FP68-C25.....68-pin “P” / 50-pin Centronics – 8m
CBL-FP68-C79.....68-pin “P” / 50-pin Centronics – 24m
CBL-F68E-00X ..... 68-pin “P” / 68-pin fine pitch “P” – 1ft
CBL-U68E-681 .....68-pin “P” / 68-pin fine pitch “P” – 1m
CBL-F68E-686......68-pin “P” / 68-pin fine pitch “P” – 2m
CBL-F68E-003......68-pin “P” / 68-pin fine pitch “P” – 3m
CBL-F68E-010......68-pin “P” / 68-pin fine pitch “P” – 10m
CBL-F68E-025......68-pin “P” / 68-pin fine pitch “P” – 25m
CBL-F68E-68X ..... 68-pin “P” / 68-pin fine pitch “P” – 16m.
ATTO Technology, Inc.
- 53 -
Page 59

ATTO Technology, Inc. ATTO FibreBridge Installation & Operation Manual
Appendix F: How to Contact ATTO Technology, Inc.
Customer service, sales information and technical support are available by phone Monday through
Friday, Eastern Standard Time 8:00 a.m. to 8:00 p.m., or by fax and web site 24-hours a day.
ATTO Technology, Inc.
155 CrossPoint Parkway
Amherst, New York 14068
(716) 691-1999 • voice
(716) 691-9353 • fax
http://www.attotech.com
ATTO Technology can also be reached via e-mail at the following addresses:
Sales Support : sls@attotech.com
Technical Support : techsupp@attotech.com
ATTO Technology, Inc.
- 54 -
 Loading...