

Page 1
Diamond Storage Array
VT-Class
Installation and Operation Manual
© 2005 ATTO Technology Inc. All rights reserved. All brand or product names are trademarks of their
respective holders. No part of this manual may be reproduced in any form or by any means without the
express written permission of ATTO Technology Inc.
2/05 6.4 PRMA-0341-000
Page 2

Page 3

Page 4

Contents
Preface
1.0 Diamond Storage Array-VT Product Overview .............................1
Diamond-VT features
Fibre Channel model
SCSI model
2.0 Diamond-VT Technical Overview ...................................................3
ADXT Powers ATA to New Levels
3.0 Installation Instructions ..................................................................5
Step 1: physical setup
Step 2a: set up the Ethernet connection
Step 2b: connect to Ethernet
Step 3: set up Virtual Tape configuration
Configuration examples
3.1 Diamond-VT Components ....................................................7
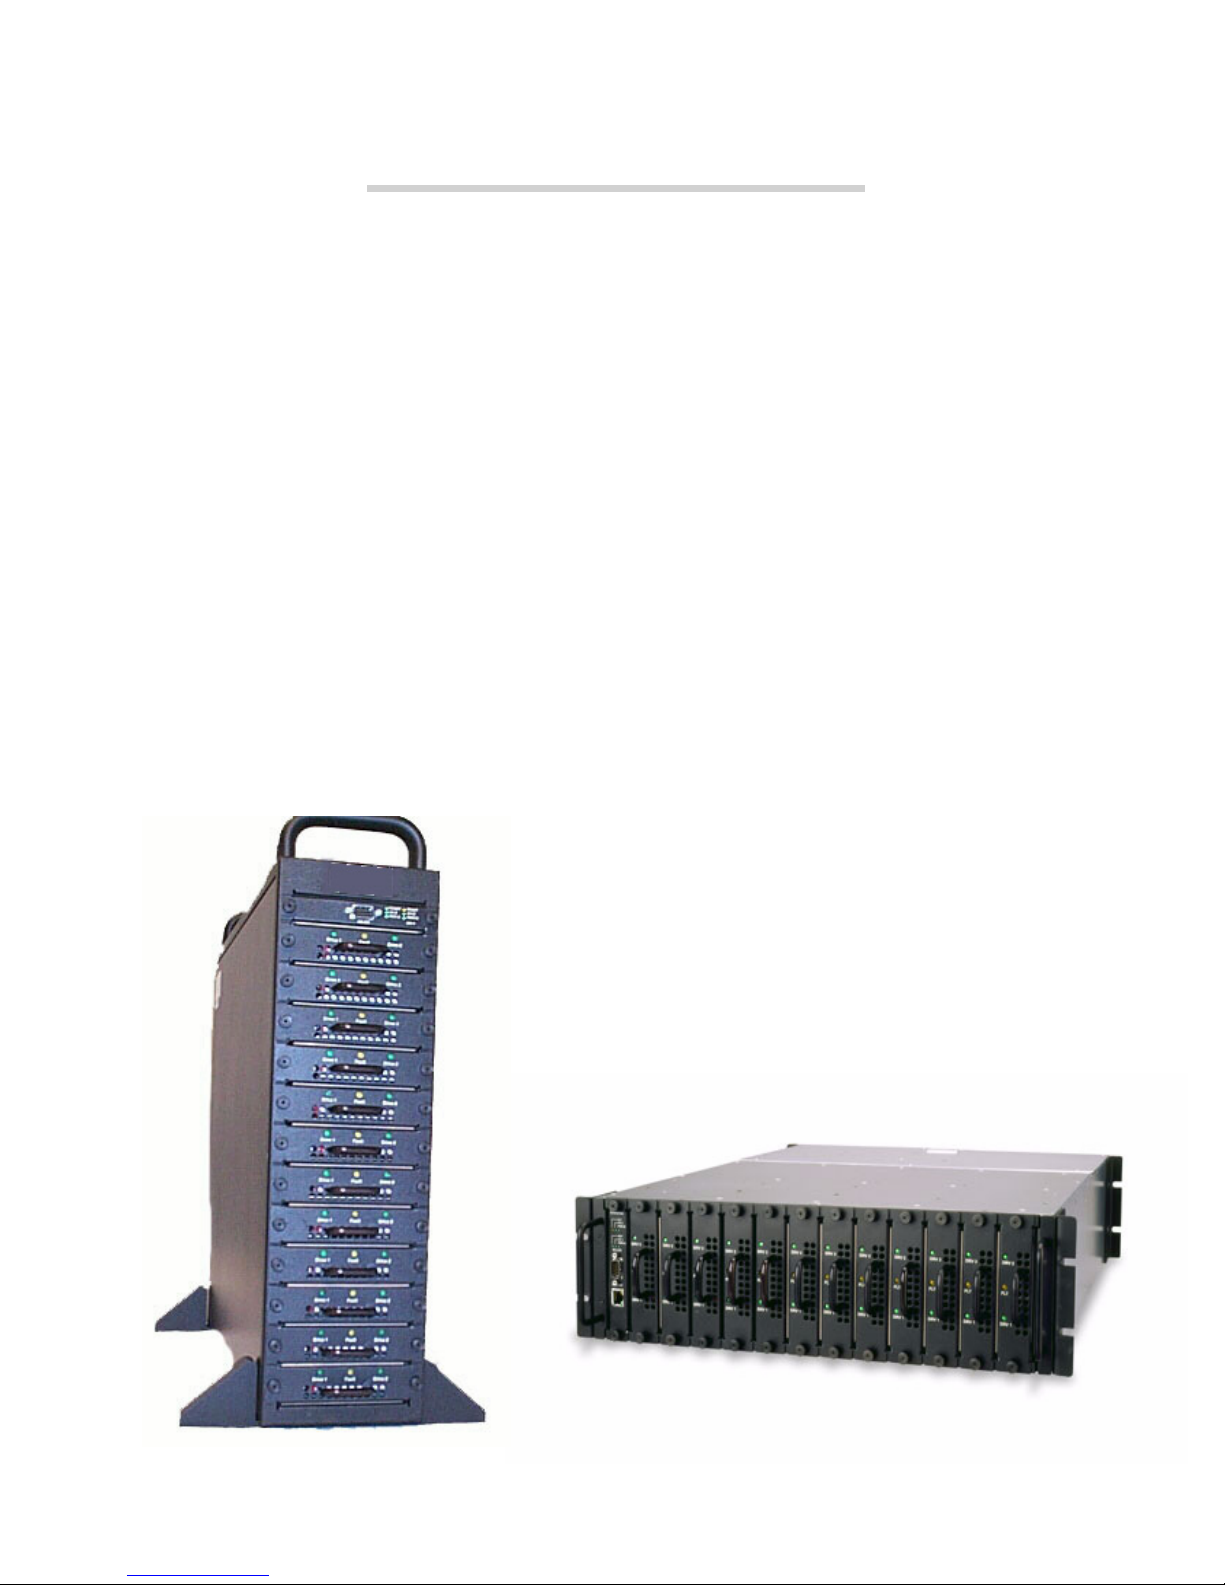
Floor model
Rack mount model
3.2 Diamond-VT Physical Setup ................................................9
Floor Model
Rack Mount
General Instructions
3.2.1 Connecting a Fibre Channel Array ........................11
Autoconfiguration
Manual configuration
3.2.2 Connecting a SCSI Array ........................................13
4.0 Accessing the Diamond-VT ............................................................15
Command Line Interface
ATTO ExpressNAV
In-band SCSI over Fibre Channel
RS-232 port
Ethernet port
SNMP
4.1 In-band CLI Over Fibre Channel ..........................................17
I/O details
4.2 Serial Port Access .................................................................19
4.3 Ethernet Access: Telnet and SNMP Protocols ...................21
ATTO Technology Inc.
Page 5

5.0 ATTO ExpressNAV: Browser-based Interface ..............................23
Browser compatibility
Opening an ExpressNAV session
Navigating ExpressNAV
5.1 ExpressNAV Pages ...............................................................25
Status
Ethernet
SNMP
Serial Port
Fibre Channel
Storage Management
RAID
Clear Data
Logical Units
Partitions
Zoning
Tape Volumes
Tape Drives
Move Medium
Rebuild
Configuration
Advanced
Restart
Help
6.0 CLI: Interface via ASCII-based Commands ...................................27
6.1 Summary of CLI Commands ................................................29
6.2 General Use Commands .......................................................32
FirmwareRestart
Help
RestoreConfiguration
SaveConfiguration
SystemSN
VerboseMode
ZoneCommit
6.3 Ethernet Commands .............................................................33
EthernetSpeed
Exit
FTPPassword
IPAddress
IPDHCP
IPGateway
IPSubnetMask
SNMPTrapAddress
SNMPTraps
SNMPUpdates
Te ln e t Pa s sw or d
TelnetTimeout
TelnetUsername
TelnetUsername
Diamond Storage Array Installation and Operation Manual
Page 6

6.4 Fibre Channel Configuration Commands ...........................35
FcConnMode
FcDataRate
FcFairArb
FcFrameLength
FcFullDuplex
FcHard
FcHardAddress
FcNodeName
FcPortInfo
FcPortList
FcPortName
FcScsiBusyStatus
FcWWName
6.5 Serial Port Configuration Commands .................................37
SerialPortBaudRate
SerialPortEcho
SerialPortHandshake
SerialPortStopBits
6.6 Maintenance Services Commands ......................................38
FcScsiBusyStatus
FirmwareRestart
MaxEnclTempAlrm
MinEnclTempAlrm
ResolveLUNConflicts
RestoreConfiguration
SaveConfiguration
SpeedWrite
Temperature
Zmodem
ZoneRetrieve
6.7 Diagnostic Commands .........................................................39
ATTO Technology Inc.
AudibleAlarm
DiamondModel
DiamondName
DriveCopyStatus
DriveInfo
FcNodeName
FcPortInfo
FcPortList
FcPortName
Help
IdentifyDiamond
Info
LUNInfo
PartitionInfo
PowerAudibleAlarm
RAID5ClearDataStatus
RAIDRebuildStatus
SerialNumber
SledFaultLED
SMARTData
TapeDriveInfo
TapeVolumeInfo
Page 7

Temperature
VirtualDriveInfo
ZoneInfo
ZoneState
6.8 Drive Management Commands ............................................41
ATA Di sk St a t e
AutoRebuild
ClearDiskReservedAreaData
DriveCopy
DriveCopyHalt
DriveCopyResume
DriveCopyStatus
DriveInfo
DriveSledPower
DriveWipe
ECC
IdeTransferRate
IdeWriteCache
InquiryData
LUNInfo
LUNState
MediumType
PartitionInfo
QuickTape
RAID5ClearData
RAID5ClearDataStatus
RAIDInterleave
RAIDHaltRebuild
RAIDManualRebuild
RAIDRebuildState
RAIDRebuildStatus
RAIDResumeRebuild
RebuildPriority
ResolveLUNConflicts
RestoreModePages
SledFaultLED
TapeDriveInfo
TapeVolumeBlockSize
TapeVolumeInfo
TapeWriteProtect
VirtualDriveInfo
ZoneAddDevice
ZoneAddHost
ZoneAddPort
ZoneClearAll
ZoneCommit
ZoneCreate
ZoneDelete
ZoneInfo
ZoneRemoveDevice
ZoneRemoveHost
ZoneRemovePort
ZoneRetrieve
ZoneState
Diamond Storage Array Installation and Operation Manual
Page 8

7.0 Configuring the Diamond-VT ..........................................................47
RAID Level 10
RAID Level 5
Virtual Tape Volumes
Hot Spare sleds
Zones
Interleave
Enhancing performance
7.1 Virtual Tape ............................................................................49
Configuration examples
7.2 Optional Hot Spare Sled .......................................................50
7.3 Zones ......................................................................................51
Principles of Zoning
Factors to consider
Status and Sense Data
Configuring Zoning
Errors
8.0 Updating Firmware ..........................................................................55
Updating firmware via the RS-232 serial port
Updating firmware via the optional Ethernet card
9.0 Diagnostics, Upgrade and Maintenance ........................................57
9.1 Troubleshooting ....................................................................61
Windows 2000 special instructions
Error Messages
Command Line Interface messages
Specific situations and suggestions
9.2 Resetting Defaults .................................................................63
Default
Return to Default settings
Factory Default
9.3 Rebuilding RAID Level 5 and 10 Configurations ................65
10.0 Hardware Maintenance ..................................................................67
10.1 Hot Swap Operating Instructions ......................................69
Disk Drives
Power Supplies
Blower Assemblies
ATTO Technology Inc.
Page 9

Appendix A Glossary .............................................................................i
Fibre Channel technology
SAN technology
SCSI protocol
Appendix B ATA Disk Technology .......................................................iii
Appendix C Information Command Returns .......................................iv
Driveinfo
VirtualDriveInfo
Appendix D Sample Zoning Command Sequences ............................ix
Φιρστ τιµε χονφιγυρατιον (αφτερ δοωνλοαδ)
Σιµπλε χονφιγυρατιον
Σψµµετριχ Μοδελ
Ασψµµετριχ Μοδελ
Χοµβινεδ Σψµµετριχ/Ασψµµετριχ Μοδελ
Appendix E Specifications ....................................................................xii
Environmental and physical
Rack Mount Dimensions
Floor Mount Dimensions
Appendix F Product Safety ...................................................................xiii
Safety compliances
EMC specifications
Radio and television interference
Appendix G Part numbers .....................................................................xiv
Appendix H Warranty ............................................................................xv
Manufacturer limited warranty
Contact ATTO Technology, Inc.
Diamond Storage Array Installation and Operation Manual
Page 10

Preface
This guide will take the technology-savvy user through the installation and maintenance of the Diamond
Storage Array-VT.
The Diamond-VT was designed to meet your
need for large amounts of easily accessible
storage using proprietary Aggregated Data
Transfer Technology (ADXTJ) to merge the
power of multiple, high performance ATA disk
drives with the sustained data transfer rates
required by sophisticated computer users.
Your comments help us improve and update our
products. Contact us:
Disclaimer
Although reasonable efforts have been made to
assure the accuracy of the information contained
herein, this publication could include technical
inaccuracies or typographical errors.
Manufacturer expressly disclaims liability for any
error in this information and for damages,
whether direct, indirect, special, exemplary,
consequential or otherwise, that may result from
such error including but not limited to loss of
profits resulting from the use or misuse of the
manual or information contained therein (even if
Manufacturer has been advised of the possibility
of such damages). Any questions or comments
regarding this document or its contents should be
addressed to Manufacturer.
ATTO Technology, Inc.
155 CrossPoint Parkway
Amherst, New York 14068
(716) 691-1999 • voice
(716) 691-9353 • fax
http://www.attotech.com/diamond
ATTO Technology can also be reached via e-mail
at the following addresses:
Sales Support: sls@attotech.com
Technical Support: techsupp@attotech.com
Manufacturer provides this publication as is,
without warranty of any kind, either express or
implied, including, but not limited to, the implied
warranties for merchantability or fitness for a
particular purpose.
Information in this publication is subject to
change without notice and does not represent a
commitment on the part of Manufacturer.
Changes may be made periodically to the
information herein; these changes will be
incorporated in new editions of the publication.
Manufacturer reserves the right to make
improvements and/or changes at any time in
product(s) and/or program(s) described in this
publication.
Page 11

Page 12
1.0 Diamond Storage Array-VT Product Overview
The Diamond Storage Array-VT Class offers up to 30 Virtual Tape drives and up to 60 virtual tapes in
a rack mount or floor model configuration.
The Diamond-VT appears and functions to ISV
(Independent Software Vender) applications as if
it were a traditional tape device although it is
actually an array of ATA disk drives. Virtual tape
provides increased performance for restore and
backup operations, RAID protection of data, and
compatibility with existing software and backup
procedures. Virtual Tape can be used anywhere
traditional tape is used to augment and enhance
existing tape drive/library investments.
With the cost effective approach of using ATA
disk drives, you can add more storage capacity as
your needs grow without the costs of other disk
storage technologies. You can also improve the
performance and capacity of the Diamond-VT
cabinet as technology progresses by simply
replacing disk drive sleds and host interface cards.
The Diamond-VT is operating system
independent and supports all popular computer
hardware platforms and network environments.
Two interface options are available: a 2-gigabit
Fibre Channel interface and an Ultra160 SCSI
interface.
The Diamond-VT is a fully populated, turnkey
solution with drives pre-installed. It is fully
supported by a highly trained customer service
and engineering staff.
The Diamond-VT uses Aggregated Data Transfer
J
Technology (ADXT
) to merge the performance
of multiple ATA drives to achieve sustained, full
bandwidth data transfer rates. ADXT provides
end users with the power and sophisticated data
control needed to take moderately priced ATA
disk drives, combine them in a disk storage array,
and power them to the performance levels of
SCSI or Fibre Channel disk arrays.
Diamond-VT features
• Up to 7.2 Terabytes initial configuration
(expandable with future drive technology)
• Supports most major operating systems and ISV
software applications
• Configurable up to 30 Virtual Tape Drives
1
ATTO Technology Inc. Diamond Storage Array Installation and Operation Manual
Page 13
• Aggregated Data Transfer Technology
(ADXTJ) for high performance/scalability
• Ultra ATA 100 megahertz (Mhz)
• RAID Level 10 and RAID Level 5 configurable
• Zoning capability compatible with third party
servers, switches and with deliverables from
industry standards organizations.
• Hot spare sleds: replace degraded sleds with
spares on the fly using software
• Staggered drive spin-up to reduce peak power
demand
• Tagged command queuing to process up to 255
simultaneous data requests
• RS-232 management for local management
control; Ethernet option available for setup
connection only
• ExpressNAV
• Two power supplies capable of 85-264 V (rated
100-240V AC) operation (340 watts each)
• UL, TUV and CE marked and compliant
• Internal thermal and power management
• Redundant hot swappable power supplies with
integrated thermal and power management
• Floor model cabinet or 19” 3U rack mount
TM
browser-based user interface
Fibre Channel model
• 2 gigabit Fibre Channel Port (single or dual
channel)
• SFP-based Fibre Channel interface supports
long wave and short wave optical cables
• Built-in hub for daisy-chaining
• Up to 9,500 I/Os per second per port
• Up to 240 MB/sec. sustained Fibre Channel
transfer rates per interface
SCSI model
• Ultra 160 SCSI bus
• Dual stacked VHDCI connectors for daisychaining and termination
• SCSI Target ID selection switch
• Support for single-ended and LVD SCSI
• No onboard termination
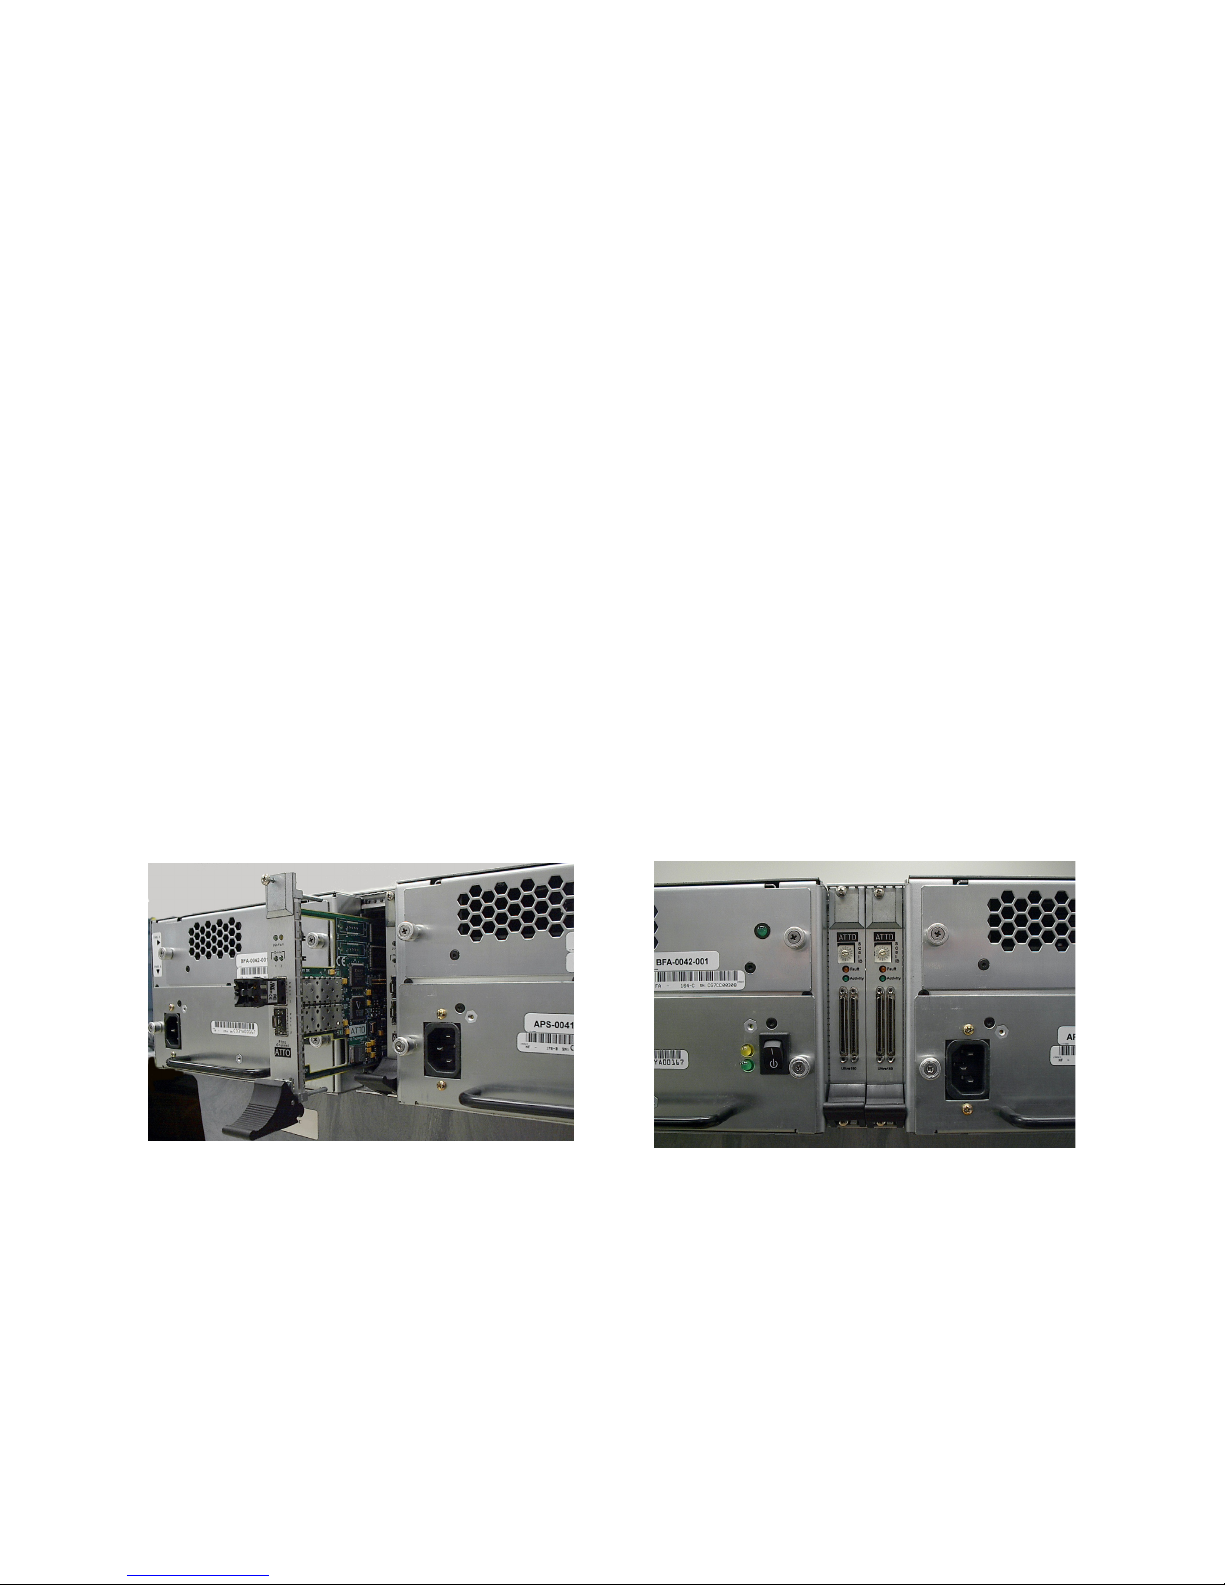
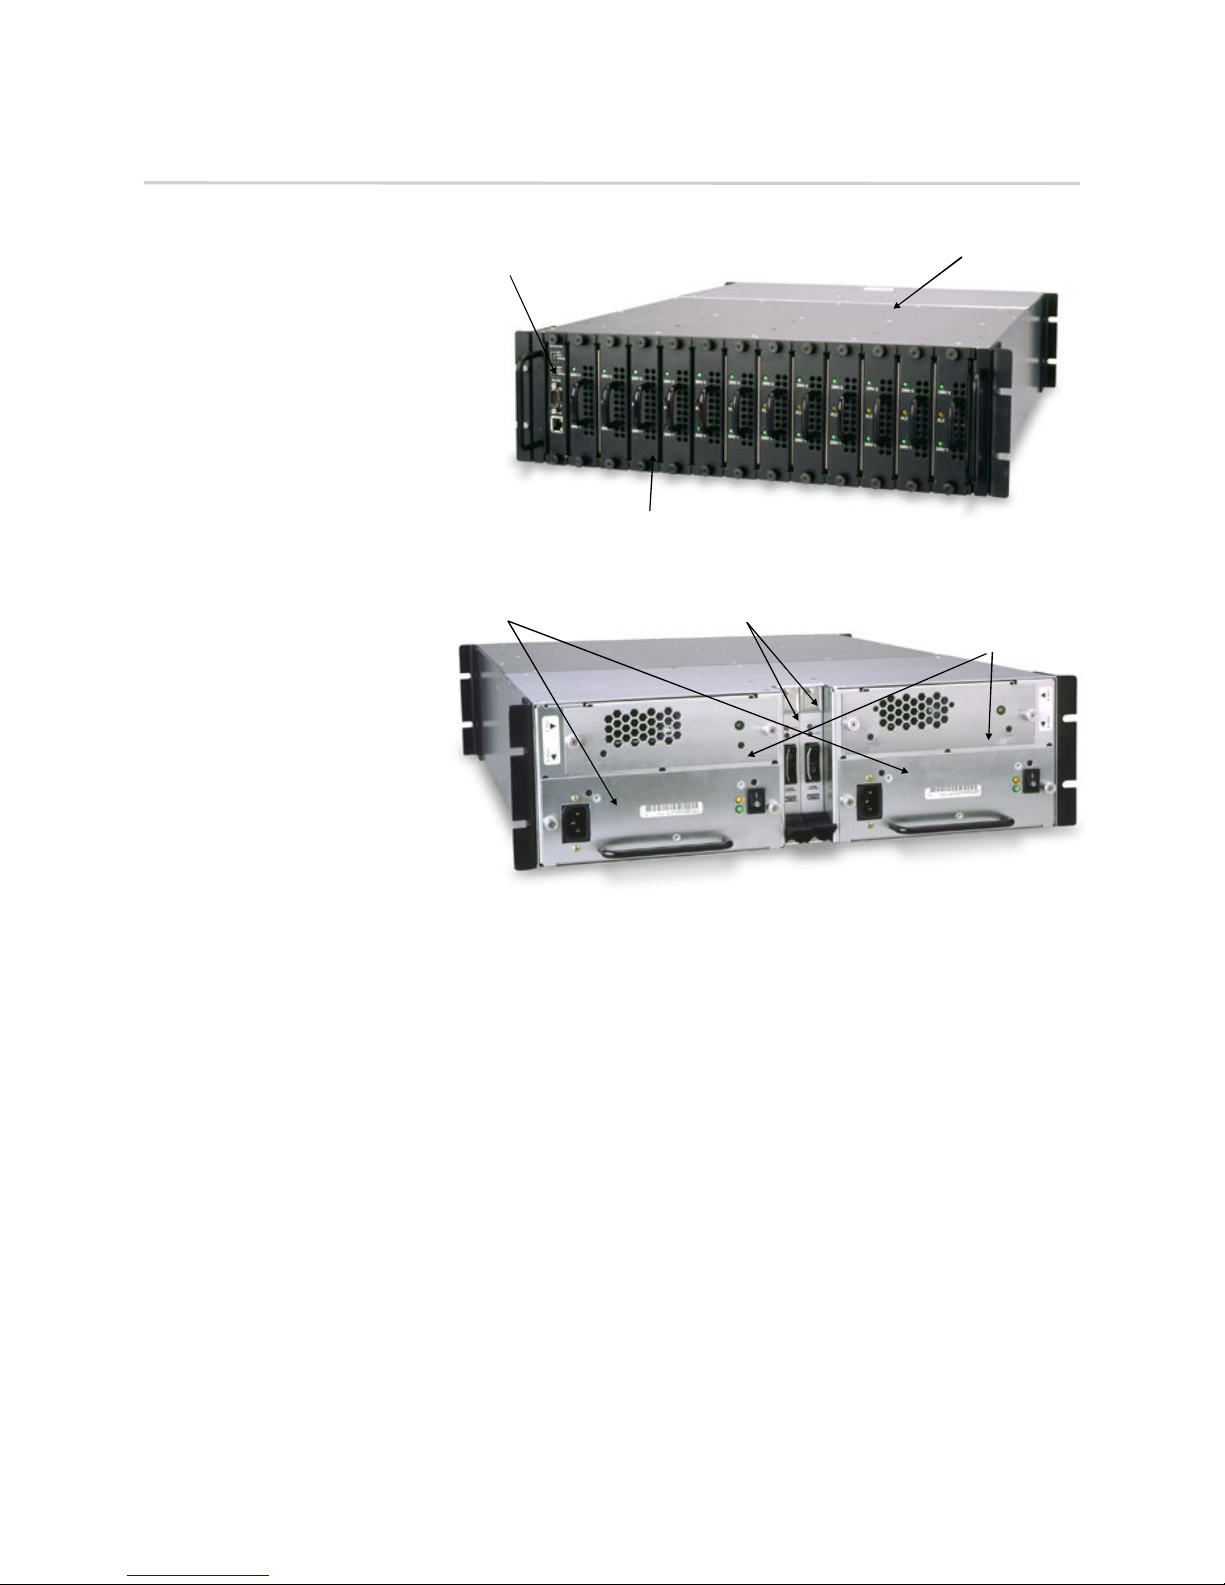
Exhibit 1.0-1Back of rack mount model, Diamond-VT. Left: 2 gigabit Fibre Channel. Right: SCSI.
2
Diamond overview
Page 14
2.0 Diamond-VT Technical Overview
The Diamond-VT uses Aggregated Data Transfer Technology (ADXT) to achieve the high data transfer
performance you need. ADXT
sustained, full bandwidth Fibre Channel data transfer rates.
merges the performance of multiple ATA drives together to achieve
Unlike other storage arrays which use expensive
SCSI or Fibre Channel disk drives to achieve
performance, the Diamond Series uses lower cost
ATA disk drives combined with an intelligent
midplane to create a storage array with
exceptional price and performance
characteristics.
The intelligent midplane contains hardware and
software which provide the proprietary ADXT
,
switched data management and data movement
technology, to create a higher performance
storage solution.
Using this technology, we are able to provide a
storage array that delivers faster sustained data
transfer rates as well as impressive I/Os per
second at a new price point in the storage market.
The Diamond Array is made up of dual SCSI or
Fibre Channel host interface cards, the intelligent
a
midplane, a system management card, and 12
independent disk drive sleds containing up to 24
ATA disk drives.
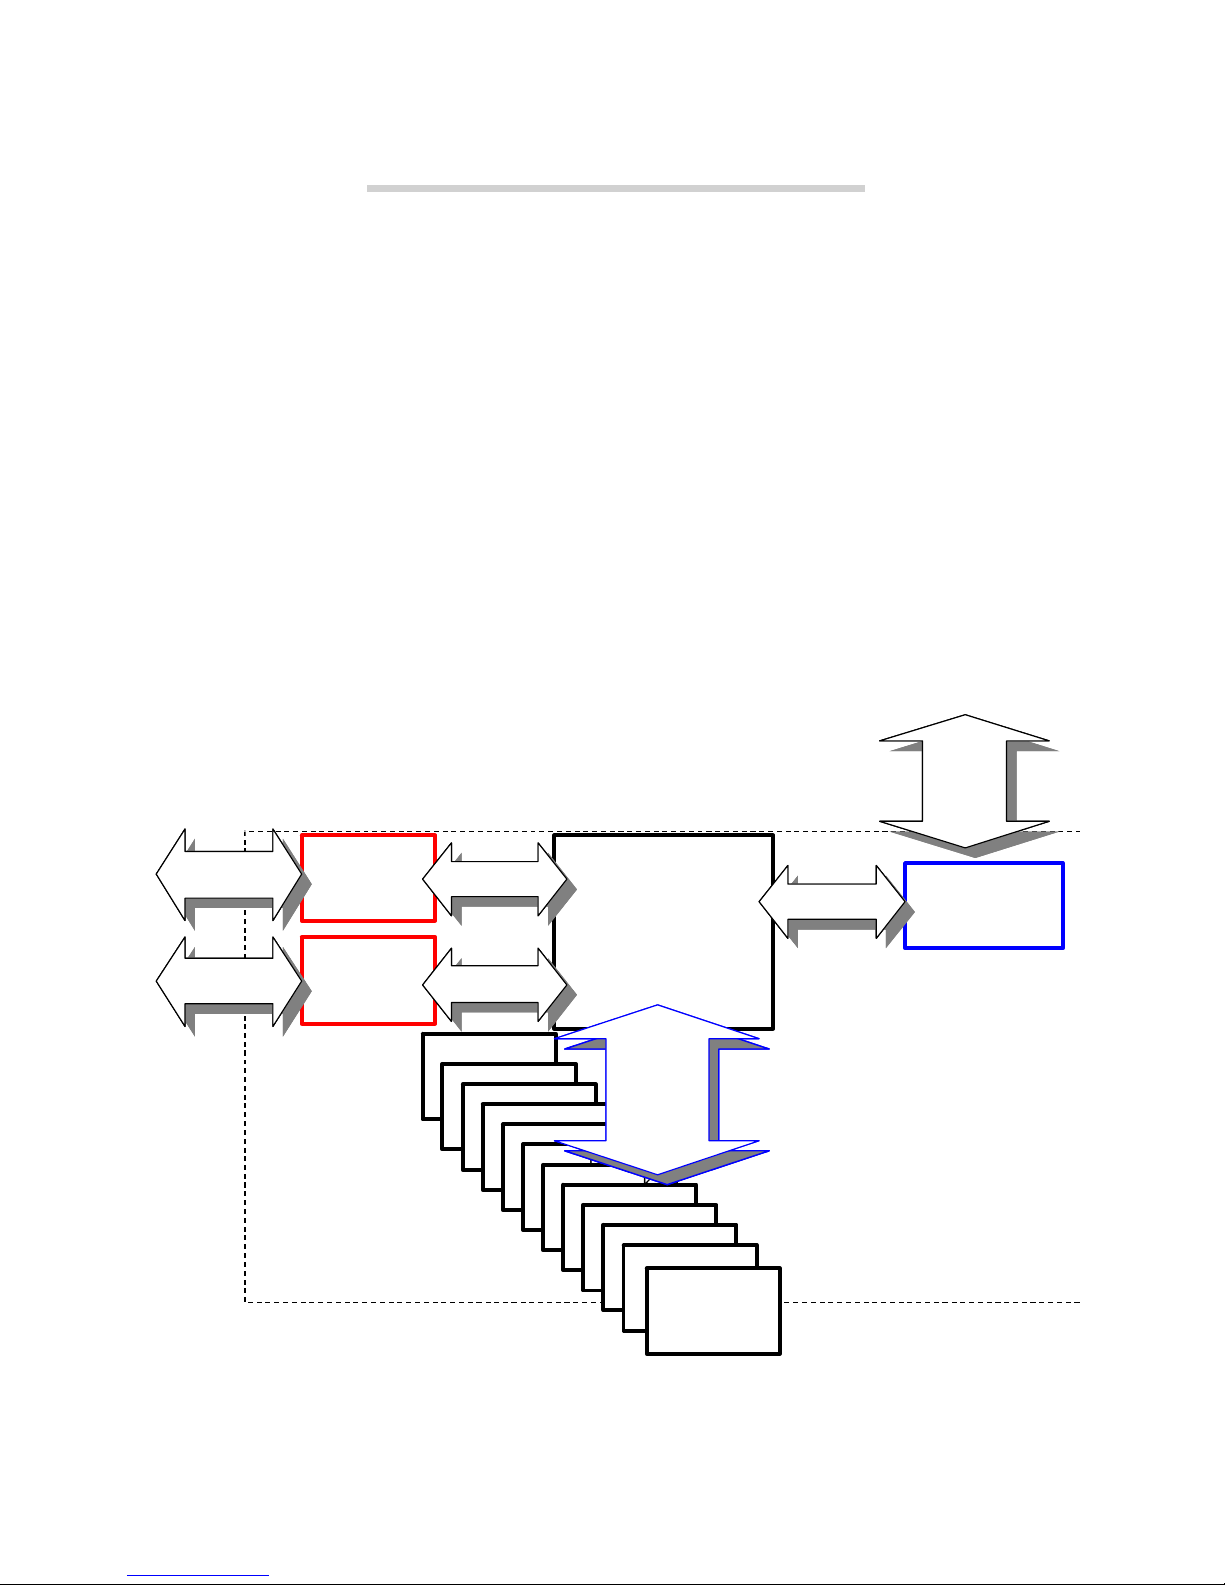
Exhibit 2.0-1 Data pathways and architecture for Fibre Channel operation
In band management
SNMP / Telnet/ FPT Management
software
400MB/sec
Duplex
2Gb FC or
Ultra160 SCSI
Host
CPCI bus
Intelligent
Midplane
400MB/sec
Duplex
2Gb FC or
Ultra160
SCSI Host
CPCI bus
I/O Data
Local Terminal
RS-232
Ethernet
System
Management
Card
3
ATTO Technology Inc. Diamond Storage Array Installation and Operation Manual
Dual Disk
Drive
Sled
Dual Disk
Drivue
Dual Disk
Drive
Sled
Dual Disk
Sled
Drive
Dual Disk
Sled
Drive
Dual Disk
Drive
ADXT
organized
streams
Sled
Dual Disk
Sled
Drive
Diual Disk
Sled
Drive
Dual Disk
Drive
™
data
Sled
Dual Disk
Sled
Drive
Dual Disk
Sled
Drive
Dual Disk
Drive
Sled
Sled
Page 15
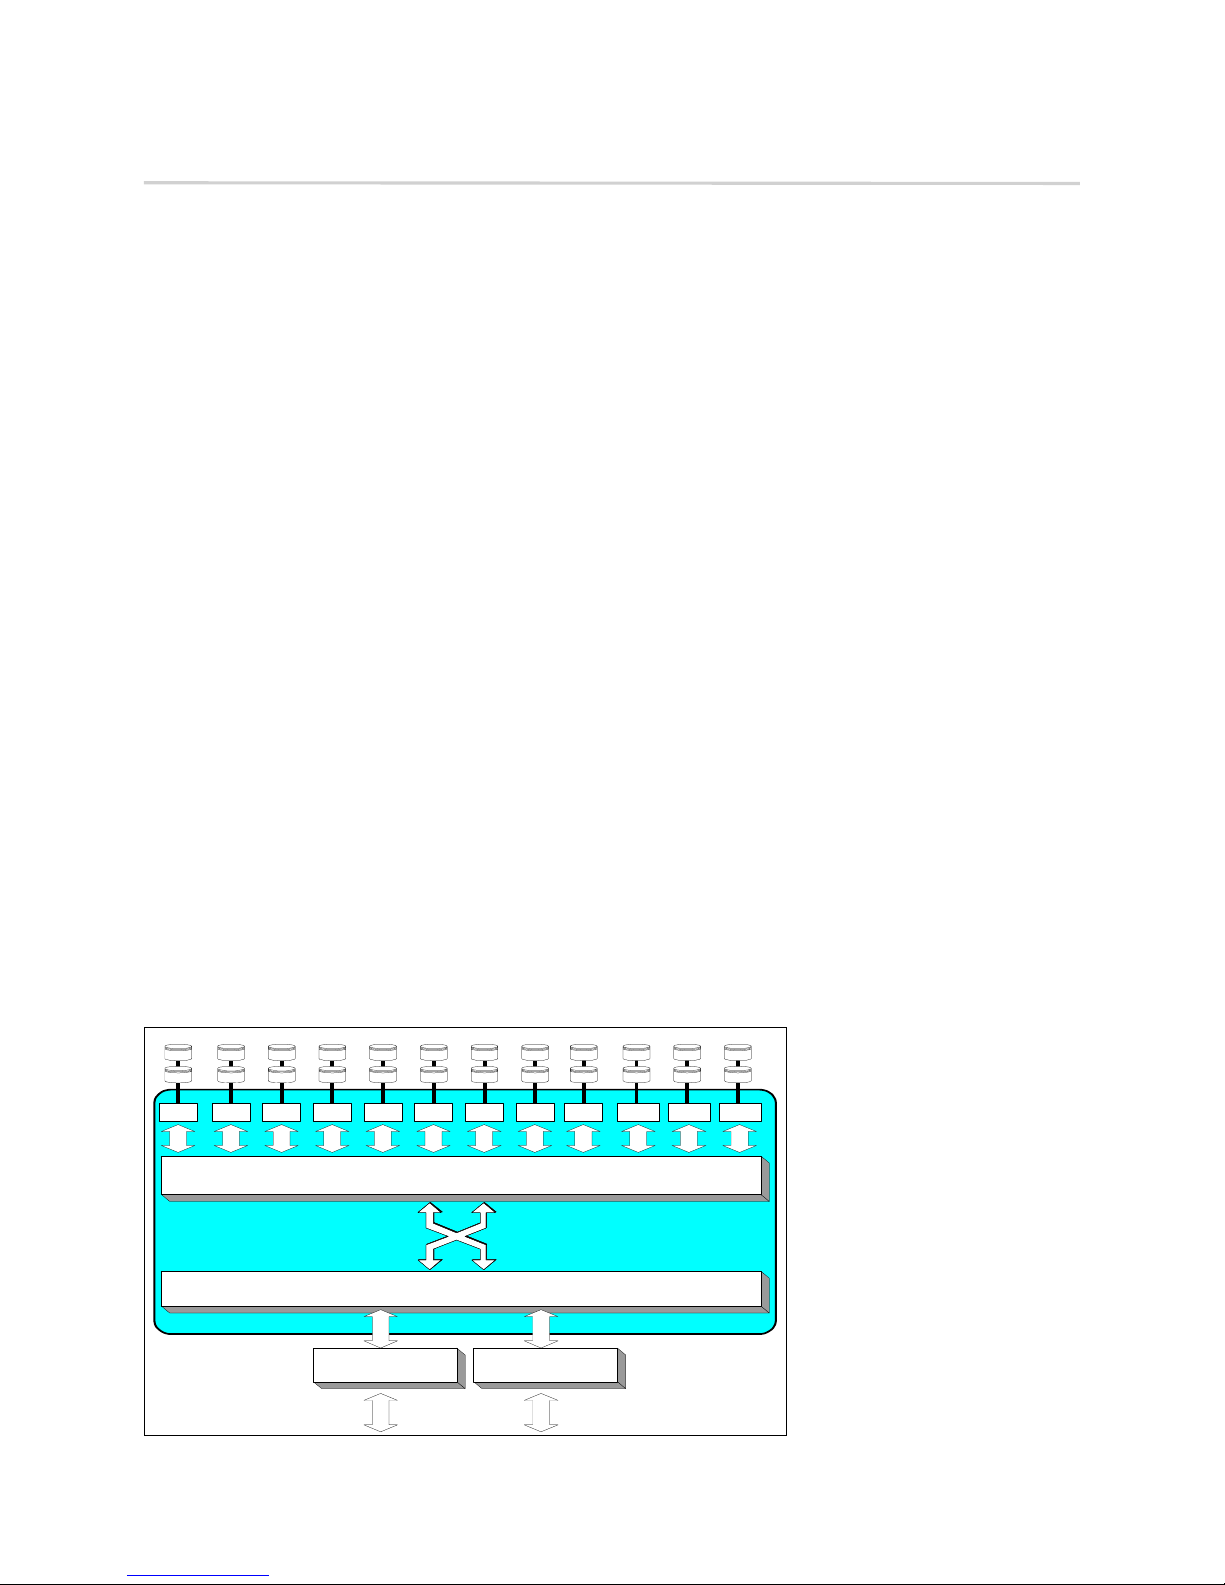
ADXT Powers ATA to New Levels
The original notion of RAID was to build high
capacity, reliable storage subsystems using large
numbers of inexpensive disk drives. Thus its
original definition:
Inexpensive Drives
became
Redundant Array of Independent Drives
Redundant Array of
. Over time that definition
and the inherent cost advantage in a RAID system
was lost. The Diamond Series provides a high
capacity, high performance and highly reliable
disk array that uses the merged power of many
inexpensive ATA disk drives.
Intelligent Midplane
The heart of the Diamond
Series storage array is the intelligent midplane
with ADXT
to sum or
aggregate
the data rates of
individual ATA disk drives to create high data
transfer rates. This technology enables features
such as serverless backup, advanced error
protection, metadata storage techniques,
virtualization software, thermal management and
advanced enclosure services.
The midplane contains a combination of custom
Application Specific Integrated Circuits (ASICs),
processors and proprietary embedded software. It
is divided into three main processing sections
which handle the data being read or written to the
ATA disk drives from the Fibre Channel or SCSI
host interfaces. The Virtual Device Manager
(VDM), Data Routing Fabric (DRF) and ATA
Disk 2
Disk 2
Disk 2
Disk 2
Disk 2
Disk 2
Disk 2
Disk 2
Disk 2
Disk 1
Disk 1
Disk 1
Disk 1
Disk 1
Disk 1
Disk 1
Disk 1
Disk 1
AIE2AIE3AIE4AIE5AIE6AIE7AIE8AIE9AIE10AIE11AIE
AIE
1
DATA ROUTING FABRIC
text
VIRTUAL DEVICE MANAGER
Interface Engines (AIE) organize data streams for
storage or retrieval.
Virtual Drive Manager
Data is accessed through
Virtual Drives using an implementation of the
standard SCSI protocol controlled by the Virtual
Device Manager. The VDM adds capabilities
such as RAID, data management services,
enclosure management services, serverless
backup, data replication using SCSI Extended
Copy and LUN mapping.
Data Routing Fabric
Incoming or outgoing data is
routed between the ATA Interface Engines (AIE)
and the Fibre Channel or SCSI interface by the
custom Data Routing Fabric ASIC, a high speed,
low latency transfer fabric with more than 2
GB/sec. of bandwidth supported by up to 512
Megabytes of memory.
ATA Interface Engine (AIE)
The interface to each
pair of drives is through a custom ATA Interface
Engine ASIC. The AIE implements the typically
software-intensive ATA interface completely in
silicon. Each AIE contains a dedicated ATA
protocol processor to completely automate
command and protocol processing. Automated
command overlapping and queuing maximizes
the performance of multi-threaded I/O. The AIE
transfers data using double-clocking technology
at 66 megabytes per second. The Diamond-VT
contains 12 AIEs for a parallel transfer rate of 792
megabytes per second. In
Disk 2
Disk 1
Disk 1
Disk 1
12
addition to guaranteeing
data transfer integrity with
automatic CRC checking,
Disk 2
Disk 2
the command and status
transfers are validated
using a patent pending
technology unique to the
AIE.
FIBRECHANNEL
INTERFACE 1
FIBRECHANNEL
INTERFACE 2
4
Technical overview
Page 16

3.0 Installation Instructions
If you are familiar with the Diamond-VT, Fibre Channel, SCSI and RAID configurations, you may set
up and configure the Diamond-VT using these instructions. Find details, illustrations and other
guidance for more involved operations and special cases in the rest of this manual.
CAUTIONCAUTION
Before configuring the Diamond-VT,
ensure that any computer data to be stored
on the array is properly backed up and
verified. The operation and storage of
computer data on any disk storage array
should be accompanied by a regular
program of computer data backups and
verification for the data stored on such an
array.
The Manufacturer is not responsible for the
loss of any data stored on the Diamond-VT
under any circumstances and any special,
incidental, or consequential damages that
may result thereof.
Three major steps are required to set up the
Diamond-VT
1 Physically set up Diamond-VT
2 Connect to Ethernet
3 Configure Virtual Tape
Step 1: physical setup
1 Make sure the Diamond-VT is mounted
properly and has adequate air flow around it.
2 Insert the appropriate connector into the
interface card in the back of the Diamond-VT.
3 Connect the Fibre Channel or SCSI cable from
your host computer system to the connector. To
use ExpressNAV browser-based management
interface and configure your Diamond-VT, you
must connect to the Ethernet port.
4 To set up the Ethernet connection: connect a
cross-over cable (for a direct connection to a
PC) or regular network cable from a network
device to the RJ45 Ethernet port on the
Ethernet management card on the front of the
Diamond-VT.
Step 2a: set up the Ethernet connection
The Diamond-VT supports service operations
over the RS-232 serial port using standard
terminal emulation software available with most
systems.
1 Connect a DB-9 null modem serial cable
between the port marked RS-232 on the front of
the Diamond-VT and the computer’s serial port.
The cable must be no longer than three meters.
2 Make sure the power switches on the power
supplies on the rear of the unit are in the Standby position.
3 Plug in the power cords to the back of the unit,
then into an appropriate power source (100-240
VAC).
4 Reboot your host computer system.
5 Press the Stand-by power switch for each
power supply on the Diamond-VT to the ON
position.
6 Upon successful power up and diagnostics, the
unit displays the POST (power up self test)
information.
The Diamond is now in Command Line Interface
mode. You may modify the setup of the DiamondVT using the CLI (see
Commands
on page 27), but the easiest method to
CLI: Interface via ASCII-based
configure the array is by using ATTO
ExpressNAV software, a graphical user
management interface accessed through a
standard Internet browser. See
Browser-based Interface
on page 23.
ATTO ExpressNAV:
Step 2b: connect to Ethernet
If the Diamond-VT is attached to a DHCP server
1At the Ready prompt after POST (see Step 6
above), type set IPDHCP enabled
2Type SaveConfiguration Restart
3At the Ready prompt after POST (see above),
type get IPAddress
4 Enter this address into your browser.
5 The ATTO ExpressNAV screen appears. Log in
using the Telnet defaults:
Username: Telnet
Password: Diamond
5
ATTO Technology Inc. Diamond Storage Array Installation and Operation Manual
Page 17

6 Follow the screens to find information about the
array or to configure the array from the factorydefault settings. The Diamond-VT may be set
up in a RAID Level 5 or RAID Level 10
configuration with or without Hot Spare sleds
and/or set up in a zoned configuration.
If the Diamond-VT is not attached to a DHCP
server and you wish to change the defaults
1 At the Ready prompt after POST (see above),
type set IPAddress [desired IP address].
2Type set IPSubnetMask [desired IP Subnet
Mask]
3Type set IPGateway [desired IP Gateway]
4Type SaveConfiguration Restart to save the
configuration and restart the Diamond-VT
5 After the powerup and POST complete, type
the IP address from step 1 above into your
browser.
6 The ATTO ExpressNAV screen appears. After
logging in (refer to Step 2b: connect to
Ethernet, Step 5 on page 5), follow the screens
to find information about the array or to
configure the array from the factory-default
settings. The Diamond-VT may be set up in a
RAID Level 5 or RAID Level 10 configuration
with or without Hot Spare sleds and/or set up in
a zoned configuration.
Step 3: set up Virtual Tape configuration
The simplest way to set up Virtual Tape
configurations is to use the ExpressNAV
interface. Refer to
Interface
on page 23 for more information on the
interface. After logging in (refer to
connect to Ethernet
ATTO ExpressNAV: Browser-based
Step 2b:
, Step 5 on page 5
), follow the
screens to find information about the array or to
configure the array from the factory-default
settings
If you use the CLI, the command
.
QuickTape
™
sets up Virtual Tapes using the following format:
set QuickTape [RAID5|RAID10] [# tape
volumes] [# tape drives] <enabled>
<Barcode Prefix>
Hot Spares are not available for all Virtual Tape
configurations. You must designate
allow Hot Spare sleds or
disabled
enabled
to forgo Hot
to
Spare sleds. Refer to and
Optional Hot Spare Sled
on
page 50 for more information and examples.
Each Hot Spare sled configuration requires a
certain number of Hot Spare sleds. These sleds,
once designated as Hot Spares, are not available
for other use.
• RAID Level 10: 10 drive sleds and two Hot Spare
sleds (sleds 11 and 12).
• RAID Level 5: 10 drive sleds and two Hot Spare
sleds (sleds 11 and 12)
• RAID Level 5: five drive sleds (sled positions 1
through 5) and one Hot Spare sled (sled 12).
You may specify the first four to six alphanumeric characters of a tape bar code, used by
tape backup software. The remaining four
characters will be entered by the system
automatically to identify the tape number. Refer
Virtual Tape
to
on page 49 for more information and
examples.
Note
The maximum number of tape volumes and
tape drives for RAID Level 5 is 30.
The maximum number of tape volumes and
tape drives for RAID Level 10 is 15.
You must designate either enabled or disabled
for the Hot Spare option when designated a
barcode prefix.
All arrays using RAID level 10 and Hot Spare
sled options must be fully populated.
Configuration examples
RAID Level 10 with Hot Spare sleds
set QuickTape RAID10 15 1 enabled
SaveConfiguration Restart
The Diamond-VT will be configured into RAID
Level 10 with one tape drive, 15 tape volumes and
two Hot Spare sleds.
RAID Level 5 and no Hot Spare sled
set QuickTape RAID5 30 2
SaveConfiguration Restart
The Diamond-VT will be configured into RAID
Level 5 with two tape drives and 30 tape
volumes.
6
Installation
Page 18
3.1 Diamond-VT Components
The Diamond-VT has been designed to be easy to use, maintain and upgrade. It features a durable steel
outer case and modular components in either a floor or a rack mount model.
Immediately upon receipt, check the shipping
carton for damage from mishandling. Contact us
at once via the means that is easiest for you (see
Warranty
on page A-xv) if the carton has been
mishandled or displays any signs of damage.
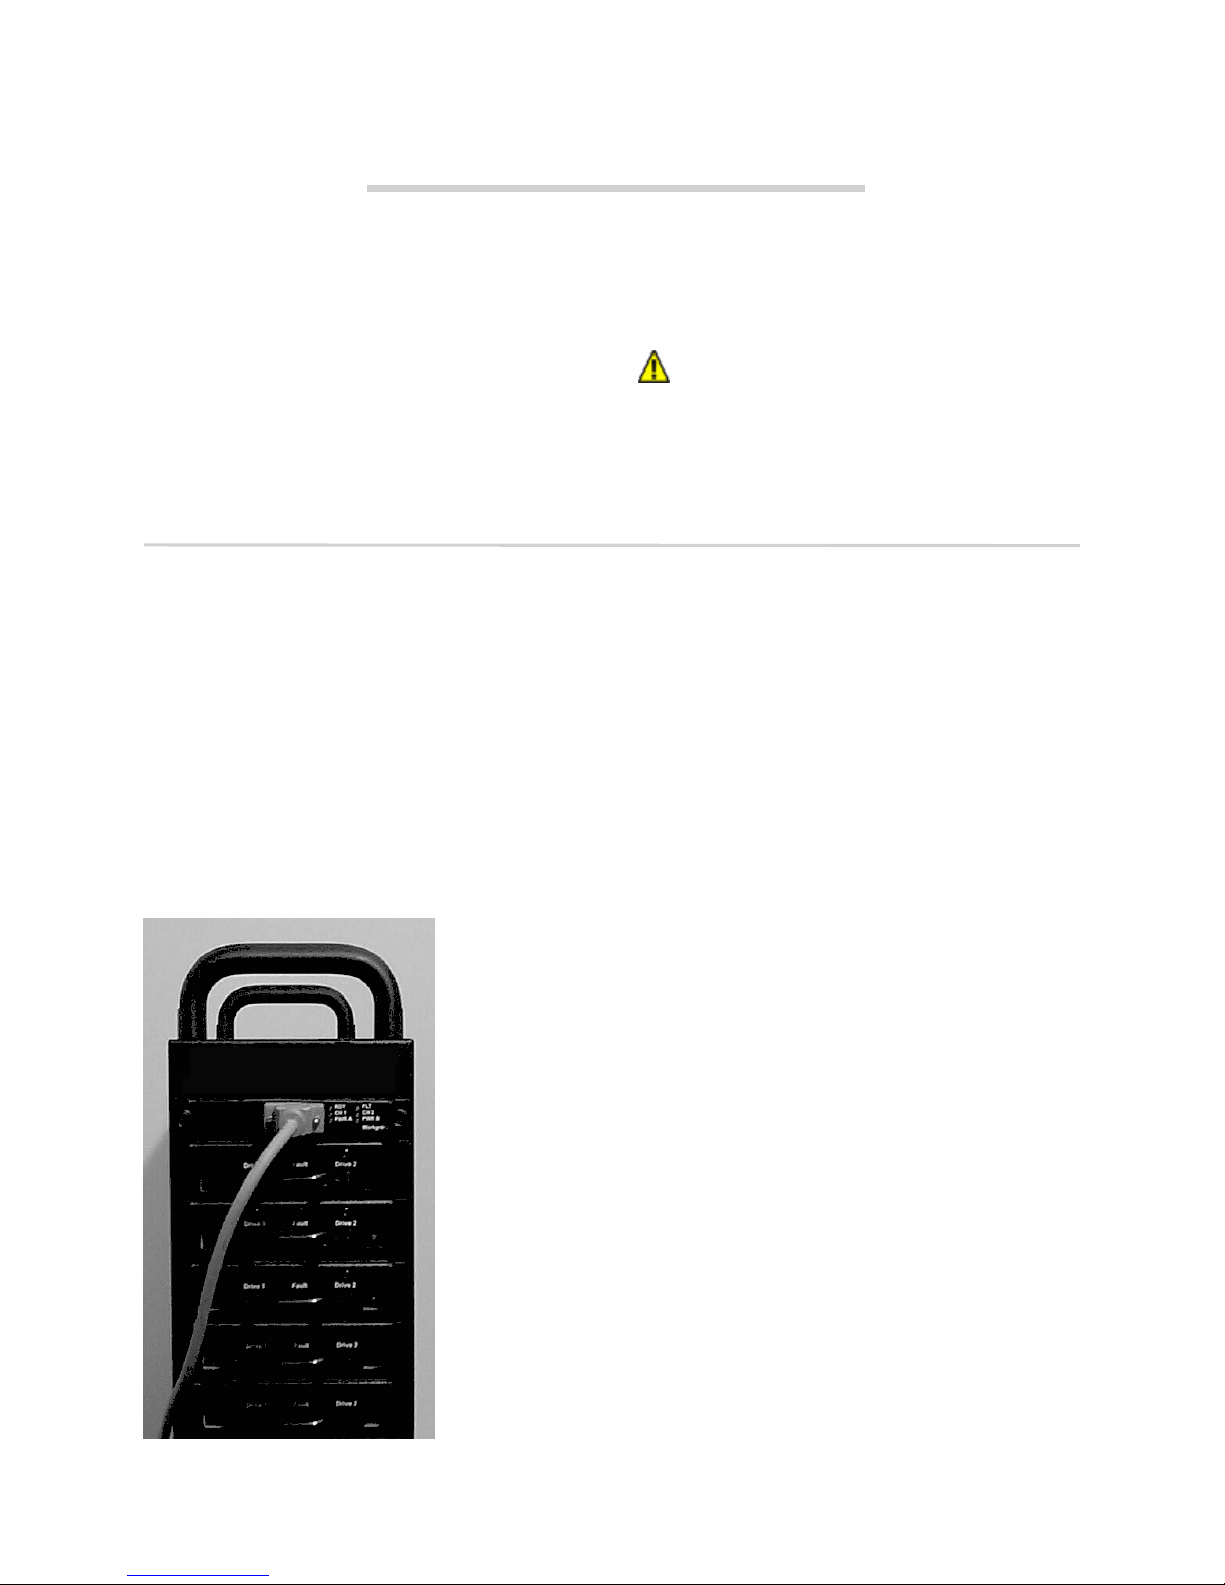
The front of the Diamond-VT provides access to
the management card and disk drive sleds. The
Floor model
The management system card is at the top front of
the case. At its center is a DB-9 serial RS-232
port, a connection for setup, monitoring and
upgrade of the unit from any computer system
with an RS-232 interface. The optional 10/100
BaseT Ethernet management services card
enables Telnet-based monitoring and
management. It also provides the ability to update
the firmware in the array via FTP.
LEDs to the port’s right indicate fault, unit ready,
host interface cards A and B installation status,
and the power status for each power supply.
Below the
management
system card are
individual disk
drive sleds
which also have
LEDs for each
drive’s status.
Each sled
contains two
hard drives. Up
to 24 hard
drives may be
installed on the
12 sleds. Empty
bays should be
covered by
blank faceplates
rear of the unit holds the host interface cards,
power supplies and blower assemblies.
CAUTIONCAUTION
All modular components must be replaced
by qualified personnel only. Refer to
Swap Operating Instructions
on page 69.
Hot
or empty sleds. Access is provided by loosening
two screws and gently pulling on the sled handle.
On the rear of the unit are blowers which support
hard drive, cabinet and power supply cooling. The
blowers are held in by removable screws. Correct
operation is displayed by a LED at the top of each
panel.
The power supplies for the Diamond-VT, also in
the rear of the unit, are accessible by loosening
two screws and pulling on the power supply
module handle. The power standby on/off switch
is at the top of each module. A yellow LED
indicates
caution
and a green LED indicates on.
The power cord socket is at the bottom of each
power supply.
Between the power supplies and blower
assemblies are two slots that hold the Host
Interface cards. The HIC is the connection point
into the Diamond-VT and is available in a 2Gigabit Fibre Channel or Ultra 160 SCSI. Host
Interface cards have
activity
SCSI
LED indicators, depending on the model.
The SCSI card faceplate has a rotary
fault
and
on-line
or
fault
and
binary-coded hex switch to set the SCSI ID of the
Diamond-VT. The SCSI card also has an in
channel, to connect via cable to the unit’s
communication source, and an out channel,
available for daisy-chaining arrays together or to
complete termination using an external LVD
terminator.
7
ATTO Technology Inc. Diamond Storage Array Installation and Operation Manual
Page 19
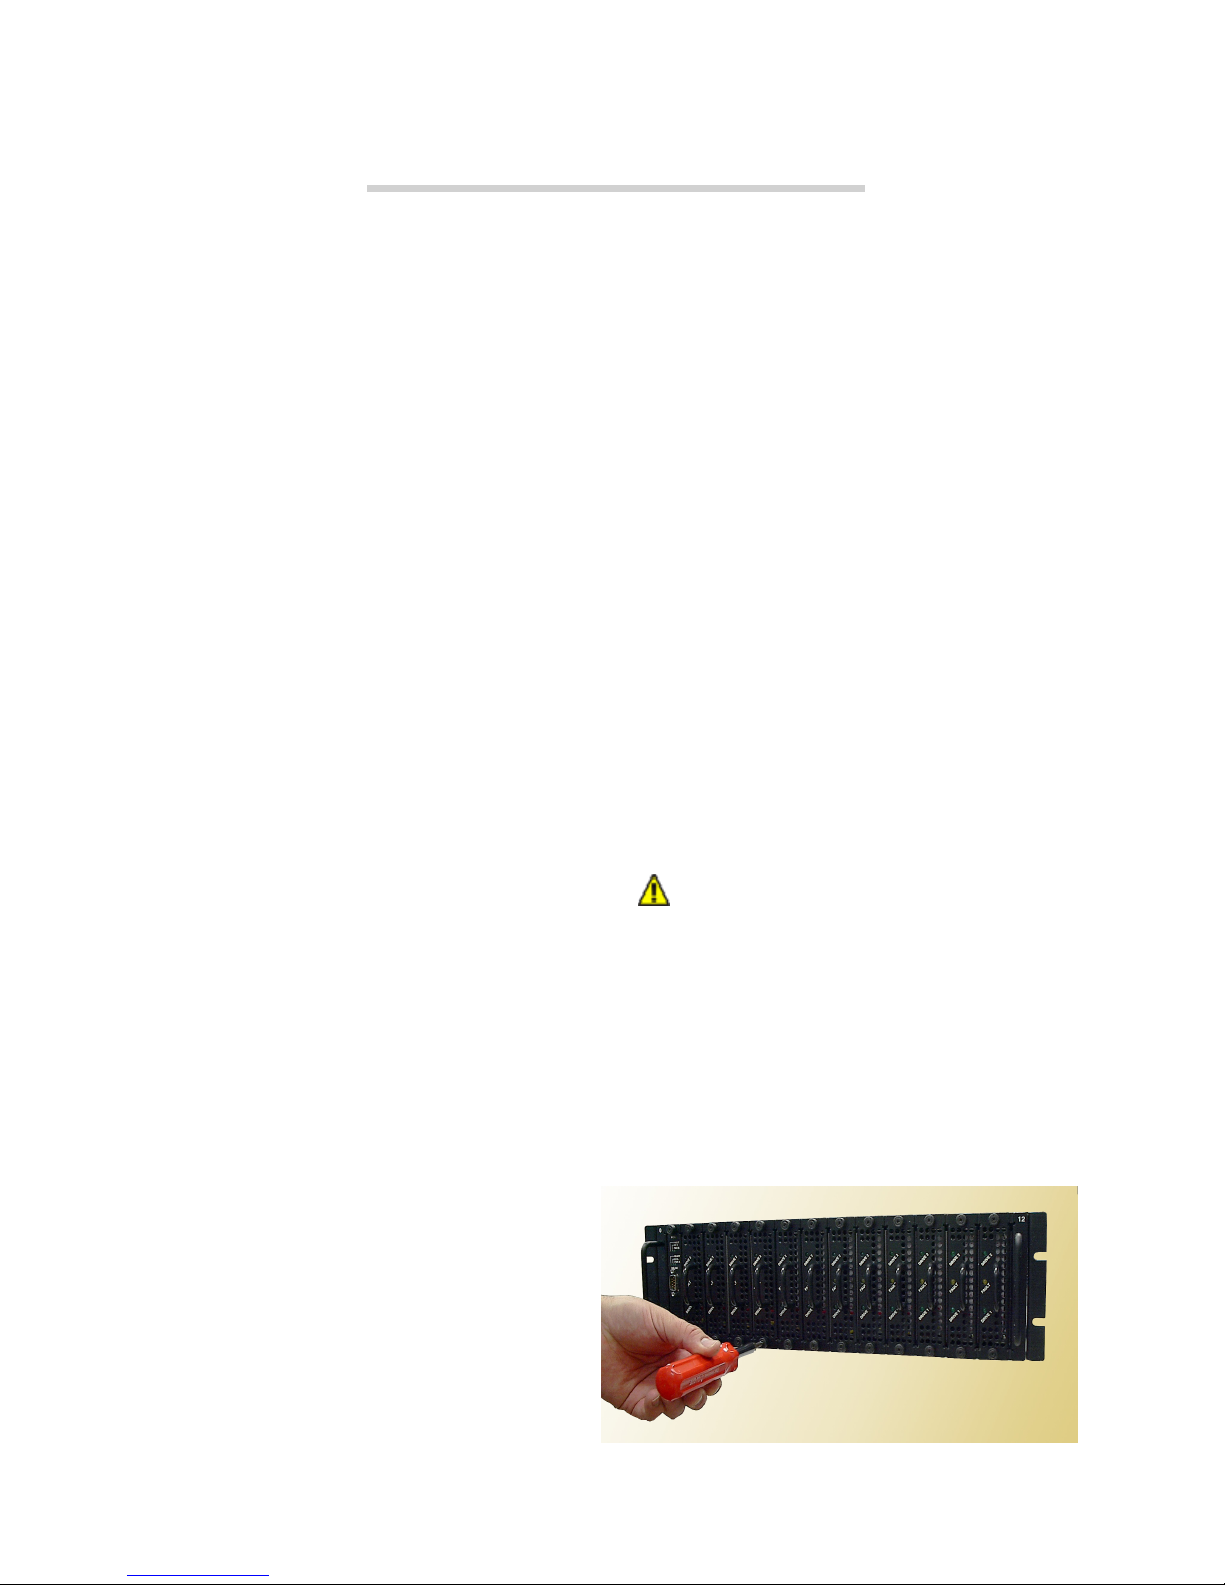
Rack mount model
The system management card
is at the left front of the case.
At its center is a DB-9 serial
RS-232 port which allows a
connection for setup,
monitoring and upgrade of the
unit from any computer
system with an RS-232
interface. The optional 10/100
BaseT Ethernet management
services card enables Telnetbased monitoring and
management. It also provides
the ability to update the
firmware in the array via FTP.
LEDs farthest to the left
indicate fault, unit ready, Host
Interface cards A and B
installation status, and the
power status for each power
supply.
System Management Card
Disk drive sleds (12)
Power supplies
Intelligent midplane (internal)
Host interface cards
Blower assemblies
To the right of the system
management card are
individual disk drive sleds
which also have LED
indicators for each drive’s
status. Each sled contains two hard drives. Up to
24 hard drives may be installed on the 12 sleds.
Empty bays should be covered by blank
faceplates or filled with empty sleds to promote
effective cooling. Access is provided by
loosening two screws and pulling on the sled
handle.
In the rear of the unit are the blower assemblies
which support hard drive, cabinet and power
supply cooling. Correct operation is displayed by
a LED at the top of each panel. The blowers are
held in place by removable screws.
The power supplies for the Diamond-VT are
accessible by loosening two screws and pulling on
the power supply module handle. The power
standby on/off switch is at the top of each module.
A yellow LED indicates
caution
and a green LED
on
indicates
. The power cord socket is at the
bottom of each power supply.
Between the power supplies and blower
assemblies are two slots that hold the Host
Interface cards. The HIC is the connection point
into the Diamond-VT and is available in a 2Gigabit Fibre Channel, or Ultra 160 SCSI. Host
Interface cards have
activity
SCSI
LED indicators, depending on the model.
The SCSI card faceplate has a rotary
fault
and
on-line
or
fault
and
binary-coded hex switch which allows you to set
the SCSI ID of the Diamond-VT. The SCSI card
also has an in channel, to connect by a cable to the
unit’s communication source, and an out channel,
available for daisy-chaining arrays together or to
complete termination using an external LVD
terminator.
8
Components
Page 20
3.2 Diamond-VT Physical Setup
The Diamond-VT is shipped completely assembled with two 120 VAC power cords for use in the United
States and Canada.
Immediately upon receipt, check the shipping
carton for damage from mishandling. Contact us
at once by the means easiest for you (see
Warranty
on page A-xv) if the carton has been mishandled
or displays any signs of damage.
Floor Model
The Diamond-VT is heavy (about 92 pounds fully
loaded) and requires two people to lift and carry it
safely. Place the Diamond-VT on a level surface
and make sure there is adequate space in the front
and back of the unit for proper cooling and
airflow. Continue with the general instructions.
Rack Mount
The Diamond-VT fully loaded is heavy (about 86
pounds). The unit should be handled with care and
requires two people to lift, carry and/or install it
safely.
The Diamond Array can be mounted via several
different methods in a 19” rack with 3U (5.25”) of
vertical space required. Air flow should not be
restricted in any way.
Installation in a rack may create a differential
between the room ambient temperature and the
internal ambient temperature in the rack. While
the maximum internal operating temperature of
the Diamond-VT is 47°C, you should not run the
system at the maximum temperature for extended
periods. Therefore, ensure that the room ambient
temperature is kept below 30°C for best
operation.
Each side of the rack mount Diamond-VT chassis
has three pairs of mounting holes. One is located
near the front of the rack, one near the unit’s
center of gravity, and one near the rear of the rack.
The holes accommodate 10/32 screws but the
screws can protrude no farther than .375 inches
into the rack.
Spaced rail pairs in some rackmount cabinets.
You can mount the Diamond-VT using two sets of
rail pairs spaced to accommodate the overall
length of the unit (approximately 23 inches).
Mount using the rack mount brackets on the front
and rear of the unit fastened to the rail pairs using
10/32 pan head screws with lock and flat washers.
Rack mount cabinets with stationary shelf or tray
system.
The shelf or tray must be able to support
at least 125 pounds. The shelf or tray must be
installed and secured to the rack before installing
the Diamond-VT. Secure the front of the array to
the rack with 10/32 screws, locks and flat
washers.
Sliding shelf or tray type systems
should never
be used under any circumstances.
Two point open rack system.
The rack must be
strong enough to support the Diamond Array
properly. Mounting brackets should be moved to
the centermost mounting holes and secured using
10/32 screws.
CAUTIONCAUTION
Do not mount multiple Diamond-VT units
on a two-rail rack or mount the array above
the midpoint of a two-rail rack system.
Do not mount the Diamond-VT on any kind
of rail-type system. The array is too heavy
and does not have the proper hole pattern
for rails.
Insure the Diamond-VT has adequate air flow and
continue with the general instructions.
9
ATTO Technology Inc. Diamond Storage Array Installation and Operation Manual
Page 21
General Instructions
1 Insert the proper connector into the Host
Interface Card in the back of the Diamond-VT.
(See
Connecting a Fibre Channel Array
11 or
Connecting a SCSI Array
on page 13).
on page
2 Connect the cable (Fibre Channel or SCSI)
from your host system to the Host Interface
Card connector on the back of the DiamondVT. The cable you use depends upon your
application, the environment and distance.
3 Make sure the power switches on the power
supplies on the rear of the unit are in the standby position. Plug in the power cords to the back
of the unit, then into an appropriate power
source (100-240 VAC). The power source must
Power Sw itch Posit ions
be connected to a
protective earth ground and
comply with local electrical
codes. Improper grounding
On Stand-by
may result in an electrical
shock or damage to the
4 Press the stand-by power switch for each
power supply to the ON position. When the
green power LED on the back of the unit is lit,
the power supply is fully operational and
delivering power to the system. The power LED
on the front of the array lights once the firmware
begins to execute.
When the power is turned on, the LEDs on the
front of the Diamond-VT flashes twice. Drives
spin up in groups of three, about every one to
two seconds. The individual LEDs blink. After
all available drives have spun up, the individual
drive LEDs stays lit. When all available drives
are operational, the ready LED on the top front
panel of the management card remains lit.
5 Reboot your computer
6 Determine the best configuration for your needs
and refer to the rest of this manual for more
detailed explanations and configuration
information.
unit.
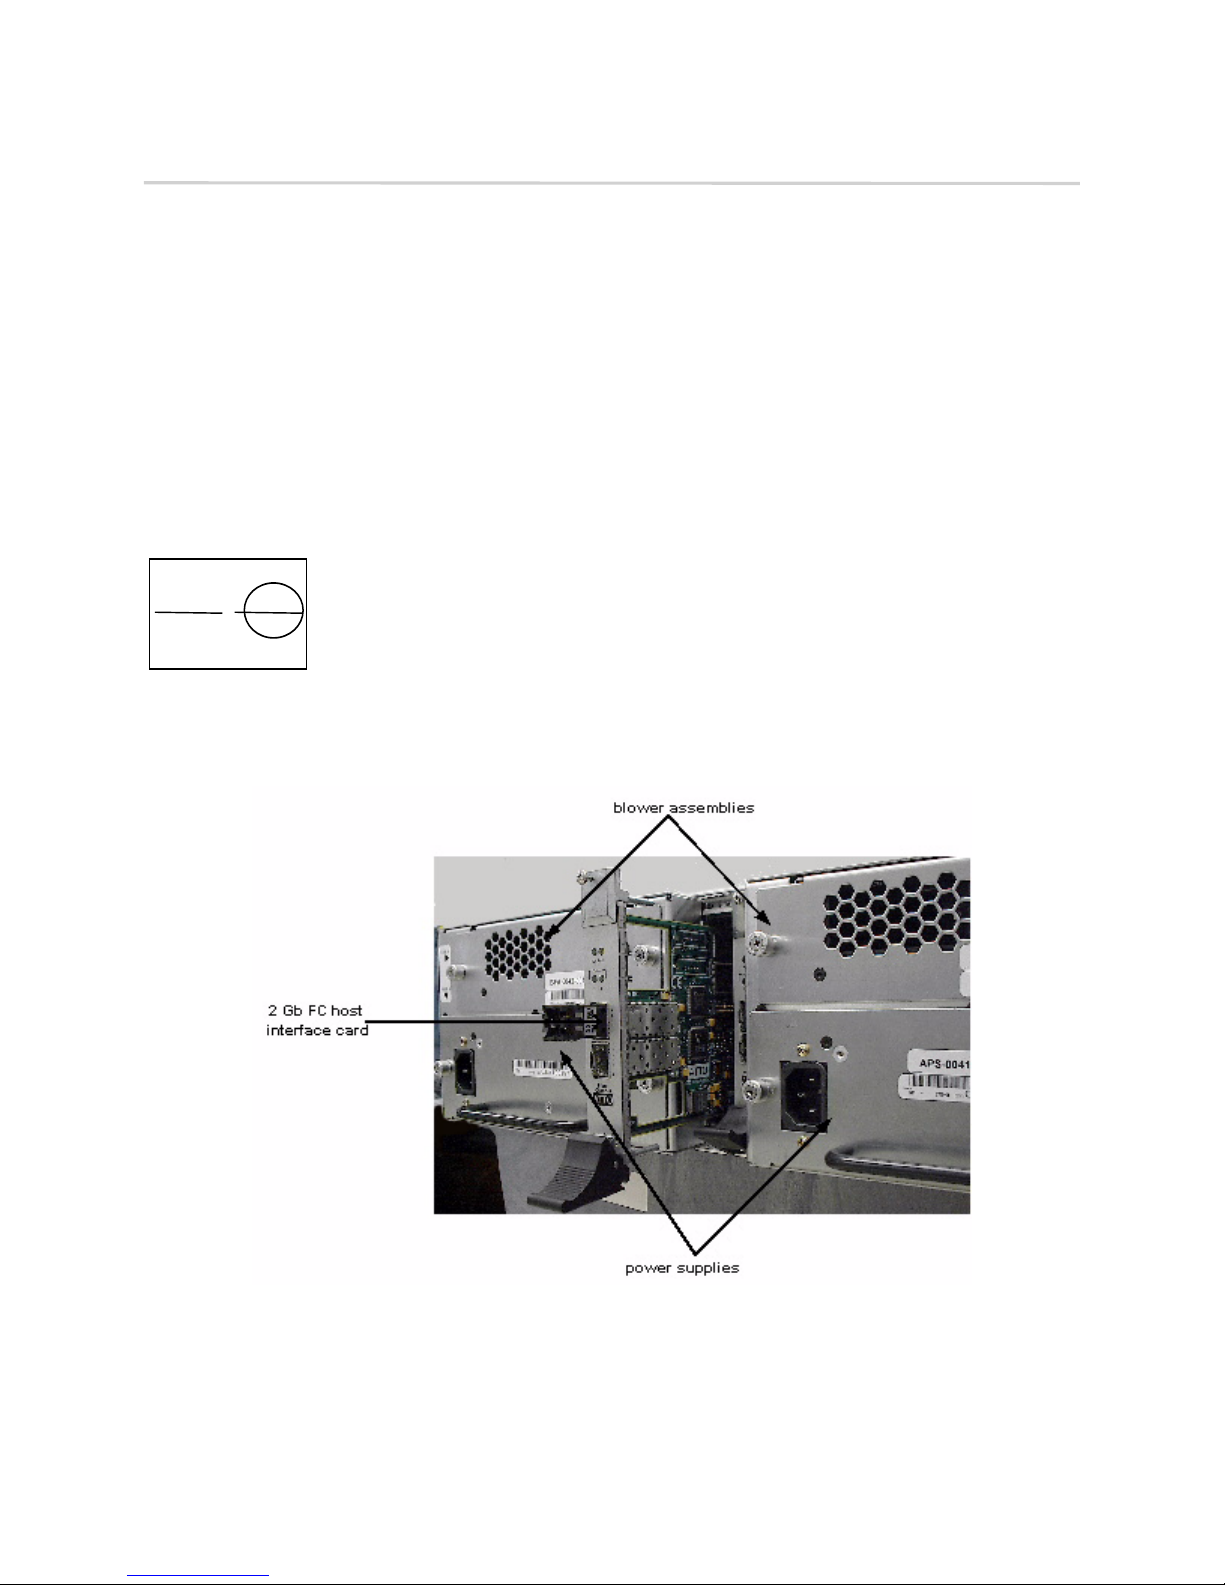
Exhibit 3.2-1 Back side of a rack mount, Fibre Channel Diamond-VT with blower assemblies on top, power supplies
at the bottom, separated by the Host Interface Card.
10
Physical setup
Page 22

3.2.1 Connecting a Fibre Channel Array
The Diamond-VT supports up to two Fibre Channel Host Interface Cards (HIC). Physical connections
and CLI commands contribute to the Fibre Channel topology.
The Diamond-VT may have
two Fibre Channel Host
Interface Cards (HIC). Each
2 Gb HIC uses
2 SFPs to connect up
to 2 FC cables
HIC is connected by a Fibre
Channel cable via an SFP
(small form factor
pluggable) module into a
point-to-point or loop Fibre Channel topology.
1 Install the SFP according to the manufacturer’s
instructions.
2 Insert the SFP into the Fibre Channel Host
Interface Card in the back of the Diamond-VT.
3 Insert the correct cable.
The cable you use depends upon your application,
the environment and the distance required for
your storage area network.
To comply with FCC and CE EMI for the 2gigabit Host Interface Card, use fiber optic cables.
Exhibit 3.2.1-1 Fibre Channel cable options
Cable length Cable type Cable
size
<10 meters Unequalized
copper
>10 <30 meters Equalized copper
Up to 175
meters
Up to 500
meters
Up to 10
kilometers
multi mode fiber
optic
multi mode fiber
optic
single mode fiber
optic
62.5
micron
50 micron
9 micron
Each HIC has two ports and an on-board hub.
Each port has an SFP module to connect to Fibre
Channel. Each HIC is independent of the other, so
that one may be connected into a point-to-point
topology and the other into a loop. However, if
one port in a HIC is connected into a point-topoint topology, the other port cannot be used.
One of the advantages of using loop topology for
Fibre Channel connections is that it allows
Diamond-VT units to be daisy-chained together.
See Exhibit 3.2.1-2.
Autoconfiguration
The Diamond-VT automatically determines if the
Array HICs are in loop or point-to-point
topologies.
If you wish to see how the unit has been set up, go
Info
to the CLI commands and type
Status
page of the ExpressNAV interface. The
or go to the
return displays the data rate and connection mode
for each HIC (FC 0 and FC 1).
Manual configuration
You may manually configure the Diamond-VT
using CLI commands (see
based Commands
Channel
The
FCConnMode
on page 27.) or access the
page of the ExpressNAV interface.
CLI command specifies the
CLI: Interface via ASCII-
Fibre Channel topology for both HICs on a
Diamond-VT. Options are loop only (loop), pointto-point only (ptp), loop preferred (loop-ptp) or
point-to-point preferred (ptp-loop).
Loop connects to either an FC-AL arbitrated loop or
a fabric loop port (FL_Port) on a switch.
Point-to-point (ptp) connects to a direct fabric
connection, such as an F port on a switch.
Loop-ptp allows the Diamond-VT to determine
what kind of connection to use, but tries to connect
in loop mode first, then point-to-point mode.
Ptp-loop allows the card to determine what kind of
connection to use, but tries to connect in point-topoint mode first, then loop mode.
Fibre
11
ATTO Technology Inc. Diamond Storage Array Installation and Operation Manual
Page 23
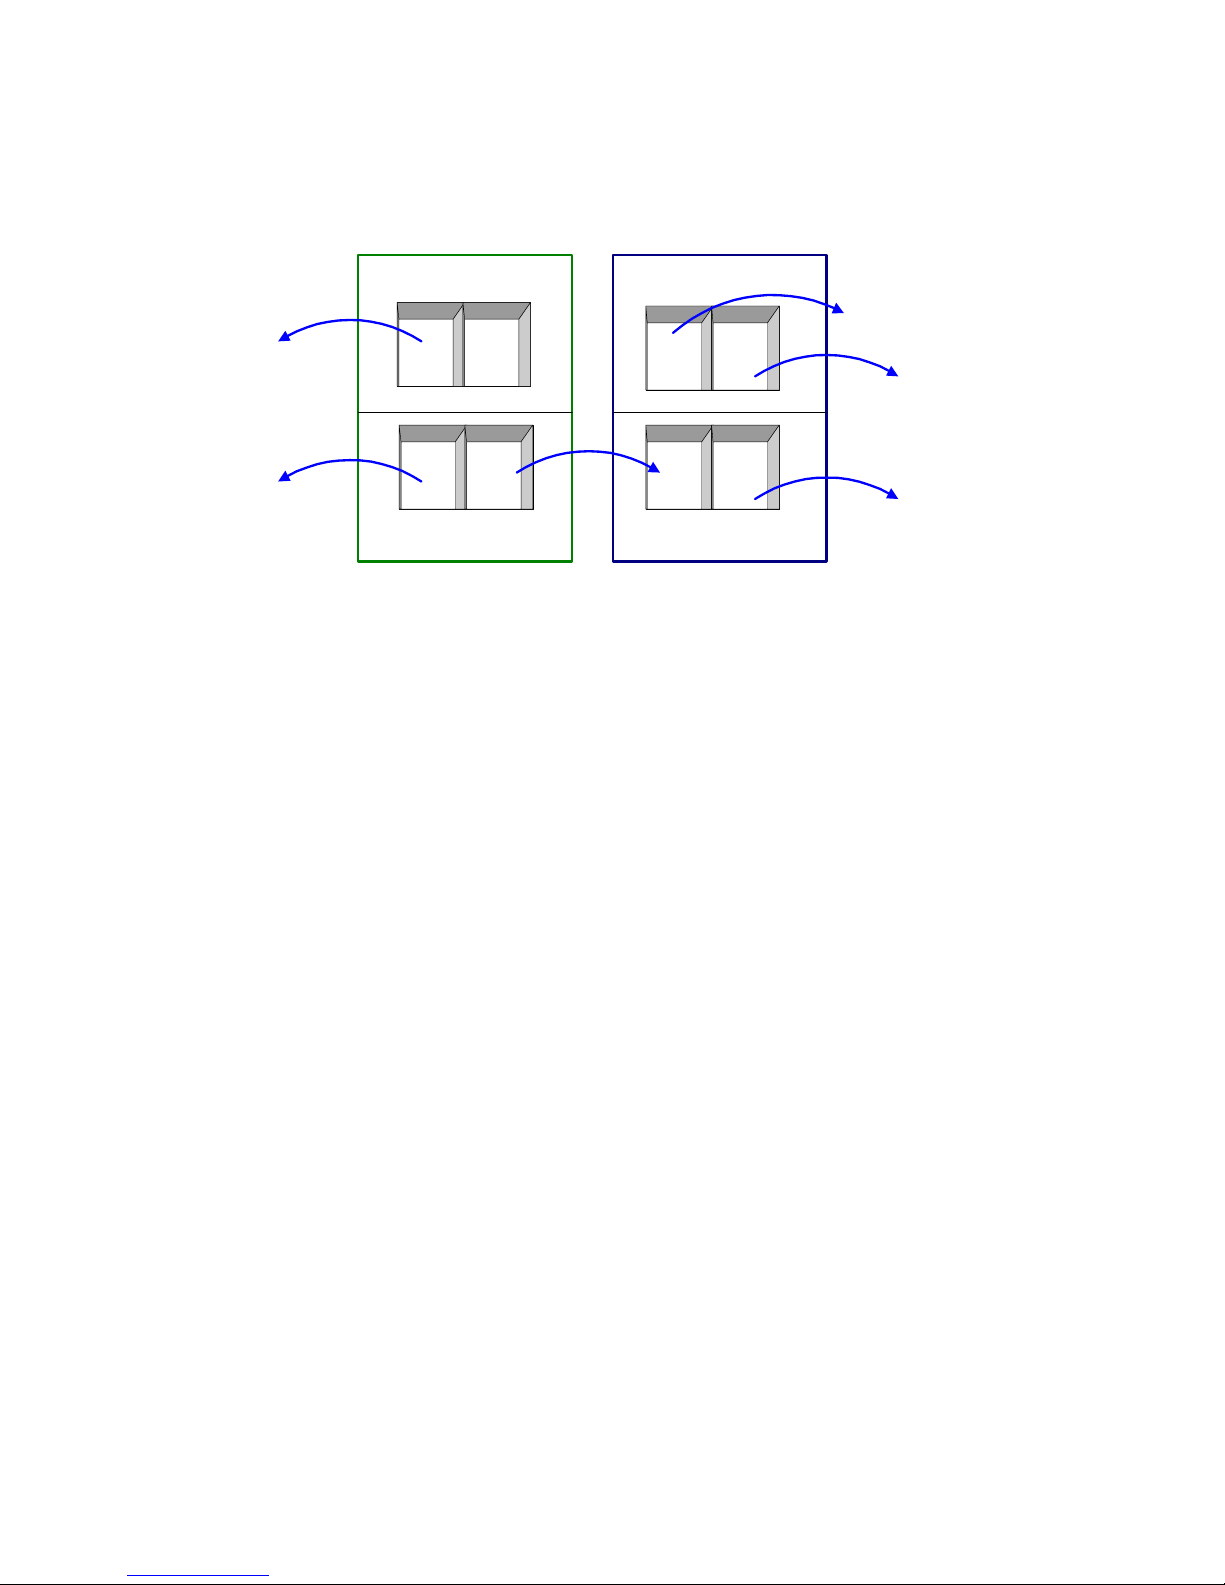
Exhibit 3.2.1-2 Possible 2 gigabit Fibre Channel physical connections depending on which Fibre Channel
connection mode has been selected.
point-to-
point mode
loop
mode
Diamond Storage Array A Diamond Storage Array B
no
connection
possible
loop
mode
daisy-chain
loop
mode
loop
mode
loop
mode
loop
mode
12
Fibre Channel connections
Page 24
3.2.2 Connecting a SCSI Array
The SCSI Diamond-VT uses a VHDCI connector and SCSI cables to connect to a host. It automatically
detects the type of Host Interface Card it is using without any intervention.
To connect the SCSI Diamond-VT
1 Insert a SCSI VHDCI connector into the Host
Interface Card in the back of the Diamond-VT.
2 If the SCSI Diamond-VT is the last device on
the bus, you must attach a VHDCI terminator to
one connector of the SCSI Host Interface Card
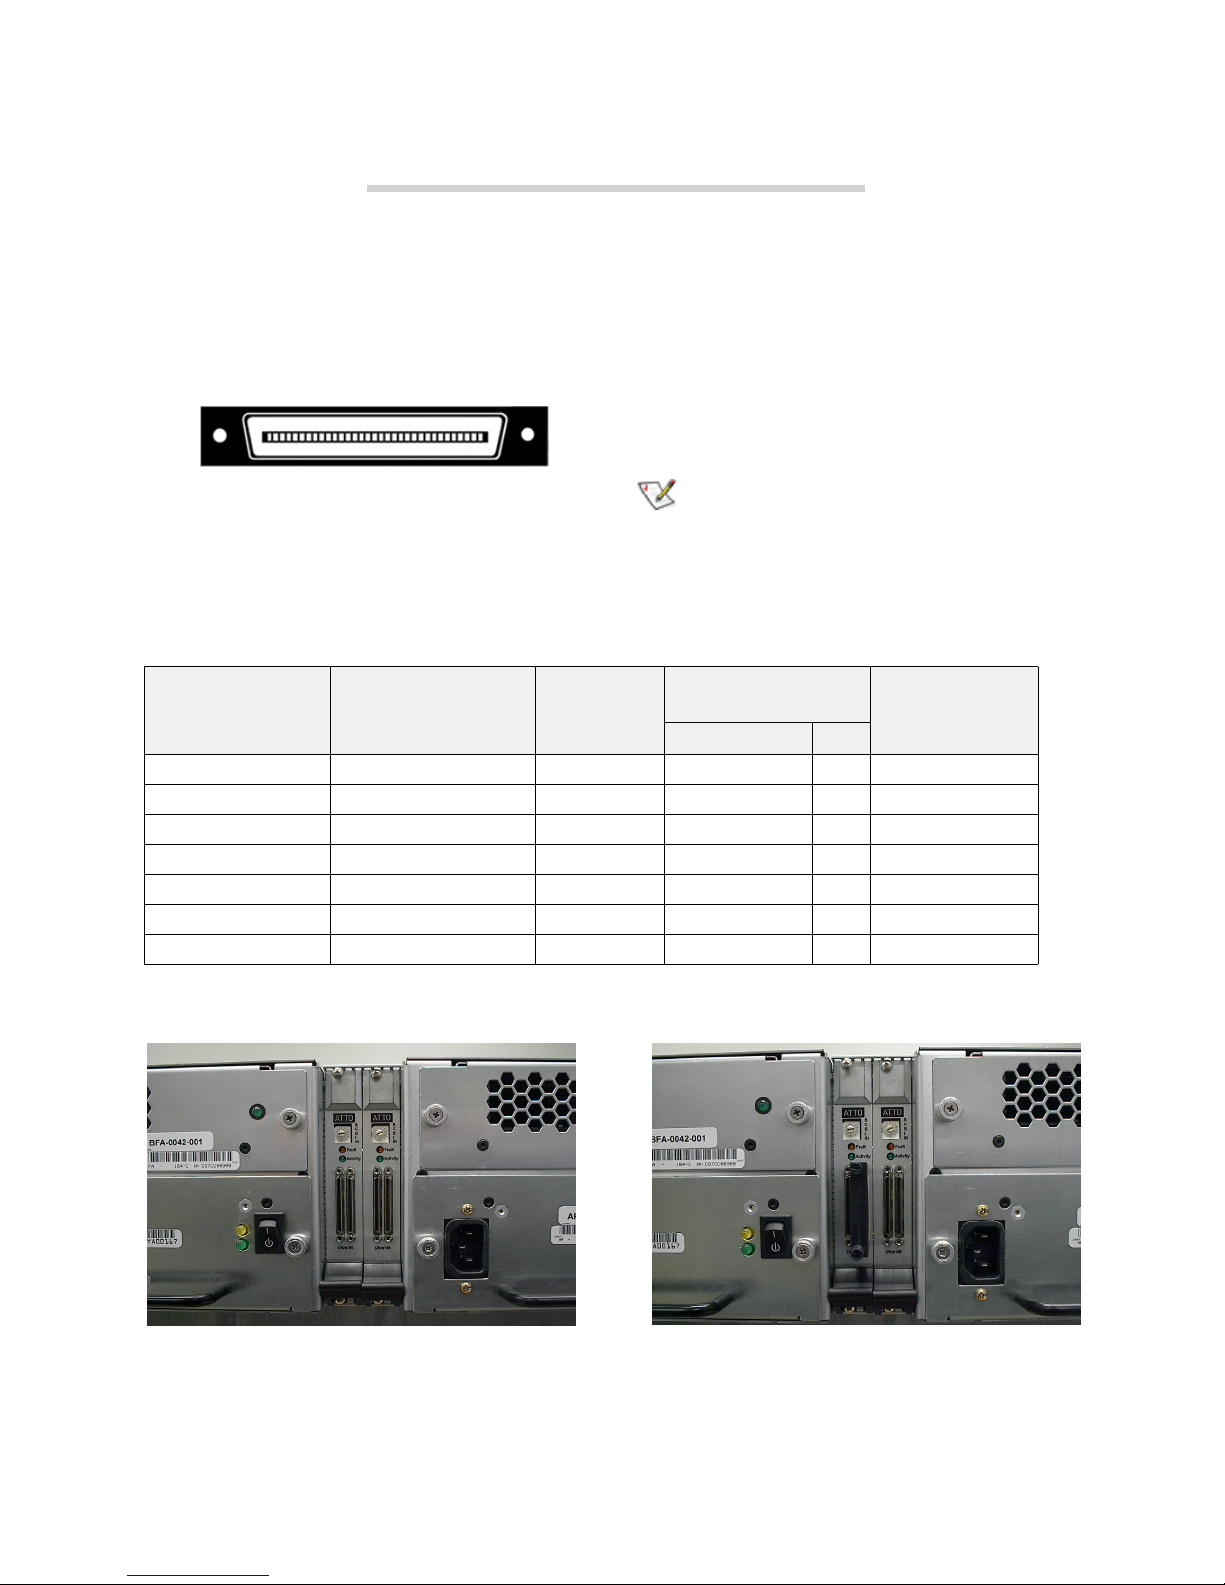
Exhibit 3.2-1 SCSI cable options.
Bus speed, MB/sec.
max.
SCSI-1 5 8 6 - 8
Fast SCSI 10 8 6 - 8
Fast Wide SCSI 20 16 6 - 16
Wide Ultra SCSI 40 16 3 - 4
Wide Ultra SCSI 40 16 1.5 - 8
Wide Ultra 2 SCSI 80 16 - 12 16
Ultra 3 or Ultra160 SCSI 160 16 - 12 16
Bus width,
bits
or connect a cable between the second
connector and the next device on the SCSI bus.
3 The SCSI Host Interface Card has a rotary
binary-coded hex switch which allows you to
set the SCSI ID of the HIC. Be sure the selected
ID is different from all other SCSI devices on
the bus.
Note
If slower devices are connected on the same
SCSI bus as the Ultra 160 Diamond-VT, the
bus communicates at the rate of the slowest
device.
Max. bus lengths,
meters
Single-ended LVD
Max. device
support
Exhibit 3.2-2SCSI interface cards: left without terminators attached; right with a terminator attached.
13
ATTO Technology Inc. Diamond Storage Array Installation and Operation Manual
Page 25

14
SCSI connections
Page 26

4.0 Accessing the Diamond-VT
Communicate with the Diamond-VT through the Fibre Channel link, the RS-232 port or the Ethernet
port using Command Line Interface commands or ATTO ExpressNAV,
console
.
an integrated user management
You may configure and tune the Diamond-VT for
different environments and applications, update
the firmware, monitor internal power and
temperature status, report on hardware
diagnostics and log failures.
Three avenues are available:
• In-band SCSI over Fibre Channel and over SCSI
• RS-232 port
• Telnet and SNMP over Ethernet
The following chapters describe how to access the
Diamond-VT and use the Command Line
Interface or ATTO ExpressNAV, an integrated
user management console.
Command Line Interface
The Command Line Interface provides access to
the Diamond-VT through ASCII command lines.
An initial display, after powering up the unit or
restarting the firmware, contains the information
in Exhibit 4.0-1. Once the initial display is
Ready
complete, with the word
, you are in the
Command Line Interface mode.
Help
Type
to display a list of all commands
available.
ATTO ExpressNAV
ATTO ExpressNAV is an integrated configuration
tool accessible through an Ethernet connection.
Platform independent, ExpressNAV contains all
the current capabilities of the CLI in a userfriendly GUI console. A menu on each page
provides access to information and configuration
operations.
Refer to
ATTO ExpressNAV: Browser-based Interface
on page 23 for more information on the program.
In-band SCSI over Fibre Channel
In-band SCSI commands (Write Buffer and Read
Buffer) may be issued to the Diamond-VT Fibre
Channel port to manage configuration via two
mechanisms:
• In-band CLI over SCSI, where ASCII CLI
commands, may be issued via
CLI commands except
• ID/value, where the application program uses a
SCSI CDB (command descriptor block) to select
the buffer ID of the configuration parameters to
be affected, and the new value of the parameter.
Most configuration options are available.
Zmodem
Write Buffer
are supported.
. All
RS-232 port
The Diamond-VT provides remote service
operations over the RS-232 serial port using
standard terminal emulation software available
with most systems.
Set the following serial parameters in your
terminal program:
• Bits per second: 115200
• Data Bits: 8
• Parity: None
• Stop Bits: 1
• Flow Control: None.
• Terminal type: ASCII
• Echo: on
Ethernet port
The 10/100 BaseT Ethernet port provides Telnetor SNMP-based monitoring and management.
The default IP address is 10.0.0.1; the default
subnet mask is 255.255.0.0. Change these
parameters using the RS-232 port or Telnet. The
Diamond-VT should first be configured for the
network using the RS-232 port to establish the
correct IP address.
15
ATTO Technology Inc. Diamond Storage Array Installation and Operation Manual
Page 27

SNMP
SNMP, or Simple Network Management
Protocol, is an application layer protocol that
allows network devices to exchange management
information. Through a combination of standard
and custom MIBs (Management Information
Array to be managed with other devices in a
complex system through a common interface.
You use CLI commands to configure up to six
unique Trap addresses. A trap is a way for the
Diamond-VT to tell the SNMP server that
something has happened.
Base), the Diamond-VT provides status and error
indications to an SNMP server, allowing the
Exhibit 4.0-1 The POST information displayed after boot of the Diamond-VT.
Initialization Complete
Diamond Storage Array
(c) 2004 ATTO Technology, Incorporated.
Firmware version A21R release date Apr 30 2004, 11:14:42 Build A21R
Power-On Self-Test Completion Status: GOOD
128 Megabytes of RAM Installed.
Interface Port 0 is not installed.
Interface Port 1 is not installed.
Interface 0 World Wide Name = 20 00 00 10 86 10 45 64
Interface 1 World Wide Name = 20 00 00 10 86 10 45 64
Diamond Array Serial Number = “MIDP100463”
Diamond Array Name = “ “
System Serial Number = “ “
Active Configuration = ATTO
DiamondClass = (T)84
Internal Temperature = 25 C [5 - 47]
ErrorLog Contents: NO ERRORS
For help, type HELP.
Ready.
16
Accessing the array
Page 28

4.1 In-band CLI Over Fibre Channel
In-band Command Line Interface (CLI) configures and manages the Diamond-VT using SCSI-based
CLI commands over a Fibre Channel port connection.
In-band CLI allows a programmer to configure
the Diamond-VT while it is moving data. Using a
programmer’s interface, CLI commands as
described previously in this manual may be
implemented.
In-band CLI is implemented as part of LUN 0. It
uses a different LUN than the Diamond-VT, and
reports as a Storage Enclosure Services (SES)
device (device type 0x0D).
LUN 0 is visible on all Fibre ports but is actually
a single unit. The default value for LUN 0 is 0x00.
LUN 0 must be reserved for each Write
Buffer/Read Buffer pair, using the SCSI Reserve
command to insure integrity of the in-band CLI
session.
1 An initiator (host) sends a SCSI Reserve
command to LUN 0.
• If LUN 0 is not reserved by another initiator,
LUN 0 is now reserved and ready to begin a
new CLI session.
• If the Diamond-VT configuration is reserved
by a different CLI session (i.e. serial or
Telnet), the in-band session is not allowed to
modify the Diamond-VT configuration. If you
try, the results buffer of LUN 0 returns:
Process X has the configuration
reserved.
ID of this session = Y
Ready.
2 The initiator issues a SCSI
command to LUN 0. A
must be accompanied by an ASCII buffer
representing the CLI command string such as
set DiamondName Omega1
LUN 0 executes the command line and create
feedback in the form of ASCII characters into a
buffer. This buffer is 8 KB and circular. Retrieve
the results by issuing a Read Buffer command
before issuing another Write Buffer command.
Write Buffer
Write Buffer
command
3 A subsequent Write Buffer command
executes the new command line and overwrites
the previous results in the buffer with new
results.
4 LUN 0 can be released by issuing a SCSI
Release command to the LUN after each
Write/Read Buffer pair, or multiple Write/Read
Buffer pairs.
Initiator (Host) Diamond-VT
Reserve LUN 0 return: “ok”
Write Buffer
LUN 0
bid ‘AA’
“get Temperature”
Read Buffer
LUN 0
bid ‘AA’
Release LUN 0 return: “ok”
executes the CLI
command, stores
output in buffer
return:”Temperature=28
C\r\n\Ready.\r\n\0”
I/O details
The buffer sent to the Services LUN during the
data out phase of a Write Buffer command must
be:
• ASCII data
• maximum 80 bytes length
• terminated with either a carriage return
character (0x0D), line feed character (0x0A) or
NULL character (0x00)
• Characters following the first carriage return
character, line feed character or NULL character
are ignored.
The buffer retrieved from the Services LUN
during the data-in phase of a
Read Buffer
command:
• ASCII data
• 8 KBytes (8192 bytes) in length
• terminated with a NULL character (0x00)
• Characters following the NULL character are
meaningless.
A CHECK_CONDITION,
INVALID_PARAMETER_IN_CDB is returned
17
ATTO Technology Inc. Diamond Storage Array Installation and Operation Manual
Page 29

to an initiator that specifies an incorrect Buffer
ID, Mode, Length or Buffer Offset. The Mode is
Exhibit 4.1-2 The SCSI command process: reserve the Diamond-VT, send the command, release the Diamond-VT.
Initiator/Host Diamond-VT
Goal
: reserve the Diamond-VT for an in-band CLI command
SCSI cdb: Reserve LUN 0 =>
Goal
: retrieve the Diamond-VT temperature via in-band CLI
1. Issue the command:
SCSI cdb: WriteBuffer LUN 0, bid=’AA’, “get Temperature\n” => places “Temperature=28C\n\r” into
2. Retrieve the results:
SCSI cdb: ReadBuffer LUN 0, bid=’AA’ =>
Goal
: release the Diamond-VT for other in-band users
SCSI cdb: Release LUN 0 =>
always Data (0x2), the Buffer ID is always 0 and
the Buffer Offset is always 0.
<= SCSI success
the read-data buffer
<= SCSI success
<= Returns “Temperature=28C\n\r” from
the read-data buffer
<= SCSI success
<= SCSI success
18
In-band CLI
Page 30

4.2 Serial Port Access
The Diamond-VT provides remote service operations over the RS-232 serial port using standard
terminal emulation software available with most systems.
The Diamond-VT supports service operations
over the RS-232 serial port using standard
terminal emulation software available with most
systems.
1 Connect a DB-9 null modem serial cable
between the port marked RS-232 on the front of
the Diamond-VT and one of the computer’s
serial ports. A gender changer or DB-9 to DB25 converter may be needed depending on the
cables you are using. The cable must be no
longer than three meters.
2 Boot the computer used to manage the
Diamond-VT.
3 Start a terminal emulator program such as
Windows HyperTerminal. Set the emulator to
use the COM port with cable attached, then the
following settings
• 115200 baud
• 8 bit ASCII
• no parity
• ASCII terminal type
• 1 stop bit
• flow control none
• echo typed characters locally
4 Turn on the Diamond-VT. Upon successful
power on and diagnostics, the unit should
display the POST (power on self test)
information found in Exhibit 4.0-1 on page 16.
5 You should now be in the Command Line
Interface mode. To see a list of available
commands, type help at the Ready prompt or
refer to this manual’s Index.
6 Use the Command Line Interface to configure
the unit as a RAID Level 10 or RAID Level 5
array with zones and/or Hot Spare sleds as
described later in this manual.
19
ATTO Technology Inc. Diamond Storage Array Installation and Operation Manual
Page 31

20
Serial port access
Page 32

4.3 Ethernet Access: Telnet and SNMP Protocols
The optional 10/100 BaseT Ethernet port provides Telnet- or SNMP-based monitoring and management.
The 10/100 Base T Ethernet management services
card provides Telnet-based monitoring and
management, including firmware update using
FTP.
Remote system monitoring is also available using
Simple Network Management Protocol (SNMP).
An agent resides in the Diamond-VT which takes
information from the Array and translates it into a
form compatible with SNMP. If certain conditions
arise, the agent sends asynchronous notifications
(traps) to a client.
To connect to the Ethernet port
1 Connect a cross-over cable (for a direct
connection to a PC) or regular network cable
from a network device to the optional RJ45
Ethernet port on the Ethernet management
card on the front of the Diamond-VT.
2 If using a direct connection, power on and boot
up the host computer.
3 Attach a DB-9 null modem serial cable (the
cable must be no longer than three meters)
from the RS-232 port of the Diamond Array to a
host computer and open a terminal emulator
program on the host to set the Ethernet
parameters.Turn on the Diamond-VT.
4 First time use: Upon successful power up and
diagnostics, set the host computer with the
appropriate settings.
The host computer must have appropriate
network settings to allow it to communicate with
the Diamond-VT. Please see your system
administrator for more information.
To use Telnet
1 If you have not already done so, change the IP
address from the default by first accessing the
serial connection and using the CLI.
You may change the IP address to a network
specific value or, if the local network uses
DHCP, you may enable automatic IP
addressing (set IPDHCP enabled) using the
CLI.
2 Open a Telnet session on the host computer.
• IP address
• Port type: telnet
• Terminal type: vt100
3 If you make any changes to the network setting
on the Diamond Array, use the
SaveConfiguration Restart
4 Username/password: You are prompted for a
username and password, up to eight characters
each, case insensitive. Only one
username/password combination is available
per Diamond-VT.
• You may change the telnet username and/or
password after entering a CLI session using
the commands
set TelnetUsername [username]
set TelnetPassword [password]
• Or you may change the telnet username
and/or password using the Configuration
page of the ExpressNAV interface.
• The default username is telnet and default
password is diamond
5 In the Command Line Interface mode, see a list
of available commands by typing help at the
Ready prompt or refer to
Commands
6 Using the ExpressNAV interface, configure the
unit as RAID Level 10 or RAID Level 5 with
zones and/or Hot Spare sleds as described
later in the manual.
To use SNMP
1 Enter the Command Line Interface through the
serial port or Ethernet.
2 Change the IP address to a network specific
value or, if the local network uses DHCP,
enable automatic IP addressing.
3 Set the number of trap client addresses by
typing set SNMPTrapAddress [1-6]
[IPAddress] [Level]
4Type set SNMPUpdates enabled.
5Type set SNMPTraps enabled.
6Type SaveConfiguration restart to reboot the
Diamond-VT.
7 Install SNMP management software on each
client you wish to receive traps (messages).
on page 29.
command.
.
Summary of CLI
21
ATTO Technology Inc. Diamond Storage Array Installation and Operation Manual
Page 33

8 Call technical support (see
Appendix, page xv) to get the appropriate MIB
file for your Diamond-VT.
9 For each client, copy the MIB file to the
directory containing the SNMP management
software.
10 From within the SNMP management software,
compile the file attodmnd-mib.mib according
to the software’s procedures.
11 Unload any default MIBs.
12 Load the Diamond MIB ATTODIAMOND.
13 When requested, enter the Diamond-VT IP
address as the Remote SNMP Agent.
Warranty
in the
14 The SNMP management software contacts the
agent in the Diamond-VT. The screen displays
system information.
15 Status is monitored and reported through the
SNMP management software.
Traps are generated for the following situations:
• Temperature status changes in any of the
sensors located on the Diamond-VT mid-plane.
• A drive or a sled is physically removed from the
Array or put into the Array.
• The power supply is turned on or off.
• The fan is physically stopped.
22
Ethernet protocols
Page 34

5.0 ATTO ExpressNAV: Browser-based Interface
The easiest way to communicate with the Diamond Storage Array is to use ATTO ExpressNAV, a user-friendly
GUI interface accessed through a browser to control the most common capabilities of the array.
Access ATTO ExpressNAV from any browser that
supports the latest standards for XHTML 1.0 and
CSS1. To take full advantage of the ExpressNAV
interface you should have Java script enabled through
your browser.
Browser compatibility
All pages are written in pure XHTML 1.0 and CSS1 to
be compatible with the latest versions of Internet
Explorer, Netscape, Mozilla (including K-Meleon,
Camino, Mozilla Firefox, Epiphany and Galeon), and
KHTML (including Konqueror and Safari).
Opening an ExpressNAV session
1 Obtain the IP address of the array.
2 Type the IP address of the array into the
browser address window.
3 The ExpressNAV interface splash screen is
displayed. Click on Enter.
4 Enter the username and password set
previously in
Interface
ATTO ExpressNAV: Browser-based
on page 23.
Minimum requirement is for Internet Explorer 5.5 and
Netscape 6.2.
To optimize ExpressNAV in Internet Explorer
1 Go to the browser toolbar and click on Tools
2Click on Internet Options
3 Click on the Security tab
4 Click on the Custom Level button.
5Click on Microsoft VM, Java permissions
6 Ensure Disable Java is not selected.
7 Click on the Miscellaneous tab.
8Click on Metarefresh
The
•
• The default password is Password
5 The product faceplate display appears. Click
the component you want to manage on the lefthand side menu or go to the Advanced screen
to use the CLI.
default username is Diamond
Navigating ExpressNAV
All pages are accessible by clicking on their titles on
the left side of the page. You may also go back one
page or go to the
Home
page via the titles on the left
side of the page.
23
ATTO Technology Inc. Diamond Storage Array Installation and Operation Manual
Clicking on any of the red option names will bring up
a help window. After making changes on a page, click
the
Submit button at the bottom. Clicking this button
is equivalent to typing in all the CLI commands and
then the command
saveconfiguration norestart.
Page 35

Exhibit 5.0-3 Navigating ATTO ExpressNAV screens
Information required to perform changes
Sidebar:
select the
item you
wish to
view
options
Parameter name
Red print provides
link to help text
Submit button
same as typing all
CLI commands and
saveconfiguration
norestart
Reset button
return to previous
setting without
making any changes
24
ExpressNAV
Page 36

5.1 ExpressNAV Pages
Each page in the ATTO ExpressNAV interface provides information and/or configuration parameters
based on specific topics. Each page can be reached through the menu on the left hand side of each page.
Status
General information:
• Unit Information including Vendor ID, Product ID,
Firmware Revision and Serial Number
• Environmental information
• World Wide Identifiers including Node Names and
Port Names
• Host Interface Card Status
• Fan Status
• Power Supply Status
• Storage Status including ATA Disk Errors and Logical
Unit Conflicts
Ethernet
Configures the Ethernet port. Configurable parameters
are:
• IP Address
• IP Gateway
• IP Subnet Mask
• Ethernet Speed
• Use DHCP
See
Ethernet Access: Telnet and SNMP Protocols
on
page 21 for details.
SNMP
Remote system monitoring is available using Simple
Network Management Protocol (SNMP).
See
Ethernet Commands
on page 33 for details on each
parameter.
Serial Port
Allows you to configure the serial port. Configurable
options are
See
Ethernet Access: Telnet and SNMP Protocols
Baud Rate
and
Echo
on
page 21 for more information.
Fibre Channel
Manages the Fibre Channel port.
• Data rate
• Full duplex mode
• Connection mode
See
Connecting a Fibre Channel Array
more information.
on page 11 for
Storage Management
Displays information about the drives and their status
including
• Sled Number
• Capacity of each sled
• Number of errors
• Type of configuration (RAID level)
• Virtual Disk ID
You may place sleds on or off line by selecting or deselecting a check box.
See
Drive Management Commands
on page 41 for more
information.
Once you open this page, other configuration pages are
available on the menu on the left hand side of the page.
RAID
Configures RAID groups. Information provided
includes
• Type of configuration (RAID level)
• Virtual Disk ID
• Number of partitions
• State of sleds
• Capacity of sleds
• Interleave values
Configurable options are:
• RAID Level
• Number of tape volumes
• Number of tape drives
• Hot Spare sleds
From the
Configuration
• Interleave
• Rebuild state
• Enable/disable auto rebuild
See
RAID
page, go to
RAID Rebuild
to change
Configuring the Diamond-VT
on page 47 for more
information.
Clear Data
• view the status of any Clear Data command
• view the rebuild state of each sled
• initiate a RAID Level 5
See
Drive Management Commands
information.
Clear Data command
on page 41 for more
25
ATTO Technology Inc. Diamond Storage Array Installation and Operation Manual
Page 37

Logical Units
Displays information on the logical units which have
been configured and allows you to change the status
from online or offline or degraded.
Partitions
Displays the current configuration of the Diamond-VT
including
• Partition ID
• Virtual Drive ID
• LUN
• Capacity of each partition
See
Drive Management Commands
on page 41 for more
information.
Zoning
Displays the current configuration of the DiamondVT. Changes may be made.
See
Zones
on page 51 for more information.
Tape Volumes
Displays the Volume ID and capacity, capacity used
and capacity remaining of tape volumes.
You may also Write Protect a Virtual Tape Volume.
See
Configuring the Diamond-VT
on page 47 for more
information.
Tape Drives
Sets up Virtual Tape configurations and displays the
LUN, state, partition ID, Virtual Disk ID, Tape Volume
ID and the capacity and usage percentage of all the
tape drives.
See
Configuring the Diamond-VT
on page 47 for more
information.
Move Medium
Manually move the available tape volumes in or out of
a tape drive by dragging and dropping a tape volume
icon onto one of the tape drive icons.
Rebuild
Displays the current status of rebuilds and allows you
to halt, resume or initiate rebuilds.
See
Drive Management Commands
on page 41 for more
information.
Configuration
Manages with configurable options
• User name
• Password
• Minimum operating temperature
• Maximum operating temperature
• Identify Diamond
• Restore defaults
Refer to
Maintenance Services Commands
on page 38
for details.
Advanced
Input any CLI command available through the
Diamond-VT while in ExpressNAV
To use the advanced page CLI commands
1 After the page opens and the Ready prompt
appears, type in the CLI command
2Click the Submit button, the equivalent of typing the
CLI command into a telnet or serial port CLI session.
A text field beneath the box lists the most recent
commands issued to the Diamond-VT.
3Type SaveConfiguration norestart
4 Click the Submit button. Your changes are
implemented.
5 To keep the changes through the next power cycle,
FirmwareRestart or go to the Restart page
type
and click Restart.
Restart
Allows you to implement a firmware restart of the
Diamond-VT. Access is via the
Restart
link on the
left side of the page.
Note
Restarting the firmware may take a few
minutes.
1 Click the Restart button.
A box asks you to wait until the counter gets to
0 and then the browser refreshes.
2 If the browser does not refresh after the counter gets
to 0, click the link to refresh it manually.
Help
Gives help information about the command line
interface commands and troubleshooting tips. This
page provides links to pages with help text for each
category of options and one link to the
Troubleshooting Tips
website. Contact information for getting in touch with
ATTO technical support is on the right.
When you click a red text box on any page,
ExpressNAV asks for your login information, then
open a dialog box with help text.
and
FAQs
page on the ATTO
26
ExpressNAV
Page 38

6.0 CLI: Interface via ASCII-based Commands
The command line interface (CLI) provides access to Diamond-VT services through a set of ASCIIbased commands. CLI commands may be entered while in CLI mode or by accessing the
Configuration
page in the ExpressNAV interface.
Advanced CLI
• CLI commands are context sensitive and
generally follow a standard format:
[Get|Set] Command [Parameter1|Parameter2]
followed by the
• CLI commands are not case sensitive: you may
type all upper or all lower case or a mixture, no
matter what the definition either in help or these
pages states. Upper and lower case in this
manual and the help screen are for clarification
only.
• Commands generally have three types of
operation: get, set and immediate as
summarized in Exhibit 6.0-1.
return
or
enter
key
The get form returns the value of a parameter or
setting and is an informational command.
Responses to get commands are specified in the
Results field for each command, followed by
Ready.
The set form is an action that changes the value of
a parameter or configuration setting. It may
require a
SaveConfiguration
command and a
system restart before changes are implemented.
The restart can be accomplished as part of the
SaveConfiguration
separate
FirmwareRestart
command or by using a
command. A number
of set commands may be issued before the
SaveConfiguration
command.
Responses to set commands are either an error
message or
SaveConfiguration
Ready. *,
which indicates a
command is required.
Set commands which do not require a
SaveConfiguration
command, defined as
immediate commands, are immediately
implemented.
Responses to immediate commands are either an
error message or
Note
Zone commands do not use the get, set forms.
See
how to use Zone commands.
Ready
.
Zones
on page 51 for more information on
Symbols, typefaces and abbreviations used to
indicate functions and elements of the command
line interface used in this manual include those
found in Exhibit 6.0-2.
Exhibit 6.0-1 Command Line Interface actions and responses
Set
commands configure the Diamond-VT and display what you have changed after
completing the task. Commands which require a
their implementation will return Ready. *.
SaveConfiguration
Get
commands display information about the configuration of the Diamond-VT.
Responses to
command are immediately implemented.
get
commands are specified in the Results field for each command,
followed by Ready.
Screen messages, also called returns, may be either terse, with just the current
information, or verbose, with labels and the current information. Default is verbose. If
you want the terse mode, type
27
ATTO Technology Inc. Diamond Storage Array Installation and Operation Manual
SaveConfiguration
Set
commands which do not require a
set VerboseMode disabled
command to complete
.
Page 39

Exhibit 6.0-2 Symbols, typefaces and abbreviations used to indicate functions and elements of the Command Line
Interface
Symbol Indicates
[ ] Required entry
< > Optional entry
| pick one of
… Ellipses, repetition of preceding item
\n end of line
- a range (6 – 9 = 6, 7, 8, 9)
Boldface words must be typed as they appear
Italicized words Arguments which must be replaced by whatever they represent
Fp Fibre Channel port number (0 <= fp <= 1)
Fl
Fibre Channel LUN (0 <= fl <= 24), where 0 represents the Diamond-VT
unit, and 1-24 represent the disk drives.
device_lun
host_name
The LUN of the RAID drive (used in zoning)
In a Fibre Channel environment, the WWPN (World Wide Port Name); in a
SCSI environment, SCSI Initiator ID (used in zoning)
port_number
zone_name
The Diamond port number (0, 1) for the data path (used in zoning)
Alphanumeric or ‘_’, character string less than or equal to16 characters long
(used in zoning)
Exhibit 6.0-3 CLI commands returns may be terse (short) or verbose (with parameter names and details of results).
Zoning command returns follow these patterns:
return type/mode return format/content
errors context sensitive error message\n
ERROR message\n
command completion
..........single line output
Ready.\n
shows the line
..........multiple line output
shows the line count followed by the output lines
28
Command Line Interface
Page 40

6.1 Summary of CLI Commands
A summary of the Command Line Interface commands, their defaults, an example of how they might be
used, and where you can find the specifics of the command. Commands which have no default values
associated with them have a blank entry in that column of the table.
Command Defaults Example Page
ATADiskState Online set AtaDiskState 6 1 offline
AudibleAlarm Disabled set AudibleAlarm disabled
AutoRebuild Disabled set AutoRebuild enabled
ClearDiskReservedArea ClearDiskReservedArea 8 2
DiamondModel Diamond get DiamondModel
DiamondName “
DriveCopy DriveCopy 1 1 2 2
DriveCopyHalt DriveCopyHalt 2 2
DriveCopyResume DriveCopyResume 2 2
DriveCopyStatus DriveCopyStatus
DriveInfo DriveInfo 3 2
DriveSledPower On set DriveSledPower 9 1 off
DriveWipe DriveWipe 2 2
ECC Enabled set ECC disabled
EthernetSpeed Auto set EthernetSpeed 100
Exit exit
FcConnMode Loop get FcConnMode
FcDataRate Auto set FcDataRate 2 gigabit
FcFairArb Enabled get FcFairArb
FcFrameLength 2048 get FcFrameLength
FcFullDuplex Enabled set FcFullDuplex enabled
FcHard Disabled get FcHard
FcHardAddress 0x03, 0x04 get FcHardAddress 0
FcNodeName get FcNodeName
FcPortInfo get FcPortInfo
FcPortList FcPortList
FcPortName get FcPortName 1
FcSCSIBusyStatus Busy set FcSCSIStatus qfull
FcWWName get FcWWName 0
FirmwareRestart FirmwareRestart
FTPPassword diamond set FTPPassword barbw52
Help Help DriveInfo
IdentifyDiamond Disabled get IdentifyDiamond
IdeTransferRate 4 set IdeTransferRate 4
...............
” get DiamondName
41
39
41
41
39
39
41
41
41
39
39
41
42
42
33
33
35
35
35
35
35
35
35
39
35
36
39
36
36
32
33
32
39
42
29
ATTO Technology Inc. Diamond Storage Array Installation and Operation Manual
Page 41

Command Defaults Example Page
IdeWriteCache enabled set idewritecache disabled
Info Info
InquiryData InquiryData 11456 124345 1.0 11242 14564 2
IPAddress 10.0.0.1 set ipaddress 19.172.2.2
IPDHCP Disabled set ipdhcp enabled
IPGateway 0.0.0.0 get ipgateway
IPSubnetMask 255.255.255.0 get IPSubnetMask
LUNInfo LUNInfo 1
LUNState Online get LunState 1
MaxEnclTempAlrm 47 get MaxEnclTempAlrm
MediumType 0x85 get MediumType
MinEnclTempAlrm 5 set MinEnclTempAlrm 10
PartitionInfo partitionInfo
PowerAudibleAlarm poweraudiblealarm disabled
QuickTape set QuickTape RAID5 15 1 enabled
RAID5ClearData RAID5ClearData
RAID5ClearDataStatus RAID5ClearDataStatus
RAIDHaltRebuild RAIDHaltRebuild 3
RAIDInterleave 128 get RAIDInterleave
RAIDManualRebuild RAIDManualRebuild 2 3
RAIDRebuildState set RAIDRebuildState 2 OK
RAIDRebuildStatus get RAIDRebuildStatus
RAIDResumeRebuild RAIDResumeRebuild 5
RebuildPriority same set RebuildPriority high
ResolveLUNConflicts resolvelunconflicts
RestoreConfiguration RestoreConfiguration default
RestoreModePages RestoreModePages
SaveConfiguration SaveConfiguration restart
SerialNumber get SerialNumber
SerialPortBaudRate 115200 set SerialPortBaudRate 9600
SerialPortEcho Disabled get SerialPortEcho
SerialPortHandshake None get SerialPortHandshake
SerialPortStopBits 1 set SerialPortStopBits 1
SledFaultLED set SledFaultLED 9 on
SMARTData SMARTData 2 1
SNMPTrapAddress 10.0.0.1 get snmptrapaddress
SNMPTraps Disabled get snmptraps
SNMPUpdates Disabled get snmpupdates
SpeedWrite get speedwrite
42
39
42
33
33
33
33
39
42
38
42
38
39
40
42
43
40
43
43
43
40
40
43
44
44
32
44
32
40
37
37
37
37
40
40
33
34
34
38
30
CLI index
Page 42

Command Defaults Example Page
SystemSN get systemsn
TapeDriveInfo TapeDriveInfo
TapeVolumeBlockSize 1 set TapeVolumeBlockSize 2
TapeVolumeInfo TapeVolumeInfo
TapeWriteProtect Disabled set TapeWriteProtect enabled
TelnetPassword diamond set TelnetPassword 123ABC
TelnetTimeout Disabled set TelnetTimeout 360
TelnetUsername telnet set TelnetUsername diamond1
Temperature get Temperature
VerboseMode Enabled get VerboseMode
VirtualDriveInfo virtualdriveinfo active
Zmodem zmodem receive
ZoneAddDevice zoneadddevice zone1 2
ZoneAddHost zoneaddhost zone1 20:00:00:18:86:00:98:00
ZoneAddPort zoneaddport zone1 0
ZoneClearAll zoneclearall
ZoneCommit zonecommit
ZoneCreate zonecreate zone1
ZoneDelete zonedelete zone1
ZoneInfo zoneinfo
ZoneRemoveDevice zoneremovedevice zone1 1
ZoneRemoveHost
zoneremovehost zone1 20:00:00:18:86:00:98:00
ZoneRemovePort zoneremoveport zone1 0
ZoneRetrieve zoneretrieve
ZoneState Disabled ZoneState zone1 enabled
32
40
44
40
44
33
34
34
40
32
40
38
44
44
44
45
45
45
45
40
45
45
45
38
45
31
ATTO Technology Inc. Diamond Storage Array Installation and Operation Manual
Page 43

6.2 General Use Commands
The following commands, listed alphabetically, describe or perform general functions.
FirmwareRestart
Causes a warm restart of the Diamond Storage Array.
Immediate: FirmwareRestart
Help
Displays a list of available commands. Type ‘help’
followed by a command name to display detailed
command-specific information.
Immediate: Help [Command Name]
RestoreConfiguration
Restores configuration to either the default configuration
or the configuration last saved into non-volatile memory.
The saved option will undo any changes made since the
last save.
Immediate: RestoreConfiguration [Default|Saved]
SaveConfiguration
If the restart option is selected, the Diamond will cycle its
power. The norestart option will save changes without
restarting. Please note: certain modifications require a
SaveConfiguration
required, the return
command and a system restart. If
Ready. *
will be displayed after the
return for the modification. You may make several
changes through commands and
SaveConfiguration
before implementing a restart, but once you have
restarted the Diamond, all the command changes created
before the restart and saved will be implemented. Restart
or no Restart parameter is optional
Immediate: SaveConfiguration <Restart| NoRestart>
SystemSN
Stores the Diamond Storage Array serial number. The
serial number may be 1-16 characters.
Set syntax: set SystemSN [n]
Requires a SaveConfiguration command
Get syntax: get SystemSN
VerboseMode
Specifies the detail of verbal feedback for the Command
Line Interface. Disabling this option removes parameter
names from ‘get’ commands and removes descriptions
from ‘help’ commands.
Default: enabled (returns have parameter information)
Set syntax: set VerboseMode [enabled | disabled]
Get syntax: get VerboseMode
ZoneCommit
Commits the current Planned Zone Configuration,
making it the persistent, Active configuration. To
complete this procedure, the ZoneState command must be
entered as enabled to activate the zone before using the
ZoneCommit command.
Set syntax: ZoneCommit
32
Diamond Storage Array Installation and Operation Manual
Page 44

6.3 Ethernet Commands
Ethernet configuration commands configure the Ethernet and TCP/IP parameters for the Diamond
Storage Array with an optional Ethernet management services card.
EthernetSpeed
Specifies the speed of the Ethernet Network to which the
Diamond Storage Array is connected. Choices are:
[10|100 | Auto] where 10= 10 baseT, 100= 100 baseT
Default: auto
Set syntax: set EthernetSpeed [10 | 100| Auto]
Get syntax: get EthernetSpeed
Requires a SaveConfiguration command
Returns: [10 | 100 | UNKNOWN]
If auto enabled, value in parentheses indicates current
speed
Exit
Exits the current Ethernet telnet CLI session; it has no
effect if used during a serial or in-band CLI session.
Immediate command: Exit
FTPPassword
Specifies a password of up to 32 characters for an FTP
session.
Default: diamond
Set syntax: set FTPPassword
Requires a SaveConfiguration Restart command
IPAddress
Specifies the IP Address of the Diamond Storage Array
on the Ethernet network. If DHCP is enabled, the
assigned address of the Diamond will be displayed.
Setting this value always modifies the internal NVRAM
value of the IP address.If IPDHCP is enabled (see below),
get command reports current IP address assigned by
DHCP server
Default IP Address: 10.0.0.1
Set syntax: set IPAddress xxx.xxx.xxx.xxx
Get syntax: get IPAddress
Requires a SaveConfiguration command
IPDHCP
Selecting DHCP allow the Diamond Storage Array to
request an IP address from the network. It requires that
the Diamond be attached to a network with at least one
DHCP server. The network must have at least one DHCP
server.
Default: disabled
Set syntax: set IPDHCP [enabled | disabled]
Get syntax: get IPDHCP
Requires a SaveConfiguration command
IPGateway
Specifies the IP Gateway for the Diamond Storage Array
on the Ethernet network. If IPDHCP is enabled (see
above), get command reports current IP gateway assigned
by DHCP server. Must conform to xxx.xxx.xxx.xxx
standard network IP addressing.
Default: 0.0.0.0
Set syntax: set IPGateway xxx.xxx.xxx.xxx
Get syntax: get IPGateway
Requires a SaveConfiguration command
IPSubnetMask
Specifies the IP Subnet Mask for the Diamond Storage
Array on the Ethernet network. If DHCP is enabled, the
assigned subnet mask for the unit will be displayed.
Setting this value always modifies the internal NVRAM
value of the IP Subnet Mask.If IPDHCP is enabled (see
above), get command reports current subnet mask
assigned by DHCP server.
Default: 255.255.255.0
Set syntax: set IPSubnetMask xxx.xxx.xxx.xxx
Get syntax: get IPSubnetMask
Requires a SaveConfiguration command
SNMPTrapAddress
Sets up IP trap address and trap level.
33
ATTO Technology Inc.
Default: 10.0.0.1
Set syntax: set SNMPTrapAddress [Index:1-6] [Address:
xxx.xxx.xxx.xxx] Level: Critical | Warning | All
| None]....................................
Requires a SaveConfiguration Restart command
Get syntax: get SNMPTrapAddress
Page 45

SNMPTraps
Enables or disables SNMP traps.
Default: disabled
Set syntax: set SNMPTraps [enabled|disabled]
Requires a SaveConfiguration Restart command
Get syntax: get SNMPTraps
SNMPUpdates
Enables or disables the SNMP Management Information
Base (MIB) database.
Default: disabled
Set syntax: set SNMPTraps [enabled|disabled]
Requires a SaveConfiguration Restart command
Get syntax: get SNMPUpdates
TelnetPassword
Specifies password for telnet session. Only one
username/password combination is available per
Diamond Storage Array. RestoreConfiguration default
sets the telnet username and password to the default
values.Password is case insensitive, 1 to 8 characters.
TelnetTimeout
Specifies the number of minutes of inactivity which will
elapse before a telnet session automatically times
out.Limits: 1-1440 minutes.
Default: disabled
Set syntax: set TelnetTimeout [1-1440 | disabled]
Get syntax: get TelnetTimout
Requires a SaveConfiguration command
TelnetUsername
Specifies username for telnet session. Only one
username/password combination is available per
Diamond Storage Array. RestoreConfiguration default
sets the telnet username and password to the default
values.Username is case insensitive, 1 to 8 characters
Default: telnet
Set syntax: set TelnetUsername [username]
Requires a SaveConfiguration Restart command
The Telnet and SNMP protocols also use CLI
commands.
Default: diamond
Set syntax: set TelnetPassword [password]
Get syntax: none
Requires a SaveConfiguration command
TelnetUsername
Specifies username for telnet session. Only one
username/password combination is available per
Diamond Storage Array. RestoreConfiguration default
sets the telnet username and password to the default
values.Username is case insensitive, 1 to 8 characters.
Default: telnet
Set syntax: set TelnetUsername [username]
Get syntax: none
Requires a SaveConfiguration command
34
Diamond Storage Array Installation and Operation Manual
Page 46

6.4 Fibre Channel Configuration Commands
The Fibre Channel ports are configured with default settings but may be customized to your
specifications using the CLI commands in this section.
FcConnMode
Specifies the Fibre Channel topology for the Diamond
Storage Array. Options are loop only (loop), point-topoint only (ptp), loop preferred (loop-ptp) or point-topoint preferred (ptp-loop). See
Channel Array
on page 11 for more information on Fibre
Connecting a Fibre
Channel topology. Applies to both Host Interface Cards
Default: loop
Set syntax: set FcConnMode [loop | ptp| loop-ptp| ptploop]
Requires a SaveConfiguration Restart command
Get syntax: get FcConnMode
FcDataRate
Specifies the Fibre Channel data rate at which the
Diamond operates. Applies to both Host Interface Cards
Default: auto
Set syntax: set FcDataRate [1gb | 2gb | auto]
Requires a SaveConfiguration Restart command
Get syntax: get FcDataRate
FcFairArb
Enabling this feature causes the Diamond Storage Array
to follow the arbitration fairness rules on the FC-AL.
Applies to both Fibre Channel ports
Default: enabled, enabling arbitration fairness
Set syntax: set FcFairArb [enabled | disabled]
Requires a SaveConfiguration Restart command
Get syntax: get FcFairArb
host devices. Disable FcFullDuplex causes half duplex
mode. Applies to both Fibre Channel ports
Default: enabled
Set syntax: set FcFullDuplex [enabled | disabled]
Requires a SaveConfiguration Restart command
Get syntax: get FcFullDuplex
FcHard
If hard addresses are enabled, the Diamond Storage Array
tries to use its internal hard address as its address on the
loop. Under soft addressing, the Diamond Storage Array
loop address is assigned during loop initialization. Use
FcHardAddress
(described below) if you enable hard
addressing. Applies to both Fibre Channel ports
Default: disabled
Set syntax: set FcHard [enabled | disabled]
Requires a SaveConfiguration Restart command
Get syntax: get FcHard
FcHardAddress
This hexadecimal value represents the address the
Diamond Storage Array tries to use if hard addressing is
enabled. When an optional address is not present, the
current value is displayed. Each port has individual hard
address value
Default: 0x03 for port 0, 0x04 for port 1
Set syntax: set FcHardAddress [fp |[address]]
Requires a SaveConfiguration Restart command
Get syntax: get FcHardAddress [fp]
FcFrameLength
Sets the frame length of a command. If not specified in
the set command, current frame length is displayed.
Applies to both Fibre Channel ports
Default: 2048
Set syntax: set FcFrameLength [512 | 1024 | 2048]
Requires a SaveConfiguration Restart command
Get syntax: get FcFrameLength
FcFullDuplex
Enable to allow full duplex Fibre Channel
communication between the Diamond Storage Array and
35
ATTO Technology Inc. Diamond Storage Array Installation and Operation Manual
FcNodeName
Returns the Fibre Channel node name stored in NVRAM
for this Fibre Channel port: the same as the World Wide
Name for port 0.
Get syntax: get FcNodeName
FcPortInfo
Retrieves information about the current state of each
Fibre Channel port. The status field indicates ‘disabled’
when a port has been internally disabled.
Immediate command: FcPortInfo
Page 47

FcPortList
Lists the status of all available Fibre Channel ports.
Immediate command: FcPortList
FcPortName
Returns the Fibre Channel port name stored in NVRAM
for this Fibre Channel port.
Get syntax: get FcPortName [port number]
FcScsiBusyStatus
Specifies the SCSI status value returned when the
Diamond is unable to accept a SCSI command because of
a temporary lack of resources.
Default: busy
Actions: set FcScsiBusyStatus [busy | qfull]
Requires a SaveConfiguration Restart command
Get syntax: get FcScsiBusyStatus
FcWWName
Sets or view the Word Wide Name (WWPN) of the
referenced Fibre Channel port. The WWPN is a unique 8byte number that identifies the port on a Fibre Channel
network. Only the three least significant bytes of the
WWPN can be modified. Fabric and loop operations are
unpredictable if duplicate WWNs are assigned.
Default: 20 00 0x where x is for 0 for port 0, 1 for port 1
Set syntax: set FcWWName [PortNumber [0 | 1]
Requires a SaveConfiguration Restart command
Get syntax: get FcWWName [PortNumber [0 | 1]
36
CLI: Fibre Channel
Page 48

6.5 Serial Port Configuration Commands
The serial port configuration may be customized by using the following commands:
SerialPortBaudRate
Sets the baud rate the Diamond Storage Array uses for its
terminal interface. Choices are 2400, 9600, 19200,
38400, 57600, 115200.
Default: 115200
Set syntax: set SerialPortBaudRate [2400 | 9600 | 19200
| 38400 | 57600 | 115200]
Get syntax: get SerialPortBaudRate
SerialPortEcho
Controls whether the Diamond Storage Array echoes
characters on its RS-232 port. Local ASCII terminal (or
terminal emulator) echo settings should be set to disabled
while in serialportecho enabled
Default: disabled
Set syntax: set SerialPortEcho [enabled | disabled]
Requires a SaveConfiguration Restart command
Get syntax: get SerialPortEcho
SerialPortHandshake
Describes which handshaking method the Diamond
Storage Array uses for its terminal interface (hardware,
Xon/Xoff or none). Choices are
Default: none
Set syntax: set SerialPortHandshake [hard| Xon| none]
Requires a SaveConfiguration Restart command
Get syntax: get SerialPortHandshake
hardware, Xon
or
none
SerialPortStopBits
Configures/reports the number of stop bits per character
for the Diamond Storage Array RS -232 serial port. The
number of data bits per character is fixed at 8 with no
parity. Choices are 1 or 2 stop bits
Default: 1
Set syntax: set SerialPortStopBits [1 | 2]
Requires a SaveConfiguration Restart command
Get syntax: get SerialPortStopBits
37
ATTO Technology Inc.
Page 49

6.6 Maintenance Services Commands
Maintenance commands allow updating and maintenance of the Diamond-VT.
FcScsiBusyStatus
You may set the Diamond to report busy or queue full
when it is unable to accept a command.
Default: Busy
Set syntax: set FcScsiBusyStatus [busy|qfull]
FirmwareRestart
Causes a warm restart of the Diamond Storage Array
Immediate command: FirmwareRestart
MaxEnclTempAlrm
Sets/displays the maximum enclosure temperature alarm
of the Diamond Storage Array in degrees Celsius. Valid
entries are between 5 and 52 degrees and above the
current minimum enclosure temperature alarm
Default: 47
Set syntax: set MaxEnclTempAlrm [5-52]
Requires a SaveConfiguration command
Get syntax: get MaxEnclTempAlrm
MinEnclTempAlrm
Sets/displays the minimum enclosure temperature alarm
of the Diamond Storage Array in degrees Celsius.Valid
entries are between 5 and 47 degrees and below the
current maximum enclosure temperature alarm
Default: 5
Set syntax: set MinEnclTempAlrm [5-47]
Requires a SaveConfiguration command
Get syntax: get MinEnclTempAlrm
SaveConfiguration
required, the return
command and a system restart. If
Ready. *
will be displayed after the
return for the modification. You may make several
changes through commands and
SaveConfiguration
before implementing a restart, but once you have
restarted the Diamond, all the command changes created
before the restart and saved will be implemented.
Restart
Immediate: SaveConfiguration <Restart| NoRestart>
or
no Restart
parameter is optional
SpeedWrite
SpeedWrite is a method to improve the performance of
FCP WRITE commands to SCSI devices attached to the
array.
Default: disabled
Set syntax: set SpeedWrite [enabled | disabled]
Requires a SaveConfiguration Restart command
Get syntax: get SpeedWrite
Temperature
Returns the current internal temperature of this Diamond
Storage Array in degrees Celsius. The value is read only.
Get syntax: get Temperature
Zmodem
Use the Zmodem protocol to transfer a file to or from the
Diamond Storage Array. The filename is required if the
‘send’ option is specified. Available only through the RS232 interface
ResolveLUNConflicts
Re-numbers any conflicting Logical Unit numbers that
exist in the Diamond. Conflicts may occur when a unit is
taken from one Array and inserted into another Array.
Immediate command: ResolveLUNConflicts
RestoreConfiguration
Restores configuration to either the default configuration
or the configuration last saved into non-volatile memory.
The saved option will undo any changes made since the
last save.
Immediate: RestoreConfiguration [Default|Saved]
SaveConfiguration
If the restart option is selected, the Diamond will cycle its
power. The norestart option will save changes without
restarting. Please note: certain modifications require a
CAUTIONCAUTION
After a firmware image is downloaded to
the Diamond Storage Array, the image is
placed into flash memory. During this time
(about 90 seconds), DO NOT remove power
to the Diamond Storage Array or the flash
may become corrupted. Power should not
be removed until the READY prompt
appears.
Immediate command: Zmodem [Send filename|Receive]
ZoneRetrieve
Retrieves the Active Zone Configuration into the Planned
Zone Configuration to allow modifications of the current
configuration.
Zone syntax: ZoneRetrieve
38
CLI: maintenance
Page 50

6.7 Diagnostic Commands
Diagnostic commands provide information or diagnostic tools for Fibre Channel, SCSI and Serial port
configurations, Diamond Storage Array settings and the status of various commands which affect the
ATA drives.
AudibleAlarm
Enables or disables the audible alarm in the Diamond
Storage Array. When enabled, an alarm sounds when the
Fault LED on the front panel blinks.
Default: disabled
Set syntax: set AudibleAlarm [enabled | disabled]
Get syntax: get AudibleAlarm
DiamondModel
Returns specific Diamond Storage Array model
information including firmware release and date.
Get syntax: get DiamondModel
DiamondName
Used to identify this Diamond over its Fibre Channel and
Ethernet networks. You may customize the name of each
Diamond Storage Array enclosure to distinguish it from
other units. Maximum eight characters.
Set syntax: set DiamondName [name]
Requires a SaveConfiguration command
Get syntax: get DiamondName
DriveCopyStatus
Displays the status of a DriveCopy, DriveWipe or
RAID5ClearData operation
Immediate command: DriveCopyStatus
DriveInfo
Displays information about all disk drives or detailed
information about a specific disk drive. Detailed
information about an individual drive is obtained by
supplying a drive identifier. VD ID is Virtual Disk ID.
Get syntax: DriveInfo [sled ID] [drive ID]
FcNodeName
Returns the Fibre Channel node name stored in NVRAM
for this Fibre Channel port: the same as the World Wide
Name for port 0.
Get syntax: get FcNodeName
FcPortInfo
Retrieves information about the current state of each
Fibre Channel port. The status field indicates ‘disabled’
when a port has been internally disabled.
FcPortList
Lists the status of all available Fibre Channel ports.
Immediate command: FcPortList
FcPortName
Returns the Fibre Channel port name stored in NVRAM
for this Fibre Channel port.
Get syntax: get FcPortName [port number]
Help
Displays a list of available commands. Type ‘help’
followed by a command name to display detailed
command-specific information.
Get syntax: Help [Command Name]
IdentifyDiamond
Enable this option to identify the current Diamond
Storage Array. The fault LED on its front panel blinks.
Disable to cancel the ‘blink code.’
Set syntax: set IdentifyDiamond [enabled|disabled]
Get syntax: get IdentifyDiamond
Info
Displays version numbers and other key information
about the Diamond Storage Array including data rate,
connection mode, WorldWideName, Diamond Storage
Array name.
Immediate command: Info [all]
LUNInfo
Displays information about all LUNs (logical unit
numbers) or detailed information about a specific LUN.
Do not specify a LUN to get information about all LUNs.
Specify a LUN to get detailed information about that
individual LUN.
Get syntax: get LUNInfo [LUN]
PartitionInfo
Displays Partition information for the selected partitions
or all partitions.
Get syntax: PartitionInfo [active|planned] [Virtual Drive
ID] [Partition ID]
Immediate command: FcPortInfo
39
ATTO Technology Inc. Diamond Storage Array Installation and Operation Manual
Page 51

PowerAudibleAlarm
Silences the audible alarm for a current power supply
failure. The alarm will be activated on the next power
failure.
SledFaultLED
Changes the state of the selected sled LED to the
1-12,
indicated state. Choose the sled number,
on
or
off
or
all
, turn
Immediate command: PowerAudibleAlarm disabled
RAID5ClearDataStatus
Displays the status of RAID5 Clear Data processing. S
represents the sled number, D represents the drive
number. Applies to RAID5 only
Set syntax: RAID5ClearDataStatus
RAIDRebuildStatus
Displays the RAID1, RAID 5 or RAID 10 Rebuild Status
Summary. If no RAID groups are defined, the header
information is displayed with no data. The status
summary contains the RAID1, RAID 5 or RAID 10.The
RAIDRebuildStatus command has no effect on the state
of any rebuild in progress.
Member index and the following fields in tabular form:
•
Status
FAULTED
•
Sled Number
•
Current LBA
rebuilt
•
Maximum LBA:
rebuilt
•
Status OK
rebuild activity is occurring. The Current LBA,
Maximum LBA and percentage complete values
are not displayed.
•
Status Degraded
sync and is waiting to be rebuilt.
•
Status In Progress
sync and a rebuild is occurring on the respective
drive.
•
Status Faulted
and an error occurred in an attempt to
synchronize the drives in the RAID 1 group.
: OK, DEGRADED, IN PROGRESS, or
: Location of the sled
: Logical block currently being
Last logical block to be
: the RAID1 Mirror is in sync and no
: the RAID1 Mirror is out of
: the RAID1 Mirror is out of
: the RAID1 Mirror is out of sync
SerialNumber
View the board serial number, a 10-character field. The
first four alphanumeric characters are an abbreviation
representing the product name. The remaining six digits
are the individual unit’s number.
Get syntax: get SerialNumber
Default: off
Set syntax: set SledFaultLED [ all | 1 | 2 | 3 | 4 | 5 | 6 | 7 |
8 | 9 |10 |11| 12] [ on | off]
SMARTData
Displays the current SMART (Self-Monitoring Analysis
and Reporting Technology) data for the specified drive.
Immediate command: SMARTData [sled#] [drive #]
TapeDriveInfo
Displays information about the named Tape Drive
including LUN, Tape Volume ID and state of the tape
drive.
Get syntax: TapeDriveInfo [tape drive #]
TapeVolumeInfo
Displays information about the named Tape Volume
including Volume ID, LUN, Virtual Disk ID, Partition ID,
Total capacity and percentage of capacity used.
Get syntax: TapeVolumeInfo [tape volume #]
Temperature
Returns the current internal temperature of this Diamond
Storage Array in degrees Celsius. The value is read only.
Get syntax: get Temperature
VirtualDriveInfo
Displays the named Virtual Drive definitions.
Get syntax: VirtualDriveInfo [active|planned] [Virtual
Drive ID]
ZoneInfo
Displays the named zones’ definitions. Information about
the Active Zone Configuration is the default; if you want
information about the Planned Zone Configuration, type
ZoneInfo Planned zone_name.
Zone syntax: ZoneInfo [Planned] [zone_name] [all]
ZoneState
Changes the specific state of a zone. The ZoneState
command must be entered as enabled to activate the zone
before using the ZoneCommit command (which makes
the Planned Zone Configuration the Active
configuration).
Default: disabled
Set syntax: ZoneState zone_name [enabled|disabled]
Get syntax: ZoneInfo
40
CLI: diagnostics
Page 52

6.8 Drive Management Commands
The Diamond Storage Array ATA drives may be monitored or configured through the CLI using the
commands listed below.
ATADiskState
Sets the ATA disk to the specified state. Enter the sled
number (1-12), drive number (1-2) and online or offline
CAUTIONCAUTION
In a Hot Spare configuration, a drive sled
should only be taken offline if there is
absolutely no activity on that drive. If there
is any activity, the rebuild of the Hot Spare
sled may be flawed.
Default: online
Set syntax: set AtaDiskState [sled number] [drive
number] [online| offline]
Get syntax: get AtaDiskState [sled number] [drive
number]
AutoRebuild
If enabled, initiates an automatic rebuild of a “degraded”
RAID group when a sled is replaced by a new sled. If
disabled, you must manually rebuild the RAID
configuration for the new sled by using
RAIDManualRebuild.
Default: disabled
Set syntax: set AutoRebuild [enabled|disabled]
Requires a SaveConfiguration Restart command
Get syntax: get AutoRebuild
.
DriveCopy
Copies a drive from the source disk to the destination
disk. Parameters are the sled and drive numbers of the
source and destination drives. The destination drive must
be offline: use the ATADiskState command to determine
if the disks are offline. If you choose the same source and
destination drive, this command performs a DriveWipe.
Set syntax: DriveCopy [Source Sled] [Source Drive]
[Destination Sled] [Destination Drive]
Get syntax: DriveCopyStatus
DriveCopyHalt
Stops a DriveCopy operation in progress.
Set syntax: DriveCopyHalt [Destination Sled] [Destination
Drive]
Get syntax: DriveCopyStatus
DriveCopyResume
Resumes a DriveCopy operation that had been stopped.
Set syntax: DriveCopyResume [Destination Sled]
[Destination Drive]
Get syntax: DriveCopyStatus
DriveCopyStatus
Displays the status of a DriveCopy, DriveWipe or
RAID5ClearData operation
ClearDiskReservedAreaData
Clears the data in the disk’s reserved area. Restarting the
Diamond Storage Array is required for these settings to
take effect. Omitting ReservedAreaIndex clears the entire
reserved area. Enter the sled number (1-12) and drive
number (1-2).
Immediate command: ClearDiskReservedAreaData [sled
number] [drive number]
41
ATTO Technology Inc. Diamond Storage Array Installation and Operation Manual
Immediate command: DriveCopyStatus
DriveInfo
Displays information about all disk drives or detailed
information about a specific disk drive. Detailed
information about an individual drive is obtained by
supplying a drive identifier. For examples see
Commands
Get syntax: DriveInfo [sled ID] [drive ID]
on page 39.
Diagnostic
DriveSledPower
Gets/sets power to the specified drive sled. Sled must be
offline
Default: on
Set syntax: set DriveSledPower [sled number] [on|off]
Get syntax: get DriveSledPower [sled number]
Page 53

DriveWipe
Initializes a drive: wipes it of all data. Drive must be
offline
Set syntax: DriveWipe [Destination Sled] [Dest Drive]
Requires a SaveConfiguration Restart command
Get syntax: DriveCopyStatus
ECC
Specifies or displays whether ECC is enabled or not. If
ECC is not available, an
ECC invalid
message will be
returned.
Default: enabled
Set syntax: set ECC [enabled | disabled]
If enabled, SaveConfiguration Restart command required
If disabled, SaveConfiguration command required
Get syntax: get ECC
LUNInfo
Displays information about all LUNs (logical unit
numbers) or detailed information about a specific LUN.
Do not specify a LUN to get information about all LUNs.
Specify a LUN to get detailed information about that
individual LUN. For examples, see
39.
...
Get syntax: get LUNInfo [LUN]
LUNInfo
on page
LUNState
Sets the LUN to the specified state. May be used to
facilitate removal and insertion of sleds and RAID groups
during power up/power down of sleds.
Default: online
Set syntax: set LUNState [LUN number] [online|offline]
Get syntax: get LUNState [LUN number]
IdeTransferRate
Sets the DMA mode transfer rate for all devices. Choices
are 0, 1, 2, 3, 4
Default: 4
Set syntax: set IdeTransferRate [0 | 1 | 2 | 3 | 4]
Requires a SaveConfiguration Restart command
Get syntax: get IdeTransferRate
IdeWriteCache
Sets write caching for all drives.
Default: enabled
Set syntax: set IdeWriteCache [enabled |disabled]
Requires a SaveConfiguration Restart command
Get syntax: get IdeWriteCache
InquiryData
Sets/displays the SCSI media changer (MC) & tape drive
(TD) inquiry data returned by the Diamond Virtual Tape
device.
MC Vendor ID: 1 - 8 chars
MC Product ID: 1 - 16 chars
MC Revision: 1 - 4 chars
TD Vendor ID: 1 - 8 chars
TD Product ID: 1 - 16 chars
TD Revision: 1 - 4 chars
Set syntax: set InquiryData [MC Vendor ID] [MC Product
ID] [MC Revision] [TD Vendor ID] [TD Product ID] [TD
Revision]
Requires a SaveConfiguration Restart command
Get syntax:
get InquiryData
MediumType
Sets or displays the medium type returned by the mode
pages. Use the command
InquiryData
to change the
inquiry data displayed. Choices are
DLT/Diamond = 0x85
SDLT = 0x86
LTO = 0x00
AIT = 0x34
Default: 0x85
Set syntax: set MediumType [medium type]
Requires a SaveConfiguration Restart command
Get syntax: get MediumType
PartitionInfo
Displays Partition information for the selected partitions.
See
PartitionInfo
Immediate command: PartitionInfo [active|planned]
[Virtual Drive ID] [Partition ID]
on page 39 for examples.
QuickTape
Configures the Diamond-VT as a Virtual Tape device.
Specify the RAID level, either RAID5 or RAID10, the
number of tape volumes, enable ZoneState and specify
whether Hot Spare sleds are enabled.
The system will determine the optimal number of Virtual
Devices based on the number of tape volumes. Hot Spares
are not available for all Virtual Tape configurations. You
must designate
disabled
to forgo Hot Spare sleds
enabled
to allow Hot Spare sleds or
You may specify the first four to six alpha-numeric
characters of a tape bar code, used by tape backup
42
CLI: configure drives
Page 54

software. The remaining four characters will be entered
by the system automatically to identify the tape number.
See
Virtual Tape
on page 49 and
Optional Hot Spare Sled
on page 50 for more information and examples.
Note
The maximum number of tape volumes and
tape drives for RAID Level 5 is 30.
The maximum number of tape volumes and
tape drives for RAID Level 10 is 15.
Set syntax:
volumes] [# tape drives] <enabled> <barcode
prefix>
Requires a SaveConfiguration command
Get syntax: get QuickTape
set QuickTape [RAID5 | RAID10] [# tape
RAID5ClearData
To Zero all drives and parity to make newly created
RAID5 groups ‘coherent’. The parameter ALL clears
data on all RAID5 groups present in the system. Must be
used at initial configuration to ensure parity is valid for all
drives in the RAID Level 5 group by setting all data and
parity to zero. Takes all LUNs offline automatically, then
brings them online. The operation takes 3-6 hours,
depending on drive capacity. Do not interrupt this
process. This is a destructive operation: all information
on these drives is lost. Applies to RAID5 only
Set syntax: RAID5ClearData [ALL | LUN]
Get syntax: DriveCopyStatus or RAID5ClearDataStatus
RAID5ClearDataStatus
Displays the status of RAID5 Clear Data processing. S
represents the sled number, D represents the drive
number. Applies to RAID5 only
Set syntax: RAID5ClearDataStatus
RAIDInterleave
Specifies the Interleave size (in 512 byte blocks) between
members of a RAID group. SPAN indicates that the
interleave size between drives in the group is the
minimum drive size of all members in the group.
RAIDInterleave options are 16, 32, 64, 128, 256 blocks
and span. Span is not available for RAID Level 5. For
RAID Level 10, choices are
16, 32, 64, 128, 256
SPAN. For RAID Level 5, choices are:
16, 32, 64, 128,
or
256.
Default: 128
Set syntax: set RAIDInterleave [1-256] [SPAN]
Requires a SaveConfiguration Restart command
Get syntax: get RAIDInterleave
RAIDHaltRebuild
Stops a RAID Level 5 or 10 rebuild that is in progress.
Immediate command: RAIDHaltRebuild [Sled Number]
RAIDManualRebuild
Initiates a manual rebuild of a RAID Level 5 or 10 LUN.
An error message is returned if the specified LUN is not
a RAID Level 5 or 10 LUN or if the sled number is not
available; no rebuild takes place. Applies to RAID Levels
1, 5 and 10 only
Set syntax:. RAIDManualRebuild. [LUN]. [Sled Number]
RAIDRebuildState
Sets the RAID Level 5 or 10 rebuild status of the specified
sled to OK, degraded or faulted.
Set syntax:. set RAIDRebuildState [Sled Number]
[Degraded | OK | Faulted]
RAIDRebuildStatus
Displays the RAID1, RAID 5 or RAID 10 Rebuild Status
Summary. If no RAID groups are defined, the header
information is displayed with no data. The status
summary contains the RAID1, RAID 5 or RAID 10. The
RAIDRebuildStatus command has no effect on the state
of any rebuild in progress.
Member index and the following fields in tabular form:
Status, Sled Number, Current LBA, Maximum LBA,
Status.
Get syntax: RAIDRebuildStatus
RAIDResumeRebuild
Resumes a RAID Level 5 or 10 rebuild which had been
previously stopped.
Immediate command: RAIDResumeRebuild [Sled
Number]
43
ATTO Technology Inc. Diamond Storage Array Installation and Operation Manual
Page 55

RebuildPriority
Sets the priority of a RAID Level 5 or 10 rebuild. If you
select High priority, rebuild I/O requests are implemented
before system I/O requests. I f you select Low priority,
rebuild I/O requests executes only when there are no
pending I/O requests. If you select Same priority, rebuild
I/O and system I/O receive equal consideration.
Set syntax: set RebuildPriority [high | low | same]
Requires a SaveConfiguration Restart command
Get syntax: get RebuildPriority
ResolveLUNConflicts
Re-numbers any conflicting Logical Unit numbers that
exist in the Diamond. Conflicts may occur when a unit is
taken from one Array and inserted into another Array.
Immediate command: ResolveLUNConflicts
RestoreModePages
Restores all mode pages to the factory set default.
Restarting the Diamond Storage Array is required for
settings to take effect.
Set syntax: RestoreModePages
SledFaultLED
Changes the state of the selected sled LED to the
indicated state. Enter the sled number,
off
Default: off
Set syntax: set SledFaultLED [all|sled number] [on| off]
1-12
or
all, on
or
TapeDriveInfo
Displays information about the named Tape Drive
including LUN, Tape Volume ID and state of the tape
drive.
Immediate information: TapeDriveInfo [tape drive #]
TapeVolumeBlockSize
Determines the volume’s block size in increments of 512byte blocks. Setting the number of blocks to 0 will allow
devices to have different upper and lower block size
limits (variable block size) while setting the number of
blocks to a non-zero value will limit both the upper and
lower block size limits to that number (fixed block size).
Choices are 0-127.
Default: 0
Set syntax: set TapeVolumeBlockSize [ 0 - 127 ]
Requires a SaveConfiguration command
Get syntax: get TapeVolumeBlockSize
TapeVolumeInfo
Displays information about the named Tape Volume
including Volume ID, LUN, Virtual Disk ID, Partition ID,
Total capacity and percentage of capacity used.
Get syntax: TapeVolumeInfo [tape volume #]
TapeWriteProtect
Specifies or displays the Hardware Write Protection state
of the named Tape Volume.
Default: disabled
Set syntax: TapeWriteProtect [tape volume ID | all]
[enabled | disabled]
Get syntax: TapeWriteProtect [tape volume ID | all]
VirtualDriveInfo
Displays the named Virtual Drive definitions. For
examples, see
Information Command Returns
on page A-
iv.
Immediate command: VirtualDriveInfo [active|planned]
[Virtual Drive ID]
ZoneAddDevice
Adds one or more LUNs (devices) to an existing zone.
LUNs not added to zones are not available.To complete
this procedure, the ZoneState command must be entered
as enabled to activate the zone before using the
ZoneCommit command (which makes the Planned Zone
Configuration the Active configuration).
Zone syntax: ZoneAddDevice [zone_name]
[device_LUN...]
ZoneAddHost
Adds one or more hosts to an existing zone. The host is
the WWPN of the HBA attached to the system. To
complete this procedure, the ZoneState command must be
entered as enabled to activate the zone before using the
ZoneCommit command (which makes the Planned Zone
Configuration the Active configuration).
ZoneAddPort
Adds one or more ports [port_name] to an existing zone.
The port refers to the specific Host Interface Card on the
Diamond Storage Array, either 0 or 1.To complete this
procedure, the ZoneState command must be entered as
enabled to activate the zone before using the
ZoneCommit command (which makes the Planned Zone
Configuration the Active configuration).
Set syntax: ZoneAddPort [zone_name] [0|1]
44
CLI: configure drives
Page 56

ZoneClearAll
Removes all entries from the Planned Zone
Configuration.Removes any active zones if followed
immediately by a ZoneCommit command.
command must be entered as enabled to activate the zone
before using the ZoneCommit command (which makes
the Planned Zone Configuration the Active
configuration).
Set syntax: ZoneClearAll
ZoneCommit
Commits the current Planned Zone Configuration,
making it the persistent, Active configuration. To
complete this procedure, the ZoneState command must be
entered as enabled to activate the zone before using the
ZoneCommit command.
Set syntax: ZoneCommit
ZoneCreate
Creates a new named zone. Names may be up to 16
characters.To complete this procedure, the ZoneState
command must be entered as enabled to activate the zone
before using the ZoneCommit command (which makes
the Planned Zone Configuration the Active
configuration).
Set syntax: ZoneCreate zone_name
ZoneDelete
Deletes one or more named zones. To complete this
procedure, the ZoneState command must be entered as
enabled to activate the zone before using the
ZoneCommit command (which makes the Planned Zone
Configuration the Active configuration).
Set syntax: ZoneDelete [zone_name...]
ZoneInfo
Displays the named zones’ definitions. Information about
the Active Zone Configuration is the default; if you want
information about the Planned Zone Configuration, type
ZoneInfo Planned zone_name.
Get syntax: ZoneInfo
ZoneRemoveDevice
Removes one or more LUNs (devices) from an existing
zone. To complete this procedure, the ZoneState
Set syntax: ZoneRemoveDevice [zone_name]
[device_LUN...]
ZoneRemoveHost
Removes one or more hosts from an existing zone. To
complete this procedure, the ZoneState command must be
entered as enabled to activate the zone before using the
ZoneCommit command (which makes the Planned Zone
Configuration the Active configuration).
Set syntax: ZoneAddHost [zone_name] [host_name...]
ZoneRemovePort
Removes one or more ports [port_name] from an existing
zone. The port refers to the specific HIC, either 0 or 1. To
complete this procedure, the ZoneState command must be
entered as enabled to activate the zone before using the
ZoneCommit command (which makes the Planned Zone
Configuration the Active configuration).
Set syntax: ZoneAddPort [zone_name] [0|1]
ZoneRetrieve
Retrieves the Active Zone Configuration into the Planned
Zone Configuration to allow modifications of the current
configuration.
Get syntax: ZoneRetrieve
ZoneState
Changes the specific state of a zone. The ZoneState
command must be entered as enabled to activate the zone
before using the ZoneCommit command (which makes
the Planned Zone Configuration the Active
configuration).
Default: disabled
Set syntax: ZoneState zone_name [enabled|disabled]
Get syntax: ZoneInfo
Information: DriveCopyStatus
45
ATTO Technology Inc. Diamond Storage Array Installation and Operation Manual
Page 57

46
CLI: configure drives
Page 58

7.0 Configuring the Diamond-VT
The Diamond-VT can be configured as RAID Level 10 or RAID Level 5 with zones and/or Hot Spare
sleds. Partitions are created automatically during configuration of Virtual Tape emulation. The default
is a single zone which includes all LUNs (devices), all ports and all hosts. RAID is a storage
configuration which uses multiple disk drives to increase capacity, performance and/or reliability.
You may configure your Diamond-VT in several
different ways depending on your needs although
the Diamond-VT makes some choices for you.
The following elements must be considered when
you are configuring your Diamond-VT:
• RAID level
• Interleave
• Number of tape volumes
• Number of tape drives
• Hot Spare sled option
• Zoning
Using the ExpressNAV browser-based interface is
the easiest way to set up your Diamond-VT. You
may also use the Command Line Interface
commands.
CAUTIONCAUTION
Changing these parameters causes all
previous drive data on the Diamond-VT to
be erased. Make sure you back up all
information before setting up a different
configuration.
RAID Level 10
RAID Level 10 (mirroring with striping)
increases data transfer rates while ensuring
security by writing the exact same data
simultaneously to two or more different drives.
RAID Level 10 is used in applications requiring
high performance and redundancy.
other end to make sure the transmission has not
had any errors.
In the Diamond-VT, transmitted data with the
added parity data is striped across disk drives. A
hardware XOR engine computes parity, thus
alleviating software processing during reads and
writes.
The Diamond-VT will operate in degraded mode
if a drive fails unless you have Hot Spare sleds
enabled (see below).
Virtual Tape Volumes
When the Diamond-VT is configured as a Virtual
Tape, it is divided into several tape volumes and
tape drives based on your choice and the RAID
level you choose. See
Virtu al Tape
on page 49.
Hot Spare sleds
In most configurations, if a member of a virtual
device becomes degraded, you must swap out the
faulted sled as defined in
Instructions
AutoRebuild
on page 69. If you have not enabled
, you must also start a manual
Hot Swap Operating
rebuild.
However, you may designate Hot Spare sleds as
replacements for faulted sleds without
intervention by you or a host. These sleds, once
designated as Hot Spares, are not available for
other use.
RAID Level 5
RAID Level 5 increases reliability while using
fewer disks than mirroring by using parity
redundancy. Distributed parity on multiple drives
provides the redundancy to rebuild a failed drive
from the remaining good drives. Parity data is
added to the transmitted data at one end of the
transaction, then the parity data is checked at the
47
ATTO Technology Inc. Diamond Storage Array Installation and Operation Manual
See
Optional Hot Spare Sled
on page 50 for more
information.
Zones
Zoning is a collection of related Diamond
capabilities supporting flexible Diamond-VT
configuration management configurable via CLI
commands in the Command Line Interface or the
Page 59

Advanced CLI configuration page of the
ExpressNAV interface. Zoning supports security
by granting or denying access between initiators
and devices as defined by an administrator.
A zone is a collection of devices which can access
each other. The devices in a zone usually include
one or more initiators, one or more devices, and
one or more paths between the initiators and the
devices.
The CLI command
RAIDInterleave
allows you to
change the size of the sector interleave between
RAID groups. The value will depend upon the
normal expected file transfer size. If the normal
file transfer size is large, the interleave value
should be large, and vice versa.
The value entered for the
RAIDInterleave
command refers to blocks of data: one block is
equivalent to 512 bytes of data.
Interleave
The interleave size sets the amount of data to be
written to each drive in a RAID group. This is a
tunable parameter which takes a single stream of
data and breaks it up to use multiple disks per I/O
interval.
• The default sector interleave in RAID Level 10 is
128 blocks (64k).
• The default sector interleave in RAID Level 5 is
256 blocks (128k).
Valid entries are 16, 32, 64, 128, 256 and SPAN.
SPAN, not available in RAID Level 5, indicates
that interleave size between the drives in the
group will be the minimum drive size of all
members in the group.
Enhancing performance
SpeedWrite, enabled by the CLI command
SpeedWrite,
improves the performance of
WRITE
commands.
48
Configure drives
Page 60

7.1 Virtual Tape
When the Diamond-VT is configured as a Virtual Tape, it is divided into several tape volumes based on
your choice and the RAID level you choose.
Virtual Tape provides increased performance by
reducing the time needed to backup and restore
data. Virtual Tape volumes reside on Virtual
Drives. The Diamond-VT appears to hosts as a
tape library, allowing ISV packages to issue a set
of tape library commands to perform backup and
restore operations to the Diamond-VT.
The underlying storage used for Virtual Tape is
specified using the
QuickTape
command.
The simplest way to set up Virtual Tape
configurations is to use the ExpressNAV
interface. See
Interface
If you use the CLI, the command
ATTO ExpressNAV: Browser-based
on page 23 for more information.
QuickTape
sets
up Virtual Tapes using the following format:
set QuickTape [RAID5|RAID10] [# tape
volumes] [# tape drives] <enabled>
<Barcode Prefix>
Hot Spares are not available for all Virtual Tape
configurations. You must designate
allow Hot Spare sleds or
Spare sleds. Refer to and
disabled
Optional Hot Spare Sled
enabled
to
to forgo Hot
on
page 50 for more information and examples.
tape backup software. The remaining four
characters will be entered by the system
automatically to identify the tape number.
Note
The maximum number of tape volumes and
tape drives for RAID Level 5 is 30.
The maximum number of tape volumes and
tape drives for RAID Level 10 is 15.
Configuration examples
RAID Level 10 with Hot Spare sleds
set QuickTape RAID10 15 1 enabled
SaveConfiguration Restart
The Diamond-VT will be configured into RAID
Level 10 with one tape drive, 15 tape volumes and
two Hot Spare sleds.
RAID Level 5 and no Hot Spare sled
set QuickTape RAID5 30 2
SaveConfiguration Restart
The Diamond-VT will be configured into RAID
Level 5 with two tape drives and 30 tape volumes.
You may specify the first four to six alphanumeric characters of a tape bar code, used by
49
ATTO Technology Inc. Diamond Storage Array Installation and Operation Manual
Page 61

7.2 Optional Hot Spare Sled
To maintain array up time with minimal risk of data loss, individual sleds which fail may be replaced
with a spare sled.
In most configurations, if a member of a virtual
device becomes degraded, you must swap out the
faulted sled as defined in
Instructions
AutoRebuild
on page 69. If you have not enabled
, you must also start a manual
Hot Swap Operating
rebuild.
However, Hot Spare sleds may be designated as
replacements for faulted sleds without
intervention by you or a host.
Each configuration requires a certain number of
Hot Spare sleds. These sleds, once designated as
Hot Spares, are not available for other use.
• RAID Level 10: 10 drive sleds and two Hot Spare
sleds (sleds 11 and 12).
• RAID Level 5: 10 drive sleds and two Hot Spare
sleds (sleds 11 and 12)
• RAID Level 5: five drive sleds (sled positions 1
through 5) and one Hot Spare sled (sled 12).
Note
All arrays using RAID level 10 and Hot Spares
options must be fully populated.
If a sled becomes degraded and a Hot Spare sled
has been designated:
• the Diamond will replace the degraded sled with
the Hot Spare sled, simulating a hot swap of a
sled with
intervention
• any sled with a Faulted drive will not be used.
Faulted sleds maintain their faulted status until
they are removed and re-inserted or if the
system is restarted.
• Hot Spares are handled as sleds, not as
individual drives
• the Hot Spare sled replaces the Faulted sled in
the Virtual Device
AutoRebuild enabled, without
• a rebuild will automatically start after the Hot
Spare is switched into the Virtual Device, even if
AutoRebuild
• the DriveInfo command will list the number of
Hot Spare sleds currently in the system
• you can replace the faulted drive or sled later.
However, faulted is a non-persistent state. After
a power cycle, the faulted sled will display on the
DriveInfo screen as having no type, i.e, the type
field will be blank. The sled cannot be accessed
but must be removed and replaced. If it is
replaced, it will become part of any open Virtual
Disk in this order:
1 if a Virtual Device is missing a sled or you are
hot swapping a sled, the new sled becomes
part of the existing Virtual Device.
2 if a Hot Spare sled is missing, the new sled will
become a Hot Spare sled.
is disabled.
The simplest way to set up Hot Spare sleds is to
use the ExpressNAV interface. However, you may
use the CLI as follows:
To set up RAID Level 10 with Hot Spare sleds
1 Connect to Diamond-VT services (see
Accessing the Diamond-VT
the CLI.
2Type set QuickTape RAID10 15 1 enabled
3Type SaveConfiguration Restart
on page 15) and use
The Diamond-VT will be configured into RAID
Level 10 with one tape drive, 15 tape volumes and
two Hot Spare sleds.
To set up RAID Level 5 and Hot Spare sleds
1Type
2Type SaveConfiguration Restart
set QuickTape RAID5 30 2 enabled
The Diamond-VT will be configured into RAID
Level 5 with two tape drives, 30 tape volumes and
two hot spare sleds.
50
Hot swap spare sled
Page 62

7.3 Zones
Zoning is a collection of related Diamond-VT capabilities supporting flexible Diamond configuration
management configurable via CLI commands in the Command Line Interface mode or in the Advanced
CLI Configuration page in the ExpressNAV interface. Zoning supports security by granting or denying
access between initiators and devices as defined by an administrator.
A zone is a collection of devices which can access
each other. The devices in a zone usually include
one or more initiators, one or more devices, and
one or more paths between the initiators and the
devices.
To set up zones, use the Command Line Interface
Accessing the Diamond-VT
(see
on page 15) or the
Advanced CLI page in the ExpressNAV interface.
Zone CLI commands only take effect after you
enter the ZoneCommit command.
The individual elements are referred to as
device_lun, host_name, port_number and
zone_name as defined in Exhibit 7.3-1.
Exhibit 7.3-1 Definitions of zone configuration entries.
device_lun The LUN of the RAID drive
host_name In a Fibre Channel environment, the
WWPN; in a SCSI environment, SCSI
Initiator ID
port_number The Diamond port number (0, 1) for the
data path
zone_name Alphanumeric or ‘_’, character string less
than or equal to 16 characters long
Principles of Zoning
Zoning provides a validation filter for each SCSI
command.
Each zone entry includes a named zone, a host
portion, a port portion and a device portion. The
components of a valid path from a host to a device
satisfy the following conjunction:
<host_name> AND <port_list> AND
device_list>
The zone
zones. It appears as
The host portion
is named to identify it from other
zone_name
in this manual.
defines the valid access path
from a host through a port to a device (LUN),
representing the Initiator ID in a SCSI
environment or the World Wide Port Name in a
Fibre Channel environment. It appears as
host_name
The device portion
participating in the zone. It appears as
in this manual.
defines the LUN(s)
device_lun
in this manual.
The port portion
defines the Fibre Channel or
SCSI port in the Diamond-VT. It appears as
port_n
The process:
in this manual.
Each command received by the
Diamond-VT is parsed to determine its host/HBA
identifier, its port number and the target LUN,
forming the zone nexus. This zone nexus is
looked up in the defined zones table. If the zone
nexus is present, the operation continues; if it is
not found, the command is rejected with the
appropriate status and sense data.
Two zone configurations accessed through the
Command Line Interface regulate zoning:
The Planned configuration
is a work-in-process
configuration used to build or edit the desired
configuration. The Planned configuration does
not control I/O access until it is transformed into
the Active Zone Configuration via successful
completion of the
ZoneCommit
command.
Other than as a site for zone configuration editing,
the Planned configuration has no impact on the
Active configuration or the Diamond-VT.
Changes to the Planned configuration may be
made without considering synchronization with
other configuration commands.
Use the
ZoneClearAll
command to clear the
Planned configuration.
If, while working in the Planned configuration,
you decide you want to negate that configuration
and edit the Active configuration, use the
ZoneRetrieve
command. The information from
51
ATTO Technology Inc. Diamond Storage Array Installation and Operation Manual
Page 63

the Active configuration will be copied into the
Planned configuration.
To determine what is in the Planned
configuration, type
Active configuration
ZoneInfo Planned
.
is persistent and establishes
the Diamond zoning configuration after powerup.
The Planned configuration becomes the Active
configuration after successful execution of the
ZoneCommit
command. The Active
Factors to consider
configuration is replicated as the Planned
configuration after the successful
after power-up and after
ZoneRetrieve
ZoneCommit
. This
,
replication eases incremental modifications to the
current zone configuration: you only need to enter
changes. Modifications to the Planned
Configuration made before
ZoneCommit
are not
persistent and are lost in the case of power-up.
To determine what is in the Active Configuration,
type
ZoneInfo.
Several factors must be considered when
configuring a Diamond-VT with zones:
• Be careful when changing Diamond-VT zoning
configurations. Internal validation logic cannot
detect misconfigurations.
• The Diamond-VT zoning may be driven by
external applications which handle
considerations such as aliasing of parameters.
• Stopping or pausing I/O operations during
zoning changes is the responsibility of the host
computer, external to the Diamond-VT.
• You must refer to a device by a consistent LUN
across zones in accordance with Fibre Channel
specifications.
• RAID configuration changes require planning
and preparation independent of whether any
zones are enabled. Such changes affect data
integrity, and any write to an incorrect LUN may
result in data corruption.
• Degraded operation and RAID rebuilding occur
at a lower level than the Zoning features. SCSI
command operation continues to operate, and
you can modify the Zoning configuration via the
ZoneCommit command at any time.
• Zone validation of switch/fabric routing is not
supported. The Diamond-VT operates within a
SAN environment including host systems, host
bus adapters, switches and other devices. The
Operating System you use may limit zoning
flexibility in your SAN.
• You may create up to 32 zones. Each zone may
have up to two ports, up to 24 devices and up to
32 hosts.
Status and Sense Data
Commands sent to a device may be rejected with sense key, code, qualifier as follows:
LOGICAL UNIT NOT CONFIGURED: 68 00 00 No such LUN exists; the initiator does not have access
to this LUN
LOGICAL UNIT NOT SUPPORTED: 25 00 00 The Logical unit is not in an accessible zone
LOGICAL UNIT NOT READY: 04 03 00 The Logical unit is in an accessible zone, but is not
ready; it may be offline or busy
If the logical unit inventory changes for any reason, including completion of initialization,
removal of a logical unit, or creation of a logical unit, the device server generates a Unit Attention
command for all initiators, telling them a
server sets the additional sense code to
REPORTED LUNS DATA HAS CHANGED: 3F 0E 00 (LUN has been added to or removed from the zone)
ZoneCommit
procedure has been successful. The device
52
Zones
Page 64

Configuring Zoning
CAUTIONCAUTION
Be careful when changing Diamond-VT
zoning configurations. Internal validation
logic cannot detect misconfigurations
An unrestricted zone configuration, exactly
mimicking the LUN configuration, is created
first
internally after the
installation of the Diamond-VT. No special
operating modes are required and Zoning can be
easily installed with no impact on previous
configurations. The unrestricted zone can be
considered an all/all/all zone: all hosts, all ports
and all devices.
Examples of initial configurations are available in
Sample Zoning Command Sequences
on page ix.
To create a zone
1 The Diamond-VT must be configured to the
appropriate QuickRAID configuration before
applying the Zoning configuration.
Note
Interpretation of the Zoning command is a
single forward pass, so any entities referenced
in any command must have been previously
defined or you will receive an error message.
2Type ZoneInfo Planned to determine the
status of a Planned Zone Configuration.
3Type ZoneInfo to determine the status of an
Active Zone Configuration.
4 If you want to start fresh and create zones
without reference to the definitions in the
current Active Zone Configuration, type
ZoneClearAll to remove all entries from the
Planned zone definition table.
5 Create a new named zone. Type
ZoneCreate zone_name
6 Add the devices, hosts and ports you want to
include in the zone.
ZoneAddDevice zone_name device_lun
ZoneAddHost zone_name host_name
ZoneAddPorts zone_name port_number
7 Enable the zone, type
ZoneState zone_name enabled
8Type ZoneCommit to make this Planned Zone
Configuration the Active Zone Configuration.
power-up or restart after
in the Appendix
See
Sample Zoning Command Sequences
in the
Appendix on page ix.
If the Diamond pauses operation by using a
queue while a ZoneCommit command is
executing
1 The Diamond-VT completes any in-process I/O
requests received before the ZoneCommit
command was issued
2 The array performs the zoning changes
3 The array resumes I/O operations.
To remove zones
1 Remove the named zone. Type
ZoneRemove zone_name
2Type ZoneCommit to commit this Planned
Zone Configuration to become the Active Zone
Configuration.
To change current zones
CAUTIONCAUTION
Be careful when changing Diamond-VT
zoning configurations. Internal validation
logic cannot detect misconfigurations
3Type ZoneInfo Planned to determine the
status of a Planned Zone Configuration.
4Type ZoneInfo to determine the status of an
Active Zone Configuration.
5 If necessary, type ZoneRetrieve to overwrite
the Planned configuration with the current
Active configuration.
6 Create or delete named zones as outlined
above.
7 Add or delete devices, hosts and ports as
outlined above.
8Type ZoneCommit to make this Planned Zone
Configuration the Active Zone Configuration.
Other operations
• To disable a zone, type
ZoneState zone_name disabled
• To clear the Planned Zone Configuration of all
entries, type
ZoneClear All
• To restore the Diamond-VT to factory default,
type
ZoneClearAll
ZoneCommit
53
Diamond Storage Array
Page 65

Errors
Zone definition tables:
The Zone commands
manage entries in the Zone definition tables
which manage the overall zoning process.
Definition tables are indexed by unique keys
zone_name
(
). All definition tables are
repositories for their respective data and
participate in establishing the configuration by
executing the
ZoneCommit
command.
The integrity of these tables is essential to the data
integrity of the Diamond-VT. If the Zone
definitions are faulty problems can occur.
Although Zone command processing provides a
level of command and configuration validation,
you must be very careful managing
configurations with any zoning system.
Validation of the command line is performed
before the command is deemed acceptable to be
executed.
These descriptions are generalizations.
• Configuration inaccuracies occurring before
application or operating system data is written to
the drives may have no impact on the DiamondVT, but results after an operating system or
application have written to the drives are
unpredictable.
• Incorrect Zone entries can include misspecification of resources to a zone.
• Verify each command line is properly formed
(number of parameters, proper spelling of
keywords).
• For commands defining entities, the name being
defined must not already be defined.
• If you want to undefine an entity, the name being
undefined must already be defined. (A warning
will be displayed if the name to be undefined
doesn’t exist.)
• World wide port names are validated according
to basic format rules. Content verification of
WWPN occurs at runtime.
• LUN must be in the range defined by the
RAID<n> configuration.
• Errors detected in the CLI command line are
described in Exhibit 7.3-1.
• Errors detected while writing the Active Zone
Configuration result in an error message and no
change to the zoning configuration. The Active
configuration continues to match the persistent
configuration.
• Errors detected while reading the Active Zone
Configuration result in an error message and the
zoning configuration remains unchanged.
54
Zones
Page 66

8.0 Updating Firmware
Engineers, technicians and/or system administrators/integrators may update the firmware of the
Diamond-VT using the Command Line Interface (CLI) (See
RS-232 serial port or the optional Ethernet management services card.
Updating firmware via the RS-232 serial port
Accessing the Diamond-VT
on page 15) via the
To update the firmware via a connection to the
RS-232 serial port, you will need
• a host computer with a terminal emulation
program such as HyperTerminal in Windows
• binary information file (“...”.ima) available from
technical support or on our website (see
Warranty
• a null modem serial cable with a DB-9 connector
1 Connect to Diamond-VT services via the RS-
232 port (see
15). You should now be in the Command Line
Interface mode.
2 Copy the latest Diamond-VT image file
(“...”.ima) onto the host computer.
3Type ZModem Receive at the
The terminal program on the host should be in
Zmodem only mode, with no other parameters.
The Diamond-VT will display information that it
is preparing to receive a file from your terminal
program.
4 On the terminal program, choose Transfer
Send File
on page A-xv)
Accessing the Diamond-VT
on page
Ready prompt.
5 In the Send File box, enter the current
Diamond flash (“...”.ima) filename or click the
browse button to find it.
6Click Send File
7 The Diamond should acknowledge receiving
the file and display a message not to interrupt
power for 90 seconds.
CAUTIONCAUTION
Do not interrupt the flash process. If the
process is interrupted, the Diamond-VT
will become inoperable and will have to
be returned to the factory for repair.
Do not turn off the Diamond-VT until the
display returns the Ready prompt.
8 If upgrading the firmware from versions older
than 2.5.3, follow the procedures outlined in
Resetting Defaults
9 When the flash procedure is complete, cycle
power on the Diamond-VT.
on page 63.
Updating firmware via the optional Ethernet card
To update the firmware via the optional Ethernet
management services card, you will need
• the optional Ethernet management services
card installed in your Diamond-VT
• a host computer with a network card or a
network-connected device such as a hub
• binary information file (“...”.ima) available from
technical support or on our website (see
Warranty
• a crossover network cable for a direct connect or
standard network cable if attached to a network
device
55
ATTO Technology Inc. Diamond Storage Array Installation and Operation Manual
on page A-xv)
• a valid IP address
1 To connect to the Ethernet and set up your host
computer, refer to
SNMP Protocols
Note
The host computer must have appropriate
network settings to allow it to communicate
with the Diamond-VT. Please see your system
administrator for more information.
2 Turn on the Diamond-VT.
Ethernet Access: Telnet and
on page 21.
Page 67

3 Copy the latest Diamond-VT image file
(“...”.ima) onto the host computer and note its
directory
c:\diamond\flash\“...”.ima
4 Change directories to the place where you
copied the “...”.ima file
cd c:\diamond\flash
5 Open an FTP session using a user-defined IP
address or the default (10.0.0.1) if it has not
changed. The IP address must be a valid
address for your network.
6 At the FTP login prompt, type sysadmin as the
userID.
7 Press Enter at the password prompt.
8Type put “...”.ima.
The Diamond should acknowledge receiving
the file and display a message not to interrupt
power for 90 seconds.
CAUTIONCAUTION
Do not interrupt the flash process. If the
process is interrupted, the Diamond-VT
will become inoperable and will have to
be returned to the factory for repair.
Do not turn off the Diamond-VT until the
display returns the Ready prompt.
9 If upgrading the firmware from versions older
than 2.5.3, follow the procedures outlined in
Resetting Defaults
10 When the flash procedure is complete, cycle
power on the Diamond-VT.
on page 63.
56
Update firmware
Page 68

9.0 Diagnostics, Upgrade and Maintenance
The Diamond-VT provides a number of visual, audible and computer system-generated indicators to
identify the operational status of the array. System status and error information is readily available.
Various methods are available to correct problems or to upgrade equipment and firmware.
RS-232 Monitoring Port and CLI
One tool to
support a Diamond-VT is a host computer with an
RS-232 port and terminal emulation software.
Using this computer, you can hook up a null
modem serial cable to the RS-232 port on the
Diamond-VT management card and control the
array via the Command Line Interpreter (CLI)
management software built into the array. The
CLI can be used to configure the unit, modify key
parameters and read back key system information.
(See
Accessing the Diamond-VT
Ethernet Monitoring Port and CLI
on page 15)
If the optional
Ethernet management system card has been
installed, you may use the RJ45 Ethernet port and
Telnet to access the CLI software on the
Diamond-VT. Use the same CLI commands to
configure, modify or read key systems
information (see
Accessing the Diamond-VT
on page
15) or the ExpressNAV browser-based interface.
If you restart the array, the Telnet session will end
and the session cannot be re-established until the
array completes its Power On Self Test.
At power up, the green Diamond Array Ready
(RDY) LED is disabled until successful
completion of the POST (Power On Self Test)
indicating the array is ready for normal operation.
If a host computer is hooked to either Fibre
Channel or SCSI port, the Ready LED will
momentarily blink and then stay lit if the
connection is good. If that host is rebooted, the
Ready LED will blink again and stay on once the
connection is reestablished.
Audible Alarm
The Diamond-VT audible alarm
warns of potential problems or faults. It beeps
twice at power up to indicate it is operational and
will beep repeatedly when the System Fault (FLT)
light on the system management card is activated.
The alarm will turn off when the fault condition is
cleared or the alarm can be disabled by issuing an
AudibleAlarm disabled or PowerAudibleAlarm
disabled
Maintenance Services Commands
command via CLI as described in
on page 38.
Disabling the alarm for a specific error will not
silence the alarm for other errors.
Power On Self Test (POST)
Diamond-VT array is powered up, it will perform
a series of internal tests called POST (Power on
Self Test). The POST sequence takes from 1 to 2
minutes to complete.
The Diamond-VT LEDs will blink at various
points in the test sequence and, if the RS-232
system management port is connected, a list of
tests and test results will scroll across the screen.
When the POST is nearly complete, all the LEDs
on the array will flash simultaneously twice in a
row. If the system is fully operational, the ready
LED will be lit and the unit is ready to be
accessed. If the POST fails, the System Fault LED
will be lit and an error code will be flashed.
Ready LED
The Ready LED (RDY) indicates the
operational status of the Diamond-VT.
57
ATTO Technology Inc. Diamond Storage Array Installation and Operation Manual
Each time the
Thermal Monitoring
advance warning of temperature problems
through visual, audible and software warning
mechanisms and through an automatic system
which protects the disk drives under abnormal
operating or ambient conditions.
The Diamond-VT will function under normal
external operating temperatures of 5°C and 40°C.
Temperature sensors provide data to the software
to trip a temperature warning alarm and will, at
excessively high or low temperatures, flush cache
memory to prevent data loss and disable disk
drive activity to protect the drives. The Diamond
reports the temperature via SES, SNMP, CLI and
the Status page of the ExpressNAV interface as
well as the state of the temperature warning alarm
Not Present, OK, Warning, Critical)
(
The Diamond-VT provides
. The
Page 69

temperature warning alarm will report OK during
normal operating conditions.
In an abnormal operating condition, such as
blower failure, under high ambient temperatures
when the Diamond internal midplane temperature
reaches a critical point, the temperature alarm will
report
Warni ng
and activate the audible alarm and
midplane temperature were to reach a higher
point, the temperature warming alarm will report
Critical
, the Array will be taken off line, and all
disk drive activity will be disabled. When the
ambient temperature decreases to within standard
operating range, the drives will be powered back
on and the host will be allowed to access the data.
fault LED on the front of the unit. If the internal
Exhibit 9.0-1 Typical Diamond-VT operation over a range of external ambient temperatures. Alarms will be
audible, visual, CLI and SES cues as described above.
Temperat
ure
Condition
Read/Writes normal normal normal normal normal normal normal Array offline
Alarms OK OK OK OK OK
25°C
blowers OK
25°C
1 blower
fails
32°C
blowers
OK
32°C
1 blower
fails
35°C
blowers
OK
35°C
1 blower
fails
WARNING OK CRITICAL
40°C
blowers
OK
40°C
1 blower
fails
Power Supply Monitoring
The Diamond-VT
monitors the operation of its power supplies and
blower assemblies every 30 seconds. If the status
changes, the system reports it visually with an
LED and a message in the CLI.
If a power supply or blower fails, the management
system sends a CLI message and turns off the
corresponding power supply LED.
The blower assembly directly adjacent a power
supply must be functioning properly for the power
supply to work properly. If a blower assembly
fails, the power supply will shut down and the
management system will send a CLI message.
The corresponding power supply LED on the
system management card will also turn off.
If a good replacement power supply or blower
assembly is inserted into the array, the
management system will send a CLI message and
the corresponding system management card LED
will go on. It may take up to 30 seconds for the
system to note these changes.
System Fault LED and Error Codes
If a serious
hardware or software error occurs in the
Diamond-VT, the System Fault LED will display
a series of flashes or blink codes. Error
information will be reported via the Command
Line Interface if it is operational.
At power up, the green Diamond Array Ready
(RDY) LED turns on after successful completion
of the POST (Power On Self Test) indicating the
array is ready for normal operation.
During operation, the Ready LED will stay lit
even if the amber Fault (FLT) LED lights.
If a serious error occurs in the array, the amber
Fault LED will flash repeatedly in a blink code
pattern:
• an initial series of blinks indicating the system
problem
Number of blinks Problem area
1, 2 or 3 processor or memory
4 Fibre Channel interface
5 SCSI interface
7 Fibre Channel connection
8 general internal processing
9 SCSI Enclosure Services
• a two second pause
• another series of blinks providing more detailed
information for technical personnel.
• a four-second pause
• the blink code sequence will repeat from step 1
until the error is cleared.
In general, any fault will require notification of
Diamond Array technical personnel for resolution
or for further debug instructions. When you report
58
Monitoring, reporting
Page 70

an error code, please provide both the first and
second blink code values.
During a fault condition, more detailed
information about the fault may be available via
the CLI or the ExpressNAV interface over the RS232 interface port or the optional Ethernet port.
These error messages should be reported to
technical personnel to assist in debugging the
problem.
The blink codes are also saved internally by the
array to NVRAM (Non Volatile Random Access
Memory) and will be displayed at power up if the
power to the array is recycled.
Disk Drive Activity and Disk Fault LEDs
Each
dual disk drive sled assembly contains two green
activity LEDs and an amber disk fault LED. Once
the system has successfully powered up and
passed POST, the green activity LEDs are full on
and the disk fault LED off.
The Drive 1 and Drive 2 activity LEDs will stay
full on when the system is operational and no disk
drive activity is present. As the disk drives are
accessed, the green LEDs will flash. If the disk
drives are heavily accessed the green activity
LEDs will appear to flash at a high rate or may
even appear to be completely turned off.
The amber disk fault LED will be off under
normal operation. If either of the disk drives on a
dual disk drive assembly reports a disk error of
any kind, the amber disk fault LED will come on.
The disk fault LED can be activated by minor
issues such as a disk drive writing to a bad sector
(which is usually corrected by the disk drive the
next time it writes) or major issues such as a head
crash or complete drive failure.
When the disk fault LED is turned on, the system
will issue a detailed message via the CLI. These
messages are not written permanently to the error
log file but should be recorded to help assess the
disk problem.
If the disk drive error is a non fatal error and the
drive is still functional, the array will continue to
read and write data to the disk drive but the disk
fault LED will remain on. If you repeat a drive
command or action and it completes successfully,
the disk fault LED may have been set by an
anomaly in the disk drive. You can clear the Disk
Fault LED by either power cycling the array or
issuing the
Maintenance Services Commands
SledFaultLED
command in CLI as per
on page 38
If you repeat a disk command or action and the
disk fault LED remains on, the disk error may be
serious. You should write down the error message
issued by the CLI and contact technical support
via the means easiest for you for assistance (see
Warranty
on page A-xv). If you choose to replace
the suspected faulty dual disk drive sled assembly,
follow the appropriate procedures.
59 Diamond Storage Array
Page 71

60
Monitoring, reporting
Page 72

9.1 Troubleshooting
The Diamond-VT provides a number of indicators to identify the operational status of the array. System status
and error information is readily available. If your situation is not defined here or elsewhere in the manual, if these
solutions do not help, or if you have any questions or concerns about any aspect of operating the Diamond-VT,
contact technical support.
Windows 2000 special instructions
When using Windows 2000 and booting up the
Diamond-VT for the first time, the
New Hardware
screen may ask for a driver. While a driver is not
necessary, install a dummy driver to eliminate the
screen’s appearance. Download
www.attotech.com
, unzip it, and install the driver
according to the instructions in
AttoDM2k.zip
AttoDM2k.pdf
from
.
Error Messages
System Fault LED
error occurs in the Diamond-VT, the
LED
will display a series of flashes or blink codes.
• an initial series of blinks indicate a system
problem
Number of blinks Problem area
1, 2 or 3 processor or memory
4 Fibre Channel interface
5 SCSI interface
7 Fibre Channel connection
8 general internal processing
9 SCSI Enclosure Services
• a two second pause
• another series of blinks providing more detailed
information for technical personnel.
• a four-second pause
• sequence repetition from step 1 until the error is
cleared.
In general, any fault will require notification of
Diamond Array technical personnel for resolution or
for further debug instructions. When you report an
error code, please provide both the first and second
blink code values.
During a fault condition, more detailed information
about the fault may be available via the CLI or the
ExpressNAV interface over the RS-232 interface port
or the optional Ethernet port. The blink codes are
saved internally by the array to NVRAM and are
displayed at power up.
If a serious hardware or software
System Fault
Command Line Interface messages
ERROR. Wrong/Missing Parameters
Check
Help
for the correct input and retype command
ERROR. Invalid Command. Type ‘help’ for
command list
Check
Help
to find a list of all commands which are
available. Contact Diamond-VT technical support via
the means easiest for you. Refer to
Warranty
A-xv for additional information.
ERROR. Command Not Processed.
The Diamond-VT did not accept the command you
requested. Check
Help
for a list of commands or check
this manual for the function you wish to access. If you
cannot accomplish what you want to do with the
commands listed, contact Diamond-VT technical
support via the means easiest for you.
Audible Alarm
The Diamond-VT audible alarm will
warn of potential problems or faults. It will beep
repeatedly when the System Fault (FLT) light on the
system management card is activated. The alarm will
turn off when the fault condition is cleared or the alarm
can be disabled by issuing
PowerAudibleAlarm disabled
described in
Maintenance Services Commands
AudibleAlarm disabled or
command via CLI as
38. Disabling the alarm for a specific error will not
silence the alarm for other error conditions.
Specific situations and suggestions
For all problems, first check the pages of the
ExpressNAV interface appropriate for the problem
especially the
use the appropriate CLI commands
If a drive fails to respond
• Determine which drive has failed by observing
the amber fault LED on the drive sled or connect
to the CLI and type
drives and their status.
• For specific information on a particular drive in
CLI, type
number]
Status
and Storage Management
driveinfo
for a list of all
driveinfo [sled number] [drive
. Record all errors.
on page
on page
or
61
ATTO Technology Inc. Diamond Storage Array Installation and Operation Manual
Page 73

• Follow the instructions in the appropriate
chapters of this manual to remove, replace and
reconfigure the drive such as
Instructions
• You may copy drives by using Command Line
interface commands. Refer to
Commands
If a power supply fails
• Verify the power cord is correctly plugged and
there is power at the power receptacle.
• If there is power, the cord is secure and the
blower and power supply LEDs are off, replace
the blower unit. Refer to
Instructions
• If there is power, the cord is secure and the
power supply LED is off, but the blower LED is
on, replace the power supply Refer to
Operating Instructions
• Command Overlap: The Diamond-VT contains
special software to take advantage of the
Command Overlap feature offered in some high
performance disk drives. Because all 24 disk
drives in a Diamond Array may be seeking at the
same time under Command Overlap, only
Diamond-VTs with two operational power
supplies and blower assemblies will support
Command Overlap: the Diamond-VT will
automatically disable the Command Overlap
feature if a power supply fails and notify the
system administrator through the audible alarm
and CLI.
If you cannot read or write to the Diamond-VT
on page 69.
on page 41.
on page 69.
on page 69.
Hot Swap Operating
Drive Management
Hot Swap Operating
Hot Swap
You may have lost connection to the host via the Host
Interface Card. The HIC LED on the back of the
Diamond-VT should be lit green. The amber LED
should go out and the green LED should light when the
connection is complete.
Also check the host bus adapter (HBA) in the host
machine for proper functioning and drivers.
• Verify that the connector and both ends of the
cable are completely seated.
• Try connecting directly to the host, bypassing
any hubs or switches.
To determine if the problem exists with the Host
Interface Card or the connection
• Swap the cable from one HIC to the other HIC.
• If the LED is now green, swap the GBIC and
cable back to the original HIC. If the LED is
green, then the GBIC is defective; if it is amber,
the HIC is defective.
• Swap the defective HIC or GBIC (see
Operating Instructions
If you can’t access the Diamond-VT CLI via
Ethernet
• Verify there are three or fewer concurrent
sessions using Telnet or FTP. You may be the
fourth session or someone in another session
has entered a command which requires a Save
Configuration command.
• Verify you are using a crossover cable for direct
connection, or a network cable for a network
connection.
• Verify the Diamond-VT is set to IPDHCP
enabled
assigned by the network and DHCP is an option
available on the network.
• Verify the IP address is compatible with the host.
• Verify the system is functioning and accessible
via in-band inquires such as Disk Management.
• Try setting your terminal emulator with a
different baud rate, starting at 2400, then 9600,
19200, 38400, 57600, and 115200.
• If you perform a hardware restart, the Ethernet
connection is dropped. You must re-establish
the Ethernet connection.
• If you enter a command that requires
Configuration
command in either the serial interface window or
the Ethernet connection window, you will not be
able to access the inactive window until the
command is complete in the active window.
• If you still fail to communicate with the DiamondVT, swap out the management card and try to
connect using default settings.
If you do not see the appropriate number of
LUNs on the host machine
• Ensure any configuration changes are
appropriate
• Type
• Re-start the host computer
• Verify all drives associated with the missing
LUN(s) are inserted properly and powered up.
if you expect an IP address will be
FirmwareRestart in CLI
on page 69)
or
RestoreConfiguration
Hot Swap
a
Save
62
Troubleshooting
Page 74

9.2 Resetting Defaults
Resetting the Diamond-VT to defaults will not alter the RAID configuration, zoning configuration, IP
configuration or Telnet information. However, resetting the Diamond-VT to factory defaults is a last-ditch effort
to recover from corrupt configurations or complete failure. All data will be lost, but the zoning configuration will
remain.
CAUTIONCAUTION
Data will be lost if you follow these
procedures. Make sure you have no other
choice before resetting the Diamond-VT to
factory defaults.
Default
If you need to return to the default settings of the
Diamond-VT but do not want to lose data or Ethernet
settings, use the CLI command
in CLI mode or in the
default
RestoreConfiguration
Advanced CLI
configuration page of the ExpressNAV interface.
Note
Using
RestoreConfiguration default
RestoreConfiguration factory default
affect the zoning configuration. To restore the
Diamond-VT to factory default, type
ZoneClearAll
ZoneCommit
or
will not
Return to Default settings
1 Connect to Diamond-VT services via the RS-232
port or the optional Ethernet management
services card (see
page 15). You should now be in Command Line
Interface. Continue with the CLI or access the
ExpressNAV interface (see
Browser-based Interface
Note
Because the ExpressNAV pages take you
through this process easily, the following
instructions are based on the CLI commands.
Use these instructions as a guide in ExpressNAV.
2 Type
3Type
RestoreConfiguration default
system configuration (See Exhibit 9.2-2 for a list of
configurations which will be changed).
FirmwareRestart
Diamond-VT.
Accessing the Diamond-VT
ATTO ExpressNAV:
on page 23).
to reset the
or cycle power of the
on
4 Reboot the host PC after the Diamond-VT
completes its power on cycle.
Factory Default
Resetting the Diamond-VT to factory defaults is a lastditch effort to recover from corrupt configurations or
complete failure. All data will be lost.
Note
Using
RestoreConfiguration default
RestoreConfiguration factory default
affect the zoning configuration. To restore the
Diamond-VT to factory default, type
ZoneClearAll
ZoneCommit
To reset to Factory Defaults, firmware version
2.5.3 or higher
1 Connect to Diamond-VT services via the RS-232
port or the optional Ethernet management
services card (see
page 15). You should now be in Command Line
Interface.
2 Continue with the CLI or access the ExpressNAV
interface (see
Interface
3 Type
the system configuration. (See Exhibit 9.2-2 for a
list of configurations which will be changed).
4 Type
power.
5 Reboot the host PC after the Diamond-VT
completes its power on cycle.
on page 23).
Note
Because the ExpressNAV pages take you
through this process easily, the following
instructions are based on the CLI commands.
Use these instructions as a guide in ExpressNAV.
RestoreConfiguration factorydefault
FirmwareRestart
Accessing the Diamond-VT
ATTO ExpressNAV: Browser-based
or cycle the Diamond-VT
or
will not
on
to reset
63
ATTO Technology Inc. Diamond Storage Array Installation and Operation Manual
Page 75

Exhibit 9.2-2 Configurations which will be changed during a RestoreConfiguration command
Command Default
AudibleAlarm Disabled
AutoRebuild Disabled
DiamondName “
EthernetSpeed Auto
FcConnMode Loop
FcDataRate Auto
FcFairArb Enabled
FcFrameLength 2048
FcFullDuplex Enabled
FcHard Disabled
FcHardAddress 0x03
IdentifyDiamond Disabled
IdeTransferRate 4
IPAddress 10.0.0.1
IPDHCP Disabled
IPGateway 0.0.0.0
IPSubnetMask 255.255.255.0
MaxEnclTempAlrm 47
MinEnclTempAlrm 5
RAIDInterleave 128
SerialPortBaudRate 115200
SerialPortEcho Disabled
SerialPortHandshake None
SerialPortStopBits 1
SNMPSendTrap Disabled
SNMPTrapAddress 10.0.0.1
SNMPTraps 4
SNMPUpdates Disabled
TelnetPassword diamond
TelnetTimeout Disabled
TelnetUsername telnet
VerboseMode Enabled
............
”
Reset if
default
chosen Reset during
factorydefault
▼▼
▼
▼
▼
▼
▼▼
▼▼
▼▼
▼▼
▼▼
▼▼
▼▼
▼▼
▼
▼
▼
▼
▼▼
▼▼
▼
▼▼
▼▼
▼▼
▼▼
▼▼
▼▼
▼▼
▼▼
▼
▼
▼
▼▼
64
Reset defaults
Page 76

9.3 Rebuilding RAID Level 5 and 10 Configurations
If a sled must be removed and a new sled inserted into the Diamond Storage Array while it is configured in a RAID
Level 5 or 10, you must rebuild the RAID Level using CLI commands or the ExpressNAV interface.
WARNING
Selecting RAID parameters causes all
previous drive data on the Diamond
Storage Array to be erased. Make sure all of
your information is backed up before
setting up RAID groups.
When you initially set up RAID groups using the
QuickRAID
command, groups are synchronized
automatically because there is no pre-existing data on
the drives. However, drives may display as “degraded,
and you need to set all LUNs to OK status.
The simplest method to check RAID group status is to
access the
See
page 23
To reset LUN status
1 Display the status of the array by typing
2 Set the sleds which are listed as degraded to a
RAID
page of the ExpressNAV interface.
ATTO ExpressNAV: Browser-based Interface
.
Note
Because the ExpressNAV pages take you
through this process easily, the following
instructions are based on the CLI commands.
Use these instructions as a guide in ExpressNAV.
RAIDRebuildStatus
rebuild state of OK by entering
.
on
set RAIDRebuildState [sled number] OK
Virtual Tape synchronization
The most efficient method to synchronize Virtual
Tape configurations is to enable Hot Spares or the
Auto Rebuild feature.
To synchronize mirrored drives automatically
If mirrored drives are removed for more than 15 to 30
seconds and then re-inserted or replaced, the replaced
drives are labeled “degraded” when you check the
Array’s status by typing
enable
AutoRebuild.
RAIDRebuildStatus
. If you
the array rebuilds the degraded
drives automatically when a new drive is inserted.
Note
Drive rebuilding reduces performance. You may
want to leave
disabled
hours, or use the
described below.
1 Connect to Diamond Storage Array services via
the RS-232 port or the optional Ethernet
management services card (see
Diamond-VT
the CLI.
2 Continue with the CLI or access the RAID page of
the ExpressNAV interface (see
Browser-based Interface
3 Type
4 Information displays on the screen while the array
5 Type SaveConfiguration.
6Type
7 Reboot the host computer connected via Fibre
8 To verify the configuration, type
9 If a rebuild is necessary, the array will
Rebuild priority
AutoRebuild enabled.
updates NVRAM ending with a
FirmwareRestart to reboot the array.
Channel or SCSI to the array.
RAIDRebuildStatus
automatically rebuild drives.
AutoRebuild
and manually rebuild during off-peak
RebuildPriority
at the default
command
Accessing the
on page 15). You should now be in
ATTO ExpressNAV:
on page 23).
Ready*
.
Drive rebuilding reduces performance. Use the
RebuildPriority
RAID
page of the ExpressNAV interface to customize
when your rebuilds will occur.Choices are
and
Same
• If you select High priority, rebuild I/O requests
are implemented before system I/O requests.
• If you select Low priority, rebuild I/O requests
execute only when there are no pending I/O
requests.
• If you select Same priority, rebuild I/O and
system I/O receive equal consideration.
You must use a
command through the CLI or on the
.
SaveConfiguration Restart
High, Low
command to implement the rebuild priority command.
65
ATTO Technology Inc. Diamond Storage Array Installation and Operation Manual
Page 77

To synchronize mirrored drives manually
The most efficient method to synchronize Virtual
Tape configurations is to enable Hot Spares or the
auto rebuild feature.
1 Connect to Diamond Storage Array services via
the RS-232 port or the optional Ethernet
management services card (see
Diamond-VT
CLI.
2 Access the RAID page of the ExpressNAV
interface (see
Interface
3 Use the
commands to identify a Tape Volume associated
with the RAID group you wish to rebuild.
on page 15). You should now be in
ATTO ExpressNAV: Browser-based
on page 23).
VirtualDriveInfo and TapeVolumeInfo
Accessing the
4 Go to the Move Medium page.
5 Drag the selected Tape Volume into an
unoccupied Tape Drive LUN.
6 From the CLI window, initiate a Rebuild operation
from the Tape Drive LUN to the desired Drive
Sled.
Note
When this rebuild operation has completed, the
entire RAID group will have been rebuilt,
effectively rebuilding all Tape Volumes
associated with the underlying RAID Group: you
do not need to rebuild each Tape Volume
separately.
66
rebuilding RAID
Page 78

10.0 Hardware Maintenance
E
s
The disk drive sleds, blower assemblies, power supplies, host interface cards, and system management
card may be replaced with identical or upgraded parts.
CAUTIONCAUTION
Do not leave empty openings on the front
or rear of the Diamond-VT under any
circumstances. Empty openings affect
airflow and may cause the unit to overheat
and shut down.
WARNING
The only way to completely de-energize the
unit is to turn off both
Power Switch Positions
On Stand-by
Stand-by position on one power supply
does not completely turn off power to the
Diamond-VT; it is not an AC on-off switch.
Power may still be in the unit through the
other power supply.
CAUTIONCAUTION
All modular components must be replaced
by qualified personnel only. Use a static
wriststrap when handling any of the cards
inside the Diamond-VT. Components are
electrostatic sensitive. Use proper
grounding methods when working with or
around the Diamond-VT. Always store
spare components in proper ESD
containers when not in use.
• The power supply and blower assembly may be
replaced while the unit is running. (See
Operating Instructions
• Host interface cards and management cards
may only be replaced when the Diamond-VT is
off. Backup the unit fully before replacing these
components.
• You may remove a disk drive sled while the
Diamond-VT is powered on. See the instructions
in
Hot Swap Operating Instructions
details.
Management card:
power supplies and
unplug both power
cords from the back of
the unit. Turning the
power switch to the
Hot Swap
on page 69)
on page 69 for
To remove a management
card, power down both power supplies, loosen the
screws holding the card in place, pull out the
xhibit 10-1: The management card may be accessed via a
erial port DB-9 connector or an optional Ethernet
connection.
assembly and replace it with another. Securely
tighten all screws after replacing the component.
Disk drive sled:
To remove a disk drive sled
(Exhibit 10-2), loosen the screws on either side of
the assembly, then pull on the assembly’s handle
and carefully slide it out of its bay.
FC or SCSI Host Interface Card
To remov e a
Fibre Channel or SCSI Host Interface Card from
the back of the Diamond-VT (Exhibit 10-3),
power down both power supplies and remove any
cable attached to the port. Loosen the retaining
screws and pull the Host Interface Card out of the
unit. To replace the card, push it back into the unit
and tighten the retaining screws.
Power supply:
To remove the power supply
(Exhibit 10-4), press the Stand-by power switch to
the off position, remove the power cord, and,
using a No. 1 Phillips screwdriver, loosen the
screws holding the assembly in place. Pull out the
assembly and replace it with another. Securely
tighten all screws after replacing the component.
Blower assembly:
To remove a blower assembly
(Exhibit 10-4), using a No. 1 Phillips screwdriver,
loosen the screws holding the assembly in place.
Pull out the assembly and replace it with another.
Securely tighten all screws after replacing the
component.
67
ATTO Technology Inc. Diamond Storage Array Installation and Operation Manual
Page 79

E
xhibit 10-2: Above, disk drive sled partially pulled out of the Diamond
Storage Array. Bottom left, top of disk drive sled. Bottom right, underside
of disk drive sled showing individual drives
Exhibit10-3: The Fibre Channel or SCSI Host
Interface Card may be replaced by shutting
power down, removing any cable attached to the
port, removing the GBIC or SFP according to
manufacturer's instructions, loosening the
screws at the top and bottom of the card, then
carefully pulling out the unit.
Exhibit 10-4: A power supply pulled out from a rackmount Diamond Storage Array: do not leave an empty opening
while the Diamond Storage Array is operating. Access the blower assembly and the power supply by loosening the
screws on either side of the component, then pulling out the part. If a blower or power supply stops working, keep it
in place until another component is installed. (Note: host interface configuration pictured is not supported)
68
Hardware maintenance
Page 80

10.1 Hot Swap Operating Instructions
To maintain array up time, individual disk drive sled assemblies, power supplies and blower assemblies
can be replaced with the unit fully operational. Special instructions need to be followed to perform these
operations.
Disk Drives
CAUTIONCAUTION
• Individual disk drive sled assemblies may be
replaced while the array is operating with no other
intervention only if there is absolutely no activity
on that drive.
• Failure to ensure no activity may destroy any data
on that drive and possibly stop the entire
Diamond-VT operation. Please follow the
instructions below using CLI commands to
replace drives.
• Do not leave empty openings on the front or rear
of the Diamond-VT under any circumstances.
Empty openings affect airflow and may cause the
unit to overheat and shut down.
• All modular components must be replaced by
qualified personnel only. Components are
electrostatic sensitive. Use a static wriststrap
when handling any of the cards inside the
Diamond-VT. Use proper grounding methods.
Always store spare components in proper ESD
containers when not in use.
Follow your backup procedures before removing a
sled. You may copy drives using the appropriate CLI
commands (See
41).
The following method is the safest way to perform
a hot swap of a drive.
The general approach: identify the disk drive sled to be
replaced, take it offline using the appropriate CLI
commands, turn off its power using CLI commands,
remove and replace with a new disk drive sled, power
up the new sled, and place back on line.
1 Connect to Diamond-VT services (see
Accessing the Diamond-VT
the Command Line Interface mode.
2 The fault LED should be blinking on the disk
drive sled to be replaced. If it is not, type set
SledFaultLED [n] on. The LED of the drive you
want [n] will light.
3 Determine the Drive Sled Number. The disk
drive sled closest to the management card is
always the number 1 disk drive sled.
Drive Management Commands
on page 15) and enter
on page
4 The Drive Sled Number identified in step 2 is
the
SledNum
variable to be entered into the CLI
commands. Take the disk drive sled offline by
entering the following CLI commands at the
control computer
Set AtaDiskState (SledNum, 1, OFFLINE)
Set AtaDiskState (SledNum, 2, OFFLINE)
Set DriveSledPower (SledNum, OFF)
Ready
prompt:
CAUTIONCAUTION
In a Hot Spare configuration, a drive sled should
only be taken offline if there is absolutely no
activity on that drive. If there is any activity, the
rebuild of the Hot Spare sled may be flawed.
5 Wait 30 seconds for the disk drive sled to spin
down and complete any remaining I/O activity.
6 Unscrew the two screws on the disk drive sled
with the appropriate tool.
7 Carefully pull the disk drive sled out of chassis
using its handle.
8 Mark or tag the disk drive sled with the
Diamond Array serial number, the date
removed, and its slot number.
9 Place the disk drive sled in an appropriate ESD
container or bag.
10 Install the replacement disk drive sled into the
array chassis using proper ESD control steps
and with the proper orientation (The disk drive
sled assembly is keyed and can only be
inserted one way).
11 Tighten the two screws on the disk drive sled
with the appropriate tool.
12 If you do not have AutoRebuild enabled, using
the disk drive sled number identified in step 2,
on the control computer Ready prompt type:
ClearDiskReservedArea (SledNum, 1)
ClearDiskReservedArea (SledNum, 2)
Set AtaDiskState (SledNum, 1, ONLINE)
Set AtaDiskState (SledNum, 2, ONLINE)
ResolveLUNConflicts
The new disk drive sled will be available for
system use 10 to 15 seconds after the disk
drives spin up and communication is
reestablished.
69
ATTO Technology Inc. Diamond Storage Array Installation and Operation Manual
Page 81

Power Supplies
CAUTIONCAUTION
Do not leave empty openings on the front or rear
of the Diamond-VT under any circumstances.
Empty openings affect airflow and may cause
the unit to overheat and shut down.
WARNING
Hazardous voltage and stored energy hazard
when removing power supplies.
In a system with at least one operational power supply,
the other power supply can be successfully removed
and replaced without powering the system down and
with no loss of array functionality. The green activity
LED on the front of the system management card
identifies the operational status of each power supply
(Green means the power supply is operating
correctly).
Note
System command overlap is discontinued across
some drives when only one power supply is
operational.
Labels on the rear of the Diamond-VT point to the
appropriately related A and B power supplies.
1 Identify the power supply to be swapped on the
rear of the unit.
2 Turn off the power supply on/off switch.
3 Disconnect AC line cord.
4 Unscrew the two screws on the power supply
with the appropriate tool.
5 Pull power supply out of chassis using the
power supply module handle.
6 Install new power supply in chassis with proper
orientation (Power supply is keyed and can only
be inserted one way).
7 Tighten the two screws on the power supply
with the appropriate tool.
8 Connect AC line cord
9 Turn on power supply switch.
10 Verify correct operation by observing that the
green light on the rear of the power supply is lit
and that the appropriate power
supply light on the system
management card on the front of the
unit is lit.
removal of a power supply and change the LED on
the system management board. The CLI will issue
messages about the change (see
Upgrade and Maintenance
Diagnostics,
on page 57).
Blower Assemblies
CAUTIONCAUTION
Do not leave empty openings on the front or rear
of the Diamond-VT under any circumstances.
Empty openings affect airflow and may cause
the unit to overheat and shut down.
The Diamond-VT contains two blower assemblies.
The blowers are critical to proper array cooling
operation. However, the array can operate with only
one functional blower within certain ambient
temperatures. The blowers are electronically
connected to the power supplies and a power supply
will not run without its corresponding blower
assembly operating. This means if the blower adjacent
to power supply A is removed, the ‘A’ power supply
will shut down, turning off the corresponding LED on
the system management card. The CLI will issue a
message about the power supply being turned off.
To replace a blower assembly
1 Unscrew the two screws on the blower
assembly with the appropriate tool.
2 Pull the blower assembly out of chassis.
3 Install new blower assembly in chassis with
proper orientation (Blower assembly is keyed
and can only be inserted one way).
4 Tighten the two screws on the blower assembly
with the appropriate tool.
5 Verify correct operation by observing that the
green light is lit on the rear of the power supply,
and that the appropriate power supply green
light on the system management card on the
front of the unit is also on.
Note
It takes up to 30 seconds for the system to
recognize the insertion or removal of a power
supply and change the LED on the system
Drive Sleds
Note
It takes up to 30 seconds for the
system to recognize the insertion or
1 2 3 4 5 6 7 8 9 10 11 12
Management Card
70
Hot swap hardware
Page 82

Appendix A Glossary
The following terms are only a few examples of the language used for Fibre Channel, SCSI and storage systems.
For more information, visit the websites of these professional organizations: the Fibre Channel Industry
Association
click on Fibre Channel; the Storage Area Networking Industry Association
Association
www.fibrechannel.org
www.scsita.org
.
; the Fibre Channel Consortium
www.iol.unh.edu/consortiums/index.html
www.snia.org
, or SCSI Trade
Fibre Channel technology
Fibre Channel (FC) is a serial communication
interface designed to transfer large amounts of data
among a variety of hardware systems over long
distances. It is becoming a key technology for
applications that require shared, high-bandwidth
access to storage.
Fibre Channel provides a logical point-to point serial
channel for the transfer of data between a buffer at a
source device and a buffer at a destination device. It
moves buffer contents from one port to another,
without regard to the format or meaning of the data,
allowing different upper level protocols to run over the
Fibre Channel connection.
The Fibre Channel architecture is a hierarchical set of
protocol layers. Defined within these layers are rules
for signal interfaces, serial encoding and decoding,
error control, frame format and communications
protocols. Fibre Channel provides a range of
implementation possibilities and purposely isolates
the transmission medium from the control protocol so
that each implementation may use the technology best
suited to the application.
Fibre Channel arbitrated loop (FC-AL) technology
allows 127 systems and devices to be distributed over
a range of up to 10 kilometers running at speeds of 1
gigabit/sec. Multiple FC-AL loops can be connected
via a fabric switch topology to extend the range.
SAN technology
A Storage Area Network (SAN) is a shared storage
architecture. SANs connect computers and storage
devices for online data access. Each connected system
can directly access any attached storage device. A
SAN maintains greater fault tolerance and load
balancing by supporting server clustering and fail-over
(the ability for one server to take over for another in
the event of a failure.
SCSI protocol
SCSI (pronounced scuzzy) stands for Small Computer
System Interface, a processor-independent standard
for system-level interface between a computer and
SCSI devices such as hard disks, CD-ROM and
printers, and to other computers and local area
networks.
The protocol has many standards specifying data
transfer rates, data width and speeds which allow SCSI
devices to exchange data and control signals with a
computer's CPU. Each device connected to a SCSI bus
must have a different SCSI ID.
Term Definition
arbitrate process of selecting one L_Port from a collection of ports which ask for use of the arbitrated
loop at the same time
arbitrated loop a loop topology in which two or more ports are interconnected, but only two ports can
communicate at one time
ATA Advanced Technology Attachment: A disk drive interface standard, formerly called IDE; the
ATA specification deals with the power and data signal interface of an integrated disk
controller and drive
auto negotiation hardware senses and automatically responds depending on configuration
CLI Command Line Interface: used by applications and advanced users to perform diagnostic
or configuration tasks; access is available through a computer terminal or terminal emulator
via connections to the RS-232 port or the optional Ethernet management services card via
the local area network using Telnet
fabric A FC switch or two or more FC switches interconnected to physically transmit data between
any two N_Ports on a switch or switches
A-i
ATTO Technology Inc. Diamond Storage Array Installation and Operation Manual
Page 83

Term Definition
F_port A port in the FC fabric where a N_port may attach
FC-AL Fibre Channel Arbitrated Loop: an FC network in which up to 126 systems and devices are
connected in a loop topology, with each transmitter connecting to the receiver of the device
to its logical right; multiple FC-AL loops can be connected via a fabric switch
FL-port A port in the FC fabric where a NL_port may attach in an arbitrated loop
firmware Software stored in read-only memory (ROM) or programmable ROM; easier to change than
hardware but more difficult to change than software stored on disk; firmware is responsible
for the behavior of the system when it is first switched on
GBIC A removable serial transceiver module which provides a connection between an external
FC interface and a host interface board
host a processor which communicates with devices over an interface
hot swapping Components are removed and replaced while the unit is running, with power to either the
component or a device connected to the unit
initiator device A component which originates a command
JBOD Just a Bunch of Disks: a storage subsystem of multiple independent disk drives
L_port a port in an arbitrated loop, either a NL_port or a FL_port
LED Light-emitting diode, a type of diode that emits light when current passes through it; visible
LEDs are used as indicator lights on the Diamond-VT
LUN Logical Unit Number: a SCSI or FC identifier of a device. A LUN is associated with a RAID
group or Virtual Drive.
N_port a port attached to a node used with point to point or fabric configurations
NL_ port a port attached to a node in FC arbitrated loop or fabric loop
originator an initiating device; a component which originates a command
partition a continuous range of addresses in a storage subsystem that appear as a logical unit; used
to subdivide and manage a storage subsystem
port an access point in a device: see N_port, NL_port, etc.
receiver the ultimate destination of data transmission; a terminal device
RAID originally Redundant Array of Inexpensive Disks, now Redundant Array of Independent
Drives: a storage system spanning multiple disk drives.
The following standard RAID specifications will be used here:
RAID 0: non-redundant striped array; drives are accessed alternately, as if stacked one on
top of the other; no data protection
RAID 1: mirrored arrays: information written to one disk is also written to another
simultaneously; provides complete data protection
RAID 10: striping of mirrored groups
RAID 5: striping across multiple disks offering redundancy by including a parity block in
every stripe; the parity block is used to reconstruct the data if a single drive in the
subsystem fails
SFP Small Formfactor Pluggable: a removable transceiver which provides the connection
between an external FC interface and a host interface
subpartition a convenient term used to describe the allocation nature of a partition; a partition may be
split into a number of subpartitions (each a partition in its own right) and a collection of
contiguous subpartitions may be merged into a partition
topology logical layout of the parts of a computer system or network and their interconnections
Virtual Drive
Virtual Drive ID a unique identifier associated with each Virtual Drive and displayed via CLI
the presentation of a collection of disk drives as a single logical disk, also known as a RAID group.
A-ii
Appendix
Page 84

Appendix B ATA Disk Technology
ATA is the dominant disk drive technology today and will be for the foreseeable future. It offers all the cost
advantages of a mass produced, consumer-driven technology which is rapidly being driven forward. Today ATA
also offers all the performance and reliability features needed to create high performance ATA-based disk storage
arrays.
We view ATA as the perfect disk drive technology for
“in-the-box” disk storage array solutions.
Aggregated Data Interface Technology (ADXT
™
)
with its built-in Virtual Device Manager (VDM), Data
Routing Fabric (DRF) and ATA Interface Engines
(AIE) smoothly and efficiently organizes Fibre
Channel data streams for storage or retrieval on ATA
disk drives. ADXT provides end users with the power
and sophisticated data control needed to take
moderately priced ATA disk drives combine them in a
disk storage array and power them to the performance
levels of SCSI or Fibre Channel disk arrays
Unlike other storage arrays which use expensive SCSI
or Fibre Channel disk drives to achieve performance,
the Diamond Series uses lower cost ATA disk drives
combined with an intelligent midplane to create a
storage array with exceptional price and performance
characteristics.
Disk features and standards
Feature IDE ATA SCSI Fibre Channel
Connectivity
•Max Devices
• Cable Length
Performance
• Bandwidth
• Bandwidth/drive
• Multi-threaded I/O
Max Initiators 1 1 <16 125...millions
Topology Bussed Bussed Bussed Loop/Fabric
Error Detection None Yes Yes Yes
Protocol “weight” very light light medium to heavy heavy
•Cost
•Interface
•Drives
Manageability none low to medium medium medium+
2
46 cm
16 MB/sec.
8 MB/sec.
No
n/a
n/a
ATA disk drives are used in the enormous PC
marketplace and an estimated 85% of all disk drives
sold today contain an ATA interface. Shipments of
ATA drives are expected to grow rapidly over the next
five years with increasing consumer and business
demand. In general, ATA disk drives are the “driver”
of all disk storage technology as the costs, volumes
and demands of the PC marketplace are the primary
focus of the world’s largest disk drive manufacturers.
ATA disk drives today offer capacities comparable to
SCSI and FC disk drives – although at a tremendously
lower cost. Advances in platter and head technology
will push drive capacity along a very steep curve in the
next five years. The chart below summarizes ATA and
other disk interface standards. It clearly indicates that
ATA drive technology offers characteristics that
ideally suit it for “in the box” usage in high capacity,
high performance disk arrays.
2
46 cm
100 MB/sec.
33 MB/sec.
Yes
lowest
lowest
16
25 m
160 MB/sec.
10 MB/sec.
Yes
medium to high
medium to high
126...millions
10 km
200 MB/sec.
1.6 MB/sec.
Yes
highest
medium to high
A-iii
ATTO Technology Inc. Diamond Storage Array Installation and Operation Manual
Page 85

Appendix C Information Command Returns
Driveinfo
Sled Capacity Errors TYPE
=== ======
1 76292MB 0 JBOD 1 76292MB 0 JBOD 13
2 76292MB 0 JBOD 2 76292MB 0 JBOD 14
3 76292MB 0 JBOD 3 76292MB 0 JBOD 15
4 76292MB 0 JBOD 4 76292MB 0 JBOD 16
5 76292MB 0 JBOD 5 76292MB 0 JBOD 17
6 76292MB 0 JBOD 6 76292MB 0 JBOD 18
7 76292MB 0 JBOD 7 76292MB 0 JBOD 19
8 76292MB 0 JBOD 8 76292MB 0 JBOD 20
9 76292MB 0 JBOD 9 76292MB 0 JBOD 21
10 76292MB 0 JBOD 10 76292MB 0 JBOD 22
11 76292MB 0 JBOD 11 76292MB 0 JBOD 23
12 73307MB 0 JBOD 12 73307MB 0 JBOD 24
DriveInfo 7 2
JBOD VDID 19
Sled = 7, Drive = 2
Drive Model: Maxtor 98196H8
S/N: V80D15GC F/W Rev: ZAH814Y0 ATA Rev: 007e
Capacity: 76292 MB (09502790 blocks)
PIO: 03 MDMA: 07 UDMA: 07 QD: 00 CMDSet: 7c69 4309
Operations Blocks
Read 00000000 00000000
Write 00000000 00000000
Errors 00000000
..
===== ===== ===== ====== ===== =====. =====
...
VDID Capacity Errors TYPE VDID
DriveInfo RAID10 3
========= Drive 1 =========== ========= Drive 2 ==============
Sled Capacity Errors TYPE VDID Capacity Errors TYPE VDID
=== ====== ====== ===== ==== ======= ==== ====== ======
1 76292MB 0 RAID10 56 76292MB 0 RAID10 56
2 76292MB 0 RAID10 56 76292MB 0 RAID10 56
3 76292MB 0 RAID10 56 76292MB 0 RAID10 56
4 76292MB 0 RAID10 56 76292MB 0 RAID10 56
5 76292MB 0 RAID10 57 76292MB 0 RAID10 57
6 76292MB 0 RAID10 57 76292MB 0 RAID10 57
7 76292MB 0 RAID10 57 76292MB 0 RAID10 57
8 76292MB 0 RAID10 57 76292MB 0 RAID10 57
9 76292MB 0 RAID10 58 76292MB 0 RAID10 58
10 76292MB 0 RAID10 58 76292MB 0 RAID10 58
11 76292MB 0 RAID10 58 76292MB 0 RAID10 58
12 73307MB 0 RAID10 58 73307MB 0 RAID10 58
DriveInfo 7 2
RAID10 VDID 57 State: ONLINE
RAID10 Member Index 5 of total members 8 disks
RAID10 Interleave Size 128 Blocks
Sled = 7, Drive = 2
Drive Model: Maxtor 98196H8
S/N: V80D15GC F/W Rev: ZAH814Y0 ATA Rev: 007e
Capacity: 76292 MB (09502790 blocks)
PIO: 03 MDMA: 07 UDMA: 07 QD: 00 CMDSet: 7c69 4309
Operations Blocks
A-iv
Page 86

Read 00000000 00000000
Write 00000000 00000000
Errors 00000000
LunInfo for a JBOD setup
LUN TYPE State Capacity Errors SerialNumber
=== ==== ===== ======= ==== ============
0 Processor ONLINE 0MB .0
1 JBOD ONLINE 76292MB 0 V80EE4YCXAI0000
2 JBOD ONLINE 76292MB 0 V80EE4HCXAI0000
3 JBOD ONLINE 76292MB 0 V80DTESCXAI0000
4 JBOD ONLINE 76292MB 0 V80DTCWCXAI0000
5 JBOD ONLINE 76292MB 0 V80EE4TCXAI0000
6 JBOD ONLINE 76292MB 0 V80CG4RCXAI0000
7 JBOD ONLINE 76292MB 0 V80D44LCXAI0000
8 JBOD ONLINE 76292MB 0 V80DTCXCXAI0000
9 JBOD ONLINE 76292MB 0 V80DTELCXAI0000
10 JBOD ONLINE 76292MB 0 V80ED9GCXAI0000
11 JBOD ONLINE 76292MB 0 V80CFVHCXAI0000
12 JBOD ONLINE 73307MB 0 YSDYSG9HXAI0000
13 JBOD ONLINE 76292MB 0 V80EE4GCXAI0000
14 JBOD ONLINE 76292MB 0 V80EE5LCXAI0000
15 JBOD ONLINE 76292MB 0 V80DTDTCXAI0000
16 JBOD ONLINE 76292MB 0 V80DTDLCXAI0000
17 JBOD ONLINE 76292MB 0 V80EE4PCXAI0000
18 JBOD ONLINE 76292MB 0 V80CLN4CXAI0000
19 JBOD ONLINE 76292MB 0 V80D15GCXAI0000
20 JBOD ONLINE 76292MB 0 V80DTDRCXAI0000
21 JBOD ONLINE 76292MB 0 V80DTDYCXAI0000
22 JBOD ONLINE 76292MB 0 V80EE5ECXAI0000
23 JBOD ONLINE 76292MB 0 V80CG2GCXAI0000
24 JBOD ONLINE 73307MB 0 YSDYSG9MXAI0000
LunInfo 13
ATADisk
SerialNumber V80EE4GC XAI0000
Sled = 1, Drive = 2
Drive Model: Maxtor 98196H8
S/N: V80EE4GCXAI0000 F/W Rev: ZAH814Y0 ATA Rev: 007e
Capacity: 76292 MB (09502790 blocks)
PIO: 03 MDMA: 07 UDMA: 07 QD: 00 CMDSet: 7c69 4309
Operations Blocks
Read 00000000 00000000
Write 00000000 00000000
Errors 00000000
LunInfo for a RAID10 3
LUN TYPE State Capacity Errors SerialNumber
=== ==== ===== ======== ===== ============
0 Processor ONLINE 0MB 0
1 RAID10 ONLINE 305171MB 0 V80EE4YCAAL0000
2 RAID10 ONLINE 305171MB 0 V80EE4TCAAL0000
3 RAID10 ONLINE 293231MB 0 V80DTELCAAL0000
LunInfo 2
RAID10
SerialNumber V80EE4TCAAL0000
Virtual Drive ID 57, Capacity: 305171 MB (0x00025409e00 blocks)
Operations Blocks
Read 00000000 00000000
A-v
ATTO Technology Inc. Diamond Storage Array Installation and Operation Manual
Page 87

Write 00000000 00000000
Errors 00000000
LunInfo for a RAID5 1 configuration
LUN TYPE State Capacity Errors SerialNumber
=== ==== ===== ====== ==== ============
0 Processor ONLINE 0MB 0
1 RAID5 ONLINE 1612749MB 0 V80EE4YC5AM0000
LunInfo 1
RAID5
SerialNumber V80EE4YC5AM0000
Virtual Drive ID 59, Capacity: 1612749 MB (0x000c4de6f00 blocks)
Operations Blocks
Read 00000000 00000000
Write 00000000 00000000
Errors 00000000
LunInfo for a RAID5 4 configuration
LUN TYPE State Capacity Errors SerialNumber
=== ==== ===== ======== ==== ============
0 Processor ONLINE 0MB 0
..
1 RAID5 ONLINE 305167MB 0 V80EE4YC5AN0000
2 RAID5 ONLINE 305167MB 0 V80DTCWC5AN0000
3 RAID5 ONLINE 305167MB 0 V80D44LC5AN0000
4 RAID5 ONLINE 293227MB 0 V80ED9GC5AN0000
LunInfo 4
RAID5
SerialNumber V80ED9GC5AN0000
Virtual Drive ID 62, Capacity: 293227 MB (0x00023cb5a00 blocks)
Operations Blocks
Read 00000000 00000000
Write 00000000 00000000
Errors 00000000
Part ID Name VDID LUN Capacity StartVDLBA
===== ==== ==== ===
0 0000 59 1 7629
1 0001 59 5 7629
2 0002 59 6 7629
3 0003 59 7 7629
0 0000 60 2 30516
0 0000 61 3 30516
0 0000 62 4 29322
...
====== ==========
.....
1MB
.....
0x0000000000
.....
1MB
.....
0x0009501f00
.....
1MB
.....
0x0012a03e00
.....
2MB
.....
0x001bf05d00
....
7MB
.....
0x0000000000
....
7MB
.....
0x0000000000
....
7MB
.....
0x0000000000
PartitionInfo active 59 1
Part ID
......
Name VDID LUN Capacity StartVDLBA
======= ==== ==== === ======== ==========
0
..........
0000 59
TYPE VDID #Parts State Capacity
====== ==== ====== ======= ======= ..=========
RAID5 ....59 4
RAID5 60 1
RAID5 61 1
RAID5 62 1
......
............
............
............
............
1 76291MB 0x0000000000
....
Serial Number
ONLINE 305165MB V80EE4YC5AN
ONLINE 305167MB V80DTCWC5AN
ONLINE 305167MB V80D44LC5AN
ONLINE 293227MB V80ED9GC5AN
A-vi
Page 88

Volume Partition Total % Capacity Write
ID LUN VDID ID Capacity Used Protection
===============================================
059 - 59 0 3439315MB 0% disabled
Ready.
TapeVolumeInfo 059
Volume ID : 059
LUN :
VDID : 59
Partition ID : 0
Device Kind : RAID5
Device State : OFFLINE
Total Capacity : 3439315MB
% Capacity Used : 0%
Write Protection : disabled
Primary Volume ID : G80FQC2E____________5AA0000
Volume Sequence Number : 0
VirtualDriveInfo
TYPE VDID #Parts State Capacity
====== ==== ====== ======= ======= ..=========
RAID5 59 4
RAID5 60 1
RAID5 61 1
RAID5 62 1
............
............
............
............
ONLINE 305165MB V80EE4YC5AN
ONLINE 305167MB V80DTCWC5AN
ONLINE 305167MB V80D44LC5AN
ONLINE 293227MB V80ED9GC5AN
....
Serial Number
VirtualDriveInfo active 59
TYPE VDID #Parts State Capacity
====== ==== ==== ====== =======
RAID5 59 4
VirtualDriveInfo active 59
TYPE VDID #Parts State Capacity
====== ==== ==== ====== =======
RAID5 59 4
Verbose return
.......
ONLINE 305165MB V80EE4YC5AN
.......
ONLINE 305165MB V80EE4YC5AN
.....
Serial Number
= ....
==========
.....
Serial Number
= ....
==========
ZoneInfo
ZoneInfo abcd
Zone: abcd disabled
Host: Remaining
IID: none
Port: 0
Device: 123
ZoneInfo 1234
Zone 1234 disabled
Host: 20:00:00:10:86:00:21:12
IID: none
Port: 0 1
Device: 3 4 5 6
ZoneInfo 1
Zone: zone1 enabled
Host: 20:00:00:10:00:00:00
IID: none
Port: 1
Device: 12345
A-vii
ATTO Technology Inc. Diamond Storage Array Installation and Operation Manual
Page 89

A-viii
Page 90

Appendix D Sample Zoning Command Sequences
First time configuration (after download)
QuickRAID under Zoning “first time” configuration,
an all/all/all configuration in the selected QuickRAID
configuration. All zone commands except
ZoneClearAll
ZoneCommit
Clears any previously-defined zones
Sets the new zoning configuration.
Simple configuration
2 hosts. Hosts can use different operating systems. All
zone commands except
ZoneClearAll
ZoneCreate zone_1
ZoneAddHost zone_1 20:00:00:10:86:00:01:34
ZoneAddDevice zone_1 1 4
ZoneAddPort zone_1 0
ZoneCreate zone_2
ZoneAddHost zone_2 20:00:00:60:00:00:12:34
ZoneAddDevice zone_2 7
ZoneAddPort zone_2 1
ZoneState zone_1 enabled
ZoneState zone_2 enabled
ZoneCommit
ZoneCommit
affect only the
Clears any previously defined zones from the planned
configuration.
Creates a zone named zone_1
Adds host WWPN to zone_1
Adds LUN 1 and 4 to zone_1
LUN 1 and LUN 4 will be available through HIC 0 for only the host
in zone_1
Creates a zone named zone_2
Adds host WWPN to zone_2
Adds LUN 7 to zone_2
LUN 7 will be available through HIC 1 for only the host in zone_2
Enables zone_1.
Enables zone_2.
Sets the Planned Zoning Configuration into the Active
configuration. No other LUNs will be available to any host.
ZoneCommit
ZoneCommit
Active Configuration
planned configuration.
affect only the planned configuration.
sets the Planned Configuration into the
.
ZoneCommit
sets the Planned
Configuration into the Active Configuration.
Symmetric Model
1 host, 1 switch. All host ports travel through a switch
to both Diamond ports. Zoning is not required, since
there is no reason to restrict host/HBA/Port access. All
ZoneClear all
ZoneCommit
A-ix
ATTO Technology Inc. Diamond Storage Array Installation and Operation Manual
Clears any previously-defined zones from the planned configuration
Copies what is in the Planned Zoning Configuration to the Active Configuration: in this case, clears
any previously-defined zones.
zone commands except
planned configuration.
ZoneCommit
ZoneCommit
affect only the
sets the Planned
Configuration into the Active Configuration.
Page 91

Asymmetric Model
3 hosts, 1 metadata controller (also a host), RAID 5
with 3 LUNs. All zone commands except
affect only the planned configuration.
ZoneClearAll
ZoneCreate zone_1
ZoneAddHost zone_1 20:00:00:10:86:00:01:34
ZoneAddHost zone_1 20:00:00:10:10:10:86:01
ZoneAddDevice zone_1 1 2
ZoneAddPort zone_1 0
ZoneCreate zone_2
ZoneAddHost zone_2 20:00:00:60:32:01:02:12
ZoneAddHost zone_2 20:00:00:10:10:10:86:01
ZoneAddDevice zone_2 1 2
ZoneAddPort zone_2 0
ZoneCreate zone_3
ZoneAddHost zone_3 20:00:00:08:11:01:22:22
ZoneAddHost zone_3 20:00:00:10:10:10:86:01
ZoneAddDevice zone_3 3
ZoneAddPort zone_3 1
ZoneState zone_1 enabled
ZoneState zone_2 enabled
ZoneState zone_3 enabled
ZoneCommit
ZoneCommit
ZoneCommit
sets the Planned Configuration into the Active
Configuration.
Clears any previously defined zones
Creates a zone named zone_1
Adds host 1 WWPN to zone_1
Adds metadata controller host WWPN to zone_1
Adds LUN 1 and LUN 2 to zone_1
LUN 1 and LUN 2 will be available through HIC 0 for only the
hosts in zone_1
Creates a zone named zone_2
Adds host 2 WWPN to zone_2
Adds metadata controller host WWPN to zone_2
Adds LUN 1 and LUN 2 to zone_2
LUN 1 and LUN 2 will be available through HIC 0 for only the
hosts in zone_2
Creates a zone named zone_3
Adds host WWPN to zone_3
Adds metadata controller host WWPN to zone_3
Adds LUN 3 to zone_3
LUN 3 will be available through HIC 1 for only the hosts in zone_3
Enables Zone_1.
Enables Zone_2.
Enables Zone_3.
Sets the Planned Zoning Configuration into the Active
configuration. No other LUNs will be available to any host.
A-x
Appendix
Page 92

Combined Symmetric/Asymmetric Model
Many hosts. All zone commands except
affect only the planned configuration.
ZoneClearAll
ZoneCreate zone_1
ZoneAddHost zone_1 20:00:00:10:86:00:01:34
ZoneAddHost zone_1 20:00:00:10:10:10:86:01
ZoneAddDevice zone_1 1 2
ZoneAddPort zone_1 0
ZoneCreate zone_2
ZoneAddHost remaining
ZoneAddDevice zone_2 3 4 5 6
ZoneAddPort zone_2 1
ZoneState zone_1 enabled
ZoneState zone_2 enabled
ZoneCommit
ZoneCommit
ZoneCommit
sets the Planned Configuration into the Active
Configuration.
Clears any previously defined zones
Creates a zone named zone_1
Adds host 1 WWPN to zone_1
Adds host 2 WWPN to zone_1
Adds LUN 1 and LUN 2 to zone_1
LUN 1 and LUN 2 will be available through HIC 0 for only the
hosts in zone_1
Creates a zone named zone_2
Allows all other hosts (not host 1 or host 2) access to zone_2
Adds LUNs 3, 4, 5 and 6 to zone_2
LUNs 3, 4, 5 and 6 will be available through HIC 1 for all hosts in
zone 2 (excludes host 1 and host 2)
Enables Zone_1
Enables Zone_2
Sets the Planned Zoning Configuration into the Active
configuration. No other LUNs will be available to any host.
A-xi
ATTO Technology Inc. Diamond Storage Array Installation and Operation Manual
Page 93

Appendix E Specifications
Environmental and physical
• Humidity: 10-85% non-condensing
• Normal operating temperature at sea level: 5-
o
40
C
• Storage temperature: -25-60
• AC input voltage 100-240V rated
• 50/60 Hz
o
C
Rack Mount Dimensions
• Height: 131mm (5.16”) 3U
• Width: 447mm (17.60”)
• Depth: 585mm (23.03”)
• Approximately 39 kg (86 pounds) fully loaded
with 24 drives
Floor Mount Dimensions
• Height: 524mm (20.62”) 3U
• Width: 137mm (5.39”)
• Depth: 595mm (23.42”)
• Approximately 42 kg (92 pounds) fully loaded
with 24 drives
A-xii
Appendix
Page 94

Appendix F Product Safety
s
Safe handling of the Diamond-VT will help protect its components as well as the people working with them.
• The Diamond-VT is heavy (92 pounds for the
floor model, 86 pounds for the rack mount
system). Two people will be needed to move it
safely.
• Mechanical, shock and energy hazards are
present through the system if one or more of the
modules is removed. There are no operatorserviceable components inside the unit except
those indicated in
67 and
69of this manual.
• This equipment must be connected to a
protective earth ground in accordance with the
instructions provided in this guide. Improper
grounding may result in an electrical shock.
Power Swi tch Positi on
On Stand-by
AC power cord from the back of the unit from
both power supply inputs. The switch on the
power supply is only a standby switch and does
not disconnect the AC from the system.
Hot Swap Operating Instructions
CAUTIONCAUTION
All modular components must be replaced
by qualified personnel only.
Hardware Maintenance
• When the power supply
green LED is on, the power
source is fully operational,
delivering power to the
system. The only way to
completely disconnect from
the system is to remove the
on page
on page
• This unit is designed to only have inside
communication lines connected to it (no lines
outside the building proper).
• The Diamond-VT must be provided with
adequate air flow. To reduce the risk of damage,
the ambient temperature of the inlet air should
not exceed 40
• Service personnel must follow proper grounding
methods when working with or around the
system because of the Diamond-VT’s
electrostatic sensitive components. Use a static
wriststrap when handling any components from
the Diamond-VT.
o
C.
Safety compliances
• UL 1950 3rd Edition
• CSA 22.2 No. 950-95
• LEDs and fibre GBIC are Class 1 Laser Rated
EMC specifications
• EN 55022: class A
• EN 50204 RF Immunity 900 MHz Pulse
• EN 61000-4-8 Magnetic Immunity
• EN 61000-4-2: ESD
• EN 61000-4-3: Radiated Immunity
• EN 61000-4-4: EFT
• EN 61000-4-5: Surge
• EN 61000-4-6: Conducted Immunity
• EN 61000-4-11: Voltage Dips and Interruptions
Radio and television interference
WARNING
This equipment has been tested and found to comply with the limits for a Class A digital device,
pursuant to Part 15 of the FCC rules. These limits are designed to provide reasonable protection
against harmful interference in a commercial environment. This equipment generates, uses and
can radiate radio frequency energy and, if not installed and used in accordance with the
instruction manual, may cause harmful interference to radio communications. Operation of this
equipment in a residential area is likely to cause harmful interference in which case the user will
be required to correct the interference at his own expense.
A-xiii
ATTO Technology Inc. Diamond Storage Array Installation and Operation Manual
Page 95

Appendix G Part numbers
Each Diamond-VT has a master part number to identify it. The floor model base number is on the side of the unit.
The rack mount part number is on the top of the unit and near the host interface cards.
Description All models
System management card (Ethernet) MGMT-ETHR-001
System management card (RS-232) MGMT-R232-001
*
Cable, 3 meter copper FC (unequalized) (1 Gb FC) CBL-FCCU-003
*
Cable, 10 meter copper FC (unequalized) (1GbFC) CBL-FCCU-010
*
Cable, 10 meter Fibre (1 Gb FC) CBL-FCFI-010
*Cable, 3 meter optical LCLC (2 Gb FC) CBL-LCLC-003
*Cable, 10 meter optical LCLC (2 Gb FC) CBL-LCLC-010
*Cable, 3 meter SCSI VHDC CBL-V68E-003
*Cable, 30 meter Fibre Channel (1Gb FC) CBS-FCFI-030
CPCI Filler panel, 3U CPCI-PANL-003
Blower assembly DBLA-A001-000
Drive card, dummy DDSL-0000-000
Dual Disk Drive Sled Assembly, 150 GB DDSL-150G-000
Dual Disk Drive Sled Assembly, 160 GB DDSL-160G-M00
DDSL160G-J00
Dual Disk Drive Sled Assembly, 320 GB DDSL-320G-M00
Host Interface Card (GBIC Fibre Channel) EPCI-FCCU-001
Host Interface Card (2 gigabit) Class 1 laser rated EPCI-FCCU-002
Host Interface Card (Ultra 160 SCSI) DHIC-U160-BLK
Power supply DPWR-A001-001
*
GBIC-DB9 (copper) AMP 788615-1 (1Gb FC) GBIC-DB90-000
*
GBIC-SW SC cnctr Class 1 laser rated (1Gb FC) GBIC-SWFO-000
*Connector, SFP optical Class 1 laser rated (2 Gb FC) SFP2-0000-000
*Terminator, 68-pin VHDCI TERM-V68E-002
*All parts UL recognized
A-xiv
Page 96

Appendix H Warranty
Manufacturer limited warranty
Manufacturer warrants to the original purchaser of this
product that it will be free from defects in material and
workmanship as described in the ATTO Technology
website, www.attotech.com. Manufacturer liability
shall be limited to replacing or repairing, at its option,
any defective product. There will be no charge for
parts or labor should Manufacturer determine that this
product is defective.
Products which have been subject to abuse, misuse,
alteration, neglected, or have been serviced, repaired
or installed by unauthorized personnel shall not be
covered under this warranty provision. Damage
resulting from incorrect connection or an
inappropriate application of this product shall not be
the responsibility of Manufacturer. Manufacturer’s
liability is limited to Manufacturer’s product(s);
damage to other equipment connected to
Manufacturer’s product(s) will be the customer’s
responsibility.
This warranty is made in lieu of any other warranty,
express or implied. Manufacturer disclaims any
implied warranties of merchantability or fitness for a
particular purpose. Manufacturer’s responsibility to
repair or replace a defective product is the sole and
exclusive remedy provided to the customer for breech
of this warranty. Manufacturer will not be liable for
any indirect, special, incidental, or consequential
damages irrespective of whether Manufacturer has
advance notice of the possibility of such damages. No
Manufacturer dealer, agent or employee is authorized
to make any modification, extension or addition to this
warranty.
Contact ATTO Technology, Inc.
Customer service, sales information and technical support are available by phone Monday through
Friday, Eastern Standard Time 8:00 a.m. to 8:00 p.m., or by fax and web site 24-hours a day.
ATTO Technology, Inc.
155 CrossPoint Parkway
Amherst, New York 14068
(716) 691-1999 • voice
(716) 691-9353 • fax
http://www.attotech.com/diamond
ATTO Technology can also be reached via e-mail at the following addresses:
Sales Support: sls@attotech.com
Technical Support: techsupp@attotech.com
A-xv
ATTO Technology Inc. Diamond Storage Array Installation and Operation Manual
 Loading...