

Page 1
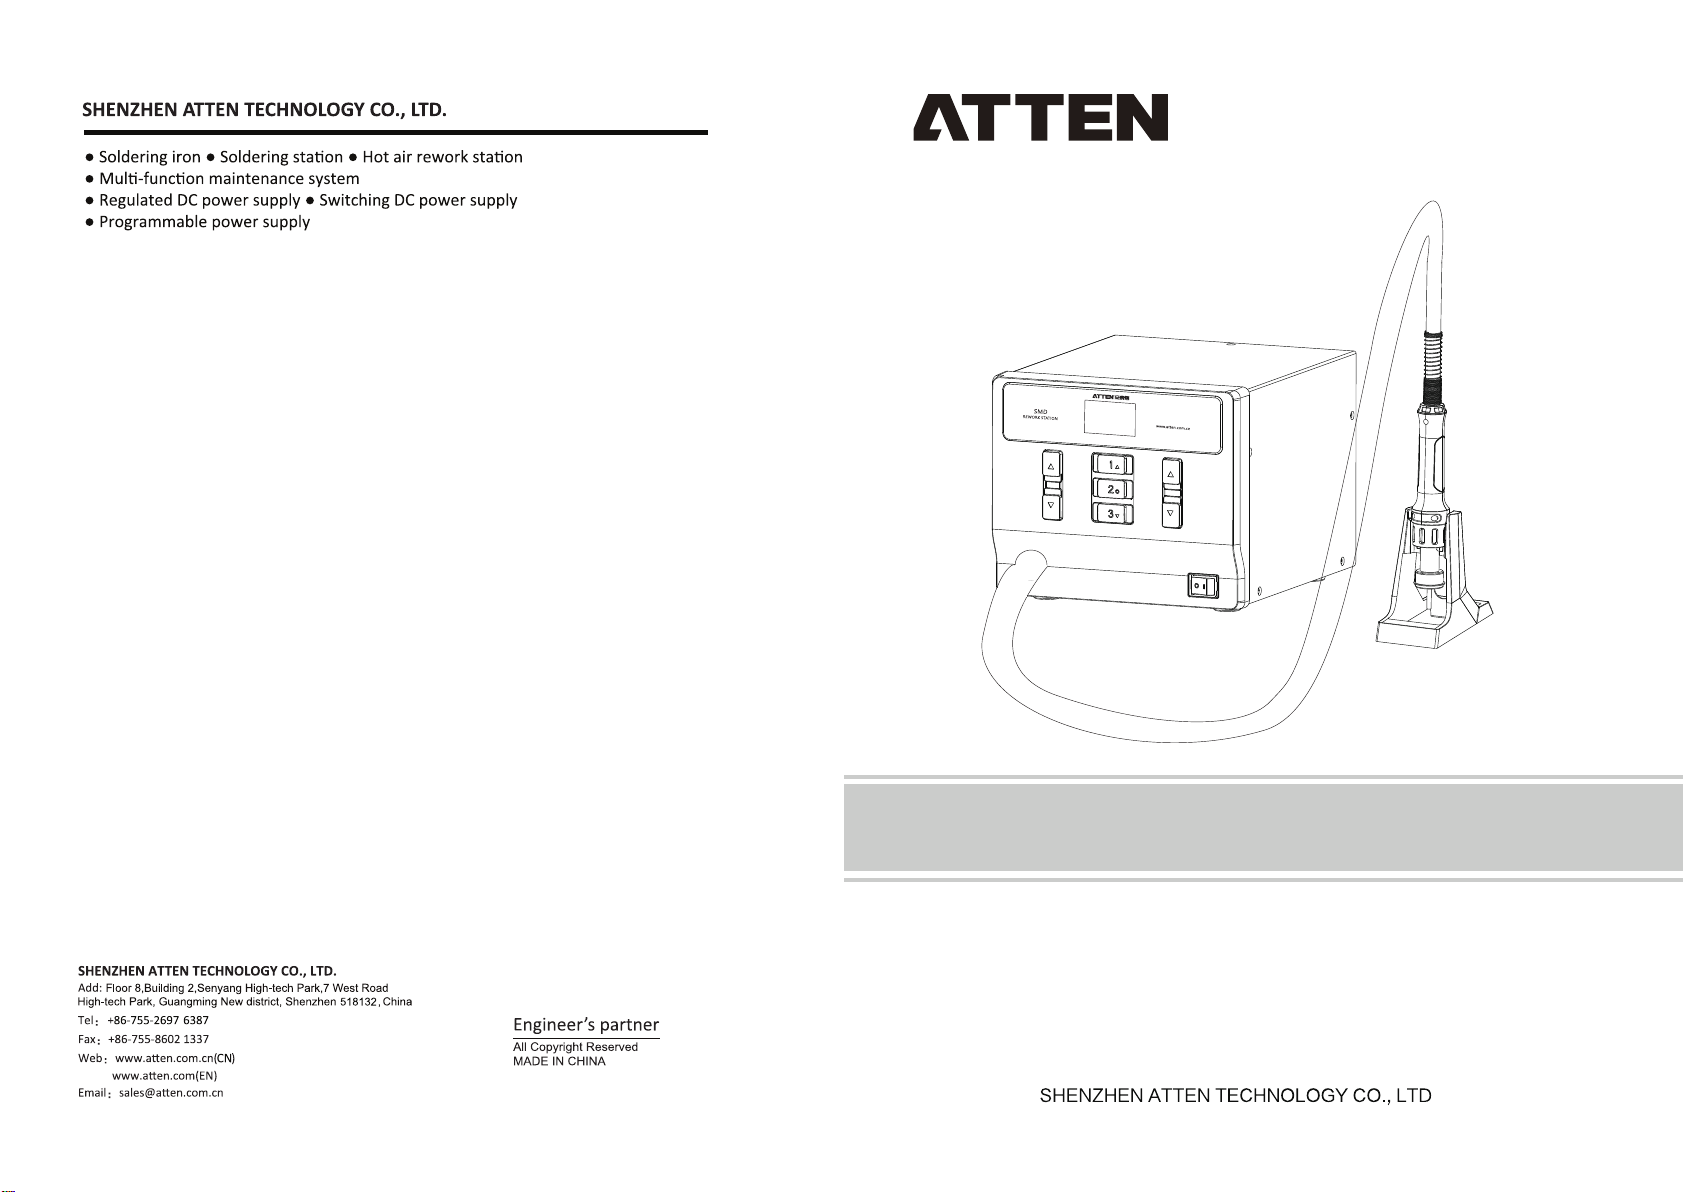
ST-86 2D
ST-862D Hot Air Station User Manual
CBN 031661(F )
Page 2
9. Start mode options (S-S) : Heating-up start mode option, there are two
options available
Nor: Normal (Default)
The standby function is not turn on or entered to standby mode: the device turn
on/off is control by handle button, press once to open,press again to close.
f
o
Enter to standby mode
The standby function has been turn on but not enter to standby mode: the output
is control by handle seat, the handle will start immediately when remove from the
handle seat;return handle to handle seat to turn off output
For: In forced mode, turn on/off the device is only control by handle remove/return
to handle seat. the handle will start immediately when remove from the handle seat;
return handle to handle seat to turn off output. The standby function is forbid under
this mode.
f
101
Page 3
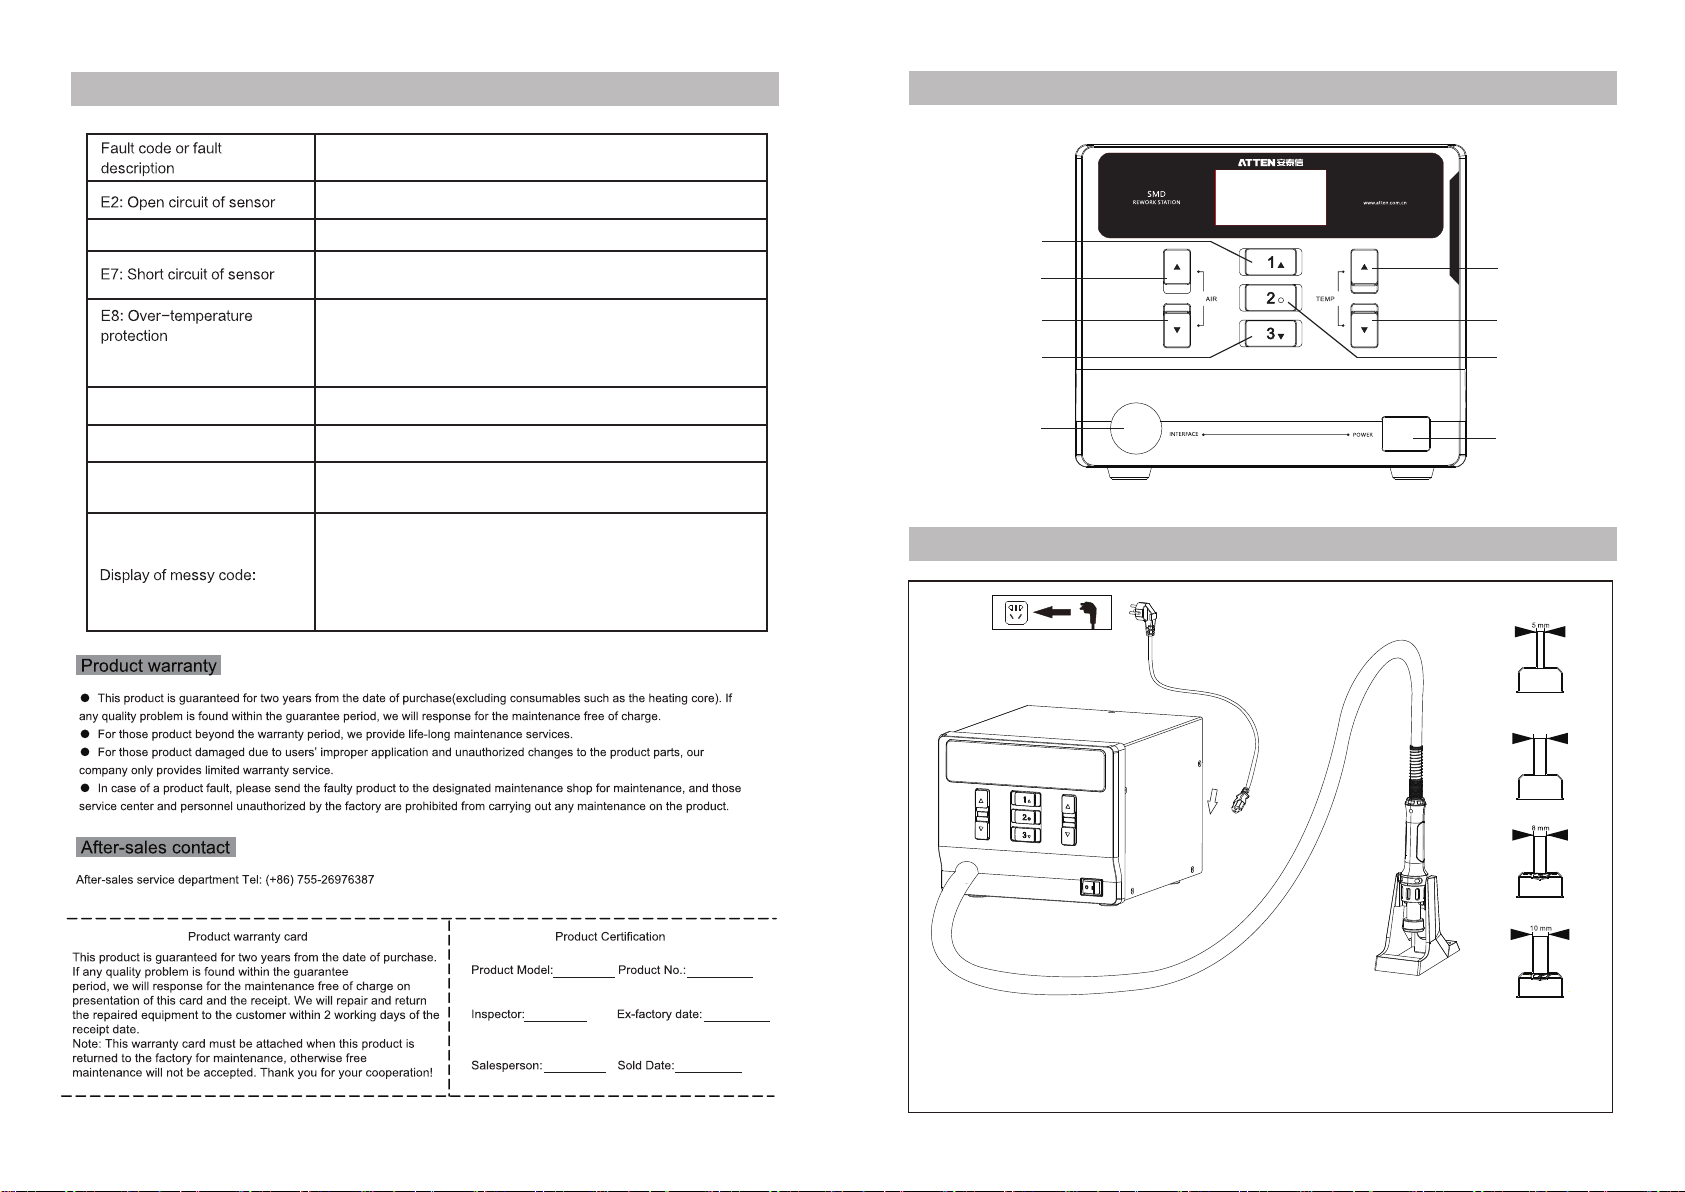
Error information
Like ly c auses o f th e fau lt s an d sol ut io n
Poor contact of air gun connector or handle,please change heater
The zero-cross circuit is damaged,please return to factory repair
The short circuit occurs to the temperature sensor in the heating core;
or heating core open circuit.pleas replace theheating core.
Schematic Diagram of the Whole Equipment
Shortcut Key 1/
Menu Key/
Menu Turn-up Key
Blowing Plus Key
ST-86 2D
ST-86 2D
Temp Plus Key
E10:Heater overheating
E11: Fa n bro ken
E13: The heating output
switch component was failed
1. Th e tem pe ratur e se nsor is a bn orm al ; pl eas e re place t he
heat in g core.
2. Th e tem pe ratur e of h eatin g co re is too h ig h; af te r th e hea ti ng
core i s co ol, res ta rt the ma ch ine .
solu ti on : retu rn t o facto ry m ain te na nce
solu ti on : retu rn t o facto ry m ain te na nce
The he at ing out pu t switc h co mpo ne nt w as fa il ed, the c om ponen t
has be en b roken b y sh ort c ir cu it, pl ea se re tu rn to fac to ry repa ir .
1.In c as e there i s st rong in te rfe re nc e sou rc e from th e ou tside
envi ro nment , pl eas e ch an ge th e ap plica ti on envi ro nme nt o r
evac ua te from t he i nterf er enc e ar ea .
2.In c as e the int er nal cir cu it is a
equi pm ent ton t he d esi gn at ed af te r- sal es o utlet f or maint en anc e.
bnor ma l, plea se s end t he
Blowing Minus Key
Shortcut Key 1/
Menu Key/
Menu Turn-down Key
Hot Air Handle
Interface
Connection Diagram for the Whole Equipment
Power cord
ST-862D host
Temp Minus Key
Shortcut Key 2/
Menu Exit Key
Powe r Key
4x Spray nozzle
A2605
6.5mm
A2664
hot air gun
B2608
holder
B2610
Packing list: ST-862D hot air station 1PCS +hot air gun holder 1PCS+ 4PCS Spray nozzles
+ 1PCS Power cord + 1PCS ground wire + 1PCS Manual+1PCS nozzle converter
Note: The hot air handle connected with host well before sell.
9
2
Page 4
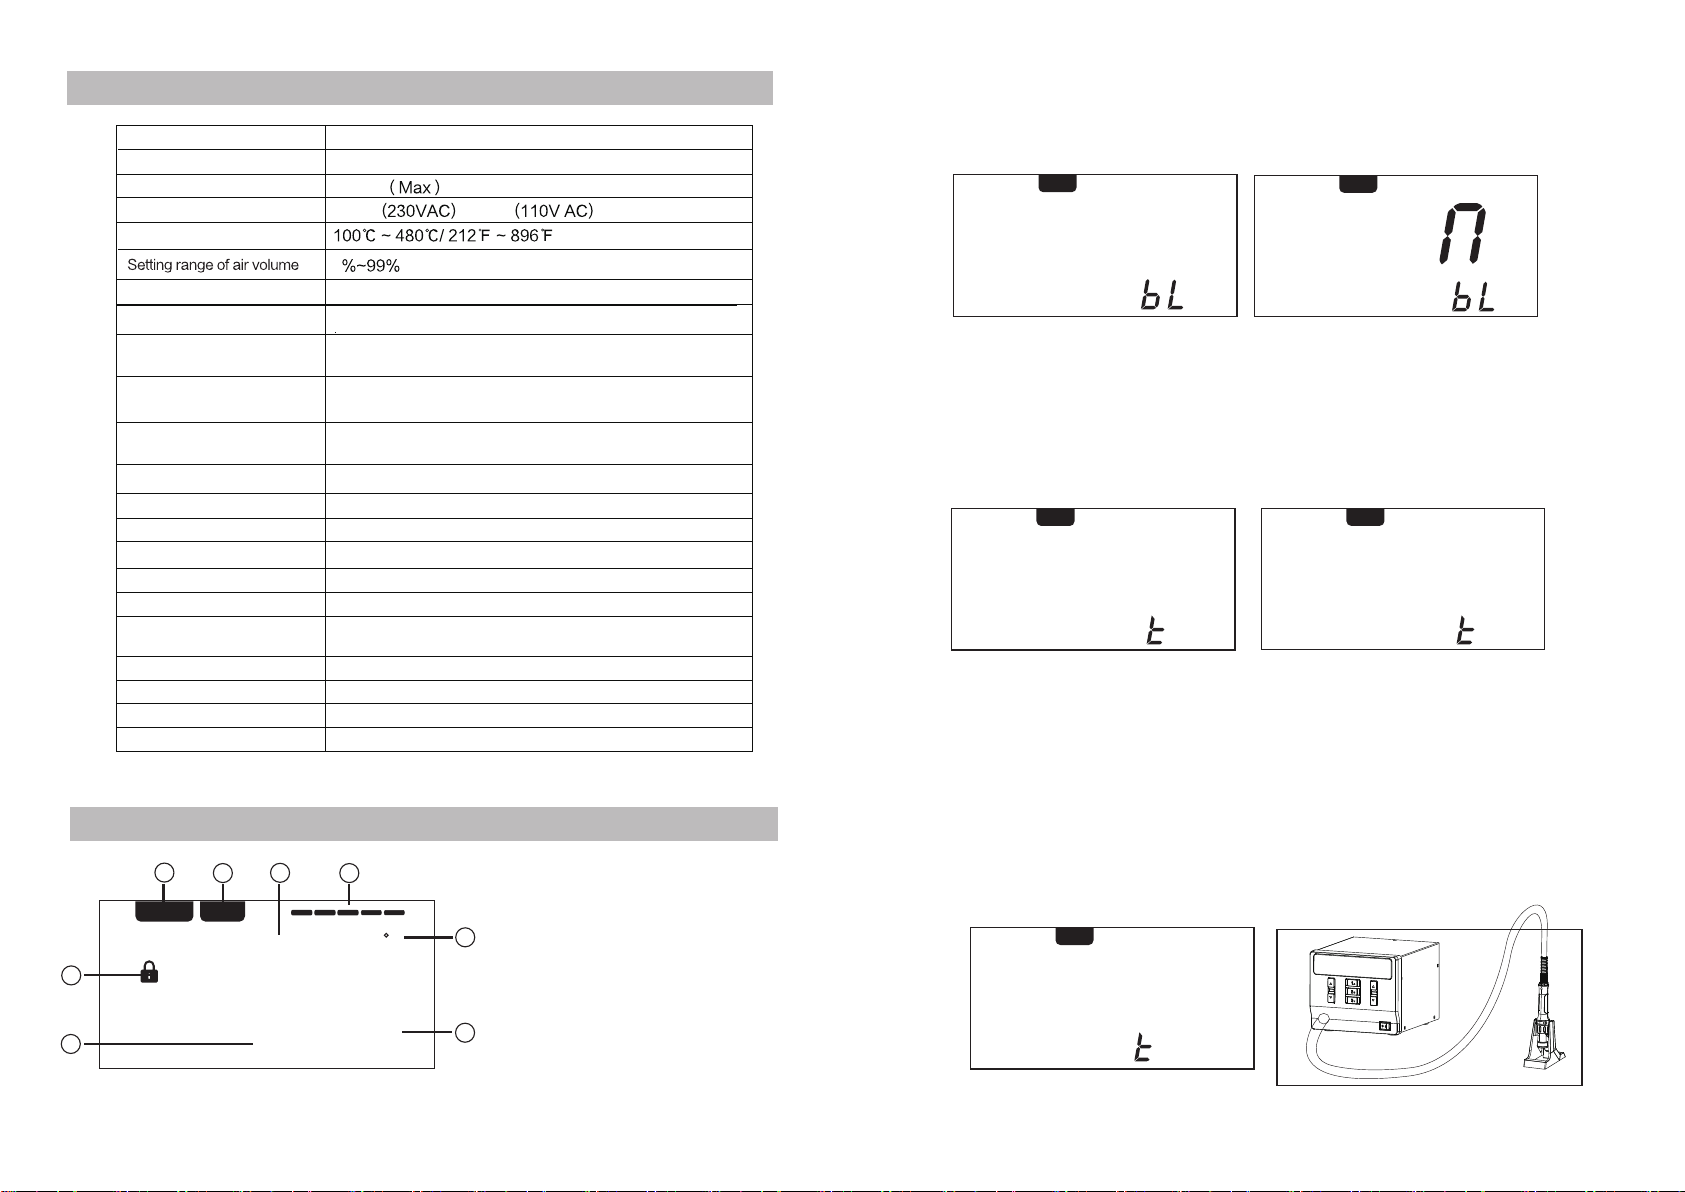
Technical Data
Model:
Voltage
Power
Fuse type
Temperature range:
Temperature unit
Air flow
Standby heater
cooling function
Abnormal detection of
heating element
Abnormal detection of
temperature sensor
Beep alarm function
Quick function
Temperature compensation
Heating status display
Temperature adjustment
Air flow adjustment
Shortcut temperature/
air flow
Working conditions
Storage conditions
Dimension
Weight
LCD Description
1
REAL SET
5
8 8
6
3
2
. .
8 8
ST-86 2D
AC23 0V± 10% 5 0Hz ( 110V±10% 60 Hz Op tio nal )
1000 W
T6.3 A
1
°C/°F (default °C)
20~1 30L /mi n
Supp ort
Heating element remove detection; heating element open
circuit detection; heating element overheating detection
Temperature sensor open circuit detection
Available
3 sets shortcut temperatures
±50°C/±90°F
5 dynamic simulate bars
10 digits (Coarse)/1 digit (Fine-tuning)
2 digits (Coarse)/1 digit (Fine-tuning)
3 sets shortcut temperatures/air flow for quick selection
Temperature 0-40°C, relative humidity <80%
Temperature -20-80°C, relative humidity <80%
208(L)x175(W)x150(H)mm
About 3340g
4
E
.
8
%
. .
8.8
.
T12A
1. REAL : Real Temperature status
2. SET : Start up and set temperature
status
8
3. Actual temperature value
4. Display bar for heating power
status
5. Symbol for lock
7
6. Display settings value
7. Air flow percentage
8. Temperature unit
6. Button Beeping Function
Under menu BL mode, user can turn on/ off the beeping function by pressing “▲”or
“▼”key.Refer Pic.1-16, OFF disable beeping function;Refer Pic.1-17, ON enables beeping
function.
REAL SET
O F F
FIG. 1-16 FIG. 1-17
7. Defining Work Function
Under menu HTO mode, it can adjust time of defining work by pressing “▲”or“▼”
key (FIG. 1-18, the time of defining work is 20 seconds, “0” means turn off defining work
function, the minimum setting time for defining work is 10 seconds, maximum setting
time is 900 seconds. ); it can turn up or down menu by pressing Button “1” or “3”,
then press Button “2” to exit and save your setting.
REAL SET
2
0
0
h
FIG. 1-18
8. Standb y Function
Under Menu STBY, that press button can adjust standby function. (Pic.1-20) When standby
function is off, it can adjust the time (time can be set from 1 to 10mins)when this machine
can enter into standby. When standby function is on, this handle can be shut off
automatically when putting it into this holder after used, it will recover to work after
taking this handle out if within standby time, if beyond the standby time, it don't work
until pressing the button in this holder after taking this handle out.(Note: If both timing
function and standby function are on simultaneously, timing function will be recount time
when the hot air gun working. )
SET
f
o
f
S
FIG. 1-20
8
Y
REAL SET
REAL SET
0
0
F
FIG. 1-19
h
F
0
3
8
Page 5
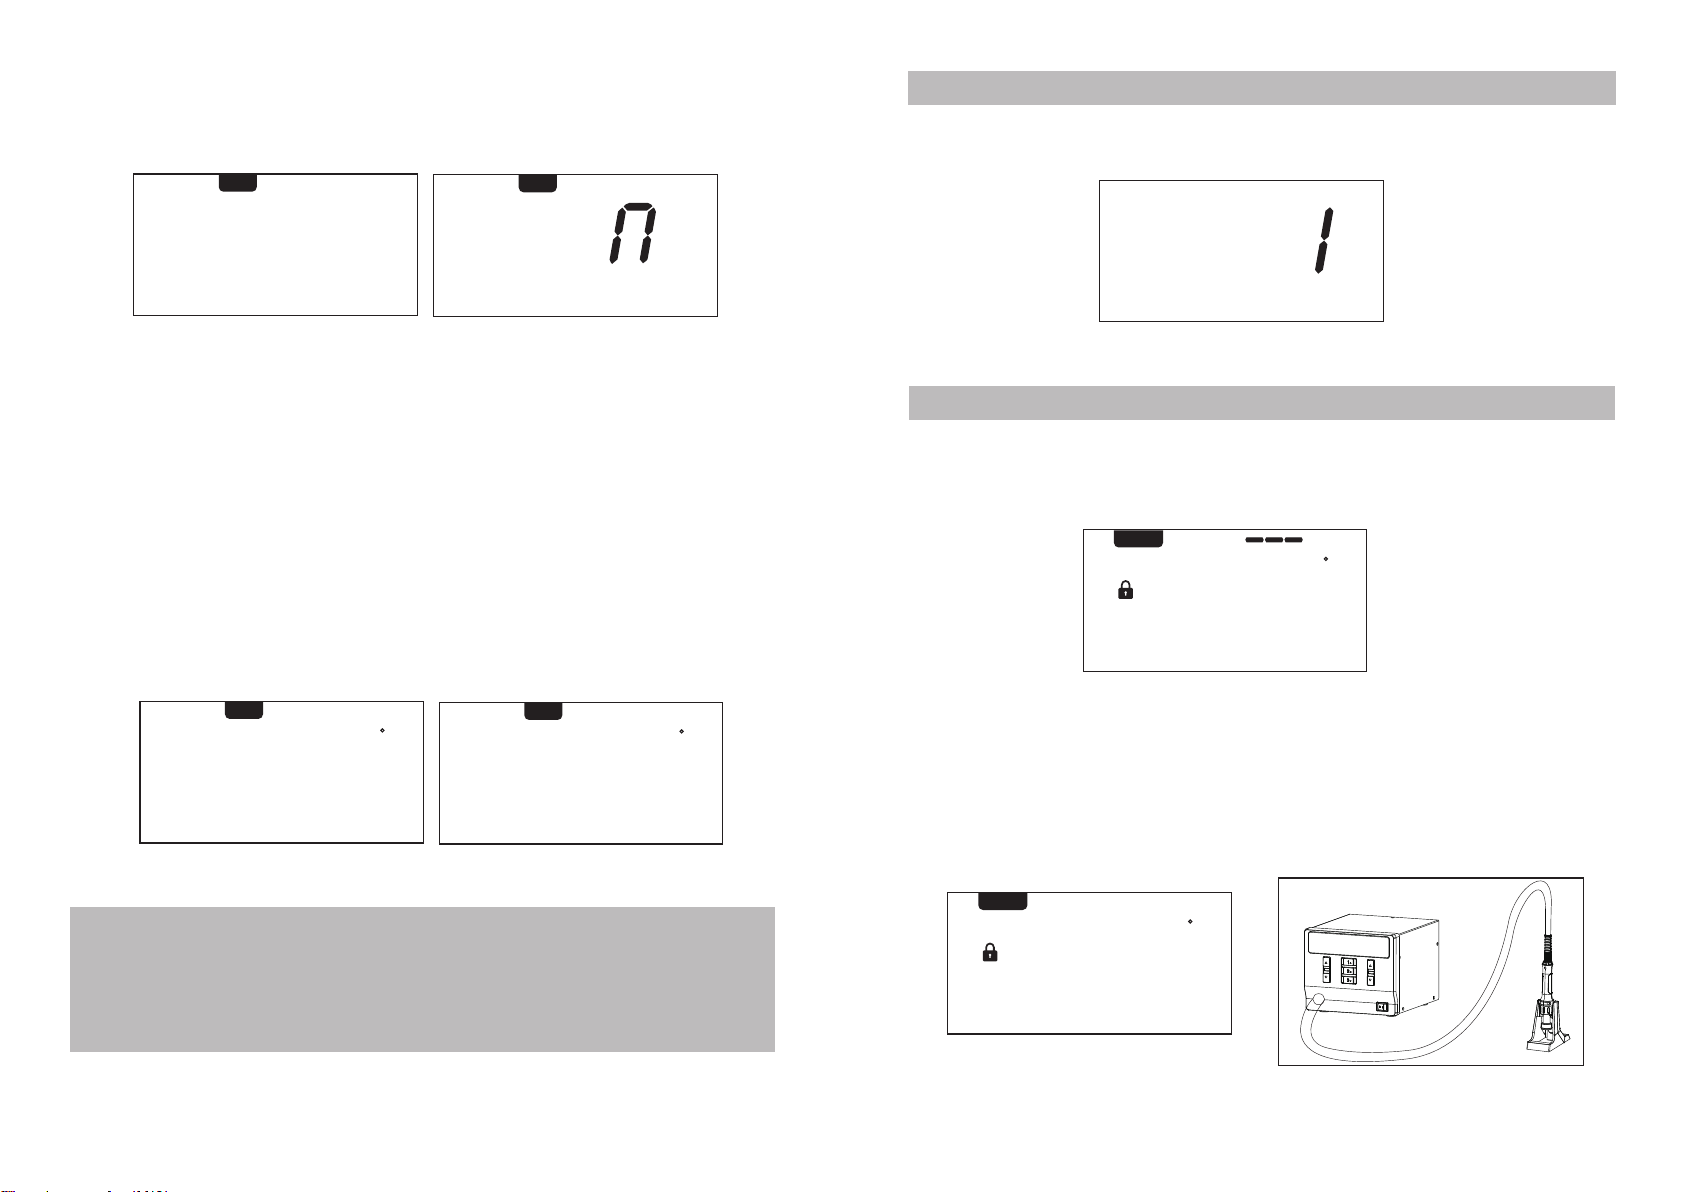
4. Restore Factory Setting
In FAC menu ,press “▲”and“▼”keys to adjust ON/OFF. Press the [2] key when the menu is
ON, then return to the normal operation interface to restore factory setting
REAL SET
REAL SET
Boot-up Screen
After the station has been switched on, the display will turn on and show the system version
number for one second before switching to the normal display.
0 F F
FAC
FIG. 1-12
Default value :
Loc ( temperature locked function):OFF
CAL(calibration value): cleared
BL(Beeping function):ON
F-C(temperature unit):℃
HTO(Timing operation) : OFF
5. Temperature Calibration
Under menu CAL mode, press “▲”or“▼”key to enable temperature calibration
function, whose calibration range is -50℃~ 50℃(-90℉~90℉). Calibration value will be
negative as actual-measured temperature is lower than setting temperature; Calibration
value will be positive as actual-measured temperature is higher than setting temperature.
SET
C
Memory temperature 1:200°C
Memory temperature 2:300°C
Memory temperature3:400°C
0 5
CAL
FIG. 1-14 FIG. 1-15
0
FAC
FIG. 1-13
SET
C
- 0 5
CAL
u
(Mean s ST-862D V0 .1 v er si on )
Settings
1. Normal display
(FIG. 1-1) shows real temperature is 300°C, the temperature setting value is locked, the
air volume is 50% and the heating power value is 3 bars.
REAL SET
0
8
6
2 0
C
3 0 0
%
5 0
FIG. 1-1
2. Display Of Hot Air Gun Status
(FIG. 1-2)shows when the air gun is off (non-power)) The setting value can be adjusted
when the hot air gun is off. When the hot air gun is on, it will work according to the
setting value.(FIG. 1-3) When the handle of the air gun is placed on the holder, the hot
air gun will automatically stop heating and delay air supply, (the air supply will stop after
the heating wire cools). Pick up the handle again and press the switch key on the handle,
it will resume to work.
Note: User need cali br at e te mp er at ur e by a dj us ti ng i ts val ue i f th e di splayed temperatu re is much d if fe re nt w it h
actual-m ea su re d temp er at ur e af te r ch an ging a new heater or tips , it s ca li br at io n method be refere d as below:
1.Set this han dl e requ ired c al ib ra ti on a s a su it able temperature like 35 0℃/ 662℉;
2.Af te r th is s et ti ng t em pe ra ture i s st able, use tempera tu re tester to measure the actua l temp er at ur e of its tip,
for example, i ts a ct ua l- me as ured t em pe ra ture i s 36 5℃/ 689℉;
3.We ca n ge t co nclusion th at t he a ct ua l- me as ured t em pe rature c ompa re d to t he s e
15℃/ 27℉ hig he r;
4.Then press “▲” ke y to c al ibrate temperature.
7
tting temperature is
REAL SET
C
o f f
%
5 0
FIG. 1-2
FIG. 1-3
4
Page 6
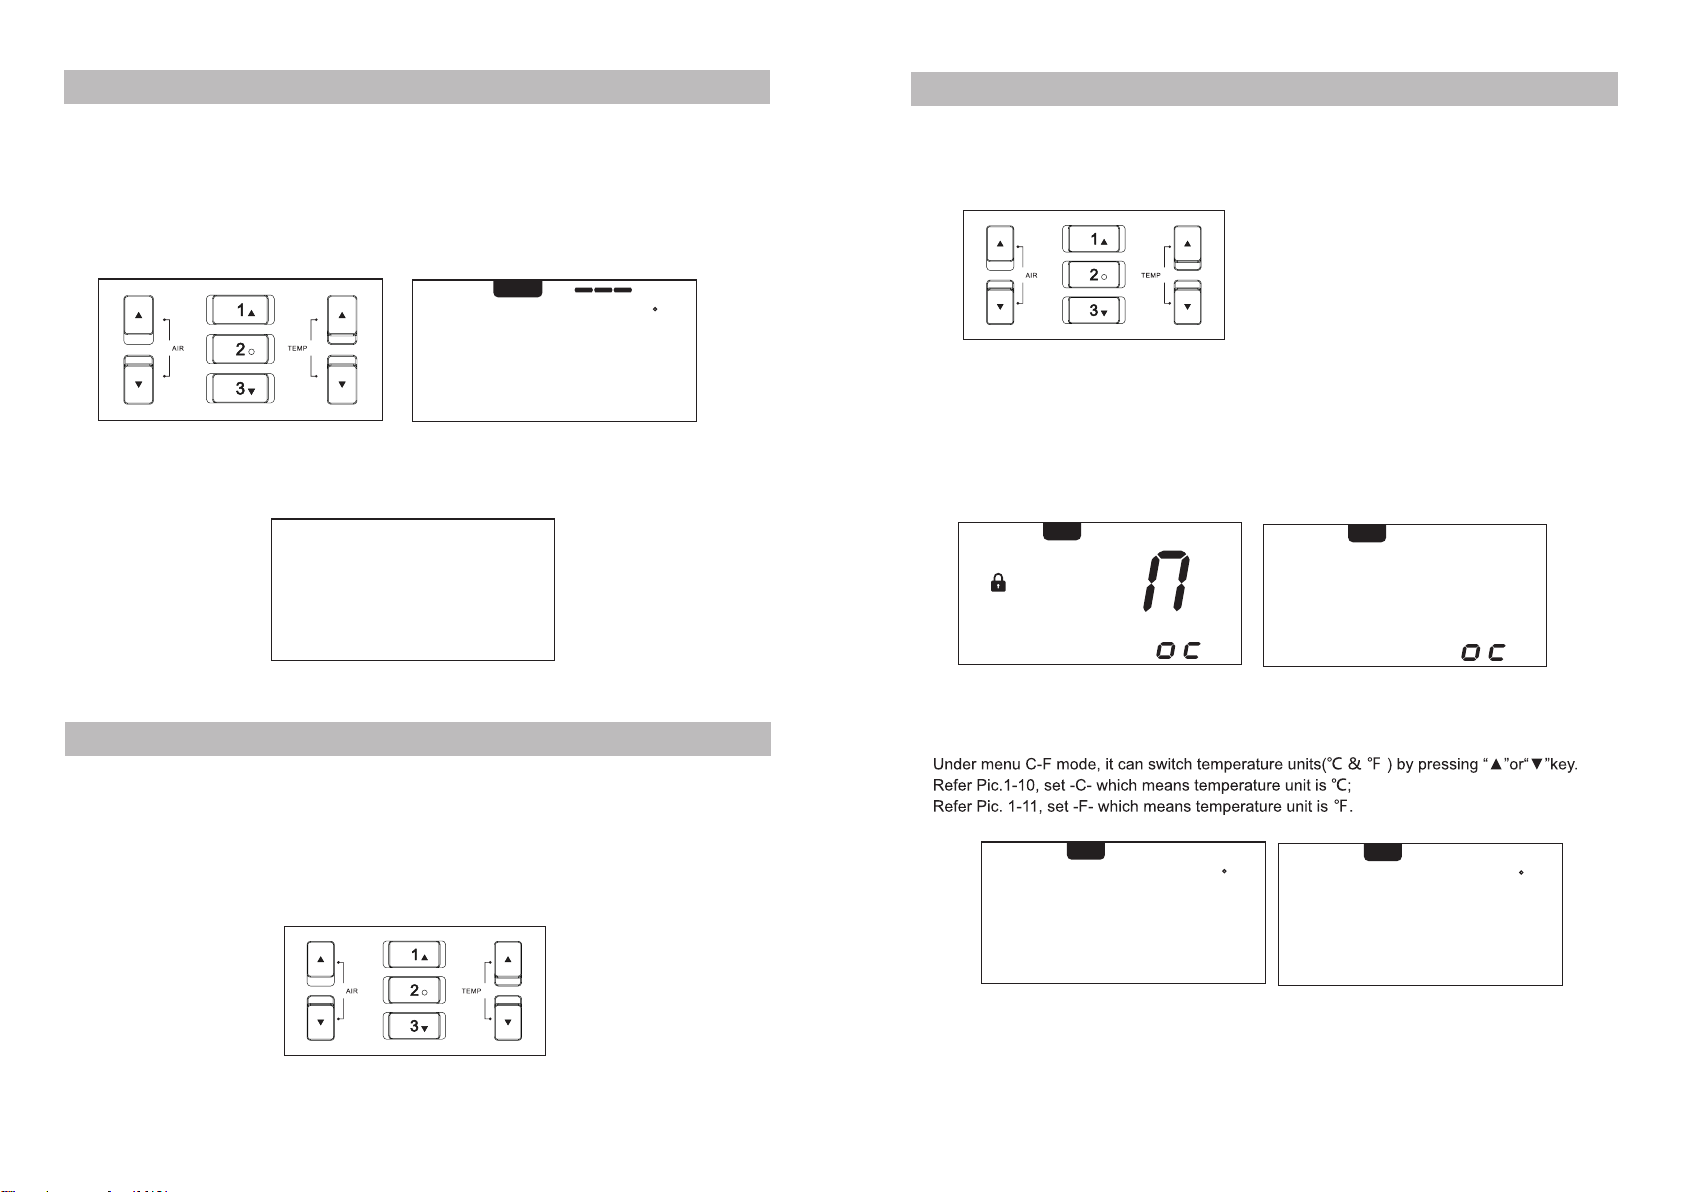
Temperature/Air Flow Setting
Menu Mode
1. Adjust the air volume: Press air “▲” or “▼” key (see FIG 1-4). Long press for quickly
adjusting. Stop pressing the key for 3 seconds, it will save the setting automatically.
2. Adjust temperature value (when temperature value is locked, it can not be adjusted): Press
temperature "▲" or "▼" key, switch to SET status (see figure 1-5). Long press for quickly
adjusting, stop pressing the key for 3 seconds, it will automatically save temperature
setting, and state switch to REAL.
SET
C
3 0 0
%
5 0
FIG. 1-4 FIG. 1-5
3. The cool air function is used when the
temperature setting value under 100 °C.
C 0 L
%
5 0
Cold air display interface
Enter into menu mode by pressing both Button “1” and “3” more than 3 seconds
under working status.
1. Button Definition under Menu Setting Mode
Butt on “1 ”: Me nu pa ge up
Button “2”: Men u exi t
Button “3”: Men u page dow n
Par ameter plus
Par ameter minus
FIG. 1-7
2. Temperature Locking Function
Under Menu Loc, it can turn on or turn off temperature locking function by pressing
“▲”or“▼”key(FIG. 1-8, ON means turn on temperature lock function, OFF means
turn off temperature locking function); it can turn up or down menu by pressing Button
“1” or “3”, then press Button “2” to exit and save your setting.
SET
0
L
FIG. 1-8
SET
0
F
FIG. 1-9
F
L
Saving and Retrieving Shortcut Temperature(User define)
1. Retrieving shortcut temperature: It can rapidly retrieving preset temperature and blowing
restored in Button “1”/“2”/“3” by pressing Button “1”/“2”/“3”.(FIG. 1-6)
when working
2. Saving shortcut temperature: It can save the user-define temperature and blowing in
Button “1”/ “2”/ “3” by pressing Button “1”/ “2”/ “3” more than 2 seconds.
FIG. 1-6
5
3. Switching Temperature Unit
SET
- C -
FIG. 1-10 FIG. 1-11
C-F
SET
C
F
- F -
C-F
6
 Loading...