

Page 1
w w w. a t tel ec om.e u
Page 2

Table of Contents
1. For your Safety ........................................................- 4 -
2. Mobile Phone Profile................................................- 7 -
3. Preparations before Use ..........................................- 8 -
Installing SIM Cards...................................................................- 8 -
Installing a Memory card (T-Flas h )............................................- 9 -
Install the Battery.......................................................................- 9 -
PIN and PUK Codes................................................................- 12 -
4. General Instructions for using the Mobile Phone ...- 13 -
5. Icons in Standby State ...........................................- 16 -
6. Terms and Understanding .....................................- 17 -
7.Basic operation.......................................................- 20 -
8. Main Menu with Sub-Menus ...................................- 24 -
Menu MESSAGES ........................................................- 24 -
SMS message.........................................................................- 24 -
MMS [Messages].....................................................................- 28 -
Chat.........................................................................................- 33 -
Voice mail server.....................................................................- 33 -
Broadcast Message.................................................................- 34 -
Menu PHONEBOOK ....................................................- 35 -
Search contact.........................................................................- 35 -
Add new contact......................................................................- 35 -
Copy All...................................................................................- 36 -
Move All...................................................................................- 36 -
Delete......................................................................................- 36 -
Page 3

AT-Telecom USER-MANUAL AT-B17D
Caller Groups...........................................................................- 36 -
Extra numbers.........................................................................- 37 -
Settings....................................................................................- 37 -
Menu CALL CENTER ...................................................- 38 -
Menu MULTIMEDIA ....................................................- 40 -
Bluetooth..................................................................................- 40 -
Image viewer...........................................................................- 43 -
Audio player:............................................................................- 44 -
Video player:............................................................................- 45 -
Sound recorder:.......................................................................- 45 -
FM Radio:................................................................................- 46 -
Schedule Radio Recorder:.......................................................- 47 -
Melody composer:...................................................................- 48 -
Menu ORGANIZER ......................................................- 48 -
Calendar..................................................................................- 48 -
To Do.......................................................................................- 49 -
Alarm.......................................................................................- 49 -
Calculator.................................................................................- 50 -
World Clock.............................................................................- 50 -
Menu SETTINGS .........................................................- 51 -
User Profiles............................................................................- 51 -
Dual SIM Settings....................................................................- 52 -
Phone Setup............................................................................- 52 -
General Call Setup..................................................................- 54 -
- 2 -
Page 4

AT-Telecom USER-MANUAL AT-B17D
Network Setup.........................................................................- 57 -
Security Setup.........................................................................- 57 -
Restore Factory Settings.........................................................- 58 -
Menu Fun & Games]...................................................- 59 -
Games.....................................................................................- 59 -
Menu SERVICES..........................................................- 60 -
WAP.........................................................................................- 60 -
Data account............................................................................- 61 -
Connection manager...............................................................- 62 -
Menu FILE MANAGER .................................................- 63 -
[Phone]....................................................................................- 63 -
Memory Card...........................................................................- 64 -
9. Appendix 1 Troubleshooting .................................- 66 -
10. Appendix 2, Abbreviations and Definitions..........- 68 -
11. Appendix 3 Notices for the use of accessories ...- 69 -
Battery.....................................................................................- 69 -
Charger....................................................................................- 69 -
Use of the USB connector.......................................................- 70 -
T-Flash card.............................................................................- 71 -
- 3 -
Page 5

AT-Telecom USER-MANUAL AT-B17D
1. For your Safety
For your safety and for proper use of the mobile phone,
please read the following guidelines carefully:
¾ Do not switch the mobile phone on when close to
chemicals, gas stations or other explosive materials.
¾ During driving, please use the headset or a Bluetooth
set for safety purpose.
¾ A mobile phone can cause interference in an Airplane,
switch off the mobile phone before boarding.
¾ A mobile phone can cause interference with heart
pacemakers, deaf-aids and other medical equipments.
Keep distance from those aids when calling.
¾ Do not dismantle the mobile phone. In case of failure,
please contact the supplier or his Service Centre.
¾ Do not plug the charger into the mobile phone
without a battery in the phone.
¾ Always power off the mobile phone when taking out
the battery; otherwise the memory of the phone may
be damaged.
¾ When charging the mobile phone, put it in a place
with good ventilation.
¾ Ensure that the mobile phone does not come in
contact with any liquid. If it occurs, remove the
battery and contact the supplier or his service center.
- 4 -
Page 6

AT-Telecom USER-MANUAL AT-B17D
¾ Do not use the mobile phone in the environments
with extreme temperatures. Never expose the mobile
phone to strong sunlight. The suitable temperature
for the phone and accessories is 0℃-40℃. The height
to use the phone shall be less than 2,000m.
¾ Do not use liquid or strong cleanser to clean the
mobile phone.
¾ This mobile phone has Bluetooth, Image viewer,
Audio player, FM radio, Schedule FM record and
Melody composer functions. You can use these
features only in accordance with related local laws
and regulations.
¾ Violent treatment of the mobile phone (Fall / Throw)
may damage the inner circuits and precise structures.
¾ Please do not waste the battery into general
household garbage. Please deal with the local “waste
battery regulations”.
Warning: “AT” (Ambiance Technology) will not bear any
responsibility for any incompliance with the above
guidelines or improper use of the mobile phone.
“AT” keeps the right to make modifications to any of the
content in this user guide without public announcement
in advance.
- 5 -
Page 7

AT-Telecom USER-MANUAL AT-B17D
The content of this manual may vary from the actual
content displayed in the mobile phone. In such case, the
latter shall govern.
- 6 -
Page 8
AT-Telecom USER-MANUAL AT-B17D
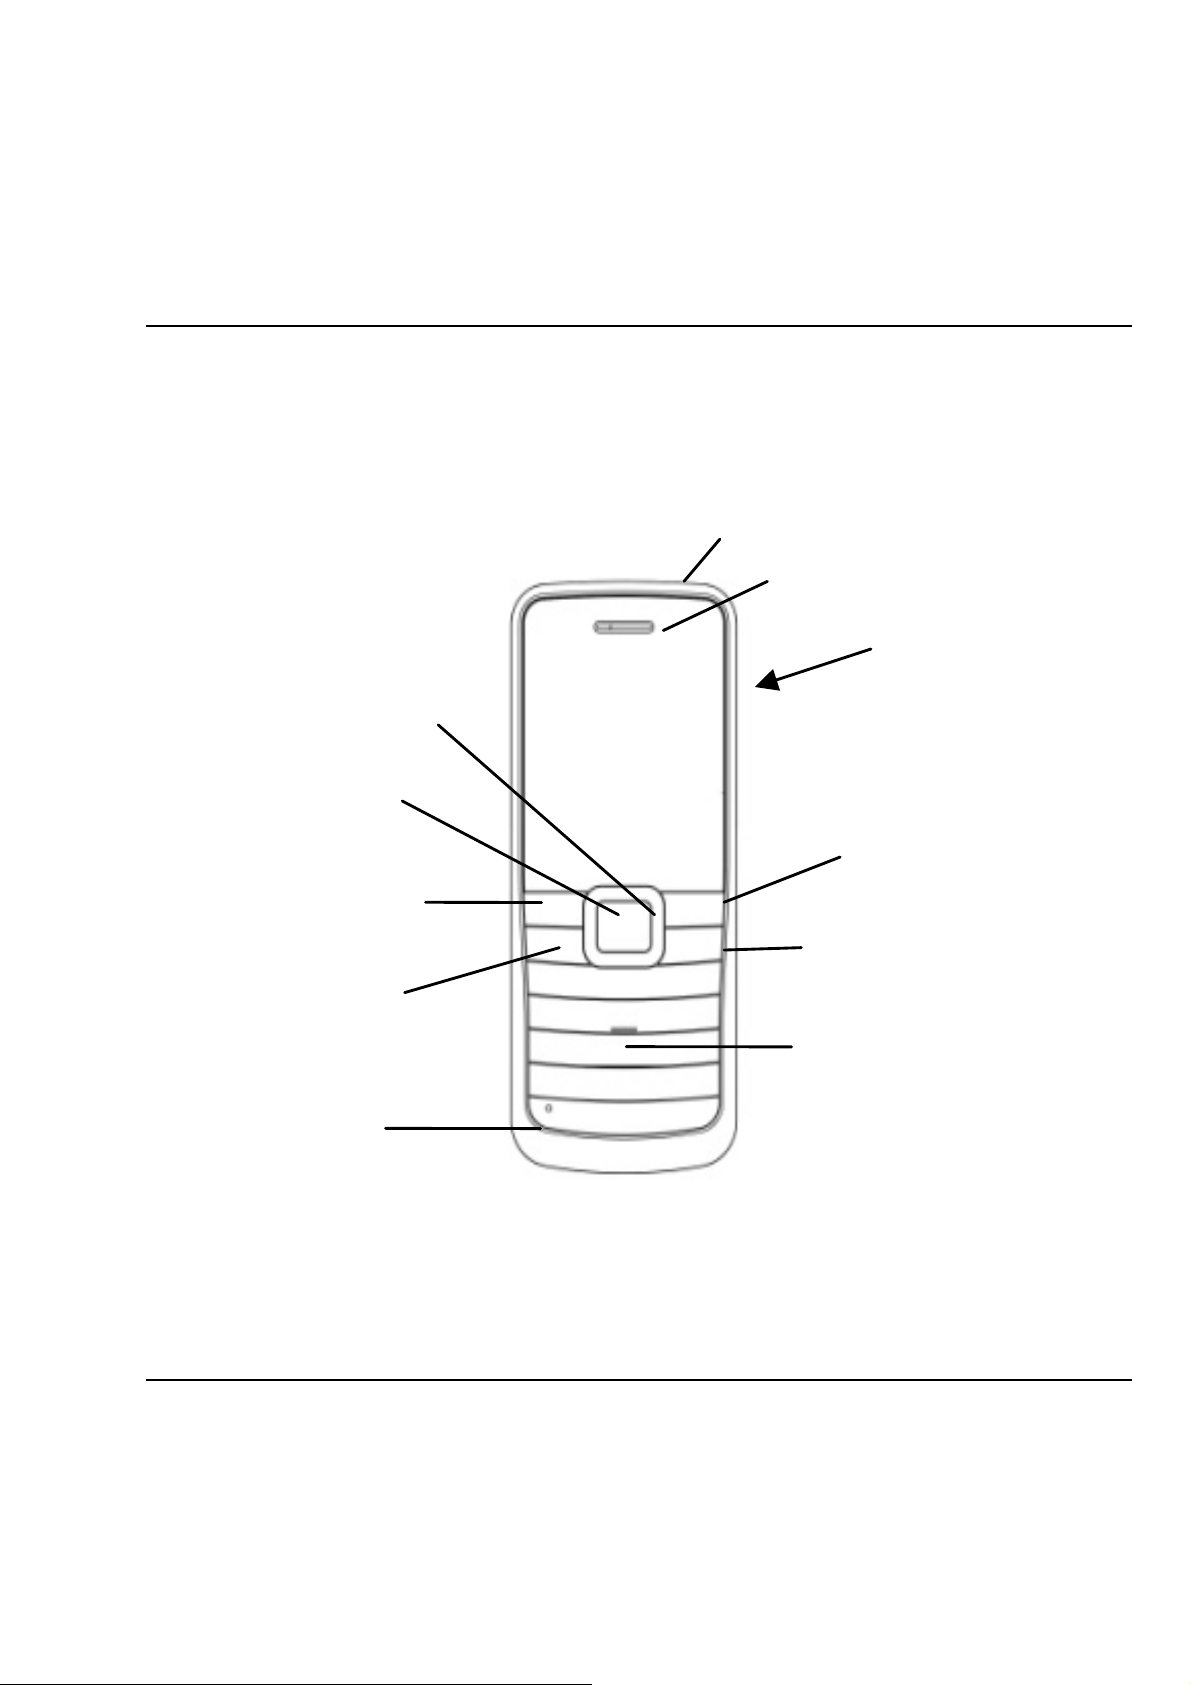
2. Mobile Phone Profile
(FRONTSIDE)
Loader/PC-Sync and Headset
Navigation Keys
SIM1 Call-Key
OK & Option Key
SIM2 Call-Key
Microphone
OK-Key
Ear Loudspeaker
Loudspeaker
at Backside
Right Funktion Key
On/Off– and EndCall-Key
Digit- / Character-keys
- 7 -
Page 9
AT-Telecom USER-MANUAL AT-B17D
3. Preparation s before Use
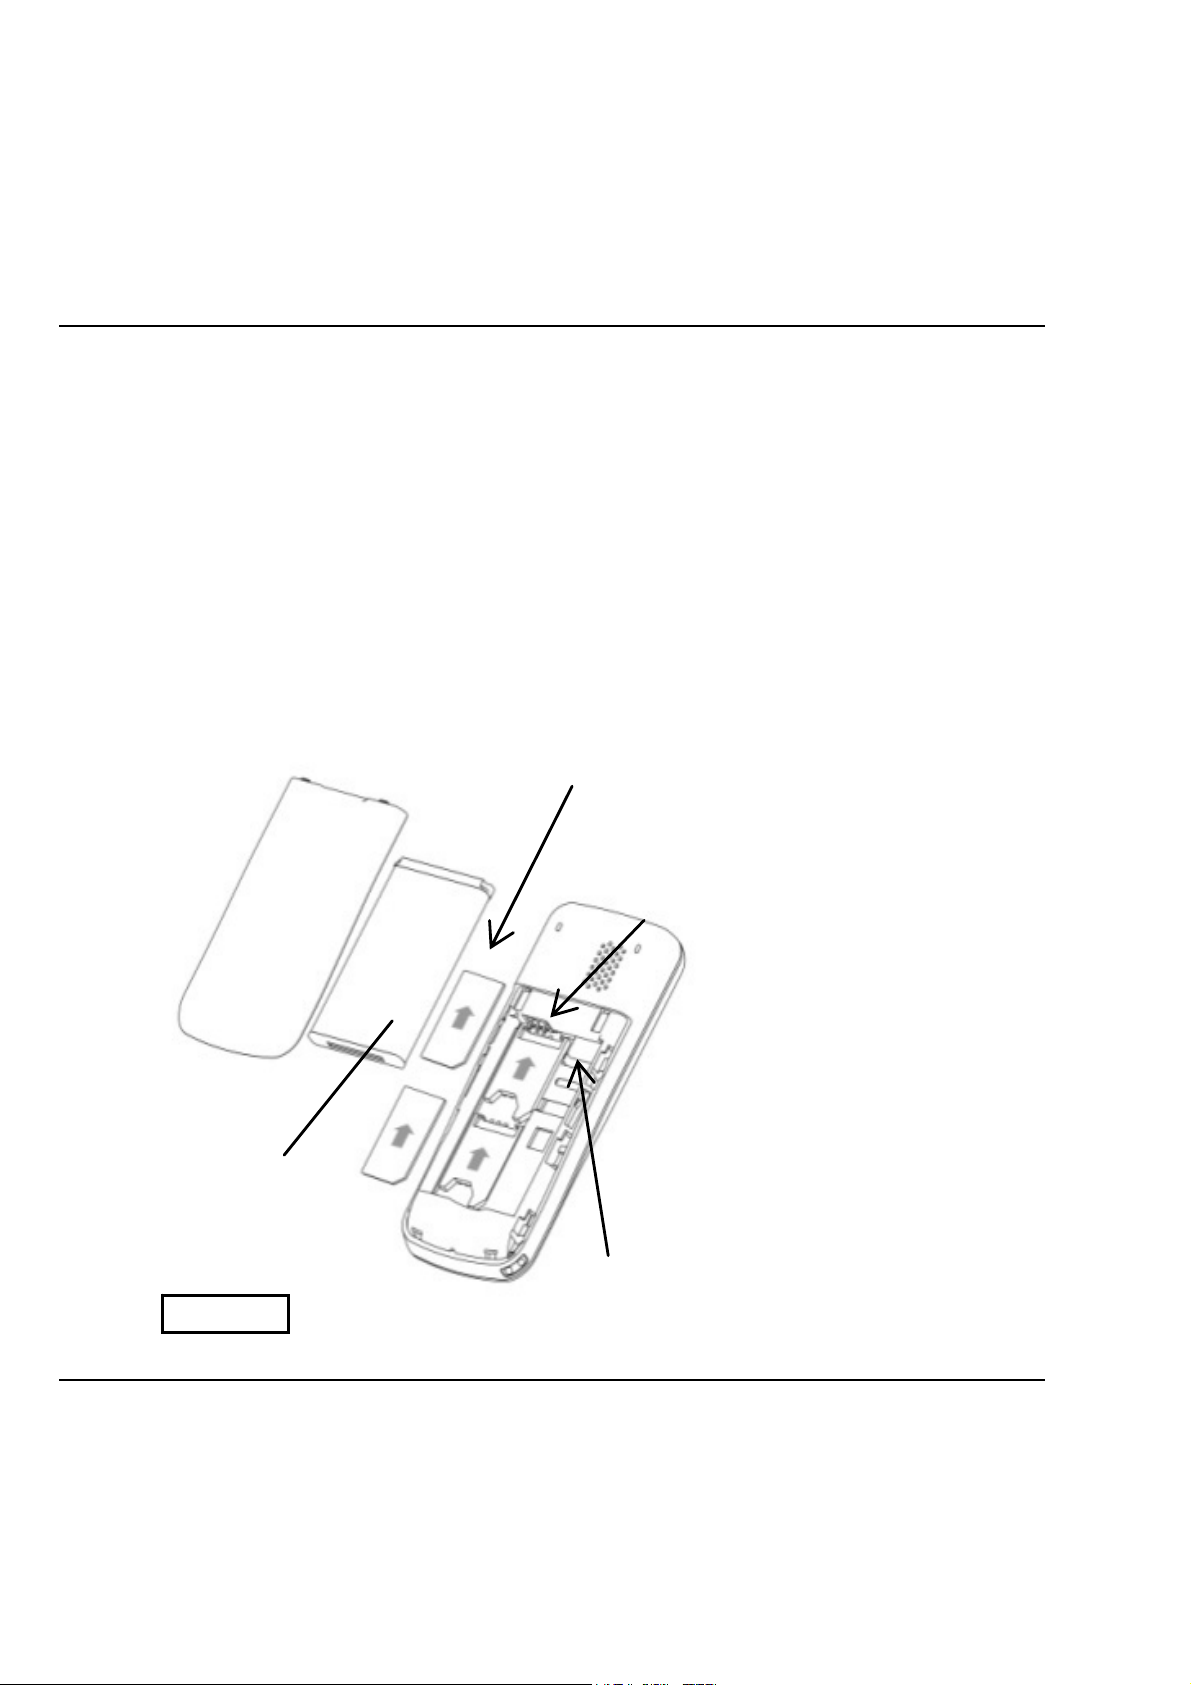
Installing SIM Cards
You can apply for two SIM cards from two different mobile
network providers. With each SIM card separately, you can
use all functions of your mobile phone.
See Fig.03 how to install the SIM cards.
Batterry cover
Battery
Fig.03
2 Sim cards
Double
Sim-cards slot
T-Flash
memory card slot
- 8 -
Page 10

AT-Telecom USER-MANUAL AT-B17D
First switch off the mobile phone and take the battery
out. The SIM cards are installed in the back of the mobile
phone.
Installing a Memory card (T-Flash)
The mobile phone has limited internal storage space. We
strongly recommend to install a memory card (T-Flash
card) to have the best performance for all available
functions and features of the mobile phone. See Fig.03.
Warning: Do not distort or scratch the SIM card nor let it
contact static, dust or moisture. As the SIM card and the
T-Flash card are small objects, keep it out of children’s
reach or prevent children gulping it!
Note: Even with one (1) SIM card inserted either in SIM1
slot or SIM2 slot, the mobile phone works normally.
Install the Battery
The mobile phone is suitable for original battery and
accessories. When the battery is idle, it is recommended
to put it into the protection box.
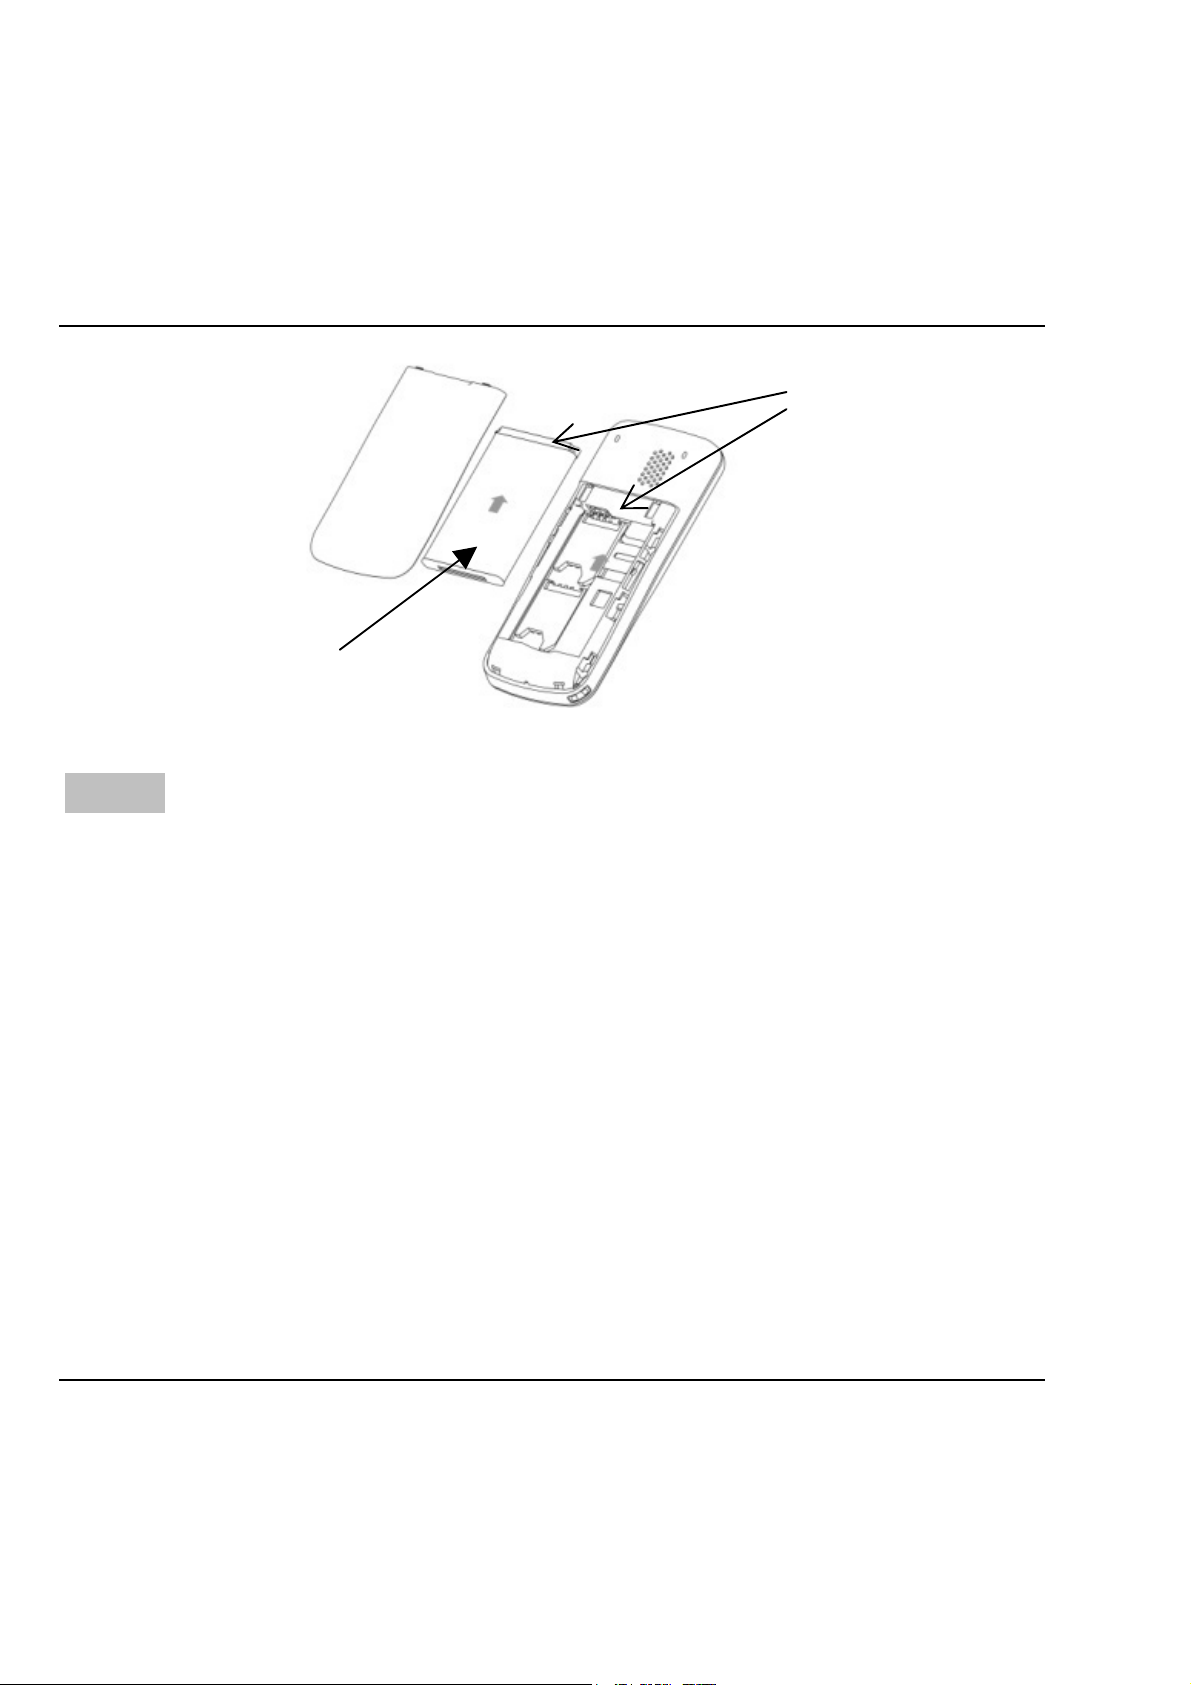
See next picture how to install the battery.
- 9 -
Page 11
AT-Telecom USER-MANUAL AT-B17D
Copper-plate
Contacts
Battery
Note: Install the battery first with the copper-plate
contacts in the phone. Then click down the backside of
the battery.
Charging the Battery
A new battery first time charge will take at least 4 to 8
hours to reach its optimal efficiency. Charge the battery
in time, but over-charge will damage the battery.
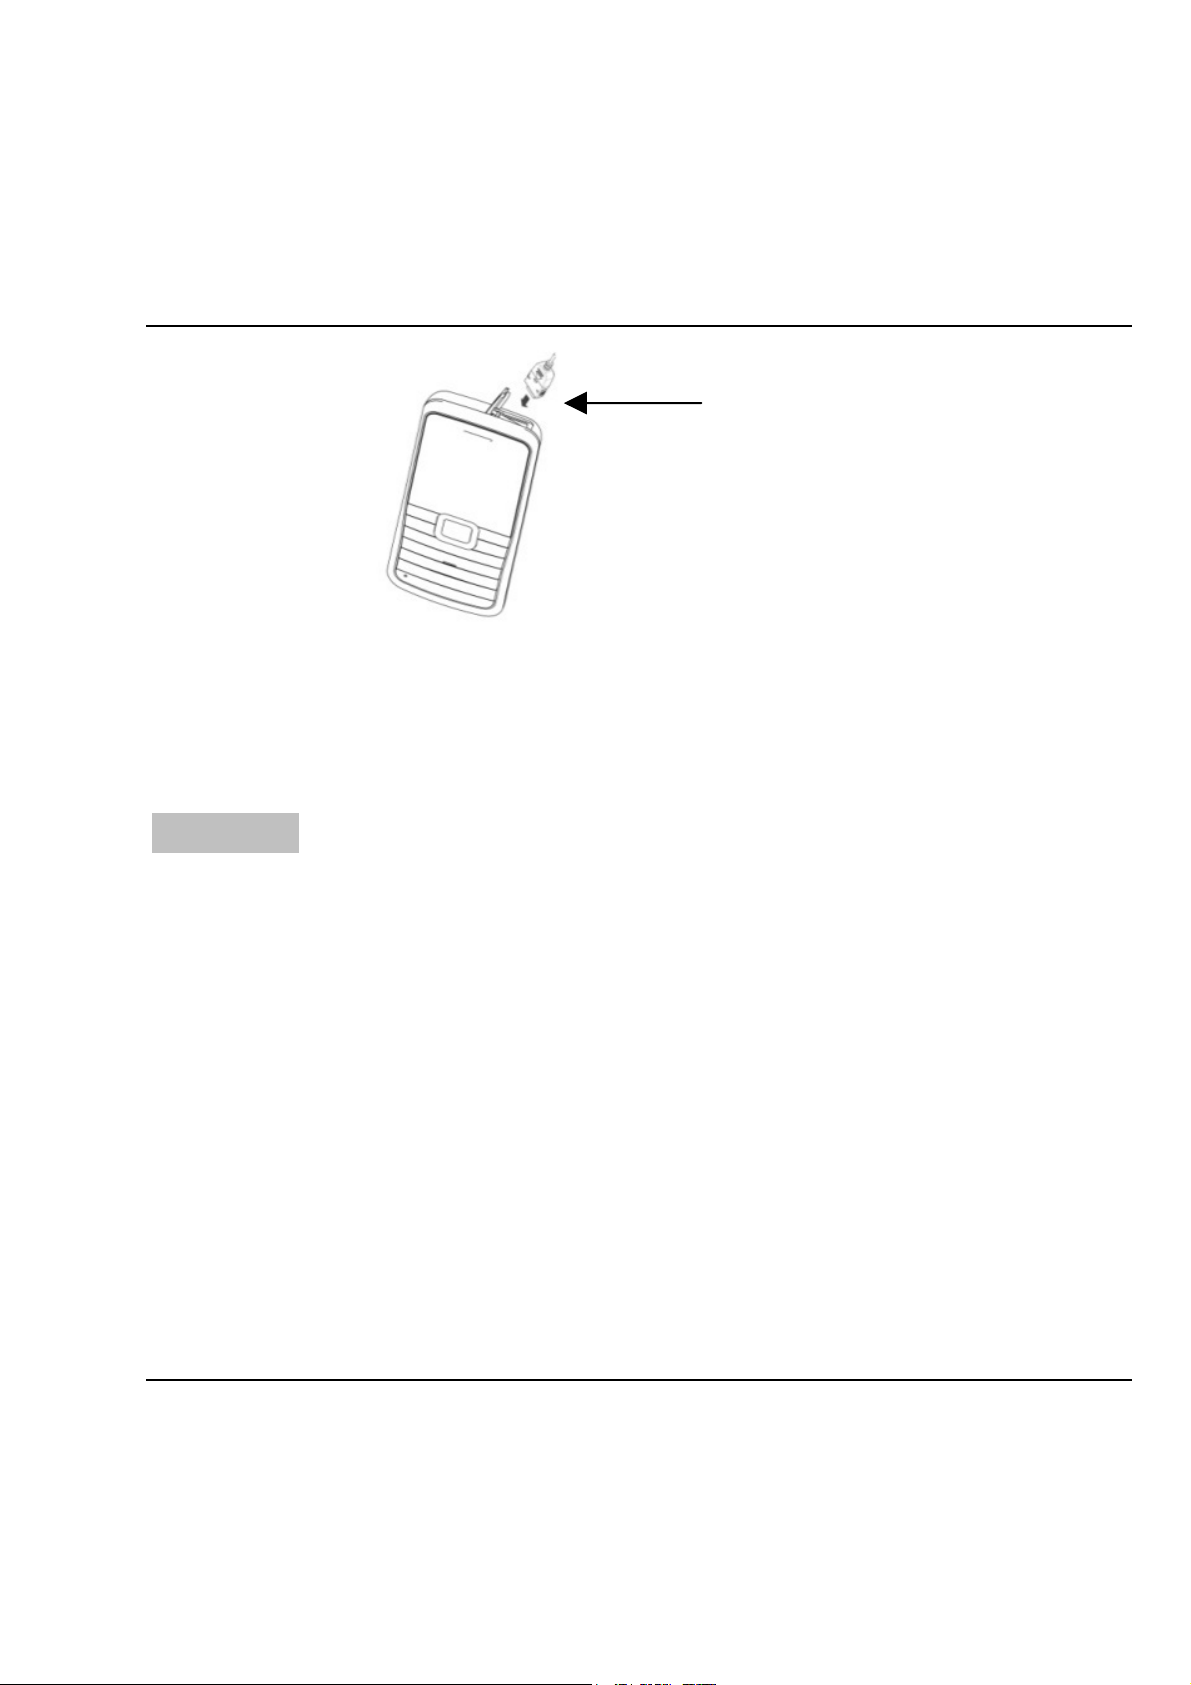
See next diagram how to connect the charger.
- 10 -
Page 12
AT-Telecom USER-MANUAL AT-B17D
Cable Connector
and
USB Slot
During charging, the battery capacity icon on the screen
moves from the right to the left. After the battery is fully
charged, the icon is filled with bars.
Warning: Use only the original Charger and cable, using
other accessories may damage your mobile.
Notes on using the battery
A new battery or a battery that has been idle for a long
time, needs charging for a long time (4 hrs).
When charging, keep the phone and charger at room
temperature.
Even with normal use of the phone, the battery will
gradually be worn out and thus need longer time to
charge. This is normal. However, after normal charging, if
call duration decreases and charging time increases, you
need to buy another battery from the original supplier.
- 11 -
Page 13
AT-Telecom USER-MANUAL AT-B17D
A not original battery can damage your mobile phone!
Note: Please dispose the battery according to the local
regulations and try to recycle the battery. Do not throw
away the battery as common waste.
Warning: Do not throw the battery into fire, it may cause
an explosion.
PIN and PUK Codes
PIN1 Code: It is the personal identification number used
to enter SIM1 and is to prevent others using SIM1 without
permission. If the PIN1 code is activated, the screen will
display “Input SIM1 PIN code” when the phone is switched
on.
PIN2 Code
: see above PIN 1 code.
Warning: If the PIN code is input wrongly for successively
three times, the SIM card will be locked. Use now the PUK
code(s) to unlock the SIM card(s)
PUK Code and PUK2 Code(8-digit):
To change the locked SIM1 card / PIN1 code, you need to
use PUK1 (Personal Unblocking Key) code. To change the
locked PIN2 code, you need to use PUK2 code. These two
codes are provided together with the SIM cards.
- 12 -
Page 14

AT-Telecom USER-MANUAL AT-B17D
4. General Instructions for using
the Mobile Phone
SIM 1 Call key
To make a SIM1 call and to receive a SIM1 incoming call.
In standby state, press this key to display the latest calls
(all received calls, missed calls, and dialed calls, at most
20 phone numbers). In standby state, press this key twice
successively to dial out the last called/calling number.
Note: In several sub-menus this key is also used as OK
key or Options key.
SIM 2 Call key
The function is the same as used with the SIM 1 call key.
Switch-on/off key or End key
In dialing state or conversation state, use it to end a call.
This key can also be used to quickly return from a menu
operation to the standby screen.
Hold this key for 4~5sec. to switch on/off the mobile
phone.
SIM1 key/Right function key
Press these keys to activate the functions indicated in the
bottom row of the main screen.
- 13 -
Page 15

AT-Telecom USER-MANUAL AT-B17D
Navigation keys
This mobile phone has four navigation keys and in the
middle an OK button. They have different functions in
different menu’s. I.e. while calling, press the up/down key
to adjust the volume. The four navigation keys are pre-set
with shortcut functions as next:
¾ Up key: open the Audio player.
¾ Down key: write a SMS.
¾ Left key: open the SMS inbox for SIM1 or SIM2.
¾ Right key: Open the Shortcuts-list and choose one of
the functions listed. .
The function for the Navigation keys can be set by:
Menu > Settings > Phone Settings > Dedicated key.
Standard keypad/ Number & Character keys
The keypad has 0-9 number keys, the [*] and [#] key.
Press these keys to input a phone number, a password,
characters, symbols etc, or choose numbered menus.
Note: In standby state, pres the “1” for 3 sec. to call your
voice inbox service center. The number for the voice
inbox must be set in advance.
The [*] key and [#] key have different functions in
different menus:
Press [#] long to start or exit from the silent-profile mode.
- 14 -
Page 16

AT-Telecom USER-MANUAL AT-B17D
Using the Audio player, [*] and [#] are used to adjust the
volume.
Keypad lock
When the mobile phone is idle for certain time, according
to your setting in Security setup, the keypad will be
locked automatically. Press the right function key and
press [*] to unlock the keypad. In case of an incoming call
when locked, press the answer key and talk; after that,
the keypad will be locked automatically.
- 15 -
Page 17

AT-Telecom USER-MANUAL AT-B17D
5. Icons in Standby State
Antenna. For SIM2 is a “2”on the icon.
Alarm clock is on.
SMS received at SIM1
SMS received at SIM2
Battery capacity indication
Ring tone is On
Vibrate then ring
Ring only
Vibrate
Missed Calls
Keypad Lock
SIM1 card information
SIM2 card information
Host line 2
Slave line 2
MMS
GPRS
All calls diverted
- 16 -
Page 18

AT-Telecom USER-MANUAL AT-B17D
6. Terms and Understanding
Language and Input Mode
The mobile phone has default English input mode.
Services
Services are provided with SIM kit. The mobile phone
support service function. The detailed menu items
depend on SIM card and the network. When the network
provides such function and your SIM card supports too,
the service menu will automatically be posted in the
services of the mobile phone.
Caller groups
The callers group in the mobile phone includes Friends,
Family, VIP, Business and Others etc. You can set different
call tone and photo for different caller group.
Term Description
Dial domestic calls
The simplest method to make a local call is to input
phone number via the number keypad, then press dial key
to dial call. To change phone number, press “Clear” key.
During dialing, the screen will display a cartoon. If SIM
card 1 call, shows "SIM1-"; if SIM card 2 call, shows "SIM2-
- 17 -
Page 19

AT-Telecom USER-MANUAL AT-B17D
". When the other party is connected, the screen will
display the corresponding information.
Press end key to end the call.
To dial a domestic call, input area code + phone number
and then press the dial key.
Dial international calls
If you want to make an international call, you can press *
key continuously until the international dialing prefix “+”
is shown on the screen. This will allow you make an
international call from any country without knowing the
dialing prefix (for example, 00 or 001).
After inputting the prefix, you need to input the Country
number and complete telephone number. You can input
the Country number according to the common practice,
such as, 49 for Germany, 44 for British, 46 for Sweden,
etc.
Dial international telephone number as following: “+”
Country number +Complete telephone number + Dial key.
Dial fixed-line telephone extension
Some fixed-line telephone extension may not directly get
through, so you need to connect to the switchboard at
first then put through extension number. The mobile
phone can automatically dial extension number if you
input “P” between the switchboard and extension number.
Method for input “P” as following: hold press or
- 18 -
Page 20

AT-Telecom USER-MANUAL AT-B17D
continually short press three times “*” key (“P” will be
shown on the display).
Dial fixed-line telephone extension as following: phone
number + “P” + extension number + dialing key
Emergency calls
If your phone is under the network coverage (you can find
this by checking the signal bar at the up left corner on the
screen), you can make emergency calls. If your network
supplier does not provide roaming service in this area,
Emergency will be shown on the screen. That means you
can only make this kind of calls. If your phone is under
the network coverage, you can even make emergency
calls without the SIM card.
* In some areas, 112 (emergency call) service is provided
by the network operator. In case of failure, consult the
network operator.
IMEI
International Mobile Equipment Identity number. Switch
off the mobile phone and take off the battery, then you
will see the label with such number on the back of the
mobile phone. Also, this number is saved in the mobile
phone. After switch on, in standby state, input “*#06#” to
display it.
- 19 -
Page 21

AT-Telecom USER-MANUAL AT-B17D
7.Basic operation
Switch on
Press the switch-on/off key to start the mobile phone,
then the screen will display switch-on image. Then you
can enter Settings menu to set phone modes, including
Dual SIM open, Only SIM1 open, Only SIM2 open and
Flight mode. The defaulted mode is Dual SIM open.
After insert SIM card, the mobile phone will automatically
check the SIM card availability, and then it will show the
following information on the display by sequence:
1. “Input phone lock code”——If you have set the
password.
2. “Input PIN” —— If you set SIM card password.
3. “No service”—Indicates fail to make register and cannot
make any calls.
4. “Emergency calls only”—indicates has registered to
other network and only can make call to 112.
5. “Searching”—the mobile phone is searching network
until find appropriate network;
6. “Operator name”—Indicates network successfully
registered.
Note: If you do not know PIN code, please contact the
network service provider.
The defaulted phone password “1122”
- 20 -
Page 22

AT-Telecom USER-MANUAL AT-B17D
Switch off
To switch off the mobile phone, press the end key. When
the screen displays switch-off cartoon, the host and the
slave will be off at the same time. Do not take out the
battery to switch off the mobile phone. If so, the SIM card
can be damaged easily and some data will be lost.
Dial a Call
With the number keypad, you can enter phone numbers
(if wrong characters are input, press the clear key to
delete them). Press the dial key to dial the phone number.
In SIM1 and SIM2 On state, you can choose to dial a call
via SIM1 or SIM2. To end a call, press the end key; or to
cancel a dialing, press the Right selection key or the
switch-on/off key. After the call is connected, you can see
the call timer on the screen.
Dial a call via phonebook: Enter the phonebook and
search the desired name/phone number, and then press
call key to dial call.
Redial latest dialed number: In standby state, press call
key to view the list of the latest dialed 40 phone numbers
or names. Roll to the desired phone number or name and
press call key to dial call.
Adjust Receiver Volume
- 21 -
Page 23

AT-Telecom USER-MANUAL AT-B17D
In call conversation, press the up navigation key or down
navigation key to adjust the volume of the receiver.
Answer a Call
When there is a coming call, as per the settings of the
mobile phone, you will be alerted with ring only, vibration
only, vibration then ring.
To receive a call, press SIM1/SIM2 Call Key.
To refuse a call, press Right selection key or the end key
directly.
If the CLI (Call Line Identity) is opened, the phone number
of the caller will show on the screen. If this number has
been saved in the phonebook, the name correspond to
this number will be displayed on the screen.
Send DTMF Signal
When this function is set, in call conversation, press the
desired number key and * key and # key to send DTMF
signals to the other party. If this function is inactive, the
extension call will be impossible.
Dial Hold
If you have applied for dial hold, in the call conversation
process, press “Options” to have the following function
menus:
Hold single call: Pause the current call but with the line
keeping connected.
End single call: End the current call conversation.
- 22 -
Page 24

AT-Telecom USER-MANUAL AT-B17D
New Call: Enter the dial interface, dial another call.
Phonebook: Enter the directory of the phonebook.
Messages: Enter the directory of SMS.
Sound recorder: While having call conversation, you can
record the call.
Mute: You can activate/inactivate the speaker.
DTMF: You can set to send DTMF signals.
Note: Some menu items need the support of the local
network or can occur in special cases, such as Conference
and New Call. Consult the local network operator for
details.
Fast Read SMS
When the user receives unread SMS, the screen will
display an icon of unread SMS. Press Read/Left selection
key to read the SMS. The SIM card 1 unread SMS icon is
marked with “1” and SIM card 2 unread SMS icon is
marked with “2”.
Missed Calls
When there have a missed incoming call, the screen will
display a missed call icon. And press Read/Left selection
key to read missed call.
Connect to Voice mail
The mobile phone allows connecting the incoming call
into the voice mail and then you can receive a notice
- 23 -
Page 25

AT-Telecom USER-MANUAL AT-B17D
about voice message. (The voice mail number must be
preset).
8. Main Menu with Sub-Menus
Menu MESSAGES
SMS message.
Both SIM cards of the mobile phone can send and receive
SMS messages. An SMS is sent to the SMS center of the
network and then sent to the target user (GSM user). If
the user does not switch on the mobile phone or the
mobile phone cannot receive the SMS (the memory is full),
the network will save the SMS temporarily. The duration
of temporary storage depends on sender’s settings and
network service provider.
When the SMS storage is full, there will be an SMS icon
flickering on the standby screen. You can solve the
problem by deleting some SMS messages.
If the other party has received SMS you sent, you will hear
the alert sound from your mobile phone (if the alert
function is set ON)
- 24 -
Page 26

AT-Telecom USER-MANUAL AT-B17D
Note: The mobile phone may display “Message sent”. It
indicates that the SMS has been sent to the SMS center,
but does not mean that the receiver has received the SMS.
Editting modes
In the “write message” screen you can choose with the [#]
key for different character / number modes:
i.e. “abc” /“ABC”/ “DE”/“de” or Number input (123).
For Symbols input use the [*] key then use the navigation
keys to select and press OK.
Inbox
You can see the SMS in the SIM1 Inbox or SIM2 Inbox.
Reply: You can reply on the received SMS.
Delete: Delete the current SMS.
Edit: You can edit the current draft SMS and send it after
editing.
Forward: You can directly forward this SMS to others.
Copy to phone: You can copy the entries in SIM card into
the phone.
Move to phone: You can move the entries in SIM card onto
the phone.
Chat: You can chat with the sender after set a chat room.
Delete all: You can delete all SMS in inbox.
- 25 -
Page 27

AT-Telecom USER-MANUAL AT-B17D
Copy all: You have two options, i.e. copy all entries in the
inbox of SIM card into the phone, and vice versa.
Move all: You have two options, i.e. move all entries in the
inbox of SIM card into the phone, and vice versa.
Use number: You can extract the number of SMS sender
and save it or make a call.
Use URL: You can link to the website contained in the
received SMS.
Use USSD: You can get the service supported by the
operator.
Outbox
While sending SMS, if choosing “Save and send”, you can
save the SMS into the Outbox. You can directly save the
edited SMS into the Outbox, in such case, the Outbox will
display “No number”, i.e. no target number. If you fail to
send the SMS, it will be saved in the Outbox. Also, you
can have such operations as Send from SIM1/SIM2, Edit,
Delete, Copy to phone ,Move to phone, Delete all, Copy
all, Move all, Use number, Use URL, Use USSD.
Write Message
You can write message in this menu.
Every SMS can contain 160 word length English
characters. To write SMS, press “#” key to switch input
modes, “*” key to select Symbol; press “Clear” key to clear
- 26 -
Page 28

AT-Telecom USER-MANUAL AT-B17D
one character before the cursor, long press “Clear” key to
delete all characters; press the left and right direction key
to choose characters, press the end key to go back to the
standby screen.
The mobile phone can send a chain-SMS of more than 160
characters (limit for common text messages). If more than
160 characters, the SMS will be splited into 2pcs or more.
You can insert Picture, My picture, Predefined animation,
My animation, Melody, My melody, Predefined sound into
an SMS. However, the SMS will not be received and
displayed unless the network and the receiving mobile
phone support these features.
You can enter the phone number or choose a number
from the phonebook to send the SMS. In dual-SIM standby
mode, you can choose to send the SMS via SIM1or SIM2.
Templates
With it, you can pre-edit some common phrases, which is
convenient for quick SMS editing.
SMS settings
You can set some parameters for the SIM1-SMS or the
SIM2-SMS in next menu.
Profile settings: To send SMS, you must input the SMS
center number.
Common settings
Delivery report: The network will inform you
- 27 -
Page 29

AT-Telecom USER-MANUAL AT-B17D
whether the other party has received the SMS and
what the time is.
Reply path: You can send the reply path to the
network terminal. This function needs the support
from the SMS center.
Memory status: You can view the capacity of the SIM
card or the phone for SMS.
Preferred storage: You can set the storage position
(SIM or phone) for SMS.
MMS [Messages]
MMS can contain text, sounds and photos. If the SMS
contains photos, the mobile phone will adjust the photo
so that it can be displayed completely on the screen.
Note: To use MMS, the network operator or service
provider must support it.
Write a message
To
Add Number-- Input the number of the receiver.
Add E-mail-- Input the e-mail of the receiver.
Cc
Add Number-- Input the number of the receiver.
Add E-mail-- Input the e-mail of the receiver.
Bcc
- 28 -
Page 30

AT-Telecom USER-MANUAL AT-B17D
Add Number-- Input the number of the receiver.
Add E-mail-- Input the e-mail of the receiver.
Subject: You can edit the subject of the MMS.
Edit content
Press Edit key to have the following options:
Add text: You can write you want to say.
Add picture: You can insert you desired picture.
Add audio: You can insert your desired audio.
Add attachment: You can insert you desired attachment.
Add slide before: You can add a slide before the current
page.
Add slide after: You can add a slide after the current
page.
Preview: You can preview the current MMS.
Slide timing: You can set the play time of every slide.
After editing, you can press “Done” to finish the MMSand
to send the MSM with the following options:
send only, save and send, save to drafts or save as
template.
You can also set functions including: Validity period,
Delivery report, Read report, Priority.
Inbox
If you a MMS in the inbox you have the following options:
- 29 -
Page 31

AT-Telecom USER-MANUAL AT-B17D
View: You can view the MMS and save photos, audio and
annex.
Reply: Reply the sender with MMS Reply by SMS: Reply the
sender with SMS.
Reply all: If the MMS you received has been sent to many
receivers by the sender, with such function, you can send
a reply MMS to the same receivers.
Forward: You can directly forward this MMS to others.
Delete: Delete the current MMS.
Delete all: You can delete all MMS in inbox.
Save as template: You can save the MMS as template.
Properties: View the detailed information of the current
message.
Use details: You can extract the number in the MMS and
save it or make a call or use the URL in the MMS.
Outbox
You can view the MMS sent and saved in the Outbox.
Next options are: View, Send, Delete and Delete all, Save
as template, Properties and Use details.
Drafts
You can save the edited MMS into the drafts box/folder.
Template
- 30 -
Page 32

AT-Telecom USER-MANUAL AT-B17D
There are 5 preset MMS templates available.
Use next options as View, Write message and Properties.
You can store your own designed MMS templates or MMS
messgae as template here.
MMS Settings
Compose:
Creation mode-- "Free" and “Restricted ".
Picture resizing-- You can reduce the size of the
inserted photo, including: 160*120,320*240 and Off.
Best slide duration-- You can set On or Off to activate
such function.
Auto Signature-- set On or Off
Signature-- Edit the content of the automatic
signature.
Send:
Validity period-- You can set the time to store the
MMS in the MMS service center and then send,
(Maximum,1hour, 6hours, 12hours, 1day, 1week.)
Delivery report--set On or Off for receiving a report
Read report-- set On or Off
Priority-- Medium, High, Low.
Slide timing-- set the interval of the receiver to see
the MMS slides, defaulted as 5s.
Delivery time --Immediate, 1hour later, 12 hours later,
24 hours later.
- 31 -
Page 33

AT-Telecom USER-MANUAL AT-B17D
Retrieve:
Home network—Immediate and Rejected, Delayed.
Roaming -- The same as to the main network,
including and As home, Delayed and Rejected.
Read report—On request, Send, Never send.
Delivery report—You can set On or Off to activate or
close this function.
Filter:
Anonymous -- Allow and Reject.
Advertisement-- Allow and Reject.
Server profile:
In dual-SIM mode, you can separately set SIM1
and SIM2. You have the following settings:
Activate account.
View account: You will view the Account name, MMSC
address, Data account, Connection type, User name
and Password of the account.
Note: To send/receive MMS messages, you need to set:
MMS sever, Data account and Internet sevice settings
properly.
For Data account and Internet service settings, please
refer to page 47-49. If your SIM card is from a provider on
the list, it will be automatically recognized and need not
to be setup again.
- 32 -
Page 34

AT-Telecom USER-MANUAL AT-B17D
Memory Status:
You can see the utilization rate of the mobile phone,
including the used space and the usable space.
Chat
You can have a chat in the selected chat-room.
Preset information: my nickname, destination number.
Voice mail server
This is a kind of network service, which cannot be used
until you apply to the network operator and open a voice
mail number.
Call voice mail:
You can dial the voice mail number saved in the
voice mail number function list. If you have two phone
numbers, they will have their own voice mail number.
Edit:
You can edit the voice mail name and the voice
mail number. Press the OK key to save the number.
Tip: In standby state, after the voice mail number is set,
press 1 key to call the voice mail. In dual-SIM standby
state, you can choose to call the voice inbox via SIM1 or
SIM2.
- 33 -
Page 35

AT-Telecom USER-MANUAL AT-B17D
Broadcast Message
Cell broadcast is a kind of information service such as
weather report, traffic etc. that the network operator
sends to the GSM users within a certain area. In dual-SIM
mode, you can separately set for SIM1 and SIM2:
Receive mode:
You can set ON/OFF to activate or close this
function.
Read message:
You cannot read the received information until
you activate this function.
Languages:
You can set the language for the received
information. Default is All languages.
Channel settings:
You can Select, Add, Edit and Delete channel
number.
- 34 -
Page 36

AT-Telecom USER-MANUAL AT-B17D
Menu PHONEBOOK
The mobile phone is provided with the business card
folder type phonebook. The information of every contact
saved in the phone-memory can included three phone
numbers (mobile phone, home phone and office phone),
company name, e-mail address, office number, fax
number, birthday, associate picture, associate sound,
Caller groups (Six types: none, family, friends, VIP,
business and others).
Every contact saved into SIM1 or SIM2 can only include
name and number. The mobile phone supports 1,000
numbers.
Search contact
Input the name to be searched, press “Search” in the
phonebook, then you can find the matched name.
Add new contact
You can save phone numbers to SIM cards or phone. On
SIM card, one entry has only name and phone number. On
the phone, one contact can include Name, Number, Home
Number, Company Name, E-mail Address, Office Number,
- 35 -
Page 37

AT-Telecom USER-MANUAL AT-B17D
Fax Number, Birthday, Associate Photo, Associate Sound
and Caller Groups.
Copy All
You can copy all contacts from SIM1 to phone, from
phone to SIM1, from SIM2 to phone, from phone to SIM2,
from SIM1 to SIM2 and from SIM2 to SIM1.
Move All
You can move all contacts from SIM1 to phone, from
phone to SIM1, from SIM2 to phone, from phone to SIM2,
from SIM1 to SIM2 and from SIM2 to SIM1.
Delete
You can delete: From SIM1, From SIM2, From phone and
One by one.
Caller Groups
You can set Ringtone, photo and select members for five
caller groups. Caller group members can only be copied
from the phone memory, not from SIM cards.
- 36 -
Page 38

AT-Telecom USER-MANUAL AT-B17D
Extra numbers
You can separately set SIM1 and SIM2 owner number,
service dialing number and SOS number.
Settings
Memory Status: The current status of memory usage for:
SIM1, SIM2 and phone memory. The display format is
“Used/Total” (i.e. 20/250).
Preferred Storage: SIM1, SIM2 or phone memory
Fields: What to store and display in the phonebook and
with ‘Add a Contact”.
My vCard: You can edit and send my business card.
vCard version: Choose vCard 2.1 or vCard 3.0.
- 37 -
Page 39

AT-Telecom USER-MANUAL AT-B17D
Menu CALL CENTER
Call history for separately the call registers of SIM1 and
SIM2.
Call history includes missed calls, dialed calls, received
calls, Delete call logs, call timers, call cost, SMS counter
and GPRS counter.
In missed-, received- and dialed-calls, you can see the
date and time of the call.
Edit or delete the phone number in the list, save the
number to the phonebook or send SMS and MMS to the
number, or redial this number etc.
Note: SIM1 and SIM2 contains respectively 20 entries.
Choose any entry from the list, press the SIM1 or SIM2
call-key to dial the number directly.
Call timers
Last Call: view the time of the last made call.
Dialed calls: the duration of all dialed calls.
Received calls: the duration of all received calls.
Reset al time: clear all call timers.
Call cost
This needs the support of the network service provider.
- 38 -
Page 40

AT-Telecom USER-MANUAL AT-B17D
Last call cost: With this function, you can view the fees of
the last call.
Total cost: With this function, you can view the fees of all
calls.
Reset cost: With this function, you can clear all fee
records. PIN2 code must be input to set call cost.
Max cost: With this function, you can limit call fees in the
specified pricing unit or currency unit. PIN2 code must be
input to set call cost.
Price per unit: This function needs network support. For
more details, please consult the network operator.
Text message/SMS counter
With this function, you can see and reset the number of
sent messages and received messages .
GPRS counter
Last sent: the sending traffic of last link.
Last received: the reception traffic of last link.
All sent: You can view the sending traffic of all links.
All received: You can view the reception traffic of all links.
Reset counter: You can clear all link traffic.
- 39 -
Page 41

AT-Telecom USER-MANUAL AT-B17D
Menu MULTIMEDIA
Bluetooth
Use Bluetooth wireless technology to set wireless
connections with other compatible devices as mobile
phones, computers, headsets, in-car accessories etc.
With the Bluetooth function, you can transmit files to a PC
or other BT device and connect to the Web by dialing a
number via your SIM.
Keep the distance to another BT device not more than
10m.
Do not use the Bluetooth function in a hospital and an
airplane.
The Bluetooth Menu
Power:
ON, to activate BT. We recommended to close the
function when it is idle, because it uses much
power.
Inquiry audio device:
With this function, you can inquiry an audio device.
For other devices, enter My Devices to search.
My device:
- 40 -
Page 42

AT-Telecom USER-MANUAL AT-B17D
Inquiry a new device or you will see the Bluetooth
devices compatible with the AT-B17D.
Active devices:
You will see all devices currently connected with the
mobile phone and their link service type. You can
interrupt the specified link service.
Settings:
Before using the Bluetooth functions, enter this
menu to set the corresponding settings. If theBluetooth
function is not activated (On), you will see an activation
confirmation on the screen.
Visibility: After activating, other Bluetooth devices can
find your device/phone.
Change device name: You can edit my device name.
Authentication: When activated, pairing is needed
when a BT device accesses my device.
Audio path: If using Bluetooth to make calls, set this
path as a head-set device.
Block list: You can view the block list if used.
Storage: Select Phone or Memory card as the default
storage place.
FTP Settings: You can set the file directory shared by
my device and the access right to online Bluetooth
devices.
About:
- 41 -
Page 43

AT-Telecom USER-MANUAL AT-B17D
Information about the name of my device, device
address and the Bluetooth services supported by
my device.
Tip: When searching Bluetooth devices and pairing the
found devices, you need to know a pairing password.
Use Bluetooth to Receive/Send Data:
1. Choose the content to be sent, and then choose
Options-> Send-> To Bluetooth. The screen will display
the Bluetooth device(s) within the signal coverage.
2. Choose the device to connected with.
3. If the other device requires pairing before data
transmission, the device will require to input a pairing
password.
4. After the connection is established, the mobile phone
will display the data transmission speed.
5. When another Bluetooth devices want to send data, the
mobile phone will ask whether to receive the data. The
received data will be stored in the initially set receiving
folder.
Tip:
The function of using a Bluetooth headset for calls is
limited either to SIM1-calls or to SIM2-calls.
Go to 5. Settings > 4. Audio path and click “Forward to
Bluetooth Headset”.
- 42 -
Page 44
AT-Telecom USER-MANUAL AT-B17D
Attention: A Non-Stereo Bluetooth headset cannot be used
to listen music. When a Stereo Bluetooth headset is used
to listen music, there will be no audio output from the
phone speaker. Incoming calls or dialed calls will mute
the ongoing music.
Tip: Use the following methods to disconnect:
Turn OFF Bluetooth to disconnect all devices.
Enter My Devices and delete the paired devices
Image viewer
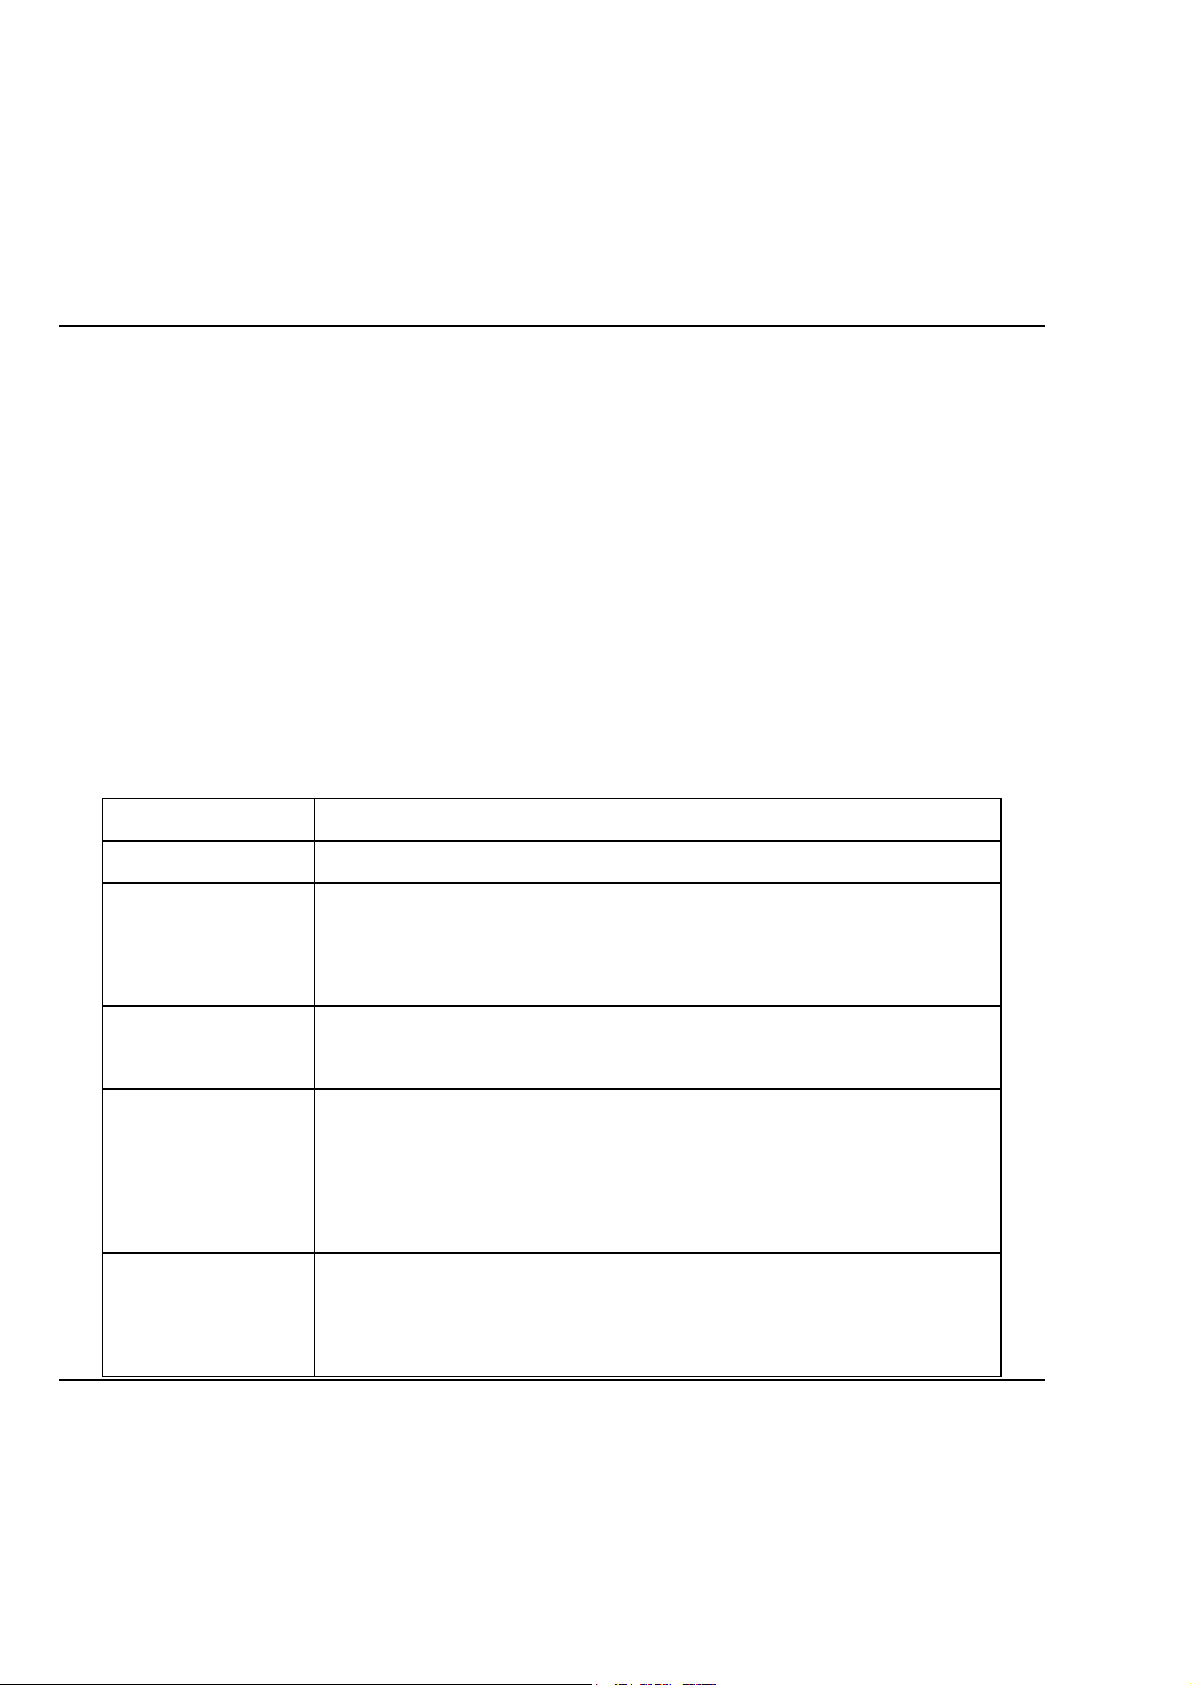
Options Description
View You can view the selected photos.
There are two browse styles, i.e. list
Browse style
and matrix.
You can set the picture as wallpaper or
Use
screen saver.
You can send photo by MMS and
Send
Bluetooth.
Rename You can rename the selected photo.
Delete You can delete the selected photo.
Delete all files You can delete all photos in the album.
You can choose photos storage path
Storage
(Phone or Memory card).
- 43 -
Page 45
AT-Telecom USER-MANUAL AT-B17D
Audio player:
If the operation system is Windows 2000 and above, no
driver needs to be installed. To download music, you
must insert the T-Flash card into the mobile phone,
switch off the mobile phone, connect the mobile phone to
a PC by USB cable, then the PC will detect the new
hardware and create a new “mobile HD”.
Download the chosen MP3 file only into the "My Music"
folder, otherwise the file cannot be played. (Only MP3,
AMR and MIDI is supported).
Audio player options:
Options Description
Play Play the current music.
Details View file name, Channel, Quality, Size,
Time, title, artist, album, genre, year
etc.
Add to
Add this music into the ringtone base.
ringtones
Refresh
list
Enter the track list and update it (e.g.
the deleted music in the file
management will not disappear until
update is conducted.
Settings Play Settings: Track list path,
automatic track list, repeat, shuffle
and background play.
- 44 -
Page 46
AT-Telecom USER-MANUAL AT-B17D
Video player:
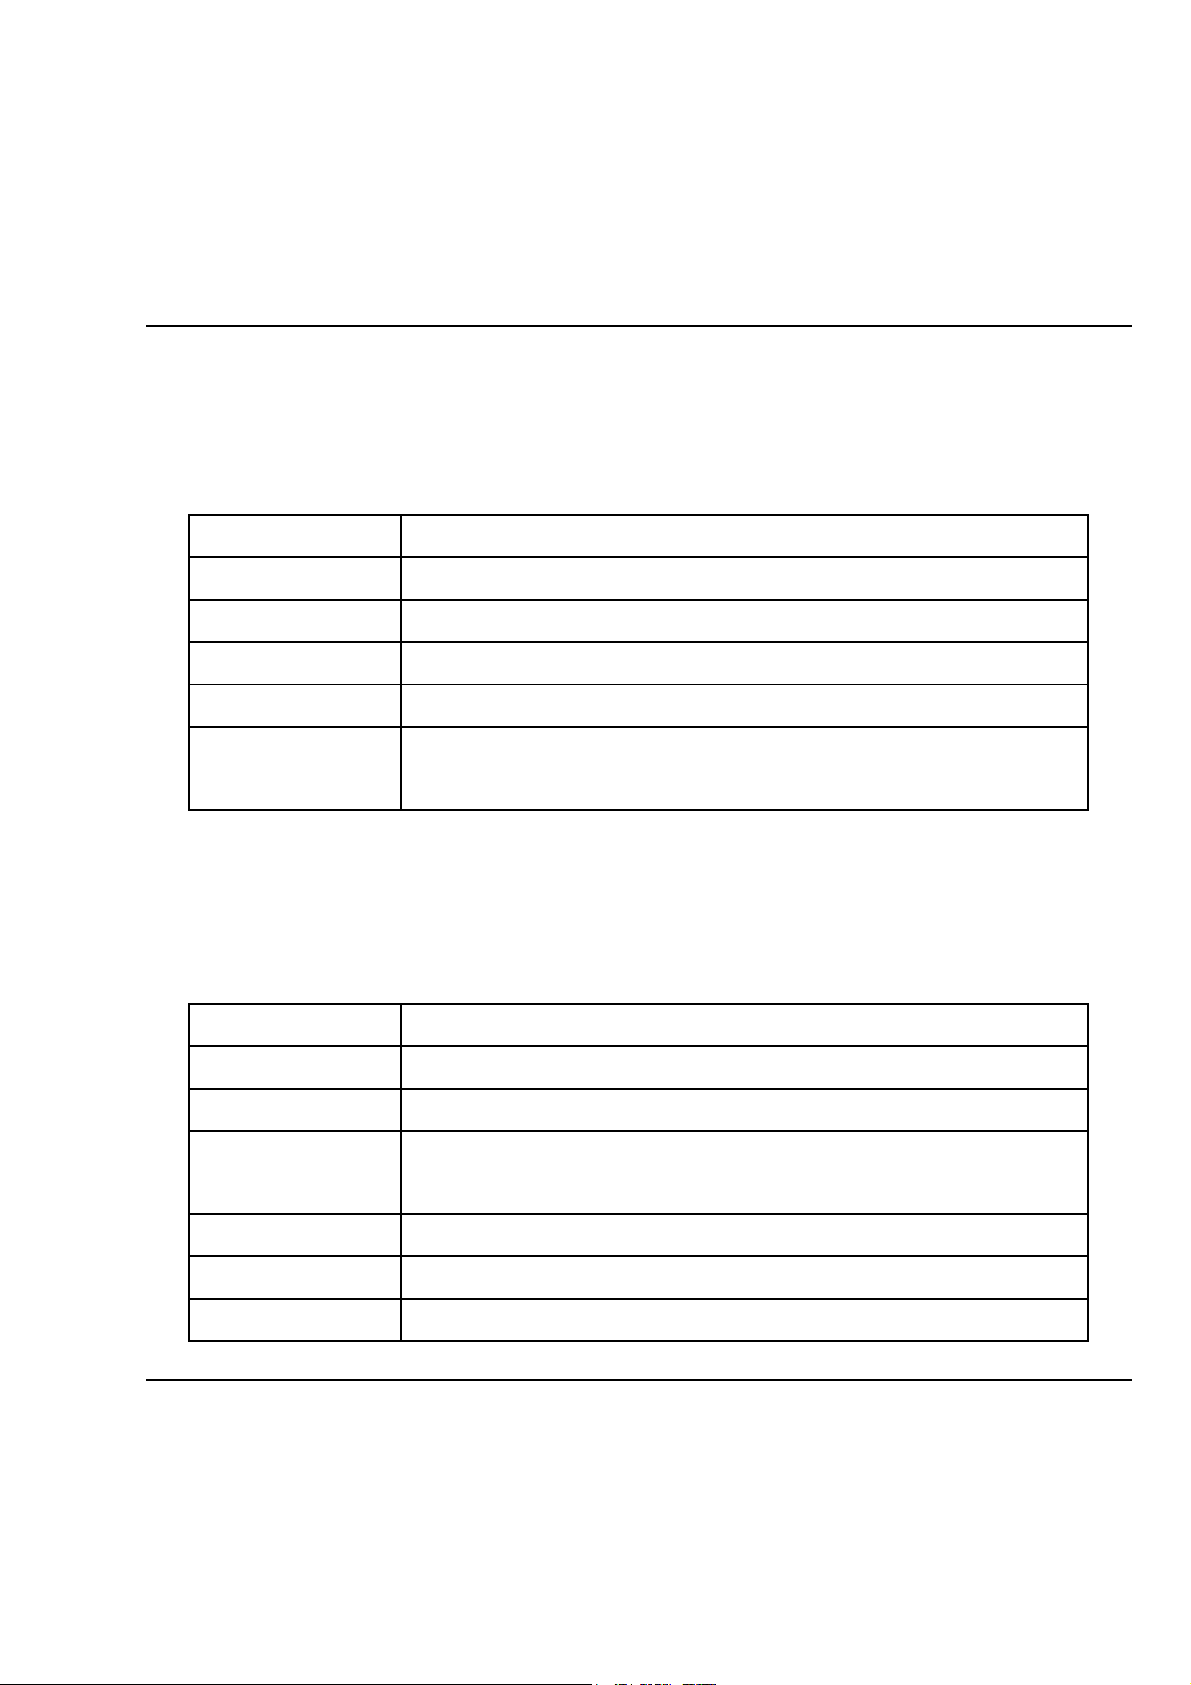
You can download video files into "videos" of your T-Flash
card and playback. (Only AVI and 3GP is supported).
Video player options:
Options Description
Play Play the current video.
Rename Change the name of current video.
Delete You can delete the selected video.
Delete all You can delete all videos in the album.
Storage You can choose videos storage path
(Phone or Memory card).
Sound recorder:
You can record sound or playback recorded sounds
Sound recorder options:
Options Description
Record To record new sound.
Play Play the current sound.
Append To extend recording on the same
sound file.
Rename Change the name of current sound.
Delete You can delete the selected sound.
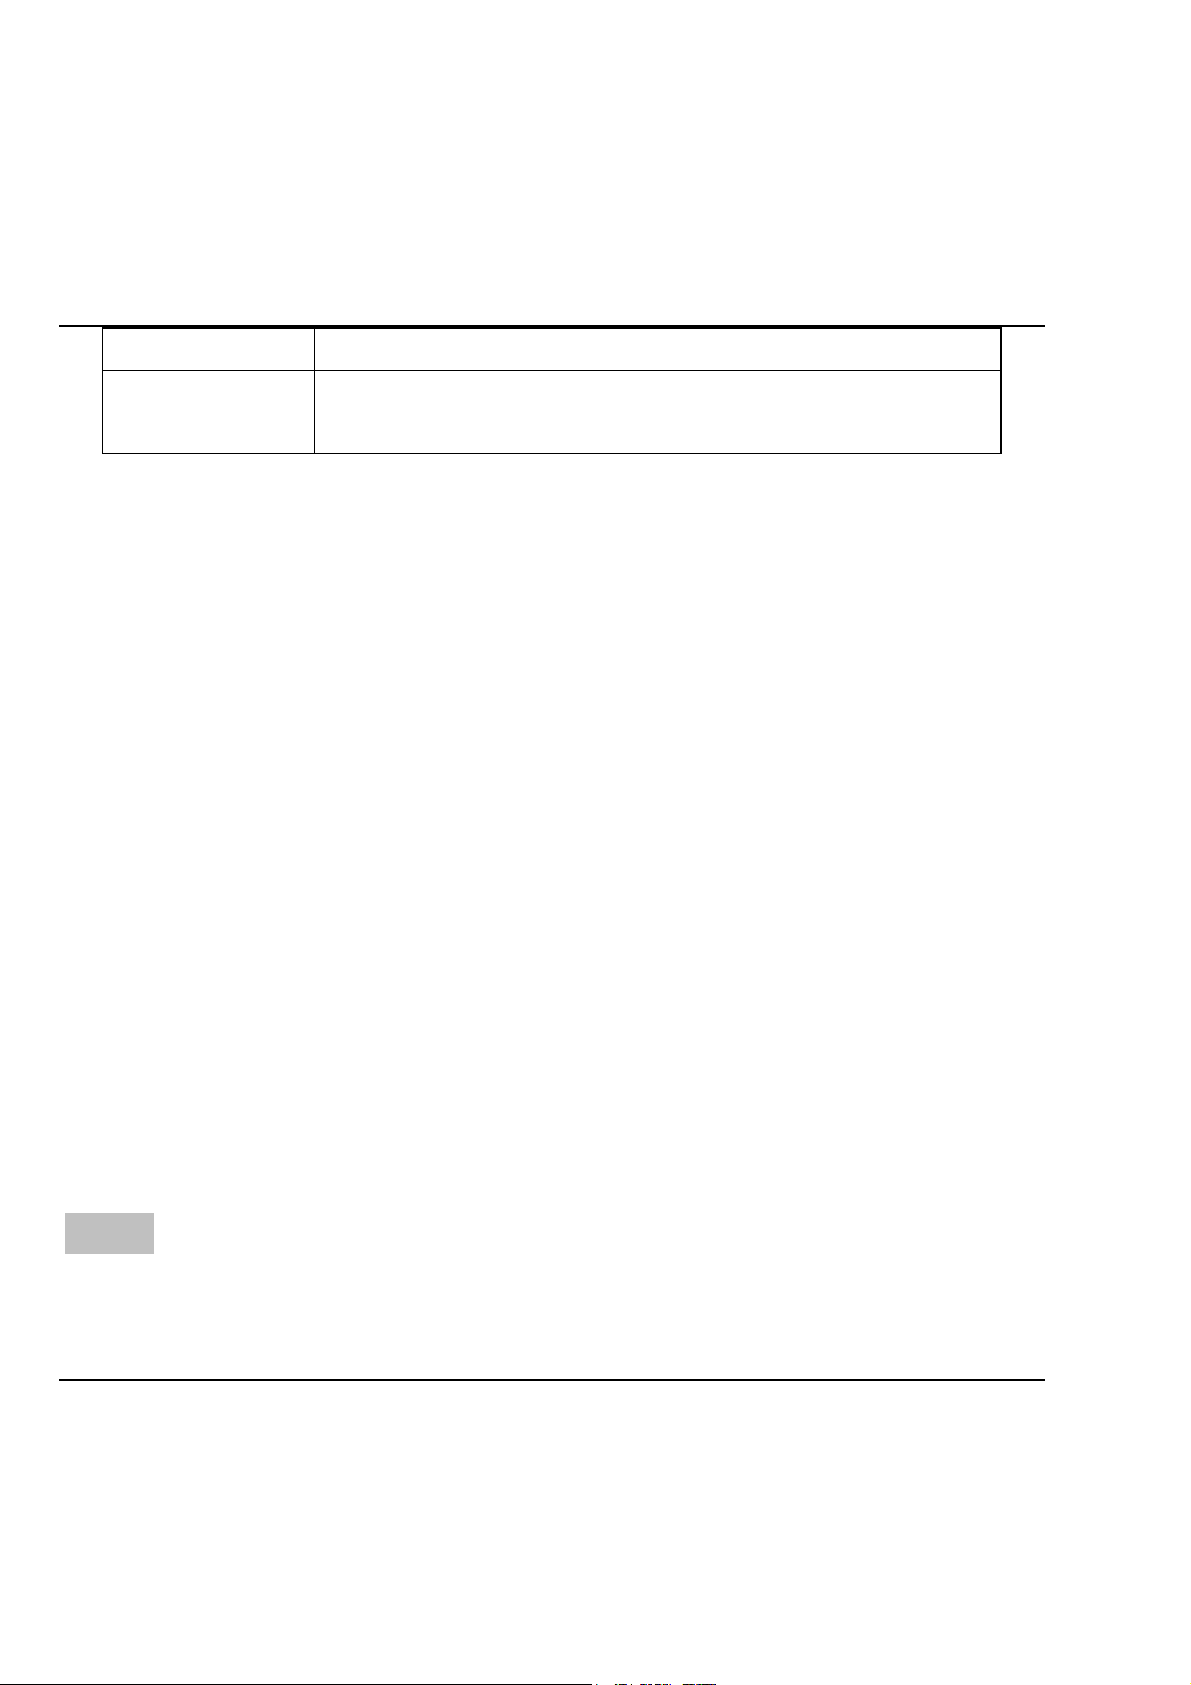
Delete all You can delete all sounds in the
- 45 -
Page 47
AT-Telecom USER-MANUAL AT-B17D
album.
Settings Set up sound storage, format and
quality.
FM Radio:
Options:
1. Channel list: the corresponding FM frequencies channel
list.
2. Manual input: You can input a FM frequency between:
87.5-108.0 Mhz.
3. Preset Auto search: Automatic frequency / channel
search that will be saved in the FM channel list.
4. Setting: You can set Background play On/Off,
Loudspeaker On/Off, Recording format AMR/WAV, audio
quality Low/High, recording storage Phone/T-Flash card
5. Audio recording: You can activate radio recording.
6. Append: Choose an existing radio recording file to
continue recording. The new recorded content will be
added (apended) to the selected file.
7. File list: To display all recorded files.
Note: You can choose the recording as a ringtone. In 7.
File list, choose a recorded file and go to Options/Use/To
Profiles. In Profiles/Personal Settings/Ring Settings, set
the recording as a ringtone.
- 46 -
Page 48

AT-Telecom USER-MANUAL AT-B17D
In Menu Organizer > Alarm > Edit > Alarm Tone: You can
choose FM-Radio or Tone. At alarm time the FM-radio will
play. (Headset must be connected)
FM-radio and function keys
Down key: to turn on/off the FM-radio.
Up key: Activate recording a radio program.
OK key: Enter the FM-radio menu for further options.
Left/Right key: To search channels forward and
backward until you find an effective channel. In fine
tuning, you can have a tuning of 0.1MHz up or down
1-9 number keys: Pressed shortly, you switch to the
corresponding channels saved in the channel list.
Pressed long, you save the current frequency to the
corresponding channel number.
0 key: open the FM channel list and switch to the
preffered station
[*] Up-, [#] Down-volume.
Schedule Radio Recorder:
There are 4 recording-places available. Open a place and
set: Date, Start- and End-time, Repeat options, Select from
the channel list or input the frequency manually,
Recording settings: record format (AMR/WAV), Audio
- 47 -
Page 49

AT-Telecom USER-MANUAL AT-B17D
quality (High/Low), storage (Phone/ Memory card), Record
file(New file/Append file).
Melody composer:
With the melody composer you can make ring tones of
different musical instruments and add them into profiles
or SMS/MMS messages.
Menu ORGANIZER
Calendar
With this function, you can set the alarm clock to remind
you of your schedule and record your schedule. Roll the
rectangle block to the desired date. If the date is set with
memo function, then this date will be highlighted in
yellow. To view all memos of one day, press OK to see the
schedule. You can have the following operations:
View tasks:
You can view the task of the date where the cursor
is on and set the time, date, content and whether to
activate alarm on this schedule. When editing the
task, you can choose the alarm defaulted time with
- 48 -
Page 50

AT-Telecom USER-MANUAL AT-B17D
the left and right direction keys. In addition, you
can Add, Delete, Delete all and Send vCalendar.
Add task:
You can select a task-type to edit: Reminder,
Meeting, Course, Date, Call, Anniversary.
Jump to date:
You can move to the calendar of a specific date.
Go to weekly view:
View all tasks per week. By choosing Go to Monthly
view, you see all tasks for that month.
To Do
For Memo’s you can: View, Add, Edit, Delete, Delete all
and Send as vCalendar.
If you have set an alarm for the memo, at alarm time the
mobile phone will ring and display the memo content.
Alarm
The time format for the alarm clock is identical to the
Date & Time setting. When the mobile phone is off, the
alarm clock still works. The system has 5 alarm clock
settings. When alarm time is reached, the mobile phone
will give an alert tone and flicker the current time and
date on the screen. Press Stop to Stop; press Sleep, then
- 49 -
Page 51

AT-Telecom USER-MANUAL AT-B17D
the mobile phone will pause ringing and will continue
after 4min.
When the mobile phone is switched off at alarm-time, the
mobile phone will switch on automatically and ring.
You can edit alarms: On/Off, Time, repeat(once, everyday,
days),alarm tone(tone, FM radio),snooze(default, 110mins),alert type(ring only, vibration only).
Calculator
Enter amounts and with the navigation keys you can
choose the calculator function on the display. Press the
clear key to clear the last input or results, digit by digit.
Press the clear key long to clear all content or result.
Press “OK” to obtain the result.
Note: The precision of this calculator is limited and only
use for simple calculation.
World Clock
Press the left and right navigation keys to view the
current time of every country. If you set daylight saving
time for a foreign city, the current time of that city
(except the default city) will be ahead an hour.
- 50 -
Page 52

AT-Telecom USER-MANUAL AT-B17D
Menu SETTINGS
User Profiles
Your mobile phone has multiple profiles so that you can
customize settings for different cases for different events.
Profiles as General, Meeting, Outdoor, Indoor, Headset
and Bluetooth can be changed to your needs.
Editing a profile:
Tone setup:
Include Incoming Call, Power on, Power off,
Message tone and Keypad tone.
Volume:
Set the volume of Ringtone and Key tone.
Alert type:
You can choose any one from Ring only, Vibration
only, Vibration then ring as the current ring mode.
Ring type:
You can choose any one from Single, Repeat,
Ascending as the current ring type.
Extra tone:
Select/Cancel settings on Warning, Error, Camp on
and Connect to have corresponding tone tips.
Answer mode:
- 51 -
Page 53

AT-Telecom USER-MANUAL AT-B17D
You can choose whether to use any key to
answer.
After having individualized the settings, choose “1.
Activate”
Note: After the headset is inserted into the mobile phone,
the mobile phone will automatically change to the
headset profile. Unplug the headset to return to the
previous profile.
Tip: In standby, press # key for several seconds to switch
to the silent profile and again back to the previous
profile.
Dual SIM Settings
Only SIM1 open
Only SIM2 open
Flight mode
Phone Setup
Time and date:
With this function, you can set home city, time and
date format and the time of specific place.
Set Home City: You can set different cities. This
option must be used together with auto update of
time and date. (If the network supports it).
- 52 -
Page 54

AT-Telecom USER-MANUAL AT-B17D
Set Time and Date: You can set the current time
and date.
Set Format: You can set the display format for
time and date.
Note: If the battery has been taken from the mobile
phone, you need to reset the time and date.
Schedule power on/off:
You can set the time for scheduled power on/off.
Language:
Choose the desired language. (English, German,
French or Dutch)
Pref. input methods:
Choose from the following input methods for
editting or writing: Multitap ABC, Multitap abc,
Smart FR, Smart fr, Multitap FR, Multitap fr, Smart
DE, Smart de, Multitap DE, Multitap de, Multitap NL,
Multitap nl and Numeric.
Display characteristics:
You can set standby menu wallpaper, screen saver,
power on display, power off display, whether to
show date and time and LCD backlight Timer /
Brightness.
Greeting text:
You can set a greeting text displayed on the main
screen.
- 53 -
Page 55

AT-Telecom USER-MANUAL AT-B17D
Shortcuts:
You can add, edit, delete, disable and change order
of the shortcusts list.
Dedicated key:
You can have corresponding settings on the up,
down, left and right navigation keys.
Auto update of date and time:
“Activate” to automatically update time and date
according to the current time zone. Auto update of
time and date will not affect the alarm clock or
calendar.
UART setup:
Choose for access with the PC-Phonesuite software,
either for SIM1+Phone or for SIM2.
General Call Setup
Call setting:
1. SIM1 call settings.
2. SIM2 call settings.
For both SIM cards next settings can be done:
Caller ID: 1. Set by network, 2. Hide ID, 3. Send ID.
Note: These functions needs network support.
Call waiting: 1. Activate, 2. Deactivate, 3. Query status
- 54 -
Page 56
AT-Telecom USER-MANUAL AT-B17D
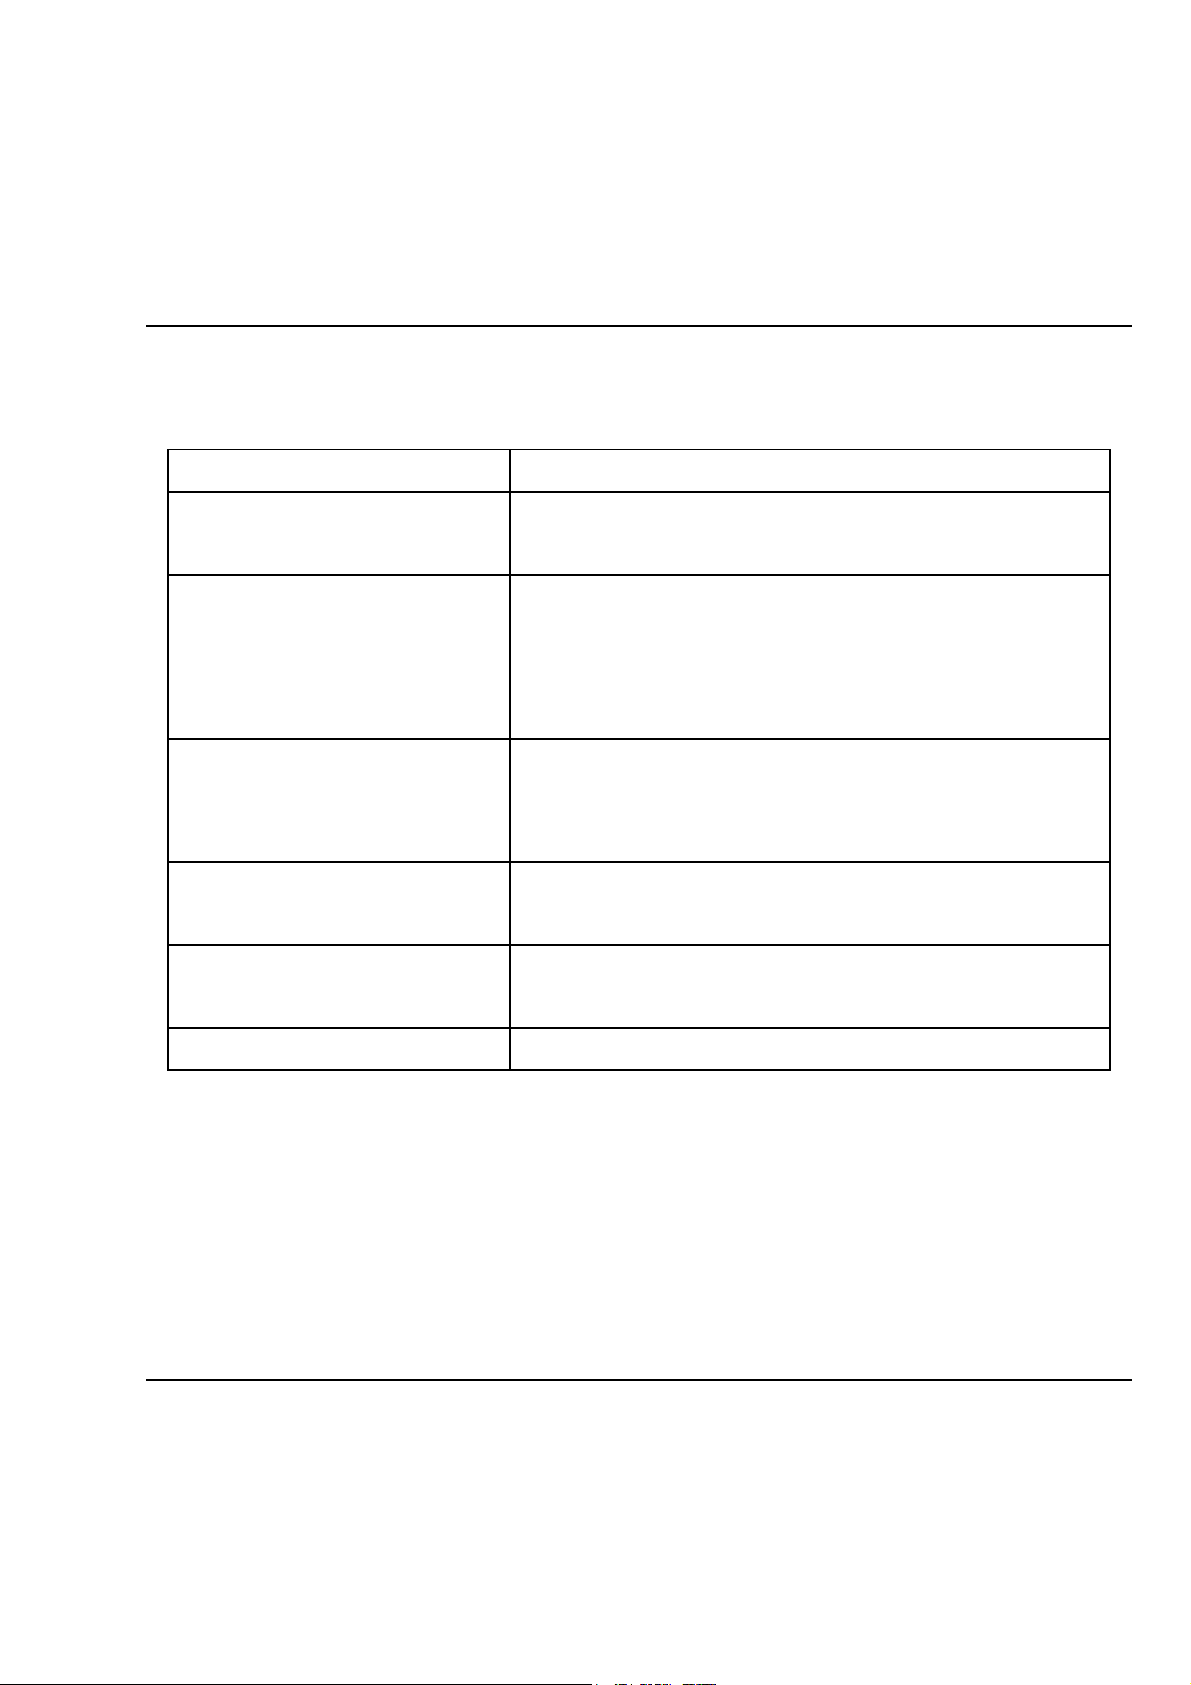
Call divert: A network function that must be supported by
the network operator. With this function, you can divert
calls to another number or voice mail.
Action Description
Divert all voice
calls
The network will divert all voice
calls without conditions.
When the network cannot find
Divert if
unreachable
your mobile phone (switched-off
or out of the service area), it will
divert the calls.
When the mobile phone does not
Divert if no
answer the call, the network will
answer
automatically divert it.
When you are on line, the
Divert if busy
network will divert the call.
Divert all data
Network support needed.
calls
Cancel all diverts Cancel all divert functions.
Call barring:
1. Outgoing calls: All calls, International calls,
International calls except to home PLMN:
2. Incoming calls: All calls, When Roaming.
3. Cancel all: You need the password. (1122).
- 55 -
Page 57

AT-Telecom USER-MANUAL AT-B17D
4. Change barring password: Old password / New
password.
Line switching: With OK, choose Line 1 or Line 2.
Closed user group: n/a
3. Black list:
On or Off or set numbers.
4. Auto redial:
On or Off.
5. Speed Dial:
You can edit the related speed dialing numbers. If
this function is “Active”, then you push any of the
corresponding individual keys (2-9) in the standby
screen to dial the number specified for this key.
6. More:
6.1 Call time display:
You can set whether to display call duration during
call conversation.
6.2 Call time reminder:
Set an alert tone or periodic alert tone for several
round minutes to remind you during call
conversations.
6.3 Auto quick end:
After the ‘set’ time expires, the mobile phone will
automatically end the call.
- 56 -
Page 58

AT-Telecom USER-MANUAL AT-B17D
Network Setup
In dual-SIM standby mode, you can separately set SIM1
network and SIM2 network.
1. Network selection: You can search the network
again. Select your favorite network and choose to
register the network automatically or manually.
2. Preferred network: You can set the preferred
registered network for the SIM1 or SIM2 card.
Security Setup
In dual-SIM standby mode, you can separately set SIM
lock, Fixed dial, Barred dial and Change password for
both SIM1 or SIM2.
1. SIM Lock:
On / Off. When this option is On, it is necessary to
input a PIN code when you switch on the phone.
2. Fixed dial:
This function needs support of the network
operator. When activated, you can only dial the
phone numbers saved in the fixed dial list. To
activate it, you need to input the PIN2 code.
3. Barred Dials: On / Off
4. Change Password:
To change the default SIM PIN1 and PIN2 code.
- 57 -
Page 59

AT-Telecom USER-MANUAL AT-B17D
Phone Lock: On or Off. With password 1122.
Auto keypad lock: On or Off. When on the mobile phone
will after certain time lock the keypad. Timing can be set
to: Off, 5sec, 30sec, 60sec and 5min.
Change Password: You can change the default phone
password “1122” into a 4-8-digit number. If the phone
lock is activated, the mobile phone will hint “Phone
locked” after switch On. To unlock it, you can input the
phone lock password and click OK.
Restore Factory Settings
You can restore the factory settings of the mobile phone.
The factory reset password is 1122.
- 58 -
Page 60

AT-Telecom USER-MANUAL AT-B17D
Menu Fun & Games]
Games
This phone provides four kinds of games: Riches, Puzzle,
Panda and UFO, concrete operations could see the Game
Help of these games.
Games settings:
BGM: Set the background sound effect of the game
On/Off.
Sound Effect: Set the sound effect On/Off.
Vibration: On/Off.
Volume: Set the volume
- 59 -
Page 61

AT-Telecom USER-MANUAL AT-B17D
Menu SERVICES
With this function, you can access multiple services on the
Internet. These services include weather report, news and
financial and economic information etc. This function is
provided by the network supplier. According to the
services the SIM card provides, there will be new menu
options displayed.
WAP
Homepage-- Start the website chosen in the connection
settings file.
Bookmarks—Enter options for next operations:
Go to: Log into the chosen website.
Edit: Edit the chosen bookmark name and
website.
Send: Send the bookmark as text message or
multimedia message.
Delete: Delete the chosen bookmark.
Delete all: Delete all bookmarks.
Add bookmark: Add new bookmarks.
Recent pages: Record the latest 10 web pages browsed.
Offline pages: You can view these pages when you
offline.
- 60 -
Page 62

AT-Telecom USER-MANUAL AT-B17D
Input address: Input the website to be logged in.
Service Inbox: To receive the service information
(“Recommended” information) sent by the service
provider.
Settings: Select SIM1 or SIM2 or Always ask
Edit account: Select SIM1 or SIM2 and Edit / view the
list with service providers
View account: You will view the Account name,
Homepage, Data account, Connection type, User
name and Password of the account.
If your SIM Provider is not on the list, you need to add
a new account and active after you finish it.
Note: You will get the data setting specification for GPRSWAP from your SIM Provider.
Browser options-- You set whether to display images
during waiting time and when browsing webpages.
Service message settings-- choose ON or OFF to
enable the push messages.
Clear cache-- When the cached data is increasing,
network surfing speed can be affected.
Clear cookies-- You can clear personal data.
Data account
GSM Data or GPRS.-- The use of GSM data will be provided
with the following ID information, i.e. “? GSM”
- 61 -
Page 63

AT-Telecom USER-MANUAL AT-B17D
Account name: ? GSM.
Number: ?12345
User Name : ?wap
Password: ?wap
Line Type: ISDN and Analogue.
Speed: 4.8 Kbps, 9.6 Kbps, 14.4 Kbps
DNS: ie. 010.000.000.172
GPRS-- The use of GPRS data will be provided with the
following ID information:
Account Name: ? GPRS
APN: ??
User Name: ? gprs
Password: ? gprs
Auth.type: Normal or Secure.
Note: For related charging standard and detailed settings,
please consult the local network service operator.
Connection manager
View the connection status.
- 62 -
Page 64

AT-Telecom USER-MANUAL AT-B17D
Menu FILE MANAGER
You can manage photos, MP3 and folders.
[Phone]
Storage in the phone.
[Open]: You can open Images, Photos, My Music and
Video folders.
Images—Images Folder
View: You can view the folder.
Send: You can send images to screen saver, Switch-on
Cartoon, Switch-off Cartoon, Phonebook, MMS and SMS
etc.
Details: You can see the date and size of the file.
Rename: You can rename the folder.
Copy: You can copy the file into Audio, Images, My Music,
Photos, Video or specified folders.
Move: You can move the file into Audio, My Music,
Images, Photos, Video or specified folders.
Delete: You can delete the current record.
Delete All files: You can delete all records in all current
folders.
Sort by: You can rank files as per name, type, time and
size or choose “None”.
- 63 -
Page 65

AT-Telecom USER-MANUAL AT-B17D
My Music--MP3 Folder
Play: You can play the current MP3.
Use: You can use the current MP3 to User profiles.
Send: You can send music to Profiles, MMS and SMS.
Details: You can see the date and size of the file.
Rename: You can rename the folder.
Copy: You can copy the file into Audio, Images, Photos,
Video or specified folders.
Move: You can move the file into Audio, Images, Photos,
Video or specified folders.
Delete: You can delete the current record.
Delete All: You can delete all records in all current folders.
Sort by: You can rank files as per name, type, time and
size or choose “None”.
New folder: Under the root directory, you can create a
new folder to save more detailed files.
Format: Formatting can clear all files in the mobile phone
and newly created folders. After formatting, you need to
restart the mobile phone and the Audio folder and Images
folder will restore automatically and Photos folder will
automatically occur after the first photo is taken.
Memory Card
Open: You can open the files in the memory card.
- 64 -
Page 66

AT-Telecom USER-MANUAL AT-B17D
New folder: you can create a new folder to put specific
(privat) files in.
Format: You can format all files in the memory card, but
we recommend to do that in your PC.
- 65 -
Page 67
AT-Telecom USER-MANUAL AT-B17D
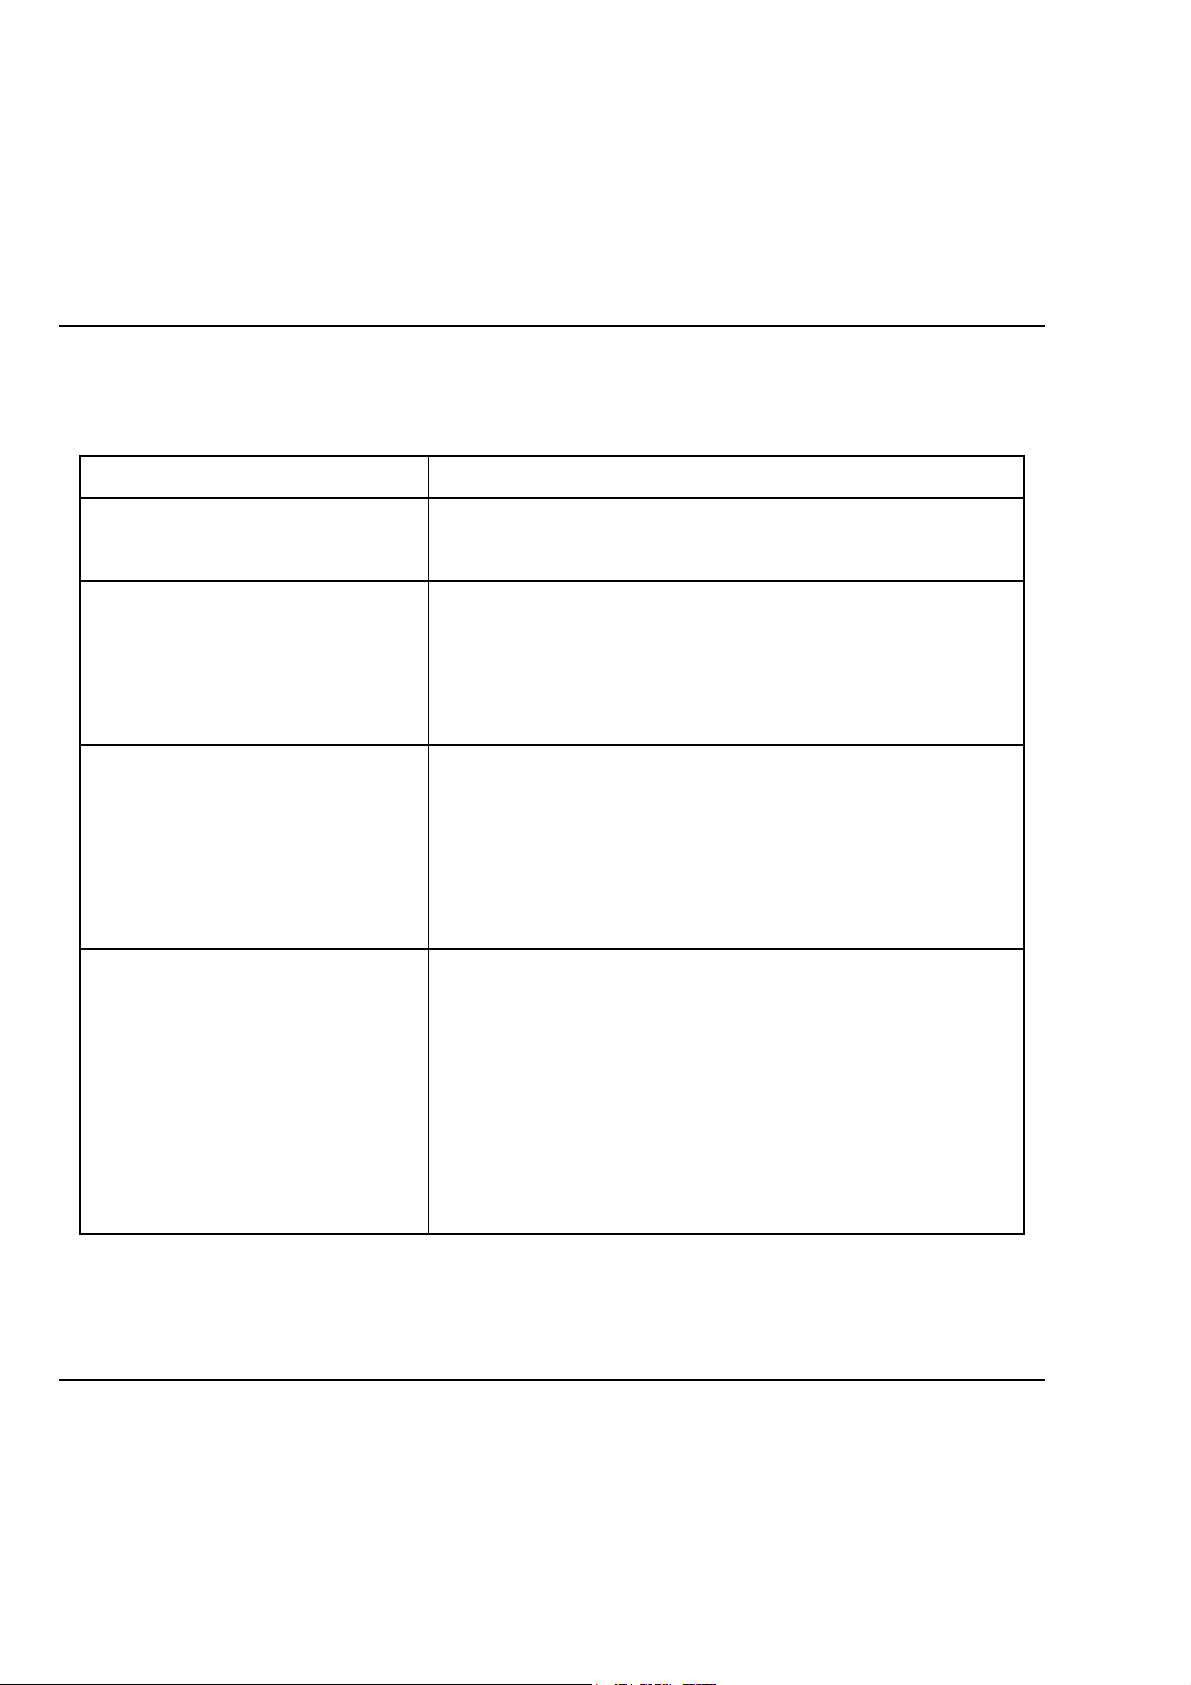
9. Appendix 1 Troubleshooting
Phenomena Possible Causes
Unable to switch
on
SIM failed
Poor signals
Unable to dial out
Does the battery have power?
Is the battery placed correctly?
The SIM card is dirty. Clean it.
Reinstall the SIM card.
The SIM card is damaged.
Replace it.
Check the signal strength icon
on the screen. If the icon
contains 3 bars, it indicates the
signal is OK. If below 1 bar, the
signal is very poor.
Strong interference exists
around you.
Maybe you have activated the
call restriction function.
Maybe you have activated Line 2
but your network operator does
not provide this service for you.
- 66 -
Page 68

AT-Telecom USER-MANUAL AT-B17D
The battery may discharge too
much; so it cannot be charged
Unable to charge
until it is connected for certain
the battery
time.
Its performance has worsened.
Too weak signals or strong
interference.
SIM card installed properly? Bad
Unable to register
contact or SIM card damaged? If
to the network
the SIM card is broken, please
contact the network operator to
replace it.
Unable to access
service menus.
Maybe the SIM card does not
support service function.
- 67 -
Page 69
AT-Telecom USER-MANUAL AT-B17D
10. Appendix 2, Abbreviations
and Definitions
SMS Short Message Service
EMS Enhanced Message Service
SIM Subscriber Identity Module
GSM Global System for Mobile Communication
PIN Personal Identity Number
PUK PIN Unblocking Key
IMEI International Mobile Equipment Identity
CB Cell Broadcast
GPRS General Packet Radio Service
MMS Multimedia Message service
Card 1 Host card (the card inserted in SIM1 slot)
Card 2 Slave card (the card inserted in SIM2 slot)
- 68 -
Page 70

AT-Telecom USER-MANUAL AT-B17D
11. Appendix 3 Notices for the
use of accessories
Battery
More than 12h charging is needed for the new battery or
that idle for long.
Other batteries other than the original one can damage
your mobile phone and cause risk! The short in any form
can lead to explosion, fire or personal injury!
For your security and environment protection, do not
throw the battery freely but put it into the specified
recovery place.
Charger
Do not plug the charger into the mobile phone and
charge without battery so as to prevent the phone being
damaged.
Always use the charger in dry place indoor; never let the
charger touch any liquid during use so as to prevent
damaging the phone or even causing explosion, fire or
personal injury!
- 69 -
Page 71

AT-Telecom USER-MANUAL AT-B17D
Always use the charger by the original manufacturer so as
to prevent damaging the phone or even causing fire or
personal injury etc!
Use of the USB connector
Notices before use
Always dis-connect the USB device correctly in Windows.
Never use the Windows formatting command to format
the mobile phone Memory.
Direct USB connection to PC under Windows2000 / XP /
Win7, without any driver to install.
For other operation systems, the connection between PC
and the mobile phone cannot be made unless an USB
driver is installed.
Please insert USB in switch-off status or choose the first
option “Memory unit” in switch-on status, then the mobile
phone can be used as a memory body.
Never insert the USB reversely, because doing so can
make the I/O port short.
Never use any other USB except that from the original
manufacturer; otherwise, the mobile phone and the USB
port may be damaged.
- 70 -
Page 72

AT-Telecom USER-MANUAL AT-B17D
T-Flash card
It is recommended to use an eligible T-Flash card, other
products may damage the T-Flash memory card slot.
- 71 -
 Loading...