

Page 1
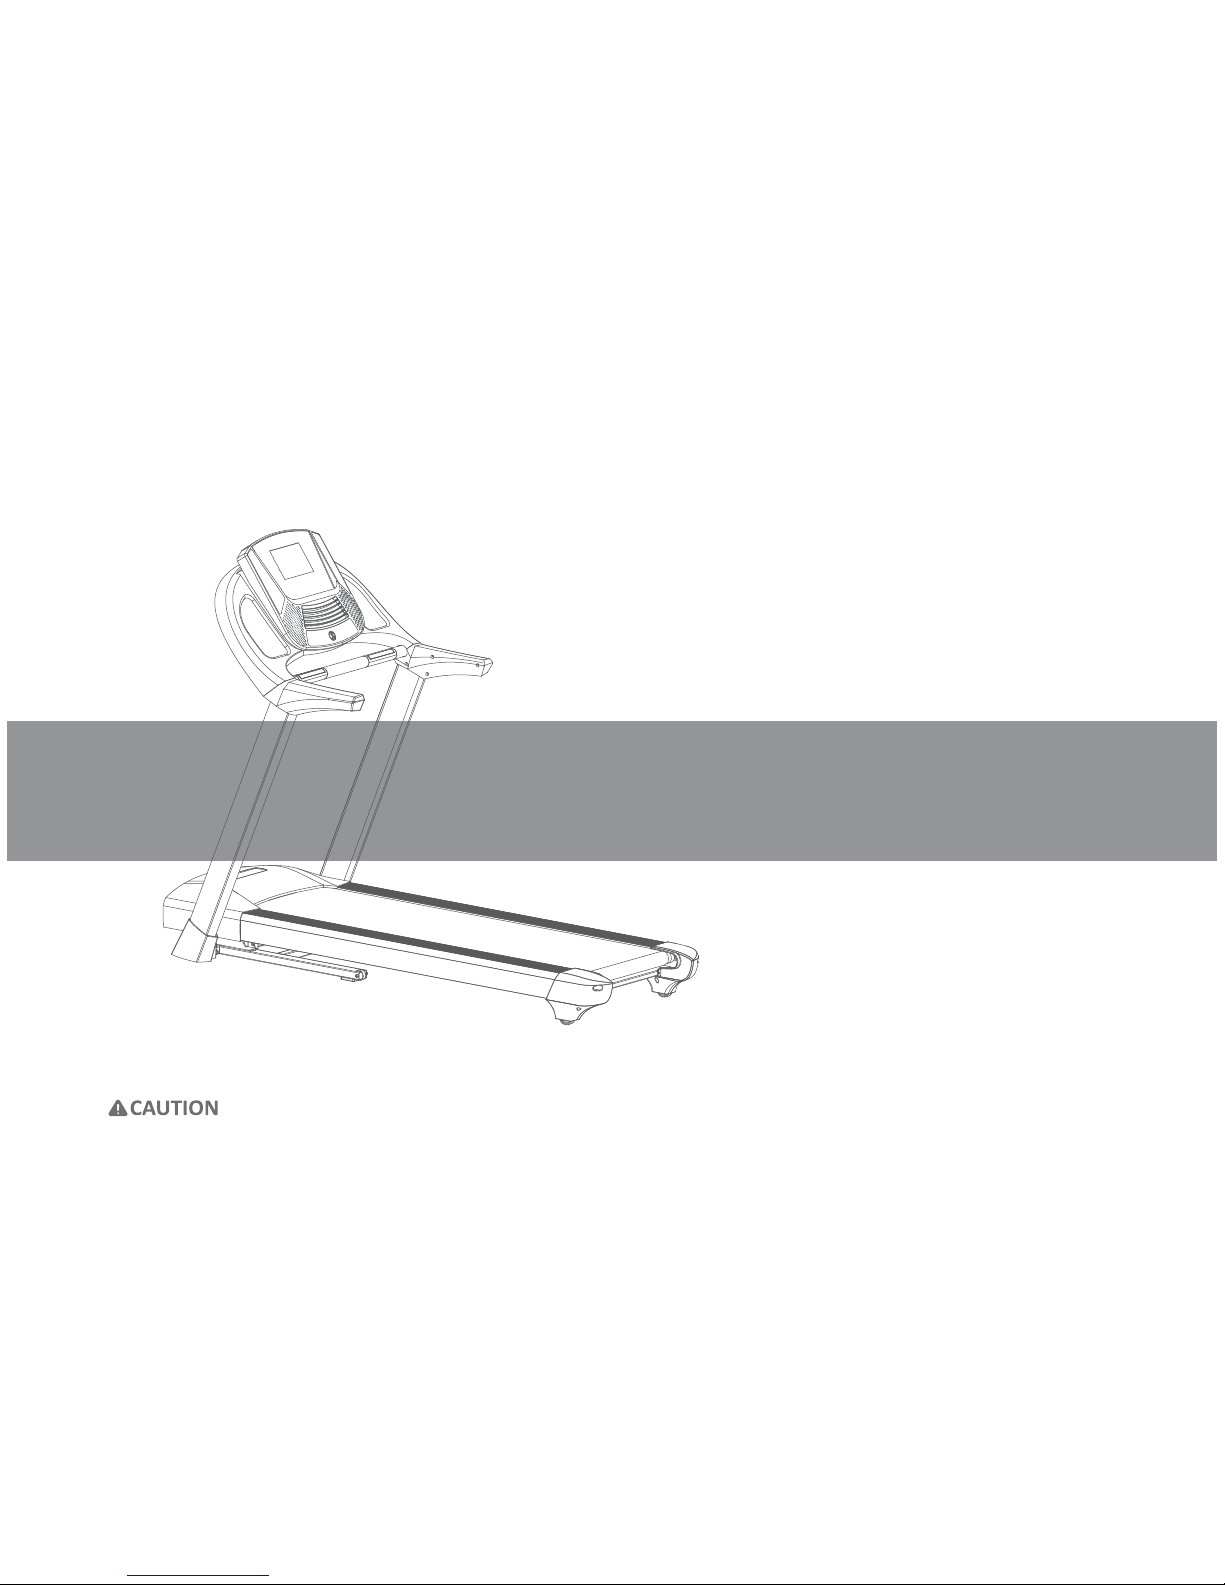
Please thoroughly read all safety noces in this manual before using this product. Save this manual properly for future reference.
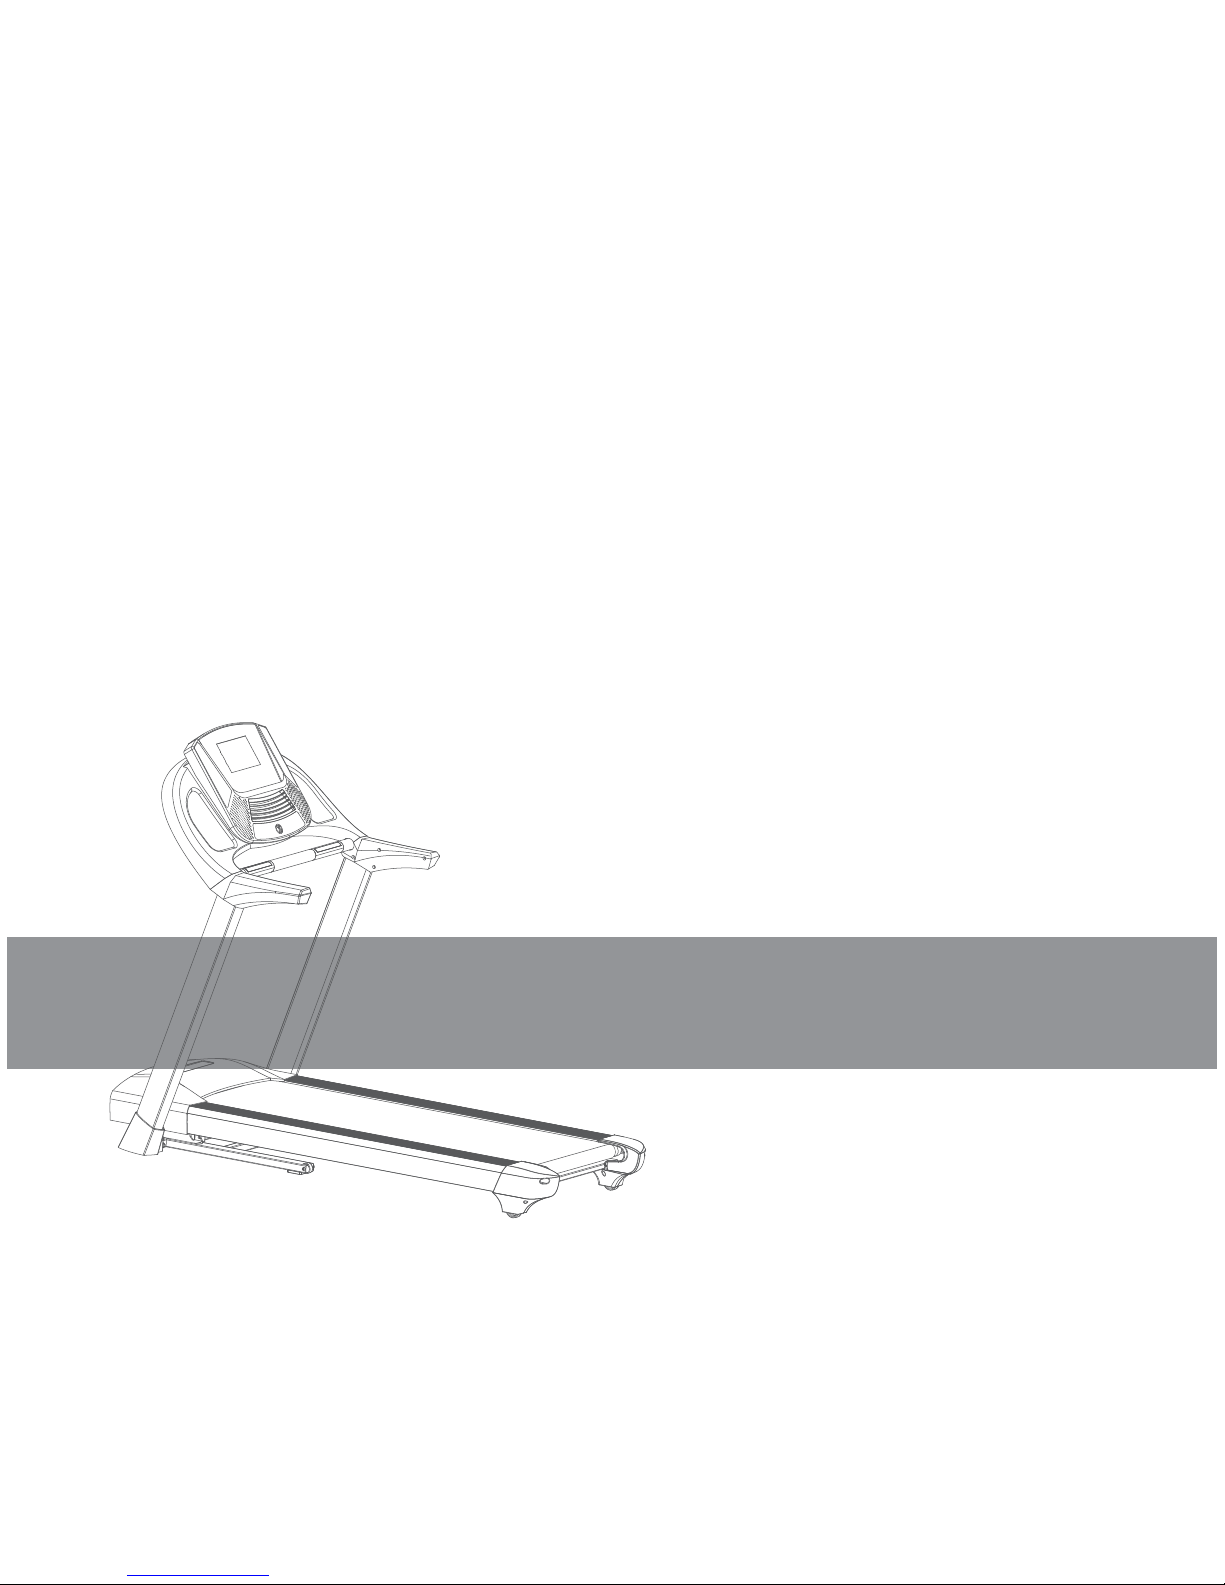
User Manual
User Manual
AT-200.300.400
Page 2

Page 3

ALL
1
Please Save this manual properly for future reference.
When using any electrical products, basic precauons should always be followed. Thoroughly read instrucons in this manual before using the treadmill. It is the responsibility of the owner to ensure that all users
of this treadmill are adequately informed of all warnings and precauons. If you have any quesons aer
reading this manual, please contact your local dealer or the Warranty card for technical support.
This treadmill is for ordinary household use ONLY. The warranty does not cover applicaons in business
place, rental service, school or organizaon or the condion when it is approved that the machine is used
in a non-family locaon.
Do NOT try to modify, disassemble or repair the treadmill on your own. Please contact the dealer or the
Warranty card for technical support if you find any malfuncon. Arbitrary modificaon or disassemble may
cause malfuncon and lead to personnel injury. The warranty does NOT cover malfuncon caused by any
arbitrary modificaon, disassembly or improper repair by the user. Failure to comply will void the warranty.
Important Percauons
Page 4

AT
2
Contents
Important Precauon..................................... 1
Table of Contents............................................ 2
Grounding Instrucon .................................... 3
Treadmill Precauons..................................... 4
To Ensure Yours Safety.................................... 5
Assembly Instrucon...................................... 6
Treadmill Design Illustraon........................... 7
Before Assembly / Replacement parts ..... 8~10
Assembly Procedure............................... 11~15
Move / Transport the Treadmill.................... 16
Adjust / Maintain the Belt............................ 17
Preparaons before Use...........................18~19
Operaon Instrucon..................................... 20
Operang Panel..............................................21
AT200.300 Console display overview .......22~23
AT400 Console display overview ..............24~25
Basic Operaon ........................................26~27
Exercise Programs ....................................28~35
Target Heart Rate Zone...................................36
Pairing of Various Devices ..............................37
Troubleshoong .......................................38~39
Roune Maintenance .....................................40
Specificaon .............................................41~43
Page 5
ALL
3
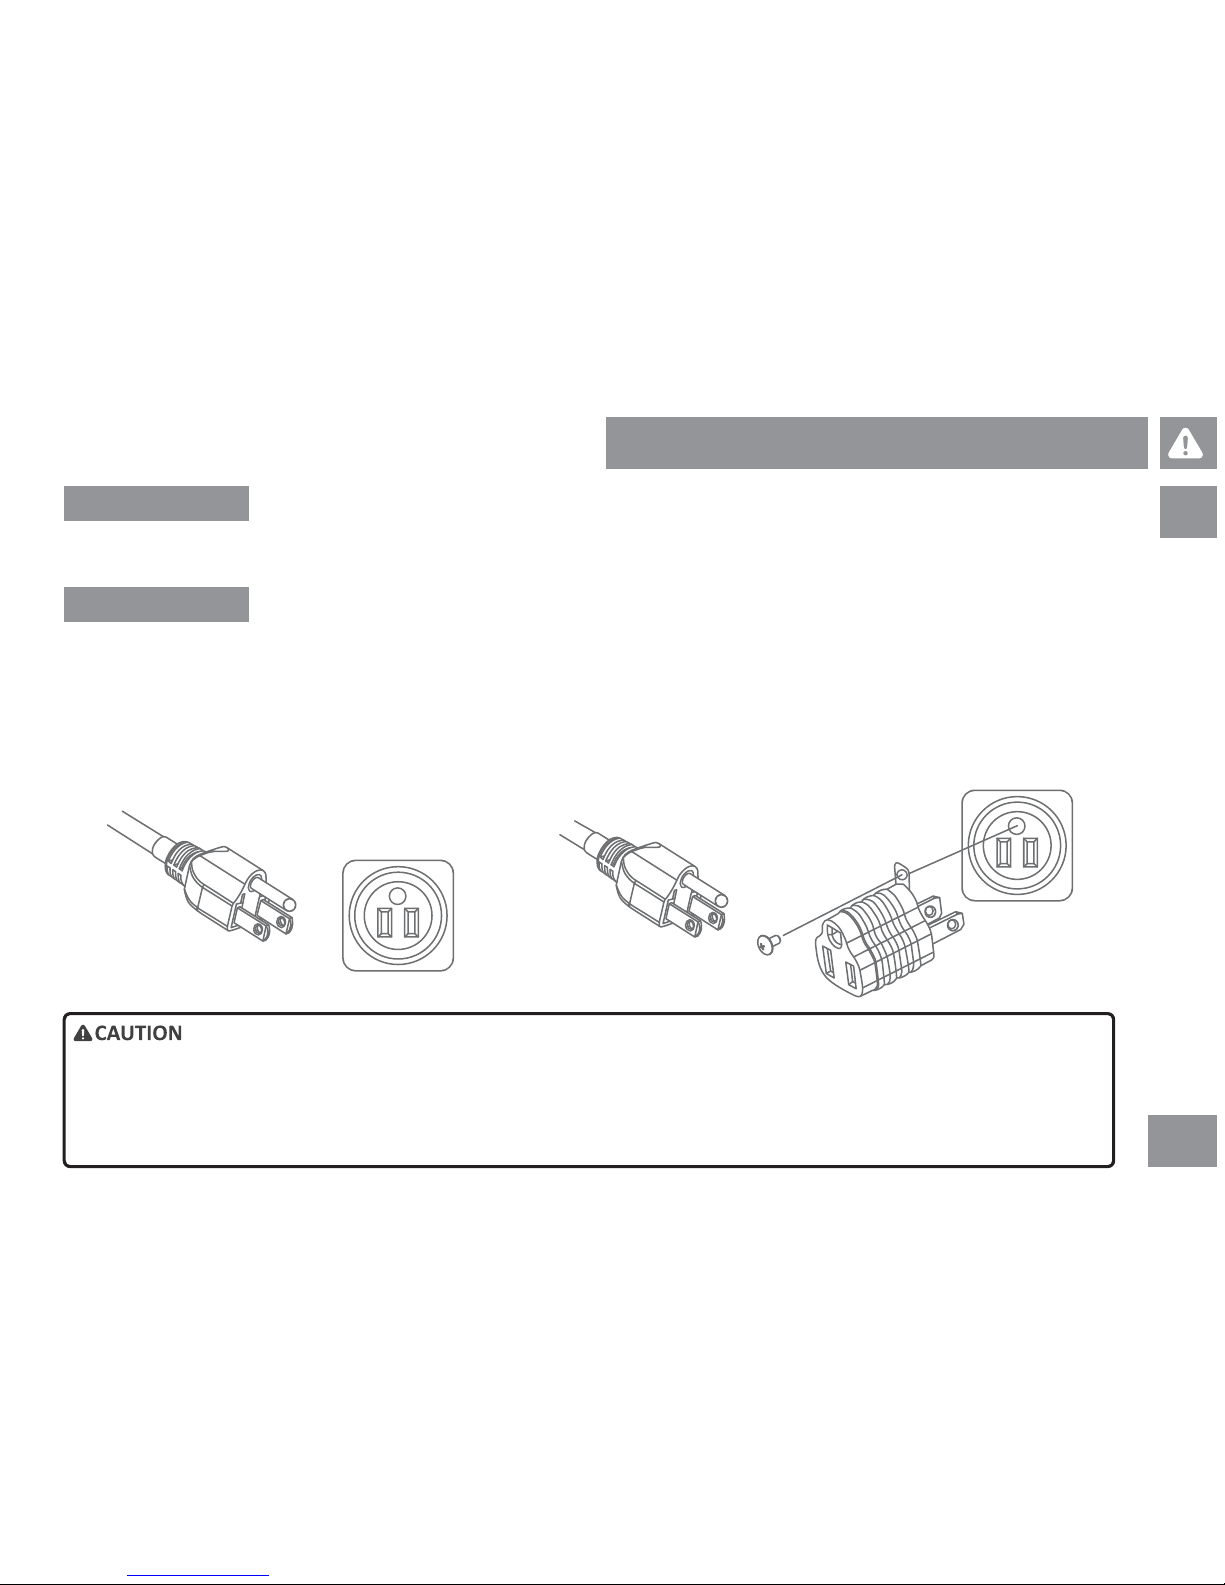
The power socket of this product contains a grounding conductor. This socket must be inserted into the outlet via the power cord with grounding latch. The plug must
be plugged into an appropriate outlet that is properly installed and grounded in accordance with local codes and ordinances.
This product uses a rated voltage of 220V or 110V and comes with a three-pin power cord as shown in the following illustraon.
If the grounding outlet is not available, please use grounding adapter to connect this plug to the two-pin outlet. Please have qualified electrician install the
grounding outlet correctly before using the adapter. Please connect the grip or similar adapter extension to the ground and fix with the metal screw whenever
the adapter is used. Refer to the following illustraon.
Do determine the power cord is electrically related for 220V or 110V by checking the specificaon label or specificaon in the manual (P.41~43). Please make
sure the cord is connected to the plug with correct voltage. DO not use the power cord via adapter or extension cord to avoid of any component damage or
personnel injury caused by sudden voltage changes such as voltage surges and spikes.
Power cable
Three-pin outlet
Power cable
Grounding adapter
Metal grounding screw
Two-pin outlet
The above illustraons only show three-pin power code power cord and outlet or two-pin outlet and grounding adapter. The type of three
The above illustraons only show three-pin power code power cord and outlet or two-pin outlet and grounding adapter. The type of three-
prong, two-prong and grounding adapter may vary in different countries. The enclosed power cord will be provided according to local regula
prong, two-prong and grounding adapter may vary in different countries. The enclosed power cord will be provided according to local regula-
aons of each country.
aons of each country.
Make sure the power cord is connected to the outlet with correct voltage. DO NOT connect the power cord to the outlet via voltage adapter
Make sure the power cord is connected to the outlet with correct voltage. DO NOT connect the power cord to the outlet via voltage adapter
or extension cord to avoid accidental current that may damage component and lead to personnel injury.
or extension cord to avoid accidental current that may damage component and lead to personnel injury.
•
•
•
•
Grounding Instrucon
Grounding
Outlet
Page 6
ALL
4
• Never use the treadmill before securing the safety key clip to your clothing.
• Stop exercising immediately and consult your physician before connuing, if you experience any kind of pain, including but not limited to chest pains, nausea,
dizziness, or shortness of breath.
• Maintain a pace you feel comfortable during the workout. DO NOT run with extremely high speed.
• Do not wear clothes that might catch on any part of the treadmill.
• Always wear athlec shoes while using this equipment.
• At no me should more than one person be on treadmill while in operaon.
• Do not jump on the treadmill or stand on plasc parts such as Motor safety guard , Upright safety covers or rear cover, to avoid any improper use or acon.
• This treadmill should not be used by persons weighing more than Max. User Weight. Failure to comply instrucons will void the warranty.
• Disconnect all power before maintenance, moving or folding the treadmill.
• Please use a wet cloth to clean the surface for machine maintenance. DO NOT use any detergent.
• The treadmill should never be le unaended when the power is plugged in. Always UNPLUG from outlet when NOT in use.
• DO NOT cover the machine with blanket or fabric. The blanket or fabric may cause overheat and lead to fire, electric shock or other personnel injuries.
• Make sure the machine is connected to the correct outlet. Failure to comply instrucon will void the warranty.
• Please place the machine on a level ground. DO NOT place and use the machine on an uneven ground.
Please abide by following instrucon to avoid burn, fire, electric shock or injury to persons:
• Please turn off the power and unplug the power cord immediately aer finishing the workout.
• Please turn off the power and unplug the power cord immediately aer finishing the workout.
• Always turn off the power and unplug the power cord before cleaning, performing maintenance, move or taking off parts.
• Always turn off the power and unplug the power cord before cleaning, performing maintenance, move or taking off parts.
Treadmill Precauons
Page 7
ALL
5
• Keep children under 13 or pets always away from the treadmill at least 3M (10.) at all mes. Children under 13 are not allowed to use this machine.
• The use by children between 13~18, seniors over 65 or disabled people must be under the surveillance of other adults to avoid any danger.
• Please follow instrucons in this manual when using the machine.
• DO NOT use parts other than manufacturer or distributor recommendaon to avoid personnel injury.
• Please stop using the machine immediately and contact maintenance staff if you encounter power cord or plug damage or irregular operaon caused by
accidental drop, impact or soaking in the water.
• Put the power cord away from the surface with high temperature. DO NOT li the machine with the power cord or use the power cord as a handrail.
• Make sure the vent of the machine is clean before the workout. Remove substances like coon wadding and hair.
• DO NOT put, drop or insert any object in openings as it may result in electric shock. Alatech is not responsible for any damage rising from failure to follow
instrucons.
• The motor controller generate heat. DO NOT use any spray near this area as it may result in combuson.
• Turn off all equipment and power and unplug the power cord when the workout is completed or the connecon is removed.
• Only use this machine in a place with controlled temperature. DO NOT use in the garage, porch, bathroom, kitchen, carport or outdoors. We is not responsible
for any damage rising from failure to follow instrucons.
• This treadmill is for ordinary household use ONLY. The warranty does not cover applicaons in business place, rental service, school or organizaon.
• Specific sole materials of shoes may generate stac electricity. To avoid electric shock, please wear sneakers with gum sole instead of plasc or insulated one.
• Before using the machine, please DO consult your physician and evaluate by physical exam, especially for users are over age 45, users with pre-exisng health
problems from family history such as high pressure or heart disease, users with high cholesterol or obesity, smokers, expectant mother, and users have not done
a workout regularly over one year.
Please abide by following instrucon to avoid burn, fire, electric shock or injury to persons:
This product is for indoor use only. Please pay aenon to room temperature and humidity. If the machine is placed in the environment with
unstable temperature and humidity, it is recommended to warm-up the machine to ambient temperature before the workout. Fail to follow
this instrucon may lead to early damage to electronic components.
To Ensure Your Safety
Page 8
AT
6
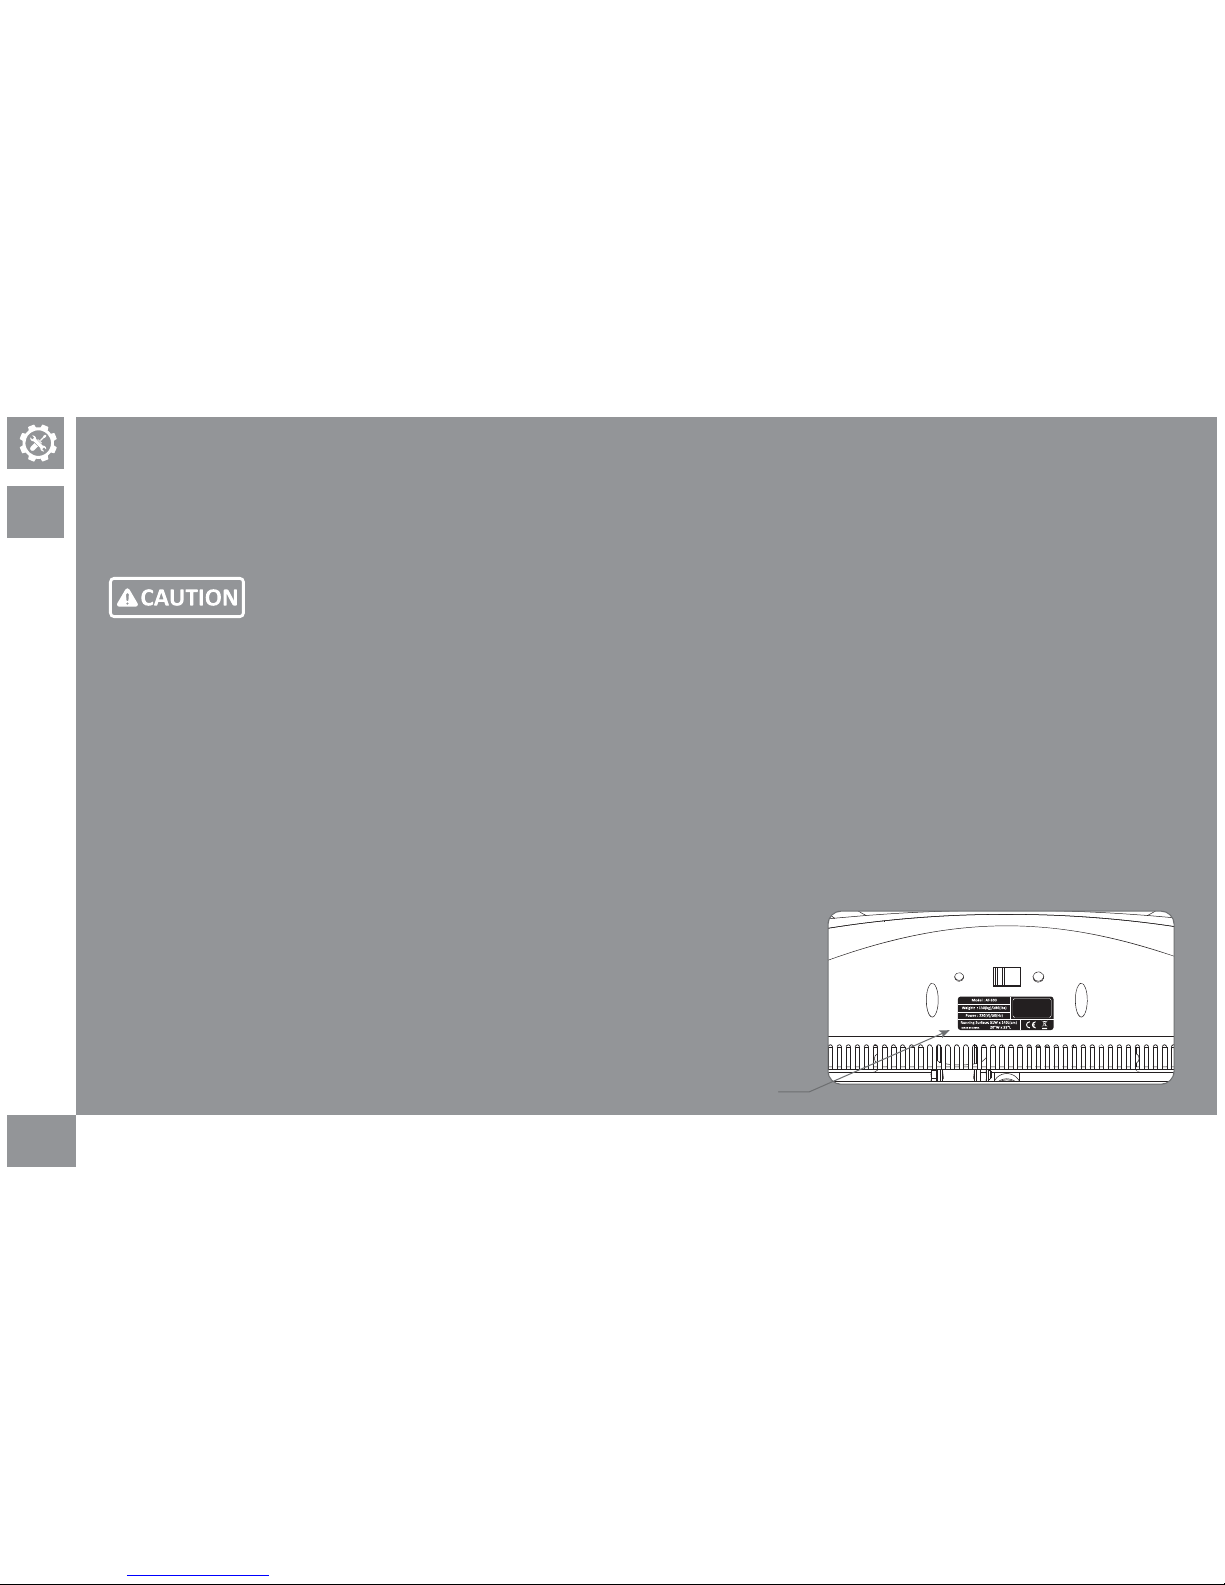
Treadmill Serial Number
Please always make sure that serial number on treadmill is same as warranty card indicated. If not, please do not assemble machine and contact
Alatech’s service center or distributor for further assistance. If maintenance needed, the serial number on machine and warranty card must be
the same, if inconsistent serial number is found, we will not provide warranty.
Ensure your warranty by following noces:
1) The warranty will be invalid if there is no distributor stamp on warranty card or the content is incomplete. However, this warranty does not
cover following condions:
•When customers can provide original invoice or proof of purchase
•When the related proof of purchase can be provided by document
2) Please bring this warranty card when you need maintenance services.
3) Please contact approved distributors or service locaons while your warranty is sll valid.
4) Please keep this warranty card in a secure place.
Assembly Instrucon
Please follow the assembly instrucons and steps in this manual and make sure all parts are securely fastened. Fail to follow the instrucons
may lead to loose parts on the treadmill. Loose parts can result noise or may cause personnel injury. Please thoroughly read the assembly
instrucon to avoid any damage to the treadmill.
Page 9
ALL
7
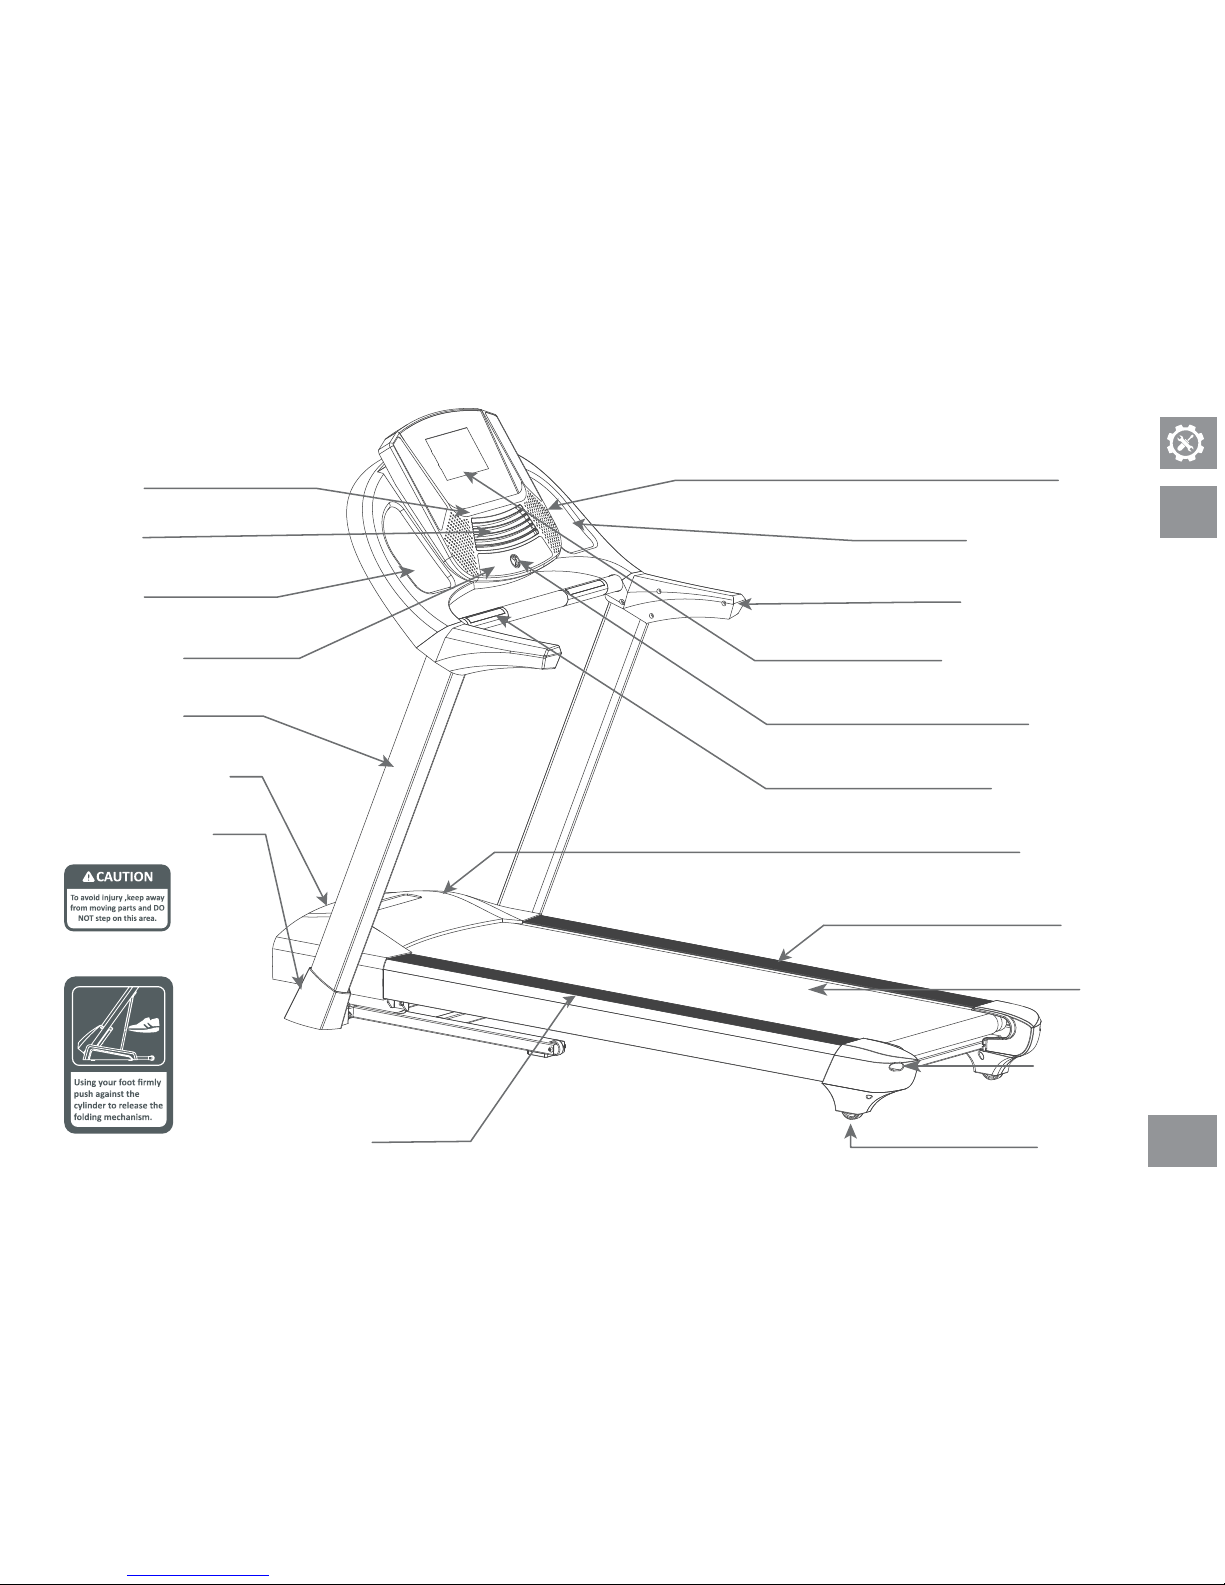
Speaker
Console display overview/
operang panel
Rack
Quick key panel
Power switch/power cord
Upright
Upright safety cover
Hydraulic li system
Fan
Magazine rack
Handrail
Safety key
Heart rate sensor bar
Motor safety guard
Side rail
Belt
Belt tension
adjusng screw
Caster
Water bole holder
Page 10
AT
8
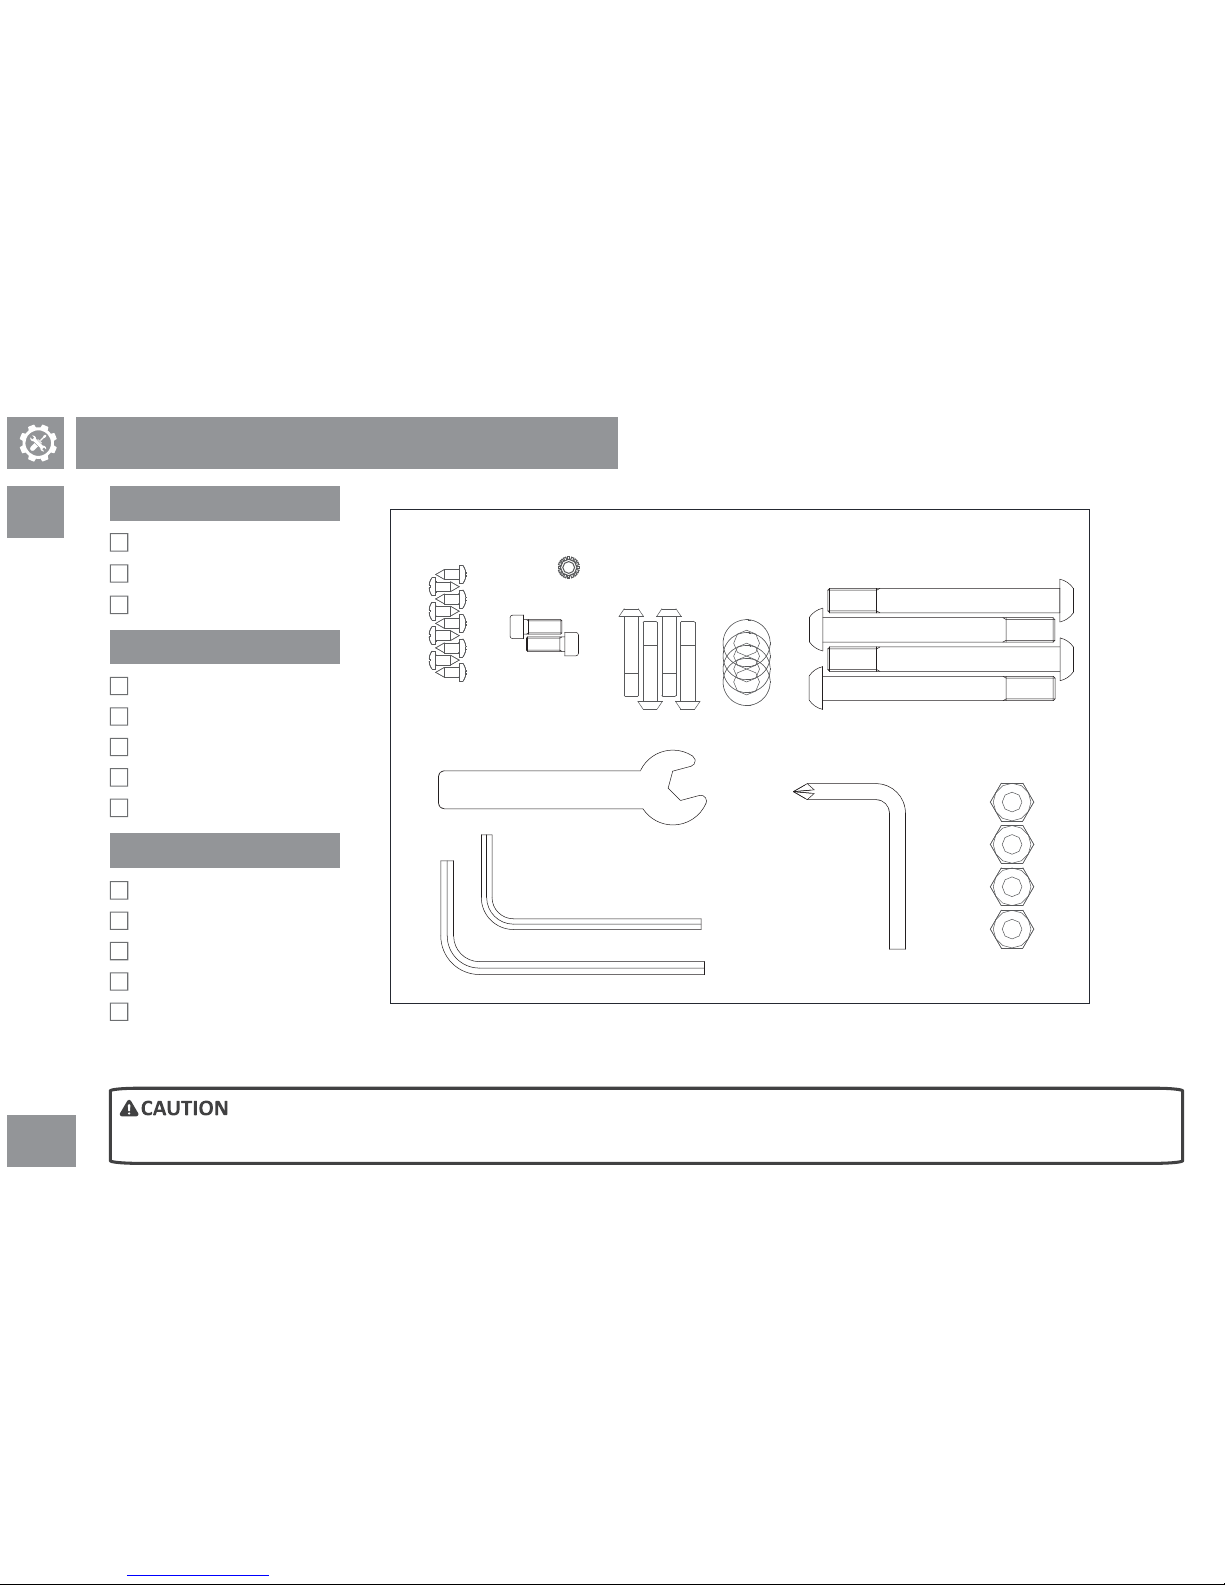
Enclosed tools
Hex wrench
Phillips screwdriver
Single side open end wrench
Assembly parts
Console x 1
Display Console x 1
Front armrest set x 1
Armrest cover x 2(L & R)
Upright safety cover x 2(L & R)
Accessory pack
Hardware parts box x 1
Safety key x 1
Power cable x 1
Line-level audio adapter x 1
Silicon oil x 1
Please contact the distributor or the Warranty card for technical support if any part is missing or you have any queson.
Please contact the distributor or the Warranty card for technical support if any part is missing or you have any queson.
Before Assembly
Single side open end wrench 17mm
Hex wrench-5mm
Hex wrench-6mm
Truss head Phillips screw
ST4.2*10
Start washer
Washer
Ø10
Buon Head Socket Bolt
M10*95-20
Nylon nuts
M10
Buon Head Socket Bolt
M8*34-12
Socket Head Cap Bolt
M6*16
Phillips screwdriver
Page 11
AT
9
1) Please move and transport the treadmill carefully. Put the box on a level surface. Only open the box with its surface on top. It is recommended to put a protecve mat on the floor.
2) Unpack and assemble the treadmill at the planned locaon to avoid unnecessary transportaon. Pay great aenon when unfastening cable e that used for
packing or fixing to avoid accidental bounce.
3) Please follow assembly procedure to assemble the treadmill aer unfastening cable e. Please fold the machine to upright and make sure the pin of hydraulic
li is securely locked if you need to li or move it. DO NOT try to crane the machine.
4) DO NOT try to li or move the machine with a single part or stand. (Refer to “Move/transport the treadmill” on P.16 for informaon related to moving the
product.)
Noces and safety ps
When assembling, make sure all nuts, screws and parts are posioned and lightly locked before proceeding to the next step. Aer the
When assembling, make sure all nuts, screws and parts are posioned and lightly locked before proceeding to the next step. Aer the
assembly is completed, make sure all screws are securely locked. DO NOT arbitrarily decrease the quanty of assembling screw.
assembly is completed, make sure all screws are securely locked. DO NOT arbitrarily decrease the quanty of assembling screw.
Several parts are lubricated before delivery to facilitate assembly. DO NOT arbitrarily wipe off the lubricant. You can use lubricant to
Several parts are lubricated before delivery to facilitate assembly. DO NOT arbitrarily wipe off the lubricant. You can use lubricant to
assemble parts when facing any difficulty. It is recommended to use the lithium base grease for bike.
assemble parts when facing any difficulty. It is recommended to use the lithium base grease for bike.
Several parts are very heavy; DO NOT try to assemble the machine on your own. These heavy parts may fall and lead to personnal injury.
Several parts are very heavy; DO NOT try to assemble the machine on your own. These heavy parts may fall and lead to personnal injury.
Strongly recommend to have more than 2 persons for assembly.
Strongly recommend to have more than 2 persons for assembly.
•
•
•
•
Please follow assembly instrucons to li or move the treadmill. DO NOT arbitrarily li or take out the product from the package.
Please follow assembly instrucons to li or move the treadmill. DO NOT arbitrarily li or take out the product from the package.
Fail to following above instrucons may lead to personnal injury and machine damage. Please pay great aenon to these instrucons.
Fail to following above instrucons may lead to personnal injury and machine damage. Please pay great aenon to these instrucons.
•
•
Before Assembly
Page 12
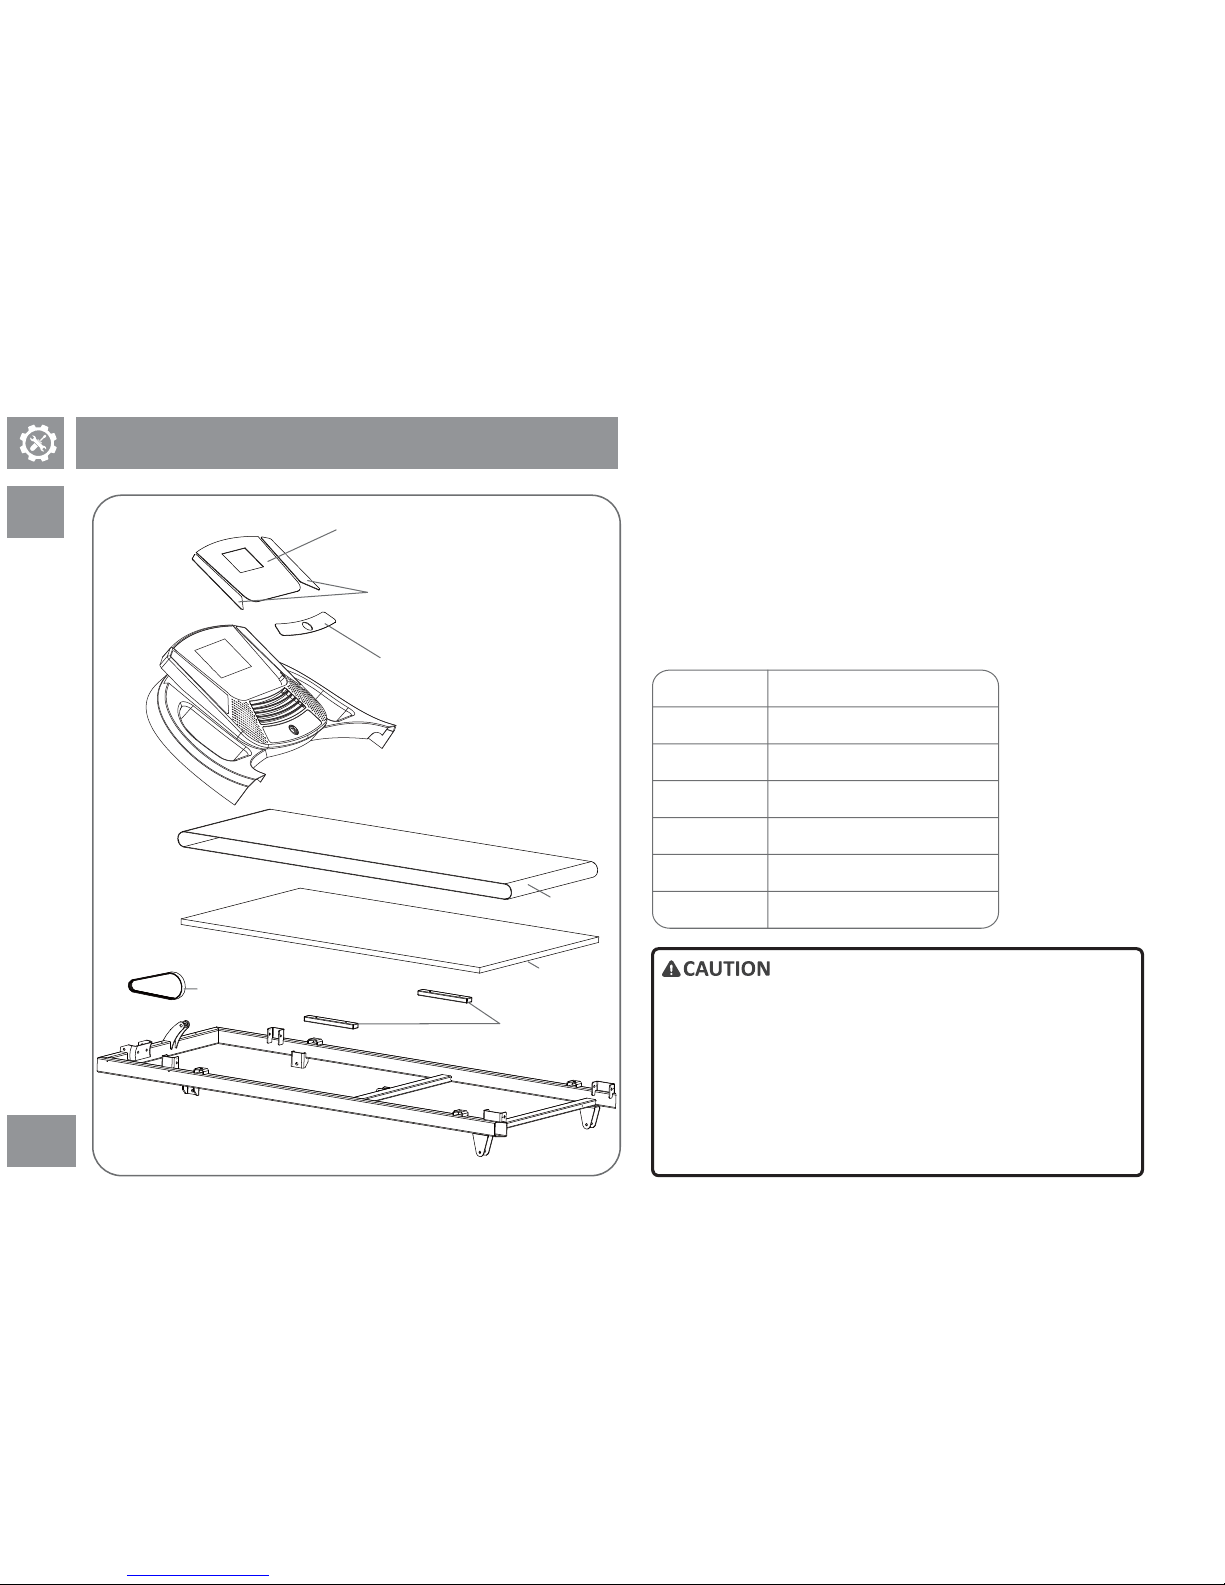
Replacement parts
AT
10
1
1
2
3
4
5
7
6
1
2
3
5
4
6
7
Wear condion of replacement parts will vary according to different use
condions such as weight, frequency of use, average speed and incline. Wear
condion of operang panel depends on the frequency of press. Buons that are
frequently used will wear first. Under normal use condions, the lifeme of
replacement parts will be 1~2 years. Wear of supplies may cause irregular
operaon such as noise and slipping belt. Please contact the distributor or the
technician and have them to determine the cause. DO NOT disassemble the
machine by yourself as it may lead to the misjudgment of technician.
Belt
Cushion
Film panel(small)
Drive belt
Film panel(main)
Film panel(side)
Deck
Refer to the exploded parts diagram (P.10~15) if you noce any
Refer to the exploded parts diagram (P.10~15) if you noce any
part is missing and inform the distributor or the technician the
part is missing and inform the distributor or the technician the
corresponding number. The technician will determine if the
corresponding number. The technician will determine if the
user can replace with another part and assemble on his/her
user can replace with another part and assemble on his/her
own. Please contact technician if you don’t know how to
own. Please contact technician if you don’t know how to
assemble the missing part. DO NOT disassemble the treadmill
assemble the missing part. DO NOT disassemble the treadmill
to conduct parts assembly or maintenance as the technician
to conduct parts assembly or maintenance as the technician
may misjudge the problem or the machine may not reach
may misjudge the problem or the machine may not reach
complete fixaon and lead to personnel injury.
complete fixaon and lead to personnel injury.
Page 13
AT
11
QtyDescriponParts TypeIllustraon
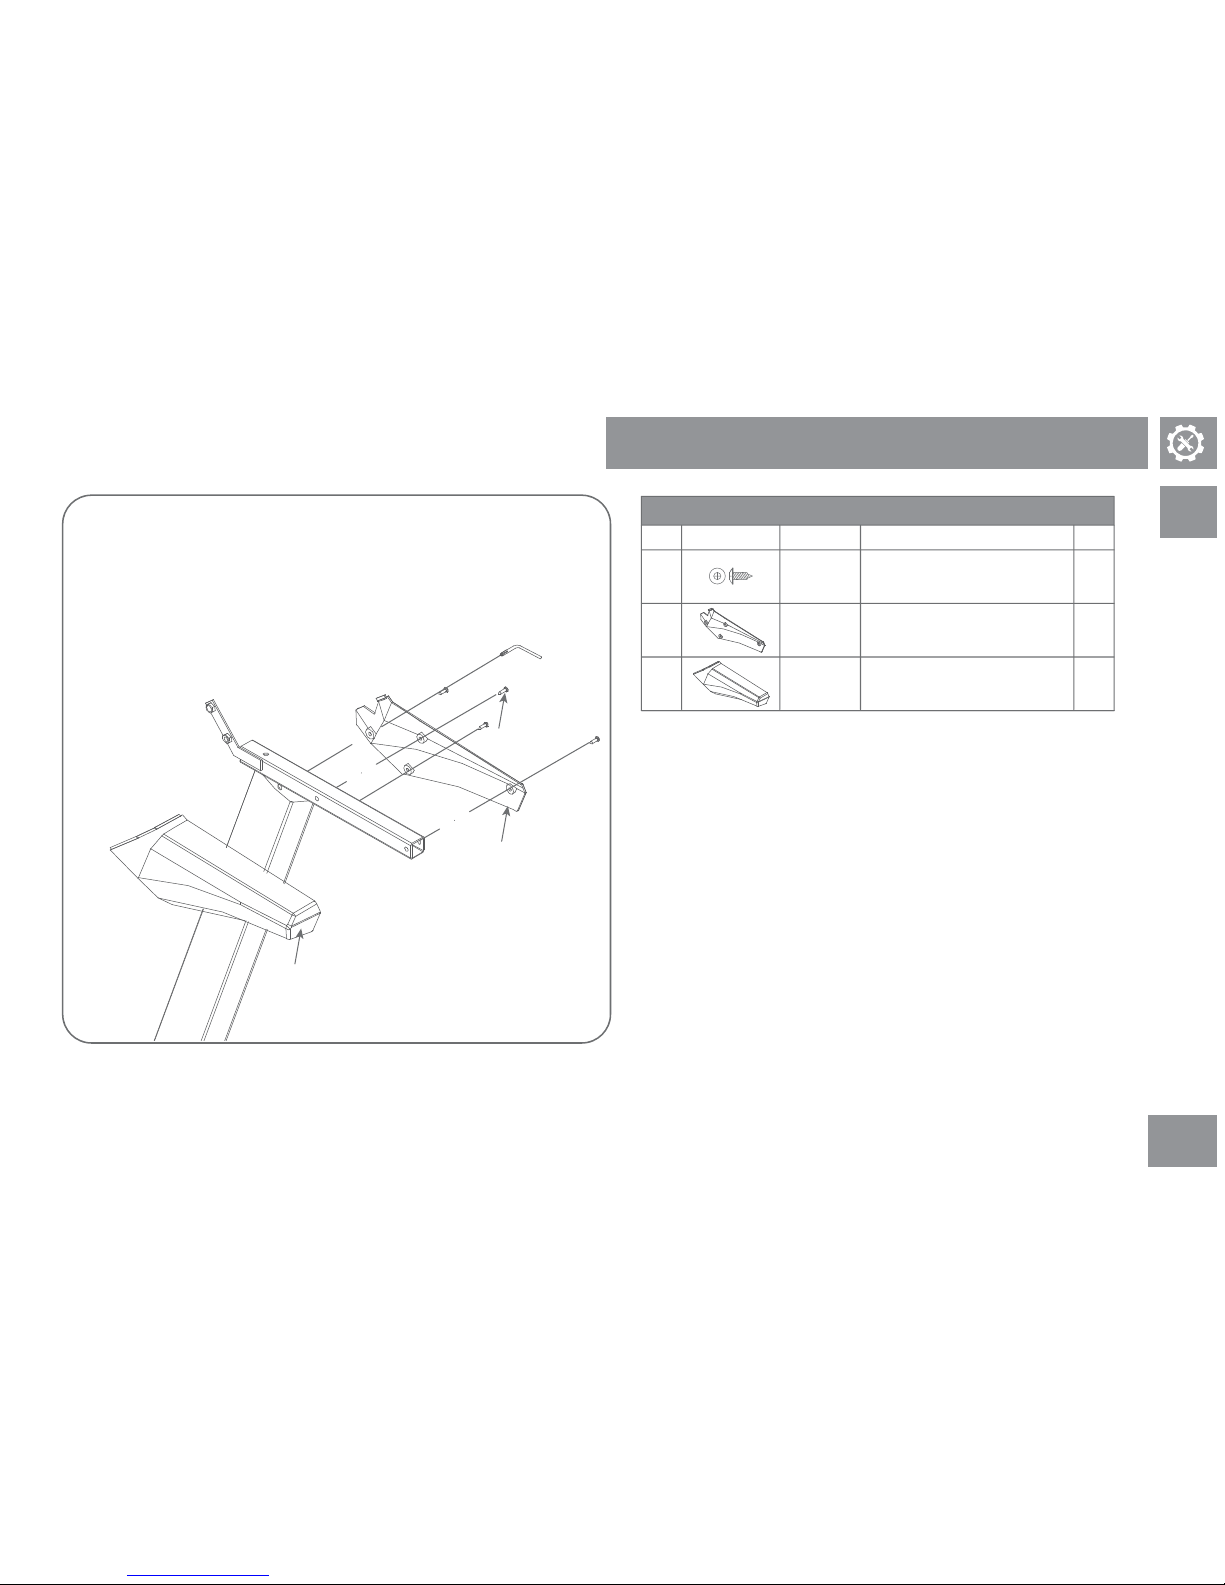
Step 1 of Assembly Procedure
A
B
C
1) Insert le inner cover of the le hand armrest in inner side of armrest
tube.
2) Remove and align le outer cover of the armrest as required.
3) Screw ght both the inner and outer covers of the armrest.
4) Repeat step 1~3 for the right hand armrest.
A
A
B
C
4
2
2
Le and right outer cover
Le and right inner cover
Cover
Cover
Screw Truss head Phillips screw (10L)
Hardware pack for step 1
Phillips screwdriver
Page 14
AT
12
Hex wrench
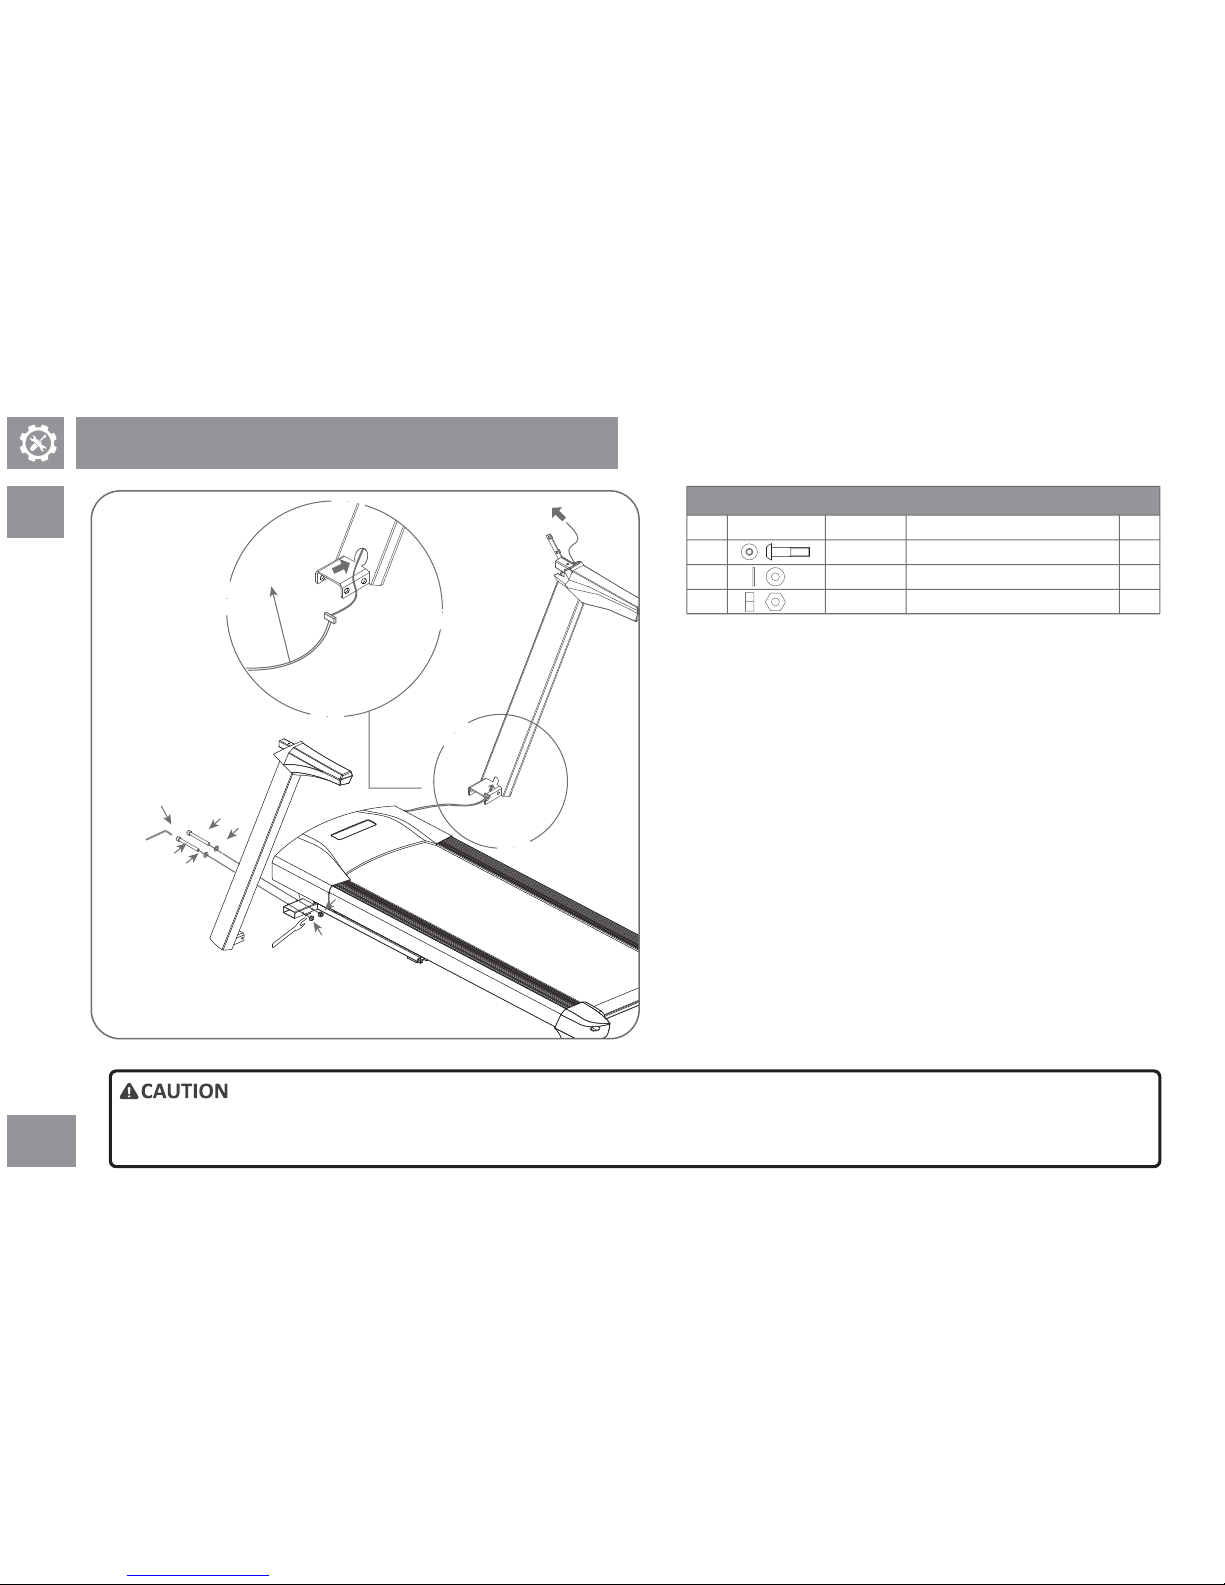
1) Open hardware pack 1.
2) Connect the lead wire to the console cable, pull them through the
right strut of the console, pull out the lead wire from the right strut and
then fix the console cable to the top of strut. Please remove the lead
wire then.
3) Put the right strut on the frame.
4) Use part A, B & C (2 of each) and connect the strut to the frame. Make
sure all screws and washers are well posion and lock them lightly.
5) Repeat step 3~4 to complete the assembly of the le strut.
Hardware pack for step 2
QtyDescriponParts
A
B
C
TypeIllustraon
4
4
4
Buon Head Socket Bolt (95L)
Flat washer (Ø10)
Nylon nuts (M10)
Screw
Wash er
Nut
• Put the console strut on the frame with great care to avoid any damage to the console cable.
• Put the console strut on the frame with great care to avoid any damage to the console cable.
Step 2 of Assembly Procedure
Console
cable
B
C
A
A
B
C
Single side open end wrench
Page 15
AT
13
B
B
A
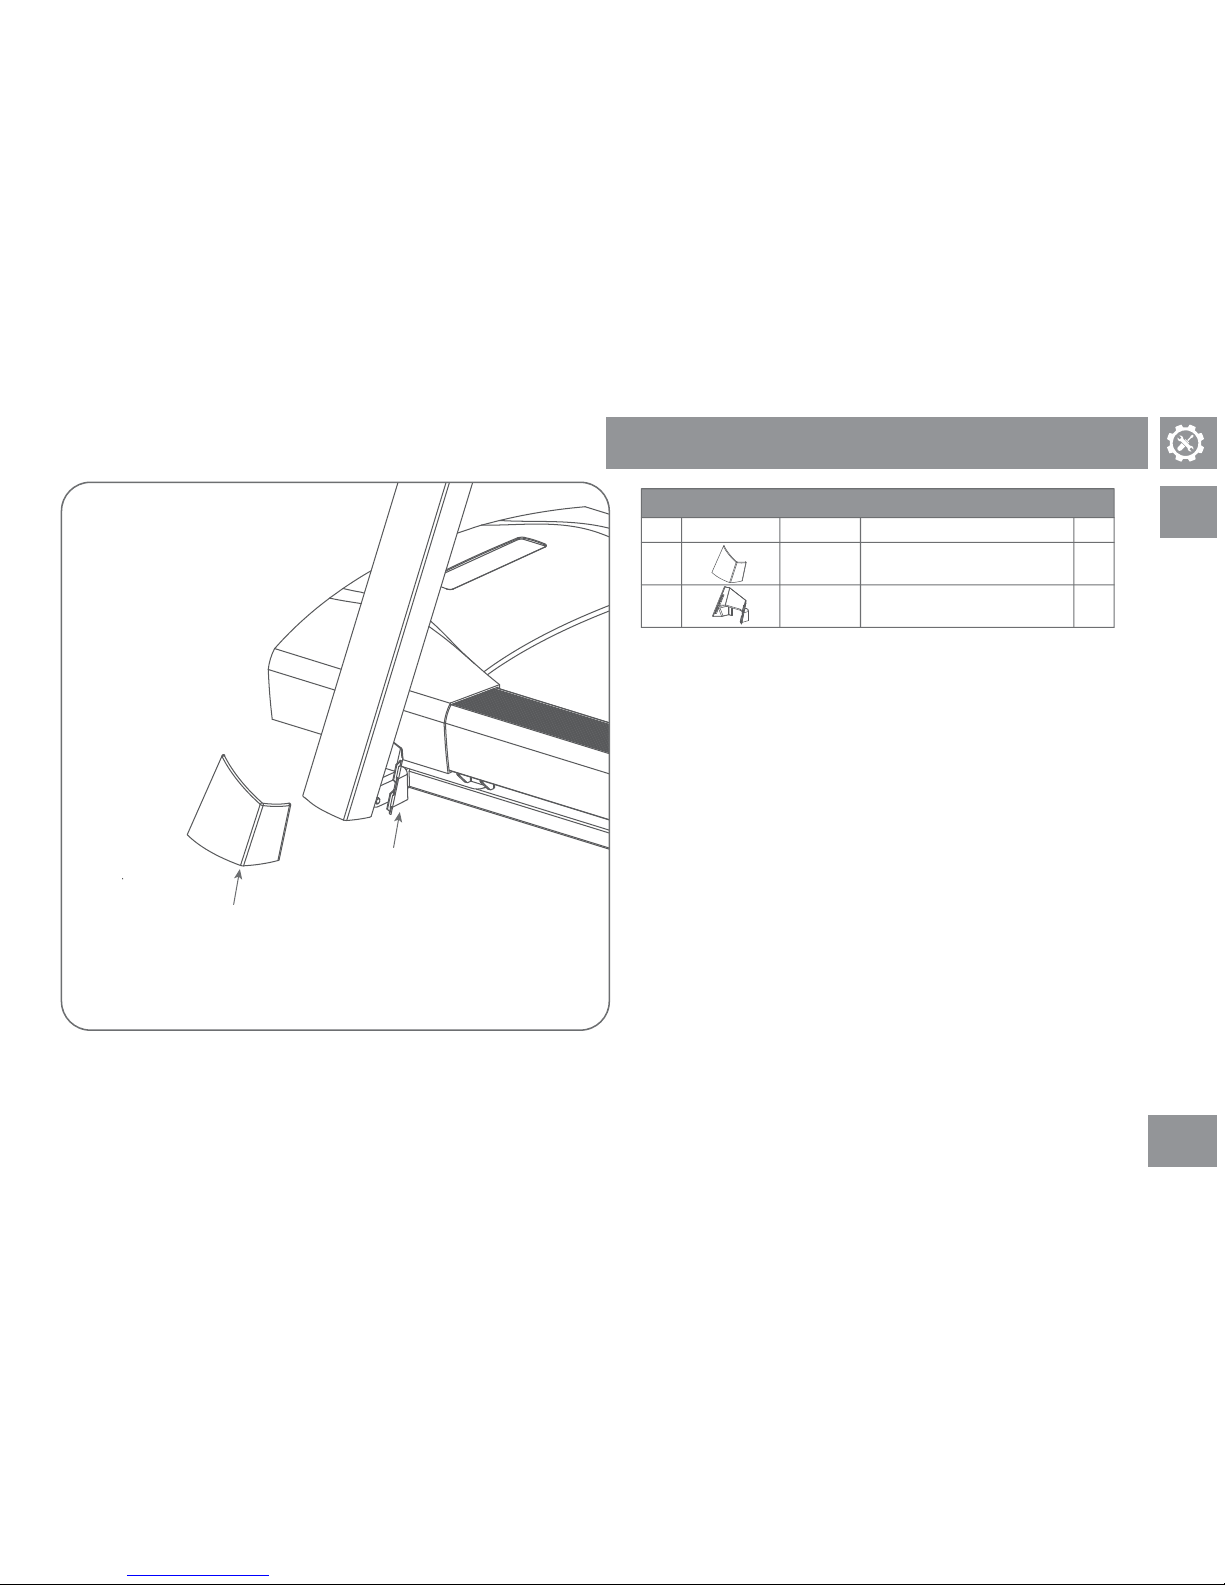
1) Insert le inner cover in vercal tube.
2) Get and align the le outer cover.
3) Secure the le inner and outer covers firmly.
4) Repeat steps 1-3 to complete the right inner and outer cover.
Step 3 of Assembly Procedure
Hardware pack for step 3
QtyDescriponParts
A
B
TypeIllustraon
2
2
Le and right outer cover
Le and right inner cover
Cover
Cover
Page 16
AT
14
Hex wrench
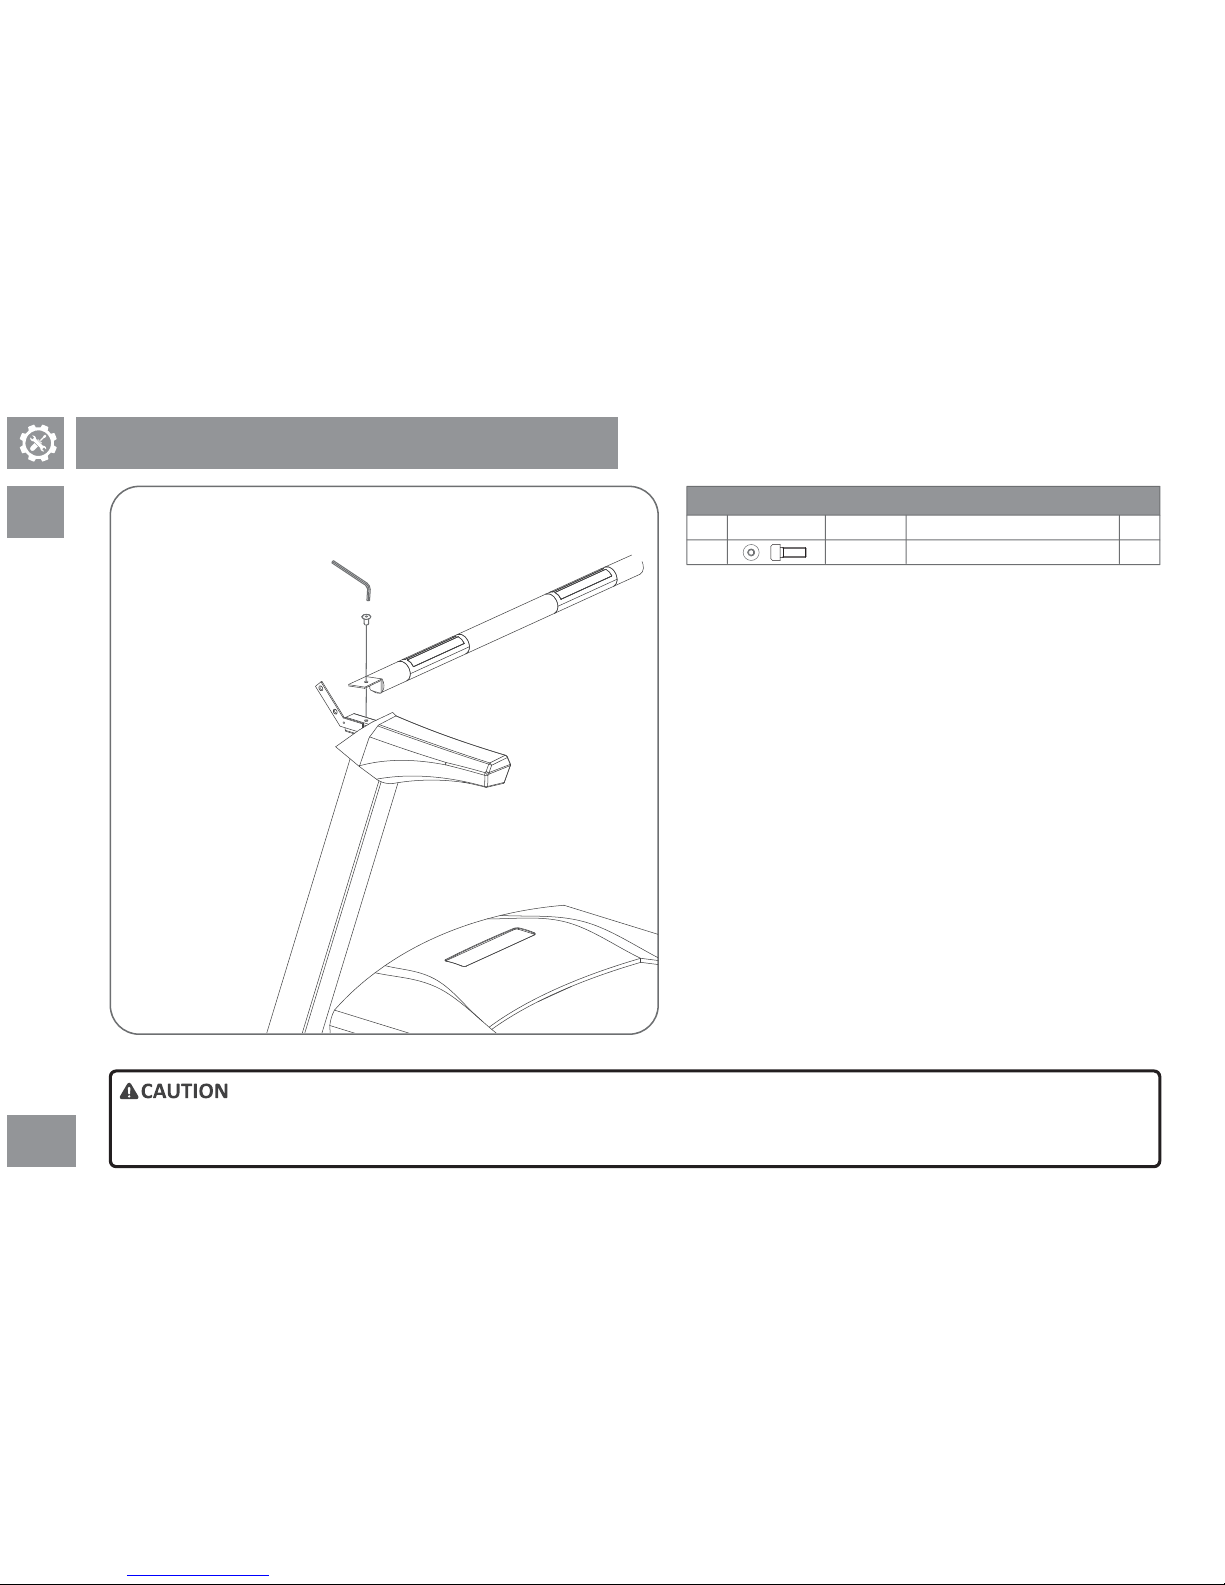
1) Get the front armrest set.
2) Insert screw through the front armrest retainer and vercal tube unit
bracket carefully, make sure screws are well posioned and parally
ghtened.
3) Repeat step 2 to secure right armrest unit bracket fixaon.
Hardware pack for step 4
QtyDescriponParts
A
TypeIllustraon
2
Socket Head Cap Bolt
(16L)
Screw
• Please assemble the console with great care. Make sure no wire is pressed or bent to avoid any damage.
• Please assemble the console with great care. Make sure no wire is pressed or bent to avoid any damage.
Step 4 of Assembly Procedure
Page 17
AT
15
Hex wrench
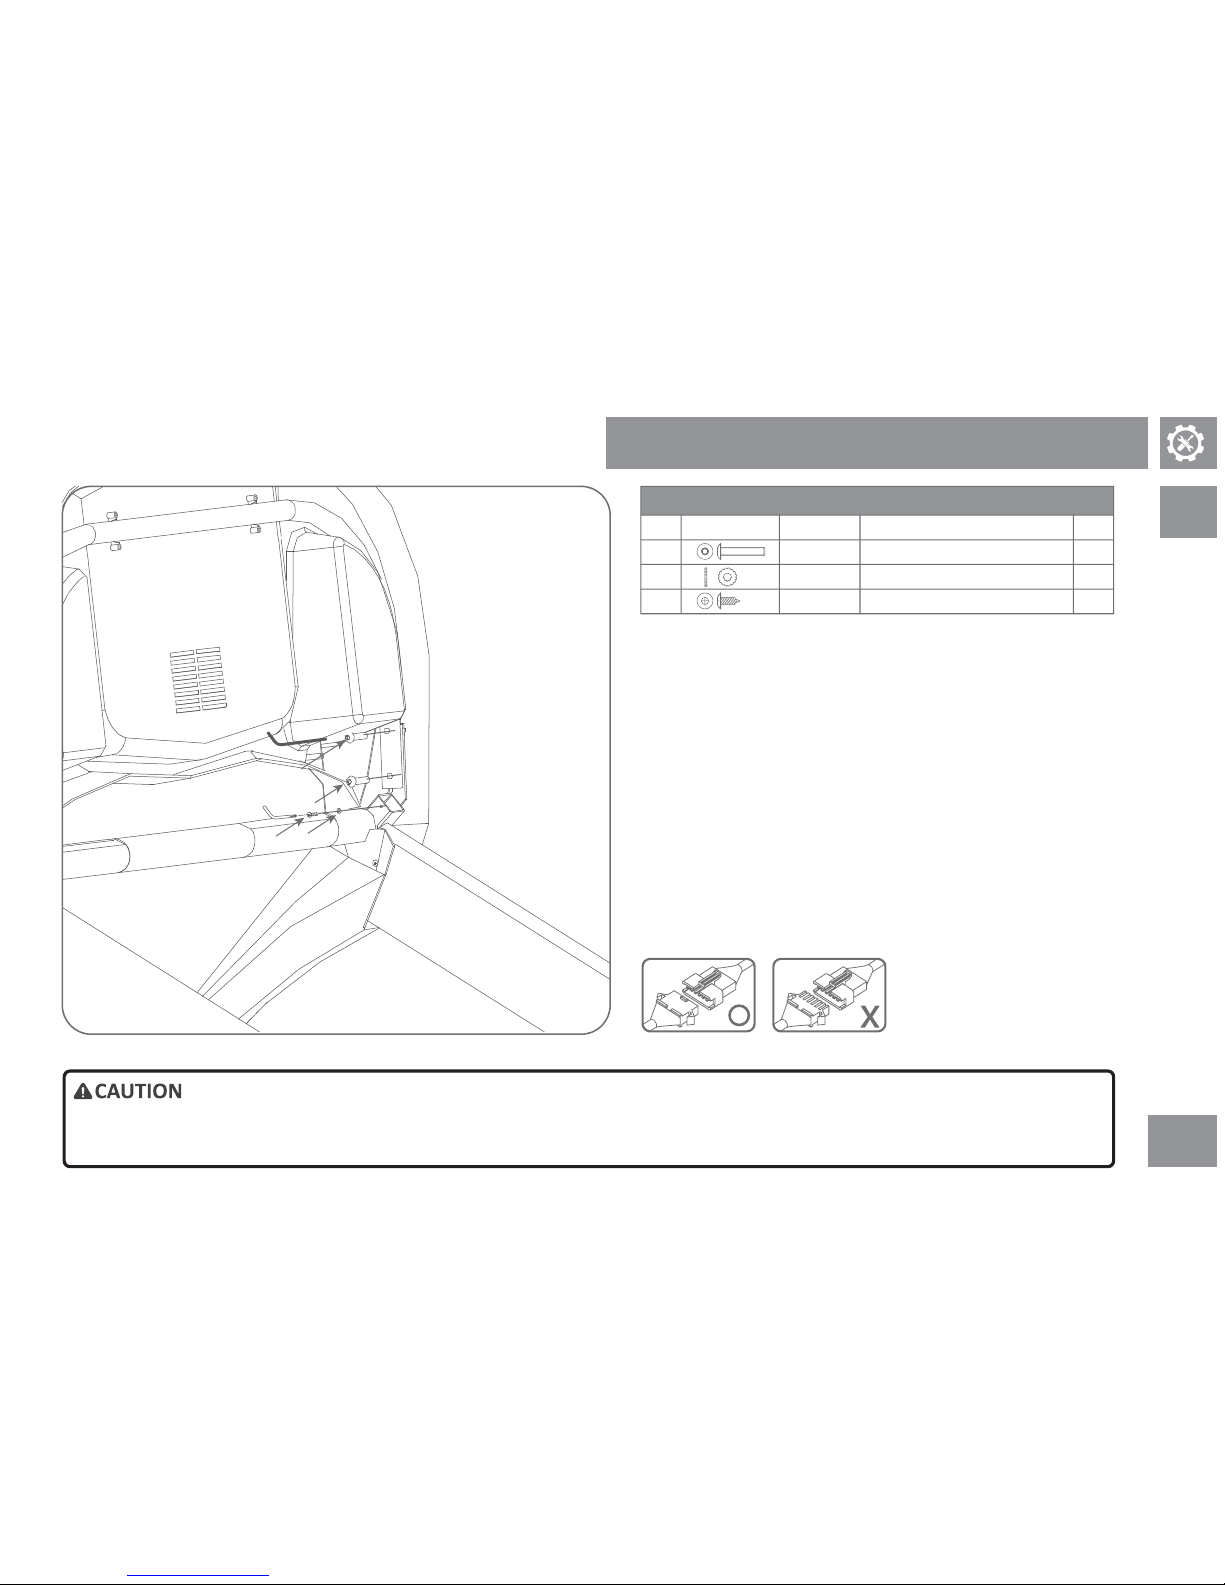
1) Get the instrumentaon unit.
2) Insert the screw through the le armrest retainer and the instrument unit
bracket carefully, make sure screws and washers are well posioned and
parally ghtened.
3) Repeat step 2 to secure the right instrumentaon unit bracket fixaon.
4) Remove instrument unit's le grounding wire, use the included combo
tool to secure component B, C, and grounding wire to the uncoated square
holes of the armrest square tube.
Note: Place component B in the inner side and direct contact with the square
tube as shown in figure on the le.
5) Connect the sensing wire at both sides of the front armrest to the le and
right hand of instrument unit.
6) Connect the console cable to the connecng cable on the console.
Hardware pack for step 5
QtyDescriponParts
A
B
C
TypeIllustraon
4
1
1
Screw
Screw
• Please assemble the display console with great care. Make sure no wire is pressed or bent to avoid any damage.
• Please assemble the display console with great care. Make sure no wire is pressed or bent to avoid any damage.
Step 5 of Assembly Procedure
Truss head Phillips screw (10L)
Toothed washer (Ø10)
Wash er
Buon Head Socket Bolt (34L)
A
A
C
B
Phillips screwdriver
Page 18
ALL
16
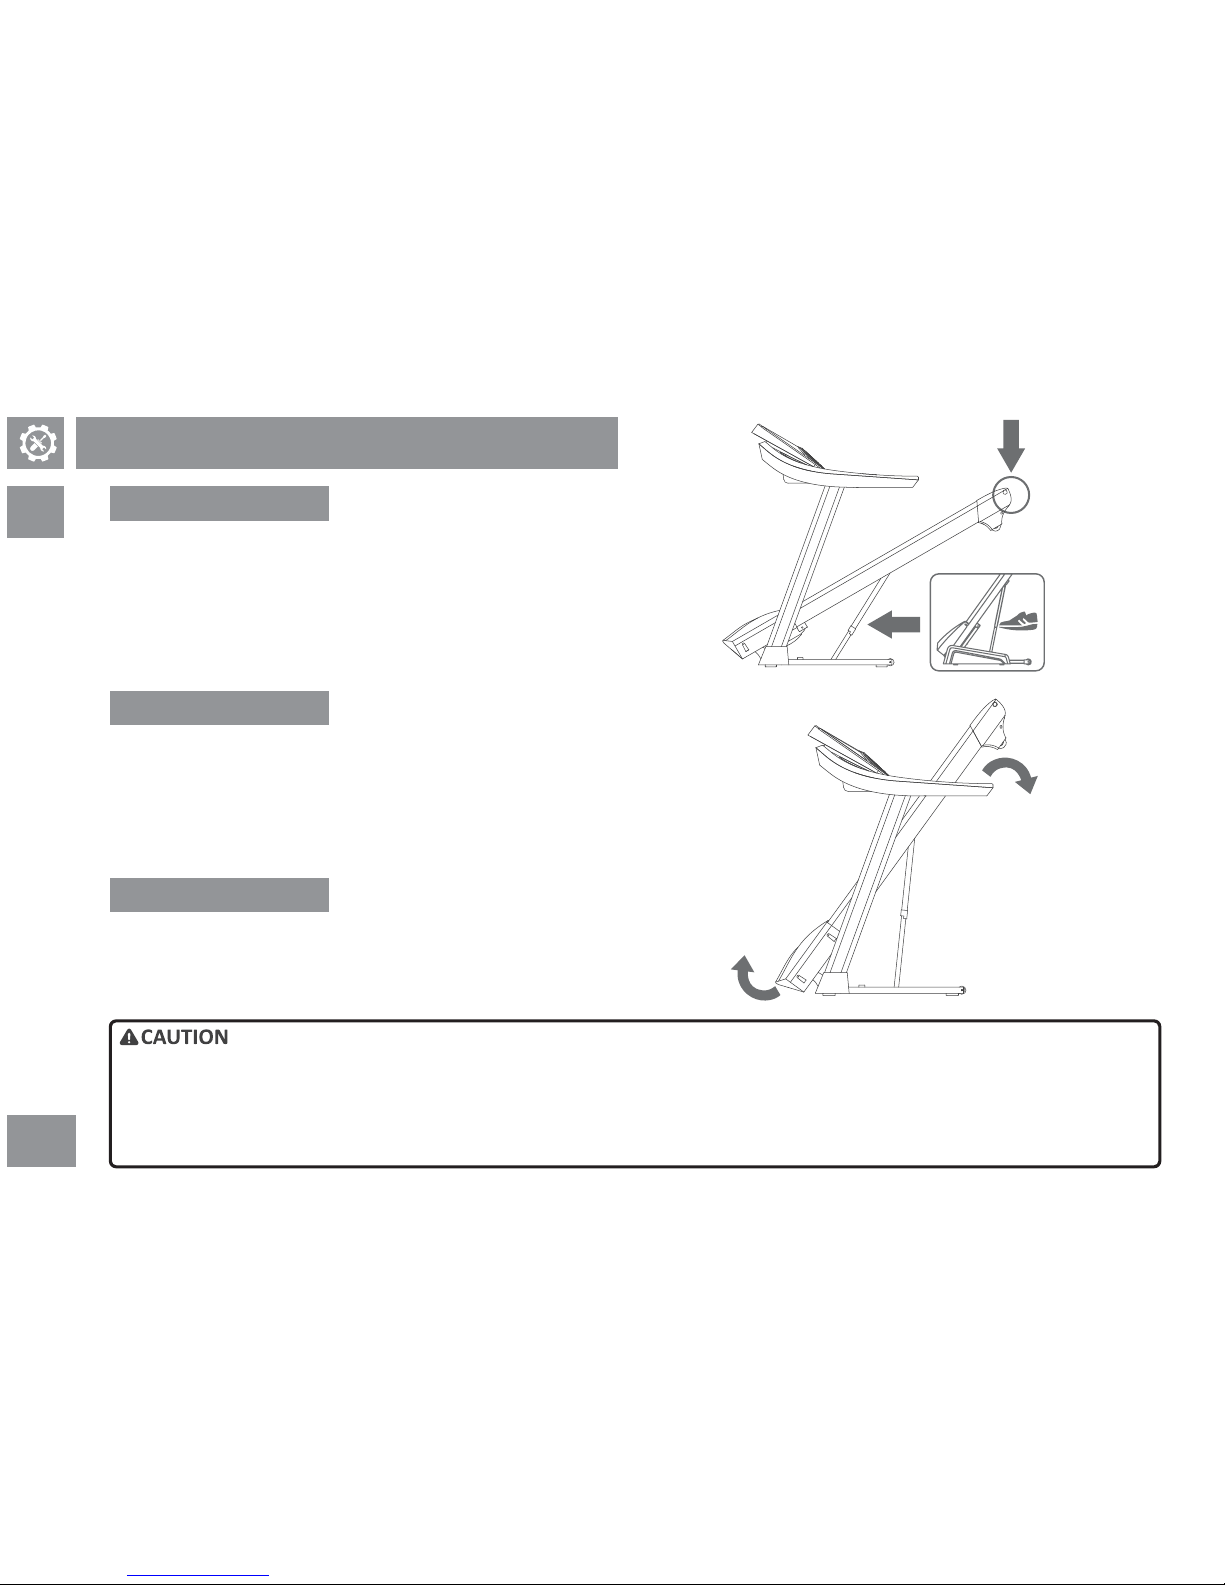
Press
Move
Transport
•
•
•
•
There is a safety lock on the hydraulic li under the machine. If you like to put down the deck, please gently kick the orange pin of hydraulic
There is a safety lock on the hydraulic li under the machine. If you like to put down the deck, please gently kick the orange pin of hydraulic
li and press deck slightly, then lower the deck carefully on the ground.
li and press deck slightly, then lower the deck carefully on the ground.
The treadmill is very heavy. Please ask another person to move or transport it with you. Before moving or transporng, make sure the deck is
The treadmill is very heavy. Please ask another person to move or transport it with you. Before moving or transporng, make sure the deck is
folded and the pin of hydraulic li is fixed. DO NOT try to arbitrarily move or transport the treadmill on your own. Fail to follow above instrucons
folded and the pin of hydraulic li is fixed. DO NOT try to arbitrarily move or transport the treadmill on your own. Fail to follow above instrucons
may lead to personnel injury and machine damage. Please pay great aenon to these instrucons.
may lead to personnel injury and machine damage. Please pay great aenon to these instrucons.
Move / Transport the Treadmil
Please hold the frame at the rear side of machine or under back roller
securely and upright the deck carefully unl the pin of the hydraulic li is
locked. Please put down the deck carefully and make sure it does not fall. To
unlock the fixaon, please hold the frame at the rear side of machine or
under back roller securely and lightly kick the orange pin of hydraulic li and
press deck slightly. Put the deck on the floor carefully.
How to fold
The treadmill comes with two sets of casters. Please fold the treadmill and
make sure the deck is fixed before moving it. Hold the handrails ghtly, make
the machine lean backward and move it. Aempt to move or transport the
treadmill without a folded and fixed deck can result in personnel injury or
machine damage.
How to move
The treadmill comes with two sets of casters. Please fold the treadmill and
make sure the deck is fixed before moving it. Hold the handrails ghtly, make
the machine lean backward and move it. The treadmill is very heavy. DO NOT
arbitrarily move it unless it’s necessary.
How to transport
Page 19
ALL
17
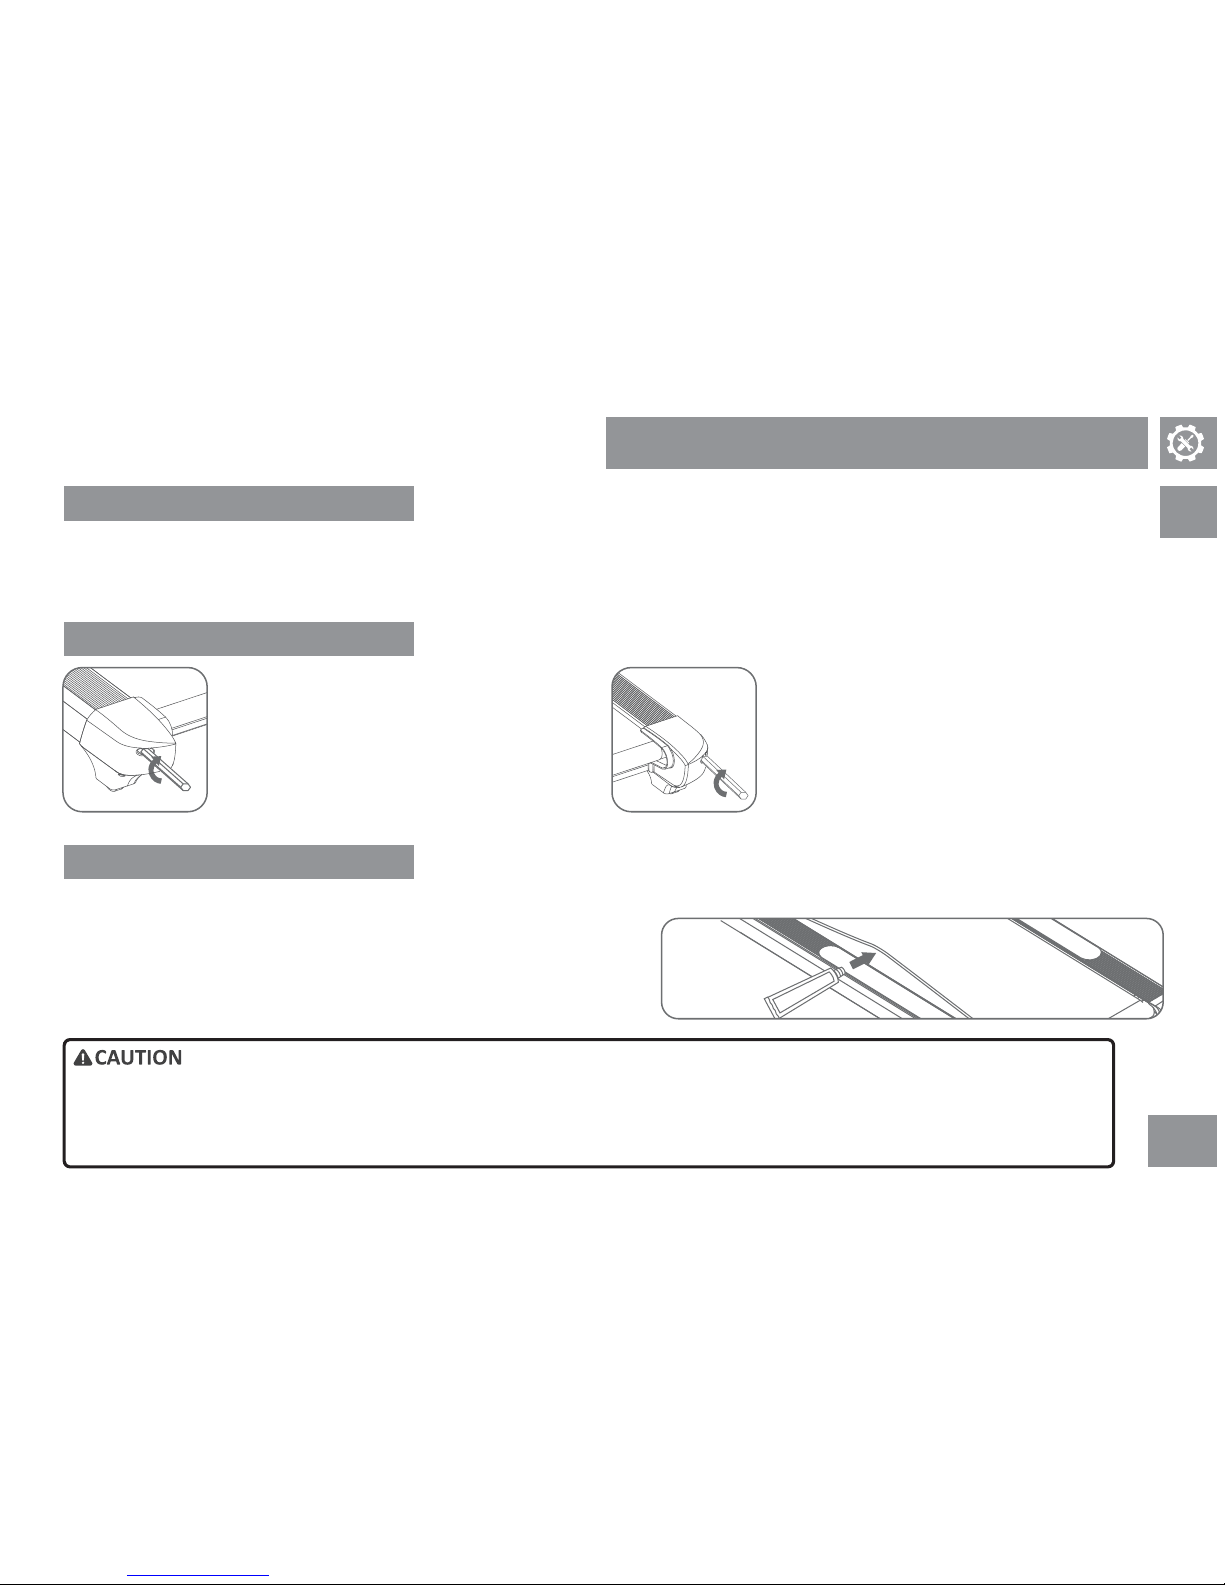
“LUBE” will be displayed on the digital screen when the accumulated hour reaches 100
hours or distance of 1000km as a reminder of belt maintenance. Please press “STOP” or
remove the safety switch and maintain the belt under standby status. Aer finishing belt
maintenance, please press “START”, “SPEED UP” and “SPEED DOWN” simultaneously to
clear the accumulated hours or kilometers. For belt maintenance, apply the silicon oil
(the whole bole) to the inner side of belt. Aer the oil is fully applied to the belt, please
operate with high speed (10KM) for 10 minutes to make the oil spread evenly on the belt.
The belt slides to the le:
When the belt slides to the le, please fine-tune
the rear le screw in a clockwise direcon to the
right under high speed operaon (10KM). Repeat
above steps unl the belt moves back to the
center if the belt sll shis off aer 30~60 seconds
under high speed operaon.
The belt slides to the right
When the belt slides to the right, please fine-tune
the rear right screw in a clockwise direcon to the
right under high speed operaon (10KM). Repeat
above steps unl the belt moves back to the
center if the belt sll shis off aer 30~60 seconds
under high speed operaon.
The posion of belt is adjusted before shipment. However, somemes the belt may shi off center during transportaon.
To adjust a slipping belt, please use the enclosed hex wrench turn the screws at rear (both sides) of the deck to the right by 90 degrees unl no slippage occurs.
Make sure the belt is not moving while adjusng the screw.
DO NOT adjust the belt when the machine is operang. A ght belt may bring extra load to the frame and electronic components and
DO NOT adjust the belt when the machine is operang. A ght belt may bring extra load to the frame and electronic components and
therefore should be avoided.
therefore should be avoided.
When the belt is adjusted to the center, please test with the speed of 10KM for 30~60 seconds to check if the belt is appropriately
When the belt is adjusted to the center, please test with the speed of 10KM for 30~60 seconds to check if the belt is appropriately
ghtened and if any deviaon occurs. Keep your fingers, hair and clothing away from the belt when tesng.
ghtened and if any deviaon occurs. Keep your fingers, hair and clothing away from the belt when tesng.
•
•
•
Adjust / Maintain the Belt
Belt maintenance
Belt adjustment
The belt stays at the center
Page 20
ALL
18
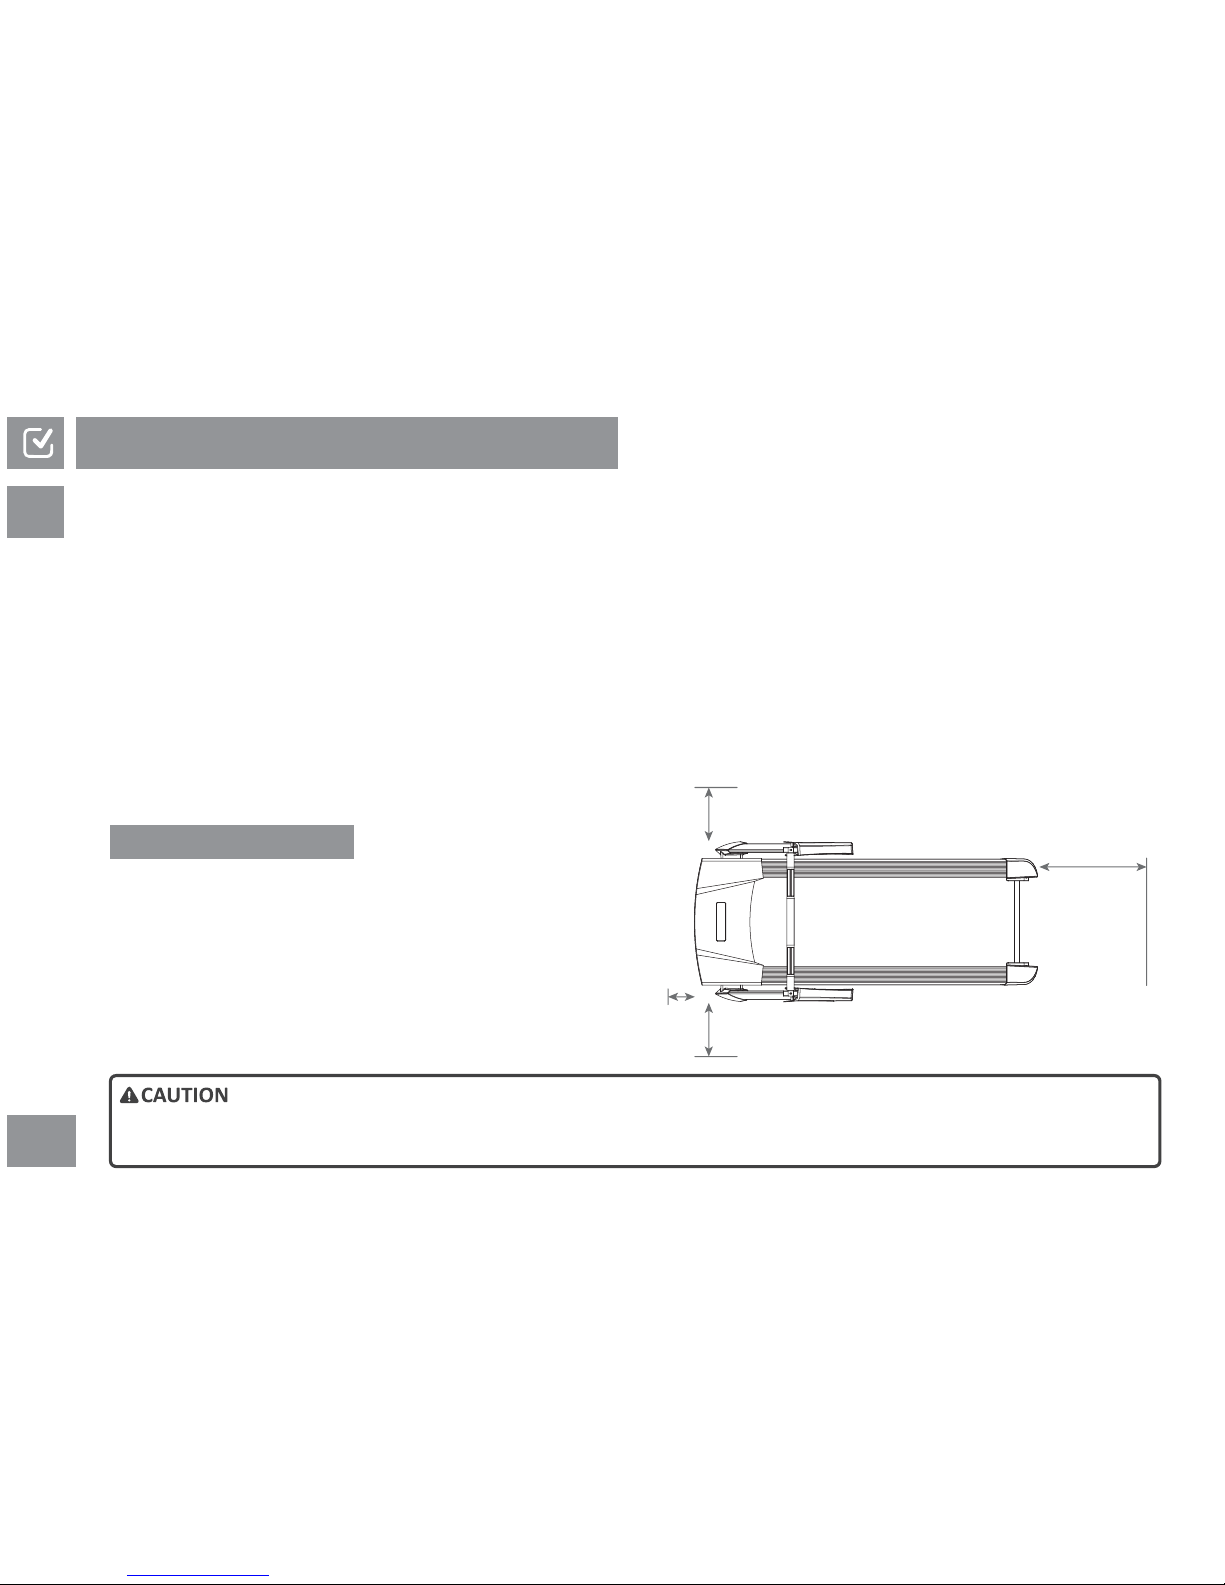
200CM
100CM
100CM
30~50CM
Place the machine on a level ground. Clearance requirement: 200cm at the
rear, 100cm at le and right sides and 30~50 cm at the front. DO NOT place
the machine in front of the indoor/outdoor vent, in the garage, in the open
yard, outdoors, or near the water supply.
The treadmill is an equipment for aerobic exercise that can facilitate weight loss, cardiopulmonary funcon enhancement, and muscle tension and basic
metabolic rate improvement. Good exercise habits are helpful for achieving these goals. This product can help you to build healthy exercise habit at home.
Please evaluate your physical condion before the exercise and pay aenon to following advice:
1) Do warm-up before you start to run. Warm-up can help stretching your muscles and avoid sports injury.
2) Wear sneakers with a gum sole. This can effecvely relieve the pressure to knees during the workout.
3) Please focus on your workout and please aach the safety clip to your clothing, please also pay highly aenon to your safety to use smart device or any media
player to watch TV/magazine during workout as this may lead to sport injury caused by poor posture.
4) Gradually increase your running speed. Release your grip on the handrails at a comfortable speed.
5) We recommend to limit your exercise to 30~60 minutes. Excessive exercise may result in knee injury or other potenal injuries.
6) Decrease your speed from a fast walk to a slow walk for a gradual recovery when your workout is coming to the end. DO NOT leave the deck immediately aer
the workout to avoid dizziness.
The treadmill is a simple and efficient training equipment and your shortcut to pursue a
healthy lifestyle.
DO NOT start the machine with your feet on the belt. Please stand on foot rails when starng the machine. Start walking on the treadmill only
DO NOT start the machine with your feet on the belt. Please stand on foot rails when starng the machine. Start walking on the treadmill only
when the belt starts moving. DO NOT start the machine with the fast run speed. DO NOT try to jump on the machine.
when the belt starts moving. DO NOT start the machine with the fast run speed. DO NOT try to jump on the machine.
Preparaons before Use
Treadmill locaon
Page 21
ALL
19
The machine will not start operang unl the safety key is correctly inserted into the port. Always aach the safety key to your clothing during workout. The
safety key is the device to ensure your safety, the emergency stop cung off the power in case runner accidentally falls down on the treadmill. Please check every
2 weeks to ensure the safety key work funconally.
Start with slow speed and gradually increase the speed to a comfortable level. DO NOT let the machine run by itself. Please pull out the safety switch, turn the
power off and unplug the power cord when not in use. Please start the machine with slow speed. Stand on foot rails first and try to turn your trunk or lean
forward. Please stop using any sport equipments including the treadmill immediately once you feel any dizziness, pain, exhauson or difficult breathing.
Make sure the power cord of the treadmill is correctly plugged in. The indicator should light up when the power is on. The digital screen will light up aer the
beep; 3 seconds aer the machine enters standby status, you can press “Start” twice to proceed to fast exercise or select exercise mode and set up your treadmill
to operate at low speed.
DO NOT use the machine without using the safety clip. Please aach the safety clip to your clothing before the workout. Try to pull out
DO NOT use the machine without using the safety clip. Please aach the safety clip to your clothing before the workout. Try to pull out
the safety switch and make sure the clip does not fall from clothing.
the safety switch and make sure the clip does not fall from clothing.
Damaged power cord or outlet may lead to irregular machine operaon and personnel injury. Please stop the operaon or workout imme
Damaged power cord or outlet may lead to irregular machine operaon and personnel injury. Please stop the operaon or workout imme-
diately if this occurs.
diately if this occurs.
•
•
•
Turn on the power
Safety key
Correct use
Page 22
ALL
20
In this chapter, we’ll introduce the basic operaon including panel operaon and training plan and personal parameter seng. Please make yourself familiar with
the buons and use the machine for workout according to your requirement. It is recommended to read this manual before starng the workout.
When using the machine, we recommend you to pair and connect to smart and wearable devices first when the treadmill is in standby
mode. Confirm if your exercise data has been transmied to the personal device from the treadmill aer workout immediately. Exercise
data will not be saved when the machine is in sleep mode or the power is off. To ensure complete data, it is recommended to confirm right
aer you finish the workout. (Refer to “Connecon of various devices on P.34 for detailed informaon)
Operaon Instucon
Please download treadmill APP before use
ALA CLOUDRUN
Page 23
ALL
21
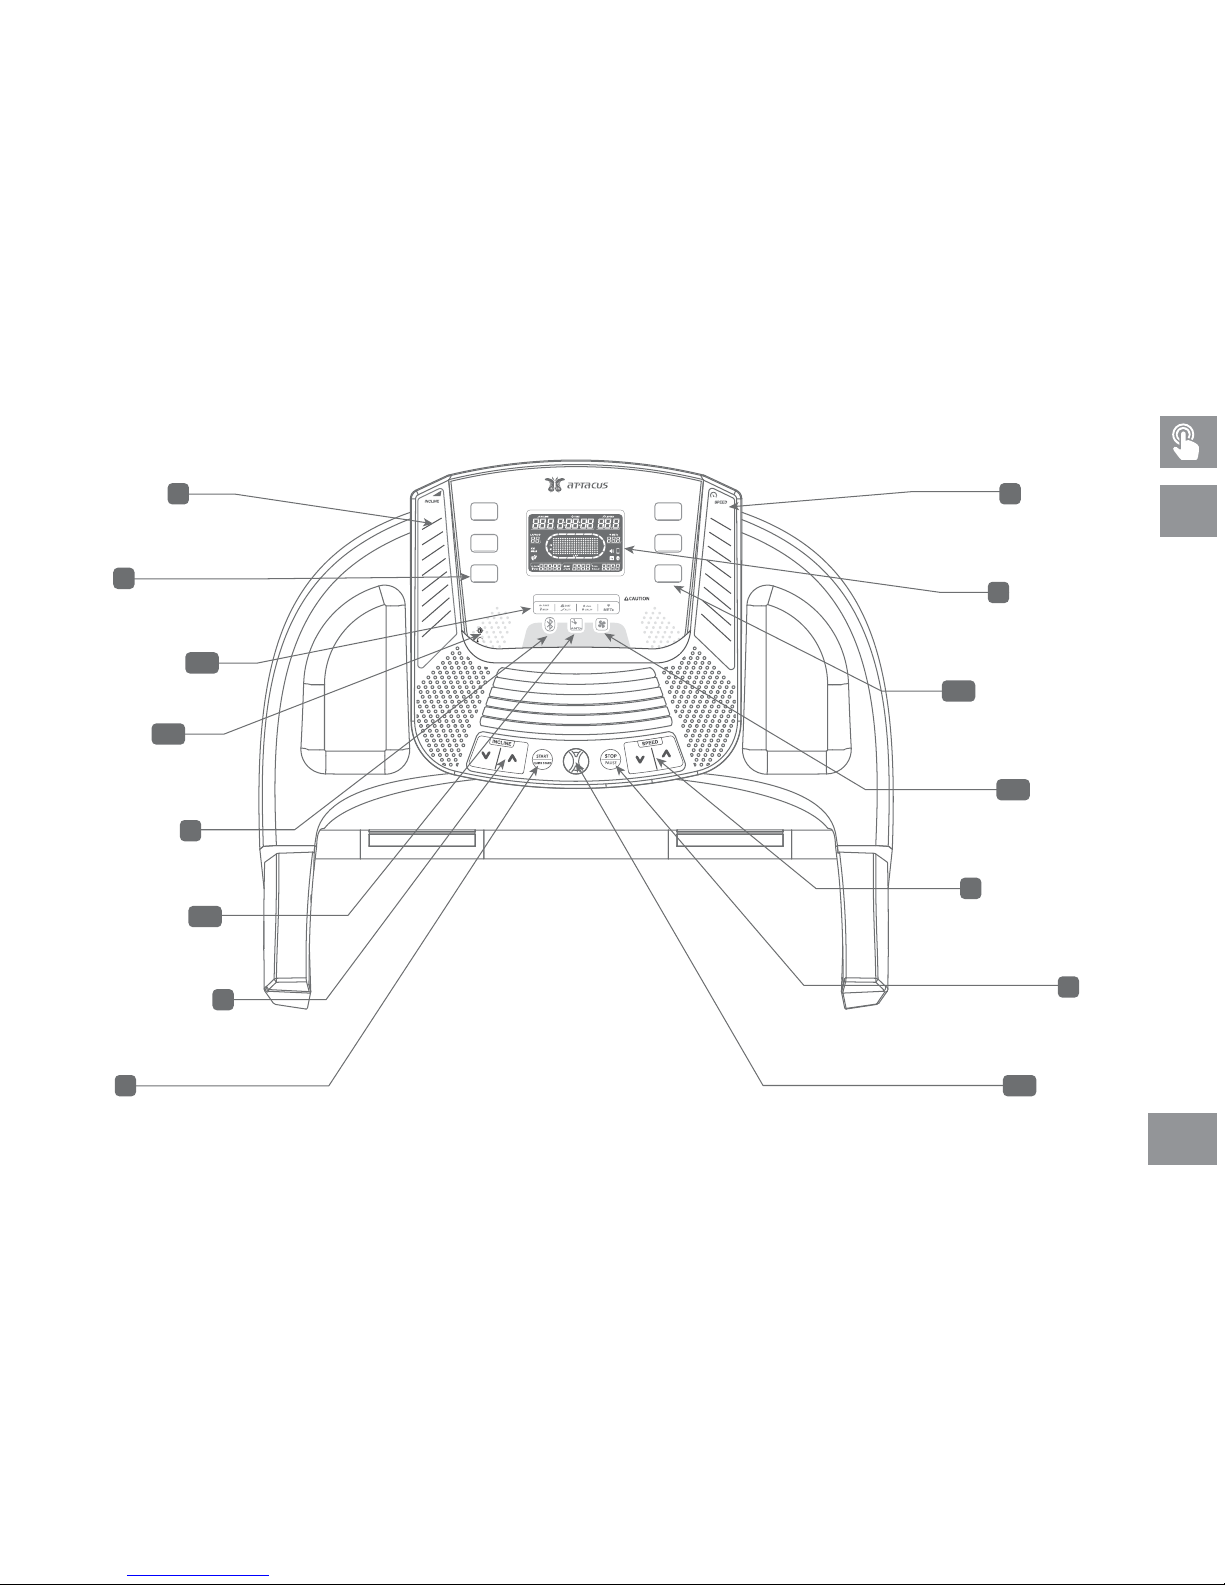
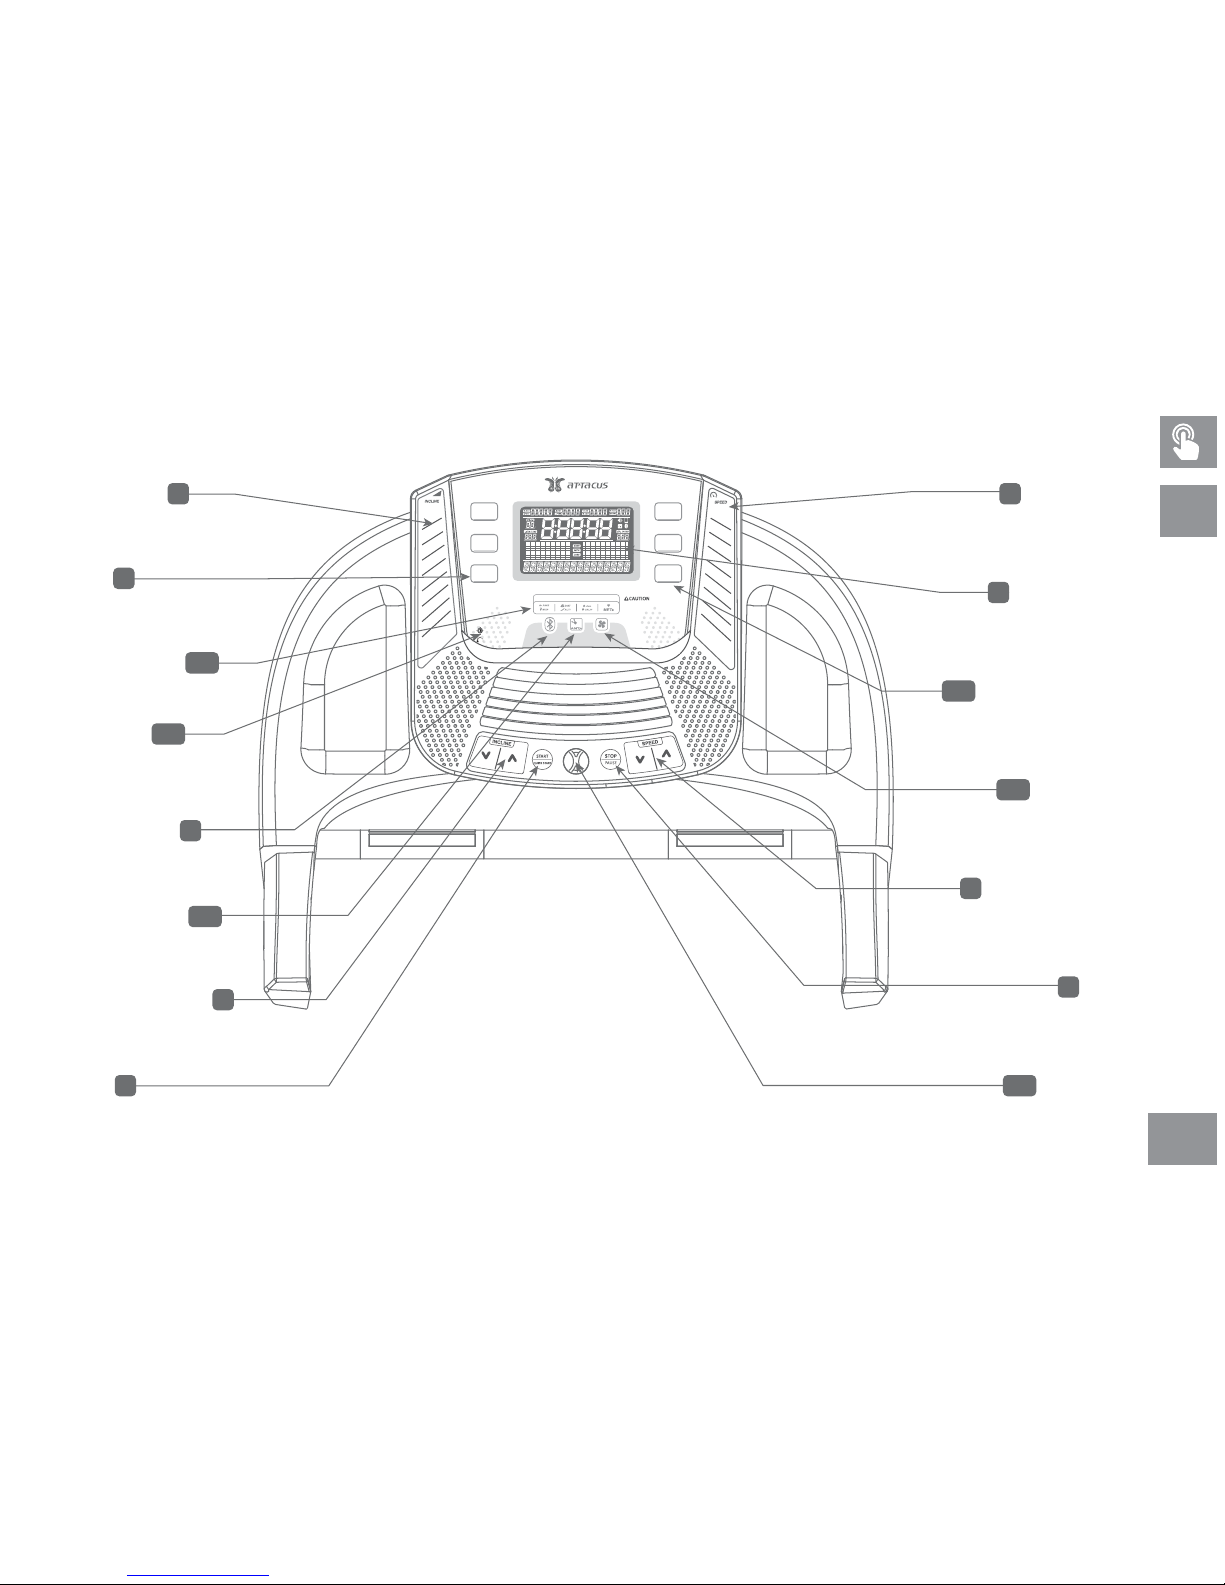
1) Digital screen: displays informaon such as the workout me, distance, calorie, heart rate, step, slope and speed (Refer to “Digital screen” on P.22~25).
2) START: press this buon to start your workout, or start the exercise aer selecng the program. Press to restart the exercise aer the pause.
3) STOP: press this buon to pause and press it again to stop the exercise and collect the data. Press this buon to return to the previous program when seng
program value.
4) Quick speed buon: quickly switch different speed values including warm-up and fast run.
5) Quick incline buon: quickly switch different slope angles including warm-up and workout.
6) SPEED UP/DOWN: adjust the speed (unit=0.1). It can also help you to enter quickly when seng program value.
7) INCLINE UP/DOWN: gradually increase or decrease the slope (level unit=0.5, AT200-10%,20Level,AT300.400-12%,24Level). It can also help you to enter quickly
when seng program value.
8) ENTER: press this buon to proceed to the input of next data when seng program value.
9) Bluetooth display/pairing: short press to switch the heart reat value of the paired device and pair with smart device APP. Press this buon long to pair any
wearable device.
10) ANT+ display/pairing: click this buon can switch the heart rate of paired device. Long press this buon to pair any wearable device.
11) Fan switch: turn on/off the fan.
12) Audio Jack (AUX IN): connect your media player to the treadmill with the audio signal wire.
13) Basic/Advanced/Interval/HRC/Goal/Custom: sports mode selecon keys, direct switching, (item AT200-20, AT300-25, AT400-27) for exercise mode selecon and
setup.
14) Exercise data display: exercise data switch; there are 4 types of data available, including Pace/steps(Step1)/step frequency(Step2)/current length(Step3),
distance/slope, total calorie/calorie per hour and heart rate.
15) Safety key: you can turn on and operate the treadmill aer the switch is inserted. The machine is in emergency mode when the safety key is not inserted and no
operaon will be allowed.
Please remove the transparent protecve film on the operang panel before use.
Operaon Panel
You can choose to display your workout data by pressing “PACE/STEP” buon. “Pace” shows target speed in minutes per mile (or kilometer),
You can choose to display your workout data by pressing “PACE/STEP” buon. “Pace” shows target speed in minutes per mile (or kilometer),
“Step 1” shows steps, “Step 2” shows step frequency per minutes, or “Step 3” shows your current length, total 4 workout data.
“Step 1” shows steps, “Step 2” shows step frequency per minutes, or “Step 3” shows your current length, total 4 workout data.
Page 24
200
300
22
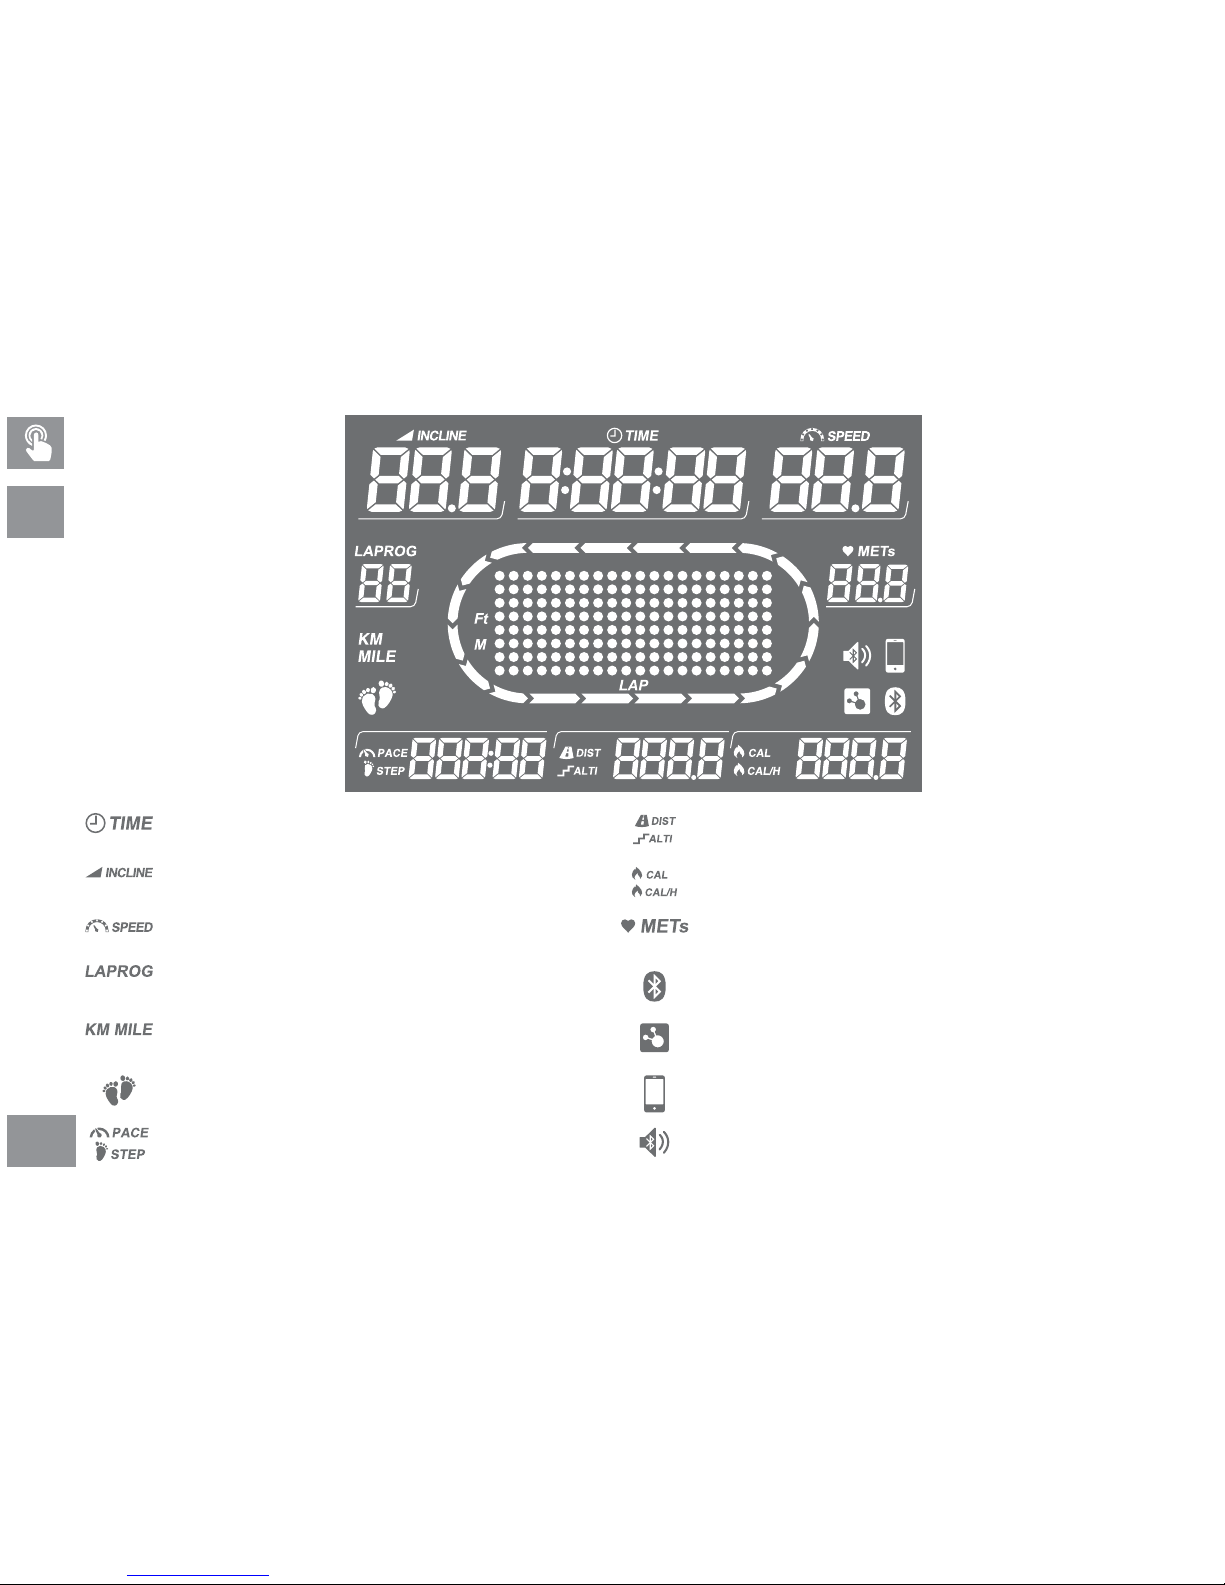
1) Time : display in the format of HH: MM: SS. Display your
workout me or connuous workout me.
2) Slope : display in level. Display the slope when you are doing a
fast walk or running on the treadmill.
3) Speed : display in km or mile. Display the slope when you are
doing a fast walk or running on the treadmill.
4) Lap & Program : display the lap or program selecon.
5) KM & Mile : display the distance in digital clock in km or mile.
6) STEP : display the step detected when running in le and right
feet.
7) Pace & Step : can switch the display of your current Pace,
steps(Step1), step frequency(Step2), and current length(Step3).
8) Distance & Slope : can switch the display of total distance or accumulated slope of your workout.
9) Total calories & Calories per hour : can switch the display current total
calories burned or calories burned per hour.
10) Heart rate & Workout metabolic rate : can switch the display of current
heartbeat or convert the heart rate into metabolic rate to show workout
intensity.
11) Bluetooth connecon : when this indicator is on, the heart rate is the
value detected by Bluetooth on the connected wearable device.
12) ANT+ connecon : when this indicator is on, the heart rate is the value
detected by ANT+ on the connected wearable device.
13) Smart device connecon : when this indicator is on, it means the
smart device is connected to the treadmill via Bluetooth.
14) Bluetooth Speaker connecon : when this indicator is on, it means the
Speaker is connected to the treadmill via Bluetooth.
Page 25
200
300
10
8
1
2
3
4
5
6
0
16
18
14
12
10
8
6
4
2
SCREEN OPTION
BASIC ADVANCED
GOAL
CUSTOM
HRC
ENTER
Consult your physician for the target heart rate appropriate
for your fitness level. Stop exercising if you feel faint, dizzy or
short of breath. Do not allow children or people unfamiliar
with operaon on or near this unit. Keep hands and clothing
away from moving parts. Obtain proper instrucon prior to
using this equipment. Improper use of this equipment could
result in serious injury.
1
5
2
9
6
7
8
4
3
10
11
12
13
(Basic/HRC/Advenced/Goal/Custom)
14
15
Enter
23
Workout programs
Fan switch
ANT+
display/pairing
Bluetooth
display/pairing
Quick incline
buon
Start
Incline UP/DOWN
Speed UP/DOWN
Workout data
display
Stop
Safety key
Quick speed
buon
3.5mm
Audio Jack
(AUX IN)
Digital Screen
Page 26
400
24
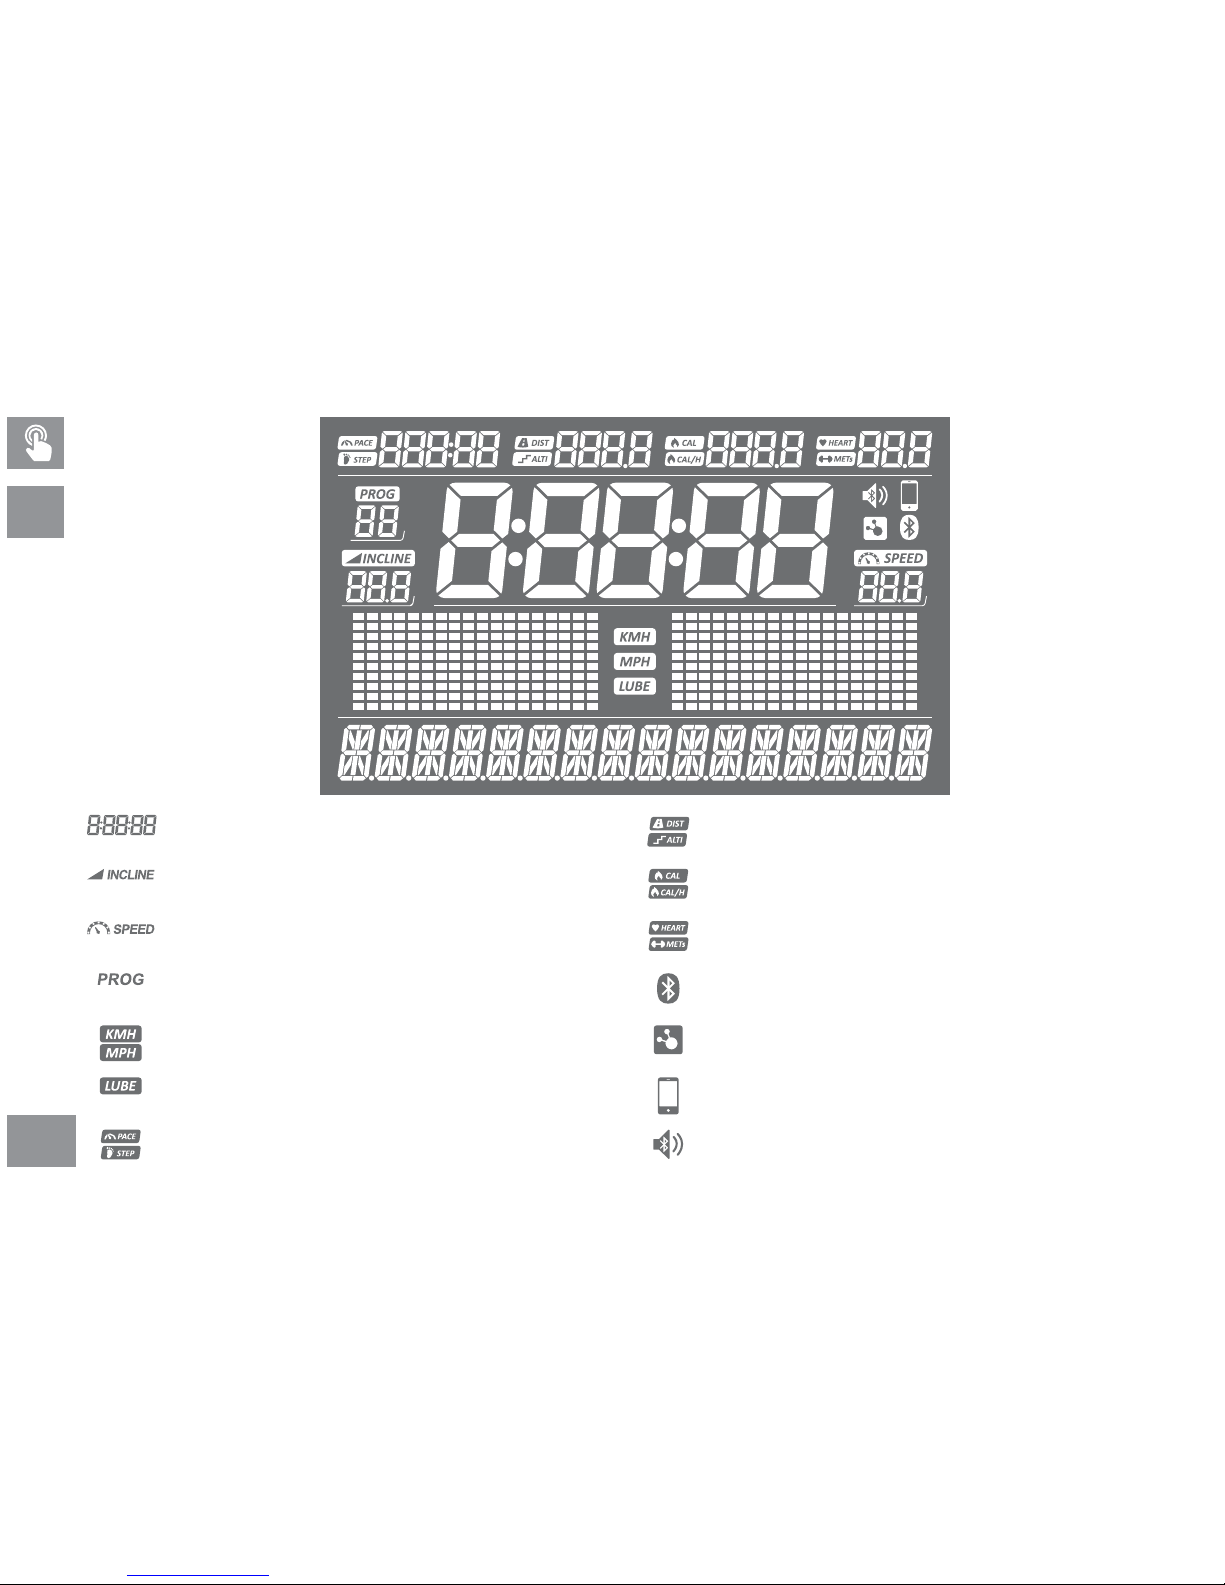
8) Distance & Slope : can switch the display of total distance or accumulated slope of your workout.
9) Total calories & Calories per hour : can switch the display current total
calories burned or calories burned per hour.
10) Heart rate & Workout metabolic rate : can switch the display of current
heart rate or convert the heart rate into metabolic rate to show workout
intensity.
11) Bluetooth connecon : when this indicator is on, the heart rate is the
value detected by Bluetooth on the connected wearable device.
12) ANT+ connecon : when this indicator is on, the heart rate is the value
detected by ANT+ on the connected wearable device.
13) Smart device connecon : when this indicator is on, it means the
smart device is connected to the treadmill via Bluetooth.
14) Bluetooth Speaker connecon : when this indicator is on, it means the
Speaker is connected to the treadmill via Bluetooth.
1) Time : display in the format of HH: MM: SS. Display your
workout me or connuous workout me.
2) Slope : display in level. Display the slope when you are doing a
fast walk or running on the treadmill.
3) Speed : display in km or mile. Display the slope when you are
doing a fast walk or running on the treadmill.
4) Lap & Program : display the lap or program selecon.
5) KM & Mile : display the distance in digital clock in km or mile.
6) STEP : display the step detected when running in le and right
feet.
7) Pace & Step : can switch the display of your current Pace,
steps(Step1), step frequency(Step2), and current length(Step3).
Page 27
400
10
8
1
2
3
4
5
6
0
16
18
14
12
10
8
6
4
2
SCREEN OPTION
BASIC ADVANCED
GOAL
CUSTOM
HRC
ENTER
Consult your physician for the target heart rate appropriate
for your fitness level. Stop exercising if you feel faint, dizzy or
short of breath. Do not allow children or people unfamiliar
with operaon on or near this unit. Keep hands and clothing
away from moving parts. Obtain proper instrucon prior to
using this equipment. Improper use of this equipment could
result in serious injury.
1
5
2
9
6
7
8
4
3
10
11
12
13
(Basic/HRC/Advenced/Goal/Custom)
14
15
Enter
25
Workout programs
Fan switch
ANT+
display/pairing
Bluetooth
display/pairing
Quick incline
buon
Start
Incline UP/DOWN
Speed UP/DOWN
Workout data
display
Stop
Safety key
Quick speed
buon
3.5mm
Audio Jack
(AUX IN)
Digital Screen
Page 28
ALL
26
1) Check the belt and make sure there is no object that may interfere with machine operaon on the belt.
2) Connect the power cord to plug and turn the treadmill on. Please stand on side rail first.
3) Aach the safety clip to your clothing; make sure the clip is securely aached and will not fall during the workout. Insert the safety switch into the slot on
console.
4) Start workout: A) Press “START” and begin your training. B) Basic/Advanced/Interval/HRC/Goal/Custom: sports mode selecon keys, direct switching for
exercise mode selecon and setup.
5) Please pair and reconnect the wearable and smart device to the treadmill before use to ensure the heart rate or smart device APP can be correctly displayed.
When the workout is over, “WORKOUT SUMMARY” containing your exercise data will be displayed on the console display overview for 10 seconds. Please store
the exercise data to your personal mobile device aer the workout and before new workout and sleep mode (20minutes under standby mode)
1) Press “Basic/Advanced/Interval/HRC/Goal/Custom” kay to select exercise mode, press “ENTER” key to display the setup page.
2) Use the keypad or arrow up/down buon to enter desired value. Press “ENTER” to set the next item, “STOP” to return to the previous item, or “CLEAR” to
correct the value entered.
3) Personal parameter seng sequence of PROGRAMS: 1. Workout seng (Remark 1) 2. Age (10~99) 3. Weight (40~200KG / 88~440lb).
Please pair your wearable and smart device again before use and make sure all devices are paired and correctly connected.
Please pair your wearable and smart device again before use and make sure all devices are paired and correctly connected.
Please set in PROGRAMS when you want the machine to calculate the exercise data based on personal parameters. Or you can enable the
Please set in PROGRAMS when you want the machine to calculate the exercise data based on personal parameters. Or you can enable the
App. Input your personal parameters in the APP and press “
App. Input your personal parameters in the APP and press “
START”
START”
,and the treadmill will calculate the exercise data based on personal
,and the treadmill will calculate the exercise data based on personal
parameters in the APP. It is recommended to confirm if the exercise data has been stored in your personal device aer you complete the
parameters in the APP. It is recommended to confirm if the exercise data has been stored in your personal device aer you complete the
workout.
workout.
Remark 1:
Remark 1:
• Seng:
• Seng:
• Workout me seng are available in two paerns: 1. Count from 0:00:00 and display accumulated me 2. Countdown
• Workout me seng are available in two paerns: 1. Count from 0:00:00 and display accumulated me 2. Countdown
mode (max. 9:59:00; min. 10:00).
mode (max. 9:59:00; min. 10:00).
Basic Operaon
Workout completed
Start to use
Seng
•
•
•
•
Basic
Basic
Advanced
Advanced
Interval
Interval
HRC
HRC
Goal
Goal
Custom
Custom
Page 29
ALL
27
The speed regulaon buon can accept integer only. To adjust with decimal numbers: set the integral part first then the decimal part with
The speed regulaon buon can accept integer only. To adjust with decimal numbers: set the integral part first then the decimal part with
the speed key on control panel. During the workout, DO NOT adjust to high speed suddenly. Please speed up incrementally according to your
the speed key on control panel. During the workout, DO NOT adjust to high speed suddenly. Please speed up incrementally according to your
physical condion to avoid personnel injury.
physical condion to avoid personnel injury.
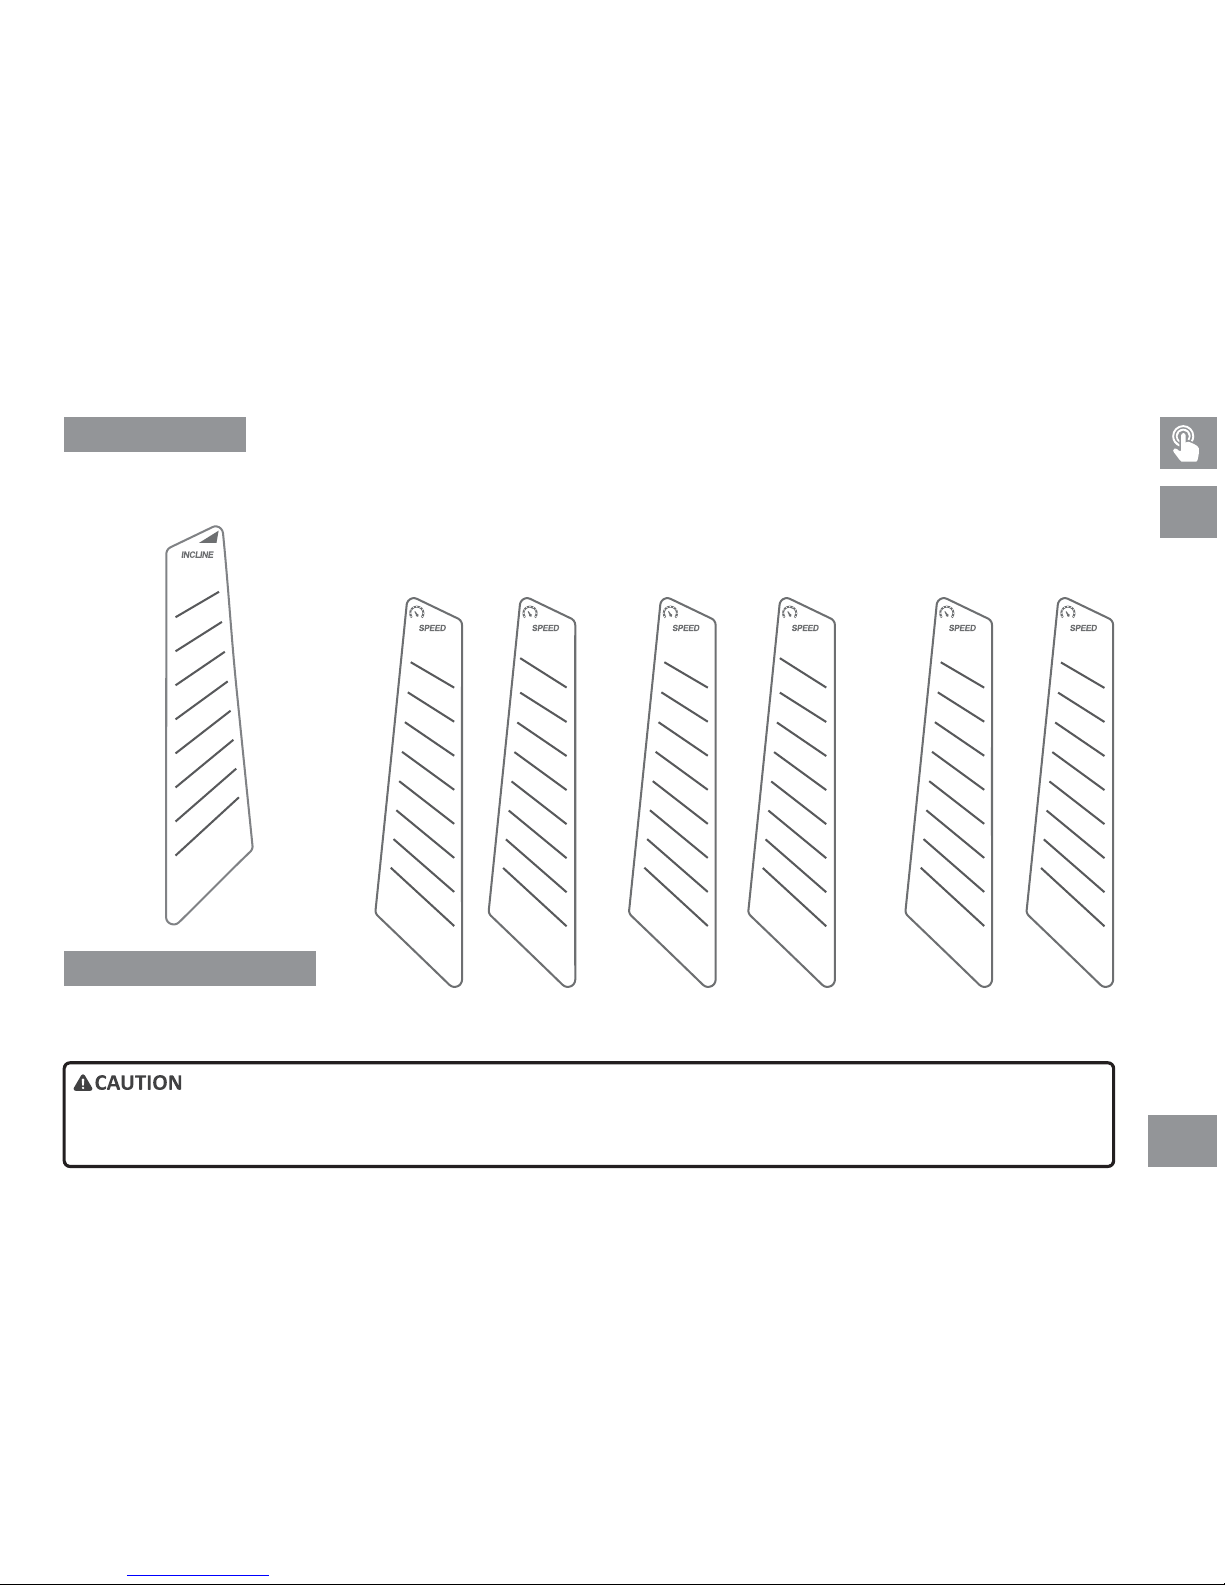
Exercise programs are with high intensity. Before the workout, there is a 3-minute WARM-UP and a 3-minute COOL-DOWN aer the workout. Complete warm-up
and cool-down enable your muscles to accept the workout with a higher intensity as well as decrease sports injuries effecvely.
Warm-up/Recovery
Keypad
Intensity
Exercise programs are with high intensity. Before the workout, there is a 3-minute WARM-UP and a 3-minute COOL-DOWN aer the workout. Complete warm-up
and cool-down enable your muscles to accept the workout with a higher intensity as well as decrease sports injuries effecvely.
MatricSpeedIncline
AT200 (1.5HP) AT300.400
Imperial Matric Imperial
14
16
12
10
9
8
6
4
2
16
18
14
12
10
8
6
4
2
16
18
14
12
10
8
6
4
2
10
8
7
6
5
4
3
2
1
Matric
AT200 (2.0HP)
Imperial
10
8
7
6
5
4
3
2
1
12
10
8
6
5
4
3
2
1
10
8
1
2
3
4
5
6
0
Page 30
28
Exercise PROGRAMS
P02 RANDOM
)
AT200/300 AT400
P04 WEIGHT LOSS
AT200/300 AT400
P03 CROSS COUNTRY
AT200/300 AT400
BASIC
•
P01 MANUAL MODE
AT200/300 AT400
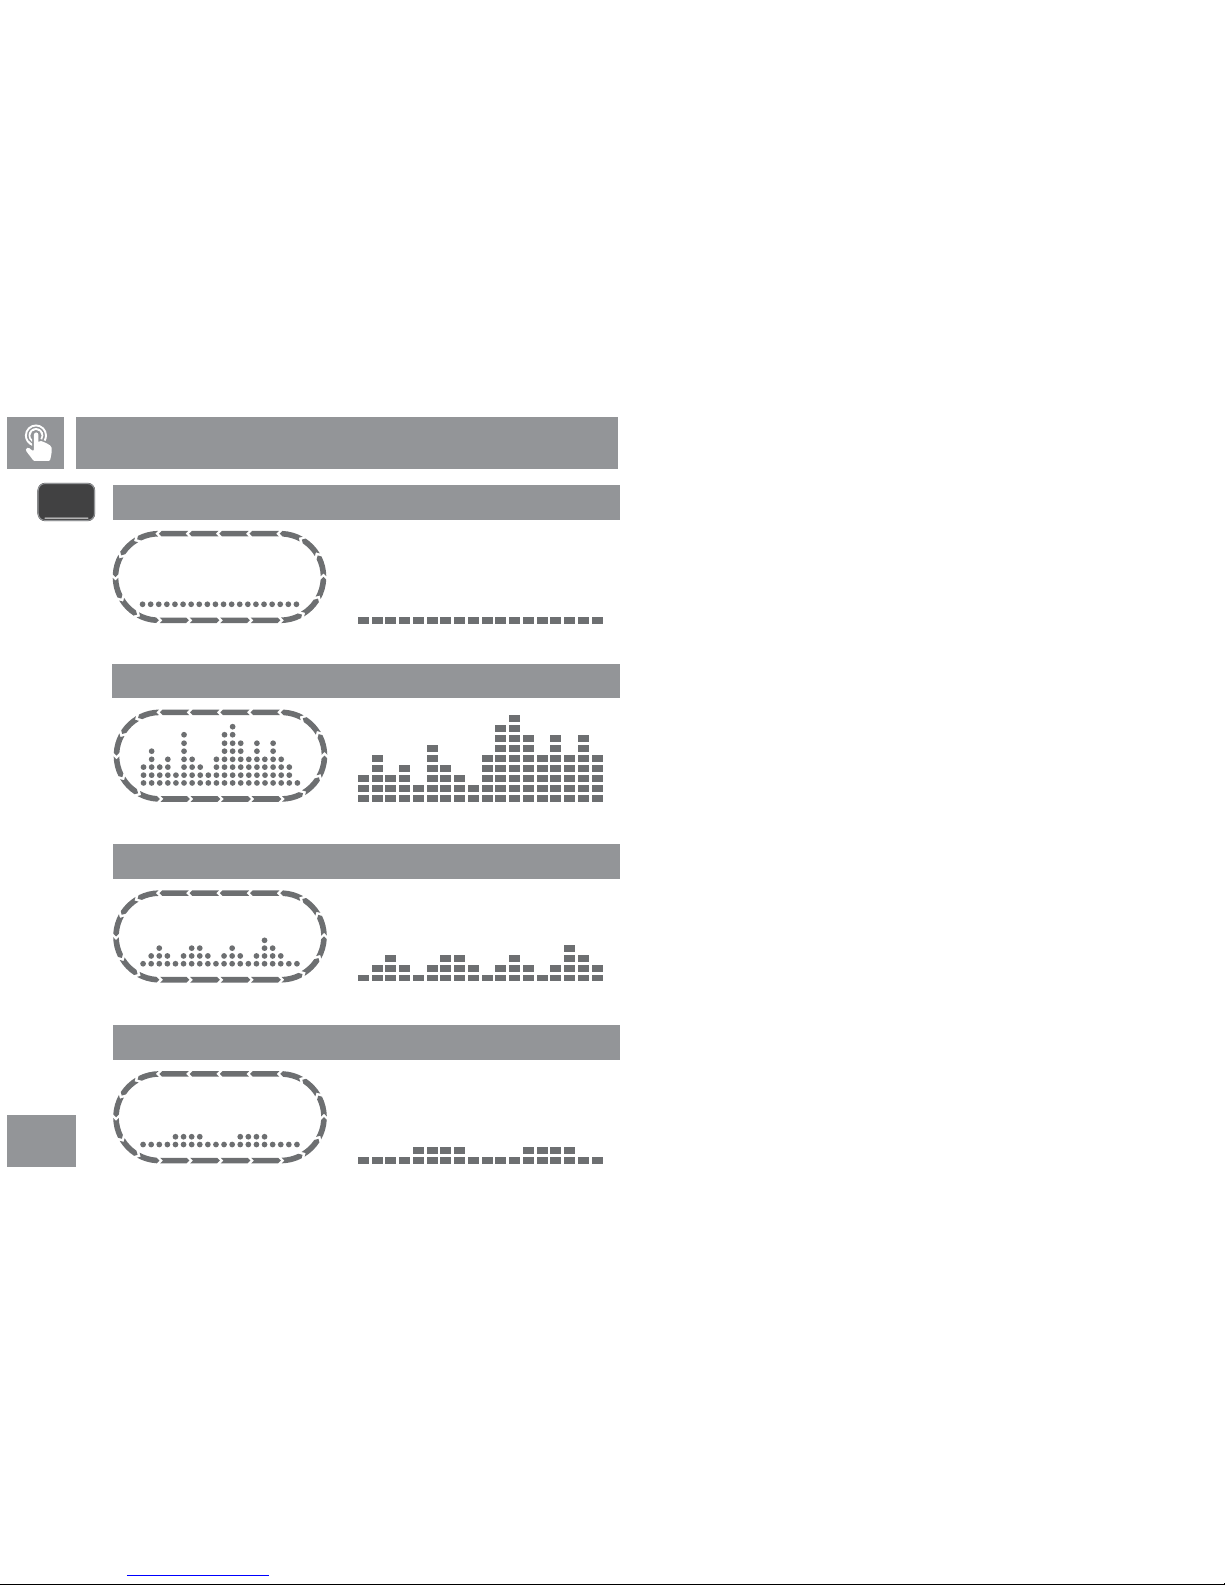
Within the set me, you can adjust speed and slope according to your physical
condion at any me to train muscle tension, strength and endurance and exercise
with different tensions.
This program improves your muscle intensity, strength and endurance and train your
heart and other peripheral muscles through the increase and decrease of speed during
the workout. You can change the speed according to personal workout intensity and the
machine will calculate the corresponding speed change. Under the same program, the
machine can simulate the path when climbing a hill by changing slope and increase
workout difficulty.
During the random workout period, your treadmill will randomly change slope. This
may keep your aenon while exercising the "muscle disorder" training rules. The
premise behind muscle disorders is that if you connue to make unexpected
changes to your workout, your body tends to burn off more calories.
This program burns your fat and leads to weight loss with the increase and decrease of
speed during workout. The exercise me of this program is set to 28 minutes. Your
heart rate should be between 55% and 70%, the maximum aerobic heart rate, for
weight loss. Make yourself comfortable with the steps and meet the target heart rate
range through adjusng the sleep and slope. (Refer to P36 for informaon related to
aerobic heart rate)
Page 31
29
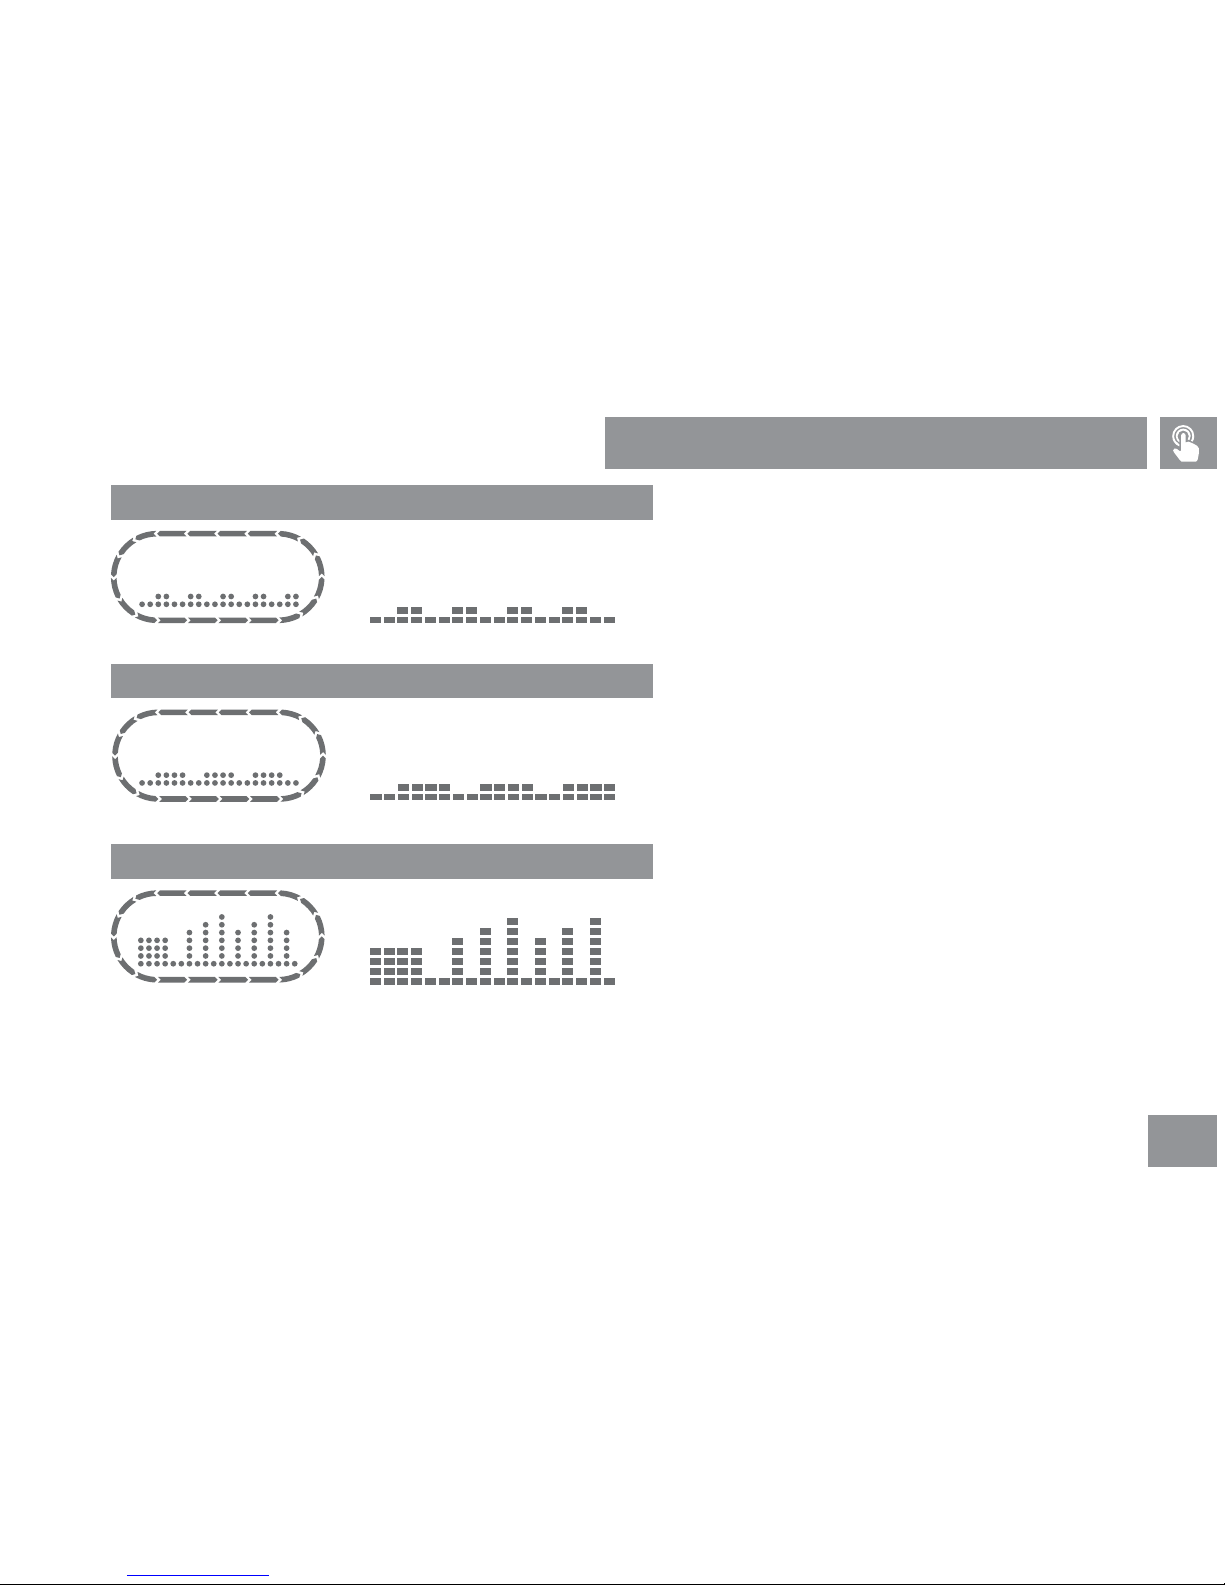
Mountain climbing mode would be ideal for treadmill exercise aimed at
losing weight and leg sculpturing. The mountain climbing mode strengthens
the workout and leg muscles with the lt funcon of your treadmill. Jog at a
constant speed to finish mountain climbing training. Increasingly lt your
treadmill unl it reached the desired level aer warmup. At end of the
exercise reduce the slope to ease off.
Exercise PROGRAMS
P07 HILL
AT200/300 AT400
P05 INTERVAL 1-1
AT200/300 AT400
P06 INTERVAL 2-1
AT200/300 AT400
This program improves your muscle intensity, strength and endurance and
trains your heart and other peripheral muscles through the increase and
decrease of speed during the workout. You can change the speed according
to personal workout intensity and the machine will calculate the
corresponding speed change. The intensity workout with different speeds
is available under the same program.
This program improves your muscle intensity, strength and endurance and
trains your heart and other peripheral muscles through the increase and
decrease of speed during the workout. You can change the speed according
to personal workout intensity and the machine will calculate the
corresponding speed change. The intensity workout with different speeds
is available under the same program.
Page 32
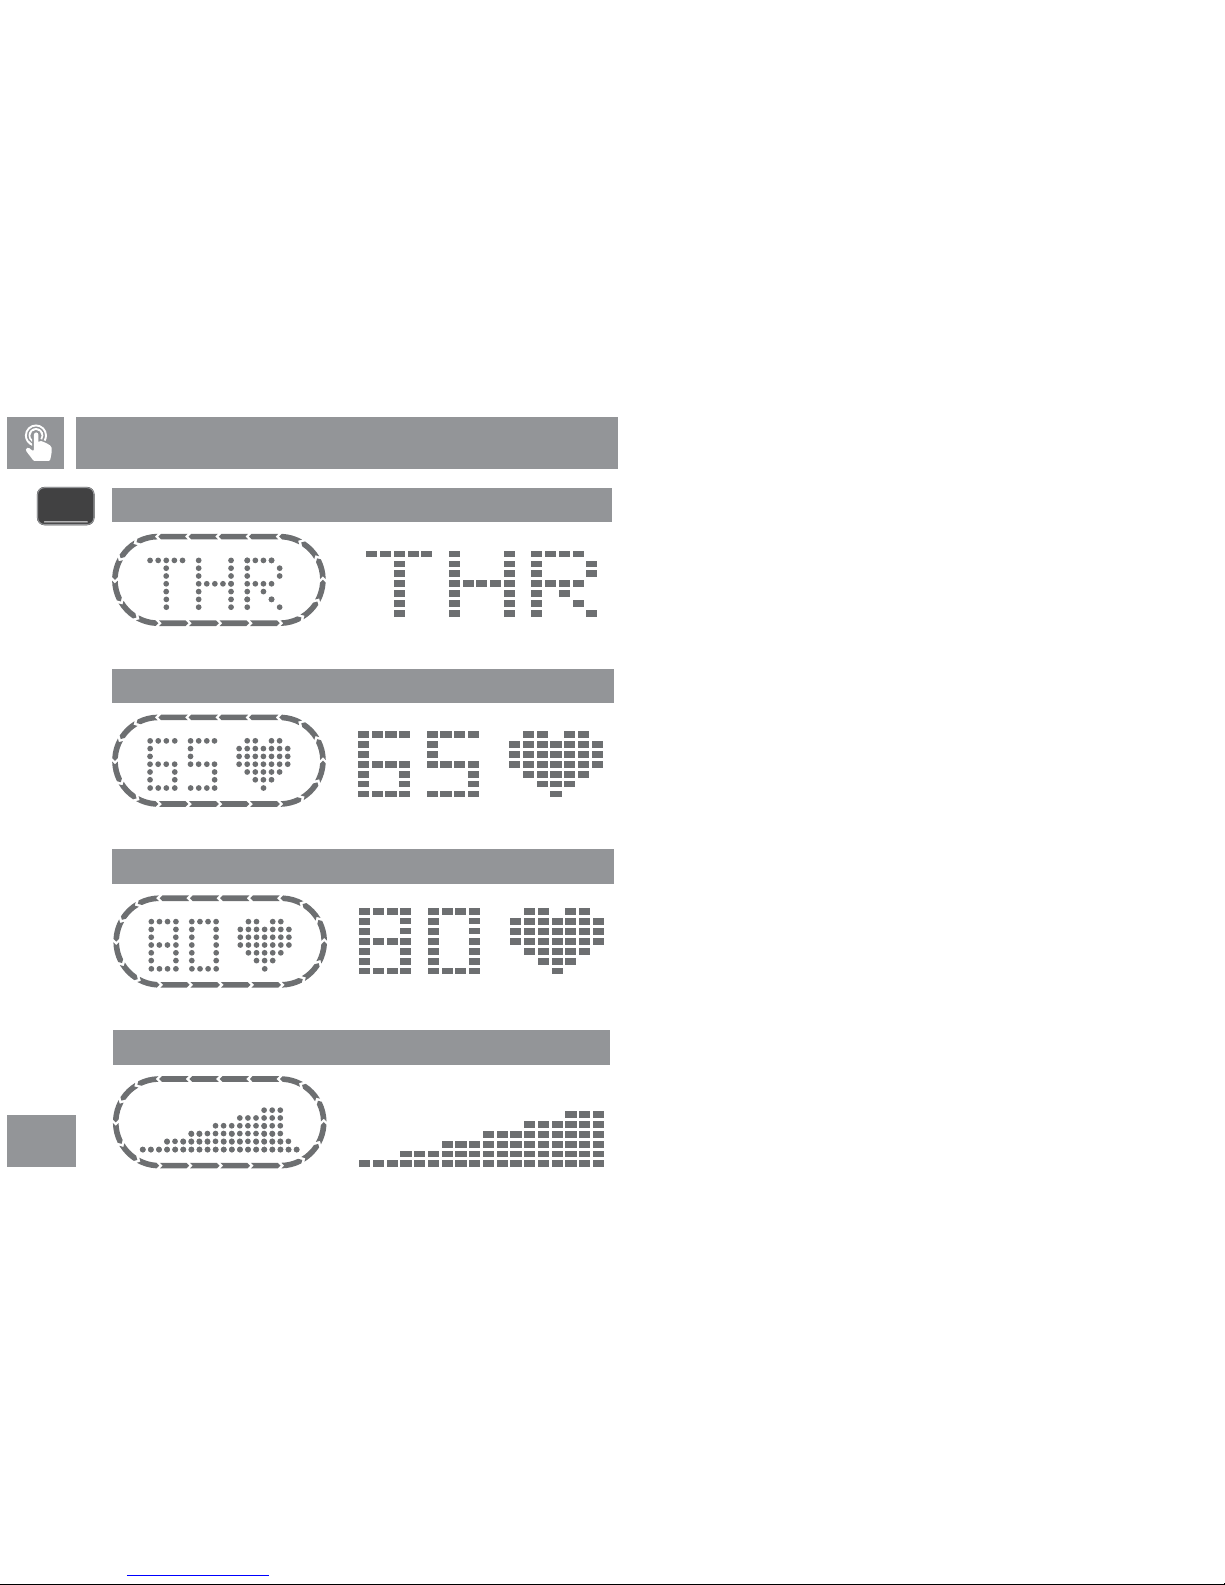
30
Calculate target heartrate rate based on your age and weight. Determine exercise
strength by keeping heart rate in range of 60-72% over the target value. You may change
speed and slope based on your heart rate. Raise training and challenge level
under the same exercise mode by changing speeds and slope to meet target heartrate
value.
Calculate target heart rate based on your age and weight. Determine exercise strength
by keeping heart rate in range of 72-85% over the target value. You may change speed
and slope based on your heart rate. Raise training and challenge level
under the same exercise mode by changing speed and slope to meet target heart rate
value.
You may set up target heart rate and have the system determine exercise strength by
detecng heart rate at 65%/75%/80% of target one. You may change speed and slope
based on your target heart rate. Raise training and challenge level under the same
exercise mode by changing speed and slope to meet target heart rate value.
Exercise PROGRAMS
P10 CARDIO
)
AT200/300 AT400
•
P09 FAT BURN
AT200/300 AT400
P11 HEART RATE HILL
AT200/300 AT400
P08 TARGET HEART RATE GOAL
AT200/300 AT400
HRC
You can set target heart rate. Workout intensity is determined by heart rate detecon
during the workout. You can change the speed according to personal workout
intensity. Under the same program, the machine can simulate the path when climbing
a hill by changing slope and increase workout difficulty.
Page 33
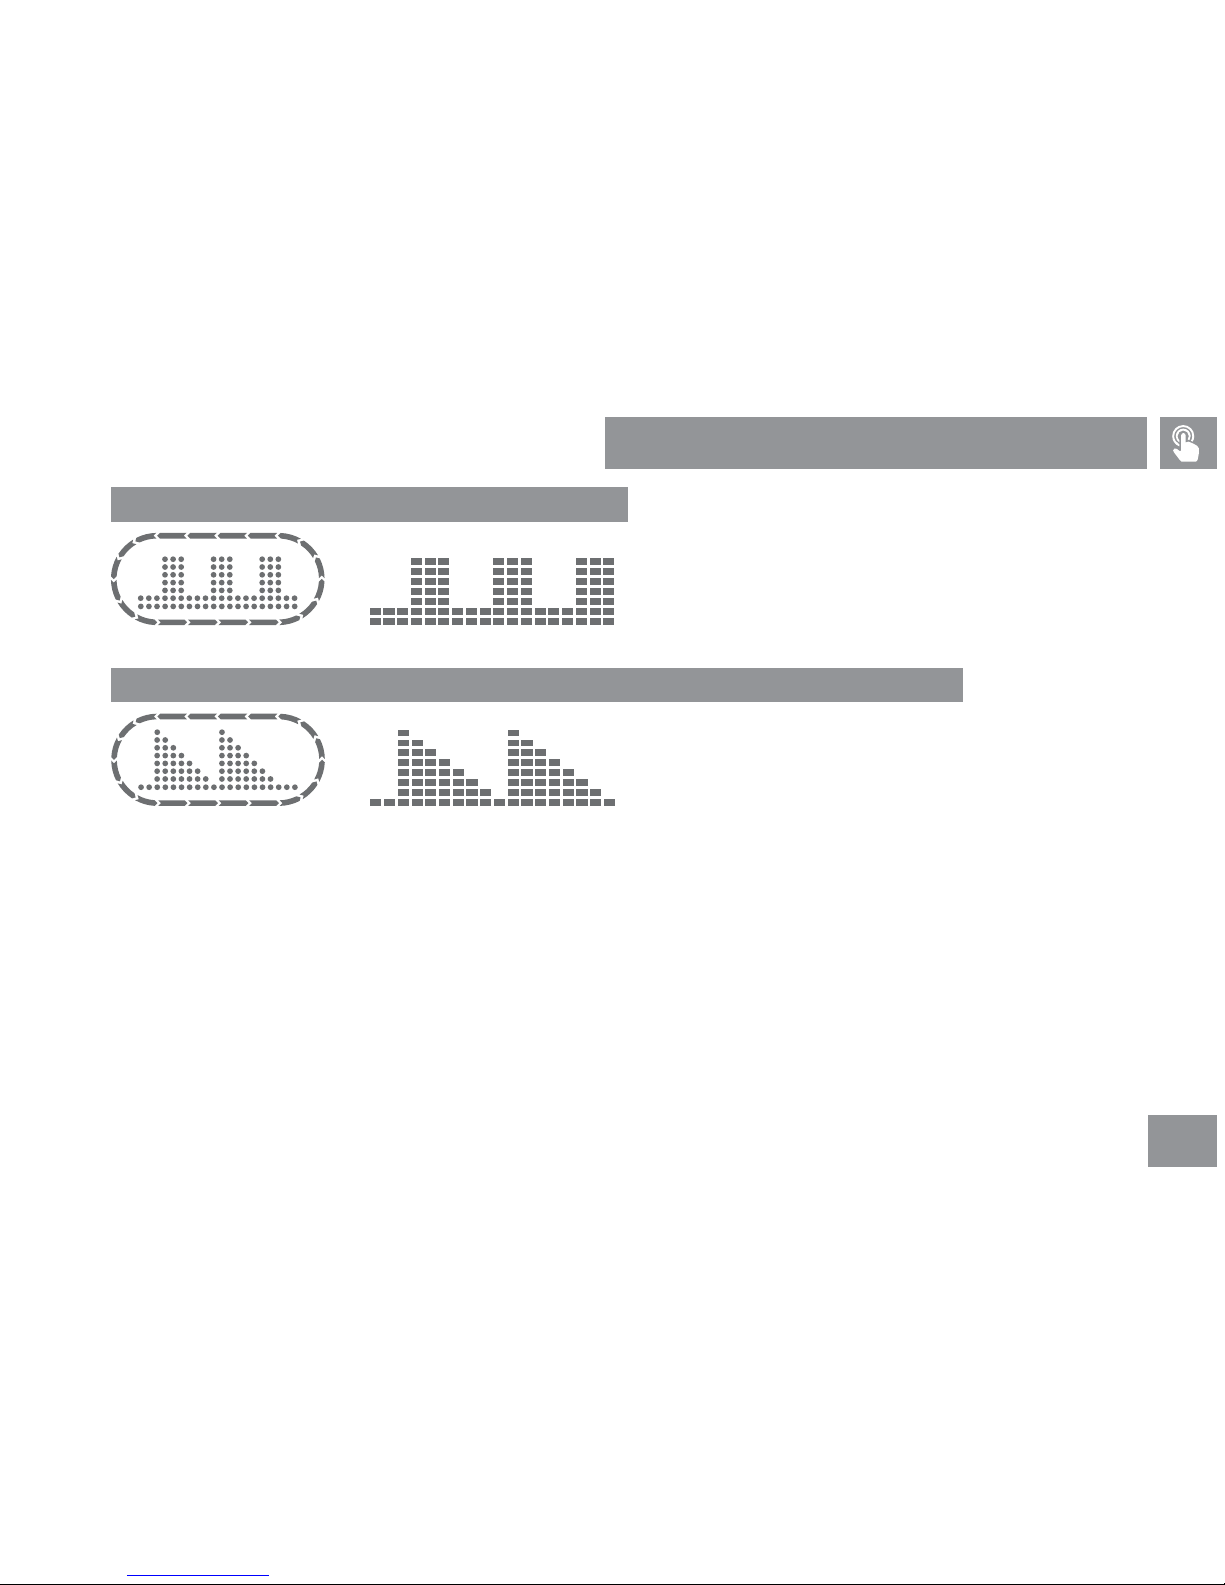
31
You may set up target heart rate and have the system determine exercise
strength by detecng heart rate at 80%/65% of the target one. You may
change speed and slope based on your target heart rate rate. Raise the
training and challenge level under the same exercise mode by changing
speed and slope to meet target heart rate value.
You may set up target heart rate and have the system determine exercise
strength by detecng heart rate at 85% of target one. You may change
speed and slope based on your target heart rate. Raise training and
challenge level under the same exercise mode by changing speed and
slope to meet target heart value.
Exercise PROGRAMS
P13 EXTREME HEART RATE (except for model AT200)
AT200/300 AT400
P12 HEART RATE INTERVAL
AT200/300 AT400
Page 34
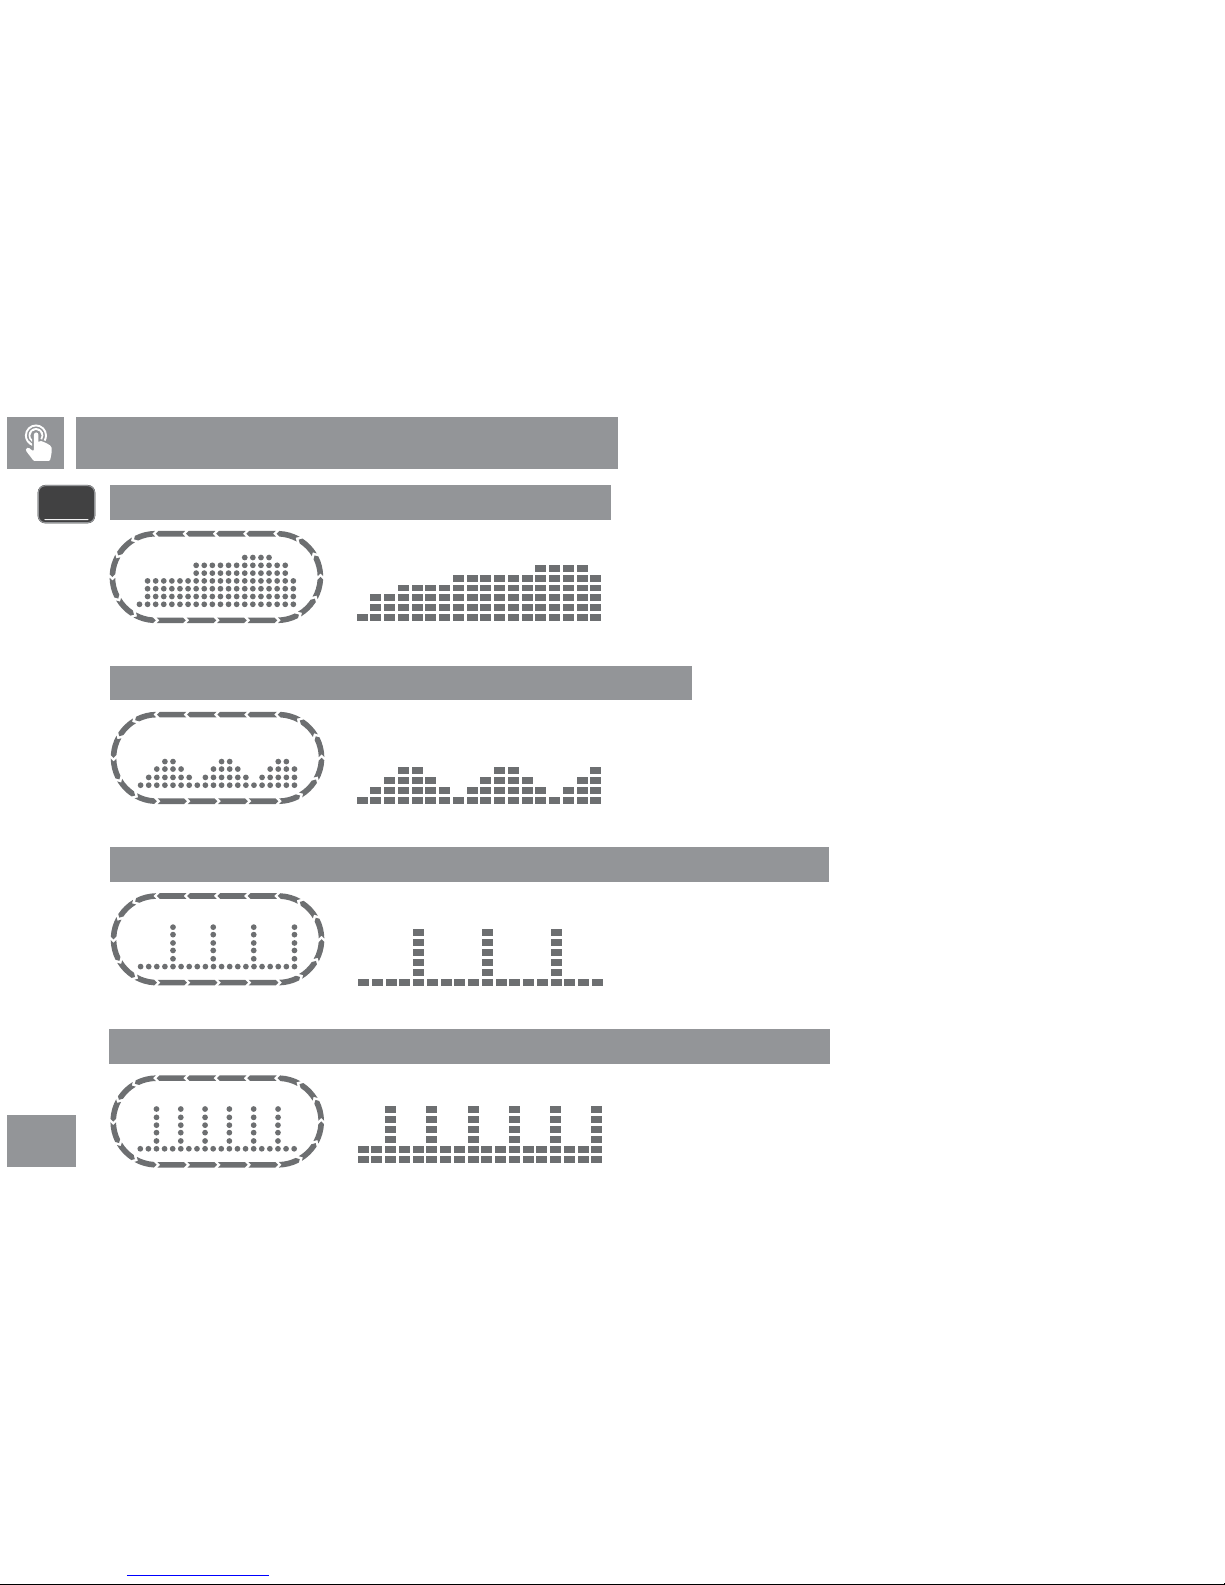
32
Exercise PROGRAMS
P15 AEROBIC (except for model AT200)
AT200/300 AT400
P16 INTERVAL 1-4 (except for model AT200)
AT200/300 AT400
P14 HILL CLIMB
AT200/300 AT400
ADVANCED
P17 INTERVAL 1-2 (except for model AT200)
AT200/300 AT400
This program improves your muscle intensity, strength and endurance and trains your
heart and other peripheral muscles through the increase and decrease of slope during
the workout. You can change the speed according to personal workout intensity and
the machine will calculate the corresponding speed change. Under the same program,
the machine can simulate the path when climbing a hill by changing slope and increase
workout difficulty.
This program improves your muscle intensity, strength and endurance and train your
heart and other peripheral muscles through the increase and decrease of slope during
the workout. You can change the speed according to personal workout intensity and the
machine will calculate the corresponding speed change. Raise challenge levels under
the same exercise mode by simulang oxygen rich mountain routes with different
slopes.
This program improves your muscle intensity, strength and endurance and trains your
heart and other peripheral muscles through the increase and decrease of slope during
the workout. You can change the speed according to personal workout intensity and the
machine will calculate the corresponding speed change. The intensity workout with
different speeds is available under the same program.
This program improves your muscle intensity, strength and enduranceand trains your
heart and other peripheral muscles through theincrease and decrease of slope during
the workout. You can changethe speed according to personal workout intensity and the
machinewill calculate the corresponding speed change. The intensity workout with
different speeds is available under the same program.
Page 35
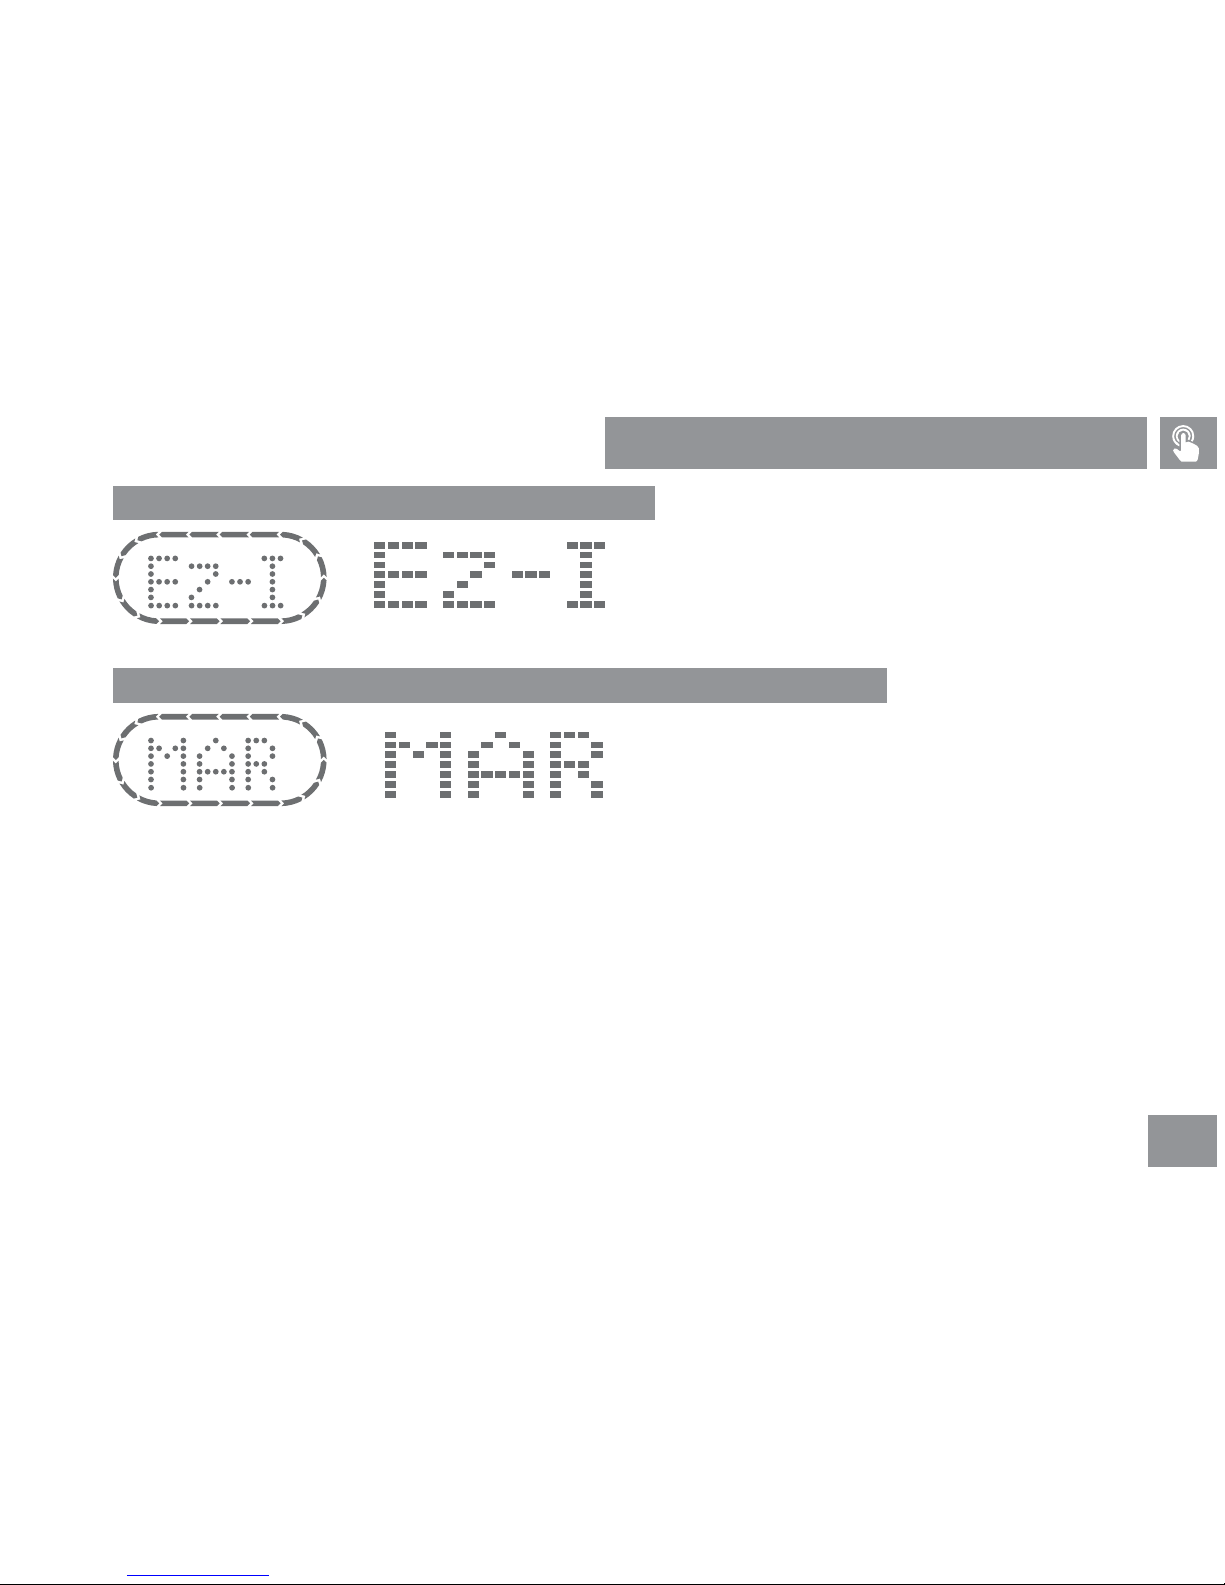
33
Exercise PROGRAMS
P18 EZ INCLINE
AT200/300
AT400
P19 MARATHON MODE
(except for model AT200)
AT200/300 AT400
You may set up the target slope and have the slope to raise from 0% to a
given target in 70% of the training me. You may change the slope based
on your sengs. Raise the training and challenge level under the same
exercise mode to meet target exercise strength.
During exercise, you can adjust speed and slope according to your physical
condion at any me to train muscle tension, strength and endurance and
exercise with different tensions.
Page 36
34
Exercise PROGRAMS
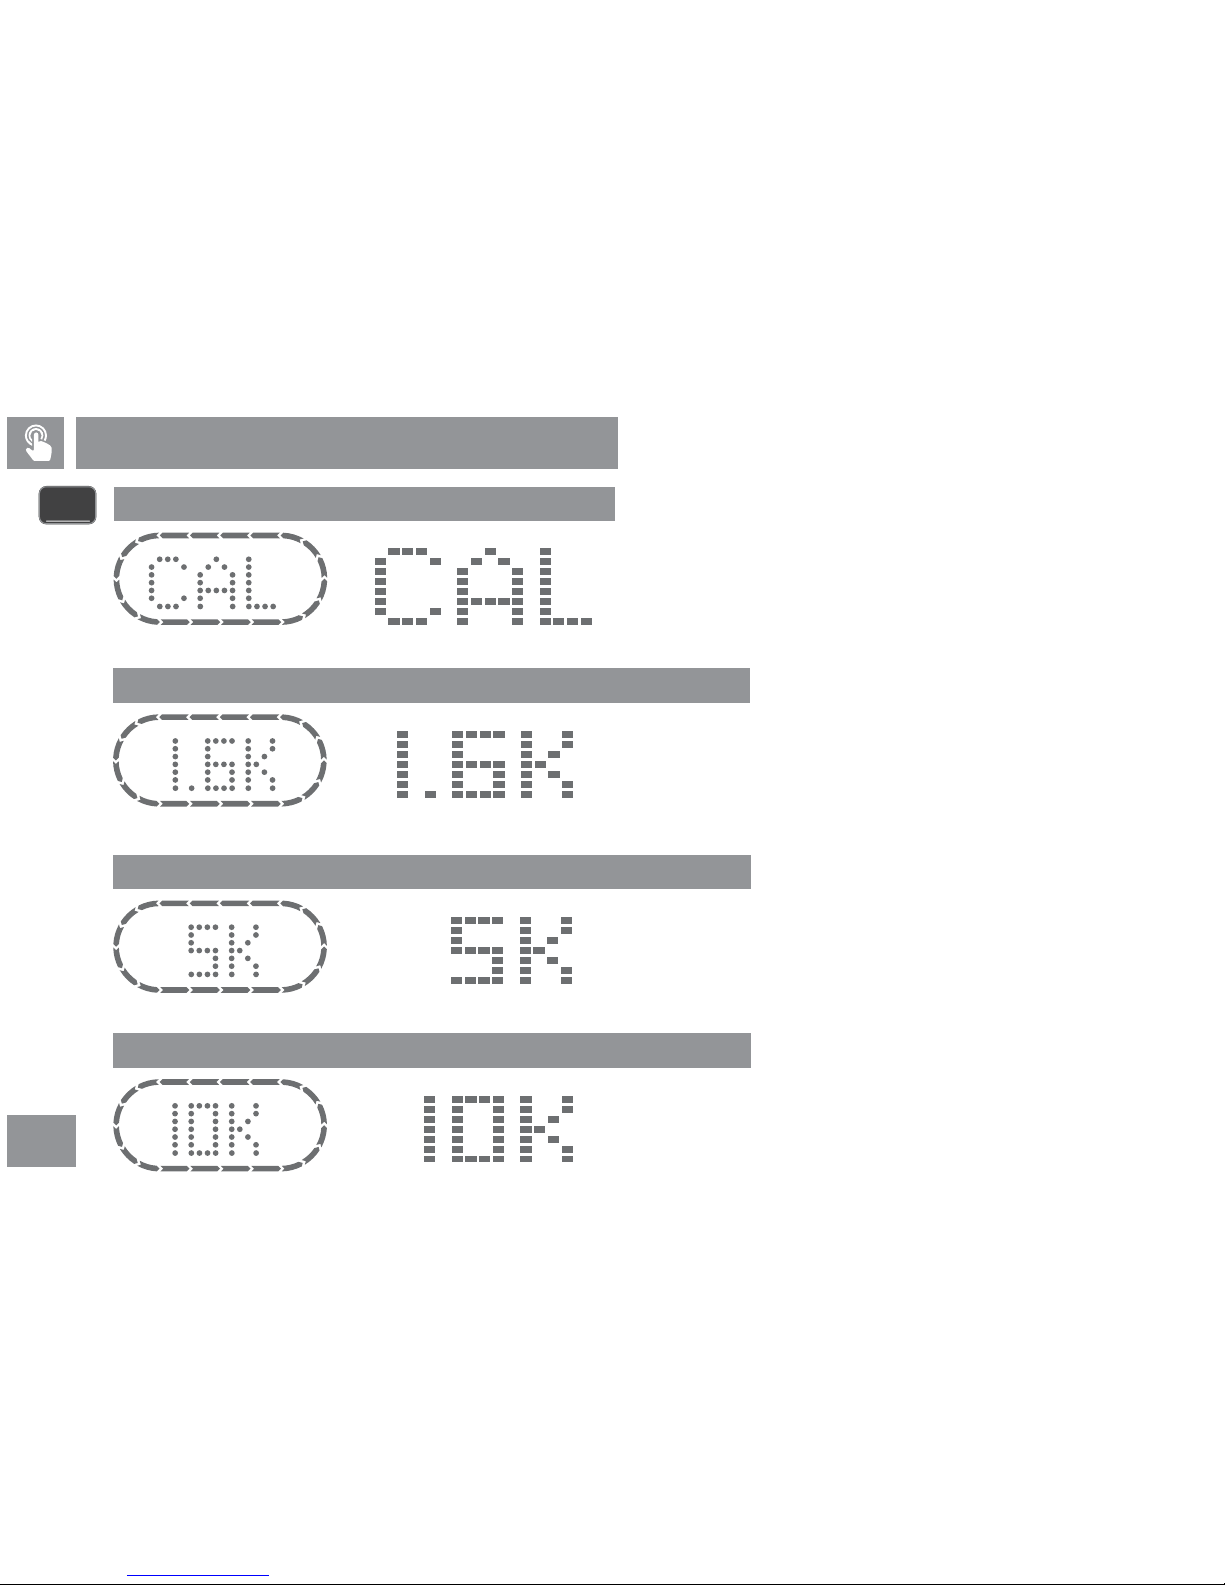
P22 DISTSNCE GOAL 5K/3M
AT200/300 AT400
P21 DISTSNCE GOAL 1.6K/1M
AT200/300 AT400
P23 DISTSNCE GOAL 10K/6M
AT200/300 AT400
P20 CALORIE GOAL
AT200/300 AT400
GOAL
You may set up target calorie based on your habits or aligned with your training
program and have the system calculate exercise calorie throughout the training session.
Calculate by your age and Heart rate.
You may set up a target strength based on your habits or aligned with your training
program and have the system set up a range of slopes throughout the training session.
Run on different slope (for variable exercise strength) in given target distance.
You may set up a target strength based on your habits or aligned with your training
program and have the system set up a range of slopes throughout the training session.
Run on different slope (for variable exercise strength) in given target distance.
You may set up a target strength based on your habits or aligned with your training
program and have the system set up a range of slopes throughout the training session.
Run on different slope (for variable exercise strength) in given target distance.
Page 37
35
Exercise PROGRAMS
You may customize exercise and relaxaon zone before training session and have the system simulate it before saving the sengs in the system. Select custom
exercise mode according to your workout preference.
You can quickly select your favorite sport mode before exercise and record it in the system. The next me you use it, you can reduce the operang me to more
easily enter your favorite sports mode.
P27 USER 2 (except for model AT200 & AT300)
P26 USER 1 (except for model AT200 & AT300)
P24 CUSTOM 1
P25 CUSTOM 2
CUSTOM
You may customize exercise and relaxaon zone before training session and have the system simulate it before saving the sengs in the system. Select custom
exercise mode according to your workout preference.
You can quickly select your favorite sport mode before exercise and record it in the system. The next me you use it, you can reduce the operang me to more
easily enter your favorite sports mode.
Page 38
ALL
36
Before workout, please stand on the side rail and hold the heart rate bar lightly with both hands to test. Simply hold the bar lightly. A hold too ght can lead to
detecon of other values. Please hold the bar unl your heart rate is displayed on the digital screen. If you are wearing the heart rate monitor, please adjust to
strap to an appropriate ghtness and make sure it will not get loose during workout. Please wet the sensing area with clean water before wearing the monitor.
The monitor should be fixed under your chest (Refer to “Wearable connecon on P.39 for wearing and pairing of the heart rate monitor).
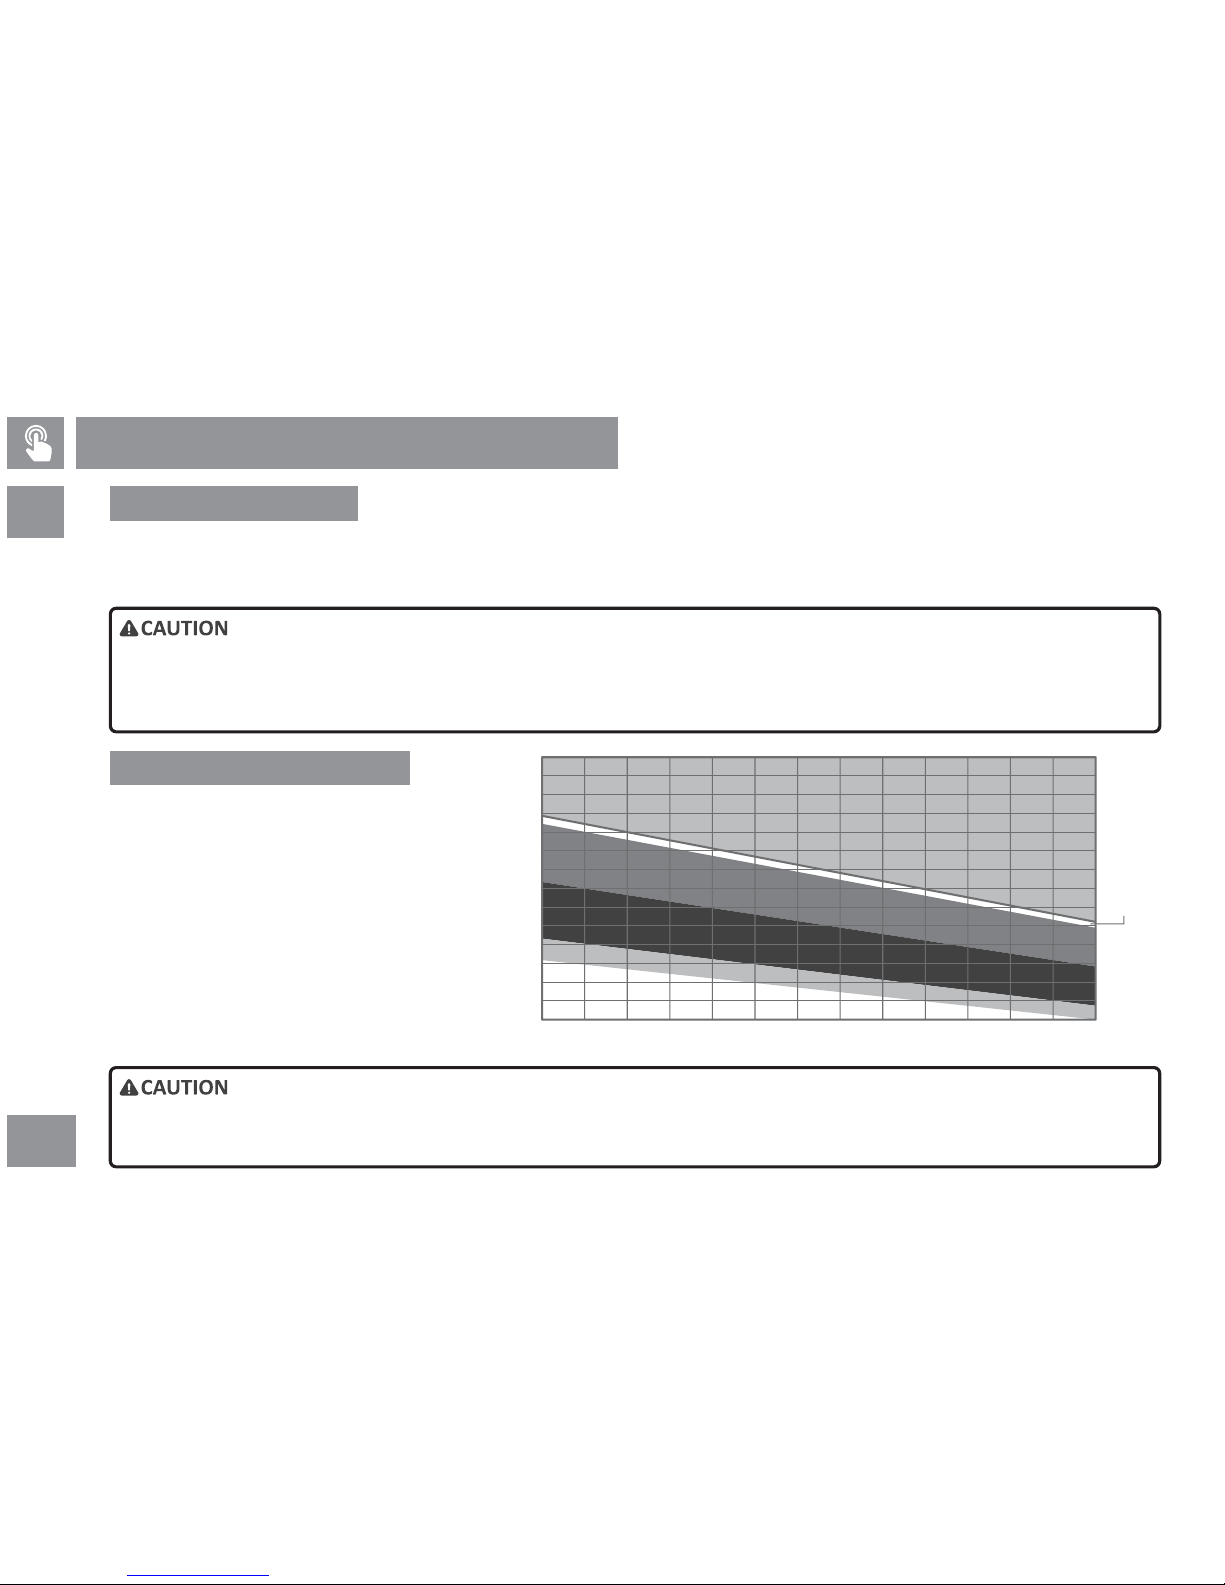
Target heart rate zone displays your maximum heart rate
with percentage. The target heart zone should be
determined by your age, physical condion and goal.
American Heart Associaon suggests that the target
heart rate zone should be determined as 50~85% of
your maximum heart rate. It is recommended to
calculate your target heart rate zone by deducng your
age from maximum heart rate 220 and mulply by 50%
and 85%. Or you may refer to the graph on the right.
For example, A is a user aged 40, then (220-40)X0.50=90
and (220-40)X0.85=153. Target heart rate zone of A is
between 90~153.
80
90
100
110
120
130
140
150
160
170
180
190
200
Heart beat/minute
70
20 25 30 35 40 45 50 55 60 65 70 75 Age
WEIG
HT
L
OSS
C
AR
D
IO
Warm -up
zone
Fat-burning
zone
Cardio
zone
Peak
High zone
Heart rate monitor on the handrails or any wearable connected via Bluetooth/ANT+ can only be used as an assisve device for workout, not
Heart rate monitor on the handrails or any wearable connected via Bluetooth/ANT+ can only be used as an assisve device for workout, not
as a medical equipment. Besides heart rate, please also consider your physical condion to do the workout with appropriate tension and
as a medical equipment. Besides heart rate, please also consider your physical condion to do the workout with appropriate tension and
avoid any personnel injury.
avoid any personnel injury.
Simply hold the heart rate bar lightly and it will detect your heart rate. A hold too ght can lead to incorrect detecon. Simply hold the
Simply hold the heart rate bar lightly and it will detect your heart rate. A hold too ght can lead to incorrect detecon. Simply hold the
bar lightly for test.
bar lightly for test.
Make sure the heart rate monitor or wearable device is worn at the correct posion and adjusted to the appropriate tension. If the monitor
Make sure the heart rate monitor or wearable device is worn at the correct posion and adjusted to the appropriate tension. If the monitor
is worn at the wrong posion, or too ghtly or loosely, the detecon accuracy or value stability will be affected.
is worn at the wrong posion, or too ghtly or loosely, the detecon accuracy or value stability will be affected.
•
•
•
Target Heart Rate Zone
Heart rate monitor
Target Heart Rate Zone
Page 39
ALL
37
Pairing of Various Devices
Please set in PROGRAMS when you want the machine to calculate the exercise data based on personal parameters. Or you can enable the
Please set in PROGRAMS when you want the machine to calculate the exercise data based on personal parameters. Or you can enable the
App. Input your personal parameters in the APP and press “
App. Input your personal parameters in the APP and press “
START”
START”
,and the treadmill will calculate the exercise data based on personal
,and the treadmill will calculate the exercise data based on personal
parameters in the APP.
parameters in the APP.
1) The treadmill can only pair and connect to ONE smart device when operang. Please pair and connect to the treadmill via the APP on the smart device.
2) Once the APP or Bluetooth is disabled, the smart device will be disconnected from the treadmill.
3) You can set personal parameters on the APP and press “START” on the smart device screen; the treadmill will start calculang according to your personal
parameters.
Mobile phone connecon
If your wearable provides 5 kHz signal, you’ll see your heart rate aer standing near the treadmill aer 5 to 10 seconds.
To display the 5 kHz heart rate, you need to disable the display funcon of Bluetooth & ANT+. When the indicator of Bluetooth & ANT+ is off
To display the 5 kHz heart rate, you need to disable the display funcon of Bluetooth & ANT+. When the indicator of Bluetooth & ANT+ is off
on the console display overview, the heart rate at this me is the detected value of 5 kHz heart rate.
on the console display overview, the heart rate at this me is the detected value of 5 kHz heart rate.
5 kHz connecon
How to pair and connect your wearable through Bluetooth/ANT+ connecon:
1) Press the buon of Bluetooth/ANT+ on the operang panel for about three seconds unl the beep is sounded.
2) The pairing takes 40~60 seconds. The indicator of Bluetooth/ANT+ will blink when pairing; you can see the heart rate on the console display overview aer
pairing is completed.
3) You may simultaneously pair Bluetooth & ANT+; simply select the available pairing method of Bluetooth or ANT+ from the operang panel.
The pairing process will be stopped if the Bluetooth or ANT+ buon on operang panel is pressed. If you wish to use wearables again,
The pairing process will be stopped if the Bluetooth or ANT+ buon on operang panel is pressed. If you wish to use wearables again,
simply pair through via long press.
simply pair through via long press.
In general, device pairing takes 40~60 seconds. Please check if there is any noise interference in surroundings when the pairing takes too
In general, device pairing takes 40~60 seconds. Please check if there is any noise interference in surroundings when the pairing takes too
long. It is recommended to disable other Bluetooth/ANT+ devices and press the pairing buon for another pairing.
long. It is recommended to disable other Bluetooth/ANT+ devices and press the pairing buon for another pairing.
•
•
Bluetooth/ANT+
Page 40
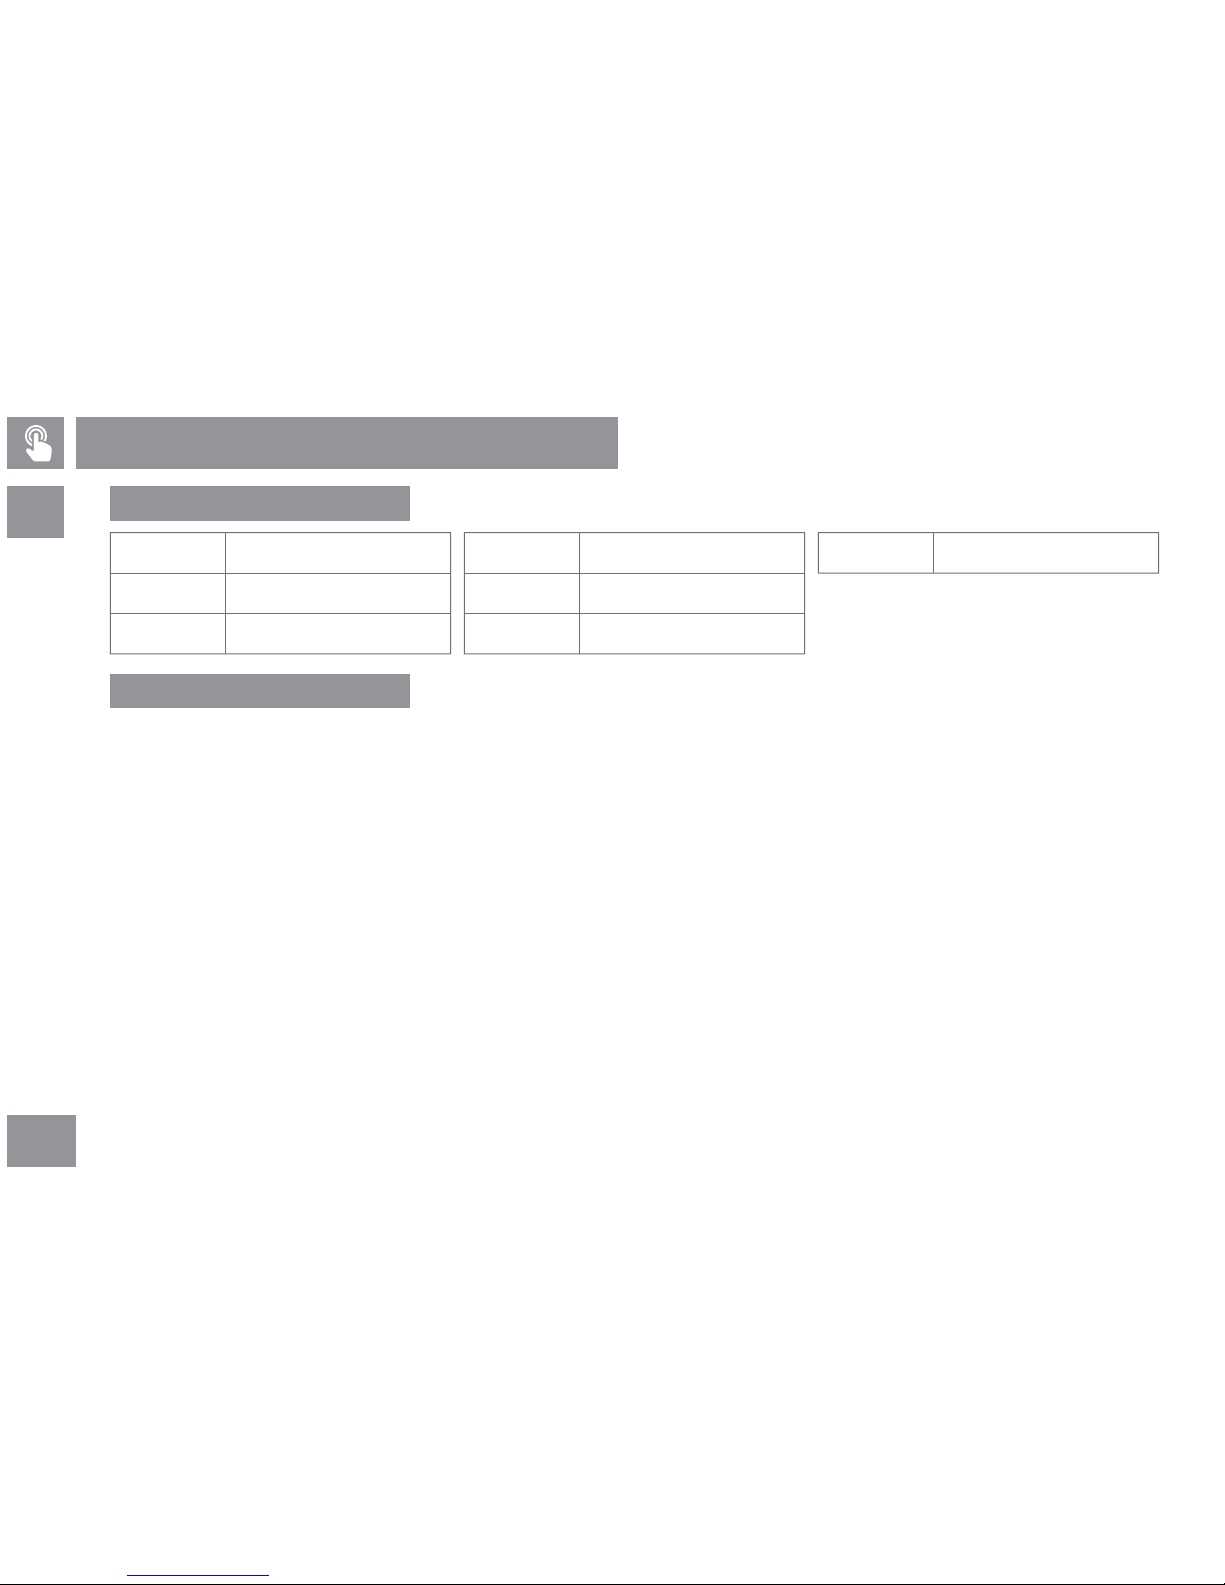
ALL
38
1)The console display overview is not ON:
• Make sure the outlet has power, the power cord is connected to the outlet and the treadmill is turned on.
• Make sure the connect line in the
display console
is correctly connected and there is no potenal damage caused by the pressure to
display console
during
assembly.
2)Current breaker acvates when the machine is operang:
Make sure the power cord is connected to the designated treadmill outlet with power.
3)The power goes out when the treadmill is inclined or lied:
Make sure the power cord is not pulled to loose when the treadmill is inclined or lied.
4)The belt cannot stay at the center when operang:
Make sure the belt is not loose. Please adjust the belt to the appropriate ghtness if it’s loose (refer to Adjust/maintenance belt on P.17).
• The treadmill is not placed on a level locaon and loses its balance.
5)Noise occurs at the front side when the treadmill is operang:
Please check if the machine is level.
6)Sound occurs when the treadmill is operang:
• It is common that the sound will occur when the machine is operang; with the extension of operang me and belt, these sounds will lower but not disappear
completely.
• It is normal if the sound of the machine is no louder than a general conversaon.
7)During operaon, the treadmill makes no noise, but the sound is very loud:
• Generally, the treadmill produces echo; if the machine is placed next to the wall, the echo will be louder. A thick rubber mat under the treadmill can effecvely
decrease echos from the ground.
Treadmill is designed with high security and easy to use. Please refer to following informaon and soluons for any operaonal problem:
E00
E01
E02
No signal in motor controller
Speed signal error
Motor voltage error
E03
E04
E05
Motor current error
Motor power cord falling out
Motor acceleraon error
E09 Motor controller error
Troubleshoong
Error detecon code
Troubleshoong
Page 41
ALL
39
Please correctly wear the heart rate monitor(oponal accessories) according following steps. The posion and ghtness will influence the accuracy of
detecon:
1) Adjust the strap length to fit ghtly but comfortably around your chest and avoid any slide during workout.
2) Make sure the fastener of heart rate monitor sensor is securely fastened.
3) Wet the electronic sensing area with clean water.
4) Wear your monitor under your chest.
5) Make sure the monitor is worn in right direcon. The logo must be at exact center of your chest to ensure successful and accurate detecon.
Please follow the above-menoned steps to wear the heart rate monitor correctly and achieve the most accurate detecon during workout.
Please follow the above-menoned steps to wear the heart rate monitor correctly and achieve the most accurate detecon during workout.
The heart rate monitor is an assisve devices instead of a medical equipment. Please select the appropriate exercise intensity according to
The heart rate monitor is an assisve devices instead of a medical equipment. Please select the appropriate exercise intensity according to
your physical condion.
your physical condion.
Troubleshoong of The Heart Rate
Wearable connecon
Fluorescent lamps, computers or large motors may interfere the detecon and lead to inaccurate heart rate reading:
1)Your heart rate reading may be unstable under following condions:
•The holds to heart rate sensor bar are too ght. Please hold the heart rate sensor bar with appropriate stress.
•Moon and vibraon caused by connuous hold to the heart rate sensor bar during the workout.
•Users with heavy breathing during the workout or thick skin on the palms.
•Wearing accessories like rings during the workout can lead to inaccurate detecon.
•Dry, moist or cold hands can influence the accuracy of detecon. It is recommended to keep moderate moisture on your hands and rub your hands for
keeping warm.
•Users with serious asthma, or atherosclerosis or peripheral arterial occlusive disease.
2)Unstable heart rate reading or the machine fails to display heart rate on the console display overview :
•Please make sure your skin have contact with the heart rate monitor. We recommend to wet the sensing area with clean water and try pairing again aer
wearing.
•Make sure the fastener of heart rate monitor sensor is securely fastened.
•Make sure the distance between the device and the receiver (on the upper right of onsole display overview) is within 300cm (118 in).
•Make sure the baery of heart rate monitor sensor is fully charged.
•Dry sensing area or loose strap of the heart rate monitor can effect detecon. It is necessary to maintain moderate moisture on the sensing area. Please
also make sure the strap fits your chest ghtly but comfortably.
Troubleshoong
Page 42
ALL
40
1) Please wipe the treadmill, motor safety guard, console and display console set with clean cloth. DO NOT use any detergent.
2) Check if the power cord is damaged. Please contact the distributor or Alatech customer service for any damage.
3) Make sure the power cord is not pressed by the machine or jammed anywhere.
4) Check if there is any stain that can affect operaon on the belt.
5) Check belt tension. Make sure the uncalibrated belt will not damage other components.
1) Upright the treadmill and check if the pin of hydraulic li can be securely locked.
2) Move the machine and clean the dust and stain underneath the treadmill. Move the machine back aer cleaning.
1) Make sure all screws are securely locked.
2) Upright the treadmill and check if there is any loose or missing component.
1) Please lubricate the pin of hydraulic li, the sha of iron pieces, deck and belt every year to ensure normal operaon.
Keep the treadmill and surroundings clean can effecvely decrease maintenance issues. We recommend
users to abide by following prevenve maintenance procedure. Please make sure the power of treadmill
is off and the power cord is unplugged for any maintenance.
Please make sure the power of treadmill is off and the power cord is unplugged for any maintenance. Please contact the distributor or
Please make sure the power of treadmill is off and the power cord is unplugged for any maintenance. Please contact the distributor or
Alatech customer service for any maintenance issue.
Alatech customer service for any maintenance issue.
Roune Maintenance
Daily maintenance
Weekly maintenance
Monthly maintenance
Yearly maintenance
Page 43
41
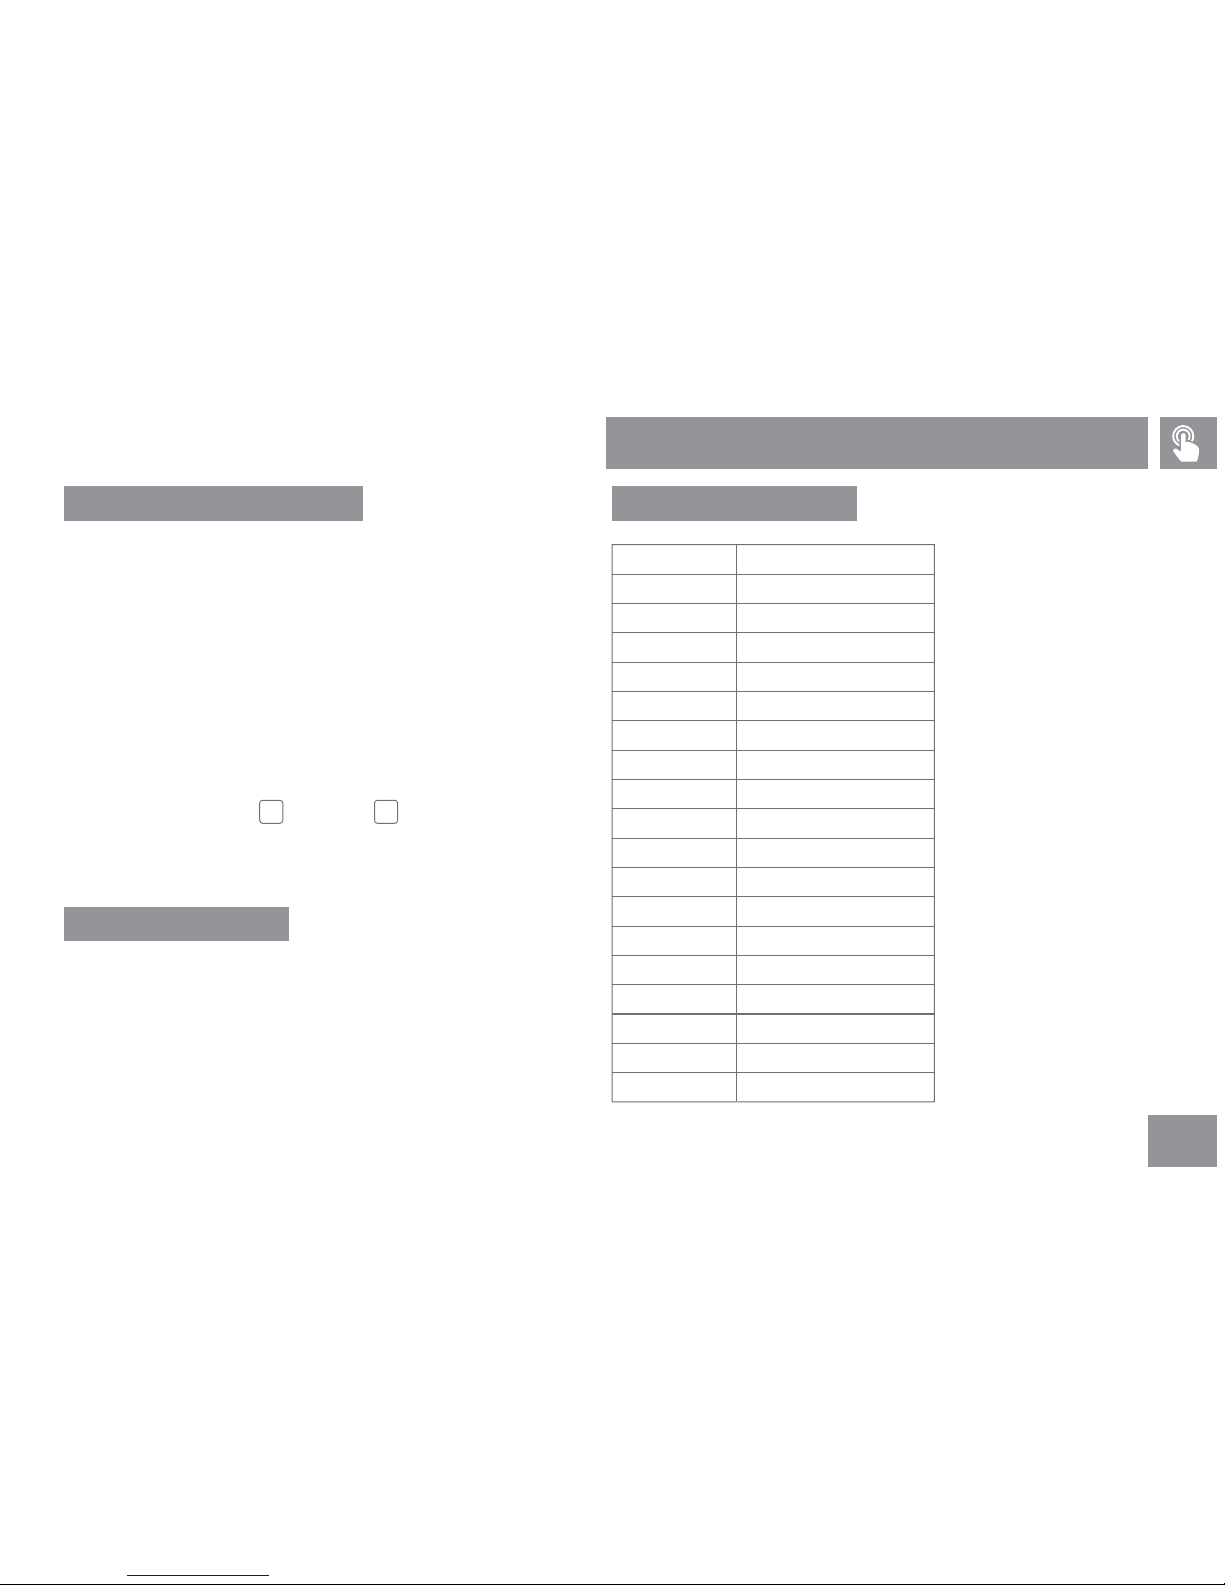
Unit dimensions:
Unit weight:
Maximum weight
carrying capacity:
Belt size:
Motor:
Voltage:
Speed:
Incline:
Length: 175 CM (68.9 in)
Width: 93 CM (36.61 in)
Height: 135 CM (53.15 in)
82 KG (181 lb)
135 KG (300 lb)
51 x 130 CM (20 x 51 in)
1.5 HP/2.0HP
110V 220V,50/60Hz
0.8~16 (KM/H)/0.8~18 (KM/H)
10%,20LEVEL
Exercise programs
Hand held heart
rate monitor:
Wireless receiving
device:
Fan:
Audio:
YES
5 kHz, Bluetooth and ANT+
YES
Bluetooth audio device/High
quality audio
Specificaon
AT200 Basic specificaon
Basic equipment
EZ INCLINE
HR HILL
TARGET HR GOAL
FAT BURN
CARDIO
HR INTERVAL
CALORIE
DISTANCE 1.6K
DISTANCE 5K
DISTANCE 10K
MANUAL
RANDOM
CROSS COUNTRY
WEIGHT LOSS
INTERVAL 1-1
INTERVAL 2-1
HILL
HILL CLIMB
BASIC
ADVANCED
HRC
GOAL
CUSTOM*2 CUSTOM
Page 44
42
Specificaon
Unit dimensions:
Unit weight:
Maximum weight
carrying capacity:
Belt size:
Motor:
Voltage:
Speed:
Incline:
Length: 185 CM (72.8 in)
Width: 93 CM (36.61 in)
Height: 135 CM (53.15 in)
90 KG (198 lb)
135 KG (300 lb)
51 x 140 CM (20 x 55 in)
2.0HP/2.5 HP
110V 220V,50/60Hz
0.8~18 (KM/H)/0.8~20 (KM/H)
12%,24LEVEL
Exercise programs
Hand held heart
rate monitor:
Wireless receiving
device:
Fan:
Audio:
YES
5 kHz, Bluetooth and ANT+
YES
Bluetooth audio device/High
quality audio
AT300 Basic specificaon
Basic equipment
CALORIE
DISTANCE 1.6K
DISTANCE 5K
DISTANCE 10K
GOAL
CUSTOM*2CUSTOM
NTERVAL 1-4
NTERVAL 1-2
EZ INCLINE
MARATHON MODE
TARGET HR GOAL
FAT BURN
CARDIO
HR HILL
HR INTERVAL
EXTREME HR
MANUAL
RANDOM
CROSS COUNTRY
WEIGHT LOSS
INTERVAL 1-1
INTERVAL 2-1
HILL
HILL CLIMB
AEROBIC
BASIC
ADVANCED
HRC
Page 45
43
Unit dimensions:
Unit weight:
Maximum weight
carrying capacity:
Belt size:
Motor:
Voltage:
Speed:
Incline:
Length: 197 CM (77.6 in)
Width: 93 CM (36.61 in)
Height: 135 CM (53.15 in)
91 KG (200 lb)
135 KG (300 lb)
51 x 153 CM (20 x 60 in)
2.5HP/3.0 HP
110V 220V,50/60Hz
0.8~20 (KM/H)/0.8~22 (KM/H)
12%,24LEVEL
Exercise programs
Hand held heart
rate monitor:
Wireless receiving
device:
Fan:
Audio:
YES
5 kHz, Bluetooth and ANT+
YES
Bluetooth audio device/High
quality audio
Specificaon
AT400 Basic specificaon
Basic equipment
CALORIE
DISTANCE 1.6K
DISTANCE 5K
DISTANCE 10K
GOAL
CUSTOM*2
USER*2
CUSTOM
NTERVAL 1-4
NTERVAL 1-2
EZ INCLINE
MARATHON MODE
TARGET HR GOAL
FAT BURN
CARDIO
HR HILL
HR INTERVAL
EXTREME HR
MANUAL
RANDOM
CROSS COUNTRY
WEIGHT LOSS
INTERVAL 1-1
INTERVAL 2-1
HILL
HILL CLIMB
AEROBIC
BASIC
ADVANCED
HRC
Page 46
44
Note
Page 47
45
Note
Page 48
2PF21050100102
2018/03 Ver.A
AT-200.300.400
 Loading...