

Page 1

Getting Started .............................. 2
Battery ............................................... 2
Inserting the SIM Card ...................... 3
Getting to Know Your Phone .............4
Communicating .............................. 9
Address Book .................................... 9
Making and Receiving Calls............ 10
Recent Calls .................................... 11
Entering Text ...................................11
Messaging....................................... 13
Mobile Email & IM .......................... 14
Mobile Web .................................. 14
AppCenter ..................................... 15
AT&T Mobile Care ....................... 15
My Stuff ......................................... 16
Settings.......................................... 18
Fundamentals ............................... 21
Security ........................................... 21
Safety Precautions .......................... 21
FCC Compliance .............................. 25
Limitation of Liability ...................... 28
Table of Contents
1
LEGAL INFORMATION
Devices purchased for use on AT&T’s system are designed for use exclusively on AT&T’s
system. You agree that you won’t make any modifications to the Equipment or programming
to enable the Equipment to operate on any other system. A voice plan is required on all voicecapable devices, unless specifically noted otherwise in the terms governing your agreement.
Some devices or plans may require you to subscribe to a data plan.
Your phone is designed to make it easy for you to access a wide variety of content. For your
protection, AT&T wants you to be aware that some applications that you enable may involve
the location of your phone being shared. For applications available through AT&T, AT&T offers
privacy controls that let you decide how an application may use the location of your phone
and other phones on your account. However, AT&T’s privacy tools do not apply to applications
available outside of AT&T. Please review the terms and conditions and the associated
privacy policy for each location-based service to learn how location information will be used
and protected.
Your phone may be used to access the Internet and to download, and/or purchase goods,
applications, and services from AT&T or elsewhere from third parties. AT&T provides tools for
you to control access to the Internet and certain Internet content. These controls may not be
available for certain devices which bypass AT&T controls.
AT&T may collect certain types of information from your device when you use AT&T services to
provide customer support and to improve its services. For more information on AT&T’s Privacy
Policy, visit att.com/privacy.
Version No.: R1.0
Edition Time: 20100823
Manual No.: 079584501941
Page 2
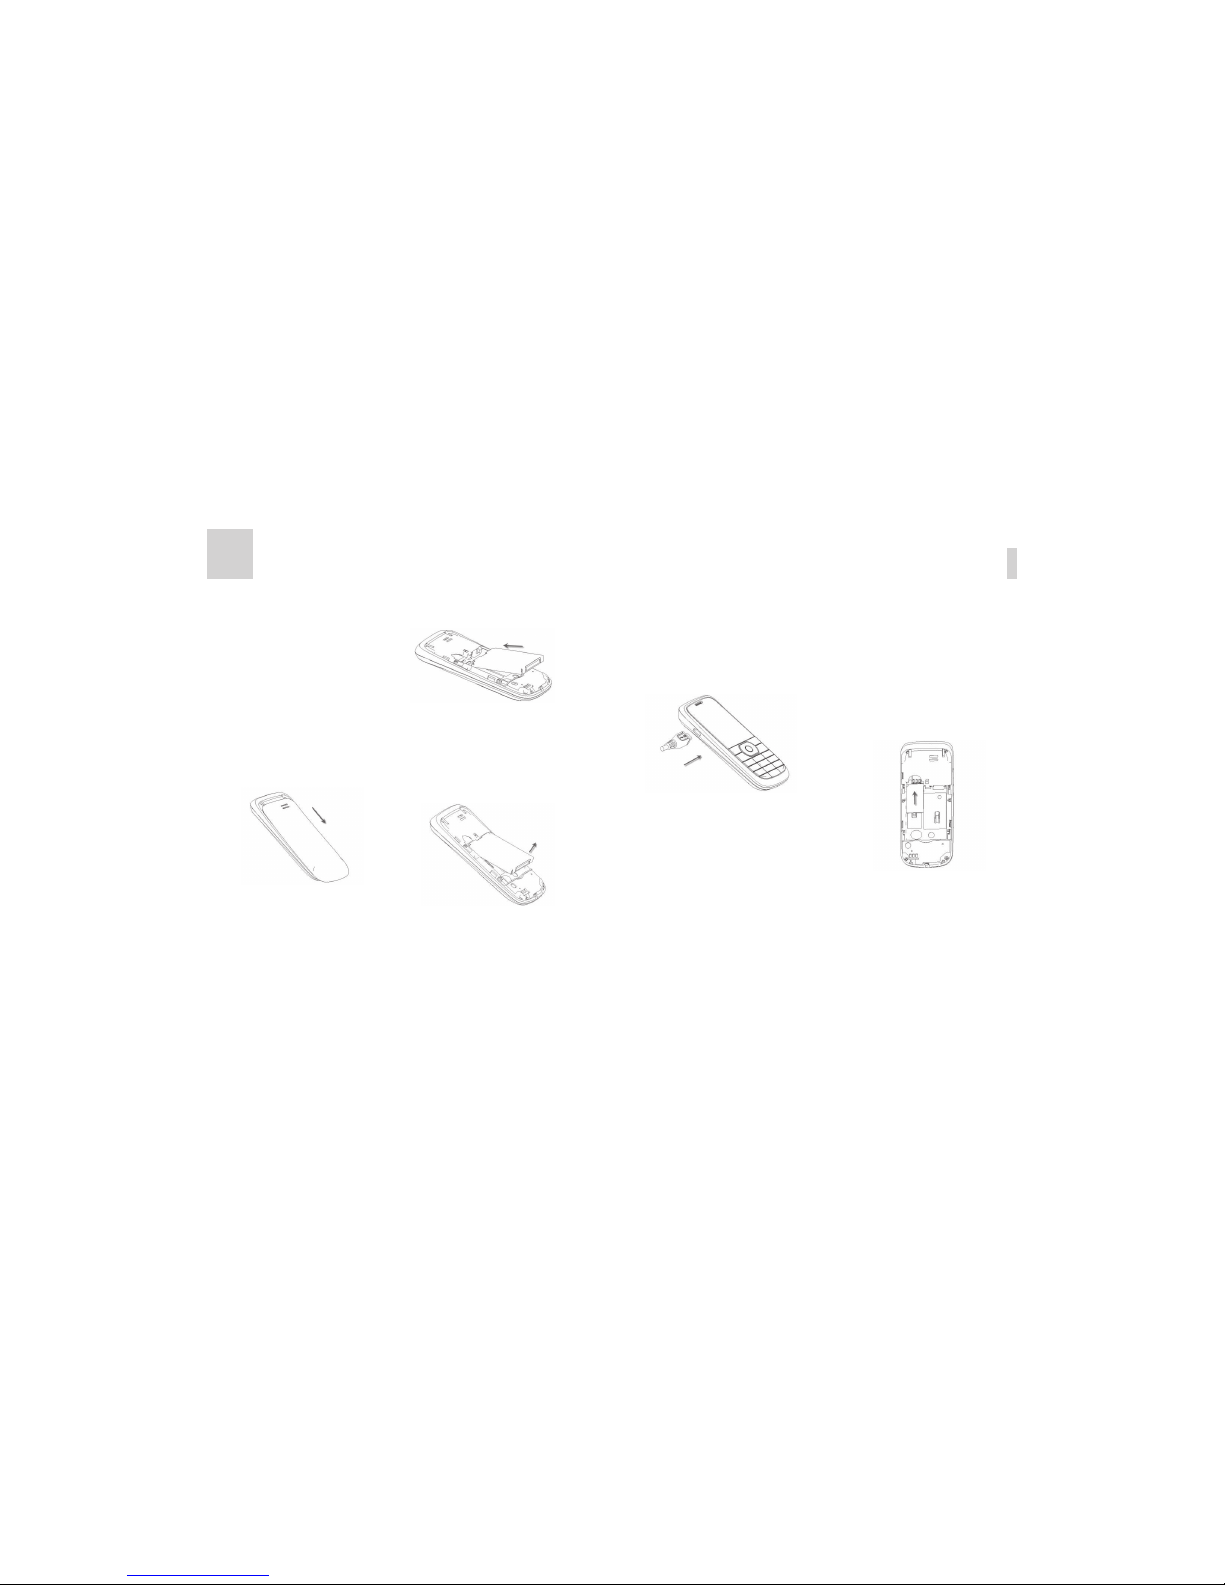
2. Turn the phone over and remove the
battery cover.
3. Remove the battery if it is already
installed.
4. Hold your SIM card with the cut corner
oriented as shown on the handset. Slide
it into the card holder with the goldcolored contacts facing downward.
5. Replace the battery.
6. Replace the battery cover.
What is a SIM card?
Your mobile phone has a Subscriber Identity
Module (SIM) card. This is a microchip that
holds your personal information, such as
names and phone numbers. Your phone
will not function properly without it. If you
already have contacts on your SIM card,
they can be transferred in most cases.
Getting Started
3
back of the handset. Push the cover in an
upward motion until you hear a click.
Removing the Battery
1. Make sure that your mobile phone is
switched off.
2. Remove the battery cover as directed.
3. Pull the battery up and remove it from
the mobile phone.
Charging the Battery
Your phone is powered by a rechargeable
lithium ion battery. For maximum battery
performance, it is recommended that you
fully discharge the initial charge and then
charge it completely. A new battery’s full
performance is achieved only after three
complete charge and discharge cycles.
1. Connect your travel adapter to the
side of your mobile phone as shown in
the diagram.
2. The battery charging indicator will
appear.
3. Once the battery is fully charged,
disconnect the charger.
Battery charging time
Your battery can be fully charged in three
hours. Do not charge your battery for more
than six hours.
Inserting the SIM Card
Before you can begin operation of your
mobile phone, you need to insert the
SIM card that was provided by AT&T. Full
functionality of your device can only be
ensured when the AT&T SIM card is
inserted properly.
Insert the SIM card as follows:
1. Make sure that the phone is switched
off and the charger is disconnected from
the phone.
2
Note: In this User Manual, “press a key”
means to press the key and release it, while
“hold a key” means to press the key for at
least two seconds and then release it.
Battery
The included lithium ion battery can be used
immediately after unpacking.
Installing the Battery
1. Remove the battery cover by turning the
phone upside down, pressing down on
the upper portion of the battery cover, and
pushing the cover in a downward motion.
2. Insert the battery by aligning the goldcolored contacts with the contacts in
the battery slot.
3. Push down the upper section of the
battery until it becomes flush with
the handset.
4. Replace the battery cover by aligning the
tabs on the upper portion of the cover
with the slots on the upper portion of the
Getting Started
Page 3

Getting Started
5
Getting to Know Your Phone
Key Functions
4
Earpiece
Left Soft Key
Send Key
* Key
OK/Select Key
Charger/
Headset Port
4-Way
Navigation Key
Right Soft Key
Power/End Key
# Key
Speaker
Function Description
4-Way
Navigation Key
Allows menu navigation and quick access to some key functions
from idle mode.
From idle mode:
Up: Create Message
Down: Address Book
Right: IM
Left: My Stuff
Send Key From idle mode, press to view call history.
Power/End Key Press to exit to idle mode.
Press to end a call.
Hold to turn the phone on or off.
Keypad Enter numbers 0-9 and characters from a-z.
0 Key Press to enter symbols when you are writing text messages, contact
information, and notes.
* Key From idle mode, hold to lock the keypad.
Press to change the input mode when you are writing text messages,
contact information, and notes.
# Key From idle mode, hold to toggle the sound profile between General
and Meeting.
Press to enter a space when you are writing text messages, contact
information, and notes.
Function Description
Left Soft Key Perform the function indicated at the bottom left of the screen.
Right Soft Key Perform the function indicated at the bottom right of the screen.
OK/Select Key Confirm actions and make selections.
0 Key
Getting Started
Page 4
Getting Started
7
Turning On/Off or Waking
Your Phone
Hold the Power/End Key to turn your phone
on or off.
Go to Menu > Settings > Phone settings
> LCD backlight to set the LCD backlight
time. If the phone is not operated within this
timeframe, the screen will darken.
Press any key to wake up your phone.
Locking/Unlocking the Keypad
Locking the keypad can prevent unintentional
operations of the handset. You can answer
an incoming call by pressing the Send Key
when the keypad is locked.
Hold the * Key in idle mode to lock the
keypad. Then you can press the Left Soft
Key and then the * Key quickly to unlock
the keypad.
Go to Menu > Settings > Security
settings > Auto keypad lock to set the
auto keypad lock time. If the phone is not
used within this timeframe, the keypad will
be locked.
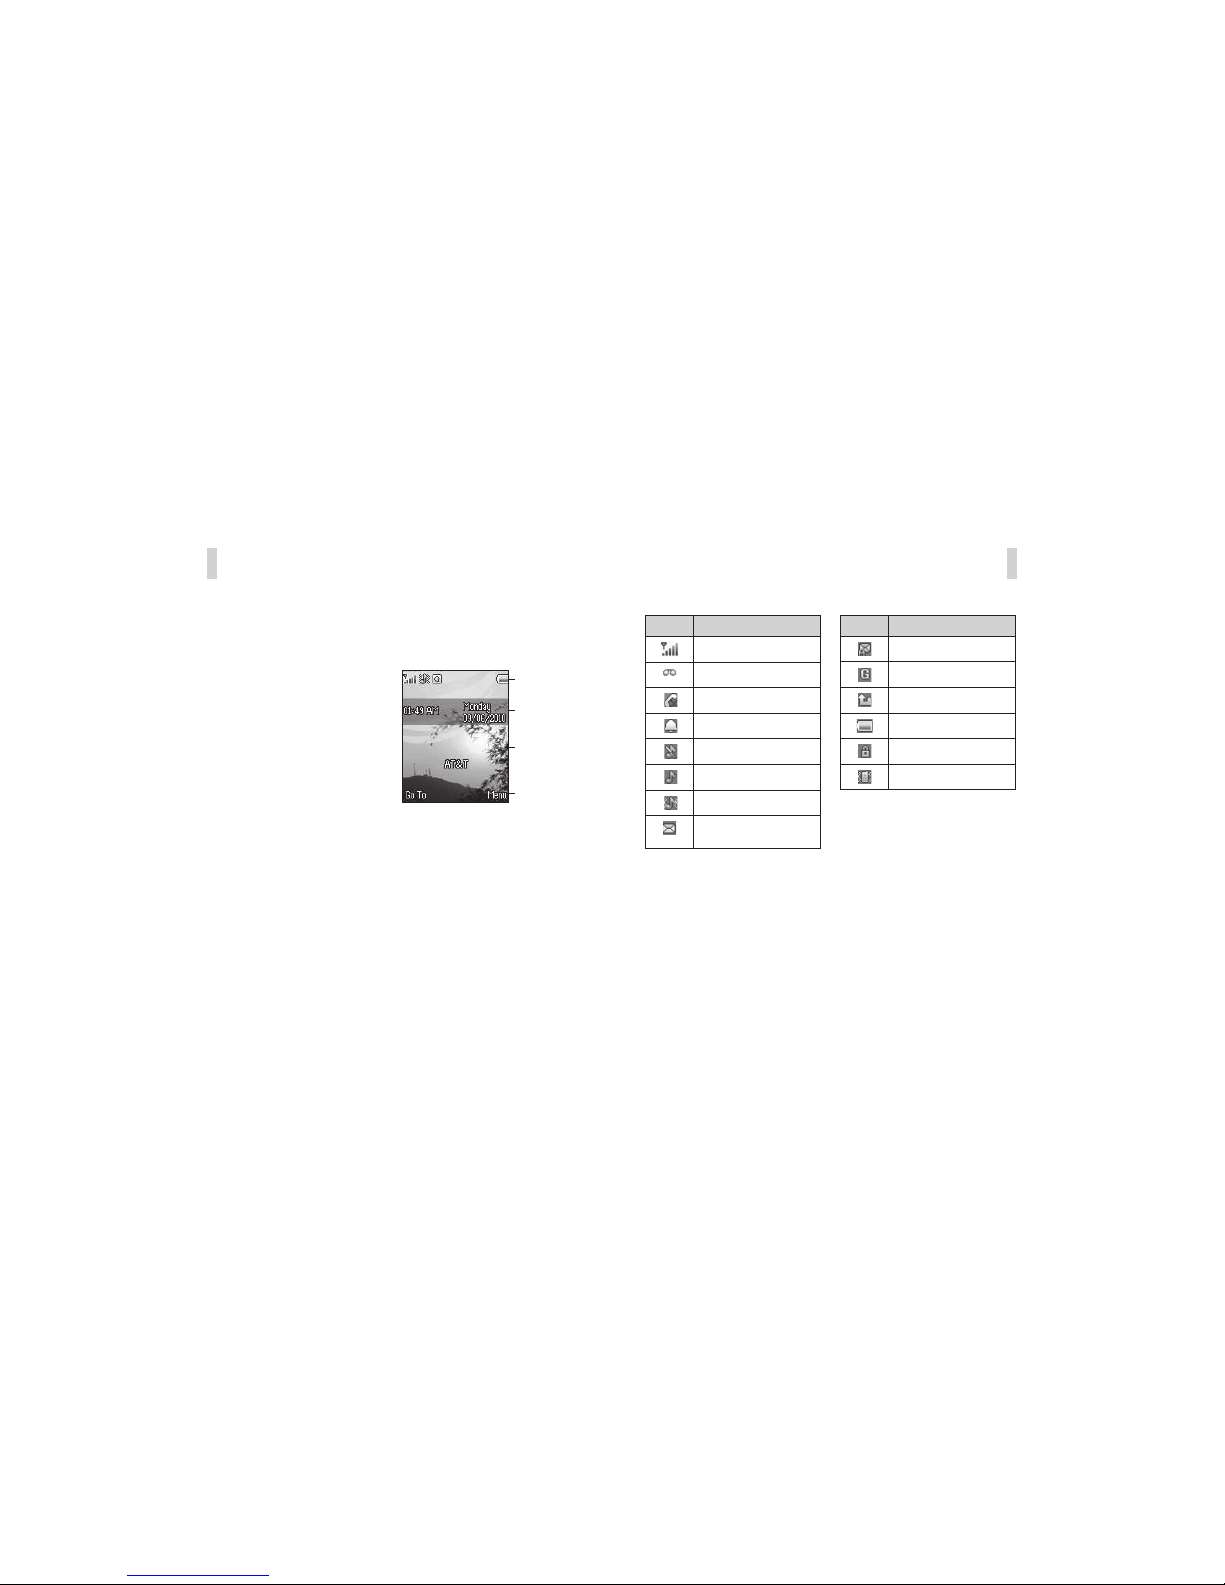
Idle Screen
After powering on the phone, when the
name of the network is displayed on the
screen, the phone is in idle mode and ready
for use. The display has 4 areas:
Getting Started
6
On-Screen Indicators
Indicator What it means
Signal strength
Voicemail
Missed call
Alarm clock set
Silent profile
Indoor profile
Outdoor/General profile
New SMS (blinks when
message box is full)
Indicator What it means
New MMS
GPRS
Call forwarding
Battery status
Keypad locked
Meeting profile
Indicators and
Icons area
Date and
Time area
Text and
Graphics area
Soft Key
function
indicators
Page 5
Communicating
9
Getting Started
8
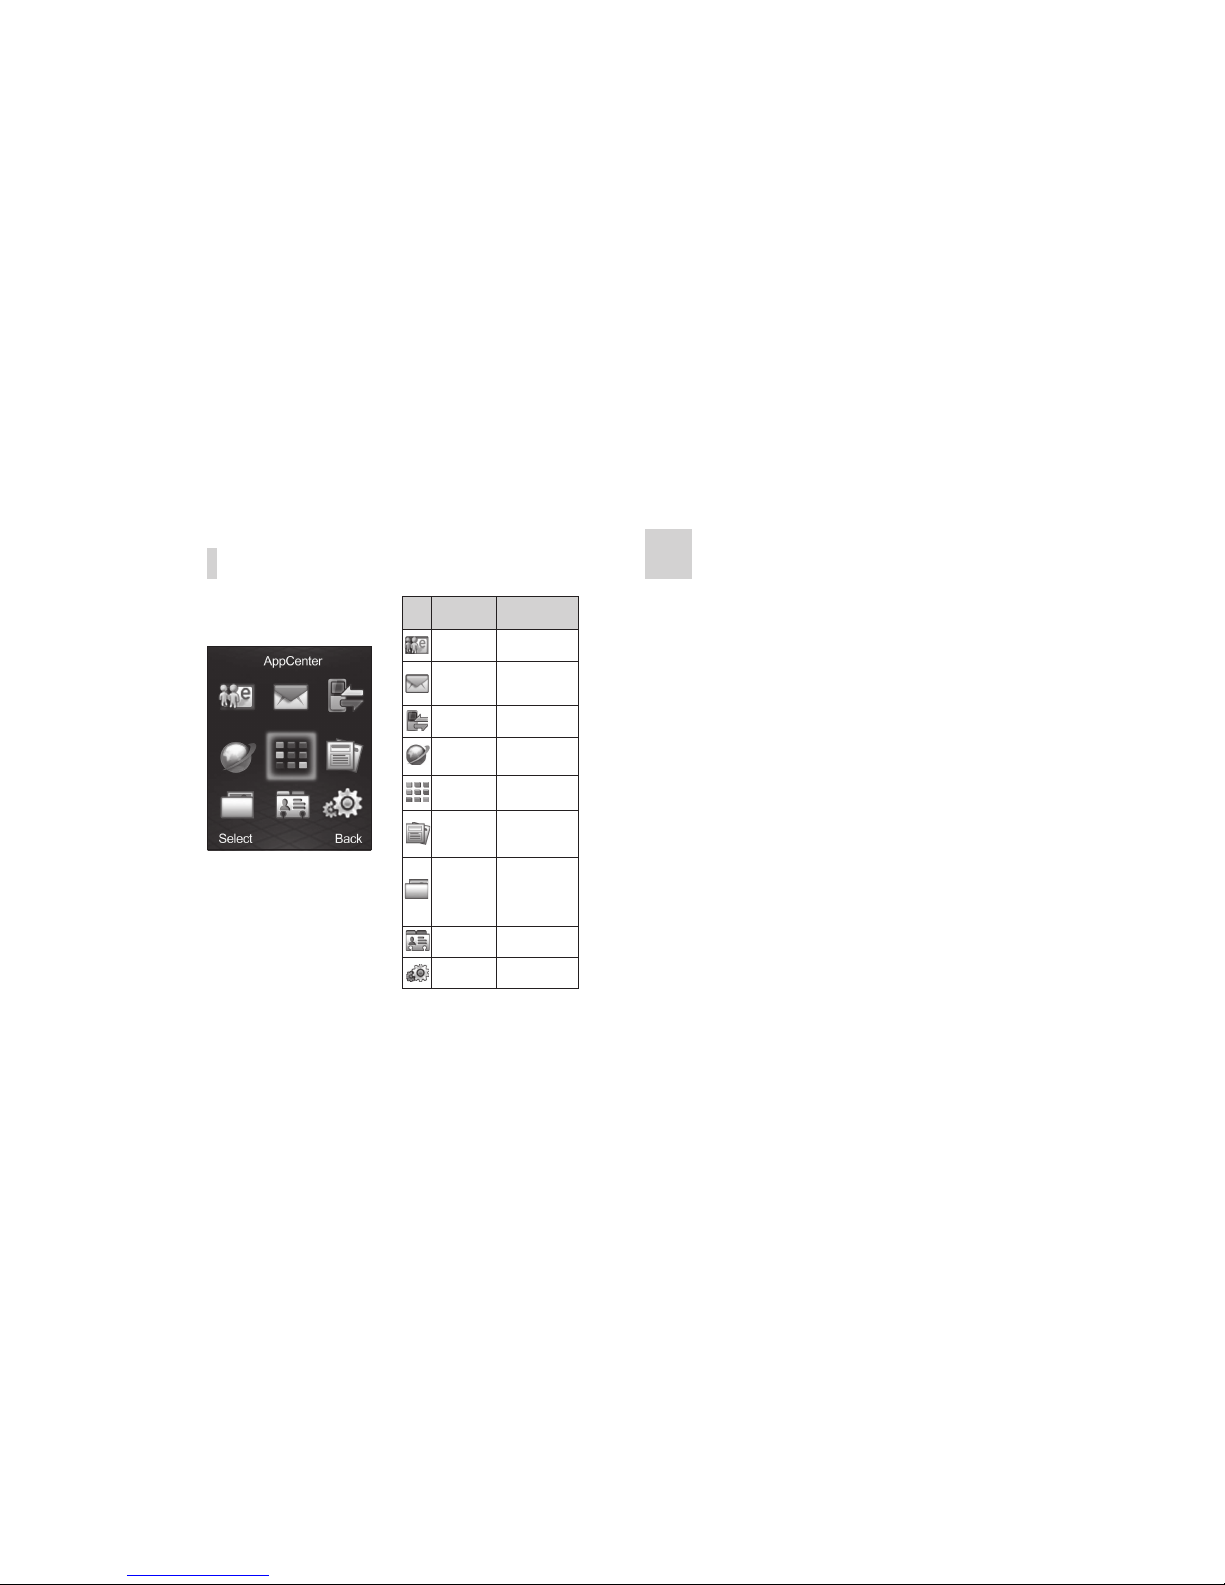
Icon What it
means
Description
Mobile Email
& IM
Mobile email and
instant messaging
Messaging
Send and receive
SMS or MMS
messages
Recent Calls View call history
Mobile Web Access the web
AppCenter
Online application
store
AT&T Mobile
Care
Add money and
access account
information
My Stuff
Contains
applications and
tools such as
Alarm, Calendar,
and more
Address Book
Add and edit
contacts
Settings
Set up and personalize your phone
Main Menu
From idle mode, press the Right Soft Key
for Menu to access the main menu.
Address Book
There are some numbers that you may want
to call again and again, so it makes sense
to add these numbers to your Address Book.
You can then access these numbers quickly
and easily.
Go to Menu > Address Book.
Contact list
To quickly search for a contact, select
Contact list, and then enter the first letter
of the desired contact’s name. Scroll to the
desired contact and then press the Left Soft
Key to display the following options:
• View: View the contact’s details.
• Send message: Send the contact a
text message.
• Edit: Edit the contact’s information.
• Delete: Delete the contact from your
Address Book.
• Send contact info: Send the contact to
others via text message or MMS.
• Add new contact: Add a new contact.
• Remove contact: Allows you to mark
multiple contacts and remove them all at
the same time.
• My contact info: Edit your own contact
information.
Add new contact
Go to Menu > Address Book > Add new
contact. Edit the information and select
Save, and then select Yes to confirm.
Tips:
• You can also save a number to your
Address Book after you’ve made or
received a phone call or a text message.
Locate the number in your Recent Calls
or in Messaging and select Options >
Save to Address Book.
• The default storage location for your
contact information is your phone
memory. If you want to change this
location (to either SIM or Both), go to
Menu > Address Book > Settings >
Preferred storage.
Caller groups
There are five caller groups (Friends, Family,
VIP, Business, and Others) in your phone. The
default settings for each group are preset
in the phone. Select a group and then press
the Left Soft Key to display the following
options:
• View members: View the contacts in
the group. Select Add members to mark
contacts in the Address Book and add
them to the group.
• Send message: Send the same message
to all contacts in the selected group.
Page 6

Communicating
10
• Group settings: Edit the group name and
set the ringtone and picture that will be
displayed when there is an incoming call
from a member of the group.
SIM management
Select Copy from SIM to copy selected
contacts from your SIM card to your phone.
Select Copy to SIM to select contacts and
copy them from your phone to your SIM card.
Select Delete from SIM to delete selected
contacts from the SIM card.
Settings
• Preferred storage: You can set the
preferred storage location (SIM, phone,
or both) for Address Book entries.
• Speed dial: You can assign eight
speed dial numbers (2 through 9) to
selected contacts. If this function is on,
you can hold a key from idle to call the
corresponding contact.
• My contact info: You can edit your
contact information and send it.
• Extra numbers: You can edit the owner
number associated with your phone, view
and call the service dial number, or view
and call an SOS (emergency) number.
• Memory info: Check the memory status
of both the phone and the SIM card.
Making and Receiving Calls
Dial the number
From idle mode, enter the number with the
keypad and press the Send Key to dial.
Use the Address Book
Go to Menu > Address Book > Contact
list. Find the name of the person you want
to call, and press the Send Key.
Make an emergency call
You can make emergency calls without the
SIM card inserted as long as you are in an
area with network coverage.
Answer a call
Press the Send Key.
End a call
Press the Power/End Key.
Use call options
During a call, press the Left Soft Key to
view call options.
You can put a call on hold, make a
conference call, and use applications such
as Messaging and the Address Book while
you’re on a call.
You can use the speakerphone by pressing
the Right Soft Key for H-Free (hands-free).
Communicating
11
Recent Calls
Go to Menu > Recent Calls.
Dialed calls, received calls, and missed
calls are saved in Recent Calls. If the
records are full, the earliest saved records
will be deleted. Press the Left Soft Key to
view options:
• View: View the details of a call record.
• Call: Call the number/contact again.
• Send message: Send a message to the
number/contact.
• Save to Contacts: Save the current
number to the Address Book as a
new contact or as an update to an
existing contact. (Available for unsaved
numbers only.)
• Add to blacklist: Add the number to the
call blocked list. Future calls from that
number will be blocked.
• Edit before call: Edit the number before
you call.
• Delete: Delete the selected number/
record.
• Delete all: Delete all call records.
• Advanced:
– Call timers: Check the time total
for calls.
– Data Call Time: Check the data total
for calls.
Entering Text
When writing text messages, contact
information, notes, and more in a text
input field, there are several input modes
and options.
Changing Input Mode
Press the * Key to change the input mode.
The input modes are as follows in English:
• Smart En: Predictive English text with
the first letter of the first word in each
sentence in uppercase.
• Smart EN: Predictive English text in all
uppercase letters.
• Smart en: Predictive English text in all
lowercase letters.
• En: English text with the first letter of the
first word in each sentence in uppercase.
• EN: English text in all uppercase letters.
• en: English text in all lowercase letters.
• 123: Numbers and symbols.
The input modes are as follows in Spanish:
• Smart Es: Predictive Spanish text with
the first letter of the first word in each
sentence in uppercase.
• Smart ES: Predictive Spanish text in all
uppercase letters.
• Smart es: Predictive Spanish text in all
lowercase letters.
Page 7

• Es: Spanish text with the first letter
of the first word in each sentence in
uppercase.
• ES: Spanish text in all uppercase letters.
• es: Spanish text in all lowercase letters.
• 123: Numbers and symbols.
Note: The Smart input modes are shown as
eZi input modes on your phone screen.
Entering Letters
In EN/en/ES/es mode, press the corresponding letter key multiple times until the
desired letter appears.
Using Predictive Text
In Smart EN/Smart en/Smart En/Smart ES/
Smart es/Smart Es mode, enter words by
pressing the appropriate letter keys just once
for each letter. The word you are typing will
be predicted, so it will change after each
keystroke. Predictive text input is based on
a built-in dictionary. When you have finished
typing the word and it is correct, confirm
it by pressing the OK Key or the Left Soft
Key. If the word is incorrect, press the
Navigation Key to view other possible
words found in the dictionary. Pressing the
Navigation Key moves the cursor.
Entering Numbers
In Smart EN/Smart en/Smart En/Smart
ES/Smart es/Smart Es mode, press the
appropriate key on the keypad, and then
use the Navigation Key to scroll to the
number. Select it with the OK Key. In
EN/en/ES/es mode, press the appropriate
key on the keypad repeatedly until the
digit appears.
Note: To input 0, press the 0 Key, and then
select 0.
Entering Symbols
Select Options > Input method > Insert
symbol or press the 0 Key to enter symbol
mode. Use the Navigation Key to scroll
to the required symbol and press the OK
Key or the Left Soft Key to select it. In
Smart EN/Smart en/Smart En/Smart ES/
Smart es/Smart Es mode, press the 1 Key
to bring up a list of common symbols,
use the Navigation Key to scroll to the
required symbol, and press the OK Key to
select it. In EN/en/ES/es mode, press the
1 Key repeatedly until the required symbol
(common symbols) appears.
Entering a Space
Press the # Key to enter a space.
Deleting a Character
Press the Right Soft Key to clear a
character. Hold the Right Soft Key to delete
all characters and clear the display.
Communicating
12
Communicating
13
Moving the Cursor
Press left or right on the Navigation Key to
move the cursor to the left or right.
Messaging
Writing a New Message
You can use your mobile phone to send and
receive messages.
1. Go to Menu > Messaging > Create
Message.
2. Write your message. For more
information on input method, see the
Entering Text section.
3. The default message type is text
message (SMS). To insert an object into
a message, select Options > Insert to
add a sound, attachment, contact info,
or bookmark to the message.
4. When you finish writing, press the
OK Key to enter a number or an email
address or to select a contact from the
Address Book. After adding recipients,
you can add or change recipients to Cc or
Bcc by selecting Options > Add CC, Add
BCC, Change to Cc, or Change to Bcc.
5. Once you’ve added recipients, press the
OK Key to send the message. To save
the message as a draft without sending,
select Options > Save to drafts.
Viewing Messages
Upon receiving a message, the mobile phone
will alert you with a ringtone, prompt, or a
New Message icon.
1. Press the Left Soft Key for View to
open the Message Inbox. You can also go
to Menu > Messaging > Inbox to read
your messages.
2. While the message is open, press the
Left Soft Key for Options to reply to,
delete, or forward the message. You can
also call the sender or save the sender’s
number to you phone’s Address Book.
From the Messaging menu, you can access
the following menu options:
• Inbox: View received messages.
• Outbox: View unsuccessfully sent
messages.
• Sent: View successfully sent messages.
• Drafts: View saved drafts.
• Saved messages: View saved
messages.
• Delete messages: Delete messages
from a selected folder.
• IM: Sign in to an instant messaging
service to send and receive instant
messages. (See the Mobile Email & IM
section for more information.)
Page 8

Mobile Web
15
• Mobile Email: Sign in to an email
provider to send and receive email
messages. (See the Mobile Email & IM
section for more information.)
• Voicemail: Call voicemail to check your
voice messages.
• Message settings: Under Message
alert, set the tone heard when there is
a new message. You can also choose
Silent. Under Text message, view and
modify SMS settings and information.
Under Multi msg., view and modify
MMS settings and information.
Mobile Email & IM
Go to Menu > Mobile Email & IM.
Mobile Email
Select from the preset email providers
or manually enter your email account if
your provider is not listed. Mobile Email
allows you to send and receive emails
from a personal POP3 email account using
the handset.
IM
Your mobile phone supports instant
messaging, so you can communicate
online with your friends through your AIM
®
,
Yahoo!
®
, or Windows Live® IM account.
Communicating
14
Mobile Web lets you access the Internet on
your phone so you can find information and
get updates on news, weather forecasts,
and more.
Go to Menu > Mobile Web. From here, you
can perform the following operations:
• Homepage: Open the homepage.
• Bookmarks: Access your phone’s
preset websites. Select a bookmark and
select Go to load the website, or select
Edit, Send, Delete, Delete all, or Add
bookmark.
• Recent pages: Display the pages you’ve
visited recently. Select an item and
choose Go to to visit the page again.
• Offline pages: Previously viewed web
pages saved on your mobile phone can be
viewed while your phone is offline.
• Input address: Input a web address and
select Options > Done to visit the site.
• Settings: You can modify your profile,
browser options, or service message
settings or clear your cache or cookies.
AppCenter is a one-stop shop for
downloadable content created especially for
your phone. At AppCenter, you can purchase
ringtones, AnswerTones, wallpapers, and
games to enrich your phone. No matter what
your preferences, let your phone reflect
your style.
Go to Menu > AppCenter. Use the
Navigation Key to scroll through categories
and content. Press the OK Key to select and
purchase content.
AppCenter AT&T Mobile Care
AT&T Mobile Care is a free application that
allows you to view your account information,
add money, and buy features for your account,
all from your mobile phone. Simply follow
the instructions on the screen to manage
your account.
Go to Menu > AT&T Mobile Care. Once
connected, you can view account balance
information and access the following tasks:
• Add Money: Add money to your
GoPhone account from your phone.
• Features: View and modify current
account features.
• More Choices: View account summary
information, call customer care, and
access other account features.
• GoPhone FAQs: View answers to
frequently asked questions about the
GoPhone service.
Page 9

My Stuff
16
My Stuff
17
My Stuff is where you can find games and
apps you have downloaded to your phone;
important tools, such as the alarm clock and
calculator; and direct links to download other
content for your phone, such as ringtones
and wallpaper.
Go to Menu > My Stuff.
Audio
• Shop Tones: Find and purchase
tones online.
• Answer Tones: Find and purchase
Answer Tones online or manage the
Answer Tones on your phone.
• Sound recorder: Select Options > New
record to record a sound clip. Select
Options > Settings to set file format and
audio quality. Select Options > List to
access previously recorded sound clips.
Games & Apps
• Shop Apps: Find and download
applications online.
• Shop Games: Find and download
games online.
• Applications: MIDlets are Java™-based
applications that can run on your phone.
Your phone supports Java 2 Edition,
J2ME™. Java allows you to download
Java-based applications, such as games
and tools that are specifically designed
for mobile phones. Java gives you the
flexibility of installing and managing
additional J2ME applications from
the Internet. There are some Java
applications preloaded in your phone.
Pictures
Shop Wallpapers: Find and download
pictures online.
Tools
• Alarm: View and edit the alarm clock
settings, including enabling or disabling
the alarms. Select Edit to adjust the
settings of the corresponding alarm.
• To do list: View upcoming tasks. Select
Add or Options > Add to add date, call,
or anniversary tasks.
• Calendar: View the current month’s
calendar with the current date
highlighted. Select Options to add an
event or to use other options.
• Calculator: Perform simple calculations.
You can add, subtract, multiply, or divide
and select M+, M-, MR, and MC to
perform relevant operations.
Note: This calculator has limited
accuracy, and rounding errors may occur
in more complex calculations.
Others
Check all of the folders in the phone and
create, rename, delete, and sort them.
Files you download from the Internet will
be stored in these folders.
Memory Info
Check the free memory space on your phone.
• Currency conv.: Perform basic currency
conversions. Enter the rate (use the # Key
to enter a decimal), press the OK Key,
enter a figure in the Local field, and then
press the Left Soft Key for the result.
• Stopwatch: Record split and lap times
with the Stopwatch, and use the
4Way stopwatch to operate four
separate stopwatch times using the
Navigation Key.
• World clock: View the time in different
time zones worldwide.
Page 10

Settings
1918
Settings
To adjust your phone’s settings, go to Menu
> Settings.
Profiles
A sound profile is a set of options, such as
ringtone, ring volume, ring type, and so on,
that your phone uses when it receives a
call or other incoming communication. You
can select your preferred sound profile in
this menu. The profile options are General,
Meeting, Outdoor, Indoor, Headset, Silent,
and Hearing aid mode. The default settings
for each profile are preset at the factory.
You can change them by selecting Edit.
• Tone settings: Set the tone for
various functions.
• Volume: Set the ringtone and key
tone volumes.
• Alert type: Choose among four variations
of ring and vibration settings.
• Ring type: Choose single, repeat,
or ascending.
• Extra tone: Let the phone alert you
when a warning or error occurs.
• Answer mode: When Answer mode is
on, you can press any key to answer an
incoming call. Press the Left Soft Key to
toggle between on and off.
Note: Headset mode can be activated only
while a headset is connected to the phone.
Hearing aid mode provides clearer sound
when you are using a hearing aid during
a call.
Phone settings
• Time and date: When Autoupdate with
Network is off, you can set time/date and
format. When it is on, you can set only
format. Press the Left Soft Key to toggle
between on and off.
• Schedule on/off: Schedule times for the
handset to automatically power on or off.
• Language: Set the language for the
device: English or Spanish.
• Preferred input: Set the preferred
input method.
• Display: Select a wallpaper and main
menu style. Under My number, choose
whether to have your own phone number
displayed on the phone’s idle screen.
Press the Left Soft Key to toggle this
option on or off.
• Greeting text: Edit and set the
greeting text.
• Flight mode: Select between normal,
flight, and power on query modes. In
flight mode, all wireless functions are
disabled. In power on query mode, you
will be asked to select a mode when
you turn on the phone.
• LCD backlight: Set the brightness and
timeout period for the LCD backlight.
If the phone is not operated within the
specified time, the screen will enter
sleep mode.
Call settings
• Caller ID: Select set by network, hide ID,
or send ID.
• Call waiting: After this function is
activated, the system will inform you if
there is another incoming call. Please
contact your network provider for details.
• Call forward: The call forward service
enables you to forward an incoming call
from a service to a specified telephone
number in preset conditions. You can
contact the network provider to activate
this service. You can set the call forward
service so that voice calls and data calls
are forwarded to a preset number.
• Advanced: You can set blacklist,
auto redial, call time display, call time
reminder, auto quick end, text phone, and
reject by SMS settings.
Security settings
• SIM lock: The SIM lock setting can be
used to secure your phone. If it is on,
you will need to enter the correct PIN to
unlock your SIM card and use the phone.
Note: The PUK code is required to unlock
the SIM card if you have incorrectly entered
the PIN three consecutive times. The PIN
and the PUK code may be supplied along
with the SIM card. If not, contact your
network provider.
• Phone lock: Phone lock can protect
your mobile phone from unauthorized
use. Select on or off to enable or disable
phone lock protection.
• Auto keypad lock: Select a time for
auto keypad lock, and after that period
of time elapses without operation of the
phone, the keypad will automatically be
locked to prevent unintended operation.
• Fixed dial: If your SIM card supports
this function and this function is enabled,
the phone can only dial those numbers
starting with the fixed dial number you
set. For example, if you set the fixed dial
number to 139, then the phone can only
dial numbers starting with 139.
• APN control: Allows the user to turn
service mode on or off and to add or
subtract from the APN control list.
• Change pass.: Change the PIN, PIN2,
and phone password here.
• Master Reset: Reset all settings to their
default AT&T values (no user data will
be lost).
Page 11

Settings
20
Fundamentals
21
Security
To protect your mobile phone from illegal
usage, take the following security measures:
• Set the PIN code of the SIM card. (p19)
• Set the phone lock code. (p19)
Safety Precautions
This section includes some important
information on safe and efficient operation.
Please read this information before using
the phone.
Operational Precautions
• Please use your phone properly. When
making or receiving a call, please hold
your phone as when holding a standard
wireline telephone. Make sure that the
phone is at least one inch (about two
point five centimeters) from your body
when transmitting.
• Do not touch the antenna when the
phone is in use. The antenna is located
on the bottom of the handset. Touching
the antenna area affects call quality and
may cause the phone to operate at a
higher power level than needed.
• Some people may be susceptible to
epileptic seizures or blackouts when
exposed to flashing lights, such as when
watching television or playing video
games. If you have experienced seizures
or blackouts, or if you have a family
history of such occurrences, please
consult your doctor before playing video
games on your phone or enabling a
flashing light feature on your phone. (The
flashing light feature is not available on
all products.)
• Keep the phone out of reach of small
children. The phone may cause injury if
used as a toy.
Precautions While Driving
• Please pay attention to traffic safety.
Check the laws and regulations on the
use of your phone in the area where you
drive. Always obey them.
• Use the hands-free function of the phone,
if available.
• Pull off the road and park before making
or answering a call if required.
Precautions for Medical Devices
and Facilities
• When using your phone near pacemakers,
always keep the phone more than eight
inches (about twenty centimeters)
from the pacemaker when the phone is
switched on. Do not carry the phone in
your breast pocket. Use the ear opposite
• Master Clear: Reset all settings to
their default AT&T values AND delete all
user data (including contacts, messages,
music, and more).
Note: You may be required to enter the
phone lock code to modify some of the
security settings. The default lock code
is 1234.
Connectivity
Data account: Add and view your GSM and
GPRS data usage.
Phone info
View information about your phone,
including your phone number.
Page 12

Fundamentals
22
the pacemaker to minimize the potential
for interference. Switch off the phone
immediately if necessary.
• Some phones may interfere with some
hearing aids. In the event of such interference, you may consult your hearing aid
manufacturer to discuss alternatives.
• If you use any other personal medical
device, please consult the manufacturer
of your device to determine if it is
adequately shielded from RF energy
before using this product.
• In areas with special requirements, such
as hospitals or health care facilities,
please pay attention to the restrictions on
the use of your mobile phone. Switch off
your phone if required.
Mobile Phone
• Please use original accessories or
accessories approved by the phone
manufacturer. Using any unauthorized
accessories may affect your mobile
phone’s performance, void the
manufacturer’s warranty, damage your
phone, or even cause injury.
• Turn off your phone before you clean it.
Use a damp or anti-static cloth to clean
the phone. Do not use a dry cloth or
electrostatically charged cloth. Do not
use chemical or abrasive cleaners as
these could damage the phone.
• As your mobile phone can produce an
electromagnetic field, do not place it near
magnetic items such as computer disks.
• Using the phone near electrical
appliances such as TVs, telephones,
radios and personal computers can
cause interference.
• Do not expose your mobile phone to
direct sunlight or store in hot places.
High temperatures can shorten the life
of electronic devices.
• Keep your phone dry. Any liquid may
damage your phone.
• Do not drop, knock or harshly treat the
phone. Rough handling can damage
internal circuit boards.
• Do not connect the phone with any
incompatible accessory or enhancement.
• Do not attempt to disassemble the mobile
phone or battery.
• Do not store the phone with flammable
or explosive articles.
• Do not charge the mobile phone without
the battery.
• Failure to adhere to the above
mentioned safety tips may result in a
voided warranty.
Fundamentals
23
Safety and General Use in
Vehicles
• Safety airbags, brakes, speed control
systems and fuel injection systems
should not be affected by wireless
transmissions. If you experience problems
with the above-mentioned systems,
please contact your automobile provider.
Do not place your phone in the area over
an airbag or in the airbag deployment
area. Airbags inflate with great force. If a
phone is placed in the airbag deployment
area and the airbag inflates, the phone
may be propelled with great force
and cause serious injury or death to
occupants of the vehicle.
• Please turn off your mobile phone at
a refueling point, and in the locations
where the use of two-way radio is also
prohibited.
Aircraft Safety
• Please turn off your mobile phone before
take off or as instructed by the flight
crew. In order to protect the airplane’s
communication system from interference,
do not use your mobile phone during your
flight. Safety regulations require you to
have permission from a crew member to
use your phone while the plane is on the
ground taxiing.
Precautions for Potentially
Hazardous Environments
• Switch off your phone prior to entering
any area with potentially hazardous
environments including, but not limited
to fuel/chemical transfer areas or
storage facilities.
• Do not remove, install, or charge
batteries in such areas. Sparks in
potentially hazardous environments
can cause explosions or fire, resulting
in bodily injury or even death.
• To avoid possible interference with
blasting operations, switch off your
phone when you are near electrical
blasting caps, in a blasting area, or
in areas posted “Turn off electronic
devices.” Obey all signs and instructions.
Precautions for Electronic
Devices
• Some electronic devices are susceptible
to electromagnetic interference sent
by the mobile phone if inadequately
shielded, such as the electronic
systems of vehicles. Please consult the
manufacturer of the other device before
using the phone if necessary.
Page 13

Fundamentals
24
Fundamentals
25
• Promptly dispose of used batteries in
accordance with local regulations.
• Battery usage by children should
be supervised.
• Avoid dropping the phone or battery.
If the phone or battery is dropped,
especially on a hard surface, and the user
suspects damage, take it to a service
center for inspection.
• Improper battery use may result in a fire,
explosion or other hazard.
• For those host devices that utilize a
USB port as a charging source, the host
device’s user manual shall include a
statement that the phone shall only be
connected to CTIA certified adapters,
products that bear the USB-IF logo or
products that have completed the USB-IF
compliance program.
• Do not attempt to short circuit the battery
through any means as this can cause the
unit to overheat or ignite.
• Do not store the battery in hot areas or
expose it to direct flame of any kind. Such
misuse may damage the battery or could
cause an explosion.
• Do not disassemble or refit the
battery. This may cause liquid leakage,
overheating, explosions or ignition of
the battery.
• If the mobile phone has the automatic
timing power on feature, please check
your alarm setting to make sure that your
phone will not be automatically turned on
during the flight.
Battery Use
• Do not modify or remanufacture, attempt
to insert foreign objects into the battery,
immerse or expose to water or other
liquids, expose to fire, explosion or
other hazard.
• Do not disassemble or open, crush, bend
or deform, puncture or shred.
• Only use the battery for the system for
which it is specified.
• Only use the battery with a charging
system that has been qualified with
the system per this standard. Use of
an unqualified battery or charger may
present a risk of fire, explosion, leakage,
or other hazard.
• Do not short circuit a battery or allow
metallic conductive objects to contact
battery terminals.
• Replace the battery only with another
battery that has been qualified with
the system per this standard, IEEEStd-1725-2006. Use of an unqualified
battery may present a risk of fire,
explosion, leakage or other hazard.
The output voltage of adapter and input
voltage of host device
• The output voltage range of adapter
(STC-A22O50I700M5-C) is DC4.75~5.40V.
• The input voltage range of the host
device charge interface is DC4.0~6.0V so
that the adapter output meets the input
requirements of the host device.
FCC Compliance
This device complies with part 15 of the
FCC Rules. Operation is subject to the
following two conditions: (1) This device
may not cause harmful interference, and (2)
this device must accept any interference
received, including interference that may
cause undesired operation.
This device has been tested and found to
comply with the limits for a Class B digital
device, pursuant to Part 15 of the FCC
Rules. These limits are designed to provide
reasonable protection against harmful
interference in a residential installation.
This equipment generates, uses, and can
radiate radio frequency energy and, if not
installed and used in accordance with the
instructions, may cause harmful interference
to radio communications. However, there
is no guarantee that interference will not
occur in a particular installation. If this
• Please store the battery in a cool
dry place if you do not use it for a
long period.
• The battery can be recharged many
times, but it will eventually wear out
over the course of normal usage. When
the operating time (talk time and standby
time) is noticeably shorter than normal,
replace it with a new manufacturer
approved battery.
• Please stop using the charger and
battery when they are damaged or show
evidence of aging.
• Return the used battery to the provider
or dispose of it in accordance with
local environmental regulations. Do not
dispose of it in household refuse.
• Please use original batteries or batteries
approved by the phone manufacturer.
Using unauthorized batteries may affect
your handset performance or may cause
danger of explosion, etc.
• Use of an unapproved manufacturer
battery or charger may present a risk of
fire, explosion, leakage, or other hazard.
Warning: If the battery is damaged,
immediately discontinue its use in your
mobile device. If leakage does come into
contact with eyes or skin immediately flush
the affected areas thoroughly in clean water
and consult a doctor immediately.
Page 14

Fundamentals
26
Fundamentals
27
This phone is designed and manufactured
not to exceed the emission limits for
exposure to radio frequency (RF) energy set
by the Federal Communications Commission
of the U.S. Government:
The exposure standard for wireless mobile
phones employs a unit of measurement
known as the Specific Absorption Rate,
or SAR. The SAR limit set by the FCC is
1.6 W/kg.* Tests for SAR are conducted
using standard operating positions accepted
by the FCC with the phone transmitting
at its highest certified power level in all
tested frequency bands. Although the SAR
is determined at the highest certified power
level, the actual SAR level of the phone
while operating can be well below the
maximum value. This is because the phone
is designed to operate at multiple power
levels so as to use only the power required
to reach the network. In general, the closer
you are to a wireless base station antenna,
the lower the power output.
The highest SAR value for the model phone
as reported to the FCC when tested for use
at the ear is 0.805 W/kg and when worn on
the body, as described in this user guide,
is 1.420 W/kg. (Body-worn measurements
equipment does cause harmful interference
to radio or television reception, which can
be determined by turning the equipment
off and on, the user is encouraged to try to
correct the interference by one or more of
the following measures:
• Reorient or relocate the receiving
antenna.
• Increase the separation between the
equipment and receiver.
• Connect the equipment into an outlet on
a circuit different from that to which the
receiver is connected.
• Consult the dealer or an experienced
radio/TV technician for help.
Changes or modifications not expressly
approved by the party responsible for
compliance could void the user‘s authority to
operate the equipment.
The antenna(s) used for this transmitter must
not be co-located or operating in conjunction
with any other antenna or transmitter.
Health and Safety Information
Radio Frequency (RF) Energy
This model phone meets the government’s
requirements for exposure to radio waves.
* In the United States and Canada, the SAR limit for mobile phones used by the public is 1.6 watts/kg (W/kg)
averaged over one gram of tissue. The standard incorporates a substantial margin of safety to give additional
protection for the public and to account for any variations in measurements.
Hearing Aid Compatibility with
Mobile Phones
When some mobile phones are used near
some hearing devices (hearing aids and
cochlear implants) users may detect a
buzzing, humming, or whining noise. Some
hearing devices are more immune than
others to this interference noise, and phones
also vary in the amount of interference they
generate in such conditions.
The wireless telephone industry has
developed ratings for some of their mobile
phones, to assist hearing device users in
finding phones that may be compatible with
their hearing devices. Not all phones have
been rated. Phones that are rated have the
rating on their box or a label on the box.
The ratings are not guarantees of
satisfactory results. Results will vary
depending on the user’s hearing device and
hearing loss. If your hearing device happens
to be vulnerable to interference, you may not
be able to use a rated phone successfully.
Trying out the phone with your hearing
device is the best way to evaluate it for your
personal needs.
M-Ratings: Phones rated M3 or M4 meet
FCC requirements and are likely to generate
less interference to hearing devices than
phones that are not labeled. M4 is the
better/higher of the two ratings.
differ among phone models, depending
upon available enhancements and FCC
requirements.)
While there may be differences between the
SAR levels of individual ZTE R225 phones
and at various positions, they all meet the
government requirement.
The FCC has granted an Equipment
Authorization for this model phone with
all reported SAR levels evaluated as in
compliance with the FCC RF exposure
guidelines. SAR information on this model
phone is on file with the FCC and can be
found under the Display Grant section of
http://www.fcc.gov/oet/fccid after searching
on FCC ID: Q78-GR225.
For body-worn operation, this phone has
been tested and meets the FCC RF exposure
guidelines for use with an accessory that
contains no metal and that positions the
handset a minimum of 1.5 cm from the body.
Use of other enhancements may not ensure
compliance with FCC RF exposure guidelines.
If you do not use a body-worn accessory
and are not holding the phone at the ear
level, position the handset a minimum of
1.5 cm from your body when the phone is
switched on.
Page 15

Fundamentals
28
T-Ratings: Phones rated T3 or T4 meet
FCC requirements and are likely to be more
usable with a hearing device’s telecoil (“T
Switch” or “Telephone Switch”) than unrated
phones. T4 is the better/higher of the two
ratings. (Note that not all hearing devices
have telecoils in them.)
Hearing devices may also be measured for
immunity to this type of interference. Your
hearing device manufacturer or hearing
health professional may help you find results
for your hearing device. The more immune
your hearing aid is, the less likely you
are to experience interference noise from
mobile phones.
Limitation of Liability
AT&T shall not be liable for any loss of
profits or indirect, special, incidental or
consequential damages resulting from or
arising out of or in connection with using
this product, whether or not AT&T had been
advised, knew or should have known the
possibility of such damages. The user should
refer to the enclosed warranty card for full
warranty and service information.
Note: The pictures and icons shown in
the manual are just schematic drawings
for demonstration of functions. If they are
inconsistent with your handset, please
take your handset as the standard. If the
inconsistency exists within the manual
because the handset function has been
updated, please refer to the follow-up
public information from AT&T.
Notes
Page 16

Notes Notes
Page 17

Notes
 Loading...