

Page 1
User Guide
AT&T Velocity® USB Stick
Page 2

Copyright © 2017 ZTE CORPORATION.
All rights reserved.
No part of this publication may be excerpted, reproduced,
translated or utilized in any form or by any means, electronic or
mechanical, including photocopying and microlm, without the
prior written permission of ZTE Corporation.
The manual is published by ZTE Corporation. We reserve the right
to make modications on print errors or update specications
without prior notice.
Version No. : V1.0
Edition Time: April 2017
Get Started ..........................................................3
Know Your Device .................................................3
Set Up and Connect to the Internet. . . . . . . . . . . . . . . . . . . . . . . . . . . . . . 5
Disconnect and Remove the Device .............................7
Use the AT&T Velocity
®
USB Stick .................................8
Management Web Site ...........................................8
View Network Information .......................................9
Congure Data Network Options ................................9
View Messages ...................................................10
View Details ......................................................11
View Local Time and Time Zone ................................. 11
Replace the Nano-SIM Card .....................................12
Reset the Device .................................................13
Advanced Settings .................................................14
Congure APN Details ...........................................15
Enable MAC/IP/Port Filtering ....................................16
Enable DMZ ......................................................19
Congure SIM PIN ................................................20
Troubleshooting ..................................................21
Specications ....................................................22
Contents
Contents 1
Page 3

Get Started
This chapter provides an overview of the features of your
AT&T Velocity USB Stick and instructions on how to set it up
and connect to the Internet.
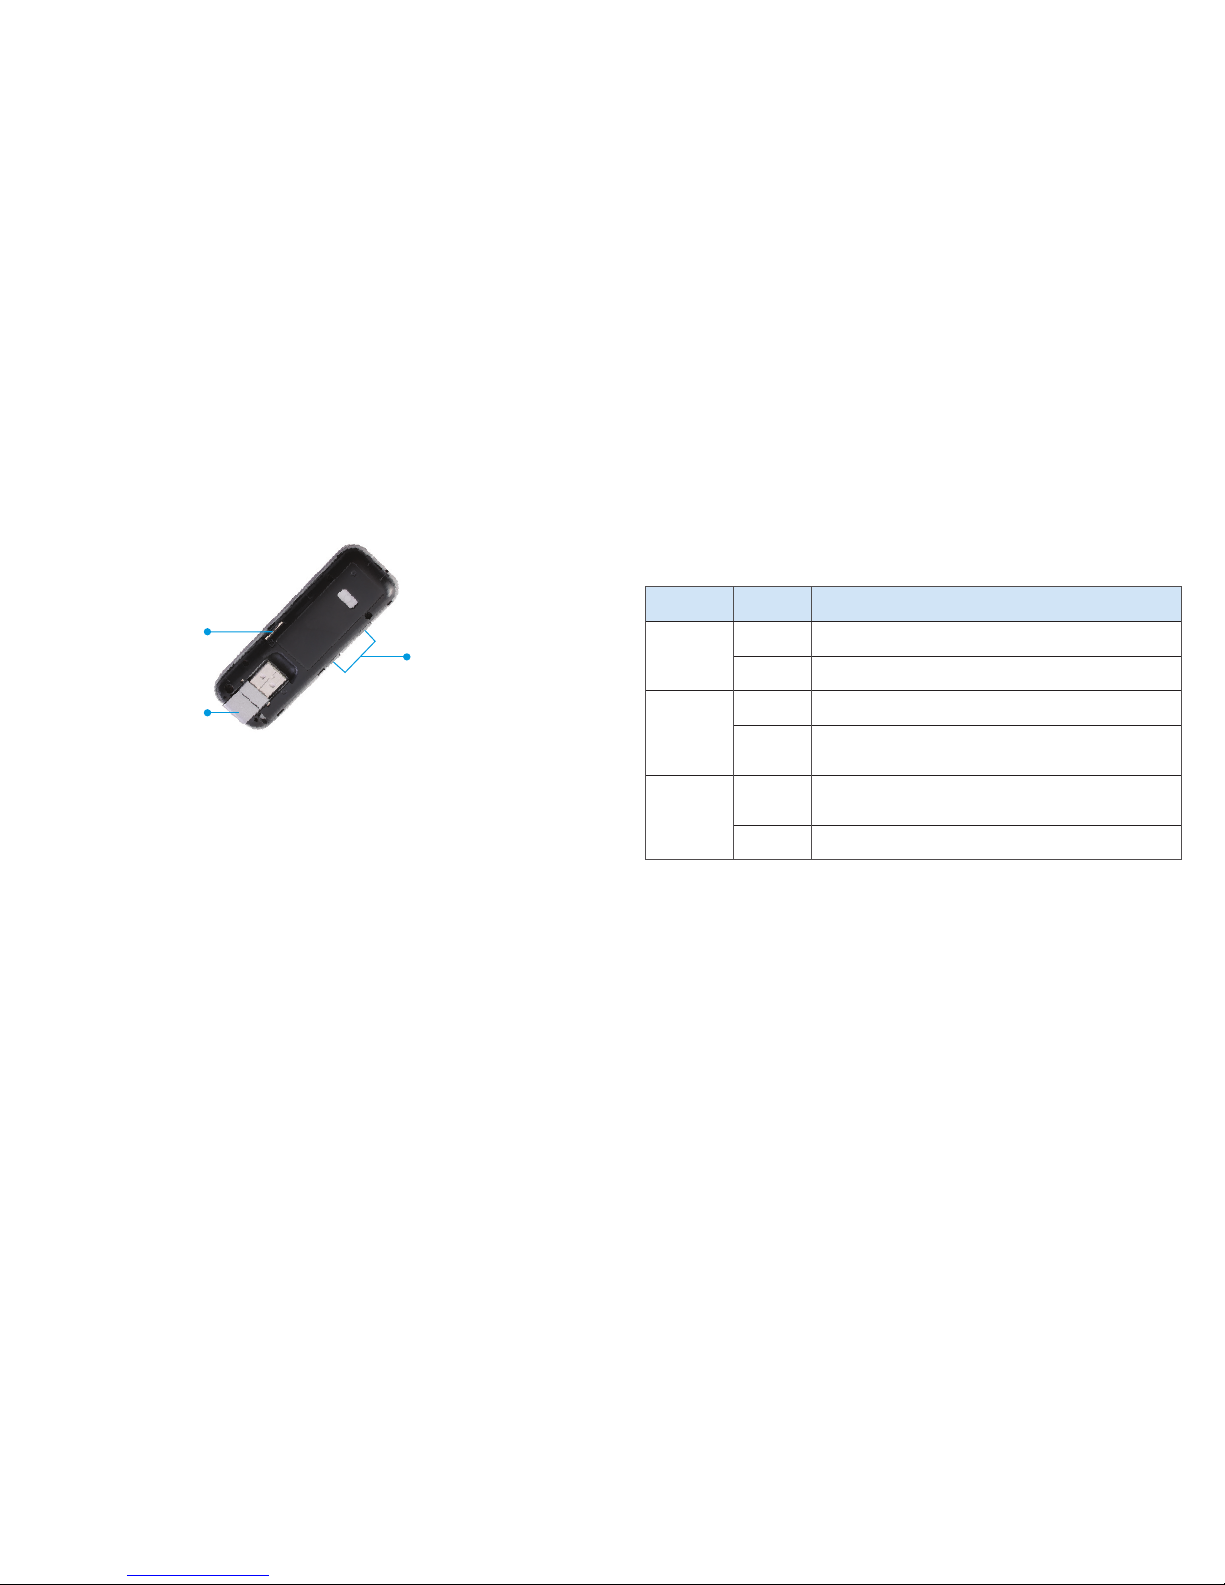
Know Your Device
Contents2 Get Started 3
USB connector
USB
connector
pivot
Back cover
(removable)
Indicator light
Health and Safety Information ..................................23
To the Owner ...................................................23
Using Your USB Stick ...........................................24
RF Exposure Information (SAR) ................................25
FCC Compliance ................................................26
Warranty ..........................................................28
Limited Warranty ...............................................30
How to Get Warranty Service ..................................31
Other Warranty Programs ..................................... 31
USB connector – Connects to your computer through a standard
(type A) USB port.
USB connector pivot – Allows the USB connector to rotate for
easier connection to computers.
Back cover (removable) – Covers the nano-SIM card slot.
Indicator light – Indicates connection status and more
(see Status Indicator Light on page 5 for details).
Page 4
Status Indicator Light
The color and behavior of the light indicates the device’s current
status regarding network connection, nano-SIM card, soware
updates, and more.
Color Status Description
Green
Solid
Device ready, network connection registered
Blinking Device powering up, searching for network
Yellow
Solid No network service
Blinking
Soware upgrading or new message
received (see View Messages on page 10).
Red
Solid
Failure state (no SIM, locked SIM, SIM error,
PUK error)
Blinking Soware upgrade failure
Set Up and Connect to the Internet
Connect to a Computer
1. Use your thumb to gently ip open the USB connector on
the device.
Note: Avoid overextending the USB connector past its
resistance point.
2. Hold the device along its side edges and gently insert it into
your computer’s USB port.
External antenna connector – Allows an external antenna to
be connected, if necessary.
USB folding hinge – Allows the USB connector to fold in for
storage or out to plug into a computer.
Nano-SIM card slot – Spring-loaded slot for insertion of a
4G LTE
™
nano-SIM card (preinstalled).
External
antenna
connector
Nano-SIM
card slot
USB folding
hinge
Get Started4 Get Started 5
Page 5

Get Started6 7Get Started
3. The operating system will automatically detect and recognize
your device and install any needed drivers. (If you are using a
Mac, see Install the Driver (Mac® OS X®) below.)
Note: Compatible with many operating systems; see Supported
Operating Systems on page 22 for details. Installation may vary
depending on your operating system and version.
Install the Driver (Mac OS X)
Note: Installing the driver will improve data speed, particularly on
systems running version 10.10.
1. Insert the AT&T Velocity USB Stick into a USB port on
your Mac.
2. Double-click on the AT&T USB Modem icon that appears.
3. Double-click on the AT&T USB Modem package icon.
(You may need to enter your password.)
Uninstall the Driver (Mac OS X)
1. Disconnect from the Internet and remove the AT&T Velocity
USB Stick from your Mac.
2. Open Applications (in Finder, click Go > Applications
or press Shi-Command-A) and double-click on the
Uninstall AT&T USB Modem icon.
3. Click Uninstall. (If you have not yet removed the AT&T Velocity
USB Stick from your Mac, remove it and click OK.)
4. You may need to enter your password. When driver removal is
nished, click Close.
Connect to the Internet
Once installation is complete, your device will automatically
connect to the network. Connection is complete when the
indicator light is solid green.
Disconnect and Remove the Device
Disconnect From the Network
1. Launch a browser and enter http://attusbmodem/ or
http://192.168.1.1 in the address bar.
2. Under Domestic Data, click O next to Mobile Data.
3. Click Apply.
Properly Remove the Device
Disconnect from the network and close the management web
site before removing the device from the computer. You can
safely remove the device at any time when you are not connected
to the network. Gently grip the device on both sides and pull
straight out of the port to avoid damaging the USB connector.
Page 6
Use the AT&T Velocity USB Stick
This chapter describes the main features of the web site for
managing and conguring the device.
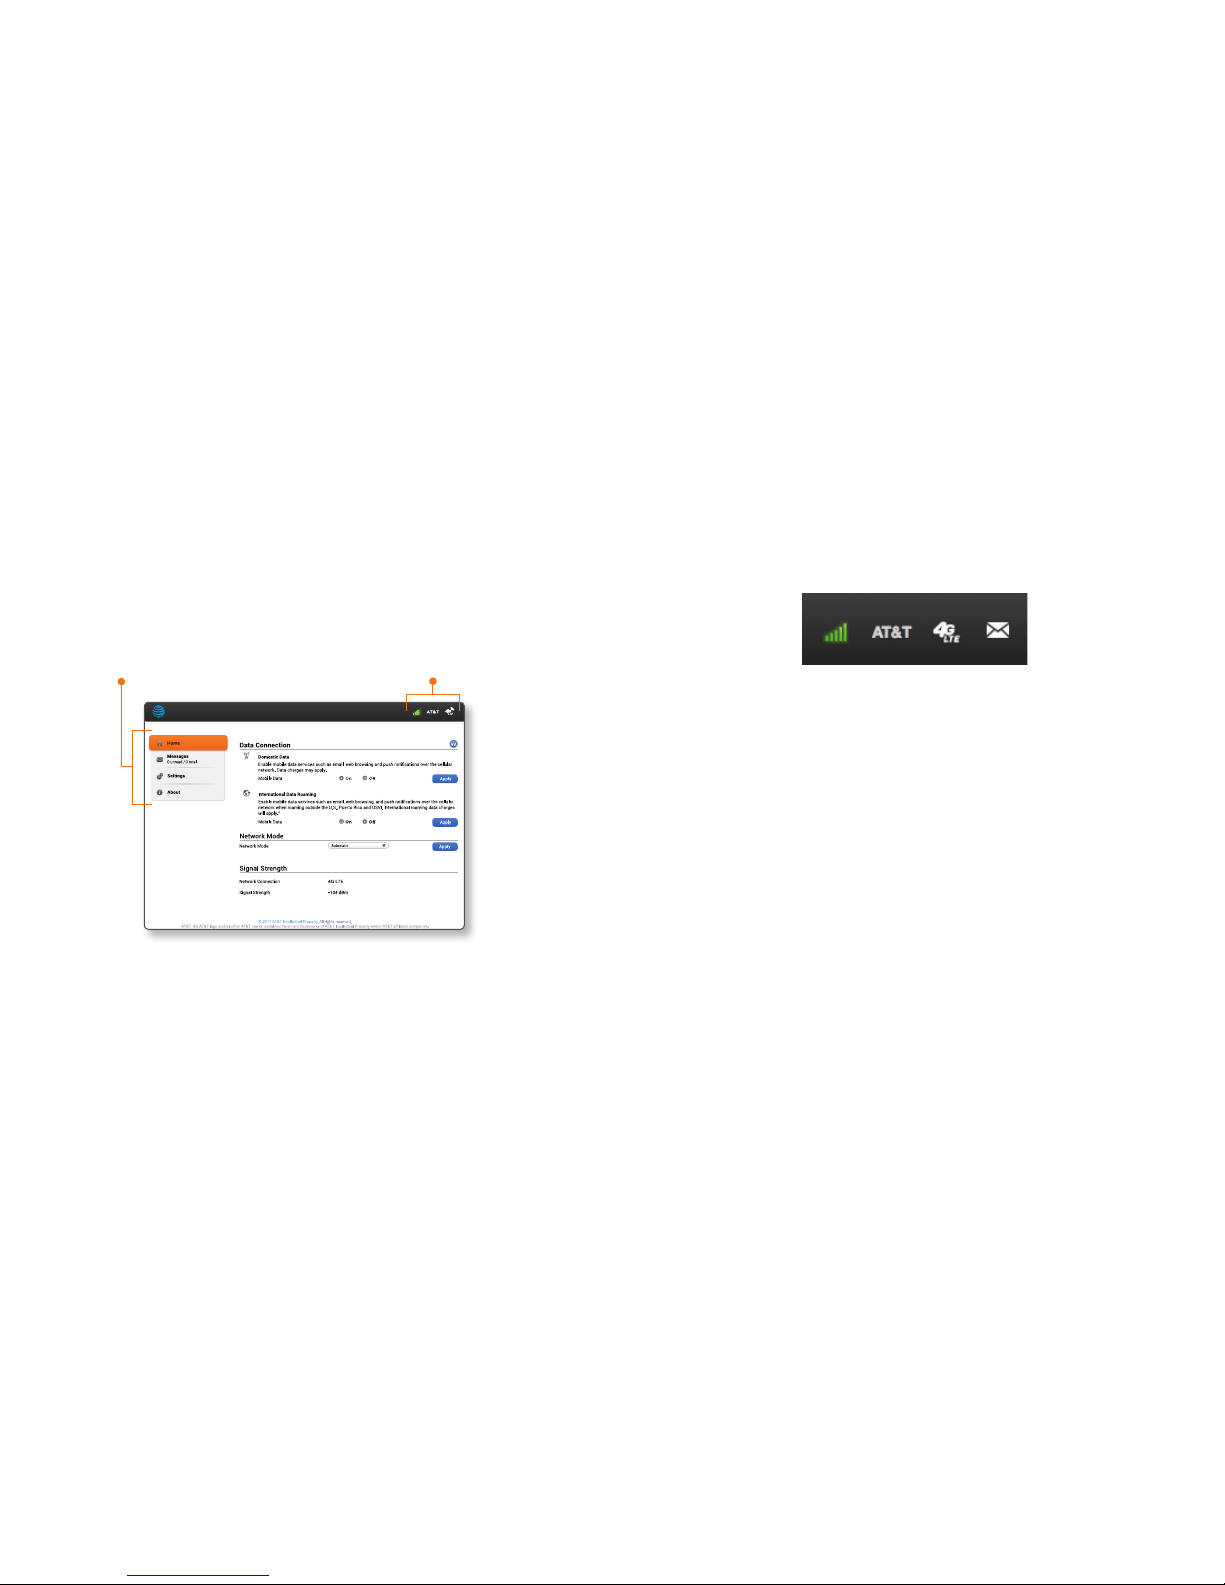
Management Web Site
Launch a browser and enter http:/attusbmodem/ or http://192.168.1.1
in the address bar. You will see this screen:
Navigation options:
• Home – Manage your network connection.
• Messages – Read messages from AT&T.
• Settings – Manage advanced settings.
• About – View device details, such as your wireless number.
98
View Network Information
On the right side of the status bar at the top of the management
web site, you can view network information, such as the signal
strength, operator, and network mode.
Congure Data Network Options
You can turn the data connection on or o, choose whether to
allow the device to be used when roaming internationally, and
select the preferred network mode.
1. From the management web site, click Home on
the menu and do one of the following:
• To enable/disable mobile data: Under Domestic Data,
click On or O next to Mobile Data.
• To enable/disable international roaming: Under
International Data Roaming, click On or O next to
Mobile Data.
• To set network mode: With mobile data o, click the
drop-down box beside Network Mode and select the
one you prefer.
Note: Specifying a mode may limit network availability.
2. Click Apply.
Status bar
Menu
Use the AT&T Velocity USB StickUse the AT&T Velocity USB Stick
Page 7

View Messages
Your device can receive important messages from AT&T about
your service plan and soware updates for your device. You
cannot reply to them. The indicator light will turn yellow and blink
when you have a new message (see Status Indicator Light on
page 5).
1. From the management web site, click Messages on the menu to
view your messages.
2. Click on a message to mark it as read.
3. To delete a message, click the checkbox beside the message,
and then click Delete. You can also click Delete All to delete all
messages in the list.
1110
View Details
You can view details about your device, such as the wireless
number, hardware version, and IMEI. From the management
web site, click About on the menu.
View Local Time and Time Zone
You can view the local time and time zone.
1. From the management web site, click Settings on
the menu.
2. Click Advanced
Time/Date.
Use the AT&T Velocity USB StickUse the AT&T Velocity USB Stick
Page 8
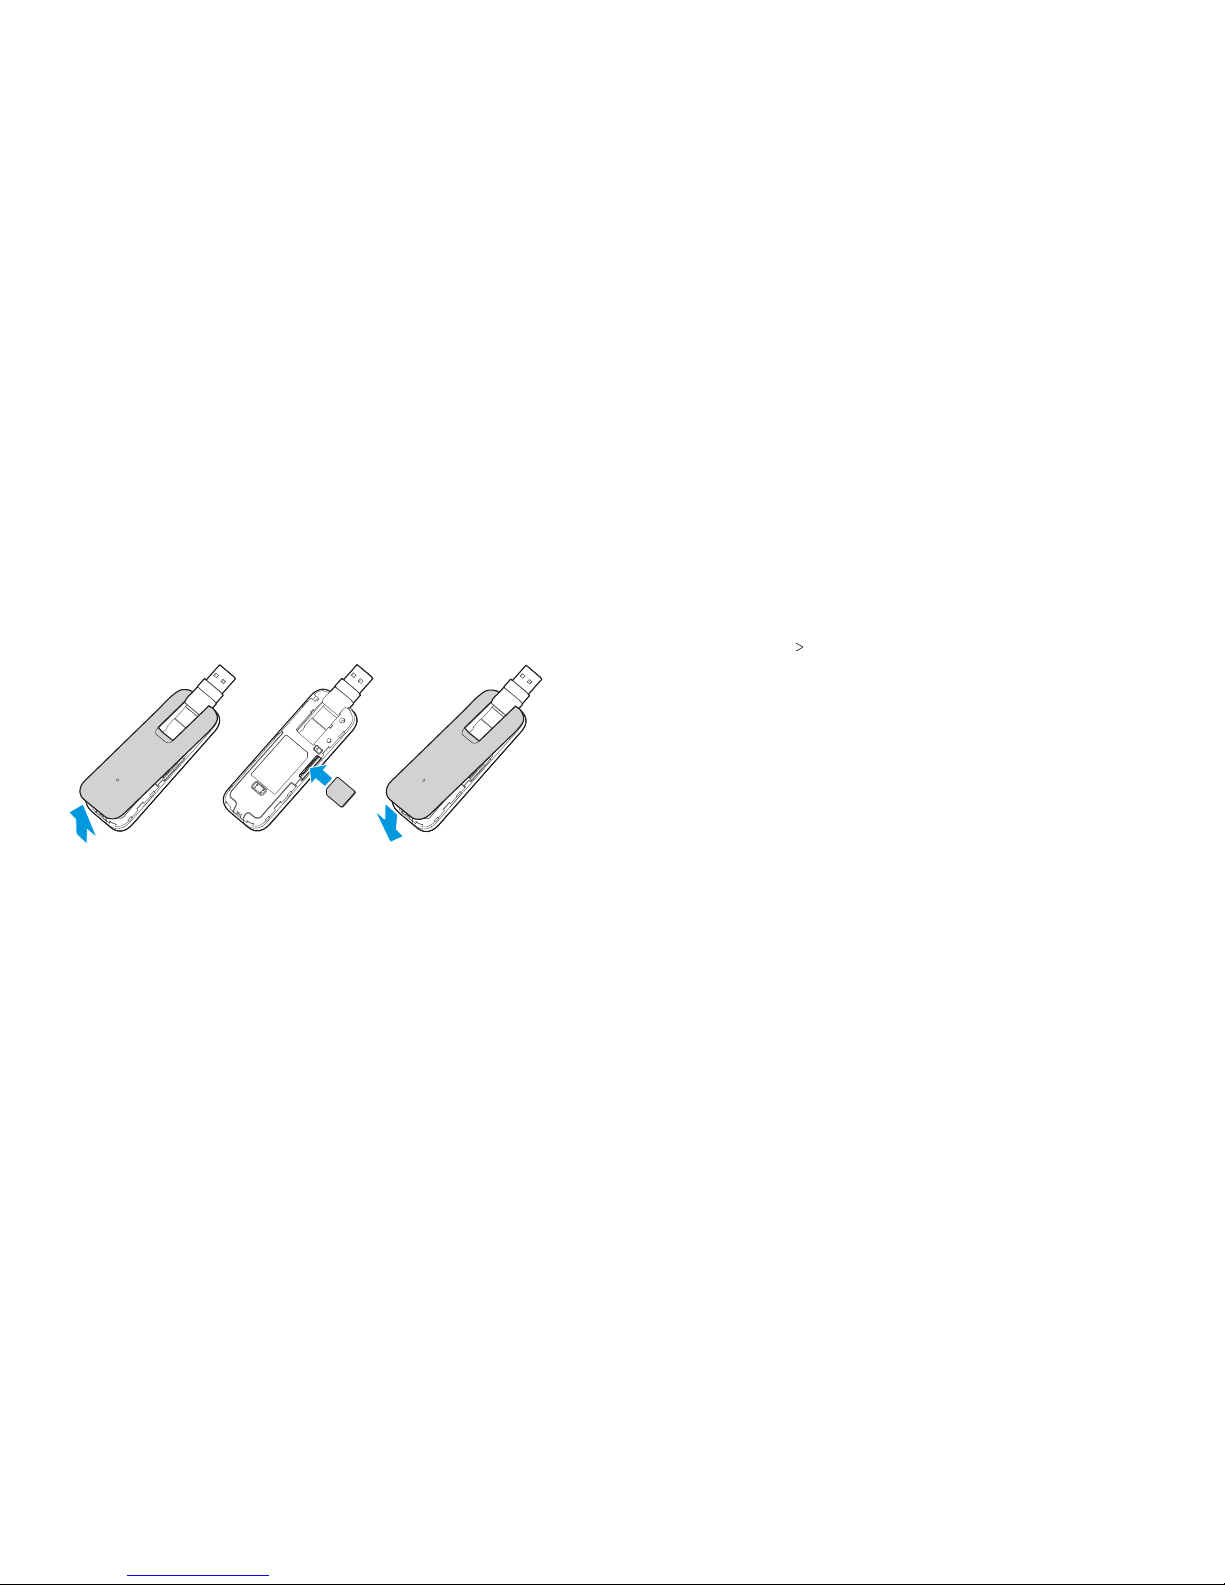
Replace the Nano-SIM Card
The device comes with a nano-SIM card preinstalled. Should you
need to swap out your nano-SIM card, follow these instructions.
WARNING! To avoid damage to the device, do not use any other
kind of SIM card, or any nonstandard nano-SIM card cut from
a SIM card. You can get a standard nano-SIM card from your
service provider.
1. Gently pry the back cover away from the notch at the top
of the device.
Note: Open the back cover carefully to avoid damaging it.
2. Remove the existing nano-SIM card.
3. Insert the new nano-SIM card in the slot.
4. Replace the back cover.
1312
Reset the Device
You can reset the device to its original factory settings.
Note: If you reset the device to factory settings, all of your
customizations will be lost.
1. Go to the management web site at http://attusbmodem
and click Settings on the menu.
2. Click Advanced
Device Reset.
3. Click Reset.
Use the AT&T Velocity USB Stick Use the AT&T Velocity USB Stick
Page 9

Advanced Settings
This chapter provides information on how to congure advanced
settings for the device, such as APN, rewall, SIM PIN, and more.
Note: Disconnect the device from the network before changing
any settings (see Disconnect From the Internet on page 7).
Settings tabs:
• Network – Add a new APN or select one to use.
• Firewall – Congure MAC/IP/Port Filtering or DMZ settings.
• Advanced – Congure SIM PIN, view local time and time zone,
or reset the device.
Congure APN Details
The Access Point Name (APN) is checked to determine the
type of network connection to establish. Your device comes
precongured with the APN for AT&T.
Add an APN for Another Network
1. From the management web site, click Settings on the menu.
2. On the Network tab, next to Mode, click Manual.
3. Click Add.
4. Enter the prole name and APN (obtained from your carrier).
5. Select the PDP type: IPv4, IPv6, or IPv4/IPv6 (default).
6. Select the DNS mode. If set to Manual DNS, you will need to
enter the Primary DNS and (optionally) Secondary DNS.
7. Select the network authentication mode: NONE (default),
CHAP, or PAP.
8. Enter the user name and password.
9. Click Save.
Select the APN Entry to Use
1. From the management web site, click Settings on the menu.
2. On the Network tab, next to Mode, click Manual.
3. From the drop-down box beside Prole Selection, select the
desired APN.
4. Click Set Default.
Advanced Settings Advanced Settings 1514
Page 10

17Advanced Settings16
Remove an APN Entry
1. From the management web site, click Settings on the menu.
2. From the drop-down box beside Prole Selection, select the
APN you want to remove.
3. Click Delete.
Note: You cannot delete the default prole. Set another prole as
the default before attempting to delete.
Enable MAC/IP/Port Filtering
You can enable or disable the MAC/IP/Port Filtering feature as
needed to block certain Internet trac. If this setting is enabled,
you can then choose whether trac is Accepted or Dropped
by default.
Enable Port Filtering
1. From the management web site, click Settings on the menu.
2. Click Firewall.
3. On the MAC/IP/Port Filtering tab, click Enable.
4. Select the Default Policy:
• Accepted – Internet trac is allowed by default. Only
trac from the selected applications will be blocked from
accessing the Internet. Trac is identied by port numbers.
Some applications are predened. You can dene additional
applications by clicking Add Custom Application, but you
need to know the details of the trac used and generated
by the applications you wish to dene. In particular, you
Advanced Settings
need to know the port numbers and the protocol used by
outgoing trac.
• Dropped – Internet trac is blocked by default. Only trac
from the selected predened or custom applications is
allowed to access the Internet.
5. Click Apply.
6. Check the applications you will allow to access the Internet
and click Apply, or click Add Custom Application to add
application and lter settings (see Add a New Port Filtering Rule
below for details).
Add a New Port Filtering Rule
1. On the management web site, from the Settings Firewall
MAC/IP/Port Filtering tab, with ltering Enabled,
click Add Custom Application.
2. Enter the details under MAC/IP/Port Filtering Settings, as
described in Port Filtering Options on page 18.
3. Click Apply to save the rule.
Page 11
1918
Port Filtering Options
• MAC Address – Set the MAC address to be ltered.
• Destination IP Address – Set the destination IP address to
be ltered.
• Source IP Address – Set the source IP address to be ltered.
• Protocol – Select which protocol will be used for ltering.
• Action – Select whether to Accept or Drop packets that match
the rule.
• Comment – Enter a comment about the lter settings.
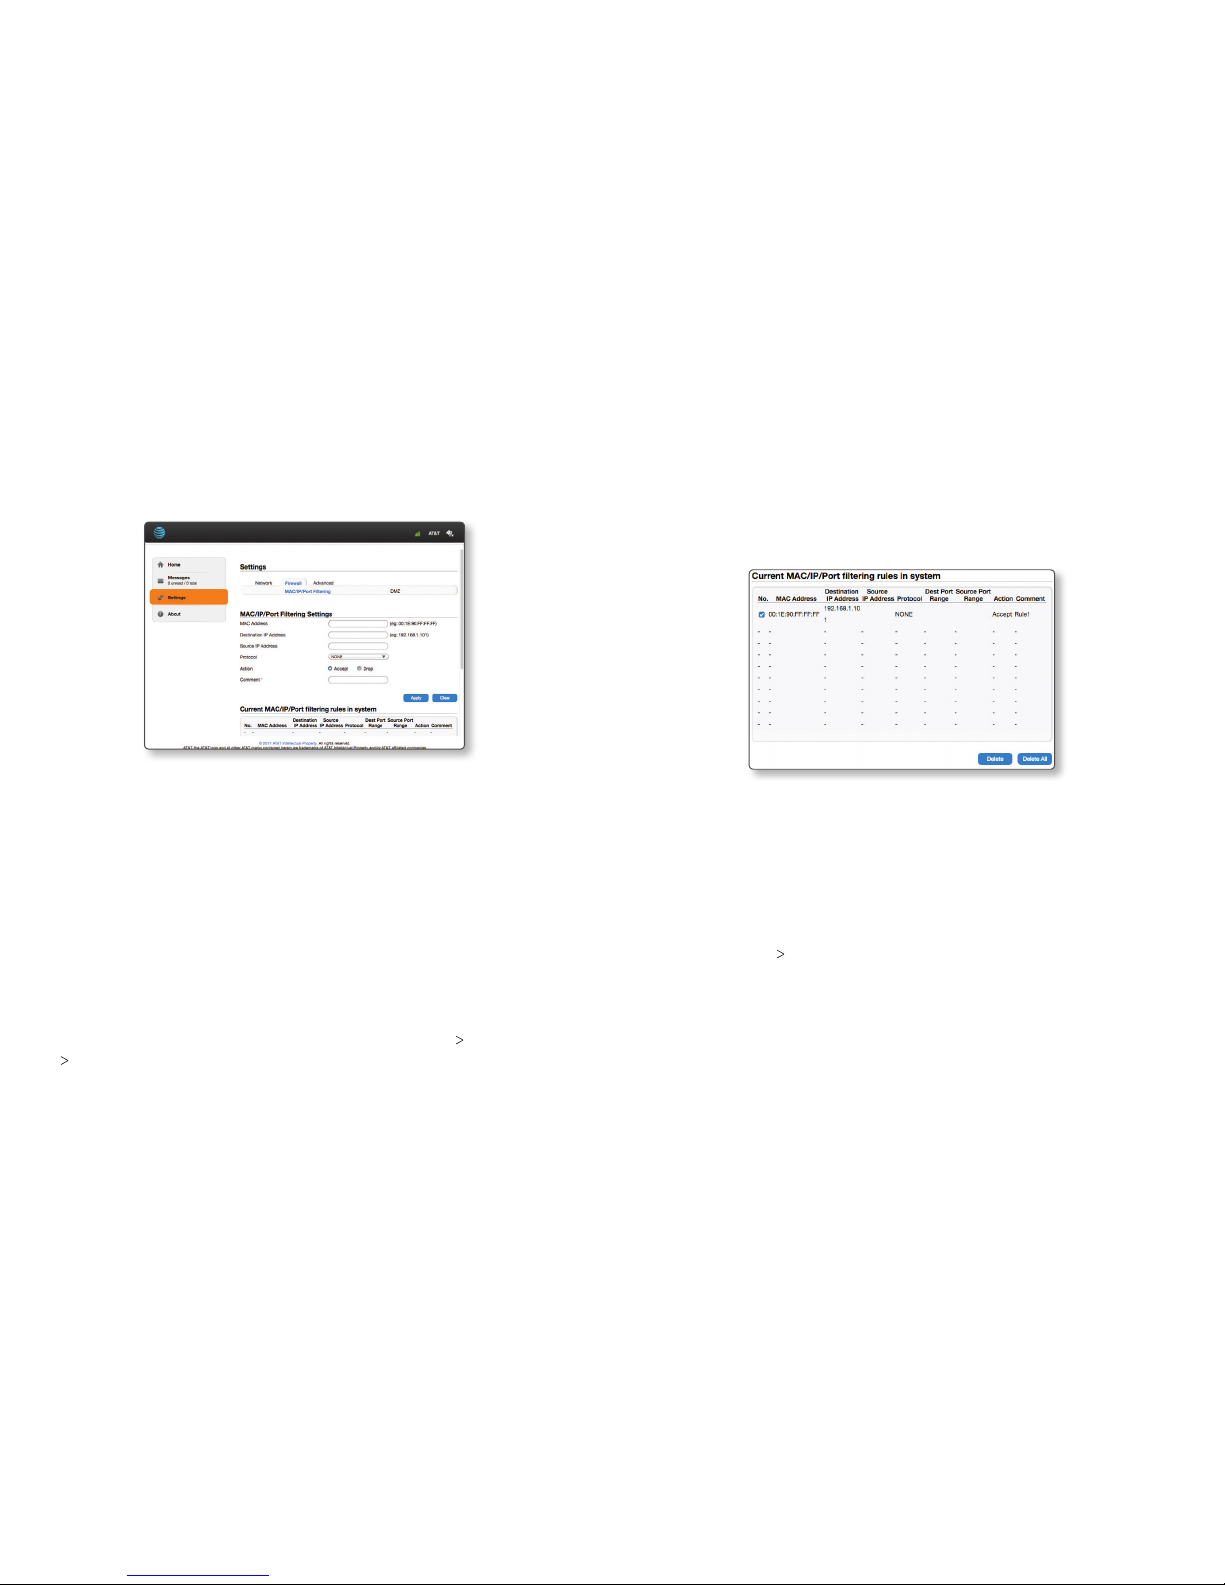
Delete a Port Filtering Rule
1. On the management web site, from the Settings Firewall
MAC/IP/Port Filtering tab, with ltering Enabled, click Add
Custom Application.
Advanced Settings Advanced Settings
2. Under Current MAC/IP/Port ltering rules in system, click to
check the box beside the rule you want to delete.
3. Click Delete.
Enable DMZ
In a DMZ (demilitarized zone) network conguration, a computer
runs outside the rewall in the DMZ. This computer intercepts
incoming Internet trac, providing an extra layer of protection to
the rest of the network.
1. From the management web site, click Settings.
2. Click Firewall
DMZ.
3. Click Enable next to DMZ Settings.
4. Click Apply.
Page 12

2120
Congure SIM PIN
If the SIM PIN feature is enabled for the nano-SIM card in your
device, you will need to enter the PIN when you log in for the
rst time. To change the SIM PIN status, you need to disconnect
from the network rst (see Disconnect From the Network on
page 7 for details).
Note: The nano-SIM card will be locked if you enter the wrong PIN
three times consecutively.
Enable or Disable the SIM PIN
1. From the management web site, click Settings.
2. Click Advanced
SIM PIN.
3. Click Enable or Disable next to PIN Status.
4. Enter the SIM PIN and click Apply.
Change the SIM PIN
Note: You must enable the SIM PIN before you can change the PIN.
1. From the management web site, click Settings.
2. Click Advanced
SIM PIN.
3. Click Change PIN.
4. Enter the current PIN and the new PIN; click Apply.
Advanced Settings Troubleshooting
Troubleshooting
Problem Solution
Cannot access
the Internet
Wait until the device has connected to
the network (indicator light is solid green,
not blinking).
Move to a location with a stronger signal.
Make sure the device contains a
nano-SIM card.
Contact your service provider.
Cannot access
the management
web site
Wait until the device has connected to
the network (indicator light is solid green,
not blinking).
Make sure you have entered the
correct address: http://attusbmodem
or http://192.168.1.1 .
Only use one network adapter in your
computer.
Connection is slow
If you are using a computer running Mac
OS X, install the device driver. (See Install
the Driver (Mac OS X) on page 6.)
Move to a location with a stronger signal.
Page 13

Specications
Mechanical Specications
Dimensions 3.82" (L) x 1.30" (W) x 0.63" (D)
Weight 3.17 oz.
Memory 256 MB RAM/512 MB ROM
USB Version USB 2.0
Connectivity LTE/UMTS
Supported RF Bands
Technology Bands
Cat 6 LTE B2 / B4 / B5 / B12 / B29 / B30
HSPA 2100 / 850 / 900 / 1900
Supported Operating Systems
OS Versions
Microso® Windows
®
7, 8, and 10
Mac OS X 10.5 and above
Linux® Ubuntu® 32-bit 15.04, 15.10, 16.04
Linux Fedora
®
32-bit 21, 22, 23, 25
Health and Safety Information
To the Owner
• If inadequately shielded, some electronic devices may be
aected by the electromagnetic interference caused by the
modem, such as the electronic system of vehicles. Consult
the manufacturers of such devices before using the modem
if necessary.
• Operating the modem may interfere with medical instruments
such as hearing aids and pacemakers. Always keep the modem
more than 20 centimeters (8 inches) away from such medical
instruments when your modem is turned on. Turn the modem
o if necessary. Consult a physician or the manufacturers of
medical instruments before using the modem if necessary.
• Be aware of the usage limitation when using the modem at
places such as oil warehouses or chemical factories, where there
are explosive gases or explosive products being processed. Turn
o the modem if necessary.
• Do not use electronic transmission devices in aircras, at gas
stations or in hospitals. Observe and obey all warning signs, and
turn o the modem in these conditions.
• Do not touch the inner antenna area unless it is necessary.
Otherwise the performance of the modem may be aected.
• Keep the modem out of the reach of little children. The modem
may cause an injury if used as a toy.
• When the modem is operating, do not touch the metallic parts.
Failing to do so may cause burns.
2322 Specications Health and Safety Information
Page 14

25Health and Safety Information24
Using Your USB Stick
• Use original accessories or accessories that are authorized.
Using any unauthorized accessories may aect the performance
of the modem and violate the related national regulations about
telecom terminals.
• Avoid using the modem near or inside metallic structures or
establishments that can emit electromagnetic waves, because
signal reception may be aected.
• The modem is not waterproof. Keep the modem dry and store it
in a shady and cool place.
• Do not use the modem immediately aer a sudden temperature
change. In such case, dew may be generated inside and outside
the modem, so do not use it until it becomes dry.
• Handle the modem carefully. Do not drop, bend or strike it.
Otherwise the modem may be damaged.
• Only qualied personnel can dismantle and repair the modem.
• An operating temperature between -10°C (14°F) and +55°C
(131°F) and a humidity between 5% and 95% are recommended.
RF Exposure Information (SAR)
This device meets the government’s requirements for exposure to
radio waves.
This device is designed and manufactured not to exceed the
emission limits for exposure to radio frequency (RF) energy set by
the Federal Communications Commission of the U.S. Government.
The exposure standard for wireless devices employs a unit of
measurement known as the Specic Absorption Rate, or SAR.
The SAR limit set by the FCC is 1.6 W/kg.
Tests for SAR are conducted using standard operating positions
accepted by the FCC with the device transmitting at its highest
certied power level in all tested frequency bands. Although the
SAR is determined at the highest certied power level, the actual
SAR level of the device while operating can be well below the
maximum value. This is because the device is designed to operate
at multiple power levels so as to use only the power required to
reach the network. In general, the closer you are to a wireless base
station antenna, the lower the power output.
The device was tested according to FCC RF exposure procedures
to address hand and near-body exposure conditions, and the
highest SAR value as reported to the FCC is 1.40 W/kg.
While there may be dierences between the SAR levels of various
devices and at various positions, they all meet the government
requirement.
The FCC has granted an Equipment Authorization for this device
with all reported SAR levels evaluated as in compliance with the
FCC RF exposure guidelines. SAR information on this device is on le
Health and Safety Information
Page 15

27Health and Safety Information26
with the FCC and can be found under the Display Grant section of
www.fcc.gov/oet/ea/fccid aer searching on FCC ID: SRQ-MF861.
This device has been tested and meets the FCC RF exposure
guidelines.
SAR compliance for body operation is based on a separation
distance of 10 mm between the unit and the human body. Carry
this device at least 10 mm (0.4 in.) away from your body to ensure
RF exposure level compliant with or lower than the reported level.
FCC Compliance
This device complies with part 15 of the FCC Rules. Operation is
subject to the following two conditions: (1) This device may not
cause harmful interference, and (2) this device must accept any
interference received, including interference that may cause
undesired operation.
Caution: Changes or modications not expressly approved by
the manufacturer could void the user’s authority to operate the
equipment. This transmitter must not be co-located or operating
in conjunction with any other antenna or transmitter.
This equipment has been tested and found to comply with the
limits for a Class B digital device, pursuant to part 15 of the FCC
Rules. These limits are designed to provide reasonable protection
against harmful interference in a residential installation. This
equipment generates, uses, and can radiate radio frequency
energy and, if not installed and used in accordance with
the instructions, may cause harmful interference to radio
communications. However, there is no guarantee that interference
will not occur in a particular installation. If this equipment does
cause harmful interference to radio or television reception, which
can be determined by turning the equipment o and on, the user
is encouraged to try to correct the interference by one or more
of the following measures:
• Reorient or relocate the receiving antenna.
• Increase the separation between the equipment and receiver.
• Connect the equipment into an outlet on a circuit dierent from
that to which the receiver is connected.
• Consult the dealer or an experienced radio/TV technician
for help.
Health and Safety Information
Page 16

29Warranty28
Warranty
ZTE oers you a limited warranty that the enclosed subscriber
unit and its enclosed accessories will be free from defects in
material and workmanship for a period that expires one year
from the date of sale of the Product to you, provided that you are
the original end user and purchaser of the Product and provided
that your purchase was made from a supplier authorized by the
Seller. Transfer or resale of a Product will automatically terminate
warranty coverage with respect to that Product. This limited
warranty is not transferable to any third party, including but not
limited to any subsequent purchaser or owner of the Product. This
limited warranty is applicable only to end users in the United States.
1. This product is warranted for 12 (twelve) months from date
of purchase.
2. The product will be repaired or replaced free of charge by local
Authorized Service Centers, if, at their sole discretion, it is found
to be faulty within the warranty period.
3. This warranty only applies to products sold and distributed
within countries approved by ZTE and its authorized distributors
and/or retail outlets.
4. This warranty only applies if the product has been used in
accordance with the manufacturer’s instructions under normal
use and with reasonable care.
5. What this warranty does not cover:
a) Defects or damages resulting from the misuse of this
product.
Warranty
b) Defects or damages from abnormal use, abnormal
conditions, improper storage, exposure to moisture,
dampness or corrosive environments, unauthorized
modications, unauthorized repair, neglect, rough handling,
abuse, accident, alteration, improper installation, incorrect
voltage application, food or liquid spillage, acts of God.
c) Normal wear and tear.
d) If the Product has been opened, modied, or repaired
by anyone other than a warranty service center, or if it is
repaired using unauthorized spare parts.
e) If the serial number or mobile accessory date code has been
removed, erased, defaced, altered, or is illegible in any way
subject to sole judgment of ZTE.
Page 17

31WarrantyWarranty30
LIMITED WARRANTY
TO THE EXTENT PERMITTED BY APPLICABLE LAW, THIS LIMITED
WARRANTY IS YOUR SOLE AND EXCLUSIVE REMEDY AGAINST
ZTE AND ZTE’S SOLE AND EXCLUSIVE LIABILITY IN RESPECT OF
DEFECTS IN PRODUCT. HOWEVER, THIS LIMITED WARRANTY
SHALL NOT EXCLUDE NOR LIMIT ANY OF YOUR LEGAL
(STATUTORY) RIGHTS UNDER THE APPLICABLE NATIONAL LAWS.
TO THE EXTENT PERMITTED BY APPLICABLE LAW, ZTE DOES
NOT ASSUME ANY LIABILITY FOR LOSS OF OR DAMAGE TO OR
CORRUPTION OF DATA, FOR ANY LOSS OF PROFIT, LOSS OF USE
OF PRODUCTS OR FUNCTIONALITY, LOSS OF BUSINESS, LOSS
OF REVENUES OR LOSS OF ANTICIPATED PROFIT, INCREASED
COSTS OR EXPENSES, OR FOR ANY INDIRECT, SPECIAL, OR
CONSEQUENTIAL LOSS OR DAMAGE. TO THE EXTENT PERMITTED
BY APPLICABLE LAW, ZTE’S LIABILITY SHALL BE LIMITED TO THE
PURCHASE VALUE OF THE PRODUCT.
THE ABOVE LIMITATIONS SHALL NOT APPLY TO DEATH OR
PERSONAL INJURY CAUSED BY DEFECT OF PRODUCT IN MATERIAL,
DESIGN, AND WORKMANSHIP.
How to Get Warranty Service
To obtain warranty service, please call (877) 817-1759. Please have
the following information available when you send the device in
for repair:
• A valid Proof of Purchase
• Return address
• Daytime phone number or fax number
• Model number
• IMEI number
• Complete description of the problem
• Transportation prepaid
Other Warranty Programs
You may have other warranty programs with your purchase, such
as warranty exchange. If so, please refer to equipment package or
the original point of sale.
Page 18

32
Page 19

 Loading...