

Page 1
User Guide
AT&T Velocity® 2
Page 2

Copyright © 2018 ZTE CORPORATION.
All rights reserved.
No part of this publication may be excerpted, reproduced,
translated or utilized in any form or by any means, electronic or
mechanical, including photocopying and microlm, without the
prior written permission of ZTE Corporation.
The manual is published by ZTE Corporation. We reserve the right
to make modications on print errors or update specications
without prior notice.
microSDXC is a trademark of SD-3C, LLC.
Version No. : V1.0
Edition Time: January 2018
Page 3

i
CONTENTS
Get Started ............................................................1
Know Your Velocity 2 ................................................1
Manage Your Device and Settings .................................6
Connect to the Internet ............................................9
Guest Wi-Fi® ........................................................13
Use Your Velocity 2 ...................................................15
Security Credentials. . . . . . . . . . . . . . . . . . . . . . . . . . . . . . . . . . . . . . . . . . . . . . . .15
View Your Data Usage .............................................16
Manage Wi-Fi .......................................................17
Messages ..........................................................22
File Sharing ........................................................ 23
Battery ............................................................. 27
Security ............................................................30
Congure International Data Roaming ..........................34
View Details ........................................................ 34
Soware Update .................................................. 35
Replace the SIM Card ..............................................37
Reset Your Velocity 2 ..............................................38
Advanced Settings ..................................................39
Set Wi-Fi Network Options .......................................39
View Network Information .......................................40
Enable Port Forwarding ...........................................40
Contents
Page 4

ii
CONTENTS
Enable MAC/IP/Port Filtering ......................................41
Enable DMZ ........................................................ 42
Enable VPN Passthrough .........................................42
Congure APN Details ............................................43
Set Router Options ...............................................44
Troubleshooting .....................................................45
Specications ........................................................47
Mechanical Specications ........................................47
Supported RF Bands ..............................................47
Health and Safety Information ....................................48
FCC Regulations ...................................................49
RF Exposure Information (SAR) ..................................50
Distraction ..........................................................51
Electrical Safety ................................................... 53
Interference ....................................................... 53
Warranty ............................................................. 55
Limited Warranty .................................................. 56
How to Get Warranty Service .................................... 57
Other Warranty Programs ........................................ 57
Page 5

1
GET STARTED
Get Started
This chapter provides an overview of the features of your AT&T
Velocity 2 and instructions for setting up your mobile hotspot and
connecting to the internet.
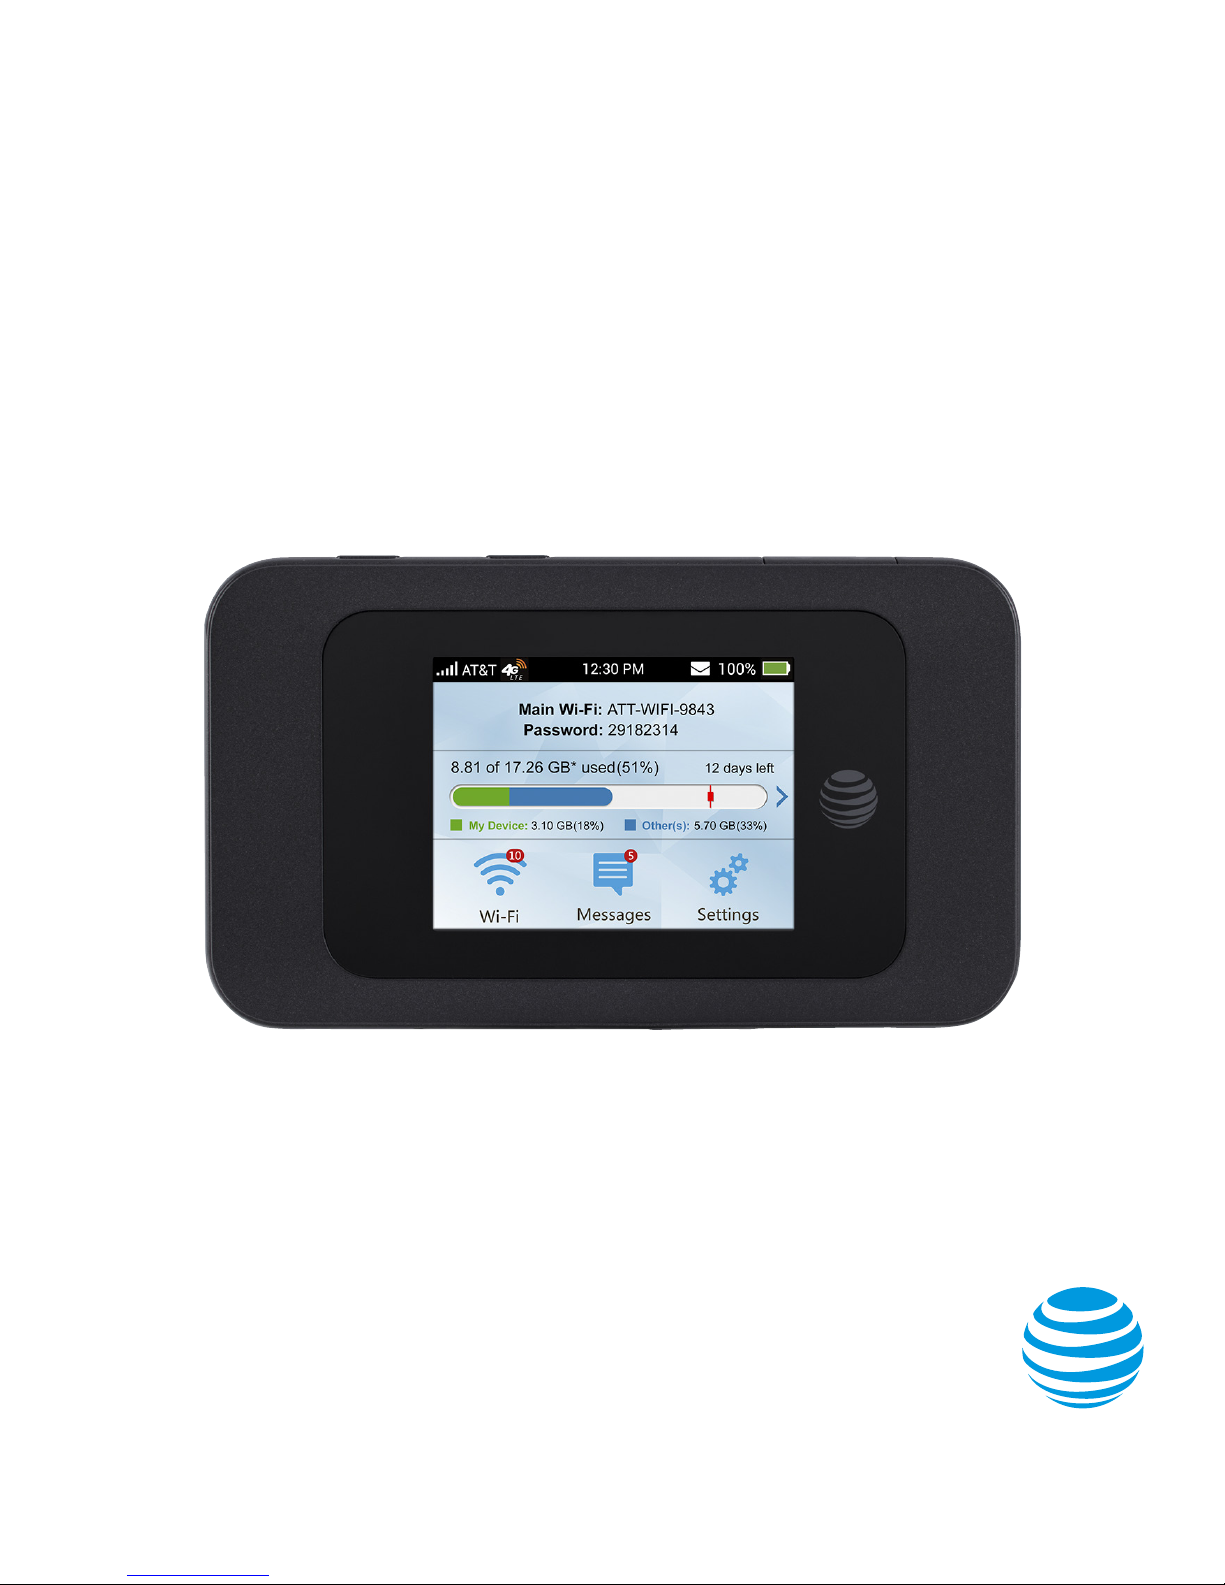
Know Your Velocity 2
Your Velocity 2 enables you to create a Wi-Fi network anywhere
there is cellular network coverage. You can use that network to
connect your laptop and other Wi-Fi capable devices to your service
provider’s mobile broadband network, enabling them to connect to
the internet. You can also provide wired internet access for a laptop
by connecting it to your Velocity 2 using the USB Type-C™ cable.
Additional features include:
• Touch screen LCD interface – Congure basic Wi-Fi and display
settings, view data usage details, view system and network
provider messages, and more.
• Wi-Fi Protected Setup (WPS) – A fast, easy way to connect
WPS-enabled devices to your Wi-Fi network.
• Guest Wi-Fi – Enable the Guest Wi-Fi network for temporary
users, so you can reserve the Main Wi-Fi network for trusted
devices.
Power On or Wake Your Velocity 2
Press and hold the Power button for 2 seconds to power your
Velocity 2 on or o. Press the Power button to wake up your
Velocity 2 when the screen is inactive.
Page 6
2
GET STARTED
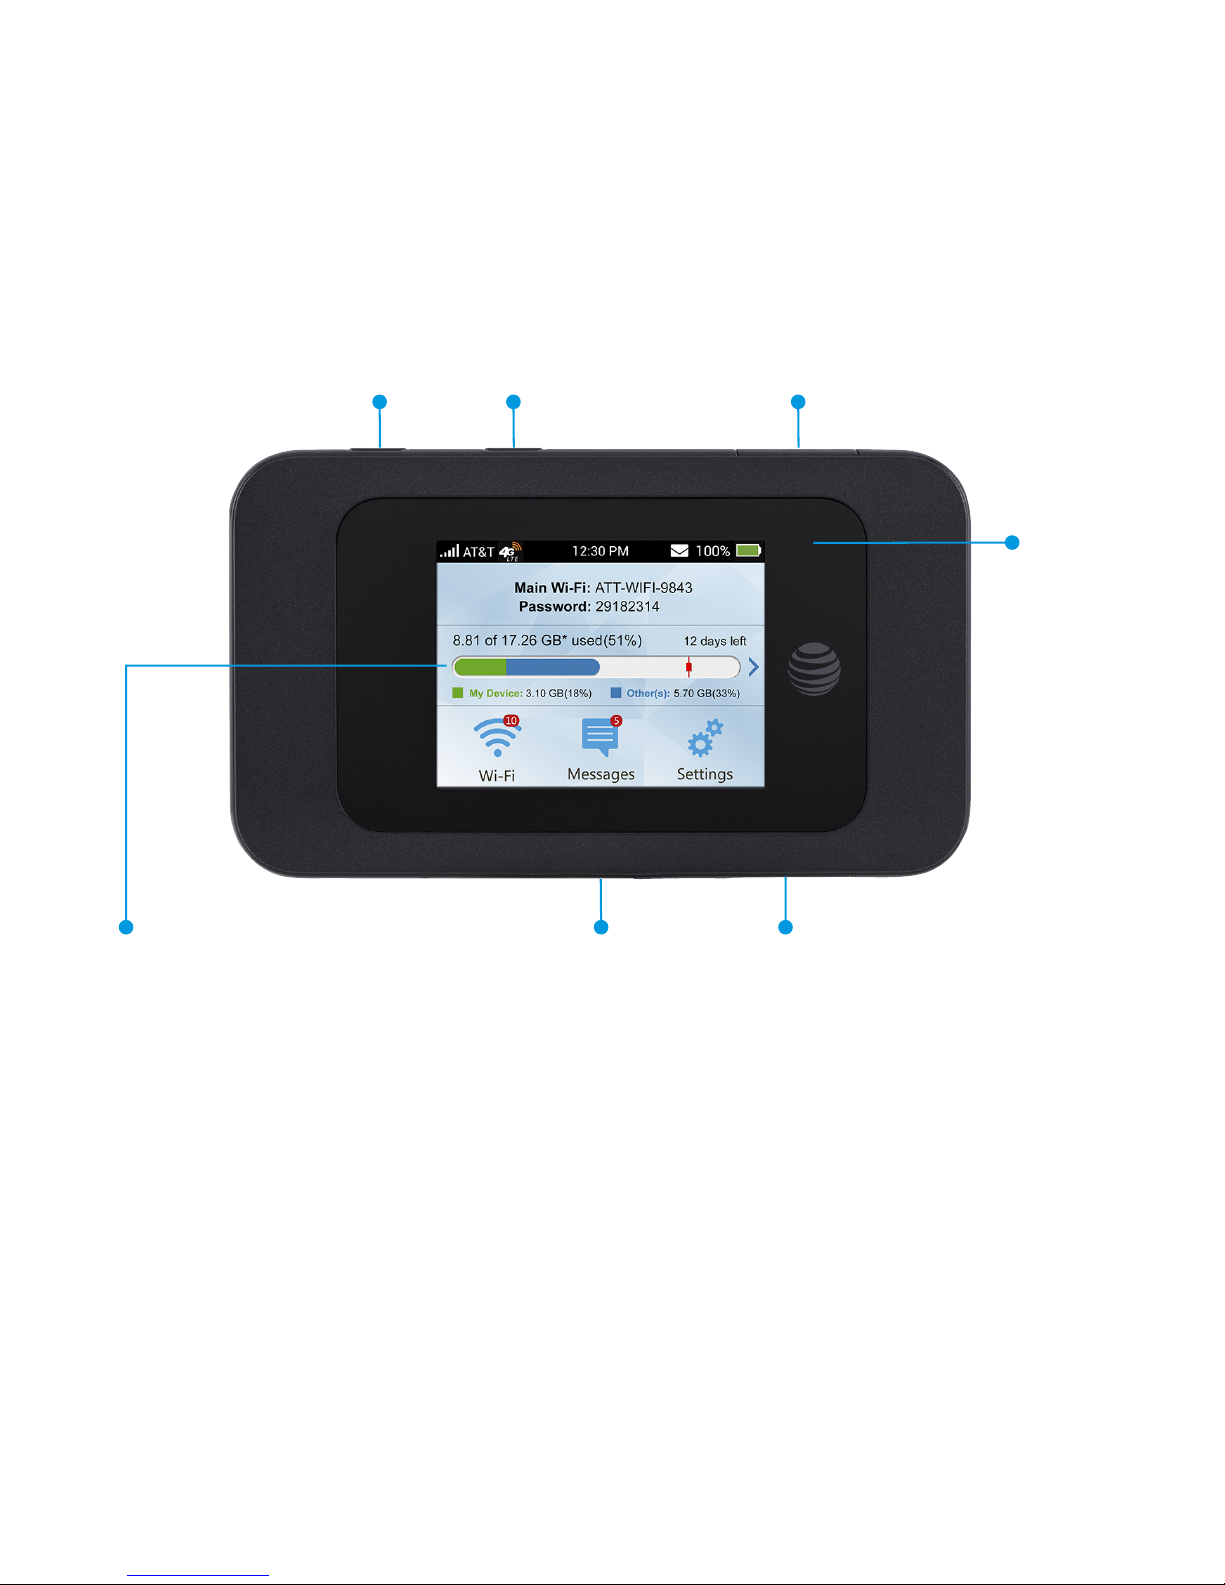
External antenna
connector
WPS button Power button
USB Type-C
charging port
Touch screen
Nano-SIM/microSDXC™
card slot
Status
indicator
light
Page 7

3
GET STARTED
Status Indicator Light
The color and behavior of the light indicates the device's current
status regarding network connection, nano-SIM card, soware
updates, and more.
Color Status Meaning
Green Blinking
New message notication
Soware update notication
Data usage notication
Solid
Battery fully charged
Red Blinking Low battery
No SIM card
SIM lock enabled
SIM PIN/PUK enabled
Searching for network
No service
Limited service
Solid Charging
Page 8
4
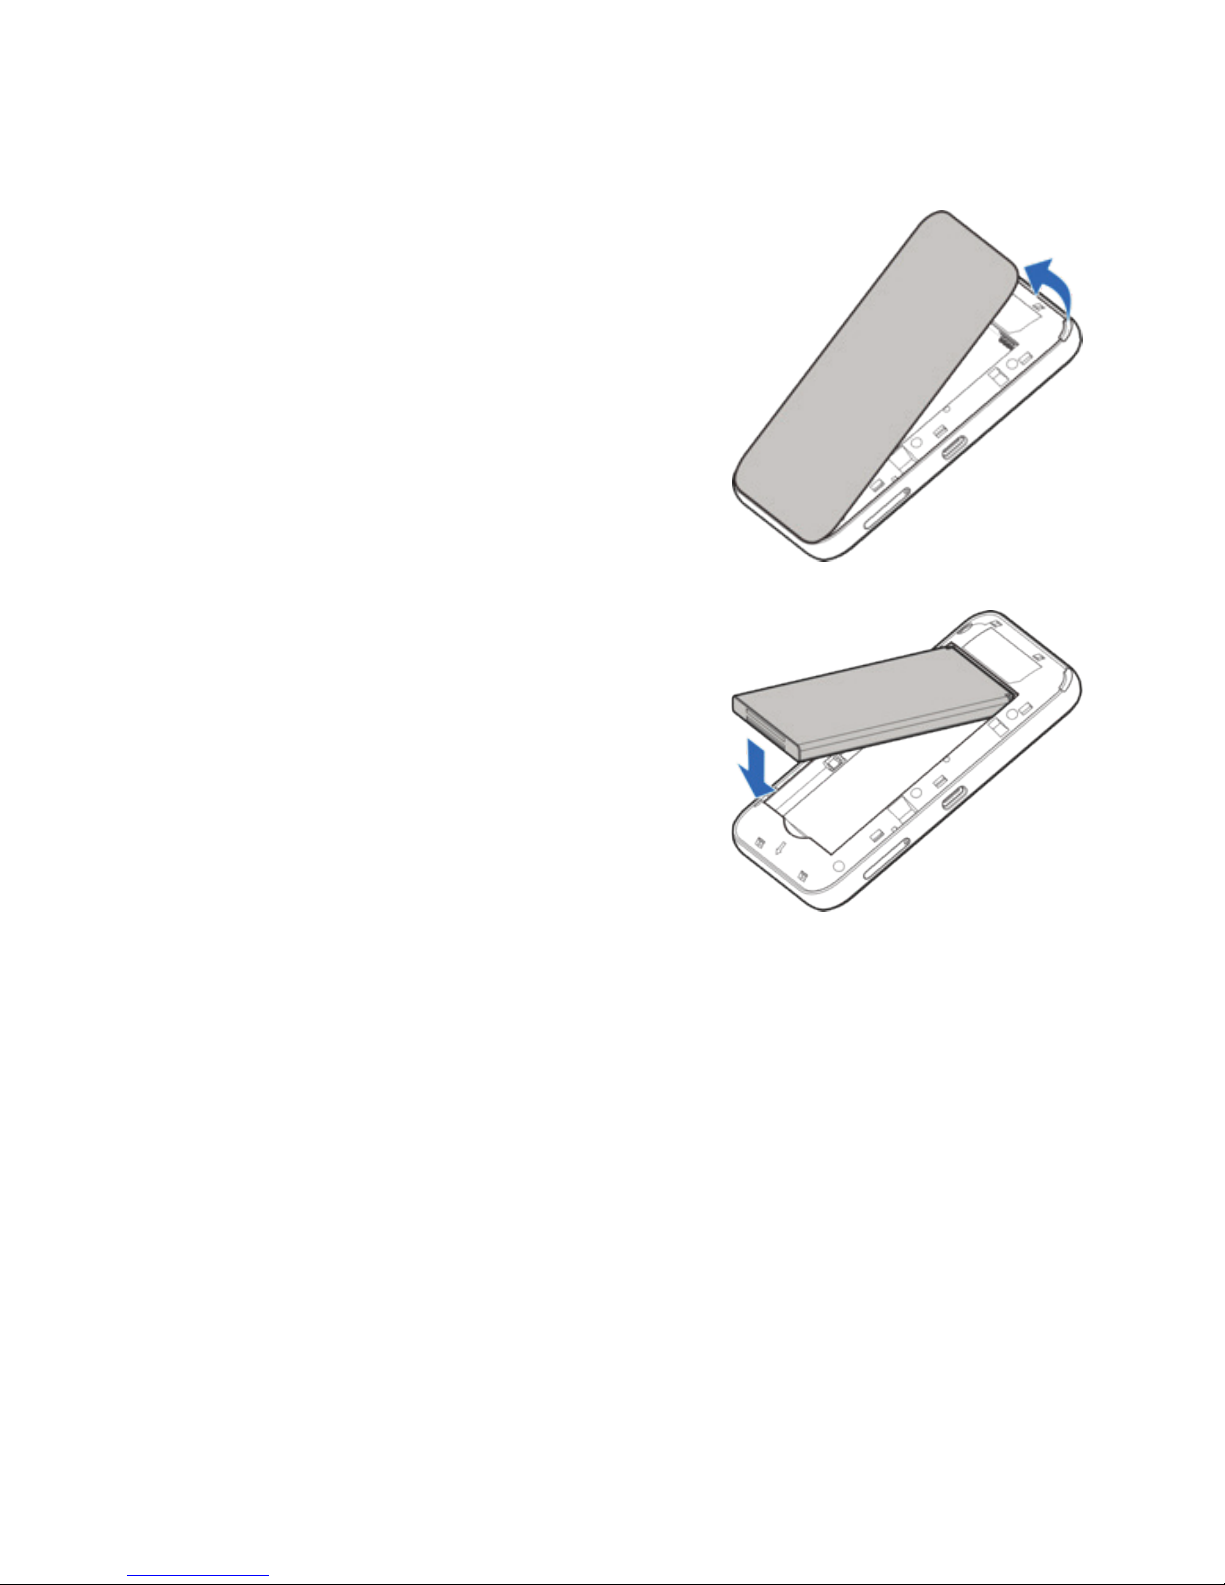
Install the Battery
1. Remove the back cover.
2. Insert the battery as shown.
Align the contacts with the
metal springs. Press the
battery down into the case.
3. Replace the back cover.
Note: The battery is precharged and
ready to use. To recharge it, see
Recharge the Battery on page 29.
GET STARTED
Page 9
5
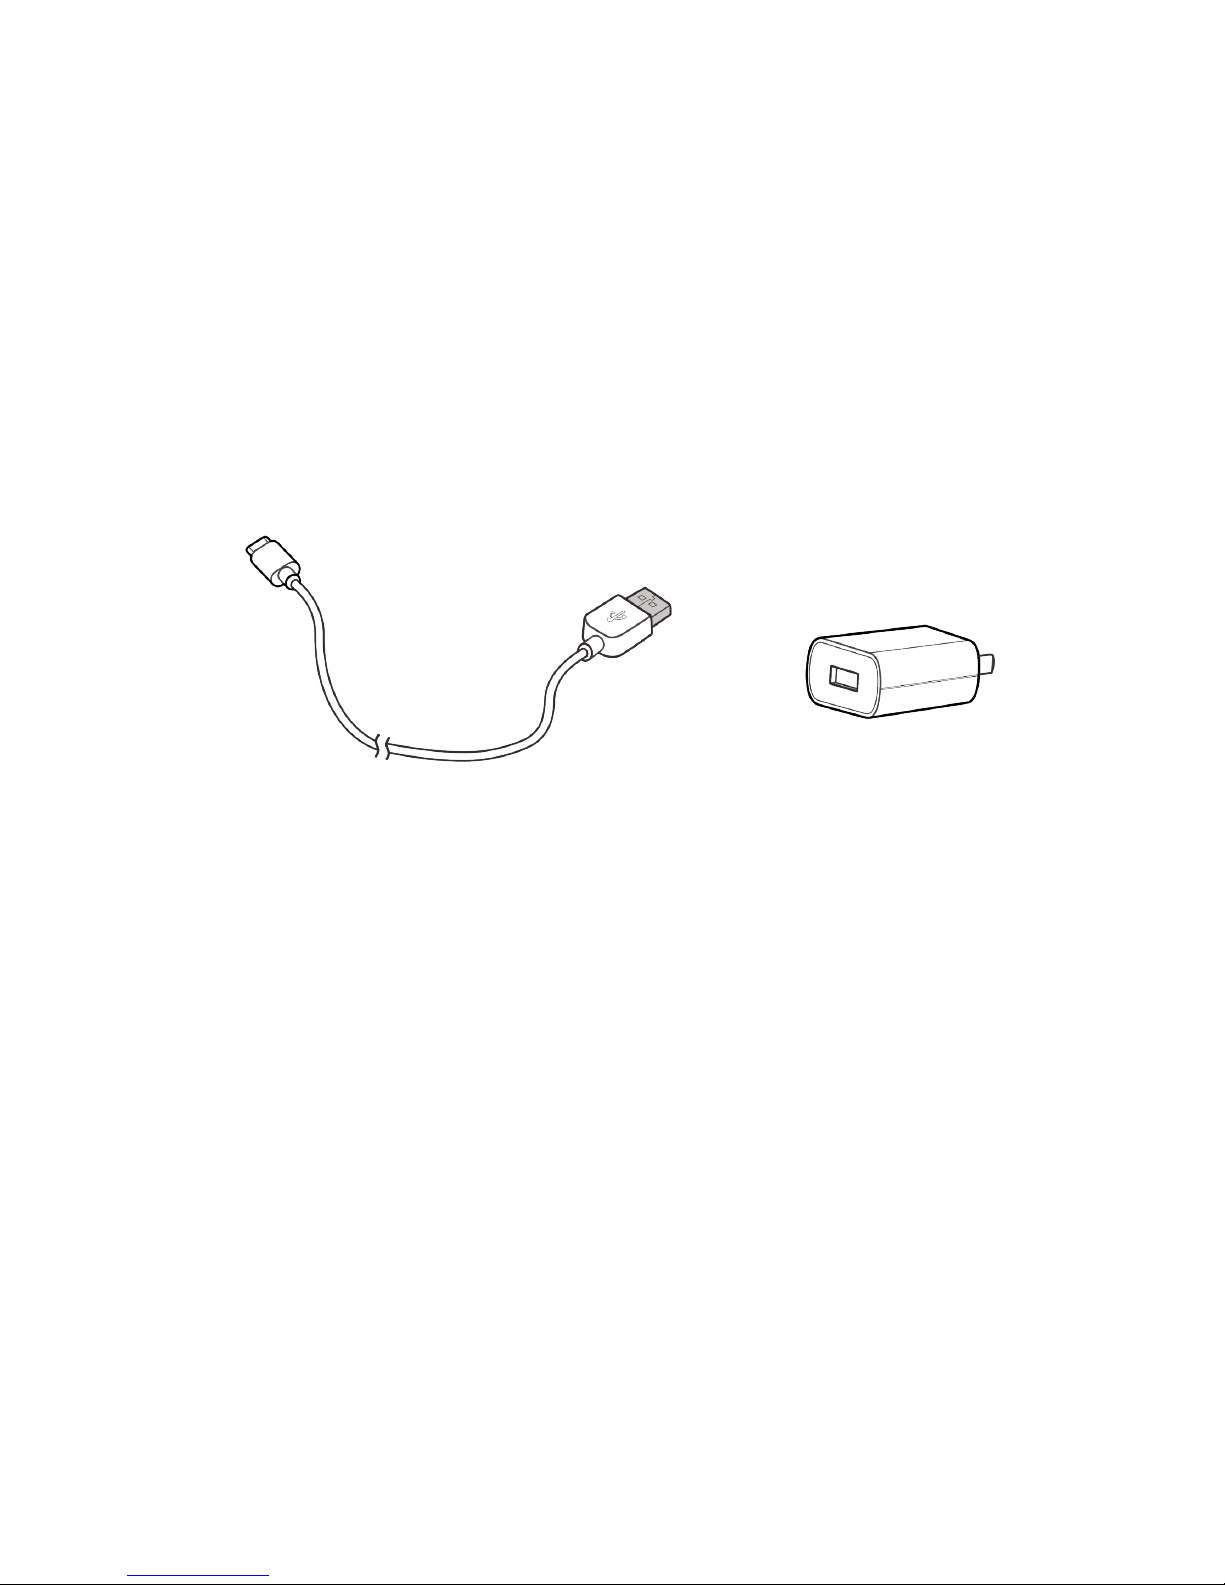
Accessories
• USB Type-C cable – Connect to your Velocity 2 to recharge the
battery or to provide a wired connection to your computer for
internet access or le sharing.
• Wall charger – Connect to your Velocity 2 using the USB Type-C
cable to recharge the battery or to provide power from a
wall outlet.
USB Type-C cable Wall charger
GET STARTED
Page 10
Manage Your Device and Settings
There are two interface options for managing your Velocity 2
device and settings: the touch screen and the browser-based
AT&T Wi-Fi Manager.
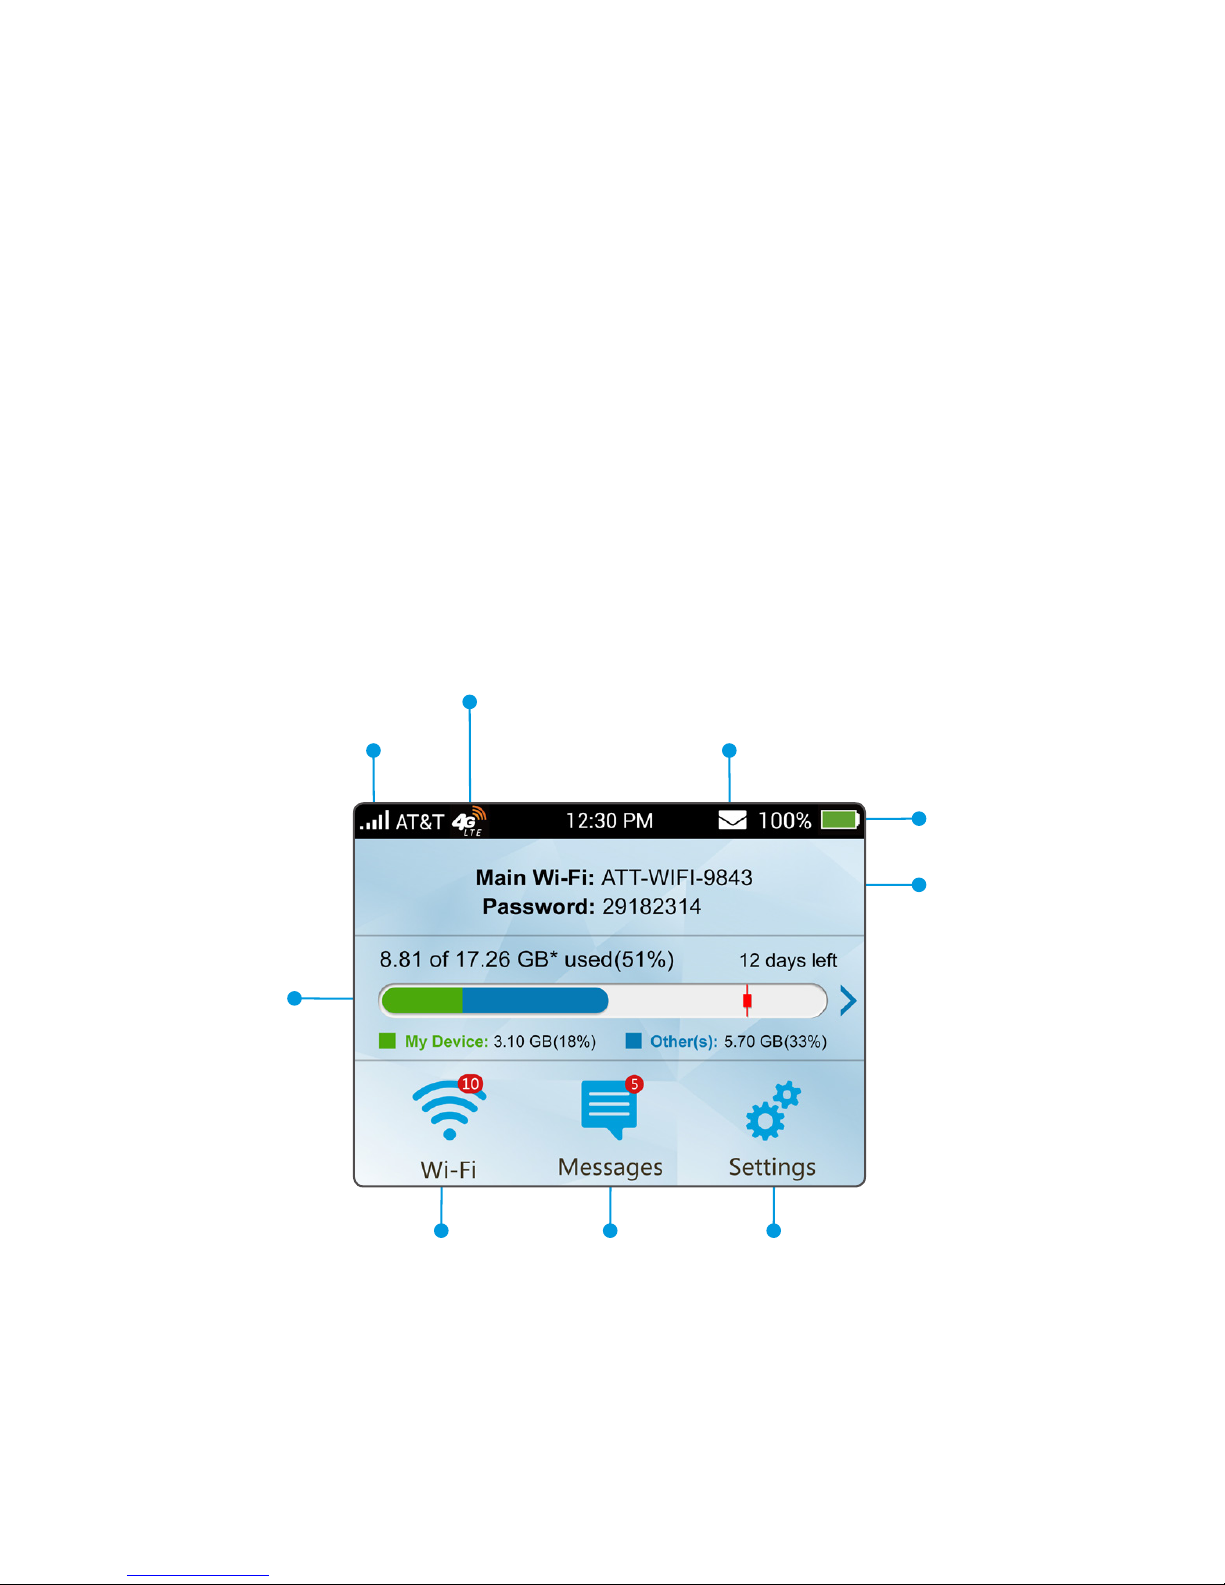
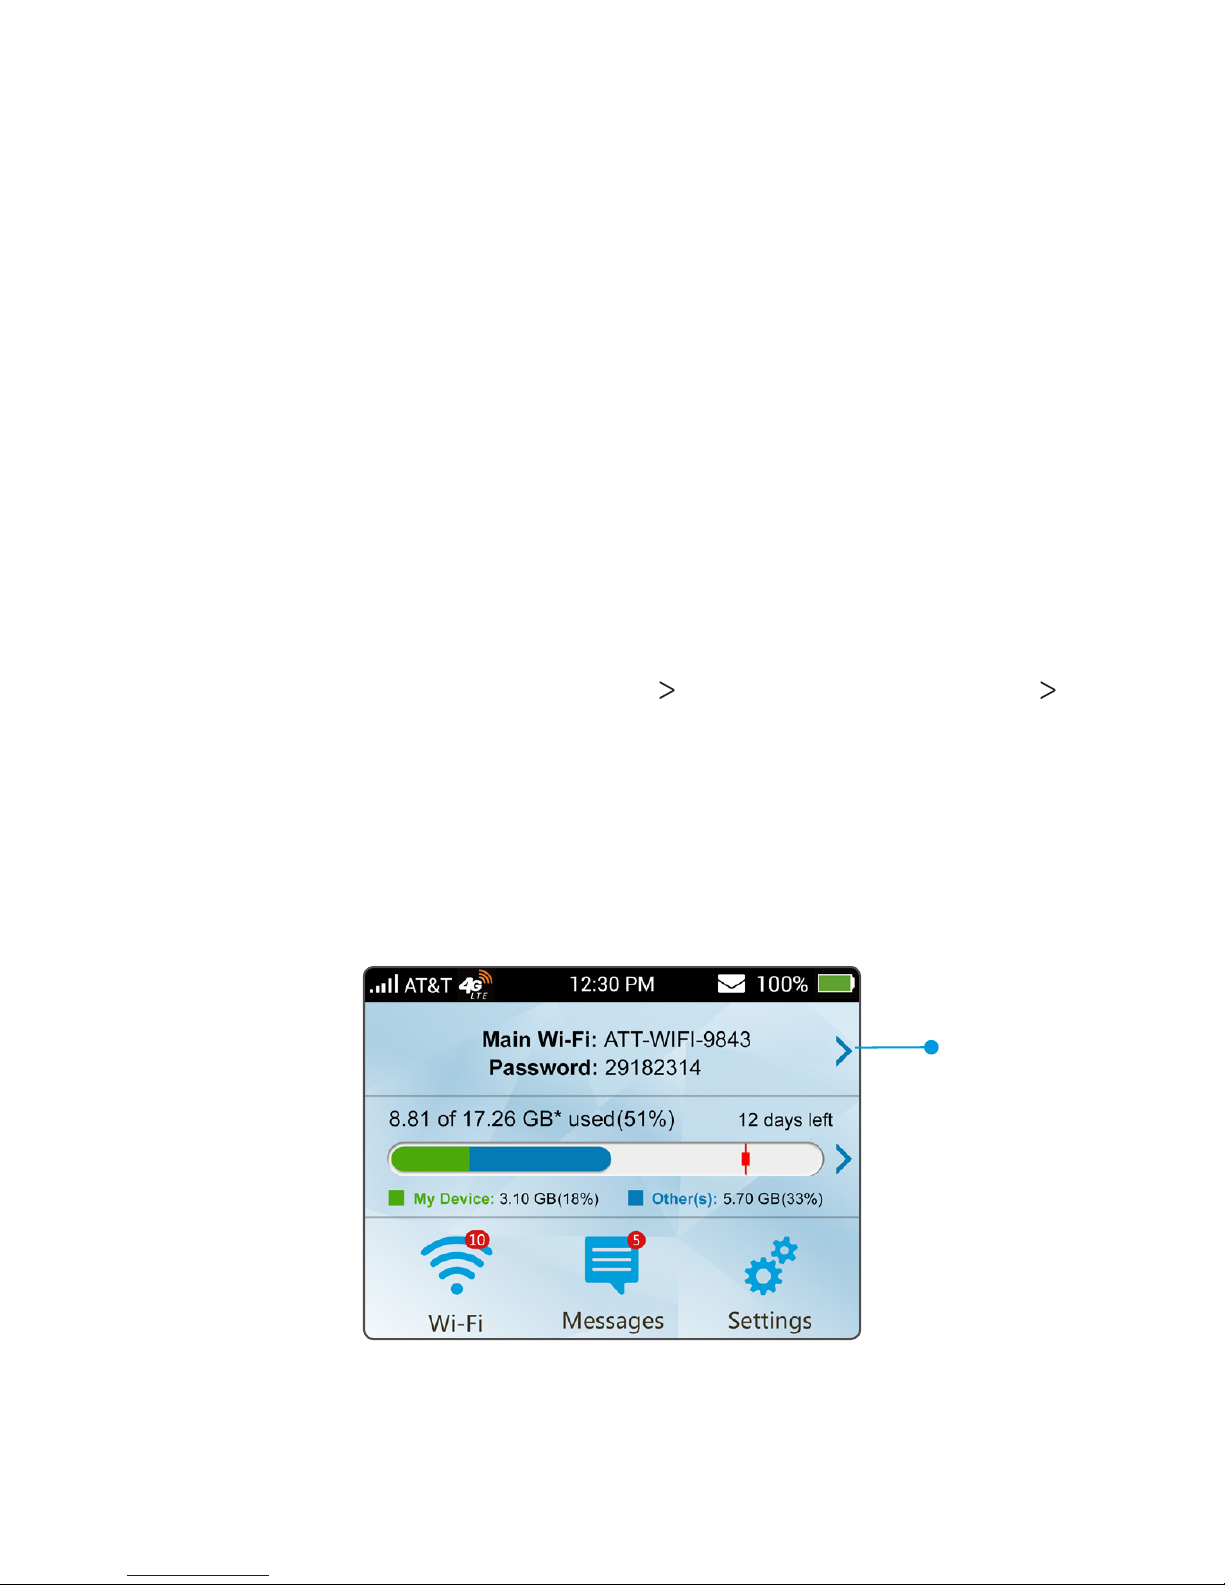
Touch Screen
Icons on the touch screen’s top row indicate the status of the
mobile hotspot, and several screen elements can be tapped or
swiped to congure Wi-Fi and device settings, view data usage
details, and view carrier messages.
6
GET STARTED
Tap for WPS,
Guest Wi-Fi, and
other options
Signal strength
Network indicator
New message
Battery
Tap to view
messages
Tap to change display
and adjust other settings
Tap for
usage
details
Main Wi-Fi
network
name and
password
Page 11
7
GET STARTED
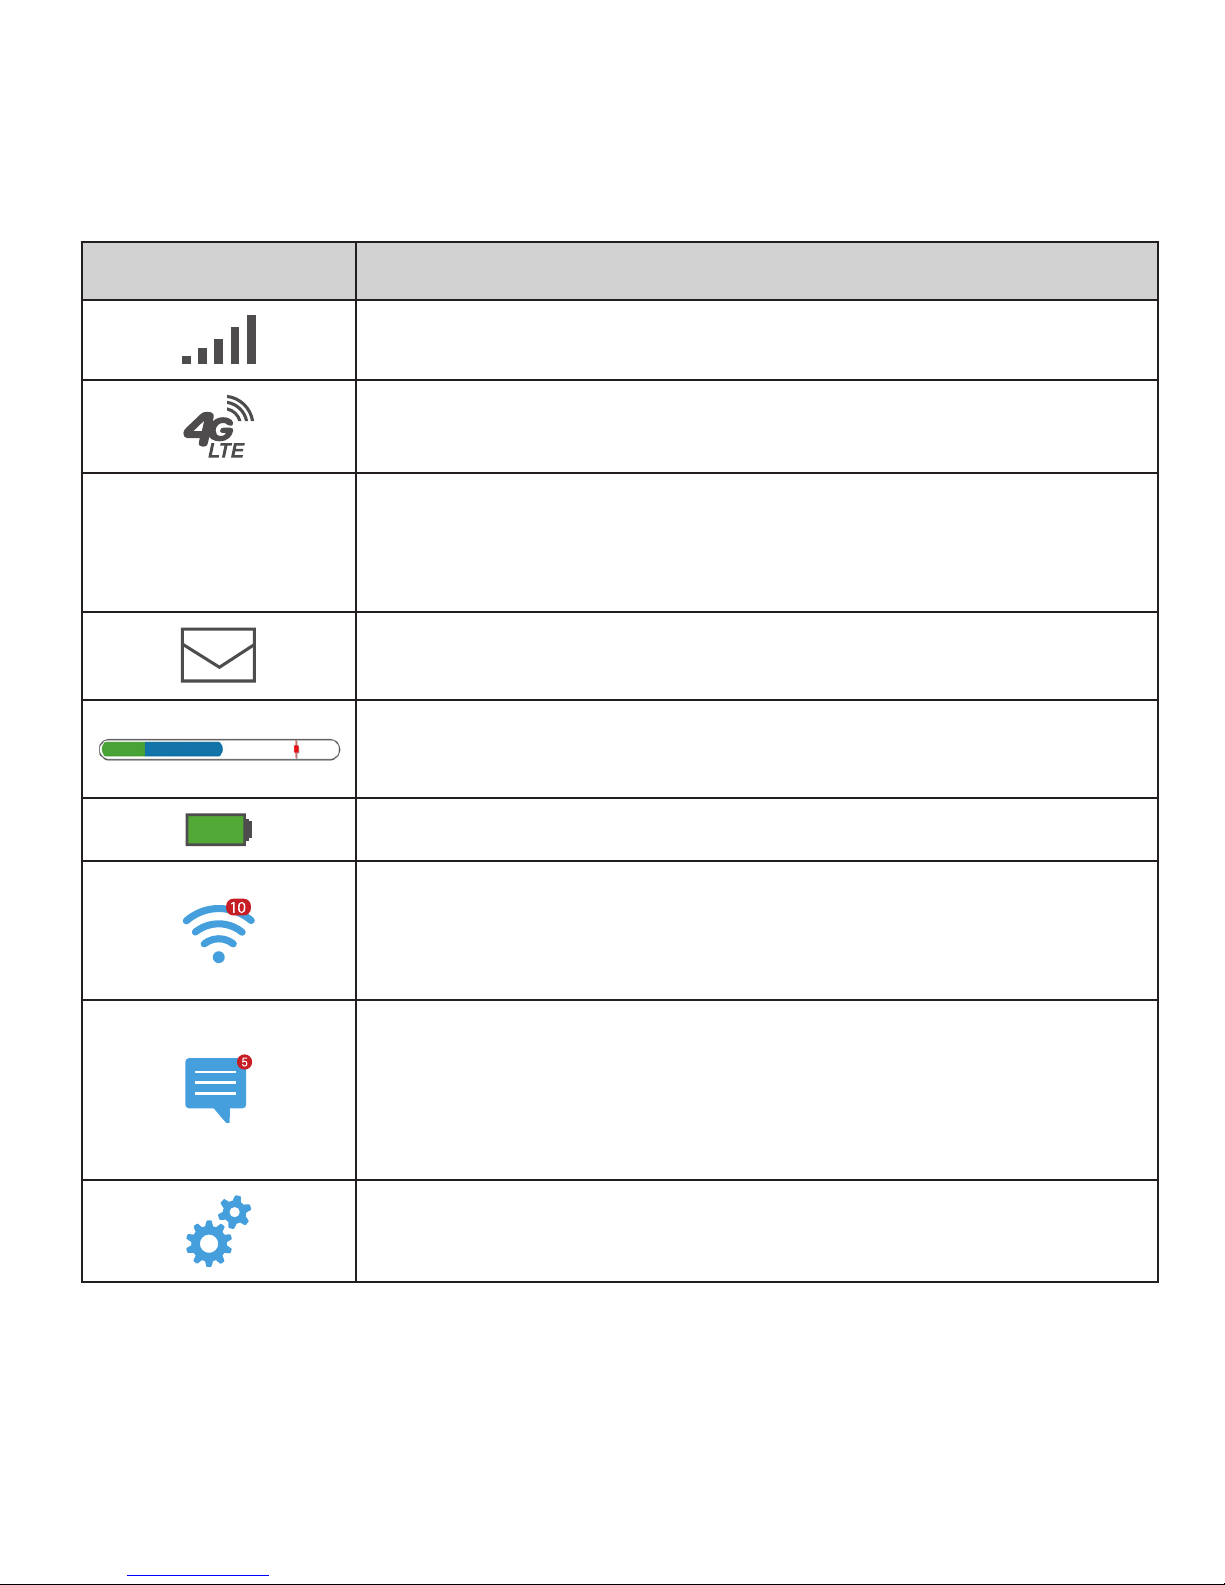
Touch Screen: Home Screen Elements
Icon Indication
Network signal strength
Network type
Main Wi-Fi:
Password:
Network name and password. Wi-Fi capable
devices can connect to the mobile hotspot
using this information.
New system or network provider message(s).
Data usage for current billing period. Tap to
view detailed information.
Battery power level
Wi-Fi:
Number indicates currently connected devices.
Tap to congure basic Wi-Fi settings.
Messages:
Number indicates unread system or network
provider message(s).
Tap to view message(s).
Settings:
Tap to congure basic device settings.
Page 12
8
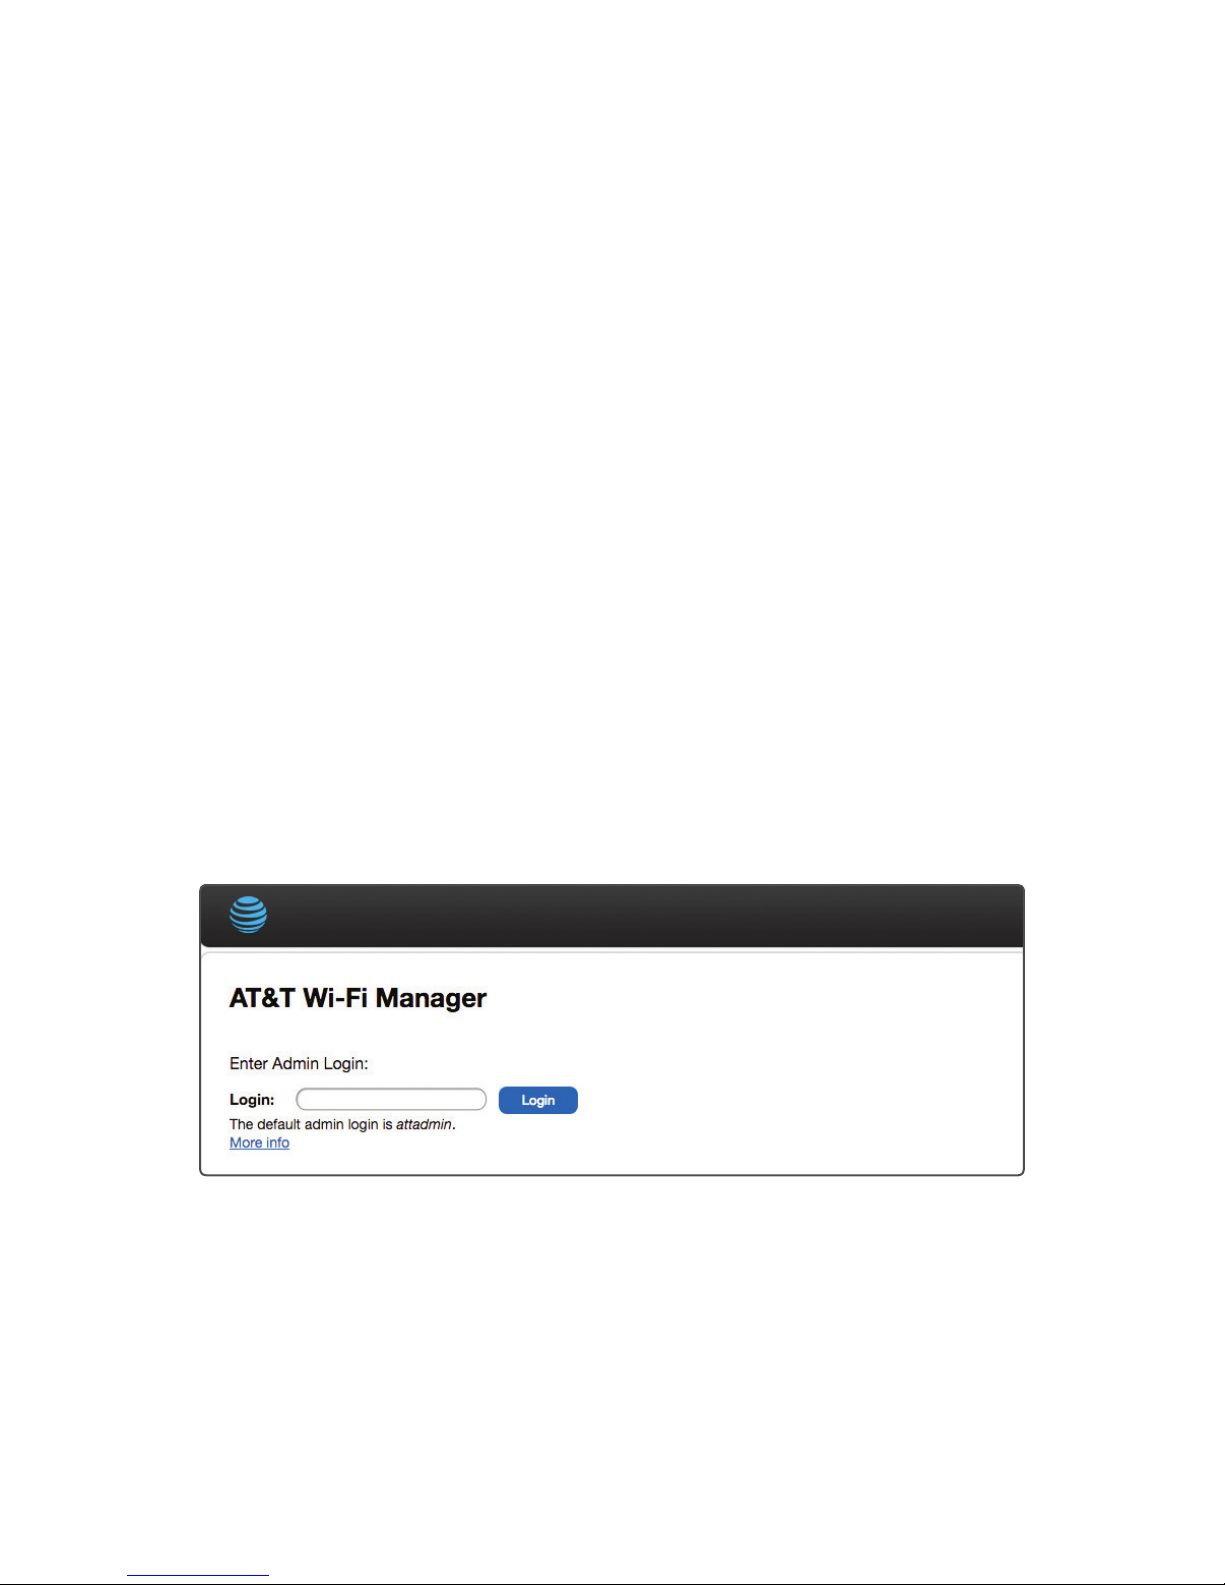
AT&T Wi-Fi Manager
The AT&T Wi-Fi Manager is a browser-based user interface for
conguring basic and advanced settings for your Velocity 2.
To use the AT&T Wi-Fi Manager:
1. Open a browser on a connected device. In the address bar, enter
http://attwimanager or http://192.168.1.1.
2. Enter the login. (The default login is attadmin.)
3. Click Login.
Note: When you log in using the default “attadmin”, you will be
prompted to create a new, unique login. Create a new login as soon
as possible, and be sure to record it in a safe place. If you forget it,
you will need to reset your Velocity 2 to factory default settings to
restore the default login. (See Reset Your Velocity 2 on page 38.)
GET STARTED
Page 13

9
Connect to the Internet
You can connect up to 10 wireless devices, such as smartphones,
laptops, tablets, digital cameras, printers, gaming consoles, and
digital picture frames, to your mobile hotspot’s Wi-Fi network(s).
(See Set Maximum Number of Connected Devices on page 18 for
instructions on setting connections for the Main Wi-Fi and Guest
Wi-Fi networks.)
To connect a wireless device, you can manually enter the password,
or you can use WPS to connect a WPS-enabled device without the
need for a password. (See Connect a WPS-Enabled Wireless Device
on page 10.)
Note: You can also connect a single device directly to your
Velocity 2 using the USB Type-C cable.
Connect Wireless Devices to Your Mobile Hotspot
1. Power on your Velocity 2 by pressing and holding the Power
button for 2 seconds, until the screen turns on.
Your Velocity 2 will automatically search for and connect to your
network provider’s mobile broadband network.
2. Connect your computer or other wireless device(s) to
your network. (Steps may vary by device.)
a) On the home screen of your Velocity 2, locate the Main Wi-Fi
network name and password.
GET STARTED
Page 14
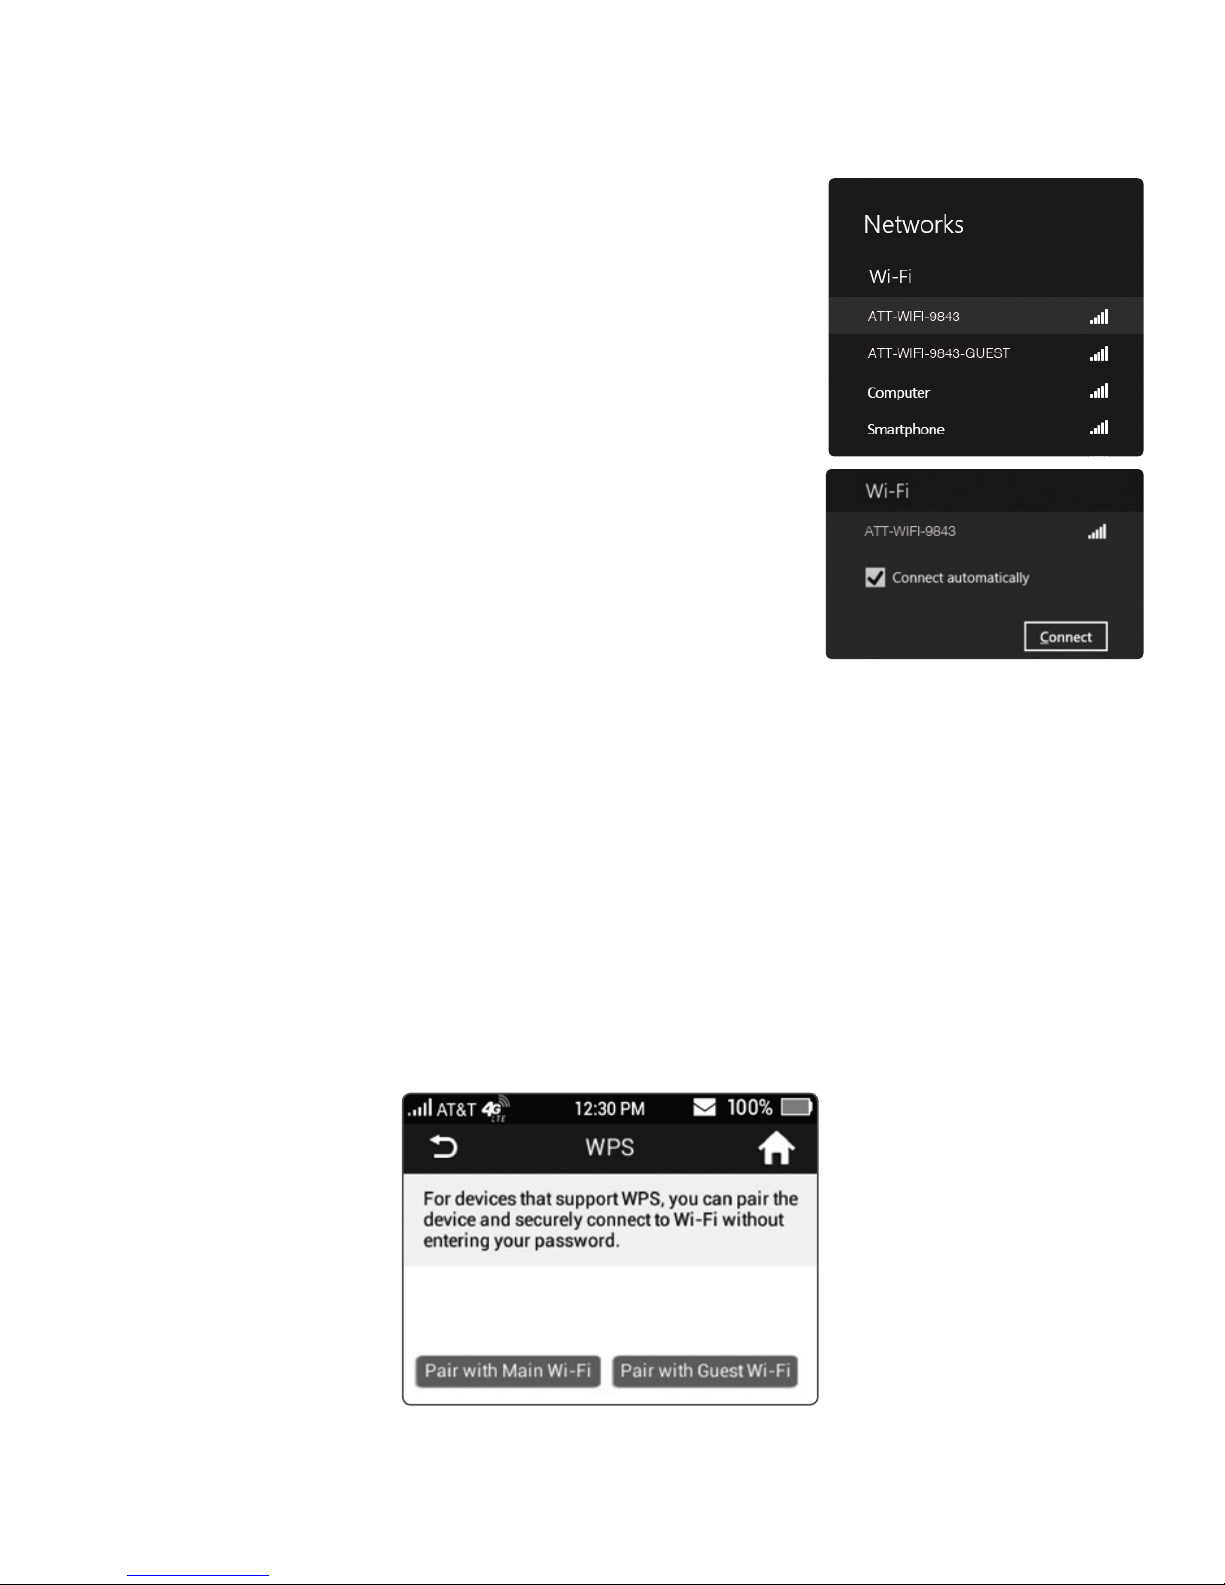
b) On the wireless device you wish to
connect, view the list of available
Wi-Fi networks. Locate and select
your hotspot's network name
(e.g., ATT-WIFI-XXXX).
c) Click Connect or Join.
d) Input the password for the network.
(Refer to the home screen of your
Velocity 2 for this password.) If needed,
select Next.
3. Launch your browser.
Connect a WPS-Enabled Wireless Device
You can connect WPS-enabled devices to your mobile hotspot
without the need to manually enter a password.
From your AT&T Velocity 2:
1. Press and hold the WPS button on your Velocity 2.
2. On the touch screen, tap Pair with Main Wi-Fi or (if Guest Wi-Fi
is enabled) Pair with Guest Wi-Fi.
10
GET STARTED
Page 15

3. On the wireless device you wish to connect, press the
WPS button.
4. On the Velocity 2 touch screen, tap OK.
Your mobile hotspot and the wireless device will communicate and
establish the connection.
Note: You can also initiate a WPS connection from the Velocity 2
touch screen without pressing the button. From the home screen,
tap Wi-Fi Main Wi-Fi Network or Guest Wi-Fi Network WPS
Pair with Main Wi-Fi or Pair with Guest Wi-Fi.
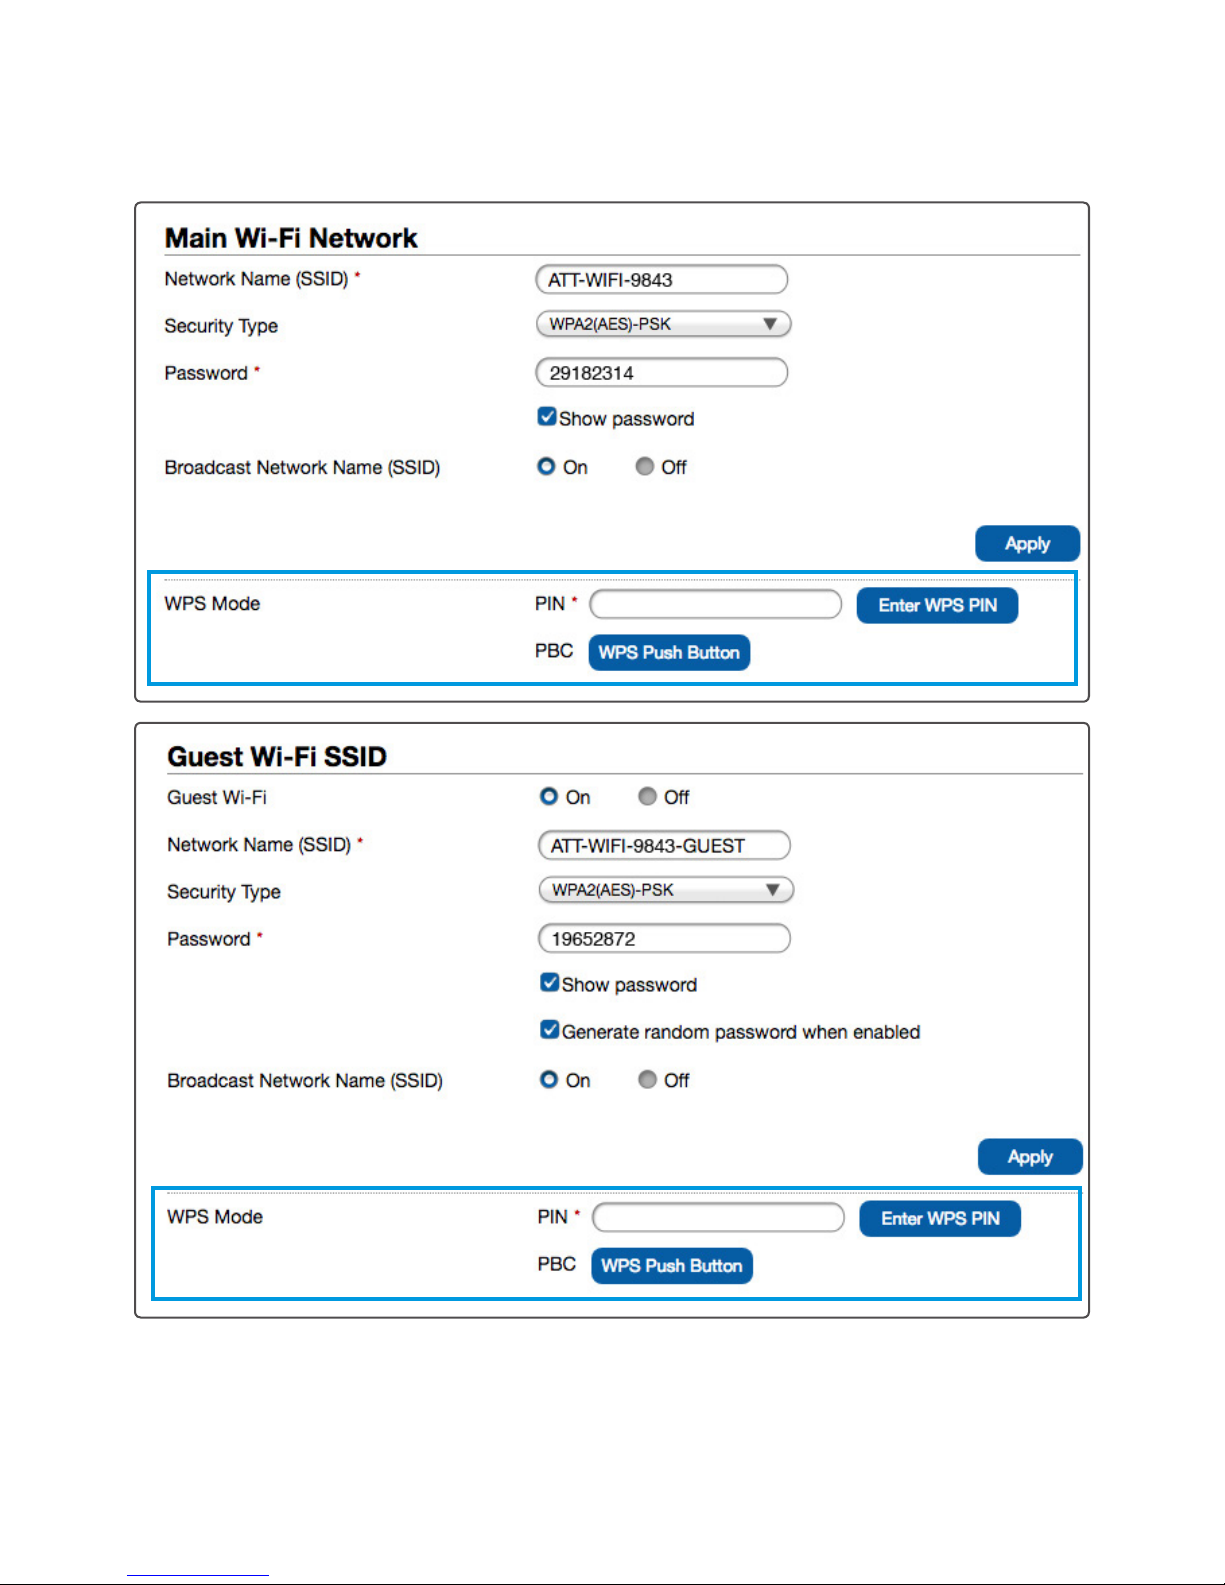
From the AT&T Wi-Fi Manager:
1. On a connected device, log in to the AT&T Wi-Fi Manager.
(See AT&T Wi-Fi Manager on page 8.)
2. Click Settings in the navigation menu.
3. Click Wi-Fi Basic.
4. Under either Main Wi-Fi Network or (if Guest Wi-Fi is enabled)
Guest Wi-Fi SSID, locate the WPS Mode section.
5. Choose a WPS connection method:
• If the wireless device you want to connect has a WPS button,
click WPS Push Button, and then within 2 minutes, press the
wireless device's WPS button.
• If the device you want to connect has a WPS PIN associated
with it, click the PIN eld and enter the device's PIN. Click
Enter WPS PIN. Your mobile hotspot and the wireless device
will communicate and establish the connection.
11
GET STARTED
Page 16
12
GET STARTED
Page 17
Guest Wi-Fi
You can provide one-time access to your mobile hotspot with
a second (Guest) network and password. You can enable the
Guest Wi-Fi network on the Velocity 2 touch screen or on the
AT&T Wi-Fi Manager.
Note: The Guest Wi-Fi network is turned o when your Velocity 2
is restarted.
Enable Guest Wi-Fi
On the touch screen:
1. From the home screen, tap Wi-Fi Guest Wi-Fi Network
Turn On.
2. Tap OK. The current (default) Guest Wi-Fi network name and
password appear.
3. Now users can connect using the Guest Wi-Fi network name
and password.
13
Tap to view
Guest Wi-Fi
network
name and
password
GET STARTED
Page 18
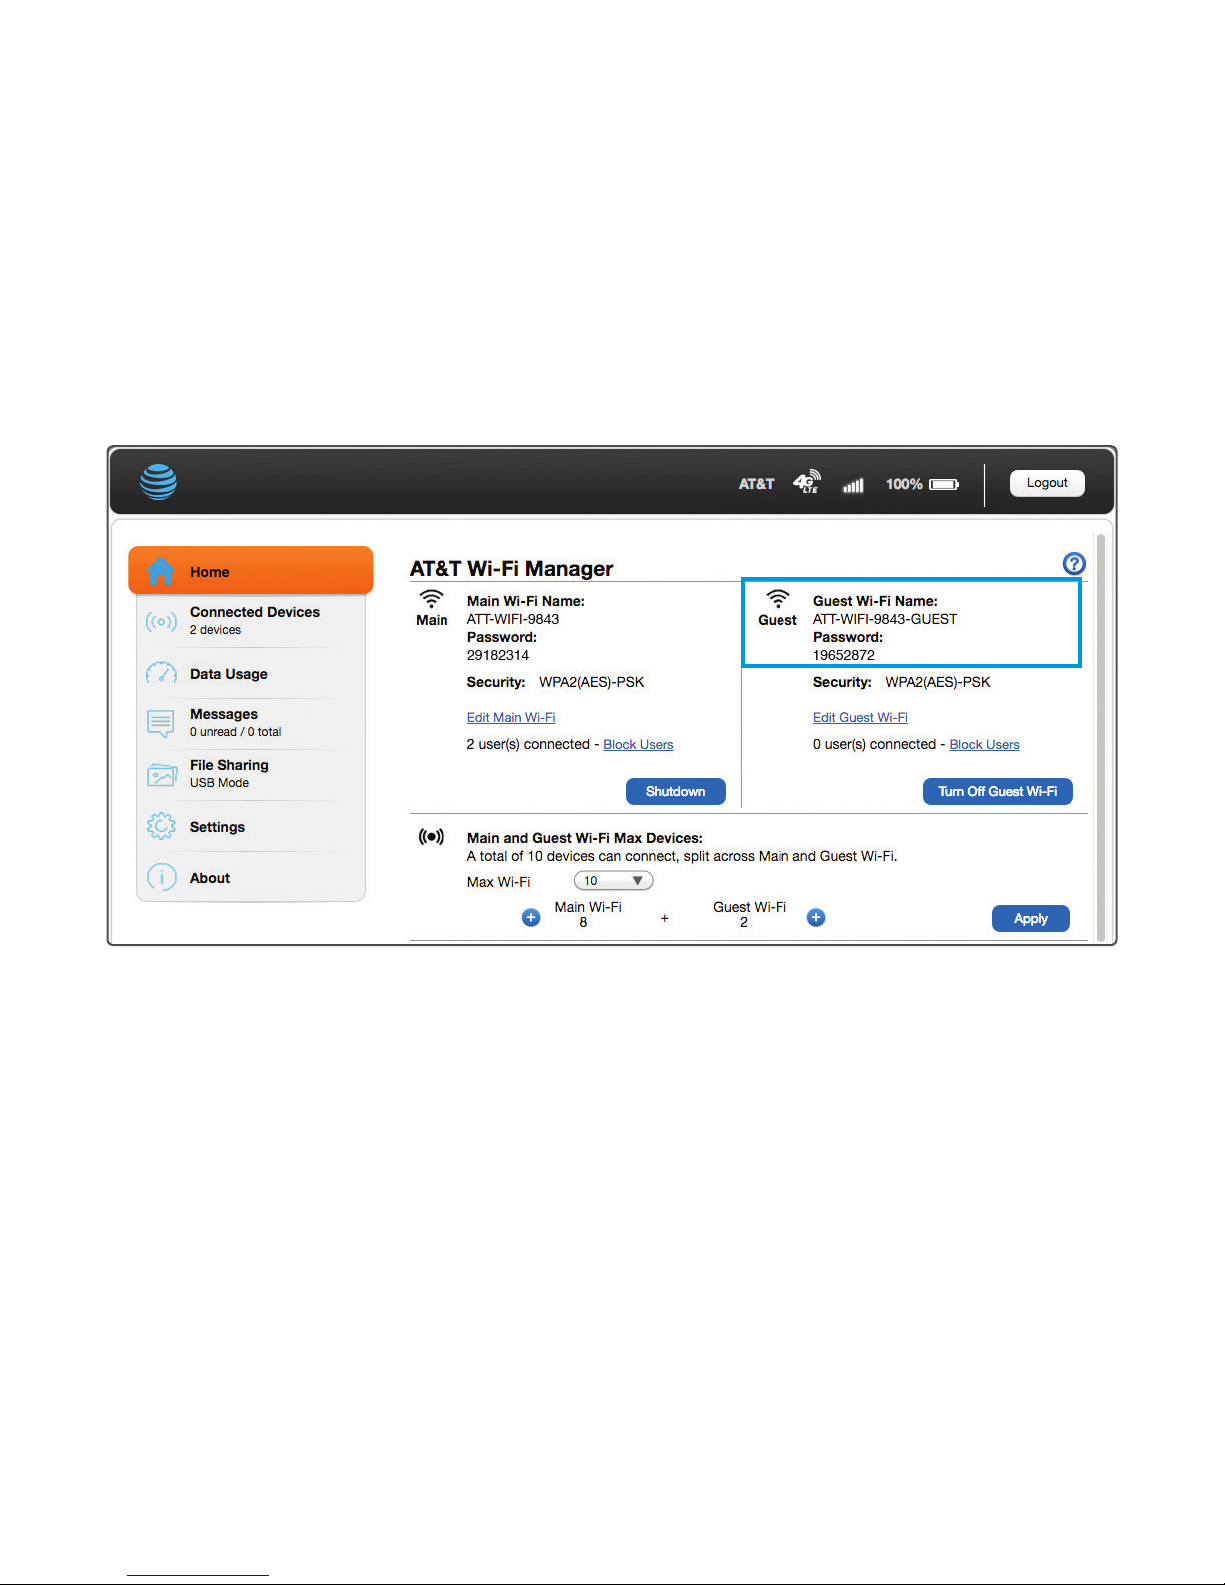
On the AT&T Wi-Fi Manager:
1. Log in, and click Home in the navigation menu.
2. Click Turn On Guest Wi-Fi.
3. Now users can connect using the Guest Wi-Fi network name
and password.
14
GET STARTED
Page 19

Use Your Velocity 2
This chapter describes the basics of using and managing your
Velocity 2 and its Wi-Fi network(s). It includes instructions for using
the touch screen and the browser-based AT&T Wi-Fi Manager.
Security Credentials
Connecting to and managing your Velocity 2 and its Wi-Fi
network(s) involves three dierent passwords:
• Main Wi-Fi network password – Enter this password when
connecting a wireless device to your mobile hotspot's Main Wi-Fi
network. The default password is unique to your Velocity 2. The
current password for the Main Wi-Fi network appears on the
Velocity 2 home screen. (The default password is also printed on
a label on the back of your Velocity 2.)
• Guest Wi-Fi network password – When the Guest Wi-Fi
network is enabled, temporary users can use this password
to access it.
Note: To change the password for the Main Wi-Fi or Guest
Wi-Fi network, see Change Wi-Fi Network Name or Password
on page 30.
• AT&T Wi-Fi Manager administrator login – Use this password
to access the AT&T Wi-Fi Manager through a web browser on
a connected device. You must be logged in to the AT&T Wi-Fi
Manager to use features and make changes to your mobile
hotspot's settings.
The default administrator login is attadmin. The login can be
changed. You will be prompted to change it when you log in
using the default. The new login must be 4-32 characters.
(See Change AT&T Wi-Fi Manager Access Settings on page 31.)
15
USE YOUR VELOCITY 2
Page 20
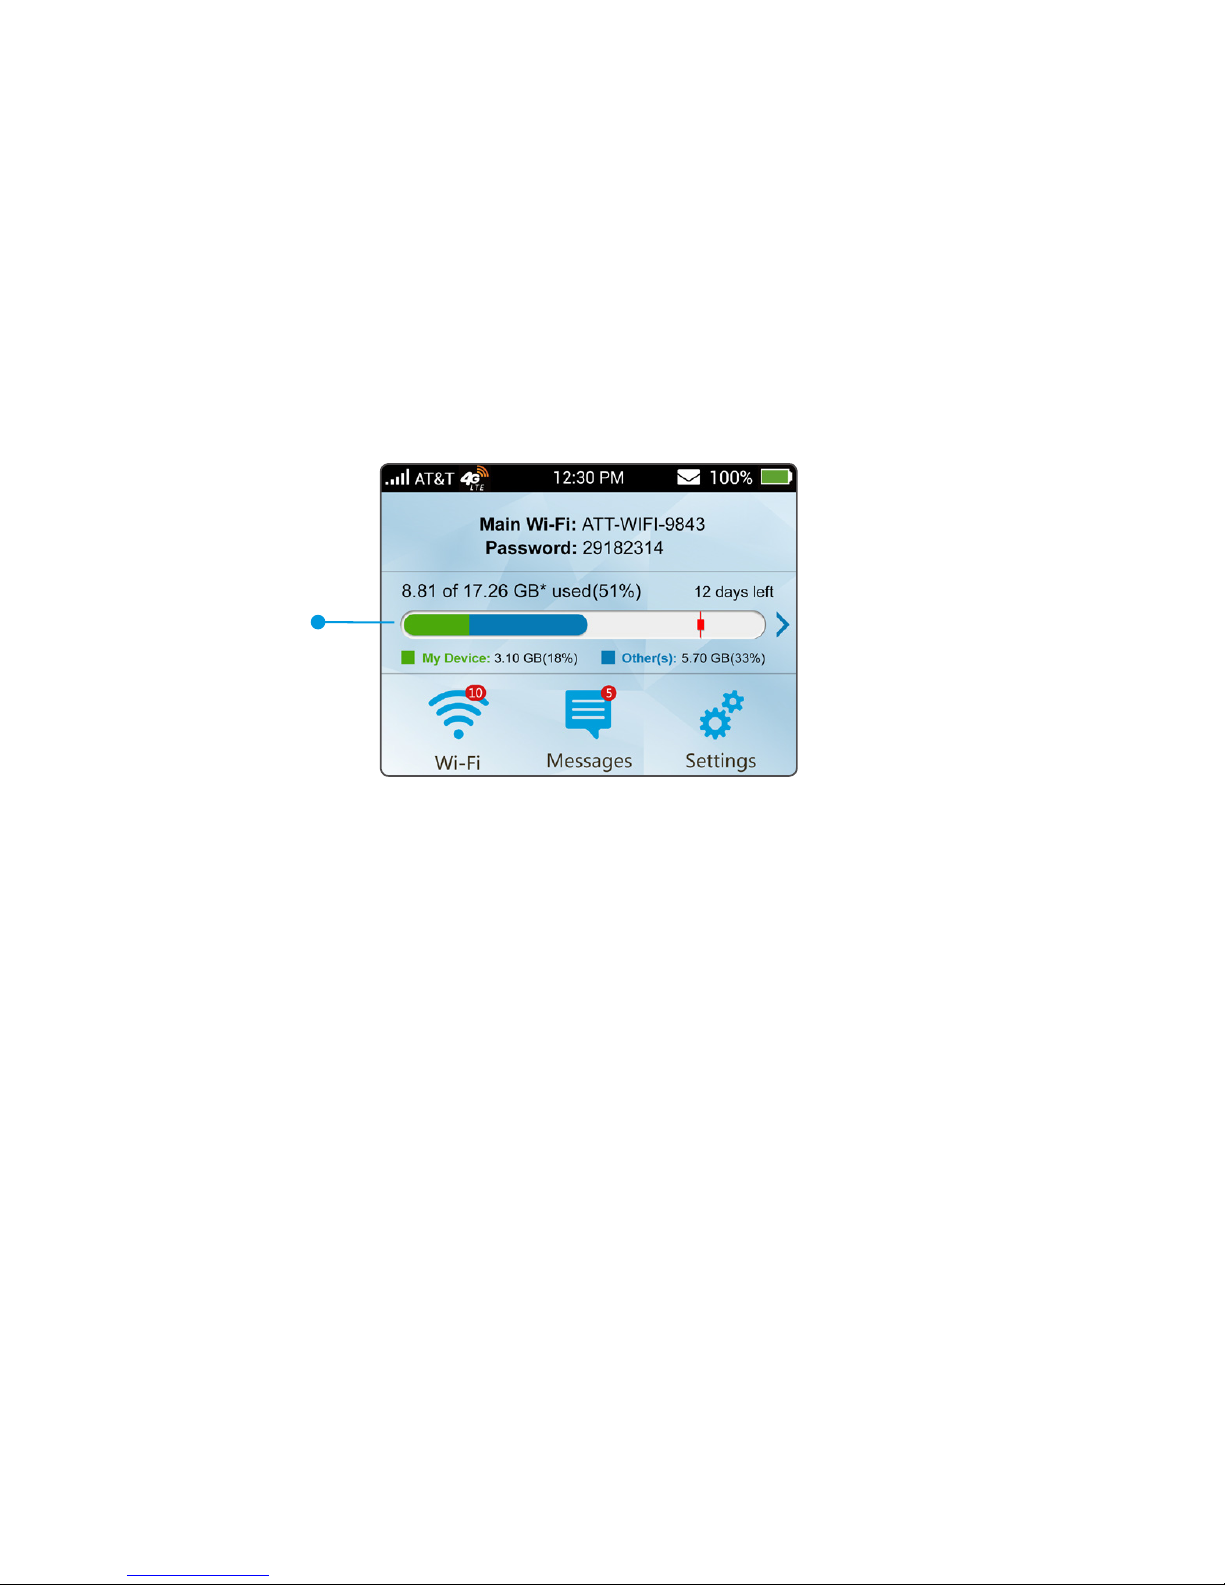
View Your Data Usage
You can view estimates of your data plan usage on the Velocity 2
touch screen or the AT&T Wi-Fi Manager. These estimates are not
accurate for billing purposes. The data counter resets automatically
at the beginning of the next billing cycle.
You can view more detailed information on your data usage as
follows.
On the touch screen:
1. From the home screen, tap the data usage bar.
2. From the Data Usage menu, swipe up or down to view details
on the following:
• Rollover Data – Tap to view the amount of any available
rollover data (unused plan data available for use in the next
billing period).
• Data Alert – The data usage point at which you will receive
an alert notication. Tap to change this setting.
• My Device – Estimated current data usage for your device.
• Other(s) – Estimated current data usage for other device(s).
• Disclaimer – Tap to view a disclaimer about data usage.
• Next Billing Date – The date on which your billing cycle
resets, and a statement on your data usage so far.
16
USE YOUR VELOCITY 2
Tap to view
usage details
Page 21

On the AT&T Wi-Fi Manager:
1. Log in, and click Data Usage in the navigation menu.
2. View data usage information, including the data usage estimate
for your device and others, the date on which the billing cycle
resets, and a statement on your data usage so far. This may
include rollover data (unused plan data that can be used in
the next billing period), if available.
You can also do the following:
• Data Usage Disclaimer – Click to view the disclaimer.
• Data Alert is set at __% – Click the checkbox to turn the
alert notication o or on, or enter a percentage in the text
eld to change the data usage point for the alert. Click Apply.
Manage Wi-Fi
View Connected Devices
You can view a list of devices connected to your mobile hotspot on
the Velocity 2 touch screen or on the AT&T Wi-Fi Manager.
On the touch screen:
1. From the home screen, tap Wi-Fi.
2. Tap Connected Devices. A list of devices connected to the
Main Wi-Fi and Guest Wi-Fi networks appears.
3. To view the IP address and MAC address for a connected
device, tap its name in the list.
On the AT&T Wi-Fi Manager:
1. Log in, and click Connected Devices in the navigation menu.
17
USE YOUR VELOCITY 2
Page 22

2. View a list of currently connected devices, with each device's
name, IP address, MAC address, and network (Main or Guest).
Set Maximum Number of Connected Devices
You can connect up to 10 wireless devices to the mobile hotspot.
These connections are shared between the mobile hotspot’s Main
and Guest Wi-Fi networks. You can change the total number of
connections allowed. You can also change how many connections
are available for the Main and Guest Wi-Fi networks. You can
change these settings from the Velocity 2 touch screen or the
AT&T Wi-Fi Manager.
On the touch screen:
1. From the home screen, tap Wi-Fi.
2. Tap Max Wi-Fi Devices.
3. Beside Max Wi-Fi, tap or
to set the maximum total
number of Wi-Fi connections permitted. (You cannot permit
more than 10 or fewer than one.)
18
USE YOUR VELOCITY 2
Page 23

4. Beside Main or Guest on the slider, tap to increase the
number of connections available for that network. This will
decrease the number available for the other network.
5. Tap Save.
On the AT&T Wi-Fi Manager:
1. Log in, and click Home in the navigation menu.
2. Under Main and Guest Wi-Fi Max Devices, use the Max Wi-Fi
drop-down menu to adjust the maximum number of Wi-Fi
connections.
3. Click
+
beside Main Wi-Fi or Guest Wi-Fi to increase the
number of connections permitted for that network. This will
decrease the number available for the other network.
4. Click Apply.
19
USE YOUR VELOCITY 2
Page 24

Block Devices
You can block a device that is currently connected to your mobile
hotspot. It will be disconnected, and it will not be able to connect
again unless you choose to unblock it. Reasons that you may want
to block a device include:
• Preventing overuse of your bandwidth and possible resulting
overage charges on your plan.
• Temporarily restricting a child's internet access.
You can block devices from the Velocity 2 touch screen or the
AT&T Wi-Fi Manager. To unblock a device, see Unblock Devices on
page 21.
Note: Whenever you block or unblock a device, the Wi-Fi connection
resets to activate the new settings. Any devices that were
connected to the mobile hotspot will need to be reconnected.
On the touch screen:
1. From the home screen, tap Wi-Fi.
2. Tap Connected Devices.
3. To block a listed device from
connecting to your mobile
hotspot, tap the device name.
4. Tap Block.
5. Tap OK. The mobile hotspot will
reset, and the blocked device will
not be able to reconnect to access
the internet.
20
USE YOUR VELOCITY 2
Page 25

On the AT&T Wi-Fi Manager:
1. Log in, and click Connected Devices in the navigation menu.
2. In the list of connected devices, locate the name of the device
you want to block. Click the Block Access checkbox beside it.
3. Click Apply OK.
Unblock Devices
You can unblock a device that you've previously blocked. This will
allow it to connect to the mobile hotspot again. You can unblock
devices from the Velocity 2 touch screen or the AT&T Wi-Fi Manager.
Note: Whenever you block or unblock a device, the Wi-Fi connection
resets to activate the new settings. Any devices that were
connected to the mobile hotspot will need to be reconnected.
On the touch screen:
1. From the home screen, tap Wi-Fi.
2. Tap Connected Devices.
3. Tap Block List. (You may need to
swipe up to nd it.) A list of blocked
devices appears.
21
USE YOUR VELOCITY 2
Page 26

4. Tap Unblock beside the name of
the device you want to unblock.
5.
Tap OK. The selected device will be able
to connect to your mobile hotspot again.
On the AT&T Wi-Fi Manager:
1. Log in, and click Connected Devices in the navigation menu.
2. In the list of blocked devices, locate the name of the device you
want to unblock. Click the Unblock Access checkbox beside it.
3. Click Apply OK.
Messages
View or Delete Messages
Your Velocity 2 can receive important messages from your mobile
service provider; you cannot reply to these messages. You can read
and delete these messages on the Velocity 2 touch screen or the
AT&T Wi-Fi Manager.
On the touch screen:
1. From the home screen, tap Messages.
Note: The Messages icon shows the number of unread messages
.
22
USE YOUR VELOCITY 2
Page 27

2. Tap any message to read the full text.
3. To delete the message, swipe up to reach the end of the
message, and then tap Delete OK.
On the AT&T Wi-Fi Manager:
1. Log in, and click Messages in the navigation menu.
2. Click a message to read it.
3. To delete a message, click the checkbox beside it, and then click
Delete. To delete all messages on the page, click Delete All.
File Sharing
If a microSDXC card is inserted in your Velocity 2, you can share
les on it via Wi-Fi or USB connection.
Share Files via Wi-Fi
You can use a browser-based interface to view, download, or
upload les when you share via Wi-Fi. These les can be accessed
without entering the AT&T Wi-Fi Manager login.
On the touch screen:
1. From the home screen, tap Settings.
2. Tap File Sharing Share Mode.
3. Tap Wi-Fi Only.
You can now access les using the AT&T Wi-Fi Manager. To access
les through a browser without logging in to AT&T Wi-Fi Manager,
see Use the File Browser on page 24.
23
USE YOUR VELOCITY 2
Page 28

On the AT&T Wi-Fi Manager:
1. Log in, and click File Sharing in the navigation menu.
2. Click the Settings tab.
3. Click Wi-Fi Only to set the sharing mode. You can manage the
following options, if needed:
• Path to Share – Permit access to data on the entire
microSDXC card (Entire microSD card) or only to a le you
designate (Select File Path).
• Access Type – Permit les on the microSDXC card to be
viewed only (Read Only) or both viewed and changed
(Read/Write).
4. Click Apply.
5. Click the File Browser tab. From this screen, you can view,
upload, and download les from the microSDXC card.
Use the File Browser:
When Wi-Fi sharing is enabled, you can access les on the
microSDXC card through a browser without logging in to the
AT&T Wi-Fi Manager.
1. Open a browser window on a connected device.
24
USE YOUR VELOCITY 2
Page 29

2. Enter http://attwimanager in the address eld.
3. From the AT&T Wi-Fi Manager login screen, click Access the
les on the microSD card.
4. Use the File Browser to view, upload, or download les on the
microSDXC card.
Share Files via USB
You can share les by connecting your Velocity 2 to a computer
with the USB Type-C cable.
On the touch screen:
1. From the home screen, tap Settings.
2. Tap File Sharing Share Mode.
3. Tap USB Only.
4. Connect your Velocity 2 to a computer with the USB Type-C
cable.
5. Tap OK to continue. When you enable this function, Wi-Fi will be
turned o.
You can now access les using your computer’s le viewer.
Note: You cannot use the browser interface for sharing les via
USB, only via Wi-Fi. See Share Files via Wi-Fi on page 23.
25
USE YOUR VELOCITY 2
Page 30

On the AT&T Wi-Fi Manager:
1. Log in, and click File Sharing in the navigation menu.
2. Click the Settings tab.
3. Click USB Only to set the sharing mode.
4. Click Apply.
5. Connect your Velocity 2 to a computer with the USB Type-C
cable.
6. Press and hold the touch screen to unlock your Velocity 2,
and tap OK to continue. When you enable this function,
Wi-Fi will be turned o.
You can now access les using your computer’s le viewer.
Note: You cannot use the browser interface for sharing les via
USB, only via Wi-Fi. See Share Files via Wi-Fi on page 23.
26
USE YOUR VELOCITY 2
Page 31

Battery
Extend Battery Life
The mobile hotspot is congured (by default) to optimize battery
life. Battery life is aected by:
• Standby time
• Data throughput
• Mobile broadband signal strength (the better the signal, the
longer the battery life)
• Wi-Fi range
• Touch screen brightness and timeout
There are several settings you can adjust to help extend the
battery life of your Velocity 2.
You can:
• Shorten the Wi-Fi range if the devices that regularly connect to
your mobile hotspot are located near your Velocity 2.
• Reduce the wait time before your Velocity 2 enters Wi-Fi Sleep
Mode (turns o Wi-Fi) when no devices are connected.
• Reduce the brightness of the touch screen.
• Reduce the Display Timeout, the wait time before the touch
screen on your Velocity 2 goes dark aer being used.
You can adjust Wi-Fi and display settings on the Velocity 2 touch
screen. You can adjust Wi-Fi settings on the AT&T Wi-Fi Manager.
27
USE YOUR VELOCITY 2
Page 32

On the touch screen:
1. From the home screen, tap Wi-Fi.
2. Adjust these settings:
• Wi-Fi Sleep Mode – Tap to select a
shorter time period (5 minutes or
10 minutes). The shorter the time,
the longer the battery life.
• Wi-Fi Range – Tap to select a
shorter range (Medium or Short).
The longer the range, the shorter
the battery life.
3. From the home screen (tap to
return), tap Settings Display.
4. Adjust these settings:
• Screen Brightness – Tap to
reduce the brightness of the
touch screen. The brighter the
screen, the shorter the battery life.
• Display Timeout – Tap to select
a shorter time period (30 seconds
or 1 minute). The shorter the time,
the longer the battery life.
28
USE YOUR VELOCITY 2
Page 33

On the AT&T Wi-Fi Manager:
1. Log in, and click Settings in the navigation menu.
2. Click Wi-Fi Advanced Settings.
3. Adjust these settings:
• Wi-Fi Coverage – Click the drop-down menu and
select Short.
• Sleep Mode – Click the drop-down menu and select a
shorter time period.
Recharge the Battery
The battery is precharged. To recharge the battery, you can use a
wall outlet (the faster option) or the USB port on a computer.
Recharge using a wall outlet (faster):
1. Attach one end of the
USB Type-C cable to
your Velocity 2, and attach
the other end to the
wall charger (included).
2. Plug the wall charger into a wall outlet.
29
USE YOUR VELOCITY 2
Page 34

Recharge using a USB port:
1. Attach one end of the USB Type-C cable to your Velocity 2.
2. Connect the other end of the cable to the USB port on
a computer.
When the battery is fully charged, the status indicator light on the
Velocity 2 will be solid green, and the touch screen battery icon will
appear full: .
Security
Change Wi-Fi Network Name or Password
You can customize the network name and/or password for the
Main or Guest Wi-Fi network(s) on the AT&T Wi-Fi Manager.
Note: When Guest Wi-Fi is enabled (see Guest Wi-Fi on page 13), the
default Guest Wi-Fi network name is the same as the Main Wi-Fi
network name with “-GUEST” added.
On the AT&T Wi-Fi Manager:
1. Log in.
2. From Home, click Edit Main Wi-Fi or Edit Guest Wi-Fi.
or
Click Settings in the navigation menu, and then click
Wi-Fi Basic.
3. Click the Network Name (SSID) eld and enter a new name,
and/or click the Password eld and enter a new password.
30
USE YOUR VELOCITY 2
Page 35

4. Click Apply.
Note: When the network name or password is changed, all
connected devices will be disconnected and will have to reconnect.
Change AT&T Wi-Fi Manager Access Settings
You can customize the login (password) used to access the AT&T
Wi-Fi Manager.
On the AT&T Wi-Fi Manager:
1. Log in, and click Settings in the navigation menu.
2. Click Advanced Administrator.
3. Enter the current login in the Current Login eld.
31
USE YOUR VELOCITY 2
Page 36

4. Enter the desired new login in the New Login and Verify New
Login elds. (The login must have at least 4 characters and no
more than 32 characters.)
5. Click Apply.
Note: Record the new login in a safe place. If you forget it, you will
need to restore the default login (attadmin) by resetting the device
to factory default. (See Reset Your Velocity 2 on page 38.)
Change Wi-Fi Security Types
You can set the preferred type of Wi-Fi security for your mobile
hotspot on the AT&T Wi-Fi Manager.
On the AT&T Wi-Fi Manager:
1. Log in, and click Settings in the navigation menu.
2. Click Wi-Fi Basic.
32
USE YOUR VELOCITY 2
Page 37

3. Click the Security Type drop-down menu, and select the
desired security type. (WPA2(AES)-PSK is recommended and
should be used whenever possible.)
• WPA2(AES)-PSK – Recommended. Other users can access
your mobile hotspot only if they enter the correct password.
• WPA-PSK/WPA2-PSK – Other users can access your mobile
hotspot only if they enter the correct password.
• OPEN – Not recommended. Anyone can access your Wi-Fi
network without a password, and you are responsible for
charges incurred.
4. Click Apply.
33
USE YOUR VELOCITY 2
Page 38

5. Reconnect your Wi-Fi device(s) using the new password. See
Connect to the Internet on page 9.
Congure International Data Roaming
You can choose whether or not to allow the mobile hotspot to be
used when roaming internationally.
Note: When enabled, international roaming data charges will apply.
On the touch screen:
1. From the home screen, tap Settings.
2. Tap International Data Roaming.
3. To enable or disable international roaming, tap the
International Data OFF/ON toggle.
On the AT&T Wi-Fi Manager:
1. Log in, and click Settings in the navigation menu.
2. Click Network Connections.
3. Beside International Data, click On or O, as needed.
4. Click Apply.
View Details
You can view details about your device, such as the wireless
number, hardware version, and IMEI, on the Velocity 2 touch screen
or the AT&T Wi-Fi Manager.
On the touch screen:
From the home screen, tap Settings About Your Device.
34
USE YOUR VELOCITY 2
Page 39

On the AT&T Wi-Fi Manager:
Log in, and click About in the navigation menu.
Soware Update
Soware or rmware updates for your Velocity 2 may become
available periodically. You will receive an alert when an update
becomes available, and you can check for updates manually
from the Velocity 2 touch screen.
Once an update becomes available, you can install it immediately
or (if it is not a critical update) postpone installation for up to 12
hours. Aer 12 hours, the update installs automatically.
35
USE YOUR VELOCITY 2
Page 40

Check for and Install an Update
On the touch screen:
1. If you have received an update alert: You can choose to update
now or to postpone. Go to step 4.
If you want to check for updates manually: From the home
screen, tap Settings.
2. Tap AT&T Soware Update.
3. Tap Check for Updates.
4. If an update is available, the soware will be downloaded
automatically. If the update is not critical, you have two options:
• Tap Reboot & install to install the update immediately.
or
• Tap Remind me later to postpone the update. Aer 4
hours, an alert will appear reminding you that the update is
available. You can postpone the update two more times (up
to 12 hours total), aer which you will only have the Reboot &
install option.
Note: If the update is critical, you will only have the Reboot &
install option.
5. Before you begin the update, plug in your Velocity 2 to a wall
outlet using the USB Type-C cable and the wall charger. This
ensures that your Velocity 2 will have power so that the update
can be completed. If you received a low-battery warning, tap
Begin aer plugging in the device.
36
USE YOUR VELOCITY 2
Page 41

Replace the SIM Card
Your Velocity 2 comes with the nano-SIM card preinstalled.
If you need to replace the nano-SIM card, follow
these steps:
1. Power o your Velocity 2. Insert
the tip of the tray eject tool
into the hole next to the
card tray.
2. Pull out the card tray. Remove
the existing nano-SIM card
(if present).
3. Insert the new nano-SIM card.
Note: You can also insert a
microSDXC card (sold separately)
in the card tray, as shown.
4. Carefully slide the tray back
into place.
37
USE YOUR VELOCITY 2
Nano-SIM
card
microSDXC
card
Page 42

Reset Your Velocity 2
You can reset your Velocity 2 to factory default settings. (You may
need to do so to restore the default AT&T Wi-Fi Manager login if
you have changed it and cannot remember the new one.)
Notes:
• If you reset your Velocity 2 to factory settings, all of your
customizations will be lost.
• When you reset your Velocity 2, any currently connected devices
will be disconnected. They will have to be reconnected aer the
Velocity 2 restarts. If the Guest Wi-Fi network was in use, you will
need to enable it again. (See Guest Wi-Fi on page 13.)
On the touch screen:
1. From the home screen, tap Settings.
2. Tap Factory Reset.
3. Tap Reset device OK.
On the AT&T Wi-Fi Manager:
1. Log in, and click Settings in the navigation menu.
2. Click Advanced Device Reset.
3. Click Reset OK.
Aer the device has restarted, reconnect Wi-Fi devices.
38
USE YOUR VELOCITY 2
Page 43

Advanced Settings
This chapter provides information on how to congure advanced
settings for your Velocity 2, such as Wi-Fi network options, WAN
and router settings, and more. You can manage these settings
from the AT&T Wi-Fi Manager.
Set Wi-Fi Network Options
1. Log in to the AT&T Wi-Fi Manager, and click Settings in the
navigation menu.
2. Click Wi-Fi Advanced Settings.
3. Manage the following options, as needed:
• Wi-Fi Coverage – Select the range of the Wi-Fi signal.
Shorter coverage means devices must be closer to your
Velocity 2 to connect, but it can increase battery life. Longer
coverage means devices can connect when farther from
your Velocity 2, but battery life will be decreased.
• Sleep Mode – Select the length of time before Wi-Fi is turned
o when no devices are connected. A shorter time period
can increase battery life.
• Band Selection – Select the Wi-Fi band range used for your
network(s). The 2.4 GHz band uses less power and has a
longer range than the 5 GHz band, but the 5 GHz band can
provide higher speeds with less interference.
• Network Mode – Select the WLAN protocol. The
recommended mode depends on the Wi-Fi band. When
using the 2.4 GHz band, select 802.11 b/g/n. When using
the 5 GHz band, select 802.11 a/n/ac.
39
ADVANCED SETTINGS
Page 44

• Channel Bandwidth – Select a bandwidth option, if
necessary (not recommended without prior experience).
When using the 2.4 GHz band, select 20MHz or 20MHz/40MHz;
when using the 5 GHz band, select 20 MHz, 20 MHz/40 MHz,
or 20 MHz/40 MHz/80 MHz.
• Country/Region Code – Select the country in which your
Velocity 2 is located.
• Frequency (Channel) – Select the frequency (channel)
for your Wi-Fi network(s). The recommended option is
Automatic, which will select the channel with the least
potential interference.
• AP Isolation – Turn AP Isolation on or o. When on, AP
Isolation prevents devices connected to the Main Wi-Fi
network from sharing network resources. (AP Isolation is
on permanently for the Guest Wi-Fi network.)
4. Click Apply.
View Network Information
1. Log in to the AT&T Wi-Fi Manager, and click About in the
navigation menu.
2. View detailed network information, such as the active network,
connection status, and signal strength.
Enable Port Forwarding
If your computer hosts a server, you can enable port forwarding so
that other users can access the server.
1. Log in to the AT&T Wi-Fi Manager, and click Settings in the
navigation menu.
40
ADVANCED SETTINGS
Page 45

2. Click Firewall Port Forwarding.
3. Beside Port Forwarding Settings, click Enable.
4. Click Apply. The Port Forwarding Settings options and Current
Virtual Servers (port forwarding rules) list will appear. Incoming
trac will be forwarded to specic ports and devices on your
network using their local IP addresses.
5. Identify the ports to forward by entering information in the
following elds: IP Address, Port Range, Protocol (optional),
and Comment.
6. Click Apply.
Caution: Port forwarding creates a security risk. When not required,
port forwarding should be disabled.
Enable MAC/IP/Port Filtering
You can enable or disable the MAC/IP/Port Filtering feature to
block certain internet trac. When this setting is enabled, you can
choose whether trac is accepted or dropped by default.
1. Log in to the AT&T Wi-Fi Manager, and click Settings in the
navigation menu.
2. Click Firewall MAC/IP/Port Filtering.
3. Beside MAC/IP/Port Filtering, click Enable.
4. Click an option to set the Default Policy:
• Accepted – Internet trac is allowed by default. Only trac
from the selected applications will be blocked from accessing
the internet. Trac is identied by port numbers.
41
ADVANCED SETTINGS
Page 46

Some applications are predened. You can dene additional
applications by clicking Add Custom Application, but you
need to know details of the trac used and generated by
the applications you wish to dene. In particular, you need to
know the port numbers and the protocol (TCP, UDP) used by
outgoing trac.
• Dropped – Internet trac is blocked by default. Only trac
from the selected predened or custom applications is
allowed to access the internet.
5. Click Apply.
Enable DMZ
In a DMZ (demilitarized zone) network conguration, a computer
runs outside the rewall in the DMZ. This computer intercepts
incoming internet trac, providing an extra layer of protection for
the rest of the network.
1. Log in to the AT&T Wi-Fi Manager, and click Settings in the
navigation menu.
2. Click Firewall DMZ.
3. Beside DMZ Settings, click Enable.
4. In the DMZ IP Address eld, enter the IP address of the
computer you want to use to screen incoming trac.
5. Click Apply.
Enable VPN Passthrough
Before devices connected to your mobile hotspot can connect to a
Virtual Private Network (VPN), you must enable VPN Passthrough.
42
ADVANCED SETTINGS
Page 47

1. Log in to the AT&T Wi-Fi Manager, and click Settings in the
navigation menu.
2. Click Advanced Router.
3. Beside VPN Passthrough, click Enable.
4. Click Apply.
Congure APN Details
The Access Point Name (APN) is checked to determine the type
of network connection to establish. Your mobile hotspot comes
precongured with the APN for AT&T.
Add an APN for Another Network
1. Log in to the AT&T Wi-Fi Manager, and click Settings in the
navigation menu.
2. Click Network APN.
3. Beside Mode, click Manual.
4. Click Add.
5. Enter the Prole Name and APN (obtained from your carrier).
6. In the Authentication drop-down menu, select a mode: NONE
(default), CHAP, or PAP.
7. Enter the User Name and Password, if these are required for
the wireless network.
8. Click Save. (Or, to use the new entry as the default APN, click
Set Default OK.)
43
ADVANCED SETTINGS
Page 48

Select an APN Entry to Use
1. From Settings Network APN, beside Mode, click Manual.
2. In the Prole Selection drop-down menu, select the entry for
the APN you wish to use.
3. Click Set Default OK.
Remove an APN Entry
1. From Settings Network APN, beside Mode, click Manual.
2. In the Prole Selection drop-down menu, select the entry for
the APN you wish to remove.
3. Click Delete OK.
Set Router Options
1. Log in to the AT&T Wi-Fi Manager, and click Settings in the
navigation menu.
2. Click Advanced Router.
3. Enter the desired information in each section.
4. Click Apply.
Notes:
• You may need to reconnect to the wireless network aer
applying changes.
• When DHCP Server is set to Enable, it automatically assigns an
IP address to each device on the network and manages their
conguration information.
44
ADVANCED SETTINGS
Page 49

Troubleshooting
Problem Suggested Solution(s)
Cannot establish
Wi-Fi connection
between Velocity 2
and wireless device
On the wireless device, refresh the
Wi-Fi network list, and select the correct
SSID (network name). The Main Wi-Fi
network name appears on your
Velocity 2 home screen.
Enter the correct password for the
network. The Main Wi-Fi network password
appears on your Velocity 2 home screen.
Check the IP address to ensure the
wireless device can obtain an IP address
automatically in the internet protocol
(TCP/IP) properties. Follow these steps to
congure the internet protocol for your
Wi-Fi connection in Windows 7:
1. Right-click Network and select
Properties.
2. Select Change adapter settings.
3. Right-click Wireless Network
Connection and select Properties.
4. Select Internet Protocol Version 4
(TCP/IPv4), and click Properties.
5. Select Obtain an IP address
automatically and Obtain DNS server
address automatically, and click OK.
45
TROUBLESHOOTING
Page 50

Problem Suggested Solution(s)
Connected device
cannot access the
internet
Check that the nano-SIM card is correctly
inserted in the Velocity 2.
Move the Velocity 2 to a location with a
better signal.
Contact your service provider.
Cannot access the
AT&T Wi-Fi Manager
Enter the correct address. The default
address is http://192.168.1.1 or
http://attwimanager.
Only use one network adapter in your PC.
Do not use any proxy server.
Password is
incorrect /
Forgot password
The Main Wi-Fi network password appears
on your Velocity 2 home screen. The
default password appears on a label
on your Velocity 2. If the Guest Wi-Fi
network is enabled, tap the arrow on
your Velocity 2 home screen to see
the Guest Wi-Fi password.
If you have changed the password for the
Main Wi-Fi and/or Guest Wi-Fi network(s)
and have forgotten the new one, you must
restore the factory default settings. See
Reset Your Velocity 2 on page 38.
46
TROUBLESHOOTING
Page 51

Specications
Mechanical Specications
Weight 4.55 oz.
Dimensions 4.54" (L) x 2.61" (W) x 0.61" (D)
Display 2.4" QVGA TFT LCD
240 x 320 pixels
Capacitive touch screen
Memory 256 MB RAM
512 MB ROM
Supports up to a 128 GB microSDXC card
Battery 3,000 mAh
Supported RF Bands
Technology Bands
LTE 2, 4, 5, 12, 29, 30, 66
UMTS/HSPA+ 850/1700/1900
47
SPECIFICATIONS
Page 52

Health and Safety Information
Don’t use at gas stations.
Power o when asked to in hospitals and
medical facilities.
Small parts may cause choking.
Avoid contact with anything magnetic.
Avoid contact with liquids. Keep your device dry.
Power o when near explosive materials or liquids.
Don’t rely on your device for emergency
communications.
Keep away from pacemakers and other electronic
medical devices.
Power o when asked to in aircras and airports.
Don’t dispose of your device in a re.
Avoid extreme temperatures.
Don’t take your device apart.
Only use approved accessories.
48
HEALTH AND SAFETY INFORMATION
Page 53

FCC Regulations
This device complies with part 15 of the FCC Rules. Operation is
subject to the following two conditions: (1) This device may not
cause harmful interference, and (2) this device must accept any
interference received, including interference that may cause
undesired operation.
This device has been tested and found to comply with the limits
for a Class B digital device, pursuant to Part 15 of the FCC Rules.
These limits are designed to provide reasonable protection against
harmful interference in a residential installation. This equipment
generates, uses and can radiate radio frequency energy and, if
not installed and used in accordance with the instructions, may
cause harmful interference to radio communications. However,
there is no guarantee that interference will not occur in a particular
installation. If this equipment does cause harmful interference to
radio or television reception, which can be determined by turning
the equipment o and on, the user is encouraged to try to correct
the interference by one or more of the following measures:
• Reorient or relocate the receiving antenna.
• Increase the separation between the equipment and receiver.
• Connect the equipment into an outlet on a circuit dierent
from that to which the receiver is connected.
• Consult the dealer or an experienced radio/TV technician
for help.
Changes or modications not expressly approved by the party
responsible for compliance could void the user‘s authority to
49
HEALTH AND SAFETY INFORMATION
Page 54

operate the equipment. The antenna(s) used for this transmitter
must not be co-located or operating in conjunction with any
other antenna or transmitter.
RF Exposure Information (SAR)
This device is designed and manufactured not to exceed the
emission limits for exposure to radio frequency (RF) energy
set by the Federal Communications Commission of the
United States.
During SAR testing, this device was set to transmit at its highest
certied power level in all tested frequency bands, and placed in
positions that simulate RF exposure in usage against the head with
no separation, and near the body with the separation of 10 mm.
Although the SAR is determined at the highest certied power
level, the actual SAR level of the device while operating can be well
below the maximum value. This is because the device is designed
to operate at multiple power levels so as to use only the power
required to reach the network. In general, the closer you are to a
wireless base station antenna, the lower the power output.
The exposure standard for wireless devices employing a unit of
measurement is known as the Specic Absorption Rate, or SAR.
The SAR limit set by the FCC is 1.6 W/kg.
The FCC has granted an Equipment Authorization for this model
device with all reported SAR levels evaluated as in compliance with
the FCC RF exposure guidelines. SAR information on this model
device is on le with the FCC and can be found under the Display
Grant section of www.fcc.gov/oet/ea/fccid aer searching on
FCC ID: SRQ-MF985.
50
HEALTH AND SAFETY INFORMATION
Page 55

For this device, the highest reported SAR value for usage near the
body is 1.41 W/kg.
While there may be dierences between the SAR levels of various
devices and at various positions, they all meet the government
requirements.
SAR compliance for body operation is based on a separation
distance of 10 mm between the unit and the human body. Carry
this device at least 10 mm away from your body to ensure RF
exposure level compliant with or lower than the reported level.
Distraction
Operating Machinery
Full attention must be given to operating the machinery in order to
reduce the risk of an accident.
Product Handling
• You alone are responsible for how you use your device and any
consequences of its use.
• You must always power o your device wherever the use of
such device is prohibited. Use of your device is subject to safety
measures designed to protect users and their environment.
• Always treat your device and its accessories with care and keep
it in a clean and dust-free environment.
• Do not expose your device or its accessories to open ames
or lit tobacco products.
51
HEALTH AND SAFETY INFORMATION
Page 56

• Do not expose your device or its accessories to liquid, moisture,
or high humidity.
• Do not drop, throw, or try to bend your device or its accessories.
• Do not use harsh chemicals, cleaning solvents, or aerosols to
clean the device or its accessories.
• Do not paint your device or its accessories.
• Do not attempt to disassemble your device or its accessories.
Only authorized personnel can do so.
• Please check local regulations for disposal of electronic
products.
Small Children
• Do not leave your device or its accessories within the reach
of small children or allow them to play with it. They could hurt
themselves or others, or could accidentally damage the device.
• Your device contains small parts with sharp edges that may
cause an injury or may become detached and create a
choking hazard.
Demagnetization
To avoid the risk of demagnetization, do not allow electronic
devices or magnetic media close to your device for a long time.
Power Supply
Do not connect your device to the power supply or switch it on
until instructed to do so in the installation instructions.
52
HEALTH AND SAFETY INFORMATION
Page 57

Device Heating
Your device may become warm during charging and during
normal use.
Electrical Safety
Accessories
• Use only approved accessories.
• Do not connect with incompatible products or accessories.
• Take care not to allow metal objects, such as coins or key rings,
to contact or cause a short-circuit in the battery terminals.
Faulty and Damaged Products
• Do not attempt to disassemble the device or its accessories.
• Only qualied personnel can service or repair the device or
its accessories.
• If your device (or its accessories) has been submerged in water,
punctured, or subjected to a severe fall, do not use it until you
have taken it to be checked at an authorized service center.
Interference
General Statement on Interference
Care must be taken when using the device in close proximity to
personal medical devices, such as pacemakers and hearing aids.
53
HEALTH AND SAFETY INFORMATION
Page 58

Medical Devices
Please consult your doctor and the device manufacturer to
determine if operation of your device may interfere with your
medical device.
Hospitals
Power o your device when requested to do so in hospitals, clinics,
or health care facilities. These requests are designed to prevent
possible interference with sensitive medical equipment.
Aircra
Power o your device whenever you are instructed to do so by
airport or airline sta.
54
HEALTH AND SAFETY INFORMATION
Page 59

Warranty
ZTE oers you a limited warranty that the enclosed subscriber unit
and its enclosed accessories will be free from defects in material
and workmanship for a period that expires one year from the date
of sale of the Product to you, provided that you are the original end
user purchaser of the Product and provided that your purchase
was made from a supplier authorized by the Seller. Transfer
or resale of a Product will automatically terminate warranty
coverage with respect to that Product. This limited warranty is
not transferable to any third party, including but not limited to
any subsequent purchaser or owner of the Product. This limited
warranty is applicable only to end users in the United States.
1. This product or device is warranted for 12 (twelve) months from
date of purchase.
2. For warranty service information, please call the ZTE service
number: (877) 817-1759 (Toll Free). The manufacturer’s website,
http://www.zteusa.com, is also available for assistance.
3. This warranty only applies if the product has been used in
accordance with the manufacturer’s instructions under
normal use and with reasonable care.
4. What this warranty does not cover:
a) Defects or damages resulting from the misuse of
this product.
b) Defects or damages from abnormal use, abnormal
conditions, improper storage, exposure to moisture,
dampness or corrosive environments, unauthorized
modications, unauthorized repair, neglect, rough handling,
55
WARRANTY
Page 60

abuse, accident, alteration, improper installation, incorrect
voltage application, food or liquid spillage, acts of God.
c) Normal wear and tear.
d) If the Product has been opened, modied or repaired
by anyone other than a warranty service center or if it is
repaired using unauthorized spare parts.
e) If the serial number or mobile accessory date code has been
removed, erased, defaced, altered or is illegible in any way
subject to sole judgment of ZTE.
Limited Warranty
TO THE EXTENT PERMITTED BY APPLICABLE LAW, THIS LIMITED
WARRANTY IS YOUR SOLE AND EXCLUSIVE REMEDY AGAINST
ZTE AND ZTE’S SOLE AND EXCLUSIVE LIABILITY IN RESPECT OF
DEFECTS IN PRODUCT. HOWEVER, THIS LIMITED WARRANTY SHALL
NOT EXCLUDE NOR LIMIT ANY OF YOUR LEGAL (STATUTORY)
RIGHTS UNDER THE APPLICABLE NATIONAL LAWS.
TO THE EXTENT PERMITTED BY APPLICABLE LAW, ZTE DOES
NOT ASSUME ANY LIABILITY FOR LOSS OF OR DAMAGE TO OR
CORRUPTION OF DATA, FOR ANY LOSS OF PROFIT, LOSS OF USE
OF PRODUCTS OR FUNCTIONALITY, LOSS OF BUSINESS, LOSS
OF REVENUES OR LOSS OF ANTICIPATED PROFIT, INCREASED
COSTS OR EXPENSES OR FOR ANY INDIRECT, OR SPECIAL OR
CONSEQUENTIAL LOSS OR DAMAGE. TO THE EXTENT PERMITTED
BY APPLICABLE LAW, ZTE’S LIABILITY SHALL BE LIMITED TO THE
PURCHASE VALUE OF THE PRODUCT. THE ABOVE LIMITATIONS
SHALL NOT APPLY TO DEATH OR PERSONAL INJURY CAUSED BY
DEFECT OF PRODUCT IN MATERIAL, DESIGN AND WORKMANSHIP.
56
WARRANTY
Page 61

57
WARRANTY
How to Get Warranty Service
To obtain warranty service, please call (877) 817-1759. Please have
the following information available when you send the device in
for repair:
• A valid Proof of Purchase
• Return address
• Daytime phone number or fax number
• Model number
• IMEI number (Look for the 15-digit IMEI number behind the
battery of the device.)
• Complete description of the problem
• Transportation prepaid
Other Warranty Programs
You may have other warranty programs with your purchase, such
as warranty exchange. If so, please refer to equipment package or
the original point of sale.
Page 62

58
Page 63

Page 64

 Loading...