

Page 1
User’s Guide
Synapse SB67040 Remote Handset
Page 2

Page 3

Answer Voice Call
Description Setup Make Call Call Mail Hold/Park Transfer Conference Trouble Glossary
C
ONTENTS
Contents
Preface
Introduction............................................................................................................................................................................................................................................................7
Using This Document........................................... .................................. ..........................................................................................................................................................7
Description
Introduction............................................................................................................................................................................................................................................................9
SB67040 Remote Handset Components........................................................................................................................................................................................10
Handset Description.............................................................. ................................... .....................................................................................................................................11
SB67040 Remote Handset Screens . . . . . . . . . . . . . . . . . . . . . . . . . . . . . . . . . . . . . . . . . . . . . . . . . . . . . . . . . . . . . . . . . . . . . 13
LCD Screen Types. . . . . . . . . . . . . . . . . . . . . . . . . . . . . . . . . . . . . . . . . . . . . . . . . . . . . . . . . . . . . . . . . . . . . .14
Display Keys . . . . . . . . . . . . . . . . . . . . . . . . . . . . . . . . . . . . . . . . . . . . . . . . . . . . . . . . . . . . . . . . . . . . . . . . . . . . . . . . . . . . . . . . . . 16
Screen Icons. . . . . . . . . . . . . . . . . . . . . . . . . . . . . . . . . . . . . . . . . . . . . . . . . . . . . . . . . . . . . . . . . . . . . . . . . . . . . . . . . . . . . . . . . . 17
Using the Speakerphone............................................................................................................................................................................................................................19
Deskset In Use...................................................................................................................................................................................................................................................19
SB67040 Remote Handset/The SB67030 Deskset Comparison....................................................................................................................................20
Setup
Introduction.........................................................................................................................................................................................................................................................22
Handset Power Up.......................................................................... .................................. .............................................................................................................................23
Battery Charging.............................................................................................................................................................................................................................................24
Low Battery Notification . . . . . . . . . . . . . . . . . . . . . . . . . . . . . . . . . . . . . . . . . . . . . . . . . . . . . . . . . . . . . . . . . . . . . . . . . . . . . . . 25
Power Save. . . . . . . . . . . . . . . . . . . . . . . . . . . . . . . . . . . . . . . . . . . . . . . . . . . . . . . . . . . . . . . . . . . . . . . . . . . . . . . . . . . . . . . . . . . 25
Handset Registration................................ ....................................................................................................................................................................................................26
Link Loss Notification. . . . . . . . . . . . . . . . . . . . . . . . . . . . . . . . . . . . . . . . . . . . . . . . . . . . . . . . . . . . . . . . . . . . . . . . . . . . . . . . . . 29
Handset Setup................................................................... .................................. ..............................................................................................................................................30
SB67040 Remote Handset User’s Guide - Contents 3
Page 4

Answer Voice Call
Description Setup Make Call Call Mail Hold/Park Transfer Conference Trouble Glossary
Handset Volume Control................................. ..................................................................... ......................................................................................................................34
Making a Call
Introduction........................................................................................................................................................................................................................................................36
Dialing Rules.......................................................................................................................................................................................................................................................37
Pre-dialing...........................................................................................................................................................................................................................................................38
Live Dialing..........................................................................................................................................................................................................................................................39
Making a Call From a Directory.............................................................................................................................................................................................................40
Directory Sort Options . . . . . . . . . . . . . . . . . . . . . . . . . . . . . . . . . . . . . . . . . . . . . . . . . . . . . . . . . . . . . . . . . . . . . . . . . . . . . . . . .41
Making a Call From an Extension List................................................................................................................................................................................................42
Making a Call From the Call Log..........................................................................................................................................................................................................43
Call Log Dialing Options. . . . . . . . . . . . . . . . . . . . . . . . . . . . . . . . . . . . . . . . . . . . . . . . . . . . . . . . . . . . . . . . . . . . . . . . . . . . . . . . 44
Making a Call From Redial........................................................................................................................................................................................................................45
Making a Call From Quick Dial...............................................................................................................................................................................................................46
Call Answer
Introduction........................................................................................................................................................................................................................................................47
New Call Notification....................................................................................................................................................................................................................................48
How to Answer a Call...................................................................................................................................................................................................................................49
Incoming Call While On a Call...............................................................................................................................................................................................................50
How to Handle Multiple Incoming Calls..........................................................................................................................................................................................51
Voicemail
Voicemail Notification..................................................................................................................................................................................................................................53
Retrieving Voicemail.....................................................................................................................................................................................................................................54
Reviewing Voicemail Records.................................................................................................................................................................................................................55
Voicemail Management..............................................................................................................................................................................................................................56
Hold/Park
Introduction........................................................................................................................................................................................................................................................58
SB67040 Remote Handset User’s Guide - Contents 4
Page 5

Answer Voice Call
Description Setup Make Call Call Mail Hold/Park Transfer Conference Trouble Glossary
Placing a Call on Hold.................................................................................................................................................................................................................................59
How to Retrieve a Call on Hold.............................................................................................................................................................................................................60
How to Park a call..........................................................................................................................................................................................................................................61
Paging Others to Pick up a Parked Call..........................................................................................................................................................................................62
How to Retrieve a Parked Call...............................................................................................................................................................................................................64
Call Transfer
Introduction.........................................................................................................................................................................................................................................................65
Transfer To An Extension...........................................................................................................................................................................................................................66
Transfer to an External Number............................................................................................................................................................................................................67
Transferring in Dial Mode...........................................................................................................................................................................................................................68
Transferring to the Call Log.....................................................................................................................................................................................................................69
Transferring to the Redial List................................................................................................................................................................................................................70
Transferring to the Directory...................................................................................................................................................................................................................71
Transferring to Quick Dial..........................................................................................................................................................................................................................72
Transfer Confirmation..................................................................................................................................................................................................................................73
Conference
Introduction.........................................................................................................................................................................................................................................................74
Conference a Call........................................................................................................... ................................................................................................................................75
Conference Confirmation . . . . . . . . . . . . . . . . . . . . . . . . . . . . . . . . . . . . . . . . . . . . . . . . . . . . . . . . . . . . . . . . . . . . . . . . . . . . . . 76
Hold/Unhold a Conference. . . . . . . . . . . . . . . . . . . . . . . . . . . . . . . . . . . . . . . . . . . . . . . . . . . . . . . . . . . . . . . . . . . . . . . . . . . . . 77
Cancel a Conference....................................................................................................................................................................................................................................78
Conference with Held Calls......................................................................................................................................................................................................................79
Conferences with Extension List...........................................................................................................................................................................................................80
Conference with Call Log........................................................... ...............................................................................................................................................................81
Conference with Redial List.....................................................................................................................................................................................................................82
Conference with Park List.........................................................................................................................................................................................................................83
Conference with Directory............................................................... .........................................................................................................................................................84
Conference with Quick Dial.......................................... ...........................................................................................................................................................................85
SB67040 Remote Handset User’s Guide - Contents 5
Page 6

Answer Voice Call
Description Setup Make Call Call Mail Hold/Park Transfer Conference Trouble Glossary
Troubleshooting
Important safety instructions . . . . . . . . . . . . . . . . . . . . . . . . . . . . . . . . . . . . . . . . . . . . . . . . . . . . . . . . . . . . . . . . . . . . . . . . . . . 87
Maintenance.......................................................................................................................................................................................................................................................88
Avoid rough treatment . . . . . . . . . . . . . . . . . . . . . . . . . . . . . . . . . . . . . . . . . . . . . . . . . . . . . . . . . . . . . . . . . 88
Avoid water . . . . . . . . . . . . . . . . . . . . . . . . . . . . . . . . . . . . . . . . . . . . . . . . . . . . . . . . . . . . . . . . . . . . . . . . . . 89
Electrical storms . . . . . . . . . . . . . . . . . . . . . . . . . . . . . . . . . . . . . . . . . . . . . . . . . . . . . . . . . . . . . . . . . . . . . . 89
Cleaning your unit. . . . . . . . . . . . . . . . . . . . . . . . . . . . . . . . . . . . . . . . . . . . . . . . . . . . . . . . . . . . . . . . . . . . . 89
Warranty................................................................................................................................................................................................................................................................89
Technical Specifications............................................................................................................................................................................................................................. 89
Glossary
ACTIVE CALL . . . . . . . . . . . . . . . . . . . . . . . . . . . . . . . . . . . . . . . . . . . . . . . . . . . . . . . . . . . . . . . . . . . . . . . . . 92
DIAL . . . . . . . . . . . . . . . . . . . . . . . . . . . . . . . . . . . . . . . . . . . . . . . . . . . . . . . . . . . . . . . . . . . . . . . . . . . . . . . . 93
Held Calls . . . . . . . . . . . . . . . . . . . . . . . . . . . . . . . . . . . . . . . . . . . . . . . . . . . . . . . . . . . . . . . . . . . . . . . . . . . 93
IDLE . . . . . . . . . . . . . . . . . . . . . . . . . . . . . . . . . . . . . . . . . . . . . . . . . . . . . . . . . . . . . . . . . . . . . . . . . . . . . . . . 93
SB67040 Remote Handset User’s Guide - Contents 6
Page 7
Voice Make Call Answer
Install Overview PC UI Setup Mail Directory CallLog Call Manage Call Handset Trouble
P
REFACE
Introduction
This User’s Guide provides a complete set of instructions to guide you through operation of your
SB67030 Deskset. Operating these devices does not require the technical expertise of a
traditional system administrator or IT professional, However, we recommend that you make one
person responsible for controlling the system-wide features described in this guide.
Before using this AT&T product, please read “Important Safety Instructions” on page 237 of this
manual. Please thoroughly read this user’s manual for all the feature operations and
troubleshooting information necessary to install and operate your new AT&T product.
Note For customer service or product information, visit our website at
www.telephones.att.com or call 1 (800) 222-3111. In Canada,
dial
1 (866) 288-4268.
1. “Navigation” on page 12
2. “In This Manual” on page 13
3. “Procedures” on page 14
SB67030 Deskset User’s Guide - Preface 11
Page 8
Voice Make Call Answer
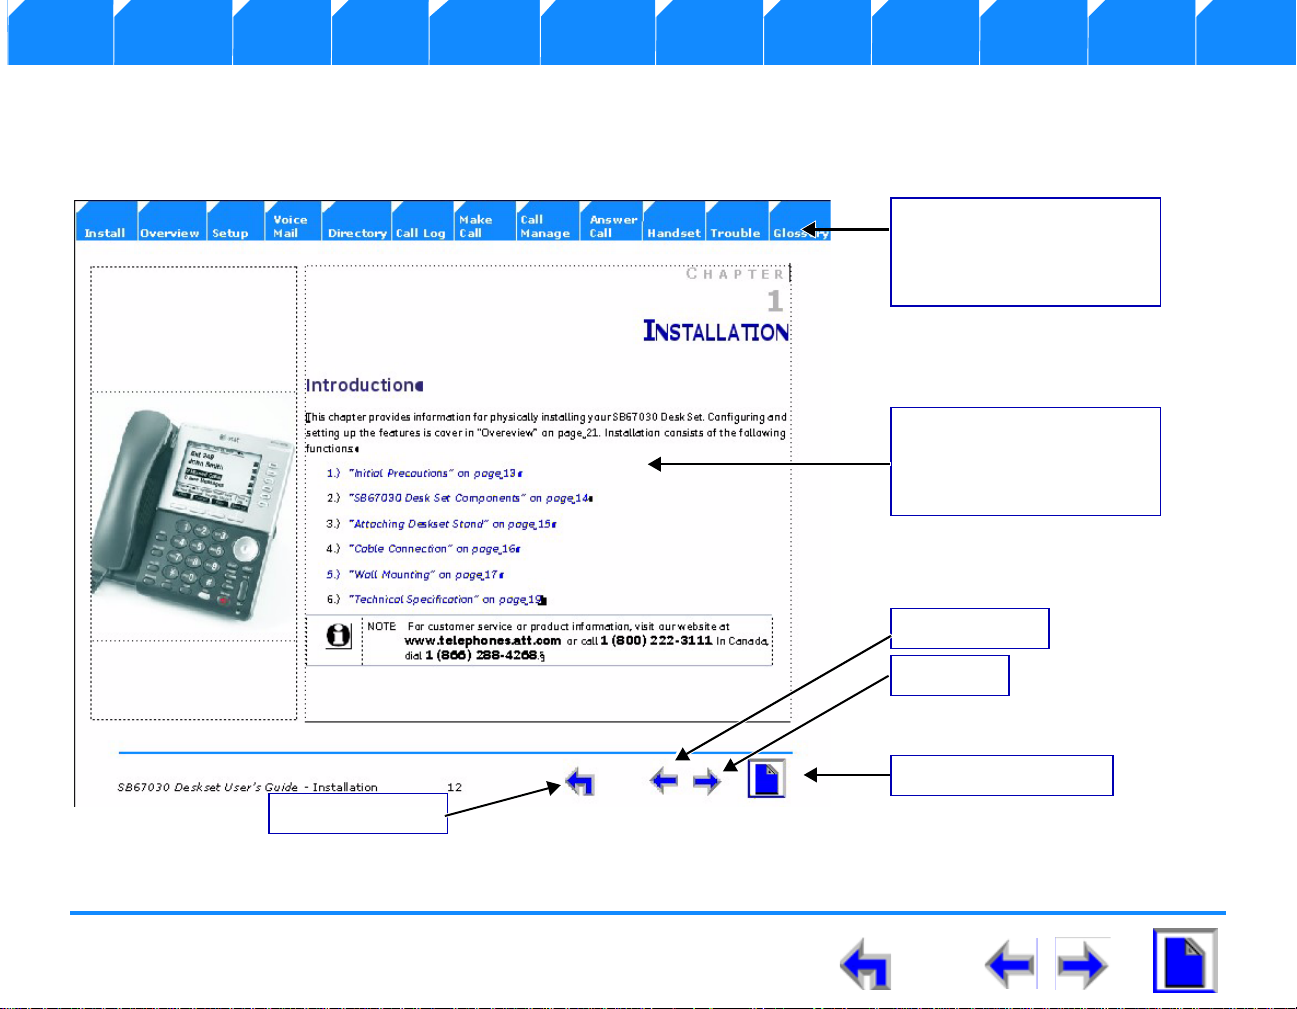
Chapter Tabs
Click on these tabs to open
the chapter covered by that
topic.
Primary Topic
Click on this link to move to
the first page covering that
topic.
Previous Topic
Previous Page
Next Page
First Page in Chapter
Install Overview PC UI Setup Mail Directory CallLog Call Manage Call Handset Trouble
Navigation
Your SB67030 Deskset User Guide provides the ability to move from topic to topic easily, and to return to your original or previous
topic.Figure 1 illustrates the navigation conventions for this user guide.
Figure. 1 User Guide Navigation
SB67030 Deskset User’s Guide - Preface 12
Page 9

Voice Make Call Answer
Note Notes are added to give more information,
usually in a procedure.
CAUTION A caution means that damage to
equipment is possible.
Tip A tip provides information that can assist
you in performing a procedure.
Install Overview PC UI Setup Mail Directory CallLog Call Manage Call Handset Trouble
In This Manual
Table 1 lists text formats used in this manual to assist you in identifying items referenced within procedures.
Table 1 Description of Text Formats
Text Format Description
Screen
FUNCTION KEY
Figure 1, Table 1, or “Navigation” on page 12 This identifies a reference to a figure, procedure, table, or section
“Introduction” This identifies a hyperlink to a primary topic.
This identifies text that appears on the screen in a menu or prompt.
This identifies a Function key. See “The Idle Screen” on page 42 for a
complete description of the Function keys.
This identifies a Programmed key. See “Programmed Operations Keys” on
page 30 for a complete description of the Function keys.
within this manual.
Notes are added to give more information, usually in a procedure.
A caution means that damage to equipment is possible.
A tip provides information that can assist you in performing a
procedure.
SB67030 Deskset User’s Guide - Preface 13
Page 10
Voice Make Call Answer
WARNING A warning means that injury or death
is possible if the instructions are not obeyed.
Install Overview PC UI Setup Mail Directory CallLog Call Manage Call Handset Trouble
Table 1 Description of Text Formats
Text Format Description
A warning means that injury or death is possible if the instructions
are not obeyed.
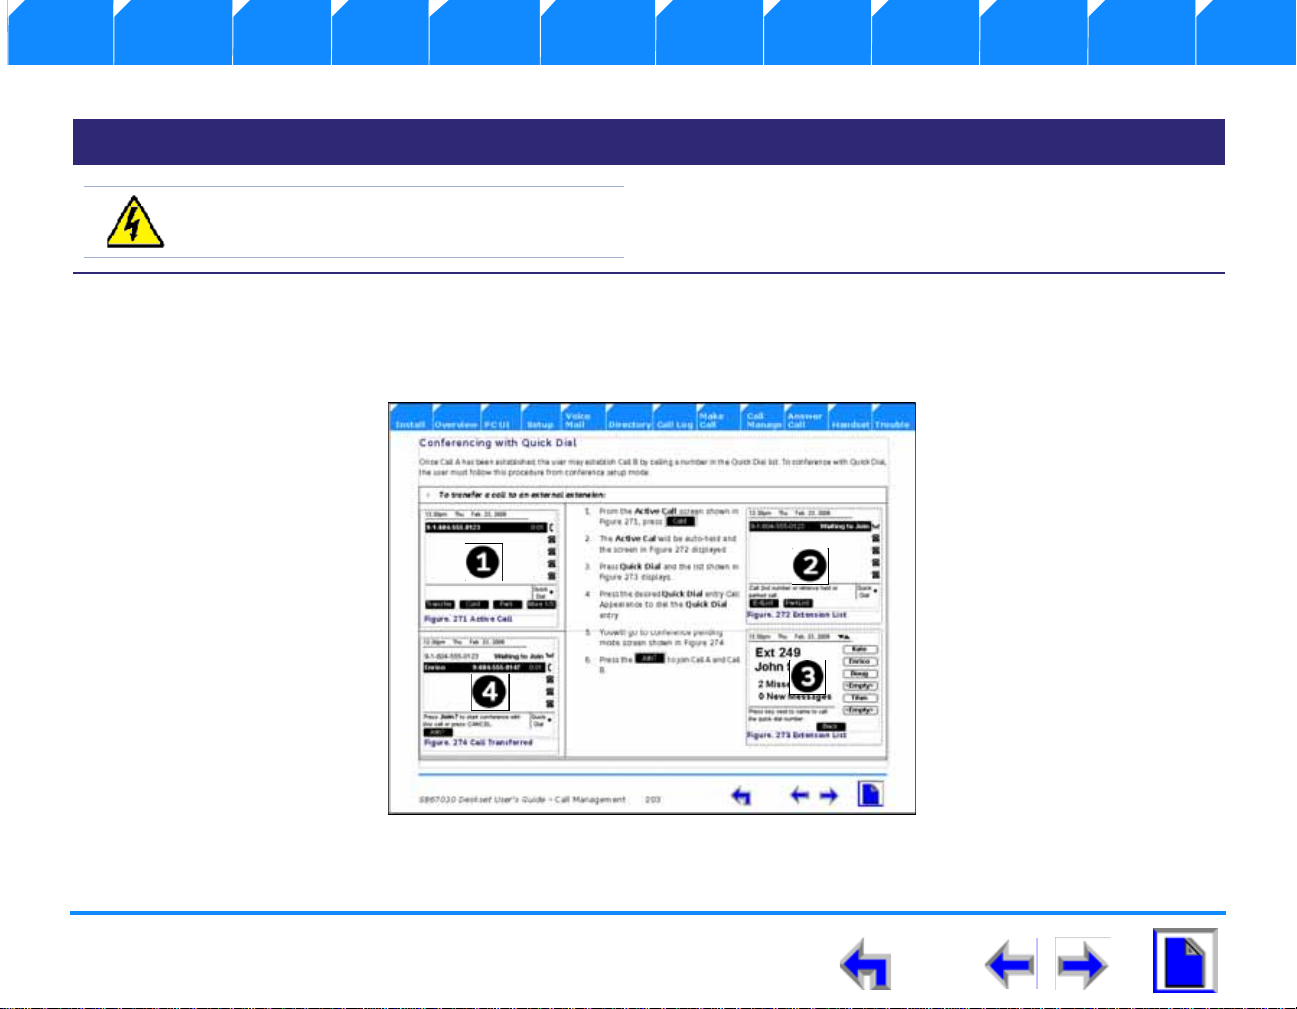
Procedures
The procedures in this manual are contained on a single page, unless otherwise noted. Each page contains the topic heading and a
procedure table as shown in Figure 2. The screen images appear in clockwise order as ind icated by the numbers in Figure 2.
Figure. 2 Sample Procedure
SB67030 Deskset User’s Guide - Preface 14
Page 11

Voice Make Call Answer
Install Overview PC UI Setup Mail Directory CallLog Call Manage Call Handset Trouble
Additional Documentation
This CD contains a complete documentation set for the SB67030 Deskset, SB67040 Remote Handset (Optional), 67020 Gateway, and
the 7610 Cordless Headset (Optional). The documentation set includes;
n 67020 Gateway System Administrators Guide
n 7610 Cordless Headset User’s Guide
n SB67040 Remote Handset User’s Guide
SB67030 Deskset User’s Guide - Preface 15
Page 12
Answer Voice Call
Description Setup Make Call Call Mail Hold/Park Transfer Conference Trouble Glossary
C HAPTER
1
D
ESCRIPTION
Introduction
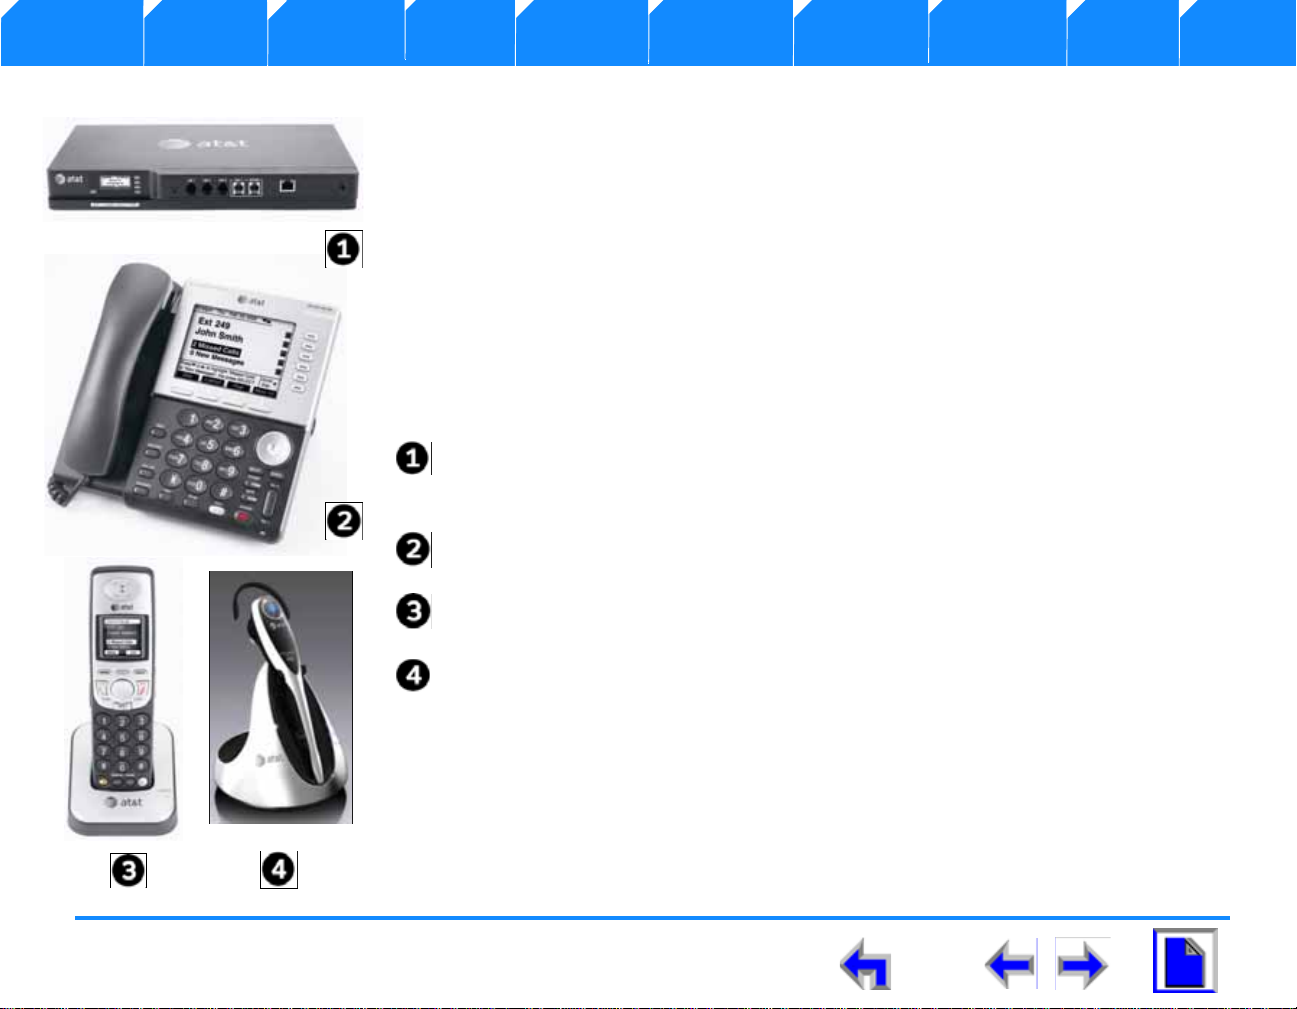
This s section provides a description of the functions and features of the SB67040 Remote
Handset. The SB67040 Remote Handset provides a user interface for the AT&T Business
Telephone System. The complete telecommunications system includes:
System Gateway - The System Gateway provides control for system component s
and access to external communications networks. Use the Gateway to add and
remove users. (See The System Gateway Adm inistrators Guide).
Deskset - The Deskset provides up to 50 desk set user interface for the system..
Remote Handset (Optional)- The remote handset duplicates many of the Deskset
features and provides a high degree of mobility.
Headset (Optional) - The headset replaces the deskset local handset to provide
hands-free operation.
.
SB67040 Remote Handset User’s Guide - Description 9
Page 13
Answer Voice Call
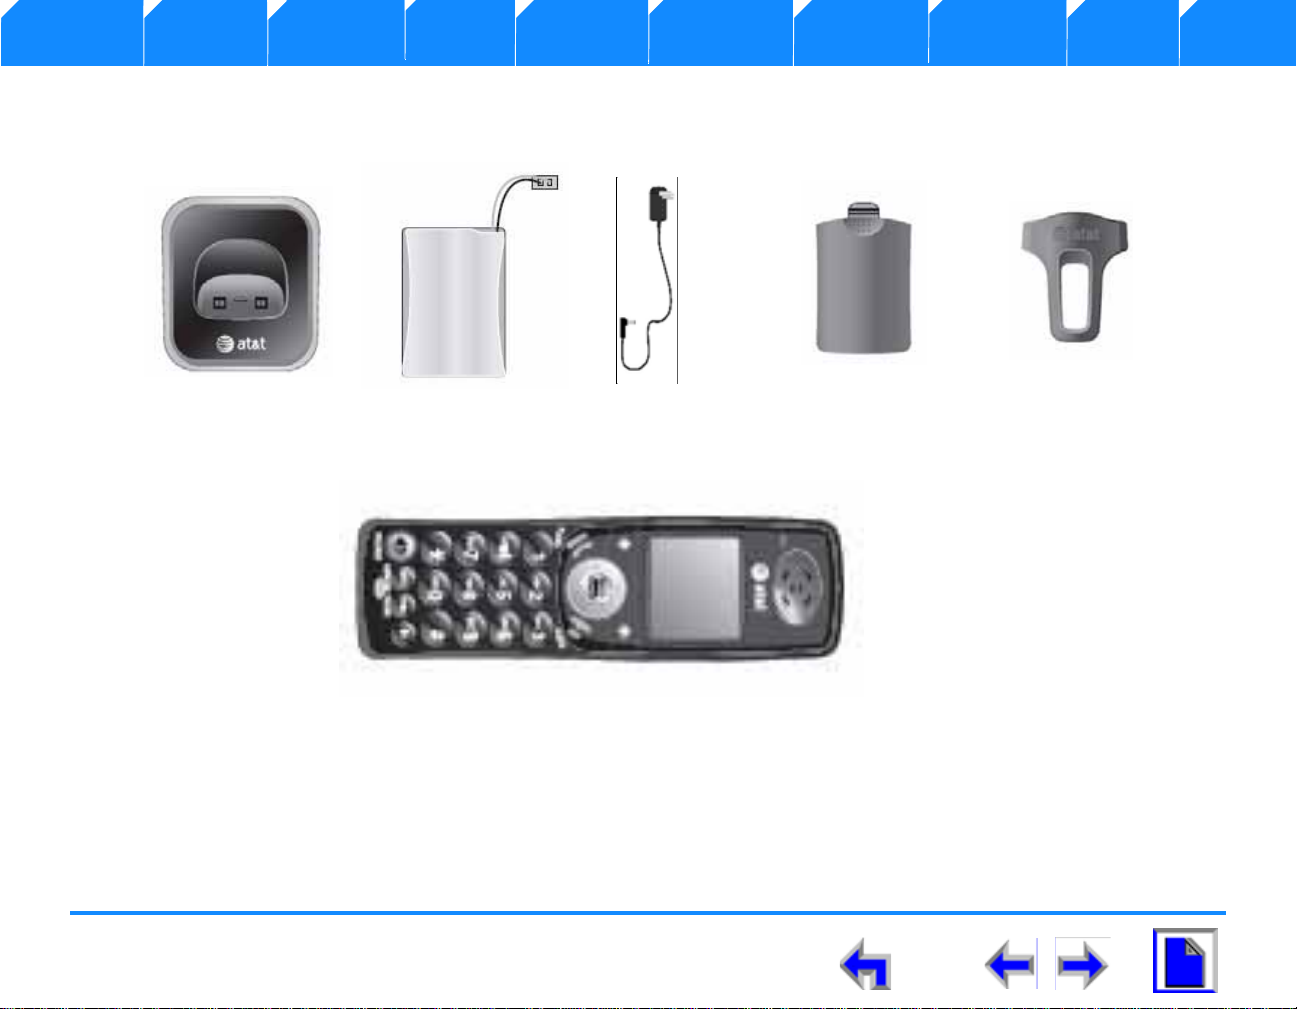
Battery
Charger for
cordless
handset
Power Cable
Battery Cover
Handset
Belt Clip
Description Setup Make Call Call Mail Hold/Park Transfer Conference Trouble Glossary
SB67040 Remote Handset Components
Your SB67040 Remote Handset consists of the components pictured in Figure 1
Figure. 1 SB67040 Remote Handset Components
SB67040 Remote Handset User’s Guide - Description 10
Page 14
Answer Voice Call
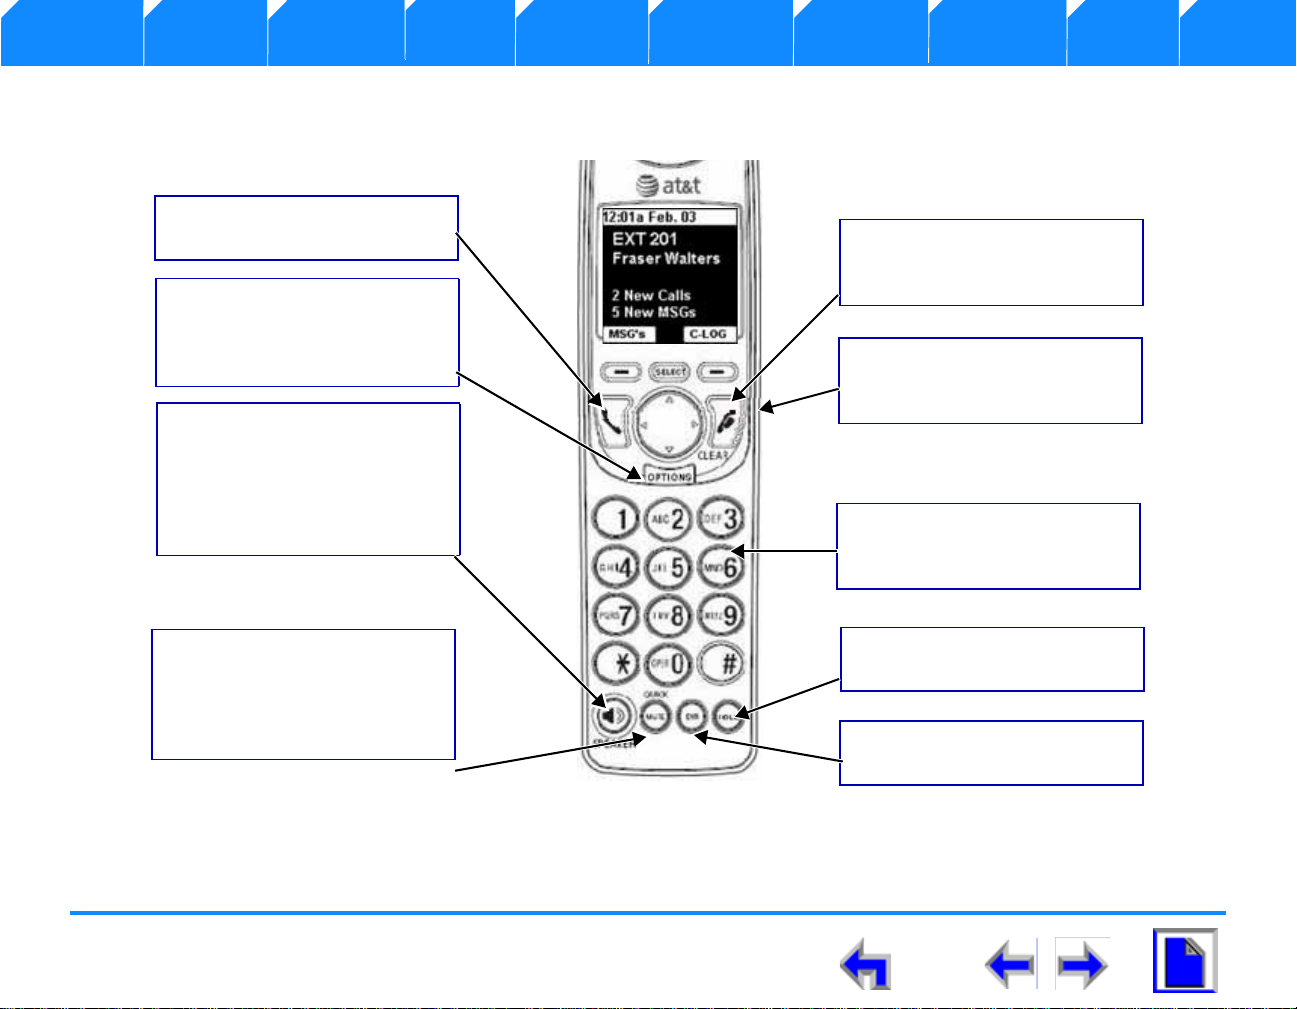
Phone
Function depends on mode.
Clear/Off
Hangs up current call or ends
paging.
Options
Accesses options available
within the current mode of
operation
Mute/Quick
Mutes the base microphone
while on active or conference
call. In most other modes,
accesses quick dial numbers.
DIR
Accesses local directory.
Hold
Function depends on mode.
SPEAKER
Routes audio to speakerphone.
Generates dial tone in Idle mode.
Toggles audio from speaker to
headset or wired headset during
active call.
Vol+/Vol-9 (On side)
Increases the ringer, audio, or
call volume.
Dial, 0-9, *, #
Displays digits entered, performs
short cuts, or indexes to list.
Description Setup Make Call Call Mail Hold/Park Transfer Conference Trouble Glossary
Handset Description
Figure 2 and Figure 3 illustrate and describe the function keys for the SB67040 Remote Handset
Figure. 2 SB67040 Remote Handset Key Functions
SB67040 Remote Handset User’s Guide - Description 11
Page 15
Answer Voice Call
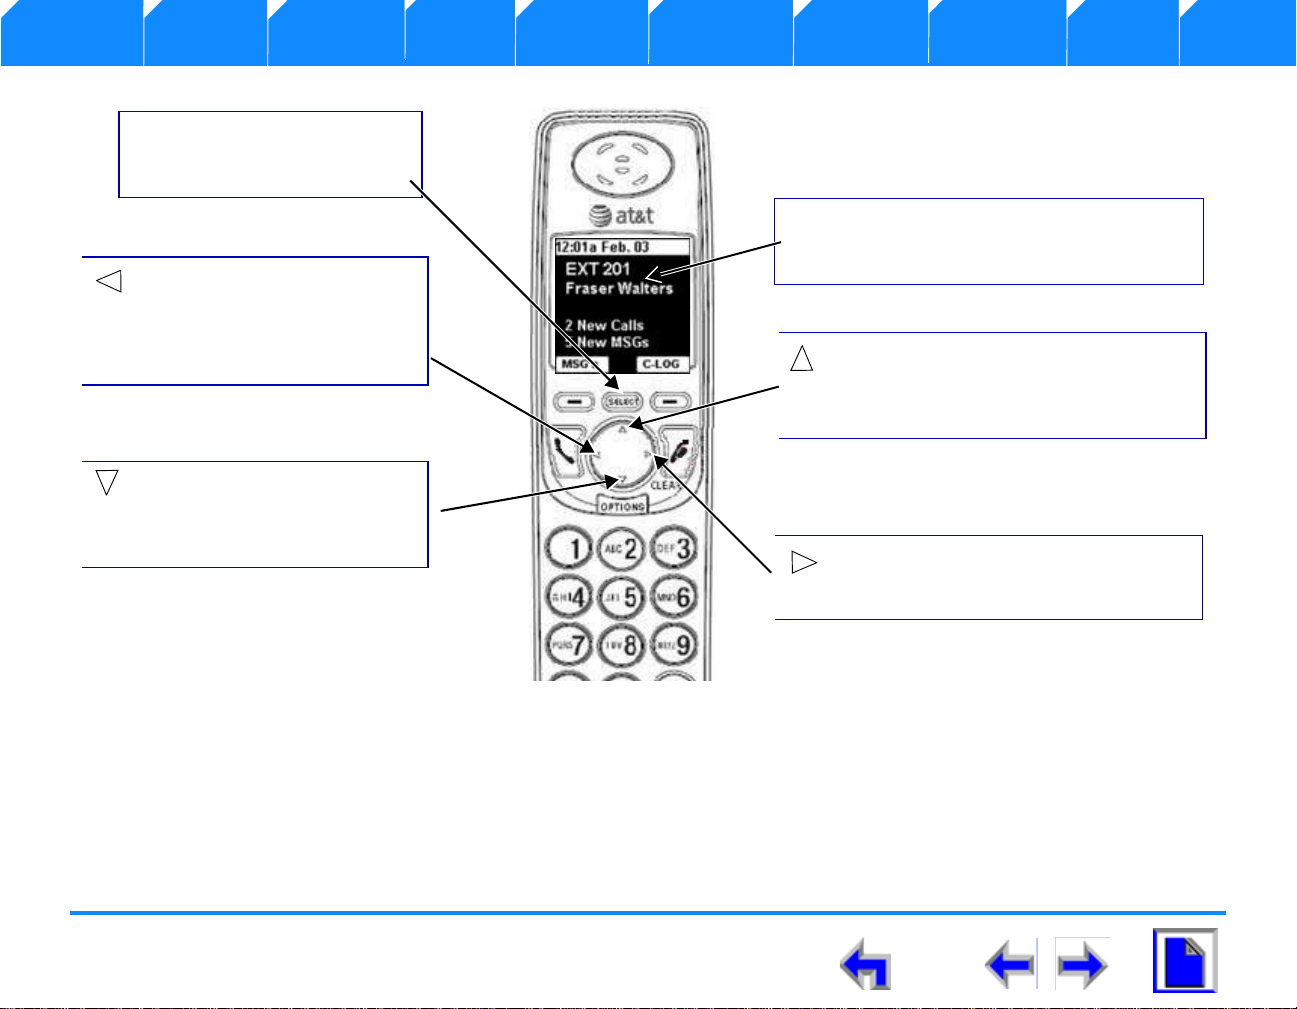
Select
Selects an option out of a menu
or list.
Scrolls through list entries. Highlights
new messages or new calls in Idle
mode. Adjusts contrast level in display
menu.
Scrolls or cycles through list entries.
Used in message playback toforward
message or play next message.
Scrolls or cycles through list
entries. Performs backspace
function, or is used in message
playback to rewind message or
play previous message.
Scrolls through list entries.
Highlights new messages or
new calls in Idle mode. Adjusts
contrast level in display menu.
Liquid Crystal Display (LCD)
Provides the Graphical User Interface (GUI) for
the business system
Description Setup Make Call Call Mail Hold/Park Transfer Conference Trouble Glossary
Figure. 3 SB67040 Remote Handset Key Functions
SB67040 Remote Handset User’s Guide - Description 12
Page 16
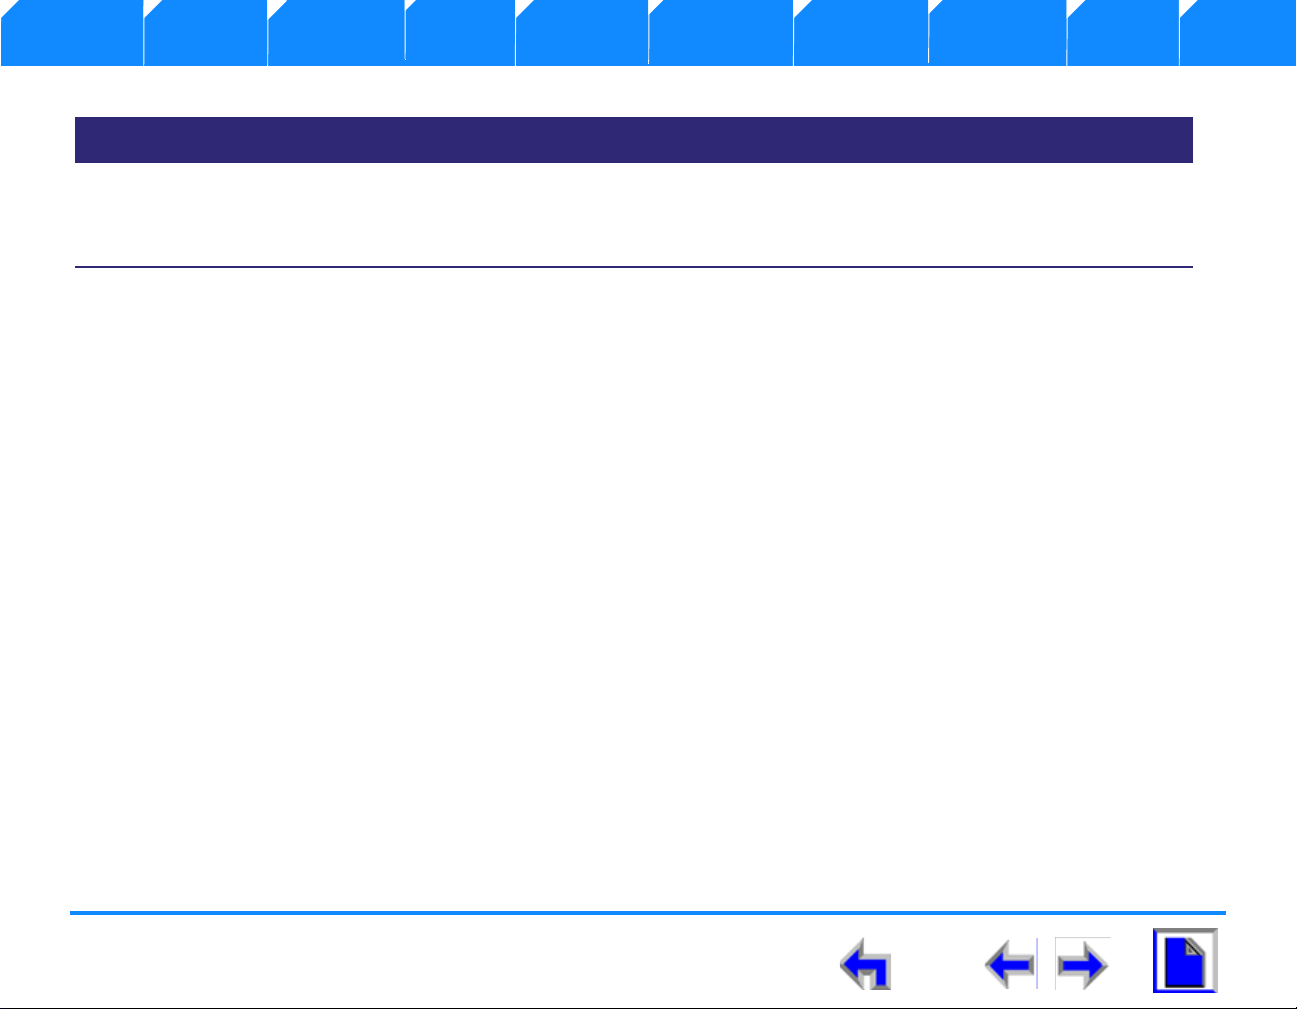
Answer Voice Call
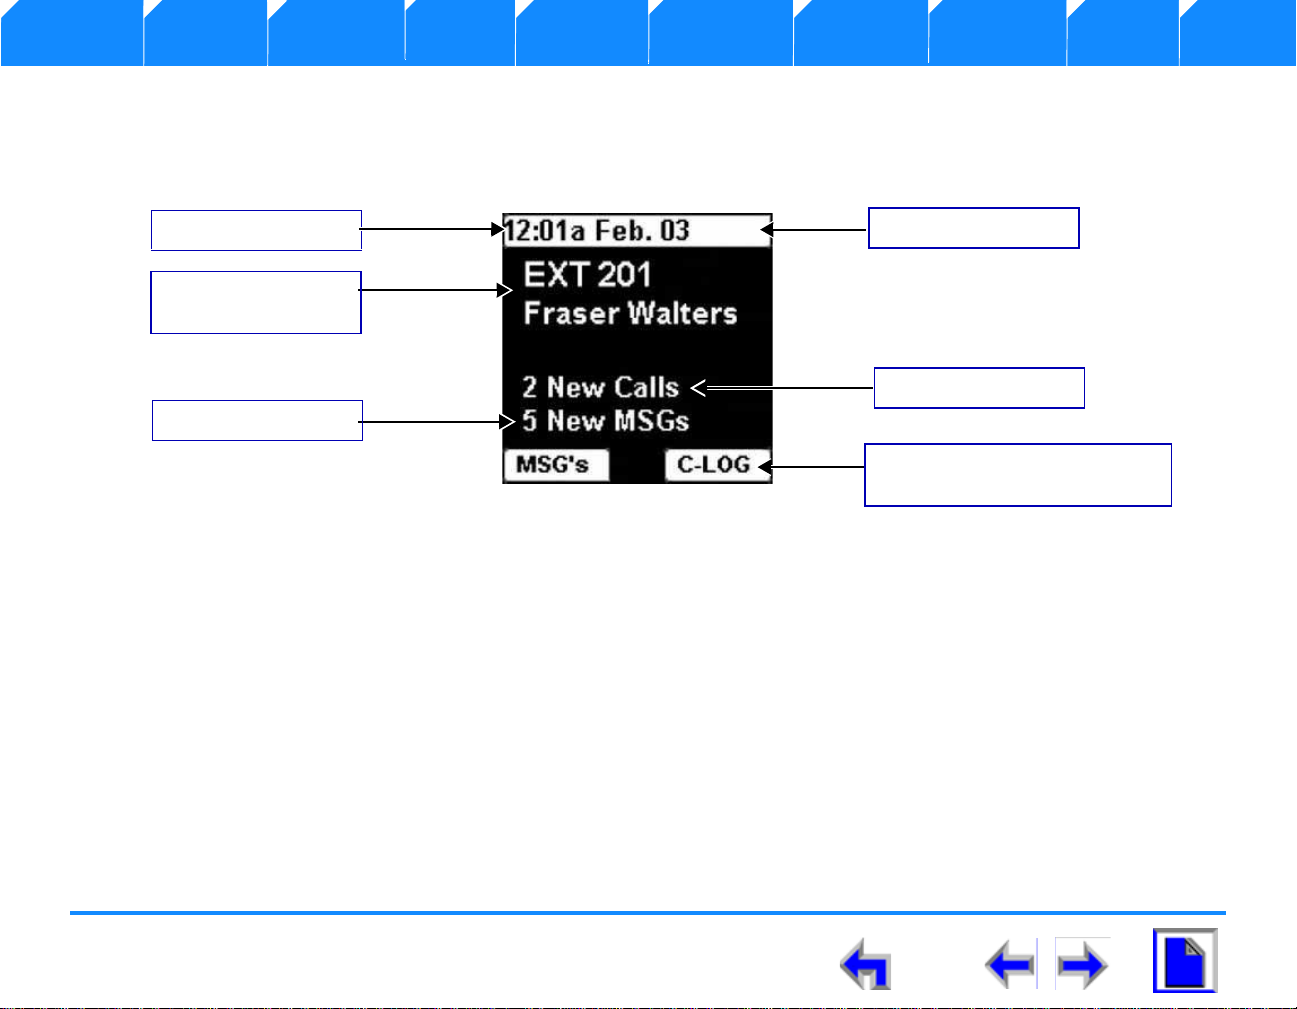
Status Notification
Date and Time
Extension number
and name
Missed Calls
New Messages
Display keys (See “Display
Keys” on page 16
Description Setup Make Call Call Mail Hold/Park Transfer Conference Trouble Glossary
SB67040 Remote Handset Screens
All SB67040 Remote Handset operation begins from the Idle screen shown in Figure 4. This screen displays when the Desk Set is first
turned on or at the end of any operation such as completion of a call, or when the extension does not have any Active or Held Calls.
Figure. 4 SB67040 Remote Handset Idle Screen
SB67040 Remote Handset User’s Guide - Description 13
Page 17
Answer Voice Call
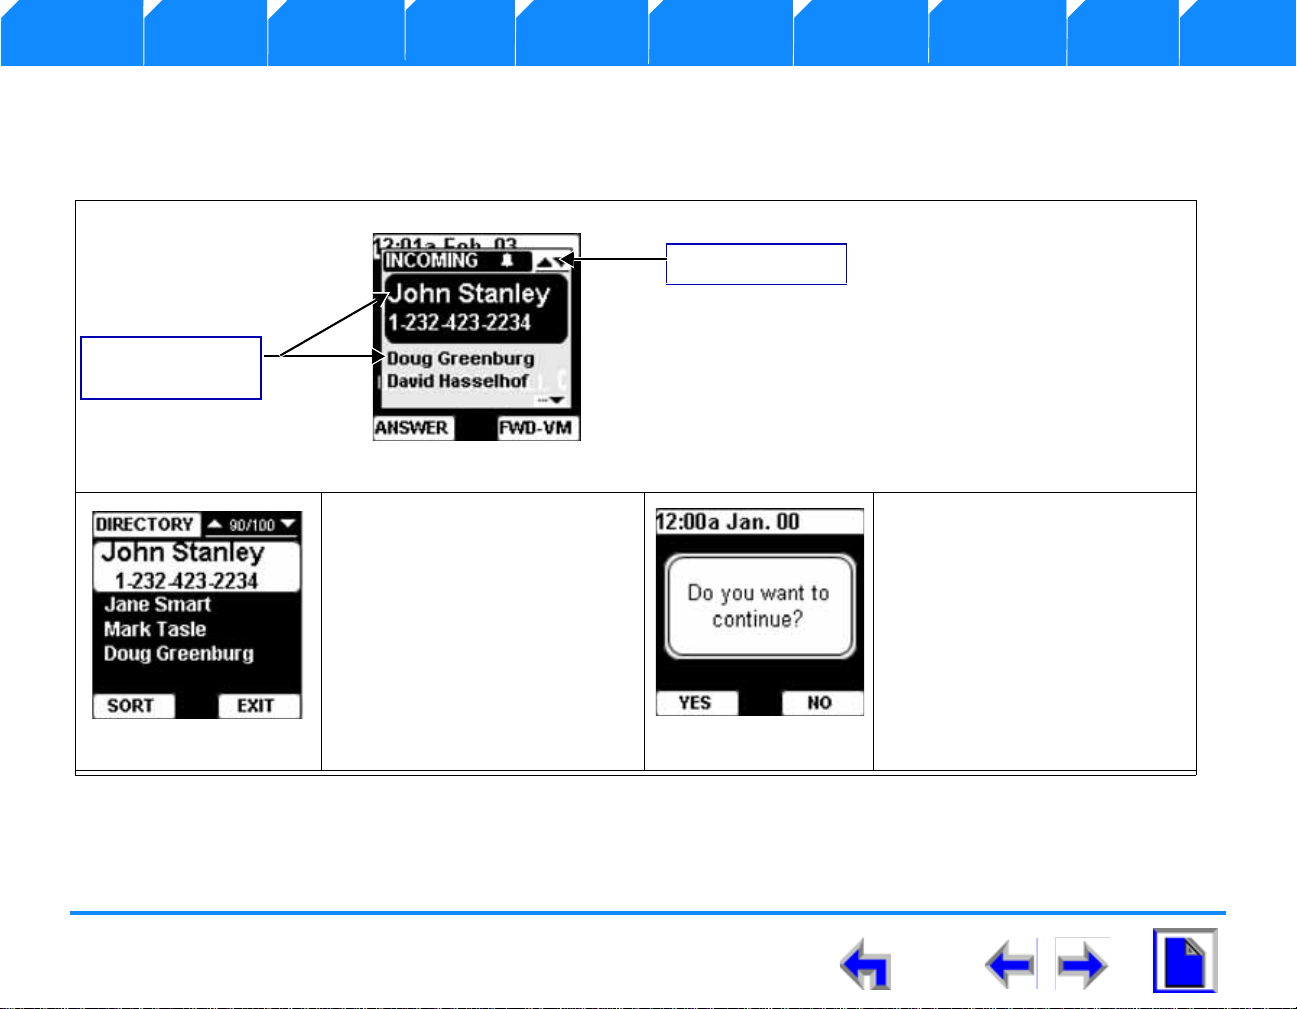
Incoming Ring
Multiple Incoming
Rings
Incoming Call Splash Screen
List Screen
Confirmation Screen
Description Setup Make Call Call Mail Hold/Park Transfer Conference Trouble Glossary
LCD Screen Types
The SB67040 Remote Handset provides several types of screens to assist you as shown inTable 1.
Table 1 SB67040 Remote Handset Screen Types
The highlighted entry in the
Incoming Call splash screen
displays name (if available) and
number. The other entries display
name only. The up and down
arrows to the right of the header
indicate that the up or down
navigation key can be pressed to
cycle through incoming calls.
SB67040 Remote Handset User’s Guide - Description 14
The highlighted entry on list
screens display a name and
number. The other entries may
display name and time called. The
up and down arrows on either side
of the entry count allow you to
cycle through entries. The left and
right arrows on either side of the
name indicate that the left or right
navigation key can pressed to
cycle through dialing options.
Confirmation screens require that
that you confirm a choice by
pressing a YES or NO soft key.
Page 18
Answer Voice Call
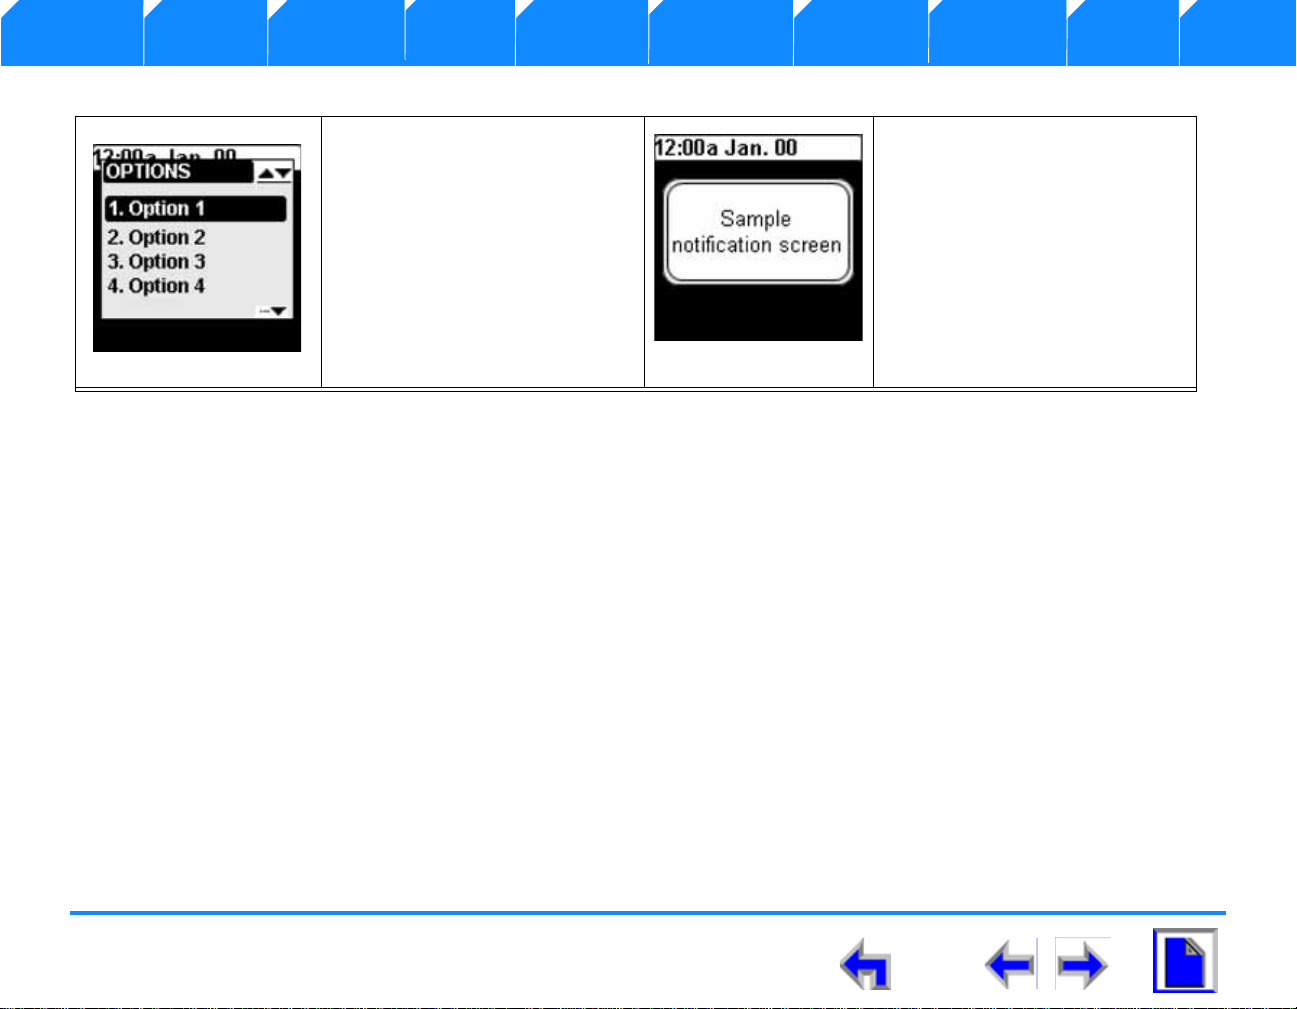
Interaction Screen
Notification Screen
Description Setup Make Call Call Mail Hold/Park Transfer Conference Trouble Glossary
Table 1 SB67040 Remote Handset Screen Types (cont’d)
Interaction screens display menu
option lists in which you can cycle
through options and make a
selection.
Notification screens alert you that
an action has been completed,
provides a status update, or gives
a warning.
SB67040 Remote Handset User’s Guide - Description 15
Page 19
Answer Voice Call
Description Setup Make Call Call Mail Hold/Park Transfer Conference Trouble Glossary
Display Keys
The SB67040 Remote Handset display keys provide programmed functions based on your current activity. For example, different display
keys are available if you are making a call, using the directory, or answering a call. Table 2 provides a list and description of all of the
Display keys available to you.
Table 2 SB67040 Remote Handset Display keys
Key Description Key Description
MSG’s Accesses message playback. PAUSE Pauses message (once message playback has started) in
message playback mode. In Pre-dial mode, Inserts a two
second pause into the digit string.
C-LOG Accesses call log. ANSWER Answers incoming call in Idle mode. During an active call,
auto holds current call and answers incoming call.
HELP Accesses context-sensitive help
on the display screen.
EXIT Exits from current mode and
returns user to previous state.
PAGE Pages other extensions in Synapse
network
SORT Accesses sort options menu. UNHOLD Takes a call off hold and returns user to active call.
EXT_#s Accesses extension list. PLAY Plays message (if auto-play is off) during message playback.
CANCEL Terminates current operation. DROP Drops a selected call during a three-way conference.
SB67040 Remote Handset User’s Guide - Description 16
FWD-VM Silences ringer and forwards incoming call to voicemail.
Returns user to previous mode.
XFER During an active call, holds call, reserves line for transfer
and generates dial tone. During a held call, reserves line for
transfer and generates dial tone. In transfer confirmation
mode, is used to transfer call to destination.
CONF During an active call, holds call, reserves line for transfer
and generates dial tone. In conference confirmation mode,
initiates three-way conference.
Page 20
Answer Voice Call
Description Setup Make Call Call Mail Hold/Park Transfer Conference Trouble Glossary
Screen Icons
The SB67040 Remote Handset screen icons provide a shorthand indication of handset activity. Table 3 lists and desc ribes the screen
icons available to you.
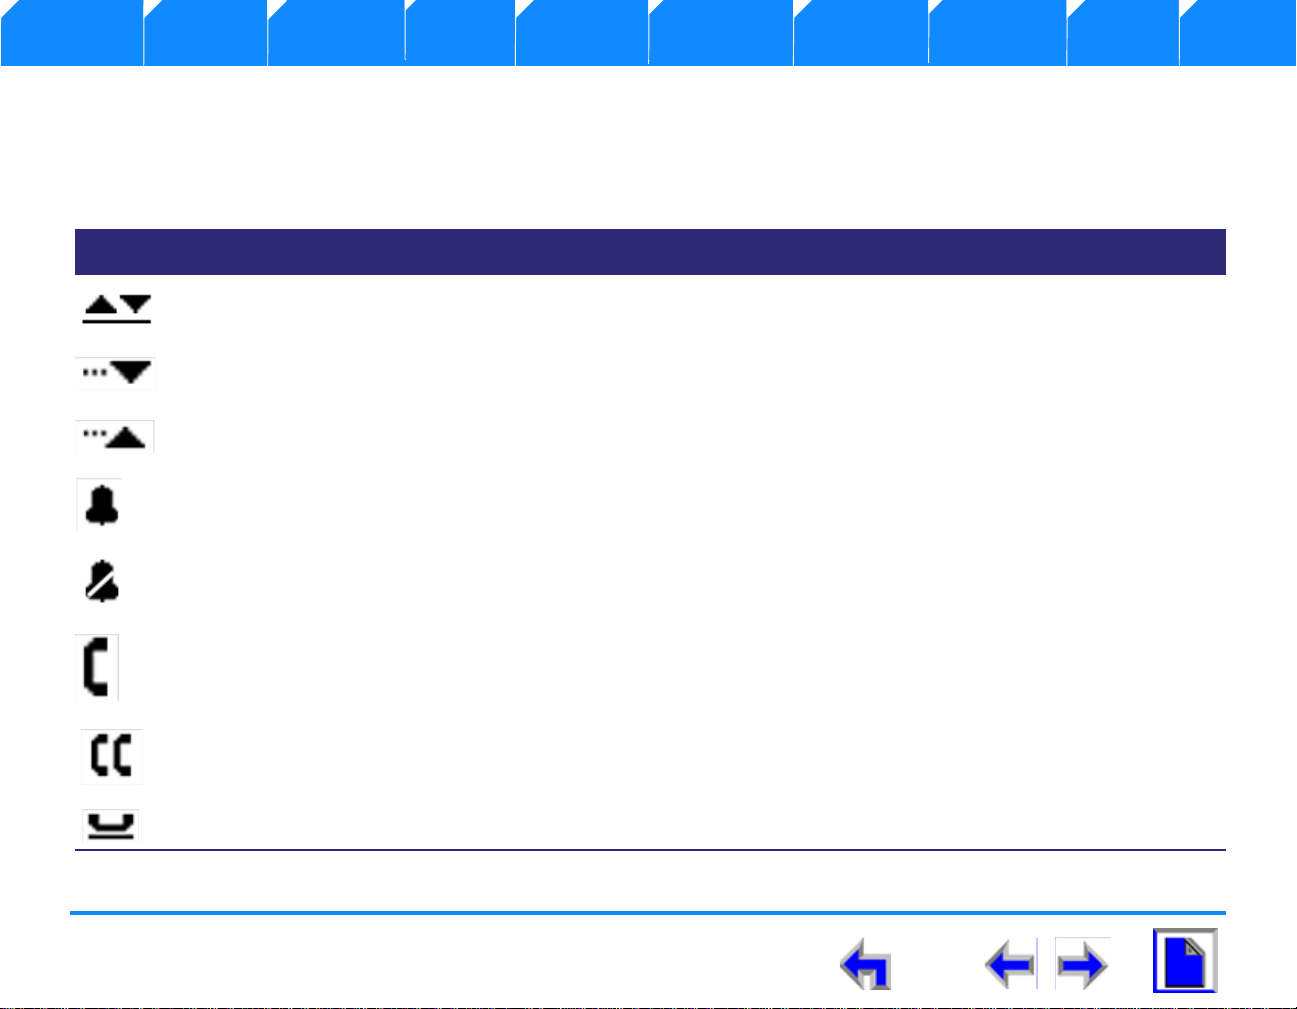
Table 3 SB67040 Remote Handset Screen Icons
Icon Function Description
Navigate up or down list Present whenever the up or down navigation key can be used to move the highlight
bar to the next or previous entry in a list.
Page down Present when text or a list continues onto a new page below the current page.
Page up Present when text or a list is available to view in the previous page.
Incoming ring, or CS ringer on Appears during an incoming ring event, or during volume control.
Silenced incoming ring, or CS
ringer silenced (muted)
Active call (off-hook) Present during an active call.
Conference Present during a three-way conference.
Call on hold Appears when a call is placed on hold. In sync with soft key LED.
SB67040 Remote Handset User’s Guide - Description 17
Appears during an incoming ring event, or during volume control.
Page 21
Answer Voice Call
Description Setup Make Call Call Mail Hold/Park Transfer Conference Trouble Glossary
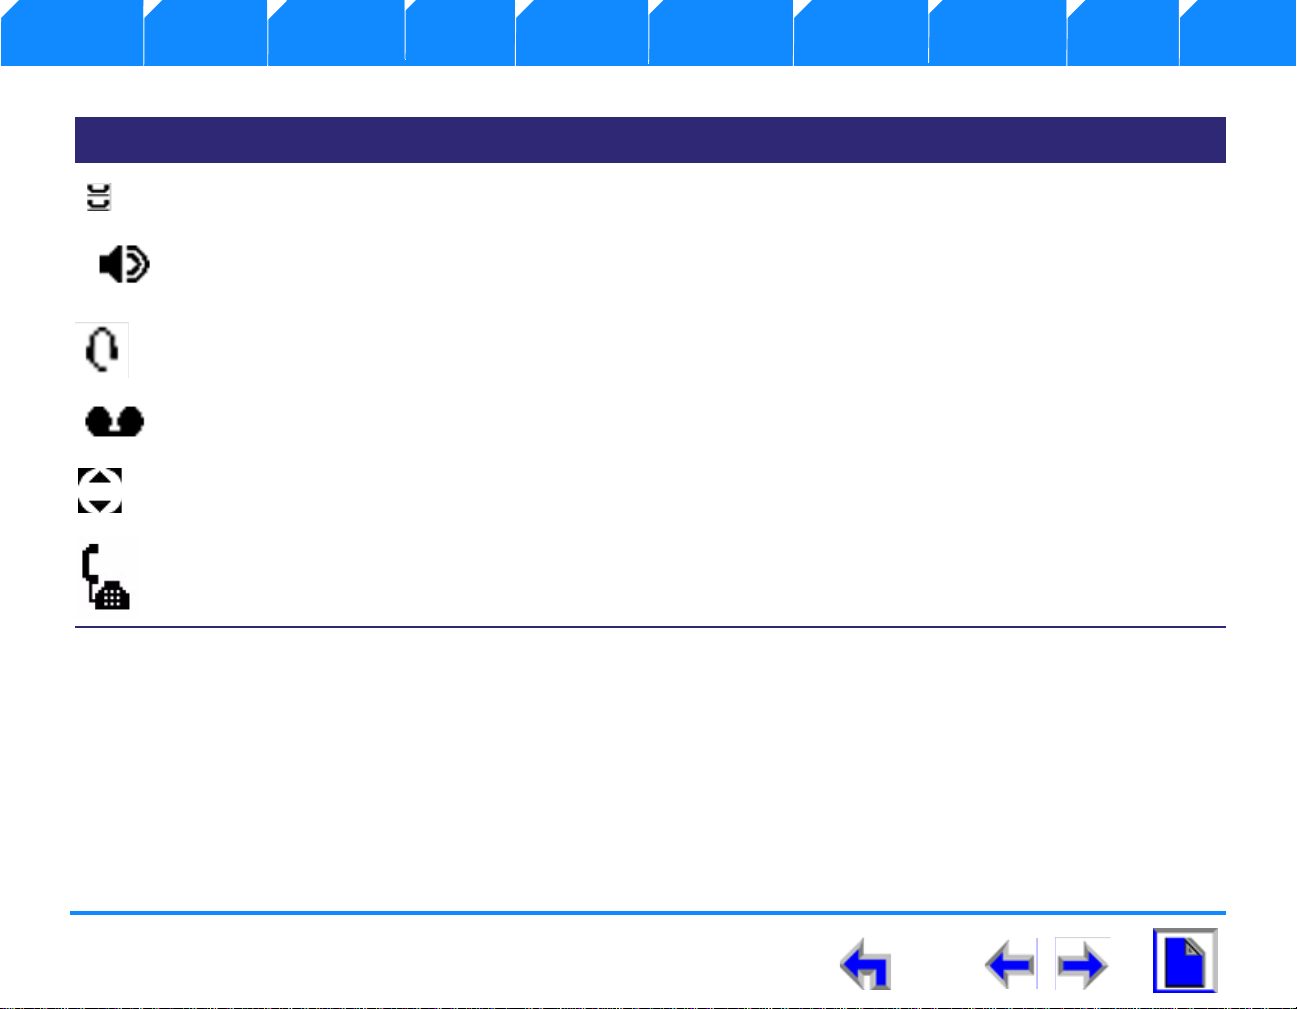
Table 3 SB67040 Remote Handset Screen Icons (cont’d)
Icon Function Description
Conference on hold Appears when a conference call is placed on hold.
Speaker, or page Appears when user switches to speakerphone, or when paging. In sync with hard key
LED.
Headset in use Appears when a headset is inserted.
New voicemail message Appears in the call log to indicate when a caller has left a new voicemail message.
Message playback navigation Present during message playback to indicate that the up or down navigation keys can
be pressed.
Deskset in use Appears when the Deskset has assumed control of operations.
SB67040 Remote Handset User’s Guide - Description 18
Page 22
Answer Voice Call
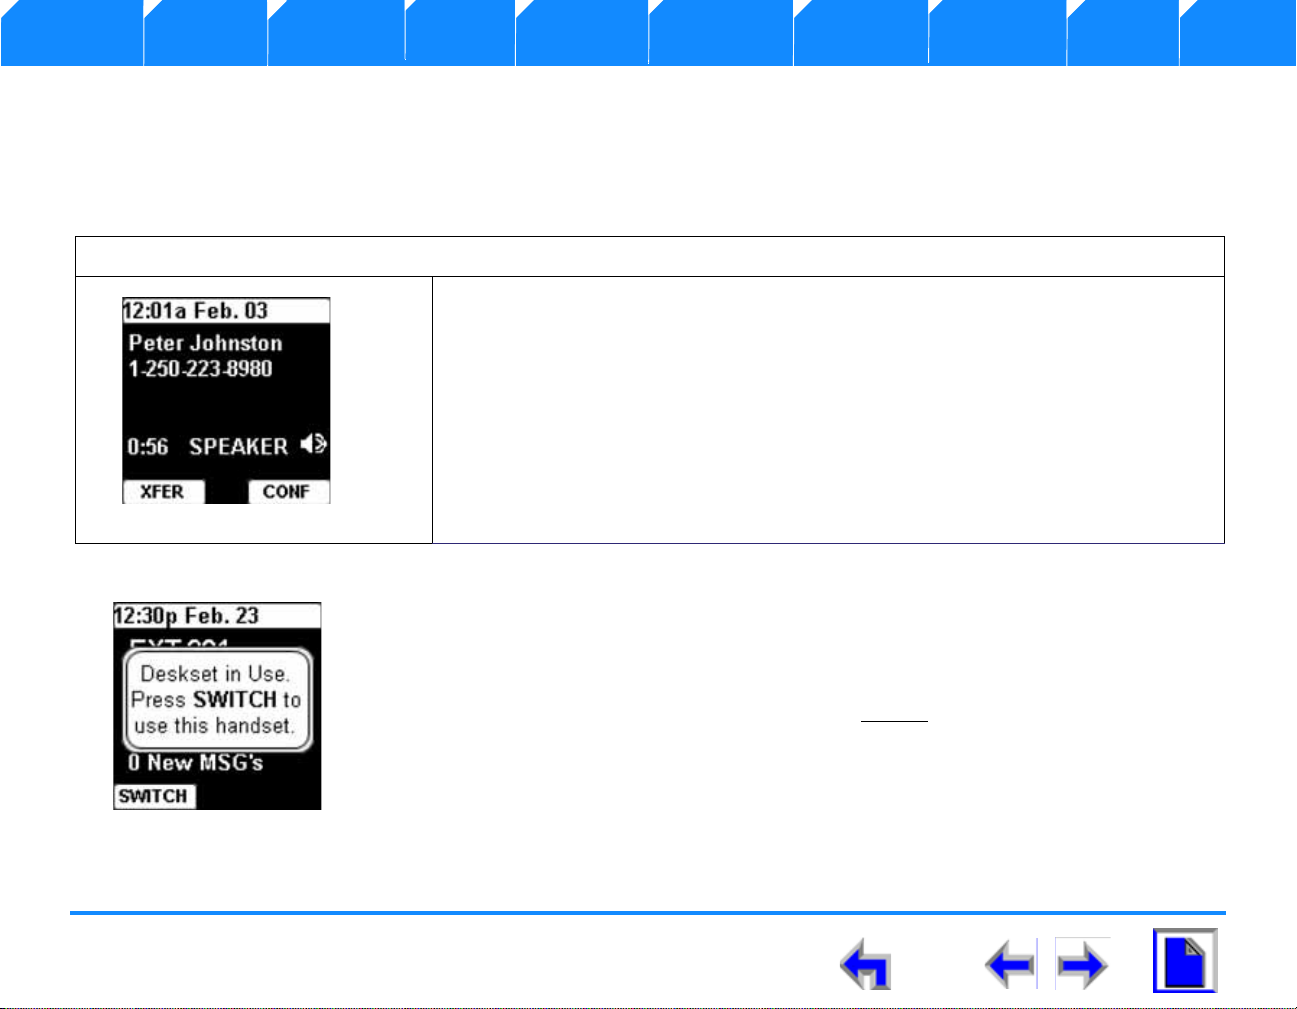
Figure. 5 Speakerphone
Description Setup Make Call Call Mail Hold/Park Transfer Conference Trouble Glossary
Using the Speakerphone
The speakerphone can be toggled on or off in all modes. When the speakerphone is active, the SPEAKER hard key is backlit. In Idle or
dial mode, this hard key behaves similarly to PHONE, except that audio is routed to the speakerphone. Plugging in the headset will
reroute audio from the speakerphone to the headset.
To use the speakerphone on an active call:
1. Press SPEAKER with the idle screen displayed, and observe that the key becomes
backlit and the screen shown in Figure 5 displays.
2. Press SPEAKER with the screen shown in Figure 5 displayed and the key
backlight goes out and the Idle screen displays.
3. During an active call, pressing SPEAKER toggles audio from the handset to
the speakerphone. If the headset is plugged in, pressing SPEAKER will toggle
audio from the headset to the speakerphone.
Figure. 1 Deskset In Use
SB67040 Remote Handset User’s Guide - Description 19
Deskset In Use
Initiating a call or pressing a Function key on the deskset transfers control from the handset to the
deskset. When you switch control from the handset to the deskset, the “deskset in use” notification
screen shown in Figure 1 displays on the handset. Press SWITCH
to return control to the handset.
Page 23
Answer Voice Call
Description Setup Make Call Call Mail Hold/Park Transfer Conference Trouble Glossary
SB67040 Remote Handset/The SB67030 Deskset Comparison
Table 4 highlights key capability differences between the cordless handset and the desktop
Table 4 Handset/Deskset Capabilities
Feature Handset Deskset
Pick up held call
XX
View other Held calls Scrollable in a Call Deck Available in CA appearance view
View simultaneous incoming calls Scrollable in a pick list Available in CA appearance view
Pre-dial Available in idle and held call state
View Voicemail List Not available, scrollable through individual
X
X
voicemail records
Play voicemail in Call Logs Not available
Record Voicemail greeting Not available
Delete all Call Log entries Not available
Copy Call logs to Directory Not available
Create Directory entry Not available
Edit Directory entry Not available
Delete Directory entry Not available
Copy Redial into Directory Not available
Directory Sort Limited to First/Last Name sort in entire list
only. Cannot list specific groups by First/Last
First/Last Name toggle allows user to
sort specific groups
X
X
X
X
X
X
X
X
Name.
SB67040 Remote Handset User’s Guide - Description 20
Page 24
Answer Voice Call
Description Setup Make Call Call Mail Hold/Park Transfer Conference Trouble Glossary
Table 4 Handset/Deskset Capabilities
Feature Handset Deskset
Program Quick Not available
Speakerphone Key Routes audio to/from speaker & picks up call
(does not hang up call)
X
Routes audio, pick up and hang up call
SB67040 Remote Handset User’s Guide - Description 21
Page 25
Answer Voice Call
Description Setup Make Call Call Mail Hold/Park Transfer Conference Trouble Glossary
C HAPTER
2
S
ETUP
Introduction
Your SB67040 Remote Handset ships with a factory or default settings for a variety of settings in
the following categories:
1. “Handset Power Up” on page 23
2. “Battery Charging” on page 24
3. “Handset Registration” on page 26
4. “Handset Setup” on page 30
5. “Handset Volume Control” on page 34
Note Use only the power adapter(s) supplied with this product. To order
a replacement power adapter, visit our website at
www.telephones.att.com, or call 1 (800) 222-3111. In Canada, dial
1 (866) 288-4268.
SB67040 Remote Handset User’s Guide - Setup 22
Page 26
Answer Voice Call
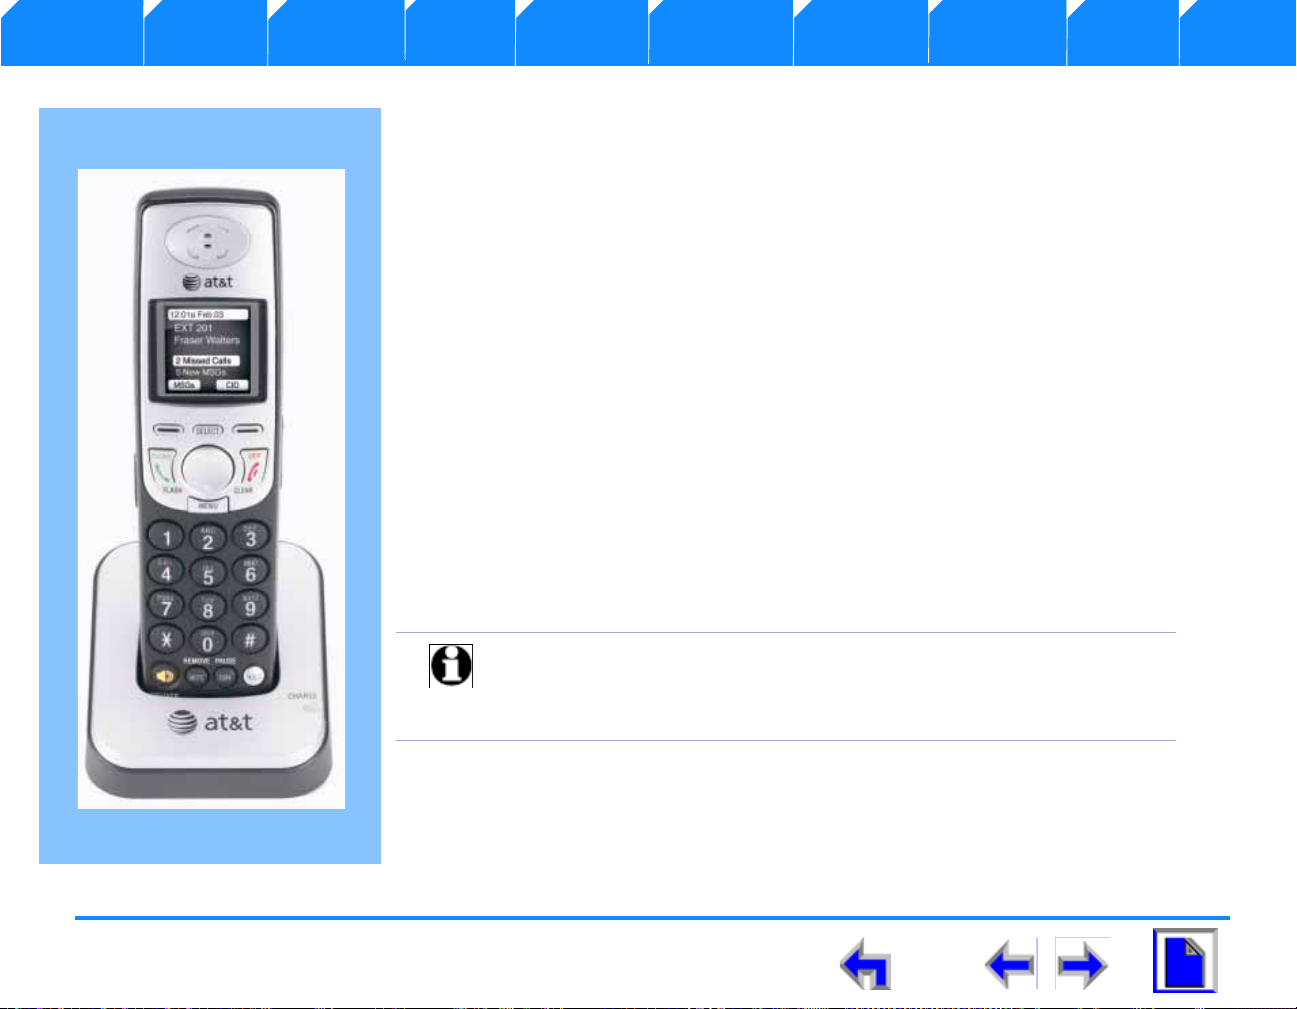
Figure. 6 Handset Power Connect
Note The power adapter is intended to be correctly
oriented in a vertical or floor mount position. The
prongs are not designed to hold the plug in place
if it is plugged into a ceiling, under-the-table or
cabinet outlet.
Figure. 7 Handset Battery Install
Description Setup Make Call Call Mail Hold/Park Transfer Conference Trouble Glossary
Handset Power Up
The SB67040 Remote Handset uses a rechargeable 3.3v nickel-metal hydride cell (NiMH) pack and comes with a battery charger..
To apply power to the SB67040 Remote Handset:
1. Plug the power adapter into an electrical outlet not controlled
by a wall switch.
2. Plug the small end of the handset charger power adapter into
the jack on the underside of the charger
3. Route the cord through the slot as shown in Figure 6.
1. Install the battery as shown in Figure 7. After installing the
battery, you can make and receive short calls.
2. Plug the battery securely into the plug inside the handset
battery compartment, matching the color-coded label.
3. Place the battery in the compartment with THIS SIDE UP facing
up as indicated.
4. Align the cover flat against the battery compartment cover,
then slide it upwards until it clicks into place.
SB67040 Remote Handset User’s Guide - Setup 23
Page 27
Answer Voice Call
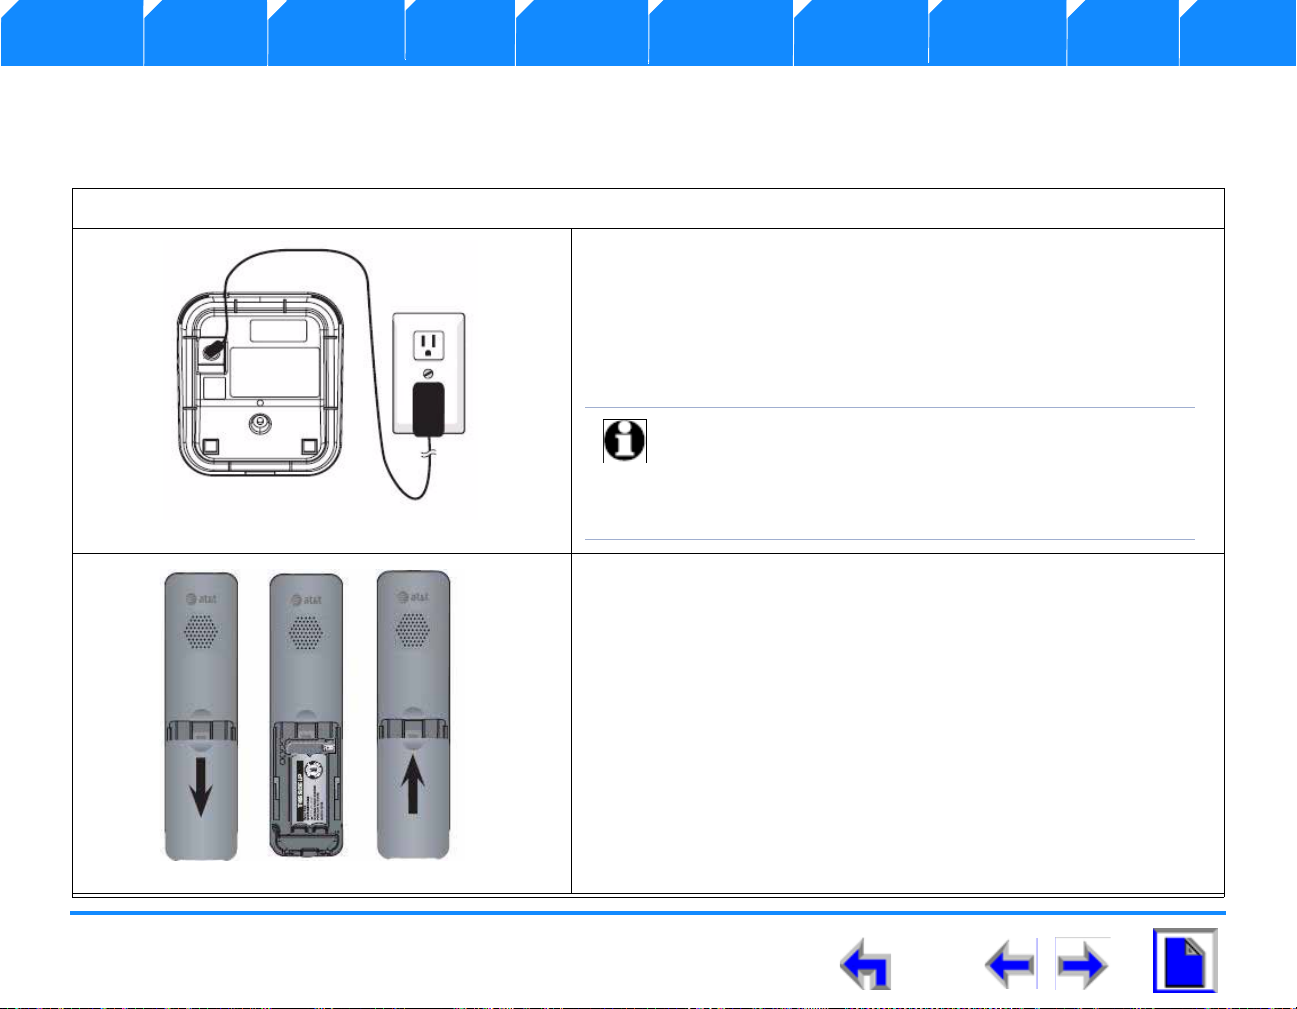
Figure. 8 Place In Charger Screen
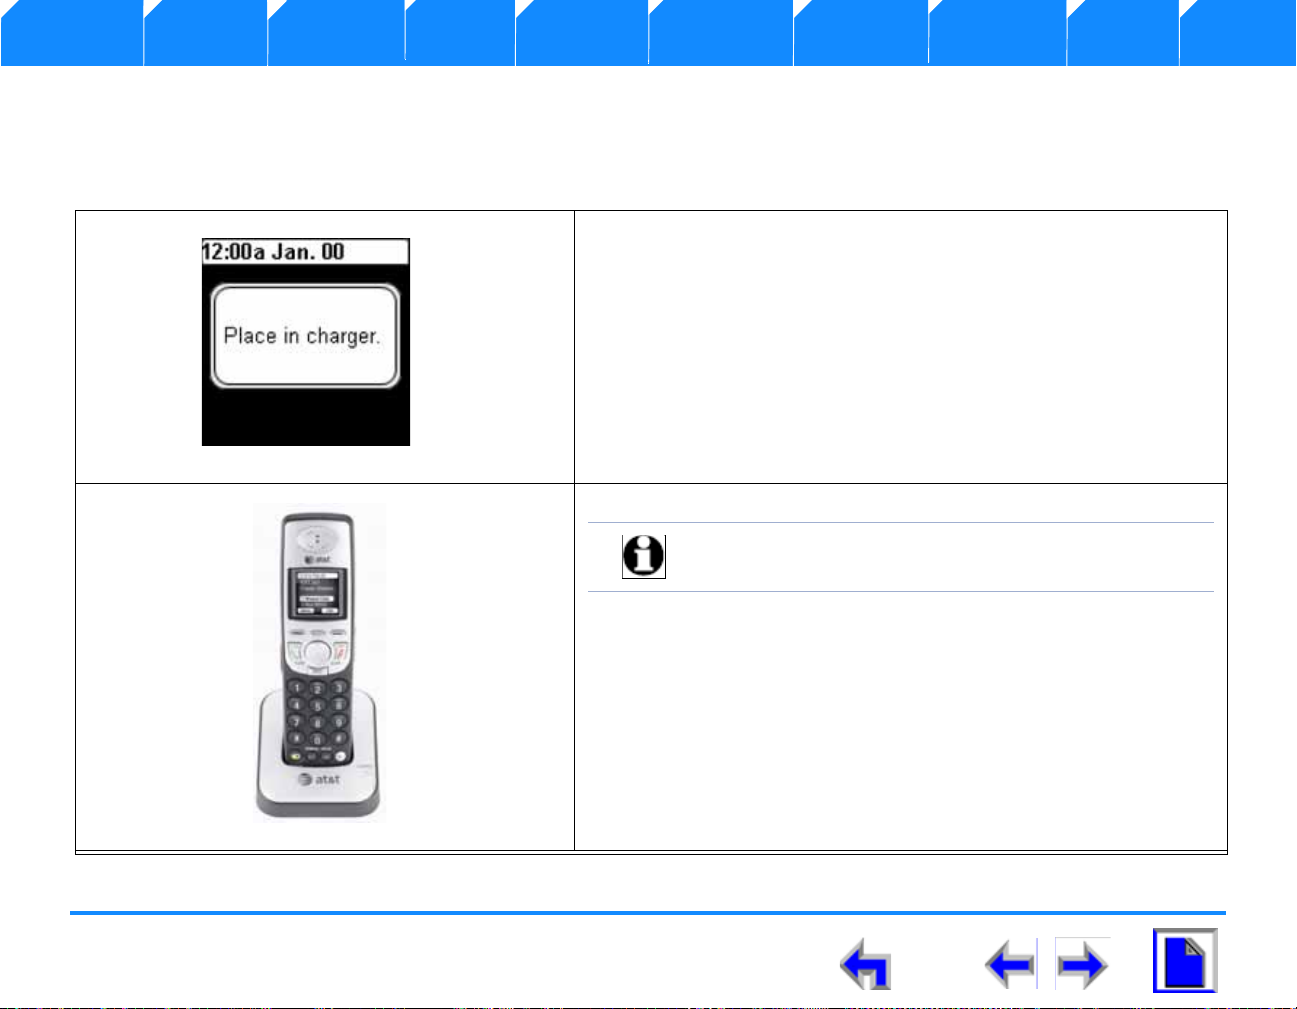
Figure. 9 Handset in Charger
Note Place the handset in the base when not in use.
Description Setup Make Call Call Mail Hold/Park Transfer Conference Trouble Glossary
Battery Charging
Charge the handset battery for at least 16 hours before use.When fully charged, the handset battery provides approximately five hours
of talk time or three days of standby time
1. During handset start up and initialization, the LCD displays a white
background.
2. When the system is fully operational, the LCD displays the “Place
in charger” notification screen shown in Figure 8.
3. Place the handset in the base face up as shown.in Figure 9
4. The CHARGE light will be on when charging.
SB67040 Remote Handset User’s Guide - Setup 24
Page 28
Answer Voice Call
Figure. 10 Low Battery
Note If the handset shuts down due to depleted batteries and
the user was on an active call at the time, that call will
be auto-held on the deskset
Figure. 11 Power Save
Description Setup Make Call Call Mail Hold/Park Transfer Conference Trouble Glossary
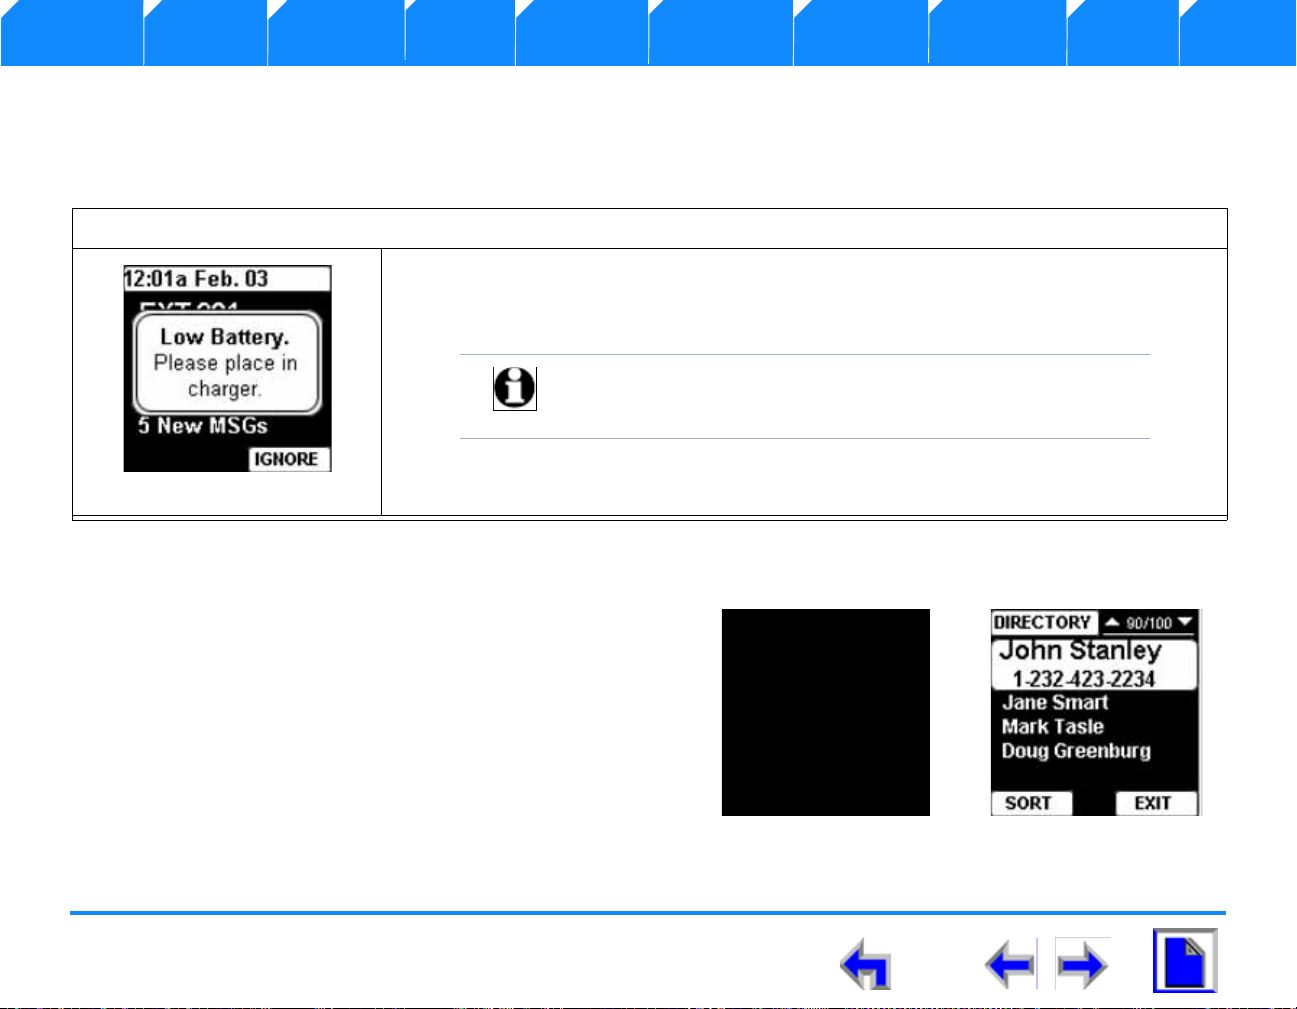
Low Battery Notification
When the battery is low, the handset emits a single alert tone and displays a “Low Battery – please place in charger” notification screen.
shown in Figure 10.
To handle low battery notification:
1. Pressing IGNORE to exit the notification screen.
2. Place the handset into the base.
.
Power Save
If the user is not on an active call and takes no action for thirty
seconds, the system will go into power save mode shown in
Figure 11.
n If you were in a feature or menu list, such as the Directory or
Call Log, the system will return Idle before going into powersave mode.
n In this mode, the backlight turns off.
n Press any key to end power-save mode. The key you pressed
determines the screen to be displayed, If you pressed DIR,
you will go to the directory.
SB67040 Remote Handset User’s Guide - Setup 25
Page 29
Answer Voice Call
Figure. 12 Charger Menu
Note Only one Cordless Handset or Headset can be
registered with the Deskset.
Figure. 13 Register Handset
Figure. 14 Menu Function
Description Setup Make Call Call Mail Hold/Park Transfer Conference Trouble Glossary
Handset Registration
This procedure provides instructions for registering a SB67040 Remote Handset. For complete information on cordless device
registration See the SB67030 Deskset User’s Guide for complete instructions on registering a handset . To unregistered a handset
see “Handset setup begins with the IDLE screen illustrated and described in Figure 4 on page 13.” on page 30.
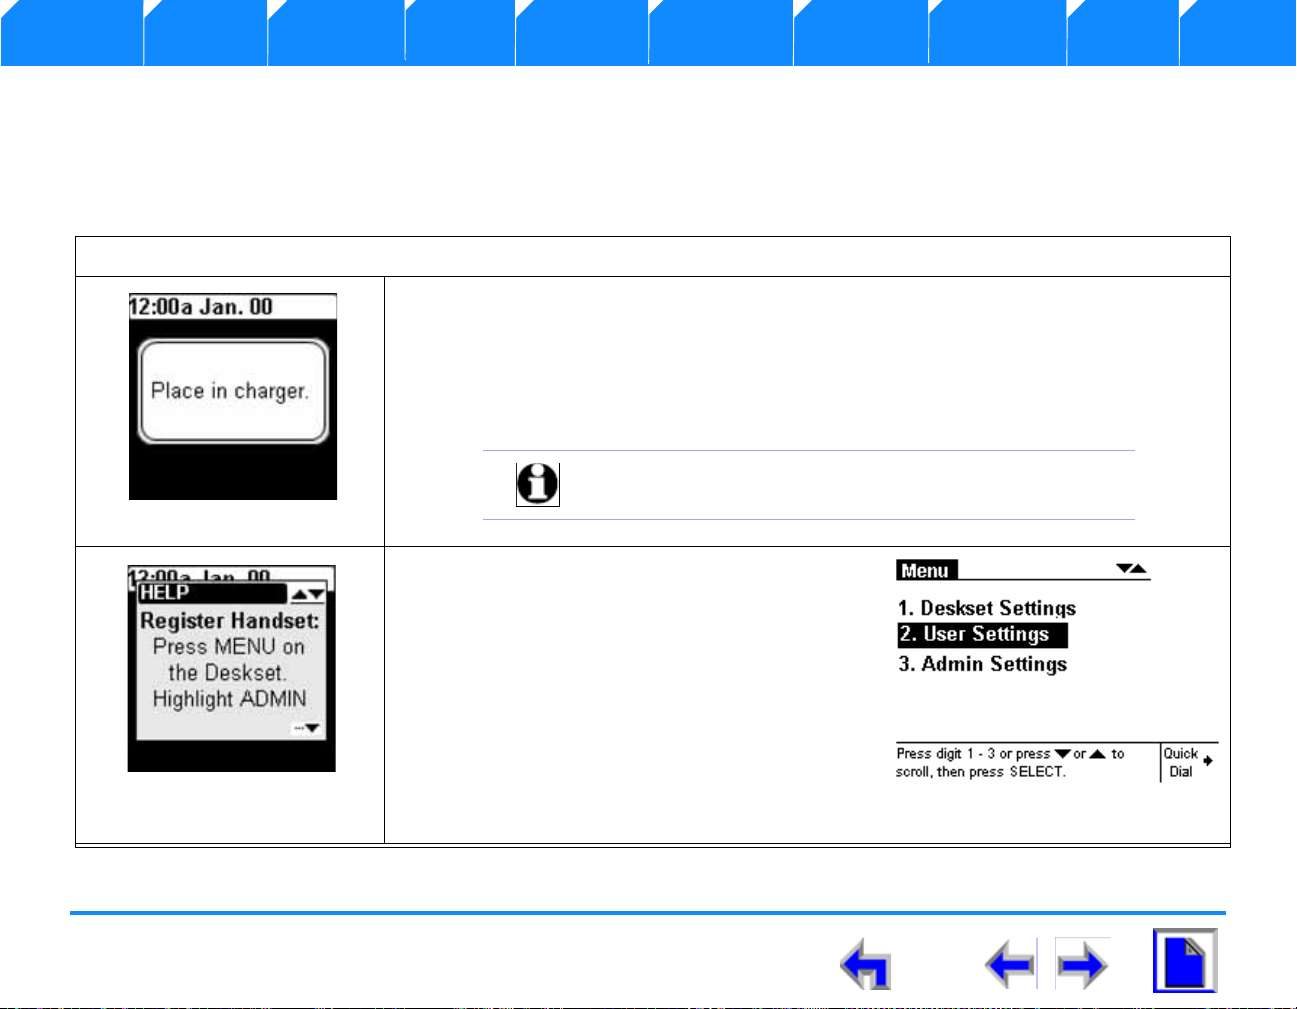
To register the SB67040 Remote Handset:
1. If the handset has no deskset registration information, the Place in Charger
notification screen shown in Figure 12 displays upon power up.
2. Place the handset into the base.
3. The handset will generate a beep and the “Register Handset” screen shown in
Figure 13 displays.
4. Press the MENU function key on the SB67030
Desk Set and observe that the Menu screen
shown in Figure 14 displays.
SB67040 Remote Handset User’s Guide - Setup 26
5. Press 2 on the keypad or press the down
arrow on the NAVIGATION button once to
move the highlight to User Settings as shown
in Figure 14.
Page 30
Answer Voice Call
Figure. 15 User Settings Cordless
Note For security reasons, the registration process on both
deskset and handset will terminate after the timeout
period of 60 seconds if registration is not successful.
Figure. 16 Cordless Registration
Figure. 17 Handset Not Registered
Note Registration can only be terminate by pressing the
CANCEL key on the deskset. The handset will continue to
attempt registration until it times out because the handset
will not know the deskset has terminated registration.
Description Setup Make Call Call Mail Hold/Park Transfer Conference Trouble Glossary
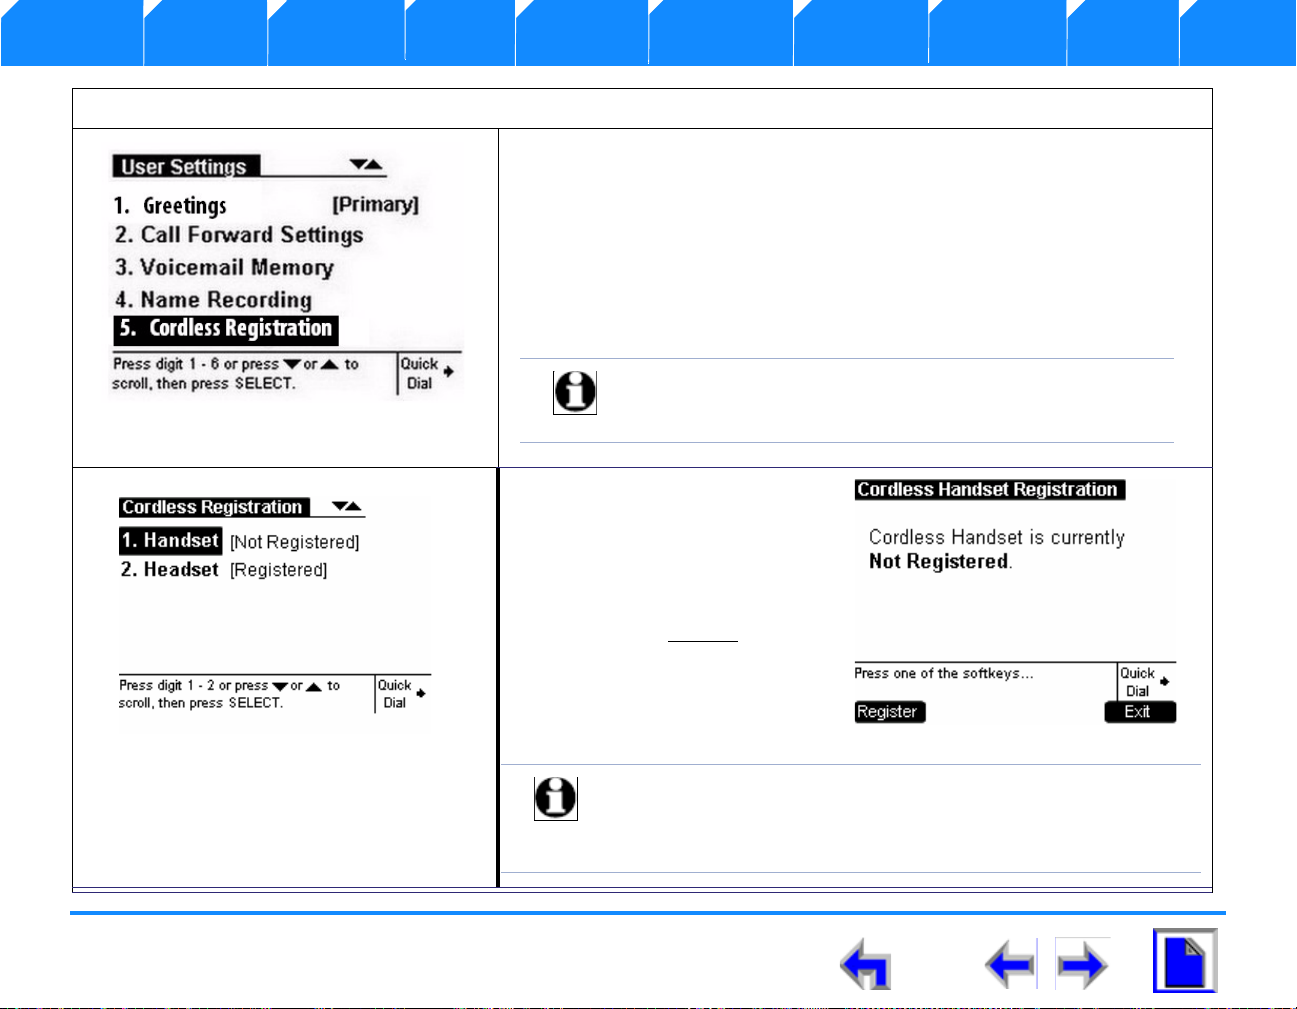
To access the Handset Registration function:
6. Press the SELECT function key to display the User Settings menu
shown in Figure 15.
7. Press 5 on the keypad or press the down arrow on the NAVIGATION
button four times to move the highlight to Cordless Registration as
shown in Figure 15 and press SELECT.
8. Observe that the Cordless Registration menu shown in Figure 16
displays.
9. Press 1 or press SELECT
to display the Cordless
Handset Registration
splash screen shown in
Figure 17.
10. Press the Register
programmed key shown in
Figure 17.
SB67040 Remote Handset User’s Guide - Setup 27
Page 31

Answer Voice Call
Figure. 18 Registration in Progress
Figure. 19 Handset Registered
Note Only one Cordless Handset
can be registered with the
Deskset.
Description Setup Make Call Call Mail Hold/Park Transfer Conference Trouble Glossary
To register a cordless device:
11. Once the handset has completed the initial
handshake with the deskset, the handset and
deskset display the “Registration in Progress”
splash screens shown in Figure 18.
12. When registration is complete, t he Deskset and
Handset generate a confirmation tone.
13. Observe that the Deskset Cordless Handset
Registration screen, displays “Cordless
Handset is currently Registered” and the
handset displays “Handset registered” as
shown in Figure 19.
14. Press the Exit
Cordless Registration screen.
If the registration process times out on the handset, it will
display “Registration Failed,” generate an error tone, and
initiate a self-reset. After the handset powers up again, it
will return to the unregistered handset start up screen. If
the registration process times out on the deskset, it will
display “Registration Failed,” generate an error tone, and
return to Idle mode.
SB67040 Remote Handset User’s Guide - Setup 28
programmed key to return to the
Page 32

Answer Voice Call
Description Setup Make Call Call Mail Hold/Park Transfer Conference Trouble Glossary
Link Loss Notification
If the handset goes out of the operating range of the deskset or if there is RF interference, a “Lost connection with Deskset” notification
screen shown in Figure 20 displays. The handset will search for the deskset in the background. After 30 seconds, the “Searching for
Deskset…” notification screen displays.
Figure. 20 Link Loss Notification Screens
If you are on a call, that call will not be dropped immediately, but will be muted on the far-end until a connection with the deskset is
re-established. The deskset displays the handset in use icon in the associated Call Appearance.
Any active or held calls will be dropped after four minutes of continuous link loss.
SB67040 Remote Handset User’s Guide - Setup 29
Page 33

Answer Voice Call
Figure. 21 Options Menu
Figure. 22 Settings Menu
Description Setup Make Call Call Mail Hold/Park Transfer Conference Trouble Glossary
Handset Setup
Handset setup begins with the IDLE screen illustrated and described in Figure 4 on page 13.
To view and alter configuration settings on the handset:
1. Press the OPTIONS function key and observe that the menu shown in Figure 21
displays.
2. Press 5 on the keypad or press the down arrow on the NAVIGATION button four
times to move the highlight to Settings as shown in Figure 21.and press SELECT.
3. Observe that the Settings menu shown in Figure 22 displays.
4. Perform one of the following functions:
a. Press 1 on the keypad or press SELECT to display Contrast menu shown in
Figure 23 on page 31.
b. Press 2 on the keypad or press the down arrow on the NAVIGATION button once
to move the highlight to Sounds and press SELECT to display the Sounds menu
shown in Figure 24 on page 31.
SB67040 Remote Handset User’s Guide - Setup 30
c. Press 3 on the keypad or press the down arrow on the NAVIGATION button twice
to move the highlight to Reset Settings and press SELECT to display t he Reset
Settings menu shown in Figure 25 on page 32.
d. Press 4 on the keypad or press the down arrow on the NAVIGATION button three
times to move the highlight to Unregister and press SELECT to display
Unregister menu shown in Figure 26 on page 32.
e. Press 5 on the keypad or press the down arrow on the NAVIGATION button four
times to move the highlight to Product ID and press SELECT to display Product
ID menu shown in Figure 27 on page 33.
Page 34

Answer Voice Call
Figure. 23 Contrast Menu
Figure. 24 Sounds Menu
Description Setup Make Call Call Mail Hold/Park Transfer Conference Trouble Glossary
To adjust the display contrast:
1. Press the left or right NAVIGATION button to adjust the Contrast until the desired
level is reached.
2. Press EXIT to accept the adjustments and return to the Settings menu shown in
Figure 22 on page 30.
To adjust the sound:
1. Press the up or down navigation key to cycle through audio options.
2. To adjust the Ring Volume from 0 to 6, Press the left or right NAVIGATION button.
Decreasing the volume to zero will turn off the ringer. The ringer will sound as it is
adjusted. You may also alter the ringer volume in Idle by pressing the Volume
Predefined key.
SB67040 Remote Handset User’s Guide - Setup 31
3. Press the down arrow on the NAVIGATION button once to choose one of eight
Ringers. The ringer tone for an incoming call from another extension will be
different.
4. Press the down arrow on the NAVIGATION button twice to highlight Key Beeps.
Press the left or right NAVIGATION button to adjust the Key Beeps ON
5. Press EXIT to accept the adjustments and return to the Settings menu shown in
Figure 22 on page 30.
or OFF.
Page 35

Answer Voice Call
Figure. 25 Reset Settings Menu
Figure. 26 Unregister Menu
Description Setup Make Call Call Mail Hold/Park Transfer Conference Trouble Glossary
To reset the handset to default settings (factory defaults):
1. Press YES to reset default settings, or press NO to keep current settings.
2. Press EXIT to accept the adjustments and return to the Settings menu shown
in Figure 22 on page 30.
To unregister the handset:
1. Press YES to unregister the handset from the deskset, or press NO to keep the
handset registered.
SB67040 Remote Handset User’s Guide - Setup 32
2. Press EXIT to accept the adjustments and return to the Settings menu shown
in Figure 22 on page 30.
Page 36

Answer Voice Call
Description Setup Make Call Call Mail Hold/Park Transfer Conference Trouble Glossary
.
To view the Product ID
1. This page displays the handset’s identification information, including serial number,
model number, software version, and registration status. This information cannot be
altered
2. Press EXIT to return to the Settings menu shown in Figure 22 on page 30.
SB67040 Remote Handset User’s Guide - Setup 33
Page 37

Answer Voice Call
Figure. 28 Ringer Volume
Figure. 29 Silenced Ringer
Incoming Ring
Description Setup Make Call Call Mail Hold/Park Transfer Conference Trouble Glossary
Handset Volume Control
Handset volume control includes both Ringer and Audio volume. You can increase or decrease the audio volume during an active call
or during message playback. You can increase or decrease the ringer volume only if not on an active call.
To adjust the Ringer volume:
1. Press the hard key VOL+ to increase the ringer volume, or press VOL- to decrease the
ringer volume when not on an active call.
2. Observe that a screen similar to the one shown in Figure 28 displays. The example shows
the volume set to 3. The minimum ringer volume is zero (off) and maximum volume is 6.
3. If you set the ringer to zero (silenced), the silent ring icon (See “Screen Icons” on page 17)
displays on the Idle screen and in the notification header during an incoming ring event,
as shown in Figure 29.
SB67040 Remote Handset User’s Guide - Setup 34
Page 38

Answer Voice Call
Figure. 30 Ringer Volume
Description Setup Make Call Call Mail Hold/Park Transfer Conference Trouble Glossary
To adjust the audio volume:
1. Press the hard key VOL+ to increase the audio volume, or press VOL- to decrease the
audio volume during an active call or during message playback.
2. Observe that a screen similar to the one shown in Figure 28 displays. The example shows
the volume set to 3. The minimum audio volume is 1and maximum audio volume is 6.
SB67040 Remote Handset User’s Guide - Setup 35
Page 39

Answer Voice Call
Description Setup Make Call Call Mail Hold/Park Transfer Conference Trouble Glossary
C HAPTER
3
M
AKING A
Introduction
This section describes the various methods available to you for making a call either on-hook, or
off-hook. The on-hook/off-hook refers to a historical telephone concept. A phone is on-hook
when there is no dial tone and you are not on a call. The phone is off-hook when you can hear
the dial tone. You can make a call:
3. In Idle mode or with calls on hold, press a DIAL KEY (1-9) then go off-hook, see “Pre-
dialing” on page 38
4. By choosing an off-hook method, then dialing a number, see.“Live Dialing” on page 39
5. When viewing the Directory, see “Making a Call From a Directory” on page 40
C
ALL
6. When viewing the Extension list, see “Making a Call From an Extension List” on page 42
7. When viewing the Call Log, see “Making a Call From the Call Log” on page 43
8. Through the redial feature, see “Making a Call From Redial” on page 45
9. From the quick dial list, see “Making a Call From Quick Dial” on page 46
SB67040 Remote Handset User’s Guide - Making a Call 36
Page 40

Answer Voice Call
Description Setup Make Call Call Mail Hold/Park Transfer Conference Trouble Glossary
Dialing Rules
The dialing rules determine when the system connects to the outside phone line in dial mode. Once the rule applies, the system dials
the digits. The mode changes from dial to active. There are five basic types of calls that need to be identified by the dialing rules:
Table 5 Dialing Rules
Call Type Dialing Rule Description
External call (PSTN
call)
Intercom call
(extension number)
Operator call 0 This is a special case of an intercom call, establishing a connection to the
Parked call 1xx This is a special case of the intercom call and is used to directly access parked
Emergency call 911 or 9911 Emergency services can be accessed either by dialing 911, or 9-911(where the
9 [0,2-8]
or
91[0,2-9]
or
99[0,2-9]
or
991[0,2-9]
[2-7]xx A 3-digit number with the 1st digit in the range 2~7. Makes a call to an
Any number starting with the external access code (9), EXCEPT 911 (see
emergency call below). Any additional digits dialed after the PSTN call type is
determined will be passed to the PSTN gateway (i.e. - the dial plan will NOT
wait for a full PSTN number to be dialed - it will only wait until it is determined
that PSTN dialing is required).
For example, entering the digit 9 will not pass this digit to the PSTN gateway.
However, entering 9-4 will prompt the system to pass the digit 4 to the
gateway.
Note that the dialing rule here has been written to specifically exclude 911 and
9911.
extension in the local network.
designated operator extension (e.g. 203) by simply dialing 0.
calls - defined by a 3 digit number with a leading 1.
leading 9 is used to access an external line, but is OPTIONAL).
SB67040 Remote Handset User’s Guide - Making a Call 37
Page 41

Answer Voice Call
Figure. 31 Registration in Progress
Figure. 32 Registration in Progress
Description Setup Make Call Call Mail Hold/Park Transfer Conference Trouble Glossary
Pre-dialing
Pre-dialing refers to dialing while in Idle mode or when all calls are on hold. Pressing a dialing key in these cases initiates the Pre-dial
mode. In this mode, no dial tone is generated but hyphenation rules do apply.
To make a call on-hook:
1. Press any DIAL key to initiate Pre-dial mode.
2. Press additional DIAL keys to insert the desired phone number at the
cursor. You have the following formatting options:
a. To delete a digit and move the cursor back one space, press left
NAVIGATION key.
b. To clear all digits, press OFF.
c. To insert a two-second pause into the digit string, press PAUSE.
3. Press CANCEL at any time to terminate the dialing sequence.
4. Press PHONE to go off-hook and dial the Pre-dial digits, or press
SPEAKER to go off-hook via speakerphone.
SB67040 Remote Handset User’s Guide - Making a Call 38
Page 42

Answer Voice Call
Figure. 33 Live Dial - Dial Mode
Figure. 34 Live Dial Digits
Description Setup Make Call Call Mail Hold/Park Transfer Conference Trouble Glossary
Live Dialing
Live dialing refers to making a new call off-hook.
To. make a call off-hook:
1. Press PHONE or SPEAKER to initiate Dial mode shown in Figure 33
2. Press the DIAL keys to insert a digit string at the cursor as shown in Figure 34.
Auto formatting applies. EXT_#s
entered.
3. After dialing rules are met, the handset goes to an active call mode. Hyphens
are automatically inserted for all 7, 8, 10, and 11 dialing, except when 9 is
followed by a zero for an outgoing international call.
n If you are on an active call, it is placed on hold.
.
n If there are calls on hold, pressing PHONE will get a new line.
n Pressing SPEAKER from Idle enters dial mode but pressing SPEAKER during
an active call re-routes audio to spea kerphone.
soft key is not available once a digit is
SB67040 Remote Handset User’s Guide - Making a Call 39
n During an active call, pressing dialing keys will display and transmit Dual Tone
Multiple Frequencies (DTMF) tones, but will not interfere with the current call.
n The user can press PHONE when Idle or during an active call to enter dial
mode.
Page 43

Answer Voice Call
Figure. 35 Directory Call
Description Setup Make Call Call Mail Hold/Park Transfer Conference Trouble Glossary
Making a Call From a Directory
The user may access the local directory by pressing DIR in any mode with the following exceptions.
n In Pre-dial mode
n During an incoming call event (with overlay)
n During call transfer confirmation
n During conference confirmation
n During a three-way conference call
To make a call from the directory:
1. Press DIR to access local directory.
2. Press the up or down navigation key to scroll to the desired entry, or
press a dialing key to index into the list based on the first character
entered.
3. You have the following options:
a. Press SELECT or PHONE to dial out the number selected
(highlighted) in the directory.
b. If you are accessing the directory from Idle mode, pressing
SPEAKER will dial the selected number. You are expected to
have programmed directory entries with a preceding 9 in the
digit string.
c. Press SORT to initiate sort directory options.
4. Press EXIT
to return to previous state
SB67040 Remote Handset User’s Guide - Making a Call 40
Page 44

Answer Voice Call
Figure. 36 Sort Options
Description Setup Make Call Call Mail Hold/Park Transfer Conference Trouble Glossary
Directory Sort Options
To arrange the directory according to sort criteria, use the NAVIGATION keys to scroll to the desired
sort option and press SELECT. Alternatively, press a DIAL key short cut to sort the directory based
on selection. The following sort options shown in Figure 36 are available:
1. First Name Sort directory by first name
2. Last Name Sort directory by last name
3. Personal Entries Sort directory according to personal contact list
4. Extensions Sort directory by extension number
SB67040 Remote Handset User’s Guide - Making a Call 41
Page 45

Answer Voice Call
Figure. 37 Select Option - Extension
Note To access the extension list during dial mode, press
EXT_#s
. This soft key is not available once a digit is entered.
Figure. 38 Extension List
Description Setup Make Call Call Mail Hold/Park Transfer Conference Trouble Glossary
Making a Call From an Extension List
You may make a call from the extension list in Idle or during Dial mode.
To make a call from the extension list:
1. Press OPTIONS and observe that the screen shown in Figure 37 displays.
2. Press the down navigation key twice so that the option Extension List is
highlighted and press SELECT, or press 3.
3. Observe that the screen shown in Figure 38 displays.
1. Press the up or down NAVIGATION key to scroll to the desired extension
entry, or press a dialing key to index into the list based on the first
character entered.
SB67040 Remote Handset User’s Guide - Making a Call 42
2. You have the following options:
a. Press SELECT or PHONE to dial out the number selected (highlighted)
in the extension list. If the user is accessing the extension list from Idle
mode, pressing SPEAKER will also dial out the selected number.
b. Press EXIT
c. Press HELP
to return to the previous state.
to access context-sensitive help.
Page 46

Answer Voice Call
Figure. 39 Options - Call Log
Note To access the call log from Idle or dial mode, press
C-LOG
.
Description Setup Make Call Call Mail Hold/Park Transfer Conference Trouble Glossary
Making a Call From the Call Log
The user may access the call log from Idle, dial, held call or active mode.
To make a call from the call log:
1. To access the call log press OPTIONS. and observe that the menu shown
in Figure 39 displays.
2. Press the down NAVIGATION key twice so that Call Log is highlighted
and press SELECT, or press 3.
3. Observe that the menu shown in Figure 40 displays.
1. Press the up or down NAVIGATION key to scroll through call log entries.
2. Press the left or right NAVIGATION key to scroll through the dialing options
for the call log entry (See “Call Log Dialing Options” on page 44).
3. You have the following options:
a. Press SELECT or PHONE to dial out the number selected (highlighted)
in the call log. If the user is accessing the call log from Idle mode,
pressing SPEAKER will also dial out the selected number. Note that a 9
will automatically be inserted before the number when dialed.
b. Press DELETE
c. Press EXIT
SB67040 Remote Handset User’s Guide - Making a Call 43
to delete highlighted call log entry.
to return to previous state
Page 47

Answer Voice Call
Description Setup Make Call Call Mail Hold/Park Transfer Conference Trouble Glossary
Call Log Dialing Options
Hyphenation rules apply to dialing options. The following dial options are available:
n yyy-zzzz (7 digits)
n 1-yyy-zzzz (8 digits)
n xxx-yyy-zzzz (10 digits)
n 1-xxx-yyy-zzzz (11 digits)
The basic rule is to display the actual Caller ID information first. The user may then select an alternative dialing option by pressing the
left or right navigation key. The options are on a circular list, so if the right NAVIGATION key is pressed when the last option is visible,
the user returns to the first option. The dial option sequence is as follows:
n If 7 digits are displayed, press the right navigation key to cycle through A ? B
n If 8 digits are displayed, press the right navigation key to cycle through B ? A.
n If 10 digits are displayed, press the right navigation key to cycle through C ? D ? A ? B (or press the left navigation key to cycle
through C ? B ? A ? D)
n If 11 digits are displayed, press the right navigation key to cycle through D ? C ? A ? B (or press the left navigation key to cycle
through D ? A ? B ? C).
Note There are no programmable area codes.
SB67040 Remote Handset User’s Guide - Making a Call 44
Page 48

Answer Voice Call
Figure. 41 Options - Redial
Figure. 42 Redial List
Description Setup Make Call Call Mail Hold/Park Transfer Conference Trouble Glossary
Making a Call From Redial
The user may make a call from the redial list from Idle, dial, held call, or active mode.
To make a call from the redial list:
1. Press OPTIONS and observe that the screen shown in Figure 41 displays.
2. From the Idle mode, press the down NAVIGATION key three times so that
Redial is highlighted and press SELECT, or press 4.
3. From the Held call mode, press the down NAVIGATION key five times so
that Redial is highlighted and press SELECT, or press 6.
4. From the Dial or Active mode, press the down NAVIGATION key three
times so that Redial is highlighted and press SELECT, or press 4.
5. Observe that the screen shown in Figure 42 displays.
1. Press the up or down navigation key to scroll through the redial list.
2. You have the following options:
a. Press SELECT or PHONE to dial out the number selected (highlighted)
in the redial list. If the user is accessing the redial list from Idle mode,
pressing SPEAKER will also dial out the selected number.
b. Press DELETE
c. Press EXIT
SB67040 Remote Handset User’s Guide - Making a Call 45
to delete the highlighted redial entry.
to return to previous state.
Page 49

Answer Voice Call
Figure. 43 Quick Dial List
Description Setup Make Call Call Mail Hold/Park Transfer Conference Trouble Glossary
Making a Call From Quick Dial
Access the quick dial list by pressing and holding MUTE/QUICK in any mode except during:
n Message playback, options or forwarding
n Pre-dial mode
n An incoming call event (with overlay)
n Call transfer confirmation
n Conference confirmation
n A three-way conference
To make a call from the Quick Dial list:
SB67040 Remote Handset User’s Guide - Making a Call 46
1. Press and hold QUICK
to access quick dial list shown in Figure 43.
2. Press the up or down navigation key to scroll through quick dial entries.
3. Press SELECT, PHONE, or any digit from 1 to 6 to dial the quick number.
If you access Quick Dial from Idle mode, pressing SPEAKER will also dial
out the selected number.
Page 50

Answer Voice Call
Description Setup Make Call Call Mail Hold/Park Transfer Conference Trouble Glossary
C HAPTER
4
C
ALL
A
NSWER
Introduction
If the system receives an incoming call in Idle mode, the handset will ring at the set volume and
a splash screen with incoming call information will be displayed on-screen. The highlighted entry
in the splash displays name (if available) and number. The other entries display name only. The up
and down arrows to the right of the header indicate to the user that the up or down navigation
key can be pressed to cycle through incoming calls
The user can answer the call in the following ways:
1. “New Call Notification” on page 48
2. “How to Answer a Call” on page 49
3. “Incoming Call While On a Call” on page 50
4. “How to Handle Multiple Incoming Calls” on page 51
.
SB67040 Remote Handset User’s Guide - Call Answer 47
Page 51

Answer Voice Call
Description Setup Make Call Call Mail Hold/Park Transfer Conference Trouble Glossary
New Call Notification
If an incoming call event occurs but you do not take any action, the new call is recorded in the call log. A call is considered as new if it
has not been reviewed yet. The user will be notified of any new calls on the Idle screen. Once a new call is reviewed in the Call Log, the
call count will go down by one. If there are no new calls, the notification will display 0 New Calls. You will not be able to play messages
while in the Call Log.
To review the call log:
1. To review the call log from Idle or Dial mode, press C-LOG
2. Press the up or down navigation key to scroll through call log entries.
3. Press the left or right navigation key to scroll through the dialing options for the
call log entry.
4. Press SELECT or PHONE to dial the number selected (highlighted) in the call log.
5. Press DELETE
6. Press EXIT
7. If the Caller ID is unavailable, the Call Log entry displays the name as Unknown..
a. The NEW tag indicates that the Call Log entry has not been reviewed.
b. The message icon indicates that a message is available. If the message icon has
been flagged with an exclamation mark, the message has not been played.
If the user is accessing the call log from Idle mode, pressing SPEAKER will also dial
out the selected number. A 9 will automatically be inserted before the number when
dialled and will be shown on the display.
SB67040 Remote Handset User’s Guide - Call Answer 48
to delete highlighted call entry.
to return to previous mode
Page 52

Answer Voice Call
Figure. 46 Answer Call
Note Press Vol+ or Vol- to increase or decrease the ringing
volume
Description Setup Make Call Call Mail Hold/Park Transfer Conference Trouble Glossary
How to Answer a Call
You have the following options to answer a call:
1. Press ANSWER
2. Press FWD-VM
Forward-No Answer setting (See “Call Transfer” on page 65).
or PHONE, or SPEAKER to go off-hook.
to forward the call to the destination defined in the Call
SB67040 Remote Handset User’s Guide - Call Answer 49
Page 53

Answer Voice Call
Figure. 47 Incoming Call/Active Call
Description Setup Make Call Call Mail Hold/Park Transfer Conference Trouble Glossary
Incoming Call While On a Call
If you are already on an active call and receive another incoming call, the system emits an abbreviated ring and displays an overlay
screen similar to the one illustrated in Figure 47 with incoming call information.
You have the following options during an incoming call event:
1. Press ANSWER
answer the incoming call.
2. Press FWD-VM
Forward-No setting and return to current call (See “Call Transfer” on
page 65).
3. Answering a call while on a call
.
or PHONE, or SPEAKER auto-hold the current call and
to forward the call to the destination defined in the Call
SB67040 Remote Handset User’s Guide - Call Answer 50
Page 54

Answer Voice Call
Figure. 48 Multiple Incoming Calls
Note The other incoming calls will be handled according to the Call
Forward-No Answer setting. The ringing will stop and the user will go
to active state with the selected call.
Description Setup Make Call Call Mail Hold/Park Transfer Conference Trouble Glossary
How to Handle Multiple Incoming Calls
If the system receives multiple incoming calls, the handset rings at the set volume in Idle mode, or emits an abbreviated ring if in active
mode. A splash screen with incoming multiple calls will be displayed onscreen.
You have the following options during multiple incoming call events:
1. Press ANSWER
incoming call..
2. Press FWD-VM
voicemail..
As long as there are multiple incoming calls, the user will remain on the
incoming calls splash screen.
3. Press VOL+ or VOL- to increase or decrease the ringing volume.
or PHONE, or SPEAKER to answer the highlighted
or OFF to forward the highlighted incoming call to
SB67040 Remote Handset User’s Guide - Call Answer 51
Page 55

Answer Voice Call
Description Setup Make Call Call Mail Call Hold Transfer Conference Trouble Glossary
C HAPTER
5
V
OICEMAIL
Your SB67040 Remote Handset voicemail system provides the ability to capture important
messages and save, replay, or forward those messages. The voicemail system includes:
1. “Voicemail Notification” on page 53
2. “Retrieving Voicemail” on page 54
3. “Reviewing Voicemail Records” on page 55
4. “Voicemail Management” on page 56
SB67040 Remote Handset User’s Guide - Voicemail 52
Page 56

Answer Voice Call
Description Setup Make Call Call Mail Call Hold Transfer Conference Trouble Glossary
Voicemail Notification
If you do not respond to an incoming call event, the call is automatically forwarded to voicemail r you can forward the call to voicemail
during an incoming ring event by pressing FWD-VM
The following are voicemail notification options:
1. The Idle splash screen displays a New MSGs indication as shown in Figure 49.
2. If no message is left, the New Calls indication is updated.
3. Once the new message is reviewed in the voicemail records, the notification on
..
if the caller leaves a voicemail message.
the Idle screen disappears.
SB67040 Remote Handset User’s Guide - Voicemail 53
Page 57

Answer Voice Call
Description Setup Make Call Call Mail Call Hold Transfer Conference Trouble Glossary
Retrieving Voicemail
Voicemail is accessible in Idle mode only.
To retrieve voicemail:
1. Press MSG’s. on the Idle screen.
2. If auto-play is enabled, playback of the most recent message will start
immediately.
3. Press PLAY
page 55).
4. Press EXIT
to begin playing the voicemail (See “Reviewing Voicemail Records” on
to return to the Idle screen,
SB67040 Remote Handset User’s Guide - Voicemail 54
Page 58

Answer Voice Call
Progress Bar
Counter
Description Setup Make Call Call Mail Call Hold Transfer Conference Trouble Glossary
Reviewing Voicemail Records
You have the following options when reviewing voicemail records in message playback mode:
1. Press PLAY
available only if auto-play is off.
2. Once message playback starts, this soft key becomes PAUSE as shown in
Figure 52. T
3. The message progress bar indicates the chronological position in message
playback.
4. The message counter will count down from total message time to zero.
5. Press PHONE to exit message playback and start a new call in dial mode.
6. Press SPEAKER to route message playback through the speaker.
7. Press up NAVIGATION key to play the previous message, or press down
NAVIGATION key to play the next message.
8. Press and hold left NAVIGATION key to rewind the message in 8-second
increments.
9. Press and hold right NAVIGATION key to forward the message in 8-second
increments.
10. Press OPTIONS to access options menu (See “Voicemail Management” on
page 56). Message playback will stop if started.
to begin message playback as shown in Figure 51. This option is
11. Press EXIT
SB67040 Remote Handset User’s Guide - Voicemail 55
to return to Idle mode.
Page 59

Answer Voice Call
Description Setup Make Call Call Mail Call Hold Transfer Conference Trouble Glossary
Voicemail Management
The user can delete a message or forward a message to an internal extension in the Synapse network.
To delete a message:
1. Press OPTIONS from message playback mode:, message playback will stop and
the screen shown in Figure 53 displays.
2. Press the down NAVIGATION button to highlight Delete and press SELECT or
press 1.
3. Observe that the splash screen shown in Figure 54 displays to confirm that the
message has been deleted.
4. You will return to message playback mode.
SB67040 Remote Handset User’s Guide - Voicemail 56
Page 60

Answer Voice Call
Figure. 57 Forward Confirmation
Description Setup Make Call Call Mail Call Hold Transfer Conference Trouble Glossary
To forward a message:
1. Press OPTIONS from message playback mode:, message playback will stop and
the screen shown in Figure 55 displays.
2. Press the down NAVIGATION button to highlight Forward and press SELECT or
press 2.
3. Observe that the extension list shown in Figure 56 displays,
4. Press up or down NAVIGATION key to scroll through the extension list until
desired entry is highlighted.
5. Press SELECT to forward the message
to the selected extension. A
confirmation screen will appear.
6. Observe that the splash screen shown in
Figure 57 displays to confirm that the
message has been forwarded.
7. You will return to message playback
mode.
SB67040 Remote Handset User’s Guide - Voicemail 57
Page 61

Answer Voice Call
Description Setup Make Call Call Mail Hold/Park Transfer Conference Trouble Glossary
C HAPTER
6
H
OLD
Introduction
Parking a call and placing it on hold are similar operations. The difference is that a Parked call can
be answered by an another extension.
You can place an active call on hold by pressing the HOLD key. The call will move into the local
call deck. Further incoming calls can be answered and put on hold. These held calls will be stacked
in the call deck. A maximum of 5 calls can be held. If the user has reached the maximum number
of held calls, a “Maximum of 5 held calls reached” notification screen will appear.
1. “Placing a Call on Hold” on page 59
/P
ARK
2. “How to Retrieve a Call on Hold” on page 60
3. “How to Park a call” on page 61
4. “Paging Others to Pick up a Parked Call” on page 62
5. “The user may retrieve a parked call by accessing the park list from Idle, dial, active,
or held call mode” on page 64
SB67040 Remote Handset User’s Guide - Hold/Park 58
Page 62

Answer Voice Call
Figure. 59 Hold Options 1- 4
Figure. 60 Hold Options5-6
Description Setup Make Call Call Mail Hold/Park Transfer Conference Trouble Glossary
Placing a Call on Hold
To place an active call on hold:
1. Press HOLD from the Idle mode, and observe that the screen shown in Figure 58
displays.
a. Press XFER
a. Press UNHOLD
a. Press SPEAKER to pick up the held call on the speaker and return to active
call state.
a. Press PHONE to start a new call off-hook.
a. Press dialling keys to go to Pre-dial mode and make a call on-hook.
2. Press OPTIONS to access hold options shown in Figure 59 and Figure 60.
a. 1. Conference Goes to conference setup
and uses the current held call as Call A
b. 2. Page All Pages other extensions in the
Synapse network
c. 3. Call Log Accesses call log
d. 4. Park Places the current held call in the
park list
e. 5. Park List Accesses the park list
to transfer the held call to another number.
to return to active call state.
SB67040 Remote Handset User’s Guide - Hold/Park 59
f. 6. Redial Accesses the redial list
Page 63

Answer Voice Call
Figure. 63 Held Call List
Description Setup Make Call Call Mail Hold/Park Transfer Conference Trouble Glossary
How to Retrieve a Call on Hold
If multiple calls have been placed on hold, the display header will no longer display the date and time. Instead, the phrase Next Call
displays as shown in Figure 61. Up and down arrow icons in the display header will indicate to the user that the up or down navigation
key may be pressed to scroll through the call deck.
To retrieve a held call:
1. Press up or down navigation key to scroll through calls held in the call deck.
2. Press UNHOLD
call mode.
3. Press OPTIONS. the screen shown in Figure 62 displays.
To access the held call deck mode from active mode:
4. Press the down NAVIGATION key once to highlight
Held Calls, or press 2.
5. Press SELECT. The held calls list (interaction screen)
shown in Figure 63 displays.
6. Press the up or down navigation key to scroll through
the held call deck.
7. Once the held call you want to retrieve is highlighted,
press SELECT, PHONE, or SPEAKER. The current active
call will be auto-held and user will go to active with selected held call.
when the call you want to retrieve is displayed. You will return to active
SB67040 Remote Handset User’s Guide - Hold/Park 60
Page 64

Answer Voice Call
Figure. 65 Parked Call
Figure. 67 Park List
Description Setup Make Call Call Mail Hold/Park Transfer Conference Trouble Glossary
How to Park a call
To park an active call:
1. Press OPTIONS and observe that the screen
shown in Figure 64 displays.
2. With Park highlighted, press SELECT or 1.
3. The splash screen shown in Figure 65 displays to
announce the parked call extension.
To park a held call:
1. Press HOLD.to place the active call on hold.
2. Press OPTIONS.and observe that the screen
shown in Figure 66 displays.
3. Press down NAVIGATION key three times to
highlight Park, or press 4.
4. Press SELECT. The splash screen shown in
Figure 67 displays the parked call extension.
5. The call will be disappear from the held calls list
and appear in the park list, which is available system-wide.
SB67040 Remote Handset User’s Guide - Hold/Park 61
Page 65

Answer Voice Call
Description Setup Make Call Call Mail Hold/Park Transfer Conference Trouble Glossary
Paging Others to Pick up a Parked Call
Once you have parked a call, you can page the other extensions in the network and inform them of the parked call. You can page from
Idle, dial, held call mode, or from the park list (when accessed from held or Idle mode only).
To page from Idle or dial mode:
1. Press OPTIONS and observe that the screen shown in Figure 64 displays.
2. With Page - All highlighted, press SELECT or 1.
The system originating the page will emit a single short tone for half a second just
before paging commences. An alert tone will sound on the far-end extensions as well
3. Speak into the microphone.
4. The user has the following options:
a. Press EXIT
b. Press SPEAKER to route audio to the speakerphone.
a. Press HELP
SB67040 Remote Handset User’s Guide - Hold/Park 62
or OFF to end paging.
to access context-sensitive help.
Page 66

Answer Voice Call
Description Setup Make Call Call Mail Hold/Park Transfer Conference Trouble Glossary
To page from held call mode:
1. Press OPTIONS and observe that the screen shown in Figure 64 displays.
2. Press the down NAVIGATION key once to highlight Page - All and press SELECT or
press 2.
The system originating the page will emit a single short tone for half a second just
before paging commences. An alert tone will sound on the far-end extensions as well
3. Speak into the microphone.
4. The user has the followin g options:
a. Press EXIT
b. Press SPEAKER to route audio to the speakerphone.
c. Press HELP
5. To page from the park list (when accessed from held or Idle mode), press PAGE.
SB67040 Remote Handset User’s Guide - Hold/Park 63
or OFF to end paging.
to access context-sensitive help.
Page 67

Answer Voice Call
Figure. 71 Park List
Description Setup Make Call Call Mail Hold/Park Transfer Conference Trouble Glossary
How to Retrieve a Parked Call
The user may retrieve a parked call by accessing the park list from Idle, dial, active, or held call mode
To retrieve a parked call:
1. Press OPTIONS and observe that the screen shown in
Figure 70 displays.
2. Press the down NAVIGATION key once to highlight
Park List and press SELECT or press 2.
To access the park list from active mode:
1. 1) Press OPTIONS and observe that the screen shown
in Figure 71 displays.
2. Press the down NAVIGATION key to highlight Park
List and press SELECT or press 5.
To access the park list from held call mode:
SB67040 Remote Handset User’s Guide - Hold/Park 64
1. Press OPTIONS and observe that the screen shown in Figure 71 displays.
2. Press the down NAVIGATION key to highlight Park List and press SELECT or
press 5.
To retrieve a parked call:
1. Press the up or down NAVIGATION key to scroll to the parked call list shown in
Figure 72 you want to retrieve.
2. Press SELECT or PHONE to unpark the selected call and go to active mode.
Page 68

Answer Voice Call
Description Setup Make Call Call Mail Hold/Park Transfer Conference Trouble Glossary
C HAPTER
7
C
ALL
T
RANSFER
Introduction
You can only transfer an active or a held call An unsupervised transfer occurs if the user does not
communicate with the transfer recipient. In this case, the call may be transferred while dialing out
to the transfer recipient. The transfer recipient does not have to pick up the phone and talk to the
user before receiving the transferred call. A supervised transfer occurs if the user communicates
with the transfer recipient before completing the tran sfer. You may transfer a call to an internal
extension or external number. For more detail, refer to:
1. ““Transfer Confirmation” on page 73” on page 65
2. “Transfer to an External Number” on page 67
3. “Transferring in Dial Mode” on page 68
4. “Transferring to the Call Log” on page 69
5. “Transferring to the Redial List” on page 70
6. “Transferring to the Directory” on page 71
7. “Transferring to Quick Dial” on page 72
8. “Transfer Confirmation” on page 73
SB67040 Remote Handset User’s Guide - Call Transfer 65
Page 69

Answer Voice Call
Figure. 74 Transfer To
Figure. 75 Transfer Confirm
Description Setup Make Call Call Mail Hold/Park Transfer Conference Trouble Glossary
Transfer To An Extension
To transfer a held or active call to an internal extension:
1. Press XFER
setup mode in preparation for a new call (Call B) and display the screen shown in
Figure 73.
2. Press EXT_#s
Figure 76.
3. Press the up or down NAVIGATION key to scroll through
extension list entries, or press a digit to index into the list.
4. The user has the following options:
a. Press SELECT or PHONE to dial the selected extension
b. Press CANCEL
c. Press HELP
5. Press XFER
If there are no other calls on hold the user will return to idle after
viewing a Call Transferred splash screen shown in and observe
that the screen shown in Figure 75 for 2 seconds. If there are still
calls on hold the user will return to held call deck. Note that the
user may press XFER before the extension picks up (unsupervised
transfer), or after the extension picks up (supervised transfer)
. The current call (Call A) will be placed on hold, the system will go to transfer
. and observe that the screen shown in
number as a transfer destination. and observe that the
screen shown in Figure 74.
or OFF to hang up Call B and return to
held Call A.
for context-sensitive help. User will go to
transfer confirmation mode.
to complete the transfer.
SB67040 Remote Handset User’s Guide - Call Transfer 66
Page 70

Answer Voice Call
Figure. 79 Extension List
Description Setup Make Call Call Mail Hold/Park Transfer Conference Trouble Glossary
Transfer to an External Number
To transfer an active or a held call:
1. Press XFER
in Figure 77.
2. The current call (Call A) will be placed on hold, and the user will go to transfer
setup mode in preparation for a new call (Call B) and display the screen shown
in Figure 78.
3. Press EXT_#s
4. You can transfer a call to an external number either by going to dial mode and
dialling it directly, or by accessing it through the call log, redial list, directory, or
quick dial.
in either the active or held call mode and display the screen shown
. and observe that the screen shown in Figure 79 displays.
SB67040 Remote Handset User’s Guide - Call Transfer 67
Page 71

Answer Voice Call
Figure. 81 Transfer To Dial Mode
Figure. 82 Dial Mode Transfer
Description Setup Make Call Call Mail Hold/Park Transfer Conference Trouble Glossary
Transferring in Dial Mode
To transfer a call to a dialed number:
1. Pressing PHONE or SPEAKER to enter dial mode and display the screen shown
in Figure 80.
2. Pressing the dialing keys to enter a digit string as shown in Figure 81. Dialing and
hyphenation rules will apply.
3. Once the rules are met, the number will dial out and connect (Call B and display
the screen shown in Figure 82.
SB67040 Remote Handset User’s Guide - Call Transfer 68
4. Press XFER
5. The user also has the following options:
a. Press CANCEL
b. Press PHONE to cancel the transfer and start a new call. You will go to transfer
to complete the transfer. and go to transfer confirmation mode.
or OFF to hang up Call B and return to held Call A.
confirmation mode.
Page 72

Answer Voice Call
Figure. 85 Call Log Transfer
Description Setup Make Call Call Mail Hold/Park Transfer Conference Trouble Glossary
Transferring to the Call Log
To transfer a call to a number in the call log:
1. Press OPTIONS from transfer setup mode and display the screen shown in Figure 80.
2. With Call Log highlighted, press SELECT or 1 and display the screen shown in
Figure 84.
3. Press the up or down navigation key to scroll through call log entries until desired
entry is highlighted.
4. Press SELECT or PHONE. User will go to transfer confirmation mode and display the
screen shown in Figure 86.
5. Press XFER
SB67040 Remote Handset User’s Guide - Call Transfer 69
to complete the transfer. and go to transfer confirmation mode.
Page 73

Answer Voice Call
Figu
Figure. 88
Description Setup Make Call Call Mail Hold/Park Transfer Conference Trouble Glossary
Transferring to the Redial List
To transfer a call to a number in the redial list:
1. Press OPTIONS from transfer setup mode and display the screen shown in Figure 86.
2. Press down NAVIGATION key once to highlight Redial, pres s SELECT or 2. and
display the screen shown in Figure 87.
3. Press the up or down NAVIGATION key to scroll through redial list entries until
desired entry is highlighted.
4. Press SELECT or PHONE. User will go to transfer confirmation mode and display the
screen shown in Figure 88.
5. Press XFER
SB67040 Remote Handset User’s Guide - Call Transfer 70
to complete the transfer. and go to transfer confirmation mode.
Page 74

Answer Voice Call
igure. 89
Description Setup Make Call Call Mail Hold/Park Transfer Conference Trouble Glossary
Transferring to the Directory
To transfer a call to a number in the directory:
1. Press DIR from transfer setup mode and display the screen shown in Figure 89.
2. Press the up or down NAVIGATION key to scroll through redial list entries until
desired entry is highlighted.
3. Press SELECT or PHONE. User will go to transfer confirmation mode and display the
screen shown in Figure 90.
4. Press XFER
SB67040 Remote Handset User’s Guide - Call Transfer 71
to complete the transfer. and go to transfer confirmation mode.
Page 75

Answer Voice Call
Fig
Figu
Description Setup Make Call Call Mail Hold/Park Transfer Conference Trouble Glossary
Transferring to Quick Dial
To transfer a call to a quick dial number:
1. Press and hold QUICK
Figure 91.
2. Press the up or down NAVIGATION key to scroll through quick dial entries.
3. Press SELECT or PHONE. to go to transfer confirmation mode. and display the
screen shown in Figure 92.
4. Press XFER
to complete the transfer.
from transfer setup mode and display the screen shown in
SB67040 Remote Handset User’s Guide - Call Transfer 72
Page 76

Answer Voice Call
Fig
Description Setup Make Call Call Mail Hold/Park Transfer Conference Trouble Glossary
Transfer Confirmation
Once the user has chosen a destination number, the system goes to transfer confirmation mode.:
You have the following options:
1. Press XFER
If there are no other calls on hold the user will return to idle after viewing a “Call
transferred” splash screen for 2 seconds. If there are still calls on hold the user will
return to held call deck. Note that the user may press XFER
up (unsupervised transfer), or after the extension picks up (supervised transfer).
2. Press CANCEL
3. Press PHONE to cancel the transfer, put Call B on hold and start a new call.
4. Press HOLD to cancel the transfer and put Call B on hold.
to complete the transfer and return to Idle or held calls mode.
before the extension picks
or OFF to hang up Call B and return to held Call A.
SB67040 Remote Handset User’s Guide - Call Transfer 73
Page 77

Answer Voice Call
Description Setup Make Call Call Mail Hold/Park Transfer Conference Trouble Glossary
C HAPTER
8
C
ONFERENCE
Introduction
You can initiate a conference during an active call or when calls are held using. Conferences occur
between you and dialed calls or numbers in any of the systems lists . To co n ference using the
extension list, call log, redial list, park list, directory, or quick dial, go to the appropriate section
below:
1. “Conference a Call” on page 75
2. “Conference with Held Calls” on page 79
3. “Conferences with Extension List” on page 80
4. “Conference with Call Log” on page 81
5. “Conference with Redial List” on page 82
6. “Conference with Park List” on page 83
7. “Conference with Directory” on page 84
8. “Conference with Quick Dial” on page 85
SB67040 Remote Handset User’s Guide - Conference 74
Page 78

Answer Voice Call
Description Setup Make Call Call Mail Hold/Park Transfer Conference Trouble Glossary
Conference a Call
To set up the conference:
1. Press CONF
displays.
2. The current call (Call A) is automatically placed on hold and the user goes to
conference setup mode where system waits to establish Call B.
3. Call A (name and on hold icon) appears in the display header.
4. Press CANCEL
OR
5. Press PHONE or SPEAKER to enter dial mode and start call B.
6. Press dialing keys to en ter a dig it string as shown in Figure 96. Dialing and
hyphenation rules apply.
7. Once the rules are met, the number will dial out and connect (Call B).
in the Idle mode and observe that the screen shown in Figure 95
or OFF to exit conference dial mode and return to held Call A.
SB67040 Remote Handset User’s Guide - Conference 75
Page 79

Answer Voice Call
Description Setup Make Call Call Mail Hold/Park Transfer Conference Trouble Glossary
Conference Confirmation
To set up the conference: (Continue d)
8. You will then go to conference confirmation mode.
9. Press CONF
10. Once connected to Call B, the system goes to conference confirmation mode. In this
mode, you may speak to the call recipient.
11. Observe the Conference Confirmed screen shown in Figure 98 displays.
You have the following options:
1. Press HE LP
2. Press DROP
3. Press PHONE or HOLD to hold the conference call (Calls A and B) and start a new
call (See below)
4. Press OFF to hang up all calls. If the user has held calls, the system will return to
held calls mode. If there are no held calls, the system will return to Idle mode.
shown in Figure 97 to start the conference.
to access context-sensitive help.
to drop one of the calls (See below).
SB67040 Remote Handset User’s Guide - Conference 76
Page 80

Answer Voice Call
Note The XFER Soft key will not be available.
Description Setup Make Call Call Mail Hold/Park Transfer Conference Trouble Glossary
Hold/Unhold a Conference
To put a conference on hold:
1. Press HOLD or PHONE. and observe that the scre en shown in Figure 99 displays.
2. Call A and B will be placed on hold, but will still be able to communicate with
each other.
1. The system generates a dial tone and you will go to the dial mode.
To unhold a conference:
1. Press OFF to hang up and go to the held call deck shown in Figure 100.
2. Press UNHOLD
3. Press any key to resume the conference.
SB67040 Remote Handset User’s Guide - Conference 77
when either Call A or Call B displays.
Page 81

Answer Voice Call
Note If the user has held calls, the system will return to
held calls mode. If there are no held calls, the system
will return to Idle mode
Description Setup Make Call Call Mail Hold/Park Transfer Conference Trouble Glossary
Cancel a Conference
To cancel out of a current conference:
1. Press DROP
from the current conference screen shown in Figure 101.
2. Press the up or down NAVIGATION key to scroll to the call you want to drop.
3. Press SELECT to drop the highlighted call from the conference and hang it up.
4. You will return to an active call state with the remaining call.
r
You have the following options:
1. Press HELP
2. Press CANCEL
to access context-sensitive help.
to return to the three-way conference.
3. Press OFF to hang up all calls.
SB67040 Remote Handset User’s Guide - Conference 78
Page 82

Answer Voice Call
Figure. 103 Options List _Held
Description Setup Make Call Call Mail Hold/Park Transfer Conference Trouble Glossary
Conference with Held Calls
The user may conference with previously held calls by following this procedure from conference setup mode:
To conference with held calls:
1. Press CONF
page 75 displays.
1. Press OPTIONS and observe that the screen shown in Figure 103 displays.
2. Press the down NAVIGATION button to highlight Held Calls and press SELECT
or press 1.
3. Observe that the screen shown in Figure 104 displays.
4. Press the up or down NAVIGATION key to scroll through the held calls list until
desired entry is highlighted.
5. Press SELECT to unhold selected call.
6. Go to “Conference Confirmation” on page 76.to complete conference setup.
in the Idle mode and observe that the screen shown in Figure 95 on
SB67040 Remote Handset User’s Guide - Conference 79
Page 83

Answer Voice Call
Description Setup Make Call Call Mail Hold/Park Transfer Conference Trouble Glossary
Conferences with Extension List
The user may conference with an internal extension by following this procedure from conference setup mode:
To conference using the extension list:
1. Press CONF
page 75 displays.
2. Press EXT_#s
3. Press the up or down NAVIGATION key to scroll to the desired extension entry,
or press a dialing key to index into the list based on the first character entered.
4. Press SELECT or PHONE. and observe that the screen shown in Figure 106
displays.
5. Press CONF
6. Once connected to Call B, the system goes to conference confirmation mode. In this
mode, you may speak to the call recipient.
7. Observe the Conference Confirmed screen shown in Figure 98 on page 76
displays.
in the Idle mode and observe that the screen shown in Figure 95 on
.and observe that the screen shown in Figure 105 displays.
to start the conference.
SB67040 Remote Handset User’s Guide - Conference 80
Page 84

Answer Voice Call
Description Setup Make Call Call Mail Hold/Park Transfer Conference Trouble Glossary
Conference with Call Log
The user may conference with a number from the call log by following this procedure from conference setup mode:.
To conference using the Call Log:
1. Press CONF
page 75 displays.
2. Press OPTIONS and observe that the screen shown in Figure 107 displays.
3. Press the down NAVIGATION button twice to highlight Call Log and press
SELECT or press 3.
4. Observe that the screen shown in Figure 108 displays.
5. Press the up or down NAVIGATION key to scroll to the desired entry, or press a
dialing key to index into the list based on the first character entered.
6. Press SELECT or PHONE. and observe that the screen shown in Figure 106 on
page 80 displays.
7. Go to “Conference Confirmation” on page 76.to complete conference setup.
in the Idle mode and observe that the screen shown in Figure 95 on
SB67040 Remote Handset User’s Guide - Conference 81
Page 85

Answer Voice Call
Description Setup Make Call Call Mail Hold/Park Transfer Conference Trouble Glossary
Conference with Redial List
The user may conference with a number from the redial list by following this procedure from conference setup mode:.
To conference using the Redial list:
1. Press CONF
page 75 displays.
2. Press OPTIONS and observe that the screen shown in Figure 109 displays.
3. Press the down NAVIGATION button twice to highlight Redial and press SELECT
or press 4.
4. Observe that the screen shown in Figure 110 displays.
5. Press the up or down NAVIGATION key to scroll to the desired entry, or press a
dialing key to index into the list based on the first character entered.
6. Press SELECT or PHONE. and observe that the screen shown in Figure 106 on
page 80 displays.
7. Go to “Conference Confirmation” on page 76.to complete conference setup.
in the Idle mode and observe that the screen shown in Figure 95 on
SB67040 Remote Handset User’s Guide - Conference 82
Page 86

Answer Voice Call
Description Setup Make Call Call Mail Hold/Park Transfer Conference Trouble Glossary
Conference with Park List
The user may conference with a number from the park list by following this procedure from conference setup mode:
To conference using the Park list:
1. Press CONF
page 75 displays.
2. Press OPTIONS and observe that the screen shown in Figure 111 displays.
3. Press the down NAVIGATION button twice to highlight Park List and press
SELECT or press 2.
4. Observe that the screen shown in Figure 112 displays.
5. Press the up or down NAVIGATION key to scroll to the desired entry, or press a
dialing key to index into the list based on the first character entered.
6. Press SELECT or PHONE. and observe that the screen shown in Figure 106 on
page 80 displays.
7. Go to “Conference Confirmation” on page 76.to complete conference setup.
in the Idle mode and observe that the screen shown in Figure 95 on
SB67040 Remote Handset User’s Guide - Conference 83
Page 87

Answer Voice Call
Description Setup Make Call Call Mail Hold/Park Transfer Conference Trouble Glossary
Conference with Directory
The user may conference with a number from the directory by following this procedure from conference setup mode:
To conference with directory:
1. Press CONF
page 75 displays.
2. Press DIR and observe that the screen shown in Figure 113 displays.
3. Press the up or down NAVIGATION key to scroll to the desired entry, or press a
dialing key to index into the list based on the first character entered.
4. Press SELECT or PHONE. and observe that the screen shown in Figure 114
displays.
5. Go to “Conference Confirmation” on page 76.to complete conference setup.
in the Idle mode and observe that the screen shown in Figure 95 on
SB67040 Remote Handset User’s Guide - Conference 84
Page 88

Answer Voice Call
Description Setup Make Call Call Mail Hold/Park Transfer Conference Trouble Glossary
Conference with Quick Dial
The user may conference with a quick dial number by following this procedure from conference setup mode:.
To conference using Quick Dial:
1. Press CONF
page 75 displays.
2. Press and hold QUICK
3. Press the up or down NAVIGATION key to scroll through quick dial entries.
4. Press SELECT or PHONE. and observe that the screen shown in Figure 116
displays.
5. Go to “Conference Confirmation” on page 76.to complete conference setup.
in the Idle mode and observe that the screen shown in Figure 95 on
and observe that the screen shown in Figure 115 displays.
SB67040 Remote Handset User’s Guide - Conference 85
Page 89

Answer Voice Call
Description Setup Make Call Call Mail Hold/Park Transfer Conference Trouble Glossary
C HAPTER
9
T
ROUBLESHOOTING
If you have difficulty operating your SB67040 Remote Handset, try the suggestions in Table 6.
Note For customer service or product information, visit our website at
www.telephones.att.com or call 1 (800) 222-3111. In Canada,
dial
1 (866) 288-4268.
Table 6 SB67040 Remote Handset Problem Resolutions
Symptom
My SB67030 Desk Set
does not work at all.
SB67040 Remote Handset User’s Guide - Troubleshooting86
Probable Cause Corrective Action
No power to the Desk Set. Make sure the power adapter is
securely plugged into an outlet
not controlled by a wall switch.
Unplug the unit? electrical power.
Wait for approximately 15
seconds, then plug it back in.
Allow up to three minutes for the
Internet radio to boot up.
Make sure the sufficient batteries
are used and installed correctly
Page 90

Answer Voice Call
Description Setup Make Call Call Mail Hold/Park Transfer Conference Trouble Glossary
Table 6 SB67040 Remote Handset Problem Resolutions
Symptom
Probable Cause Corrective Action
Remove and re-insert the
batteries. If that still does not
work, it may be necessary to
purchase a new battery.
Important safety instructions
When using your telephone equipment, basic safety precautions should always be followed to reduce the risk of fire, electric shock and
injury, including the following:
n Read and understand all instructions.
n Follow all warnings and instructions marked on the product.
n Unplug this product from the wall outlet before cleaning. Do not use liquid or aerosol cleaners. Use a damp cloth for cleaning.
n Do not use this product near water (for example, near a bathtub, kitchen sink, or swimming pool).
n Do not place this product on an unstable table, shelf, stand or other unstable surfaces.
n Slots and openings in the back or bottom of the unit are provided for ventilation. To protect it from overheating, these openings
must not be blocked by placing the product on a soft surface such as a bed, sofa or rug. This product should never be placed
near or over a radiator or heat register. This product should not be placed in any area where proper ventilation is not provided.
n This product should be operated only from the type of power source indicated on the marking label. If you are not sure of the
type of power supply in your home, consult your dealer or local power company.
n Do not allow anything to rest on the power cord. Do not install this product where the cord may be walked on.
SB67040 Remote Handset User’s Guide - Troubleshooting87
Page 91

Answer Voice Call
Description Setup Make Call Call Mail Hold/Park Transfer Conference Trouble Glossary
n Never push objects of any kind into this product through the slots in the unit because it may touch dangerous voltage points
or create a short circuit. Never spill liquid of any kind on the product.
n To reduce the risk of electric shock, do not disassemble this product, but take it to an authorized service facility. Opening or
removing parts of the unit other than specified access doors may expose you to dangerous voltages or other risks. Incorrect
reassembling can cause electric shock when the product is subsequently used.
n Do not overload wall outlets and extension cords.
Unplug this product from the wall outlet and refer servicing to an authorized service facility under the following conditions:
n When the power supply cord or plug is damaged or frayed.
n If liquid has been spilled onto the product.
n If the product has been exposed to rain or water.
n If the product does not operate normally by following the operating instructions. Adjust only those controls that are covered
by the operation instructions. Improper adjustment of other controls may result in damage and often requires extensive work
by an authorized technician to restore the product to normal operation.
n If the product has been dropped and the unit has been damaged.
n If the product exhibits a distinct change in performance.
n The power adapter is intended to be correctly oriented in a vertical or floor mount position. The prongs are not designed to
hold the plug in place if it is plugged into a ceiling or an under-the-table/cabinet outlet.
Maintenance
Your SB67040 Remote Handset contains sophisticated electronic par ts, so it must be treated with care.
Avoid rough treatment
Handle the unit gently. Save the original packing materials to protect your telephone if you ever need to ship it.
SB67040 Remote Handset User’s Guide - Troubleshooting88
Page 92

Answer Voice Call
Description Setup Make Call Call Mail Hold/Park Transfer Conference Trouble Glossary
Avoid water
Your unit can be damaged if it gets wet. Do not use the handset outdoors in the rain, or handle it with wet hands. Do not install the
telephone base near a sink, bathtub or shower.
Electrical storms
Electrical storms can sometimes cause power surges harmful to electronic equipment. For your own safety, take caution when using
electrical appliances during storms.
Cleaning your unit
Your unit has a durable plastic casing that should retain its luster for many years. Clean it only with a soft cloth slightly dampened with
water or a mild soap. Do not use excess water or cleaning solvents of any kind.
Warranty
Technical Specifications
I Selects the highlighted item.
Note
SB67040 Remote Handset User’s Guide - Troubleshooting89
Page 93

Answer Voice Call
Description Setup Make Call Call Mail Hold/Park Transfer Conference Trouble Glossary
Tip
CAUTION
WARNING
SB67040 Remote Handset User’s Guide - Troubleshooting90
Page 94

Answer Voice Call
Description Setup Make Call Call Mail Hold/Park Transfer Conference Trouble Glossary
SB67040 Remote Handset User’s Guide - Troubleshooting91
Page 95

Answer Voice Call
Description Setup Make Call Call Mail Hold/Park Transfer Conference Trouble Glossary
G
LOSSARY
CA – Call Appearance
Call Appearance represents call presence on the Synapse system. The number of call appearance
buttons on the desktop dictates the number of calls on the system the User can have directed to
them. On the Cordless handset Call Appearance is different because of the lack of dedicated CA
buttons.
CD Handset – Corded Handset
CS – Cordless Handset
DS – Desk Set
HL – Highlight
Highlight refers to a reverse bar in the display that brings focus of the user to a listed item.
HK – Hard Key
PK – Programmed Key
ACTIVE CALL
Active Call is a state that occurs after the system has dialed out the dialing digits. The system will
assume this as a connected state even though a connection may not be set up with the far-end.
Active call state also applies when the user answers an incoming call.
SB67040 Remote Handset User’s Guide - Glossary 92
Page 96

Answer Voice Call
Description Setup Make Call Call Mail Hold/Park Transfer Conference Trouble Glossary
DIAL
Dial state refers to an intermediary state that occurs after the user has request a calling line by going off hook. As the user enters dialing
digits, the System checks whether the dialing rules are met. The System will then dial the digit string. The state then changes from DIAL
to Active Call.
Held Calls
Held Calls are calls that are placed on hold at the extension by the user. The system can automatically hold a call based on Call
Appearance rules.
IDLE
Idle refers to a state where the extension does not have any Active or Held Calls.
SB67040 Remote Handset User’s Guide - Glossary 93
Page 97

 Loading...