

Page 1

SGH-i907
Getting Started Guide
Page 2

Welcome to AT&T
Please use our interactive web tutorial available at
att.com/WirelessTutorials
for most complete and up-to-date information available to setup
your device and services. The on-line tutorials include detailed
step-by-step instructions and screen shots to assist your learning.
Or use this simple Getting Started Guide to quickly get an overview
of the major features and services available with your smartphone.
Open the back flap
diagram of device key locations and functions.
of the Getting Started Guide to review
We recommend that you keep this diagram open for reference
while working through the guide.
Thanks again for choosing AT&T.
2
Page 3

Table of Contents
Set up Your i907 6
What’s in the Box? 6
Insert the SIM 6
Insert Battery 7
Charge Battery 7
Insert microSD™ Card 7
Get to Know Your i907 8
Check Your Wireless AT&T Connection 9
Status indicators 9
Today Screen 10
Start Menu 10
Using the Touchscreen 11
Using the Stylus 11
Using the Keypad 11
Using the Keyboard 12
Use the Phone 14
Make a Call 14
Answer a Call 14
Set Up Voicemail 14
Check Voicemail 15
Add a Contact 15
Copy Contact from SIM card to the i907 16
3
Page 4

Table of Contents
Use Text/Multimedia Messaging & IM 17
Send a Text Message 17
Receive a Text Message 17
Take & Send a Picture 18
Instant Messaging 19
Browse the Web & Shop Online 20
Go to Web Pages 20
Bookmark a Page 20
AT&T Mall 21
Set Up Your Email 22
Choose the Best Email Option for You 22
Personal Email Setup With Xpress Mail 22
Send and Receive Personal Email 25
Set Up Self-Service Corporate Email with Xpress Mail 26
Set Up IT-Managed Corporate Email 26
Personalize Your Device 27
Assign a Ringtone 27
Set up Bluetooth® 28
Set up Bluetooth® 28
Bluetooth® Hands-Free Device 28
4
Page 5

Table of Contents
Set up AT&T Navigator 29
AT&T Navigator 29
Download and Installation Instructions 29
Login Instructions 30
Generate a Route 30
Exiting AT&T Navigator 30
Listen to Music & Watch Video 31
AT&T Mobile Music 31
Watch CV 32
Transfer Music from a PC 33
Play Music 34
Video Share 35
Make a Call Using Video Share 35
Manage Appointments 37
Schedule an Appointment 37
Wi-Fi 38
About Wi-Fi Networks 38
Turn Wi-Fi On/Off 38
Connect to an Available Wi-Fi Network 38
Tips & Tricks 42
5
Page 6
Set up Your i907
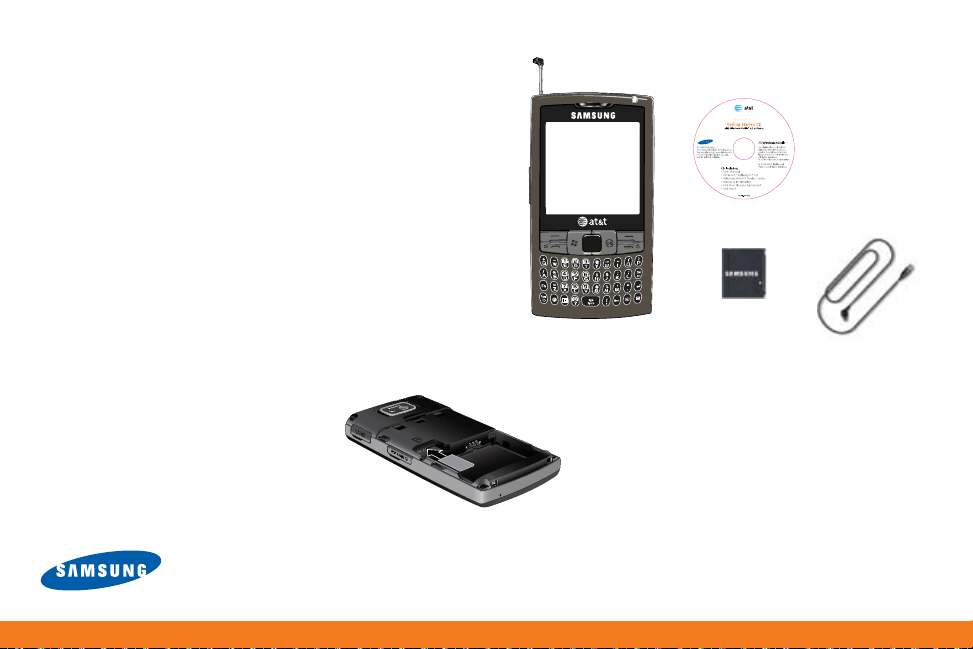
What’s in the Box?
To get started, we recommend the following:
Carefully follow the step-by-step instructions in this guide to •
set up your device.
Review the User Manual on the Getting Started CD to learn •
about the full power of the i907.
Take note of the following components included in the box:
Insert the SIM
Remove the battery cover.1.
Remove battery.2.
Slide SIM face up (gold contacts 3.
face down) into SIM slot.
Replace battery and battery cover.4.
6
I907
I907
Getting Started CD
Standard Battery
3.5 mm Audio Adaptor
Travel Charger
Data Cable
Page 7
Set up Your i907
+
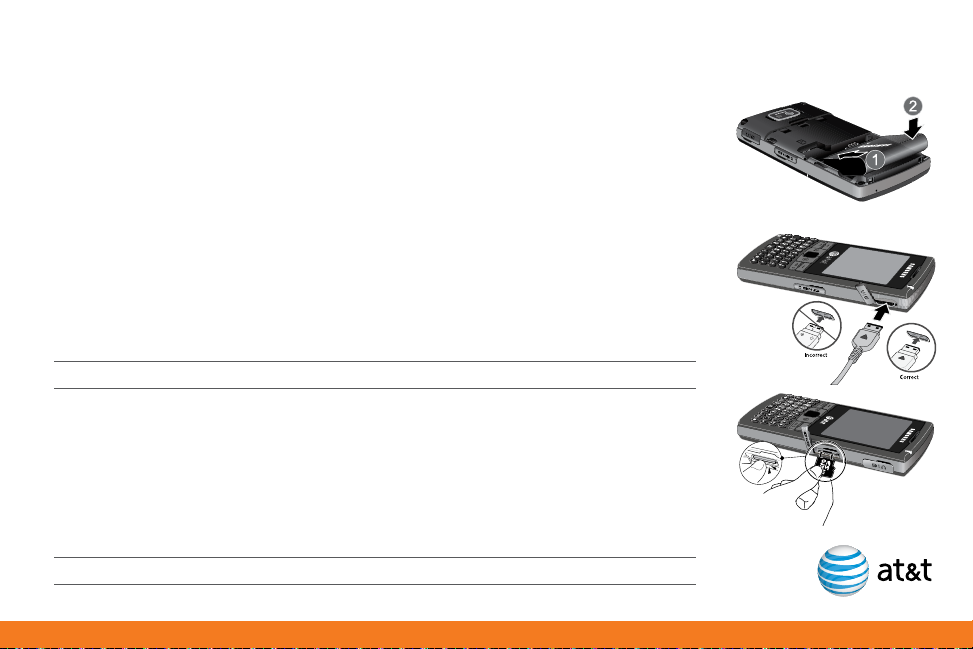
Insert Battery
Remove the battery cover. 1.
Align the contacts on the battery with the contacts in the back of the device. 2.
Push the battery down until it locks into place. 3.
Replace the battery cover. 4.
Charge Battery
Plug the AC Travel Charger into a standard AC wall outlet. 1.
Plug the travel charger into the jack on the top right side of the phone with the green 2.
arrow facing up. The indicator light at the top of the device is red while charging, and
green when fully charged.
Note: When charging is complete, unplug the charger from the power outlet.
Insert microSD™ Card
A microSD™ Card is a removable memory card that will increase data
storage capacity of the device.
Remove the cover on the right side of the device, that reads microSD™. 1.
Insert the narrow end of the microSD™ Card into the slot, then replace 2.
the cover.
Note: microSD™ Card sold separately.
7
Page 8

Get to Know Your i907
Turn On/Off Your Device
Press and hold the Power ON/OFF button located on the left side of the device.
Lock/Unlock Your Device Keypad
To Lock the device, press and hold the END key. To unlock the device, press the
LEFT SOFT key, followed by the * key (or select unlock). If the device is locked,
and backlight is off, quick press the Power ON/OFF button.
Backlight
In the unlock mode, after 30 seconds the screen will dim to save battery power. It will
finally power off after another 30 seconds. To turn your screen on, quick press the
Power ON/OFF button.
Change Backlight Settings
Press the 1. START key to enter the Start menu, select Settings.
Select the 2. System tab.
Select 3. Backlight.
Change 4. Turn off backlight if device is not used for settings.
Select 5. OK to save your changes and exit.
8
Power ON/OFF button
Page 9
Get to Know Your i907
3G
3G
3G
3G
3G
3G
3G
3G
x
G
3
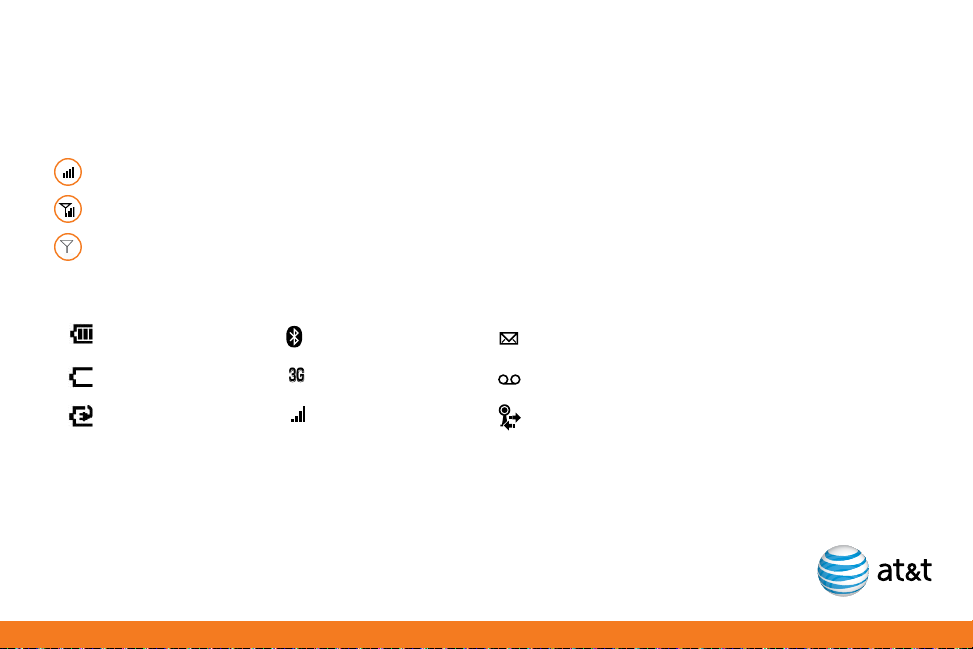
Check Your Wireless AT&T Connection
On the top right corner of the home screen, you will find the network coverage indicator.
Full wireless 3G data coverage
Full wireless coverage (no data connection)
Wireless is turned off
Status indicators
Battery full
Battery empty
Battery charging
Bluetooth on
3G network
New Text message
New voice mail
Signal strength Wi-Fi on
9
Page 10

Get to Know Your i907
Today Screen
The Today screen displays important information, such as upcoming appointments, status
indicators, the current date, time, and profile. You can open a program directly by tapping its
associated icon.
Start Menu
There is one main menu used by the i907 called the Start Menu.
The Start menu contains links to all the applications and settings information, similar to that
of a Windows based PC system. To access the Start menu, simply use the stylus to tap in the
upper left corner of the screen on the word Start or press the START key. A drop down menu
list is then displayed, and from there, all other applications and settings can be accessed.
10
Page 11
Using the Touchscreen
To navigate the screen using your finger, simply tap on-screen selection
desired. It’s that easy!
Using the Stylus
To navigate the screen with the Stylus, simply tap the on-screen
selection desired. You can enter text and numbers by using the
on-screen keyboard displayed at the bottom of the screen.
In a program, tap the keyboard icon at the bottom of the screen. 1.
Enter text and numbers by tapping keys on the on-screen keyboard.2.
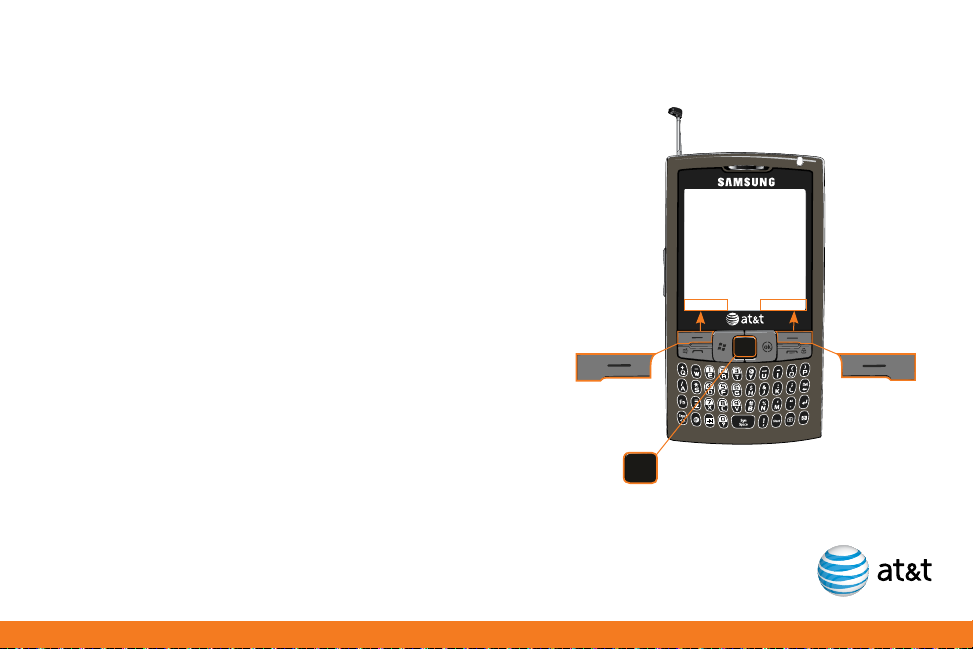
Using the Keypad
To move around the screen, use the NAVIGATION PAD to control the
onscreen mouse pointer to highlight selections. Press the NAVIGATION
PAD to select. You can also use the NAVIGATION PAD in a 4-way
navigation mode. Pressing the FUNCTION and N key when in the
homescreen view will switch between these two modes.
To select the bottom left and right items on the screen, use the
LEFT and RIGHT SOFT keys.
For more information visit att.com/WirelessTutorials.
LEFT SOFT KEY
activates
menu above
NAVIGATION
STYLUS
use to make on
screen selections
RIGHT SOFT KEY
activates
menu above
PAD
11
Page 12

Get to Know Your i907
Using the Keyboard
Your i907 is equipped with an innovative keyboard. You can easily and accurately type words
with the keypad. When you select a field that requires text or numbers, the phone automatically selects the appropriate input mode. However, if you need to switch between modes,
press one of the keys listed in the following illustration. See the indicator at the lower center
of the Home Screen to identify the current text mode setting.
Creating Text
To type a single uppercase letter, press CAPS/SHIFT key, and then press the
corresponding key. To enter all CAPS, press the CAPS/SHIFT key twice.
To enter a number or symbol, press the FUNCTION key, and then press the
corresponding key. To enter all numbers or symbols, press the FUNCTION
key twice.
12
FUNCTION
key
CAPS/SHIFT
key
Page 13

Get to Know Your i907
Task Keys
MEdia™ Net - direct access to MEdia™ Net. Short press - you can access MEdia Net.
Long press - you can run Voice Command (only if the Voice Command is enabled).
Calendar - direct access to your calendar.
SYMBOL/SPACE - short press activates phone on Today screen. When in text
mode short press inserts a space/long press brings up additional symbols.
SILENT - turn ringtone on or off.
CAMERA/ZOOM - short press activates camera/long press enters Zoom mode.
For a full description of camera features see page 18.
MAIL - direct access to email and text messaging. See page 17 & 19 for details.
MEdia™ Net
symbol/
space
mailsilentCalendar
camera/zoom
13
Page 14
Use the Phone
Make a Call Time Required: 2 minutes
From the 1. Today screen, you can access the Phone screen by pressing the SEND
key or by directly entering a phone number by pressing the numeric keys
on the keypad.
Press the 2. SEND key.
To end the call, press the 3. END key.
Answer a Call
Press the 1. SEND key.
Note: To activate speakerphone, press and hold the SEND key for 2 seconds. To place a call
on hold or unhold, press quickly on the SEND key.
Set Up Voicemail Time Required: 2 minutes
Press and hold the 1. 1 key on your I907 to connect to the AT&T voicemail system.
Follow the voice prompts to create a password and record your name and greeting. 2.
14
Page 15

Use the Phone
Check Voicemail Time Required: 1 minutes
Press and hold the 1. 1 key.
Follow the voice prompts. 2.
Check Voicemail Messages From Other Phones
Dial your 10-digit wireless number. 1.
Press the 2. * key when you hear your personal greeting.
Enter your personal password that you created while setting up your voicemail. 3.
Add a Contact Time Required: 2 minutes
On the Today screen, press the 1. RIGHT SOFT key to enter the Contacts menu.
Press the 2. LEFT SOFT key to select New.
To save the information to your SIM card, select 3. SIM Contact.
Type the contact information. 4.
Press the 5. OK key.
15
Page 16

Use the Phone
Copy Contact from SIM card to the i907 Time Required: 1 minute
Press the 1. RIGHT SOFT key to enter the Contact menu.
Select the 2. Contact you want to save from your list.
Select 3. Menu.
Select 4. Save to Contacts.
Press the 5. OK key.
16
Page 17

Use Text/Multimedia Messaging & IM
Send a Text Message Time Required: 2 minutes
On the Today screen, press the 1. START key to enter the Start menu.
Select 2. Messaging.
Select 3. Messages.
Press the 4. RIGHT SOFT key to enter the Menu. Select New.
Choose 5. Text Message.
In the 6. To field, type a phone number, or press the RIGHT SOFT key to enter the Menu,
Select Add Recipient.
Type a message. 7.
Press the 8. LEFT SOFT key to select Send.
Receive a Text Message Time Required: 1 minute
On the 1. Today screen, press the START key to select Start, select Messaging then
select Messages.
Scroll to a message.2.
Select a message.3.
Enter your message then select 4. Send.
To end a conversation, select 5. Menu and then select Close.
17
Page 18

Use Text/Multimedia Messaging & IM
Take & Send a Picture Time Required: 2 minutes
Press the 1. CAMERA key on the bottom right hand side of the keyboard.
Press the 2. NAVIGATION PAD to take a picture.
After the picture has been taken, press the 3. RIGHT SOFT key to enter the Menu, and
select Send Multimedia Msg.
In the To field, type a phone number or you can select an entry in your saved contact list. 4.
Type a message (optional).5.
Note: To add or attach an item to the message, press the RIGHT SOFT key to enter the Menu.
Select Insert and select the type of item to attach. Choose the desired item from the list.
Select 6. Send.
Note: Pictures will automatically be saved in the My Stuff Folder.
18
Page 19

Use Text/Multimedia Messaging & IM
Instant Messaging
If you subscribe to an instant messaging (IM) service such as Yahoo!®, AOL®, or Windows
Live™, you can have the convenience and fun of IM on your i907.
Set Up Time Required: 1 minute
On the Today screen, press the 1. START key to select Start, and then select Programs.
Select 2. IM & Email.
Select 3. Instant Messaging.
Highlight your desired IM service and press the 4. NAVIGATION PAD.
Enter your user name and password and press the 5. LEFT SOFT key to select Sign In.
Add a Contact Time Required: 1 minute
While signed in, press the 1. RIGHT SOFT key to enter the Menu.
Select 2. Add Contact.
Enter contact information. 3.
Press the 4. LEFT SOFT key to select Add.
19
Page 20

Browse the Web & Shop Online
Go to Web Pages Time Required: 1 minute
Use Internet Explorer® to access web sites.
On the 1. Today screen, press the START key to enter the Start menu.
Select 2. Internet Explorer.®
In the address bar that appears, type the URL (e.g. www.att.com) that you wish to go to. 3.
Press the 4. RETURN key to download the new web page.
Bookmark a Page
From the Today screen, press the 1. START key.
Select 2. Internet Explorer.®
Enter the web address into the Address field and select 3. Go.
Select 4. Menu then select Add to Favorites.
Confirm or change the name and address, then select a folder.5.
Select 6. Add to store the bookmark and return to the web page.
Typing Tip: To capitalize a letter, press the CAPS/SHIFT key, then press the appropriate key.
To insert symbols such as @, _ and /, press the FUNCTION key, then press the appropriate
letter key.
20
Page 21

Browse the Web & Shop Online
AT&T Mall Time Required: 1 minute
Personalize your device with downloadable games, graphics and ring tones.
Shop Applications
Browse thousands of ring tones in • Shop Tones.
Select • Shop Games to find games that turn your down-time into fun time.
Personalize your phone with unique art at • Shop Graphics.
Go to • Shop Multimedia to find an MMS greeting card that’s perfect for the occasion.
Subscribe to useful applications and cool tools discovered at • Shop Applications.
On the Today screen, press the 1. START key to enter the Start menu. Select Programs.
Select 2. AT&T Mall.
Select the Mall you wish to enter. 3.
Note: For web browsing, AT&T recommends a data plan. If you do not have a data plan
associated with your account, please visit att.com/wireless or call 1-800-331-0500.
21
Page 22

Set Up Your Email
Choose the Best Email Option for You
You can use your device to access personal or corporate email:
Personal email accounts send email directly from your internet service provider (ISP) like
Yahoo!®, AOL® or Hotmail to your Windows® Mobile powered smartphone. To set up a personal email account on your device, you can use Xpress Mail.™ Xpress Mail offers automated
setup and synchronization so that changes and deletions on your device also appear in your
ISP email account.
Corporate email accounts like Microsoft® Exchange Server or IBM Lotus Domino, are
typically managed by an IT organization. To set up corporate email on your device, you can
use Xpress Mail for self-service or Microsoft® Direct Push or Good Mobile Messaging
for IT-managed service.
Personal Email Setup With Xpress Mail Time Required: 8 minutes
Xpress Mail automates the setup process, and will work with the majority of email services such
as Yahoo!® or AOL®.
Select 1. Get Xpress Mail on the Today screen and press the NAVIGATION PAD.
Highlight 2. Install Now and press the NAVIGATION PAD.
Highlight 3. Download Now and press the NAVIGATION PAD. (Download time will vary
depending on your service area).
22
Page 23

Set Up Your Email
Personal Email Setup With Xpress Mail (continued)
Press the 4. LEFT SOFT key to select Yes to continue the download.
Once the download is complete, press Yes to reset your device.
Press the 5. RIGHT SOFT key to accept the license agreement.
Confirm your 10-digit mobile (cell) number (numbers only) and select 6. Next.
Select 7. Portal or ISP then press the RIGHT SOFT key to select Next.
Note: Using email on your device requires a data plan. If you do not have a data plan
associated with your account, please visit att.com/wireless or call 1-800-331-0500.
23
Page 24

Set Up Your Email
Personal Email Setup With Xpress Mail
(continued)
Choose your provider and press 8. Next. (If your provider
is not listed highlight More then press Next to view an
additional list of personal email providers.)
Enter your User Name and Password and press 9. Next.
Accept the license agreement if applicable, by pressing 10.
the RIGHT SOFT key. Then, press Register and wait for
the registration process to complete.
After successfully registering, your i907 will display the 11.
Xpress Mail Settings page. Press Inbox to go to the
Messaging section with your personal email account.
24
Page 25

Set Up Your Email
3G
3G
Send and Receive Personal Email Time Required: 6 minutes
On the 1. Today screen press the START key to select Start, then select Messaging,
and select Yahoo (or your personal email provider), or select the key.
Press 2. Menu and select Send/Receive to synchronize your email.
Press 3. Menu and select New to compose a new email.
When you are finished composing your message select 4. Send.
25
Page 26

Set Up Your Email
Set Up Self-Service Corporate Email with Xpress Mail™
A Corporate email account (like Microsoft® Exchange or Lotus Notes) is an account
managed by a company’s IT organization. Xpress Mail can provide wireless access to
your corporate email from your device without support from IT. Go to
xpressmailpe.wireless.att.com to set up self-service corporate email.
Set Up IT-Managed Corporate Email
To set up your IT managed corporate email account, you will need information from your
corporate IT organization. Contact your IT administrator about Microsoft® Direct Push or Good Mobile
Messaging support for the Samsung i907.
Microsoft® Direct Push
Microsoft® Direct Push provides wireless access to your corporate email, contacts, calendar and tasks for
Microsoft® Exchange Server. Contact your IT administrator for set up instructions. Before you use Microsoft®
Direct Push, activate a “PDA Enterprise for Microsoft” data plan on your AT&T account.
Good Mobile Messaging
Visit get.good.com to check availability and support of Good Mobile Messaging for your Samsung i907. You
will need a PIN in order to download and install. If you do not have a PIN, check with your IT administrator.
Before using Good Mobile Messaging, activate a “PDA Enterprise for Good” data plan on your AT&T account.
26
Page 27

Personalize Your Device
Assign a Ringtone Time Required: 1 minute
On the 1. Today screen, press the START key to enter the Start menu, and then select
Settings.
Select 2. Sounds & Notifications.
Select 3. Notifications tab.
Select 4. Ringtone menu. Press the NAVIGATION PAD to open and select a Ringtone.
Press the 5. OK key to exit.
27
Page 28

Set up Bluetooth®
Set up Bluetooth® Time Required: 2 minutes
On the 1. Today screen with the Connections menu open, select the Bluetooth icon.
Select 2. Bluetooth again to turn on Bluetooth.
Select 3. Done.
Bluetooth® Hands-Free Device
You can use a Bluetooth Hands-free device with your i907.
Select 1. Add new device.
Select the 2. Bluetooth® device you wish to add.
If required, type the passkey for the Bluetooth® enabled 3.
device on your i907.
Once the Bluetooth® is paired with the i907, you are ready 4.
to use Bluetooth.®
28
Page 29

Set up AT&T Navigator
AT&T Navigator
AT&T Navigator helps you get around town by giving you voice-guided, turn-by-turn
GPS driving directions and real-time alerts to avoid traffic incidents.
You can access 3D maps and over 10 million business listings to find nearby restaurants,
ATMs, hotels and–category or by name–and even find the lowest-priced gas.
Download and Installation Instructions Time Required: 2-5 minutes
On the 1. Today screen, press the START key to enter the Start menu. Select Programs.
Select 2. AT&T GPS.
Select the 3. Get AT&T Navigator icon.
Once the Browser has launched, you will be presented with a product overview page for 4.
AT&T Navigator. Select the Download option.
Optional: If you choose to cancel the download and try again later, press the CANCEL
button. You will lose any progress up to this point.
29
Page 30

Set up AT&T Navigator
Login Instructions Time Required: 3 minutes
After the download process has completed successfully, locate the 1. AT&T Navigator icon
in AT&T GPS folder and press the ENTER key.
To complete the login process, you will be prompted to enter your mobile phone number, 2.
Name and AT&T Navigator PIN. This PIN will be sent to you via SMS once you activate
service. After entering your password, select Login.
Generate a Route Time Required: 3 minutes
Select the 1. Drive To option.
Select the 2. Address option and choose the Type it option.
Enter the address for your desired destination and 3.
select Done. AT&T Navigator will validate the address and
generate your route.
Congratulations! You have successfully generated your route.
Exiting AT&T Navigator
To exit AT&T Navigator, back out to the main menu and press
the OK key to exit.
30
Page 31

Listen to Music & Watch Video
AT&T Mobile Music
AT&T Music provides the ultimate music experience.
Transfer and listen to your music with • Windows Media® Player.
Purchase tracks from digital music stores. •
Stream dozens of XM music stations with • XM Radio®.
Watch the latest music videos by selecting • Music Videos.
Personalize with ringtones and Answer Tones under • Shop Music.
Instantly ID the title and artist of a song with • MusicID.
Get the latest music news, charts and concert info from the • The Buzz.
Note: The number of files you can store depends on the size and format options of the
memory card. A microSD™ memory card is preferable to copy songs to your phone.
31
Page 32

Listen to Music & Watch Video
Watch CV
CV brings your phone to life. Watch news, sports, weather and entertainment clips via
AT&T’s high-speed data network while on the go.
On the 1. Today Screen, press the Start key to enter the Start menu and select
Programs.
Select 2. CV.
Once connected, select the program options you wish to view and press the 3. Navigation
pad.
Select the clip you want to play and press the 4. Navigation pad.
Personalize your CV Content
Select 1. Customize CV from the CV home screen
Select 2. Edit My Favorites and press the Navigation pad.
Select the content you would like to appear on your CV Home screen and press the 3.
Navigation pad.
32
Page 33

Listen to Music & Watch Video
Transfer Music from a PC Time Required: 3 minutes
To transfer music to your device, you will need:
Microsoft® ActiveSync®• installed on your PC.
Windows Media® Player 10 (or higher) installed on your PC. You can download this at: •
www.microsoft.com/mediaplayer.
Connect your device to your PC. 1.
Close 2. ActiveSync® (it will automatically open when you connect your device).
Open 3. Windows Media® Player on your PC.
Select 4. Media Library, then highlight the music you want to copy.
Right-click on it, then select 5. Add to Playlist.
Select 6. Sync List (The songs will appear in the Sync List pane on the right).
Select 7. Start Sync.
33
Page 34

Listen to Music & Watch Video
Play Music Time Required: 1 minute
On the 1. Today screen, press the START key to enter the Start menu. Select Programs.
Select 2. AT&T Music.
Select 3. 1 Windows Media®.
Select 4. My Music.
Select 5. All Music.
Select the song you wish to play. 6.
34
Page 35

Video Share
Make a Call Using Video Share
Share events the moment they happen. Video Share lets you stream live video directly to
your contacts.
Note: Video Share is a one way video, two way audio connection.
To make a Video Share call: Time Required: 3 minutes
Dial, or accept a call from, another 3G Video Share capable device*. 1.
Once the call is connected and both sides are ready, each device will display 2. Video
Share Ready.
Press the 3. RIGHT SOFT key to enter the Menu then select Video Share to initiate the
Video Share session. You will be prompted to select either live or a pre-recorded video.
Your device will initiate the video on your side and send a request to the connected 4.
party to accept the video stream.
35
Page 36

Video Share
To accept a Video Share call: Time Required: 1 minute
When receiving a Video Share request, the name or number of the person initiating 1.
the call will appear on the screen with the prompt …wants to share video with you.
Accept the connection?.
Select 2. Yes and the Video Share session will begin automatically.
To end a Video Share call and continue with the phone call:
Press the 1. Stop icon and continue talking.
*Note: Video Share requires an iSim card and is not available in all markets. Both parties
must be in a 3G service area – a 3G icon must appear by the signal bars prior to a call being
placed, and both parties must remain in the 3G coverage area for the duration of the Video
Share session.
Save the recording.2.
36
Page 37

Manage Appointments
Schedule an Appointment Time Required: 2 minutes
On the 1. Today screen, press the START key to enter the Start menu.
Select 2. Calendar.
Press the 3. RIGHT SOFT key to enter the Menu.
Select 4. New Appointment.
Type the appointment information. 5.
Press the 6. OK key to save.
Note: To change the calendar views, press the LEFT SOFT key.
37
Page 38

Wi-Fi
About Wi-Fi Networks
With Wi-Fi capability, you can access and browse the internet on private or public Wi-Fi
networks.
Turn Wi-Fi On/Off Time Required: 2 minutes
On the 1. Today Screen, press the START key and select Settings and choose the
Connections Tab.
Select 2. Wireless Manager.
Select 3. Wi-Fi and then Done.
Connect to an Available Wi-Fi Network Time Required: 2 minutes
On the 1. Today screen with the Connections menu open, highlight the Wi-Fi icon and
press the NAVIGATION PAD to select.
If Wi-Fi is off, Highlight 2. Wi-Fi and press the NAVIGATION PAD to turn on.
Press 3. RIGHT SOFT key to enter Menu.
Select 4. Wi-Fi Settings.
Select network name. Select 5. Connect.
Select 6. Next. Select Next again. Select Finish.
For password protected network, follow on screen instructions.7.
38
Page 39

Copyright © 2008 Samsung Telecommunications America LLC. Samsung is a registered trademark
of Samsung Electronics America, Inc. and its related entities. Appearance of phone may vary. Screen
images simulated.
Microsoft, Windows Logo, Windows Mobile, Windows Media, ActiveSync and Outlook are either registered trademarks or
trademarks of Microsoft Corporation in the United States and/or other countries.
© 2008 AT&T Intellectual Property. All rights reserved. AT&T, AT&T logo and all other marks contained
herein are trademarks
of AT&T Intellectual Property and/or AT&T affiliated companies.
WARNING: This product contains small parts. Keep your mobile phone and any small parts out of
small children’s reach.
To take advantage of all the benefits and service features, you may need to purchase additional
hardware or software, pay monthly access and/or per use charges. This device contains a Lithium Ion
Battery. Do not dispose of as household waste.
This carton is made from partially recycled paper fibers and is recyclable when local recycling programs are in place.
39
Page 40

404142
Page 41

Page 42

Tips & Tricks
Phone
TO: DO:
Turn the speakerphone on and off during a call Select Menu, then select Turn Speakerphone On or Turn Speakerphone Off
Change volume during a call Press the volume button on the left side of the phone.
Any Button Wake-up Select Start, then Settings. Select Wake up Button and choose Any button.
Change phone service settings Select Start, then select Settings. Select Phone and select the desired phone
Use the phone while out of the country Contact AT&T to enable international voice and data roaming.
Browser
TO: DO:
View a page in full-screen mode On a web page, select Menu, then select View, then choose Full Screen.
Change the size of the text on web pages On a web page, select Menu, then select View, choose Zoom Level then
Navigating the Screen
TO: DO:
Control the mouse pointer Slide thumb or finger acroos the NAVIGATION PAD up, down, left or right.
Launch a program or select an item Press the NAVIGATION PAD.
Scroll up/down/left/right on the screen Slide thumb or finger across the NAVIGATION PAD up, down, left or right.
services.
select the size you want.
Page 43

Tips & Tricks
Typing
TO: DO:
Insert a period Press the PERIOD key
Insert a space Press the SPACE key.
Start a new line Press the ENTER key.
Delete letter(s) Press the DELETE key.
Capitalize a letter Press the CAPS/SHIFT key.
Double-click the CAPS/SHIFT key to lock capital letters.
Insert symbol Press and hold the SYM/SPACE key
Insert number Press the FUNCTION key
Double-click the FUNCTION key to lock number key
Function Keys
The following keys when pressed at the same time, while on the Home Screen, will take you to the associated entry.
TO: DO: TO: DO:
Turn Bluetooth® On/Off FN + B Launch MEdia™ Net FN + W
Launch AT&T Mail FN + C Launch Cellular Video FN + V
Launch Headset Manager Fn + H Mouse On/Off FN + N
Launch AT&T Music FN + M
43
Page 44

SGH i907
Volume keys
Power on/off key
Navigation pad
Send (short press)/
Speakerphone key
(long press during a call)
Hold/Unhold
(short press during a call)
Ringer
on/off
Symbol/Space
Calendar
MEdia Net (short press)
Voice Command
(long press while
Voice Command is active)
End key (short press)
Lock key (long press)
Display
microSDTM card slot
Headset/
Power adapter jack/
USB or data cable
Earpiece
Messaging (short press)
Camera (short press)
Zoom (long press)
Right soft key (RSK)
OK Key
Left soft k ey (LSK)
Start Key
Page 45

Page 46

Find More Information
On the Web
Interactive web tutorials, tips & tricks and FAQs are available at • att.com/WirelessTutorials.
Select Manufacturer: Samsung and Model: SGH-i907 from the drop down menus.
Detailed support information including device specifications, user manual, troubleshooting, •
user forums and knowledgebase articles are available at att.com/DeviceSupport.
For information about your wireless account, service plan or network, visit • att.com/Wireless.
Phone Support Help
Call AT&T Customer Care at 1-800-331-0500 or dial 611 from any AT&T mobile phone for
assistance with your service or device.
On your computer
To view the user manual for your device, insert the Getting Started CD into your computer and
open the guide file.
Find Accessories
Accessories for your smartphone are available at att.com/WirelessAccessories or visit
your local AT&T store.
GH68-19301A
 Loading...